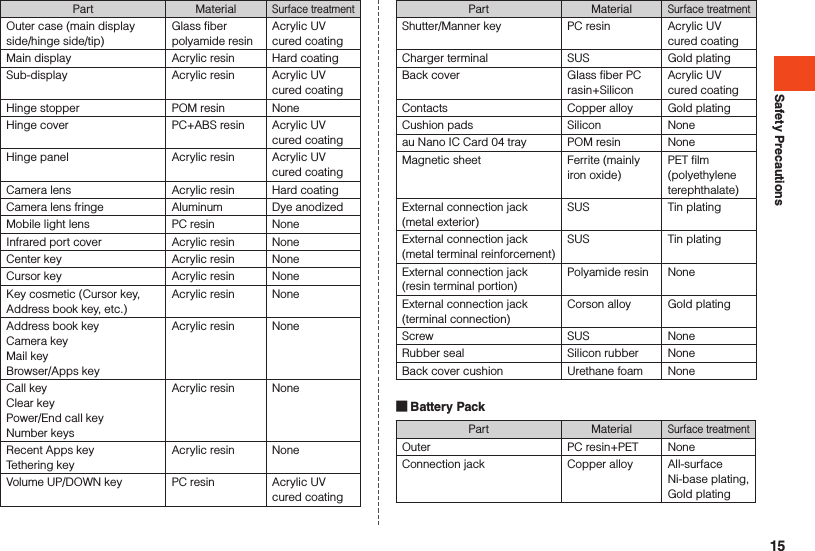
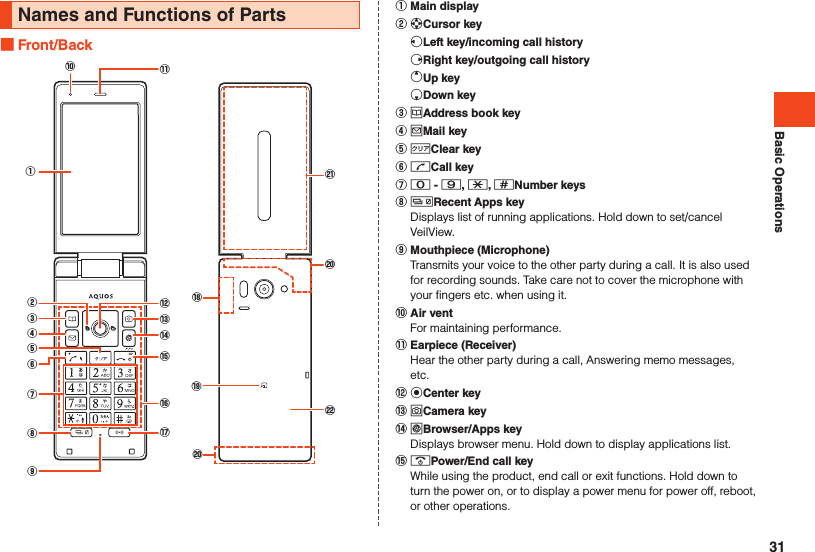
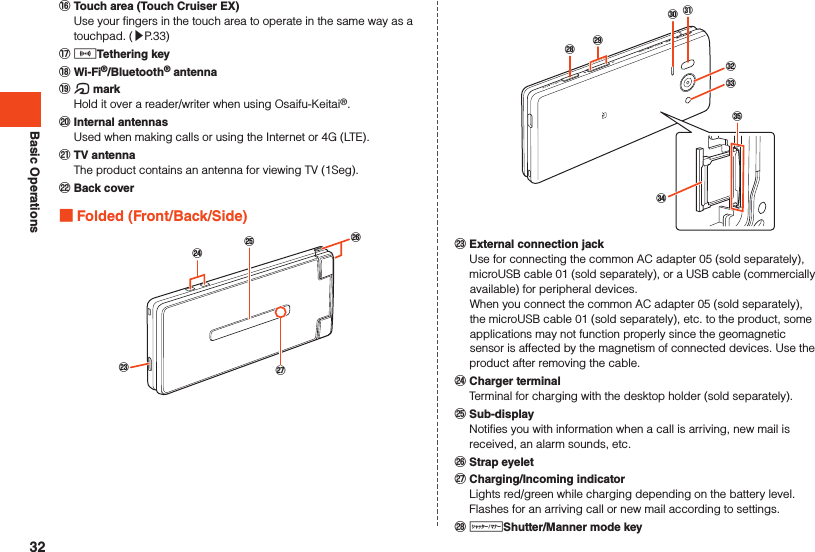
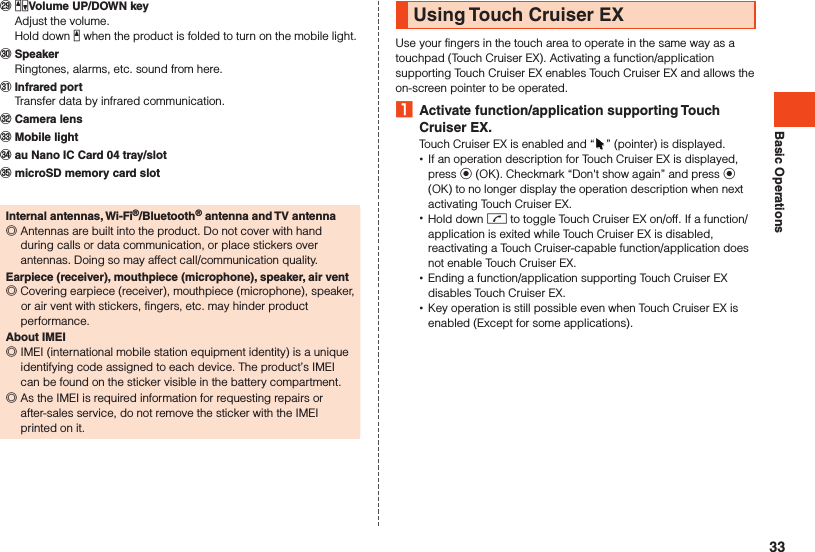
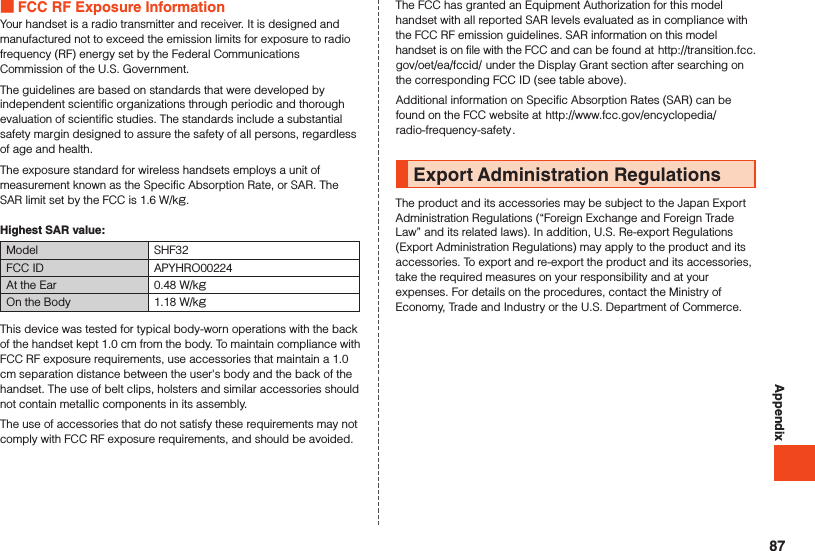
Sharp HRO00224 LTE, WCDMA, GSM Smart phone with Bluetooth, WLAN, NFC and GPS User Manual Operation manual
Sharp Corporation LTE, WCDMA, GSM Smart phone with Bluetooth, WLAN, NFC and GPS Operation manual
Sharp >
Contents
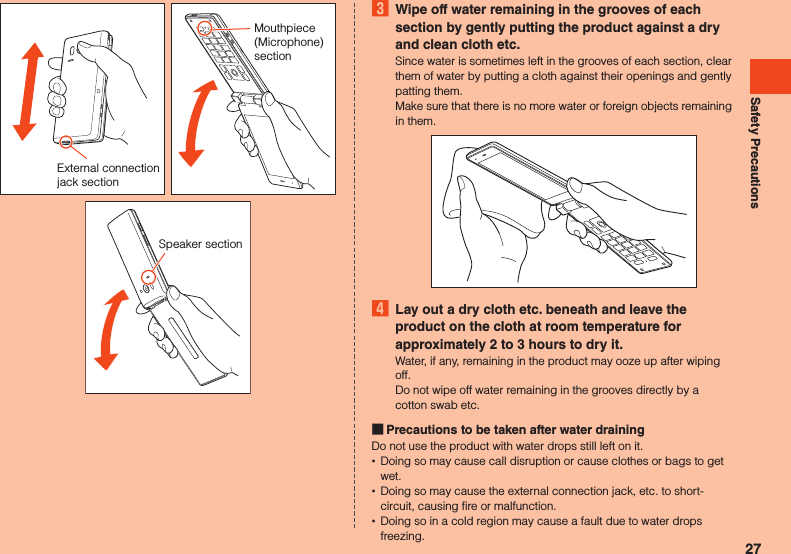
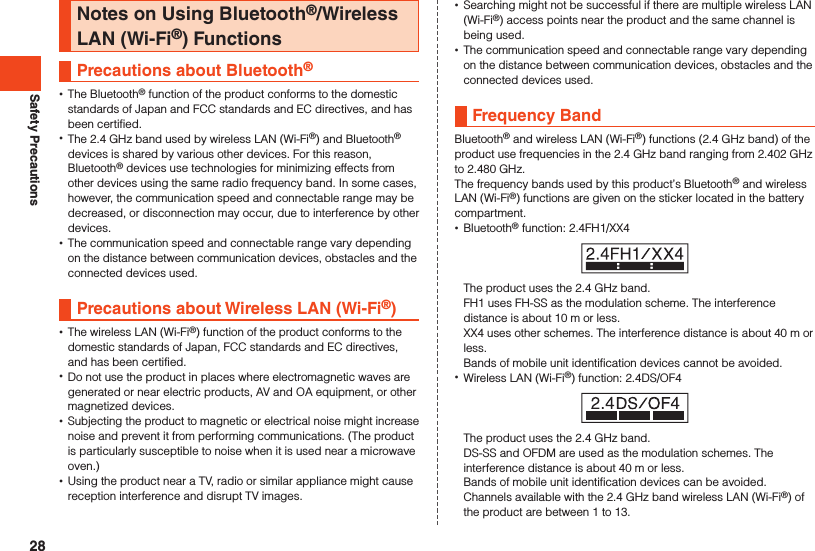
- 1. FCC statements
- 2. Operating manual
- 3. Operation manual
- 4. User manual
Operation manual
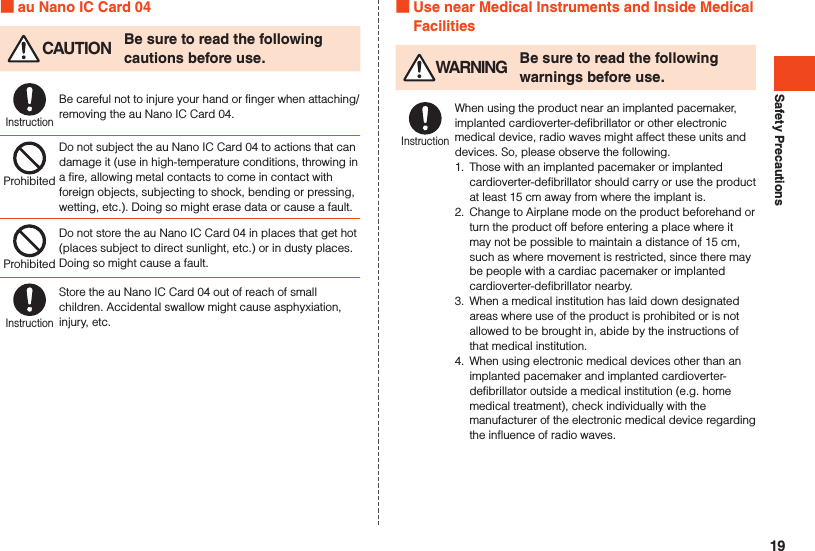
![Illustrations and Descriptions in This Manual Note on Key IllustrationsIn this manual, the key illustrations are simplified as shown below.uojlm,.123456789-0^b nzqvkPressing e or c ................wPressing s or f ................xPressing e, c, s, or f ...d Description of Operations for Selecting Item/Icon/Key etc.In this manual, descriptions enclosed in [ ] abbreviate the steps for selecting an item/icon/onscreen button/etc. in the w or d menu and then pressing k (OK/Check/Set/Commit/Done).Example: To edit address book contacts1 When the standby screen is displayed, press u Select contact to edit u (Submenu) [Edit].Indicates to select “Edit” with w and commit with k. ◎For details on key operation, refer to “Learn Basic Key Operations” (▶P. 44).3](https://usermanual.wiki/Sharp/HRO00224.Operation-manual/User-Guide-2665779-Page-5.png)

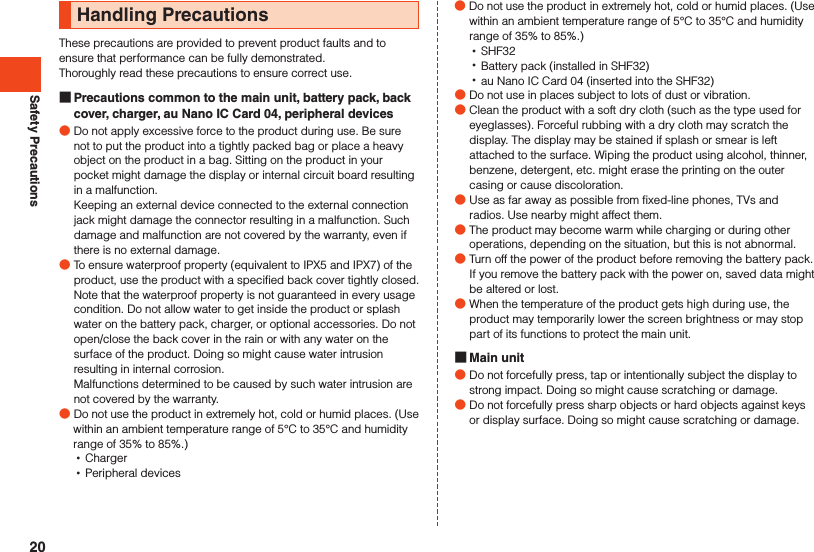
![Using au Disaster Countermeasure Applicationau Disaster Countermeasure is an application in which you can use Disaster Message Board, Emergency Rapid Mail (Earthquake Early Warning, Disaster and Evacuation Information, and Tsunami Warning), Disaster Voice Messaging Service and Disaster Information.1 When the standby screen is displayed, press k [Service] [au] (au Disaster Countermeasure).The au Disaster Countermeasure menu is displayed.If terms of use or an initial settings screen is displayed, check the contents and follow the on-screen instructions. Using Disaster Message BoardDisaster Message Board is a service to enable customers in disaster areas to register their safety information via LTE NET when large-scale disasters, such as an earthquake whose Japan seismic scale is approximately 6-lower or more, occur. The registered safety information can be checked by customers using au phones, and also from other carriers’ cell phones, PCs, etc.For details, refer to “Disaster Message Board Service” on the au homepage.1 From the au Disaster Countermeasure menu, [] (Disaster Message Board).Follow the on-screen instructions for registration/confirmation. ◎To register the safety information, an e-mail address (~ezweb.ne.jp) is required. Set the e-mail address in advance. ◎Deletion of the safety information and configurations for Safety Notification Mail are not available during wireless LAN (Wi-Fi®) connection. ◎The Company does not guarantee the quality of this service. The Company, regardless of the cause, shall not be liable for any problems related to registration of safety information due to the concentration of access to this service or equipment errors, any loss due to the damage, ruination, etc. of safety information or any loss arising from registered safety information. Using Emergency Rapid MailEmergency Rapid Mail is a service to collectively deliver Earthquake Early Warning and Tsunami Warning provided by the Japan Meteorological Agency, and Disaster and Evacuation Information provided by the national government or the local governments to au phones in the specified areas. •At the time of purchase, receiving setting of Emergency Rapid Mail (Earthquake Early Warning, and Disaster and Evacuation Information) is set to “受信する” (Receive). You can receive Tsunami Warning by setting 災害・避難情報 (Disaster and Evacuation Information).When receiving Earthquake Early Warning, secure your safety and act composedly according to the surrounding situations.When receiving Tsunami Warning, leave sea coasts immediately and evacuate to safe places such as hills and strongly-built tall buildings.1 From the au Disaster Countermeasure menu, [] (Emergency Rapid Mail).The inbox is displayed.Select a mail to check to display the details of the mail.削除 (Delete)Delete received mails.5](https://usermanual.wiki/Sharp/HRO00224.Operation-manual/User-Guide-2665779-Page-7.png)
![設定 (Settings) (Earthquake Early Warning) •受信設定 (Receive settings) Set whether to receive Earthquake Early Warning. ・[受信する] (Receive)/[受信しない] (Not receive). •音量 (Volume) Set the volume of the receiving sound. •マナー時の鳴動 (Linkage to the manner mode) Set whether to make the product ring at the time of reception while the manner mode is applied. •バイブ (Vibrator) Set whether to activate the vibrator at the time of reception. (Disaster and Evacuation Information) •受信設定 (Receive settings) Set whether to receive Disaster and Evacuation Information, and Tsunami Warning. ・[受信する] (Receive)/[受信しない] (Not receive). •音量 (Volume) Set the volume of the receiving sound. •マナー時の鳴動 (Linkage to the manner mode) Set whether to make the product ring at the time of reception while the manner mode is applied. •バイブ (Vibrator) Set whether to activate the vibrator at the time of reception. ◎This service is available only in Japan (Not available overseas). ◎Emergency Rapid Mail is free of both information charges and communication charges. ◎Emergency Rapid Mail cannot be received while the power is turned off. ◎Emergency Rapid Mail may not be received when you are in a place where the signal cannot be received (e.g. tunnels and basements) or the signal is weak, even within the service area. ◎Emergency Rapid Mail which failed to be received will not be able to be received again. ◎When you receive Emergency Rapid Mail, you will be notified by the dedicated alarm tone and the vibrator. The alarm tone cannot be changed.* When you receive Earthquake Early Warning, you will be notified by the alarm tone, voice (“地震です” (Jishin-desu)) meaning that an earthquake has occurred and the vibrator. ◎The alarm tone does not ring if Emergency Rapid Mail is received during a call. ◎Information intended for the areas of other than your present location may be received. ◎As for this service, the Company shall not be liable for any damage incurred on the users resulted from failure or delay of information delivery due to communication disturbance or system failure, contents of the information or other problems that are not supposed to be blamed on the Company. ◎For details on Earthquake Early Warning and Tsunami Warning provided by the Japan Meteorological Agency, refer to the agency’s homepage. (http://www.jma.go.jp/jma/indexe.html)Earthquake Early Warning ◎Earthquake Early Warning notifies areas where a strong shaking (Japan seismic scale 4 or more) is expected when an earthquake whose maximum Japan seismic scale is predicted of 5-lower or more has been detected.6](https://usermanual.wiki/Sharp/HRO00224.Operation-manual/User-Guide-2665779-Page-8.png)
![◎This service detects an earthquake (P-wave, preliminary tremors) near the seismic center immediately after the earthquake occurs and automatically calculates its location, scale and predicted strength of the shaking. After that, you will be notified of the earthquake as soon as possible within a few seconds to dozens of seconds before a strong shaking from the earthquake (S-wave, principal shock) occurs. ◎In the vicinity of the seismic center, a strong shaking may reach you before Earthquake Early Warning. ◎The Earthquake Early Warning distribution system provided by this service is different from that provided by TV, radio and other communication media and thus the arriving time of Earthquake Early Warning may be different among those media.Tsunami Warning ◎Tsunami Warning notifies areas including target sea coasts of Major Tsunami Warning and Tsunami Warning provided by the Japan Meteorological Agency.Disaster and Evacuation Information ◎Disaster and Evacuation Information notifies information related to the safety of citizens, such as evacuation advisories, evacuation orders or various alarms delivered by the national government or the local governments. Using Disaster Voice Messaging ServiceDisaster Voice Messaging Service is a service to record voices with a cell phone and deliver them as a voice message to people to whom you want to deliver the information that you are safe when large-scale disasters occur.1 From the au Disaster Countermeasure menu, [] (Disaster Voice Messaging Service).Follow the on-screen instructions. Sending voices (Send)Tap “声をお届け” (Send voices) and then “あて先入力”* (Enter recipient) → “声を録音” (Record voices to send).* You can also select to whom to send your voices from the address book. Receiving voices (Receive)You will be notified via a pop-up screen or an SMS that a voice message has been received. You can listen to the message by receiving (downloading) and playing the voice message. •If the recipient’s cell phone does not have an au災害対策 (au Disaster Countermeasure) application activated that supports 災害用音声お届けサービス (Disaster Voice Messaging Service), SMS is sent instead. •If the receivers are notified via an SMS, the information will not be saved in the au Disaster Countermeasure application. ◎To use this service via Wi-Fi®, making initial settings via 4G (LTE) networks is required. ◎Voice messages can be recorded for up to 30 seconds. ◎Voice messages can be exchanged among au phones as well as other carriers’ cell phones and PHS devices. ◎Voices may not be heard when the media sound volume is set to low. ◎When no free space is left on the internal memory, voice messages may not be saved or played. ◎Some cell phones cannot receive voice messages. For details, refer to the au homepage. Using Disaster InformationYou can check disaster information, histories of Disaster and Evacuation Information delivered by the local governments, etc.1 From the au Disaster Countermeasure menu, [] (Disaster Information).Select an item to check.7](https://usermanual.wiki/Sharp/HRO00224.Operation-manual/User-Guide-2665779-Page-9.png)
.2 [](Other settings) [(Language)](Select language).3 [English].35](https://usermanual.wiki/Sharp/HRO00224.Operation-manual/User-Guide-2665779-Page-37.png)
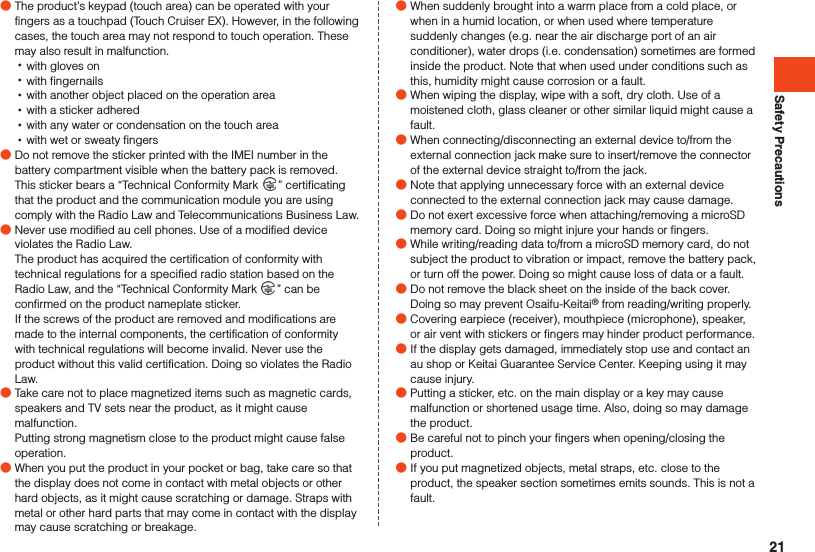
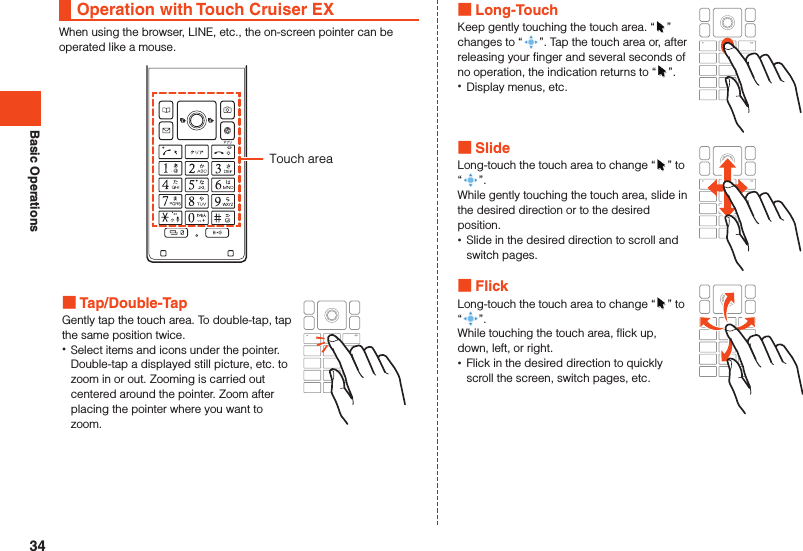
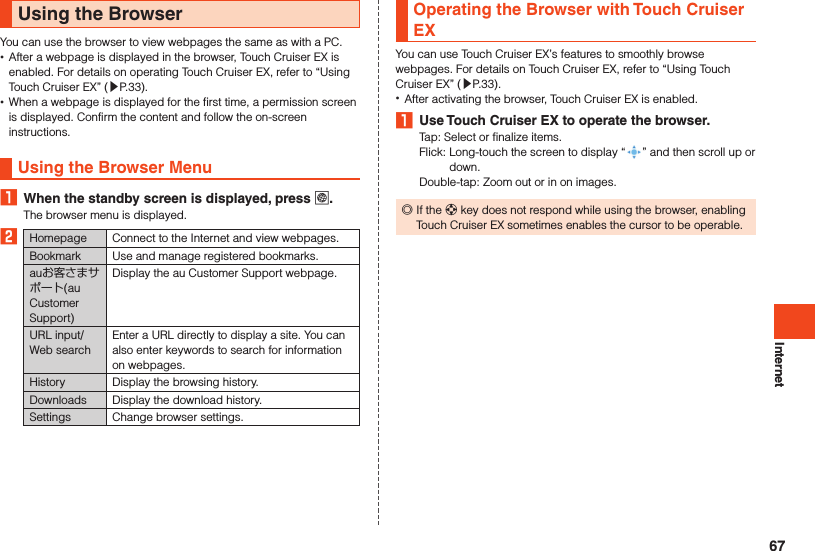
![Basic OperationsUsing the Notification/Status PanelIn the notification/status panel, you can check the details on notification icons and status icons or activate an application corresponding to the icon.You can also set the manner mode and check Answering memo.1 When the standby screen is displayed, press w Select the status bar k.2 Select the notification k.The application corresponding to the notification is activated. Viewing the Notification/Status Panel①②《Notification/Status Panel》 Music controllerDisplayed when playing music with LISMO. Only allows pausing. Notification areaCheck the status of the product and contents of notifications. Using notifications1 Select the desired notification in the notification/status panel o (Operate).Options corresponding to the content of the notification are displayed.2 Select an option k.You can activate a corresponding application, etc. Deleting 1 notification1 Select the notification to delete in the notification/status panel u (Submenu) [Delete one item] k. Deleting all notifications1 u (Submenu) in the notification/status panel [Delete all] k. •You may not be able to delete a notification, such as for battery level or signal strength.38](https://usermanual.wiki/Sharp/HRO00224.Operation-manual/User-Guide-2665779-Page-40.png)
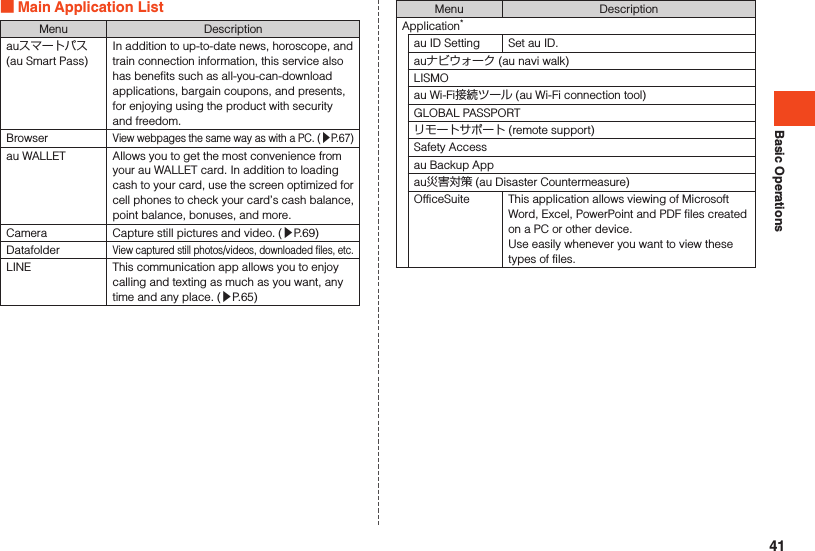
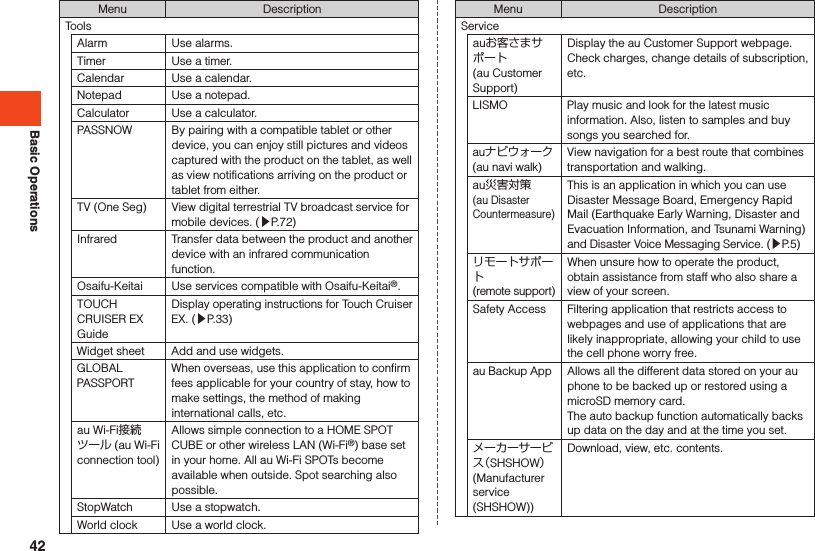
![Basic OperationsMenu DescriptionCall/mailIncoming/outgoing call historyView incoming and outgoing call histories. (▶P. 50)Address Book Register contacts to the address book and use registered information. (▶P. 56)Call settings Make call settings.Speed dial View a speed dial list. (▶P. 52)Voice party Call with up to 30 people at the same time. (▶P. 54)E-mail Use an e-mail (~ezweb.ne.jp) address to send and receive e-mail. (▶P. 61)SMS Send and receive SMS using a phone number as the recipient. (▶P. 64)Profile Check and edit your profile. (▶P. 55)Settings Specify and manage settings in the settings menu. (▶P. 74)* Additionally downloaded applications are displayed in “DOWNLOAD” (▶P. 43). ◎When activating applications and using their functions, communication charges may result for some functions. ◎After upgrading an application version or in similar instances, the design of applications, icons, etc. on the product may differ from this manual. ◎Initializing the product does not delete preinstalled applications.About Applications“Application” allows you to use applications pre-installed at time of purchase as well as additionally downloaded applications.1 When the standby screen is displayed, press k [Application].The application list is displayed. Switching tabs1 When the application list is displayed, press x.The “PRESET”/“DOWNLOAD” tabs switch. Searching for applications1 When the application list is displayed, press o (AppSearch).The auスマートパス(au Smart Pass) site is displayed. Follow the on-screen instructions to search for and download applications.43](https://usermanual.wiki/Sharp/HRO00224.Operation-manual/User-Guide-2665779-Page-45.png)
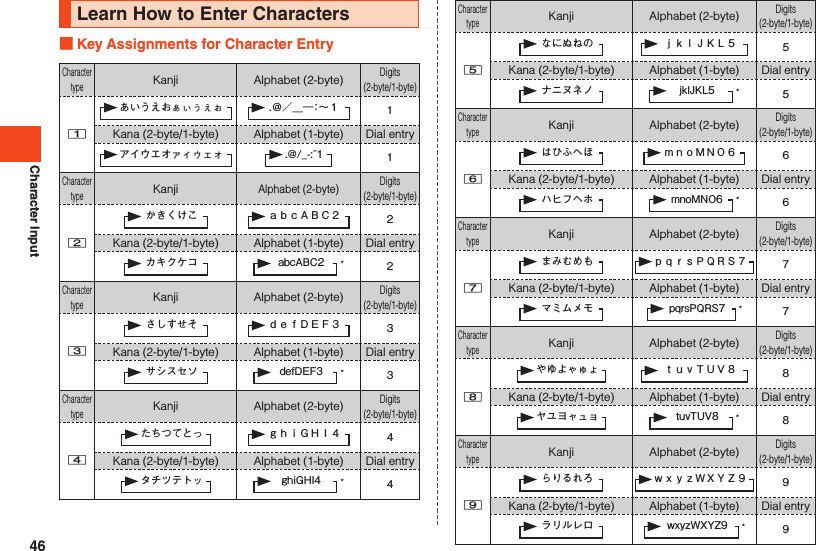
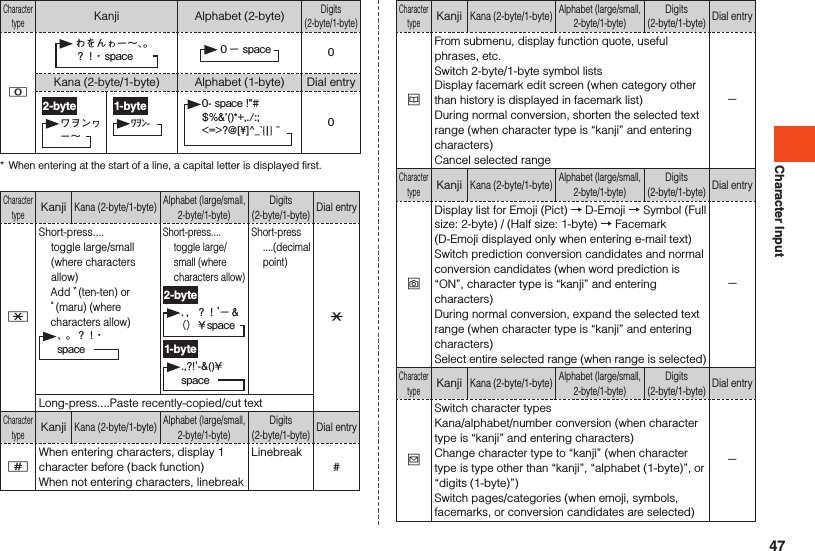
![Character InputCharacter typeKanjiKana (2-byte/1-byte)Alphabet (large/small, 2-byte/1-byte)Digits (2-byte/1-byte)Dial entrylStart range selectSwitch pages/categories (when emoji, symbols, facemarks, or conversion candidates are selected)-Character typeKanjiKana (2-byte/1-byte)Alphabet (large/small, 2-byte/1-byte)Digits (2-byte/1-byte)Dial entrymFinalize characters and return to preceding stateRestore deleted characters (up to 5 times in a row)Delete learned conversion candidates / search for conversion candidates in browser / search for and quote conversion candidates in other application (when character type is “kanji” or “alphabet (large/small, 1-byte)” and conversion candidates selected)-Character typeKanjiKana (2-byte/1-byte)Alphabet (large/small, 2-byte/1-byte)Digits (2-byte/1-byte)Dial entrysMove cursor leftSelect conversion candidateDuring prediction conversion, shorten the selected text rangeDelete 1 “*” character when entering ** (wild card)-Character typeKanjiKana (2-byte/1-byte)Alphabet (large/small, 2-byte/1-byte)Digits (2-byte/1-byte)Dial entryfMove cursor rightSelect conversion candidateDuring prediction conversion, enlarge the selected text rangeEnter 1 “*” character when entering ** (wild card) when unfinalized characters are entered (when character type is “kanji” or “alphabet (large/small, 1-byte)” and word prediction is “ON”)When cursor is at end of text string, enter 1-byte space-Character typeKanjiKana (2-byte/1-byte)Alphabet (large/small, 2-byte/1-byte)Digits (2-byte/1-byte)Dial entryeMove cursor upSelect conversion candidate -Character typeKanjiKana (2-byte/1-byte)Alphabet (large/small, 2-byte/1-byte)Digits (2-byte/1-byte)Dial entrycMove cursor downSelect conversion candidateWhen cursor is at end of text string, linebreak-Character typeKanjiKana (2-byte/1-byte)Alphabet (large/small, 2-byte/1-byte)Digits (2-byte/1-byte)Dial entry,Short-press.... Delete 1 character to right of cursorIf no characters are to right of cursor, delete 1 character to left of cursorStop conversion (return to character entry screen)S hort-press ....Delete 1 placeLong-press.... Delete all characters to right of cursorWhen cursor is at start or end of text string, delete all charactersL ong-press ....Delete all ◎When entering characters, in the standby screen, navigate k → [Settings] → [Other settings] → [Text input] and check that “SH Input” is selected in “Keyboard & input methods”. The Android keyboard (AOSP) does not support Japanese entry and it may not be possible to enter characters.48](https://usermanual.wiki/Sharp/HRO00224.Operation-manual/User-Guide-2665779-Page-50.png)
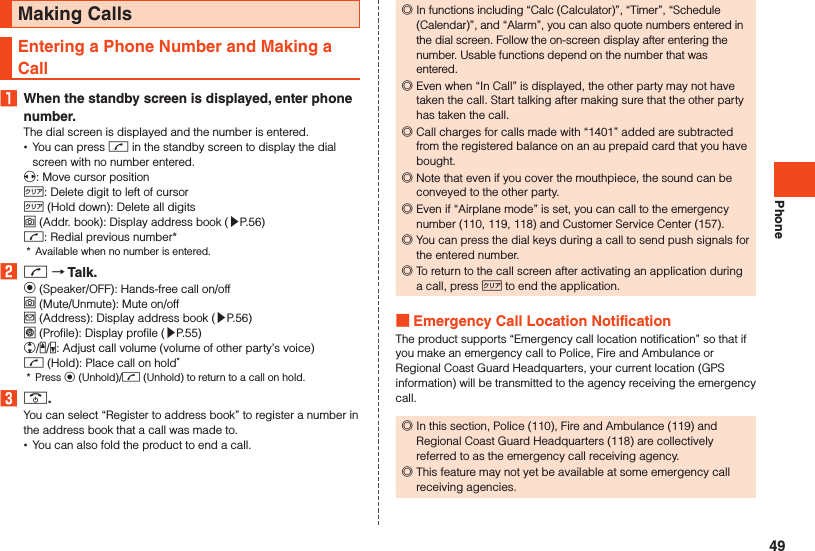
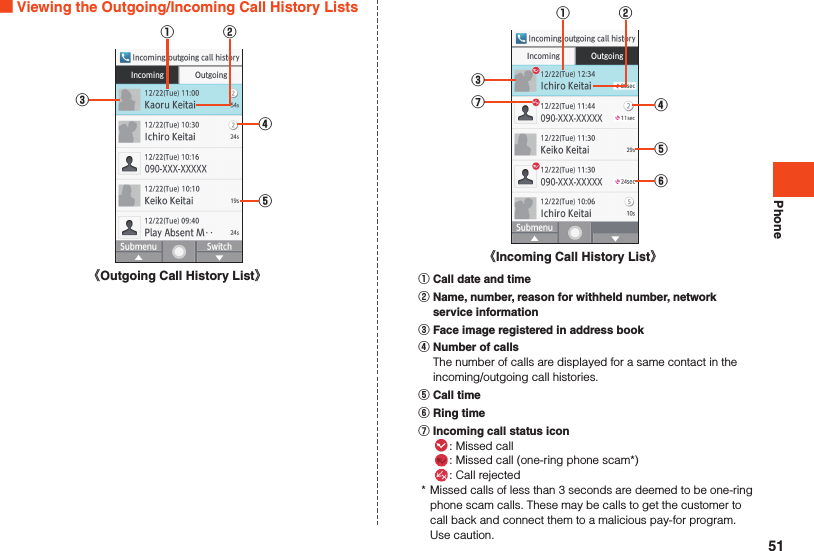
![Phone ◎If you add “184” before the Japan emergency call number 110/119/118, the emergency call responding agency will not be notified of your location and phone number. ◎VoLTE (LTE network) by au is used when connecting with emergency organizations within Japan. You cannot connect using 3G (circuit-switched network). ◎In places where signal reception from GPS satellites or a base station is relatively poor, such as in an underground mall, inside a building or behind a tall building, the emergency call receiving agency may be notified of some other place different from your actual location. ◎When GPS cannot be used to notify of your location, base station signal is used instead. ◎When making an emergency call to Police, Fire and Ambulance or Regional Coast Guard Headquarters, always confirm where you are, and tell them your exact location on the phone. Note that depending on the area where you are calling, your call may not be connected to the agency having jurisdiction over that area. ◎If the emergency call receiving agency determines that human lives and health are in danger, they will be able to acquire the caller’s location information during the call or within a certain period of time after the call. Using P (Pause) Dialing and Making a CallEnter the push signals to send beforehand and then select “Yes” during the call to send the push signals. This is a convenient feature when using information services and automatic reservation services.Example: To dial “03-0001-XXXX (bank phone number)” and send the branch “22X” and the account “123XX”1 Enter bank phone number “030001XXXX”.2 k (Call etc) [Add Prefix] [Add P] Enter the branch “22X”.3 k (Call etc) [Add Prefix] [Add P] Enter the account “123XX”.You can enter P (pause) between numbers to enter several push signals at the same time.4 m [Yes] [Yes].After dialing, a confirmation screen is displayed. Confirm that the destination has answered the call and then select “Yes”. A push signal is sent each time you select “Yes” and press k.Using Call Histories and Making a Call1 When the standby screen is displayed, press f (Outgoing)/ s (Incoming).Press x to toggle the outgoing and incoming call histories.2 Select contact to call from history k.The outgoing/incoming call history details screen is displayed. •When a history with the number of outgoing/incoming calls displayed is selected and o (Switch) is pressed, collected outgoing/incoming call history information is displayed.3 m.You can also dial by selecting the contact in the outgoing/incoming call history list and pressing m. ◎Up to 100 calls can be saved in the outgoing/incoming call histories. Once more than 100 calls are made/received, calls are deleted starting with the oldest. The number of calls that can be saved may be fewer depending on available memory.50](https://usermanual.wiki/Sharp/HRO00224.Operation-manual/User-Guide-2665779-Page-52.png)
![PhoneUsing Speed Dial and Making a CallYou can make calls quickly to contacts registered to speed dial. Registering to Speed Dial1 When the standby screen is displayed, press k [Call/mail] [Speed dial].2 Select <Not registered> for the number to register k (Register). •If a number is selected with a destination already registered, operations such as dialing are available.3 Select the destination to register k (Set). Dialing with Speed Dial1 When the standby screen is displayed, enter the speed dial number (0 to 99).2 m. ◎Entering an unregistered speed dial number and pressing m displays the speed dial list. From the list, you can dial or register a new speed dial. ◎If an e-mail address is registered to a destination registered in speed dial, you can enter the speed dial number and press j (Mail) to create e-mail.Using Kantan Hasshin (Speech Recognition) and Making a CallYou can use Kantan Hasshin (speech recognition) to make a call by voice command to a speed dial contact without using the dial keys. •For details on registering contacts to speed dial, refer to “Registering to Speed Dial” (▶P. 52).1 Open the product/In the standby screen, - (hold down). is displayed in the main display. •If “Screen lock” is set, unlock the screen, then in the standby screen, - (hold down).2 Say the information for the contact into the product.Say the name of the contact and then say “Dennwa” or “Hasshin”.Example: “Bob, dennwa”, “Taro, hasshin”3 Confirm the contact as displayed [Yes]. ◎This feature may not work correctly if several phone numbers are given for a contact in the address book or several contacts by the same name are registered.Calling Overseas from au Phones (au International Call Service)You can make international calls without any special procedure from the product.Example: To call “212-123-XXXX” in the USA from the product1 Enter the international access code “010”.Entering 0 (hold down) in the dial screen enters a “+” and adds “010” when the number is dialed.2 Enter the country code of the USA “1”.52](https://usermanual.wiki/Sharp/HRO00224.Operation-manual/User-Guide-2665779-Page-54.png)
![Phone3 Enter the area code “212”.If the area code starts with “0”, dial it without including the “0” (There are some exceptions such as fixed-line phones in some countries or regions including Italy and Moscow).4 Enter the phone number of the other party “123XXXX” m. ◎You can also press u (Submenu) → [Add Prefix] → [International call] to enter the country code when entering a phone number. ◎The monthly limit fee is set for the au International Call Service. The au International Call Service is unavailable from when the limit fee is confirmed to be exceeded until the end of the same month. ◎Even if you cannot use the service by exceeding the limit fee, you can use from the first day of the next month. Also, you can use the domestic call as usual while the service is stopped. ◎International call charges are billed together with monthly local call charges. ◎If you do not wish to use the service, you can set not to use the au International Call Service. For au International Call Service: From au phones 157 (area code not required) (toll free) From fixed-line phones 0077-7-111 (toll free) Open 9:00 to 20:00 (everyday)Receiving CallsAnswering an Incoming Call1 When a call is arriving, m/k (Answer).Press o (Silent) to stop the ringtone.You can press w, z, or q to change the volume of the ringtone.2 Talk .. ◎If you are not subscribed to LTE NET or LTE NET for DATA, disable “Data transmission” for “Mobile networks” and set “Network Mode” to “Japan(4G)” before using the product. ◎If a call arrives while using the address book, e-mail, etc., the call is given priority and the function can be used again once the call ends.Rejecting an Incoming Calls1 When a call is arriving, l (Reject).The ringtone stops and the incoming call is disconnected. The other party will hear voice guidance.53](https://usermanual.wiki/Sharp/HRO00224.Operation-manual/User-Guide-2665779-Page-55.png)
![PhoneSending SMS to an Incoming Call1 When a call is arriving, u (Submenu) [Quick reply].2 Select a message to send k.The incoming call is disconnected. The other party will hear voice guidance. ◎You can select “Write your own...” with the message to create and send an SMS. ◎You can edit the message to send beforehand with “Quick responses” in “Call settings”. ◎If the other party’s phone number is not notified, Quick reply is not available. Also, Quick reply may not be available depending on the communication condition. ◎A ring call is audible to the caller until the SMS is sent.Answering memo may answer the call before the SMS is sent.Using au VoLTEUsing Voice party (Optional Service)Voice party is a voice service that allows up to 30 people including the caller to call at the same time, regardless of the type of device the other parties may have.1 When the standby screen is displayed, press m u (Submenu) [Voice party].If a confirmation screen is displayed, confirm the content and follow the on-screen instructions.2 o (Create new).Outgoing history → k to make a call from the history.3 u (Submenu).4Use address book Add phone number in address book to members.Use history Add phone number in outgoing/incoming call history to members.Direct entry Directly enter phone number to add to members.5 o (Call) Talk.Select member who has not answered yet/you are talking with → k → [Yes] to end call.Select a non-present member → k to place a call/delete the member.6 .. ◎Voice party requires a subscription. ◎Call charges to the caller are according to the number of callees (number of people).54](https://usermanual.wiki/Sharp/HRO00224.Operation-manual/User-Guide-2665779-Page-56.png)
![◎Calls with this feature cannot be made to emergency responders (110, 119, 118) or time information (117) and other special numbers. ◎When placing a call with Voice party, your phone number is sent regardless of the “Send caller ID” setting. ◎After the call is initiated, no answer from any of the callees within 20 seconds causes Voice party to end. ◎The caller and callees cannot make a three-party call with Voice party at the same time. ◎The caller and callees cannot use call waiting during Voice party. ◎The caller and callees cannot send push-tones during Voice party. ◎Callees using call answering or call forwarding cannot participate in Voice party. ◎A device supporting au VoLTE and receiving a Voice party call cannot answer with Answering memo. ◎Callees can only see the name and phone number of the caller, and cannot see those of other members.Checking Your Phone NumberChecking Your Profile1 When the standby screen is displayed, press k [Profile].Editing Your Profile1 When the standby screen is displayed, press k [Profile] o (Edit).The profile edit screen is displayed.2 Enter required items.3 o (Save). ◎Items to note when editing your profile are the same as for editing the address book. For details, refer to “Registering to the Address Book” (▶P. 56).55](https://usermanual.wiki/Sharp/HRO00224.Operation-manual/User-Guide-2665779-Page-57.png)
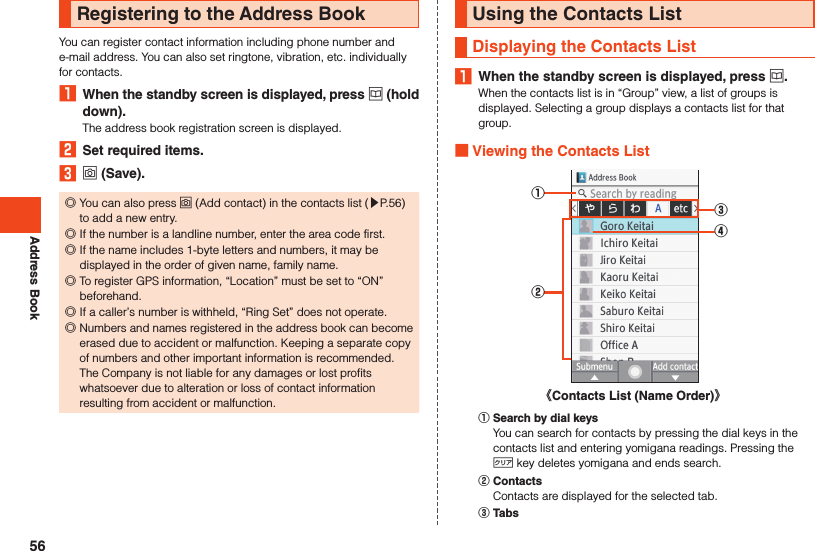
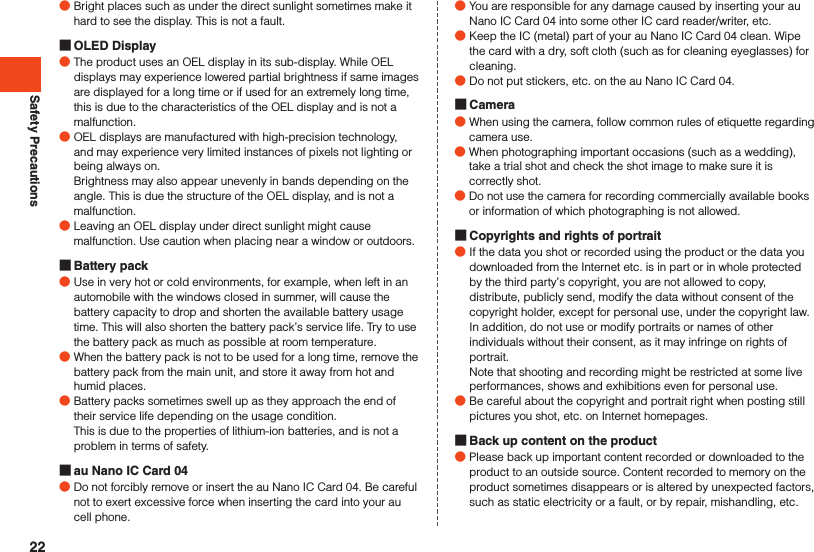
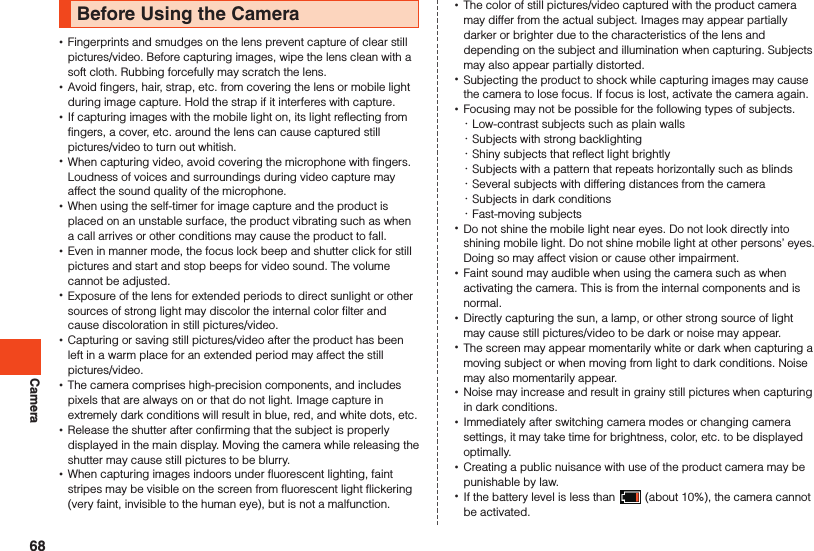
![Address Book Face imageA face image is displayed if registered. ◎Press x to switch tabs.Using Information Registered for Contacts1 When the standby screen is displayed, press u Select the contact k. Viewing Address Book Details①②③④《Address Book Details》 Name Registered information Face image Main phone number/main e-mail address ◎You can make calls, create e-mail, etc. by selecting registered information and pressing k. ◎When several phone numbers or e-mail addresses are set, you can select a phone number/e-mail address and press k → [Set main phone number]/[Set main mail address] to set as the main phone number/e-mail address. ◎You can press o (Edit) to edit registered information.57](https://usermanual.wiki/Sharp/HRO00224.Operation-manual/User-Guide-2665779-Page-59.png)
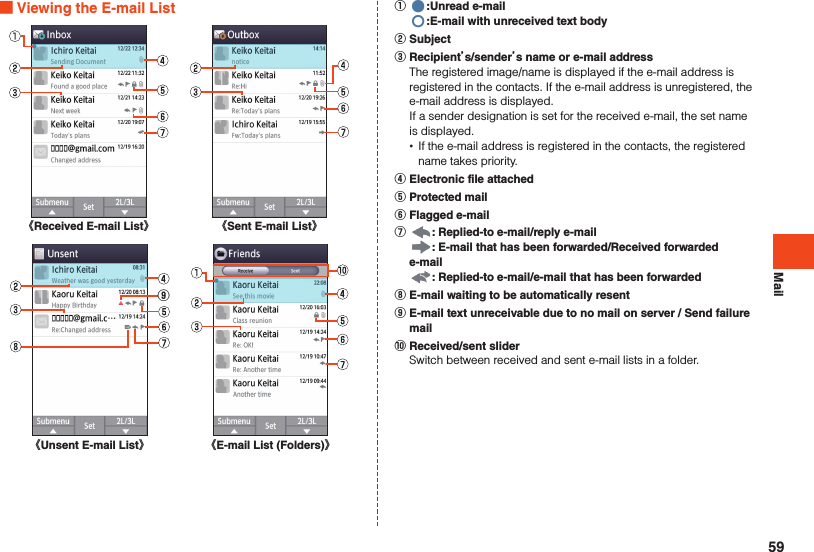
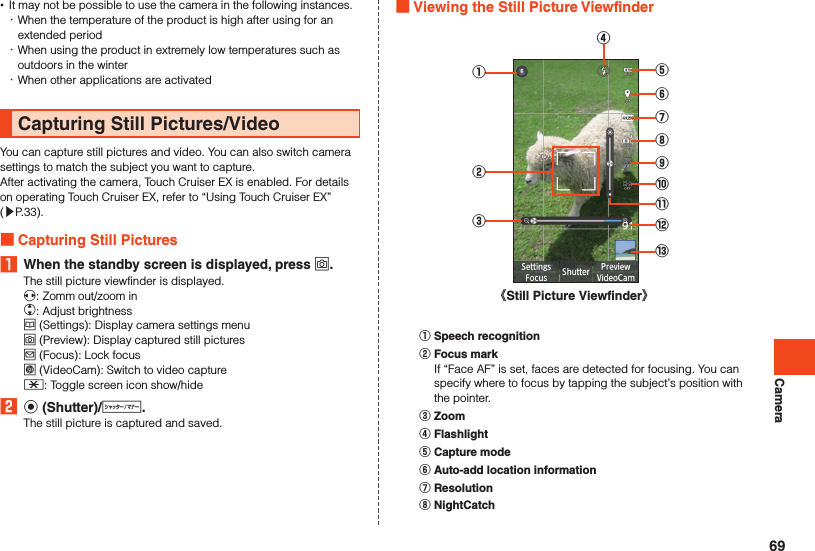
![MailChecking E-MailReceived e-mail is saved in the “Inbox”. Sent e-mail is saved in the “Outbox”. Received and sent e-mail that meets filtering criteria is saved in a designated folder.E-mail that was saved without being sent and send-failed e-mail is saved in the “Unsent” box.1 When the standby screen is displayed, press j.The folder list is displayed.2 Select [Inbox] / [Outbox] / [Unsent] / folder k.The e-mail list is displayed. •o (2L/3L): Switch mail list views.3 Select e-mail k.The e-mail is displayed. •j (Prev): View previous e-mail •l (Next): View next e-mail ◎Once the capacity of the “Inbox” is exceeded, oldest read e-mail is automatically deleted. E-mail that is unread, protected, or for which the text body is unreceived is not deleted. ◎New e-mail cannot be received if the “Inbox” is full and it contains all unread e-mail. ◎Once the capacities of the “Outbox” and “Unsent” box are exceeded, oldest sent e-mail is automatically deleted. If there is no sent e-mail that can be deleted, send-failed e-mail is deleted, followed by unsent e-mail. Protected e-mail is not deleted. Viewing the Folder ListIn the folder list, the “Inbox”, “Outbox”, folders, etc. are displayed. Folders created by selecting “Create new folder” are displayed. • (red, number of e-mail) is displayed for new e-mail in the “Inbox”. After checking new mail in the received e-mail list, the icon turns (blue, number of e-mail). The icon is not displayed if there is no unread e-mail. • (blue, number of e-mail) is displayed for e-mail in the “Unsent” box. The icon is red if there is send-failed e-mail. 《Folder List》 Create new Inbox Infobox View Infobox mail. Outbox Unsent Folder Create new folder Number of unread/unsent e-mail58](https://usermanual.wiki/Sharp/HRO00224.Operation-manual/User-Guide-2665779-Page-60.png)
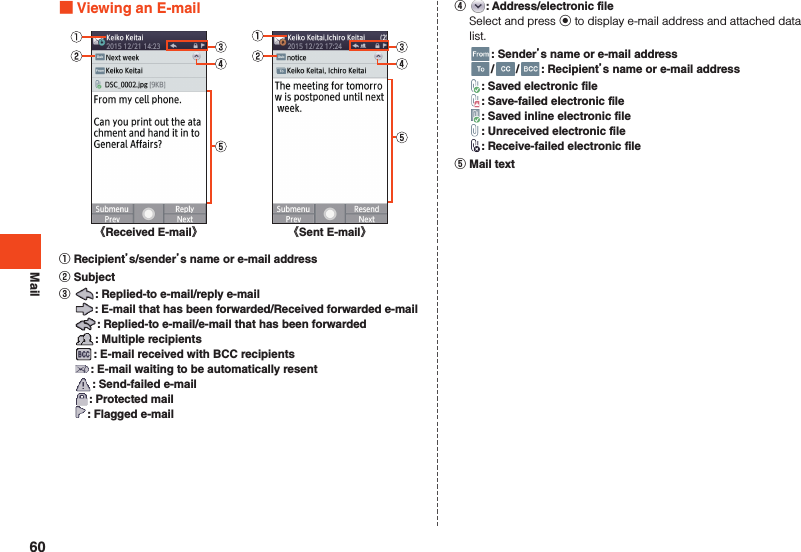
![MailSending E-mail1 When the standby screen is displayed, press j [Create new].The e-mail create screen is displayed.2 Select for the address entry field k.You can also enter the recipient directly in the address entry field.3* Menu items may depend on the function you are using, conditions of usage, etc.Address book Enter e-mail address from contacts as a recipient.Address group Enter all e-mail addresses registered to a contacts group as the recipients. •If the number of e-mail addresses in the group exceeds the limit available for recipients, addresses are entered up to the limit. •You can select “Add group by Friends Note” to create a group. Download the latest Friends Note app from auスマートパス(au Smart Pass) if it is uninstalled or if it is an older version.Receive history Select and enter an e-mail address from the received e-mail history. •u (Del history) → Select e-mail address → k (Select) → o (Delete) → [Delete] to delete the history.Send history Select and enter an e-mail address from the sent e-mail history. •u (Del history) → Select e-mail address → k (Select) → o (Delete) → [Delete] to delete the history.Profile Enter own e-mail address as recipient.Paste Paste copied e-mail address.4 Select subject field k Enter subject k (Complete).5 Select text field k Enter text k (Complete).6 o (Send). ◎You can select “Save” in the e-mail create screen to save e-mail that is being created to the “Unsent” box. ◎ デコレーションアニメ (decoration anime) is not supported. ◎In the subject or text, you cannot enter half size katakana or half size Japanese symbols (ー ゛゜、。・「」) ◎Up to 1000 e-mails as the total for all recipients can be sent in one day. ◎One e-mail can be sent to up to 30 recipients (including To, Cc, Bcc, up to 64 1-byte characters per e-mail) at a time. ◎Emoji sent to an other-brand cell phone, PC, etc. may sometimes be converted to the other-brand emoji or may not be displayed properly. Emoji sent to another au phone may sometimes be converted to an older-version au emoji. ◎The confirmation screen when sending an e-mail can be disabled with “Confirmation dialog before sending”. ◎By enabling “Automatic resend”, you can have failed e-mail automatically sent again later. ◎You can insert up to 20 (totaling up to 100 KB) decoration emoji in the mail text.* A same entered decoration emoji can be entered repeatedly any number of times.61](https://usermanual.wiki/Sharp/HRO00224.Operation-manual/User-Guide-2665779-Page-63.png)
![Mail Adding/Deleting Recipients Adding a recipient1 E-mail create screen for empty address entry field k.A menu for selecting a recipient entry method is displayed. Refer to step 3 of “Sending E-mail”.You can also add recipients by entering them directly in the address entry field. Deleting a recipient1 E-mail create screen Select for recipient to delete k [Delete]. ◎You can change the recipient type by selecting “ ” → k. You cannot change the recipient type for the topmost recipient.Receiving E-mail1 Receive E-mail.Once an e-mail is received, you are notified of the new mail in the following ways. • is displayed in the status bar, and the ringtone sounds. •The e-mail address, name, and subject are displayed in the status bar. If a sender designation is set for the received e-mail, the set name is displayed. If the e-mail address is registered in the contacts, the registered name takes priority. •The charging/incoming indicator flashes blue. •If the product is folded, j is displayed in the sub-display.2 When the standby screen is displayed, press j [Inbox].The e-mail list is displayed.3 Select a received e-mail k.The e-mail is displayed. ◎E-mail is received in the background even while using e-mail or other functions. is displayed in the status bar and a ringtone sounds. However, e-mail is not received in the background if “Auto-receive” is disabled. ◎If “Auto-recieve” is disabled or there is a receive failure, a ringtone sounds and is displayed. Use “Mail check” to receive the e-mail. ◎Packet fees may be incurred even if mail is not properly received due to reception conditions or the data being received. ◎The maximum size of mail text that can be received is 1 MB per e-mail. If a mail text exceeds that, a message appears at the end of the received portion indicating that it is truncated. ◎Received e-mail may not be correctly displayed depending on the content of the mail.62](https://usermanual.wiki/Sharp/HRO00224.Operation-manual/User-Guide-2665779-Page-64.png)
![MailInquiring for and Receiving New MailYou can inquire for and receive new mail if “Auto-receive mail” is disabled or there was an e-mail receive failure.1 When the standby screen is displayed, press j.The folder list is displayed.2 l (Mail check).Confirm whether there is new e-mail.Sending SMSSend messages (mail text body) with kanji, hiragana, katakana, alphabet and numbers, emoji, symbols, and facemarks.1 When the standby screen is displayed, press j (long-press).You can also access the screen from the standby screen by pressing j → j (SMS).A thread list grouped by contact is displayed.2 o (Create new).The SMS create screen is displayed. •When sending to a contact you have exchanged SMS with before, you can also select the thread to create SMS. In this instance, proceed to step 4 .3 Select the recipient entry field Enter the contacts phone number.You can also select from [ ] → contacts.Before sending SMS overseas, enter “010” and the “country code” at the start of the phone number for the recipient.“010” + “country code” + “phone number for recipient”* If quoting the cell phone number for the recipient from the address book, etc., select the contact again and enter “010” and the “country code”.* If the cell phone number for the recipient starts with a “0”, enter the number without the “0”.4 Select text field Enter text k (Done).You can enter up to 70 full size /160 half size characters in the mail text.5 o (Send).Select a sent message → press u (Submenu) → [Result Delivery Report] to check the send result.63](https://usermanual.wiki/Sharp/HRO00224.Operation-manual/User-Guide-2665779-Page-65.png)
![LINEUsing LINEThis communication app allows you to enjoy calling and texting as much as you want, any time and any place. •Registration of an account is required for using LINE. For details on using LINE, visit the LINE website, or from the LINE screen → [More] → [Settings] → [Help] and refer to the help.1 When the standby screen is displayed, press k [LINE].The LINE top page is displayed.Terms of use, login screen, etc. appear the first time using LINE. Confirm the content and follow the on-screen instructions.After activating LINE, Touch Cruiser EX is enabled. For details on operating Touch Cruiser EX, refer to “Using Touch Cruiser EX” (▶P. 33). ◎Games and some other functions cannot be used on the product. ◎By changing “Key Translator” in “Accessibility” to OFF, the key focus in LINE is no longer displayed. Please use “Accessibility” without changing the settings.65](https://usermanual.wiki/Sharp/HRO00224.Operation-manual/User-Guide-2665779-Page-67.png)
![InternetAccessing the InternetYou can access the Internet by packet communication or the wireless LAN (Wi-Fi®) function. ◎Packet communication is available only with subscription to LTE NET or LTE NET for DATA.Using Packet CommunicationThis product provides easy access to the Internet for packet communication with use of “LTE NET” or “LTE NET for DATA”. Settings for connecting to the Internet with LTE NET are pre-installed on the product, and activating an application that requires an Internet connection automatically connects the product to the Internet.To connect to the Internet with LTE NET for DATA, when the standby screen is displayed, press k → [Settings] → [Communication/network] → [Network settings] → [Mobile networks] → [Access Point Names] → [LTE NET for DATA]. ◎Subscription to LTEフラット (LTE flat) or other packet communication flat-rate/discount service allows you to use an Internet connection with flat-rate charges. For details on LTE NET, LTE NET for DATA, and packet communication flat-rate/discount services, refer to the latest au総合カタログ (au general catalog)/the au homepage. Precautions when Using Packet Communication •Using large-volume data communication, such as browsing websites containing images, downloading video and other data, and using applications that use data communication, results in high packet communication charges. Therefore, subscription to a flat-rate/discount service for packet communication charges is recommended. •To prevent excessive burdens on the network, communication speed is sometimes reduced due to continued large-volume data transfers, busy network conditions, etc. How to Confirm Your Packet Communication ChargesYou can confirm your packet communication charges at the following URL.https://cs.kddi.com/ (auお客さまサポート(au Customer Support)) •Subscription required for first-time use.66](https://usermanual.wiki/Sharp/HRO00224.Operation-manual/User-Guide-2665779-Page-68.png)
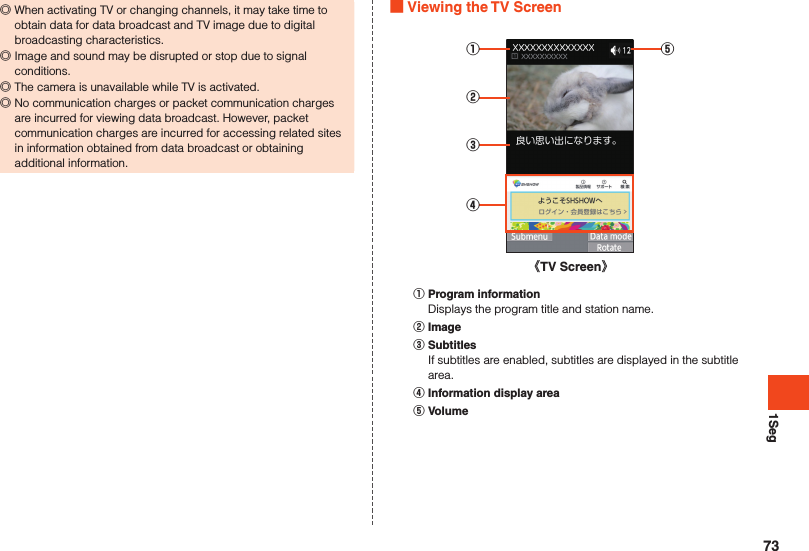
![1SegMaking Initial TV SettingsSet a channel list for viewing the first time activating TV. Once settings are complete, you can view TV programs.1 When the standby screen is displayed, press k [Tools] [TV (One Seg)].If a license screen is displayed, confirm the content and select “Agree”.2 [Create by selecting the area].If the area cannot be determined, select “Create by searching channels” and follow the on-screen instructions.3 Select the region k.4 Select the prefecture k.5 Select the area k.Scanning for broadcast stations starts.6 Confirm the channel list o (Set).Viewing TV ProgramsViewing a TV Program1 When the standby screen is displayed, press k [Tools] [TV (One Seg)].o (Data mode/TV mode): Switch data operation mode/TV viewing model (Rotate): Switch screen display between vertical and horizontal Key Operation in TV Viewing ModeYou can switch channels and adjust volume.w*1*2/z*2/q*2 : Adjust volume (volume at 15 levels or mute)x*1: Switch channels, hold down to search channels0 to 9 , - , ^: Switch channels.: End*1 Operation depends on the screen view.*2 While connected by Bluetooth®, volume adjustment from a Bluetooth® remote control is possible. However, may not be possible depending on the Bluetooth® device. Key Operation in Data Operation ModeYou can use information (data broadcast) in the information display area.w: Move cursor, scroll0 to 9 , - , ^: Select item as assigned by contentsk: Select item,: Go back one page in data broadcast72](https://usermanual.wiki/Sharp/HRO00224.Operation-manual/User-Guide-2665779-Page-74.png)
![SettingsDisplaying the Settings MenuSet and manage functions from the settings menu.1 When the standby screen is displayed, press k [Settings].Item DescriptionWallpaper/display Set wallpaper and screen brightness, change text fonts, etc.Sound/lamp Change manner mode settings, volume and sound of ringtone, etc.au ID setting Set an au ID.Lock/security Set product lock and security feature and secret mode.Energy saving/batterySet energy saving mode and check battery usage.Wi-Fi Set Wi-Fi®.Bluetooth Set Bluetooth®.Communication/networkMake settings for airplane mode, tethering, VPN or other network, etc.Data transfer/reset Transfer data or initialize the product.Other settings Set the date and time, select language, screensaver, etc.74](https://usermanual.wiki/Sharp/HRO00224.Operation-manual/User-Guide-2665779-Page-76.png)
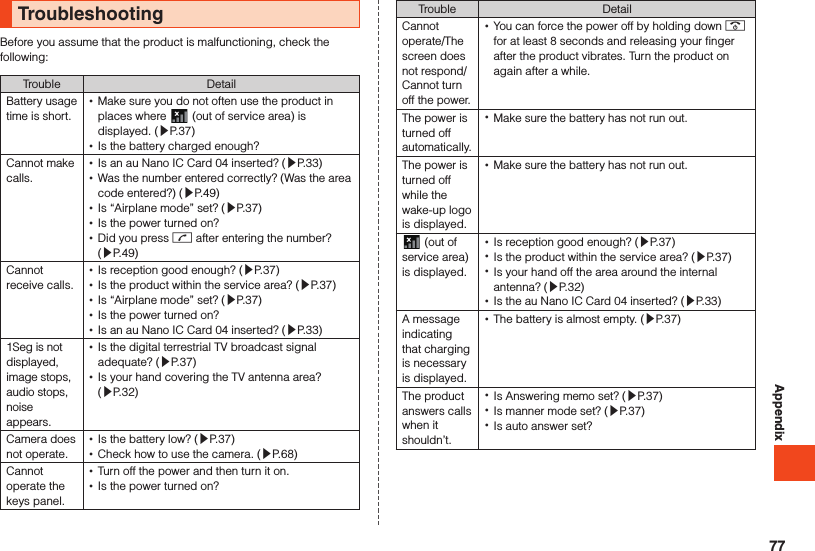
![AppendixTrouble DetailWhen making a call, a beeping sound is heard from the earpiece and a connection cannot be established. •Is reception good enough? (▶P. 37) •Is the product within the service area? (▶P. 37) •The line traffic is busy or the other party is in a call. Dial again.If symptoms do not improve after checking each of the above, information is provided through au Customer Support on the au homepage below.http://www.au.kddi.com/english/support/Updating SoftwareThe product supports the software update.1 When the standby screen is displayed, press k [Settings] [Other settings] [Device info] [Software update].2Software updateCheck whether a software update is necessary or not.Press k (Exec) to start a check. When an update is necessary, you can download data for a software update. •To update immediately, press k (Exec) and follow the on-screen instructions. •To update later, select “Later” to end the application, and “The install confirmation message will reaooear in 24 hours” is displayed. Press “OK” and is displayed in the status bar.To update software, select “Software update” in the status bar and follow the on-screen instructions. •If a software update is possible, information on the software update to download is displayed.Notification Switch the notification on/off for indicating whether a software update is available. •If set to “ON”, information on the software update to download is displayed.78](https://usermanual.wiki/Sharp/HRO00224.Operation-manual/User-Guide-2665779-Page-80.png)
![Appendix au After-Sales Service InformationService contentsKeitai Guarantee Service Plus LTE memberNon-Keitai Guarantee Service Plus LTE memberReplacement cell phone delivery service (spontaneous failure: 1st year)Free N/AReplacement cell phone delivery service (spontaneous failure: 2nd year and later)Customer charge1st: 5,000 yen2nd: 8,000 yenN/AReplacement cell phone delivery service (partial damage, water soak, irreparable damage, theft and loss)Customer charge1st: 5,000 yen2nd: 8,000 yenN/AHolding over and repair (spontaneous failure: 1st year)Free FreeHolding over and repair (spontaneous failure: 2nd year and later)Free (three-year warranty) Actual costHolding over and repair (partial damage)Customer charge Upper limit: 5,000 yenActual costHolding over and repair (water soak and irreparable damage)Customer charge 10,000 yen Actual costHolding over and repair (theft and loss) N/AN/A(By model replacement)* Charge amounts are all tax excluded.Replacement cell phone delivery service ◎When you have trouble with your au cell phone, you can have a cell phone for replacement (same model and color as your old one, new battery pack included) delivered to any destination that you specify by calling us. Please return your old faulty au cell phone within 14 days after the cell phone for replacement is delivered to you. ◎You can use this service up to twice within one year starting from the day when you first use this service. If you have not used this service over the past one year at the time of your application for this service, the application will be regarded as your first time. If you have, the application will be regarded as your second time.* For details, check on the au homepage.Holding over and repair ◎Damages and malfunctions intentionally caused by the customer as well as those due to modification (e.g. disassembly, change of parts, painting, etc.) by the customer are not covered by this service. ◎You cannot receive a refund for replacement of the outer casing due to stains, scratches, paint removal, etc. on the outer casing.SIM-Unlocking the ProductThis product can be SIM-unlocked. SIM-unlocking the product allows other-carrier SIM cards to be used with it. •Requests can be made for SIM-unlocking on the au homepage or at an au shop. •To make settings after SIM-unlocking the product, when the standby screen is displayed, press k → [Settings] → [Other settings] → [Device info] → [Status] → [SIM card status]. •For details, refer to the au homepage.82](https://usermanual.wiki/Sharp/HRO00224.Operation-manual/User-Guide-2665779-Page-84.png)
![Appendix •“NightCatch/ナイトキャッチ”, “翻訳ファインダー”, “AQUOS/アクオス” and the “AQUOS” logo, “AQUOS K”, the “SHSHOW” logo, “フレーミングアドバイザー/FramingAdviser”, “パスナウ/PASSNOW”, “TOUCH CRUISER EX”, “ベールビュー/VeilView”, “LCフォント/LCFONT” and the LC logo symbol are registered trademarks or trademarks of Sharp Corporation. •iWnn of OMRON SOFTWARE Co., Ltd. is used for conversion methods for Japanese language, and for phrase prediction methods for English.iWnn © OMRON SOFTWARE Co., Ltd. 2008-2015 All Rights Reserved.iWnn IME © OMRON SOFTWARE Co., Ltd. 2009-2015 All Rights Reserved. •The font type pre-installed in this product, Shin Go M, is licensed by Morisawa Inc. solely for the use with this product.“Morisawa” and “Shin Go” are registered trademarks or trademarks of Morisawa Inc. •Portions Copyright ©2004 Intel Corporation •The product includes pictograms that SHARP CORPORATION is licensed by NTT DOCOMO, INC. Open Source Software •The product includes software based on GNU General Public License (GPL), GNU Lesser General Public License (LGPL) and other licenses.For details on licenses of related software, in the standby screen, k → [Settings] → [Other settings] → [Device info] → [Legal information] → [Open source licenses]. •Source codes of software based on GPL, LGPL and Mozilla Public License (MPL) can be referred to on the following site for free. For details, refer to the following site.https://sh-dev.sharp.co.jp/android/modules/oss/ OpenSSL License【OpenSSL License】Copyright © 1998-2009 The OpenSSL Project. All rights reserved.This product includes software developed by the OpenSSL Project for use in the OpenSSL Toolkit. (http://www.openssl.org/)THIS SOFTWARE IS PROVIDED BY THE OpenSSL PROJECT ''AS IS'' AND ANY EXPRESSED OR IMPLIED WARRANTIES, INCLUDING, BUT NOT LIMITED TO, THE IMPLIED WARRANTIES OF MERCHANTABILITY AND FITNESS FOR A PARTICULAR PURPOSE ARE DISCLAIMED. IN NO EVENT SHALL THE OpenSSL PROJECT OR ITS CONTRIBUTORS BE LIABLE FOR ANY DIRECT, INDIRECT, INCIDENTAL, SPECIAL, EXEMPLARY, OR CONSEQUENTIAL DAMAGES (INCLUDING, BUT NOT LIMITED TO, PROCUREMENT OF SUBSTITUTE GOODS OR SERVICES; LOSS OF USE, DATA, OR PROFITS; OR BUSINESS INTERRUPTION) HOWEVER CAUSED AND ON ANY THEORY OF LIABILITY, WHETHER IN CONTRACT, STRICT LIABILITY, OR TORT (INCLUDING NEGLIGENCE OR OTHERWISE) ARISING IN ANY WAY OUT OF THE USE OF THIS SOFTWARE, EVEN IF ADVISED OF THE POSSIBILITY OF SUCH DAMAGE.89](https://usermanual.wiki/Sharp/HRO00224.Operation-manual/User-Guide-2665779-Page-91.png)