Sharp HRO00231 Cellular Phone User Manual 12 Draft APYHRO00231
Sharp Corporation Cellular Phone 12 Draft APYHRO00231
Sharp >
Contents
- 1. 12_User Manual Draft_APYHRO00231.pdf
- 2. Z1_DoC_Bluetooth_Compliance_APYHRO00231.pdf
12_User Manual Draft_APYHRO00231.pdf
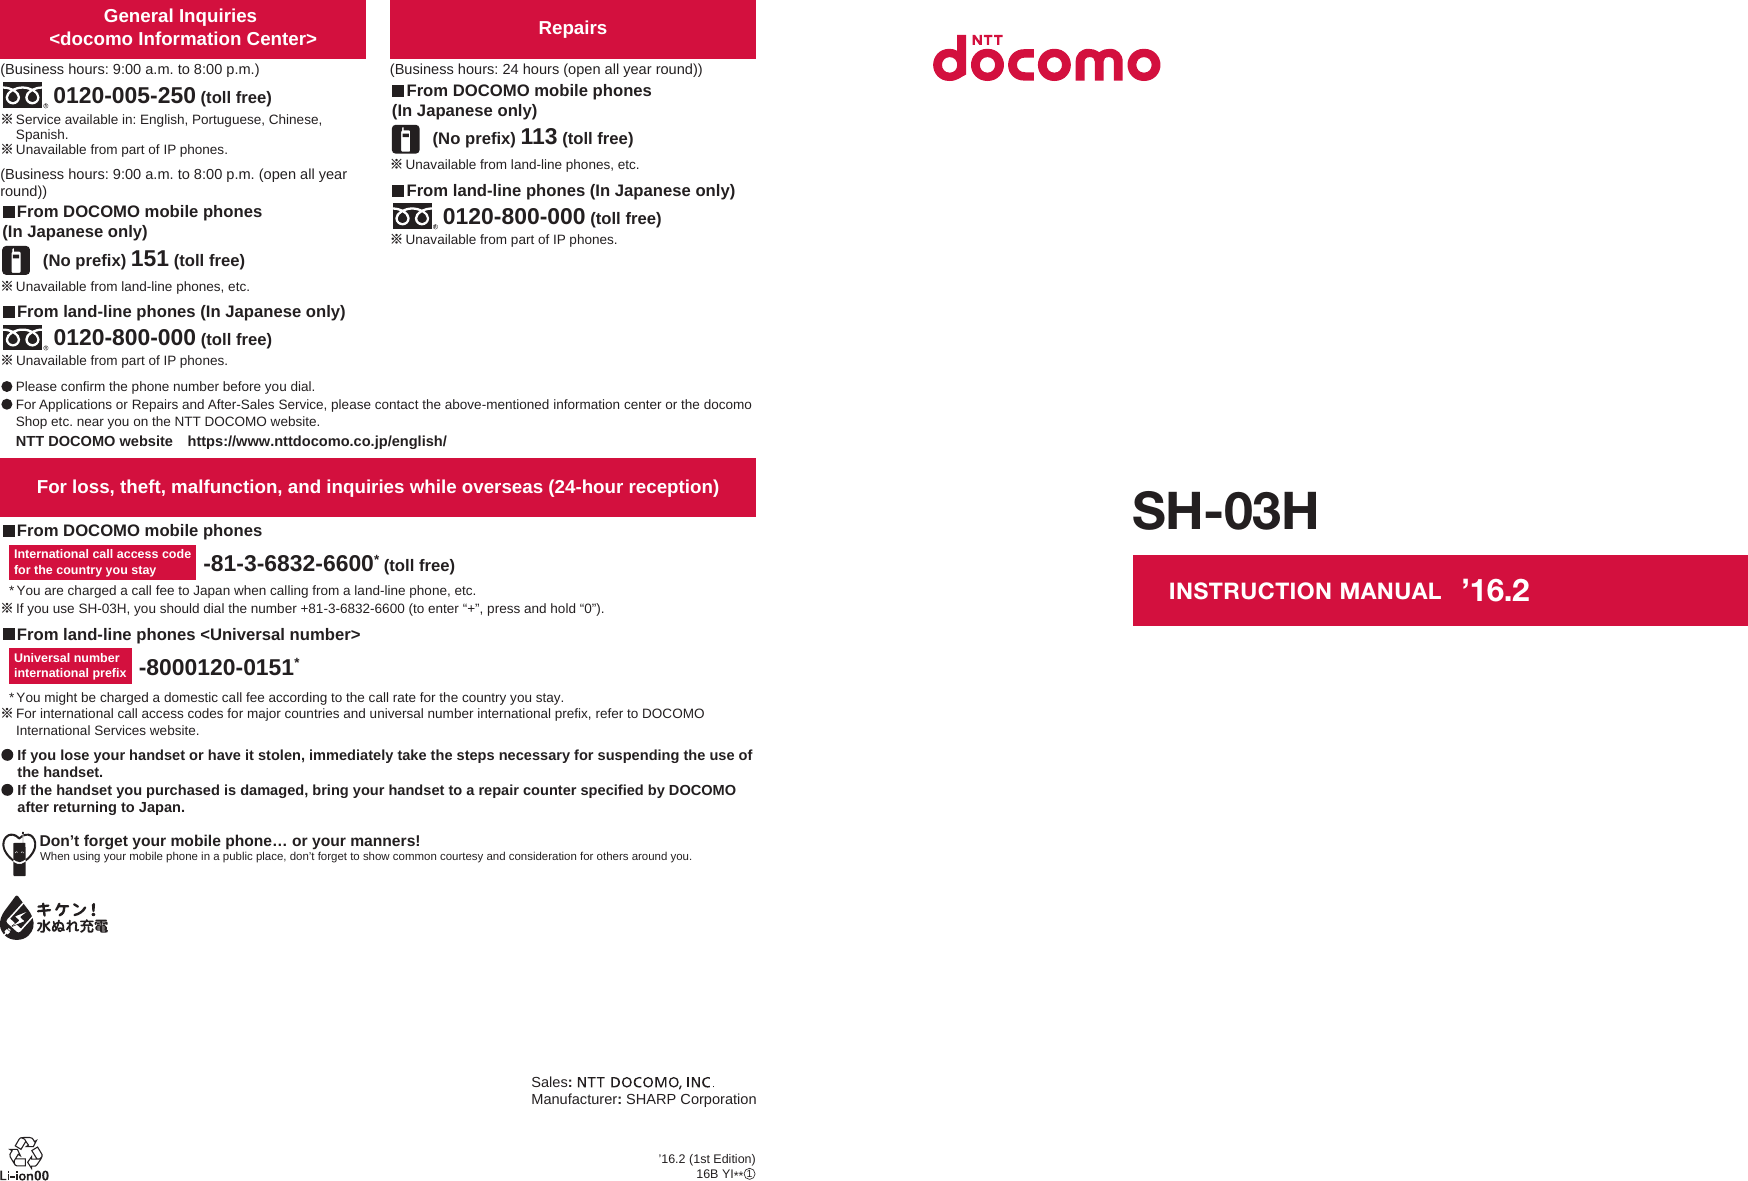
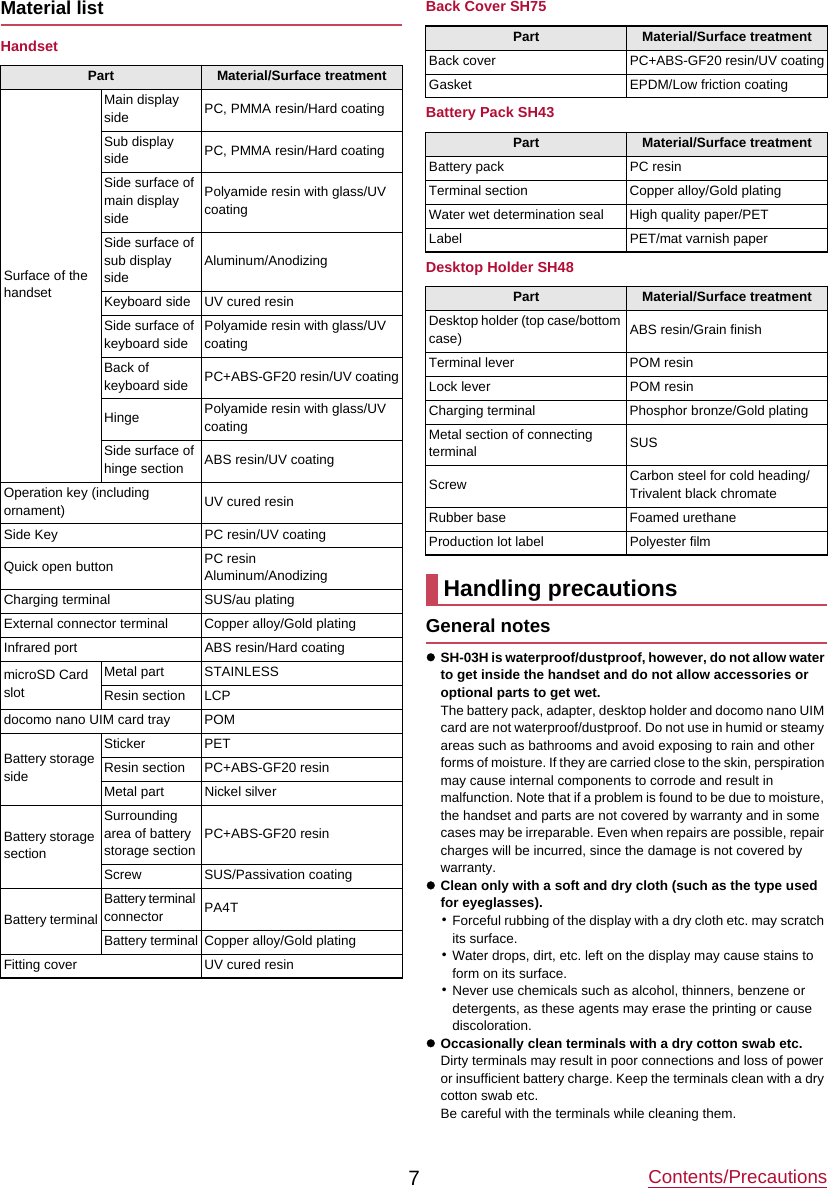
![IntroductionThank you for purchasing "SH-03H".Be sure to read this manual before and during use to ensure proper operation.zThe screens and illustrations in this manual are shown as examples. The actual screens and illustrations may differ.zKey illustrations in this manual differ from the actual design of the keys.zNote that "SH-03H" is referred to as "handset" in this manual.zThis manual refers to microSD Card or microSDHC Card as "microSD Card" or "microSD".zReproduction of this manual in part or in whole without prior permission is prohibited.zThe contents of this manual are subject to change without prior notice.zFor optional parts (sold separately) compatible with the handset, refer to the DOCOMO website.https://www.nttdocomo.co.jp/product/option/ (in Japanese only)Checking operation methodQuick Start Guide (Basic package) (in Japanese only)This guide describes operations of basic functions.Instruction Manual (App of the handset) (in Japanese only)This manual describes detailed guidance and operations of functions.In the standby screen, z/[Tools]/[Instruction Manual]Instruction Manual (in PDF format)This manual describes detailed guidance and operations of functions.Download from the DOCOMO websitehttps://www.nttdocomo.co.jp/english/support/trouble/manual/download/index.html*The URL and contents are subject to change without prior notice.Basic packageSH-03H (includes warranty)Back Cover SH75 Battery Pack SH43Desktop Holder SH48 Quick Start Guide (in Japanese only)](https://usermanual.wiki/Sharp/HRO00231.12-User-Manual-Draft-APYHRO00231-pdf/User-Guide-2886380-Page-2.png)
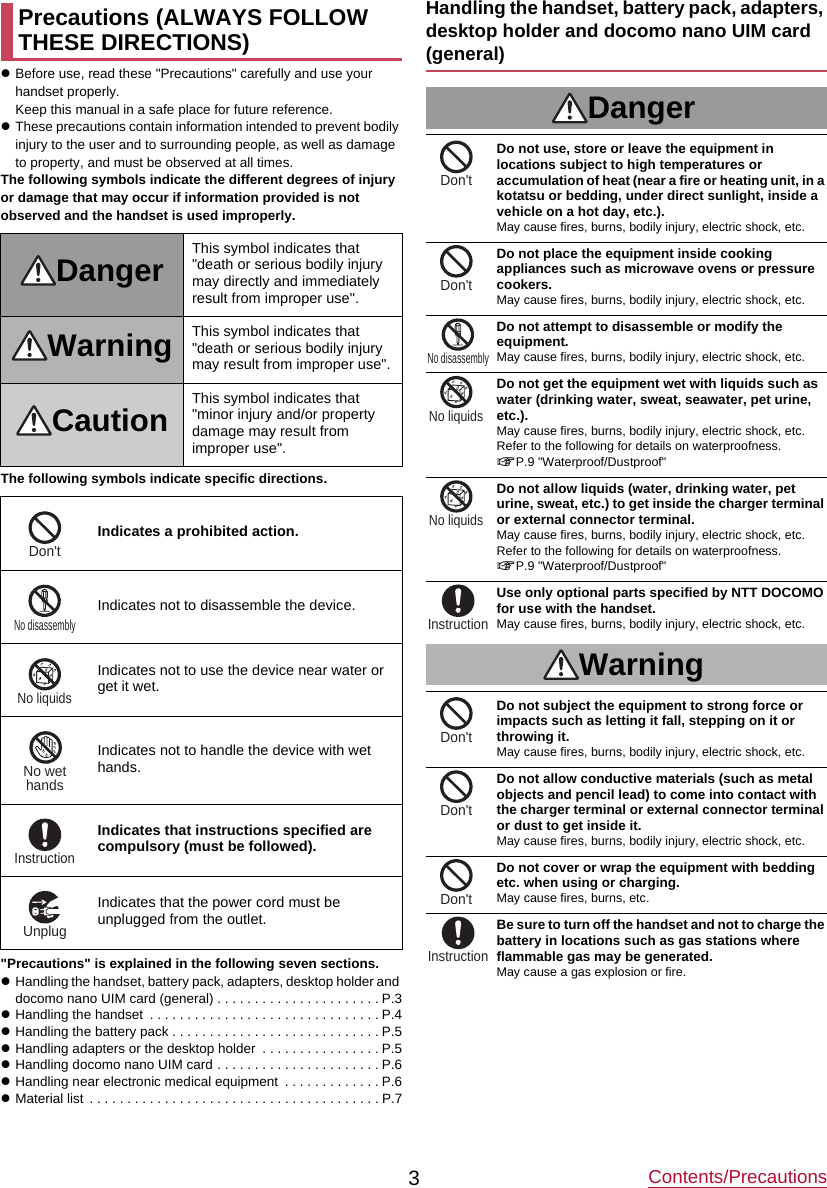
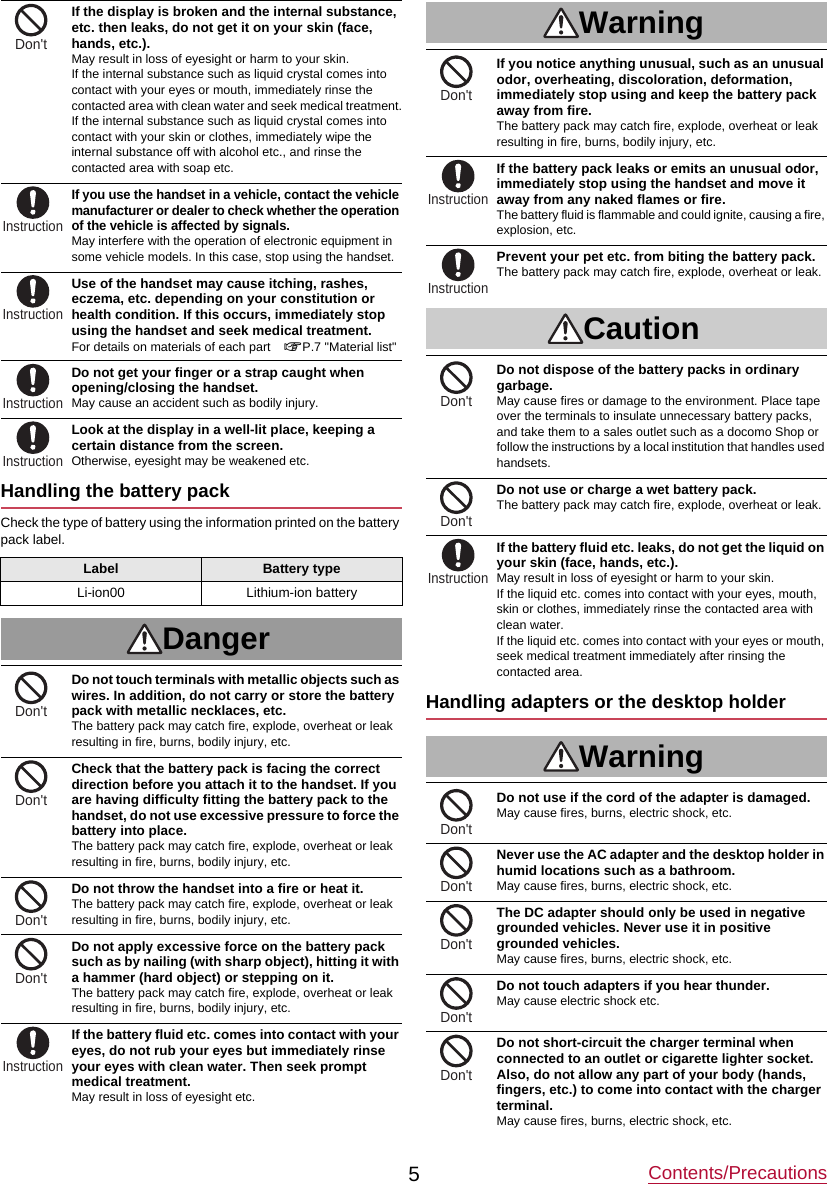
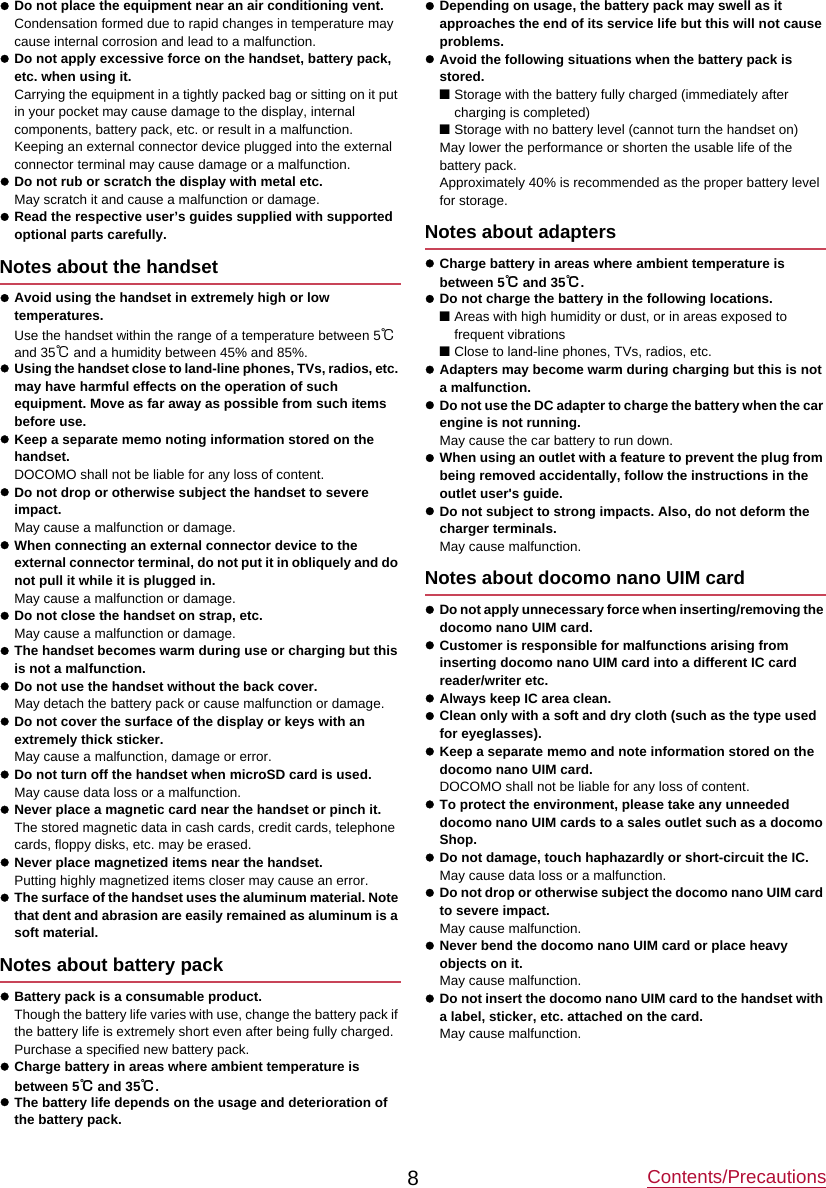
![Before Using the Handset13hTouch area (TOUCH CRUISER EX)zTouch the handset touch area with your finger to operate like using a touch pad.iy: Favorites keyzDisplays the Favorites list.jExternal connector terminalzUse to charge the battery or connect a PC.kCharging terminalzUse to charge the battery with included desktop holder.lSub displaymIncoming/Charging lampzLights/Blinks when incoming or charging.ndocomo nano UIM card tray/slotomicroSD Card slotpGPS/Bluetooth antenna*q&: Side keyzPress with the handset closed to display clock, battery level, notifications, etc. on the sub display.zPress for at least 1 second with the handset closed to set/cancel manner mode. When setting, manner mode type is the one which is previously set.rSpeakerzEmits ringtone, music sound, or the other party's voice during a hands-free call.sFOMA antenna*tBack coveruInfrared portzUse for infrared communication.vStrap hole* The antenna is built into the main body. Covering the antenna area with your hand may influence the quality.Quick open buttonPress the button to open the handset.zYou can also open the handset without pressing the button.The followings describe basic operations of the handset such as selecting items, or viewing screen display or icons.■Selecting an item (moving the cursor)Use w to point the cursor to an item, and then press t to select the item. An item that the cursor is pointed to is marked with a frame or whose color is changed.zDescription of operation steps and the meaning are as follows.zIn this manual, for the operation ended with t pressed after an item is selected/entered, pressing t description is omitted.zHold the handset with your hand to operate. Do not open the handset nearby your face, a person, or object. Also, take care not to drop the handset by opening recoil.zThe handset may not be opened when you press the quick open button depending on the handset orientation.zTo close the handset, use your hands. If you cannot close the handset, once open the handset completely, then close the handset again.Basic operationDescription MeaningIn the standby screen, z/[Settings]/[Wallpaper/display]In the standby screen, press z/point the cursor to [Settings] using w and then press t/point the cursor to [Wallpaper/display] using u and then press tzThe explanations in this manual are based on the default status of handset. The actual menu and items may differ depending on the settings you made.](https://usermanual.wiki/Sharp/HRO00231.12-User-Manual-Draft-APYHRO00231-pdf/User-Guide-2886380-Page-9.png)
![Before Using the Handset14■Menu operationsIn the standby screen, pressing z displays Normal menu/Simple menu with which you can set or change functions, or activate apps.zFor the menu nP.68 "Menu list"zSelect with w, or in Normal menu, press a dial key corresponding to the menu item number (1, 2, 3, etc.) to select the menu item.zPress c to return to the previous screen.zPress H to return to the standby screen.Switching the menu screenSwitch the menu screen between Normal menu and Simple menu.1In the standby screen, z/C/[Yes]2[Yes]/[No]zWhen the confirmation screen for font size is displayed, select the font size.■Operation guidanceOperation guidance displays menu or functions that can be operated by pressing the function key (z, m, C, i), or the select key (t).zDisplayed items vary by screen.zMain menu or functions are as follows.■Done: Determine a selected item■Submenu: Display submenu (available functions)■Back: Go back to the previous screen■Close: Close the submenu etc.■Check all/UnchkAll: Select/Cancel selecting all items■View: Display a selected image etc.■Play/Stop: Play/Stop video or music■Full: Display a selected image etc. in full screen■Send: Send mail or SMS■Stop: Stop operation such as receiving mails etc.■▲Page/▼Page, ▲/▼, ↑/↓: Scroll by page■Create new/New message: Create new memo, schedule event, SMS, etc.■Settings: Display setting items■Viewing standby screenIn the standby screen, you can check the current status and new arrival information.1Status barzVarious information such as handset status or notifications is displayed.2Stock iconzAppears when there is a missed call or new mail.3Calendar4Clock5i-channel tickerzi-channel information appears automatically for i-channel subscribers.■Using the focus modeSelect the status bar, calendar or stock icon on the standby screen to activate the corresponding app or check the information.1In the standby screen, p/tzFocus mode activates.2Select status bar/calendar/stock iconzTo cancel the focus mode: c/HzIn the focus mode, displaying the menu by pressing z is unavailable.Checking notification details from stock iconsStock icons appear in the standby screen and notify you when a call is missed, a new mail is received, etc.zMain stock icons and the operations are as follows.■ (Answering memo): Display the Answering memo list.■ (Incoming notification/New SMS): Display the SMS list.■ (Missed call): Display the incoming call list.■ (Recorded messages of voicemail): Display the confirmation screen for dialing to voicemail center.■ (New mail): Display Inbox.■ (Notification information): Display the status panel.zA stock icon will disappear when you check the content. An icon for voicemail service will disappear when you delete the recorded message.Normal menu Simple menuz Ctm i32451Stock iconCalendarStatus bar](https://usermanual.wiki/Sharp/HRO00231.12-User-Manual-Draft-APYHRO00231-pdf/User-Guide-2886380-Page-10.png)
![Before Using the Handset17■ProfileDisplay your own phone number registered to the docomo nano UIM card. You can register a name, mail address, etc.zBy default, only phone number which is registered to the installed docomo nano UIM card is displayed.1In the standby screen, z/[Profile]2Check/use the profile1Name/ReadingzDisplayed when a name is registered.2Own phone number3ImageEditing/Using profile1In the standby screen, z/[Profile]2z/[Edit profile]/set each item/CzFor items that can be set nP.28 "Adding contacts to phonebook"zTo send the profile: z/[Send via infrared]/[Send data (share)]/follow the instructions on the screen and operatezTo copy an item: Point the cursor to an item to copy/mChecking mail address1In the standby screen, m2[Mail settings]/[My address]zSelect [Update] to update My address information.■Using TOUCH CRUISER EXWhen operating the camera, browser, etc., touch the handset touch area with your finger to operate like using a touch pad. Activating a function/app corresponding to TOUCH CRUISER EX enables TOUCH CRUISER EX. You can operate with [ ] (pointer).zWhen the TOUCH CRUISER EX operation guide screen appears, read the content and then follow the instructions on the screen.zEach pressing s for at least 1 second switches TOUCH CRUISER EX enabled/disabled.zWhen TOUCH CRUISER EX is disabled, activating a function/app corresponding TOUCH CRUISER EX (Browser, Databox) does not enable TOUCH CRUISER EX.zEven when TOUCH CRUISER EX is enabled, key operations are available (except for some apps).The battery pack is not fully charged at the time of purchase. Be sure to charge the battery before use.■Cautions while chargingzFor details on the estimated charge time nP.76 "Main specifications"zThe battery can also be charged with the handset turned on (While charging, the battery icon appears with [ ] superimposed).zDo not charger for a long time with the power left turned on. If the handset is left turned on after charging is complete, the battery pack charge level decreases.In this case, an AC or DC adapter (sold separately) charges the battery again. However, depending on the time when the handset is disconnected from the AC or DC adapter, the battery charge level may be lower or the battery pack may only be usable for a short time.zIf the handset is left for a long time even after the charging is completed, the battery level may decrease.zWhen the battery is empty and the handset is being charged, the charging lamp may not illuminate immediately. However, charging is in progress.zIf the battery empty alert is displayed and the power cannot be turned on, charge the battery for a while.zWhile charging, the handset may not be turned on even when the charging lamp is illuminated in red. Charge longer and try turning the power on again.zFrequently recharging the battery when its power is still remaining enough may shorten the usable life of the battery pack. It is recommended to use the battery to a certain level (e.g. after the battery level decreases) before recharging.zWhen the battery becomes warm, charging may automatically stop even if the battery has not been fully charged. Charging automatically resumes after the temperature lowers to an appropriate temperature.■Estimated battery life when fully chargedzFor battery life nP.76 "Main specifications"■Battery pack usable lifezBattery pack is a consumable product. Battery life power charge is gradually reduced every time the battery is charged.zWhen battery life per charge is reduced to approximately half of the default time, this means that the battery pack is approaching the end of its usable life. In this case, it is recommended to replace the batter pack as soon as possible. Depending on usage, the battery pack may swell as it approaches the end of its service life but this will not cause problems.213Touch areaChargingContinuous talk time FOMA/3G Approx. 400 min.Continuous stand-by timeFOMA/3G At rest: Approx. 610 hours](https://usermanual.wiki/Sharp/HRO00231.12-User-Manual-Draft-APYHRO00231-pdf/User-Guide-2886380-Page-11.png)
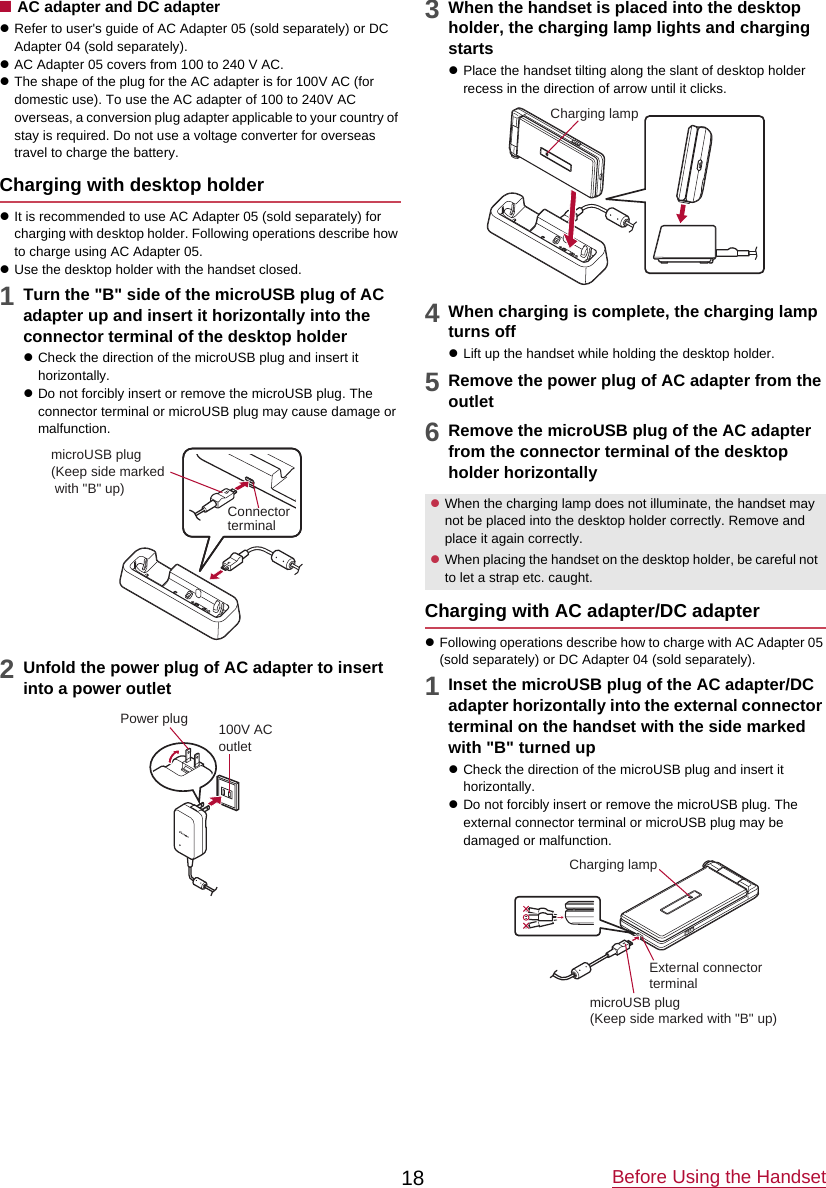
![Before Using the Handset192When you erect the AC adapter power plug and insert it into an outlet or insert the DC adapter power plug into a car cigarette lighter socket, the charging lamp illuminates and charging starts3When charging is complete, the charging lamp turns off4Remove the AC adapter power plug from the outlet, or remove the DC adapter power plug from the car cigarette lighter socket5Remove the microUSB plug of the AC adapter/DC adapter horizontally from the external connector terminal of the handsetCharging with Micro USB Cable 01You can charge the handset by connecting the handset to a PC with Micro USB Cable 01 (sold separately).zFor details on connecting to a PC nP.57 "Connecting the handset and PC"■Turning power on1H (for at least 2 seconds)zWhen you turn the power on for the first time, make the initial settings (nP.23 "Initial settings").■Turning power off1H (for at least 1 second)/[Power off]■Turning power off forciblyYou can forcibly turn the power off if the screen does not respond or the power cannot be turned off.1H (for at least 8 seconds)zRelease your finger after the vibrator is activated to turn the power off.■Showing/Hiding the main displayThe main display is turned off when the handset is not in use for a set length of time.Press any of key to turn on the display while the main display is turned off.Enter characters for functions or apps such as phonebook and mail on the handset.Mechanism of character entryMultiple characters are assigned to each dial key. Character switches by pressing a key.zThere are two types character input modes as follows.■Full-width characters: Kanji, Hiragana, Katakana, upper case alphabet, lower case alphabet, number, symbol■Half-width characters: Katakana, upper case alphabet, lower case alphabet, number, symbol1CursorzPoint the cursor to a position to add.2SubmenuzUse to make entry settings or register words to the user dictionary (nP.20 "Submenu operations for character entry").3Switch input modezSwitch the input mode.・Press m to switch input mode in the order of Half alphabet→Half numeric→Hiragana.4Input modezYou can check the input mode by the status icon.5Pict/SymzDisplays pictograms/Deco-mail picture/symbol/emoticons list.・They may not be entered depending on app.When using a DC adapterzThe DC adapter should only be used in negative grounded vehicles (12 and 24V DC).zDo not use with the car engine shut off. May drain the car battery.zThe DC adapter fuse is a consumable product. For replacement, purchase a new fuse at a nearest auto parts retailer etc.zRefer to the user's guide of DC Adapter 04 for details.100V AC outletCigarette lightersocketAC adapter DC adapterPower plugPower plugTurning power on/offCharacter entry43125](https://usermanual.wiki/Sharp/HRO00231.12-User-Manual-Draft-APYHRO00231-pdf/User-Guide-2886380-Page-13.png)
![Call24CallYou can use the phone and phonebook, and make settings for voice/answering memo, operations available when calls are received, etc.1In the standby screen, enter a phone numberzAlways enter the city code, even when it is a local number.zYou can set to notify/not to notify the other party of your phone number for each call by adding "186"/"184"to the head of the phone number.zTo delete the last entered number: czTo delete all entered number: c (for at least 1 second)zTo move the cursor and delete a number: v/c2szTo use a call option and dial: z/[Call option]/set each item/s/zzTo create/send SMS: z/[Send SMS]/enter a message/CzTo register to the phonebook: t/select a contact to register/set each item/C3To end a call, HEntering touch-tone signalsWhen using services in which you are required to enter numbers additionally during a call, such as inquiry about the balance in your bank account or ticket reservation, enter pause (,)/wait (;) after entering a phone number to make a call with an additional number added to the main phone number.■Adding 2 seconds pauseAfter making a call to a main phone number, the handset automatically pauses for 2 seconds and an additional number is sent.1In the standby screen, enter a phone number/# (for at least 1 second)2Enter a number to send/s■Adding waitAfter making a call to a main phone number, the handset automatically waits and then a screen asking whether to send an additional number is displayed. Select [Yes] to send an additional number.Making a callzYou can quickly activate functions such as "Calculator", "Timer" or "Alarm" by entering a number in the input number screen After a number is entered, follow the instructions on the screen. Available functions vary by entered number.1In the standby screen, enter a phone number/* (for at least 1 second)2Enter a number to send/s3[Yes] during the callMaking a call with Speed dialYou can make a call quickly to the other party who is registered to the speed dial.zRegister a contact in advance (nP.28 "Adding contacts to phonebook").■Registering Speed dial1In the standby screen, z/[Phone]/[Speed dial]2Select [<Not registered>] of any number to register/select a contact■Dialing with speed dial1In the standby screen, enter a number of speed dial (0 - 99)/szIf multiple phone numbers are registered in a contact, a screen for selecting call number appears.Making a call with Kantan Hasshin (speech recognition)Use Kantan Hasshin (speech recognition) to make a call to the other party whose contact is registered to Speed dial by voice.zEnable [Kantan Hasshin] in advance (nP.53 "Kantan Hasshin").1Open the handset/When the handset is opened, &z[ ] is displayed.zOperate in the standby screen or menu list screen.2Speak a name of the other party toward the mouthpiece/microphone to make a call tozSpeak "Denwa" or "Hasshin" following a name of the other party to call.Example: ○○○ san ni denwa, △△△ san ni hasshin3Confirm the other party's name/[Yes]zIf multiple phone numbers are registered in a contact, a screen for selecting call number appears.zTo display the speed dial list, enter a unregistered speed dial number in the standby screen and then press s. You can make a call by selecting a contact from the speed dial list, or register a new speed dial.zWhen a mail address is registered to the contact of speed dial, mail can be created by entering the speed dial number in the standby screen and then pressing m.zIt may not work correctly if a name is registered to several speed dials.zTo recognize names correctly, speak up the last name or first name, or first name and last name consecutively registered in the contact. If it is not recognized correctly, check first name and last name registered in the contact (nP.29 "Checking/Using phonebook").](https://usermanual.wiki/Sharp/HRO00231.12-User-Manual-Draft-APYHRO00231-pdf/User-Guide-2886380-Page-14.png)
![Call25Emergency callInternational call (WORLD CALL)WORLD CALL is an international calling service available from DOCOMO devices in Japan.zThe caller ID may not be notified or displayed correctly depending on overseas network operators. In this case, making a call with incoming call history is not available.1When a call is received, the ringtone sounds and the incoming lamp flashes2szAlternatively, press t, 1 - 9, *, 0, # to answer calls.3To end a call, H■Placing a call on hold1When a call is received, the ringtone sounds and the incoming lamp flashes2H■Adjusting ringtone volume1When a call is received, the ringtone sounds and the incoming lamp flashes2u■Rejecting an incoming call1When a call is received, the ringtone sounds and the incoming lamp flashes2z/[Reject call]■Answering by answering memo1When a call is received, the ringtone sounds and the incoming lamp flashes2z/[Absence Memo]Playing an answering memo1In the standby screen, p/select the stock icon []zAlternatively, in the standby screen, C/[Answering Memo List] to check answering memos.2Select an answering memoEmergency calls Phone numberPolice 110Fire and ambulance 119Marine emergency 118zThe handset supports "Emergency call location notification".When you make a call to an emergency number such as 110, 119 and 118, the information of your location (location information) is automatically notified to the agency that has received the emergency call (e.g. the police station). Depending on your location and the reception status of the signal, the agency that has received the emergency call may not be able to confirm the exact location.If you are not sending your caller ID by calling with "184" added or other means, your location information and phone number are not notified. However, if the agency that has received the emergency call considers your location information and phone number necessary for important purposes, such as life saving, the agency may retrieve them regardless of your settings.In addition, the area/timing to introduce "Emergency call location notification"depends on the state of preparation in each agency that receives emergency calls.zIn Japan, you cannot make a call to the emergency number (110, 119 or 118) when a docomo nano UIM card is not inserted, while the PIN code is locked, from the PUK (PIN Unlock Key) entry screen or from the password entry screen for decrypting the storage.zWhen calling 110, 119 and 118 from your handset, the police or fire stations may return your call for verification purposes. State that you are calling from a mobile phone, and give your phone number and exact present location.Remain stationary to ensure that the call is not disconnected while you are on the line, and keep the handset turned on to receive calls for approximately 10 minutes afterwards.zDepending on the region, calls to the police or fire station of the local area may not be made.zWhen you make a call to the emergency number (110, 119 or 118) while Reject call setting is set, items of Reject call setting are set to [OFF].zEven with [Restrict calls] enabled, when you make call to emergency number (110, 119 or 118), the handset accepts incoming calls from the other party who is not registered in the phonebook for approximately 5 minutes in order to receive call-back from the agency.That includes when you make a call to emergency number (110, 119 or 118) with prefix "184" or "186" registered in the phonebook.[Calling Method]zWhen calling to a land-line phone: 010/country code/area code (city code)/the other party's phone number/szWhen calling to a mobile phone: 010/country code/the other party's mobile phone number/s・As for the other parties' mobile phone numbers and area codes (city codes) that begin with "0", omit the first "0" when entering (except some countries or regions such as Italy).・Alternatively, enter "009130-010" as usual or "+" instead of "010".Answering a call](https://usermanual.wiki/Sharp/HRO00231.12-User-Manual-Draft-APYHRO00231-pdf/User-Guide-2886380-Page-15.png)
![Mail/Web browser30Mail/Web browserUse docomo mail or SMS to send/receive messages, and use the web browser to view web pages.You can send and receive mails using mail address of DOCOMO (@docomo .ne.jp). Data can be easily transferred when you have changed models or restored when you have lost the handset since sent and received mails are saved on the docomo mail server. Also, you can send, receive and view mails using the same mail address from multiple devices such as a tablet, PC browser, etc. if you use a docomo ID (d ACCOUNT).zFor details on docomo mail, refer to the DOCOMO website.zWhen you use for the first time, read "License agreement" (Japanese), then select [Agree] (if "use of cloud license agreement" appears, read it and select [Agree]). When Welcome to docomo mail! screen is displayed, press C.Creating/sending docomo mail1In the standby screen, m2[Create new mail]zAlternatively, press m to display the mail creation screen.3Select the Recipient field4Select recipient adding option/enter a recipient/C/CzTo add recipient: m/select an adding recipient method/enter a recipient/C/CzTo delete one recipient: Point the cursor to a recipient//i/[Delete 1]/[Yes]/CzTo delete selected recipients: i/[Delete selection]/select recipients/C/[Yes]/CzTo delete all recipients: i/[Delete all]/[Yes]/C5Select the Subject filed/enter a subject6Select the Message field/enter a message7CzTo save as draft: mdocomo mailMail creation screen■AttachmentAttach images, videos, etc. to docomo mail to send.zSome files cannot be attached depending on the file format.1In the mail creation screen, select Attachment field2Select a file to attach■Picture/Image: Attach downloaded images.■Video: Attach videos.■Phonebook: Attach the phonebook contacts.■Other files: Attach various format files saved in the handset or microSD card.3CAdding an attachment file1In the mail creation screen, select Attachment field2m/select a file to attach/CDeleting an attachment file1In the mail creation screen, select Attachment field2Point the cursor to an attachment file/i/[Delete 1]/[Yes]/CzTo delete selected files: i/[Delete selection]/select attachment files/C/[Yes]/CzTo delete all files: i/[Delete all]/[Yes]/C■Decorating message (Deco-mail)You can decorate a mail message by inserting images, changing text color, font size, or background color, etc.1In the mail creation screen, select the message field2z/[Deco]/select a decoration/decoratezTo decorate entered text: i/select a start point to decorate/select a end point to decorate/[Deco]/select a decoration/decorateDecoration menu](https://usermanual.wiki/Sharp/HRO00231.12-User-Manual-Draft-APYHRO00231-pdf/User-Guide-2886380-Page-16.png)
![Mail/Web browser31■Submenu operations on mail creation screen1In the mail creation screen, z2Select an item■Switch to view screen: Switch to docomo mail menu screen.■Preview: Display a docomo mail that is being created in preview.■Save as draft: Save a docomo mail that is being created as a draft in "Drafts".■Template: Use templates to create Deco-mails or save a docomo mail that is being created as a template.■End editing without saving: End docomo mail without saving docomo mail that is being created.Receiving docomo maildocomo mail is automatically received.1Receive docomo mail automaticallyzThe stock icon [ ] and [ ] appear in the standby screen and the status bar, respectively.zNot receiving automatically: In the standby screen, m/[Mail settings]/[Communication setting]/[Auto reception setting]/[Confirm every time]/[OFF]2In the standby screen, p/select the stock icon []zAlternatively, in the standby screen, m/[Inbox] to check.3Select a folder/select an unread docomo mail■Checking new mails/SMSYou can retrieve new docomo mail or SMS that is sent when you are out of service area, the handset is turned off, etc. from the center.1In the standby screen, m (for at least 1 second)zAlternatively, m/select [Check new mail/Update].You can send and receive text messages with mobile phone numbers serving as destinations.* For details on the number of characters which can be sent and received etc., refer to "Short Message Service (SMS)" on the DOCOMO website.zYou can also exchange messages with those who use network of overseas network operators. Refer to the DOCOMO International Services website for information on countries where this service is available and available overseas network operators.1In the standby screen, z/[Mail]/[SMS]2C/enter a recipient and message/CDisplaying a message1In the standby screen, z/[Mail]/[SMS]zMessages are grouped into threads according to their destinations/senders and displayed.1ImagezDisplayed if an image of the other party is registered in the phonebook.2Number of threads including unread messages3Destination/Sender4Number of messages in thread5Date and time of the message exchange2Select a thread1Destination/Sender2Message3Date and time of the message exchange3Check the messagezCall to sender: z/[Call sender]/szRegistering sender to the phonebook: z/[Register to Address Book]/select an item to register/set each item/CReplying message1In the standby screen, z/[Mail]/[SMS]2Select a thread3Enter a message/CForwarding message1In the standby screen, z/[Mail]/[SMS]2Select a thread3Point the cursor to a message/z/[Forward]4Enter a recipient and message/CSMSzIf destinations are devices owned by those who use network of overseas network operators, enter "+", the country code and the recipient's mobile phone number. If the phone number begins with "0", omit the first "0". Alternatively, enter "010", the country code and the phone number.zHalf-width katakana and special symbols in SMS messages may not appear correctly for recipient.zSMS cannot be sent when "186" or "184" is added.14523132](https://usermanual.wiki/Sharp/HRO00231.12-User-Manual-Draft-APYHRO00231-pdf/User-Guide-2886380-Page-17.png)
![Data communication61Using Bluetooth functionzTo register/connect a Bluetooth device, the Bluetooth passkey may need to be entered. Before starting the registration, decide one- to sixteen-digit number.zEnter the same number on the handset and the other party's Bluetooth device.1In the standby screen, z/[Settings]/[Bluetooth]2[Bluetooth]3Select a Bluetooth device/[Pair]zThe confirmation screen for connection may be displayed.zEntering the Bluetooth passkey may be necessary depending on the other party's Bluetooth device. Also, some Bluetooth devices may start connection after completing registration.zTo display/hide the handset's information on other Bluetooth devices: [SH-03H]・The handset's information is automatically hidden when the period of time set for Visibility timeout has passed.zTo search for Bluetooth devices: z/[Search for devices]zPress C of a paired Bluetooth device to change the name and the connection type of the other party's Bluetooth device.■When receiving registration request from Bluetooth device or connection request from unregistered Bluetooth device1Registration request/Connection request from Bluetooth device2In the standby screen, p/select the stock icon []/[Pairing request]/[Pair]zWhen the confirmation screen about the settings on pairing appears, select [Pair].zEntering the Bluetooth passkey may be necessary depending on the other party's Bluetooth device.zThe confirmation screen for connection may be displayed.■Unregistering Bluetooth device1In the Bluetooth screen, point the cursor to the Bluetooth device to unregister/C/[Unpair]■Disconnecting Bluetooth device1In the Bluetooth screen, select the Bluetooth device to disconnect/[OK]Precautions about handling Bluetooth devicesNote the followings when using Bluetooth devices.zNote the followings to make good connection.■Keep the distance between the handset and another Bluetooth device within approximately 10 m with no obstructions in sight. The distance within which you can make connection may be shorter when there are obstructions between them or depending on the conditions of the surroundings (such as walls or furniture) and the structure of a building. Especially when there is a wall, floor or ceiling of reinforced concrete between them, they may be unable to connect with each other. Note the above mentioned distance is not guaranteed.■Move the handset and another Bluetooth device as far away as possible from home electric appliances, AV devices, OA devices, etc. before connection. Bluetooth devices are liable to be adversely affected by a microwave oven, so move them as far away as possible from the microwave oven while using them. Otherwise, normal connection cannot be performed when other electric devices are powered on or Bluetooth devices may cause noises or reception failure on a TV or radio set.■Move the other party's Bluetooth device to a place where connection is possible when there is a broadcast station, radio, etc. near the Bluetooth device and the handset cannot be connected to the device. Strong radio waves may prevent connection between Bluetooth devices.■Wireless connection is available with Bluetooth devices put in a bag or pocket. However, lowering of communication speed or noise may result when you are in between the Bluetooth device and the handset.zElectromagnetic signals from Bluetooth devices may affect the operation of electronic medical equipment etc. As some cases may result in accident, turn off the handset and other Bluetooth devices in the following places.■On trains■On airplanes■In hospitals■Near automatic doors or fire alarms■In places such as gas stations where flammable gas is generatedRadio interference with Wi-Fi compatible deviceszThe Bluetooth devices use the same frequency band (2.4GHz) as wireless LANs (IEEE 802.11b/g/n). Therefore, using a Bluetooth device near a wireless LAN device may cause the radio interference, lowering of communication speed, noise or connection failure. In this case, turn off the wireless LAN device or keep the handset and the other party’s Bluetooth device at least approximately 10 m away from the wireless LAN.zYou can connect up to 7 Bluetooth devices at the same time. Bluetooth devices may not work properly or the number of Bluetooth devices which can be connected at the same time may differ depending on the profile.zIf you fail to connect a Bluetooth device, connection may become available after re-registering it.zWhen the Bluetooth function is set to [ON], the handset is set to receive registration requests/connection requests from other Bluetooth devices. Make the setting for displaying the handset's information on other Bluetooth devices in advance to allow the handset to be searched for by other Bluetooth devices.zWhile in connection stand-by, even if a connection request from a Bluetooth device is received, connection may not be made depending on the signal status etc.zFor details on the operations of the other party's Bluetooth device, refer to the manuals of the Bluetooth device to be used.](https://usermanual.wiki/Sharp/HRO00231.12-User-Manual-Draft-APYHRO00231-pdf/User-Guide-2886380-Page-18.png)
![Appendix/Index79OtherszUnder the MPEG-4 Visual Patent Portfolio License, customers have licensed permission for the following use of this product to engage in non-profit personal use. Other uses are not permitted.■Encoding MPEG-4 standard video (henceforth referred to as MPEG-4 video).■Decoding an MPEG-4 video that a customer not engaged in personal commercial activities has encoded.■Decoding an MPEG-4 video obtained from a licensed provider.For details on other intended uses, contact MPEG LA, LLC.zThis product is licensed under the MPEG-4 Systems Patent Portfolio License for encoding in compliance with the MPEG-4 Systems Standard. An additional license and payment of royalties are necessary in the following cases.■Data stored or replicated in physical media which is paid for on a title by title basis.■Data which is paid for on a title by title basis and is transmitted to an end user for permanent storage and/or use.Such additional license may be obtained from MPEG LA, LLC. Contact MPEG LA, LLC for additional details.zThis product is licensed under the AVC patent portfolio license for the personal and noncommercial use of a consumer to (i) encode video in compliance with the AVC standard (henceforth referred to as AVC video) and/or (ii) decode AVC video that was encoded by a consumer engaged in a personal and noncommercial activity and/or was obtained from a video provider licensed to provide AVC video. No license is granted or shall be implied for any other use. Additional information may be obtained from MPEG LA, L.L.C.See http://www.mpegla.com.zThis product is licensed under the VC-1 Patent Portfolio License for the personal and noncommercial use of a consumer to (i) encode video in compliance with the VC-1 standard (henceforth referred to as VC-1 video) and/or (ii) decode VC-1 video that was encoded by a consumer engaged in a personal and noncommercial activity and/or was obtained from a video provider licensed to provide VC-1 video. No license is granted or shall be implied for any other use. Additional information may be obtained from MPEG LA, L.L.C.See http://www.mpegla.com.zThe abbreviations of operating systems (Japanese versions) below are used in this manual.■Windows 8.1 stands for Microsoft® Windows® 8.1, Microsoft® Windows® 8.1 Pro and Microsoft® Windows® 8.1 Enterprise.■Windows 8 stands for Microsoft® Windows® 8, Microsoft®Windows® 8 Pro and Microsoft® Windows® 8 Enterprise.■Windows 7 stands for Microsoft® Windows® 7 (Starter, Home Basic, Home Premium, Professional, Enterprise and Ultimate).■Windows Vista stands for Windows Vista® (Home Basic, Home Premium, Business, Enterprise and Ultimate).zThe Bluetooth word mark and logos are owned by the Bluetooth SIG, INC. and any use of such marks by NTT DOCOMO, INC. is under license. Other trademarks and trade names are those of their respective owners.zGoogle, Google logo, Android, Google Search and Google Search logo are trademarks of Google Inc.Open source softwarezThis product includes software based on GNU General Public License (GPL), GNU Lesser General Public License (LGPL) and other licenses.For details on licenses of related software, in the standby screen, z/[Settings]/[Other settings]/[Device info]/[Legal information]/[Open source licenses].zSource codes of software based on GPL, LGPL and Mozilla Public License (MPL) can be referred to on the following website for free. For details, refer to the following website.https://sh-dev.sharp.co.jp/android/modules/oss/ (in Japanese only)zThe handset can unlock the SIM lock. Unlock the SIM lock to use non-DOCOMO SIM cards.zSome services, functions, etc. may be unavailable. DOCOMO shall not guarantee any operation of the handset.zFor details on unlocking SIM lock, refer to the DOCOMO website.1Insert non-DOCOMO SIM card2Turn the power on3Enter the SIM unlock code4[Unlock]/tUnlocking SIM lock](https://usermanual.wiki/Sharp/HRO00231.12-User-Manual-Draft-APYHRO00231-pdf/User-Guide-2886380-Page-21.png)
