Sharp HRO00240 Smart Phone User Manual
Sharp Corporation Smart Phone Users Manual
UserManual.wiki
>
Sharp
>
HRO00240 User Manual
>
12_User Manual_APYHRO00240.pdf
Contents
1.
12_User Manual_APYHRO00240.pdf
2.
Z1_DoC_Bluetooth_Compliance_APYHRO00240.pdf
12_User Manual_APYHRO00240.pdf
Navigation menu
Upload a User Manual
Namespaces
Wiki Guide
HTML
PDF
Info
Views
User Manual
Discussion / Help
Navigation
![IntroductionThank you for purchasing "SH-01J".Be sure to read this manual before and during use to ensure proper operation.Checking operation methodQuick Start Guide (Basic package) (in Japanese only)This guide describes operations of basic functions.Instruction Manual (App of the handset) (in Japanese only)This manual describes detailed guidance and operationsof functions.In the standby screen, z▶[Tools]▶[InstructionManual]Instruction Manual (in PDF format)This manual describes detailed guidance and operationsof functions.Download from the DOCOMO website(https://www.nttdocomo.co.jp/english/support/trouble/manual/download/index.html)* The URL and contents are subject to change withoutprior notice.zThe screens and illustrations in this manual are shown as examples. The actual screens and illustrations may differ.zKey illustrations in this manual differ from the actual design of the keys.zThe explanations in this manual are based on the case for the handset color "Black".zNote that "SH-01J" is referred to as "handset" in this manual.zThis manual refers to microSD Card or microSDHC Card as "microSD Card" or "microSD".zReproduction of this manual in part or in whole without prior permission is prohibited.zThe contents of this manual are subject to change without prior notice.Basic packageSH-01J (includes warranty)Back Cover SH76 Battery Pack SH44Desktop Holder SH49Quick Start Guide(in Japanese only)zFor optional parts (sold separately) compatible with the handset, refer to the DOCOMO website.(https://www.nttdocomo.co.jp/product/option/) (in Japanese only)](https://usermanual.wiki/Sharp/HRO00240.12-User-Manual-APYHRO00240-pdf/User-Guide-3109127-Page-2.png)

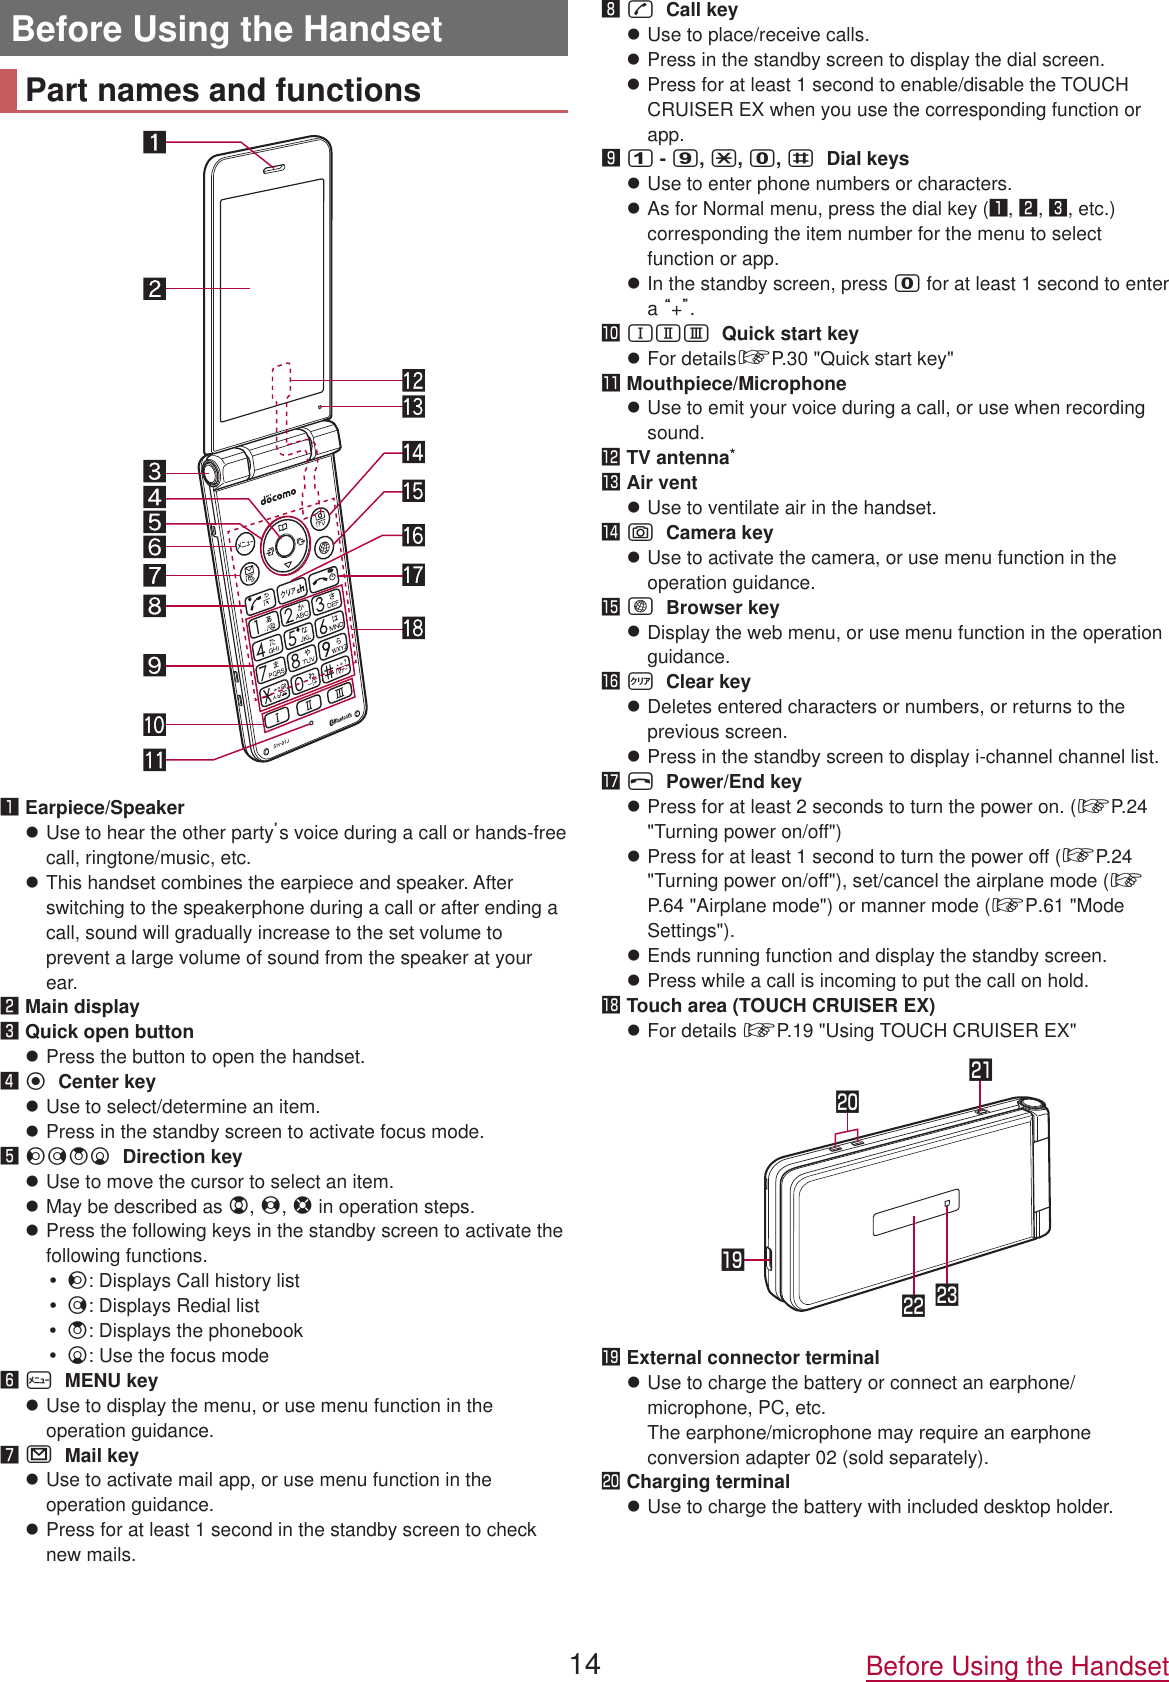
![ Strap holezWhen attaching a strap, remove the back cover (☞P. 10 “Removing back cover”), put the strap through the strap hole, put it on the hook inside and attach the back cover (☞P. 10 “Aattach back cover”). Sub displayzFor details ☞P. 18 "Viewing the sub display" Incoming/Charging lampzLights/Blinks when incoming or charging. docomo nano UIM card slot cover docomo nano UIM card slot microSD Card slot microSD Card slot cover Infrared portzUse for infrared communication.& Side keyzView a history of recently used apps.zPress while handset is closed to display clock, remaining battery, steps walked, notifications, etc. in sub display.zPress for at least 1 second with the handset closed to set/cancel manner mode. When setting, manner mode type is theone which is previously set. GPS/Bluetooth/Wi-Fi antenna* LTE/FOMA antenna* Back cover FeliCa antennazAdhered on inside of back cover. Do not remove.bmarkzIC card is contained (It cannot be removed). CamerazUse to shoot still pictures or videos.* The antenna is built into the main body. Covering the antenna area with your hand may influence the quality.Quick open buttonPress the button to open the handset.zYou can also open the handset without pressing the button.zHold the handset with your hand to operate. Do not open the handset nearby your face, a person, or object. Also, take care not to drop the handset by opening recoil.zThe handset may not be opened when you press the quick open button depending on the handset orientation.zTo close the handset, use your hands. If you cannot close the handset, once open the handset completely, then close the handset again.Basic operationThe followings describe basic operations of the handset suchas selecting items, or viewing screen display or icons.Selecting an item (moving the cursor)Use w to point the cursor to an item, and then press t to select the item. An item that the cursor is pointed to is marked with a frame or whose color is changed.zDescription of operation steps and the meaning are as follows.Description MeaningIn the standby screen, z▶[Settings]▶[Wallpaper/display]In the standby screen, press z▶point the cursor to [Settings] using w and then press t▶point the cursor to [Wallpaper/display] using uand then press tzIn this manual, for the operation ended with t pressed after an item is selected/entered, pressing t description is omitted.zThe explanations in this manual are based on the default status of handset. The actual menu and items may differ depending on the settings you made.15 Before Using the Handset](https://usermanual.wiki/Sharp/HRO00240.12-User-Manual-APYHRO00240-pdf/User-Guide-3109127-Page-11.png)
![ProfileDisplay your own phone number registered to the docomo nano UIM card. You can register a name, mail address, etc.zBy default, only phone number which is registered to the installed docomo nano UIM card is displayed.1 In the standby screen, z▶Profile2 Check/use the profile Name/ReadingzDisplayed when a name is registered. Own phone number ImageEditing/Using profile1 In the standby screen, z▶Profile2z▶Edit profile ▶set each item▶CzFor items that can be set ☞P. 36 "Adding contacts to phonebook"zTo send the profile: z▶[Send via infrared]/[Send data (share)]▶follow the instructions on the screen and operatezTo copy an item: Point the cursor to an item to copy▶mChecking mail address1 In the standby screen, m2 Mail settings ▶My addresszSelect [Update] to update My address information.Using TOUCH CRUISER EXWhen operating the camera, browser, etc., touch the handset toucharea with your finger to operate like using a touch pad. Activating afunction/app corresponding to TOUCH CRUISER EX enablesTOUCH CRUISER EX. You can operate with [ ] (pointer).ouchareazWhen the TOUCH CRUISER EX operation guide screen appears, read the content and then follow the instructions on the screen.zEach pressing s for at least 1 second switches TOUCH CRUISER EX enabled/disabled.zWhen TOUVH CREUISER EX is disabled, activating a function/app corresponding TOUCH CRUISER EX (Camera, Browser, Databox, LINE) does not enable TOUCH CRUISER EX.zEven when TOUCH CRUISER EX is enabled, key operations are available (except for some apps).Cautions when using the touch areazThe touch area is designed to be lightly touched with your finger. Do not forcefully press with your finger or a pointed object (fingernail, ballpoint pen, pin, etc.).zIn the following cases, the touch area may not work even if you touch it. May cause a malfunction.Operation with a gloved fingerOperation with the tip of a fingernailOperation with foreign objects placed on the operation padOperation on the touch area on which a sticker, etc. is putOperation while the touch area is wetOperation with fingers wet with sweat, water, etc.Tap/Double-tapTouch the touch area lightly and then release your finger from it toselect an item or icon that [ ] is pointed to. Double-tap is anoperation of tapping the same point twice consecutively.zWhile a still picture is displayed etc., the screen can be zoomed in/out by double-tapping. ooming in/out operations can be done with [ ] on the screen as a start point.Touch and holdKeep touching the touch area with your finger to change [ ] to[]. Menu appears depending on function or screen in use.zWhen you touch the touch area, or perform no operation for a few seconds after your finger is released, [ ] returns to [ ].SlideTouch and hold the touch area to change [ ] to [ ], and then trace with your finger to a target direction or point to scroll the screen, or switch pages.19 Before Using the Handset](https://usermanual.wiki/Sharp/HRO00240.12-User-Manual-APYHRO00240-pdf/User-Guide-3109127-Page-13.png)
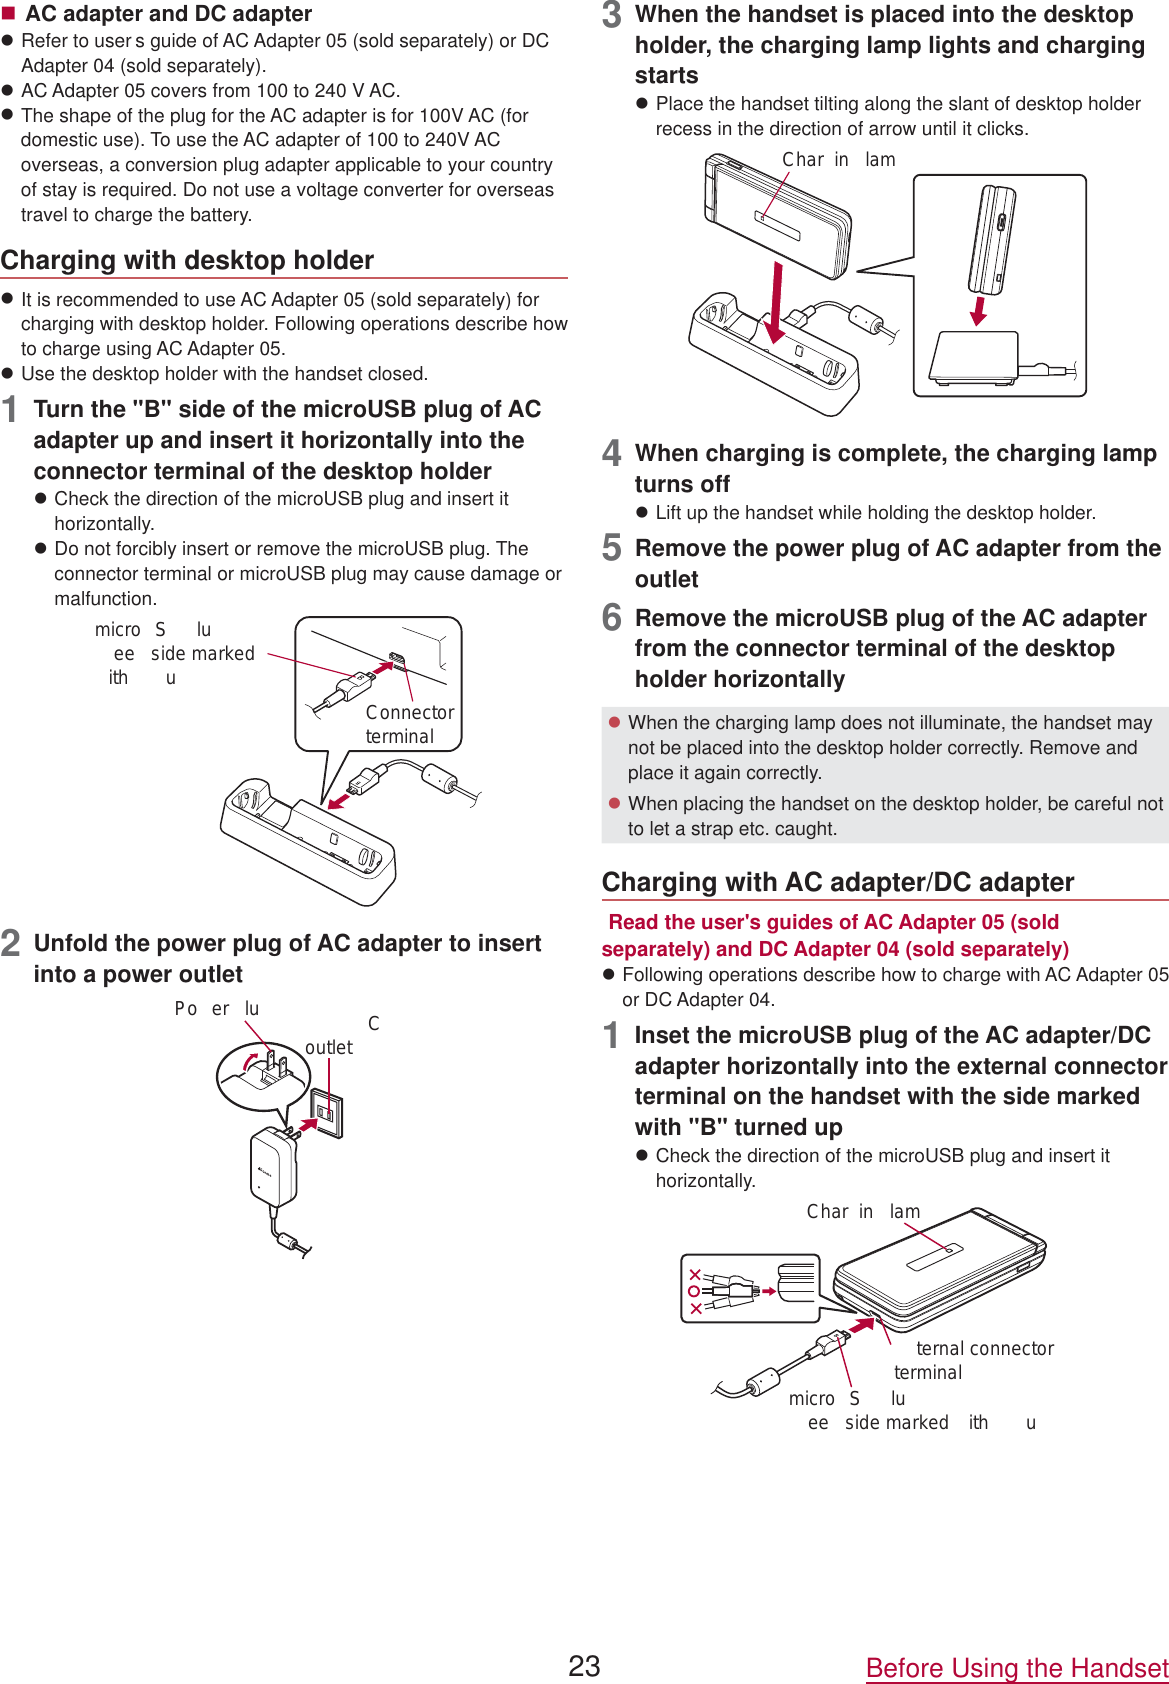
![Initial settingsWhen you turn the power on for the first time, the initial settings screen (Japanese) is displayed. Follow the instructions on the screen and operate.zTo make initial settings in English, press z▶[はい] (Yes) to skip the initial settings screen, then change the language to English from 設定 (Settings) menu, and then reboot the handset. The initial settings screen in English is displayed.zFor changing display language, ☞P.XX "Changing screen display to English"zWhen the handset log acquisition screen or software update screen is displayed, read the content and select [OK].Initial settings of security keyzFor security key, there are two types. Set either passcode or password.For passcode, set four- to sixteen-digit number.For password, set four- to sixteen-digit alphanumeric and halfwidth symbol* including at least one or more alphabets.* Some half-width symbols are not available.zFor security key settings ☞P.XX "Security key setting"1 When the initial settings screen is displayed, SetzMoving to setting of docomo service: C▶CzTo finish the initial settings: H/z▶[Yes]2 Enter the security key 0000zWhen an information screen is displayed, select [OK].3 Passcode / PasswordzEnter a new [Passcode]/[Password] and then enter [Passcode]/[Password] again.4C▶CInitial settings for docomo servicezAlternatively, in the standby screen, z▶[Settings]▶[docomoservice].1 When the Setting of docomo service screen is displayed, Start setting2 Make the initial settingszThe setting items are as follows.docomo apps passworddocomo location informationRemote initialization** Not appeared when docomo apps password is not set.3[OK]Wi-Fi settingsIf you use Wi-Fi function of the handset, you can use mail or Internet by connecting to access points of your home, corporate network or public wireless LAN service.Radio interference with Bluetooth deviceszWireless LANs (IEEE 802.11b/g/n) use the same frequency band (2.4 GHz) as Bluetooth devices. Therefore, using the wireless LAN device near a Bluetooth device may cause radio interference, lowering of communication speed, noise or connection failure. In this case, turn off the Bluetooth device or keep the handset and the wireless LAN device at least approximately 10 m away from the Bluetooth device.zPacket communication is also available while [Wi-Fi] is set to On. Wi-Fi connection is prioritized while Wi-Fi connection is set, but the connection is automatically switched to that of LTE/3G/GPRS network once Wi-Fi connection is terminated. Note that packet communication charges may be incurred in this case.zRefer to the manual of your wireless LAN base unit when using the access point at home etc.zOperate access point registration near the access point.zIf you use the docomo service by using Wi-Fi function, set d ACCOUNT in advance. In the home screen, [★]▶[Settings]▶[docomo service/cloud]▶[dアカウント設定] (Set d ACCOUNT) to set it.1 In the standby screen, z▶[Settings]▶[WLAN]2[WLAN settings]▶set to ON3 Select an access pointzIf you select an access point protected by security, enter the password (security key) and select [Connect].zTo register access points manually: z▶ [Add network] ▶enter the network name ▶ set security ▶ [Save] zWPS-compatible access points can be easily registered. In the standby screen, z▶ [Settings] ▶ [WLAN] ▶z▶[Easy Settings] ▶ [WPS Push Button]/[WPS PIN Entry] to register an access point.28 Before Using the Handset](https://usermanual.wiki/Sharp/HRO00240.12-User-Manual-APYHRO00240-pdf/User-Guide-3109127-Page-16.png)
![zIf the access point you want to connect to is not displayed: z▶ [Refresh] to scan for access point again.zWhen you select an access point and connect to it with a wrong password (security key), [IP Configuration Failure], [WiFi Connection Failure], [Authentication problem] or [Connected (Limited)] is displayed. Confirm the password (security key). When [IP Configuration Failure] or [Connected (Limited)] is displayed after entering the correct password (security key), you may not have acquired the correct IP address. Connect to the access point again after confirming signal status.zThe registration process using WPS takes a few minutes. After completion of the registration of the access point, check that the proper connection to the access point is acquired.zAs for the manual registration of an access point, this function supports WEP, WPA/WPA2 PSK and 802.1xEAP as the security setting.zIf you connect to an access point which is not connected to thezInternet, [ ] is displayed and the communication may be made by mobile networks, not Wi-Fi connection. To make Wi-Fi communication by using such an access point, enable [Using this AP without internet connection] of Advanced options before connecting to the access point.Using running appsYou can switch apps with several apps activated at the sametime, or enable/disable Bluetooth function.1&zYou can operate even when using function or app. Bluetooth function: Enable Bluetooth function/ : Disable Bluetooth function Close appzTo end app, press z while a running app is selected. FavoriteszRegister functions or apps to activate (☞P. 29 "Using Favorites"). Running appszYou can switch apps while several apps are activated. App listzYou can select a function or app from App list to activate.Using FavoritesRegister frequently-used functions and apps to Favorites so that you can activate them quickly.1&▶mzAlternatively, press $▶m to display.zRegistered functions or apps can be displayed by pressing the key while other function or app is used. SubmenuzYou can register/cancel functions or apps. Registered itemszFunctions or apps can be newly registered to [ ] - [ ].29 Before Using the Handset](https://usermanual.wiki/Sharp/HRO00240.12-User-Manual-APYHRO00240-pdf/User-Guide-3109127-Page-17.png)
![CallYou can use the phone and phonebook, and make settings for voice/answering memo, operations available when calls are received, etc.Making a call1 In the standby screen, enter a phone numberzAlways enter the city code, even when it is a local number.zYou can set to notify/not to notify the other party of your phone number for each call by adding "186"/"184"to the head of the phone number.zTo delete the last entered number: czTo delete all entered number: c (for at least 1 second)zTo move the cursor and delete a number: v▶c2szTo use a call option and dial: z▶[Call option]▶set each item▶s▶zzTo create/send SMS: z▶[Send SMS]▶enter a message▶CzTo register to the phonebook: t▶select a contact to register▶set each item▶C3 To end a call, HzYou can quickly activate functions such as "Calculator", "Timer" or "Alarm" by entering a number in the input number screen After a number is entered, follow the instructions on the screen. Available functions vary by entered number.Entering touch-tone signalsWhen using services in which you are required to enter numbers additionally during a call, such as inquiry about the balance in your bank account or ticket reservation, enter pause (,)/wait ( ) after entering a phone number to make a call with an additional number added to the main phone number.Adding 2 seconds pauseAfter making a call to a main phone number, the handset automatically pauses for 2 seconds and an additional number is sent.1 In the standby screen, enter a phone number▶# (for at least 1 second)2 Enter a number to send▶sAdding waitAfter making a call to a main phone number, the handset automatically waits and then a screen asking whether to send an additional number is displayed. Select [Yes] to send an additional number.1 In the standby screen, enter a phone number▶* (for at least 1 second)2 Enter a number to send▶s3 Yes during the callMaking a call with Speed dialYou can make a call quickly to the other party who is registered to the speed dial.zRegister a contact in advance (☞P. 36 "Adding contacts to phonebook").Registering Speed dial1 In the standby screen, z▶Phone ▶Speeddial2 Select <Not registered> of any number to register▶select a contactDialing with speed dial1 In the standby screen, enter a number of speed dial (0 - 99)▶szIf multiple phone numbers are registered in a contact, a screen for selecting call number appears.zTo display the speed dial list, enter a unregistered speed dial number in the standby screen and then press s. You can make a call by selecting a contact from the speed dial list, or register a new speed dial.zWhen a mail address is registered to the contact of speed dial, mail can be created by entering the speed dial number in the standby screen and then pressing m.Making a call with Kantan Hasshin (speech recognition)Use Kantan Hasshin (speech recognition) to make a call to the other party whose contact is registered to Speed dial by voice.zEnable [Kantan Hasshin] in advance (☞P.XX "Kantan Hasshin").1 Open the handset/When the handset is opened, &z[★] is displayed.zOperate in the standby screen or menu list screen.2 Speak a name of the other party toward the mouthpiece/microphone to make a call tozSpeak "Denwa" or "Hasshin" following a name of the other party to call.zExample: ○○○ san ni denwa, △△△ san ni hasshin3 Confirm the other party's name▶YeszIf multiple phone numbers are registered in a contact, a screen for selecting call number appears.zIt may not work correctly if a name is registered to several speed dials.zTo recognize names correctly, speak up the last name or first name, or first name and last name consecutively registered in the contact. If it is not recognized correctly, check first name and last name registered in the contact (☞P.XX "Checking/Using phonebook").31 Call](https://usermanual.wiki/Sharp/HRO00240.12-User-Manual-APYHRO00240-pdf/User-Guide-3109127-Page-18.png)
![Emergency callEmergency calls Phone numberPolice 110Fire and ambulance 119Marine emergency 118zThe handset supports "Emergency call location notification". When you make a call to an emergency number such as 110, 119 and 118, the information of your location (location information) is automatically notified to the agency that has received the emergency call (e.g. the police station). Depending on your location and the reception status of the signal, the agency that has received the emergency call may not be able to confirm the exact location. If you are not sending your caller ID by calling with "184" added or other means, your location information and phone number are not notified. However, if the agency that has received the emergency call considers your location information and phone number necessary for important purposes, such as life saving, the agency may retrieve them regardless of your settings. In addition, the area/timing to introduce "Emergency call location notification"depends on the state of preparation in each agency that receives emergency calls.zIn Japan, you cannot make a call to the emergency number (110, 119 or 118) when a docomo nano UIM card is not inserted, while the PIN code is locked, from the PUK (PIN Unlock Key) entry screen or from the password entry screen for decrypting the storage.zWhen calling 110, 119 and 118 from your handset, the police or fire stations may return your call for verification purposes. State that you are calling from a mobile phone, and give your phone number and exact present location. Remain stationary to ensure that the call is not disconnected while you are on the line, and keep the handset turned on to receive calls for approximately 10 minutes afterwards.zDepending on the region, calls to the police or fire station of thelocal area may not be made.zWhen you make a call to the emergency number (110, 119 or 118) while Reject call setting is set, items of Reject call setting are set to [OFF].zEven with [Restrict calls] enabled, when you make call to emergency number (110, 119 or 118), the handset acceptsincoming calls from the other party who is not registered in the phonebook for approximately 5 minutes in order to receive callback from the agency. That includes when you make a call to emergency number (110, 119 or 118) with prefix "184" or "186" registered in the phonebook.International call (WORLD CALL)WORLD CALL is an international calling service available from DOCOMO devices in Japan.zTo make an international call through a company other than DOCOMO, contact the respective companies for instructions.zThe caller ID may not be notified or displayed correctly depending on overseas network operators. In this case, making a call with incoming call history is not available.Calling MethodzWhen calling to a land-line phone: 010▶country code▶areacode (city code)▶the other party s phone number▶szWhen calling to a mobile phone: 010▶country code▶theother party s mobile phone number▶syAs for the other parties mobile phone numbers and area codes (city codes) that begin with "0", omit the first "0" when entering (except some countries or regions such as Italy).yAlternatively, enter "009130-010" as usual or "+" instead of "010".Answering a call1 When a call is received, the ringtone sounds and the incoming lamp flashes2szAlternatively, press t,1 - 9,*,0,# to answer calls.3 To end a call, HPlacing a call on hold1 When a call is received, the ringtone sounds and the incoming lamp flashes2HAdjusting ringtone volume1 When a call is received, the ringtone sounds and the incoming lamp flashes2uRejecting an incoming call1 When a call is received, the ringtone sounds and the incoming lamp flashes2z▶Reject callAnswering by answering memo1 When a call is received, the ringtone sounds and the incoming lamp flashes2z▶Absence Memo3 Select an answering memoPlaying an answering memo1 In the standby screen, p▶select the stock icon zAlternatively, in the standby screen, z▶[Phone]▶[Call/Ans Memo]▶[Answering Memo List] to check answering memos.2 Select an answering memo32 Call](https://usermanual.wiki/Sharp/HRO00240.12-User-Manual-APYHRO00240-pdf/User-Guide-3109127-Page-19.png)
![Mail/Web browserUse docomo mail or SMS to send/receive messages, and use the web browser to view web pages.docomo mailYou can send and receive mails using mail address of DOCOMO ( docomo .ne.jp). Data can be easily transferred when you have changed models or restored when you have lost the handset since sent and received mails are saved on the docomo mail server. Also, you can send, receive and view mails using the same mail address from multiple devices such as a tablet, PC browser, etc. if you use d ACCOUNT.zFor details on docomo mail, refer to the DOCOMO website.zWhen you use for the first time, read "License agreement" (Japanese), then select [Agree] (if "use of cloud license agreement" appears, read it and select [Agree]). When Welcome to docomo mail screen is displayed, press C.Creating/sending docomo mail1 In the standby screen, m2 Create new mailzAlternatively, press m to display the mail creation screen.Mail creation screen3 Select the Recipient field4 Select recipient adding option▶enter a recipient▶C▶CzTo add recipient: m▶select an adding recipient method▶enter a recipient▶C▶CzTo delete one recipient: Point the cursor to a recipient▶i▶[Delete 1]▶[Yes]▶CzTo delete selected recipients: i▶[Delete selection]▶select recipients▶C▶[Yes]▶CzTo delete all recipients: i▶[Delete all]▶[Yes]▶C5 Select the Subject filed▶enter a subject6 Select the Message field▶enter a message7CzTo save as draft:mAttachmentAttach still pictures, videos, etc. to docomo mail to send.zSome files cannot be attached depending on the file format.1 In the mail creation screen, select Attachment field2 Select a file to attachPicture/Image: Attach shot still pictures, or downloaded images.Video: Attach videos.Phonebook: Attach the phonebook contacts.Run camera: Activate the camera to shoot still pictures for attaching.Other files: Attach various format files saved in the handset or microSD card.3CAdding an attachment file1 In the mail creation screen, select Attachment field2m▶select a file to attach▶CDeleting an attachment file1 In the mail creation screen, select Attachment field2 Point the cursor to an attachment file▶i▶Delete 1 ▶Yes ▶CzTo delete selected files: i▶[Delete selection]▶selectattachment files▶C▶[Yes]▶CzTo delete all files: i▶[Delete all]▶[Yes]▶CDecorating message (Deco-mail)You can decorate a mail message by inserting images, changing text color, font size, or background color, etc.1 In the mail creation screen, select the message field2z▶Deco ▶select a decoration▶decorateDecoration menuzTo decorate entered text: i▶select a start point to decorate▶select a end point to decorate▶[Deco]▶select a decoration▶decorate38 Mail/Web browser](https://usermanual.wiki/Sharp/HRO00240.12-User-Manual-APYHRO00240-pdf/User-Guide-3109127-Page-20.png)
![Submenu operations on mail creation screen1 In the mail creation screen, z2 Select an itemSwitch to view screen: Switch to docomo mail menu screen.Preview: Display a docomo mail that is being created in preview.Save as draft: Save a docomo mail that is being created as a draft in "Drafts".Template: Use templates to create Deco-mails or save a docomo mail that is being created as a template.End editing without saving: End docomo mail without saving docomo mail that is being created.Receiving docomo maildocomo mail is automatically received.1 Receive docomo mail automaticallyzThe stock icon [ ] and [ ] appear in the standby screenzand the status bar, respectively.zNot receiving automatically: In the standby screen, m▶[Mail settings]▶[Communication setting]▶[Auto reception setting]▶[Confirm every time]/[OFF]2 In the standby screen, p▶select the stock icon zAlternatively, in the standby screen, m▶[Inbox] to check.3 Select a folder▶select an unread docomo mailChecking new mails/SMSYou can retrieve new docomo mail or SMS that is sent when you are out of service area, the handset is turned off, etc. from the center.1 In the standby screen, m (for at least 1 second)zAlternatively, m▶select [Check new mail/Update].SMSYou can send and receive text messages with mobile phone numbers serving as destinations.* For details on the number of characters which can be sent and received etc., refer to "Short Message Service (SMS)" on the DOCOMO website.zYou can also exchange messages with those who use network of overseas network operators. Refer to the DOCOMO International Services website for information on countries where this service is available and available overseas network operators.1 In the standby screen, z▶Mail ▶SMS2C▶enter a recipient and message▶CzIf destinations are devices owned by those who use network of overseas network operators, enter "+", the country code and the recipient s mobile phone number. If the phone number begins with "0", omit the first "0". Alternatively, enter "010", the country code and the phone number.zHalf-width katakana and special symbols in SMS messages may not appear correctly for recipient.zSMS cannot be sent when "186" or "184" is added.Displaying a message1 In the standby screen, z▶Mail ▶SMSzMessages are grouped into threads according to their destinations/senders and displayed. ImagezDisplayed if an image of the other party is registered in the phonebook. Number of unread messages Destination/Sender Number of messages in thread Date and time of the message exchange2 Select a thread Destination/Sender Message Date and time of the message exchange3 Check the messagezCall to sender: z▶[Call sender]▶szRegistering sender to the phonebook: z▶Register to Address Book]▶select an item to register▶set each item▶CReplying message1 In the standby screen, z▶Mail ▶SMS2 Select a thread3 Enter a message▶CForwarding message1 In the standby screen, z▶Mail ▶SMS2 Select a thread3 Point the cursor to a message▶z▶Forward4 Enter a recipient and message▶C39 Mail/Web browser](https://usermanual.wiki/Sharp/HRO00240.12-User-Manual-APYHRO00240-pdf/User-Guide-3109127-Page-21.png)
![Deleting message1 In the standby screen, z▶Mail ▶SMS2 Select a thread3 Point the cursor to a message▶z▶Deletemessages ▶YesDeleting thread1 In the standby screen, z▶Mail ▶SMS2z▶Delete selected ▶select threads▶C▶YeszTo delete all threads: z▶[Delete all threads]▶[Yes]Setting message1 In the standby screen, z▶Mail ▶SMS2z▶Settings3 Select an itemChange SMS app: Check an app to send and receive SMSs with.Delete old messages: When the number of saved messages reaches its limit, old messages are automatically deleted.Text message limit: Set the number of messages to be saved by thread.Delivery reports: Notify you that sent messages have been received every time a message is received.Manage SIM card messages: Manage messages saved on the docomo nano UIM card.Notifications: Notify you that messages have been received on the status bar.Sound: Set the ringtone to be rung when a message is received.Vibrate: Set the vibrator to be activated when a message is received.Delivery reportszWhen you send a message to mobile phones of other carriers, the notification for confirming that it has been received may not be sent to you.PC mailConfigure a mail account provided by a service provider to exchange mail.1 In the standby screen, z▶Mail ▶PC Mail2 Create newPC mail creation screen3 Select the recipient field4 Select recipient adding option▶enter a recipient▶czTo add recipient: [新規登録](enter new)▶select an recipient adding option▶enter a recipientzTo delete one recipient: highlight recipient▶z▶[Delete]▶[1件](1 recipient)▶[Yes]zTo delete selected recipients: z▶[Delete]▶[複数選択](several recipients)▶select recipients▶C▶[Yes]zTo change recipient type: highlight recipient▶C▶[Toへ変更] (change to To) / [Ccへ変更] (change to Cc) / [Bccへ変更](change to Bcc)5 Select the subject field▶enter a subject6 Select the message field▶enter a message7CzTo save as a draft: z▶[下書きを保存] (save draft)zTo discard mail being created: z▶[Discard]▶[Yes]40 Mail/Web browser](https://usermanual.wiki/Sharp/HRO00240.12-User-Manual-APYHRO00240-pdf/User-Guide-3109127-Page-22.png)
![Using Bluetooth functionzTo register/connect a Bluetooth device, the Bluetooth passkey may need to be entered. Before starting the registration, decide one- to sixteen-digit number.zEnter the same number on the handset and the other party s Bluetooth device.1 In the standby screen, z▶Settings ▶Bluetooth2 Bluetooth3 Select a Bluetooth device▶PairzThe confirmation screen for connection may be displayed.zEntering the Bluetooth passkey may be necessary depending on the other party s Bluetooth device. Also, some Bluetooth devices may start connection after completing registration.zTo display/hide the handset s information on other Bluetooth devices: [SH-01J]yThe handset s information is automatically hidden when the period of time set for Visibility timeout has passed.zTo search for Bluetooth devices: z▶[Refresh]zPress C of a paired Bluetooth device to change the name and the connection type of the other party s Bluetooth device.zYou can connect up to 7 Bluetooth devices at the same time. Bluetooth devices may not work properly or the number of Bluetooth devices which can be connected at the same time may differ depending on the profile.zIf you fail to connect a Bluetooth device, connection may become available after re-registering it.zWhen the Bluetooth function is set to [ON], the handset is set to receive registration requests/connection requests from other Bluetooth devices. Make the setting for displaying the handset sinformation on other Bluetooth devices in advance to allow the handset to be searched for by other Bluetooth devices.zWhile in connection stand-by, even if a connection request from a Bluetooth device is received, connection may not be made depending on the signal status etc.zFor details on the operations of the other party s Bluetooth device, refer to the manuals of the Bluetooth device to be used.When receiving registration request from Bluetooth device or connection request from unregistered Bluetooth device1 Registration request/Connection request from Bluetooth device2 In the standby screen, p▶select the stock icon ▶Pairing request ▶PairzWhen the confirmation screen about the settings on pairing appears, select [Pair].zEntering the Bluetooth passkey may be necessary depending on the other party s Bluetooth device.zThe confirmation screen for connection may be displayed.Unregistering Bluetooth device1 In the Bluetooth screen, point the cursor to the Bluetooth device to unregister▶C▶UnpairDisconnecting Bluetooth device1 In the Bluetooth screen, select the Bluetooth device to disconnect▶OKSubmenu operations on the Bluetooth screenzSet Bluetooth to [ON] beforehand.1 In the Bluetooth screen, z2 Select an itemSearch for devices :Search Bluetooth devices nearby.Rename phone: :Change the handset s name.Visibility timeout :Set how long the handset s information will be displayed on other Bluetooth devices.Handsfree setting: Set whether to always have voices output from the connected Bluetooth compatible hands-free device during a voice call.Show received files: Display the history of data received via Bluetooth connection.Sending/Receiving via Bluetooth communicationSending dataExample Still picture1 In the standby screen, z▶Album2 Select a still picture3z▶Send ▶BluetoothzSet the receiver s Bluetooth device to the reception stand-by status.4 Select a Bluetooth device to connect toReceiving data1 Data is sent from the sender's Bluetooth device2 In standby screen, p▶select the status bar▶select the incoming notification▶Accept3 In standby screen, p▶select the status bar▶select the receiving notification▶select the received datazNote that if you select [Delete and register] when receiving all data, all data registered to the target function are deleted.zReceiving all data may not be available depending on the data type.zWhen available space in the save destination becomes insufficient while receiving data, the data being received to that point are saved and receiving ends.75 Data communication](https://usermanual.wiki/Sharp/HRO00240.12-User-Manual-APYHRO00240-pdf/User-Guide-3109127-Page-23.png)
![Open source softwarezThis product includes software based on GNU General Public License (GPL), GNU Lesser General Public License (LGPL) and other licenses. For details on licenses of related software, in the standby screen, z▶[Settings]▶[Other settings]▶[Device info]▶[Legalinformation]▶[Open source licenses].zSource codes of software based on GPL, LGPL and Mozilla Public License (MPL) can be referred to on the following website for free. For details, refer to the following website.(https://sh-dev.sharp.co.jp/android/modules/oss/) (in Japanese only)Unlocking SIM lockzThe handset can unlock the SIM lock. Unlock the SIM lock to use non-DOCOMO SIM cards.zSome services, functions, etc. may be unavailable. DOCOMO shall not guarantee any operation of the handset.zFor details on unlocking SIM lock, refer to the DOCOMO website.1 Insert non-DOCOMO SIM card2 Turn the power on3 In the screen of unlocking PIN from the SIM network, enter an unlock code4 Unlock ▶t94 Appendix/Index](https://usermanual.wiki/Sharp/HRO00240.12-User-Manual-APYHRO00240-pdf/User-Guide-3109127-Page-27.png)