Sharp HRO00254 Smart Phone User Manual
Sharp Corporation Smart Phone
UserManual.wiki
>
Sharp
>
HRO00254 User Manual
User Manual
Navigation menu
Upload a User Manual
Namespaces
Wiki Guide
HTML
PDF
Info
Views
User Manual
Discussion / Help
Navigation
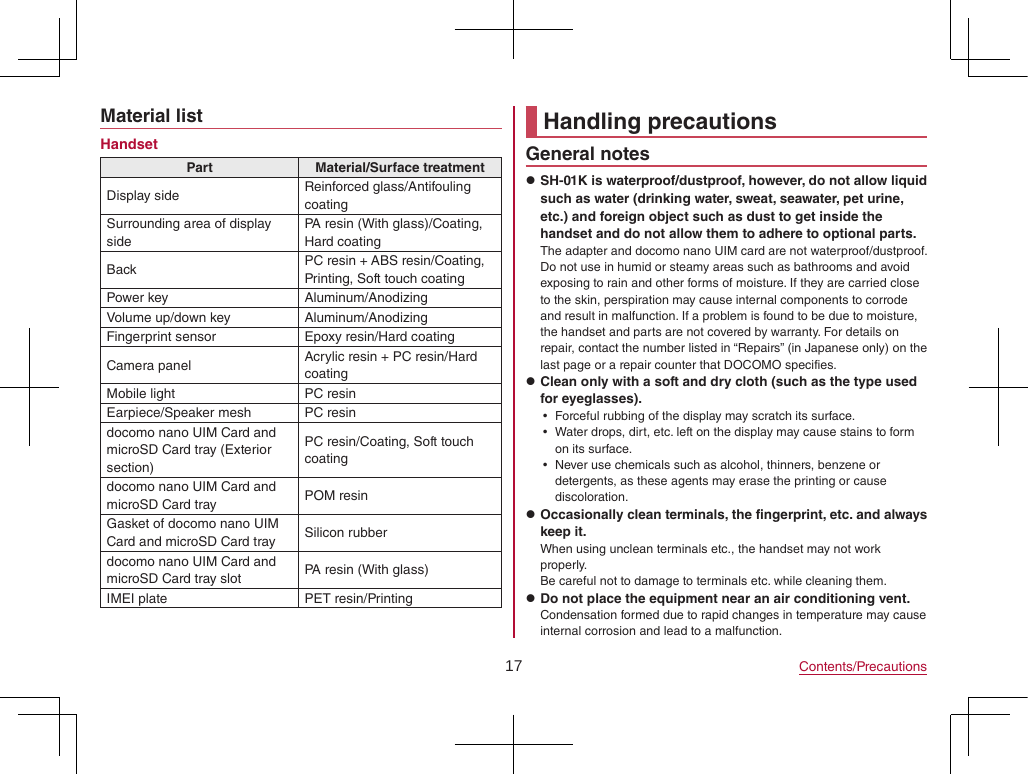
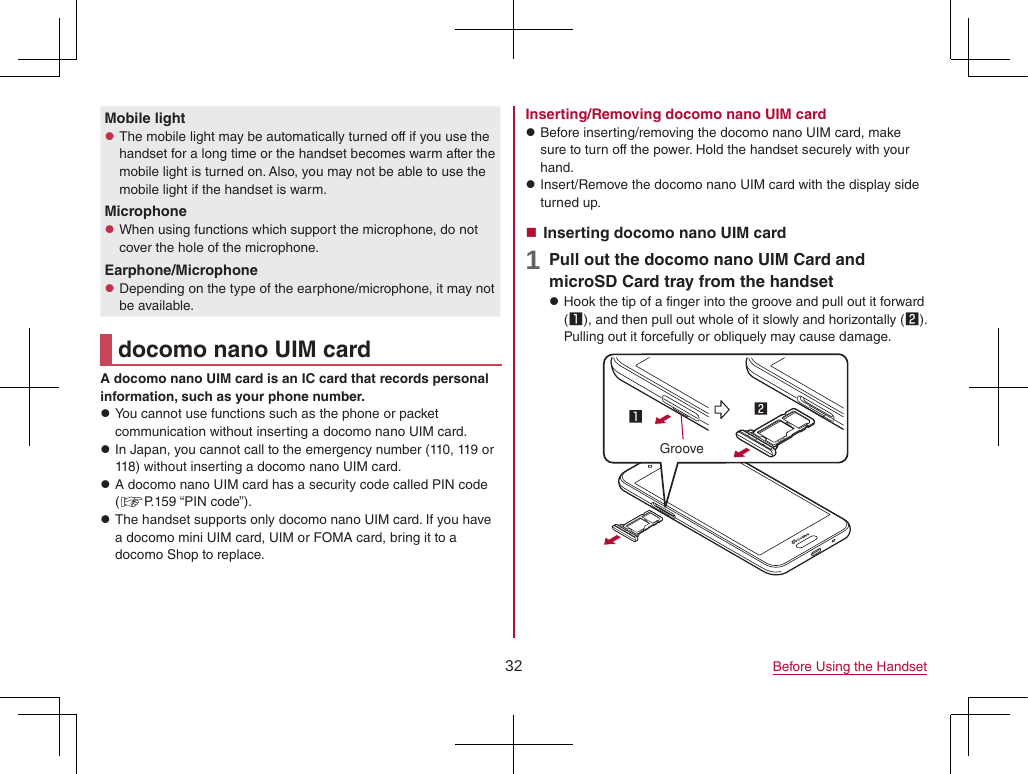
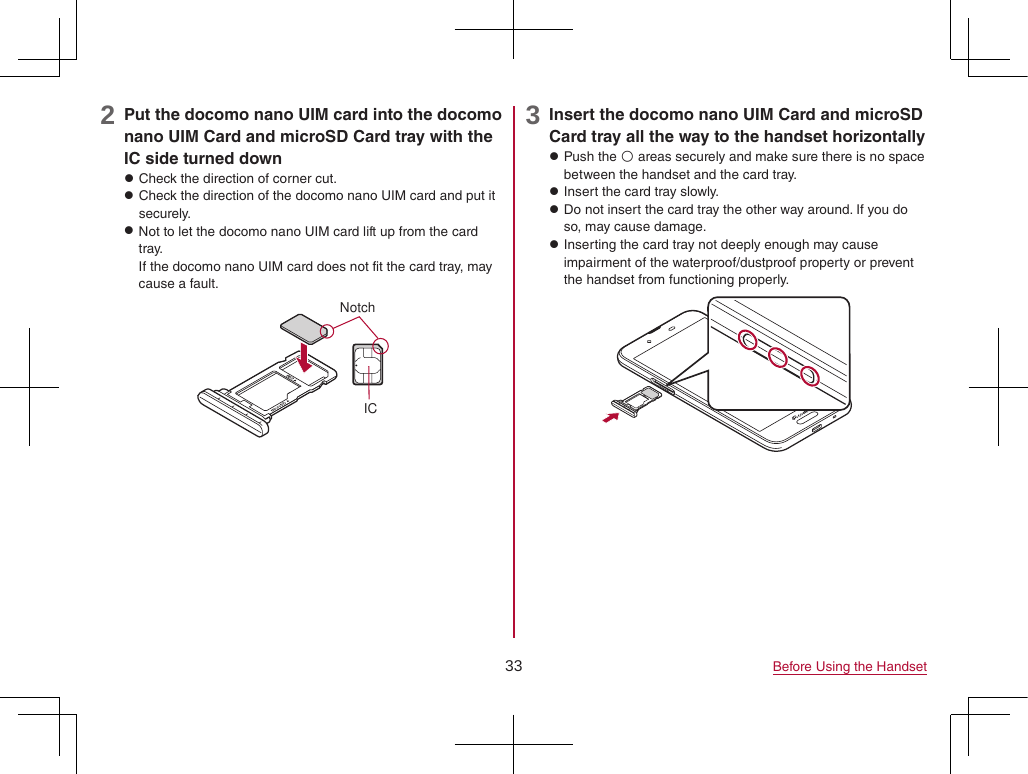
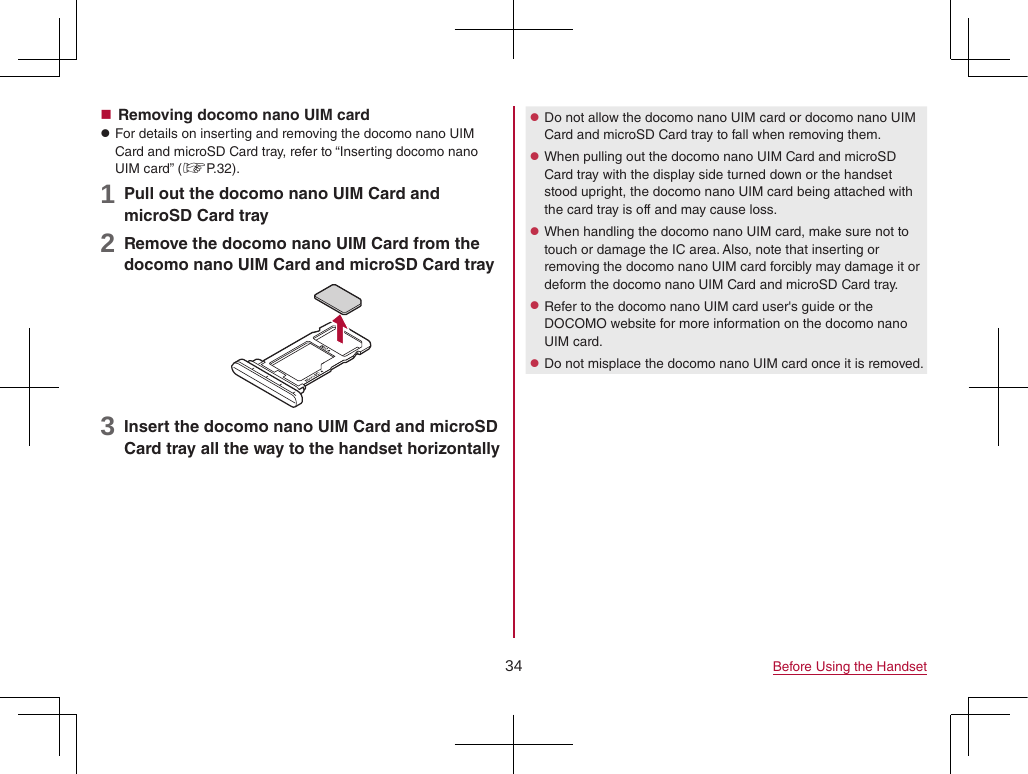
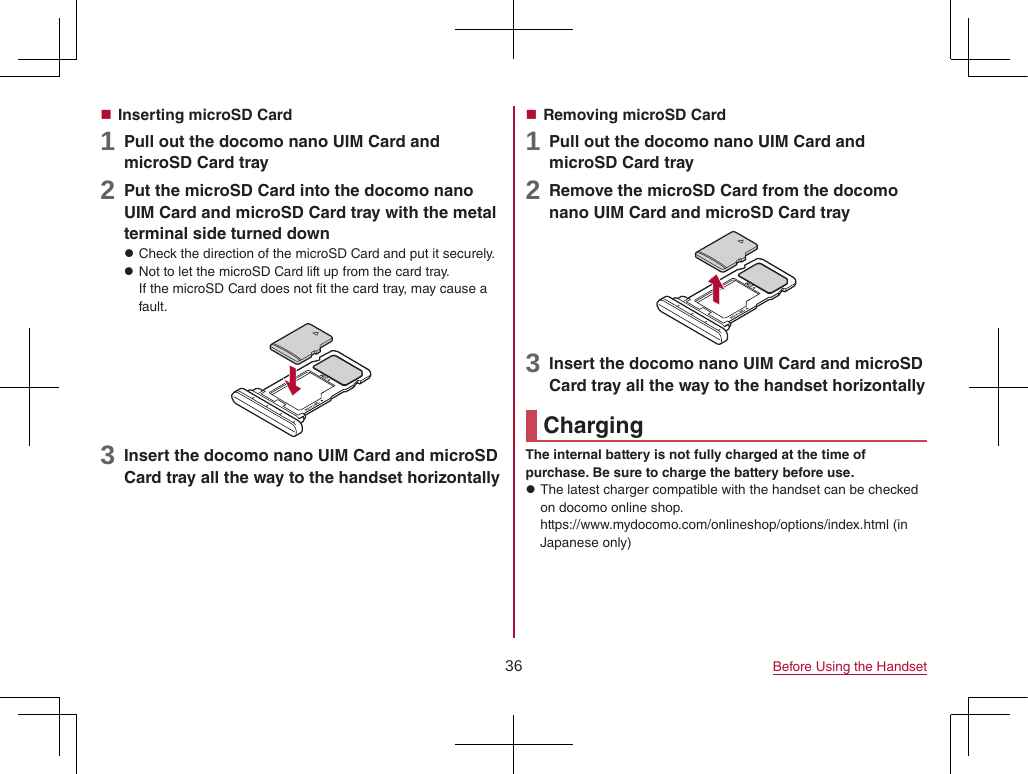
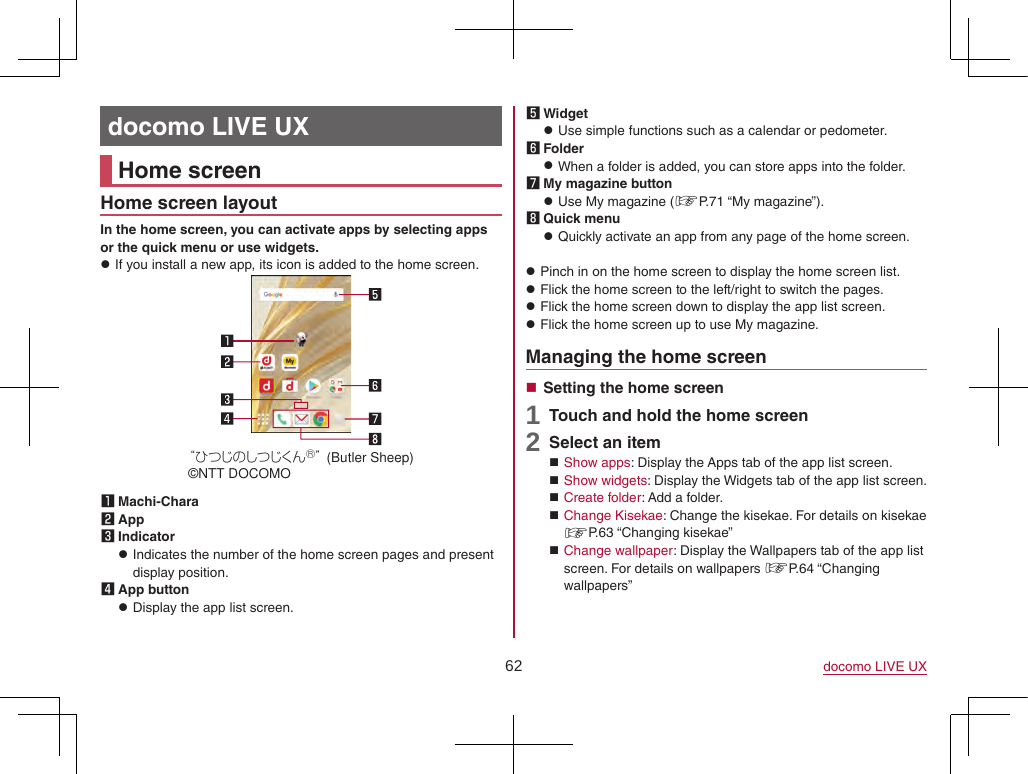
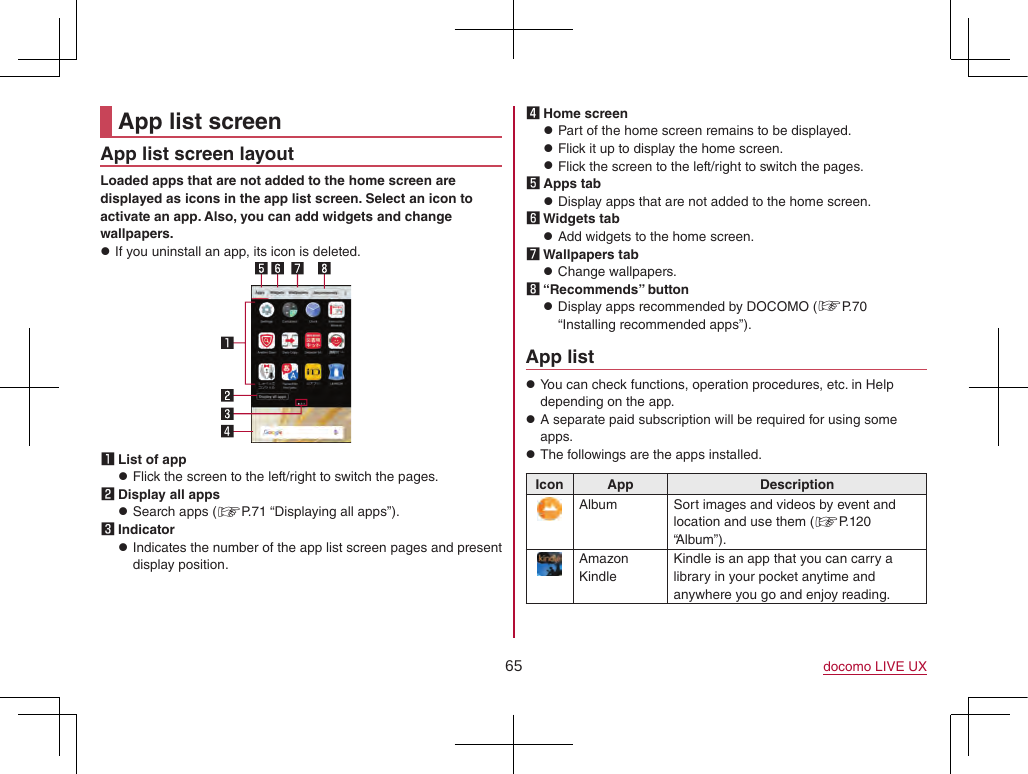
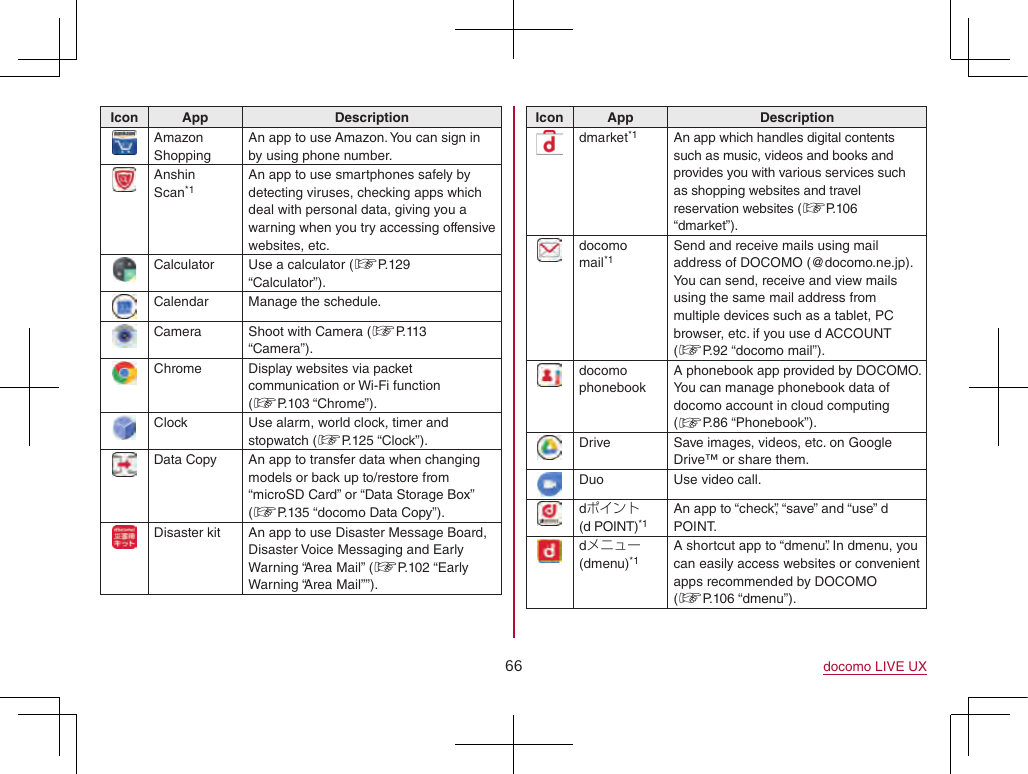
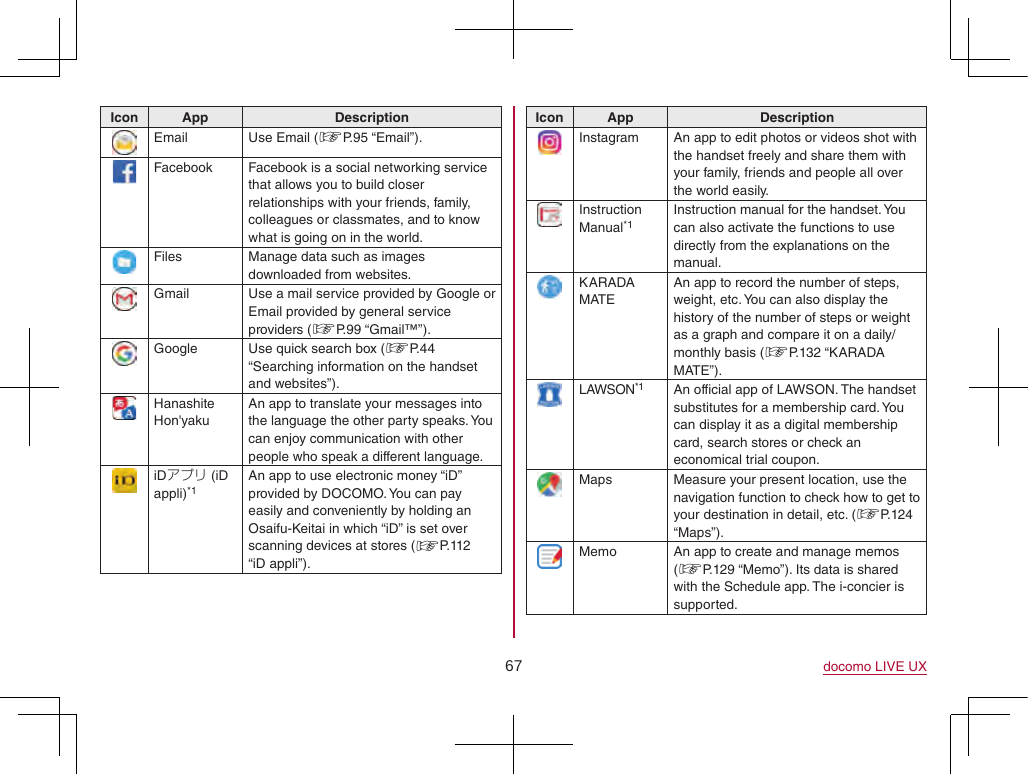
![IntroductionThank you for purchasing “SH-01K”.Be sure to read this manual before and during use to ensure proper operation.Checking operation methodQuick Start Guide (Basic package) (in Japanese only)This guide describes part names and functions.User's Manual (App of the handset) (in Japanese only)This manual describes detailed guidance and operations of functions.In the home screen, [ ]▶[Instruction Manual] ※When you use this app for the first time, you need to download it.User's Manual (in PDF format)This manual describes detailed guidance and operations of functions.Download from the DOCOMO website(https://www.nttdocomo.co.jp/english/support/trouble/manual/download/sh01k/index.html) ※The latest information can be downloaded. The URL and contents are subject to change without prior notice. zThe screens and illustrations in this manual are shown as examples. The actual screens and illustrations may differ. zThe explanations in this manual are based on the case when the home app is docomo LIVE UX and the setting of kisekae is [Champagne Gold]. If you change the home app, operation procedures etc. may be different from the explanations of this manual. zNote that “SH-01K” is referred to as “handset” in this manual. zThis manual refers to microSD Card, microSDHC Card or microSDXC Card as “microSD Card” or “microSD”. zReproduction of this manual in part or in whole without prior permission is prohibited. zThe contents of this manual are subject to change without prior notice.](https://usermanual.wiki/Sharp/HRO00254/User-Guide-3703449-Page-2.png)

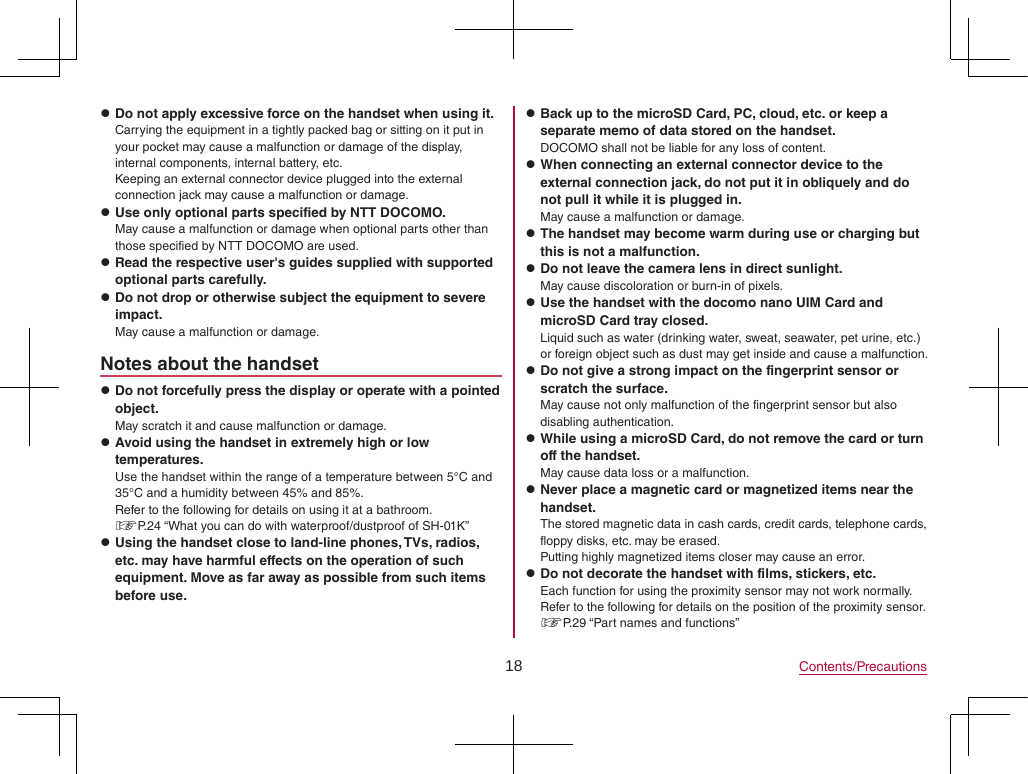
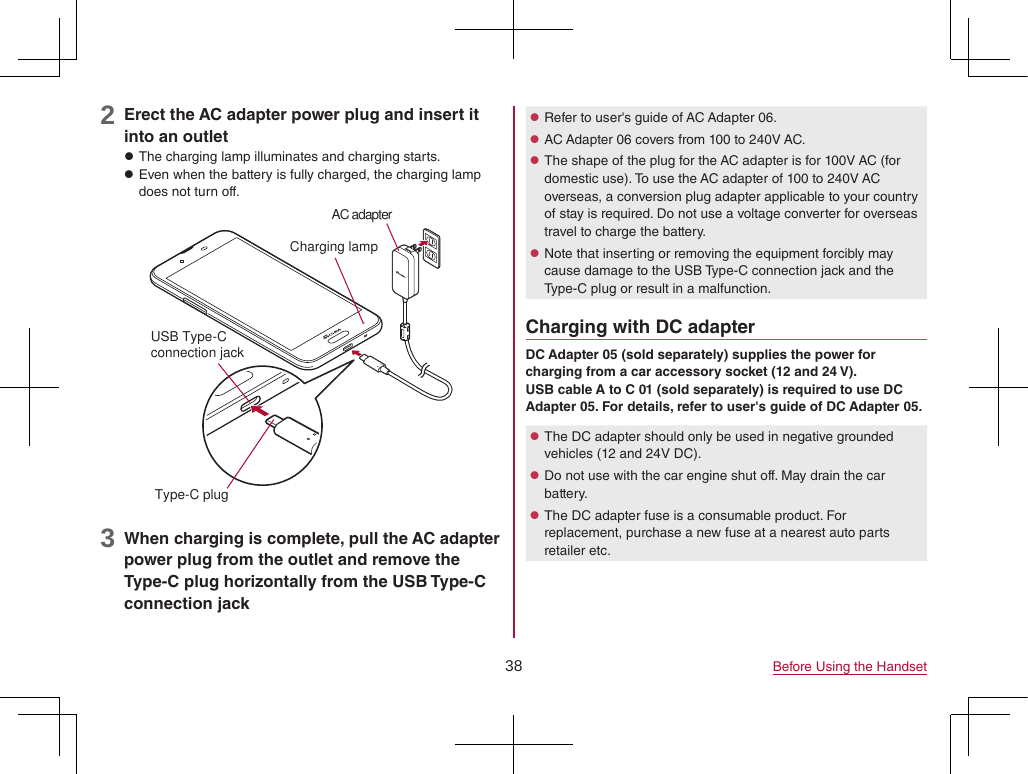
![5Contents/PrecautionsUsing the handset zThe handset supports LTE, W-CDMA, GSM/GPRS and wireless LAN systems. zBecause the handset relies on radio signals, it cannot be used in a place with no signal (such as tunnels, underground or in buildings), in places with a weak signal or outside the LTE service area or FOMA service area. You may not use the handset in the upper floors of a building even with no obstructions in sight. There may also be times when the signal is strong and [ ] (indicating signal status) is displayed, and you are not moving but the call is interrupted. zBecause the handset uses radio waves, it is possible for a third party to listen in on a conversation. However, since the LTE, W-CDMA and GSM/GPRS systems automatically apply a private call feature to every call, a third party that tries to listen in only hears noise. zThe handset converts conversations into a digital signal and sends it to the other party over the radio. If the signal cannot be reconverted properly by such as moving to an area with a weak signal, the voice may not be heard correctly. zTake notes of information (e.g. the phonebook, calendar, note, voice memo, answering memo) stored on the handset or save the information to external memory devices such as microSD Cards and PCs periodically. DOCOMO shall not be liable for any loss of content due to a failure, repair, model change or other handling of the handset. zAs with PCs, some user-installed apps, -accessed websites, etc. may disrupt the stability of your handset performance or unexpectedly transmit information via the Internet causing improper use of your location information, personal information stored on the handset, etc. Therefore, verify the supplier and operating conditions of the apps, websites, etc. to be used before using them. zThe handset supports the FOMA Plus-Area and the FOMA HIGH-SPEED Area. zWhen the available space on the microSD Card or the handset is insufficient, apps in use may not work properly. In this case, delete saved data. zThe handset does not support providers other than sp-mode, mopera U and Business mopera Internet. zThe handset supports only docomo nano UIM card. If you have a docomo mini UIM card, UIM or FOMA card, bring it to a docomo Shop to replace. zThe handset does not support Public Mode (Drive Mode). zThe handset automatically performs communication for some functions, for example, to synchronize data, check the latest software version or maintain connection with the server. Also, making a communication with large-volume data such as downloading apps or watching videos will lead to higher packet communication charges. Subscription to Packet Pack/flat-rate packet communication services is highly recommended. zEven while the Wi-Fi connection is set, packet communication charges may be incurred depending on the app and service you use. zSoftware on the handset can be updated to up-to-date status (☞P. 198 “Software update”).](https://usermanual.wiki/Sharp/HRO00254/User-Guide-3703449-Page-7.png)
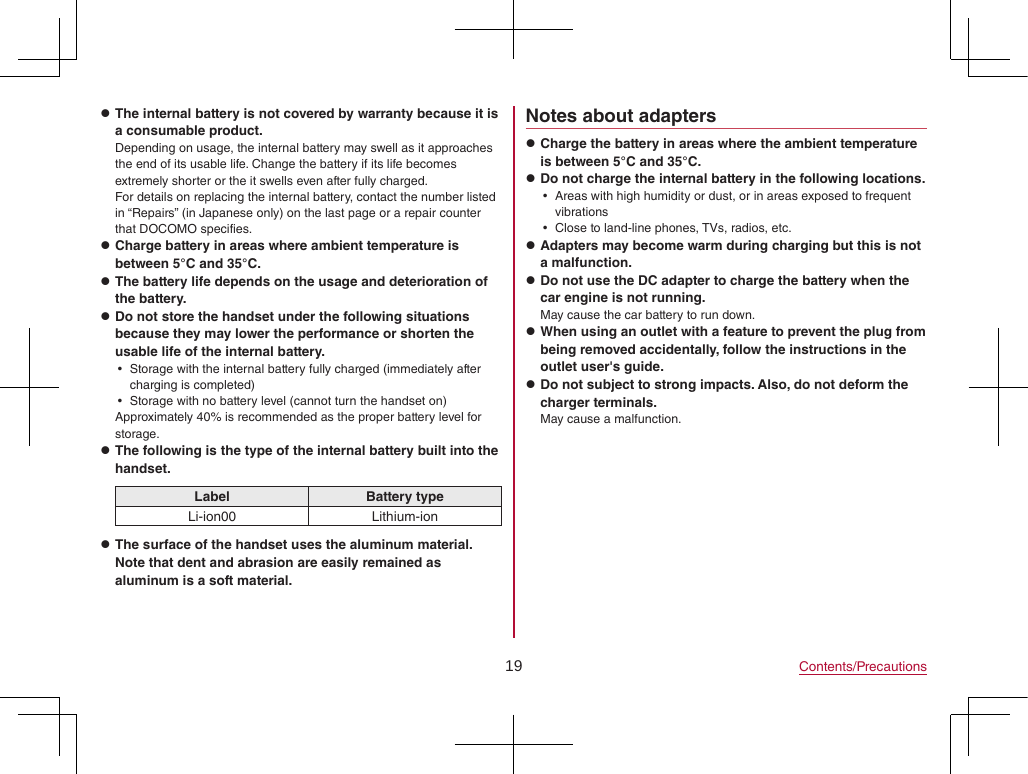
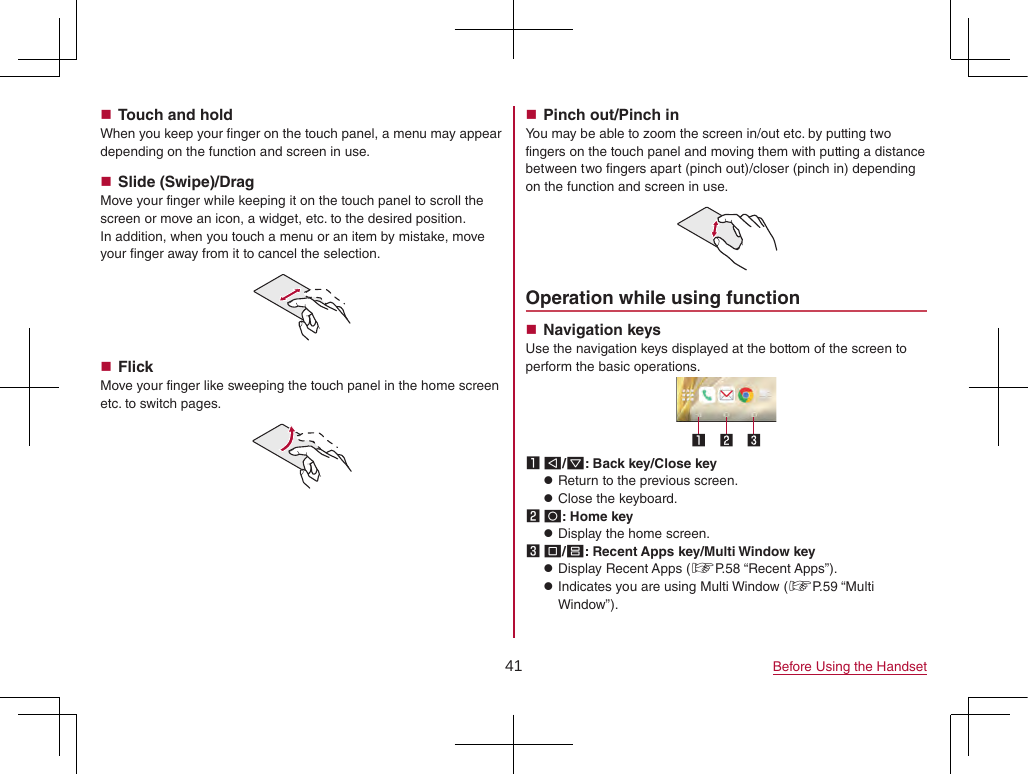
![20 Contents/PrecautionsNotes about docomo nano UIM card zDo not apply unnecessary force when inserting/removing the docomo nano UIM card. zCustomer is responsible for malfunctions arising from inserting docomo nano UIM card into a different IC card reader/writer etc. zOccasionally clean IC area and always keep it.When using the docomo nano UIM card while IC area is not clean, it may not work properly. zClean only with a soft and dry cloth (such as the type used for eyeglasses). zBack up to the microSD Card, PC, cloud, etc. or keep a separate memo of data stored on the docomo nano UIM card.DOCOMO shall not be liable for any loss of content. zTo protect the environment, please take any unneeded docomo nano UIM cards to a sales outlet such as a docomo Shop. zDo not damage, touch haphazardly or short-circuit the IC.May cause data loss or a malfunction. zDo not drop or otherwise subject the docomo nano UIM card to severe impact.May cause a malfunction. zNever bend the docomo nano UIM card or place heavy objects on it.May cause a malfunction. zDo not insert the docomo nano UIM card to the handset with a label, sticker, etc. attached on the card.May cause a malfunction.Notes on using Bluetooth function The handset supports the security function that meets the Bluetooth specification for security during communication using Bluetooth functions. However, the security may not be sufficient depending on the configuration etc. Take care of the security while making communication using Bluetooth function. Even if any leak of data or information occurs while making communication using Bluetooth function, DOCOMO shall not be liable for any loss of content. zRadio frequenciesIn the home screen, [ ]▶[Settings]▶[About phone]▶[Authentication] to confirm the radio frequencies the Bluetooth function of the handset uses. The followings are the descriptions:① ② ③ ④ ⑤⑥① 2.4: This radio equipment uses the 2,400 MHz band.② FH: The modulation system is the FH-SS system.③ 1: The estimated coverage distance is 10 m or less.④ XX: Another modulation system is used.⑤ 4: The estimated coverage distance is 40 m or less.⑥ : All radio frequencies between 2,400 MHz and 2,483.5 MHz are used and the frequencies for mobile object identifiers cannot be avoided.](https://usermanual.wiki/Sharp/HRO00254/User-Guide-3703449-Page-22.png)
![21 Contents/Precautions zCautions on using Bluetooth devicesBluetooth operates at radio frequencies assigned to the in-house radio stations for a mobile object identifier that have to be licensed and are used in production lines of a factory, specific unlicensed low power radio stations, and amateur radio stations (hereafter, referred to as “another radio station”) in addition to industrial, scientific and medical devices or home electric appliances such as microwave ovens.1. Before using the handset, make sure that “another radio station” is not operating nearby.2. If radio interference between the handset and “another radio station” occurs, avoid interference by moving immediately to another place or “turning off the power”.3. Contact the number listed in “General Inquiries” on the last page for further details.Notes about wireless LAN (WLAN) Wireless LAN (WLAN) uses radio waves to communicate information. Therefore, it has an advantage of freely connecting to the LAN within the service area. On the other hand, if security setting is not set, it is possible for a malicious third party to intercept the communication contents or hack. It is recommended to set security setting at your own risk and judgement. zWireless LANDo not use wireless LAN near magnetic devices such as electric appliances or AV/OA devices or in radio waves. yMagnetism or radio waves may increase noises or disable communications (especially when using a microwave oven). yWhen used near TV, radio, etc., reception interference may occur or channels on the TV screen may be disturbed. yIf there are multiple wireless LAN access points nearby and the same channel is used, search may not work correctly. zRadio frequenciesIn the home screen, [ ]▶[Settings]▶[About phone]▶[Authentication] to confirm the radio frequencies the wireless LAN of the handset uses. The followings are the descriptions:① ② ③ ④⑤① 2.4: This radio equipment uses the 2,400 MHz band.② DS: The modulation system is the DS-SS system.③ OF: The modulation system is the OFDM system.④ 4: The estimated coverage distance is 40 m or less.⑤ : All radio frequencies between 2,400 MHz and 2,483.5 MHz are used and the frequencies for mobile object identifiers can be avoided.Available channels for the handset's wireless LAN are between 1 and 13. Note that other channel access points cannot be connected.Available channels may vary depending on the country.For use in an aircraft, contact the airline beforehand.](https://usermanual.wiki/Sharp/HRO00254/User-Guide-3703449-Page-23.png)
![22 Contents/Precautions zCautions on using 2.4 GHz devicesWLAN-installed devices operate at radio frequencies assigned to the in-house radio stations for a mobile object identifier (radio stations requiring a license) used in production lines of a factory, specific low power radio stations (radio stations requiring no license), and amateur radio stations (radio stations requiring a license) in addition to industrial, scientific and medical devices or home electric appliances such as microwave ovens.1. Before using this device, make sure that the in-house radio stations for a mobile object identifier, specific low power radio stations and amateur radio stations are not operating nearby.2. If the device causes harmful radio interference to the in-house radio stations for a mobile object identifier, immediately change the radio frequency or stop use, and contact the number listed in “General Inquiries” on the last page for crosstalk avoidance, etc. (e.g. partition setup).3. If the device causes radio interference to specific low power radio stations for a mobile object identifier or amateur radio stations, contact the number listed in “General Inquiries” on the last page for further details.Voluntary control for radio wave interference zThis product satisfies technical requirements based on VCCI Rules for Voluntary Control Measures and its satisfied mark is displayed on the electronic nameplate of the product.You can see the electronic nameplate by operating the product as follows.In the home screen, [ ]▶[Settings]▶[About phone]▶[Authentication]FeliCa and NFC reader/writer zThe FeliCa, NFC reader/writer and P2P function of the handset use weak radio waves whose handling does not require a license of radio station. zThe frequency in use is the 13.56 MHz band. When another FeliCa, NFC reader/writer or P2P function is being used nearby, keep enough distance from it. Make sure that there is no radio station using the same frequency band in the nearby area. zFor use in an aircraft, contact the airline beforehand. Use of the function may be restricted in some countries. Check conditions such as regulations of the country/region to use the function.](https://usermanual.wiki/Sharp/HRO00254/User-Guide-3703449-Page-24.png)
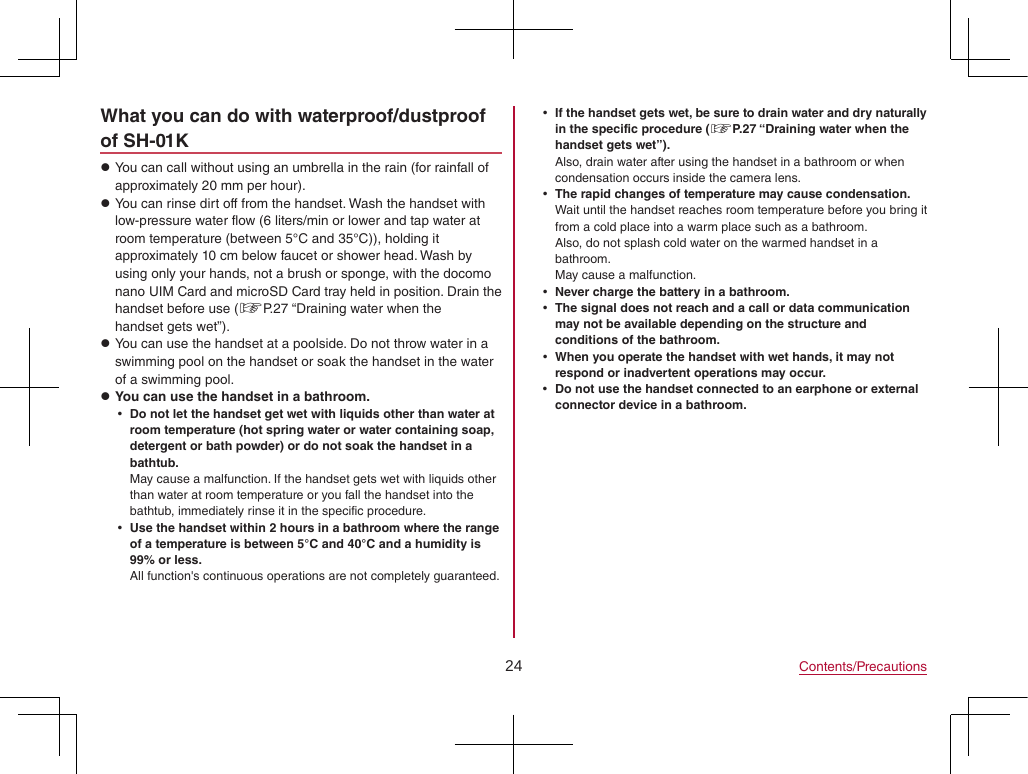
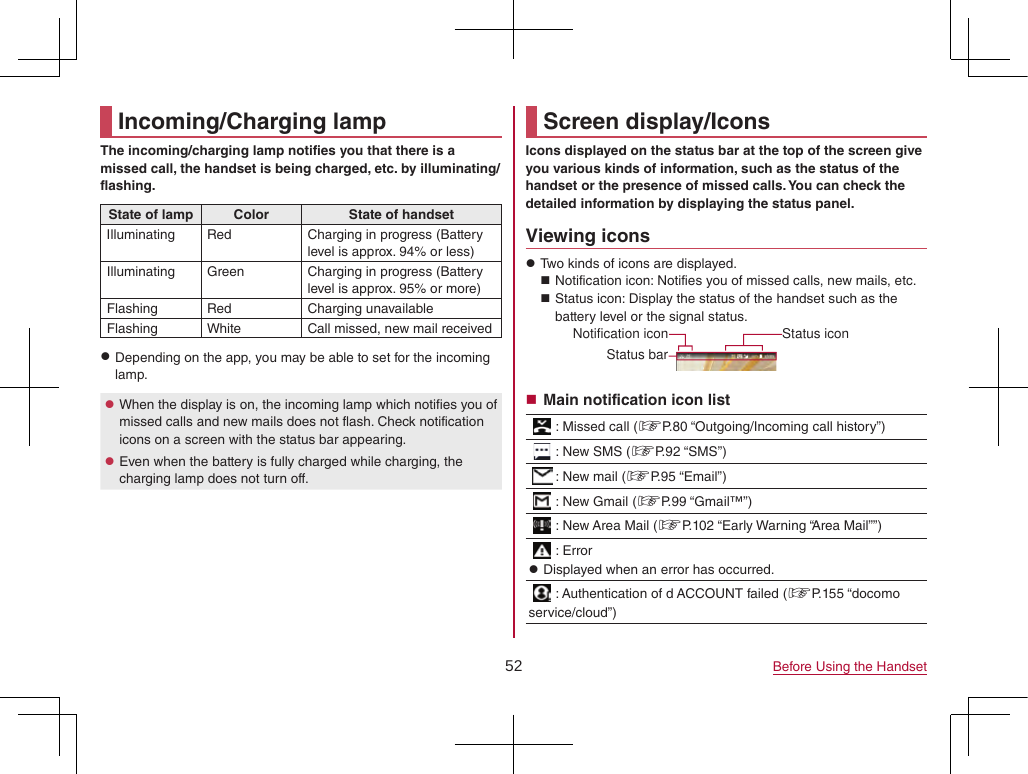
![23 Contents/PrecautionsCaution zNever use the handset that is modified. Using a modified device violates the Radio Law and/or the Telecommunications Business Law.The handset follows the regulations regarding the certification of conformity with technical regulations for specific radio stations etc. based on the Radio Law and authentication of conformity with technical regulations for devices etc. based on the Telecommunications Business Law, and the “Technical Conformity Mark ” can be displayed on the electronic nameplate of the handset as a proof. You can see it by operating as follows.In the home screen, [ ]▶[Settings]▶[About phone]▶[Authentication]If the screws of the handset are removed and a modification is given to the inside, the certification of conformity with technical regulations etc. will become invalid. Never use the handset without the valid certification etc. Doing so violates the Radio Law and/or the Telecommunications Business Law. zBe careful when using the handset while driving a motor vehicle.Using the handset in hand while driving is regarded as a punishable act.However, the punishment has no application in some cases such as when rescuing sick and injured people or maintaining public safety. zThe FeliCa and NFC reader/writer function of the handset conform to the domestic radio wave standards. When you use it overseas, check conditions such as regulations of the country/region in advance. zNever change the basic software improperly.This may be regarded as a conversion of software and repairs may be refused.Waterproof/DustproofSH-01K is waterproof to IPX5*1 and IPX8*2 standards, and dustproof to IP6X*3 standard if the docomo nano UIM Card and microSD Card tray is securely closed.*1 IPX5 means that phone keeps functioning after being subjected to a jet flow (12.5 liters/min) discharged from a nozzle (inner diameter: 6.3 mm), from all directions (approximately 3 m from the handset) for 3 minutes or more.*2 IPX8 means that SH-01K phone keeps functioning after it is slowly submerged to depth of 1.5 m in static tap water at room temperature, left there for approximately 30 minutes and then taken out.*3 IP6X means the level of dust protection. Phone has the ability to prevent dust from entering inside after it is left in the device containing dust (diameter: 75 µm or smaller) for 8 hours, agitated and then taken out.](https://usermanual.wiki/Sharp/HRO00254/User-Guide-3703449-Page-25.png)


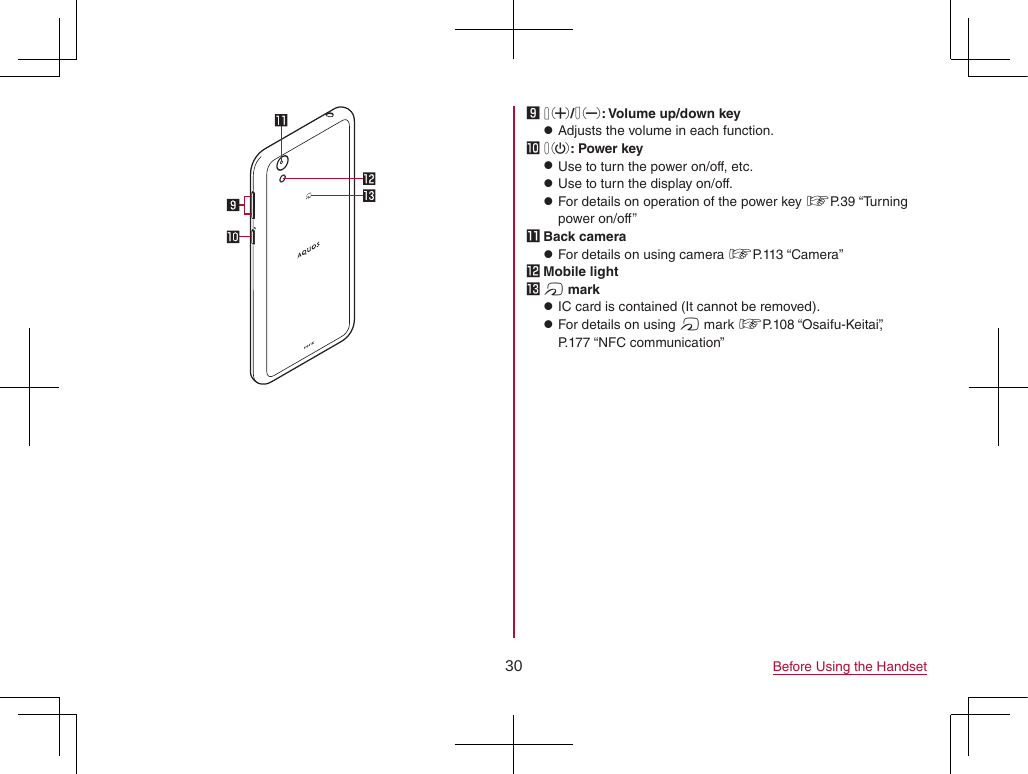
![31 Before Using the Handsete Mouthpiece/Microphone zUse as a microphone when recording videos or talking to EMOPA.f USB Type-C connection jack zFor details on connection to an external device ☞P. 36 “Charging”, P. 179 “PC connection”, P. 180 “USB host function”g LTE/FOMA antenna*h Wi-Fi/Bluetooth antenna*i GPS antenna* * The antenna of back is built into the main body. Covering the antenna area with your hand may influence the communication quality. zThe back cover cannot be removed. Removing it forcibly may cause damage or malfunction. zThe battery is built into the handset and you cannot replace it by yourself.IMEI plate zA plate with the sticker which the IMEI number (International Mobile Equipment Identifier), CE mark, etc. are printed is stowed near the docomo nano UIM Card and microSD Card tray slot. The IMEI number is required when requesting servicing or repairs. Do not pull out the plate or remove the sticker. For details on precautions about handling the IMEI plate (model nameplate), refer to “After-Sales Services” (☞P. 196). zNote that pulling out the IMEI plate forcibly or adding forces on it may damage to the plate. zIf you accidentally pull out the IMEI plate, slowly return the IMEI plate while taking care not to insert it too deep.Earpiece/Speaker zThis handset combines the earpiece and speaker. When you convert to a hands-free talking, end a call, etc., sound gradually increases to the set volume to prevent a loud sound from the speaker at your ear. zWhen you use [Answer] function of Suguden, the handset detects that your ear is closing to the speaker from which the ringtone is ringing and the ringtone volume is changed to proper volume. However, the loud volume may be sounded about your ear such as when not detecting that your ear is closing, so set the ringtone volume properly and use.](https://usermanual.wiki/Sharp/HRO00254/User-Guide-3703449-Page-33.png)
![37 Before Using the Handset Cautions while charging zFor details on the estimated charge time and battery life when fully charged ☞P. 200 “Main specifications” zThe battery can also be charged with the handset turned on (While charging, the battery icon appears with [ ] superimposed). zDo not charge for a long time with the power left turned on. If the handset is left turned on after charging is complete, the internal battery charge level decreases. In this case, an AC or DC adapter (sold separately) charges the battery again. However, depending on the time when the handset is disconnected from the AC or DC adapter, the battery charge level may be low or the battery may only be usable for a short time. zIf the handset is left for a long time even after the charging is completed, the battery level may decrease. zWhen the battery is empty and the handset is being charged, the charging lamp may not illuminate immediately. However, charging is in progress. zIf the battery empty alert is displayed and the power cannot be turned on, charge the battery for a while. zWhile charging, the handset may not be turned on even when the charging lamp is illuminated in red. Charge longer and try turning the power on again. zFrequently recharging the battery when its power is still remaining enough may shorten the usable life of the internal battery. It is recommended to use the battery to a certain level (e.g. after the battery level decreases) before recharging. zWhen the battery becomes warm, charging may automatically stop even if the battery has not been fully charged. Charging automatically resumes after the temperature lowers to an appropriate temperature. Internal battery usable life zInternal battery is a consumable product. Battery life per charge is gradually reduced every time the battery is charged. zWhen battery life per charge is reduced to approximately half of the default time, this means that the internal battery is approaching the end of its usable life. In this case, it is recommended to replace the battery as soon as possible. For details on replacing the internal battery, contact the number listed in “Repairs” (in Japanese only) on the last page or a repair counter that DOCOMO specifies. zIf you watch video etc. while charging for a long time, the usable life of the internal battery may become shorter than estimated.Charging with AC adapterWhen charging the battery with AC Adapter 06 (sold separately), operate the following steps.1 Insert the Type-C plug of the AC adapter horizontally into the USB Type-C connection jack on the handset](https://usermanual.wiki/Sharp/HRO00254/User-Guide-3703449-Page-39.png)
![39 Before Using the HandsetCharging with USB cableYou can charge the handset by connecting the handset to a PC with USB cable A to C 01 (sold separately) etc. zFor details on connecting to a PC ☞P. 179 “PC connection”Turning power on/off Turning power on1 0 (for at least 3 seconds) zWhen you turn the power on for the first time, make the initial settings (☞P. 51 “Initial settings”). Turning power off/Reboot/Emergency mode1 0 (for at least 2 seconds)2 Select an item Power off: Turn off the handset. Restart: Reboot the handset. Emergency mode: For details ☞P. 43 “Emergency mode” Turning display on/offThe display is turned off when 0 is pressed or the handset is not in use for a set length of time.Press 0 while the display is turned off to turn it on. Touch panel lockWhen the power or the display is turned on, the touch panel is locked.Touch [ ] to unlock. zAn image for the lock screen of the touch panel is automatically switched every time the display is turned on. If you set [Lock Photo Shuffle] to OFF, it is not automatically switched (☞P. 140 “Display”).Operations in touch panel lock screen zTo activate Camera: [ ] zTo activate しゃべってコンシェル (Shabette-Concier): [ ] zTo activate Clock: Touch the clock zTo display the detailed information on notifications: Drag the clock down zTo display the status panel: Drag the status bar down](https://usermanual.wiki/Sharp/HRO00254/User-Guide-3703449-Page-41.png)
![40 Before Using the Handset zThe notifications are displayed in the lock screen of the touch panel. For details on displaying of notifications ☞P. 139 “On the lock screen” zIf you set EMOPA to ON, various information delivered by EMOPA is displayed under the clock. Depending on the information, you can check the related information or details by touching it twice. Also, when [エモパーメモ] (EMOPA memo) is ON, you can use EMOPA memo in the lock screen of the touch panel. yWhen EMOPA is set to ON, Clock is not activated even if you touch the clock. yFor details on EMOPA ☞P. 129 “EMOPA”Basic operationThe followings describe basic operations of the handset such as operations of the touch panel and navigation keys, and operations for shooting screenshot.Operation of touch panelThe followings describe the operations to use the display (touch panel). zOperations may differ depending on the function and screen in use.Cautions when using the touch panel zThe touch panel is designed to be lightly touched with your finger. Do not forcefully press with your finger or a pointed object (fingernail, ballpoint pen, pin, etc.). zIn the following cases, the touch panel may not work even if you touch it. May cause a malfunction. Operation with a gloved finger Operation with the tip of a fingernail Operation with foreign object placed on the operation pad Operation on the touch panel on which a protective sheet, sticker, etc. is put Operation while the touch panel is wet Operation with fingers wet with sweat, water, etc. Operation under water zOperations may be interrupted if you touch an area other than a confirmation screen or the status bar while the confirmation screen etc. is displayed. TouchTouch a key or an item displayed on the screen and then release your finger from it to select or set it.](https://usermanual.wiki/Sharp/HRO00254/User-Guide-3703449-Page-42.png)
![42 Before Using the Handset Using user-aid functionYou can quickly activate an app supporting the user-aid function.1 Touch and hold [B] zTo set an activating app: In the home screen, [ ]▶[Settings]▶[Apps]▶[]▶[Assist & voice input]▶[Assist app]▶select an app Retrieving menuWhen you touch the menu key such as [ ]/[ ]/[ ], slide the left edge of the screen to the right or touch and hold the screen, functions (menus) available in that screen appear.Example: App list screenAvailable functionsMenu key Switching the settingsWhen a check box etc. is displayed beside the setting item, you can set it enabled/disabled or ON/OFF by touching it.Example: Call settings screen, Cellular network settings screen z[ ]: Enabled, [ ]: Disabled z[ ]: ON, [ ]: OFF](https://usermanual.wiki/Sharp/HRO00254/User-Guide-3703449-Page-44.png)
![43 Before Using the Handset Vertical/Horizontal displayThe screen display is automatically switched vertically or horizontally according to a tilt of the handset. zVertical/Horizontal display may not be switched even if the handset is turned depending on the screen being displayed. zVertical/Horizontal display is not switched if the handset is turned while it is positioned parallel to the ground. zThe screen display may not be switched properly when a sound or a vibration is being activated. zVertical/Horizontal display may not be switched properly right after the display or power is turned on. zYou can set the display not to automatically switch (☞P. 140 “Display”). It can also be set from the status panel (☞P. 55 “Using the status panel”). zScreens may be displayed in the full screen depending on the app when you switch from vertical display to horizontal display.Shooting screenshotHold 0 + 2 down for at least 1 second to shoot the screen being displayed as an image. zShot images are saved on the handset memory and you can check them by using Album etc. zAlternatively, you can shoot the screenshot by using Clip Now (☞P. 144 “Clip Now”). zData cannot be saved while displaying e-books etc. zData may not be saved completely or partially depending on the app.Emergency modeYou can save the internal battery by restricting settings and functions on the handset.1 0 (for at least 2 seconds)▶[Emergency mode]▶[OK] zThe handset restarts and it switches to Emergency mode. Disabling Emergency mode1 0 (for at least 2 seconds)▶[Emergency mode]▶[OK] zAlternatively, in the Emergency mode screen, [Stop saving]▶[OK] to disable Emergency mode. zThe handset restarts and Emergency mode is disabled.](https://usermanual.wiki/Sharp/HRO00254/User-Guide-3703449-Page-45.png)
![44 Before Using the HandsetSearching information on the handset and websites1 In the home screen, select “Google” folder▶[Google] zIf the confirmation screen is displayed, check the content, follow the instructions on the screen and operate. zQuick search box appears.2 Enter the keyword1 Search box zEnter the keyword to search with. zWhen the keyword is entered, apps, data, etc. whose names start with the entered characters are searched and displayed as a list.2 Switch to Voice Search zAlternatively, say “OK Google” at the microphone to switch to Voice Search.3 Select the search result zWhen a search result is an app, the corresponding app is activated. zIf [IMAGES] etc. is displayed, you can search by selecting a genre. zWhen you cannot see search results hidden behind the keyboard, touch [@] to close the keyboard. zWhen [ ] is displayed in the search results screen etc., touch [] to set the search.Character entryYou can enter characters using the QWERTY keyboard, 12 keyboard, voices and kuten codes. zWhen entering characters, touch [ ] at the bottom of the screen to set the input software to use. The explanations are based on the case when [S-Shoin] is set here.Keyboard layouts zYou can use the following two types of the keyboards.QWERTY keyboardYou can enter a displayed character by touching the character entry key. Use romaji for entry.12 keyboard Several characters are assigned to one character entry key. Enter characters by flicking a character entry key up/down or to the left/right. zYou can enter characters by touching a character entry key until a character which you want to enter is displayed.](https://usermanual.wiki/Sharp/HRO00254/User-Guide-3703449-Page-46.png)
![45 Before Using the HandsetQWERTY keyboard12 keyboard ※Each key may change depending on the settings and the condition.1 Shift key zTouch to switch between upper/lower case characters etc. yWhen [ ] is displayed, lower case characters are entered. When [ ] is displayed, the first character to be entered becomes upper case one. When [ ] is displayed, upper case characters are entered. ySymbols that can be entered using the keyboard change when you switch the upper/lower case characters.2 Input mode switching key zSwitch input modes. yTouch to switch input modes in the order of Half Numeric b Hiragana/Kanji b Half Alphabet. Slide to the right to switch input modes in the order of Hiragana/Kanji b Half Numeric b Half Alphabet. ySlide up to select an input mode from the list. Hiragana/Kanji Half Alphabet Half Numeric Full Alphabet Full Numeric Character Code yThe keyboard set in each input mode is displayed.3 Voice input key zVoice input is activated.4 Keyboard switching key zSwitch QWERTY keyboard/12 keyboard.5 Delete key zDelete characters displayed in a direction set in Delete key behavior.6 Enter key zInsert a line feed. zDetermine the entered characters. zExecute operations entered in an entry field such as the search box. zMove to the next entry field. zTouch and hold to close the keyboard.](https://usermanual.wiki/Sharp/HRO00254/User-Guide-3703449-Page-47.png)
![46 Before Using the Handset7 Symbol key zDisplay the pictogram/Deco-mail pictogram/symbol/emoticon list. yYou cannot enter these symbols in some apps. zSlide to the right to display Quote apps list.8 Setting key zDisplay setting menu.9 Space key zEnter a space.a Cursor key zMove the cursor or change the range of characters to be converted.b Alignment key zAlign the 12 keyboard to the left/right. yTouch [ ]/[ ] to move the keyboard, conversion candidates field, etc. to the left/right.c Character switching key zTouch to switch the upper/lower case characters. zTouch to add dakuten/handakuten.Setting character entry Display/ Keyboard1 In the character entry screen, [ ]▶[Display/ Keyboard]2 Select an item Batch change simple keyboard: Set whether to use the keyboard with easier to see design. Advanced settings: Make settings for the keyboard size, alignment, the number of lines of the conversion candidates field, the key top guides and design. Emoji/Symbol list rows: Set the number of columns of pictograms list/symbols list. Key input guide: Set whether to zoom in the selected key and to display the guide of flick input. Keyboard switching button: Set whether to display the switching button for the keyboard size and input UI. Software keyboard display setting: Set whether to display the character entry screen when you connect a commercially available keyboard using the Bluetooth function etc. and enter characters.](https://usermanual.wiki/Sharp/HRO00254/User-Guide-3703449-Page-48.png)
![47 Before Using the Handset Input assistance1 In the character entry screen, [ ]▶[Input assistance]2 Select an item Flick sensitivity: Set the sensitivity of the keyboard for when selecting characters with flick input. Guide display speed: Set how fast the guide is displayed while entering characters with flick input. Toggle input: Set whether to use the toggle input. Sound on key press: Set whether or not to enable operation sounds of entering characters. Vibrate on key press: Set whether to activate the vibrator when entering characters. Vibration time on key press: Set how long Vibrate on key press keeps the vibrator activated. Voice input provider: Set where to connect when using the voice input. Delete key behavior: Set the operations of the delete key. Romaji input assistance: Set to prevent unnecessary keys from being touched when entering Japanese with romaji. Auto cursor move: Set the speed for the cursor to automatically move to the right side after entering characters. Emoji/Symb/:) continuous input: Set whether to keep the pictogram/symbol/emoticon list displayed after selecting a candidate from it.[Delete key behavior] zWhen the cursor is on a character, delete the character. When [Left-delete (Backspace)] is set and the cursor is at the beginning of a text, you can delete characters on the right side of the cursor. When [Right-delete (Clear)] is set and the cursor is at the end of a text, you can delete characters on the left side of the cursor. Conversion1 In the character entry screen, [ ]▶[Other settings]▶[Conversion]2 Select an item Next word guess: Display relational predictive candidates immediately after an entry is determined. Wildcard prediction: Set whether to use the wildcard prediction. Internet conversion engine: Display conversion candidates by using a conversion engine on the Internet. Auto capitalization: In half-width alphabet entry, enter an initial character at the head of a text with upper case one. Auto space input: In half-width alphabet entry, automatically insert a half-width space after selecting an English word.[Auto capitalization], [Auto space input] zThis function may not follow the setting depending on the app in use.](https://usermanual.wiki/Sharp/HRO00254/User-Guide-3703449-Page-49.png)
![48 Before Using the Handset Dictionary1 In the character entry screen, [ ]▶[Other settings]▶[Dictionary]2 Select an item User dictionary: Edit words in the user dictionary. Download dictionary: Register/Cancel/Delete downloaded dictionaries. Update conversion dictionary: Update or download conversion dictionaries. Contacts name collaboration: Add name data of the phonebook to the dictionary or reset the name data in the dictionary. Slide operation1 In the character entry screen, [ ]▶[Other settings]▶[Slide operation]2 Select an item Upward slide: Set the operations available when you slide the keyboard from its bottom to top. Downward slide: Set the operations available when you slide the keyboard from its top to bottom. Rightward slide: Set the operations available when you slide the keyboard from its left edge to right edge. Leftward slide: Set the operations available when you slide the keyboard from its right edge to left edge. Reset1 In the character entry screen, [ ]▶[Other settings]▶[Reset]2 Select an item Set the default settings: Reset the settings of S-Shoin. Clear learning dictionary: Reset the learning dictionary. Reset facemark list: Reset the contents of the emoticon list. Switching input UI1 In the character entry screen, [ ]▶[Input UI]▶[12 keyboard]/[QWERTY keyboard]/[Voice Input] zAlternatively, slide [ ] up/down or to the right to switch keyboards.](https://usermanual.wiki/Sharp/HRO00254/User-Guide-3703449-Page-50.png)
![49 Before Using the HandsetEntering charactersExample: When entering “文字”1 In the character entry screen, enter “もじ”1 Enlarge zEnlarge the conversion candidates field.2 Conversion candidates field zTouch one of conversion candidates to enter.2 [ ]1 Reduce zReduce the conversion candidates field.2 Conversion candidates field zTouch one of conversion candidates to enter. zIf you set an Internet conversion engine, [Net conv] is displayed. Touch it to display conversion candidates searched by the conversion engine on the Internet.3 Predictive zPredictive candidates are displayed.4 Conversion zConversion candidates are displayed. zTouch [ ]/[ ] to change the range of characters to convert. Touch [OK] to determine the converted characters.5 Katakana and alphanumeric zDisplay katakana of the entered characters or conversion candidates of alphabets, symbols, etc. assigned to a touched key.](https://usermanual.wiki/Sharp/HRO00254/User-Guide-3703449-Page-51.png)
![50 Before Using the Handset3 In the conversion candidates field, select “文字” Wildcard predictionConversion candidates are predicted according to the number of the entered characters and appear. zEnable [Wildcard prediction] in advance (☞P. 47 “Conversion”). zThis function is available in the Hiragana/Kanji input mode and the Half Alphabet input mode.Example: When entering “アナウンス”1 In the character entry screen, enter “あな”2 [ ]▶[ ]▶[ ] zEach time you touch [ ], [+] is entered and the predictive candidates appear according to the number of characters.3 In the conversion candidates field, select “アナウンス” Inputting with kuten codesYou can use four-digit kuten codes assigned to each character for entering kanji, hiragana, katakana, symbol, alphanumeric characters, etc.1 In the character entry screen, slide the input mode switching key up▶[Character Code]2 Input a kuten code zAfter the fourth digit is entered, the corresponding character appears. zAfter the fourth digit is entered, the input mode is switched to the previous one. Inputting with voicesYou can enter characters with voices.1 In the character entry screen, [VOICE] zAlternatively, in the character entry screen, [ ]▶[Input UI]▶[Voice Input] to switch to the voice input.2 Speak at the microphone zIn the following cases, the voice input may not work properly. When the voice is too loud When the surrounding noise is big When the phonation is not clear When the phonation is not natural When the pronunciation is too fast When any key is pressed or the microphone is touched Editing charactersYou can perform operations such as cutting, copying or pasting by selecting the entered characters.1 Touch and hold the entered characters2 Edit the characters zDrag [ ]/[ ] and specify the selection range to operate such as cut, copy or paste of characters. Touch [SELECT ALL] to select all the entered characters.](https://usermanual.wiki/Sharp/HRO00254/User-Guide-3703449-Page-52.png)
![51 Before Using the Handset zTouch [CLIPBOARD] to display the history of cut and copied characters. Select characters to paste them. yTo display the list of cut or copied characters: [ ]▶[Quote apps]▶[Copy History SH] zTouch [SHARE] to use selected characters in other apps. zIf there are menus which are not displayed, [ ] is displayed. Touch it to display the menus. zUp to 10 history items of cut and copied characters can be saved. zIf the number of history items of cut and copied characters exceeds the maximum number to be saved, they are deleted from the oldest one. zDisplayed icons or operation methods may differ depending on the apps to use.Changing screen display to English1 In the home screen, [ ]▶[設定] (Settings)▶[言語と入力] (Languages & input)▶[言語] (Languages)▶[言語を追加] (Add a language)▶[English]▶slide [English (United States)] up to the top of the listInitial settingsWhen you turn the power on for the first time, the initial settings screen is displayed. Follow the instructions on the screen and set. zThe following items can be set. However, items to be displayed after each selection may differ depending on the contents selected in each setting. Language setting Select a set up method Select a network Google account settings (☞P. 166 “Setting up Google account etc.”) Owner's name of the handset Unlock with fingerprint Google services Google Assistant settings Initial settings for docomo service1 When the initial settings screen for docomo service is displayed, [Agree to all]▶[NEXT]2 Make the initial settings zThe following items can be set. d ACCOUNT docomo cloud Install all apps Other settings3 [ALL SET]](https://usermanual.wiki/Sharp/HRO00254/User-Guide-3703449-Page-53.png)
![53 Before Using the Handset: Data communication disabled (☞P. 151 “Data usage”) zDisplayed when data usage volume reaches to the limit.: Alarm information (☞P. 125 “Alarm”): Schedule notification from CalendarCall (☞P. 73 “Call”): Making a call/Receiving a call/Talking on the handset: Putting a call on hold: Answering memo (☞P. 81 “Voice/Answering memo”): Voice mail message (☞P. 82 “Network service”): microSD Card (☞P. 147 “Storage”): Available space on the handset memory being run out (☞P. 147 “Storage”): Omakase Lock setBluetooth (☞P. 173 “Bluetooth® function”): Receiving registration/connection request from Bluetooth device: Data reception request: DUN connection request/DUN connectingData transmission and reception: Transmission: ReceptionApp: App update available: Finished installing app: Open network (☞P. 150 “Wi-Fi settings”)Tethering (☞P. 152 “Tethering”): [USB tethering] enabled: [Wi-Fi tethering] enabled: [Bluetooth tethering] enabled: Multiple tethering enabled: VPN connected (☞P. 182 “Adding VPN”): Software update available (☞P. 198 “Software update”): [RelaxAuto setting] running (☞P. 141 “Relax settings”): Notification icon (not appearing) Main status icon list: Alarm set (☞P. 125 “Alarm”) zThe icon color becomes light while the manner mode is set to [Total silence].Battery level (☞P. 146 “Battery & energy saving”) to : Approx. 100 to 6%: Approx. 5% or less zWhile charging, the battery icon appears with [ ] superimposed. zPercentage of the remaining battery level appears on the left side of the battery icon. Display/Hide the percentage with [Display left percents of Battery] (☞P. 140 “Display”).](https://usermanual.wiki/Sharp/HRO00254/User-Guide-3703449-Page-55.png)
![54 Before Using the HandsetSignal strength to *: Signal level (five steps): Outside the service area: docomo nano UIM card not inserted (☞P. 32 “docomo nano UIM card”)Wi-Fi signal strength (☞P. 149 “Wi-Fi”) to *: Signal level (five steps): Airplane mode (☞P. 152 “More”)3G data communication status: 3G available: Receiving data via 3G: Sending data via 3G: Sending and receiving data via 3GGSM data communication status: GSM available: Receiving data via GSM: Sending data via GSM: Sending and receiving data via GSM4G (LTE) data communication status: 4G (LTE) available: Receiving data via 4G (LTE): Sending data via 4G (LTE): Sending and receiving data via 4G (LTE)HSPA data communication status: HSPA available: Receiving data via HSPA: Sending data via HSPA: Sending and receiving data via HSPA: International roaming (☞P. 184 “Data roaming”)NFC/Osaifu-Keitai lock status (☞P. 110 “NFC/Osaifu-Keitai lock”): Handset and docomo nano UIM card locked: Handset or docomo nano UIM card lockedOmakase Lock status: Handset and docomo nano UIM card locked by remote control: Handset or docomo nano UIM card locked by remote control: [Reader/Writer, P2P] enabled (☞P. 111 “NFC/Osaifu-Keitai settings”)Manner mode status (☞P. 56 “Manner mode”): Standard manner: Total silence: Alarms only: Priority onlyDuring a call (☞P. 78 “Operation during a call”): Talking with a hands-free call: Mute set](https://usermanual.wiki/Sharp/HRO00254/User-Guide-3703449-Page-56.png)
![55 Before Using the HandsetBluetooth (☞P. 173 “Bluetooth® function”): Connection stand-by: Connected: Measuring location information via GPS (☞P. 155 “Location”)Answering memo (☞P. 81 “Voice/Answering memo”): No answering memo when the answering memo is set: One to nine answering memos when the answering memo is set: 10 answering memos when the answering memo is set * The signal strength icon appears with [ ] superimposed like []/[ ] while you connect to an access point which is not connected to the Internet.Using the status panel1 Drag the status bar down with your two fingers at the same time zDrag the status bar down with a fingers to display reduced display area with function buttons etc.2 Use the status panel1 Network operator zConnected network operator is displayed.2 Brightness adjust bar zDrag it to adjust the brightness of the screen.](https://usermanual.wiki/Sharp/HRO00254/User-Guide-3703449-Page-57.png)
![56 Before Using the Handset3 Function button zMake settings for use of the manner mode, Wi-Fi function, location information, etc. yIf you touch [Location], the confirmation screens for the use of location information are displayed. The mode to be set may differ depending on whether you select [DISAGREE] or [AGREE] (☞P. 155 “Location”). zFlick the displaying area to the left/right to switch the pages.4 Indicator zIndicates the number of display area pages for function buttons and present display position.5 Detailed information on notifications zYou can check the state of the handset or content of notifications. zThe following operations are available depending on the type of detailed information. yTo activate or operate a corresponding app: Touch the detailed information or the function yTo switch detailed display/simplified display: Slide the detailed information up/down with your two fingers at the same time or pinch out/in yTo delete detailed information: Flick the detailed information to the left/right yTo set app notifications: Touch and hold the detailed information▶follow the instructions on the screen6 Clear all zDelete the detailed information on notifications and notification icons. Depending on the content of detailed information on notification, it cannot be deleted.7 Edit zYou can rearrange, add and delete the function buttons.8 Settings zActivate the “Settings” app.9 Enlarge/Reduce display area for function buttons zEnlarge/Reduce display area such as function buttons. zAlternatively, slide the screen up/down to enlarge/reduce it. zIf the number of missed calls is one, [CALL] and [SEND SMS] are displayed by switching the detailed information on notification to the detailed display. You can make a call or send an SMS by touching them. zWhen receiving a message, you can reply on the status panel depending on apps. Switch the detailed information on notifications to the detailed display and follow the instructions on the screen. Manner modeYou can set to avoid disturbing others when in public.1 Drag the status bar down with your two fingers at the same time](https://usermanual.wiki/Sharp/HRO00254/User-Guide-3703449-Page-58.png)
![57 Before Using the Handset2 [Manner mode] zManner mode settings screen is displayed. The items to be displayed may differ depending on the manner mode to select.1 Type of manner mode zSelect a manner mode to set. Standard manner: The ringtone and operation sound are silenced, and the vibrator is activated when receiving a call or others. The alarm sound and media sound ring according to each setting. Total silence: The ringtone and operation sound are silenced, and even the vibrator is not activated when receiving a call or others. Also, the alarm sound and media sound are silenced. Alarms only: The ringtone and operation sound are silenced, and even the vibrator is not activated when receiving a call or others. The alarm sound and media sound are not silenced. Priority only: The ringtone and notification sound ring according to the setting of [Priority only allows] in MORE SETTINGS. Other operations are same as those when the manner mode is not set.2 Explanation of operations zThe operations are explained in case you set the selecting manner mode.3 Duration until disabling manner mode zSet duration until disabling the manner mode. If you select the item of the time or the until next alarm, the manner mode is automatically disabled when the set length of time has passed or next alarm rings. zTouch [-]/[+] to set how long it takes the manner mode to be disabled.4 More settings zMake settings for the notification operation such as priority notification or specific periods of time. Priority only allows*: When the manner mode is set to [Priority only], the ringtone and notification sound ring according to this settings. Automatic rules: Make settings for the notification operation of specific periods of time or schedule periods. Block visual disturbances: Make settings for the notification operation when the screen is turned on/off. * Since Alarms is always set to priority notification, you cannot change the setting. zTouch it to set the selecting manner mode.](https://usermanual.wiki/Sharp/HRO00254/User-Guide-3703449-Page-59.png)
![58 Before Using the Handset5 Manner mode setting zThe setting condition of the manner mode is displayed. Touch it to disable the manner mode.6 Customize zSet [Priority only allows] in MORE SETTINGS. zTouch it to set the selecting manner mode.7 Done zSet the manner mode. zSet the manner mode to change the display of function button. Touch it to disable the manner mode. zThe following sounds are not silenced even when the manner mode is set. Shutter sound of shooting still pictures Focus locking sound of shooting still pictures Record start/end sound of shooting videos zWhen Answering memo setting is set to [Mannermode] and the manner mode is set, the answering memo is enabled and operated according to its setting. zThe manner mode is disabled if you turn the ringtone volume up while Standard manner is set. The Standard manner is set if you set the ringtone volume to “0” when the manner mode is not set. zPress 1/2 and display the volume bar, and then press 2 to set Total silence while Standard manner is set. zPress 1/2 and display the volume bar, and then press 1 to set Standard manner while Total silence or Alarms only is set.Recent AppsYou can activate apps by displaying the history of recently used apps.1 [C]2 Use a history item zTouch [C] to activate the previous app that you have used.1 App usage history item zTouch it to activate the app. zFlick it to the left/right to delete the history item. zTouch [CLEAR ALL] on the upper right of the screen to delete all app usage history items. yIf there are multiple app usage history items, flick the history down to display [CLEAR ALL].2 Delete history item zTouch it to delete app usage history item.](https://usermanual.wiki/Sharp/HRO00254/User-Guide-3703449-Page-60.png)
![59 Before Using the Handset3 Screen pinning zThis is displayed in the latest history item when [Screen pinning] is set to On. For details on Screen pinning☞P. 156 “Lock & security” zTouch it to restrict the use of apps other than selected app. yTo disable Screen pinning: Touch and hold [A]+[C] zSome apps may not be displayed in the history. zIf you delete the history item of the running app, you can end the app.Multi WindowYou can use two apps on the screen divided into top and bottom sections at the same time.1 Touch and hold [C] while using an app. zThe screen is divided into top and bottom sections and [C] changes to [D]. The app in use is displayed on the top section while the app usage history item is displayed on the bottom section. When you activate an app from the app usage history item or home screen, it is displayed on the bottom section of Multi Window and you can use it with an app on the top section at the same time.1 Separator zWhen you flick it up/down, an app on the bottom/top section is displayed in the full screen. Also, Multi Window ends. zWhen Display size (☞P. 140 “Display”) is set to [Small], you can change the display size of top/bottom section by dragging it up/down.2 Multi Window key zIndicates you are using Multi Window. The operating method is same as [C]. zWhen you touch and hold it on Multi Window, Multi Window ends. The indication returns [C]. zMulti Window may not be used depending on the app in use.](https://usermanual.wiki/Sharp/HRO00254/User-Guide-3703449-Page-61.png)
![60 Before Using the HandsetHome applicationsSwitch lock screens or home apps to use. zThe following home apps are registered on the handset by default. docomo LIVE UX A home app optimized for smartphones provided by DOCOMO. AQUOS Home A home app that has Desktop Sheet widgets/shortcuts are set, Apps Sheet apps are displayed as a list and Hot Sheet shortcuts to the favorite app are registered. AQUOS Kantan Home A home app that displays only Apps Sheet home apps are displayed as a list, and icons and characters are displayed in large.1 In the home screen, [ ]▶[Settings]▶[Home applications]2 Select an item Batch change lock screen/ home application: Switch lock screens and home apps. Home applications: Switch home apps.Confirmation screen at first activation of appsWhen you activate each app for the first time, the confirmation screen of “First things first”/“Battery optimization” is displayed and make settings for the operations of an app. zThe type or content of the displayed confirmation screen may differ depending on the app. The followings describe two types of the confirmation screen, “First things first” and “Battery optimization”. zWhen you use a specific function for the first time, the confirmation screen may be displayed depending on the app.First things firstYou can allow the app to use the data of the handset, camera, etc. zIf you do not allow the app to use the functions, the app may not work properly.Example: Activating Album1 In the confirmation screen of “First things first”, [NEXT]](https://usermanual.wiki/Sharp/HRO00254/User-Guide-3703449-Page-62.png)
![61 Before Using the Handset2 [DENY]/[ALLOW] zIn general, select [ALLOW] and allow the app to use the functions. zIf there are multiple functions to use, operate in the same way. Setting functions to useYou can make settings for the functions to use by following steps below as well.Setting functions to use by app1 In the home screen, [ ]▶[Settings]▶[Apps]2 Select an app▶[Permissions]3 Select a functionSetting apps to allow to use by function1 In the home screen, [ ]▶[Settings]▶[Apps]▶[ ]▶[App permissions]2 Select a function3 Select an appBattery optimizationIf you carry out Battery optimization, the apps are set not to work while the display is turned off (except while charging). zDepending on the app, the confirmation screen of “Battery optimization” may be displayed when activating apps or setting functions. In general, do not carry out Battery optimization. If you carry out it, the app may be terminated. zIf you carry out Battery optimization, the app does not work while the display is turned off (except while charging). Some unintended phenomena such as apps/functions are unavailable to use may occur. Setting Battery optimizationYou can make settings for Battery optimization by following steps below as well.1 In the home screen, [ ]▶[Settings]▶[Apps]▶[ ]▶[Special access]▶[Battery optimization] zAlternatively, in the home screen, [ ]▶[Settings]▶[Battery & energy saving]▶[Battery]▶[]▶[Battery optimization] to carry out Battery optimization. zThe list of not optimized app is displayed.2 [Not optimized]▶[All apps]3 Select an app▶[Optimize]/[Don't optimize]▶[DONE]](https://usermanual.wiki/Sharp/HRO00254/User-Guide-3703449-Page-63.png)
![63 docomo LIVE UX Machi-Chara setting: Make settings for Machi-Chara. For details on Machi-Chara setting ☞P. 64 “Machi-Chara display method” Home screens: Display the home screen list. For details on the home screen list ☞P. 64 “Managing pages” Moving apps etc.1 In the home screen, touch and hold an app etc.2 Drag it to the destination zIf you drag it to the end of the page, the previous/next page is displayed and you can move it to the previous/next page. zDrag an app onto another one to display the confirmation screen for folder creation. Touch [CREATE] to create a folder storing the two apps. Restoring apps to the app list screen1 In the home screen, touch and hold an app2 Drag it to [Back to apps list] Deleting widgets etc.1 In the home screen, touch and hold a widget etc.2 Drag it to [Remove from Home] zApps are not uninstalled even if the folder storing the apps is deleted. Uninstalling apps1 In the home screen, touch and hold an app2 Drag it to [Uninstall]▶[OK] Renaming folders1 In the home screen, select a folder2 Touch the folder name3 Enter a folder name Setting quick menuApps and/or folders etc. can be arranged.1 In the home screen, touch and hold an app etc.2 Drag it to the quick menu zDrag an app onto another one to display the confirmation screen for folder creation. Touch [CREATE] to create a folder storing the two apps.Changing kisekae1 Touch and hold the home screen▶[Change Kisekae]2 Select kisekae▶[Set]](https://usermanual.wiki/Sharp/HRO00254/User-Guide-3703449-Page-65.png)
![64 docomo LIVE UXChanging wallpapers1 Touch and hold the home screen▶[Change wallpaper]2 [Select from photo list]/[Select another wallpaper] zYou can select a wallpaper from the photo list or apps. Follow the instructions on the screen and operate. zWhen you select [SHSHOWからダウンロード] (Download from SHSHOW), you can connect to the SHARP website and download wallpapers.Machi-Chara display method1 Touch and hold the home screen▶[Machi-Chara setting]2 [ ]/[ ] of “キャラ表示” (Machi-Chara display)Managing pages Adding pages zYou can add up to seven pages.1 In the home screen, pinch in zAlternatively, touch and hold the home screen▶[Home screens] to display the home screen list.2 [+] Sorting pages1 In the home screen, pinch in zAlternatively, touch and hold the home screen▶[Home screens] to display the home screen list.2 Touch and hold a thumbnail3 Drag it to the destination Deleting pages1 In the home screen, pinch in zAlternatively, touch and hold the home screen▶[Home screens] to display the home screen list.2 [ ]](https://usermanual.wiki/Sharp/HRO00254/User-Guide-3703449-Page-66.png)
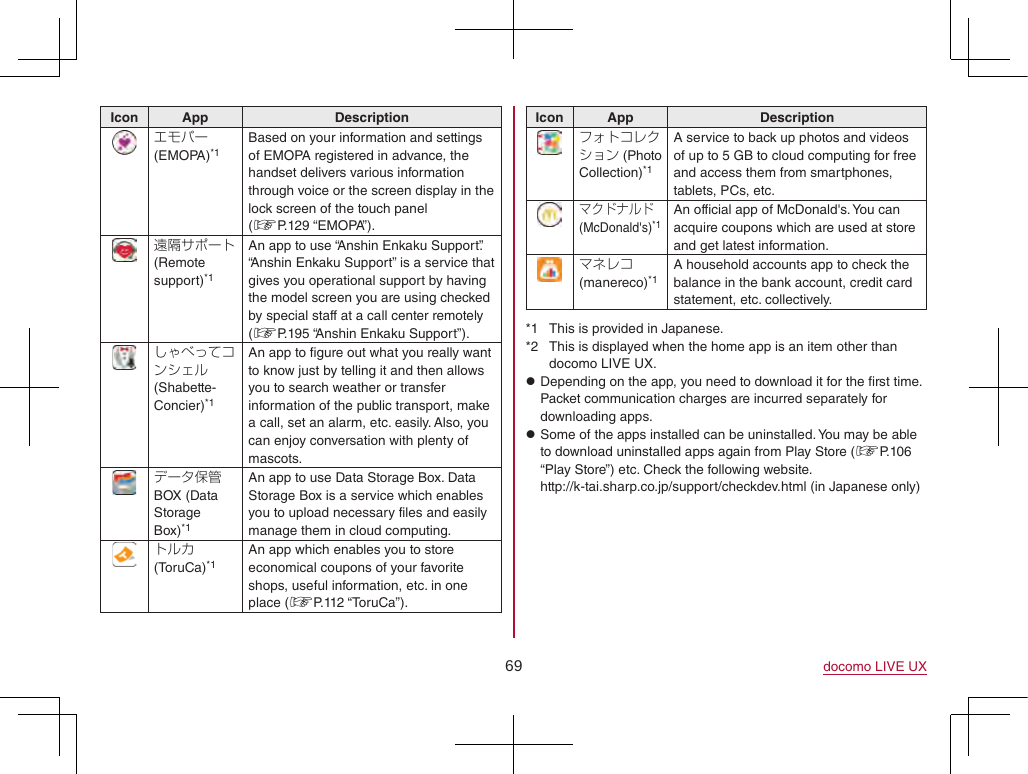
![68 docomo LIVE UXIcon App DescriptionMessaging Use SMS (☞P. 92 “SMS”).Messenger Send messages to or use voice/video call with contacts on your mobile phone or your Facebook friends/group.My docomo アプリ (My docomo app)*1Check your data volume, charges and information such as subscription.My Magazine*2A search service to display articles of genres you choose (☞P. 71 “My magazine”).OfficeSuite Use OfficeSuite. zFor details on supported files, in the home screen, [ ]▶[OfficeSuite]▶[]▶[Help and Feedback]▶[Help] to refer to help.Osaifu-Keitai Use Osaifu-Keitai (☞P. 109 “Using “Osaifu-Keitai compatible services””).Osusume Apps*2Apps recommended by DOCOMO are displayed (☞P. 70 “Installing recommended apps”).Phone An app to use the phone and make settings for calls (☞P. 73 “Call”).Photos Manage images and videos.Play Movies & TVRent and watch movies.Icon App DescriptionPlay Music Play music.Play Store Use Google Play (☞P. 106 “Play Store”).Schedule An app to create and manage schedules (☞P. 127 “Schedule”). Its data is shared with the Memo app. The i-concier is supported.Settings Make various settings for the handset (☞P. 138 “Setting menu”). zThe same operation can be performed as in the home screen, [ ]▶[ ]▶[Settings].SHSHOW*1 An app to introduce various information or content for handling AQUOS smartphones/tablets.Twitter An official client app of Twitter. You can communicate with other people by sharing short messages on websites.Voice Search Search information of websites by voice (☞P. 44 “Searching information on the handset and websites”).YouTube Use YouTube (☞P. 125 “YouTube”).](https://usermanual.wiki/Sharp/HRO00254/User-Guide-3703449-Page-70.png)
![70 docomo LIVE UXManaging apps Moving apps to the home screen1 In the home screen, [ ]▶touch and hold an app2 Drag it to the home screen Moving apps1 In the home screen, [ ]▶touch and hold an app2 Drag it to the destination Uninstalling apps1 In the home screen, [ ]▶touch and hold an app2 Drag it to [Uninstall]▶[OK]Installing recommended appsApps recommended by DOCOMO are displayed when you touch the Recommends button of the app list screen.1 In the home screen, [ ]▶[Recommends] zWhen you use this for the first time, select [ENABLE] and follow the instructions on the screen and operate.2 Select an app zThe screen for downloading the app is displayed. zWhen you activate this for the first time, the notification setting of recommended apps is set to ON. [ ]▶[ ]/[ ] of “Notification settings” to change the notification setting.Backing up/Restoring the home screenYou can restore the positions of apps, widgets, etc. in the home screen using data of docomo LIVE UX backed up to docomo cloud. At the time of restoration, a page for docomo service is added at the end of the home screen. Backing up the home screen1 In the home screen, [ ]▶[ ]▶[Layout backup & Restore]2 [ ]3 [BACKUP]](https://usermanual.wiki/Sharp/HRO00254/User-Guide-3703449-Page-72.png)
![71 docomo LIVE UX Restoring the home screen1 In the home screen, [ ]▶[ ]▶[Layout backup & Restore]2 Select an item Restore the latest backup data: Restore the home screen backed up last time. Restore from backup data list: Select and restore a home screen from the backup data list.Displaying all appsThis is a function to search an app.1 In the home screen, [ ]▶[Display all apps]2 Select an app zThe app is activated. zIf you touch [ ], the home screen/app list screen that apps are placed in is displayed with the selected app focused on.My magazineThis is a search service to display articles of genres you choose. The more you use it, the more it makes the settings come to match your preferences by guessing your preferences from the history of articles you have read or from information on your profile. Also, you can set whether to use customize of My magazine which is using notification, location data, docomo service subscription information, etc.1 In the home screen, [ ] zWhen you activate this for the first time, the genre selection screen is displayed. You can set genres to display by selecting ones and touching [OK]. zAn article list screen sorted by genre is displayed.2 Select an article zTo set My magazine: [ ]▶[My Magazine settings] zTo use help: [ ]▶[Help]Setting genres1 In the home screen, [ ]2 [ ]▶[Display category setting]3 Select genres](https://usermanual.wiki/Sharp/HRO00254/User-Guide-3703449-Page-73.png)
![72 docomo LIVE UXViewing articles1 Genres to display zDisplay articles of a selected genre. zSlide it to the left/right to switch displays of genre.2 Article zDisplay articles.3 d POINT zConnect to d POINT CLUB.Information on Home applications1 In the home screen, [ ]▶[ ]▶[About] zWhen docomo LIVE UX needs to be updated, [Update now] is displayed on the app information screen and touch it to update docomo LIVE UX.](https://usermanual.wiki/Sharp/HRO00254/User-Guide-3703449-Page-74.png)
![73 CallCallYou can use the phone and phonebook, and make settings for call, voice/answering memo, operations available when calls are received, etc.Making a call1 In the home screen, [ ]▶[Dial]2 Enter a phone number zAlways enter the city code, even when it is a local number. zYou can set to notify/not to notify the other party of your phone number for each call by adding “186”/“184” to the head of the phone number. zAdd the number registered in advance to the head of the phone number: Enter a phone number▶[]▶[Select prefix]▶select the registered name of the number yYou can add the number registered in [Prefix settings] (☞P. 81 “Call settings/Other”).1 Call zMake a call. Also, if there are outgoing call history items, touch it to enter the latest one when the phone number has not been entered.2 Favorites zDisplay the contacts set as favorites.3 Delete zDelete an entered number. zTouch and hold it to delete all the entered numbers.4 Register5 Dial zDisplay the dial screen.6 Outgoing/Incoming call history7 Phonebook zDisplay the phonebook.](https://usermanual.wiki/Sharp/HRO00254/User-Guide-3703449-Page-75.png)
![74 Call3 [ ] zTo make a video call: [ ]▶[Video call]4 [END CALL] to end the call zIf you talk on the handset with your hair put between the earpiece and your ear, the proximity sensor may not work properly. The screen may be kept turned on and the call may be interrupted when the screen is touched accidentally.VoLT E zVoLTE enables you to use call and video call with high quality. zWhen you use VoLTE, the handset and the other party's device need to satisfy the following conditions. They are VoLTE compatible models They are inside the VoLTE available area Preferred network type is set to [4G/3G/GSM(Auto)] (☞P. 184 “Preferred network type”) Call mode setting is set to ON (☞P. 153 “Cellular networks”)VoLTE (HD+) zVoLTE (HD+) enables you to use call and video call with higher quality than VoLTE. zWhen you use VoLTE (HD+), it is necessary that the handset and the other party's device are VoLTE (HD+) compatible models as well as the usage conditions of VoLTE.Entering touch-tone signalsWhen using services in which you are required to enter numbers additionally during a call, such as inquiry about the balance in your bank account or ticket reservation, enter pause (,)/wait (;) after entering a phone number to make a call with an additional number added to the main phone number. Adding 2 seconds pauseAfter making a call to a main phone number, the handset automatically pauses for 2 seconds and an additional number is sent.1 In the home screen, [ ]▶[Dial]2 Enter a phone number▶[ ]▶[Add 2-sec pause]3 Enter a number to send▶[ ] Adding waitAfter making a call to a main phone number, the handset automatically waits and then a screen asking whether to send an additional number is displayed. Touch [YES] to send an additional number.1 In the home screen, [ ]▶[Dial]2 Enter a phone number▶[ ]▶[Add wait]3 Enter a number to send▶[ ]4 [YES] during the call](https://usermanual.wiki/Sharp/HRO00254/User-Guide-3703449-Page-76.png)
![75 CallVideo callBy using video call, you and the other party can talk on the handset while seeing each other's image. Also, you can switch between voice call and video call while talking on the handset. zCall charges and packet communication charges are incurred when making a video call. In addition, packet communication charges are incurred also when receiving a video call. zQuality of image may differ depending on the usage environment because suitable communication levels are applied according to the usage condition. zIf you cannot switch to a video call during a voice call, [Switching to video call failed] is displayed and the voice call continues. zBe careful not to cover the speaker section during a video call. The other party's voice may not be heard well. zWhile using video call in the background, your image is not sent to the other party. zAs for image displayed during a video call, since processes for displaying image may differ depending on the model to use, ranges of your image displayed on the handset may differ from those displayed on the other party's device.Emergency callEmergency calls Phone numberPolice 110Fire and ambulance 119Marine emergency 118 zThe handset supports “Emergency call location notification”. zWhen you make a call to an emergency number such as 110, 119 and 118, the information of your location (location information) is automatically notified to the agency that has received the emergency call (e.g. the police station). Depending on your location and the reception status of the signal, the agency that has received the emergency call may not be able to confirm the exact location. If you are not sending your caller ID by calling with “184” added or other means, your location information and phone number are not notified. However, if the agency that has received the emergency call considers the exact location information measured via GPS and phone number necessary for important purposes, such as life saving, the agency may retrieve them regardless of your settings. In addition, the area/timing to introduce “Emergency call location notification” depends on the state of preparation in each agency that receives emergency calls. zIn Japan, you cannot make a call to the emergency number (110, 119 or 118) when a docomo nano UIM card is not inserted, while the PIN code is locked, from the PUK (PIN Unlock Key) entry screen.](https://usermanual.wiki/Sharp/HRO00254/User-Guide-3703449-Page-77.png)
![76 Call zWhen calling 110, 119 and 118 from your handset, the police or fire stations may return your call for verification purposes. State that you are calling from a mobile phone, and give your phone number and exact present location. Remain stationary to ensure that the call is not disconnected while you are on the line, and keep the handset turned on to receive calls for approximately 10 minutes afterwards. zDepending on the region, calls to the police or fire station of the local area may not be made. zWhen you make a call to the emergency number (110, 119 or 118) while Reject call setting is set, items of Reject call setting are set to [OFF]. zEmergency call may not be available in some networks. zYou cannot make a video call to the emergency number (110, 119 or 118).International call (WORLD CALL)WORLD CALL is an international calling service available from DOCOMO devices in Japan.For details on WORLD CALL, refer to the DOCOMO website. zThe caller ID may not be notified or displayed correctly depending on overseas network operators. In this case, making a call with incoming call history is not available.[Calling Method] zWhen calling to a land-line phone: 010▶country code▶area code (city code)▶the other party's phone number▶[] zWhen calling to a mobile phone: 010▶country code▶the other party's mobile phone number▶[] yAs for the other parties' mobile phone numbers and area codes (city codes) that begin with “0”, omit the first “0” when entering (except some countries or regions such as Italy). yAlternatively, enter “009130-010” as usual or “+” instead of “010”.](https://usermanual.wiki/Sharp/HRO00254/User-Guide-3703449-Page-78.png)
![77 CallAnswering a call ※If you use Suguden, you can answer a call just by putting the handset on your ear when a call is received (☞P. 83 “Suguden setting”).1 When a call is received, the ringtone sounds2 Answer the call zOperate after touching [ ].Incoming voice call screenIncoming video call screen1 Reject zReject the incoming call.2 Reject call with SMS zReject the incoming call and send a selected SMS message to the other party.3 Accept zAnswer the call.4 Accept voice zAnswer the call using voice call.5 Accept video zAnswer the call using video call.3 [END CALL] to end the call Answering a call while display is turned onWhen a call is received while a screen other than lock screen of the touch panel is displayed, the incoming notification is displayed. You can answer the call by using the notification.1 When a call is received, the incoming notification is displayed at the top of the screen2 [ACCEPT] zTouch the incoming notification to display incoming voice call/video call screen. Answering a voice call by answering memo1 When a voice call is received, the ringtone sounds2 In the incoming voice call screen, [ ]▶[Absence Memo]Playing an answering memo1 In the home screen, [ ]2 [ ]▶[Call settings]3 [Call/Ans Memo]4 [Answering Memo List]5 Select an answering memo](https://usermanual.wiki/Sharp/HRO00254/User-Guide-3703449-Page-79.png)
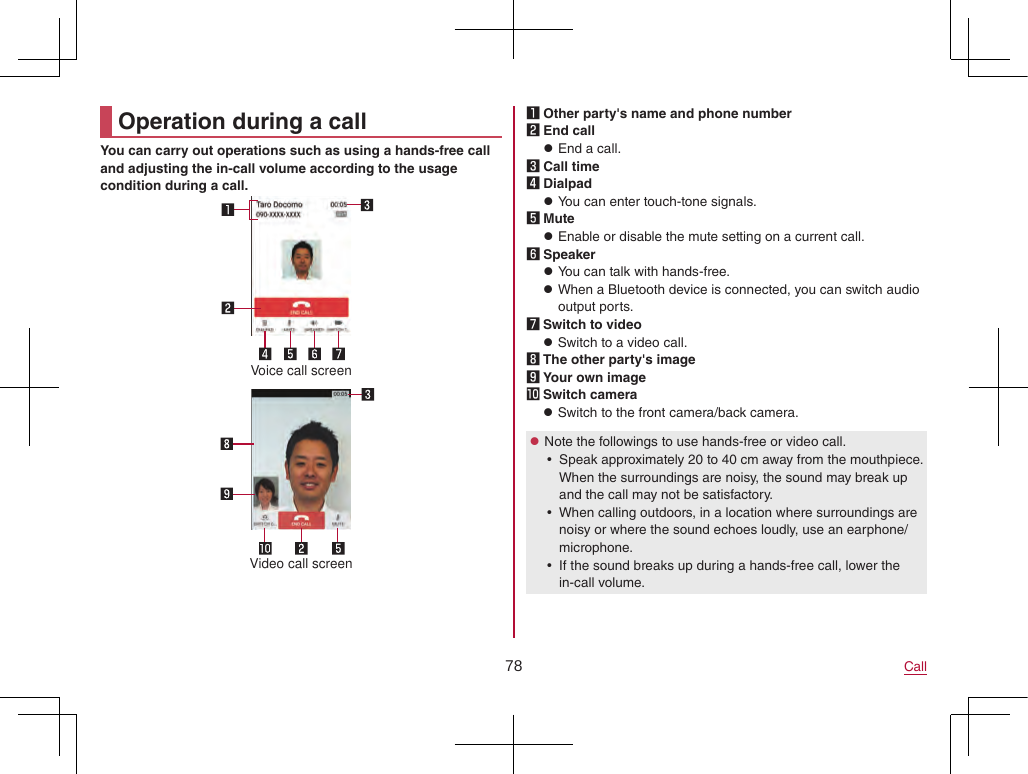
![79 Call Adjusting the in-call volume1 1/2 during a call Switching to full screen displaySwitch the video call screen to the full screen display.1 Touch the screen during a call zTo disable the full screen display: Touch the screen HoldHold/Unhold a current voice call. zSubscription to Call Waiting Service is required to use hold.1 [ ] during a call▶[Hold]/[Cancel hold] Adding a callPlace a current voice call on hold and make a call to another party. zSubscription to Call Waiting Service is required to add a call.1 [ ] during a call▶[Add call]2 Enter a phone number▶[ ] zTouch the other party put on hold to switch to whom you talk. Switching to voice callSwitch to a voice call during a video call.1 [ ] during a call▶[Switch to voice call] Switching audio output portSet whether to talk with hands-free during a video call. When a Bluetooth device is connected, you can switch audio output ports.1 [ ] during a call▶[Switch audio output destination]2 Select an audio output port Switching image areaSwitch displaying area of the other party's/your own image during a video call.1 [ ] during a call▶[Switch video area] Voice memoRecord a voice memo during a voice call.1 [ ] during a call▶[Sound Memo]2 [STOP]](https://usermanual.wiki/Sharp/HRO00254/User-Guide-3703449-Page-81.png)
![80 CallOutgoing/Incoming call historyThe handset memory keeps a record of the 500 most recent outgoing and incoming call history items in total.1 In the home screen, [ ]▶[Recent calls]2 [All]/[Incoming]/[Outgoing]▶select a history item zInformation on whether the outgoing/incoming call history items are of voice call or video call is not displayed.1 Switch displays of history zSwitch among all history, only incoming history and only outgoing history.2 The other party's name/phone number3 Outgoing call/Incoming call/Missed call4 Date and time of outgoing/incoming call5 Outgoing call icon zTouch to make a voice call.3 [Call] zTo register to the phonebook: [Register]▶select a type of registration▶set each item▶[Save] zTo compose and send SMS: [Send SMS]▶compose and send SMS zTo make a video call: [Video call]Using outgoing/incoming call1 In the home screen, [ ]▶[Recent calls]2 [All]/[Incoming]/[Outgoing]▶touch and hold a history item3 Select an item Edit number before call: The phone number is entered in the dial screen. Edit the number before making a call etc. Delete from call log: Delete the history item. Register as blocked number: Register to Nuisance call blocking service or Specified number rejection. Register to Favorites: Register to Favorites in docomo phonebook. Search location: Use imadoco search and imadoco kantan search. Deleting outgoing/incoming call history1 In the history list screen, [ ]▶[Delete log]2 Select a history item▶[Delete]▶[Delete] zTo delete all history items: [Select all]▶[Delete]▶[Delete]](https://usermanual.wiki/Sharp/HRO00254/User-Guide-3703449-Page-82.png)
![81 CallVoice/Answering memoYou can play or set the voice/answering memo. If you set the answering memo, the handset answers a call and records the caller's message when you cannot answer.1 In the home screen, [ ]2 [ ]▶[Call settings]3 [Call/Ans Memo]4 Select an item Answering Memo List: Play or delete answering memos etc. Voice Memo List: Play or delete voice memos etc. Answering memo setting: Make settings for operations of the answering memo. Answering message setting: Make settings for the reply message of the answering memo. Answer time setting: Make settings for how long before the answering memo answers a call. zUp to 10 answering memos and voice memos (approximately 60 seconds per memo) can be recorded respectively. zIf the number of saved answering memos exceeds the maximum number to be saved, answering memos which have been played are deleted from the oldest one. If no answering memo has been played, the handset does not answer calls by the answering memo. zIf the number of saved voice memos exceeds the maximum number to be saved, they are deleted from the oldest one. zAnswering memos and voice memos are not available in video call.Call settings/OtherYou can make settings for call such as voice mail and call rejection.1 In the home screen, [ ]2 [ ]▶[Call settings]3 Select an item Network service: For details ☞P. 82 “Network service” Roaming settings: Carry out settings when using international roaming service. For details on roaming settings ☞P. 187 “Setting international roaming” Phone ringtone: Set the ringtone. Vibrate on ring: Set whether to activate the vibrator when receiving a call. Dialpad touch tones: Set whether or not to enable dialing sounds. Call/Ans Memo: For details ☞P. 81 “Voice/Answering memo” Reject call setting: For details ☞P. 83 “Reject call setting” Rejection SMS: Edit texts to use for Reject call with SMS. Sub address settings: Set whether to call the particular device using sub addresses when you make a call to an ISDN device. yEnter “*” after entering the phone number to recognize the number after “*” as the sub address.](https://usermanual.wiki/Sharp/HRO00254/User-Guide-3703449-Page-83.png)
![82 Call Prefix settings: Register the number added to the head of the phone number such as the international call access number and “186”/“184”. Suguden setting: For details ☞P. 83 “Suguden setting” Contact docomo: For details ☞P. 85 “Contacting docomo” Open source licenses: Display the open source licenses. Extension line service setting: Make settings for using hold and transfer of the extension line.[Sub address settings] zThe sub address is the assigned number to distinguish multiple ISDN devices which connect to the same ISDN line.[Extension line service setting] zExtension line service is for corporate customers.Network service1 In the home screen, [ ]2 [ ]▶[Call settings]3 [Network service]4 Select an item Voicemail service: A service to answer calls with a reply message and record callers' messages for you. Call forwarding service: A service to forward calls. Call waiting: A service to place the current call on hold and answer a new incoming call when receiving a call during another call. Caller ID notification: Display your phone number on the other party's phone when you make a call. Nuisance call blocking service: Register and reject phone numbers of “nuisance calls” such as prank calls. Caller ID display request service: Answer calls without notifications of phone number and play the guidance for asking notifications of the numbers. Call notification: Notify you of incoming call information with SMS. English guidance: Play the guidance for setting each network service and the voice guidance stating that the handset is outside the service area etc. in English. Remote operation settings: Operate Voice Mail Service, Call Forwarding Service, etc. from a touch-tone land-line phone, pay phone, mobile phone provided by DOCOMO, etc. Public mode (power OFF) settings: Play a message stating that you are unable to answer because you are in a place that does not allow the use of mobile phone and automatically disconnect the call when receiving a call with the handset turned off. zThe following items are not available in video call. Voicemail service Call forwarding service Call waiting](https://usermanual.wiki/Sharp/HRO00254/User-Guide-3703449-Page-84.png)
![83 CallReject call setting1 In the home screen, [ ]2 [ ]▶[Call settings]3 [Reject call setting]4 Select an item Reject unregistered call: Set to reject incoming calls from callers not registered in the phonebook. Reject anonymous call: Set to reject incoming calls from callers not notifying their phone numbers. Reject call from pay phone: Set to reject incoming calls from pay phones. Reject unknown call: Set to reject incoming calls from callers whose phone numbers cannot be notified. Specified number rejection: Set to reject incoming calls and SMSs from the specified callers.Suguden settingYou can make settings for the function (Suguden) which allows you to operate the phone just by motions and voice such as answering a call by putting the handset on your ear or ending a call by saying keywords.1 In the home screen, [ ]2 [ ]▶[Call settings]3 [Suguden setting]4 Select an item Answer: Set whether to answer the call by placing the handset to your ear. Disconnect: Set whether to end the call by motions or voice. yMotion: Set whether to end the call by placing the handset horizontally with the screen faced downwards or by shaking the handset twice during a call. yVoice command: Set whether to end the call by putting the handset off from your ear after saying keywords during a call. Call: Set whether to make a call to the person registered in advance or the person registered to the outgoing/incoming call history by shaking the handset once in the home screen and then placing the handset to your ear during an incoming call. Mute, Reject: Set whether to stop the ringtone or reject the call by placing the handset horizontally with the screen faced downwards or by shaking the handset twice. You can also reject the incoming call and send an SMS message selected in advance to the other party. Call ranking: Check who has made calls frequently. Hide the name when receiving: Set whether to hide the other party's name and image until moving the handset when receiving a call. Sending of use information: Set whether to provide use information. Disable Suguden during roaming: Set whether to disable Suguden during international roaming.](https://usermanual.wiki/Sharp/HRO00254/User-Guide-3703449-Page-85.png)
![84 Call zIn the following cases, Suguden does not work properly. During a hands-free call When using the earphone/microphone and headset When connecting to a Bluetooth device with call function When making a call/receiving a call during a call When the motion is not detected properly while lying down or heavy exercise such as running and walking up/down stairs When the display is covered such as the handset is equipped with a flip cover and the cover is closed zIf you put the handset in your bag or pocket with the display turned on during an incoming call, Suguden may activate and Answer or Disconnect may be carried out. zThe proximity sensor has the property of being difficult to respond the black object. yIf you place the handset to your ear with your hair put between the handset and your ear and answer a call, it may not respond (not answered). In this case, place the handset to your ear directly. yIf you turn the handset back on the black desk etc. and carry out Disconnect or Mute, Reject, it may not respond (Disconnect or Mute, Reject is not carried out). In this case, do not place the handset directly on the desk etc. and turn the handset back like floating it approximately 1 cm. zSuguden does not support video call. However, [Hide the name when receiving] can be used when receiving a video call.[Answer] zThis handset combines the earpiece and speaker. When you use this function, the handset detects that your ear is closing to the speaker from which the ringtone is ringing and the ringtone volume is changed to proper volume. However, the loud volume may be sounded near your ear such as when not detecting that your ear is closing, so set the ringtone volume properly and use.[Disconnect] zEven in the following cases, a call ends when the handset detects the disconnect motion (motion/disconnect keywords). When a call is putting on hold by the other party When the answering memo is activated by the other party (playing a reply message/recording an answering memo)Motion zIf you place the handset downwards quickly when disconnecting a call, it may not respond (cannot disconnect). In this case, slowly carry out this movement to respond (disconnect). zIf you shake the handset forcefully, it recognizes a motion has carried out and the call may be disconnected.Voice command zWhen Disconnect by Voice command is set to ON, you may not be able to use other apps which use microphones or voice during a call (Example: an app to record a call). You can use these apps from the next call by setting Disconnect by Voice command to OFF after a call.](https://usermanual.wiki/Sharp/HRO00254/User-Guide-3703449-Page-86.png)
![85 Call zWhen activating the answering memo or voice memo (playing a reply message/recording an answering memo or voice memo), Disconnect by Voice command is not be used. When you answer a call during recording an answering memo or voice memo, you can use Disconnect by Voice command. zYou cannot disconnect a call by voice command during a call using “Hanashite Hon'yaku”. zTo provide Suguden voice function, speech recognition technology and language processing technology are used. However, DOCOMO shall not guarantee any accuracy of these technology etc. zIf you speak in too small a voice or where surroundings are noisy during a call, or depending on how to speak, speech recognition technology may not work properly.[Call] zThis is activated when the lock screen of the touch panel is displayed or while a home app is being used.[Mute, Reject] zIf you shake the handset forcefully, it recognizes a motion has carried out and the ringtone may be stopped or the call may be rejected.[Disable Suguden during roaming] zSuguden is automatically disabled overseas. When using it, set Disable Suguden during roaming to OFF.More information for Suguden zPlease refer to the websites listed below if you would like more detailed information for Suguden functions, precautions about using it, etc. (https://www.nttdocomo.co.jp/service/suguden/) (in Japanese only)Contacting docomo1 In the home screen, [ ]2 [ ]▶[Call settings]3 [Contact docomo]4 Select an item ドコモ故障問合せ (Inquiries to DOCOMO about malfunctions): Make a call for inquiries about malfunctions. ドコモ総合案内・受付 (General inquiries to DOCOMO): Make a call for general inquiries. 海外紛失・盗難等 (Inquiries about loss, theft, etc. while overseas): Make a call for inquiries about loss, theft, etc. from overseas. 海外故障 (Inquiries about malfunctions while overseas): Make a call for inquiries about malfunctions from overseas.](https://usermanual.wiki/Sharp/HRO00254/User-Guide-3703449-Page-87.png)
![86 CallPhonebookYou can manage phonebook data of docomo account in cloud computing or check My profile.Adding contacts to phonebook1 In the home screen, select “ドコモクラウド” (docomo cloud) folder▶[docomo phonebook]▶[Contacts] zWhen the confirmation screen for using cloud computing is displayed, check the content and select [Use]/[Not use].2 [Register]3 Set each item zInformation which can be registered may differ depending on the account type.1 Account zSet to which account to register.2 Image zRegister an image to display when making and receiving a call or checking the contact.3 First name, Last name4 Phone5 Mail6 Group zDisplayed only when you are using the group function.7 Ringtone](https://usermanual.wiki/Sharp/HRO00254/User-Guide-3703449-Page-88.png)
![87 Call8 Illumination9 Add other items zAdd items such as the address and organization.4 [Save]Checking/Using phonebookYou can retrieve registered contacts from the phonebook to make calls and send mails.1 In the home screen, select “ドコモクラウド” (docomo cloud) folder▶[docomo phonebook]▶[Contacts]2 Select a name1 Contacts2 Image3 My profile zDisplay your phone number registered on the docomo nano UIM card.4 Index bar zMove to the touched heading.5 Group6 Use cloud computing7 Register8 Search9 Index zDisplay the index bar.3 Check/Use registered information1 Image2 Registered contents zCheck or use the registered contents.3 Sending SMS4 Edit](https://usermanual.wiki/Sharp/HRO00254/User-Guide-3703449-Page-89.png)
![88 Call5 Favorites zSet the contact as a favorite. zCheck the contacts set as favorites in [Favorites] of Group. zIt is not available on contacts created with some accounts.6 Call Selecting accounts to display1 In the home screen, select “ドコモクラウド” (docomo cloud) folder▶[docomo phonebook]▶[Contacts]2 [ ]▶[Settings]▶[Accounts to display]3 Select an item▶[OK] zTo customize an account to display: [Customize...]▶select accounts▶select groups▶[OK] Sharing phonebookYou can send phonebook data to another device or save it in cloud computing.1 In the home screen, select “ドコモクラウド” (docomo cloud) folder▶[docomo phonebook]▶[Contacts]2 Select a name▶[ ]▶[Share] zTo send all: [ ]▶[SD card/SIM card/common]▶[Send all data (common)]▶after completing the contact export drag the status bar down and touch the notification3 Select a sharing tool zFollow the instructions on the screen and operate after this step.Deleting phonebook1 In the home screen, select “ドコモクラウド” (docomo cloud) folder▶[docomo phonebook]▶[Contacts]2 [ ]▶[Delete contact]3 Select names▶[OK]▶[OK] zTo delete all items: [Select all]▶[OK]▶[OK]Editing phonebook1 In the home screen, select “ドコモクラウド” (docomo cloud) folder▶[docomo phonebook]▶[Contacts]2 Select a name3 [Edit]4 Set each item▶[Save] zFor details on each item that can be set ☞P. 86 “Adding contacts to phonebook”](https://usermanual.wiki/Sharp/HRO00254/User-Guide-3703449-Page-90.png)
![89 CallUsing groups1 In the home screen, select “ドコモクラウド” (docomo cloud) folder▶[docomo phonebook]▶[Group]2 Use groups1 Account2 Group icon3 Group name4 Add group zAdd a group.5 Groups6 Number of contacts registered in the group7 Sort zYou cannot sort groups other than ones created with a docomo account. Grouping/Ungrouping contacts1 In the home screen, select “ドコモクラウド” (docomo cloud) folder▶[docomo phonebook]▶[Group]2 Select a group3 [Delete member]/[Add member]4 Select names▶[OK]▶[OK] zThe group function is available on contacts created with a docomo account, Google account, etc.](https://usermanual.wiki/Sharp/HRO00254/User-Guide-3703449-Page-91.png)
![90 CallMy profileYou can display your phone number registered on the docomo nano UIM card. You can also register your name, mail addresses, etc.1 In the home screen, select “ドコモクラウド” (docomo cloud) folder▶[docomo phonebook]▶[My profile]2 Check/Use the profile1 Image2 Registered content3 Edit Sharing My profileYou can send your profile to another device or save it in cloud computing.1 In the home screen, select “ドコモクラウド” (docomo cloud) folder▶[docomo phonebook]▶[My profile]2 [ ]▶[Share]3 Select a sharing tool zFollow the instructions on the screen and operate after this step. Editing My profile1 In the home screen, select “ドコモクラウド” (docomo cloud) folder▶[docomo phonebook]▶[My profile]2 [Edit]3 Set each item▶[Save]](https://usermanual.wiki/Sharp/HRO00254/User-Guide-3703449-Page-92.png)
![91 CallBacking up/Restoring phonebookYou can restore the phonebook from a docomo nano UIM card or back up/restore using a microSD Card. zFor details on backing up to/restoring from a microSD Card ☞P. 136 “Backing up to/Restoring from a microSD Card” Restoring from a docomo nano UI1 In the home screen, select “ドコモクラウド” (docomo cloud) folder▶[docomo phonebook]▶[Contacts]2 [ ]▶[SD card/SIM card/common]3 [Restore from SIM card] zIf there are multiple accounts, the screen for selecting to which account to register is displayed.4 Select the contact to import zTo import all contacts: [ ]▶[Import all]](https://usermanual.wiki/Sharp/HRO00254/User-Guide-3703449-Page-93.png)
![92 Mail/Web BrowserMail/Web BrowserYou can send and receive messages using docomo mail, SMS, Gmail, etc., and display websites using Chrome.docomo mailYou can send and receive mails using mail address of DOCOMO (@docomo.ne.jp). Data can be easily transferred when you have changed models or restored when you have lost the handset since sent and received mails are saved on the docomo mail server. Also, you can send, receive and view mails using the same mail address from multiple devices such as a tablet, PC browser, etc. if you use d ACCOUNT. zFor details on docomo mail, refer to the DOCOMO website. (https://www.nttdocomo.co.jp/service/docomo_mail/) (in Japanese only)1 In the home screen, [ ] zFollow the instructions on the screen and operate after this step.SMSYou can send and receive text messages with mobile phone numbers serving as destinations. ※For details on the number of characters which can be sent and received etc., refer to “Short Message Service (SMS)” on the DOCOMO website. (https://www.nttdocomo.co.jp/service/sms/) (in Japanese only) zYou can also exchange messages with those who use network of overseas network operators. Refer to the DOCOMO website for information on countries where this service is available and available overseas network operators.1 In the home screen, [ ]▶[Messaging]2 [ ]3 Enter the destination and message▶[ ] zIf destinations are devices owned by those who use network of overseas network operators, enter “+”, the country code and the recipient's mobile phone number. If the phone number begins with “0”, omit the first “0”. Alternatively, enter “010”, the country code and the phone number. zHalf-width katakana and special symbols in SMS messages may not appear correctly for recipient. zSMS cannot be sent when “186” or “184” is added.](https://usermanual.wiki/Sharp/HRO00254/User-Guide-3703449-Page-94.png)
![93 Mail/Web BrowserDisplaying message1 In the home screen, [ ]▶[Messaging]2 Select a thread zMessages are grouped into threads according to their destinations/senders and displayed.1 Image zDisplayed if an image of the other party is registered in the phonebook. Touch to display the registered content of the phonebook. If the person is not registered in the phonebook, you can register the person in the phonebook after touching it.2 Destination/Sender3 Date and time of the message exchange zDisplay latest date and time of the message exchange. When the interval from the latest exchange is short, the elapsed time is displayed.4 Message search3 Check the message1 Destination/Sender2 Phone call3 Date and time of the message exchange zDisplay latest date and time of the message exchange. When the interval from the latest exchange is short, the elapsed time is displayed.4 MessageReplying message1 In the home screen, [ ]▶[Messaging]2 Select a thread3 Enter the message▶[ ]](https://usermanual.wiki/Sharp/HRO00254/User-Guide-3703449-Page-95.png)
![94 Mail/Web BrowserForwarding message1 In the home screen, [ ]▶[Messaging]2 Select a thread3 Touch and hold a message▶[ ]4 Enter the destination and message▶[ ]Deleting message1 In the home screen, [ ]▶[Messaging]2 Select a thread3 Touch and hold a message▶[ ]▶[OK]Deleting thread1 In the home screen, [ ]▶[Messaging]2 Touch and hold a thread to delete zTouch a thread to delete when deleting multiple threads. zTouch the selected thread to disable it. zTouch the number of selected threads at the top of the screen to delete all or disable them.3 [ ]▶[DELETE]Setting Messaging1 In the home screen, [ ]▶[Messaging]2 [ ]▶[Settings]3 Select an item Default message app: Set an app to send and receive SMSs with. Sound: Set the ringtone to be rung when a message is received. Vibrate: Set whether to activate the vibrator when a message is received. Delete old messages: Set whether to delete messages from the oldest one when the number of saved messages reaches its limit. Text message limit: Set the number of messages to be saved by thread. Delivery reports: Notify you that sent messages have been received every time a message is received. Manage SIM card messages: Manage messages saved on the docomo nano UIM card.[Delivery reports] zWhen you send a message to mobile phones of other carriers, the notification for confirming that it has been received may not be sent to you.](https://usermanual.wiki/Sharp/HRO00254/User-Guide-3703449-Page-96.png)
![95 Mail/Web BrowserEmailYou can send and receive mails by setting up a mail account provided by a service provider.Setting up mail account zSetting items may differ depending on the account to use.1 In the home screen, [ ]▶[Email] zOnly when an account is not set up, the account setup screen appears.2 Enter mail address▶[ ]3 Enter password▶[ ] zProvider information is preset for some mail accounts, and a receiving mail server and a sending mail server are automatically set. zWhen you use an account whose provider information is not preset, it is necessary to set a receiving mail server and a sending mail server manually. For details on those settings, contact the Internet service provider you use.4 Set up an account▶[ ]5 Enter an account name and your name▶[ ]Sending mail1 In the home screen, [ ]▶[Email]2 [ ]3 Compose a mail1 Account zIf you set up multiple accounts, you can switch accounts.2 Destination zWhen you enter part of a mail address or a name registered in the phonebook, destination candidates are displayed.3 Subject4 Message5 File attachment6 Add destinations zTouch it to add Cc or Bcc.4 [ ] zSome receiving side models may not be able to receive the subject completely.](https://usermanual.wiki/Sharp/HRO00254/User-Guide-3703449-Page-97.png)
![96 Mail/Web Browser zMails sent from a Gmail account are treated as ones from a PC. When receiving side models set PC-mail rejection, mails cannot be sent. zMails that could not be sent for any reason will be saved in Unsent folder as unsent mails. zDepending on the signal status etc., characters may not appear correctly on the screen of the other party's device.Attaching file zFiles of up to approximately 5 MB can be attached. There are no limits to the number of files to be attached. zDepending on the receiving side device, files may not be received or correctly displayed/played. Also, the quality of videos may deteriorate or videos may be converted to continuous still pictures.Displaying mail zThe screen may appear different depending on the account to use.1 In the home screen, [ ]▶[Email]2 Select a mail1 Box name/Folder name being displayed zTouch [ ] to switch or set folders/accounts.2 Mails zThe characters of sender or subject are displayed in thin characters when a mail is read. zTouch images to checkmark the mails and you can set them to be deleted/unread/read etc. collectively.3 Mail search](https://usermanual.wiki/Sharp/HRO00254/User-Guide-3703449-Page-98.png)
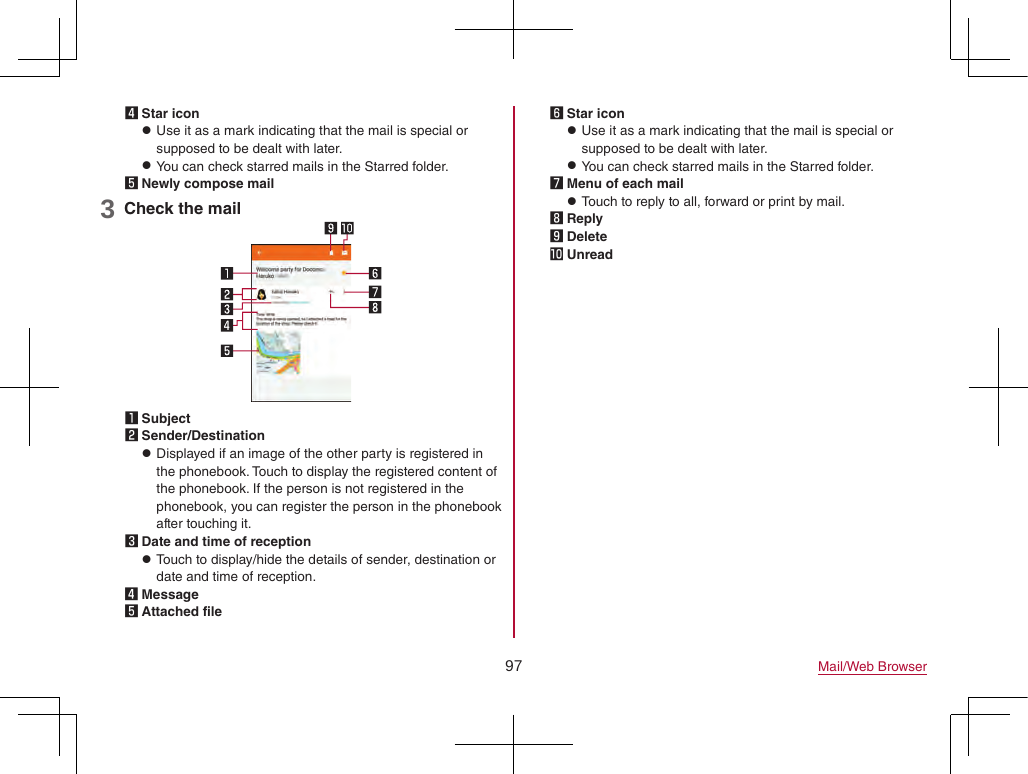
![98 Mail/Web BrowserReplying/Forwarding mail1 In the home screen, [ ]▶[Email]2 Select a mail3 [ ] zTo reply to all: [ ] of each mail▶[Reply all] zTo forward: [ ] of each mail▶[Forward]4 Compose a mail1 Reply type zTouch to switch Reply/Reply all/Forward.2 Destination3 Message4 Quote text zTouch to display/hide the mail of the sender. zYou cannot operate it when forwarding mails.5 Mail of sender6 Subject7 Respond inline zEnter the mail of the sender in the message.5 [ ]Deleting mail1 In the home screen, [ ]▶[Email] zTo delete selected mails: Touch the images of mails▶[ ]▶[OK]2 Select a mail3 [ ]▶[OK]Setting Email1 In the home screen, [ ]▶[Email]2 [ ]▶[Settings]3 Select an item General settings: Make settings for the whole Email. Add account: Add account. Privacy policy: Check the privacy policy. zSelect an account to make settings for the details on the account such as Signature and Email notifications.](https://usermanual.wiki/Sharp/HRO00254/User-Guide-3703449-Page-100.png)
![99 Mail/Web BrowserGmail™You can use a mail service provided by Google or Email provided by general service providers. zIf you have not set up a Google account or Email account, follow the instructions on the screen and set.1 In the home screen, select “Google” folder▶[Gmail]2 [ ]3 Compose a mail1 Account zIf you set up multiple accounts, you can switch accounts.2 Destination zPermit the use of phonebook by touching [Allow contacts suggestions] to display destination candidates when you enter part of a mail address or a name registered in the phonebook.3 Subject4 Message5 File attachment6 Add destinations zTouch to add Cc or Bcc.4 [ ]Displaying mail1 In the home screen, select “Google” folder▶[Gmail]2 Select a thread zIn Gmail, mails are grouped into threads by reply and displayed. If new mails are replied ones of an existing mail, they are grouped into the same thread. A new thread is created for newly composed mails or mails whose subjects have been changed.1 Box name/Label name being displayed zTouch [ ] to switch or set displaying types/accounts.](https://usermanual.wiki/Sharp/HRO00254/User-Guide-3703449-Page-101.png)
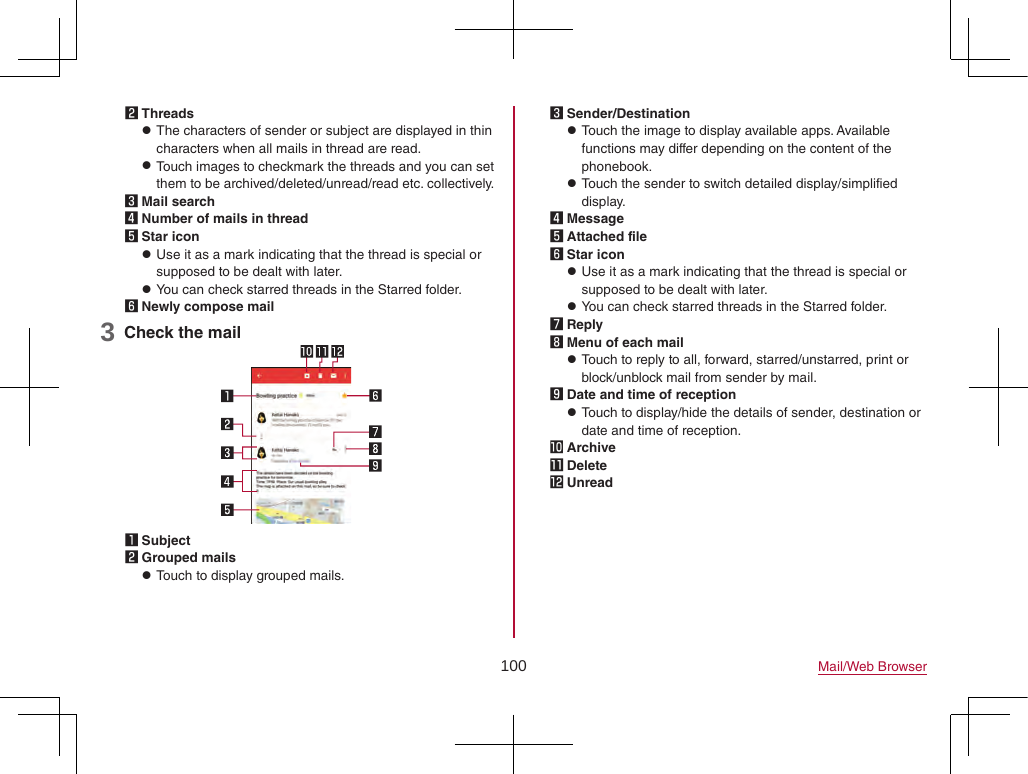
![101 Mail/Web BrowserReplying/Forwarding mail1 In the home screen, select “Google” folder▶[Gmail]2 Select a thread3 [ ] zTo reply to all: [ ] of each mail▶[Reply all] zTo forward: [ ] of each mail▶[Forward]4 Compose a mail1 Reply type zTouch to switch Reply/Reply all/Forward.2 Destination3 Message4 Message of sender zTouch to enter the mail of the sender in the message.5 Subject5 [ ]Deleting thread1 In the home screen, select “Google” folder▶[Gmail] zTo delete selected threads: Touch the images of threads▶[]2 Select a thread3 [ ]Setting Gmail1 In the home screen, select “Google” folder▶[Gmail]2 [ ]▶[Settings]3 Select an item General settings: Make settings for the whole Gmail. Add account: Add account. zSelect an account to make settings for the details on the account such as Notifications and Signature.](https://usermanual.wiki/Sharp/HRO00254/User-Guide-3703449-Page-103.png)
![102 Mail/Web BrowserEarly Warning “Area Mail”Area Mail is a service which enables you to receive earthquake early warnings, tsunami warning or emergency warnings of weather etc. sent from the Japan Meteorological Agency, or disaster and evacuation information sent from national and local governments without being influenced by congestion of the line. zArea Mail is a free service that does not require a subscription. zYou can save up to 50 Area Mails. If the number of saved Area Mails exceeds the maximum number to be saved, they are deleted from the oldest one. zIn the following cases, you cannot receive Area Mail. While the power is turned off During international roaming In Airplane mode During software update While PIN1 code entry screen is displayed While using another carrier's SIM card During a voice call (except VoLTE voice call) zWhen the handset memory has no available space, or tethering is set or using packet communication, you may not receive Area Mail. zYou cannot receive the Area Mail (earthquake early warnings) that failed to be received again. It is possible to receive the Area Mail (tsunami warning, emergency warnings of weather etc. or disaster and evacuation information) that failed to be received again because it is resent.Receiving Early Warning “Area Mail”When receiving an Area Mail, the notification screen is displayed, and it notifies with the exclusive buzzer or exclusive ringtone, and vibrator. zThe exclusive buzzer sound or exclusive ringtone cannot be changed.1 Automatically receive an Area Mail2 When the Area Mail is received, the exclusive buzzer or exclusive ringtone sounds, the icon is displayed on the status bar and its message is displayed Checking received Area Mail later1 In the home screen, [ ]▶[Disaster kit]2 [Early Warning “Area Mail”]3 Select a mail Deleting Early Warning “Area Mail”1 In the home screen, [ ]▶[Disaster kit]2 [Early Warning “Area Mail”]3 Select a mail4 [Delete]▶[OK]](https://usermanual.wiki/Sharp/HRO00254/User-Guide-3703449-Page-104.png)
![103 Mail/Web BrowserSetting Early Warning “Area Mail”You can set whether to receive Area Mail, set for operations for when receiving Area Mail, etc.1 In the home screen, [ ]▶[Disaster kit]2 [Early Warning “Area Mail”]3 [ ]▶[Settings]4 Select an item Receive setting: Set whether to receive Area Mail. Beep tone: Make settings for the ring duration and volume of the exclusive buzzer sound or exclusive ringtone, and set whether to ring them even during manner mode. Check screen image and beep tone: Confirm the receiving screen and the buzzer sound/ringtone for Area Mail of the earthquake early warning, tsunami warning, and disaster and evacuation information (including emergency warnings of weather etc.). やさしい日本語表示 (Display with simple Japanese): Set whether to display earthquake early warning and tsunami warning with simple Japanese.ChromeYou can display websites via packet communication or Wi-Fi function.Displaying websites1 In the home screen, [ ] zSome websites may not appear properly. Searching websites1 Touch the URL entry field2 Enter a keyword▶select a keyword zKeywords that include the entered characters are displayed as a list. zAlternatively, enter the entire keyword and [Go] to search websites. zTo reload the page: In the Chrome screen, [ ]▶[ ] Opening new tabs1 In the Chrome screen, [ ]▶[New tab]](https://usermanual.wiki/Sharp/HRO00254/User-Guide-3703449-Page-105.png)
![104 Mail/Web Browser Switching tabs1 In the Chrome screen, [ ] zThe number on the icon may differ depending on the numbers of opening tabs.2 Select a tab Closing tabs1 In the Chrome screen, [ ]▶[ ] zThe number on the icon may differ depending on the numbers of opening tabs. Opening incognito tabsYou can display websites without your browsing history and search history being recorded.1 In the Chrome screen, [ ]▶[New incognito tab] zWhen you display websites on an incognito tab, the surrounding area of the URL entry field is displayed in gray.2 Touch the URL entry field▶enter a keyword▶[Go] zTo close the incognito tab: In the Chrome screen, [ ]▶[] zThe websites opened on incognito tabs are not recorded in history of Chrome (☞P. 105 “Displaying websites from history”). Also, if you close all incognito tabs, information such as cookie is deleted. Downloaded files and bookmarked websites from incognito tabs can be saved, too. Searching characters in the page1 In the Chrome screen, [ ]▶[Find in page]2 Search1 Keyword entry field zEnter the keyword to search with.2 Previous3 Next4 End search5 Search results bar zMove to the search result at the touched position. Copying characters1 In the Chrome screen, touch and hold characters to copy2 Drag your finger from the start position to the end position zTo change the copy range: Drag [ ]/[ ]3 [COPY]](https://usermanual.wiki/Sharp/HRO00254/User-Guide-3703449-Page-106.png)
![105 Mail/Web Browser Convenient functionsYou can display a link with a new tab or download data such as images.1 In the Chrome screen, touch and hold a link/an image▶select a function to useSetting Chrome1 In the Chrome screen, [ ]▶[Settings]2 Select an item Sign in to Chrome: Sign in to Chrome with your Google account. You can synchronize information such as tabs, bookmarks and history saved when you used Chrome with the same account. Search engine: Set a search engine to use when searching in the URL entry field. Autofill and payments: Set information on your address or credit card to use when automatically filling out forms. Save passwords: Make settings for saving passwords. Home page: Set a home page. Privacy: Make settings for the functions that use your browsing information to improve user-friendliness. Accessibility: Make settings for the display such as font size and zoom. Site settings: Make settings for displaying websites and the information that they can use to improve user-friendliness. Data Saver: Set whether to suppress the data usage volume. About Chrome: Check information on Chrome.Using bookmark and history Saving bookmarks1 In the Chrome screen, [ ]▶[ ] Displaying websites from bookmarks1 In the Chrome screen, [ ]▶[Bookmarks]2 Select a bookmark Displaying websites from history1 In the Chrome screen, [ ]▶[History]2 Select a history item](https://usermanual.wiki/Sharp/HRO00254/User-Guide-3703449-Page-107.png)
![106 AppsAppsdmenuIn dmenu, you can easily access websites or convenient apps recommended by DOCOMO.1 In the home screen, [dメニュー] (dmenu) zInternet connection via packet communication (LTE/3G/GPRS) or Wi-Fi is required to use dmenu. zPacket communication charge is incurred separately for connecting to dmenu and downloading apps introduced on dmenu. Some downloaded apps automatically perform packet communication. zApps introduced on dmenu include charged ones.dmarketAn app which handles digital contents such as music, videos and books and provides you with various services such as shopping websites and travel reservation websites.1 In the home screen, [dmarket] zFor details on dmarket, refer to the following website. (https://d.dmkt-sp.jp/common/about/index.html) (in Japanese only)Play StoreBy using Google Play, you can download and install useful apps or fun games to the handset. zSet up a Google account in advance (☞P. 166 “Setting up Google account etc.”).1 In the home screen, [Play Store] zTo display help: [ ]▶[Help & feedback] zOnce you agree to installation of an app, you are responsible for the results of using the app. Be very cautious about apps that access many functions or a significant amount of data. zBe sure to check the security of app, then install it at your own risk. The handset may be infected with a virus, data may be damaged, etc. zNote that DOCOMO shall not be liable for each malfunction, or any disadvantage brought to you or any third party due to the user-installed app etc. provided by a third party including Google Inc. zFor the user-installed Play store app provided by a third party including Google Inc., contact the respective providers.](https://usermanual.wiki/Sharp/HRO00254/User-Guide-3703449-Page-108.png)
![107 AppsPurchasing apps1 In the Google Play screen, select an app to purchase2 Touch the price zFollow the instructions on the screen and operate after this step. zWhen the app is free: [INSTALL] zIf you make a purchase for the first time, select a payment method. You need to sign in to your Google Wallet account depending on the payment method. zYou can ask for a refund within a specified time after purchasing an app. The app is deleted and you are not charged. In addition, note that a refund request is available for each app only once. If you requested a refund for a purchased app in the past and purchase the same app again, a second refund request is not available. In the Google Play screen, [ ]▶[Help & feedback] for details on the payment method when purchasing an app, the terms on refund requests, etc. zSome downloaded apps automatically perform packet communication. Note that the packet communication charges may be higher. zYou need to pay for an app only once. Re-downloading apps which you previously uninstalled after first downloading will not be charged. zIf you have multiple Android™ devices that use the same Google account, you can download a purchased app to all of them at no additional cost. zNote that DOCOMO provides no assistance for purchase of apps, refund, etc. from Google Play. Uninstalling apps1 In the Google Play screen, [ ]▶[My apps & games]2 [INSTALLED]3 Select an app to uninstall4 [UNINSTALL]▶[OK]](https://usermanual.wiki/Sharp/HRO00254/User-Guide-3703449-Page-109.png)
![109 AppsUsing “Osaifu-Keitai compatible services” zTo use Osaifu-Keitai compatible services, make settings for services from Osaifu-Keitai app. Some services do not require the download of the Osaifu-Keitai compatible app.1 In the home screen, [ ]▶[Osaifu-Keitai] zIf the initial settings are not completed, the initial settings screen appears. Follow the instructions on the screen and operate.2 Select a service3 Set up a service zMake settings from an app or website of the service.4 Hold the # mark of the handset over the scanning devicemark zYou cannot use Osaifu-Keitai compatible services in Airplane mode. However, you can pay by holding the handset over a scanning device. zYou can use the services by holding the handset over the scanning devices without activating Osaifu-Keitai compatible app. zCommunicating with the scanning device is available even if you turn the power off. However, you may not be able to use it if the power remains turned off for a long time, the battery level is insufficient or a certain period of time has passed after turning the power on. zSince the communications necessary to provide Osaifu-Keitai compatible services run in the background regardless of the setting of Data saver (☞P. 151 “Data usage”), Osaifu Keitai compatible apps may incur packet communication charges. zDepending on the installed Osaifu-Keitai compatible app or app's settings, Osaifu-Keitai compatible services may not be used by holding the handset over the scanning device while the Screen lock is set, the display is turned off or power is turned off. zAfter turning the power on, restarting the handset or updating software, unlock the screen before holding the handset over the scanning device and then use an Osaifu-Keitai compatible service. zIf you have not subscribed to sp-mode, you may not be able to use some functions of an Osaifu-Keitai compatible service.](https://usermanual.wiki/Sharp/HRO00254/User-Guide-3703449-Page-111.png)
![110 AppsUsing “Kazashite-Link compatible services” zEnable [Reader/Writer, P2P] in advance (☞P. 111 “NFC/Osaifu-Keitai settings”).1 Hold the # mark of the handset over a device into which an NFC module is built, smart poster, etc.Precautions about holding over the other device zPay attention to the following points when holding the # mark over the other device such as a scanning device or device into which an NFC module is built. Do not let the handset strongly clashed with the other device but slowly bring the handset close to the other device when holding the # mark over it. Hold the # mark over the center of the other device and in parallel with it. If the other device does not recognize the built-in IC card even when you do so, slightly move the handset away from the other device or move the handset around. The other device may not recognize the built-in IC card if there are metallic objects between the # mark and the other device. Remove the handset from its cover or case if the other device does not recognize the built-in IC card, since equipping the handset with it may influence the communication performance.NFC/Osaifu-Keitai lockYou can restrict the use of the functions and services of Osaifu-Keitai by setting NFC/Osaifu-Keitai lock. zNFC/Osaifu-Keitai lock differs from Screen lock of the handset and Set up SIM card lock.1 In the home screen, [ ]▶[Settings]▶[More]▶[NFC/Osaifu-Keitai settings]▶[NFC/Osaifu-Keitai lock] zAlternatively, in the home screen, [ ]▶[Osaifu-Keitai]▶[] to set NFC/Osaifu-Keitai lock.2 Follow the instructions on the screen and enter the NFC/Osaifu-Keitai lock number▶[OK] zWhile NFC/Osaifu-Keitai lock is set, [ ] or [ ] is displayed on the status bar. zWhen the battery runs out while NFC/Osaifu-Keitai lock is set, NFC/Osaifu-Keitai lock cannot be disabled. Be aware of the battery level. If the battery runs out, disable NFC/Osaifu-Keitai lock after charging the battery. zTo use the menu of Osaifu-Keitai while NFC/Osaifu-Keitai lock is set, disable NFC/Osaifu-Keitai lock. zThe NFC/Osaifu-Keitai lock number is not deleted even if you initialize the handset. zWhen disabling NFC/Osaifu-Keitai lock, insert the docomo nano UIM card which had been inserted into the handset when NFC/Osaifu-Keitai lock was set.](https://usermanual.wiki/Sharp/HRO00254/User-Guide-3703449-Page-112.png)
![111 AppsNFC/Osaifu-Keitai settings1 In the home screen, [ ]▶[Settings]▶[More]▶[NFC/Osaifu-Keitai settings]2 Select an item NFC/Osaifu-Keitai lock: For details ☞P. 110 “NFC/Osaifu-Keitai lock” Reader/Writer, P2P: Set whether to use the Reader/Writer, P2P function. Android Beam: Perform data communication using Android Beam. yFor details on Android Beam ☞P. 177 “Android Beam” NFC Type setting: Select an NFC type to use from among “FeliCa/Type A/Type B (Standard)”, “FeliCa/Type A” or “FeliCa/Type B”. Tap & Pay: For details ☞P. 111 “Tap & Pay” Lock No. change: Change the lock number of NFC/Osaifu-Keitai lock.Tap & PayYou can enable/disable available services by holding the handset over the scanning device such as Osaifu-Keitai compatible services.1 In the home screen, [ ]▶[Settings]▶[More]▶[NFC/Osaifu-Keitai settings]▶[Tap & Pay]2 Select a service zFollow the instructions on the screen and operate after this step. zTo display help: [ ]▶[Help] (in Japanese only)](https://usermanual.wiki/Sharp/HRO00254/User-Guide-3703449-Page-113.png)
![112 AppsToruCaToruCa is an app which enables you to store economical coupons of your favorite shops, useful information, etc. in one place. You can retrieve one from mails or by downloading on websites. Retrieved information for ToruCa can be easily updated to the latest.For details on ToruCa, refer to the DOCOMO website.1 In the home screen, [ ]▶[トルカ] (ToruCa) zPacket communication charges may be incurred for retrieving, displaying or updating ToruCa. zThe following functions may not be available depending on the settings of the content provider. Updating Sharing ToruCa Displaying a map zSince the communications necessary to obtain ToruCa run in the background regardless of the setting of Data saver (☞P. 151 “Data usage”), ToruCa apps may incur packet communication charges.iD appli“iD” is electronic money provided by DOCOMO. You can pay easily and conveniently by holding an Osaifu-Keitai in which “iD” is set over scanning devices at stores. Two types of card information can be registered and you can switch them according to the benefits etc. zFor using iD with Osaifu-Keitai, setting of iD appli is required. zExpense (annual fee etc.) for using iD service may vary depending on the credit card company. zFor setting and checking iD appli overseas, packet communication charges differ from those in Japan. zFor information on iD, refer to the iD website. (http://id-credit.com/) (in Japanese only)](https://usermanual.wiki/Sharp/HRO00254/User-Guide-3703449-Page-114.png)
![113 AppsCameraYou can shoot still pictures and videos. Also, you can switch settings of the camera according to the object to shoot.Before using camera zIf dirt such as fingerprint or fat adheres on the lens part, images may be out of focus or blur. Wipe the lens with a soft cloth before shooting images. zAlthough the camera is made with high-precision technology, some pixels or lines look constantly dark or bright. Further, white lines and other noise increase in images especially when shooting images in dimly lit surroundings. zIf the camera lens part is exposed to direct sunlight for a long time, the internal color filter may discolor, creating a discoloration of shot images. zThe quality of images may deteriorate when shot or saved after the handset has been left in a warm location for a long time. zImages shot in shooting conditions which include strong light source such as the sun or a lamp may appear dark or distorted. zShooting the sun directly may impair the performance of the CMOS. zIf you continue to use the camera in a state that internal temperature is high, the warning screen appears and the camera automatically ends after saving shot data. zWhen [Focus Setting] is switched, sounds are heard from the camera lens. This is not a malfunction. zThe color and brightness of the object in images shot with the camera may differ from the actual color and brightness. zMake sure that your fingers, hair, etc. do not obscure the camera lens when shooting images. zBecause a larger picture size requires more data, movement in the image on the handset display may appear slow. zIndoor fluorescent lighting etc. may create flickering or streaky shading on the screen. This flickering or shading may be reduced by changing the lighting conditions and brightness of the room or adjusting the camera brightness and white balance. zShot still pictures are saved in DCF1.0 (ExifVer.2.3, JPEG) format.](https://usermanual.wiki/Sharp/HRO00254/User-Guide-3703449-Page-115.png)
![115 AppsShooting screen layout1 Focus mark zDisplayed when automatically adjusting the focus. Lock the focus to display it in blue. In [Auto] mode or when Focus Setting is set to [Face AF], focus marks are displayed by detecting faces of people.2 Remaining number for shooting zDisplayed when the remaining number for shooting decreases to 99 or less. zEven after shooting a still picture/video, the number may not be changed.3 Switching front camera/back camera zSet to shoot with the front camera or back camera. zUsing some functions or changing settings are not available while you use the front camera.4 Mobile light zSwitch settings of the mobile light.5 Shooting mode zSwitch shooting modes (☞P. 119 “Switching shooting modes”).6 Shooting videos7 Shooting still pictures8 Self-timer zDisplayed when [Self-timer Display] is set to ON (☞P. 118 “Common settings on shooting still pictures/videos”). zDisable self-timer (OFF) or switch the length of time until shooting.9 Album/Thumbnail zActivate Album or display the still picture or video you have just shot. zIcons for changing settings are displayed at the top of the screen depending on the shooting mode. Touch icons to change settings.](https://usermanual.wiki/Sharp/HRO00254/User-Guide-3703449-Page-117.png)
![116 Apps Easy ManualA mode to be automatically applied the settings appropriate to the scenes by selecting the shooting scene. You can adjust settings.1 In the home screen, [Camera]2 [ ]▶[Easy Manual]3 Select the shooting scene1 Setting icon displaying area zTouch the setting icon to display the adjustment bar and adjust various settings. ySetting icons are displayed according to the shooting scene. As for icons displayed when using “Manual”, you can set them in [Select an item for full manual shooting] (☞P. 118 “Common settings on shooting still pictures/videos”). zThe following settings are available with displayed icons. yWhite Balance: [ ] yISO Sensitivity: [ ] yShutter Speed: [ ] yFocus: [ ] ySaturation: [ ] yContrast: [ ] yClarity: [ ]2 Adjustment bar zDrag it to adjust settings.3 Automatic adjustment zTouch it to switch to the automatic adjustment.4 Water Level zCheck angles of the shooting screen.5 Shooting scene zSwitch the shooting scene.ISO Sensitivity zIf you set ISO Sensitivity to high sensitivity, the shutter speed becomes fast. Therefore, it is possible to reduce object shake and camera shake, or shoot clear images of an object in a dark place. However, the quality of still pictures deteriorates.](https://usermanual.wiki/Sharp/HRO00254/User-Guide-3703449-Page-118.png)
![117 AppsShooting still pictures1 In the home screen, [Camera]2 Turn the camera of the handset (back camera) to an object zTo adjust the brightness: Slide your finger up/down zTo zoom: Slide your finger to the left/right or pinch out/in yMaximum magnification (zoom step) is approximately 8.0-fold (90 steps). zTo lock the focus: Touch the object yTouch anywhere other than focus mark to cancel the focus lock. yDrag [AE] to the part where you want to adjust the exposure if Focus Setting is set to [Separate AE/AF].3 [ ]/1/2 zAlternatively, you can shoot still pictures by touching the focus mark when the focus is locked by one other than [Separate AE/AF]. zTouch and hold [ ] or hold 1/2 down for at least 1 second to shoot multiple still pictures in a row. zAs for the focus lock, the object's movements are detected mainly on basis of the colors. Therefore, the object may not be detected properly if its color is faint or similar to the background color.Shooting videos1 In the home screen, [Camera]2 Turn the camera of the handset (back camera) to an object zTo adjust the brightness: Slide your finger up/down zTo zoom: Slide your finger to the left/right or pinch out/in yMaximum magnification (zoom step) is approximately 8.0-fold (90 steps).3 [ ] zTouch [ ] or press 1/2 to shoot still pictures when recording videos. zTo lock the focus: Touch the object yTouch anywhere other than focus mark to cancel the focus lock. yDrag [AE] to the part where you want to adjust the exposure if Focus Setting is set to [Separate AE/AF]. yTouch the focus mark to shoot a still picture when the focus is locked by one other than [Separate AE/AF].4 [ ] zAs for the focus lock, the object's movements are detected mainly on basis of the colors. Therefore, the object may not be detected properly if its color is faint or similar to the background color.](https://usermanual.wiki/Sharp/HRO00254/User-Guide-3703449-Page-119.png)
![118 AppsCamera settings zSome functions are not available depending on the shooting mode being used etc. Settings on shooting still pictures1 In the home screen, [Camera]2 [ ]3 [PICTURE]4 Select an item Picture Size: Switch picture sizes of still pictures. Guide Line: Display the guide on the shooting screen. Intelligent Framing: Set whether to automatically compose by position and angles of the shot subject or background when shooting still pictures. yWhen composing is not needed, the function is not activated. yWhen the still picture is composed, two pictures, original one and composed one, are saved. For details on the checking method, refer to “Displaying composed still pictures” (☞P. 121). HDR: Set whether to reduce blown out highlights/blocked up shadows when you shoot still pictures in a high contrast scene such as when you shoot against the light. ISO Sensitivity: Set the sensitivity for incorporation of light according to the ambient brightness. One Touch Shutter: Set whether to shoot still pictures by touching the screen. Small Face Effect: Set the effect level to carry out small face adjustment when using the front camera. Beautiful Skin Effect: Set the effect level to carry out beautiful skin adjustment when using the front camera. Distortion Correction: Set whether to restrain image distortion using the front camera. Settings on shooting videos1 In the home screen, [Camera]2 [ ]3 [VIDEO]4 Select an item Video Size: Switch picture sizes of videos. Mic Setting: Set whether to use the microphone. Common settings on shooting still pictures/videos1 In the home screen, [Camera]2 [ ]3 [COMMON]4 Select an item Select an item for full manual shooting: Select icons to display on the setting icon displaying area when using “Manual” in Easy Manual. yUp to four icons can be displayed.](https://usermanual.wiki/Sharp/HRO00254/User-Guide-3703449-Page-120.png)
![119 Apps Clipped whites/Crushed shadows: Set whether to display stripes in the part that clipped whites or crushed shadows occur. Water Level: Set whether to display the water level. Focus Setting: Set the focus according to the object. yIf you set [Face AF], detect faces of people. Self-timer Display: Set whether to automatically shoot with a self-timer set. Anti Flicker: Set to make the screen less susceptible to striped patterns when you shoot in a place with fluorescent lighting. Save To: Set a save destination. Add Location Information: Set whether to add location information. Help: Check the functions of icons displayed on the shooting screen, operations on the touch panel or how to use functions. PHOTOSHOW (Web): Connect to the SHARP website and check camera functions and shooting methods by using pictures shot with the SHARP smartphone as an example. Reset Settings: Reset settings. Switching shooting modesYou can switch shooting modes to shoot with according to the shooting condition and object.1 In the home screen, [Camera]2 [ ]3 Select an item Auto: A mode to automatically adjust the camera according to the object. Easy Manual: For details ☞P. 116 “Easy Manual” Time Laps: Make a video by connecting still pictures that are shot at regular intervals. Fireworks: A mode suitable for skyrocket shot. You can automatically shoot fireworks as well. Monochrome: A mode for monochrome shot. Camera Reader: Scan the QR code and bar code. Hand Mirror: A mode for reflecting yourself like a hand mirror using the front camera (shooting is not available). yTouch the screen while using Hand Mirror to pause the screen. Touch the screen again to disable the pause. SHSHOW: Connect to the SHARP website and download an app for utilizing the camera.](https://usermanual.wiki/Sharp/HRO00254/User-Guide-3703449-Page-121.png)
![120 AppsAlbumYou can sort images and videos by event and location and use them. zWhen the image is displayed, it is processed to improve the detail and more clearly.1 In the home screen, [Album]2 [ ]▶select a category3 Select data zTo delete data: Touch and hold data▶[Delete]▶[YES]4 Confirm the data zIf files are not displayed, they may be displayed normally by deleting a database file of Album. Connect the handset to a PC using a USB cable and delete /PRIVATE/SHARP/PM/DATABASE folder on the handset memory or a microSD Card to use. If you delete the database file, created information of event, location, etc. are also deleted. Take extra precautions and check when deleting.Sorting dataYou can sort images and videos by created group. Sorting by event1 In the Album screen, [ ]▶[Event]2 [Not set]3 [ ]▶[Create new event]4 Select data to classify▶[Create]5 [Input new event.]▶enter an event name▶[OK] Sorting by location zThe data with location information attached is automatically sorted on a map.1 In the Album screen, [ ]▶[Map]2 [ ]▶[Location settings]3 Touch and hold the data to classify▶drag the data to the point to register it onto▶[OK]](https://usermanual.wiki/Sharp/HRO00254/User-Guide-3703449-Page-122.png)
![121 AppsDisplaying/Hiding dataYou can use the display mode that allows all images and videos to display and the hide mode that allows images and videos you have set in advance to hide. Setting displaying/hiding dataSet whether to hide data with the hide mode. zSetting is not available in the hide mode. Set it in the display mode.Setting by data1 In the Album screen, select data2 [ ]/[ ] z[ ] indicates displaying while [ ] indicates hiding. When data is set to hide, [ ] is also displayed on a thumbnail of the Album screen.Setting multiple data collectively1 In the Album screen, [ ]▶[Display/Hide images]2 [Select images to hide]/[Select images to display]3 Select data▶[OK]▶[YES] zSetting of hiding images and videos is available only in “Album”. Even if images and videos are set to hide, they are displayed in other apps. Switching displaying modesSwitch the display mode/hide mode.1 In the Album screen, [ ]▶[Display/Hide images]2 [Hide images]/[Display images]Displaying composed still picturesWhen the still picture shot by the “Camera” app is composed by [Intelligent Framing], [ ] is displayed on the thumbnail of the saved still picture. You can check and switch two pictures, original one and composed one.1 In the Album screen, select a still picture zTouch [ ] to display the switch screen of the still picture. You can select the still picture to display in thumbnails yYou can delete and edit each still pictures. yThe still pictures with [ ] is displayed on the thumbnail of the Album screen. Touch [ ] to switch to it. zWhen activating “Album” app immediately after turning the power on etc., [ ] may not be displayed. Activate the “Album” app again after a while.](https://usermanual.wiki/Sharp/HRO00254/User-Guide-3703449-Page-123.png)
![122 AppsAtokara CaptureYou can trim and save a still picture or video.1 In the Album screen, select a video2 [ ]▶[Trimming image]/[Trimming video]Trimming image screenTrimming video screen1 Trimming image zTouch it to save the frame being displayed as the still picture.2 To frame-by-frame reverse/frame-by-frame forward zDisplay a previous/following frame.3 Seek bar zDrag the seek bar to change the playback position.4 Thumbnail5 Display position zDisplay the position of the present display frame. zDrag the thumbnail to change the playback position.6 Play/Pause7 Share zTouch it to carry out trimming image/video and you can use the saved image/video in other apps.8 Trimming video zSave the selection range as another video.9 Playback time zDisplay the playback time of the video to trim.a Range of trimming video zDrag [ ] and set the trimming range.](https://usermanual.wiki/Sharp/HRO00254/User-Guide-3703449-Page-124.png)
![123 AppsGPS/NavigationYou can display Street View and search for routes using Maps. You can also search for facilities near a location on the map being displayed by genre.Using GPS function zGPS is a function to retrieve location information of devices by receiving radio wave from GPS satellites. It is necessary to set [Location] to On to measure the present location (☞P. 155 “Location”). zYou cannot use the handset as a navigation system for professional use of aircrafts, vehicles, person, etc. or surveying GPS of high accuracy. Note that DOCOMO shall not be liable for the pure economic losses such as ones caused by using the GPS for these purposes or by failing to confirm a positioning result or to communicate due to handset failure, malfunction or external factors such as power failure (including battery exhaustion). zGPS is a service administered by the U.S. Department of Defense. Therefore, GPS radio wave condition may be controlled (accuracy degradation, radio wave abort, etc.) for US national security reasons. In addition, the same results may not be retrieved even when positioned in the same location and environment, since the radio wave conditions may change depending on the location of the GPS satellites. zNote that GPS uses the radio waves from artificial satellites, therefore the following conditions may prevent the radio waves from being received or prevent the reception status of the radio waves from being satisfactory, resulting in an error of 300 m or more for location information. In or under a dense forest, in density area with buildings or residence In or under buildings In a basement, tunnel, underground or underwater Near high-tension line Inside cars, trains, etc. In bad weather with heavy rain/snow etc. In bags or boxes When people or objects are blocking the handset When hands are covering the GPS antenna area zWhen using a GPS function overseas, the displayed map based on the acquired location information (latitude and longitude information) may not be accurate because of the legal system etc. in each country and the area. zPacket communication charges may be incurred, since assisted GPS data such as satellite information is automatically retrieved when you measure present location. zPacket communication charges are incurred when you display a map based on location information etc.](https://usermanual.wiki/Sharp/HRO00254/User-Guide-3703449-Page-125.png)
![124 AppsMapsYou can measure your present location, use the navigation function to check how to get to your destination in detail, etc. zIt is necessary to set [Location] to On to measure the present location (☞P. 155 “Location”).1 In the home screen, select “Google” folder▶[Maps]2 Use Maps zTo rotate the map: Keep a finger on the touch panel and turn the map to the desired direction with another finger zTo display sterically: Slide up with your two fingers at the same time zTo measure present location: [ ] Street View1 In the Maps screen, touch and hold any place2 Touch a displayed image zTo change a displayed direction: Slide the screen up/down or to the left/right zTo move a displayed place: Touch the screen twice and slide along the blue line zTo switch to the compass mode: [ ] zSome areas are not supported by Street View. zWhen the compass mode is used, the geomagnetic compass of the handset and the direction displayed by Street View are associated with each other. Searching for routesYou can search for a route from a start point to an end point.1 In the Maps screen, [ ]2 Select how to get to the end point▶touch the search box above zThe present location is entered while it is being measured.3 Enter a start point4 Touch the search box below5 Enter an end point zFollow the instructions on the screen and operate after this step.](https://usermanual.wiki/Sharp/HRO00254/User-Guide-3703449-Page-126.png)
![125 Apps Searching for facilities nearbyYou can search for facilities near a location on the map being displayed by genre.1 In the Maps screen, touch the search box2 Select a genre of facilities to search zAlternatively, you can search by entering a name of place to search in the search box.3 Use the search result zTo display detailed information: Select an address, a name of place or facility, etc.YouTubeYouTube is a free online video streaming service. You can play, search and upload videos.1 In the home screen, select “Google” folder▶[YouTube]2 Select a video zTo display the search box: [ ]ClockYou can use alarm, world clock, timer and stopwatch.AlarmActivate an alarm tone or vibrator at the specified time.1 In the home screen, [ ]▶[Clock]▶[ ]2 Touch a time of register destination zTo add a register destination: [ ]3 Select a time▶[OK]4 Set each item1 Repeat zSet the repetition of the alarm.2 Alarm sound zSet the alarm sound.3 Label zEnter the label.](https://usermanual.wiki/Sharp/HRO00254/User-Guide-3703449-Page-127.png)
![126 Apps4 Delete zDelete the alarm.5 Alarm ON/OFF zEnable/Disable the alarm.6 Vibration zSet whether to use the vibrator.7 Switch displays zAn alarm is not activated when the handset is turned off at the set alarm time. zWhen the set alarm time arrives during a call, the other party's voice and notification sound are heard at the same time. Stopping an alarmActivate an alarm tone or vibrator at the set alarm time.1 Slide [ ] to [ ] while an alarm is ringing zTo use a snooze: slide [ ] to [ ]Stopping an alarm while display is turned onWhen the set alarm time arrives while a screen other than lock screen of the touch panel is displayed, the alarm notification is displayed. Stop the alarm by using the notification.1 [DISMISS] while an alarm is ringing zTo use a snooze: [SNOOZE] Adjusting an alarm volume1 In the alarm screen, [ ]▶[Settings]2 [Alarm volume]▶adjust the volumeWorld clockDisplay clocks for cities around the world.1 In the home screen, [ ]▶[Clock]▶[ ]2 [ ]3 Select a cityTimerActivate an alarm tone after the specified length of time passes.1 In the home screen, [ ]▶[Clock]▶[ ]2 Enter the time▶[ ] zTo add 1 minute: [+1'] zTo stop the countdown: [ ] zTo reset the countdown: [ ] zThe alarm sound is activated after the specified length of time passes. yTo stop the alarm sound: [ ]](https://usermanual.wiki/Sharp/HRO00254/User-Guide-3703449-Page-128.png)
![127 Apps Changing a name1 In the timer screen, [Label]2 Enter a name▶[OK] Adding a timer1 In the timer screen, [ ] zTo switch timers: Slide the timer up/down Deleting a timer1 In the timer screen, [ ]StopwatchYou can measure the time using stopwatch. Also, you can measure the lap time (elapsed time)/split time (total elapsed time).1 In the home screen, [ ]▶[Clock]▶[ ]2 [ ] zTo measure the lap time and split time: [ ]3 [ ] zTo share the measuring result: [ ] zTo reset the measuring result: [ ] zYou can record up to 99 history items of lap time and split time.ScheduleCreate and manage schedules.1 In the home screen, select “ドコモクラウド” (docomo cloud) folder▶[Schedule]2 Check schedules1 Selected date, name of holiday2 Registered schedule3 Search i-schedule zUse i-schedule.4 Add](https://usermanual.wiki/Sharp/HRO00254/User-Guide-3703449-Page-129.png)
![128 Apps Setting Schedule1 In the Schedule screen, [ ]▶[Settings]2 Select an item “Today's schedule” setting: Set to notify the schedules of the day at the specified time. Alarm: Make settings for the alarm. Initial screen: Set a screen shown when Schedule is activated. Starting day: Set the starting day of a week on the calendar. Update birthday data: Apply birthday data in the phonebook to the calendar. Cloud setting: Set whether to use cloud computing. Creating a schedule1 In the Schedule screen, [ ]2 Set each item1 Account zSet to which account to register.2 Label zChange label icons and colors.3 Title4 Text5 Edit details zSet the date and place. Touch [Display input option] to add input items of Repeat, Alarm, etc.6 Text color zChange text colors of the title.7 Sticker zYou can paste and remove stickers (Deco-mail pictogram/pictogram) which decorate schedules nicely.3 [Save] Deleting a schedule1 In the Schedule screen, select a date2 Touch and hold a schedule3 [Delete one]▶[DELETE]](https://usermanual.wiki/Sharp/HRO00254/User-Guide-3703449-Page-130.png)
![129 AppsMemoCreate and manage memos.1 In the home screen, select “ドコモクラウド” (docomo cloud) folder▶[Memo]2 [ ]3 Create a memo▶[Save] zBasic methods for creating memos are the same as those for creating schedules. When creating a memo, set the date and time to be classified into a schedule. For details on Schedule ☞P. 127 “Schedule”Calculator1 In the home screen, [ ]▶[Calculator]2 Calculate zTo display the scientific calculator: Slide the right edge of operation keys to the left zTo copy the calculation result: Touch and hold the calculation result▶[COPY] zTo display help: [ ]▶[Help] zTo display the history of calculation: Slide the calculation result area down. yTo delete the history of calculation: [ ]▶[Clear]▶[CLEAR]EMOPABased on your information and settings of EMOPA registered in advance, the handset delivers various information through voice or the screen display in the lock screen of the touch panel. EMOPA responds by its voice or the screen display if you answer EMOPA's voice with your voice.Also, you can use the memo function (EMOPA memo) and health support function (health care of EMOPA) by using EMOPA.The handset will get to deliver information at better timing by understanding the usage conditions of your handset as you use. zPacket communication charges are incurred when you use EMOPA. zThe present location may be measured so that EMOPA can recognize your home, information of nearby facilities, etc. It is necessary to set [Location] to On to measure the present location. Set Mode of Location to [High accuracy]. If [Location] is set to Off, EMOPA cannot deliver information requiring measurement of the present location (☞P. 155 “Location”). zSome part of EMOPA is ON by default and EMOPA talks only when charging starts/finishes. If you set EMOPA to OFF, touch [OFFにする] (Set to OFF) in the initial settings screen of EMOPA.1 In the home screen, [エモパー] (EMOPA) zAlternatively, in the home screen, [ ]▶[Settings]▶[AQUOS Useful]▶[エモパー] (EMOPA) to display EMOPA.](https://usermanual.wiki/Sharp/HRO00254/User-Guide-3703449-Page-131.png)
![130 Apps zIf the initial settings are not completed, the initial settings screen appears. Follow the instructions on the screen and operate. zAfter completing the initial settings, it is recommended to make settings for your nickname, workplace and school, etc. by [ ]▶[あなたについて] (About you). The opportunity or variation of contents that EMOPA talks may increase. zIf the initial settings are completed, the EMOPA screen is displayed. You can check the state of EMOPA, your information, daily records (for approximately a week), such as the number of steps or schedules.Settings of EMOPA1 In the EMOPA screen, [ ] zYou can switch ON/OFF of EMOPA.2 Select an item エモパー選択 (Select EMOPA): Set EMOPA and its name. Also, add EMOPA from the website. 基本動作について (About basic operation): Make settings for the basic operations such as the volume of EMOPA and operations while setting the manner mode. あなたについて (About you): Make settings for your information such as your nickname, home, workplace and school. エモパーの話題 (Topics of EMOPA): Set what kind of information EMOPA delivers. エモパーメモ (EMOPA memo): Make settings for use of EMOPA memo. エモパーヘルスケア (Health care of EMOPA): Make settings for use of health care of EMOPA. エモパーへの話しかけ方 (Methods of talking to EMOPA): Access the “声でエモパーを呼び出し” (Retrieve EMOPA by voice) of the official EMOPA information website, EMOPARK (in Japanese only). yThe handset does not support “声でエモパーを呼び出し” (Retrieve EMOPA by voice). Instead of inputting memos with voice using EMOPA memo, you can check the guide of the question function. おすすめ機能の紹介 (Introduce recommended functions): Check the simple introduction and the usage demonstration of recommended functions. エモパー使い方ガイド (EMOPA guide): Access the “エモパー使い方ガイド” (EMOPA guide) of the official EMOPA information website, EMOPARK (in Japanese only). よくある質問 (FAQ) (Frequently asked questions): Access the “よくある質問 (FAQ)” (Frequently asked questions) of the official EMOPA information website, EMOPARK (in Japanese only). エモパーの記憶 (Memories of EMOPA): Save, delete or restore data according to the memory that EMOPA and you spent together or your lifestyle habit. 注意事項 (Precautions): Check the EMOPA version, terms of service, privacy policy, etc.](https://usermanual.wiki/Sharp/HRO00254/User-Guide-3703449-Page-132.png)
![131 AppsTiming for EMOPA to talk zIf you put down the handset horizontally etc. while the lock screen is displayed or while the display is turned off in a place which you set for [自宅] (Home) or [自宅のほかにお話しできる場所] (The place EMOPA can talk other than your home) of あなたについて (About you), EMOPA starts to talk. zWhile connecting an earphone to the handset, EMOPA talks to you regardless of the place or time. zEMOPA starts to talk by shaking the handset several times (approximately 2 seconds) in the lock screen.Transferring memories of EMOPA zThe data according to the memory that EMOPA and you spent together or your lifestyle habit is backed up by a Google account and you can transfer it even though you change models. When you activate the handset compatible with EMOPA for the first time, set the same Google account as before model change and back up data in the initial settings. zYou can save memories of EMOPA to microSD Cards and transfer to the new handset compatible with EMOPA. ySave memories: In the EMOPA screen, [ ]▶[エモパーの記憶] (Memories of EMOPA)▶[記憶の保存] (Save memories)▶[OK] yRestore memories: In the EMOPA screen, [ ]▶[エモパーの記憶] (Memories of EMOPA)▶[記憶の復活] (Restore memories)▶[復活する] (Restore)Using EMOPA memoWhen you tell EMOPA the content what you want to take a memo such as a schedule, EMOPA memorizes and delivers it according to the schedule. Also, you can set an alarm or timer using EMOPA memo, or ask it a question. zTouch the lock screen twice and tell EMOPA. yIf [画面消灯時でもメモを起動] (Activate memo even when the screen is turned off) of EMOPA memo is enabled, you can also use EMOPA memo by touching the screen twice while the display is turned off. zIn the lock screen, touch the area where the clock, icon, information etc. is not displayed. zWhen you tell EMOPA outside, put the earpiece to your ear like making a call. zA memo EMOPA memorized is registered in Calendar. If you tell EMOPA including the word to express time such as “明日” (tomorrow), “今週” (this week) or “そろそろ” (soon), EMOPA delivers information at the timing you have told with the memo. zWhen you set an alarm, tell EMOPA like “XX時XX分にアラーム” (set the alarm XX:XX). It is registered in “Clock” app. zWhen you set a timer, tell EMOPA like “XX分タイマー” (set up the timer for XX minutes) or “タイマー起動して” (activate the timer). The timer of “Clock” app is activated. zWhen you ask EMOPA a question, tell like “明日の天気を教えて” (What's the weather like tomorrow). EMOPA delivers information of your question.](https://usermanual.wiki/Sharp/HRO00254/User-Guide-3703449-Page-133.png)
![132 AppsUsing health care of EMOPAThis is talks that EMOPA is anxious about your weight and number of steps or cheers up and supports health maintenance or diet. zYour weight is memorized by same steps as EMOPA memo. yWhen you tell your weight to EMOPA, tell like “今日の体重 XX.Xキロ” (today's weight is XX.X kg). zYour weight is memorized by linking up with some body composition monitors of TANITA corporation as well. yFor linking up with the body composition monitor, [エモパーヘルスケア] (Health care of EMOPA)▶[タニタ体組成計との連携] (Link up with body composition monitor of TANITA) to set it. Follow the instructions on the screen and operate. yFor details on corresponding body composition monitors which link up with EMOPA, refer to the official EMOPA information website, EMOPARK (in Japanese only). zYour weight and number of steps are managed by KARADA MATE. zWhen you make initial settings for EMOPA, [Pedometer On] is enabled (☞P. 132 “KARADA MATE”). zYou can adjust the volume by pressing 1/2 while EMOPA is talking. zEMOPA does not talk from 2:00 a.m. to 5:00 a.m. zEMOPA supports only Japanese. zInformation delivered by EMOPA may not accurately correlate to the usage conditions of your handset. zIf an earphone is not connected to the handset and the handset is put down with its display turned down, EMOPA does not talk. zIf you set [Call] in Suguden setting and shake the handset, Suguden is operated and EMOPA does not talk. zInformation delivered by EMOPA is restricted overseas.Official EMOPA information website, EMOPARK (in Japanese only) zEMOPA may be updated from Play Store for improving and changing how to use it, increasing variations of talking, etc.For the latest information on EMOPA, refer to the official EMOPA information website, EMOPARK (in Japanese only), since EMOPA is subject to change from the contents of this manual.(http://k-tai.sharp.co.jp/dash/emopa) (in Japanese only)KARADA MATEYou can record the number of steps, weight, etc. You can also display the history of the number of steps or weight as a graph and compare it on a daily/monthly basis.1 In the home screen, [ ]▶[KARADA MATE]2 [YES]3 Set each item of user information▶[Pedometer On]▶[A] zAt the time of purchase, temporary figures are registered for User Information. Set User Information properly before use. zThe number of steps is always counted while the power is turned on. zThe display of the pedometer is reset at 0:00 every day.](https://usermanual.wiki/Sharp/HRO00254/User-Guide-3703449-Page-134.png)
![134 Apps KARADA MATE screen layoutSteps mode screenWeight mode screen1 Steps mode2 Number of steps made today3 History of the pedometer zDisplayed daily/monthly number of steps in bar graph. Touch the graph to display the detailed information such as steps, distance and calories of the touched day/month.4 Entering weight zTouch it to enter a daily weight. zUse EMOPA to enter a weight by voice as well. For details on EMOPA ☞P. 129 “EMOPA”5 Setting goal zTouch it to set the goal of steps or weight. yAlternatively, in the KARADA MATE screen, [ ]▶[Set Goal] to set the goal. zTo delete the set goal: In the setting goal screen, [RESET]6 Weight mode7 Goal value8 Switching display zSwitch to the display of a daily/monthly9 Difference from previous weighta Latest weightb History of the weight zDisplayed daily/monthly weight in bar graph. Touch the graph to display the detailed information such as weight of the touched day/month and BMI. zTo move to the displaying month or week: [ ]/[ ]](https://usermanual.wiki/Sharp/HRO00254/User-Guide-3703449-Page-136.png)
![135 Apps Changing the user information1 In the KARADA MATE screen, [ ]▶[User Information]2 Set each item Disabling KARADA MATE1 In the KARADA MATE screen, [ ]▶[Settings]2 [Pedometer On] zDisable [Pedometer On] to stop KARADA MATE. Resetting dataDelete all walking data and weight data.1 In the KARADA MATE screen, [ ]▶[Reset Data]▶[YES] Checking term explanations1 In the KARADA MATE screen, [ ]▶[Term Explanation]2 Select an explanationdocomo Data Copy“docomo Data Copy” is an app to copy data saved on the handset to other handsets, back up/restore data, etc.Use to transfer data when you change models or backup the important data periodically. zYou may not be able to copy, back up and restore properly depending on the OS or file type.Data TransferYou can directly copy data such as phonebooks and images to the device of transfer destination using the direct communication of one-to-one that does not use the internet.Activate “Data Copy” on both devices of copy source and copy destination, line two up and operate.1 In the home screen, [ ]▶[Data Copy]2 [Data transfer] zFollow the instructions on the screen and operate. zThis app is needed for both devices of copy source and copy destination. If it is not installed, you can download it from the DOCOMO website. zCommunication methods may differ depending on the model or OS you use. zFor details on the compatible models or usage methods, refer to the DOCOMO website.](https://usermanual.wiki/Sharp/HRO00254/User-Guide-3703449-Page-137.png)
![136 AppsBacking up to/Restoring from a microSD CardYou can move and back up data such as phonebooks and images by using a microSD Card. zDo not remove the microSD Card from the handset or turn off the handset while backing up or restoring data. Data on the handset may be damaged. zIf the name of a phonebook item (phone number etc.) on other devices differs from that on your handset, the name of the item may be changed or deleted. Also, characters which can be registered to phonebook differ among devices, so the characters may be deleted at the copy destination. zPhonebooks registered in the docomo account can be backed up. zWhen you back up phonebooks to a microSD Card, you cannot copy data without name. zWhen the available space on the microSD Card is insufficient, backup may not be available. In this case, secure enough space by deleting unnecessary files from the microSD Card. zWhen the battery level is insufficient, backup or restoration may not be available. In this case, back up or restore again after charging the handset. zIn this app, only data such as images and movies saved on the handset are backed up. The data saved on a microSD Card are not backed up. Backing upYou can back up data such as phonebooks and media files.1 In the home screen, [ ]▶[Data Copy]2 [Backup & Restore]3 [Backup]4 Select data to back up▶[Start backup]▶[BACKUP] zSelected data are saved on the microSD Card.5 [Back to top] RestoringYou can restore data such as phonebooks and media files backed up to the microSD Card to the handset.1 In the home screen, [ ]▶[Data Copy]2 [Backup & Restore]3 [Restore]4 [Select] of a data category to restore5 Select data to restore▶[Select]6 Select the restoration method▶[Start restore]▶[RESTORE] zIt is not necessary to select the restoration method depending on the data category. zSelected data are restored to the handset.7 [Back to top]](https://usermanual.wiki/Sharp/HRO00254/User-Guide-3703449-Page-138.png)
![137 Apps Copying phonebooks to docomo accountYou can copy contacts registered in Google account to the docomo account.1 In the home screen, [ ]▶[Data Copy]2 [Backup & Restore]3 [Phonebook account copy]4 [Select] of a phonebook to copy▶[OVERWRITE]/[ADD] zThe copied accounts are saved to the docomo account.5 [OK]Backing up to/Restoring from Data Storage BoxYou can transfer and back up call log/music data using Data Storage Box.1 In the home screen, [ ]▶[Data Copy]2 [ ]▶[Backup/Restore to Cloud]3 [Backup]/[Restore] zFollow the instructions on the screen and operate. zIf you have not logged in to docomo cloud, the confirmation screen is displayed. zWhile the Screen lock is set, Energy saving is activated, etc., Periodical backup is not carried out on time but it is carried out on the next time when it can be activated. zNote that the packet communication charges may be higher if you use Periodical backup in Data Storage Box.](https://usermanual.wiki/Sharp/HRO00254/User-Guide-3703449-Page-139.png)
![138 Handset SettingsHandset SettingsSetting menuIn the home screen, [ ]▶[Settings] to display the menu and make various settings for the handset. zIn the top, recommended settings are displayed as suggestions. z[] while Settings is displayed▶enter a keyword to search with to search the setting items. zTouch [ ] in the setting screen to display setting items as a list. Select them to move to other setting items.Phone number Check your phone number registered on the docomo nano UIM card.Notifications Make settings for app notifications.Sound Make settings for the ringtone, notification sound, etc.Display Make settings for the screen display etc.AQUOS Useful Make settings for convenient functions supplied with the handset.エモパー (EMOPA)Based on your information and settings of EMOPA registered in advance, the handset delivers various information through voice or the screen display in the lock screen of the touch panel.Battery & energy savingActivate Energy saving, check the battery usage, etc.Home applicationsSwitch lock screens or home apps to use.Apps Check names, versions, memory usage, etc. of apps, enable/disable apps, uninstall them, etc.Storage Check the used capacity/total capacity of the handset memory, microSD Card or USB memory, display the data saved on it, etc.Memory Check the memory (RAM) usage.Wi-Fi Make settings for the Wi-Fi function.Bluetooth Connect the handset and Bluetooth devices wirelessly.Data usage Check the volume of data communicated via mobile networks and Wi-Fi networks.More Make settings for other functions in Wireless & networks.docomo service/cloudMake settings for the docomo service.Location Make settings for measuring location information.Lock & Security Make settings for the security lock.Languages & inputMake settings for the language displayed on the screen, character entry, text-to-speech, etc.Backup & reset Back up data using a Google account, transfer data to/from among devices, perform Reset all, etc.](https://usermanual.wiki/Sharp/HRO00254/User-Guide-3703449-Page-140.png)
![139 Handset SettingsAccounts Add/Set accounts or make settings for data synchronization.Google Make settings for various Google services collectively.Date & time Make settings for the date and time and their format.Accessibility Make settings for accessibility options.Printing Print with an app supporting the print function by installing a print app (plug-in).About phone Check the information about the handset.NotificationsYou can make settings for app notifications.1 In the home screen, [ ]▶[Settings]▶[Notifications]2 Select an item3 Set for notifications On the lock screenYou can set for notifications to be displayed on the lock screen of the touch panel.1 In the home screen, [ ]▶[Settings]▶[Notifications]▶[ ]2 [On the lock screen]▶select an item to display/hide notifications zWhen selecting [Hide sensitive notification content], you can set not to display details such as the other party's phone number or the number of notifications in the lock screen. yYou can use this item when Screen lock is set to an item other than [None] or [Swipe or Touch].SoundYou can make settings for the ringtone, notification sound, etc.1 In the home screen, [ ]▶[Settings]▶[Sound]2 Select an item Media volume: Set the volume of the media sound (music, video, etc.). Alarm volume: Set the volume of the alarm. Ring volume: Set the volume of the ringtone. エモパー volume (Volume of EMOPA): Set the volume of EMOPA. Phone ringtone: Set the ringtone. Vibrator when receiving a call: Set whether to activate the vibrator when receiving a call. Manner Mode: Make settings for the priority notification or operation of notification at specific time etc. yFor details on Manner mode ☞P. 56 “Manner mode” Default notification ringtone: Set the notification sounds. Default alarm ringtone: Set the alarm sounds. Other sounds: Set whether to activate the vibrator when a specific key operation etc. is carried out or set whether or not to enable operation sounds for when touching menus etc.](https://usermanual.wiki/Sharp/HRO00254/User-Guide-3703449-Page-141.png)
![140 Handset SettingsDisplayYou can make settings for the screen display etc.1 In the home screen, [ ]▶[Settings]▶[Display]2 Select an item Wallpaper: Set an image for the home screen and the lock screen of the touch panel. yIf you set [Lock Photo Shuffle] to ON, an image for the lock screen of the touch panel is automatically switched every time the display is turned on. Brightness level: For details ☞P. 141 “Brightness level” Sleep: Set the light duration of the backlight. Press power button twice for camera: Set whether to activate Camera by pressing 0 twice. Relax settings: For details ☞P. 141 “Relax settings” Quality mode: Make settings for the picture quality. Also, set whether to use the function of Virtual HDR which allows the video to display like HDR video. Illumination: For details ☞P. 142 “Illumination” When device is rotated: Set whether to rotate the contents of the screen when rotating the handset. Font Settings: Make settings for the text size or text font. Display size: Set icons etc. size displayed on the screen. VeilView: For details ☞P. 142 “VeilView” Screen saver: Set whether to use the screen saver. Cast: For details ☞P. 181 “Cast” Display left percents of Battery: Set whether to display the percentage of the remaining battery level on the status bar.[Sleep] zNote that the continuous stand-by time is shortened when increasing the light duration.[Quality mode] zIf [RelaxView] is enabled, the settings of Quality mode are not applied.[When device is rotated] zThis function may not follow the setting depending on the app in use.[Font Settings] zFont may not appear correctly when activating an app downloaded from Google Play etc.](https://usermanual.wiki/Sharp/HRO00254/User-Guide-3703449-Page-142.png)
![141 Handset SettingsBrightness level1 In the home screen, [ ]▶[Settings]▶[Display]▶[Brightness level]2 Select an item Automatic brightness: Set whether to automatically adjust brightness of the backlight. When not automatically adjusting, set the brightness manually. Brighten while charging: Set whether to brighten the display while charging.3 [OK][Automatic brightness] zNote that the continuous stand-by time is shortened when increasing the brightness of the display.Relax settingsYou can make settings for using the quality mode of Eye-friendly.1 In the home screen, [ ]▶[Settings]▶[Display]▶[Relax settings]2 Select an item RelaxView: Set whether to switch to the quality mode of Eye-friendly. RelaxAuto setting: Set whether to switch to RelaxView at the specific time. Overview of RelaxAuto: Display the explanation of functions. Time settings: Set the time to switch to RelaxView by [RelaxAuto setting]. yIf you select [エモパー mode] (EMOPA mode), [RelaxView] is enabled before your sleep time EMOPA learned. Adjust image quality: Set the RelaxView quality. zEven if [RelaxView] is enabled, the screen is displayed as the usual quality when using camera. However, when activating Album or displaying previous still pictures/videos from the shooting screen, the screen is displayed as the RelaxView quality.](https://usermanual.wiki/Sharp/HRO00254/User-Guide-3703449-Page-143.png)
![142 Handset SettingsIlluminationThe light performance is displayed on the screen when receiving a call, charging starts, etc.1 In the home screen, [ ]▶[Settings]▶[Display]▶[Illumination]2 Set to On3 Select an item For incoming call: Set whether to activate Illumination when receiving a call. Illumi pattern/color for incoming call: Make settings for a flashing pattern or a flashing color of Illumination for when receiving a call. Notification: Set whether to make the incoming lamp flash if there are missed calls and new mails. yFor details on the flashing color of the incoming lamp etc. ☞P. 52 “Incoming/Charging lamp” When start charging: Set whether to activate Illumination when charging starts. When unlocking: Set whether to activate Illumination when unlocking the touch panel. When ending a call: Set whether to activate Illumination when ending a call.VeilViewYou can prevent others from seeing the display.1 In the home screen, [ ]▶[Settings]▶[Display]▶[VeilView]2 Select an item VeilView: Set whether to enable VeilView. Pattern setting: Set the display pattern. Density setting: Make an adjustment for the effect (shading) to prevent others from seeing the display.[VeilView] z[VeilView] is disabled if the power is turned off.[Pattern setting] zThe effect of preventing others from seeing may differ depending on the selected patterns.](https://usermanual.wiki/Sharp/HRO00254/User-Guide-3703449-Page-144.png)
![143 Handset SettingsAQUOS UsefulMake settings for convenient functions supplied with the handset.1 In the home screen, [ ]▶[Settings]▶[AQUOS Useful]2 Select an item Fingerprint sensor: For details ☞P. 160 “Fingerprint authentication” ScrollAuto: For details ☞P. 144 “ScrollAuto” エモパー (EMOPA): For details ☞P. 129 “EMOPA” Clip Now: For details ☞P. 144 “Clip Now” Auto sleep Off: For details ☞P. 145 “Auto sleep Off” Phone cover setting: When equipping the handset with the AQUOS Frosted Cover (commercially available), set [AQUOS Frosted Cover] to ON. Also, you can check the using method of AQUOS Frosted Cover in “More info”. yYou can turn the display on/off by opening/closing the cover. If you turn the display on while the cover is closed, the display is frosted. If you trace the cover, frost whose area you traced is removed, and you can check the notification and operate while the cover is closed. ROBOQUL setting: For details ☞P. 145 “ROBOQUL setting”AQUOS Frosted Cover zIn the following cases, the display is not frosted even when the cover is closed. While receiving a call When alarm ringing When EMOPA is talking zWhen the cover is closed, EMOPA does not notify with only the screen display.](https://usermanual.wiki/Sharp/HRO00254/User-Guide-3703449-Page-145.png)
![144 Handset SettingsScrollAutoYou can automatically scroll the screen such as a website being displayed upward/downward.1 In the home screen, [ ]▶[Settings]▶[AQUOS Useful]▶[ScrollAuto]2 Select an item ON/OFF: Set whether to use ScrollAuto. Set Apps: Set apps to apply activation of ScrollAuto. Notify in status bar: Set whether to notify by notification icon when the applicable app is running. Scrolling the screen automatically1 Drag the screen in the direction to scroll▶put your finger on the displayed arrow and put it off zPut your finger off to start scrolling. zOperate it for approximately 5 minutes to stop scrolling. zTo adjust the scroll speed: [+]/[-] zTo stop scrolling: Touch the screen zIf your drag speed is too fast, the arrow is not displayed. zDepending on the position of the screen, even if you release your finger, the screen may not be scrolled automatically. zWhile the screen is scrolled automatically, [ ] is displayed on the left edge of the screen and indicate the movement of the scroll.Clip NowYou can shoot the screen being displayed as an image (archival screenshot) by tracing the edge of the screen with your finger.Also, you can use a screenshot for a temporary memo which can be saved temporarily.1 In the home screen, [ ]▶[Settings]▶[AQUOS Useful]▶[Clip Now]2 Select an item ON/OFF: Set whether to use Clip Now. Help: Display the explanation of Clip Now. Slide operation settings: Set whether to shoot archival screenshots or screenshots for a temporary memo. Display share options: Set whether to display share options when you shoot a temporary memo. Delete All: Delete all archival screenshots you have shot. zData may not be saved completely or partially depending on the app.[Slide operation settings] zYou cannot disable both functions. When you do not use Clip Now, disable Clip Now in [ON/OFF] Shooting archival screenshots1 Display the screen to save▶trace the edge of the screen to the right/left from upper left/right of the screen](https://usermanual.wiki/Sharp/HRO00254/User-Guide-3703449-Page-146.png)
![145 Handset Settings Shooting screenshots for a temporary memo1 Display the screen to save temporarily▶trace the edge of the screen down from upper left/right of the screen zTo check a temporary memo: Drag part of a temporary memo displayed on the left edge or right edge of the screen to the center of the screen zTo delete a temporary memo: Touch a temporary memo▶drag it to [ ]Auto sleep OffMake settings for the display when lifting or holding the handset with your hand.1 In the home screen, [ ]▶[Settings]▶[AQUOS Useful]▶[Auto sleep Off]2 Select an item Turn screen on by holding: Set whether to turn the display on after you lift the handset and keep it stationary while the display is turned off. Bright Keep: Set whether to set the display not to be turned off while holding the handset with your hand.[Turn screen on by holding] zThis function is enabled by default. zIn the following cases etc., the display may not be turned on. When you are moving with the handset held (while getting in a car) When you keep the handset moving before or after lifting it When you lift the handset vertically or horizontally[Bright Keep] zIf you do not move or operate the handset for a certain period of time, the display may be turned off even while Bright Keep is set and you are holding the handset with your hand.ROBOQUL settingWhen connecting the handset to ROBOQUL (commercially available), ROBOQUL rotates and turns to you according to the time when the screen is turned on and charging starts, incoming calls, alarms, etc. Also, EMOPA talks to you according to the situation. ROBOQUL links to EMOPA, and it faces and talks to you while EMOPA is activated. zIf you set EMOPA to ON, ROBOQUL links to EMOPA and activates much more situation.1 In the home screen, [ ]▶[Settings]▶[AQUOS Useful]▶[ROBOQUL setting]2 Select an item Operations of ROBOQUL: Set whether to activate ROBOQUL while charging the handset with ROBOQUL. More info: Connect to the SHARP website and check more information about ROBOQUL.](https://usermanual.wiki/Sharp/HRO00254/User-Guide-3703449-Page-147.png)
![146 Handset SettingsBattery & energy savingYou can activate Energy saving, check the battery usage, etc.1 In the home screen, [ ]▶[Settings]▶[Battery & energy saving]2 Select an item Energy saving: For details ☞P. 146 “Energy saving” Battery: Check the battery usage etc. zIf Battery optimization is carried out, the apps are set not to work while the display is turned off (except while charging) because of saving the battery consumption of each app. For details on the settings of Battery optimization ☞P. 61 “Setting Battery optimization”Energy savingYou can save the battery consumption by restricting the functions of the handset.1 In the home screen, [ ]▶[Settings]▶[Battery & energy saving]▶[Energy saving]2 [OFF]/[ON]3 Select an item Overview of Energy saving: Display the explanation of the functions. Advanced settings: Set functions to be restricted individually. Switch by battery: Set whether to automatically switch Energy saving to [ON] when the battery level is less than the set battery level. Battery level to switch: Set the battery level to switch Energy saving to [ON] by [Switch by battery]. zWhen you start charging, Energy saving is set to [OFF]. zWhen Energy saving is [ON] by [Switch by battery], Energy saving is not switched to [OFF] even if you disable [Switch by battery].AppsYou can check names, versions, memory usage, etc. of apps, enable/disable apps, uninstall them, etc.1 In the home screen, [ ]▶[Settings]▶[Apps]2 Select an app Disabling an appTerminate operations of an app and set it not to be displayed on the app list screen without uninstalling it. zYou can disable apps which cannot be uninstalled.1 In the home screen, [ ]▶[Settings]▶[Apps]2 Select an app3 [DISABLE]▶[DISABLE APP]](https://usermanual.wiki/Sharp/HRO00254/User-Guide-3703449-Page-148.png)
![147 Handset Settings zIf you disable an app, other apps which link up with the disabled app may not work properly. In this case, enable the app. Enabling an app1 In the home screen, [ ]▶[Settings]▶[Apps]2 Select an app3 [ENABLE]Apps settings1 In the home screen, [ ]▶[Settings]▶[Apps]▶[ ]2 Select an item App permissions: For details ☞P. 61 “Setting functions to use” Opening links: Make settings for the link from other apps etc. Assist & voice input: Set the app to activate by touching and holding [B]. Home app: Set the default home app. Browser app: Set the default browser app. Phone app: Set the default phone app. SMS app: Set the default SMS app. Special access: Set the special access such as Battery optimization and Modify system settings.StorageYou can check the used capacity/total capacity of the handset memory, microSD Card or USB memory, display the data saved on it, etc. zFor details on managing saved data ☞P. 171 “Operation of files”1 In the home screen, [ ]▶[Settings]▶[Storage] zThe used capacity/total capacity of the handset memory, microSD Card or USB memory are displayed. yIf the microSD Card or USB memory is not inserted, the details screen of the used capacity on the handset memory is displayed.2 Select a storage zSelect [Internal shared storage] to display the details screen of the used capacity on the handset memory. Select [Explore] in the details screen to display the data list saved on the handset memory. zSelect [SD card] or the name of USB memory to display the data list saved on it. zTo unmount the microSD Card or USB memory: [ ] of [SD card] or the name of USB memory. zTo mount the microSD Card or USB memory: Select [SD card]/name of USB memory▶[MOUNT]](https://usermanual.wiki/Sharp/HRO00254/User-Guide-3703449-Page-149.png)
![148 Handset SettingsFormatting microSD Card/USB memoryYou can format the microSD Card or USB memory.1 In the home screen, [ ]▶[Settings]▶[Storage]2 Select [SD card]/name of USB memory▶[ ]▶[Storage settings]▶[Format]▶[ERASE & FORMAT]3 [DONE] zNote that all the data on the microSD Card or USB memory will be deleted when formatted.Encrypting/Decrypting microSD CardIf you encrypt the microSD Card, data on the microSD Card is not available in the devices other than the handset used for encrypting it.You need to decrypt the microSD Card to use it as usual. zCarry out the operations while charging the battery with its battery level still left sufficiently. zSet Screen lock to [Lock No.] or [Password] in advance. yFor details on Screen lock ☞P. 156 “Lock & security”1 In the home screen, [ ]▶[Settings]▶[Storage]2 Select a microSD Card▶[ ]▶[Storage settings]▶[Encrypt]/[Release encryption]▶[CONFIRM] zUnlock the screen by method set in Screen lock.3 [START] zWhen the available space on the microSD Card is insufficient, encryption/decryption is not available. zNote that when you have carried out Reset all with the microSD Card encrypted, you cannot use the data on the microSD Card. Decrypt it before carrying out Reset all. zIf you insert an unencrypted microSD Card into the handset that has been used for encrypting another microSD Card, the handset can only read data on it. zThe handset can write data into the read-only microSD Card after encrypting the microSD Card. zEncrypting/Decrypting a microSD Card may take time. Do not stop charging the battery or do not remove the microSD Card while it is being encrypted. Data on it may be lost if the encryption is interrupted.MemoryYou can check the memory (RAM) usage.1 In the home screen, [ ]▶[Settings]▶[Memory] zTo change the measurement time: Touch the time▶select the time zTo display the memory usage of apps: [Memory used by apps]](https://usermanual.wiki/Sharp/HRO00254/User-Guide-3703449-Page-150.png)
![149 Handset SettingsWi-FiIf you use Wi-Fi function of the handset, you can use mail or Internet by connecting to access points of your home, corporate network or public wireless LAN service.Radio interference with Bluetooth devices zWireless LANs (IEEE 802.11b/g/n) use the same frequency band (2.4 GHz) as Bluetooth devices. Therefore, using the wireless LAN device near a Bluetooth device may cause radio interference, lowering of communication speed, noise or connection failure. In this case, turn off the Bluetooth device or keep the handset and the wireless LAN device at least approximately 10 m away from the Bluetooth device. zPacket communication is also available while [Wi-Fi] is set to On. Wi-Fi connection is prioritized while Wi-Fi connection is set, but the connection is automatically switched to that of LTE/3G/GPRS network once Wi-Fi connection is terminated. Note that packet communication charges may be incurred in this case. zRefer to the manual of your wireless LAN base unit when using the access point at home etc. zOperate access point registration near the access point. zIf you use the docomo service by using Wi-Fi function, set d ACCOUNT in advance. In the home screen, [ ]▶[Settings]▶[docomo service/cloud]▶[d ACCOUNT setting] to set it.1 In the home screen, [ ]▶[Settings]▶[Wi-Fi]2 Set to On3 Select an access point zIf you select an access point protected by security, enter the password (security key) and select [CONNECT]. zTo register access points manually: [Add network]▶enter the network name▶set security▶[SAVE] zWhen you connect to Wi-Fi network, [Connected] is displayed. When a different message is displayed, make sure the password (security key). When the connection is not established even if you enter a correct password (security key), the correct IP address may not have been acquired. Check the signal status and reconnect. zAs for the manual registration of an access point, this function supports WEP, WPA/WPA2 PSK and 802.1xEAP as the security setting. zIf you connect to an access point which is not connected to the Internet, [ ] is displayed and the communication may be made by mobile networks, not Wi-Fi connection. To make Wi-Fi communication by using such an access point, enable [Using this AP without internet connection] of Advanced options before connecting to the access point.](https://usermanual.wiki/Sharp/HRO00254/User-Guide-3703449-Page-151.png)
![150 Handset Settings Wi-Fi settings1 In the home screen, [ ]▶[Settings]▶[Wi-Fi]▶[ ]2 Select an item Saved networks: Display the access point that you have accessed. Network notification: Set whether to display a notification icon when an open network is detected. ySet it after setting [Wi-Fi] to On. Wi-Fi sleep policy: Set whether to disconnect Wi-Fi when the display is turned off. Avoid poor connections: Set whether to use the Wi-Fi function only when stable Internet connections are available. Internal IP phone settings: Make settings for Internet call. MAC address: Confirm the MAC address. IP address: Confirm the IP address. Wi-Fi detailed settings1 In the home screen, [ ]▶[Settings]▶[Wi-Fi]2 [ ]▶[Advanced]3 Select an item Install certificates: Install certificates. Wi-Fi Direct: Make settings for Wi-Fi Direct. WPS Push Button: Set the Wi-Fi with WPS Push Button. yPush the WPS button of the access point. An access point is detected and registered automatically. WPS Pin Entry: Set the Wi-Fi with WPS PIN. yInput the PIN displayed on the screen to the access point. zThe registration process using WPS takes a few minutes. After completion of the registration of the access point, check that the proper connection to the access point is acquired. Deleting access point settings1 In the home screen, [ ]▶[Settings]▶[Wi-Fi]2 Select an access point already set▶[FORGET]▶[YES]](https://usermanual.wiki/Sharp/HRO00254/User-Guide-3703449-Page-152.png)
![151 Handset SettingsData usageYou can check the data usage volume via mobile networks or Wi-Fi networks. Also, you can set limit.1 In the home screen, [ ]▶[Settings]▶[Data usage] zThe data communication volume via mobile networks is displayed.2 Select an item Data saver: Suppress the data usage volume by pausing data transmission in the background of some apps. yFor apps whose data communication is not restricted even during Data saver, you can set it from [Unrestricted data access]. Cellular data: Set whether to use the data communication via mobile networks. Cellular data usage: Display the data usage volume via mobile networks on a diagram. Also, you can check apps having used data communication. Billing cycle: For the data usage volume via mobile networks, set for the date of starting to measure or data communication volume for generating alert on a monthly basis.Also, if you set [Set data limit] to ON, you can pause the data communication when the data communication volume reaches to the limit. You can set the limit in [Data limit]. yWhen the data usage volume reaches to the limit, the notification that mobile data is being paused is displayed. Touch [OK] to pause data communication until the next billing period. Touch [RESUME] to resume data communication. Wi-Fi data usage: Display the data usage volume via Wi-Fi networks on a diagram. Also, you can check apps having used data communication. Network restrictions: When restricting data communication of the background, set Wi-Fi networks used same as mobile networks. zThe displayed data communication volume is an approximation. You can check the actual one on My docomo.](https://usermanual.wiki/Sharp/HRO00254/User-Guide-3703449-Page-153.png)
![152 Handset SettingsMoreYou can make settings for other functions in Wireless & networks.1 In the home screen, [ ]▶[Settings]▶[More]2 Select an item Airplane mode: Restrict the use of some functions using communication such as call/mail function. NFC/Osaifu-Keitai settings: For details ☞P. 111 “NFC/Osaifu-Keitai settings” Tethering: For details ☞P. 152 “Tethering” VPN: Make settings for VPN. For details ☞P. 182 “Adding VPN” Cellular networks: For details ☞P. 153 “Cellular networks” Proxy settings: Set to connect to the network via proxy. Network settings reset: Reset all network settings.[Airplane mode] zWhen [Lock SIM card] is enabled, you cannot call to the emergency number (110, 119 or 118). When [Lock SIM card] is disabled, you can call to the emergency number (110, 119 or 118) even in Airplane mode. If you call to the emergency number, [Airplane mode] is OFF and the call is made. z[Wi-Fi] and [Bluetooth] can be set to On even when [Airplane mode] is ON.TetheringYou can use the tethering function that connects Wi-Fi compatible devices, or PCs etc. connected via USB cable or Bluetooth communication to the Internet by using the handset as an access point. zYou can connect up to 15 devices in total at the same time: a PC connected via USB cable, 10 Wi-Fi compatible devices and four Bluetooth devices. zThe handset supports dial-up connections via DUN profile. zBefore using Bluetooth tethering, register the other party's Bluetooth device in advance (☞P. 175 “Using Bluetooth function”). As for the settings on the Bluetooth device, refer to its manual.1 In the home screen, [ ]▶[Settings]▶[More]▶[Tethering]2 Select an item USB tethering: Set whether to use the USB tethering. Wi-Fi tethering: Set whether to use the Wi-Fi tethering. Set up Wi-Fi hotspot: Make settings for Wi-Fi tethering such as network name and security. Wi-Fi tethering Easy Connection: Set whether to use the tethering by connecting to WPS compatible access points. Bluetooth tethering: Set whether to use the Bluetooth tethering.](https://usermanual.wiki/Sharp/HRO00254/User-Guide-3703449-Page-154.png)
![153 Handset Settings[USB tethering] zThe tethering function is available when OS of PCs is Windows 7, Windows 8.1, Windows 10 or Linux. zA microSD Card inserted in the handset cannot be mounted on a PC during USB tethering. zFor details on USB tethering, refer to the following website.(http://www.android.com/tether#usb)[Wi-Fi tethering] zWhile the handset is functioning as an access point, it cannot access the Internet via Wi-Fi connection. zMake settings for Wi-Fi access points in [Set up Wi-Fi hotspot]. zFor details on Wi-Fi tethering, refer to the following website.(http://www.android.com/tether#wifi)[Set up Wi-Fi hotspot] zAt the time of purchase, Network name is set to [SH-01K_AP] and Security is set to [WPA2 PSK] while Password is set randomly. Change the settings if necessary.Cellular networks1 In the home screen, [ ]▶[Settings]▶[More]▶[Cellular networks]2 Select an item Data enabled: Set whether to use data communication. Data roaming: For details ☞P. 184 “Data roaming” Preferred network type: For details ☞P. 184 “Preferred network type” Call mode setting: Set whether to use VoLTE. Access Point Names: Set and check an access point. Network operators: For details ☞P. 185 “Network operators”](https://usermanual.wiki/Sharp/HRO00254/User-Guide-3703449-Page-155.png)
![154 Handset Settings Setting an access pointAn access point (sp-mode) for Internet connection is registered by default. You can add other access points and change them if necessary.For details on sp-mode, refer to the DOCOMO website.(https://www.nttdocomo.co.jp/service/spmode/) (in Japanese only)If you use mopera U or Business mopera Internet, add an access point of either provider manually.For details on mopera U, refer to the mopera U website.(https://www.mopera.net/) (in Japanese only)1 In the home screen, [ ]▶[Settings]▶[More]▶[Cellular networks]▶[Access Point Names] zYou can check an access point in use.2 [ ]3 [Name]▶enter the name of the network profile to create▶[OK]4 [APN]▶enter the access point name▶[OK]5 Enter other items required by network operators▶[]▶[Save] zNever set the MCC to a figure other than 440 or the MNC to a figure other than 10. Otherwise the added access point disappears from the screen. zIf the settings of MCC and MNC are changed and the added access point disappears from the screen, reset the settings or set the access point manually. Resetting an access pointReset an access point to default setting.1 In the home screen, [ ]▶[Settings]▶[More]▶[Cellular networks]▶[Access Point Names]2 [ ]▶[Reset to default] zWhen sp-mode is not subscribed or if you fail to make automatic setting of an access point due to signal status such as outside the service area, you are required to set the access point again manually.](https://usermanual.wiki/Sharp/HRO00254/User-Guide-3703449-Page-156.png)
![155 Handset Settingsdocomo service/cloudYou can make settings for the docomo service.1 In the home screen, [ ]▶[Settings]▶[docomo service/cloud]2 Select an item d ACCOUNT setting: Set d ACCOUNT to use in docomo apps. Also, you can set d ACCOUNT authentication which uses biological information (fingerprint) registered in the handset. docomo cloud: Make settings for docomo cloud. docomo apps management: Make settings for the confirmation for updating apps etc. Osusume hint: Set whether to use Osusume hint. AUTO-GPS: Make settings for AUTO-GPS. docomo location information: Make settings for the location information service function of imadoco search, imadoco kantan search and Keitai-Osagashi Service. Send device error information: Set whether to send error information to the server. Profile setting: Check or change your profile used in the docomo service. docomo service initial settings: Carry out the initial settings of docomo service. Switch USB debugging: Set whether to enable USB debugging. Open source licenses: Display the open source licenses. zSome apps displayed in docomo service/cloud can be disabled. The disabled apps may not be displayed in docomo service/cloud. zWhen you newly download apps provided by DOCOMO, the downloaded apps may be displayed in docomo service/cloud.LocationYou can make settings for measuring location information.1 In the home screen, [ ]▶[Settings]▶[Location]2 Set to On zThe confirmation screens for the use of location information are displayed. The mode to be set may differ depending on whether you select [NO]/[YES].3 Select an item Mode: Set a mode to measure location information. zYou can use location histories and the share function of the present location if you have registered your Google account on the handset. zIf there are recent location requests, touch one of them to check the information on the app. zOperate [ ]▶[Scanning]▶[Wi-Fi scanning]/[Bluetooth scanning] to set whether the location information services or apps scan Wi-Fi networks or Bluetooth devices to improve the location information. ySet it to ON to scan them even if [Wi-Fi] or [Bluetooth] is Off.](https://usermanual.wiki/Sharp/HRO00254/User-Guide-3703449-Page-157.png)
![156 Handset Settings zIt is necessary to set [Location] to On to measure the present location. Some apps require that settings be made for location information by using the apps.[Mode] zThe following modes can be set. High accuracy: Measure location information with using GPS, Wi-Fi, Bluetooth or cellular networks. Battery saving: Measure location information with using Wi-Fi, Bluetooth or cellular networks. Device only: Measure location information with using GPS. zPower consumption of the handset may increase depending on the set mode.Lock & securityYou can make settings for the security lock.1 In the home screen, [ ]▶[Settings]▶[Lock & Security]2 Select an item Screen lock: Make settings for the unlock method of the touch panel for when the power or display is turned on or the notification to be displayed on the lock screen of the touch panel. Fingerprint: Register your fingerprint used for fingerprint authentication. Register your fingerprint to unlock Screen lock by fingerprint authentication as well. For details on fingerprint authentication ☞P. 160 “Fingerprint authentication” Smart Lock: Set to unlock the touch panel by swiping or touching when Screen lock is set to an item other than [None] or [Swipe or Touch] and the handset confirms the trusted places, devices, face, etc. Set up SIM card lock: For details ☞P. 163 “Setting up SIM card lock” Encrypt phone: Check that the smartphone is encrypted. Visible passwords: When you enter the PIN code etc., you can display the entered characters before they turn into [・]. Device administrators: Set a device management function of apps. Some apps may not be available if the device management function is disabled.](https://usermanual.wiki/Sharp/HRO00254/User-Guide-3703449-Page-158.png)
![157 Handset Settings Unknown sources: Allow installation of apps received via websites other than Google Play, mails, etc. Storage type: Display the storage type. Trusted credentials: Check certificates and enable/disable them. User credentials: Check credentials. Install certificates: Install encrypted certificates. Clear credentials: Delete all credentials. Trust agents: Make settings for apps (agents) that unlock the touch panel. Screen pinning: Restrict the use of apps other than selected one. For details on the operation method ☞P. 58 “Recent Apps” Apps with usage access: Set apps that can access the data of app usage history item.[Screen lock] zThe following items can be set. None: The lock screen of the touch panel is not displayed. Swipe or Touch: Set the touch panel to be unlocked by touching [ ]. When [AQUOS Home]/[AQUOS Kantan Home] is selected in Batch change lock screen/ home application, slide [ ] up to unlock. Pattern: Set a pattern which forms by linking four or more dots. Lock No.: Set four- to sixteen-digit number. Password: Set four to sixteen alphanumerics or half-width symbols. ySome half-width symbols are not available. zIf you set Screen lock to [Pattern]/[Lock No.]/[Password], the unlock screen may be displayed when making various settings. If the unlock screen is displayed, unlock the screen by the method you have set. zIf you have registered the fingerprint, unlock the screen by fingerprint authentication as well. yIf you fail in fingerprint authentication five times continuously, you cannot unlock the screen by the fingerprint for a certain period of time. Try again later or unlock the screen by method set in Screen lock. zIf you enter wrong patterns/lock numbers/passwords, you cannot unlock the screen for a certain period of time according to how many times you have entered wrong patterns. Five times in a row: 30 seconds 10 times in a row: 30 secondsAfter you have entered wrong patterns 10 times in a row, you cannot enter the pattern for 30 seconds each time you enter wrong patterns. If you unlock the screen, the count is reset.](https://usermanual.wiki/Sharp/HRO00254/User-Guide-3703449-Page-159.png)
![158 Handset Settings zYou can set the following items by touching [ ] of Screen lock. Items to be displayed may differ depending on the settings in Screen lock. Make pattern visible: Display tracks of the entered pattern with line. Automatically lock: Set how long it takes the touch panel to be locked. Power button instantly locks: Set whether to lock the touch panel regardless of the time set in Automatically lock when you turn off the display by pressing 0. Lock screen message: Set for the message to be displayed on the lock screen of the touch panel. zIf you forget the pattern/lock number/password, contact a docomo Shop.Unlock the screen when activating the handset zIf you set Screen lock to an item other than [None] or [Swipe or Touch], you can set whether to unlock the screen when the power is turned on. zIf you enter wrong patterns/lock numbers/passwords 10 or 20 times in a row when turning on the power and unlocking the screen, you cannot enter them until turning the power on again. Do not forget the unlock method you have set, since the handset is initialized if you enter wrong ones 30 times in a row.[Smart Lock] zWhen using Smart Lock, touch and hold the unlock icon such as [ ] in the lock screen of the touch panel to temporarily disable Smart Lock. yIf Batch change lock screen/ home application is set to [AQUOS Home]/[AQUOS Kantan Home], touch the unlock icon such as [ ] to temporarily disable Smart Lock.[Unknown sources] zApps you download from the websites may be of unknown origin. To protect your handset and personal data, download apps only from trusted sources such as Google Play.[Trusted credentials] zIf you delete a certificate, you cannot refer to the certificate from [Trusted credentials] but it can be referred to from other functions. If you want to delete the certificate completely, carry out Clear credentials.[Clear credentials] zSettings for VPN are also deleted.](https://usermanual.wiki/Sharp/HRO00254/User-Guide-3703449-Page-160.png)
![159 Handset SettingsSecurity codes used on the handsetSome functions for convenient use of the handset require security codes. In addition to security code used for various handset operations, use security codes such as the network security code when using network services. Use security codes properly according to the purposes to fully utilize the handset. zEntered security code for various functions and PIN code turn into [・].Precautions about various security codes zDo not use easily predictable numbers for security codes to be set such as “birthday”, “part of a phone number”, “address or room number”, “1111” or “1234”. Keep a separate memo of security codes. zKeep security codes private. If the security codes are found and improperly used by others, DOCOMO shall not be liable for any damages incurred on the users. zIf you forget your security codes, you are required to bring your identification (a driver's license etc.), your handset and your docomo nano UIM card to a docomo Shop.For details, contact the number listed in “General Inquiries” on the last page. zPUK (PIN Unlock Key) is described in the agreement form (customer copy) you received at the time of subscription at a docomo Shop. If you made a subscription at a shop other than a docomo Shop, bring your identification (a driver's license etc.) and your docomo nano UIM card to a docomo Shop or contact the number listed in “General Inquiries” on the last page. Network security codeNetwork security code is a four-digit code required for confirming the subscriber's identity when an order is received at a docomo Shop, docomo Information Center or “お客様サポート” (Support), used for accessing various network services, etc. You can set any code at the time of subscription but you can change the code. zFor details on network security code, refer to the DOCOMO website.(https://www.nttdocomo.co.jp/english/support/trouble/password/network/) PIN codeA docomo nano UIM card has a security code called PIN code. This security code is set to [0000] by default but you can change the code (☞P. 163 “Setting up SIM card lock”). The PIN code is a four- to eight-digit security code that needs to be entered for recognizing the user of the handset every time a docomo nano UIM card is inserted or when a device is turned on to prevent unauthorized use of the docomo nano UIM card by a third party. Making/Receiving a call and the device operation are enabled by entering PIN code. zUse the previously set PIN code when inserting a docomo nano UIM card that has been used in another device. It is [0000] if the setting has not been changed. zIf you enter wrong PIN codes three times continuously, it is locked and the docomo nano UIM card becomes unavailable. In this case, unlock with “PUK” (PIN Unlock Key).](https://usermanual.wiki/Sharp/HRO00254/User-Guide-3703449-Page-161.png)
![161 Handset Settings Cautions when using fingerprint sensor zDo not let the handset hit or subject to strong impacts. May cause a malfunction or damage. Do not scratch the surface of the sensor or poke it with a pointed object such as a ballpoint pen or pin. zDo not put a sticker etc. on the surface of the fingerprint sensor or daub it with ink etc. zIf dust such as dirt or fat adheres to the sensor, reading of a fingerprint may be difficult or authentication performance may degrade. Occasionally clean the surface of the fingerprint sensor. zYour fingerprint cannot be authenticated properly if it is too fast to release your finger. Release the finger after the fingerprint is authenticated. zIf you start registration or authentication of your fingerprint while touching the fingerprint sensor with your finger, you may not be able to activate the function. Release your finger and try again. Registration of fingerprintYou can register your fingerprint used for fingerprint authentication. zYou can register up to five fingerprints. zIf fingerprint sensor fails to read your fingerprint, you may be able to improve the authentication performance by using another finger. zSet Screen lock to an item other than [None] or [Swipe or Touch] in advance (☞P. 156 “Lock & security”).1 In the home screen, [ ]▶[Settings]▶[Lock & Security]▶[Fingerprint] zAlternatively, in the home screen, [ ]▶[Settings]▶[AQUOS Useful]▶[Fingerprint sensor]▶[Fingerprint setting] to set Fingerprint.2 [NEXT] zUnlock the screen by method set in Screen lock.3 [NEXT]4 Touch the fingerprint sensor with your finger ball zFor registering the wide range of the fingerprint, touch it repeatedly while shifting the touching position gradually until the percentage indicator becomes 100%. zRegister your fingerprint to unlock Screen lock by fingerprint authentication as well. yIf fingerprint authentication is not available, unlock the screen by method set in Screen lock.5 [DONE] zIf you continue to register another fingerprint, select [Add another]. zNote that if Screen lock is set to [None] or [Swipe or Touch], registered fingerprints are deleted.](https://usermanual.wiki/Sharp/HRO00254/User-Guide-3703449-Page-163.png)
![162 Handset Settings Managing fingerprintsYou can add and delete fingerprints, or change registered names.1 In the home screen, [ ]▶[Settings]▶[Lock & Security]▶[Fingerprint] zAlternatively, in the home screen, [ ]▶[Settings]▶[AQUOS Useful]▶[Fingerprint sensor]▶[Fingerprint setting] to set Fingerprint. zUnlock the screen by method set in Screen lock.2 Manage fingerprints zTo add a fingerprint: [Add fingerprint]▶follow the instructions on the screen and operate. zTo change a registered name: Touch the registered fingerprint▶enter the name▶[OK] zTo delete a registered fingerprint: Touch the registered fingerprint▶[DELETE] yWhen the confirmation screen is displayed, check the content and select [YES, REMOVE] Using fingerprint authentication function1 While the display is turned off/In the lock screen of the touch panel/In the fingerprint authentication screen, touch the fingerprint sensor with your finger ball zWhen you operate it while the display is turned off, the touch panel is unlocked and the display is turned on. zIf your fingerprint cannot be authenticated properly, release it from the fingerprint sensor and try again. Using as Home keyYou can use the fingerprint sensor as Home key. Alternatively, you can turn the display on by touching the fingerprint sensor while the display is turned off. zEven if you have not registered the fingerprint or you touch with a finger different from the registered one, you can use it as Home key. zWhen you have not registered the fingerprint, the display is turned on by touching the fingerprint sensor while the display is turned off. When you have registered the fingerprint and touch the fingerprint sensor with a finger different from the registered one, the display is not turned on.1 In the home screen, [ ]▶[Settings]▶[AQUOS Useful]▶[Fingerprint sensor]▶[Use as Home key]](https://usermanual.wiki/Sharp/HRO00254/User-Guide-3703449-Page-164.png)
![163 Handset SettingsSetting up SIM card lockYou can make settings for the PIN code.1 In the home screen, [ ]▶[Settings]▶[Lock & Security]▶[Set up SIM card lock]2 Select an item Lock SIM card: Set whether to enter the PIN code when the power is turned on. Change SIM PIN: Change the PIN code. zIn Japan, you cannot make a call to the emergency number (110, 119 or 118) when a docomo nano UIM card is not inserted, while the PIN code is locked or from the PUK (PIN Unlock Key) entry screen. zThe setting is saved on the docomo nano UIM card.Disabling PIN lock1 In the PIN locking screen, enter PUK (PIN Unlock Key)2 Enter a new PIN code3 Enter the new PIN code againLanguages & inputYou can make settings for the language displayed on the screen, character entry, text-to-speech, etc.1 In the home screen, [ ]▶[Settings]▶[Languages & input]2 Select an item Languages: Select Japanese/English. Virtual keyboard: Set the software keyboard. Physical keyboard: Set the keyboard connected via Bluetooth. Text-to-speech output: Make settings for the voice for reading the characters displayed on the handset. Spell checker: Make settings for Spell checker. Personal dictionary: Register any words into Personal dictionary. Pointer speed: Set the speed of the pointer.Virtual keyboard zWhen you enter Japanese, use S-Shoin. For details on the setting of S-Shoin ☞P. 46 “Setting character entry”[Spell checker] zJapanese is not supported.](https://usermanual.wiki/Sharp/HRO00254/User-Guide-3703449-Page-165.png)
![164 Handset SettingsBackup & resetYou can back up data using a Google account, transfer data to/from among devices, perform Reset all, etc.1 In the home screen, [ ]▶[Settings]▶[Backup & reset]2 Select an item Back up my data: Set whether to automatically back up app data, Wi-Fi passwords, etc. using a Google account. Backup account: Set a Google account to use when backing up data. Automatic restore: Set whether to restore backed up data, settings, etc. of an app when you re-install the app. Data transfer: For details ☞P. 164 “Data transfer” Reset all: For details ☞P. 166 “Resetting all”Data transferYou can import data or back up/restore data on the handset using a microSD Card. In addition, you can import phonebook data on other devices using the Bluetooth function. zThe following data can be backed up to/restored from a microSD Card. Phonebook SMS Calendar Notepad* User/Learning dictionary (S-Shoin) EMOPA * You need to download the app separately. zWhile you are backing up/restoring data using a microSD Card, [Airplane mode] is set to ON. zWhen the available space on the handset memory is less than 11 MB, you cannot back up data to a microSD Card. zInsert a microSD Card in advance when using one.1 In the home screen, [ ]▶[Settings]▶[Backup & reset]▶[Data transfer]2 Select an item Data import: Import data using a microSD Card or the Bluetooth function. Save data to SD card: Save data on a microSD Card. Function information: Check how to use with a video tutorial. Saving backup file1 In the home screen, [ ]▶[Settings]▶[Backup & reset]▶[Data transfer]2 [Save data to SD card]3 Select the data categories to save zIf you select [Address Book], the screen for selecting which account to save is displayed.4 [Save]▶[YES]5 [Complete] zYou cannot save the data when the battery level is insufficient.](https://usermanual.wiki/Sharp/HRO00254/User-Guide-3703449-Page-166.png)
![165 Handset Settings Restoring backup file1 In the home screen, [ ]▶[Settings]▶[Backup & reset]▶[Data transfer]2 [Data import]3 [Import]4 Select backup files to restore▶[Add registration]/[Delete and register] zThe confirmation screen appears. Follow the instructions on the screen and operate after this step.5 [Complete] zYou cannot restore the data when the battery level is insufficient. zYou cannot add registration of User/Learning dictionary (S-Shoin) and エモパー (EMOPA). Note that the existing data is deleted even if you select [Add registration]. Setting/Managing backup file1 In the home screen, [ ]▶[Settings]▶[Backup & reset]▶[Data transfer]2 [ ]▶[Setting]3 Select an item Organize backup files: Delete saved backup data. Addr.book pic backup: Set whether to back up images registered in a phonebook when backing up the phonebook. View result screen: Display the latest result of saving/restoring backup files. Importing phonebook data using Bluetooth function1 In the home screen, [ ]▶[Settings]▶[Backup & reset]▶[Data transfer]2 [Data import]3 Select the type of a device from which you import data zWhen the confirmation screen for the backup data on the microSD Card is displayed, select [Import phonebook data from smartphone.].4 [Next]5 Enable the Bluetooth function of the device from which you import data▶[Next] zWhen the device from which you import data is Android, set the device to be displayed on the handset.6 Select the device from which you import data7 [Start] zWhen the confirmation screen about the settings on pairing appears, select [PAIR].](https://usermanual.wiki/Sharp/HRO00254/User-Guide-3703449-Page-167.png)
![166 Handset Settings8 [NEXT]9 [Add registration]/[Delete before registration]▶[OK] zIf you set up multiple accounts, the screen for selecting to which account to register is displayed.10 [OK]Resetting allYou can erase all data on the handset memory.1 In the home screen, [ ]▶[Settings]▶[Backup & reset]▶[Reset all]2 [RESET PHONE] zYou can also erase data on a microSD Card at the same time by enabling [Delete data in SD card as well.].3 [ERASE EVERYTHING] zThe following data are erased. Data that are created, saved or registered Contents that are set in the “Settings” app Downloaded appsAccountsSetting up Google account etc. zYou can use Google services such as Gmail and Google Play if you set up Google account.1 In the home screen, [ ]▶[Settings]▶[Accounts]▶[Add account]2 Select an account type3 Set up an account zIn the home screen, [ ]▶[Settings]▶[Accounts] to find the added account on the displayed menu. zWhen activating the app that requires an account without setting one up, the account setup screen appears. zKeep a separate memo of the set account and password. Deleting your account1 In the home screen, [ ]▶[Settings]▶[Accounts]2 Select an account▶[ ]▶[Remove account]▶[REMOVE ACCOUNT] zOperation methods may differ depending on the account.](https://usermanual.wiki/Sharp/HRO00254/User-Guide-3703449-Page-168.png)
![167 Handset Settings Retrieving your Google account passwordIf you forget your Google account password, retrieve it.1 In the home screen, [ ]2 Enter “(https://www.google.com/ncr) ” in the URL entry field▶[Go]▶[Sign in]3 Enter mail address▶[Next]▶[Forgot password?]▶follow the instructions on the screen and operate zOperation methods may differ depending on the using conditions.Synchronizing dataYou can synchronize data between the handset and online services. You can access the same personal information as those stored in online services from the handset and PC, and you can use and update data by synchronizing them.When synchronizing automaticallySet whether to automatically synchronize items set in each account.1 In the home screen, [ ]▶[Settings]▶[Accounts] zTo set items to synchronize: Select an account type▶select an account▶select an item2 [ ]▶[Auto-sync data]▶[OK] zRegister a Google account in advance when you synchronize the phonebook of the handset memory with contacts on the online services even if you synchronize with an account other than Google account.When synchronizing manually zWhen Auto-sync data is disabled, you can synchronize selected items manually.1 In the home screen, [ ]▶[Settings]▶[Accounts]2 Select an account type▶select an account3 Select items to be synchronizedGoogle™You can make settings for various Google services collectively.1 In the home screen, [ ]▶[Settings]▶[Google]2 Select an item zFollow the instructions on the screen and operate after this step. zTo search by voice using a Bluetooth device, [Search]▶[Voice]▶set [Bluetooth headset] to ON.](https://usermanual.wiki/Sharp/HRO00254/User-Guide-3703449-Page-169.png)
![168 Handset SettingsDate & timeYou can make settings for the date and time and their format.1 In the home screen, [ ]▶[Settings]▶[Date & time]2 Select an item Automatic date & time: Set whether to automatically adjust the date and time. Auto timezone: Set whether to use the time zone provided via a network. Set date: Set the date manually. Set time: Set the time manually. Select time zone: Set the time zone manually. Use 24-hour format: Switch 12-hour format/24-hour format.When [Automatic date & time] is enabled zIf the handset does not adjust the time for a while after the power is turned on, turn off the power and restart it. zTime may not be adjusted depending on the signal status. zThe clock may gain or lose a few seconds.AccessibilityYou can make settings for accessibility options.1 In the home screen, [ ]▶[Settings]▶[Accessibility]2 Select an item Captions: Make settings for captions to display. Magnification gesture: Set whether to zoom in/out the screen by touching the display three times. Font size: Set the font size. Display size: Set the icon size displayed on the screen etc. Click after pointer stops moving: Set operations when pointer stops. High contrast text: Set whether to display text colors on the handset in high contrast. Power button ends call: Set whether to end a call by pressing 0. Auto-rotate screen: Set whether to rotate the contents of the screen when rotating the handset. Speak passwords: Set whether to use voice output for passwords. Large mouse pointer: Set whether to display the pointer in large size. Mono audio: Set whether to integrate channels when playing audio. Accessibility shortcut: Set whether the accessibility functions can be enabled quickly.](https://usermanual.wiki/Sharp/HRO00254/User-Guide-3703449-Page-170.png)
![169 Handset Settings Text-to-speech output: Make settings for the voice for reading the characters displayed on the handset. Touch & hold delay: Set how long you need to keep touching. Color inversion: Set whether to invert colors displayed on the screen. Color correction: Make settings for the adjustment of colors displayed on the screen. zFor details on using other accessibility services, follow the instructions on the screen.[Power button ends call] zIf the display is turned off according to the setting of [Sleep], press 0 to turn it on. Press 0 while the display is turned on to end the call.PrintingYou can print with an app supporting the print function by installing a print app (plug-in). To change settings on the installed print app (plug-in), carry out the following operations. zInstall a print app (plug-in) supporting a printer to use in advance.1 In the home screen, [ ]▶[Settings]▶[Printing]2 Select a print service zFollow the instructions on the screen and operate after this step.About phoneYou can check the information about the handset.1 In the home screen, [ ]▶[Settings]▶[About phone]2 Select an item Build number: Check the build number. Status: Check the battery level, network in use, etc. Self check: For details ☞P. 170 “Self check” Adjust sensitivity of sensor: Adjust the accuracy of retrieval by the motion sensor and geomagnetic sensor. Software Update: For details ☞P. 198 “Software update” Legal information: Check copyright notice, terms of service, etc. Authentication: Check information such as the certification of conformity with technical regulations. Model number: Check the model number. Android version: Check the Android version. Android security patch level: Check when the loaded security patch is released. Baseband version: Check the baseband version. Kernel version: Check the kernel version.[Adjust sensitivity of sensor] zMake the adjustment approximately 10 seconds after the adjustment screen appears.](https://usermanual.wiki/Sharp/HRO00254/User-Guide-3703449-Page-171.png)
![170 Handset Settings zAdjustment may be failed depending on surroundings or other simultaneously running apps. Change the place where you make adjustment, end running apps, etc.Self checkYou can diagnose the handset by selecting the symptoms or functions.1 In the home screen, [ ]▶[Settings]▶[About phone]▶[Self check] zTo restart the handset in safe mode: [REBOOT WITH SAFE MODE]▶[OK]2 [START CHECKING]3 [SELECT FROM PHONE SYMPTOMS]/[SELECT FROM PHONE FUNCTIONS]4 Select an item zAs for [SELECT FROM PHONE FUNCTIONS], select items and touch [Next]. Touch [ ] of an item to display help about the diagnosis.5 [Next]6 [Start diagnosis] zTo stop a diagnosis: [Cancel]▶[NEXT ITEM]/[YES] zTouch the history items of the diagnoses to check the results.](https://usermanual.wiki/Sharp/HRO00254/User-Guide-3703449-Page-172.png)
![171 File ManagementFile ManagementStorage structure Handset memory (internal storage)You can save data to the handset. zThe followings are the name of the handset memory storage and path. yStorage name: Internal shared storage yPath: /storage/emulated/0 zThe followings are the folder structure, types of data to be saved in each folder, etc. of the default handset memory. yDisplayed folder may differ depending on the operating conditions.Alarms Alarm tones etc. are saved.Android Temporary files etc. of installed apps are saved.DCIM Still pictures and videos shot with the handset are saved.Download Files downloaded on Chrome are saved.Movies Videos etc. are saved.Music Music data etc. is saved.Notifications Notification sounds etc. are saved.Pictures Still pictures etc. are saved.Podcasts Music data etc. transferred from a podcast is saved.PRIVATE Still pictures, videos, music data, etc. are saved.Ringtones Ringtones etc. are saved. microSD Card (external storage)You can save data on the handset to microSD Card or import data on microSD Card to the handset. zFor details on microSD Card ☞P. 35 “microSD Card”Operation of filesYou can manage data stored to the handset memory or the microSD Card (creating folders, or renaming, deleting, moving, copying, etc. folders/files).1 In the home screen, [ ]▶[Settings]▶[Storage] zIf the microSD Card is not inserted, the details screen of the used capacity on the handset memory is displayed.2 Select a storage zSelect [Internal shared storage] to display the details screen of the used capacity on the handset memory. Select [Explore] in the details screen to display the data list saved on the handset memory. zSelect the microSD Card to display the saved data list. Creating folders1 In the data list screen, [ ]▶[New folder]2 Enter the folder name▶[OK]](https://usermanual.wiki/Sharp/HRO00254/User-Guide-3703449-Page-173.png)
![172 File Management Renaming folders/files1 In the data list screen, touch and hold a folder/file2 [ ]▶[Rename]3 Enter the folder/file name▶[OK] Deleting folders/files1 In the data list screen, touch and hold a folder/file2 [ ]▶[OK] Moving/Copying folders/files1 In the data list screen, touch and hold a folder/file2 [ ]▶[Move to...]/[Copy to...]3 [MOVE]/[COPY] at the move/copy destination Searching files1 In the data list screen, [ ]2 Enter the keyword to search with▶[ ]](https://usermanual.wiki/Sharp/HRO00254/User-Guide-3703449-Page-174.png)
![175 Data Communication Wireless connection is available with Bluetooth devices put in a bag or pocket. However, lowering of communication speed or noise may result when you are in between the Bluetooth device and the handset. zElectromagnetic signals from Bluetooth devices may affect the operation of electronic medical equipment etc. As some cases may result in accident, turn off the handset and other Bluetooth devices in the following places. On trains On airplanes In hospitals Near automatic doors or fire alarms In places such as gas stations where flammable gas is generatedRadio interference with Wi-Fi compatible devices zThe Bluetooth devices use the same frequency band (2.4 GHz) as wireless LANs (IEEE 802.11b/g/n). Therefore, using a Bluetooth device near a wireless LAN device may cause the radio interference, lowering of communication speed, noise or connection failure. In this case, turn off the wireless LAN device or keep the handset and the other party's Bluetooth device at least approximately 10 m away from the wireless LAN.Using Bluetooth function zTo register/connect a Bluetooth device, the Bluetooth passkey may need to be entered. Before starting the registration, decide one- to sixteen-digit number. Enter the same number on the handset and the other party's Bluetooth device. zSet the other party's Bluetooth device to the registration stand-by status in advance.1 In the home screen, [ ]▶[Settings]▶[Bluetooth]2 Set to On3 Select a Bluetooth device▶[PAIR] zThe confirmation screen for connection may be displayed. zEntering the Bluetooth passkey may be necessary depending on the other party's Bluetooth device. Also, some Bluetooth devices may start connection after completing registration. zTo search for Bluetooth devices: [ ]▶[Refresh] zTouch [ ] of a paired Bluetooth device to set name and intended purpose of the other party's Bluetooth device. zYou can connect up to seven Bluetooth devices at the same time. Bluetooth devices may not work properly or the number of Bluetooth devices which can be connected at the same time may differ depending on the profile. zIf you fail to connect a Bluetooth device, connection may become available after re-registering it.](https://usermanual.wiki/Sharp/HRO00254/User-Guide-3703449-Page-177.png)
![176 Data Communication zWhen [Bluetooth] is set to On, the handset is set to receive registration requests/connection requests from other Bluetooth devices. Display the Bluetooth screen when other Bluetooth devices search the handset. zWhile in connection stand-by, even if a connection request from a Bluetooth device is received, connection may not be made depending on the signal status etc. zFor details on the operations of the other party's Bluetooth device, refer to the manuals of the Bluetooth device to be used. When receiving registration request from Bluetooth device or connection request from unregistered Bluetooth device1 Registration request/Connection request from Bluetooth device2 In the pairing screen, [PAIR] zWhen [ ] is displayed on the status bar, drag the status bar down▶[Pairing request]▶[PAIR] zEntering the Bluetooth passkey may be necessary depending on the other party's Bluetooth device. zThe confirmation screen for connection may be displayed. Unregistering Bluetooth device1 In the Bluetooth screen, [ ] of the Bluetooth device to unregister▶[FORGET] Disconnecting Bluetooth device1 In the Bluetooth screen, select the Bluetooth device to disconnect▶[OK] Setting Bluetooth zSet after setting [Bluetooth] to On.1 In the Bluetooth screen, [ ]2 Select an item Refresh: Search for the Bluetooth device. Rename this device: Change the handset's name. Show received files: Display the history of data received via Bluetooth connection.Sending and receiving by Bluetooth Sending dataExample: Still picture1 In the home screen, [Album]2 Select a still picture3 [ ]▶[Bluetooth] zSet the receiver's Bluetooth device to the reception stand-by status.4 Select a Bluetooth device to connect to](https://usermanual.wiki/Sharp/HRO00254/User-Guide-3703449-Page-178.png)
![177 Data Communication Receiving data1 Data is sent from the sender's Bluetooth device2 Drag the status bar down▶[ACCEPT] on incoming notification3 Drag the status bar down▶select the received data zReceiving all data may not be available depending on the data type. zWhen available space in the save destination becomes insufficient while receiving data, the data being received to that point are saved and receiving ends.NFC communicationNFC stands for Near Field Communication and is a near field wireless communication system which conforms to the international standards set by ISO (International Organization for Standardization). You can use the contactless IC card function, Reader/Writer function, P2P function, etc. on the handset.Android BeamYou can send and receive data to and from devices which support Reader/Writer, P2P function. zEnable [Reader/Writer, P2P] and set [Android Beam] to On in advance (☞P. 111 “NFC/Osaifu-Keitai settings”). zAndroid Beam is not available in Airplane mode or when NFC/Osaifu-Keitai lock is set. zYou can send and receive phonebooks, still pictures, videos, etc. zAndroid Beam may not be available depending on the app. zCommunication with all devices which support Reader/Writer, P2P function is not completely guaranteed.](https://usermanual.wiki/Sharp/HRO00254/User-Guide-3703449-Page-179.png)
![178 Data Communication When using Android Beammark zUse while placing the # mark of the receiver's device over that of the sender's device as shown. zDo not move the devices until sending and receiving of data are completed. zThere may be some cases in which data are poorly sent and received or the display is turned off by positioning a device near depending on the other party's device. In this case, put a distance between the # marks apart/closer or move them up/down or to the left/right. zOther precautions are the same as those for when you hold the handset over the other device (☞P. 110 “Precautions about holding over the other device”). Sending dataExample: Phonebook1 In the home screen, select “ドコモクラウド” (docomo cloud) folder▶[docomo phonebook]▶[Contacts]2 Select a name3 Place the # mark over that of the other party's device z[Tap to beam] appears.4 Touch the screen Receiving data1 Place the # mark over that of the other party's device](https://usermanual.wiki/Sharp/HRO00254/User-Guide-3703449-Page-180.png)
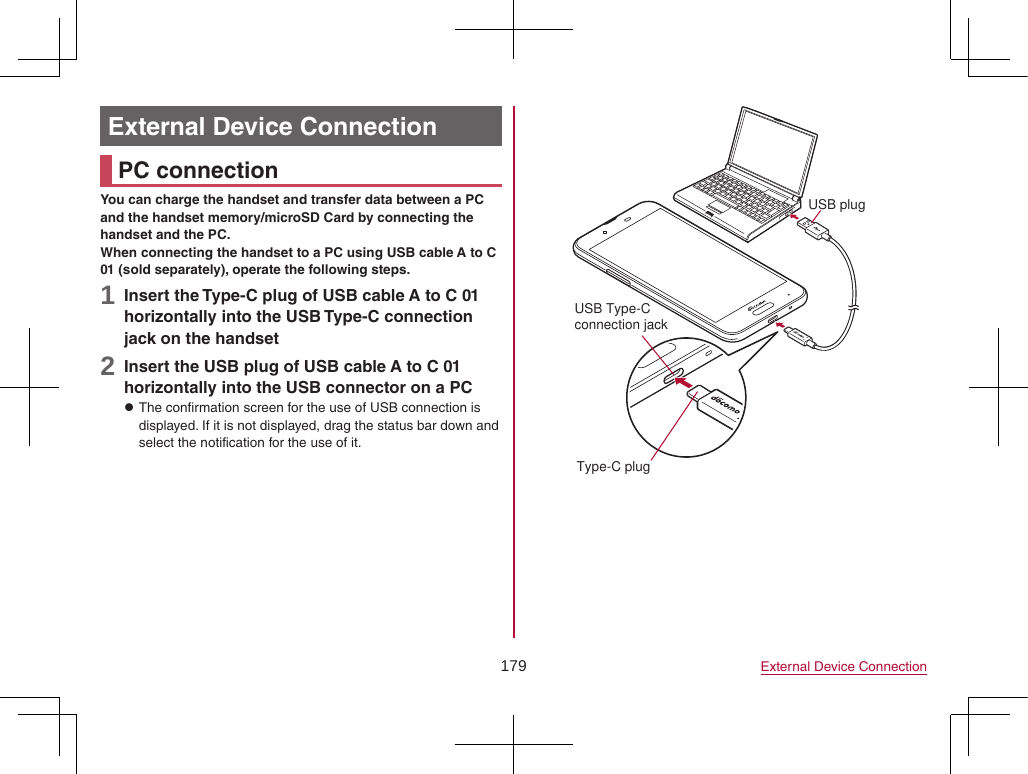
![180 External Device Connection3 Select a using method of USB Charge this device: Charge the handset only. Transfer files: Transfer data between a PC compatible with MTP and the handset memory/microSD Card. Transfer photos (PTP): Transfer still pictures between a PC compatible with PTP and the handset memory. Use device as MIDI: Use the handset for MIDI input. zFor details on tethering settings ☞P. 152 “Tethering”4 Disconnect USB cable A to C 01 from the handset and the PC zUse the USB cable compatible with the handset. The cable whose plug shape is different is not available. zUsing a USB HUB may prevent the equipment from working normally. zWhen you transfer a great deal of data at once, the transference may be interrupted. In this case, split the data into several files and send them separately. zDo not remove the USB cable while exchanging data with PC. Data may be damaged. zWindows 7, Windows 8.1 and Windows 10 all of which are Japanese version are available OS of PCs for the connection.Printing/Saving by print serviceYou can print images using a print app (plug-in) or save images in Google Drive etc.Example: When using Album1 In the image displaying screen of Album, [ ]▶[Print by print service]2 Set each item zFollow the instructions on the screen and operate after this step.USB host functionThe USB host function is installed on the handset. You can use USB devices such as mice by connecting a commercially available USB cable for peripheral device connection to the USB Type-C connection jack. zFor details on the USB host function, refer to the manuals of the USB cable for peripheral device connection and USB devices. zConnection with all USB devices is not completely guaranteed. zConnection with the USB device is disabled when the battery level decreases or the handset temperature lowers. zWhen you use the USB host function, the handset operations may slow down.](https://usermanual.wiki/Sharp/HRO00254/User-Guide-3703449-Page-182.png)
![181 External Device Connection zWhen you connect USB devices which consume large amount of electric power, the handset may be automatically turned off depending on the operating state or battery level of the handset, or surrounding temperature.Removing USB memory zUnmount the USB memory before removing it (☞P. 147 “Storage”). Data may be damaged or it may not work properly.CastYou can have the screen and voice of the handset output to a TV etc. compatible with cast. zYou can also connect the handset to other Miracast compatible devices such as a Miracast compatible TV or adapter. zAs for the operation of the connector device, refer to its manual.1 In the home screen, [ ]▶[Settings]▶[Display]▶[Cast]2 [ ]▶[Enable wireless display] zWhen [Enable wireless display] is enabled, [Wi-Fi] is set to On, and devices compatible with connection with the handset or you have connected to are displayed as a list.3 Select a device to connect to zThe confirmation screen is displayed depending on the device to connect to. Check the content, follow the instructions on the screen and operate. zTo disconnect: Touch the connecting device▶[DISCONNECT] zTo change the displaying name of the device: [ ] of the device to change the name▶enter the name▶[DONE] zTo delete the device from the list: [ ] of the device to delete▶[FORGET] zWhen the device using Cast functions is set, the Cast icon (such as [ ]) may be displayed in the corresponding app. zOutput may not be available depending on the running app or the displayed content item. zOutput may be terminated during its use depending on the running app. zDuring the wireless output, you may not be able to play copyrighted content items. zOutput automatically stops when the battery level becomes insufficient. zThe handset may be subjected to radio interference and image distortion or jumpiness may occur depending on the conditions of the surroundings. Also, connection may fail or output may be terminated. Use this function in a condition with no obstructions or other wireless devices put between the handset and a TV etc.](https://usermanual.wiki/Sharp/HRO00254/User-Guide-3703449-Page-183.png)
![182 External Device ConnectionVPN (Virtual Private Network)Adding VPNVPN (Virtual Private Network) is a connection method to prepare and connect safely to a virtual dedicated line on the network of a household PC or in an office from outside etc. zAcquire information about the security from network administrators to set VPN connection from the handset. zSet Screen lock to an item other than [None] or [Swipe or Touch] in advance (☞P. 156 “Lock & security”).1 In the home screen, [ ]▶[Settings]▶[More]▶[VPN]▶[ ]2 Set each item▶[SAVE]Connecting VPN1 In the home screen, [ ]▶[Settings]▶[More]▶[VPN]2 Select a VPN to connect to3 Enter connecting information of the VPN▶[CONNECT]Disconnecting VPN1 In the home screen, [ ]▶[Settings]▶[More]▶[VPN]▶follow the instructions on the screen and operate](https://usermanual.wiki/Sharp/HRO00254/User-Guide-3703449-Page-184.png)
![183 International RoamingInternational RoamingYou can make a call using the handset while staying overseas or make settings for international roaming, network services, etc.Outline of international roaming (WORLD WING)International roaming (WORLD WING) is a service that enables you to use the same phone number and mail address of the handset as you use in Japan in the service area of DOCOMO affiliated overseas network operators. You can use calls and SMS without any changes in settings.For details on the international roaming (WORLD WING), refer to the DOCOMO website.(https://www.nttdocomo.co.jp/english/service/world/roaming/)Available networkYou can use the handset in the LTE network, 3G network and GSM/GPRS network service areas. In addition, services are also available in countries and regions supporting 3G 850 MHz/ GSM 850 MHz. zFor country codes, international call access number, universal number international prefix and information on countries and regions where connections are available and available network operators, refer to the DOCOMO website.Available services overseasMain communication serviceLTE 3G 3G 850 GSM (GPRS)Call AAAASMS AAAAPacket communication*AAAA * Enable [Data roaming] to use packet communication when roaming (☞P. 184 “Data roaming”). zSome services may not be available depending on the network operator or network to connect to. zConnected network operator can be checked in the status panel (☞P. 55 “Using the status panel”).Before use overseas Checking before departureCheck the followings in Japan before using the handset overseas.Subscription zCheck the status of a subscription to WORLD WING. For details, contact the number listed in “General Inquiries” on the last page.Charging battery zFor details on charging the battery, refer to the DOCOMO website.](https://usermanual.wiki/Sharp/HRO00254/User-Guide-3703449-Page-185.png)
![184 International RoamingCharge zOverseas charges (call charges, packet communication charges) differ from those in Japan. For details, refer to the DOCOMO website. zSince some apps automatically perform communication, the packet communication charges may be higher. Contact the app provider for the operation of each app. Setting before departureNetwork service settingsIf you subscribed to network services, network services such as Voice Mail Service, Call Forwarding Service and Caller ID Display Request Service are available from overseas. However, some network services are not available. zTo use network services overseas, setting the remote operation settings to “Active” is required (☞P. 82 “Network service”). The remote operation settings can be set in your country of stay (☞P. 188 “Network services (overseas)”). zSome network services that can be set/disabled etc. may not be available depending on overseas network operators. Checking in your country of stayThe handset automatically connects to the available network operator when you turn the power on in your country of stay.ConnectionWhen Network operators (☞P. 185 “Network operators”) is set to [Select automatically], the suitable network is automatically selected.Settings for use overseasData roamingYou need to enable [Data roaming] to use packet communication overseas.1 In the home screen, [ ]▶[Settings]▶[More]▶[Cellular networks]▶[Data roaming] zWhen the confirmation screen is displayed, check the content and select [OK].Preferred network typeSet a network to use.1 In the home screen, [ ]▶[Settings]▶[More]▶[Cellular networks]▶[Preferred network type]2 Select an item 4G/3G/GSM(Auto): Automatically switch to an available network. 3G/GSM: Use 3G/GSM/GPRS network. GSM: Use GSM/GPRS network.](https://usermanual.wiki/Sharp/HRO00254/User-Guide-3703449-Page-186.png)
![185 International RoamingNetwork operatorsAt the time of purchase, the handset is set to automatically search for and switch to available networks. When you want to manually switch networks, set by performing following operations.1 In the home screen, [ ]▶[Settings]▶[More]▶[Cellular networks]▶[Network operators] zIf the confirmation screen for data communication is displayed, check the content and select [OK]. zSearch for networks and a list of network operators is displayed. zWhen an error occurs during the network search, disable [Data enabled] (☞P. 153 “Cellular networks”) and try again.2 Select a network operator zTo search for network operators again: [Search networks] zTo automatically select a network operator: [Select automatically]Date & timeIf [Automatic date & time] and [Auto timezone] of Date & time are enabled, the handset receives information on time and time differences from the network of a connected overseas network operator, then time and time differences are corrected. zTime and time differences may not be adjusted correctly depending on the network of an overseas network operator. In this case, set time zone manually. zThe correction timing may differ depending on the network operator. zFor details on Date & time ☞P. 168 “Date & time”Inquiries zWhen the handset or the docomo nano UIM card is lost or stolen overseas, promptly contact DOCOMO and conduct a procedure for canceling the use of service from your country of stay. Refer to the last page for inquiries. You can also cancel the use of service from My docomo. Note that call/communication charges after the handset or the docomo nano UIM card is lost or stolen are incurred to the subscriber. zAs for land-line phone etc., “International call access number” of your country of stay or “Universal number international prefix” is required.](https://usermanual.wiki/Sharp/HRO00254/User-Guide-3703449-Page-187.png)
![186 International RoamingMaking/Receiving a call in your country of stayMaking a call outside your country of stay (including Japan)1 In the home screen, [ ]▶[Dial]2 “+” (touch and hold “0”)▶enter country code, area code (city code) and the other party's phone number▶[ ] zWhen the area code (city code) begins with “0”, omit the first “0” when dialing (Include the “0” when making a call to some countries or regions such as Italy). zAlternatively, enter a phone number▶[]▶[International call]▶select a country code to enter a country code. yThe first “0” of the area code (city code) will be omitted. zTo make a video call: [ ]▶[Video call] yFor details on the video call ☞P. 75 “Video call” zEven if you notify the caller ID, [Unknown], [Anonymous], etc. may appear depending on the network operator, and the caller ID may not be displayed correctly.Making a call using International Dial AssistWhen you make a call to other countries from your country of stay, you can make an international call with simple operation using International Dial Assist. zSet International dial assist in advance (☞P. 188 “International Dial Assist”). zThe first “0” of a phone number will be automatically converted to the country code you set in Country code.1 In the home screen, [ ]▶[Dial]2 Enter a phone number▶[ ]▶follow the instructions on the screen and operateMaking a call in your country of stayYou can make a domestic call in your country of stay in the same way as you do in Japan. zAlways enter the area code (city code), even when the number is in the same area.](https://usermanual.wiki/Sharp/HRO00254/User-Guide-3703449-Page-188.png)
![187 International RoamingMaking a call to a WORLD WING subscriber overseasWhen you make a call to a WORLD WING subscriber overseas, the call is made as an international call to Japan regardless of whether the call is made to the inside or outside of your country of stay.1 In the home screen, [ ]▶[Dial]2 “+” (touch and hold “0”)▶enter country code “81” (Japan) and the other party's mobile phone number excluding the first “0”▶[ ]Receiving a call overseasYou can receive a call overseas in the same way as you do in Japan. zWhen a call is received during international roaming, the call is forwarded from Japan. Charges for connecting a call to Japan are incurred by the caller and receiving charges by the receiver. Having calls made to your handsetWhen having calls made to your handset from Japan, have your phone number entered just as a domestic call in Japan.When having calls made to your handset from countries other than Japan, have the international call access number and country code “81” (Japan) added to the beginning of your phone number with the first “0” excluded as an international call to Japan regardless of your country of stay.International call access number of the country of the caller-81-90 (or 80/70)-XXXX-XXXXSetting international roamingYou can make settings for using the international roaming service. zSetting may not be made depending on the network operator.1 In the home screen, [ ]2 [ ]▶[Call settings]3 [Roaming settings]4 Select an item Incoming call restriction while roaming: Restrict incoming calls during international roaming. Incoming call notification while roaming: Notify with SMS if you cannot receive calls because of out of service etc. during international roaming. Roaming guidance: Play the guidance notifying the other party who makes a call to you during international roaming that you are using international roaming. International dial assist: For details ☞P. 188 “International Dial Assist” Network service: Make settings for network services such as Voice Mail Service used in your country of stay. For details ☞P. 188 “Network services (overseas)”](https://usermanual.wiki/Sharp/HRO00254/User-Guide-3703449-Page-189.png)
![188 International RoamingInternational Dial Assist1 In the home screen, [ ]2 [ ]▶[Call settings]3 [Roaming settings]4 [International dial assist]5 Select an item Automatic conversion: Automatically add the international prefix or country code. Country code: Select the country code used in Automatic conversion. International prefix: Select the international prefix used in Automatic conversion.Network services (overseas)You can make settings for network services such as Voice Mail Service used in your country of stay. zIt is necessary that Remote operation settings is set to “Active” in advance (☞P. 82 “Network service”). zWhen you operate this service from overseas, charges for connecting a call to Japan from your country of stay are incurred. zSetting may not be made depending on the network operator.1 In the home screen, [ ]2 [ ]▶[Call settings]3 [Roaming settings]4 [Network service]5 Select a target service Remote operation (charges apply): Set whether to start remote operations. Caller ID notification request service (charges apply): When a call with no caller ID is received, play the guidance for requesting notifications of the numbers to callers. Incoming call notification while roaming (charges apply): Notify with SMS if you cannot receive calls because of out of service etc. during international roaming. Roaming guidance (charges apply): Play the guidance notifying the other party who makes a call to you during international roaming that you are using international roaming. Voicemail service (charges apply): Record callers' messages when the handset is outside the service area or turned off (subscription is required). Call forwarding service (charges apply): Forward calls to other mobile phones registered in advance (subscription is required).6 Follow the instructions on the screen and operate7 Follow the voice guidance and operateChecking after homecomingThe handset automatically connects to the DOCOMO network after returning to Japan. If it fails, make the following settings. zSet Preferred network type to [4G/3G/GSM(Auto)] (☞P. 184 “Preferred network type”). zSet Network operators to [Select automatically] (☞P. 185 “Network operators”).](https://usermanual.wiki/Sharp/HRO00254/User-Guide-3703449-Page-190.png)
![190 Appendix/Index zBattery life is short yMake sure the handset is not left for a long time outside the service area. Outside the service area, since radio waves are searched to make communication available, more electric power than usual is used. When the handset keeps out of service, turn power off or set Airplane. ☞P. 39 “Turning power off/Reboot/Emergency mode”, P. 152 “More” yThe battery life depends on the usage environment and deterioration level. ☞P. 200 “Main specifications” yInternal battery is a consumable product. Battery life per charge is gradually reduced every time the battery is charged. Contact the number listed in “Repairs” (in Japanese only) on the last page or a repair counter that DOCOMO specifies if the battery life becomes extremely shorter than at the time of purchase even after fully charged. ☞P. 37 “Internal battery usable life” yEnd apps which are not in use. ySet wireless functions which are not in use to OFF. ☞P. 149 “Wi-Fi”, P. 175 “Using Bluetooth function” yConserve the battery power by using Energy saving. ☞P. 146 “Energy saving” zNot activated by touching or pressing keys yMake sure the handset is not turned off. ☞P. 39 “Turning power on” zScreen response is slow when touching or pressing keys yThis may happen when a great deal of data is saved on the handset, when a large amount of data is being transferred between the handset and the microSD Card, etc. ☞P. 147 “Storage” zdocomo nano UIM card is not recognized yIs the docomo nano UIM card inserted facing right direction? ☞P. 32 “docomo nano UIM card” zClock is incorrect yClock may become incorrect if the power is left turned on for a long time. Make sure [Automatic date & time] is enabled and turn the power on again in a location with good signal conditions. ☞P. 168 “Date & time” zHandset operation is unstable yThe apps installed on the handset after purchase may become a cause. If you can improve the symptoms by activating the handset with the safe mode set, you may be able to improve the symptoms by uninstalling the installed apps. ※The safe mode is a function to activate the handset nearly in the state of default. yFor activating the safe mode Turn the power on again when the power is turned off, then keep pressing 2 on the screen during activation until the lock screen of the touch panel is displayed. ※Alternatively, 0 while the power is turned on (for at least 2 seconds)▶touch and hold [Power off]▶[OK] to activate the safe mode. Also, activate the safe mode from Self check. ☞P. 170 “Self check”](https://usermanual.wiki/Sharp/HRO00254/User-Guide-3703449-Page-192.png)
![191 Appendix/Index ※When the safe mode is activated, [Safe mode] is displayed at the bottom left of the screen. ※To deactivate the safe mode, turn the power on again. yBack up the necessary data in advance before using the safe mode. yDepending on the widget, it may disappear. yThe safe mode is not an ordinary activating state and thus deactivate the safe mode if you want to use in an ordinary way. zApps do not work properly (e.g. inability to activate them, frequent errors) yMake sure there is no disabled app. Try again after enabling a disabled app, if any. ☞P. 147 “Enabling an app” yIs the use of requiring function for operating the app allowed? ☞P. 60 “First things first” yMake sure Battery optimization is not carried out. ☞P. 61 “Battery optimization” Calling zCalls cannot be made yMake sure Airplane mode is not set. ☞P. 152 “More” zRingtone does not sound yMake sure the ringtone volume is not set to “0”. ☞P. 139 “Sound” yMake sure the manner mode or Airplane mode is not set. ☞P. 56 “Manner mode”, P. 152 “More” yMake sure call rejection is not set. ☞P. 83 “Reject call setting” yMake sure Answer time setting is not set to “0 seconds”. ☞P. 81 “Voice/Answering memo” yMake sure the ringing time for Voice Mail Service or Call Forwarding Service is not set to “0 seconds”. ☞P. 82 “Network service” zCalls are not available ([ ] does not disappear even after moving to another place or calls cannot be made/received even though signal status is not bad) yTurn the power on again or attach the docomo nano UIM card again. ☞P. 32 “docomo nano UIM card”, P. 39 “Turning power on/off” yDepending on the signal type, even though status is “inside the service area” or “[ ] (indicating signal status) appears”, making/receiving a call may not be available. Move to another place and call again. yMake sure the call restriction such as call rejection is not set. ☞P. 83 “Reject call setting” yIn a crowded place, heavy telephone/mail traffic may make it difficult to get a connection depending on how congested the radio waves are. In this case, a busy tone is played. Move to another place or call again later. Screen zDisplay is dark yMake sure the light duration of the backlight is not set to be short. ☞P. 140 “Display” yMake sure brightness of the display is not changed. ☞P. 141 “Brightness level” yMake sure [Automatic brightness] of Brightness level is not enabled. The brightness of the screen varies depending on the surrounding light if the setting is enabled. ☞P. 141 “Brightness level”](https://usermanual.wiki/Sharp/HRO00254/User-Guide-3703449-Page-193.png)
![192 Appendix/Index yMake sure [VeilView] is not enabled. ☞P. 142 “VeilView” yMake sure [Energy saving] is not set. ☞P. 146 “Energy saving” Sound zThe other party's voice is not heard well or is too loud during a call yMake sure you have not changed the in-call volume. ☞P. 79 “Adjusting the in-call volume” Mail zMail is not automatically received yMake sure Sync frequency in the account settings of Email is not set to [Never]. ☞P. 95 “Setting up mail account” Camera zStill picture or video shot by the camera is blurred ySwitch Focus Setting to [Macro] when shooting a nearby object with Camera. ☞P. 118 “Common settings on shooting still pictures/videos” yMake sure the camera lens is neither misted up nor exposed to dirt. ☞P. 113 “Before using camera” zStill pictures and videos shot while the mobile light is turned on go white yIf there is a case, cover, finger, etc. near the camera lens, lights of the mobile light may reflect on it and shot still pictures and videos may be adversely affected. Osaifu-Keitai zCannot use Osaifu-Keitai yIf Omakase Lock is set, Osaifu-Keitai functions are not available regardless of the setting of NFC/Osaifu-Keitai lock. yMake sure NFC/Osaifu-Keitai lock is not set. ☞P. 110 “NFC/Osaifu-Keitai lock” yIs the # mark of the handset held over the scanning device? ☞P. 29 “Part names and functions”, P. 110 “Precautions about holding over the other device” International roaming zCannot use the handset overseas (The signal icon appears) yMake sure you have subscribed to “international roaming service (WORLD WING)”. Check the status of a subscription to “international roaming service (WORLD WING)”. ☞P. 183 “Outline of international roaming (WORLD WING)” zCannot use the handset overseas ([ ] appears) yMake sure the handset is not outside the service area of international roaming or in a place with weak signal. Refer to the DOCOMO website if the service area or network operator is available one. ☞P. 183 “Outline of international roaming (WORLD WING)” yChange the network setting or network operator setting. Set Preferred network type to [4G/3G/GSM(Auto)]. Set Network operators to [Select automatically]. ☞P. 184 “Preferred network type”, P. 185 “Network operators” yTurn the power on again. The handset may recover. ☞P. 39 “Turning power on/off” zCannot use data communication overseas yEnable [Data roaming]. ☞P. 184 “Data roaming”](https://usermanual.wiki/Sharp/HRO00254/User-Guide-3703449-Page-194.png)
![193 Appendix/Index zSuddenly the handset becomes unavailable during overseas use yMake sure the approximate limit of usage fee is not exceeded. As for “international roaming service (WORLD WING)”, the approximate limit of usage fee is set in advance. Pay off the usage fee to resume services if usage fee exceeds the limit. zThe other party's phone number is not notified/A different phone number from that of the other party is notified/Functions to use details saved in the phonebook or Caller ID notification are not activated yThe caller ID is not displayed on the handset even though the other party makes a call with the caller ID set to be notified if the used network or network operator does not notify. In addition, a different phone number from that of the other party may be notified depending on the used network or network operator. Data management zData is not transferred yMake sure a USB HUB is not used. If used, the transference may not be carried out normally. ☞P. 179 “PC connection” yMake sure Use USB to is not set to [Charge this device]. ☞P. 179 “PC connection” zData saved on the microSD Card is not displayed yRemove the microSD Card and insert it again. ☞P. 35 “microSD Card” zImages are not displayed correctly yAn entire image goes black when the image data is damaged. Bluetooth function zCannot connect with Bluetooth connection compatible device/Cannot find it even if searching ySet the Bluetooth connection compatible device (commercially available) side to the registration stand-by status and register it from the handset side. To delete the registered device once and register it again, both the Bluetooth connection compatible device (commercially available) and the handset are required to be deleted on each side. ☞P. 175 “Using Bluetooth function” zCalls cannot be made from the handset with an external device such as a car navigation system or hands-free device connected yMaking a call to a phone number may become unavailable if you make multiple calls to the phone number in the condition that the other party does not answer or outside the service area. In this case, turn off the handset power and turn it on again. ☞P. 39 “Turning power on/off” Map/GPS function zCannot set AUTO-GPS service information yMake sure AUTO-GPS has not been suspended due to insufficient battery level. If AUTO-GPS has been suspended due to Low-power operation settings, you cannot set AUTO-GPS service information. In this case, set Low-power operation settings to [Not suspend] or charge the battery to set the service. ☞P. 36 “Charging”, P. 155 “docomo service/cloud” yMake sure [AUTO-GPS operation settings] is not disabled. ☞P. 155 “docomo service/cloud”](https://usermanual.wiki/Sharp/HRO00254/User-Guide-3703449-Page-195.png)
![194 Appendix/IndexError messages z[Cellular network not available.] yMake sure a valid preferred network type is set. ☞P. 184 “Preferred network type” z[Connection error; failed to send] [Connection has been interrupted due to no answer] [Server error; failed to send] [The destination server is not supporting it.] [Transmission error; try again in a while] yAppears when attempting to use mail or SMS with the line system not in service or extremely congested. Try again later. z[Failed to get license. Cannot play.] yAppears when failed to update a license of copyrighted content that has reached the expiration date. z[Failed to send] yAppears when SMS was not sent properly. yAppears when mail was not sent properly. Try again from a location with a strong signal. z[Finger moved too fast. Please try again] [Lift finger, then touch sensor again] [Not recognized] yAppears when failed to read your fingerprint. z[No permissions to play this content.] yAppears when there is no available license or when attempting to play copyrighted content whose playable period or limit has expired. z[No SIM card - No service] yMake sure docomo nano UIM card is properly inserted. ☞P. 32 “docomo nano UIM card” z[Please wait for a while(data)] yPacket communication network is extremely congested. Try again later. z[Please wait for a while(voice call)] yAudio line network is extremely congested. Try again later. z[Quit fingerprint authentication since failure limit was reached.] [Too many attempts. Try again later.] yAppears when failed to authenticate your fingerprint five times. Unlock the screen by method set in Screen lock depending on the situation. z[Storage space running out] yAvailable space on the handset memory is decreasing. Some functions or apps may not work properly. Uninstall unneeded apps or move/delete files. z[xx mails have been received, but some have not been received.] yAppears when not all mails can be received for an unspecified reason.](https://usermanual.wiki/Sharp/HRO00254/User-Guide-3703449-Page-196.png)
![195 Appendix/IndexAnshin Enkaku Support ※This service is provided in Japanese.By having the screen on your handset shared with DOCOMO, you can get supports for operating and setting the handset, using apps or connecting to peripheral devices such as PC. zIn the following cases, Anshin Enkaku Support is not available. When the docomo nano UIM card is not inserted During international roaming In Airplane mode zAnshin Enkaku Support is a paid service that requires subscription. zSome operations and settings are not covered. zFor details on Anshin Enkaku Support, refer to the DOCOMO website.1 Make a call to Anshin Enkaku Support centerAnshin Enkaku Support center From DOCOMO mobile phones: (No prefix) 15710 (toll free) From land-line phones: 0120-783-360Business hours: 9:00 a.m. to 8:00 p.m. (open all year round) zIn the home screen, [ ]▶[遠隔サポート] (Remote support)▶[このスマートフォンから発信する] (Make a call from this smartphone)▶[] to make a call to Anshin Enkaku Support center from the handset.2 In the home screen, [ ]▶[遠隔サポート] (Remote support)3 [遠隔サポートの接続画面に進む] (Proceed to the connection screen for Remote support)4 [同意する] (Agree)5 Enter the connection number provided by DOCOMO6 The remote support starts after the connection is establishedWarranty and After-Sales ServiceWarranty zThe warranty period is 1 year from the date of purchase. zFor the purpose of improvement, the specifications and the appearance for the handset are subject to change without prior notice. zInformation registered in your handset, such as phonebooks, may be lost or changed if your handset is damaged, repaired or mishandled. It is recommended that backup be kept of information such as phonebooks. ※The handset allows you to save phonebook data etc. to microSD Cards. ※The handset allows you to back up data such as phonebooks by using docomo cloud.](https://usermanual.wiki/Sharp/HRO00254/User-Guide-3703449-Page-197.png)
![198 Appendix/IndexSoftware updateSoftware update is a function to connect to the network and check if software update for the handset is required. If necessary, download and install update files.Software update zIf update is necessary, you will be notified by [ ] (Software Update) on the status bar or you can visit the DOCOMO website to check the availability of update. zThe following contents etc. are included in software update. Be sure to keep the version up-to-date to use the handset safely and comfortably. Improvement and addition of functions Improvement of operations Improvement of the product quality Update of security patch zYou can update software even if the handset contains data in it. However, DOCOMO may not be able to protect data that could be lost due to malfunction, damage, water exposure and so on. It is recommended that important data be backed up before updating software. Note that some data cannot be backed up. Precautions zOnce the update is completed, you cannot downgrade the software to the previous one. zWhen updating software, the information unique to the handset (model, serial number, etc.) is automatically sent to the DOCOMO server. Sent information is only used for software update. zIf you use packet communication of Xi/FOMA, the download is free of charge. zThe docomo nano UIM card of DOCOMO subscription is required to update software via packet communication. If you use packet communication, subscription to sp-mode may be required depending on the content of the update. zDuring installation, making or receiving calls, each communication function and other functions cannot be used. zDuring installation, no key operations are available. It is not possible to cancel installation. zWhen the update is completed, the handset restarts. zWhen the update is completed, some settings may be reset. Re-enter the information or re-specify the settings. zWhen PIN code is set, the PIN code entry screen appears during restart after rewriting and you are required to enter PIN code. zIf update fails and all operations become unavailable, bring the handset to a repair counter that DOCOMO specifies. zWhile updating, sent SMSs are held at SMS center. zUpdate may take time. zIn the following cases, update is not available. During a call When the handset is not connected to the Wi-Fi and [ ] is displayed When the handset is functioning as a base unit during tethering When date and time are set incorrectly](https://usermanual.wiki/Sharp/HRO00254/User-Guide-3703449-Page-200.png)
![199 Appendix/Index When battery level is insufficient for update When available space on the handset memory is insufficient When the basic software is changed improperly zDuring international roaming, update software by Wi-Fi connection (docomo nano UIM card is not inserted). zEnd all apps before installing software. zFully recharge battery before updating software. zDo not turn the power off during updating software. zIt is recommended to download software at a location with good signal conditions while you are not moving. Software update may be interrupted if signal is weak. zWhen software update is not necessary, [No upgrade is needed. Use it as it is.] appears. zFor information on available period of software update, refer to the DOCOMO website.Updating software zWhen you update the software, drag the status bar down▶select the notification▶[Install] to install the software by yourself. Changing Auto download/Auto upgrade setting1 In the home screen, [ ]▶[Settings]▶[About phone]▶[Software Update]2 [ ]/[ ] of Auto download/Auto upgrade zIf Auto download/Auto upgrade is set to OFF, carry out the operation of “When [ ] is not displayed on the status bar”. When [ ] is not displayed on the status bar1 In the home screen, [ ]▶[Settings]▶[About phone]▶[Software Update]2 [Update now] zThe confirmation screen for updating software is displayed depending on the content of the update.3 [OK]/[Install]When the confirmation screen for updating software is displayed1 In the confirmation screen for updating software, select an item Perform now (only via Wi-Fi): Download update files immediately via Wi-Fi connection. Perform at scheduled time (via Wi-Fi/Xi): Download update files at the automatically reserved time via Wi-Fi connection or Xi/FOMA*. * When you cannot download update files via Xi/FOMA, [Perform at scheduled time (only via Wi-Fi)] is displayed. zIf sp-mode is not set and touch [Perform at scheduled time (via Wi-Fi/Xi)], the update is not available. Try with Wi-Fi connection.](https://usermanual.wiki/Sharp/HRO00254/User-Guide-3703449-Page-201.png)
![200 Appendix/Index zIf the handset software is the latest, [No upgrade is needed. Use it as it is.] is displayed. zIf the download is interrupted, data downloaded up to that point is retained for up to 14 days. You can restart the download from [] (Downloading update file stopped) on the status panel. zIf you select [Perform at scheduled time (via Wi-Fi/Xi)] or [Perform at scheduled time (only via Wi-Fi)], the time for the download to start is automatically set. The time cannot be changed. If you do not want to download at the automatically set time, [Software Update]▶[Back]. Then select [Perform now (only via Wi-Fi)] and download update files.[Download now (only via Wi-Fi)], [Perform at scheduled time (via Wi-Fi/Xi)] zIf you select [Download and install] and the download is finished, the installation automatically starts. Even if you do not touch [OK], the installation starts after approximately 10 seconds. zEven if you select [Download] and the download is finished, the installation does not automatically start. When you want to install update files, you need to start installation by yourself.Updating apps zCheck if update for apps is required after the update is completed. If you do not update an app which needs to be updated, the app's operations may become unstable or functions may not work normally. Be sure to keep the version up-to-date. zFor details on the supported OS version of an app, contact the provider of the app. Updating from the status panelWhen the update is finished and the handset restarts, [ ] (Updating has been completed) is displayed on the status bar.Drag the status bar down and [Updating has been completed]▶[Next]▶[OK] to update apps in the update list. Updating from Play StoreIn the home screen, [Play Store]▶[ ]▶[My apps & games] to update each app.Main specifications HandsetProduct name SH-01KSize Approx. 144 (H) × Approx. 72 (W) × Approx. 8.6 (D) mmWeight Approx. 148 gMemory ROM: 32 GB*1RAM: 3 GB](https://usermanual.wiki/Sharp/HRO00254/User-Guide-3703449-Page-202.png)
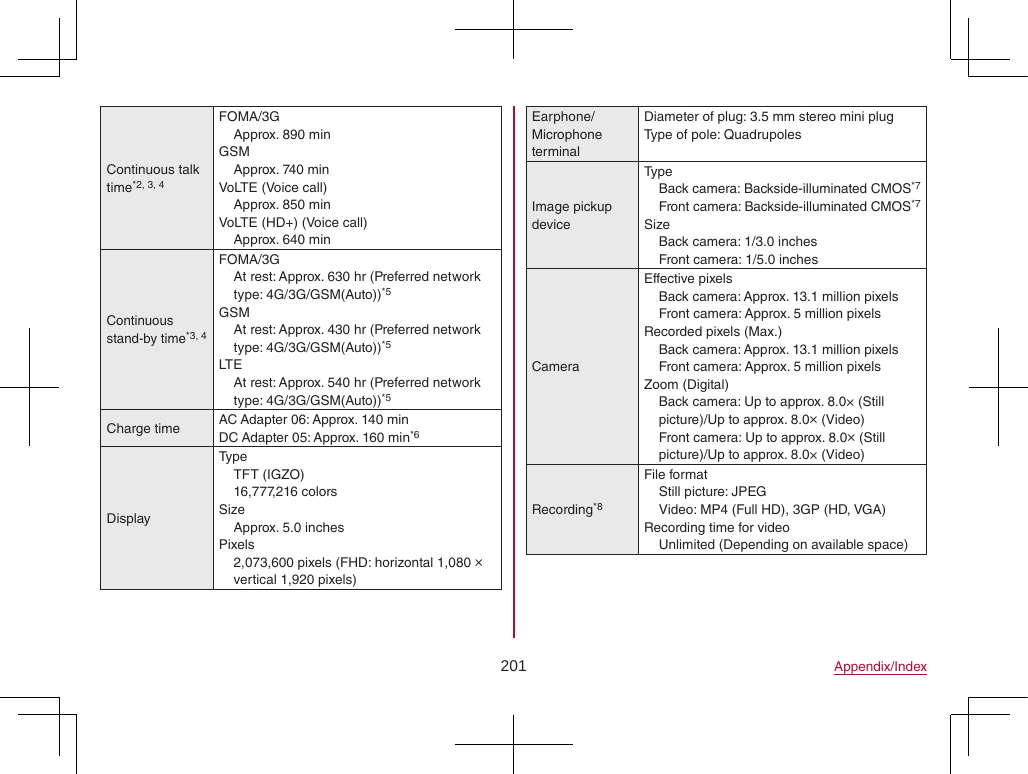
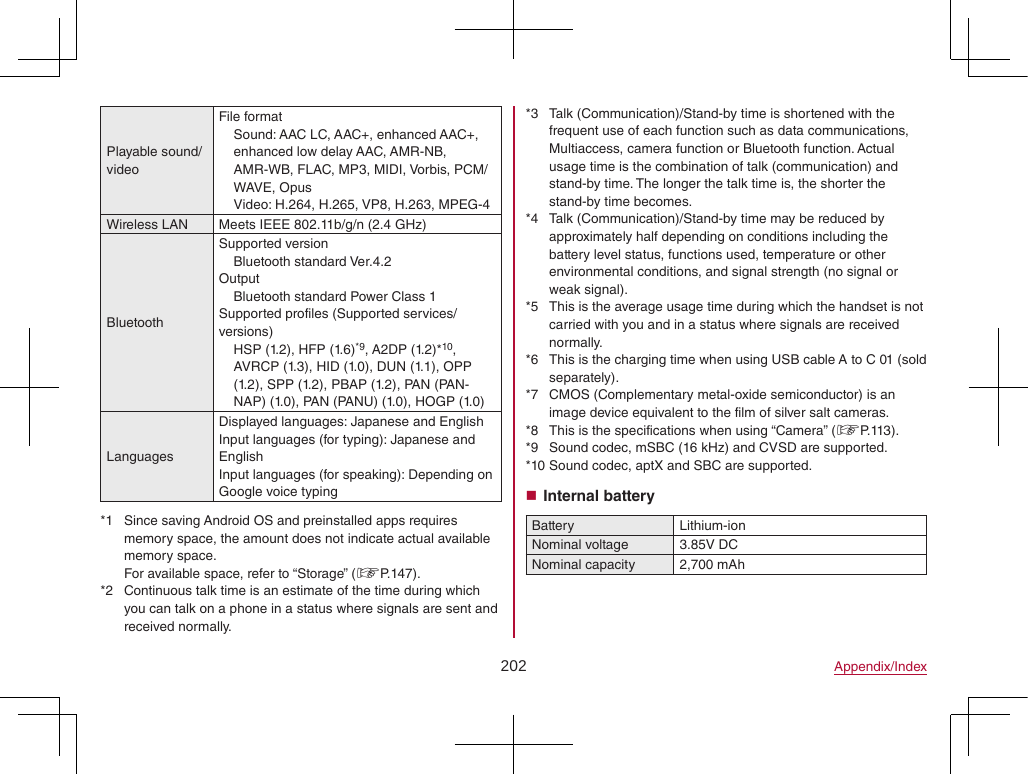
![210 Appendix/IndexOpen source software zThis product includes software based on GNU General Public License (GPL), GNU Lesser General Public License (LGPL) and other licenses. For details on licenses of related software, in the home screen, []▶[Settings]▶[About phone]▶[Legal information]▶[Open source licenses]. zSource codes of software based on GPL, LGPL and Mozilla Public License (MPL) can be referred to on the following website for free. For details, refer to the following website. (http://k-tai.sharp.co.jp/support/developers/oss/) (in Japanese only)Unlocking SIM lock zThe handset can unlock the SIM lock. Unlock the SIM lock to use non-DOCOMO SIM cards. zSome services, functions, etc. may be unavailable. DOCOMO shall not guarantee any operation of the handset. zFor details on the procedure of unlocking SIM lock, refer to the DOCOMO website.1 Insert another carrier's SIM card zFor details on how to insert/remove the SIM card (☞P. 32 “docomo nano UIM card”)2 Turn the power on3 Enter the SIM unlock code▶[Unlock]](https://usermanual.wiki/Sharp/HRO00254/User-Guide-3703449-Page-212.png)