Sharp LC 60C7500U User Manual LED TELEVISION Manuals And Guides 1309336L
User Manual: Sharp LC-60C7500U LC-60C7500U SHARP LED TELEVISION - Manuals and Guides View the owners manual for your SHARP LED TELEVISION #LC60C7500U. Home:Electronics Parts:Sharp Parts:Sharp LED TELEVISION Manual
Open the PDF directly: View PDF ![]() .
.
Page Count: 66
SHARP
AQU OS
LIQUID CRYSTAL TELEVISION
TI:!:LEVISEU RACL
TELEVISOR CON PANTALLA DE
CRISTAL LiQUIDO
OPERATION MANUAL
MODE D'EMPLOI
MANUAL DE OPERACION
N0M1245_===--_
NYOE
IMPORTANT : Please read this operation manual before
starting operating the equipment.
IMPORTANT : Veuillez lire ce mode d'emploi avant de
commencer & utiliser I'appareil.
IMPORTANTE : Lea este manual de operaci6n antes de
comenzar a operar el equipo.
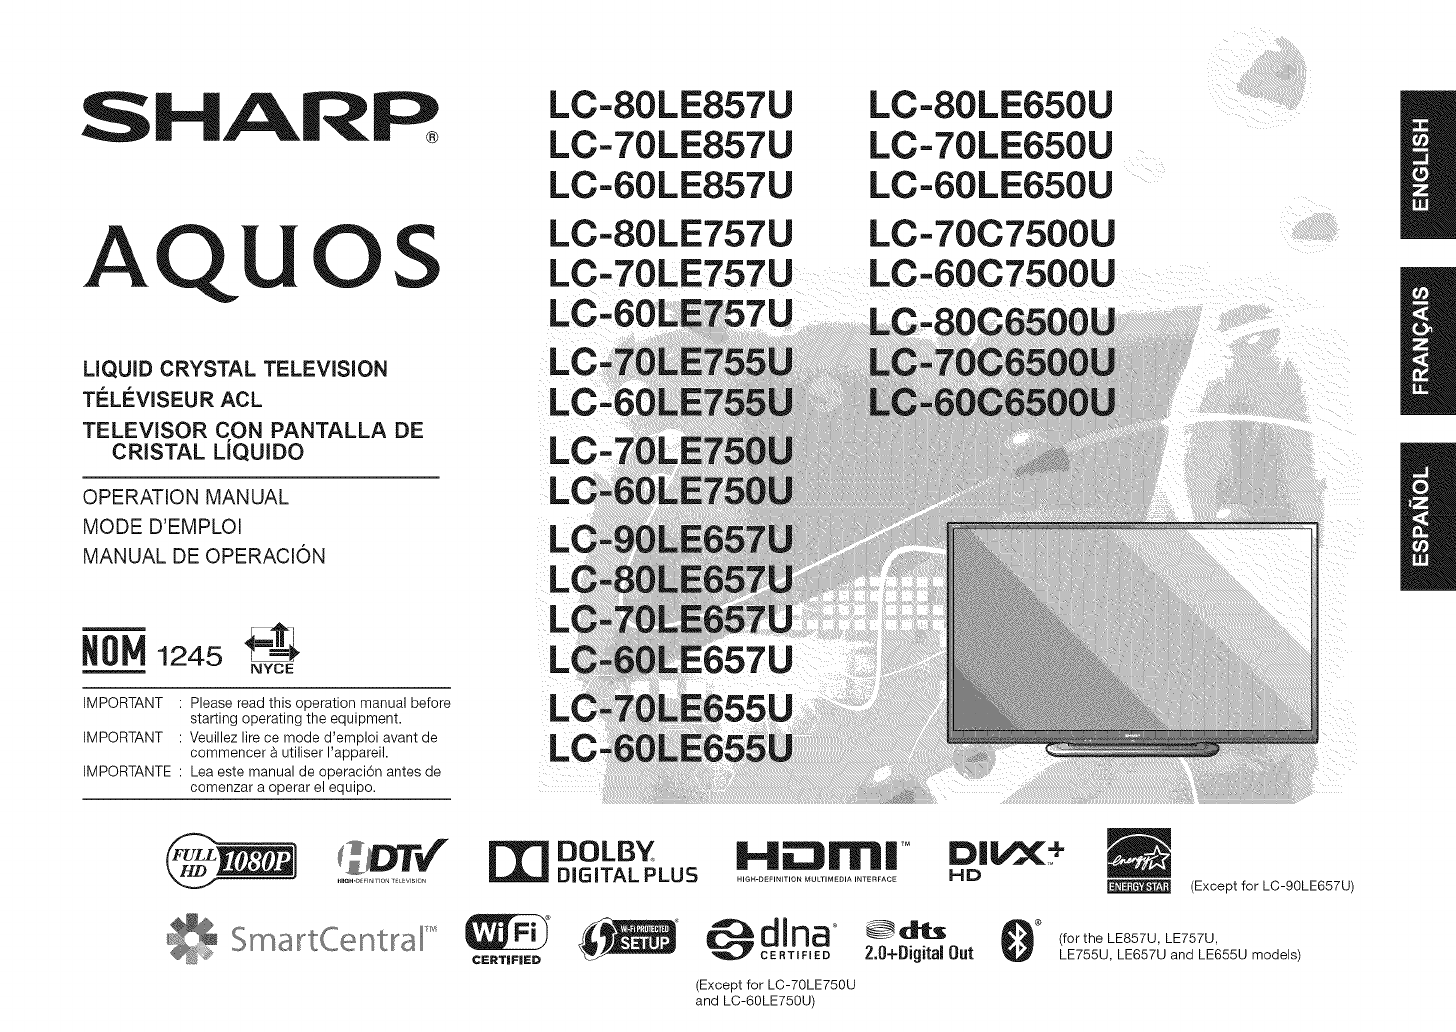
LC-80LE857U
LC-70LE857U
LC-60LE857U
LC-80LE757U
LC-70LE757U
LC
L
LC
LC-80LE650U
LC-70LE650U
LC-60LE650U
LC-70C7500U
LC-60C7500U
/
B
S
DOLBY
DIGITAL PLUS H_Frll| TM
NIGN-DEFINITION MULTIMEDIA INTERFACE (Except for LC-90LE657U)
(Except for LC-70LE750U
and LC-60LE750U)
2.0+Digital Out (forthe LE857U, LE757U,
LE755U, LE657U and LE655U models)
Skype TM is supported by this TV set. For details, refer to the following:
For the operatiorl manual:
http://www, sharpusa, corn (USA)
http://www.sharp.ca (Canada)
http://www.sharp.com.mx (Mexico)
For information on the communication camera:
http://freetalk.me/product/sharp/
For details on Skype:
http://www.skype.com
Ce televiseur eet compatible avec Skype TM. Pour lee details, reportez-vous a :
Pour le mode d'emploi :
http://www.sharpusa.com (Etats-Unis)
htt p://w_,_,'v,shar p.ca (Canada)
http://www.sharp.com.mx (Mexique)
Pour des informations sur la camera de communication :
http://freetalk.me/product/sharp/
Pour les d6tails sur Skype :
http://www.skype.com
Skype TM ee compatible con eete televisor. Para conocer m_s detallee, consulte:
Para el manual de operacion:
http://www.sharpusa.com (EE.UU.)
htt p://w_,_,'v.shar p.ca (Canada)
http://www.sharp.com.mx (Mexico)
Para obtener mas informaci6n sobre la camara de comunicacion:
http://freetalk.me/product/sharp/
Para conocer detalles de Skype:
http://www.skype.com

iMPORTANT iNFORMATiON
IMPORTANT: IModel No.:
To aid reporting in case of loss or theft, please record the I
TV's model and serial numbers in the space provided. ISerial No.:
The numbers are located at the rear and left side of the T_. I
m_
WARNING: TO REDUCE THE RISK OF FIRE OR ELECTRIC
SHOCK, DO NOT EXPOSE THIS PRODUCT TO
RAIN OR MOISTURE.
_kThe lightning flash with arrow-head
symbol, within an equilateral
_k _:k triangle, is intended to alert the
DO NOTOPEN
user to the presence of
RISK OF ELECTRIC SHOCK uninsulated "dangerous voltage"
within the product's enclosure that
may be of sufficient magnitude to
constitute a risk of electric shock
to persons.
CAUTION: TO REDUCE THE RISK OF ELECTRIC SHOCK,
DO NOT REMOVE COVER (OR BACK)_
NO USER-SERVICEABLE PARTS INSIDE,
REFER SERVICING TO QUALIFIED SERVICE
PERSONNEL
The exclamation point within a
triangle is intended to alert the
,_k .... to the p........ f important
operating and maintenance
(servicing) instructions in the
literature accompanying the
product.
CAUTION: TO PREVENT ELECTRIC SHOCK, MATCH WIDE BLADE OF PLUG TO WIDE
SLOT, FULLY INSERT.
WARNING: FCC Regulations state that any unauthorized changes or modifications to this
equipment not expressly approved by the manufacturer could void the user's authority
to operate this equipment.
CAUTION: This product satisfies FCC regulations when shielded cables and connectors are used to
connect the unit to other equipment. To prevent electromagnetic interference with electric
appliances such as radios and televisions, use shielded cables and connectors
for connections.
DECLARATION OF CONFORMITY:
SHARP LIQUID CRYSTAL TELEVISION, MODEL LC-80LE857U/LC-70LE857U/LC-60LE857U/
LC-8_LE757U/LC-7_LE757U/LC-6_LE757U/LC-7_LE755U/LC-6_LE755U/LC-7_LE75_U/LC-6_LE75_U/
LC-9_LE657U/LC-8_LE657U/LC-7_LE657U/LC-6_LE657U/LC-7_LE655U/LC-6_LE655U/LC-8_LE65_U/
LC-7_LE65_U/LC-6_LE65_U/LC-7_C75__U/LC-6_C75__U/LC-8_C65__U/LC-7_C65__U/LC-6_C65__U
This device complies with Part 15 of the FCC Rules. Operation is subject to the following two
conditions:
(1) This device may not cause harmful interference, and (2) this device must accept any interference
received, including interference that may cause undesired operation.
RESPONSIBLE PARTY:
SHARP ELECTRONICS CORPORATION
Sharp Plaza, Mahwah, New Jersey 07495-1163
TEL: 1-800-BE-SHARP
For Business Customers: URL http://www.sharpusa.com
INFORMATION: B
This equipment has been tested and found to comply with the limits for a Class B digital device,
pursuant to Part 15 of the FCC Rules. These limits are designed to provide reasonable protection
against harmful interference in a residential installation. This equipment generates, uses and can
radiate radio frequency energy and, if not installed and used in accordance with the instructions, may
cause harmful interference to radio communications. However, there is no guarantee that interference
will not occur in a particular installation. If this equipment does cause harmful interference to radio
or television reception, which can be determined by turning the equipment off and on, the user is
encouraged to try to correct the interference by one or more of the following measures:
-- Reorient or relocate the receiving antenna.
-- Increase the separation between the equipment and receiver.
-- Connect the equipment into an outlet on a circuit different from that to which the receiver is connected.
-- Consult the dealer or an experienced radio/TV technician for help.
FCC Compliance Statement
This device complies with part 15 of the FCC Rules. Operation is subject to the following two conditions:
(1) This device may not cause harmful interference, and (2) this device must accept any interference
received, including interference that may cause undesired operation.
Wireless Radio
For product available in the USA/Canada market, only channel 1-11 can be operated. Selection of
other channels is not possible. This device is going to be operated in 5.15-5.25GHz frequency range,
it is restricted in indoor environment only.
Important: Any changes or modifications not expressly approved by the party responsible for
compliance could void the user's authority to operate the equipment.
FOC Radiation Exposure Statement: This equipment complies with FCC radiation exposure limits set
forth for an uncontrolled environment. This equipment should be installed and operated with minimum
distance 20cm between the radiator & your body.
Industry Canada Statement
This Class B digital apparatus complies with CAN ICES-003(B)/NMB-3(B)
Wireless Radio
For product available in the USA/Canada market, only channel 1-11 can be operated. Selection of
other channels is not possible.
The device could automatically discontinue transmission in case of absence of information to transmit
or operational failure.
Note that this is not intended to prohibit transmission of control or signaling information or the use of
repetitive codes where required by the technology.
Important: Any changes or modifications not expressly approved by the party responsible for
compliance could void the user's authority to operate the equipment.
IC Radiation Exposure Statement: This device complies with IC RSS-210 rules; Operation is subject
to the following two conditions:
(1) This device may not cause harmful interference, and (2) this device must accept interference
recieved, including interference that may cause undesired operation.
This product contains a CR Coin Lithium Battery which contains Perchlorate Material - special
handling may apply, California residents,
See www.dtsc.ca.gov/hazardouswaste/perchlorate/ [ U.S.A. ONLY
"Note to CATV system installer: This reminder is provided to call the CATV system installer's attention
to Article 820 of the National Electrical Code that provides guidelines for proper grounding and, in
particular, specifies that the cable ground shall be connected to the grounding system of the building,
as close to the point of cable entry as practical."
This product qualifies for ENERGY STAR when "Home" is selected for "TV Location".
Setting "-Iv' Location" to "Home" allows the TV to achieve an energy-saving status for household use.
(Except for Lc-gOLE657U)
(D-1
DEAR SHARP CUSTOMER
Thank you for your purchase of the Sharp Liquid Crystam Television. To ensure safety and many
years of trouble-free operation of your product, please read the Important Safety Instructions
carefully before using this product.
iMPORTANT SAFETY iNSTRUCTiONS
Electricity is used to perform many useful functions, but it can also cause personal injuries and
property damage if improperly handled. This product has been engineered and manufactured with
the highest priority on safety. However, improper use can result in electric shock and/or fire. In order
to prevent potential danger, please observe the following instructions when installing, operating
and cleaning the product. To ensure your safety and prolong the service life of your Liquid Crystal
Television, please read the following precautions carefully before using the product.
1) Read these instructions.
2) Keep these instructions.
3) Heed all warnings.
4) Follow all instructions.
5) Do not use this apparatus near water.
6) Clean only with dry cloth.
7) Do not block any ventilation openings. Install in accordance with the manufacturer's instructions.
8) Do not install near any heat sources such as radiators, heat registers, stoves, or other apparatus
(including amplifiers) that produce heat.
9) Do not defeat the safety purpose of the polarized or grounding-type plug. A polarized plug has two
blades with one wider than the other. A grounding type plug has two blades and a third grounding
prong. The wide blade or the third prong are provided for your safety. If the provided plug does not fit
into your outlet, consult an electrician for replacement of the obsolete outlet.
10) Protect the power cord from being walked on or pinched particularly at plugs, convenience
receptacles, and the point where they exit from the apparatus.
11) Only use attachments/accessories specified by the manufacturer.
12) Use only with the cart, stand, tripod, bracket, or table specified by the manufacturer,
or sold with the apparatus. When a cart is used, use caution when moving the cart/
apparatus combination to avoid injury from tip-over.
13) Unplug this apparatus during lightning storms or when unused for long periods of
time.
14) Refer all servicing to qualified service personnel. Servicing is required when the apparatus has
been damaged in any way, such as power-supply cord or plug is damaged, liquid has been
spilled or objects have fallen into the apparatus, the apparatus has been exposed to rain or
moisture, does not operate normally, or has been dropped.
Additional Safety Information
15) Power Sources-This product should be operated only from the type of power source indicated
on the marking label. If you are not sure of the type of power supply to your home, consult your
product dealer or local power company. For products intended to operate from battery power, or
other sources, refer to the operating instructions.
16) Overloading--Do not overload wall outlets, extension cords, or integral convenience receptacles
as this can result in a risk of fire or electric shock.
17) Object and Liquid Entry--Never push objects of any kind into this product through openings as
they may touch dangerous voltage points or short-out parts that could result in a fire or electric
shock. Never spill liquid of any kind on the product.
18) Damage Requiring Service--Unplug this product from the wall outlet and refer servicing to
qualified service personnel under the following conditions:
a) When the AC cord or plug is damaged,
b) If liquid has been spilled, or objects have fallen into the product,
c) If the product has been exposed to rain or water,
d) If the product does not operate normally by following the operating instructions.
Adjust only those controls that are covered by the operating instructions as an improper adjustment
of other controls may result in damage and will often require extensive work by a qualified technician
to restore the product to its normal operation, J
_-2
iMPORTANT SAFETY iNSTRUCTiONS
e) If the product has been dropped or damaged in any way, and
f ) When the product exhibits a distinct change in performance - this indicates a need for
service.
19) Replacement Parts--When replacement parts are required, be sure the service technician has
used replacement parts specified by the manufacturer or have the same characteristics as the
original part. Unauthorized substitutions may result in fire, electric shock, or other hazards.
20) Safety Check--Upon completion of any service or repairs to this product, ask the service
technician to perform safety checks to determine that the product is in proper operating
condition.
21) Wall or ceiling mounting--When mounting the product on a wall or ceiling, be sure to install the
product according to the method recommended by the manufacturer.
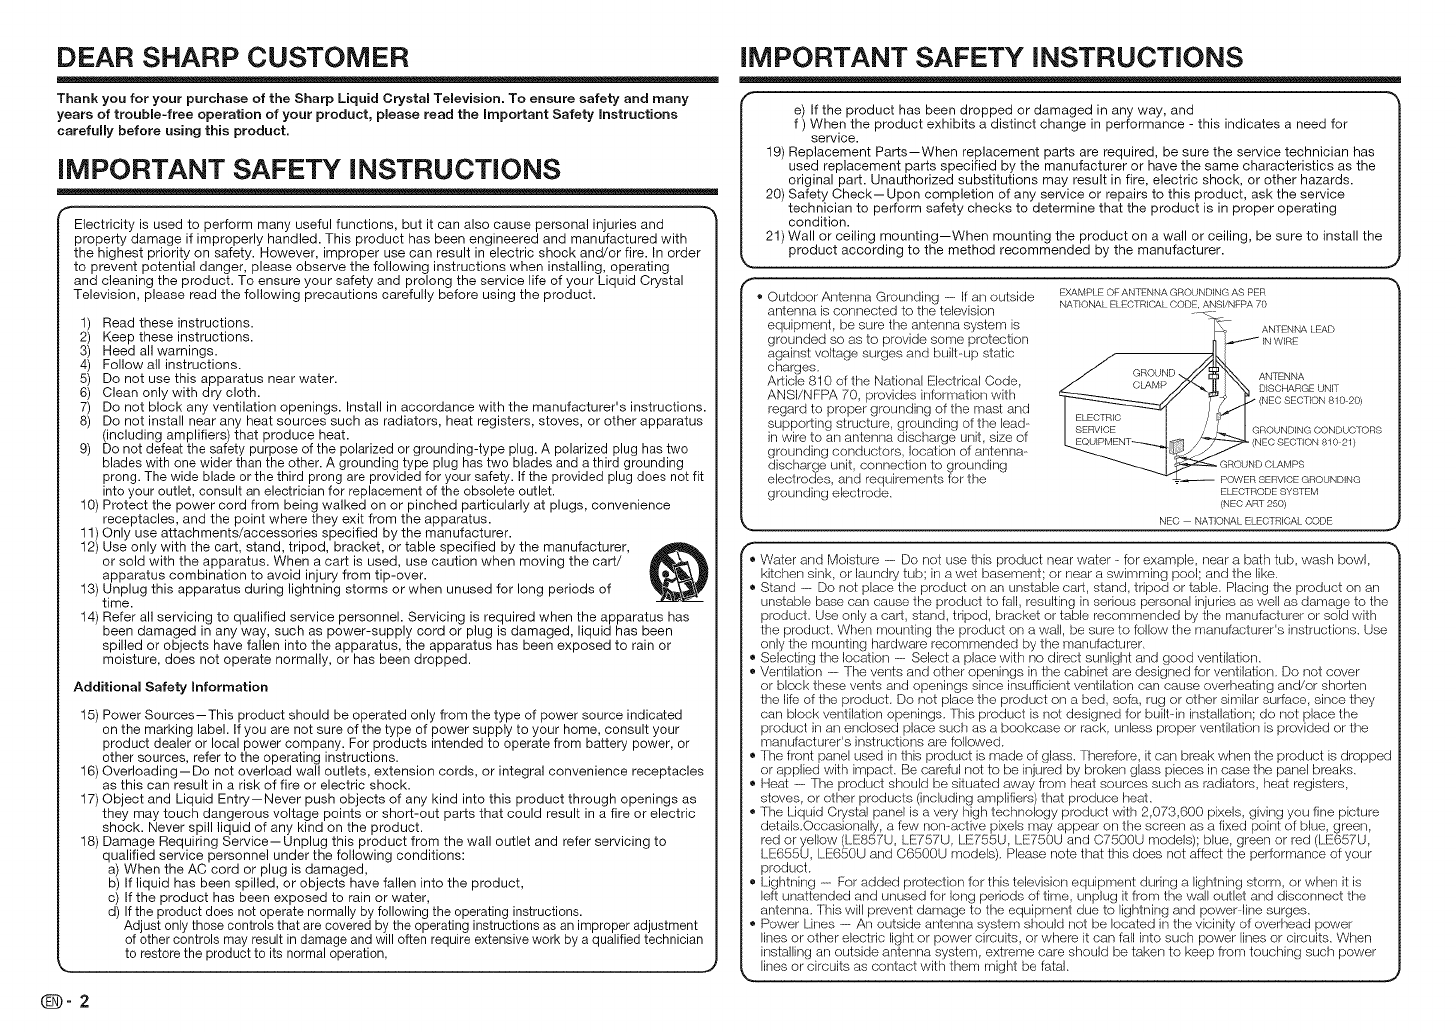
®' ' EXANiPLE OF ANTENNA GROUNDING AS PER
Outdoor Antenna Grounding ------if an outside NATIONALELECTRICALCODEANSI/NFPA70
| antenna is connected to the television z_
| equipment, be sure the antenna system is _ANTENNA LEAD
| grounded so as to provide some protection I_ _ INWIRE
| against voltage surges and built-up static ../_TJkl
| charges. _/ .......... //D$'X",,
| Article 810 of the National Electrical Code j _._2_, _U _ I_ I'_ ANTENNA
.... ' DISCHARGE UNIT
| ANSI/NFPA70 prov,des,nformat,onw,th __'_'_/// "_J:_ "_(NEOSEOTION81020'
| regard to proper grounding of the mast and IFI F(':TR_C_'_'_[ J:t_[ ' ' '
| supporting structure, grounding of the lead- I SERVICE t /LI GROUNDINGCONDUCTORS
| in wire to an antenna discharge unit, size of [ Eo_ _ /_-L _ECSECTIONm0 21
| grounding conductors, location of antenna- _ __
| discharge unit, connection to grounding ___ GROUNDCLAMPS
| electrodes, and requirements for the =.-- POWERSERVICEGROUNDING
| grounding electrode. ELECTRODESYSTEM
" " (NEC ART 250)
NEC NATIONAL ELECTRICAL CODE
,, Water and Moisture -- Do not use this product near water - for example, near a bath tub, wash bowl,
kitchen sink, or laundry tub; in awet basement; or near a swimming pool; and the like.
,, Stand -- Do not place the product on an unstable cart, stand, tripod or table. Placing the product on an
unstable base can cause the product to fall, resulting in serious personal injuries as well as damage to the
product. Use only a cart, stand, tripod, bracket or table recommended by the manufacturer or sold with
the product. When mounting the product on a wall, be sure to follow the manufacturer's instructions. Use
only the mounting hardware recommended by the manufacturer.
,, Selecting the location -- Select a place with no direct sunlight and good ventilation.
,, Ventilation - The vents and other openings in the cabinet are designed for ventilation. Do not cover
or block these vents and openings since insufficient ventilation can cause overheating and/or shorten
the life of the product. Do not place the product on a bed, sofa, rug or other similar surface, since they
can block ventilation openings. This product is not designed for built-in installation; do not place the
product in an enclosed place such as a bookcase or rack, unless proper ventilation is provided or the
manufacturer's instructions are followed.
,, The front panel used in this product is made of glass. Therefore, it can break when the product is dropped
or applied with impact. Be careful nol to be injured by broken glass pieces in case the panel breaks.
,, Heal - The product should be situated away from heat sources such as radiators, heat registers,
stoves, or other products (including amplifiers) that produce heal.
,, The Liquid Crystal panel is a very high technology product with 2,073,600 pixels, giving you fine picture
details.Occasionally, a few non-active pixels may appear on the screen as a fixed point of blue, green,
red or yellow (LE857U, LE757U, LE755U, LE750U and C7500U models); blue, green or red (LE657U,
LE655U, LE650U and C6500U models). Please note that this does not affect the performance of your
product.
,, Lightning -- For added protection for this television equipment during a lightning storm, or when it is
left unattended and unused for long periods of time, unplug it from the wall outlet and disconnect the
antenna. This will prevent damage to the equipment due to lightning and power-line surges.
,, Power Lines -- An outside antenna system should not be located in the vicinity of overhead power
lines or other electric light or power circuits, or where it can fall into such power lines or circuits. When
installing an outside antenna system, extreme care should be taken to keep from touching such power
,._ lines or circuits as contact with them might be fatal. _'
iMPORTANT SAFETY iNSTRUCTiONS
,, To prevent fire, never place any type of candle or flames on the top or near the TV set.
,, To prevent fire or shock h_ard, do not place the AC cord under the TV set or other heavy items.
,, Do not display a still picture for a long time, as this could cause an afterimage to remain. _,Am
,, To prevent fire or shock h_ard, do not expose this product to dripping or splashing.No
objects filled with liquids, such as vases, shouk_ be placed on the product. ,__
,, Do not inserl foreign objects into the product. Inserting objects in the air vents or other
openings may result in fire or electric shock. Exercise special caution when using the
product around children. [L - .......................
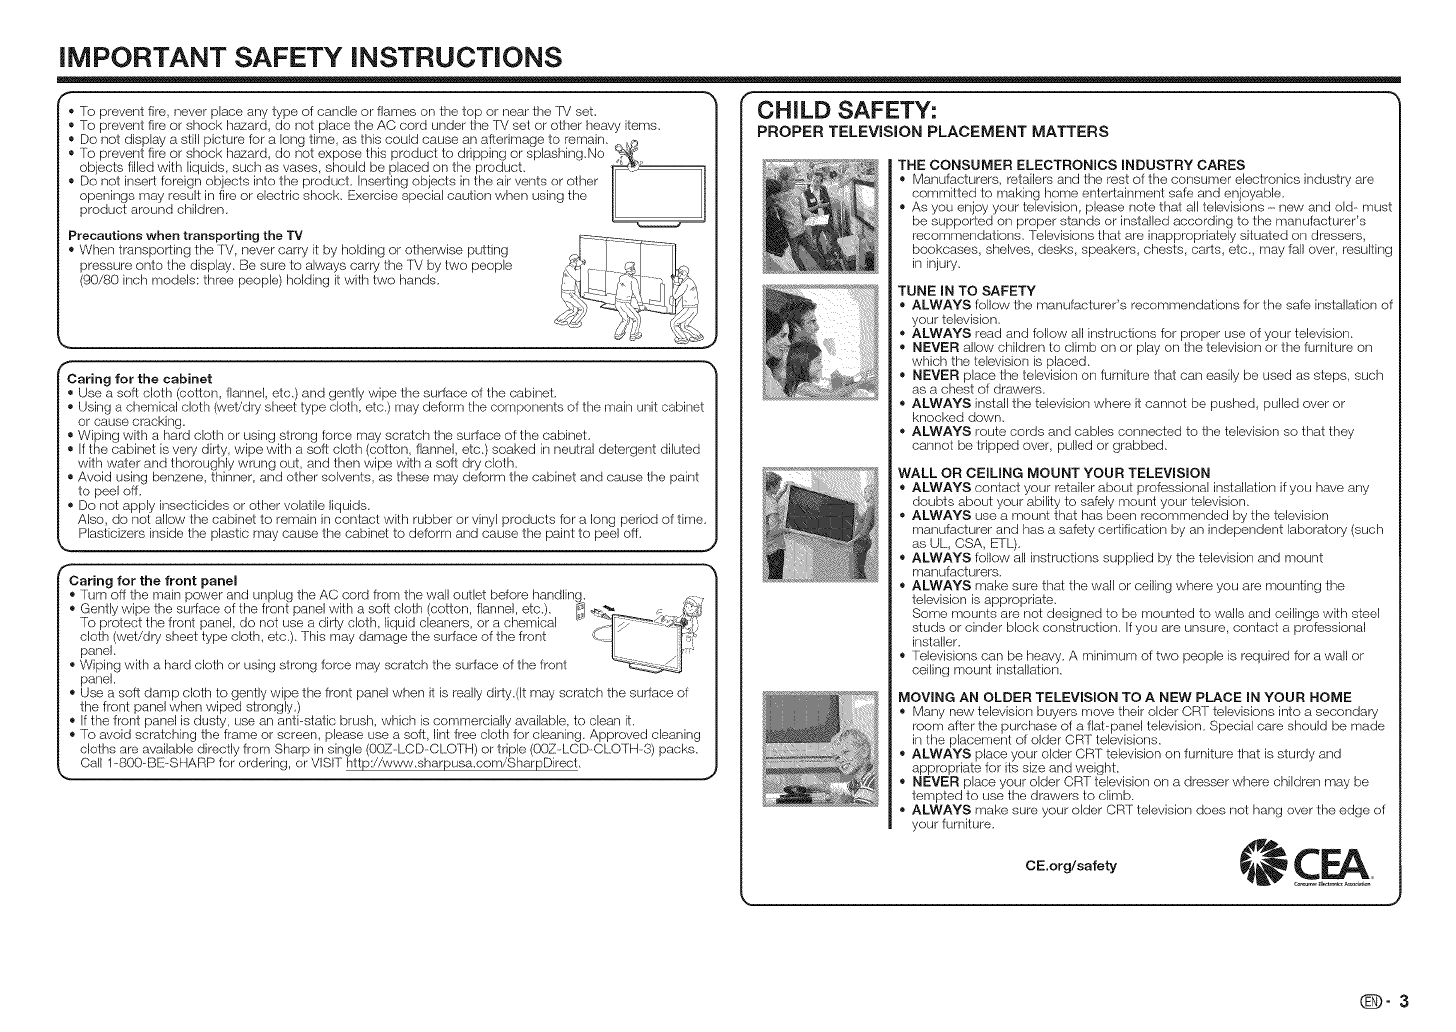
Precautions when transporting the l'V
When transporting the FV, never carry it by holding or otherwise putting _:_ _1
pressure onto the display. Be sure to always carry the TV by two people _ _ I!_
(90/80 inch models: three people) holding it with two hands.
Caring for the cabinet
,_ Use a soft cloth (cotton, flannel, etc.) and gently wipe the surface of the cabinet.
,, Using a chemical cloth (weVdry sheet type cloth, etc.) may deform the components of the main unit cabinet
or cause cracking.
,, Wiping with a hard cloth or using strong Iorce may scratch the surface of the cabinet.
,, If the cabinet is very dirty, wipe with a soft cloth (cotton, flannel, etc.) soaked in neutral detergent diluted
with water and thoroughly wrung out, and then wipe with a soft dry cloth.
,, Avoid using benzene, thinner, and other solvents, as these may deform the cabinet and cause the paint
to peel off.
® Do not apply insecticides or other volatile liquids.
Also, do not allow the cabinet to remain in contact with rubber or vinyl products for a long period of time.
Plasficizers inside the plastic may cause the cabinet to deform and cause the paint to peel off.
Caring for the front panel
" fum off the main power and unplug the AC cord from the wall outlet before handling.
,_ Gent y w pe the surface of the front pane w th a soft c oth (cotton f anne etc ) _1 __.._ • _i'_'?_
To protect the Iront panel do not use a dirty cloth liquid cleaners or a chemical " __Ir_7_'_- s._[
cloth (wet/dry sheet type cloth, etc.). This may damage the surface of the front d_ _ i'_ _
panel. [L /_
Wiping with a hard cloth or using strong force may scratch the surface of the front
panel.
,, Use a soft damp cloth to gently wipe the front panel when it is really dirty.(It may scratch the surface of
the front panel when wiped strongly.)
,, If the Iront panel is dusty, use an anti-static brush, which is commercially available, to clean it.
,, To avoid scratching the frame or screen, please use a soft, lint Iree cloth for cleaning. Approved cleaning
cloths are available directly from Sharp in single (00Z--LCD-CLOTH) or triple (00Z LCD-CLOTH-3) packs.
Call 1-800-BE-SHARP for ordering, or VISIT http://www.sharpusa.com/SharpDirect.
CHILD SAFETY:
PROPER TELEViSiON PLACEMENT MATTERS
THE CONSUMER ELECTRONICS INDUSTRY CARES
® Manufacturers, retailers and the rest of the consumer electronics industry are
committed to making home entertainment safe and enjoyable.
® As you enjoy your television, please note that all televisions - new and old- must
be supported on proper stands or installed according to the manufacturer's
recommendations. Televisions that are inappropriately situated on dressers,
bookcases, shelves, desks, speakers, chests, carts, etc, may fall over, resulting
in injury.
TUNE IN TO SAFETY
®ALWAYS follow the manufacturer's recommendations for the safe installation of
your television.
® ALWAYS read and follow all instructions for proper use of your television.
® NEVER allow children to climb on or play on the television or the furniture on
which the television is placed.
® NEVER place the television on furniture that carl easily be used as steps, such
as a chest of drawers.
® ALWAYS install the television where it cannot be pushed, pulled over or
knocked down.
® ALWAYS route cords and cables connected to the television so that they
cannot be tripped over, pulled or grabbed.
WALL OR CEILING MOUNT YOUR TELEVISION
®ALWAYS contact your retailer about professional installation ifyou have any
doubts about your ability to safely mount your television.
,, ALWAYS use a meunt that has been recommended by the television
manufacturer and has a safety certification by an independent laboratory (such
as UL, CSA, ETL).
® ALWAYS follow all instructions supplied by the television and mount
manufacturers.
® ALWAYS make sure that the wall or ceiling where you are mounting the
television is appropriate.
Some mounts are not designed to be mounted to walls and ceilings with steel
studs or cinder block construction. Ifyou are unsure, contact a professional
installer.
® Televisions can be heavy. A minimum of two people is required for a wall or
ceiling mount installation.
MOVING AN OLDER TELEVISION TO A NEW PLACE IN YOUR HOME
® Marly new television buyers move their older CRT televisions into a secondary
room after the purchase of a flat-panel television. Special care should be made
in the placement of older CRT televisions.
® ALWAYS place your older CRT television on furniture that is sturdy and
appropriate for its size and weight.
® NEVER place your older CRT television on a dresser where children may be
tempted to use the drawers to climb.
® ALWAYS make sure your older CRT television does not hang over the edge of
your furniture.
J
(D-3

iMPORTANT SAFETY iNSTRUCTiONS
3D Glasses (for the LE857U, LE757U, LE755U and LE657U models)
Prevention of accidental ingestion
" Keep the accessory out of the reach of small children. Small children carl accidentally swallow these
parts.
- If a child accidentally swallows any of these parts, seek immediate medical attention.
Do not disassemble
• Do not disassemble or modify the 3[) Glasses except when recycling the batteries. Do not modify the 3[)
Glasses.
Handling the 3D Glasses
• Do not drop, exert pressure on, or step on the 3D Glasses. Doing so may damage the glass section,
which may result in the risk of injury.
• Be careful not to trap your Iinger in the hinge section of the 3D Glasses. Doing so may result in injury.
- Pay special attention when children are using this product.
Caution for lithium battery
,, Batteries must not be exposed to excessive heat such as direct sunlight or Iire.
,, Replace only with the same or equivalent type of battery. The baltery may explode if improperly replaced.
.Take care not to reverse the battery poles (+ and -) when loading the battery. Follow the correct
procedure when loading the battery. Loading the battery incorrectly may damage the battery or cause it
to leak battery fluid, which could result in a fire, injury or damage.
Using the 3D Glasses
" Use of the 3[) Glasses should be limited to a maximum of 3 hours, and in any case no more than one
movie.
,, Use only the 3D Glasses recommended for this fM.
,, Use the 3D Glasses only for the specified purpose.
®Do not move around while wearing the 3D Glasses. The surrounding area may appear dark, which may
result in falling or other accidents that may cause injury.
Caring for the 3D Glasses
,, Use only the cloth provided with the 3D Glasses to clean the lenses. Remove dust and soil from the
cloth. Any dust or other soiling on the cloth may result in scratches. Do not use solvents such as
benzene or thinners as doing so may cause the coating to peel off.
,, When cleaning the 3D Glasses, take care not to allow water or other fluids to come into contact with the
glasses.
,, Always store the 3D Glasses in the case provided when not in use.
,, When storing the 3D Glasses, avoid very humid or hot locations.
Viewing 3D images
If you experience dizziness, nausea, or other discomfort while viewing 3D images, discontinue use and
rest your eyes.
,, Do not use the 3D Glasses if they are cracked or broken.
AWARNING
DO NOT INGEST BATTERY, CHEMICAL BURN HAZARD
"This product contains a coin/button cell battery. If tile coin/button cell battery is swallowed, it can cause
severe internal burns in just 2 hours and can lead to death. Keep new and used batteries away from
children. If the battery compartment does not close securely, stop using the product and keep it away
from children. If you think batteries might have been swallowed or placed inside any part of the body, seek
immediate medical attention."
_-4
Accessories
Make sure the following accessories are provided with the product.
Page 10 Page 9
Page 6 Page 8
Page 8
Page 6
m
Wall mount
bracket
3D Glasses
AN-52AG4
(for LC-70LE857 U/LC-60LE857 U/
LC-70LE707U/LC-60LE707U/LC-70LE7ooU/
LC-60LE7ooU/LC-70LE7oOU/LC-60LE7oOU/
LC-70LE607U/LC-60LE607U/LC-70LE6ooU/
LC-60LE6ooU/LC-70LE6oOU/LC-60LE6oOU/
LC-7007500U/LC-6007o00U/
LC-7006500U/LC-6006o00U)
AN-3DG40 (for the LE857U, LE757U,
LE755U, LE657U and LE655U models)
The listed optional accessories are available for
the Liquid Crystal Television. Please purchase
them at your nearest shop.
• Additional optional accessories may be available
in the near future. When purchasing, please read
the newest catalogue for compatibility and check
the availabilky.
• Always use the AC cord supplied with the TV.
• The illustrations above are for explanation purposes and may vary slightly from the actual accessories.
_ _ _ _(_t}_ _ _ For details, refer to the operation
Page 9 Page 7 (for the 70/60 inch models) manual.
Page 9 (for the 80 inch models)
[] Operation manual (this publication) [] Connection guide
[] Operation manual for the 3D Glasses (forthe LE857U, LE757U, LE755U and LE657U models)
Contents
IMPORTANT INFORMATION ................... 1
DEAR SHARP CUSTOMER ..................... 2
IMPORTANT SAFETY mNSTRUCTIONS ...... 2-4
Accessories ..................................... 4
Supplied Accessories ....................... 4
Optional Accessories ........................ 4
QUICK REFERENCE
Attaching the Stand ....................... 6-7
Attaching the Stand (for the 90/80 Inch
Models) ................................. 7-9
QUICK INSTALLATION TIPS ................ 9
Experiencing HD Images .................... 9
Installing Batteries in the Remote Control
Unit ...................................... 10
Using the Remote Control Unit ............. 10
Preparation
Antennas .................................. 10
Part Names
TV (Front) .................................. 11
TV (Side) ................................... 11
TV (Rea 0 ................................... 11
Remote Control Unit ....................... 12
Introduction to Connections
Types of Connection ....................... 13
Displaying an External Equipment Image ... 13
Connecting to External Equipment
Corlrlecting a Blu-ray Disc/DVD Player or
HD Cable/Satellite Set-top Box ........... 14
Conrlecting a VCR, Game Console,
Camcorder or Cable/Satellite Set-top Box... 14
Conrlecting a Surround System/
Audio System ............................ 15
Corlnecting a PC........................... 15
Watching TV
Turning On/OFFthe Power .................. 16
Initial Installation ........................ 16-17
Direct Button Operation
Changing Channels .................... 18
Changing Volume ...................... 18
MUTE .................................. 18
FREEZE ................................ 18
INPUT .................................. 18
FLASHBACK ........................... 18
SmartCentral ........................... 18
NETFLIX ............................... 19
AUDIO ................................. 19
Sleep Timer ............................ 19
AV MODE .............................. 19
Closed Captions and Digital Closed
Captions ............................. 20
VIEW MODE ....................... 20-21
On-Screen Display Menu
On-Screen Display Menu Operation ........ 22
Menu Operation Buttons ................... 22
Menu Items ................................ 23
Picture Settings ........................ 24-25
Audio Settings ............................. 25
Power Control ............................. 26
System Options ........................ 26-28
Initial Setup ............................ 28-30
Information ............................. 30-32
Enjoying 3D Image Viewing (for the LE857U,
LE757U, LE755U, LEG57U and LE655U models}
Display Methods for 3[) and 2D Images .... 33
Viewing 3D Images ..................... 33-34
Configuring the TV Settings to Enhance
3D Image Viewing .................... 34-35
Enjoying Photo/Music/Video Playback
Connecting a USB Memory Device/
USB Hard Drive .......................... 35
Connecting a Home Network Server ......... 36
Selecting the Folders to Play Back ......... 36
Playing Back Files on a USB Memory Device/
Home Network Server ................ 37-39
Playing Back Files from a
Portable Device or PC .................... 39
Using AQUOS LINK
Controlling HDMI Equipment
Using AQUOS LINK .................. 41-42
Link Operation Menu ................... 42-43
Using a Smartphone with the TM ........... 43
Using aPC
Adjusting the PC Image .................... 44
Setting Audio Input ......................... 44
Control of the TM....................... 44-45
PC Compatibility Chart ..................... 45
Using the Internet
Connecting to the Internet .................. 46
Interrlet Setup .......................... 46-47
AQUOS Advantage Live .................... 47
Entering [ext (Software Keyboard) ......... 47
Using the Browser ..................... 48-49
Using Keyboard and Mouse ................ 49
Using Applications via the Internet .......... 49
DISCLAIMERS ......................... 50
Appendix
Removing the Stand ....................... 51
Setting the TM on the Wall .............. 52-53
Troubleshooting ............................ 54
Troubleshooting - 3D Images (fer the LE857U,
LE757U, LE755U, LE657U and LE655U
models) .................................. 54
Troubleshooting - Error Message ........... 55
Infermatbn on the Software License for
This Product ............................. 55
Specifications
lV ..................................... 56-57
Wireless I..AN .............................. 58
Bluetooth .................................. 58
Trademarks .................................... 59
Calling for Service ............................. 60
LIMITED WARRANTY .......................... 60
Dimensional Drawings
®The dimensional drawings br the LCD TV set are
shown on the inside back cover.
Other Viewing Options
Presetting Remote Control Function ........ 40
Operating the Connected Equipment ....... 41
® The illustrations and on-screen displays in this operation manual are br explanation purposes and may
vary slightly from the actual operations.
® The examples used throughout this manual are based on the LC-60LE650U model.
(D-5
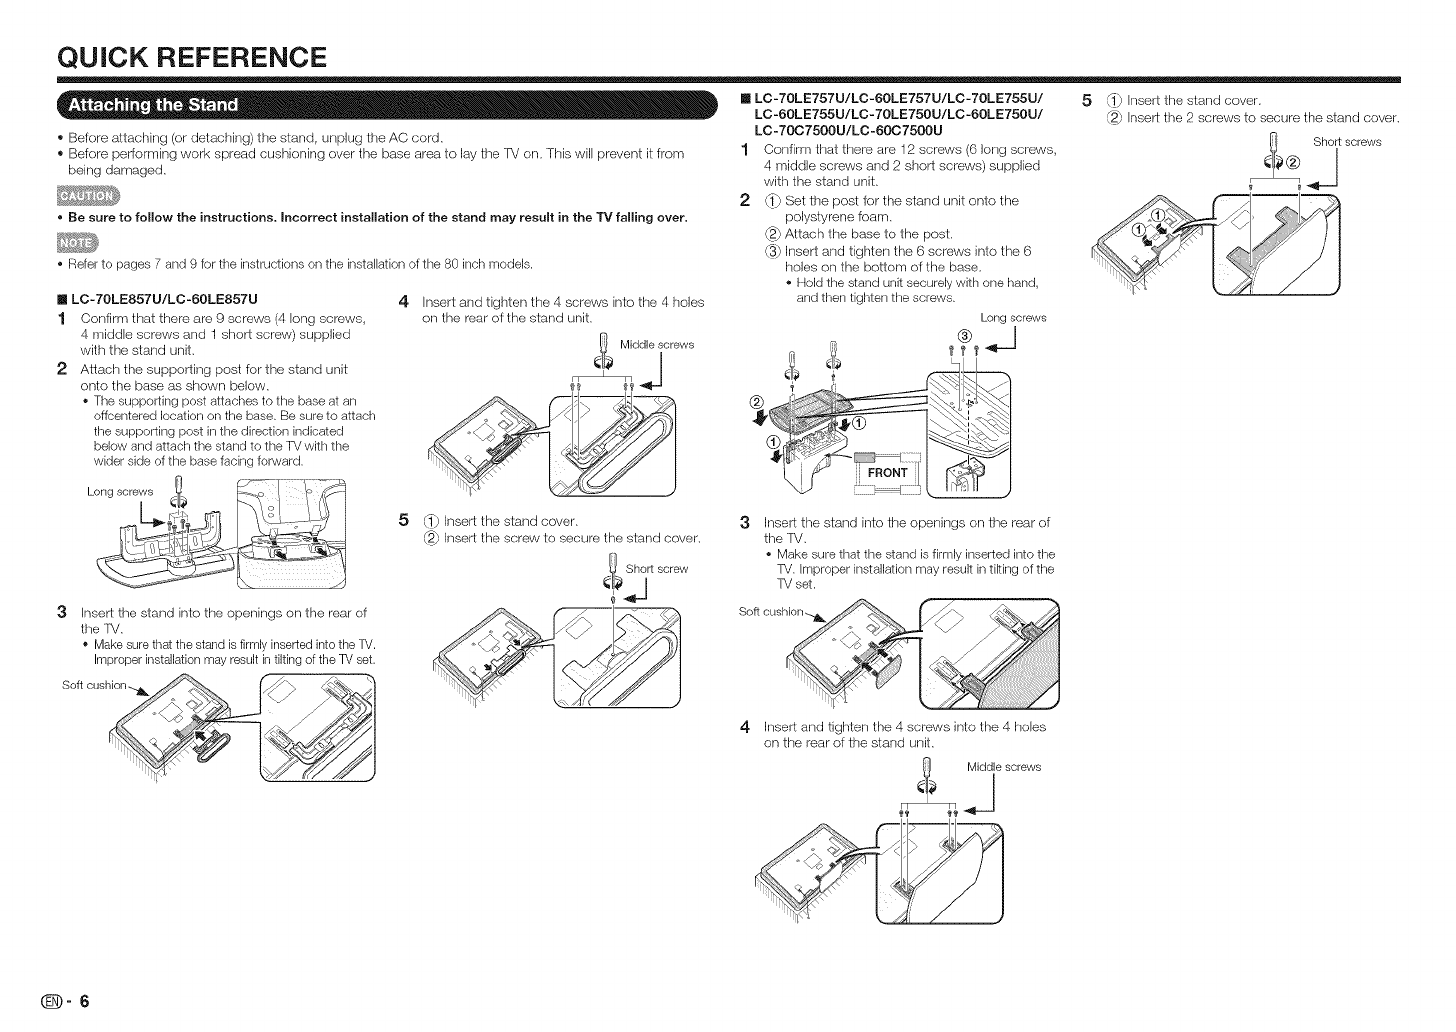
QUICK REFERENCE
® Before attaching (or detaching) the stand, unplug the AC cord.
® Before performing work spread cushioning over the base area to lay the FV on. This will prevent it from
being damaged.
•Be sure to follow the instructions, Incorrect installation of the stand may result in the "rv falling over,
• Refer to pages 7 and 9 for the instructions on the installation of the 80 inch models.
nLC- 70LE857U/LC -60LE857U
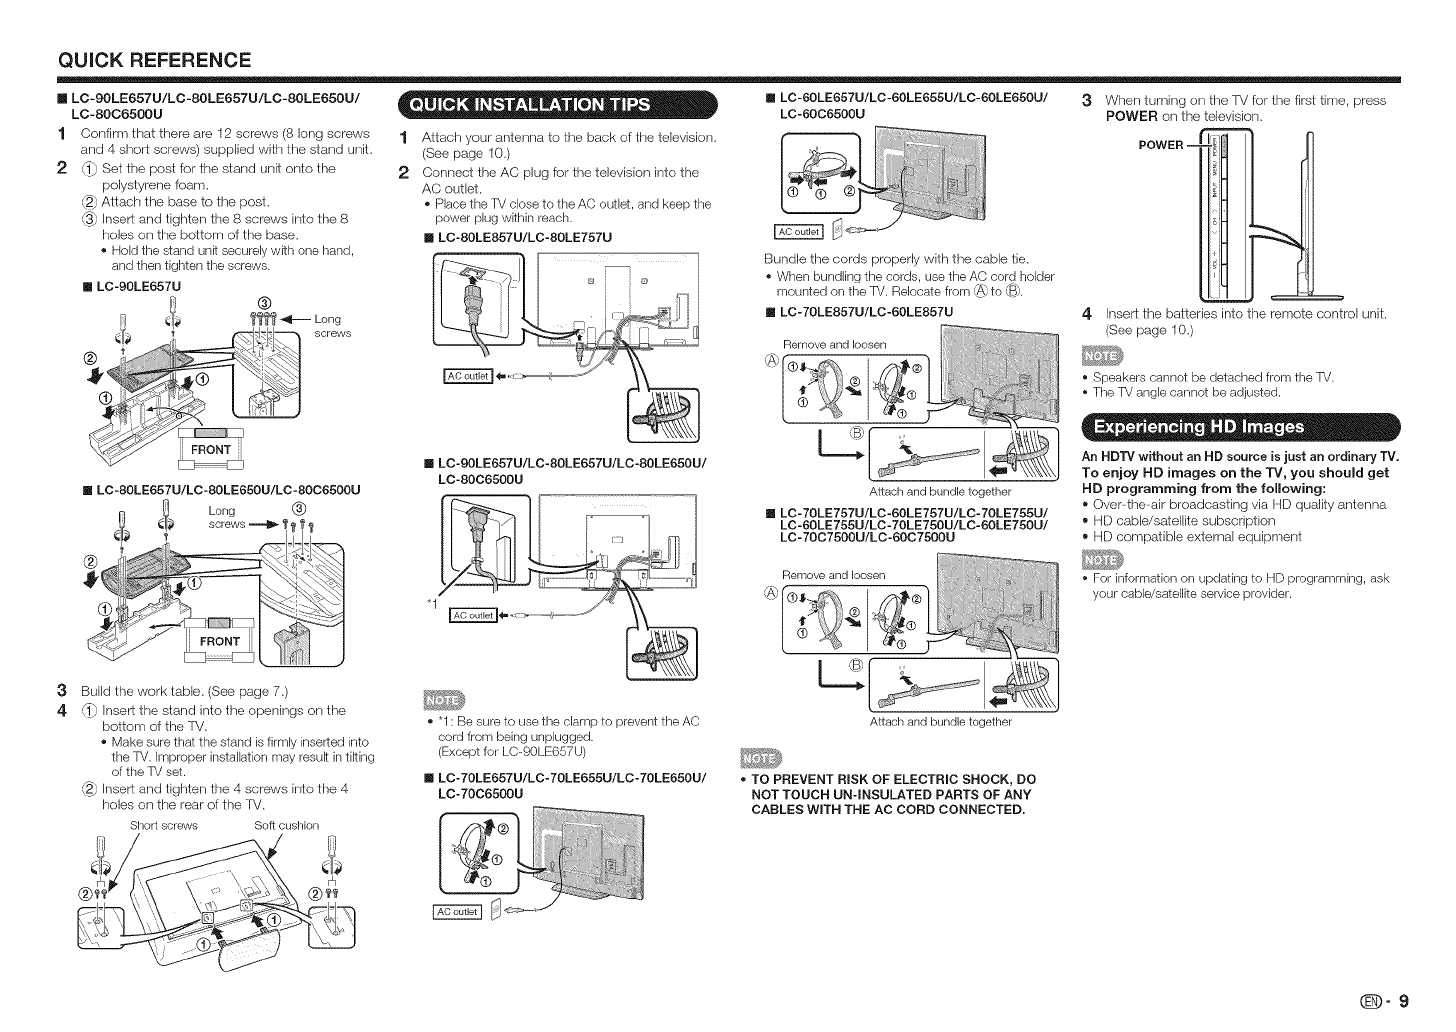
1 Confirm that there are 9 screws (4 long screws,
4 middle screws and 1 short screw) supplied
with the stand unit.
2 Attach the supporting post for the stand unit
onto the base as shown below.
• The supporting post attaches to the base at an
offcentered location on the base. Be sure to attach
the supporting post in the direction indicated
below and attach the stand to the TV with the
wider side of the base facing forward.
4Insert and tighten the 4 screws into the 4 holes
on the rear of the stand unit.
Middlescrews
J
[] LC-70LE757U/LC-60LE757U/LC-70LE755U/
LC-60LE755U/LC-70LE750U/LC-60LE750U/
LC -70C7500U/LC -60C7500U
1 Confirm that there are 12 screws (6 long screws.
4 middle screws and 2 short screws) supplied
with the stand unit.
2 (1_ Set the post for the stand unit onto the
polystyrene foam.
_2_Attach the base to the post.
(3_ Insert and tighten the 6 screws into the 6
holes on the bottom of the base.
• Hold the stand unit securely with one hand,
and then tighten the screws.
Longscrews
5_ insert the stand cover.
_ insert the 2 screws to secure the stand cover.
3insert the stand into the openings on the rear of
the FV.
* Make sure that the stand is firmlyinserted into the TV.
Improper installation may result in tilting of the TV set.
S°ft cushi°n_l_ _
5Insert the stand cover.
_ Insert the screw to secure the stand cover.
_! Short screw
3
4
Insert the stand into the openings on the rear of
the FV,
• Make sure that the stand is firmly inserted into the
TV. improper installation may result in tiking of the
TV set.
Insert and tighten the 4 screws into the 4 holes
on the rear of the stand unit.
_ Middle screws
QUICK REFERENCE
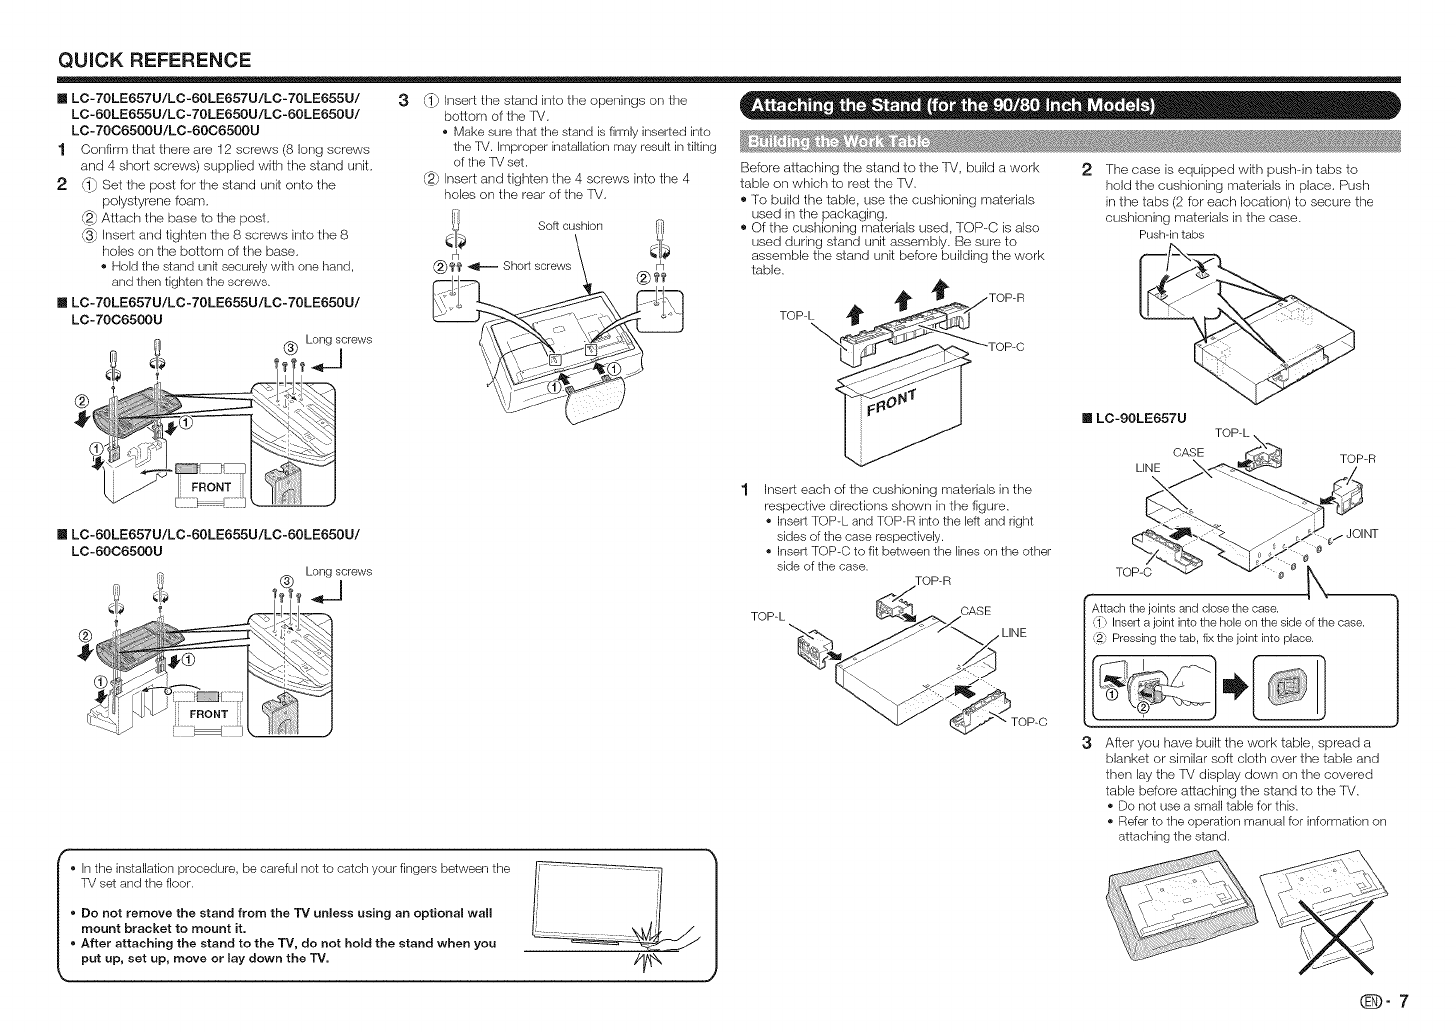
3
nLC- 70LE657U/LC-60LE657U/LC- 70LE655U/
LC-60LE655U/LC-70LE650U/LC-60LE650U/
LC- 70C6500U/LC-60C6500U
1 Confirm that there are 12 screws (8 long screws
and 4 short screws) supplied with the stand unit.
2 _} Set the post for the stand unit onto the
polystyrene foam.
@_Attach the base to the post.
@_Insert and tighten the 8 screws into the 8
holes on the bottom of the base.
• Hold the stand unRsecurely wRh one hand,
and then tighten the screws.
m LC- 70LE657U/LC -70LE655U/LC- 70LE650U/
LC-70C6500U
_ (_) Longscrews
®
_} Insert the stand into the openings on the
bottom of the fV.
• Make sure that the stand is firmly inserted into
the TV. Improper installation may result in tilting
of the TV set.
@_ Insert and tighten the 4 screws into the 4
holes on the rear of the FV.
Soft cushion
®I'f' _ Short screws
Before attaching the stand to the TV, build a work 2 The case is equipped with push-in tabs to
table ors which to rest the FV. hold the cushioning materials in place. Push
® To build the table, use the cushioning materials in the tabs (2 for each location) to secure the
used in the packaging, cushioning materials in the case.
® Of the cushioning materials used, TOP-C is also Pushqn tabs
used during stand unit assembly. Be sure to
assemble the stand unit before building the work
table.
TOP-L _TOP-R
__ _TOP-C I LC-90LE657U TOP-L
CASE
LINE \ TOP-R
nLC-60LE657U/LC -60LE655U/LC-60LE650U/
LC-60C6500U
Long screws
!÷
®
I o In the installation procedure, be careful not to catch your fingers between the V ..... _ |
TV set and the floor. ]i '[ /
o Do not remove the stand from the 13' unless using an optional wall I; ,'I |
mount bracket to mount it. [' \_,!_J, /l
o After attaching the stand to the TV, do not hold the stand when you _--_=_--_'___ |
put up, set up, move or lay down the "iV. //_ )
Insert each of the cushioning materials in the
respective directions shown in the figure.
• Insert TOP-L and TOP-R into the left and right
sides of the case respectively.
• Insert TOP-C to fit between the lines on the other
side of the case.
TOP-R
TOP-L CASE
LINE
TOP-C
_,/JOINT
0
TOP-C _ 0
Attach the joints and close the case.
1_ Insert a joint into the hole on the side of the case.
Pressing the tab, fix the joint into place.
I
3 After you have built the work table, spread a
blanket or similar soft cloth over the table and
then lay the TV display down ors the covered
table before attaching the stand to the TV.
• Do not use a small table for this.
• Refer to the operation manual for information on
attaching the stand.
qD-7
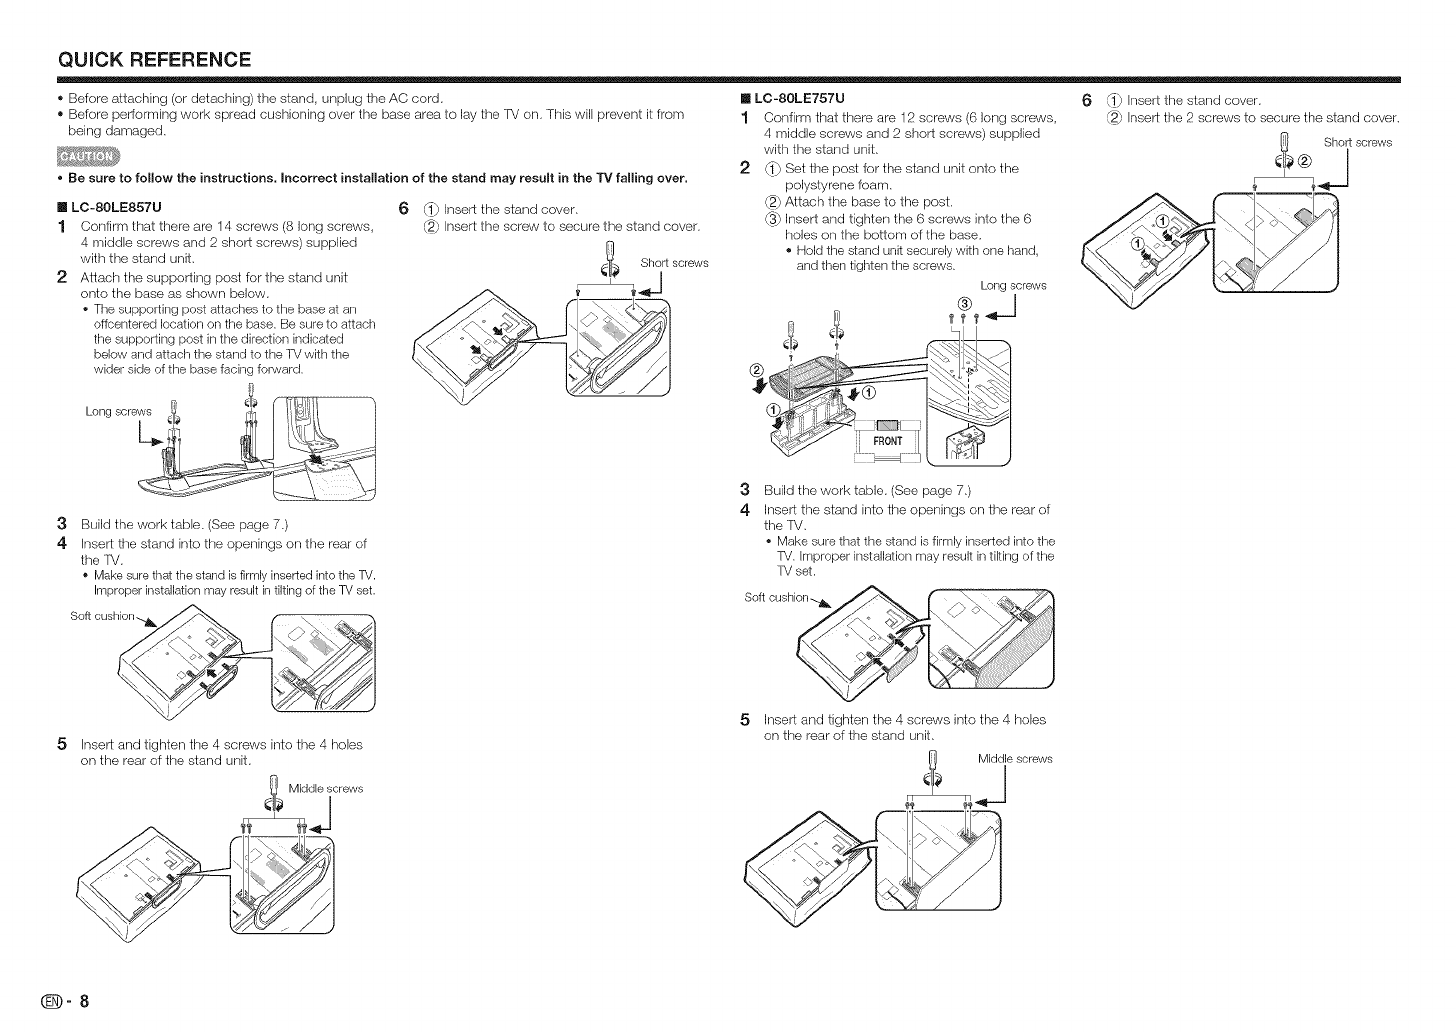
QUICK REFERENCE
® Before attaching (or detaching) the stand, unplug the AC cord.
® Before performing work spread cushioning over the base area to lay the FV on. This will prevent it from
being damaged.
•Be sure to follow the instructions, Incorrect installation of the stand may result in the TV falling over,
nLC-80LE857U
1 Confirm that there are lzi screws (8 long screws,
4 middle screws and 2 short screws) supplied
with the stand unit.
2 Attach the supporting post for the stand unit
onto the base as shown below.
• The supporting post attaches to the base at an
offcentered location on the base. Be sure to attach
the supporting post in the direction indicated
below and attach the stand to the TV with the
wider side of the base facing forward.
Longscrews _ll_ R1 I I_._JLII I
6 _ Insert the stand cover.
_] insert the screw to secure the stand cover.
......
3Build the work table. (See page 7.)
4 Insert the stand into the openings on the rear of
the fV.
• Make sure thatthe stand is firmlyinserted into the TV.
Improper installation may result in tilting of the TV set.
Soft cushion
5Insert and tighten the 4 screws into the 4 holes
on the rear of the stand unit.
Middle screws
|
[] LC-80LE757U
1 Confirm that there are 12 screws (6 long screws.
4 middle screws and 2 short screws) supplied
with the stand unit.
2 (1_ Set the post for the stand unit onto the
polystyrene foam.
_2_Attach the base to the post.
(3_ Insert and tighten the 6 screws into the 6
holes on the bottom of the base.
Hold the stand unit securely with one hand,
and then tighten the screws.
Longscrews
3
4Build the work table. (See page 7.)
Insert the stand into the openings on the rear of
the TV.
• Make sure that the stand is firmly inserted into the
TV. improper installation may result in tiring of the
TV set.
5 Insert and tighten the 4 screws into the 4 holes
on the rear of the stand unit.
_ Middle screws
6 _} Insert the stand cover.
@_ Insert the 2 screws to secure the stand cover.
_ Shortscrews
A
l
_-8
QUICK REFERENCE
nLC-9OLE657U/LC -80LE657U/LC-SOLE65OU/
LC-SOC65OOU
1 Confirm that there are 12 screws (8 long screws
and 4 short screws) supplied with the stand unit.
2 _} Set the post for the stand unit onto the
polystyrene foam.
@_Attach the base to the post.
@_Inser_ and tighten the 8 screws into the 8
holes on the bottom of the base.
• Hold the stand unRsecurely wRh one hand,
and then tighten the screws.
[] Lc-gOLE657U ®
_) _i._ _ _ Long
......
[] LC-80LE657U/LC-80LE650U/LC-80C6500U
_ Long @
®
• A _ • =
1 Attach your antenna to the back of the television.
(See page 10.)
2 Connect the AC plug for the television into the
AC outlet.
• Place the TV close to the AC outlet, and keep the
power plug wRhin reach.
[] LC-80LE857U/LC-80LE757U
[] LC-90LE657U/LC-80LE657U/LC-80LE650U/
LC-80C6500U
[] LC-60LE657U/LC-60LE655U/LC-60LE650U/
LC-6006500U
Bundle the cords properly with the cable tie.
• When bundling the cords, use the AC cord holder
mounted on the TV. Relocate from _} to {B}.
[] LC- 70LE857U/LO-60LE857U
Attach and bundle together
[] LC- 70LE757U/LO-60LE757U/LC- 70LE755U/
LC-60LE755U/LC- 70LE750U/LC-60LE750U/
LC- 70C7500U/LC-60C7500U
3When turning ors the IV for the first time. press
POWER on the television.
4 Inser_ the batteries into the remote control unit.
(See page 10.)
• Speakers cannot be detached from the TV.
• The TV angle cannot be adjusted.
e= . • D.e =
An HDTV without an HD source is just an ordinary TV.
To enjoy HD images on the TV, you should get
HD programming from the following:
®Over4he-air broadcasting via HI) quality antenna
,, HD cable/satellite subscription
,, HD compatible external equipment
• For information on updating to HD programming, ask
your cable/satellite service provider,
3
4Build the work table. (See page 7.)
_} Inser_ the stand into the openings on the
bottom of the lV.
• Make sure that the stand is firmly inserted into
the TV. Improper installation may resuR in tiring
of the TV set.
@] Inser_ and tighten the 4 screws into the 4
holes on the rear of the TV.
Short screws Soft cushion
• "1 : Be sure to use the clamp to prevent the AC
cord from being unplugged.
(Except for LC-90LE657U)
[] LC- 70LE657U/LC- 70LE655U/LC- 70LE650U/
LC-70C6500U
Attach and bundle together
• TO PREVENT RISK OF ELECTRIC SHOCK, DO
NOT TOUCH UN4NSULATED PARTS OF ANY
CABLES WITH THE AC CORD CONNECTED.
(D-9
QUICK REFERENCE
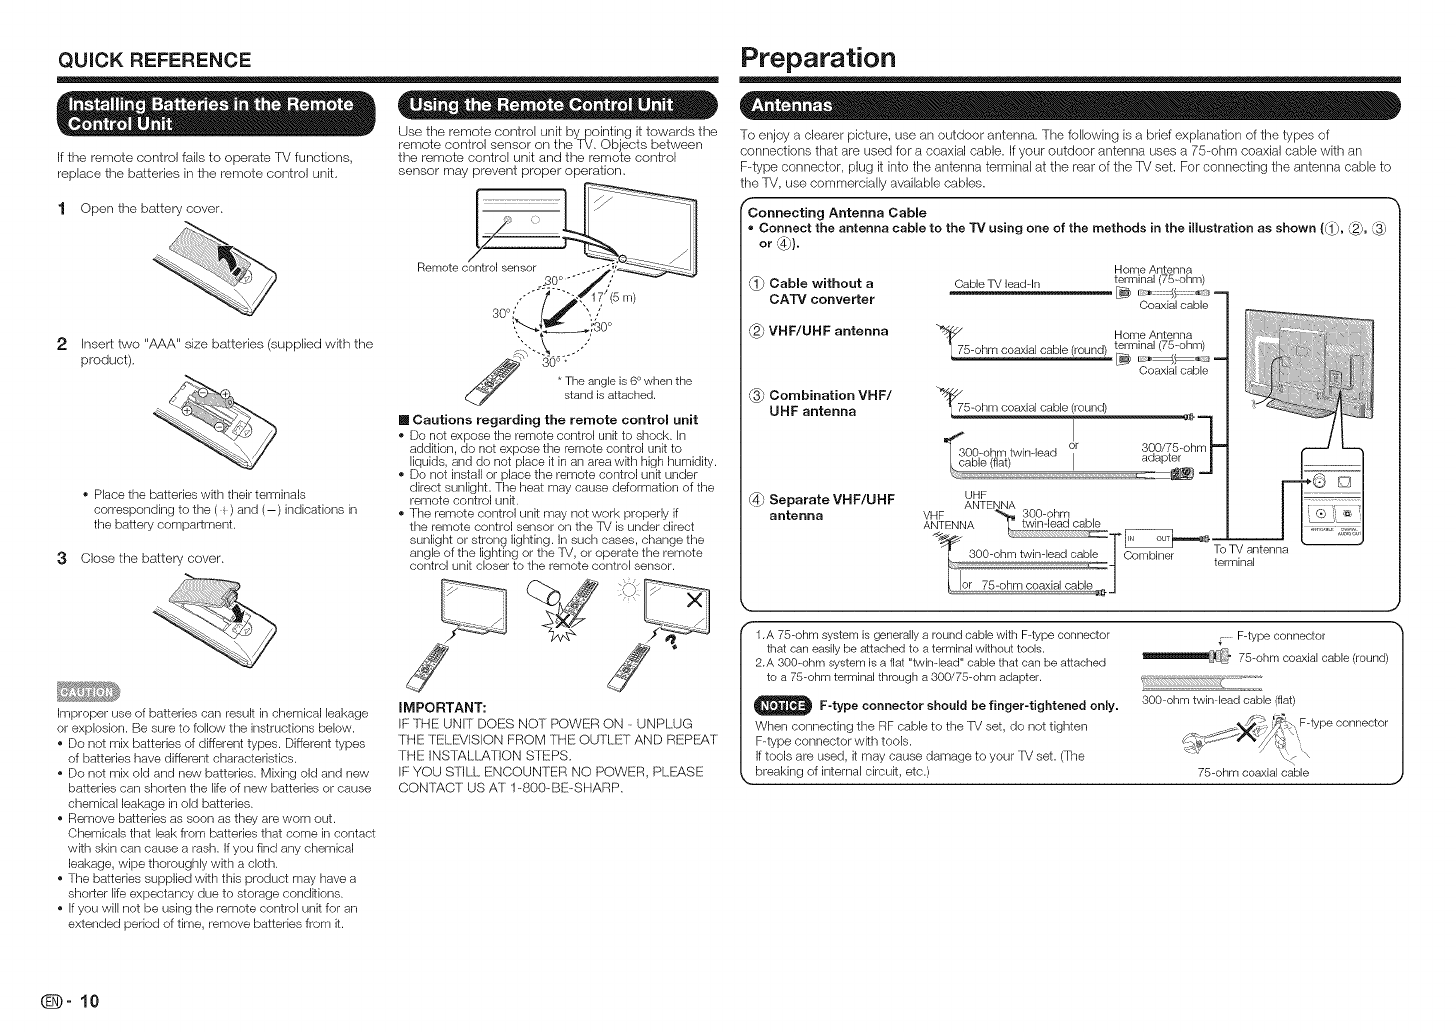
If the remote control falls to operate TV functions,
replace the batteries in the remote control unit,
1 Open the battery cover.
2 Inser_ two "AAA" size batteries (supplied with the
product),
• Place the batteries with their terminals
corresponding to the ( _ ) and (-) indications in
the battery compartment.
3Close the battery cover.
•= = -o = eo
Use the remote control unit by pointing it towards the
remote control sensor on the 'f_/. Objects between
the remote control unit and the remote control
sensor may prevent proper operation.
Remote c!
_'"" "_i: ")]2111t_glaetis(6_ed[.le n the
[] Cautions regarding the remote control unit
• Do not expose the remote control unit to shock, in
addition, do not expose the remote control unit to
liquids, and do not place it in an area with high humidity.
• Do not install or place the remote control unk under
direct sunlight. The heat may cause deformation of the
remote control unk.
• The remote control un_ may not work properly if
the remote control sensor on the TV is under direct
sunlight or strong lighting, in such cases, change the
angle of the lighting or the TV, or operate the remote
control unit closer to the remote control sensor.
Improper use of batteries can result in chemical leakage
or explosion. Be sure to follow the instructions below.
• Do not mix batteries of different types. Different types
of batteries have different characteristics.
• Do not mix old and new batteries. Mixing old and new
batteries can shorten the life of new batteries or cause
chemical leakage in old batteries.
• Remove batteries as soon as they are worn out.
Chemicals that leak from batteries that come in contact
wkh skin can cause a rash. If you find any chemical
leakage, wipe thoroughly with a cloth.
• The batteries supplied with this product may have a
shorter life expectancy due to storage condkions.
• if you will not be using the remote control unit for an
extended period of time, remove batteries from it.
J
IMPORTANT:
IF THE UNIT DOES NOT POWER ON -UNPLUG
THE TELE_/ISION FROM THE OUTLET AND REPE:AT
THE INSTALLATION STEPS.
IF YOU STILL ENCOUNTER NO POWER, PLEASE
CONTTkCT US AT 1-800-BE-SHARP.
Preparation
To enjoy a clearer picture, use an outdoor antenna. The following is a brief explanation of ttle types of
connections that are used for a coaxial cable. If your outdoor antenna uses a 75-ohm coaxial cable wittl an
F-type connector, plug it into tile antenna terminal at tile rear of tile TV set. For connecting tile antenna cable to
tile TV, use commercially available cables.
fConneeting Antenna Cable
= Connect the antenna cable to the "rv using one of the methods in the illustration as shown (_, _,
or _).
Home Antenna
Cabme without a Cable TV lead-In terminal (75-ohm)
CATV converter _ _:: t?..... :_
Coaxial cable
VHF/UHF antenna
"_7 Home Antenna5-ohm coaxial cable (round) terminal (75-ohm)
Coaxial cable
Combination VHF/
UHF antenna
_Separate VHF/UHF
antenna
"Y_75-ohm coaxial cable (round)
Iq
_O0-ohm twin-lead or 3QO/75_ohm_ =_
cable (fiat) Iaoap_er j
UHF
To TV antenna
terminal
\
1.A 75-ohm system is generally a round cable with F-type connector
that can easily be attached to a terminal without tools.
2.A 300-ohm system is a fiat "twinqead" cable that can be attached
to a 75-ohm terminal through a 300/75-0hm adapter.
_ F-type connector should be finger-tightened on_y,
When connecting the RF cable to the TV set, do not tighten
F-type connector wkh tools.
If tools are used, it may cause damage to your %/set. (The
breaking of internal circuit, etc.)
......F-type connector
__ 75-ohm coaxial cable (round)
300-ohm twin-lead cable (flat)
75-ohm coaxial cable
_-10
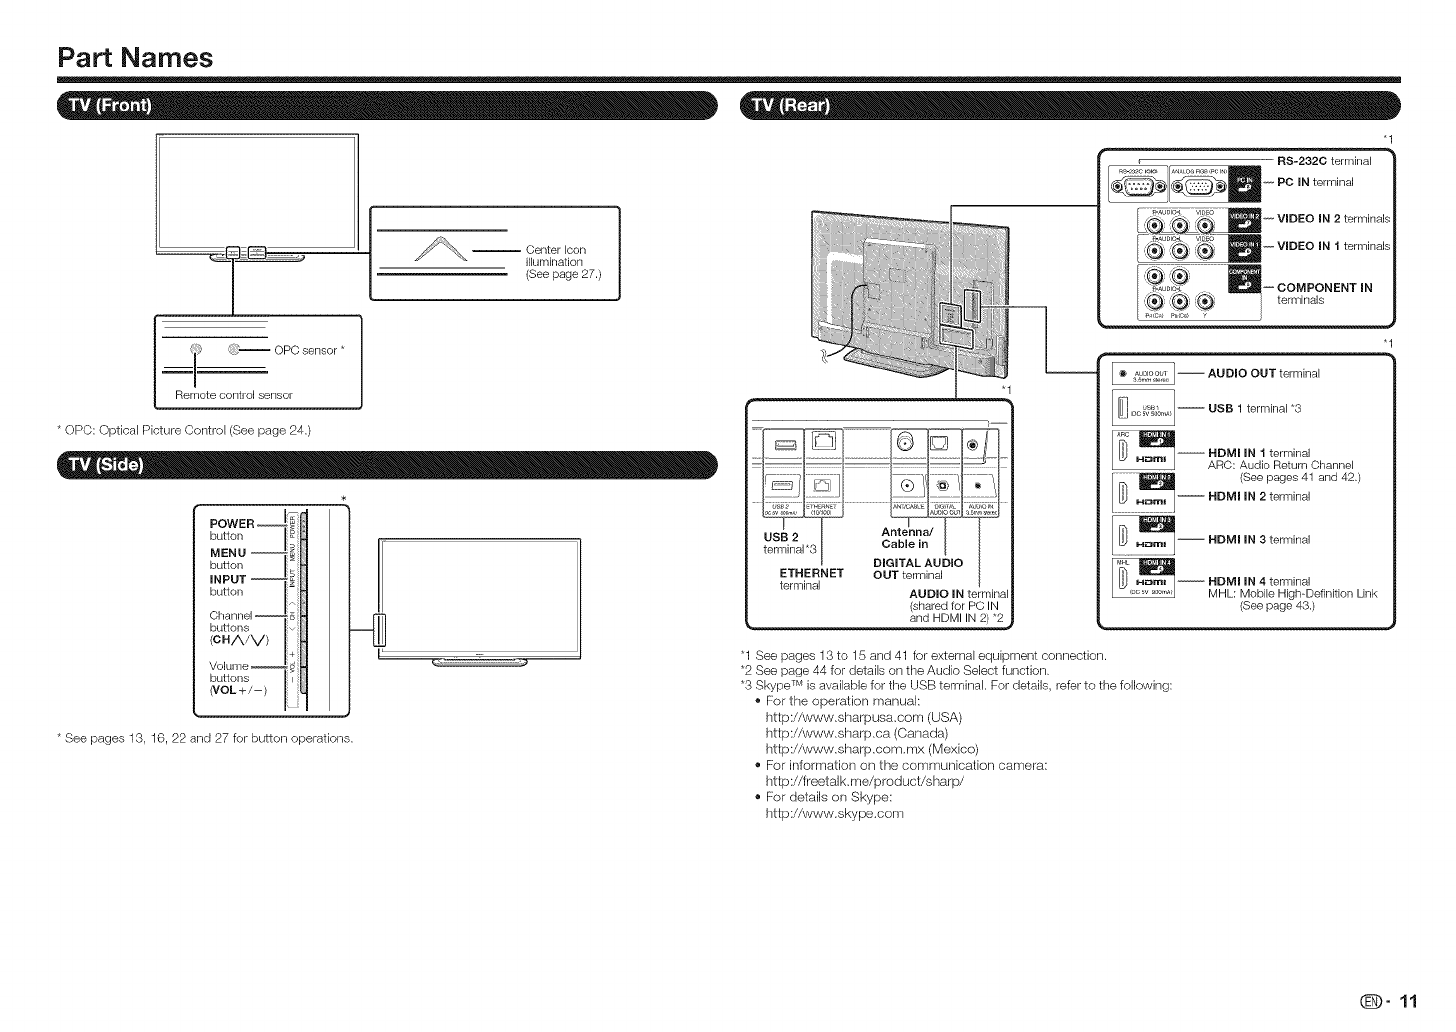
Part Names
-- Center Icon
illumination
(See page 27.)
i} }-- OPO sensor *
_=====-
Remote control sensor
* OPO: Optical Picture Oontrol (See page 24.)
utto
INPUT --
button
Volume '+H
buttons _i
{VOL+/-)
* See pages 13, 16, 22 and 27 for button operations.
"1
RS-232C terminal
-- PC IN terminal
ETHERNET OUT terminal
terminal AUDIO IN terminal
(shared for PC IN
and HDMI IN 2) *2
/(_ VIDEO IN 2 t...... I_
"/k . D
_ ,_,' --VDEO Nit ........
B= OO"PONENT'N
(_:, ,_ 1:_ terminals
= AUDIO OUT terminal
-- USB 1 terminal *3
AHRDCM:IAILNd_oteRr2iLI_alOh....... I
.................._ (See pages 41
HDMI IN 2terminal and 42.)
-- HDMI IN 3 terminal
-- DMI IN 4 terminal
MHL: Mobile High-Definition Link
(See page 43.)
"1 See pages 13 to 15 and 41 for external equipment connection.
*2 See page 44 for details on the Audio Select function.
*3 Skype TM is available for the USB terminak For details, referto the following:
® For the operation manual:
http://www.sharpusa.com (USA)
http://www.sharp.ca (Canada)
http://www.sharp.com.mx (Mexico)
® For information on the communication camera:
http://freetalk.me/product/sharp/
® For details on Skype:
http://www.skype.com
(iJD" 11

Part Names
[] LE857U, LE757U,
LE755U, LE657U
and LE655U modeNs
_re
13
[] LE750U, LE650U,
07500U and
06500U modems
AAL
13
27
17--
28
29
-- 30
• When using the remote control unk, point k at the TV.
1 POWER: Switch the TM power on or enter
standby. (See page 16.)
2 TV, STB, DVD,bVOR, AUDIO: Switches the
remote controJ for TM, STB, BD, DVD, VCR
and AUDIO operation. (See pages 40 to 41 for
details.)
* To enter the code registration mode, you
need to press an appropriale button (STB,
DVDoVCR or AUDIO) and DISPLAY at the
same time.
3External equipment operational buttons:
Operate the external equipment.
4 OPTION: Display the Link Operation Menu
screen. This button will function only when
AQUOS LINK is used. (See pages 41 to 43 for
details.)
5 SLEEP: Set the sleep timer. (See page 19.)
6 0-9: Set the channel. (See page 18.)
7 ,D(DOT}: (See pages 18 and 41 .)
8 CC: Display captions from a closed-caption
source. (See page 20.)
9 AV MODE: Select an audio or video setting. (See
page 19.)
MUTE: Mute the sound. (See page 18.)
VOL +/-: Set the volume. (See page 18.)
MENU: Display the menu screen. (See page
22.)
LE857U, LE757U, LE755U, LE657U and
LE655U modems
3D: Select between 3D and 2D image viewing.
(See pages 33 to 34 for details.)
LE750U, LE650U, 07500U and 06500U
models
AAL: Display the AQUOS ADVAN TAGE LIVE
screen. (See page 47.)
A/Y/4/_, ENTER: Select a desired item on
the screen.
EXIT: Turn off the menu screen.
FAVORITE CH: Set the favorite channels. (See
page 28.)
A, B, C, D: Select 4 preset favorite channels in
4 different categories. (See page 28.)
While watching, you can toggle the selected
channels by pressing A, B, C and D.
10
11
12
13
14
15
16
17
18 DISPLAY: Display the channel information.
19 POWER (SOURCE): Turns the power of the
external equipment on and off.
20 FREEZE: Set the still image. Press again to
return to normal screen. (See page 18.)
21 AUDIO: Selects the MTS/SAP or the audio
mode during multichannel audio broadcasts. (See
page 19.)
22 ENT: Jumps to a channel after selecting with the
0---9 buttons.
23 FLASHBACK: Return to the previous channel or
external input mode. (See page 18.)
24 VIEW MODE: Select the screen size. (See pages
20 and 21 .)
25 INPUT: Select a TV input source. (TV, HDMI1,
HDMI2, HDMI3, HDMI4, COMPONENT, VIDEO1,
VDEO2, PC IN, Home Network (DLNA)*, USB)
(See pages 13 and 18.)
*: For LE750U, "Home Network" is displayed.
26 CH/X./V: Select the channel. (See page 18.)
27 SmartCentral: Display the application window.
(See page 18.)
28 RETURN: Return to the previous menu screen.
29 NETFLIX: Display the Netflix screen. (See page
19.)
30 FAY APP 1, 2, 3: You can assign your favorite
applications to these buttons. (See pages 47 to
49.)
_-12
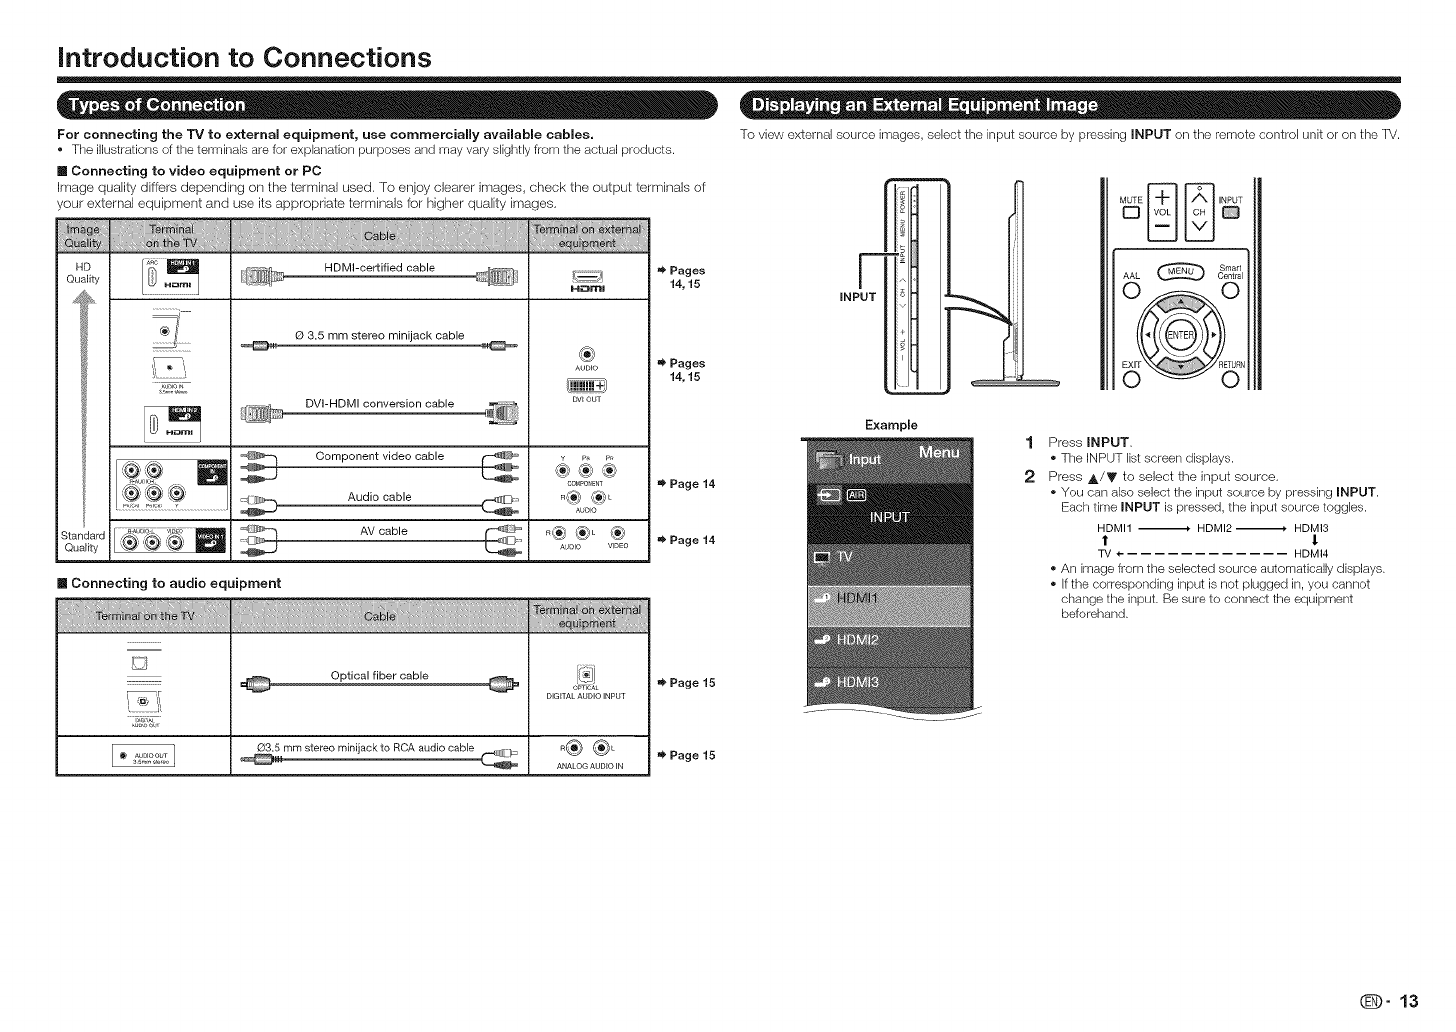
introduction to Connections
For connecting the TV to external equipment, use commercially availabJe cables.
• The illustrations of the terminals are for explanation purposes and may vary slightly from the actual products.
n Connecting to video equipment or PC
Image quality differs depending on the terminal used, To enjoy clearer images, check the output terminals of
your external equipment and use its appropriate terminals for higher quality images,
ii.al i
':on ....
Qualily
.................}_
ard
ty %-_' '_' \_
t @
HDMI-cerLified cable
O 3.5 mm stereo minijack cable
DVI-HDMI conversion cable
Component video cable
_4r_:..-m Audio cable
AV cable
H_mJ
®
AUDEO
DV_ OUT
COMPOneNT
R® ®L
AUDIO
_®®L ®
A_JDIO VIDEO
Pages
14, 15
Pages
14, 15
Page 14
Page 14
m Connecting to audio equipment
D
Optical fiber cable @
O3.5 mm stereo minijack to RCA audio cable
OPTICAL
DiGiTAL AUDIO iNPUT
o® ®L
ANALOG AUDIO iN
Page 15
Page 15
To view external source images, select the input source by pressing INPUT on the remote control unit or on the TV.
Example 1
2
Smart
AAL Central
Press INPUT.
• The INPUT list screen displays.
Press A/Y to select the input source.
• You can also select the input source by pressing INPUT.
Each time INPUT is pressed, the input source toggles.
HDMI1 .--_ HDMI2 .--_ HDMI3
t l
TV 4-- HDMI4
• An image from the selected source automatically displays.
• if the corresponding input is not plugged in, you cannot
change the input. Be sure to connect the equipment
beforehand.
@-13
Connecting to External Equipment
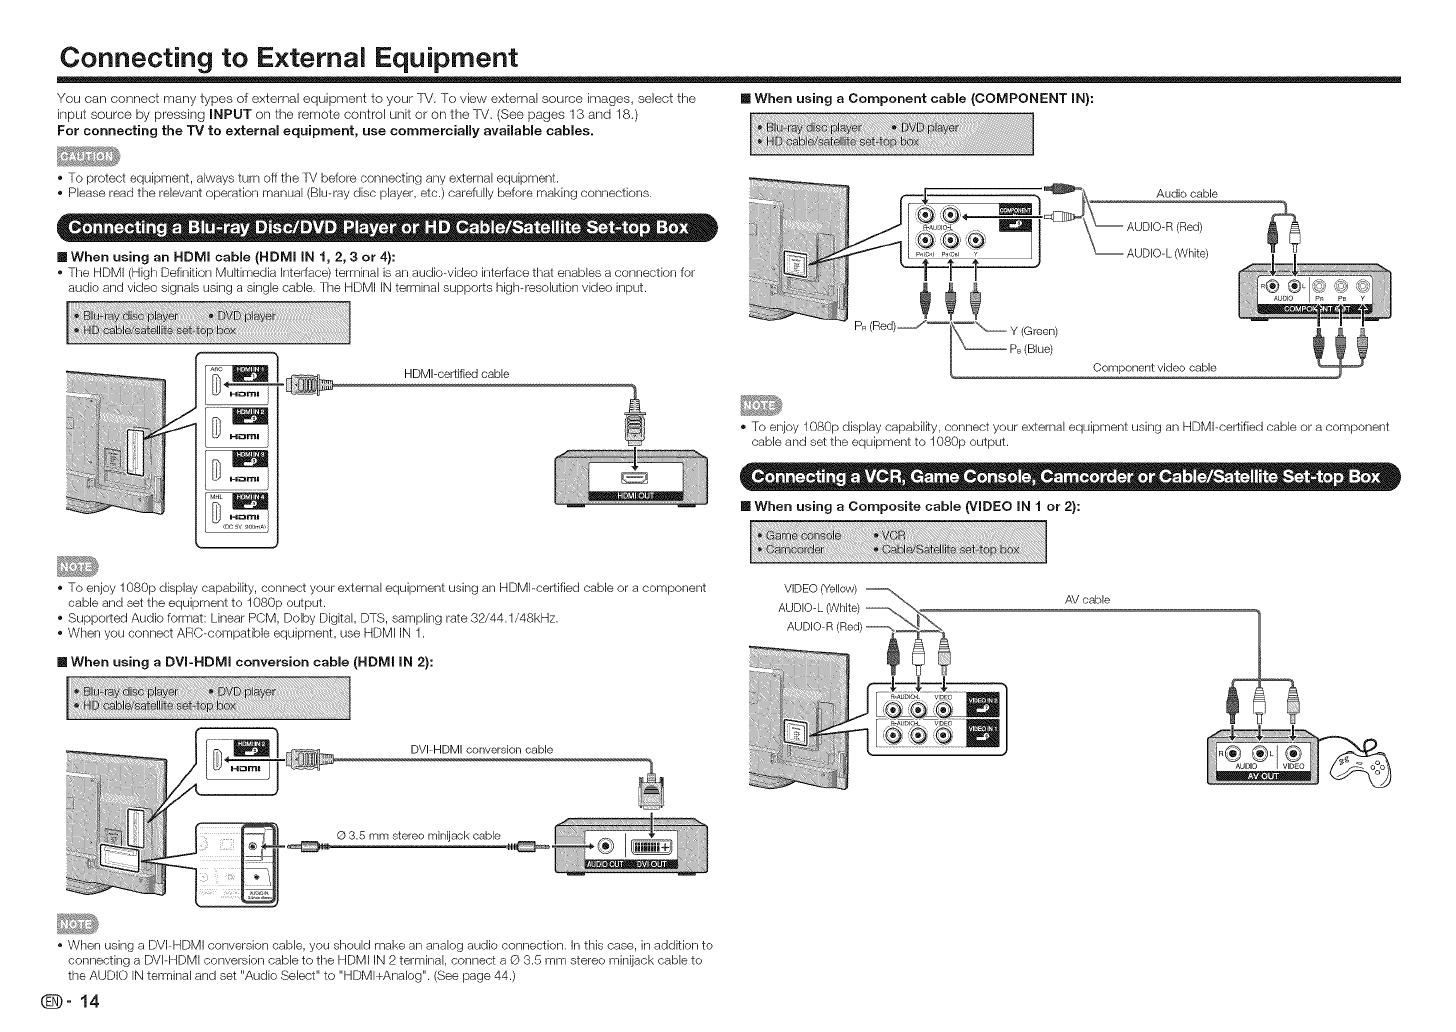
You can connect many types of external equipment to your TV. To view external source images, select the [] When using aComponent cable (COMPONENT IN):
input source by pressing INPUT on the remote control unit or on the TV, (See pages 13 and 18.)
For connecting the TV to external equipment, use commercially available cables.
• To protect equipment, always turn off the TV before connecting any external equipment.
• Please read the relevant operation manual (Blu-ray disc player, etc.) carefully before making connections.
•When using an HDMI cable (HDMI IN 1, 2, 3or 4):
• The HDMI (High Definition Mukimedia interface) terminal is an audiowideo interface that enables a connection for
audio and video signals using a single cable. The HDMI iN terminal supports high-resolution video input.
HDMI-certified cable
Y (Green)
PB (Blue)
Audio cable
(Red) _L_
AUDIO-L (White)
Component video cable
• To enjoy 1080p display capabilky, connect your external equipment using an HDMI-certified cable or a component
cable and set the equipment to 1080p output.
[] When using a Composite cable (VIDEO iN 1 or 2}:
• To enjoy 1080p display capabilky, connect your external equipment using an HDMI-certified cable or a component
cable and set the equipment to 1080p output.
• Supported Audio format: Linear PCM, Dolby Digkal, DTS, sampling rate 32/44.1/48kHz.
• When you connect ARC-compatible equipment, use HDMI IN 1.
[] When using aDVI-HDMI conversion cable (HDMI iN 2):
AV cable
DVI=HDMI conversion cable
© 3.5 mm stereo minijack cable
• When using a DVI-HDMI conversion cable, you should make an analog audio connection. In this case, in addkion to
connecting a DVPHDMI conversion cable to the HDMI IN 2 terminal, connect a Q 3.5 mm stereo minijack cable to
the AUDIO iN terminal and set "Audio Select" to "HDMl+Analog". (See page 44.)
_-14
Connecting to External Equipment
m When connecting an AV amplifier for a surround system Refer to page 45 for a list of PC signals compatible with the IV.
HD Cable/Satellite set-top box [] When using an HDMI cable (HDMI iN 1,2, 3or 4):
HDMI-certified cable "1
HDMI-certified cable
Optical fiber cable *2
*Letting the TV output the audio to an AV amplifier:
"1 When you connect ARC-compatible equipment, use the HDMI iN 1 terminal.
*2 If the equipment to be connected is not compatible with the ARC, connect an optical fiber cable.
*If the image is not in sync with the audio, check the settings of the connected surround system.
[] When connecting an audio ampJifier
It is possible to output audio through the DiGiTAL AUDIO OUT terminal. (See page 26 for details.)
Optical fiber cable
Q3.5 mm stereo minijackto RCA audio cable
*Depending on the board, only video signals may be output. In this case, in addition to connecting an HDMI-certified
cable to the HDMI iN 2 terminal, connect a © 3.5 mm stereo minijack cable to the AUDIO IN terminal and set "Audio
Select" to "HDMl+Analog". (See page 44.)
*The HDMI IN terminals only support digkal signal.
[] When using a DVI-HDMI conversion cable (HDIVll IN 2}:
DVI-HDMI conversion cable
*When using a DVI-HDMI conversion cable, you should make an analog audio connection, in this case, in addkion to
connecting a DVI-HDMI conversion cable to the HDMI IN 2 terminal, connect a @ 3.5 mm stereo minijack cable to
the AUDIO IN terminal and set "Audio Select" to "HDMl+Analog". (See page 44.)
[] When using an anaJog RGB cable (PC iN):
Analog RGB cable
(D-sub 15-pin cable or VGA cable)
© 3.5 mm stereo minijack cable
*See page 27 for details on the Output Select function. *When using an analog RGB cable, input the audio signal to the AUDIO IN terminal of PC IN.
*When connecting a PC to the PC IN, set "Audio Select" to "Video+Audio". (See page 44.)
@9" 15
Watching TV
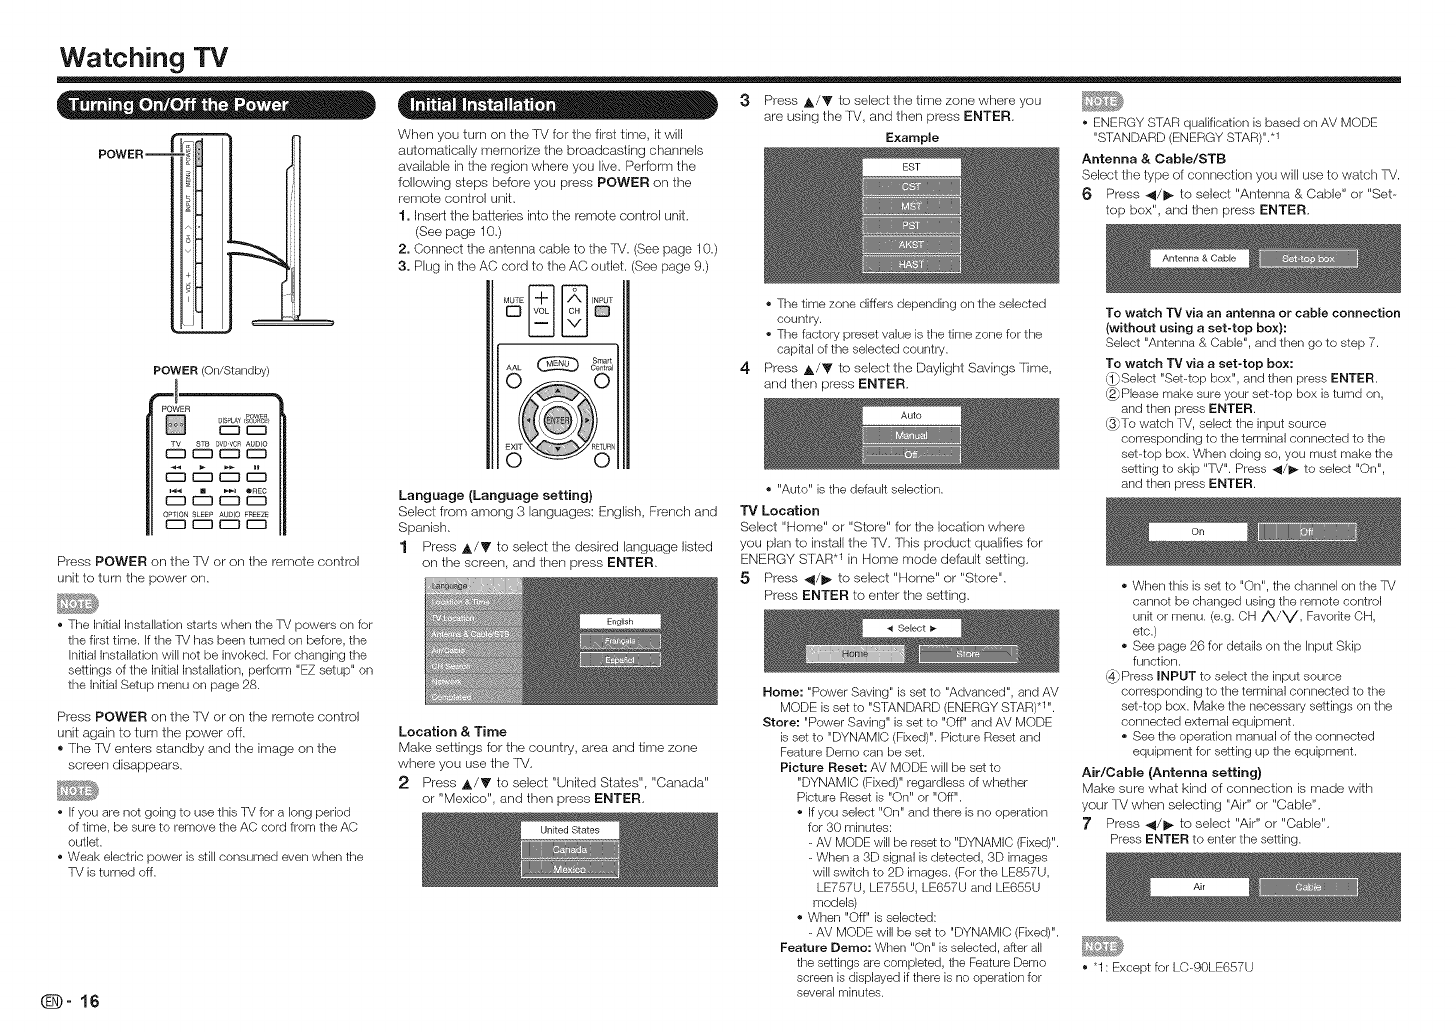
• • • - "o -
POWER _ m
POWER (On/Standby)
_PO'!ER y PowEn
Press POWER on the TV or on the remote control
unit to turn the power on,
• The Initial Installation starts when the TV powers on for
the first time. if the TV has been turned on before, the
initial Installation will not be invoked. For changing the
settings of the Initial Installation, perform "EZ setup" on
the Initial Setup menu on page 28.
Press POWER on the TV or on the remote control
unit again to turn the power off.
® The T_/enters slandby and the image on the
screen disappears.
• If you are not going to use this TV for a long period
of time, be sure to remove the AC cord from the AC
outlet.
• Weak electric power is still consumed even when the
TV is turned off.
When you turn on the TV for the first time, it will
automatically memorize the broadcasting channels
available in the region where you live. Perform the
following steps before you press POWER on the
remote control unit.
1. Insert the batteries into the remote control unit.
(See page 10.)
2. Connect the antenna cable to the TV. (See page 10.)
3. Plug in the AC cord to the AC outlet. (See page 9.)
Language (Language setting)
Select from among 3 languages: English, French and
Spanish,
1 Press A/V to select the desired language listed
on the screen, and then press ENTER,
Location & Time
Make settings for the country, area and time zone
where you use the TM,
2 Press ,t,/Y to select "United States", "Canada"
or "Mexico", and then press ENTER,
3Press ,l_/V to select the time zone where you
are using the TV, and then press ENTER,
Example
4
• The time zone differs depending on the selected
country.
• The factory preset value is the time zone for the
capkal of the selected country.
Press ,l_/y to select the Daylight Savings Time.
and then press ENTER,
o "Auto" is the default selection.
TV Location
Select "Home" or "Store" for the location where
you plan to install the lV, This product qualifies for
ENERGY STAR .1 in Home mode default setting,
5 Press 41/1_ to select "Home" or "Store",
Press ENTER to enter the setting,
Home: "Power Saving" is set to "Advanced", and AV
MODE is set to "STANDARD (ENERGY STAR) .1 ".
Store: "Power Saving" is set to "Off" and AV MODE
is set to "DYNAMIC (Fixed)". Picture Reset and
Feature Demo can be set.
Picture Reset: AV MODE will be set to
"DYNAMIC (Fixed)" regardless of whether
Picture Reset is "On" or "Off".
• If you select "On" and there is no operation
for 30 minutes:
- AV MODE will be reset to "DYNAMIC (Fixed)".
- When a 3D signal is detected, 3D images
will swkch to 2D images. (For the LE857U,
LE757U, LE755U, LE657U and LE655U
models)
• When "Off" is selected:
- AV MODE will be set to "DYNAMIC (Fixed)".
Feature Demo: When "On" is selected, after all
the settings are completed, the Feature Demo
screen is displayed if there is no operation for
several minutes.
• ENERGY STAR qualification is based on AV MODE
"STANDARD (ENERGY STAR)"..1
Antenna & Cable/STB
Select the type of connection you will use to watch TV.
6 Press -.4/1_ to select "Antenna & Cable" or "Set--
top box", and then press ENTER,
To watch "IV via an antenna or cable connection
(without using a set-top box):
Select "Antenna & Cable", and then go to step 7.
To watch "IV via a set-top box:
(_Select "Set-top box", and then press ENTER.
_Please make sure your set-top box is tumd on,
and then press ENTER.
_To watch TV, select the input source
corresponding to the terminal connected to the
set-top box. When doing so, you must make the
setting to skip "TV". Press 41/1_ to select "On",
and then press ENTER.
• When this is set to "On", the channel on the TV
cannot be changed using the remote control
unit or menu. (e.g. OH ,_/V, Favodte OH,
etc.)
• See page 26 for details on the input Skip
function.
_Press INPUT to select the input source
corresponding to the terminal connected to the
set-top box. Make the necessary settings on the
connected external equipment.
• See the operation manual of the connected
equipment for setting up the equipment.
Air/Cable (Antenna setting)
Make sure what kind of connection is made with
your FV when selecting "Air" or "Cable".
}' Press _1/1_ to select "Air" or "Cable".
Press ENTER to enter the setting.
• "1 : Except for LC-90LE657U
Watching TV
OH Search (Channel search)
Channel auto search makes the R/look for all
channels viewable in the set area,
8 When "Air" is selected in Antenna setting:
Press _/1_ to select "Start", and then press ENTER.
When "Cable" is selected in Antenna setting:
Press A/T to select "Analog & Digkal Search
Start" to search both analog and digital
broadcasts, or to select "Analog Search Start" to
search only analog broadcasts, and then press
ENTER.
• The Channel search will start automatically.
• To exk the Channel search screen, select
"Cancel", and then press ENTER.
_The Channel search results may include
scrambled channels or channels that are not
viewable in the set area. Press 41/_- to select
"Yes", and then press ENTER to remove
scrambled channels.
Network
When you connect to the Internet on the TV, select
the desired connection method and follow the
instructions shown on the display.
® Wireless LAN connection is possible only when the
WPS (push button) method is used, If any other
method is used, make settings by ]rlitia] Setup >
Internet Setup > Network Setup, (See pages 46 to
47,)
9 Press 41/1_ to select "Yes", and then press
ENTER,
10 Press A/V to select "Wired" or "Wireless", and
then press ENTER,
Completed
11 The settings confirmation screen is displayed,
Confirm the information displayed on the screen,
and then press ENTER,
Examples of the settings confirmation screen
When one or mere channel is received after
"Antenna & Cable" was selected in step 6 and a
search was carried out.
When "Set-top box" was selected in step 6.
• Click "OK" to display the confirmation screen for
input source swkching.
Connection using an ETHERNET cable:
_Select "Wired" and press ENTER.
(2>_Confirm that the TV is properly connected
with the router, and then press "Next". Follow
the instructions on the display to perform the
connection test.
Wireless LAN connection by the WPS method:
(_Select "Wireless" and press ENTER.
(2>_Follow the instructions on the display, and finalize
the connection after testing its viability.
When no channel is received after "Antenna &
Cable" was selected in step 6 and a search was
carried out.
Show the input list: You can check the current
connection status of external equipment. Confirm
which input terminal is connected to the set-top
box.
OK: Clicking "OK" will complete the EZ Setup
procedure.
• When you change the network settings, refer to Initial
Setup > Intemet Setup > Network Setup. (See pages
46 to 47.) • If no channel is found, confirm the type of connection
made wkh your TV and try "EZ Setup" again. (See
page 28.)
• To see the list of channels found during Channel
search, press INPUT, and then press I_.
• This may not display correctly depending on the
connected equipment.
• This is not displayed correctly when the connected
equipment is off.
• To watch TV using a set-top box, press INPUT
after completing the inkial settings, and select the
input to which the set-top box is connected.
• For changing the settings of the Initial Installation,
perform "EZ setup" on the Inkial Setup menu on page
28.
_)-17

Direct Button Operation
POWER
D powE_
DISPLAY(sou_c_)
r=mc3
STB DVD'VCR AUDIO
C:3 _ C:3
_ _ OREC
C2_ C_ C3C23
OPTION SLEEP AUDIO FREEZE
@@@
@@@
@@@
SmartCentral
iiii!0;
You can change channels in several ways.
Method 1
Using CH/VV on the remote control unit or on the
W,
Method 2
Using remote control buttons 0-9, ®(DOT),
Examples:
To select a 1 or 2-digit channel number (e. g.,
Channel 5}:
Press 5 _ ENT.
To select a 3-digit channel number (e. g., Channel
tt5):
Pressl_ I_5_ENT.
To select a 4-digit channel number (e. g., Channel
22.1):
Press 2 2 _>• (DOT} 1 _ENT.
Method 3
Selecting the program from the Channel list,
1 Press INPUT on the remote control unit,
• The INPUT list displays.
2 Press 4/i1_ to select "AIR" or "CABLE".
• The Channel list displays.
3Press A/V to select the desired channel, and
then press ENTER,
• When selecting a 1-digR channel number, R is not
necessary to press 0 before the number.
• When you enter 0-9 only, channel selection will be
made if there is no operation within a few seconds.
• if you push "0" by RseJf, nothing will happen.
• Complete the above steps within a few seconds.
• When you enter 0-9 and. (DOT), channel selection will
be made if there is no operation within a few seconds.
You can change the volume by pressing VOL +/-
on the TV or on the remote control unit.
• To increase the volume, press VOL +.
• To decrease the volume, press VOL-.
Audio status
Speaker Variable sound Mute
• When "Output Select" is set to "Variable", the indicator
on the screen changes as shown below.
Mutes the current sound output.
Press MUTE,
• "(_/" will be displayed on the screen for 30 minutes,
and the sound is silenced.
• Within 30 minutes of pressing MUTE, mute can be
canceled by pressing VOL+/- or MUTE.
• Mute will be canceled after 30 minutes have passed.
However, the TV will not suddenly output a loud sound
as the volume level is set to 0 automatically.
Allows you to capture and freeze a moving image
that you are watching.
Press FREEZE•
• A moving image is captured.
• Press FREEZE again to cancel the function.
• When this function is not available, "No displaying still
image available." will display.
• The still image automatically goes out after 30 minutes.
• If you are using the freeze function and a broadcast
activates the V-CHIP BLOCK, the freeze function
will be canceled and a V-CHIP BLOCK message will
appear.
• You can have the same settings by choosing "Freeze"
on the menu items. (See page 26.)
To view external source images, select the input
source by pressing INPUT on the remote control
unit or on the lV.
1 Press INPUT.
• The INPUT list screen displays.
2 Press ,_/_' or press INPUT again to select the
input source.
• An image from the selected source automatically
displays.
• Each time INPUT is pressed, the input source
toggles.
• If the corresponding input is not plugged in, you
cannot change the input. Be sure to connect the
equipment beforehand.
Press FLASHBACK to switch to the previously
tuned channel or previous input mode.
• Press FLASHBACK again to swRchback to the
currently tuned channel.
•FLASHBACK will not work if no channel has been
changed after the TV is turned on.
Allows you to directly activate various types of
applications.
1 Press SmartCentral to display the application
window.
• Press SmartCentral again to display a list of
applications by category.
2 Press _l/l_(or A/V) to select the desired
application, and then press ENTER.
• If you changed the display to the list of
applications in step 1, select a category and then
an application. See page 49 for details.
• if "_" is displayed after you switch to USB mode,
check the USB connection.
• if "a:_tJ' or "D_M" is displayed after you switch to
Home Network mode or after you connect to the
Intemet, check your TV's network settings and
connection.
• See pages 36, 47 to 49 for details of viewable
applications.
• You can display the application window by choosing
"APPS" on the menu ferns. (See page 26.)
• When this function is not available, "Can not operate
this function now" will display.
• See pages 13 to 15 and 41 for external equipment
connection.
_-18
• See page 27 for details on the Output Select function.
Direct Button Operation
Displays the Netfiix screen.
Press NETFLIX,
* To enjoy Netfiix, you need to make:
--a broadband Interact connection (See page 46.)
--settings of Intemet Setup (See pages 46 to 47.)
--adjustments for Netfiix (See page 49.)
[] MTS/SAP stereo mode
The -iM has a feature that allows reception of sound
other than the main audio for the program. This
fgature is called Multi-channel [elevision Sound
(MTS). The TV with MTS carl receive mono sound,
stereo sound
and Secondary Audio Programs (SAP). The SAP
f_ature allows a 'f_/station to broadcast other
informaUon, which could be audio in another
language or something completely different like
weather information.
You can enjoy Hi-Fi stereo sound or SAP
broadcasts where available.
• Stereo broadcasts: View programs like live sportklg
events, shows and concerts in dynamic stereo sound.
• SAP broadcasts: Receive TV broadcasts in either
MAIN or SAP sound.
MAiN sound: The normal program soundtrack (either in
mono or stereo).
SAP sound: Listen to a second language,
supplementary commentary or other information. (SAP
is mono sound.)
If stereo sound is difficult to hear.
* Obtain a clearer sound by manually switching to fixed
mono-sound mode.
You can change MTS as shown below to match the
television broadcast signal.
Press AUDIO to toggle between audio modes.
Examples: when receiving MTS and SAP
STEREO mode: STEREO_ MONO
STEREO +- SAP mode: ST(SAP)_ SAP(ST)I MONO
t i
MAIN _- SAP mode: MAIN_SAP
MONO mode: MONO
[] Digital broadcasting audio mode
The types of audio transmitted in a digital broadcast
include SURROUND as well as MONO and STEREO.
In addition, it is possible Eormultiple audio tracks to
accompany a single video track.
Press ENTER to toggle between audio modes.
Example: when receiving Digital broadcasting
STEREO (Audio1) _ STEREO (Audio2)
t....... SURROUND (Audio3) _....I
* MTS only operates while in TV mode.
* You can have the same settings by choosing "Change
Audio" on the menu items. (See page 26.)
Allows you to set a time when the 'iM automatically
switches to standby,
Press SLEEP,
* The remaining time displays when the sleep timer has
been set.
* Each time you press SLEEP, the remaining time
switches as shown below.
Off_30_ 60_90 _120
11" !
* When set, the time automatically starts counting down.
* If you want to adjust the sleep timer, you can press
SLEEP twice then change the time setting.
, When it is 5 minutes before the time expires, the
remaining time will start to keep appearing every minute.
o Select "Off" by pressing SLEEP to cancel the sleep timer.
• The TV will enter standby when the remaining time
reaches 0.
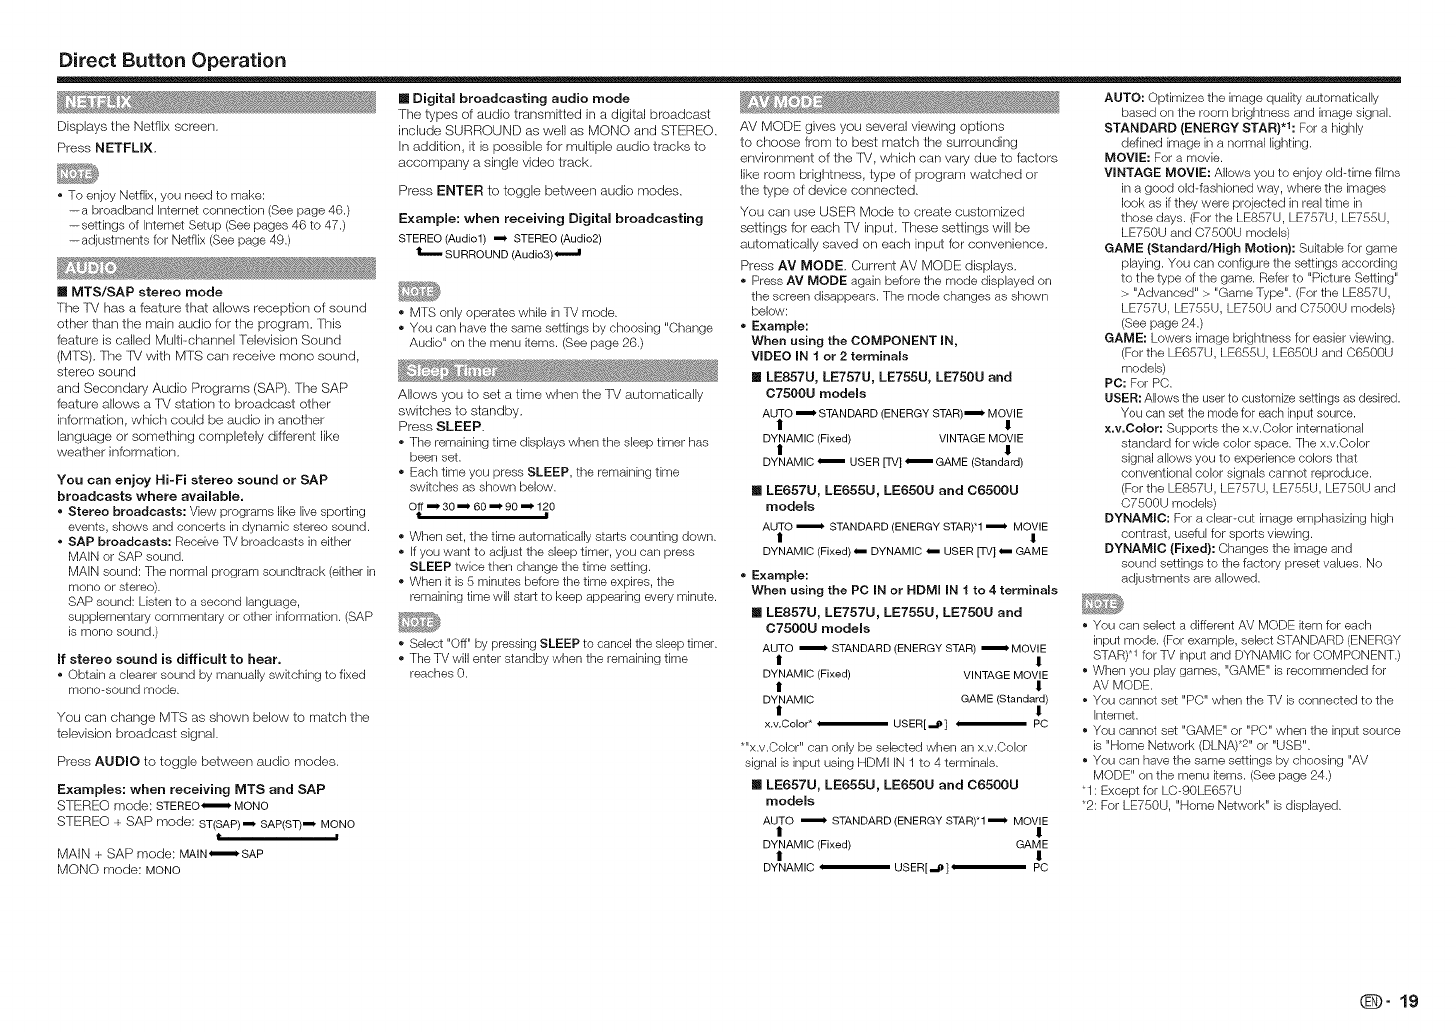
AV MODE gives you several viewing options
to choose from to best match the surrounding
environment of the TV, which can vary due to factors
like roorn brightness, type of program watched or
the type of device connected.
You can use USER Mode to create customized
settings for each l_/input. These settings will be
automatically saved on each input for convenience.
Press AV MODE, Current AV MODE displays.
* Press AV MODE again before the mode displayed on
the screen disappears. The mode changes as shown
below:
, Example:
When using the COMPONENT IN,
VIDEO IN t or 2 terminals
[] LE857U, LE757U, LE755U, LE750U and
C7500U models
AUTO iSTANDARD (ENERGY STAR) i_" MOVIE
!I
DYNAMIC (Fixed) VINTAGE MOVIE
!i
DYNAMIC iUSER [TV] _ GAME (Standard)
[] LE657U, LE655U, LE65OU and C6500U
models
AUTO ,i_ STANDARD (ENERGY STAR)*1 .i_ MOVIE
! !
DYNAMIC (Fixed) _._ DYNAMIC _i USER [TV] _ GAME
* Example:
When using the PC IN or HDMI IN i to 4 terminals
[] LE857U, LE757U, LE755U, LE75OU and
C7500U models
AUTO _ STANDARD (ENERGY STAR) _ MOVIE
I 1
DYNAMIC (Fixed) VINTAGE MOVIE
I 1
DYNAMIC GAME (Standard)
l 1
x.v.Color _ _ USER[,,,_] PC
*"x.v.Color" can only be selected when an x.v.Color
signal is input using HDMI iN 1 to 4 terminals.
[] LE657U, LE655U, LE65OU and C6500U
modems
AUTO ,i_ STANDARD (ENERGY STAR)*1 '_ MOVIE
! !
DYNAMIC (Fixed) GAME
! !
DYNAMIC USER[,,,,_ ] I PC
AUTO: Optimizes the image quality automatically
based on the room brightness and image signal.
STANDARD (ENERGY STAR}*1: For a highly
defined image in a normal lighting.
MOVIE: For a movie.
VINTAGE MOVIE: Allows you to enjoy old-time films
in a good old-fashioned way, where the images
look as if they were projected in real time in
those days. (For the LE857U, LE757U, LE755U,
LE750U and 07500U models)
GAME (Standard/High Motion): Sukable for game
playing. You can configure the settings according
to the type of the game. Refer to "Picture Setting"
> "Advanced" > "Game Type". (For the LE857U,
LE757U, LE755U, LE750U and 07500U models)
(See page 24.)
GAME: Lowers image brightness for easier viewing.
(For the LE657U, LE655U, LE650U and 06500U
models)
PC: For PC.
USER: Allows the user to customize settings as desired.
You can set the mode for each input source.
x,v,Color: Supports the x.v.Oolor international
standard for wide color space. The x.v.Oolor
signal allows you to experience colors that
conventional color signals cannot reproduce.
(For the LE857U, LE757U, LE755U, LE750U and
07500U models)
DYNAMIC: For a clear-cut image emphasizing high
contrast, useful for sports viewing.
DYNAMIC (Fixed}: Changes the image and
sound settings to the factory preset values. No
adjustments are allowed.
* You can select a different AV MODE item for each
input mode. (For example, select STANDARD (ENERGY
STAR) q for TV input and DYNAMIC for COMPONENT.)
* When you play games, "GAME" is recommended for
AV MODE.
* You cannot set "PC" when the TV is connected to the
Internet.
* You cannot set "GAME" or "PC" when the input source
is "Home Network (DLNA) .2" or "USB".
* You can have the same settings by choosing "AV
MODE" on the menu kems. (See page 24.)
"1 : Except for LC-90LE657U
*2: For LE750U, "Home Network" is displayed.
(D" 19
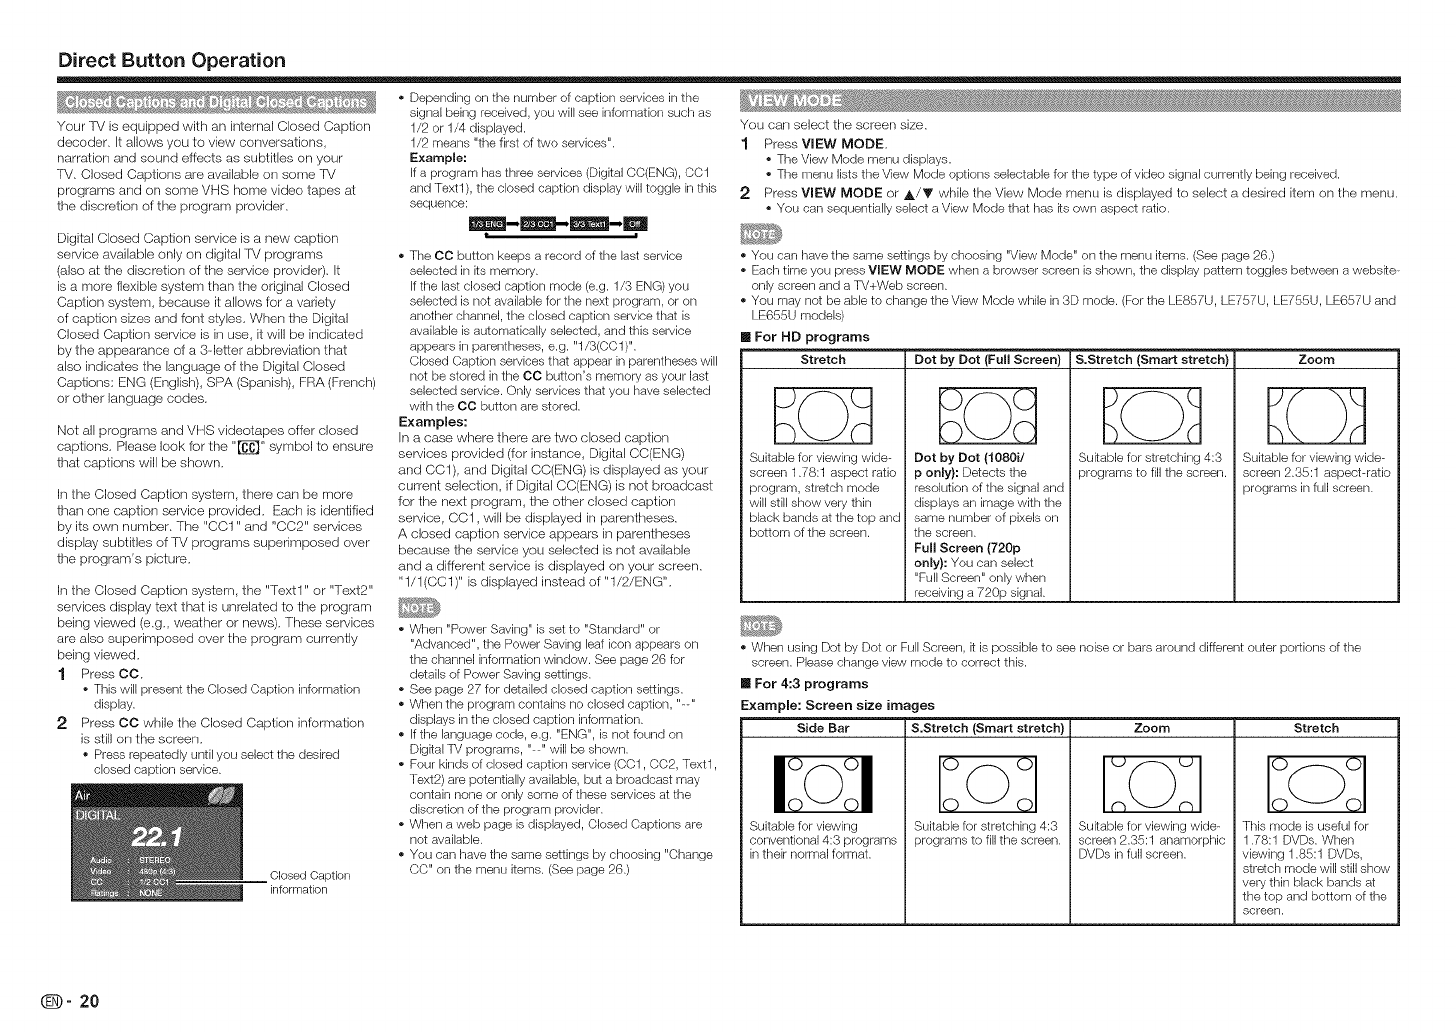
Direct Button Operation
Your 'f_/is equipped with an internal Closed Caption
decoder. It allows you to view conversations,
narration and sound effects as subtitles on your
TV. Closed Captions are available on some 'iM
programs and on some VHS home video tapes at
the discretion of the program provider.
Digital Closed Caption service is a new caption
service available only on digital lM programs
(also at the discretion of the service provider). It
is a more flexible system than the original Closed
Caption system, because it allows for a variety
of caption sizes and font styles. When the Digital
Closed Caption service is in use, it will be indicated
by the appearance of a 3-letter abbreviation that
also indicates the language of the Digital Closed
Captions: ENG (English), SPA (Spanish), FRA (French)
or other language codes.
Not all programs and VHS videotapes offer closed
captions. Please look for the "[_" symbol to ensure
that captions will be shown.
In the Closed Caption system, there cars be more
than one caption service provided. Each is identified
by its own number. The "CO1" and "CC2" services
display subtitles of TV programs superimposed over
the program's picture.
In the Closed Caption system, the "Text1" or "Text2"
services display text that is unrelated to the program
being viewed (e.g., weather or news). These services
are also superimposed over the program currently
being viewed.
1 Press CC.
This will present the Closed Caption information
display.
2 Press CO while the Closed Caption information
is still orsthe screen.
Press repeatedly until you select the desired
closed caption service.
Closed Caption
information
Depending on the number of caption services in the
signaJ being received, you will see information such as
1/2 or 1/4 displayed.
1/2 means "the first of two services".
Example:
If a program has three services (Digkal CO(ENG), CC1
and Text1), the closed caption display will toggle in this
sequence:
ti
The CC button keeps a record of the last service
selected in Rs memory.
If the last closed caption mode (e.g. 1/3 ENG) you
selected is not available for the next program, or on
another channel, the closed caption service that is
available is automatically selected, and this service
appears in parentheses, e.g. "1/3(O(}1)".
Closed Caption services that appear in parentheses will
not be stored in the CO button's memory as your last
selected service. Only services that you have selected
with the CO button are stored.
Examples:
In a case where there are two closed caption
services provided (for instance, Digital CC(ENG)
and CC1), and Digital CC(ENG) is displayed as your
current selection, if Digital CC(ENG) is not broadcast
for the next program, the other closed caption
service, CC1, will be displayed in parentheses,
A closed caption service appears in parentheses
because the service you selected is not available
and a different service is displayed on your screen,
"1/1 (CO1)" is displayed instead of "1/2/ENG",
You cars select the screen size,
1 Press VIEW MODE.
The View Mode menu displays.
The menu lists the View Mode options selectable for the type of video signal currently being received.
2 Press VIEW MODE or A/V while the View Mode menu is displayed to select a desired item on the menu,
o You can sequentially select a View Mode that has Rs own aspect ratio.
You can have the same settings by choosing "View Mode" on the menu items. (See page 26.)
Each time you press VIEW MODE when a browser screen is shown, the display pattern toggles between a websRe-
only screen and a TV+Web screen.
You may not be able to change the View Mode while in 3D mode. (For the LE857U, LE757U, LE755U, LE657U and
LE655U models)
[] For HD programs
Stretch
LO3
Suitable for viewing wide-
screen 1.78:1 aspect ratio
program, stretch mode
will still show very thin
black bands at the top and
bottom of the screen.
Dot by Dot (Full Screen)
Dot by Dot (1080i/
p only): Detects the
resolution of the signal and
displays an image with the
same number of pixels on
the screen.
FLlll Screen (720p
only): You can select
"Full Screen" only when
receiving a 720p signal.
S.Stretch (Smart stretch}
Sukable for stretching 4:3
programs to fill the screen.
Zoom
Suitable for viewing wide-
screen 2.35:1 aspect-ratio
programs in full screen.
When "Power Saving" is set to "Standard" or
"Advanced", the Power Saving leaf icon appears on
the channel information window. See page 26 for
details of Power Saving settings.
See page 27 for detailed closed caption settings.
When the program contains no closed caption, "_"
displays in the closed caption information.
If the language code, e.g. "ENG", is not found on
Digkal TV programs, "_" will be shown.
Four kinds of closed caption service (OO1,002, Text1,
Text2) are potentially available, but a broadcast may
contain none or only some of these services at the
discretion of the program provider.
When a web page is displayed, Closed Captions are
not available.
You can have the same settings by choosing "Change
OO" on the menu items. (See page 26.)
When using Dot by Dot or Full Screen, k is possible to see noise or bars around different outer portions of the
screen. Please change view mode to correct this.
[] For 4:3 programs
Example: Screen size images
Side Bar Zoom Stretch
Suitable for viewing
conventional 4:3 programs
in their normal format.
S.Stretch (Smart stretch)
Suitable for stretching 4:3
programs to fill the screen.
Sukable for viewing wide-
screen 2.35:1 anamorphic
DVDs in full screen.
This mode is useful for
1.78:1 DVDs. When
viewing 1.85:1 DVDs,
stretch mode will still show
very thin black bands at
the top and bottom of the
screen.
(D" 20
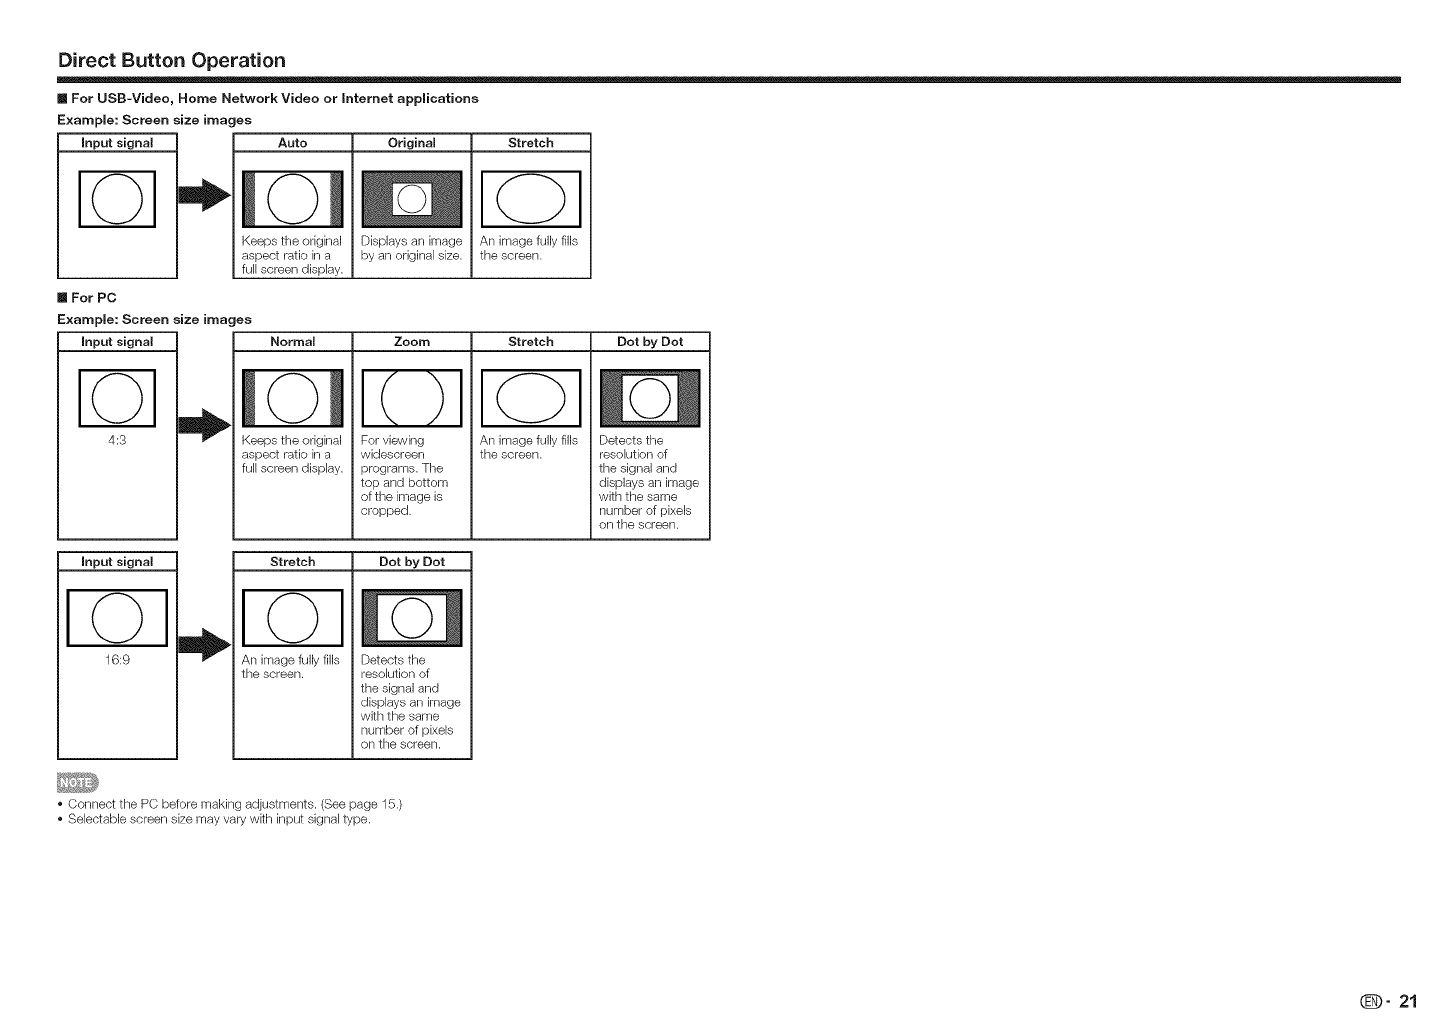
Direct Button Operation
II For USB-Video, Home Network Video or Intemet appmications
E×ampme: Screen size images
II For PC
Example: Screen size images
input signal
Auto
to]
Keeps the original
aspect ratio in a
full screen display.
Original
Displays an image
by an original size.
4:3
Stretch
An image fully fills
the screen.
Normal Zoom Dot by Dot
For viewing
widescreen
programs. The
top and bottom
of the image is
cropped.
Keeps the original
aspect ratio in a
full screen display.
Stretch
An image fully fills
the screen.
Detects the
resolution of
the signal and
displays an image
with the same
number of pixels
on tile screen.
Input signal
©
16:9
Stretch
©1
An image fully fills
the screen.
Dot by Dot
Detects the
resolution of
the signal and
displays an image
with the same
number of pixels
on tile screen.
Oonnect the PC before making adjustments. (See page 15.)
Selectable screen size may vary wkh input signal type.
(D" 21
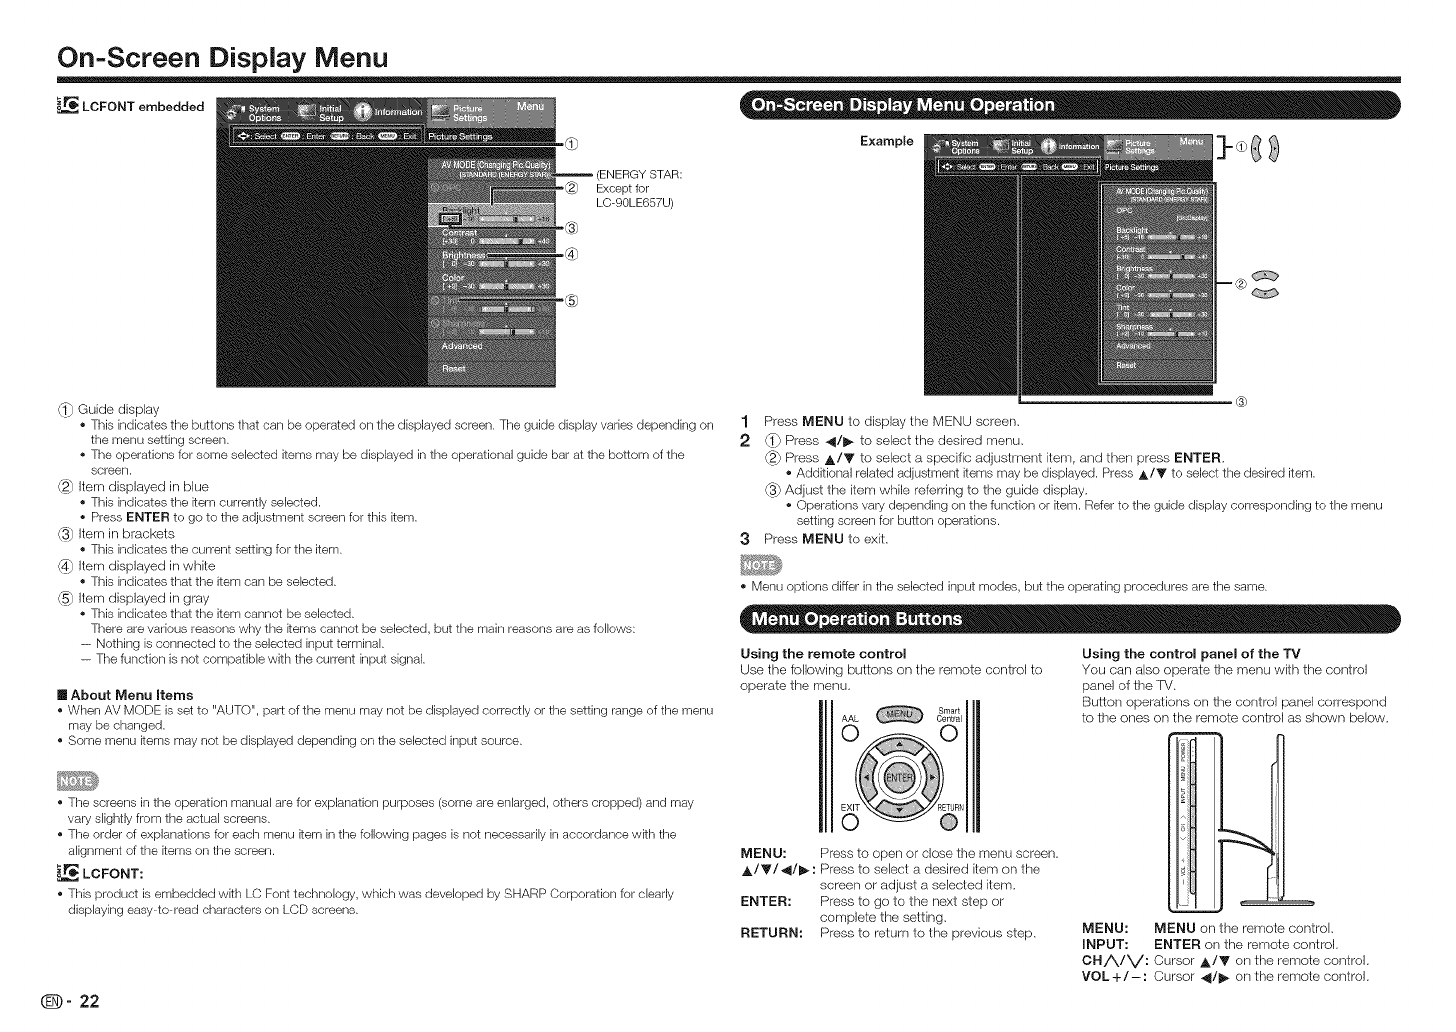
On=Screen Display Menu
LCFONT embedded
ENERGY STAR:
Except for
LC-90LE657U)
Example [_],,-f_l__ _
_ Guide display
• This indicates the buttons that can be operated on the displayed screen. The guide display varies depending on
the menu setting screen.
• The operations for some selected items may be displayed in the operational guide bar at the bottom of the
screen.
Item displayed in blue
• This indicates the Rein currently selected.
• Press ENTER to go to the adjustment screen for this item.
@_ Item in brackets
• This indicates the current setting for the item.
_4_ Item displayed in white
• This indicates that the item can be selected.
_5_ Item displayed in gray
• This indicates that the item cannot be selected.
There are various reasons why the Reins cannot be selected, but the main reasons are as follows:
-- Nothing is connected to the selected input terminal.
-- The function is not compatible with the current input signal.
[] About Menu items
• When AV MODE is set to "AUTO", part of the menu may not be displayed correctly or the setting range of the menu
may be changed.
• Some menu Rems may not be displayed depending on the selected input source.
• The screens in the operation manual are for explanation purposes (some are enlarged, others cropped) and may
vary slightly from the actual screens.
• The order of explanations for each menu Rein in the following pages is not necessarily in accordance wRh the
alignment of the Reins on the screen.
_,,,_ LCFONT:
• This product is embedded wkh LC Font technology, which was developed by SHARP Corporation for clearly
displaying easy-to-read characters on LCD screens.
Q- 22
@
1 Press MENU to display the MENU screen.
2 _1} Press 4/_ to select the desired menu.
Press A/V to select a specific adjustment item, and then press ENTER.
* Additional related adjustment items may be displayed. Press A/V to select the desired item.
@} Adjust the item while referring to the guide display.
, Operations vary depending on the function or Rem.Refer to the guide display corresponding to the menu
setting screen for button operations.
3 Press MENU to exit.
• Menu options differ in the selected input modes, but the operating procedures are the same.
Using the remote control
Use the following buttons on the remote control to
operate the menu.
SmartCentral
MENU: Press to open or close the menu screen.
A/Y/4/I_: Press to select a desired item on the
screen or adjust a selected item.
ENTER: Press to go to the next step or
complete the setting.
RETURN: Press to return to the previous step.
Using the control panel of the TV
You can also operate the menu with the control
panel of the TM,
Button operations on the control panel correspond
to the ones on the remote control as shown below,
MENU: MENU on the remote control,
INPUT: ENTER on the remote control,
CHA/V: Cursor ,_/V on the remote control,
VOL+/- : Cursor 4/_ on the remote control,
On-Screen Display Menu
= =
Picture Settings
Example
ENERGY STAR:
Except _r
LC-90LE657U)
AV MODE
(Changing Pic.Quality) .................... Pages 24 and 34
OPC ............................................................ Page 24
Backlight ..................................................... Page 24
3D Brightness Boost
(for the LE857U, LE757U
and LE755U models) ................................ Page 34
Contrast ...................................................... Page 24
Brightness ................................................... Page 24
Color ........................................................... Page 24
Tint .............................................................. Page 24
Sharpness ................................................... Page 24
Advanced ............................................. Pages 24-25
C.M.S.--Hue ..................................... Page 24
C.M.S.-Saturation ............................ Page 24
C.M.S.-Value ................................... Page 24
Color Gamut Range
(for the LE857U, LE757U, LE755U,
LE750U and 07500U models) ...... Page 24
Color Temp ..................................... Page 24
Motion Enhancement ....................... Page 24
Game lype
(for the LE857U, LE757U, LE755U,
LE750U and C7500U models) ...... Page 24
Shutter Effect
(for the LE857U, LE757U, LE755U,
LE750U and 07500U models) ...... Page 25
Lamp Swing Effect
(for the LE857U, LE757U, LE755U,
LE750U and C7500U models) ...... Page 25
Quad Pixel Plus 2
(for the LE857U
and LE757U models) .................... Page 25
Active Contrast ................................ Page 25
Gamma Adjuslment ......................... Page 25
Black Level ...................................... Page 25
Film Mode ........................................ Page 25
Digital Noise Reduction .................... Page 25
Monochrome ................................... Page 25
Range of OPC ................................. Page 25
Reset ........................................................... Page 24
,9_ Audio Settings _ System Options _ Initial Setup
Example Example Example
Auto Volume ................................................ Page 25
Treble .......................................................... Page 25
Bass ............................................................ Page 25
Balance ....................................................... Page 25
3D Surround
(for the LE857U, LE757U, LE755U,
LE657U and LE655U models) .................. Page 25
Surround
(for the LE750U, LE650U, C7500U
and C6500U models) ................................ Page 25
Bass Enhancer ............................................ Page 25
Clear Voice ....................................... Page 25
Reset ........................................................... Page 25
Power Control
Example
Audio Only ................................................... Page 26
Power Saving .............................................. Page 26
No Signal OFF............................................... Page 26
No Operation OFF......................................... Page 26
View Option ......................................... Pages 26, 39
APPS ............................................... Page 26
USB Operation Panel ....................... Page 39
Home Network (DLNA)*
Operation Panel ............................... Page 39
View Mode ....................................... Page 26
Freeze .............................................. Page 26
Change Audio .................................. Page 26
Change CC ...................................... Page 26
3D Setup
(for the LE857U, LE757U, LE755U,
LE657U and LE655U models) .................. Page 34
AQUOS LINK Setup .................................... Page 42
Terminal Setting .............................. Pages 2627, 44
Audio Setup ..................................... Page 26
PC input .......................................... Page 44
Audio Select .................................... Page 44
Input Skip ........................................ Page 26
Input Label ....................................... Page 27
HDMI Setup ..................................... Page 27
Output Select ................................... Page 27
Color System ................................... Page 27
Menu Design ............................................... Page 27
Channel Selecting Effect .................. Page 27
Program Title Display ....................... Page 27
Position ............................................ Page 27
Caption Setup .................................. Page 27
Game Play Time .......................................... Page 27
Operation Lock Out ..................................... Page 27
Icon Light Up Setting ................................... Page 27
Quick SIar_ Mode ........................................ Page 27
Wallpaper Setting ........................................ Page 27
Boot Picture ................................................ Page 28
Response Tone
(for the LE857U, LE757U, LE755U,
LE750U and C7500U models) .................. Page 28
Demo Mode ................................................ Page 28
*: For LE750U, "Home Network" is displayed.
EZ Setup ..................................................... Page 28
Language ......................................... Page 28
Location & Time ............................... Page 28
fV l...ocatiorl ..................................... Page 28
Antenna & CabldSTB ...................... Page 28
Air/Cable .......................................... Page 28
OH Search ....................................... Page 28
Network ........................................... Page 28
Completed ....................................... Page 28
Broadcasting Setup ..................................... Page 28
CH Setup ......................................... Page 28
Favorite CH ...................................... Page 28
Antenna Setup-DIGITYkL ................... Page 28
Internet Setup ........................... Pages 39, 44, 46-47
Bluetooth Setup
(for the LE857U, LE757U, LE755U,
LE657U and LE655U models) .................. Page 29
Language .................................................... Page 29
DivX Setup ................................................. Page 39
Individual Setup .................................... Pages 29-30
Secret No ....................................... Page 29
Parental CTRL .......................... Pages 29-30
Wall Mount Audio Setup .............................. Page 29
Reset ........................................................... Page 29
_information
Example
Identification ................................................ Page 30
Digital Caption Into ..................................... Page 30
Software Update .................................. Pages 30-32
Manual Updale ......................... Pages 31-32
Auto Update Setting ........................ Page 30
Softwere License ......................................... Page 52
Netfiix Help .................................................. Page 49
VUDU Help .................................................. Page 49
qD- 23
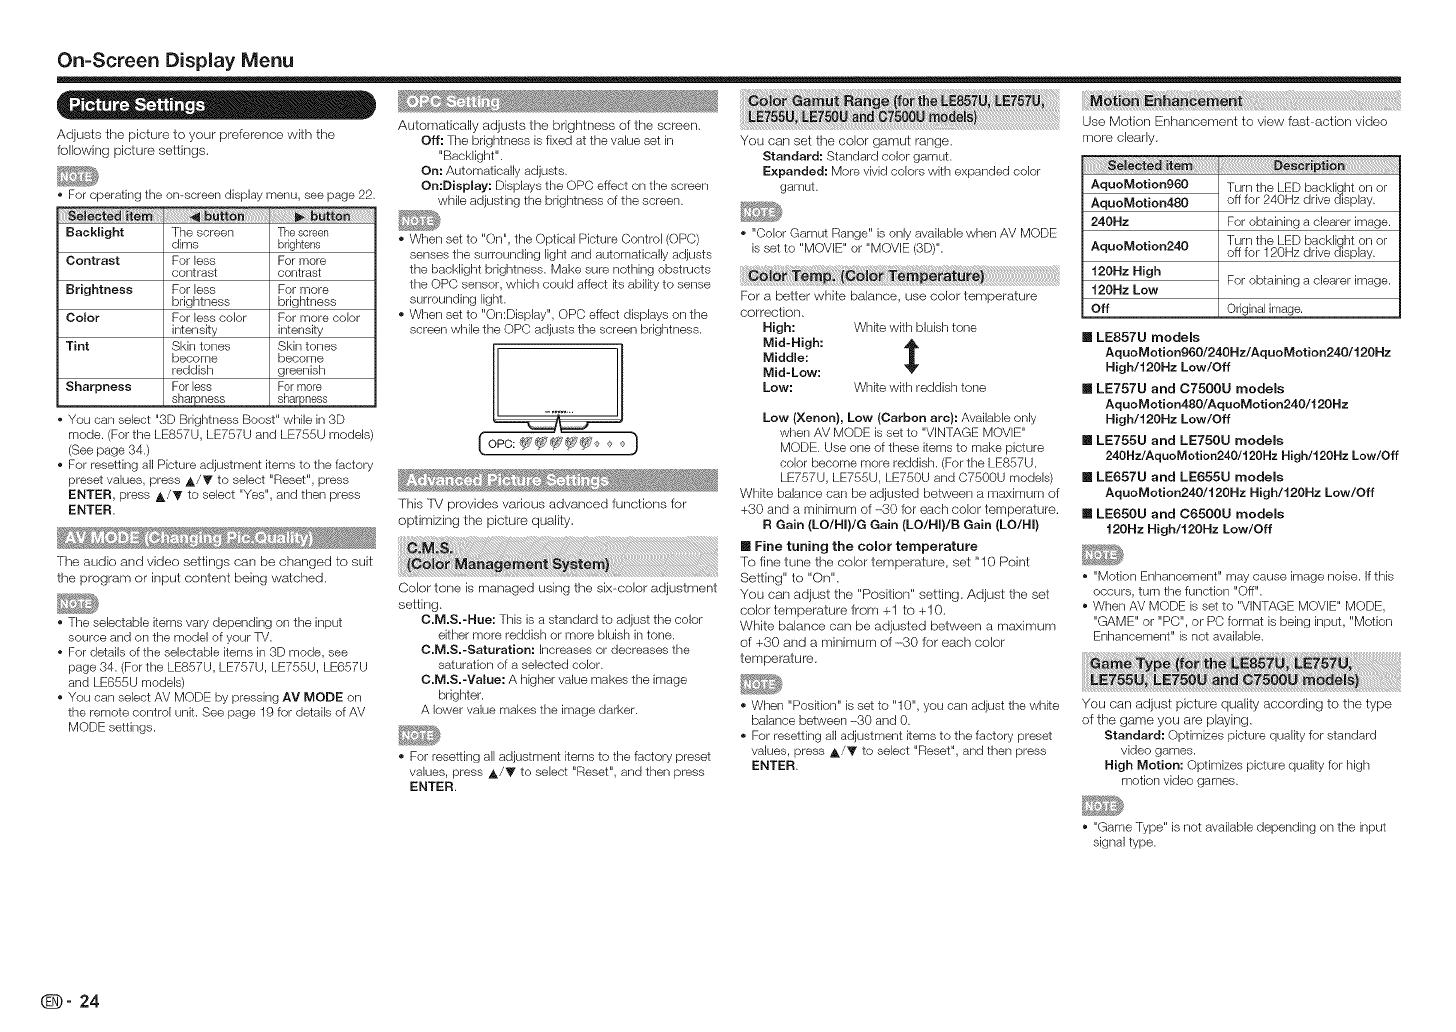
On-Screen Display Menu
Automatically adjusts tile brkjhtness of the screen. Use Motion Enhancement to view fast-action video
Adjusts the picture to your preference with the Off: The brightness is fixed at the value set in You carl set the color gamut range, more clearly.
following picture settings. "Backlight". Standard: Standard color gamut.
On: Automatically adjusts. Expanded: More vivid colors with expanded color
On:Display: Displays the OPC effect on tile screen gamut. AquoMotion960 Turn the LED backlight on or
•______Foroperating the on-screen display menu, see page 22. while adjusting the brightness of the screen. AquoMotion480 off for 240Hz drive display.
240Hz For obtaining a clearer image.
Baeklight The screen The screen • "Color Gamut Range" is only available when AV MODE
dims brightens • When set to "On", the Optical Picture Control (OPC) Turn the LED backlight on or
Contrast For less For more senses the surrounding light and automatically adjusts is set to "MOVIE" or "MOVIE (3D)". AquoMotion240 off for 120Hz drive display.
contrast contrast the backlight brightness. Make sure nothing obstructs i i20Hz High For obtakling a clearer image.
Brightness For less For more the OPC sensor, which could affect ks abilky to sense i20Hz Low
brightness brightness surrounding light. For a better white balance, use color temperature
Color For less color For more color • When set to "On:Display", OPC effect displays on the correction. Off Original image.
intensky intensity screen while the OPO adjusts the screen brightness. High: Whke with bluish tone
Tint Skin tones Skin tones Mid-High: ,_ nLE857U models
become become I[ ]l Middle: AquoMotion960/240Hz/AquoMotion240/t 20Hz
reddish greenish _ Mid-Low: "8" High/i20Hz Low/Off
Sharpness For Bess For more Low: Whke with reddish tone [] LE757U and C7500U models
sharpness sharpness AquoMotion480/AquoMotion240/i 20Hz
• You can select "3D Brightness Boost" while in 3D Low (Xenon}, Low (Carbon arc}: Available only High/i20Hz Low/Off
mode. (For the LE857U, LE757U and LE755U models) ( ) when AV MODE is set to "VINTAGE MOVIE"
(See page 34.) OPC: _* _ _> MODE. Use one of these items to make picture n LE755U and LE75OU models
• For resetting all Picture adjustment items to the factory color become more reddish. (For the LE857U, 240Hz/AquoMotion240/f20Hz High/f20Hz Low/Off
preset values, press j,/Y to select "Reset", press LE757U, LE755U, LE750U and 07500U models) n LE657U and LE655U models
ENTER, press A/T to select "Yes", and then press White balance carl be adjusted between a maximum of AquoMotion240/i 20Hz High/i20Hz Low/Off
ENTER. This TV provides various advanced functions for +30 and a minimum of-30 for each color temperature. [] LE65OU and 06500U models
optimizing the picture quality= R Gain (LO/HI)/G Gain (LO/HI)/B Gain (LO/HI) i20Hz High/i20Hz Low/Off
_ _'_*# _ [] Fine tuning the color temperature
The audio and video settings carl be changed to suit To fine tune the color temperature, set "10 Point
the program or input content being watched. Setting" to "On". • "Motion Enhancement" may cause image noise. If this
Color tone is managed using the six-color adjustment You carl adjust the "Position" setting. Adjust the set occurs, turn the function "Off".
setting, color temperature frorn +1 to +10. • When AV MODE is set to "VINTAGE MOVIE" MODE,
• The selectable items vary depending on the input C.M.S.-Hue: This is a standard to adjust the color White balance carl be adjusted between a maximum "GAME" or "PC", or PC format is being input, "Motion
source and on the model of your TV. either more reddish or more bluish in tone. of +30 and a minimum of ----30 for each color Enhancement" is not available.
• For details of the selectable items in 3D mode, see C,M.S.-Saturation: increases or decreases the
page 34. (For the LE857U, LE757U, LE755U, LE657U saturation of a selected color, temperature.
and LE655U models) C.M.S.-Value: A higher value makes the image
• You can select AV MODE by pressing AV MODE on brighter.
the remote control unit. See page 19 for details of AV A lower value makes the image darker. • When "Poskion" is set to "10", you can adjust the white You can adjust picture quality according to the type
balance between -30 and 0. of the game you are playing.
MODE settings. • For resetting all adjustment kems to the factory preset Standard: Optimizes picture qualky for standard
• For resetting all adjustment items to the factory preset values, press A/Y to select "Reset", and then press video games.
values, press A/Y to select "Reset", and then press ENTER. High Motion: Optimizes picture quality for high
ENTER. motion video games.
• "Game Type" is not available depending on the input
signal type.
(D" 24
On-Screen Display Menu
Available only when AV MODE is set to "VIN/"AGE
MOVIE" MODE. This function makes the images look
like they are flickering in the same way as old-time
films or l_/were.
Available only when AV MODE is set to "VIN/"AGE
MOVIE" MODE. When this function is enabled, the
lamp light looks like it is swinging. You can adjust the
effect level between 0 and +3.
Smoothes diagonal lines by detailed dot control.
Advanced: Produces smoother diagonal lines by
jaggy removal process.
Standard: Produces smooth diagonal lines.
Off: No adjustment.
• When AV MODE is set to "VINTAGE MOVIE" MODE,
"Quad Pixel Plus2" is not available.
_::::::::::::::
Automatically adjusts the image contrast according
to the scene.
Advanced: Produces higher contrast image
especially in dark scene.
Standard: Produces high contrast image.
Off: No adjustment.
Adjusts the differences of picture tones between
bright parts and dark parts. The adjustment range
of the gamma can be set to a maximum of +2 and a
minimum of-2 by pressing 4 or I_.
Adjusts on-screen black level to your preferred level
High: The black level gets brighter.
low: The black level gets darker.
• "Black Level" is available for input signal from
ComposRe Video, Component 480i and analog
broadcasts (air and cable).
!i!!!!!!!!i_i!ii!_!i_!i_iiMi_i__i'_i_!_i_!!_!_ii_ii_i!_!i_i_ii_'i_ii_i_i¸i¸i¸i¸i¸i_i¸ilili!ii_iiiiiiiiiiiiiiiiiiiiiiiiiiiiiiiii__i;!,!_i_ii_i_!_iiiiiiiiiiiiiiii_i_!,!_iiii_!!_iiljiiiiiiili_i_i_i_i_i_i_i_i_iii_iliJi,!!J!i
This function provides high-quality playback of
images originally encoded at 24 frames/second,
such as films.
Advanced: Adjusts effect to reduce judder from film
contents. You can select a desired level of judder
reduction from 0 to +10.
Standard: Plays back images with equal display
time for each frame, reproducing movie theater
experience.
Off: Normal viewing mode.
* "Film Mode" does not function depending on input
signal type.
, "Film Mode" does not function when you set AV MODE
to "VINTAGE MOVIE" MODE, "GAME" or "PC".
, "Standard" does not function depending on input
signal type.
Produces a clearer video image.
Auto: Automatically adjusts the level of noise
reduction.
High/Middle/Low: You can select a desired level
for viewing a clearer video image.
Off: No adjustment.
* "DigRal Noise Reduction" is not available when you set
AV MODE to "PC" or PC format is being input.
* When AV MODE is set to "GAME", "AUTO" is not
available.
For viewing a video in monochrome.
The brightness level range of the OPC sensor's
automatic adjustments can be set according to your
preferences.
The adjustment range of the OPC sensor carl be set
to a maximum of +16 and a minimum of ---q6.
Max,: -15 through +16
Min.: -16 through +15
• The "Range of OPC" settings are active only when
"OPO" is set to "On".
• The maximum setting cannot be set to a smaller
number than the minimum setting.
• The minimum setting cannot be set to a bigger number
than the maximum setting.
Depending on the brightness of the surrounding light, the
OPC sensor might not operate if the adjustment range is
small.
You carl adjust the sound quality to your preference
with the following settings.
For operating the on-screen display menu, see page 22.
Treble For weaker For stronger
treble treble
Bass For weaker For stronger
bass bass
Decrease audio Decrease audio
Balance from the right from the left
speaker speaker
* The Audio menu is grayed out when "Output Select" is
set to "Variable". (See page 27.)
For resetting Audio adjustment Reins to the factory
preset values, press _,/V to select "Reset", press
ENTER, press _/T to select "Yes", and then press
ENTER.
Different sound sources sometimes do not have
the same loudness level, such as a program and its
commercial breaks. The Automatic Volume Control
(Auto Volume) reduces this problem by equalizing
levels.
High: Reduces the loudness gaps among different
sound sources strongly.
Middle:
Low: Reduces the loudness gaps among different
sound sources slightly.
• The Audio Settings menu is grayed out when "Output
Select" is set to "Variable". (See page 27.)
The surround function produces Surround effect
from the speakers.
3D Stadium: Reproduces lifelike experience of
exckements such that live sports or concert
performances in a stadium create.
3D Hall: Reproduces concert hall experience wkh
realistic live surround sound using measured
reverberant sound in the concert hall.
3D Movie: Reproduces movie theater experience
with realistic live surround sound using measured
reverberant sound in the movie theater.
3D Standard: Creates 3 dimensional surround
sound wkh detailed control of the signal phase.
Normal: Provides mild surround sound.
Off: Outputs the normal sound.
• The Audio Settings menu is grayed out when "Output
Select" is set to "Variable". (See page 27.)
• For some discs, setup may be required on your BD/
DVD player. In this case, please refer to the operation
manual of your BD/DVD player.
The surround function produces Surround effect
from the speakers.
• The Audio Settings menu is grayed out when "Output
Select" is set to "Variable". (See page 27.)
• For some discs, setup may be required on your BD/
DVD player. In this case, please refer to the operation
manual of your BD/DVD player.
This function allows you to enjoy bass-enhanced
sound.
• The Audio Settings menu isgrayed out when "Output
Select" is set to "Variable". (See page 27.)
This function emphasizes speech against
background noise for greater clarity.
• The Audio Settings menu is grayed out when "Output
Select" is set to "Variable". (See page 27.)
Q_)- 25
On-Screen Display Menu
m e _ o o
Power control setting allows you to save energy.
• For operating the on-screen display menu, see page 22.
When listening to music from a music program, you
carl turn the screen off and enjoy audio only.
• The screen image will return to normal when a button
(except those for audio adjustment, such as VOL,
MUTE) is pressed.
This function allows you to set the Power Saving
level in order to decrease the power consumption
and increase the backlight lifespan.
Standard: Optimizes power reduction based upon
video content. When set to "Standard", "_"
appears on the screen.
Advanced: Optimizes power reduction based upon
video content and engages OPC. When set to
"Advanced",
"_" appears on the screen.
Off: This function does not work.
• "Power Saving" does not function when you set AV
MODE to "AUTO" or "DYNAMIC (Fixed)".
• You cannot select a different Power Saving Rem for
each AV MODE.
When "Power Saving" is set, the "OPC" settings for all
AV Modes will automatically change.
--If you set "OPC" to "On" when "Power Saving" is set
to "Standard", then the "Power Saving" setting will
change to "Advanced".
--When you change the "Power Saving" setting from
"Advanced" to "Off" or to "Standard", "OPC" will be
set to "Off".
--"AUTO" and "DYNAMIC (Fixed)" will remain set to
"Off".
• When "Power Saving" is set to "Standard" or
"Advanced", the Power Saving leaf icon appears to the
left of "OPC" in the Picture Settings menu screen.
• "Power Saving" is not available when the TV is in 3D
mode. (For the LE857U, LE757U, LE755U, LE657U
and LE655U models)
When this function is enabled, the 'f_/automatically
shuts down if no signal is received for more than 15
minutes.
• When it is 5 minutes before the power shuts down,
the remaining time will start to keep appearing every
minute.
• When a TV program finishes, this function may not
operate.
When you enable this function, the -iM automatically
shuts down if no operation is performed for more
than 3 hours.
• When it is 5 minutes before the power shuts down,
the remaining time will start to keep appearing every
minute.
= 0 •
• For operating the on-screen display menu, see page 22.
These functions are useful for adjusting the audio
and video settings. The View Option functions carl
be operated with the remote controJ uniL
The application window can be displayed by
selecting "APPS" ors the MENU screen.
• You can display the application window by pressing
SmartOentral on the remote control unit. (See page
18.)
This function changes the screen size.
Select "View Option" on the menu to display the
View Mode menu screen.
The View Mode menu varies depending on the input
SOUrCe.
• You can select View Mode by pressing VIEW MODE
on the remote control unR.
-- See pages 20 and 21 for adjusting the video being
input from a TV, other audiovisual equipment,
USB-Video, Home Network Video or Intemet
applications.
-- See page 21 for adjusting the video being input from
a PC.
ii!i!i!_!i_{_i_i_ii_ii_ii_i_{iii_S;_;i!_i_!!_!_!_!_i;i!i!_i_!!i!i!i!i!i!i!i!i!i!i!i!i!i!i!i!!_!_iii_!_!_!_!!!_i_:_iiiiiiiiiiiiiiiiiiiiiiiiiiiiii2!_ii_i_i_i_i_i_i_i_i_i_i_{_i_!!!!!!!!_!{L
Allows you to change the Closed Caption display.
Select "Change CC" ors the menu to display the
Closed Caption information.
o The information displayed varies depending on the
program you are watching.
o You can change Closed Caption by pressing CO on
the remote control unit. See page 20 for details of
Closed Caption function.
You can output digital audio to an AV amplifier or
similar device whose DIGITAL AUDIO INPUT terminal is
connected to the DIGITAL AUDK) OUT terminal on the
TV. Please select an audio oLRput format compatible with
the audio format of the program you are watching and
the equipment connected.
POM: For connecting to equipment that does not
support Dolby Digital and DTS. The same audio
(main, sub, or main/sub) as the audio of the
program being viewed is output.
2-channel audio wRh a sampling rate of 48 kHz or
less is output as linear PCM audio.
Bitstream: For connecting to an audio system that
supports Dolby Digital and DTS. Audio is output
through both the main and sub channels.
o Analog channel audio and video input audio are output
in PCM mode even when "BRstream" is selected.
o PCM digital input signals are output in PCM mode
even when "Bitstream" is selected.
This setting allows you to skip the TV, HDMI or PC
IN Input ("/_/", "PC IN", "HDMI 1", "HDMI 2", "HDMI
3" and "HDMI 4") ors the Input Selection operation.
• You can select Freeze by pressing FREEZE on the
remote controJ unit. See page 18 for detaiJs of Freeze
function.
Allows you to change the audio when multipk _,audio
is available for the program you are watching.
o If you connect external equipment to an HDMI
IN terminal which you have set to be skipped, a
notification message appears on the display when
a signal is received from the connected external
equipment. Press "Yes" to reset the related skipping
setting so that the input terminal becomes available.
• You can change Audio by pressing AUDIO on the
remote control unit. See page 19 for details of Audio
function.
(D" 26
On-Screen Display Menu
iiiiiiiiii{ii_¸!_!!_!_!_;_ii_{i!_!!_!i_!_i_i_;!_!i{i_!!{i!!:i!i_i_ii!i!!i!!i!!i!!i!!i!!i!!i!!i!!i!!i!!i!!i!!i!!i!!i!!i!!i!!i!!i!!i!!i!!i!!i!!i!!i!!_!_i!!{i_!!_!!_!i_!!!!;_iii_!i!!_!!_!!_!!_!!_!!_!ii!!i!ii!!i!ii!!_!!{i!!_!!i!i_ii_ii_ii_ii_ii_ii_ii_ii_ii_iiii_ii_i_!_i_i!_i!_i!ii_ii_ii_ii_ii_ii_ii_ii_ii_ii_ii_ii_ii_ii_ii_ii_ii_ii_ii_ii_ii_ii_ii_i!i_i!i!iii_
Lets you set the input terminal displayed when using
the INPUT list or channel display. Press _./V/4/I_
to select the new name for the input mode.
• Using the software keyboard, you can enter up to
10 characters for text. (See page 47.)
• You cannot change labels if the input source is TV,
Home Network (DLNA)* or USB.
• : For LE750U, "Home Network" is displayed.
When you view images sent from external equipment
in an HDMI connection, this function allows the
image size on the lM to automatically switch to an
appropriate one.
• Refer to your external equipment operation manual for
the signal type.
• When connecting a DVI-HDMI conversion adapter/
cable to the HDMI IN terminal, the image may not
come in clearly.
Allows you to select what controls the audio output.
Fixed: Sound via speaker is adjusted wkh VOL +/-
on the remote control un_ or on the TV.
Sound via the AUDIO OUT terminal is not
adjustable and outputs at a consistent level.
Variable: Sound via the AUDIO OUT terminal is
adjusted with VOL +/- on the remote control unit
or on the TV.
Sound via speaker is muted.
Select the video signal system compatible with your
equipment from the Iisl below:
Auto/NTSC/PAL- M/PAL- N
• "Color System" can only be set for the VIDEO IN 1 or 2.
• If you have already set the Secret No., input the 4-digk
secret number here. See page 29 for setting a secret
number.
You can select whether to use transition effects
when changing channels.
ii_!_!{i!i_'_i_'i_i_¸i_i_i_!!_i_ii_i!ibii_i!_!!_ii_i_i_i_i_!i_!i_!i{!!!!!_i_!!!!_!_i!!:_!i!iiii_i_ii_ii_ii_ii_ii_i_i_i_i_i_!i!_i_!_i!_i!_i!_i!_i!_i!_i!_i!_i!_i!_i!_i!_i!_ii!!i_{!i_!_i_ii_ii_i_i_!_i_!_i_i_ii_ii_ii_i_i_i_i_i_i_!!_!_i!_i_i_i_i_i_i_i_!_!_i!_i;!_!
Select the CH display when changing channels for
digital broadcasting.
For adjusting a picture's horizontal and vertical
position.
H-Pos.: Centers the image by moving k to the left or
right.
V-Pos.: Centers the image by moving k up or down.
• For resetting adjustments to the factory preset values,
press A/Y to select "Reset", and then press ENTER.
• When connecting a PC to the HDMI IN terminal, the
image position will be automatically adjusted. It cannot
be manually adjusted.
• The screen position variable ranges depend on the
View Mode or the signal type. The ranges can be seen
on the position-setting screen.
Adjustments are stored separately according to input
source.
• "Position" does not work when USB mode, Home
Network mode or an Internet application is used.
• You may not be able to adjust the position while in 3D
mode. (For the LE857U, LE757U, LE755U, LE657U
and LE655U models)
............_ _i_ _
[his function allows you to adjust the closed caption
screen appearance to suit your preference.
Caption Size/Font Style/Foreground Color/
Foreground Opacity/Background Color/
Background Opacity/Character Edge
• For resetting adjustments to the factory preset values,
press A/T to select "Reset", and then press ENTER.
• The defauk value depends on the broadcasting station.
This function will enable the lM to display the elapsed
time every 30 minutes, so tha! you do not become
too absorbed in game playing to keep track of time.
Switch AV MODE to "GAME" to activate the function.
• In some cases, "Channel Selecting Effect" does not
work.
' _ _ ......
This function locks the operation buttons on the TM
and the remote control.
Off: No adjustment.
Re Control Lock: All buttons on the remote control
are locked.
Button Control Lock: All buttons on the TV, except
POWER, are locked.
When "PC Control Lock" or "Button Control Lock" is
selected, a confirmation screen appears.
Yes: Locks the operation buttons.
No: No adjustment.
For the wallpaper, you can select either the still images
pre-installed in the TV or your favorite still images stored
in the USB memory device.
Pre-lnstalled: The images pre-installed in the TV will
be displayed in a slideshow.
USB: Your favorite images stored for the wallpaper
will appear.
If only a single still image is stored in the USB
memory device, that image will be displayed as
the wallpaper. When there are muRiple still images
in the memory, all the images will be displayed in
a slideshow.
• To unlock the buttons on the remote control by using
the control panel of the TV (see page 22):
_Press MENU to display the MENU screen, press
VOL +/- to select "System Options", and then
press INPUT.
®Press CNA/V to select "Operation Lock Out",
and then press INPUT.
®Press CNA/V to select "Off", and then press
INPUT.
_Press MENU to exk.
• To unlock the buttons on the TV, press MENU on the
remote control, and then select "Off" in "Operation
Lock Out".
When this function is set to "On", the LED on the
front of the TMturns on,
[] LE857U, LE757U, LE755U, LE657U and
LE655U models
• The LED lights white in 2D mode.
• The LED lights blue in 3D mode.
• "On" is the factory preset value. If you want to turn off
the LED, set the function to "Off".
When this function is activated, you can reduce
the lM's start-up time or even let the lM in standby
mode start displaying images and so on via the
connected equipment on the network.
• Setting "Quick Start Mode" to "On" consumes more
power.
This function is available only when "Quick Start
Mode" is set to "On (Wallpaper Mode)",
Activating the function will display still images when
the TM is in standby mode,
• Images are displayed in 3-minute intervals as a
slideshow.
• When the TV is in Wallpaper mode, you can turn off
the TV by pressing and holding POWER on the TV for
5 seconds.
- Just before the TV turns off, the last image shown
when the TV was turned off appears briefly.
- Your settings may not be saved in some cases.
[] When you display images by using the USB
memory device:
• Create a folder named "WP" in the root directory of the
USB memory device (the first directory when the USB
memory device is opened), and store into the folder
the still images you want to display for the wallpaper.
• You must insert the USB memory device into the USB
terminal before turning off the TV.
• If there are images on the USB memory device but
they do not appear on the screen, switch to USB
mode and check whether the image flies on the USB
memory device are shown correctly.
You can set the length of time the TV will remain in the
Wallpaper Mode.
3hours/6 hours/12 hours/24 hours
• No buttons except for POWER work even while the
still images are being displayed.
• If the ready-for-use USB memory device is not
inserted, the still images pre-installed in the TV will be
displayed in a slideshow even when "Data Source" is
set to "USB".
• Because the USB memory device cannot be detected
immediately after the TV is turned on from standby
mode, the wallpaper pre-installed in the TV may be
displayed even when "Data Source" is set to "USB".
• The still images will be displayed until the set time has
elapsed.
• If you do not want to use the wallpaper as described
above, set "Quick Start Mode" to "On" or "Off".
(_- 27
On-Screen Display Menu
With this function activated, the SHARP logo will be
displayed when you turn on the IV,
• This function is not available when the TV is set to
"Quick Start Mode".
With this item set to "On", the lV will give off
operalion sound when you use the Smar_Central
function,
• if an external speaker is used, the operation sound will
not be heard.
You can select the image from several types of demo
mode.
if you have selected "Auto Play", you need to select
the desired playback type(s), and then set the
playback time.
Continuous: Plays demos continuously.
tO rain,: Plays demos every 10 minutes.
20 min,: Plays demos every 20 minutes.
• What kinds of setting item are available depends on
the model of your TV.
• This function will be canceled when you press EXIT on
the remote control unit.
• "Demo Mode" may not be selected depending on input
signal type or application status.
• "Demo Mode" may be automatically canceled
depending on input signal type.
• For operating the on-screen display menu, see page 22.
• When you select "EZ Setup", "OH Setup", "Parental
CTRL" or "Reset", you can enter the 4-digit secret
number here. See page 29 for setting a secret number.
You can run EZ Setup again, even after setting up
the preset channels.
Language: Select from among 3 languages (English,
French and Spanish).
Location & Time: Make settings for the country,
area and time zone where you use the TV.
Select your country: Select either "United
States", "Canada" or "Mexico".
Select your time zone: Select your time zone.
The available settings differ depending on the
selected country.
Select DST (Daylight Savings Time}: Select
"Auto", "Manual" or "Off".
TV Location: Select "Home" or "Store" for the
location where you plan to install the TV. This
product qualifies for ENERGY STAR .1 in Home
mode default setting.
Home: "Power Saving" is set to "Advanced", and
AV MODE is set to "STANDARD (ENERGY
STAR)"*1.
Store: "Power Saving" is set to "Off" and AV
MODE is set to "DYNAMIC (Fixed)". Picture
Reset and Feature Demo can be set.
Picture Reset: AV MODE will be set to
"DYNAMIC (Fixed)" regardless of whether
Picture Reset is "On" or "Off". If you select
"On", AV MODE will be reset to "DYNAMIC
(Fixed)" if there is no operation for 30
minutes. When "Off" is selected, AV MODE
will be set to "DYNAMIC (Fixed)".
Feature Demo: When "On" is selected, after
all the settings are completed, the Feature
Demo screen is displayed if there is no
operation for several minutes.
• ENERGY STAR qualification is based on AV
MODE "STANDARD (ENERGY STAR)".*s
Antenna & Cable/STB: Select the type of
connection you will use to watch TV.
Air/Cable: Make sure what kind of connection
is made wRh your TV when selecting "Air" or
"Cable".
CH Search: Channel auto search makes the TV look
for all channels viewable in the set area.
• if "Cable" is selected for Antenna setting,
scrambled channels are removed after the
Channel search has been completed.
Network: When you connect to the Intemet on the
TV, confirm the connection method and make
adjustments.
• Wireless LAN connection is possible only when
the WPS (push button) method is used. If any
other method is used, make settings by Initial
Setup > Internet Setup > Network Setup. (See
pages 46 to 47.)
Completed: The settings confirmation screen is
displayed. Confirm the information displayed on
the screen.
• "1 : Except for LC-90LE657U model.
• See InRial Installation on pages 16 to 17 for setting
each Rem.
• If no channel is found, confirm the type of connection
made wRh your TV and try "EZ Setup" again.
• If you select "Analog Search Start" and initiate tile
channel search, the OH Memory for Cable Digital will
be deleted.
If Initial Installalion does not memorize all the
channels in your region, follow the instructions below
to manually memorize the channels.
Air/Cable: Make sure what kind of connection
is made with your TV when selecting "Air" or
"Cable".
OH Search: Channel auto search makes the TV look
for ail channels viewable in the set area.
OH Memory: You can select the channels to skip in
each ANALOG (Air), ANALOG (Cable), DIGITAL
(Air) and DIGITAL (Cable).
On: Skips channels. (Channel selection disabled
using OH A/V.)
Off: Does not skip channels. (Channel selection
enabled using CHA/V.)
Remove Scrambled OH: This function makes the
TV look for and then delete digital cable channels
that are scrambled and so unavailable in the
set area. The process may take more than 20
minutes.
Yes: Starts to remove scrambled channels.
No: This function does not work.
• See InRial Installation on pages 16 to 17 for setting
each Rem.
• if no channel is found, confirm the type of connection
made with your TV and try channel search again.
• if you select "Analog Search Start" and inRiate the
channel search, the CH Memory for Cable Digital will
be deleted.
iiiii!i!!i!i!_!_!_!i_i_ii_ii,i_ii_i_i:_!_!_!_!_i_i_!_!_i!_!_ii_i_ii_!_!i_!_i_i_i_i_i_i_i_i_i_i_i_i_i_i_i_i_i_i_i_i_i_i_i_i_i_i_
This function allows you to program 4 favorite
channels, in 4 different categories. By setting the
favorite channels in advance, you carl select your
favorite channels easily.
To register your favorite channel:
Select "Register" and then press ENTER. Press _/
T/_I/I_ to select the posRion in the category, and
then press ENTER to register.
To delete your favorite channel:
Select "1 Data Clear" and then press ENTER.
Press _/T/_/I_ to select the channel you want
to delete, and then press ENTER. Select "Yes" and
then press ENTER.
To delete all the favorRe channels, select "All Data
Clear".
• Before setting the channel, select the channel you
want to register as a favorite channel
• You can display the "Favorite OH" screen by pressing
FAVORITE CH on the remote control.
In order to receive digital air broadcasts, you need
a digital broadcast antenna. You carl confirm the
antenna configuration through the "Antenna Setup-
DIGll_&L" screen. If necessary, adjust the direction of
the antenna to obtain the maximum signal strength.
Signal Strength: The signal strength of DIGITAL
channel is displayed. The signal information is
based on the current channel.
Channel Strength: input the 2-digit channel number
to check the signal strength of the selected
channel. Make sure the signal is strong enough
for each channel.
• This function is available for DIGITAL (Air) only.
(_- 28
On-Screen Display Menu
Set this function when using the bluetooth devices
with your 'f_/,
See page 49 for how to use the devices.
• See also the instruction manual supplied wkh the
Bluetooth device.
• You can register up to 6 devices to the TV, but only
one keyboard and mouse can be used at a time.
• if a device for which "Selected" is displayed does
not operate properly, try searching and selecting the
device again.
• The keyboard or mouse may not operate propedy
depending on the application being used.
• The Bluetooth device may not operate properly
depending on the device being used.
..... /¢
You can also select a language from the Initial Setup
menu, Select from among 3 languages: English,
French and Spanish.
This selects the optimal audio for the program you
are currently watching even when the TV is mounted
to a wall,
If complex adjustments are made and the settings
cannot be restored to normal, you carl reset the
settings to the factory preset values.
• ifyou have already set the Secret No., input the 4-digit
secret number here.
• The Channel Setup settings will not be changed.
• The Language settings will not be changed.
• The Secret number settings will not be changed.
• The TV Location settings will not be changed.
• When you use the Bluetooth device with your TV for
the first time, you must make pairing between the
device and the TV. Once the pairing is correctly carried
out, the Bluetooth device will be registered on the -IV.
You can add, delete or select Bluetooth devices in
the registration,
mAddition of a Bluetooth Device
Before making the settings, press the Connect
button on the Bluetooth device you want to connect,
1 Press _1/1_ to select "Search", and then press
ENTER,
2 Model names of the detected devices will be
displayed, Select the device with the message
"New" attached, and then press ENTER,
• When a keyboard is being paired wkh the TV, a
PIN code will be displayed. Enter the PIN code
using the keyboard, and then press "Enter" key on
the keyboard.
• When you perform pairing operation on a mouse,
select "Yes", and then press ENTER.
3After the message indicating the pairing is
complete has beers displayed, click "OK",
I= Deletion of a Blaetooth Device
1 Press A/Y to select the device to delete, and
then press ENTER,
2 Press ,I,/Y to select "Delete", and then press
ENTER,
I= Semection of a Bmaetooth Device
1 Press A/Y to select the device to use, and then
press ENTER,
2 Press A/_' to select "Select", and then press
ENTER,
Allows you to use a secret number to protect certain
settings from being accidentally changed,
IMPORTANT:
Three conditions must be met to enable the V-Chip
(see pages 29 to 30):
1. Secret No, is registered,
2. V-Chip/V-Chip (DTV Only) settings have been made.
• The "V-Chip (DTV Only)" will only be selectable
when a new rating system can be downloaded via
digital broadcasting in the U.S.
3. "Status" is set to "On",
[] Setting Secret No.
You can set and change the secret number by using 0-9.
Yes: Changes or sets the Secret No.
No: The confirmation screen to clear the Secret No.
appears when the Secret No. has been set. When
the Secret No. has not been set, the previous
screen will be displayed.
[] Secret No. Clear
You can clear your secret number.
Yes: Your secret number is cleared.
No: Your secret number is not cleared.
V-CHIP is an electronic filtering device built into your
lV. This tool gives parents a great degree of control
over broadcasts accessed by their children. It allows
parents to select programs judged suitable for child
viewing while blocking ones judged not suitable. It
does so automatically once you activate the V-CHIP
f_ature in your R/. "V-Chip" and "Status" will not be
selectable from the menu if you do not first configure
your secret number.
• The U.S. has two rating systems for viewing content:
TV Parental Guidelines and movie ratings.
• The TV Parental Guidelines work in conjunction with
the V-CHIP to help parents screen out inappropriate
television shows from their children.
• Movie ratings are used for original movies rated by
the Motion Picture Association of America (MPAA) as
watched on cable TV and not edked for television. The
V-CHIP can also be set to block MPAA-rated movies.
• The setting automatically enters "Block" for any ratings
below your selection.
• if Status is not set to "On", the configuration settings
will not work.
[] MPAA (Voluntary movie rating system}
Example
• As a precautionary measure, make a note of your
secret number and keep k in a familiar place.
• If the secret number is cleared, the Status setting
automatically sets to "Off". "V-Chip" and "Status" will
not be selectable from the menu.
Used to enable or disable the parental control
function, This function will not be selectable from
the menu if you do not first configure your secret
number,
Press ,_/_' to adjust the item to your desired
position.
"_" indicates the item is blocked. Press MENU to
exit.
G: General audiences. All ages admkted.
PG: Parental guidance suggested. Some material may
not be sukable for children.
PG-13: Parents strongly cautioned. Some material may
be inappropriate for children under 13.
R: Restricted. Under 17 requires accompanying parent
or adult guardian (age varies in some jurisdictions).
NO-t7: No one 17 and under admitted.
X: X is an older rating that is unified with N0-17 but may
be encoded in the data of older movies.
• Voluntary movie rating system only uses an age-based
rating.
q29" 29
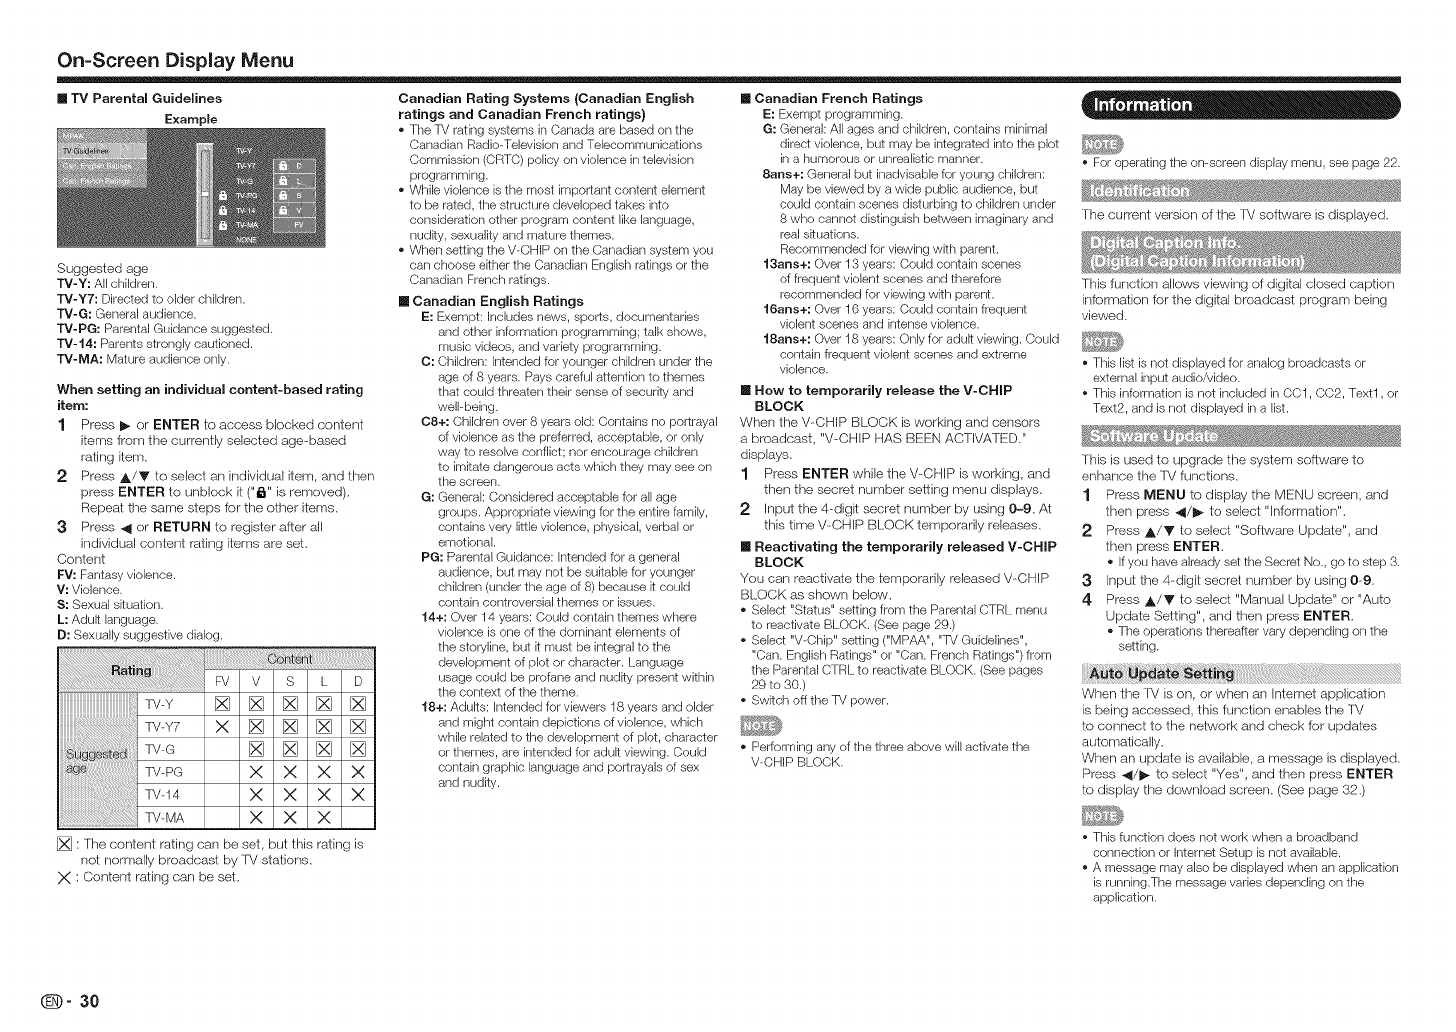
On-Screen Display Menu
nTV Parental Guidelines
Example
Suggested age
TV-Y: All children.
TV-Y7: Directed to older children.
TV-G: General audience.
TV-PG: Parental Guidance suggested.
TV-14: Parents strongly cautioned.
TV-MA: Mature audience only.
When setting an individual content-based rating
item:
1 Press I_ or ENTER to access blocked content
items from the currently selected age based
rating item.
2 Press A/Y to select an individual item, and then
press ENTER to unb]ock it ("_" is removed).
Repeat the same steps for the other items.
3Press _1 or RETURN to register after all
individual content rating items are set.
Content
FV: Fantasy violence.
V: Violence.
S: Sexual sRuation.
L: Adult language.
D: Sexually suggestive dialog.
FV V S L D
TvyTTVY[]X[][][][][][][][]
W-G [] [] [] []
TV-PG X X X X
TV-14 X X X X
TV-MA X X X
[] : The content rating carl be set, but this rating is
not normally broadcasl by lM stations.
X : Content rating carl be set.
Canadian Rating Systems (Canadian English
ratings and Canadian French ratings}
• The TV ratklg systems in Canada are based on the
Canadian Radio-Television and Telecommunications
Commission (CRTC) policy on violence in television
programming.
• While violence is the most important content element
to be rated, the structure developed takes into
consideration other program content like language,
nudky, sexuality and mature themes.
• When setting the V-CHIP on the Canadian system you
can choose either the Canadian English ratings or the
Canadian French ratings.
[] Canadian English Ratings
E: Exempt: Includes news, sports, documentaries
and other information programming; talk shows,
music videos, and variety programming.
0: Children: Intended for younger children under the
age of 8 years. Pays careful attention to themes
that could threaten their sense of security and
well-being.
08+: Children over 8 years old: Contains no portrayal
of violence as the preferred, acceptable, or only
way to resolve conflict; nor encourage children
to imitate dangerous acts which they may see on
the screen.
G: General: Considered acceptable for all age
groups. Appropriate viewing for the entire family,
contains very little violence, physical, verbal or
emotional.
PC: Parental Guidance: Intended for a general
audience, but may net be suitable for younger
children (under the age of 8) because k could
contain controversial themes or issues.
14+: Over 14 years: Could contain themes where
violence is one of the dominant elements of
the storyline, but k must be integral to the
development of plot or character. Language
usage could be profane and nudky present within
the context of the theme.
18+: Adults: Intended for viewers 18 years and older
and might contain depictions of violence, which
while related to the development of plot, character
or themes, are intended for aduk viewing. Could
contain graphic language and portrayals of sex
and nudity.
[] Canadian French Ratings
E: Exempt programming.
G: General: All ages and children, contains minimal
direct violence, but may be integrated into the plot
in a humorous or unrealistic manner.
8arts+: General but inadvisable for young children:
May be viewed by a wide public audience, but
could contain scenes disturbing to children under
8 who cannot distinguish between imaginary and
real skuations.
Recommended for viewing with parent.
13arts+: Over 13 years: Could contain scenes
of frequent violent scenes and therefore
recommended for viewing wkh parent.
16arts+: Over 16 years: Could contain frequent
violent scenes and intense violence.
18arts+: Over 18 years: Only for aduk viewing. Could
contain frequent violent scenes and extreme
violence.
[] How to temporarily release the V-CHIP
BLOCK
When the V-CHIP BLOCK is working and censors
a broadcast, "V-CHIP HAS BEEN ACTIVATED."
displays.
1 Press ENTER while the V-CHIP is working, and
then the secret number setting menu displays.
2 Input the 4-digit secret number by using 0-9. At
this time V-CHIP BLOCK temporarily releases.
[] Reactivating the temporarily released V-CHIP
BLOCK
You carl reactivaie the temporarily released V-CHIP
BLOCK as shown below.
• Select "Status" setting from the Parental CTRL menu
to reactivate BLOCK. (See page 29.)
• Select "V-Chip" setting ("MPAA", "TV Guidelines",
"Can. English Ratings" or "Can. French Ratings") from
the Parental CTRL to reactivate BLOCK. (See pages
29 to 30.)
• SwRch off the TV power.
• Performing any of the three above will activate the
V-CHIP BLOCK.
0 _ 0
• For operating the omscreen display menu, see page 22.
The current version of the R/ software is displayed.
This function allows viewing of digital closed caption
information for the digital broadcast program being
viewed.
• This list is not displayed for analog broadcasts or
external input audio/video.
• This information is not included in OO1,0C2, Text1, or
Text2, and is not displayed in a list.
This is used to upgrade the system software to
enhance the TV functions.
1 Press MENU to display the MENU screen, and
then press 41/1_ to select "information".
2 Press A./Y to select "Software Update", and
then press ENTER.
• If you have already set the Secret No., go to step 3.
3 Input the 4-digit secret number by using 0-9.
4 Press _,/Y to select "Manual Update" or "Auto
Update Setting", and then press ENTER.
• The operations thereafter vary depending on the
setting.
When the lV is on, or when an Intemet applicalion
is being accessed, this function enables the TV
to connect to the network and check for updates
automatically.
When an update is available, a message is displayed.
Press 41/1_ to select "Yes", and then press ENTER
to display the download screen. (See page 32.)
• This function does not work when a broadband
connection or Internet Setup is not available.
• A message may also be displayed when an application
is running.The message varies depending on the
application.
(D" 30
On-Screen Display Menu
3PressENTERtostartcheck_ngthedata_nthe 5 ToupdatetheW softwarew_ththeupdatef_le, 7 Afterthescreenshownbelow_sd_splayed,press
Select the method for manually updating the USB memory device, select "Yes", and then press ENTER, ENTER,
software,
USB Update: Updates the software using a USB
memory device containing the update file. (See
"Updating the Software wkh a USB Memory
Device".)
Network Update: Downloads the update file via
the network and then updates the software. (See
page 32.) 4 During the data checking, "Checking" blinks, 8 Remove the USB memory device.
• A broadband connection and Internet Setup are
required to update the software using the network. (See
pages 46 to 47.)
• It may take time to access and download the update
depending on the Internet connection and other
factors.
m Updating the Software with a USB Memory
Device
To check for the availability of a software update,
visit
http://www,sharpusa,com/products/supporV. Ifyou
have any questions, please
call 1-800-BE-SHARP (800-237-4277),
• Do not remove the USB memory device or unplug
the AC cord while the software is being updated.
• Be sure to properly follow the whole procedure
described below, step by step. Otherwise, for
example, the "1%/ cannot read the data in the USB
memory device and software updating will fail.
1 Insert the USB memory device with the update
file into the USB 1 or USB 2 terminal on the R/,
• When you update the software, use only one USB
terminal. Either USB 1 or USB 2 is usable.
• The current version of the TV software and the
version of the update file on the USB memory
device are displayed.
Example
• if the USB memory device is not properly installed
or the correct update file cannot be found on
the USB memory device, an error message is
displayed.
Check the file on the USB memory device, and
then reinsert the USB memory device correctly.
!l
Example
•Do not remove the USB memory device or unplug
the AC cord while the software is being updated.
6 When the software is successfully updated, a
screen is displayed indicating that the update
process is corrlpleted,
After this screen is displayed, the IV
automatically turns off and then turns on a,gain,
Example
• If the update has failed, check the file in the USB
memory device and try Software Update again.
2 Press A/V on the Manual Update screen to
select "USB Update", and then press ENTER,
Q_)- 31
On-Screen Display Menu
mUpdating the Software via the Network 3 After tile update file is downloaded, the software
1 Press A/Y on the Manual Update screen update process begins.
to select "Network Update", and then press
ENTER.
• The TV connects to the network and checks for
updates.
• To cancel, press ENTER.
!
Enjoying3DimageViewing(fortheLE857U,LE757U,LE755U,LE657UandLE655Umodels)
You carl use special 3D Glasses to watch 3D-supported images on this IV.
• You can enjoy 3D movies on this TV by viewing the movie throu'_h SHARP 3D Glasses supplied wkh the TV or
through optional 8D Glasses sold separately.
• To produce 8D images, liquid crystal shutters in the 3D Glasses alternately open and close imperceptibly fast to
exactly match akernating left and right video images displayed by the TV.
• Net all consumers can experience and enjoy 3DTV. Some people suffer from stereo blindness which prevents
them from perceiving the intended depth of 3D entertainment. Also, some people who watch 3D programming
may experience initial feelings of motion sickness as they adjust to the picture. Others may experience headaches,
eye fatigue or motion sickness. Some viewers might also experience epileptic seizures. Like a relier coaster, the
experience is not for everyone.
2The current version of the TV and the latest
version of seflware are displayed. To update
the fV software, select "Yes", and then press
ENTER.
• When a server connection cannot be established
or an update is not available, a message is
displayed.
If a server connection cannot be established,
check the broadband connection and Intemet
Setup.
• Do not unplug the AC cord while the software is
being updated.
4 When the software is successfully updated, a
screen is displayed indicating that the update
process is completed.
A screen indicating that the update is completed
is displayed. 4 seconds later, the fM restarts
automatically.
• If the software was not updated successfully,
check the broadband connection and Internet
Setup, and then try updating the software again.
• The 3D Glasses are precision equipment. Handle them with care.
•Improper use of the 3D Glasses or failure to follow these instructions can result in eye strain.
• If you experience dizziness, nausea, or other discomfort while viewing 3D images, immediately
discontinue use of the 3D Glasses. Using the 3DTV with incompatible 3D broadcasts or software can
make images appear blurry or create overlapping images.
• When viewing 3D images continuously, be sure to take a break periodically to prevent eye strain.
• If you are nearsighted or farsighted or have astigmatism or a different level of eyesight between the
left and right eyes, you should take the necessary steps, such as wearing eyeglasses, to correct your
eyesight before viewing 3D images. The 3D Glasses can be worn over eyeglasses.
• When viewing 3D images, keep the 3D Glasses horizontally level with the TV screen. If you tilt the
3D Glasses with respect to the "IV screen, the images viewed by the left and right eyes may appear
significantly different or images may appear overlapping.
• View 3D images at the appropriate distance from the TV screen. The recommended distance is three
times the effective height of the TV screen.
Examples of recommended distances
9g-inch screen: Approx. f f.2 ft (3.4 m)
80-inch screen: Approx. 9.8 ft (3.0 m)
70-inch screen: Approx. 8.5 ft (2.6 m)
60-inch screen: Approx. 7.2 ft (2.2 m)
Viewing should not be done closer than the recommended distance.
• Be careful of your surroundings when viewing 3D images. When you view 3D images, objects may
appear closer or farther than they are. This may cause you to misjudge the distance and possibly result
in injury if you accidentally hit the screen or surrounding objects.
• The 3D Glasses are not recommended for people aged less than 6.
• When children are viewing 3D images, be sure a parent or guardian is present. Monitor children viewing
3D images, and if they show signs of discomfort, immediately discontinue use of the 3D Glasses.
• People with a known history of photosensitivity and people with heart problems or poor health should
not use the 3D Glasses. This can worsen existing health conditions.
•Do not use the 3D Glasses for other purposes (such as general eyeglasses, sunglasses, or protective
goggles}.
DO not use the 3D function or 3D Glasses while walking or moving around. This may result in injuries due
to running into objects, tripping, and/or failing.
When using the 3D Glasses, take care not to accidentally strike the TM screen or other people. Viewing
3D images may cause you to misjudge the distance to the TV screen and accidentally strike the screen,
resulting in possible injury.
• It is recommended that you do not view 3D images if you are sleep deprived or if you have been drinking
alcohol.
(D" 32
Enjoying 3D image Viewing {for the LE857U, LE757U, LE755U, LE657U and LE655U models)
2D _ 3D _',._ _ o Converts normal 2D images into 3D images.
o Creates 3D images from 3D images displayed side by side.
3D mode The image is splk into a left and right image, and then the
(using the Side by Side images are stretched and displayed sequentially to create
3D Glasses) a 3D image.
o Creates 3D images from 3D images displayed on the
top and bottom. The image is splk into a top and bottom
Top and Bottom image, and then the images are stretched and displayed
sequentially to create a 3D image.
Side by Side _ o Creates 2D images from 3D images displayed side by side.
2D mode 2D Only the left image is stretched and displayed. The image
(without does not appear in 3D.
using the o Creates 2D images from 3D images displayed on the
3D GJasses) Top and Bottom top and bottom. Only the top image is stretched and
,2D displayed. The image does not appear in 3D.
5 Take off the 3D Glasses and turn off the power.
• The TV screen may temporarily become black when
the TV is trying to detect a 3D image signal and when
swRching from 3D to 2D mode.
The image signal may contain a 3D identification
signal. You carl enable the TV to automatically detect
the 3D image type by selecting "System Options"
> "3D Setup" > "3D Auto Change" on the TV. (See
page 34.)
1 When "3D Auto Change" is set to "Mode 1"
or "Mode 2"
• The 3D image type is detected automatically and
the appropriate 3D image isdisplayed.
• If the input signal swkches to 2D, 2D images are
displayed automatically.
• 3D mode is canceled automatically when the setting is
changed, input selection is changed, or the power is
turned off.
1 Press 3D,
• A screen appears prompting you to select
between 3D and 2D image viewing.
2 Press 4/_ to select "3D" or "2D", and then
press ENTER.
• To view in 3D mode: Select "3D", and then go to
step 3.
• To view in 2D mode: Select "2D", and then go to
step 6.
3 Press -,4/_ to select the 3D signal type
("2D ,3D", "Side by Side" or "Top and Bottom")
and then press ENTER,
When "3D Auto Change" is set to "Off"
• The following message is displayed. Press 3D.
• Press _/_ to select the "Yes", and then press
ENTER.
2 Turn on the 3[) Glasses and place them on your
head.
3You can now view 3D images.
4 Press 3D during the 3[.) mode.
Select "Yes" and press ENTER to switch to 2D
mode.
• Take off the 3D Glasses and turn off the power.
• If you select the same system as that of the input
signal, 3D images are displayed.
4 Turn on the 3D Glasses and place them on your
head.
You can now view 3D images,
6 Press ,,4/1_ to select the 2D signal type ( "Side
by Side" or "Top and Bottom") and then press
ENTER,
o If you select the same system as that of the input
signal, 2D images are displayed.
• Take off the 3D Glasses and turn off the power.
}' Take off the 3D Glasses and turn off the power.
(D" 33
Enjoying 3D image Viewing {for the LE857U, LE757U, LE755U, LE657U and LE655U models)
You can convert normal 2D images into 3D images.
1 Press 3D,
2 Press _1/1_ to select "2D ,3D", and then press
ENTER.
3 Turn on the 3[) Glasses and place them on your
head.
• The TV returns to 2D mode after 1 hour has passed.
You carl switch back to the previous mode by pressing
3D.
1 Press 3D,
• A confirmation screen is displayed.
2 Select "Yes" and then press ENTER.
• The TV returns to the previous mode.
Pressing 3D in 3D mode displays the 3D menu.
Press the colored buttons to make the necessary
settings.
A: 3D Brightness Boost
(for the LE857U, LE757U and LE755U models)
B: 3D Surround (See page 25.)
The surround mode changes each time you press
B.
C: 2D *3D Convert Effect
D: 3D Setup
You can adjus! the 3D image to the desired image
quality and make various settings for 3D image
viewing.
® Set AV MODE and "3D Brightness Boost" with
"Picture Settings".
® Set the 3D viewing settings with "System Options"
> "3D Setup".
• Which items can be selected/adjusted differs
depending on whether the TV is in 2D mode or in 3D
mode.
The audio and video settings can be changed to suit
the program or input content being watched.
STANDARD(3D}: For a highly defined image in a
normal lighting.
MOVIE(3D): For a movie.
GAME(3D): Lowers image brightness for easier
viewing.
• You can select AV MODE by pressing AV MODE on
the remote control unk.
You can adjust the backlight of the TV for 3D image
viewing.
High/Middle/Low: Select a desired level of 3D
Brightness Boost.
• When "High" or "Low" is selected, "OPC", "Backlight"
and "Range of OPC" are not available.
You can make various settings to enhance 3D image
viewing.
This setting can be used to switch to 3I) mode
automatically when a 3D identification signal is
detected.
Set the desired mode according to the type of media
you are viewing, such as video from a connected
device or video from an internet application.
Mode 1: 3D mode is selected automatically when a
3D signal is detected while viewing video from a
VOD service or HDMPconnected equipment.
Mode 2: 3D mode is selected automatically when,
in addition to detecting a 3D signal while viewing
video from a VOD service or HDMI-connected
equipment, a video pattern with "Side by Side" or
"Top and Bottom" format is also detected.
Off: Auto change is not performed.
• This function does not work when the input source is
Composite, Component, RGB or Analog/Digital tuner.
iiiiii,,i_i_i_i¸_:_!_3!_i_!_i_{i_!_i!_i!_i!_{_{_{_{_{_!!_!_!_!!!_!!_i_i_i_i_i_i_i_i_i_i_i_i_i_i_#_!i_i!_{i!_i_i!!_i_i_i_i_i_i_i_i_i_i_i_i_i_i_i_i_i_i_i_ii_!!_i!_i!_i!_i!_i!_i!_i!_i!_i!_i!_i!_i!_i!_i!_i!_i!_i!_i!_i!_i!_i!_i!ii!i_!i_!i{_¸i
You can adjust the 3D effect when converting
images from 2D mode to 3D mode.
Select a desired level of convert effect from +-1 to
+16.
•This function is only available when converting 2D
images to 3D images.
•When you use this function, image conversion on the
TV will resuk in some differences in the odginal images
and how they appear.
•2D images that have been converted to 3D images
may be viewed only for personal use.
This displays the elapsed time of 3[) image viewing.
Yes: Displays the elapsed viewing time on the screen
every hour.
No: Does not display the elapsed viewing time.
This displays 3[) images f_r testing the 3[.) operation.
Clicking "Start" on the screen plays back 3D test
images.
•if you press RETURN during playback, the previous
Select the method 1er adjusting the 3D depth.
Auto: The depth is adjusted automatically.
Manual: You can manually adjust the depth using
the function "Depth Change".
• This function is only available when the input signal is
3D.
• This function may not be displayed depending on the
type of 3D signal.
Adjusts the depth manually. "0" is the level where no
adjuslment is made.
screen will be displayed.
To enable this [unction, set "IV Location" to "Store".
On: Switch on signals to the 3D glasses. When
watching 3D images, switch this setting to "On".
Off: Switch off signals to the 3D glasses. This will
stop the TV from influencing 3D glasses that may
be in that area of the store.
• This function is only available when "3D Depth Control"
is "Manual".
(_- 34
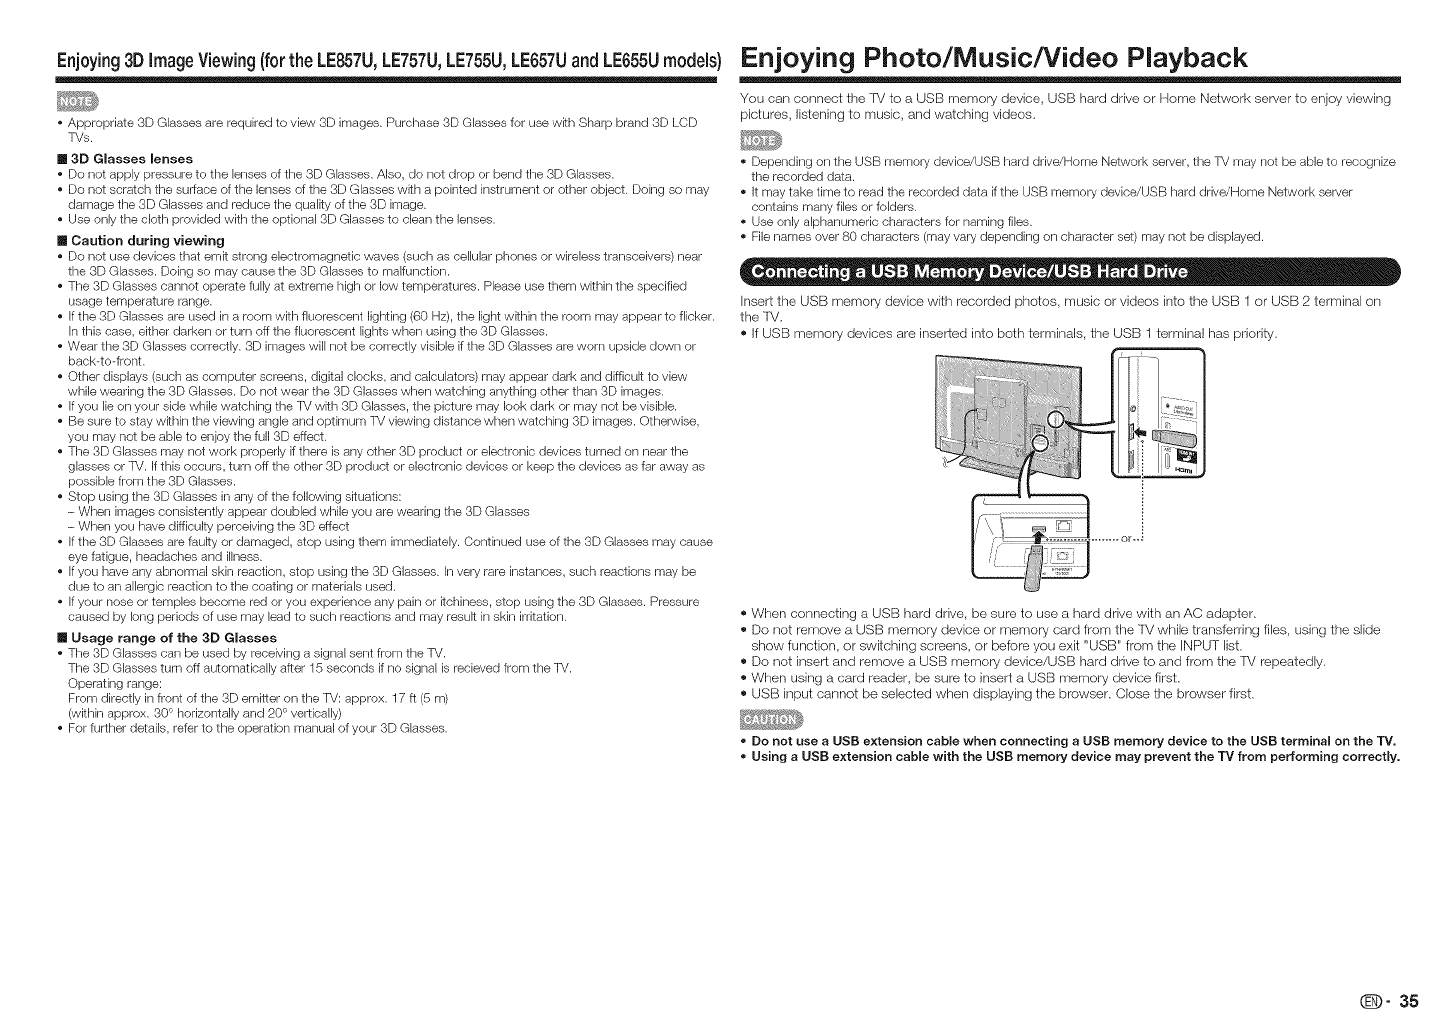
Enjoying3DimageViewing(forthe LE857U,LE757U,LE755U,LE657UandLE655Um0dels}
• Appropriate 3D Glasses are required to view 3D images. Purchase 3D Glasses for use wkh Sharp brand 3D LCD
TVs.
m 3D Glasses lenses
• Do not apply pressure to the lenses of the 3D Glasses. Also, do not drop or bend the 3D Glasses.
• Do not scratch the surface of the lenses of the 3D Glasses with a pointed instrument or other object. Doing so may
damage the 3D Glasses and reduce the qualky of the 3D image.
• Use only the cloth provided with the optional 3D Glasses to clean the lenses.
[] Caution during viewing
• Do not use devices that emk strong electromagnetic waves (such as cellular phones or wireless transceivers) near
the 3D Glasses. Doing so may cause the 3D Glasses to malfunction.
• The 3D Glasses cannot operate fully at extreme high or low temperatures. Please use them wkhin the specified
usage temperature range.
• if the 3D Glasses are used in a room with fluorescent lighting (60 Hz), the light wkhin the room may appear to flicker.
in this case, either darken or turn off the fluorescent lights when using the 3D Glasses.
• Wear the 3D Glasses correctly. 3D images will not be correctly visible if the 3D Glasses are worn upside down or
back-to-front.
• Other displays (such as computer screens, digital clocks, and calculators) may appear dark and difficuk to view
while wearing the 3D Glasses. Do not wear the 3D Glasses when watching anything other than 3D images.
• if you lie on your side while watching the TV wkh 3D Glasses, the picture may look dark or may not be visible.
• Be sure to stay wkhin the viewing angle and optimum TV viewing distance when watching 3D images. Otherwise,
you may not be able to enjoy the full 3D effect.
• The 3D Glasses may not work properly if there is any other 3D product or electronic devices turned on near the
glasses or TV. If this occurs, turn off the other 3D product or electronic devices or keep the devices as far away as
possible from the 3D Glasses.
• Stop using the 3D Glasses in any of the following situations:
- When images consistently appear doubled while you are wearing the 3D Glasses
- When you have difficulty perceiving the 3D effect
• if the 3D Glasses are fauky or damaged, stop using them immediately. Continued use of the 3D Glasses may cause
eye fatigue, headaches and illness.
• if you have any abnormal skin reaction, stop using the 3D Glasses. In very rare instances, such reactions may be
due to an allergic reaction to the coating or materials used.
• if your nose or temples become red or you experience any pain or kchiness, stop using the 3D Glasses. Pressure
caused by long periods of use may lead to such reactions and may resuk in skin irritation.
[] Usage range of the 3D Glasses
• The 3D Glasses carl be used by receiving a signal sent from the TV.
The 3D Glasses turn off automatically after 15 seconds if no signal is recieved from the TV.
Operating range:
From directly in front of the 3D emitter on the TV: approx. 17 ff (5 m)
(within approx. 300 horizontally and 20 ° vertically)
• For further details, refer to the operation manual of your 3D Glasses.
Enjoying Photo/Music/Video Playback
You carl connect the IV to a USB memory device, USE-} hard dnve or Home Network server to enjoy viewing
pictures, listening to music, and watching videos,
• Depending on the USB memory device/USB hard drive/Home Network server, the TV may not be able to recognize
the recorded data.
• It may take time to read the recorded data if the USB memory device/USB hard drive/Home Network server
contains many flies or folders.
• Use only alphanumeric characters for naming flies.
• File names over 80 characters (may vary depending on character set) may not be displayed.
Insert the USB memory device with recorded photos, music or videos into the USB I or USB 2 terminal ors
the lV,
® If USB memory devices are inserted into both terminals, the USB terminal has priority,
®When connecting a USB hard drive, be sure to use a hard drive with an AC adapter,
® Do not remove a USB memory device or mernory card from the lV while transferring files, using the slide
show function, or switching screens, or before you exit "USB" Irom the INPUT list,
® Do not insed and remove a USB memory device/USB hard drive to and from the IV repeatedly.
®When using a card reader, be sure to insert a USB memory device first,
® USB input cannot be selected when displaying the browser. Close the browser first.
• Do not use a USB extension cable when connecting a USB memory device to the USB terminal on the "IV.
• Using a USB extension cable with the USB memory device may prevent the TV from performing correctly,
(D" 35
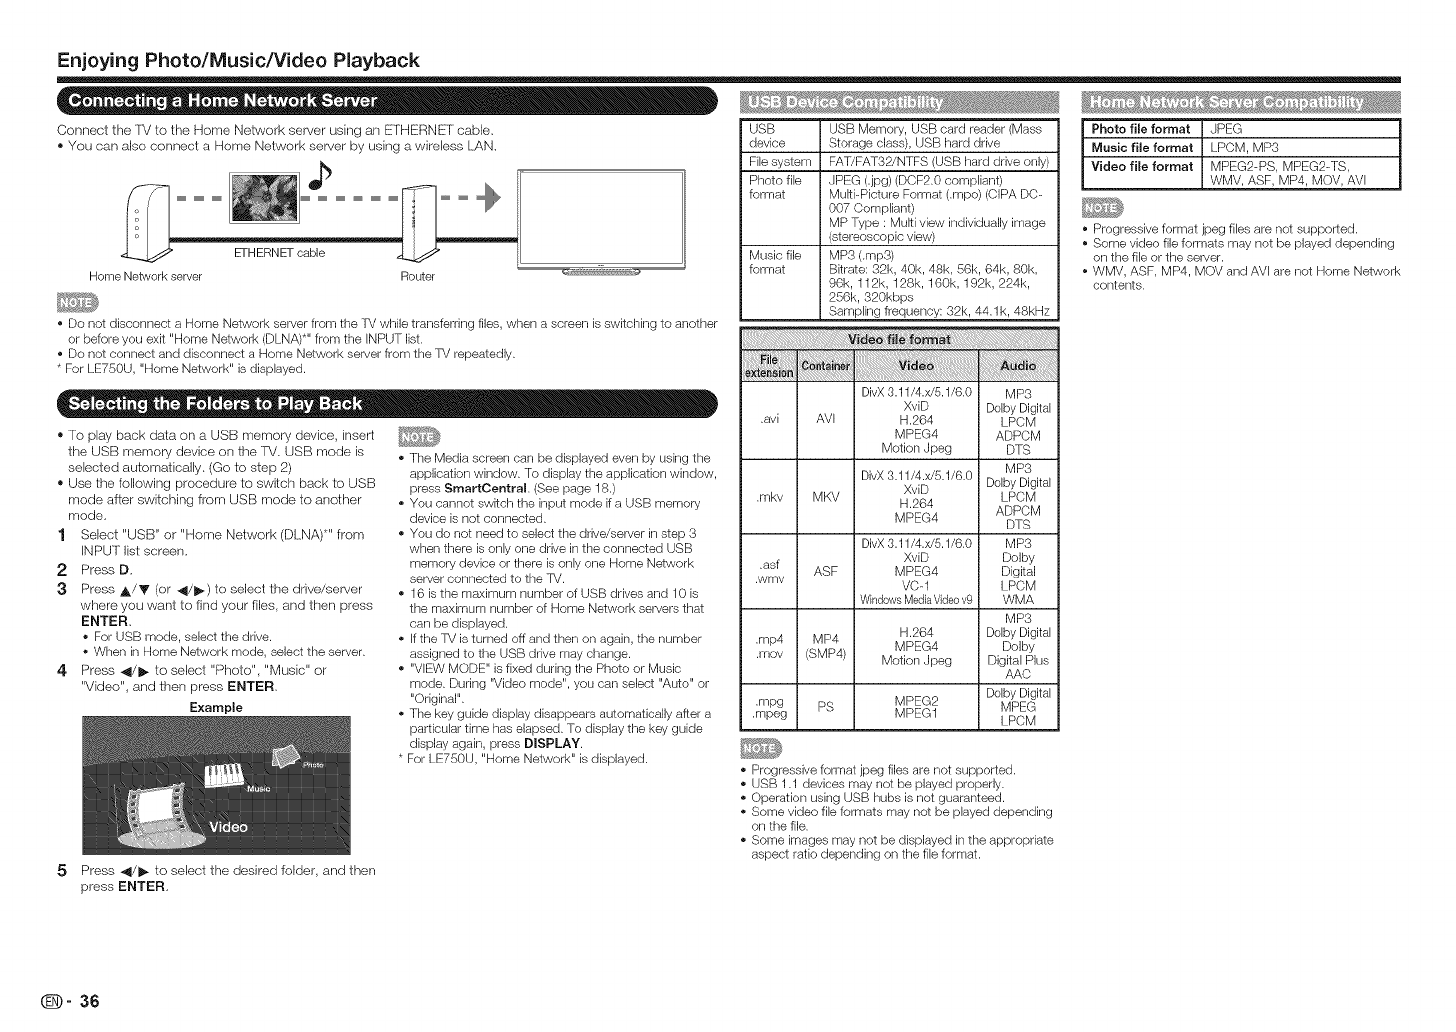
Enjoying Photo/Music/Video Playback
Connect the lM to tile Home Network server using an E!THERNET cable. USB USB Memory, USB card reader (Mass Photo file format JPEG
® You can also connect a Home Network server by using a wireless [..AN. device Storage class), USB hard drive Music file format LPOM, MP3
G_ File system FAT/FAT32/NTFS (USB hard drive only) Video file format MPEG2-PS, MPEG2-TS,
Photo file JPEG (.jpg) (DOF2.0 compliant) WMV, ASF, MP4, MOV, AVI
format Muki-Picture Format (.mpo) (OIPA D0-
007 Compliant)
MP Type : Muki view individually image • Progressive format jpeg files are not supported,
(stereoscopic view) • Some video file formats may not be played depending
ETHERNET cable Music file MP3 (.rapS) on the file or the server,
Home Network server Router -- -- format Bitrate: 32k, 40k, 48k, 56k, 64k, 80k, • WMV, ASF, MP4, MOV and AVI are not Home Network
96k, 112k, 128k, 160k, 192k, 224k, contents.
256k, 320kbps
Sampling frequency: 32k, 44.1k, 48kHz
• Do not disconnect a Home Network server from the TV while transferring files, when a screen is switching to another __
or before you exit "Home Network (DLNA)*" from the INPUT list.
• Do not connect and disconnect a Home Network server from the TV repeatedly.
• For LE750U, "Home Network" is displayed.
® To play back dala on a USB memory device, inser_
the USB memory device on the iV. USB mode is
selected automatically. (Go to step 2)
® Use the Iollowing procedure to switch back to USB
mode after switching from USB mode to another
mede.
1 Select "USB" or "Home Network (DLNA)*" from
INPUT list screen.
2 Press D.
3 Press A/Y (or _1/1_) to select the drivdserver
where you want to find your files, and then press
ENTER.
• For USB mode, select the drive.
• When in Home Network mode, select the server.
4 Press _1/1_ to select "Photo", "Music" or
"Video", and then press ENTER,
Example
DivX 3.11/4.x/5.1/6.0 MP3
XviD Dolby Digital
.avi AVI H.264 LPOM
MPEG4 ADPCM
Motion Jpeg DTS
• The Media screen can be displayed even by using the MP3
application window. To display the application window, DivX 3.11/4.x/5.1/6.0
press SmartCentral. (See page 18.) .mkv MKV XviD DolbYLPoMDigital
• You cannot swRch the input mode if a USB memory H.264
device is not connected. MPEG4 ADPOM
• You do not need to select the drive/server in step 3 DTS
when there is only one drive in the connected USB DivX 3.11/4.x/5.1/6.0 MP3
XviD Dolby
memory device or there is only one Home Network .asf ASF MPEG4 Digital
server connected to the TV. .wmv VO4 LPOM
• 16 is the maximum number of USB drives and 10 is Windows MediaVideo v9 WMA
the maximum number of Home Network servers that
can be displayed. MP3
• If the TV is turned off and then on again, the number .rap4 MP4 H.264 Dolby Digital
MPEG4 Dolby
assigned to the USB drive may change. .mov (SMP4) Motion Jpeg Digital Plus
• "VIEW MODE" is fixed during the Photo or Music AAO
mode. During "Video mode", you can select "Auto" or Dolby Digital
"Original". .mpg PS MPEG2 MPEG
• The key guide display disappears automatically after a .mpeg MPEG1 LPOM
particular time has elapsed. To display the key guide
display again, press DISPLAY.
• For LE750U, "Home Network" is displayed.
5 Press _1/1_ to select the desired folder, and then
press ENTER,
• Progressive format jpeg files are not supported.
• USB 1.1 devices may not be played properly.
• Operation using USB hubs is not guaranteed.
• Some video file formats may not be played depending
on the file.
• Some images may not be displayed in the appropriate
aspect ratio depending on the file format.
(D" 36
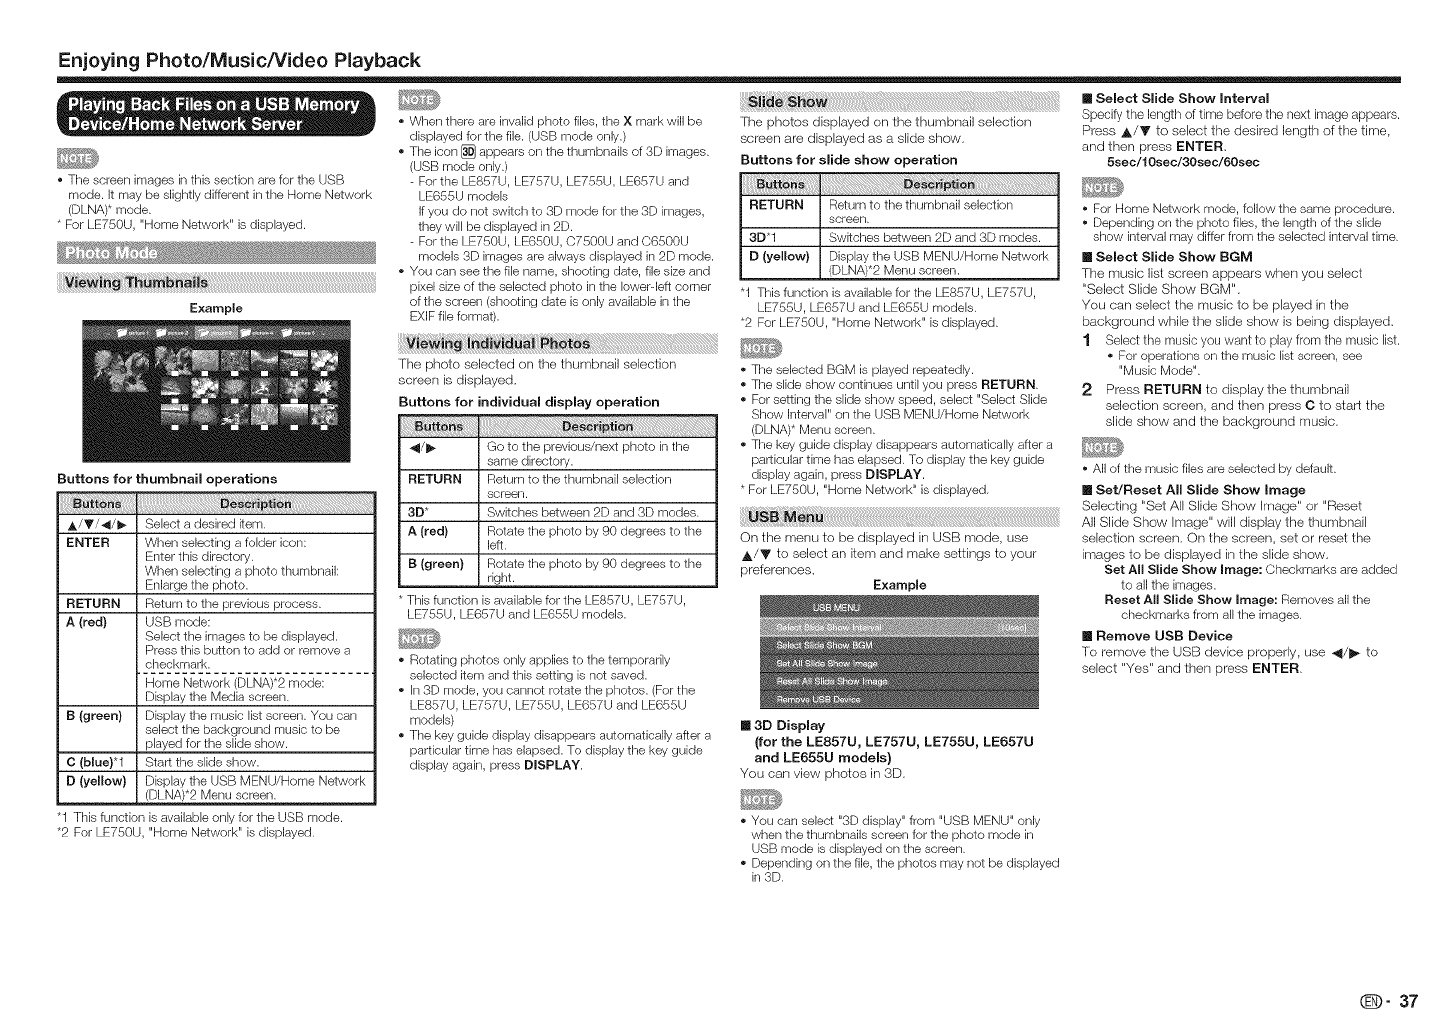
Enjoying Photo/Music/Video Playback
• The screen images in this section are for the USB
mode. it may be slightly different in the Home Network
(DLNA)* mode.
• For LE750U, "Home Network" is displayed.
Example
Buttons for thumbnail operations
A/T/4/_ Select a desired item.
ENTER When selecting a folder icon:
Enter this directory.
When selecting a photo thumbnail:
Enlarge the photo.
RETURN Return to the previous process.
A(red} USB mode:
Select the images to be displayed.
Press this button to add or remove a
checkmark.
Home Network (DLNA)*2 mode:
Display the Media screen.
B (green} Display the music list screen. You can
select the background music to be
played for the slide show.
C (blue}*1 Start the slide show.
D (yellow} Display the USB MENU/Home Network
(DLNA)*2 Menu screen.
"1 This function is available only for the USB mode.
*2 For LE750U, "Home Network" is displayed.
• When there are invalid photo flies, the X mark will be
displayed for the file. (USB mode only.)
• The icon [_ appears on the thumbnails of 3D images.
(USB mode only.)
For the LE857U, LE757U, LE755U, LE657U and
LE655U models
If you de not switch to 3D mode for the 3D images,
they will be displayed in 2D.
For the LE750U, LE650U, 07500U and 06500U
models 3D images are always displayed in 2D mode.
You can see the file name, shooting date, file size and
pixel size of the selected photo in the bwerqeft corner
of the screen (shooting date is only available in the
EXIF file format).
The photo selected on the thumbnail selection
screen is displayed.
Buttons for individual display operation
ipti
_/1_ Go to the previous/next photo in the
same directory.
RETURN Return to the thumbnail selection
screen.
3D* Switches between 2D and 3D modes.
A (red) Rotate the photo by 90 degrees to the
left.
B (green} Rotate the photo by 90 degrees to the
right.
• This function is available for the LE857U, LE757U,
LE755U, LE657U and LE655U models.
• Rotating photos only applies to the temporarily
selected item and this setting is net saved.
• In 3D mode, you cannot rotate the photos. (For the
LE857U, LE757U, LE755U, LE657U and LE655U
models)
• The key guide display disappears automatically after a
particular time has elapsed. To display the key guide
display again, press DISPLAY.
i¸_!_!_!_!_i:ia_!_!_:_!_!_!_!_!_!_!_!_!_!_!_!_!_!_!_!_!_!_!_!_!_!_!_!_!_!!_!!_!i_!i_!i_!i_!i_!i_!i_i_i_iii!!_i_i_i_i_i_i_i_i_i_i_i_i_!_!!i_i_i_i_i_i_i_i_i_i_i_i_i_i_i_i_i_i_i_i_i_i_i_i_i_i_i_i_i_i_i_i_i_i_i_i!i_!_i_!_i!_!_!!_i_i_i_i_i_i_i_i_i_i_i_i_i_i_i_i_i_i_!_i_iiiiiiiiiiiiii_i_!_i_¸i_!_i_i!!iiiiiiiiiiiiiiiiiiiiiiiiiiiii_il
The photos displayed on the thumbnail selection
screen are displayed as a slide show.
Buttons for slide show operation
RETURN Return to the thumbnail selection
screen.
3D'1 Swkches between 2D and 3D modes.
D (yellow) Display the USB MENU/Home Network
(DLNA)*2 Menu screen.
"1 This function is available for the LE857U, LE757U,
LE755U, LE657U and LE655U models.
*2 For LE750U, "Home Network" is displayed.
• The selected BGM is played repeatedly.
• The slide show continues until you press RETURN.
• For setting the slide show speed, select "Select Slide
Show interval" on the USB MENU/Home Network
(DLNA)* Menu screen.
• The key guide display disappears automatically after a
particular time has elapsed. To display the key guide
display again, press DISPLAY.
• For LE750U, "Home Network" is displayed.
On the menu to be displayed in USB mode, use
,i_/V to select an item and make settings to your
preferences.
Example
m Select Slide Show Interval
Specify the lengttq of time before ttqe next image appears.
Press _/_ to select the desired length of the time,
and then press ENTER,
5sec/t Osec/30sec/60sec
• For Home Network mode, follow the same procedure.
• Depending on the photo files, the len91h of the slide
show interval may differ from the selected interval time.
n Select Slide Show BGM
The music list screen appears when you select
"Select Slide Show BGM",
You can select the music to be played in the
background while the slide show is being displayed,
1 Select the music you want to play from the music list.
• For operations on the music list screen, see
"Music Mode".
2 Press RETURN to display the thumbnail
selection screen, and then press C to start the
slide show and the background music,
* All of the music files are selected by default.
[] Set/Reset All Slide Show Image
Selecting "Set All Slide Show image" or "Reset
All Slide Show image" will display the thumbnail
selection screen, On the screen, set or reset the
images to be displayed in the slide show,
Set All Slide Show Image: Checkmarks are added
to all the images.
Reset All Slide Show Image: Removes all the
checkmarks from all the images.
[] Remove USB Device
To remove the USB device properly, use _/_ to
select "Yes" and then press ENTER,
[] 3D Display
(for the LE857U, LE757U, LE755U, LE657U
and LE655U models)
You can view photos in 3D,
• You can select "3D display" from "USB MENU" only
when the thumbnails screen for the photo mode in
USB mode is displayed on the screen.
• Depending on the file, the photos may not be displayed
in 3D.
Q_)- 37
Enjoying Photo/Music/Video Playback
Example
Buttons for music mode
A/T/-_/I_ Select a desired item.
ENTER When selecting a folder icon:
Enter this directory.
When selecting a music file:
Play music.
RETURN Return to the previous process.
A(red} USB mode:
Select the music to be played back.
Press this button to add or remove a
checkmark.
Home Network (DLNA)*2 mode:
Display the Media screen.
El (green} Stop music.
C(blue} Play/Pause music.
DDisplay the USB MENU screen.
(yellow)*1
"1 This function is available only for the USB mode.
*2 For LE750U, "Home Network" is displayed.
When there are invalid music flies, the X mark will be
displayed for the file. (USB mode only.)
The displayed play time may differ slightly from the
actual play time depending on the files.
iiii!ii!_!_!_i_i_!_i_J_i_i_i!i_:!_i_i_i_i_!_!_!_!_!_!_!_!_!_!_!_!_!_!_!_!_!_!_!_!_!_!_!_!_!!!_i_z_!i_i_!i_i_ii_ii_ii_iiiiiiiiiii_i!_i!!_i_!_i_i_!_i_i_i_iiii!ii_i_i_iiiiiiii_iiii_i_i_i_i_i_i_i_i_i_i_i_i_i_i_i_i_i_i_i_i_i_ii_iiiiiiJiiiii_i_i_i_Ji_9_i_!!!!
On the menu to be displayed in USB mode, use
A/_' to select an item and make settings to your
preferences.
Example
_ _i_ !_ _ _ ......
* See page 37 for details on the Remove USB Device
function.
[] SeUReset All Auto Play
Selecting "Set All Auto Play" or "Reset All Auto Play"
will display the music list screen. On the screen, set or
reset the music to be played back in the slide show.
Set All Auto Play: Checkmarks are added to all the
music flies.
Reset All Auto Play: Removes all the checkmarks
from all the music files.
Example
Buttons for file selecting operations
A/T/_I/_ Select a desired Rein.
ENTER When selecting a folder icon:
Enter this directory.
When selecting a video file: Play the
video.
RETURN Return to the previous process.
A (red) USB mode:
Select/deselect kems (checkmarks are
added to the selected items).
Home Network (DLNA)*2 mode:
Display the Media screen.
D Display the USB MENU screen.
(yellow}*1
"1 This function is available only for the USB mode.
*2 For LE750U, "Home Network" is displayed.
The key guide display disappears automatically after a
particular time has elapsed. To display the key guide
display again, press DISPLAY.
Buttons for playing mode
Go to the beginning of a file by pressing
once or to the previous file by pressing
twice.
Y Go to the next file.
_- USB mode:
The fast forward speed changes every
time you press I_. After playing to the
end, the TV goes to the next file and
starts to play.
Home Network (DLNA)*3 mode:
Jump forward in a video. *4
_1 USB mode:
The reverse speed changes every time
you press _1. After going back to the
beginning, the TV starts to play the
same file.
Home Network (DLNA)*3 mode:
Jump back in a video. *4
ENTER USB mode:
Pause the video.
Home Network (DLNA)*3 mode:
Play/Pause the video. *4
RETURN Go back to the file selection screen.
3D'1 SwRches between 2D and 3D modes.
A (red)*2 Jump to the scene where playback
was last stopped.
B (green) Stop a video.
C (blue) Display the USB/Home Network
(DLNA)*3 operation panel.
Display the USB MENU screen.
D
(yellow}*2
0-9*2 Jump to a point in the video during
playback of a file without chapters.
You can jump to a later point by
pressing a higher number.*5
"1 This function is available for the LE857U, LE757U,
LE755U, LE657U and LE655U models.
*2 These functions are available only for the USB mode.
*3 For LE750U, "Home Network" is displayed.
*4 Jump forward/back and play/pause may not be
available depending on the files.
*5 During playback of a file without chapters, playback
points are set automatically. Playback points are set
at intervals of a one-tenth of playback time.
Example for a file with a playback time of 100 minutes:
Pressing t jumps 10 minutes forward, and pressing 2
jumps 20 minutes forward. Pressing 0 returns to the start
of the file being played back.
ili_i!iiiil;!0_B¸!I¸!I¸_:_!_!_!_!_!_!_!_!_!_!_!_!_!_!_!_!_!!;!:i_ii_!i_!i_!i_!i_!i_!i_!i_!i_!i_!i_!i_!i_!i_!i_!i_!i_!i_!i_!i_!i_!i_!i_!i_!i_!i_!i_!i_!i_!i_!_!!_i_i_ii_i_i_ii_ii_ii_ii_ii_ii_ii_ii_ii_ii_ii_ii_ii_ii_ii_ii_ii_ii_ii_ii_ii_ii_ii_ii_ii_i_i_i_i!_!_!i_ii_iii_i_i_ii_ii_ii_ii_ii_ii_ii_i_¸iii!_iii_ii_ii_i!!_!_!_i_i!ii!!!_!_!!_!!_!_!_ii!!_i!_i!_i!_i!_i!_i!_i!_i!_i!_i!_i!_!i_!_i!_!!!i!_ii!i_ii_ii_ii_ii_ii_ii_ii_ii_ii_ii_ii_i_i_;_¸i,!ii
On the menu to be displayed in USB mode, use
A/V to select an item and make settings to your
preferences.
Menu for file selecting operations
Example
* See page 37 for details on the Remove USB Device
function.
[] Set/Reset All Auto Play
Selecting "Set All Auto Play" or "Reset All Auto Play"
will display the video list screen. On the screen, set
or reset the video to be played back in the slide
show.
Set All Auto Play: Oheckmarks are added to all the
video files.
Reset All Auto Play: Removes all the checkmarks
from all the video flies.
Menu for playing mode
Example
* See page 37 for details on the Remove USB Device
function.
[] Title (Edition}/Chapter
Selecting "Title (Edition)" or "Chapter" will display
a list of titles/chapters contained in the video file.
Select the title or chapter you want to play back,
®The selected title or chapter is played back,
®"0-9" is displayed for files without chapters,
Playback jumps to the playback point of the
selected number.
If there is EdRion information, this screen is displayed
when the title is selected.
If there is no title or edRion, you cannot select "TRle
(Edition)".
"Chapter" cannot be selected when there is no
chapter.
[] Show Video Information
The information of the current file is displayed.
(D" 38
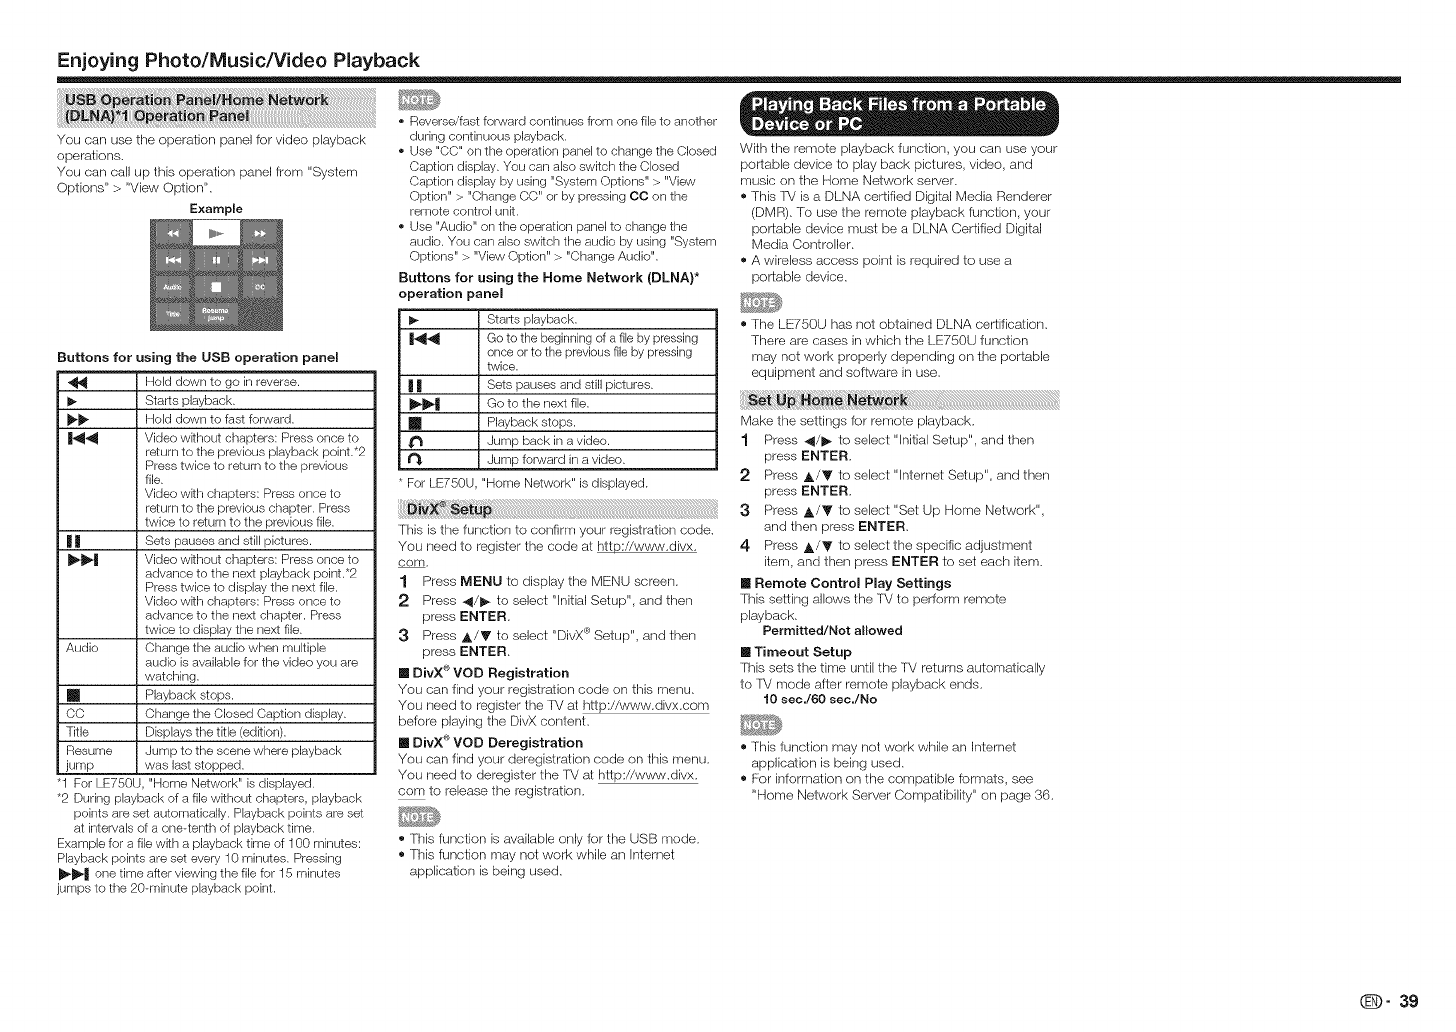
Enjoying Photo/Music/Video Playback
You can use the operation panel for video playback
operations.
You can call up this operation panel from "System
Options" > "View Option".
Example
Buttons for using the USB operation panel
Hold down to go in reverse.
I_ Starts playback.
_ Hold down to fast forward.
|_ Video wkhout chapters: Press once to
return to the previous playback point.*2
Press twice to return to the previous
file.
Video wkh chapters: Press once to
return to the previous chapter. Press
twice to return to the previous file.
| | Sets pauses and still pictures.
_-| Video wRhout chapters: Press once to
advance to the next playback point.*2
Press twice to display the next file.
Video wkh chapters: Press once to
advance to the next chapter. Press
twice to display the next file.
Audio Change the audio when multiple
audio is available for the video you are
watching.
[] Playback stops.
CO Change the Closed Caption display.
Title Displays the tkle (edkion).
Resume Jump to the scene where playback
jump was last stopped.
"1 For LE750U, "Home Network" is displayed.
*2 During playback of a file wkhout chapters, playback
points are set automatically. Playback points are set
at intervals of a one-tenth of playback time.
Example for a file with a playback time of 100 minutes:
Playback points are set every 10 minutes. Pressing
i1_11)t one time after viewing the file for 15 minutes
jumps to the 20-minute playback point.
*Reverse/fast forward continues from one file to another
during continuous playback.
Use "CC" on the operation panel to change the Closed
Caption display. You can also switch the Closed
Caption display by using "System Options" > "View
Option" > "Change CO" or by pressing CO on the
remote control unk.
Use "Audio" on the operation panel to change the
audio. You can also switch the audio by using "System
Options" > "View Option" > "Change Audio".
Buttons for using the Home Network (DLNA)*
operation panel
I_ Starts playback.
|_ Go to the beginning of a file by pressing
once or to the previous file by pressing
twice.
| | Sets pauses and still pictures.
_1_| Go to tile next file.
Playback stops.
_r_ Jump back in a video.
t_ Jump forward in a video. 2
* For LE750U, "Home Network" is displayed,
_i,,x _ _ 3
[his is the function to confirm your registration code.
You need to register the code at http://www,divx,
corn,
1 Press MENU to display the MENU screen,
2 Press 41/1_ to select "Initial Setup", and then
press ENTER,
3 Press ,t,/V to select "DivX ® Setup", and then
press ENTER.
[] DivX ® VOD Registration
You can find your registralion cede on this menu,
You need to register the IV al http://www.divx,com
befere playing the DivX content.
[] DivX ® VOD Deregistration
You can find your deregistration code on this menu,
You need to deregister the TM at http://www.divx,
corn to release the registration,
®This function is available only for the USB mode.
®This function may not work while an Internet
application is being used.
With the remote playback function, you can use your
portable device to play back pictures, video, and
music on the Home Network server.
®This TV is a DLNA certified Digital Media Renderer
(DMR). To use the remote playback function, your
portable device must be a DLNA Certified Digital
Media Controller.
®A wireless access point is required to use a
portable device.
®The LE750U has not obtained DLNA certification.
There are cases in which the LE750U function
may not work properly depending on the portable
equipment and software in use.
Make the settings for remote playback.
1 Press 41/1_ to select "Initial Setup", and then
press ENTER,
Press A/Y to select "lntemet Setup", and then
press ENTER,
Press A/Y to select "Set Up Home Network",
and then press ENTER.
4 Press A/Y to select the specific adjustment
item, and then press ENTER to set each item.
[] Remote Control Play Settings
]"hissetting allows the IV to perform remote
playback.
Permitted/Not allowed
[] Tim®out Setup
This sets the time until the IV returns automatically
to FV mode after remote playback ends.
10 sec./60 see./No
®This function may not work while an Intemet
application is being used.
®For information on the compatible formats, see
"Home Network Server Compatibility" on page 36.
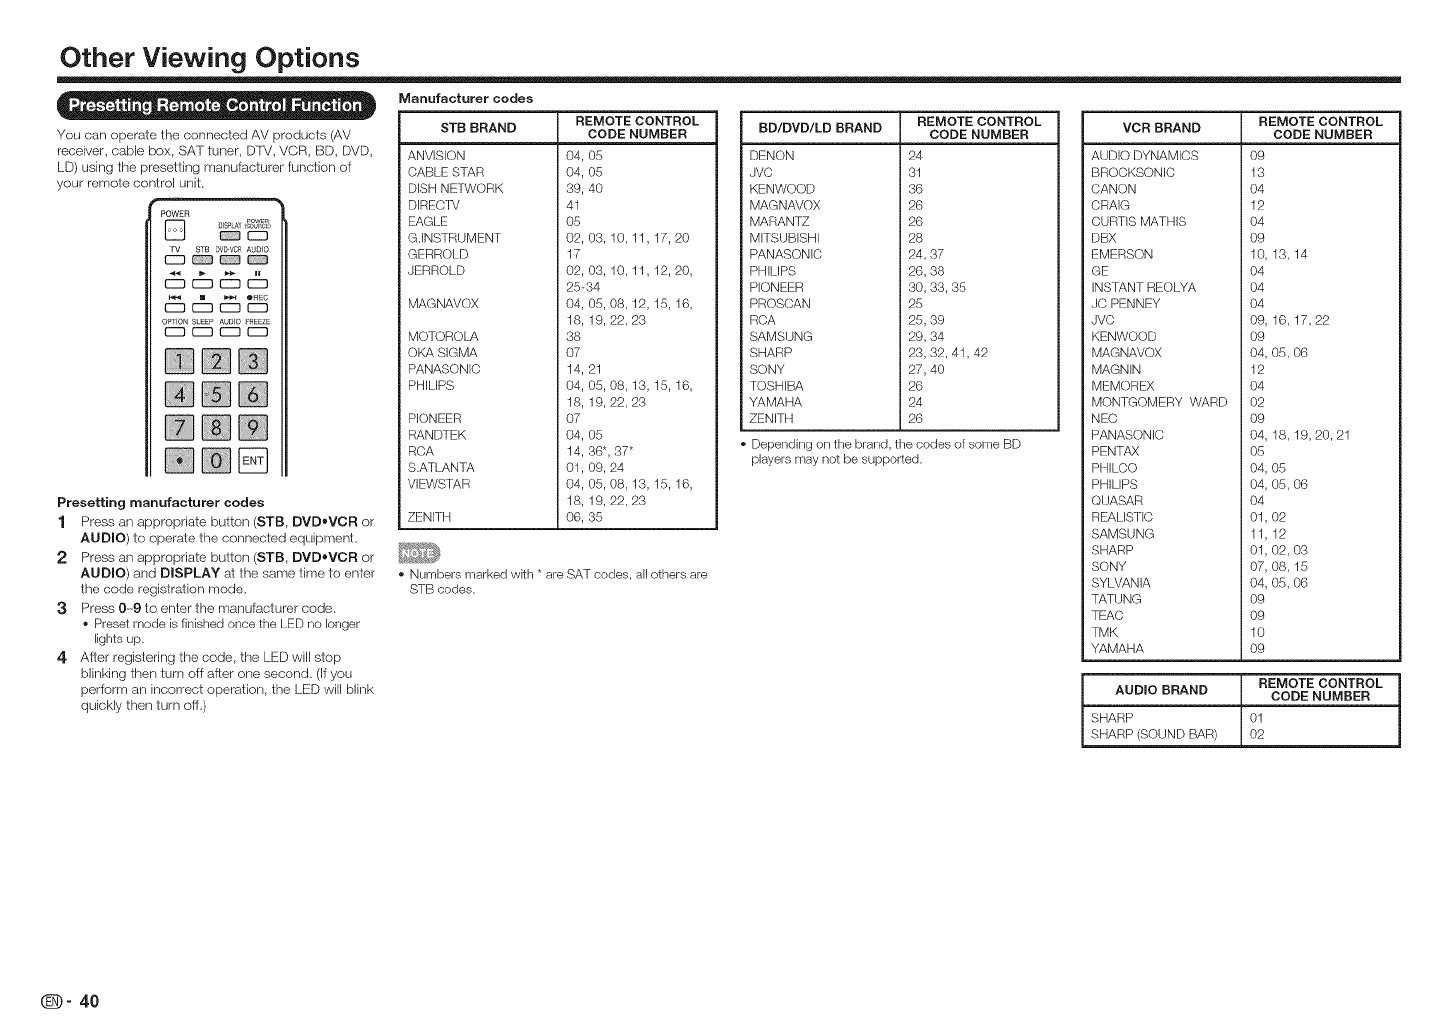
Other Viewing Options
==-- Q _ e=eo - o
You can operate the connected AV products (AV
receiver, cable box, SAT tuner, DTV, VCR, BD, DVD,
LD) using the presetting manufacturer function of
your remote control unit.
POWER
] DISPLAY<PolypS)
_E:3
STB DVD.VCS AUDIO
c_ c_ c_
_F-n _ r---n
OPTION SLEEP AUDIO FREEZE
E::2 r--q E::2 r--1
@@@
@N@
@N@
Presetting manufacturer codes
1 Press an appropriate button (STB, DVD®VCR or
AUDIO) to operate the connected equipment,
2 Press an appropriate button (STB, DVDoVCR or
AUDIO) and DISPLAY a! the same time to enter
the code registration mode.
3Press 0-9 to enter the manufacturer code.
• Preset mode is finished once the LED no longer
lights up.
4 After registering the code, the LED will stop
blinking then turn off after one second, (If you
perform an incorrect operation, the LED will blink
quickly then turn off,)
VCR BRAND
Manufacturer codes
REMOTE CONTROL
STB BRAND CODE NUMBER
ANVISION
CABLE STAR
DISH NETWORK
DIRECTV
EAGLE
G.INSTRUMENT
GERROLD
JERROLD
MAGNAVOX
MOTOROLA
OKA SIGMA
PANASONIC
PHILIPS
PIONEER
RANDTEK
RCA
S.ATLANTA
VIEWSTAR
ZENITH
04, 05
04, 05
39, 40
41
05
02, 03, 10, 11,17, 20
17
02, 03, 10, 11,12, 20,
25-34
04, 05, 08, 12, 15, 16,
18, 19, 22, 23
38
O7
14, 21
04, 05, 08, 13, 15, 16,
18, 19, 22, 23
07
04, 05
14, 36*, 37*
01, 09, 24
04, 05, 08, 13, 15, 16,
18, 19, 22, 23
06, 35
• Numbers marked wkh * are SAT codes, all others are
STB codes.
BD/DVD/LD BRAND
DENON
JVO
KENWOOD
MAGNAVOX 26
MARANTZ 26
MITSUBISHI 28
PANASONIC 24,
PHILIPS 26,
REMOTE CONTROL
CODE NUMBER
24
31
36
37
38
PIONEER
PROSCAN
RCA
SAMSUNG
SHARP
SONY
TOSHIBA
YAMAHA
ZENITH
30,33,35
25
25,39
29,34
23,32,41,42
27,40
26
24
26
Depending on the brand, the codes of some BD
players may not be supported.
AUDIO DYNAMICS
BROCKSONIC
CANON
CRAIG
CURTIS MATHIS
DBX
EMERSON
GE
INSTANT REOLYA
JC PENNEY
JVC
KENWOOD
MAGNAVOX
MAGNIN
MEMOREX
MONTGOMERY WARD
NEC
PANASONIC
PENTAX
PHILCO
PHILIPS
QUASAR
REALISTIC
SAMSUNG
SHARP
SONY
SYLVANIA
TATUNG
TEAC
TMK
YAMAHA
REMOTE CONTROL
CODE NUMBER
O9
13
O4
12
O4
O9
10,13,14
O4
O4
O4
09,16,17,22
09
04,05,06
12
O4
O2
O9
04,18,19,20,21
05
04,05
04,05,06
04
01,02
11,12
01,02,03
07,08,15
04,05,06
O9
O9
10
O9
REMOTE CONTROL
AUDIO BRAND CODE NUMBER
SHARP 01
SHARP (SOUND BAR) 02
Q- 40
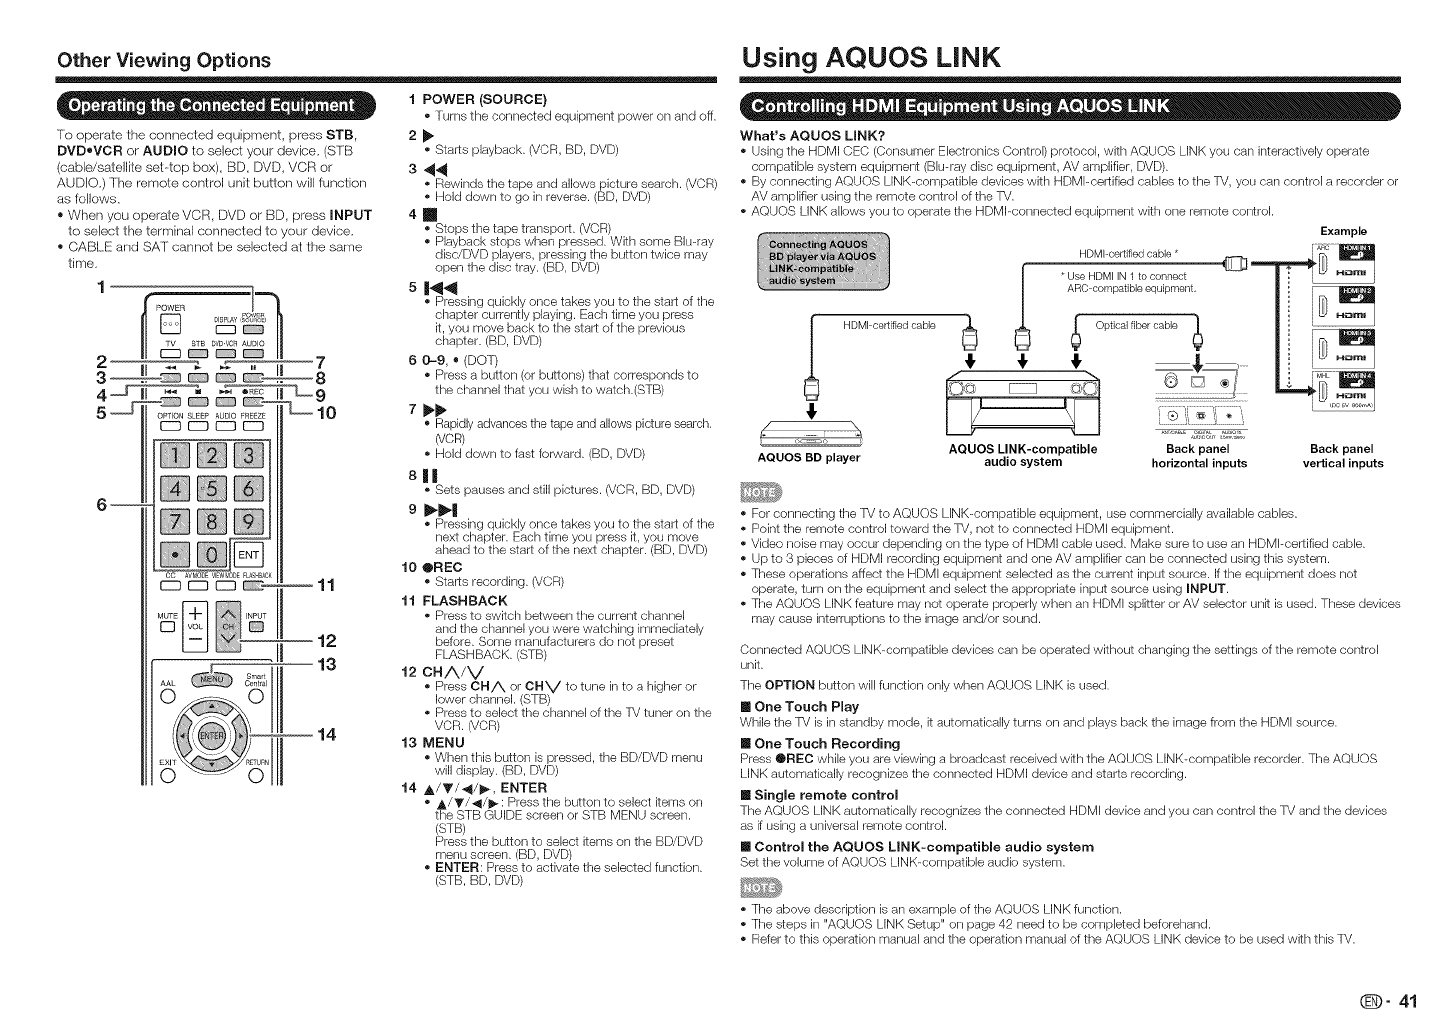
Other Viewing Options
@o= _ • = o - =e o o = 1
2
To operate the connected equipment, press STB,
DVDoVCR or AUDIO to select your device. (STB
(cable/satellite set top box), BD, DVD, VCR or
AUDIO,) The remote control unit button will function
as follows,
®When you operate VCR, DVD or BD, press INPUT
to select the terminal connected to your device.
® CABLE and SAT cannot be selected at the same
time,
@@@
@@@
@@@
POWER (SOURCE)
• Turns tile connected equipment power on and off.
• Starts playback. (VCR, BD, DVD)
3_4
• Rewinds the tape and allows picture search. (VCR)
, Hold down to go in reverse. (BD, DVD)
4m
• Stops the tape transport. (VCR)
• Playback stops when pressed. With some Blu-ray
disc/DVD players, pressing the button twice may
open the disc tray. (BD, DVD)
• Pressing quickly once takes you to the start of the
chapter currently playing. Each time you press
it, you move back to the start of the previous
chapter. (BD, DVD)
6 0-9, • (DOT)
• Press a button (or buttons) that corresponds to
the channel that you wish to watch.(STB)
7_1_
• Rapidly advances the tape and allows picture search.
(VOR)
, Hold down to fast forward. (BD, DVD)
s||• Sets pauses and still pictures. (VCR, BD, DVD)
• Pressing quickly once takes you to the start of the
next chapter. Each time you press it, you move
ahead to the start of the next chapter. (BD, DVD)
10 OREC
°Starts recording. (VCR)
11 FLASHBACK
• Press to switch between the current channel
and the channel you were watching immediately
before. Some manufacturers do not preset
FLASHBACK. (STB)
12 CHA/V
• Press CHA or CH v to tune in to a higher or
lower channel. (STB)
• Press to select the channel of the TV tuner on the
VOR. (VOR)
13 MENU
• When this button is pressed, the BD/DVD menu
will display. (BD, DVD)
14 A/_'/4/_, ENTER
• A/V/41/I_: Press the button to select kems on
the STB GUIDE screen or STB MENU screen.
(STB)
Press the button to select items on the BD/DVD
menu screen. (BD, DVD)
•ENTER: Press to activate the selected function.
(STB, BD, DVD)
Using AQUOS LINK
What's AQUOS LINK?
• Using the HDMI CEC (Consumer Electronics Control) protocol, with AQUOS LiNK you can interactively operate
compatible system equipment (Blu-ray disc equipment, AV amplifier, DVD).
• By connecting AQUOS LINK-compatible devices with HDMI-certified cables to the TV, you can control a recorder or
AV amplifier using the remote control of the TV.
• AQUOS LiNK allows you to operate the HDMI-connected equipment wRh one remote control.
Example
* Us_cEtnt.HDMI-certifiedcable * ,__ARC
_, -, _.j_ __
Back panel Back panel
horizontal inputs vertical inputs
AQUOS LINK-compatible
AQUOS BD player audio system
• For connecting the TV to AQUOS LINK-compatible equipment, use commercially available cables.
• Point the remote control toward the TV, not to connected HDMI equipment.
• Video noise may occur depending on the type of HDMI cable used. Make sure to use an HDMI-certified cable.
• Up to 3 pieces of HDMI recording equipment and one AV amplifier can be connected using this system.
• These operations affect the HDMI equipment selected as the current input source. If the equipment does not
operate, turn on the equipment and select the appropriate input source using INPUT.
• The AQUOS LiNK feature may not operate properly when an HDMI splitter or AV selector unR is used. These devices
may cause interruptions to the image and/or sound.
Connected AQUOS LINK-compatible devices can be operated without changing the settings of the remote control
unit.
The OPTION button will function only when AQUOS LiNK is used.
[] One Touch Play
While the TV is in standby mode, it automatically turns on and plays back the image from the HDMI source.
[] One Touch Recording
Press OREC while you are viewklg a broadcast received with the AQUOS LINK-compatible recorder. The AQUOS
LiNK automatically recognizes the connected HDMI device and starts recording.
[] Single remote control
The AQUOS LiNK automatically recognizes the connected HDMI device and you can control the TV and the devices
as if using a universal remote control.
[] Control the AQUOS LINK-compatible audio system
Set the volume of AQUOS LiNK-compatible audio system.
• The above description is an example of the AQUOS LiNK function.
• The steps in "AQUOS LiNK Setup" on page 42 need to be completed beforehand.
• Refer to this operation manual and the operation manual of the AQUOS LiNK device to be used with this TV.
diD" 41
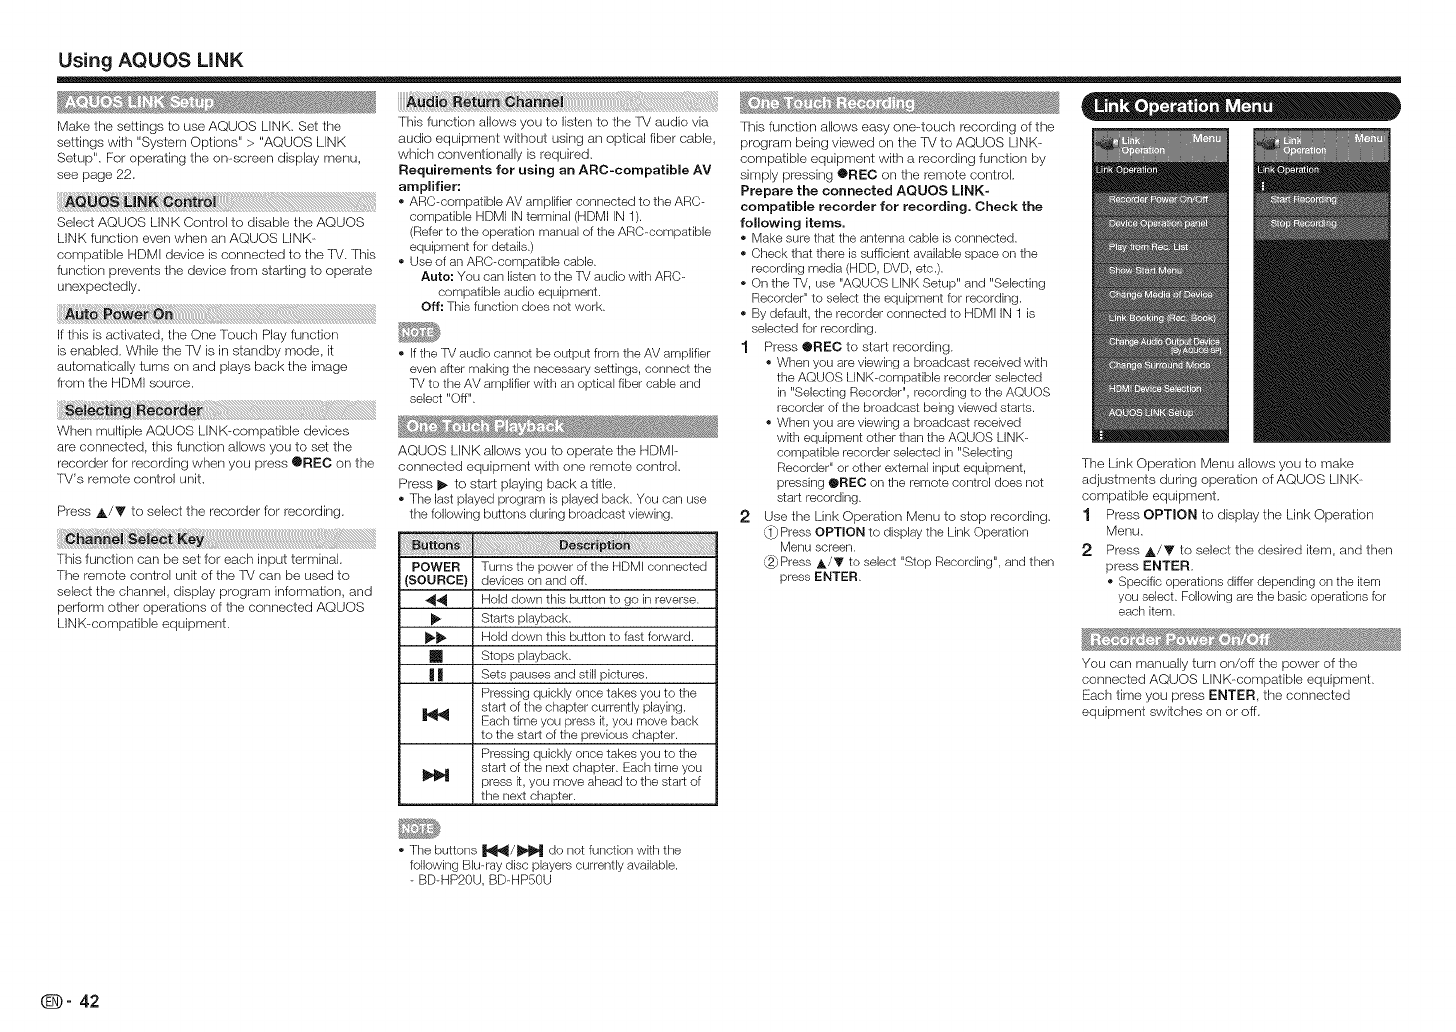
Using AQUOS LiNK
Make the settings to use AQUOS LINK. Set the
settings with "System Options" > "AQUOS LINK
Setup". For operating the on-screen display menu,
see page 22.
Select AQUOS LINK Control to disable tile AQUOS
LINK function even when an AQUOS LINK-
compaiible HDMI device is connected to the /W. This
function prevents the device from starting to operate
unexpectedly.
If this is activaied, the One Touch Play function
is enabled. While the R/is in standby mode, it
automatically turns on and plays back the image
from the HDMI source.
When multiple AQUOS LINK--compatible devices
are connected, this function allows you to set the
recorder for recording when you press ®REC on the
TV's remote control unit.
Press A/V to select the recorder for recording.
This function can be set for each input terminal.
The remote control unit of the TV carl be used to
select the channel, display program information, and
perform other operations of the connected AQUOS
LINK-compatible equipment.
.....
This function allows you to listen to the TV audio via
audio equipment without using an optical fiber cable,
which conventionally is required.
Requirements for using an ARC-compatible AV
amplifier:
• ARC-compatible AV amplifier connected to the ARC-
compatible HDMI IN terminal (HDMI IN 1).
(Referto the operation manual of the ARC-compatible
equipment for details.)
• Use of an ARC-compatible cable.
Auto: You can listen to the TV audio wkh ARC-
compatible audio equipment.
Off: This function does not work.
* If the TV audio cannot be output from the AV amplifier
even after making the necessary settings, connect the
TV to the AV amplifier wRh an optical fiber cable and
select "Off".
_ ' #
AQUOS LINK allows you to operate the HDMI-
connected equipment with one remote control.
Press I_ to start playing back a title.
• The last played program is played back. You can use
the following buttons during broadcast viewing.
POWER Turns the power of the HDMI connected
(SOURCE} devices on and off.
_j_ Hold down this button to go in reverse.
Starts playback.
_._ Hold down this button to fast forward.
Stops playback.
| | Sets pauses and still pictures.
Pressing quickly once takes you to the
start of the chapter currently playing.
Each time you press it, you move back
to the start of the previous chapter.
Pressing quickly once takes you to the
start of the next chapter. Each time you
press k, you move ahead to the start of
the next chapter.
This function allows easy one--touch recording of the
program being viewed ors the IM to AQUOS LINK-
compatible equipment with a recording function by
simply pressing @REC on the remote control.
Prepare the connected AQUOS LINK-
compatible recorder for recording. Check the
following items.
• Make sure that the antenna cable is connected.
• Check that there is sufficient available space on the
recording media (HDD, DVD, etc.).
• On the TV, use "AQUOS LINK Setup" and "Selecting
Recorder" to select the equipment for recording.
• By default, the recorder connected to HDMI IN 1 is
selected for recording.
1 Press @REO to start recording.
• When you are viewing a broadcast received with
the AQUOS LINK-compatible recorder selected
in "Selecting Recorder", recording to the AQUOS
recorder of the broadcast being viewed starts.
• When you are viewing a broadcast received
wkh equipment other than the AQUOS LINK-
compatible recorder selected in "Selecting
Recorder" or other external input equipment,
pressing @REC on the remote control does not
start recording.
2 Use the Link Operalion Menu to stop recording.
Press OPTION to display the Link Operation
Menu screen.
Press _/Y to select "Stop Recording", and then
press I:NTER.
The Link Operation Menu allows you to make
adjustments during operation of AQUOS LINK-
compaHble equipment.
1 Press OPTION to display the Link Operation
Menu.
2 Press A/T to select the desired item, and then
press ENTER.
• Specific operations differ depending on the item
you select. Following are the basic operations for
each item.
You can manually turn ors/off the power of the
connected AQUOS LINK-compalible equipment.
Each time you press ENTER, the connected
equipment switches orsor off.
• The buttons _/l_ do not function wRh the
following Blu-ray disc players currently available.
BD-HP20U, BD-HP50U
(D" 42
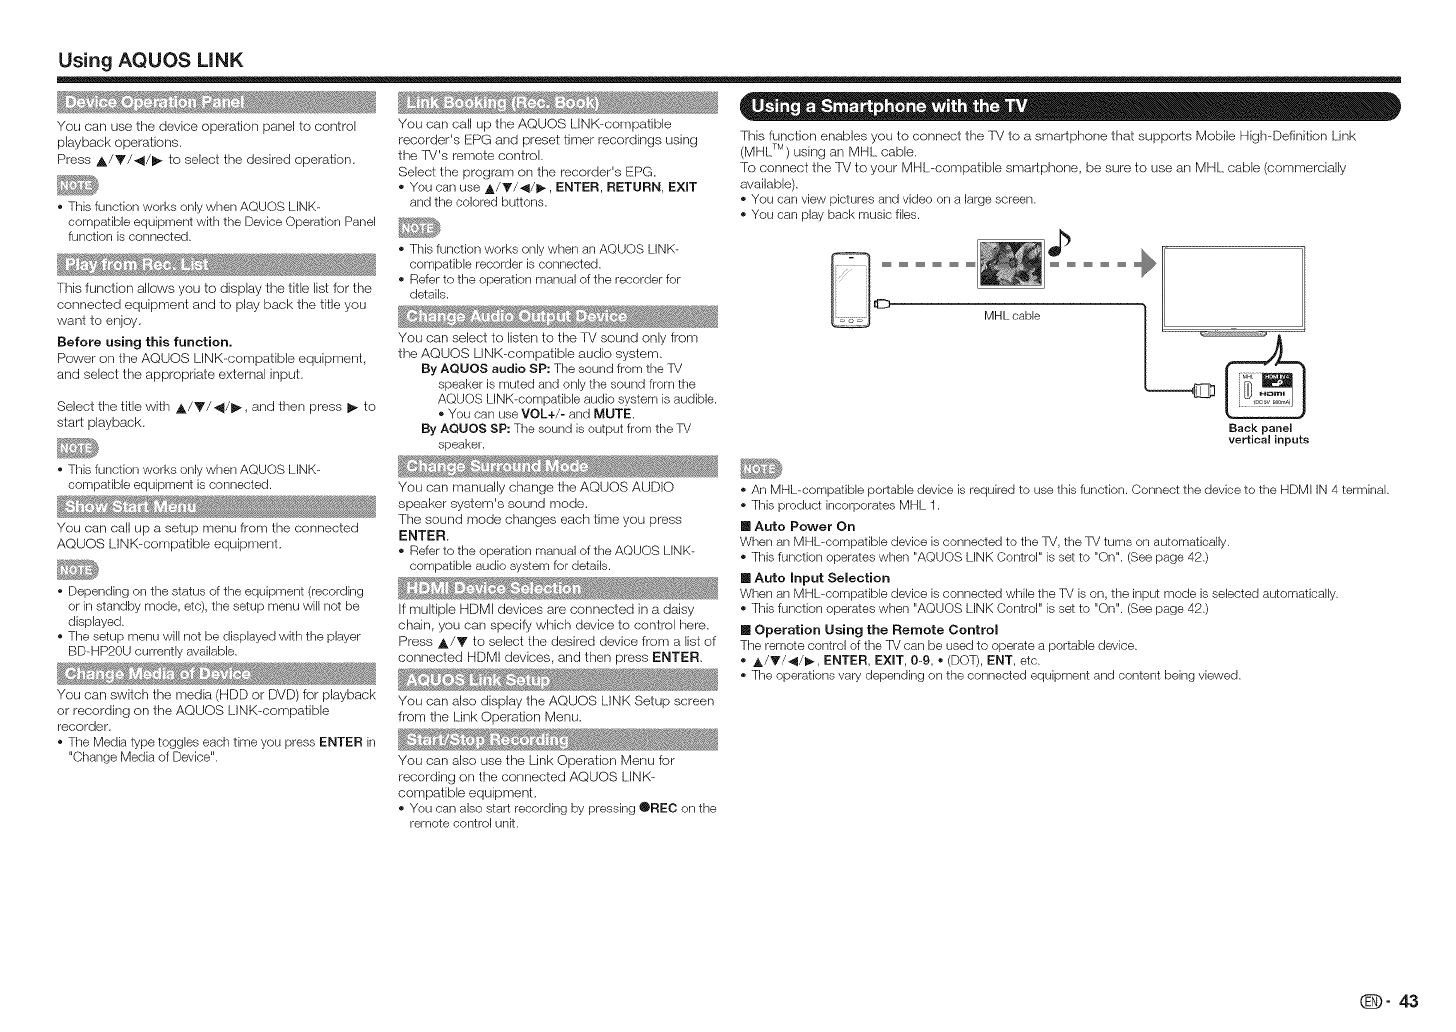
Using AQUOS LiNK
You can use the device operation panel to control
playback operations,
Press A/V/_I/I_ to select the desired operation,
• This function works only when AQUOS LINK-
compatible equipment with the Device Operation Panel
function is connected.
This function allows you to display the title list for the
connected equipment and to play back the title you
want to enjoy,
Before using this function.
Power on the AQUOS LINK-compatible equipment,
and select the appropriate external input,
Select the title with ,_,/V/4/I_, and then press I_ to
start playback,
This function works only when AQUOS LINK-
compatible equipment is connected.
You can call up a setup menu from the connected
AQUOS LINK-compatible equipment,
• Depending on the status of tile equipment (recording
or in standby mode, etc), the setup menu will not be
displayed.
The setup menu will not be displayed with the player
BD-HP20U currently available.
You can switch the media (HDD or DVD) for playback
or recording on the AQUOS LINK-compatible
recorder,
The Media type toggles each time you press ENTER in
"Change Media of Device".
_s , s_{g _r_;!_ r_<s
You can call up the AQUOS LINK-compatible
recorder's EPG and preset timer recordings using
the lV's remote centrol,
Select the program ors the recorder's EPG.
• You can use A/Y/41/_, ENTER, RETURN, EXIT
and the colored buttons.
• This function works only when an AQUOS LINK-
compatible recorder is connected.
Refer to the operation manual of the recorder for
details.
You can select to listen to the lV sound only from
the AQUOS LINK-cempatible audio syslem•
By AQUOS audio SP: The sound from the TV
speaker is muted and only the sound from the
AQUOS LiNK-compatible audio system is audible.
• You can use VOL+/- and MUTE.
By AQUOS SP: The sound is output from the TV
speaker.
You can manually change the AQUOS AUDIO
speaker system's sound mode.
The sound mode changes each time you press
ENTER.
• Refer to the operation manual of the AQUOS LINK-
compatible audio system for details.
If multiple HDMI devices are connected in a daisy
chain, you cars specify which device to control here.
Press A/Y to select the desired device from a list of
connected HDMI devices, and then press ENTER•
You can also display the AQUOS LINK Setup screen
from the Link Operation Menu,
You can also use the Link Operation Menu for
recording on the connected AQUOS LINK-
compatible equipment•
• You can also start recording by pressing @REC on the
remote control unk.
This function enables you to connect the lV to a smartphone that supports Mobile High-Definition Link
(MHL TM) using an MHL cable,
l"o connect the TV to your MHL--compatible smartphone, be sure to use an MHL cable (commercially
available),
• You can view pictures and video on a large screen.
• You can play back music files.
Mill_ cable
Back panel
vertica_ inputs
• An MHL-compatible portable device is required to use this function. Connect the device to the HDMI IN 4 terminal.
This product incorporates MHL 1.
[] Auto Power On
When an MHL-cempatible device is connected to the TV, the TV turns on automatically.
This function operates when "AQUOS LiNK Control" is set to "On". (See page 42.)
[] Auto Input Selection
When an MHL-compatible device is connected while the TV is on, the input mode is selected automatically.
This function operates when "AQUOS LINK Control" is set to "On". (See page 42.)
[] Operation Using the Remote Control
The remote control of the TV can be used to operate a portable device.
• _/V/_/I_, ENTER, EXIT, 0-9, • (DOT), ENT, etc.
• The operations vary dependk_g on the connected equipment and content being viewed.
(]_)- 43
Using a PC
_o = = m .e=
You can adjust the position of the image input from
a PC the settings with "System Options" > "Terminal
Setting" > "PC input".
For automatically adjusting the PC image.
Yes: Auto Sync. starts and "New adjusting the
image." displays.
No: This function does not work.
• When "Auto Sync." is successful, "Completed"
displays, if not, "Auto Sync." failed.
• "Auto Sync." may fail even if "Completed" displays.
• "Auto Sync." may fail if the computer image has low
resolution, has unclear (black) edges, or is moved while
executing "Auto Sync.".
• Be sure to connect the PC to the TV and switch it on
before starting "Auto Sync.".
Ordinanly you can easily adjust the picture as
necessary to change image position using "Auto
Sync.". Irl some cases, however, manual adjustment
is needed to optimize the image.
H-Pos,: Centers the image by moving it to the left or
right.
V-Pos.: Centers the image by moving it up or down.
Clock: Adjust when the image flickers wkh vertical
stripes.
Phase: Adjust when characters have low contrast or
when the image flickers.
• For resetting all "Fine Sync." adjustment items to the
factory preset values, press A/V to select "Reset",
and then press ENTER.
• it is not necessary to adjust the "Clock" or "Phase"
when a digital signal is being input, so k cannot be
selected.
• The defauk cursor position may not be in the center,
because the screen poskion variable ranges may be
asymmetrical.
• The screen position variable ranges depend on the
View Mode or the signal type. The ranges can be seen
on the positiomsetting screen.
=•_•o•
This function sets the terminal to output the computer
audio.
The adjustment items vary depending on the input
source. Select the input source corresponding to the
terminal connected to the PC and then adjust the
desired item.
To perform the operation, refer to "System Options"
> "Terminal Setting" > "Audio Select".
[] PC IN
Video: Select this when the TV and PC are
connected using an analog RGB cable and the
audio is not input.
Video+Audio: Select this when the TV and PC are
connected using an analog RGB cable and the
audio is input via a @ 3.5 mm stereo minijack.
[] HDMI 2
HDMl(Digital): Select this when the TV and PC are
connected using an HDMI-certified cable and
audio is input via the same cable.
HDMl+Analog: Select this when the TV and PC are
connected using a DVI-HDMI conversion cable
and the audio is input via a @ 3.5 mm stereo
mini jack.
• When "Audio Select" is set to "HDMl(Digital)", sound
will not be produced if you use only an HDMl-certified
cable to connect HDMl-compatible equipment. To
produce sound, you should make an analog audio
connection.
• If you want to connect HDMPcompatible equipment
using only an HDMl-certified cable, set "Audio Select"
to "HDMl(Digital)".
eo o =
® The lV cars be controlled from a PC, control panels
and other devices using the RS-2320 or IP.
® Use a cross--type RS-2320 cable, ETHERNET
cable (commercially available) or wireless [..AN for
the connections.
• This operation system should be used by a person
who is accustomed to using computers.
Set this function when operating the TV from equipment
connected by LAN or wireless LAN. To perform tile
operation, refer to "Initial Setup" > "lnternet Setup".
[] AQUOS Remote Control
When "AQUOS Remote Control" is selected,
"Cflange" will be highlighted. Press ENTER.
[] Detailed Settings
Make the detailed settings (Login ID, password, etc.).
Follow the ors-screen instructions to configure the
settings=
Set the name of the TV displayed on other network
devices.
• Use the software keyboard to set the name. See page
47 for details on the software keyboard.
Connect to the [V with the following settings made
for IP ors the PC.
TCP/IP
Set the IP address on the TV menu
None (Do not select Telnet or
SSH)
Set a port number on the TV
menu (Control port)_li_ii_!_!S_!#_#_I_ii_i_ii_!_!i_!lili_ii!!i_!!i_iii!i_!j_!ii!!%j_ililili_ii_#_
When you set your ID and password on the TV menu, you
need to enter them as soon as you connect to the TV.
• When you use this function, make settings for "AQUOS
Remote Control".
• The connection will be cut off when there has been no
communication for 3 minutes.
Set the RS-2320 communication settings ors the PC
to match the R/'s communication conditions.
The lV's communication settings are as follows:
9,600 bps
8bits
None
1 bit
None
[] Communication procedure
Send the control commands from the PC via the RS-
2320 or IP.
The IV operates aecording to the received command
and sends a response message to the PC.
Do not send multiple commands at the same time.
Wait until the PC receives the OK response before
sending the next command.
[] Command format
Eight ASCII codes + OR
101102 IP2 P41--I
Command 4-digits Parameter 4-digits Returrl code
Command 4-digits: Command. The text of four characters.
Parameter 4-digits: Parameter 0-9, x, blank, ?
[] Parameter
Input the parameter values, aligning left, and fill with
blank(s) for the remainder. (Be sure that 4 values are
input for the parameter.)
When the input parameter is not within an adjustable
range, "ERR" returns. (Refer to "Response code
format" .)
Any numerical value can replace the "x" on the table.
When "?" is input Ior some
commands, the present
setting
value
responds. _
[] Response code format
Normal response
Return code (0DH)
Problem response
(communication error or incorrect command)
R
Returrl code (0DH)
(D" 44
Using a PC
[] Command table
Commands not indicated here are not guaranteed to operate.
CONTROL ITEM COMMAND PARAMETER
POWER ON COMMAND R i S i P iW O i i i Off
gETTING ] ] ] 1 _ _ _ On [RS 2320]
i: : : 2i i i ont_p]
POWERSETnNC_'PioiwiR 0iii PowerOft
i I I I 1 I I I Power On
INPUT TOGGLE 'IiTiGiD xi i i Cogg,e)
BELEOTION I _ ] ] ] _ ]
TV I]T]V]D O]
1 8 ]1 ==A==V==D *== _ == I:HDMIIN1,2:HDMIIN2,3:HDMIINS,
j', ', ', ', _ ', 4: HDMI IN 4, 5: COMPONENT IN, 6: VIDEO IN 1,
j', ', ', ', _ ', 7: VIDEO IN 2, 8: PC IN
&V MODE SELECTION IAIVIMID *i*i*i O: (Toggle), l: STANDARD(ENERGYSTAR)*I,
J] ] ] ] _ ] 2: MOVIE, 3: GAME, 4: USER, 5: DYNAMIC (Fixed),
j] ] ] ] _ ] 6: DYNAMIC, 7: PC, 8: x.v.Color,13: VINTAGE
j] ] ] ] _ ] MOVIE 14: STANDARD (3D), 15: MOVIE (SD),
j', ', ', ', _ ', 16: GAME (SD),10O: AUTO
i ', ', ', ', :',
]VOLUME 'ViOiLiM *i*i i Volume (0 100)
i POSITION H POSITION H ] P ] O ] S * ] * _ *
v_°sm°N:ViPi°is"i'i'i
CLOCK CiLiCi K *i*i*i OnlyPCmode(OfSO)
PHASE P _H ] S _ E * _ * _ _ Only PC mode (0 40)
'V, MODEiW,OE"i'ii 0:(Tog0,e A' ,,:S,deBar A' ,2:S,Stretoh AV
, ] ] ] ] _ ] 3:Zoom [AV], 4: Stretch [AV, USB Video, Home
J== == == == _ == Network Video or Intemet applications],
J ] ] ] ] _ ] 5: Normal[PC]
J ] ] ] ] i ] 6:Zoom [PC], 7:Stretch [PC],
] ] ] ] _ ] 8: Dot by Dot [PC] [AV], 9: Full Screen [AV]
i ] ] ] ] _ ] 10:Auto [USB Video, Home Network Video or
i ] ] ] ] _ ] Internet applications],
i _ _ _ _ _ _ 11: Original[USB Video, Home Network Video or
iiii i ii Intemet applications]
]MUTE MIUITIE *I = I 0: (Toggle), l : On, 2:Off
]SURROUND 'AICISIU *i i i For the LE857U, LE757U, LE755U, LE657U and
i _ _ _ _ _ _ LE655U models:
i ] ] ] ] _ ] O: (Toggle), l: Normal, 2:Off, 4:3DHall, 5:3D
i ! ! ! ! ! ! Movie, 6: 3D Standard, 7: 3D Stadi ......
J == == == == _ == For the LE750U, LE650U, 07500U and 06500U
J ", ", ", ", _ ", models:
J i i i i i i O: (Toggle), 1: On, 2: Off
RUDIO SELECTION A ] C ] H ] A x _ _ _ (Toggle)
gLEEPT_MER 'oiFiTiM *i i i 0:Off, I:OFFTIMER 30MIN,2:OFFTIMER 60MIN
I i i i i i i S:OFFT_MERggM_N,,4:OFFT_MER_20M_N
SHANNEL DIRECT D]C]C]H * ] * _ * ] TheohannelnumberofTV
CHANNEL ] ] ] ] _ ] (1 135)
(ANALOG) ' ] ] ] ] _ ]
DIRECT D]A]2]P *]*_*]* (0100gggg)
CHANNEL _ _ _ _ _
(DIGITAL) , U i C 1 2 i U * i * i * i (1 999)
i I I I I I
:DiCi2iL"i'i'i oggg
ilii iii
' i i i i i i
CONTROL CONTENTS
The Power On command rejected
The Power On command accepted
The Power On command accepted
It shifts to standby,
Power On
It input switches by the toggle (It is the same as
an input change key)
It input switches to TV (A channel remains as it
is (Last memoly))
Although it can choose now, it is toggle operation
in inside.
8,18: For the LE857U, LE757U, LE755U,
LE750U and C7500U models,
14,15, 16: For the LE857U, LE757U, LE755U,
LE657U and LE655U models,
The screen position variable ranges depend on
the View Mode or the signal type. The ranges
can be seen on the position setting screen,
0: Although it can choose now, it is toggle
operation in inside,
1 : Only available when 4:3 signal is being input,
5, 6: Only available when 4:3 signal is being
input,
8: [PC] Available except when UXGA is being input.
[AV] Only available when 108Oi/p is being input.
9: Only available when 720p is being input.
10,11 : Available when USB Video, Home
Network Video or Internet application is used,
An input change is included if it is not %/display
In Air, 2 6gch is effective.
In Cable, 1 1350h is effective
DIGITAL Air (Two Part numbers, 2 digit plus
2 digit)
DIGITAL Cable (Two Part numbers, 3 digit plus
3 digit)
Front half of DIGITAL CABLE CHANNEL NO
(Designate major channel)
DIGITAL Cable (Two Part numbers, 3 digit plus
3 digit)
Rear half dDIGITAL CABLE CHANNEL NO,
(Designate minor channel)
CONTROL ITEM COMMAND PARAMETER
CHANNEL DIRECT U i C i 1 i O * i * i * i * (O 9999)
CHANNEL ', ', _ ', ', ',
(DIGITAL) a ]] C ]] 1 _ 1 * ,,i * ,,i* ,,i* j(O 5888)
C'R"U"p',', = _' ' ' '
CHUP ", ", ", The channel number of %/+1
CH CIRIDIw_iii Thechanrlelnumberof%/1
cc ciLiciP ×i i i (Toggle/
DEV,CENAMETiViN Mf:: i i I
,, ,, :,,,
MODELNAMEMINIRIDfi i i
SO WAREVERS,ONSiWiViNf iiil
IP PROTOCOL I ] P ] P 1 V 1 ] ] ] I
VERSION ] ] I ] ] ]
3D 9: 3D Off, 1:2D •8m, 2 SBS, 8TAB, 4: 3D?2D
_ _ ] _ _ ',SBS), 5: 3D *2D (TAB), 6: 3D auto, 7: 2D auto
RICIK_Yii i * '' '
• i09: 09, 10: DOT, 11: ENT, 12: POWER,REMOTE CONTROL
BUTTONS ', ',
iii
"1 Except for LC@0LE657U
', ', ', ]13: DISPLAY, 14: POWER (SOURCE) 15: _,
i i i 116:,, 17:,_, 18:11, 19:|_ , 20:!21:_-, ,
]22: @REC, 23: OPTION, 24: SLEEP, 27: CO,
] ] ] P8:AVMODE, 29:VIEW MODE, 30: FLASHBACK,
_ MUTE,v92:VOL_:VOL+,,_:CR_,
OH ,36: INPUT, 38: MENU, 39: SmartOentral,
] ] ] 45: RETURN, 46: EXIT, 47: FAVORITE OH,
_ _ 49: AUDIO, 50: A (led), 51 : B (g/een), 52: O (blue},
] ] ] 58: D(yellow), 54: FREE7E, 55: FAV APP 1,
', ', ', 56:FAVAPP2,57:FAVAPP3,58:3D,
iii 59: NETFUX, 60:AAL
CONTROL CONTENTS
DIGITAL Cable (One Part numbers, 5 digit, less
than 10,000)
DIGITAL Cable (One Part numbers, 5 digit, more
than 10,000)
If it is not %/display, it will input switch to %/
_ame function as CHA)
If it is not %/display, it will input switch to %/
_ame function as CRy)
Toggle operation of a closed caption,
The device name set in "%/Name Setting" is
displayed
The model name of the %/
The current version of the %/sottware is
displayed
The currently supported version of IP protocol is
displayed
This control item is available for the LE857U,
LE757U, LE755U, LE657U and LE655U models.
58: For the LE857U, LE757U, LE755U, LE657U
and LE655U models
If an underbar (_) appears in the parameter column, enter a space.
If an asterisk (*) appears, enter a value in the range indicated in brackets under CONTROL CONTENTS.
Any numerical value can replace the "x" on the table.
It is necessary to set the PC correctly to display XGA and WXGA sic nal,
Resolution Vertical Frequency VESA Standard
720 x 400
VGA
SVGA
XGA
640 x 480
800 x 600
1024 x 768
WXGA 1360 x 768
SXGA 1280x1024
SXGA+ 1400 x 1050
UXGA 1600x1200
1080p 1920x1080
VGA and XGA areregisteredtrademarks oflnternationaIBusiness Machines Corp.
Horizontal
Frequency
31.5 kHz
31.5 kHz
37.9 kHz
37.5 kHz
35.1 kHz
37.9 kHz
48.1 kHz
46.9 kHz
48.4 kHz
56.5 kHz
60.0 kHz
47.7 kHz
64.0 kHz
65.3 kHz
75.0 kHz
67.5 kHz
70 Hz
60 Hz
72 Hz
76 Hz
66 Hz
60 Hz
72 Hz
76 Hz
60 Hz
70 Hz
75 Hz
60 Hz
60 Hz
60 Hz
60 Hz
60 Hz
o
o
o
o
o
o
o
o
o
o
o
o
o
o
o
@- 45
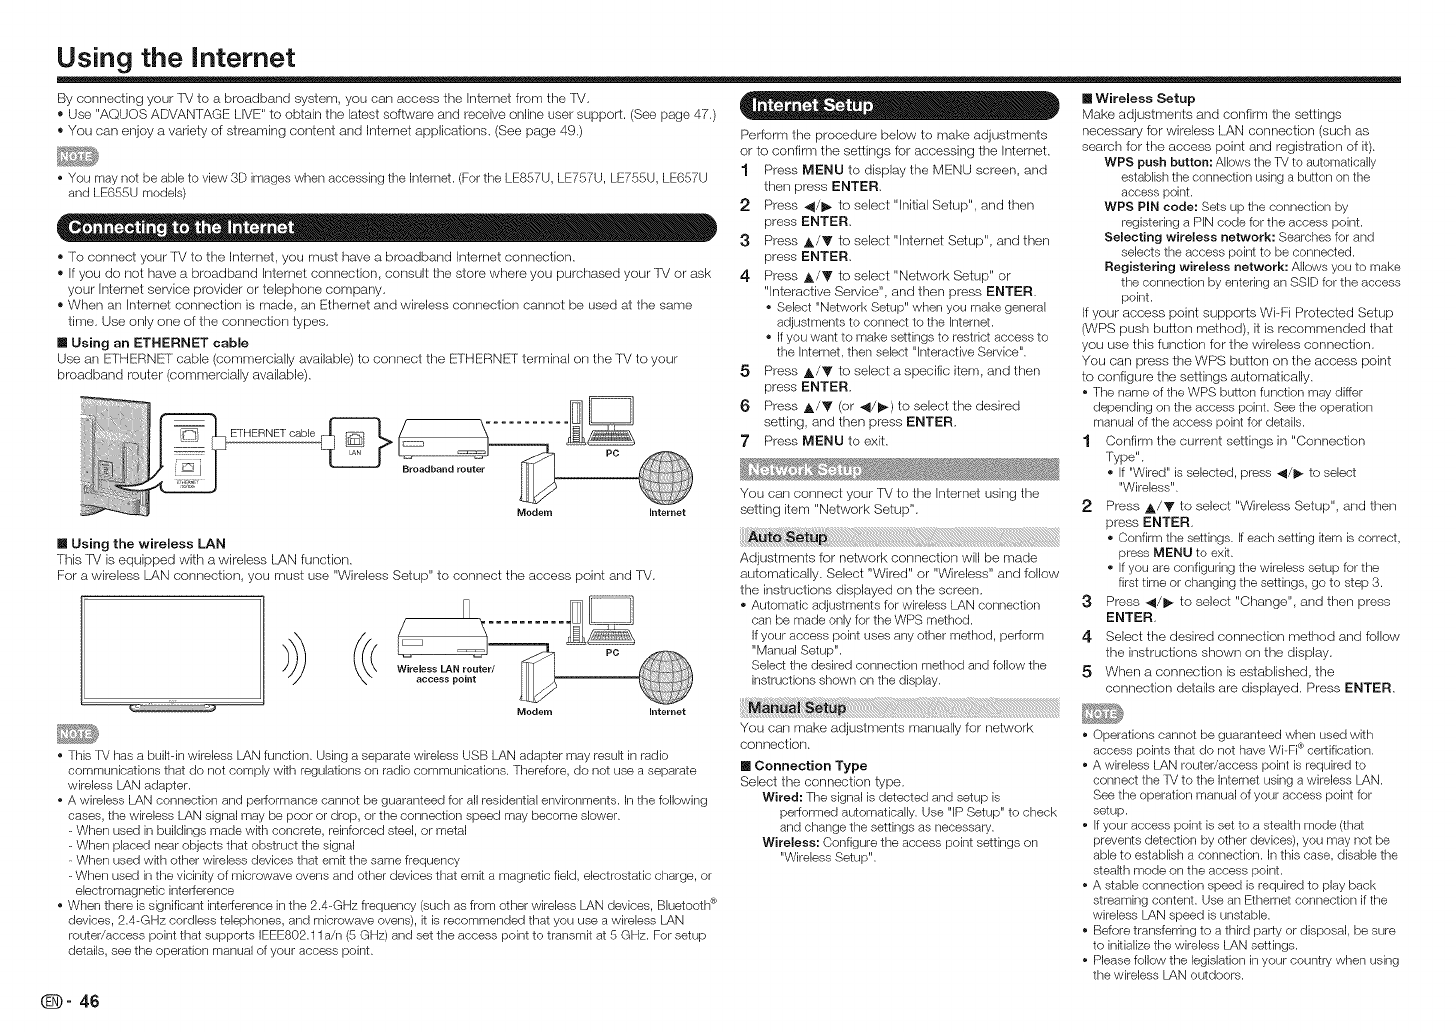
Using the Intemet
By connecting your lM to a broadband system, you carl access the Internet frorn the rM.
,_ Use "AQUOS ADVANTAGE LIVE" to obtain the latest software and receive online user support. (See page 47.)
®You can enjoy a variety of streaming content and Internet applications. (See page 49.)
• You may not be able to view 3D images when accessing the Internet. (For the LE857U, LE757U, LE755U, LE657U
and LE655U models)
® To connect your IM to the Internet, you must have a broadband klternet connection.
® If you de not have a broadband Internet connection, consult the store where you purchased your 'iM or ask
your Internet service provider or telephone cornpany.
®When an Internet connection is made, an Ethernet and wireless connection cannot be used at the same
time. Use only one of the connection types.
[] Using an ETHERNET cable
Use an E1T--IERNETcame (commercially available) to conrlect the ETHERNET terminal on the TM to your
broadband router (commercially available).
Modem
PC
Intemet
[] Using the wireless LAN
This R/is equipped with a wireless LAN function.
For a wireless [..ANconrlectien, you must use "Wireless Setup" to connect the access point and TM.
Modem Intemet
• This TV has a built-in wireless LAN function. Using a separate wireless USB LAN adapter may resuR in radio
communications that do not comply wRh regulations on radio communications. Therefore, do not use a separate
wireless LAN adapter.
• A wireless LAN connection and performance cannot be guaranteed for all residential environments. In the following
cases, the wireless LAN signal may be poor or drop, or the connection speed may become slower.
When used in buildings made wRh concrete, reinforced steel, or metal
When placed near objects that obstruct the signal
When used with other wireless devices that emR the same frequency
When used in the vicinity of microwave ovens and other devices that emit a magnetic field, electrostatic charge, or
electromagnetic interference
• When there is significant interference in the 2.4-GHz frequency (such as from other wireless LAN devices, Bluetooth ®
devices, 2.4-GHz cordless telephones, and microwave ovens), it is recommended that you use a wireless LAN
router/access point that supports IEEES02.11 a/n (5 GHz) and set the access point to transmit at 5 GHz. For setup
details, see the operation manual of your access point.
= = = •
Perform the procedure below to make adjustments
or to confirm the settings for accessing the Internet.
1 Press MENU to display the MENU screen, and
then press ENTER.
2 Press 41/1_ to select "initial Setup", and then
press ENTER,
3 Press A/Y to select "lnternet Setup", and then
press ENTER,
4 Press ._/Y to select "Network Setup" or
"Interactive Service", and then press ENTER.
• Select "Network Setup" when you make general
adjustments to connect to the Internet.
• If you want to make settings to restrict access to
the Internet, then select "interactive Service".
5 Press A/Y to select a specific item, and then
press ENTER,
6 Press ,t_/y (or _1/1_) to select the desired
setling, and then press ENTER.
}' Press MENU to exit.
You carl connect your FV to the Internet using the
setting item "Network Setup".
Adjustments for network corlnection will be made
automatically. Select "Wired" or "Wireless" and fellow
the instructions displayed on the screen.
• Automatic adjustments for wireless LAN connection
can be made only for the WPS method.
If your access point uses any other method, perform
"Manual Setup".
Select the desired connection method and follow the
instructions shown on the display.
[] Wireless Setup
Make adjustments and confirrn the settings
necessary for wireless LAN connection (such as
search for the access point and registration of it).
WPS push button: Allows the TV to automatically
establish the connection using a button on the
access point.
WPS PIN code: Sets up the connection by
registering a PiN code for the access point.
Selecting wireless network: Searches for and
selects the access point to be connected.
Registering wireless network: Allows you to make
the connection by entering an SSID for the access
point.
If your access point supports Wi-Fi Protected Setup
(WPS push button method), it is recommended that
you use this function for the wireless connection.
You can press the WPS button on the access point
to configure the settings automatically.
• The name of the WPS button function may differ
depending on the access point. See the operation
manual of the access point for details.
1 Confirm the current settings in "Connection
l"ype".
• if "Wired" is selected, press 41/1_ to select
"Wireless".
2 Press A/Y to select "Wireless Setup", and then
press ENTER.
• Confirm the settings, if each setting Rein is correct,
press MENU to exR.
• if you are configuring the wireless setup for the
first time or changing the settings, go to step 3.
3 Press _1/1_ to select "Change", and then press
ENTER,
4. Select the desired connection method and follow
the instructions shown on the display.
5 When a connection is established, the
connection details are displayed. Press ENTER.
You carl make adjustments manually for network
conrlection.
[] Connection Type
Select the connection type.
Wired: The signal is detected and setup is
performed automatically. Use "lP Setup" to check
and change the settings as necessary.
Wireless: Configure the access point settings on
"Wireless Setup".
• Operations cannot be guaranteed when used with
access points that do not have Wi-Fi ® certification.
• A wireless LAN router/access point is required to
connect the TV to the Intemet using a wireless LAN.
See the operation manual of your access point for
setup.
• if your access point is set to a stealth mode (that
prevents detection by other devices), you may not be
able to establish a connection, in this case, disable the
stealth mode on the access point.
• A stable connection speed is required to play back
streaming content. Use an Ethemet connection if the
wireless LAN speed is unstable.
• Before transferring to a third party or disposal, be sure
to initialize the wireless LAN settings.
• Please follow the legislation in your country when using
the wireless LAN outdoors.
(_- 46
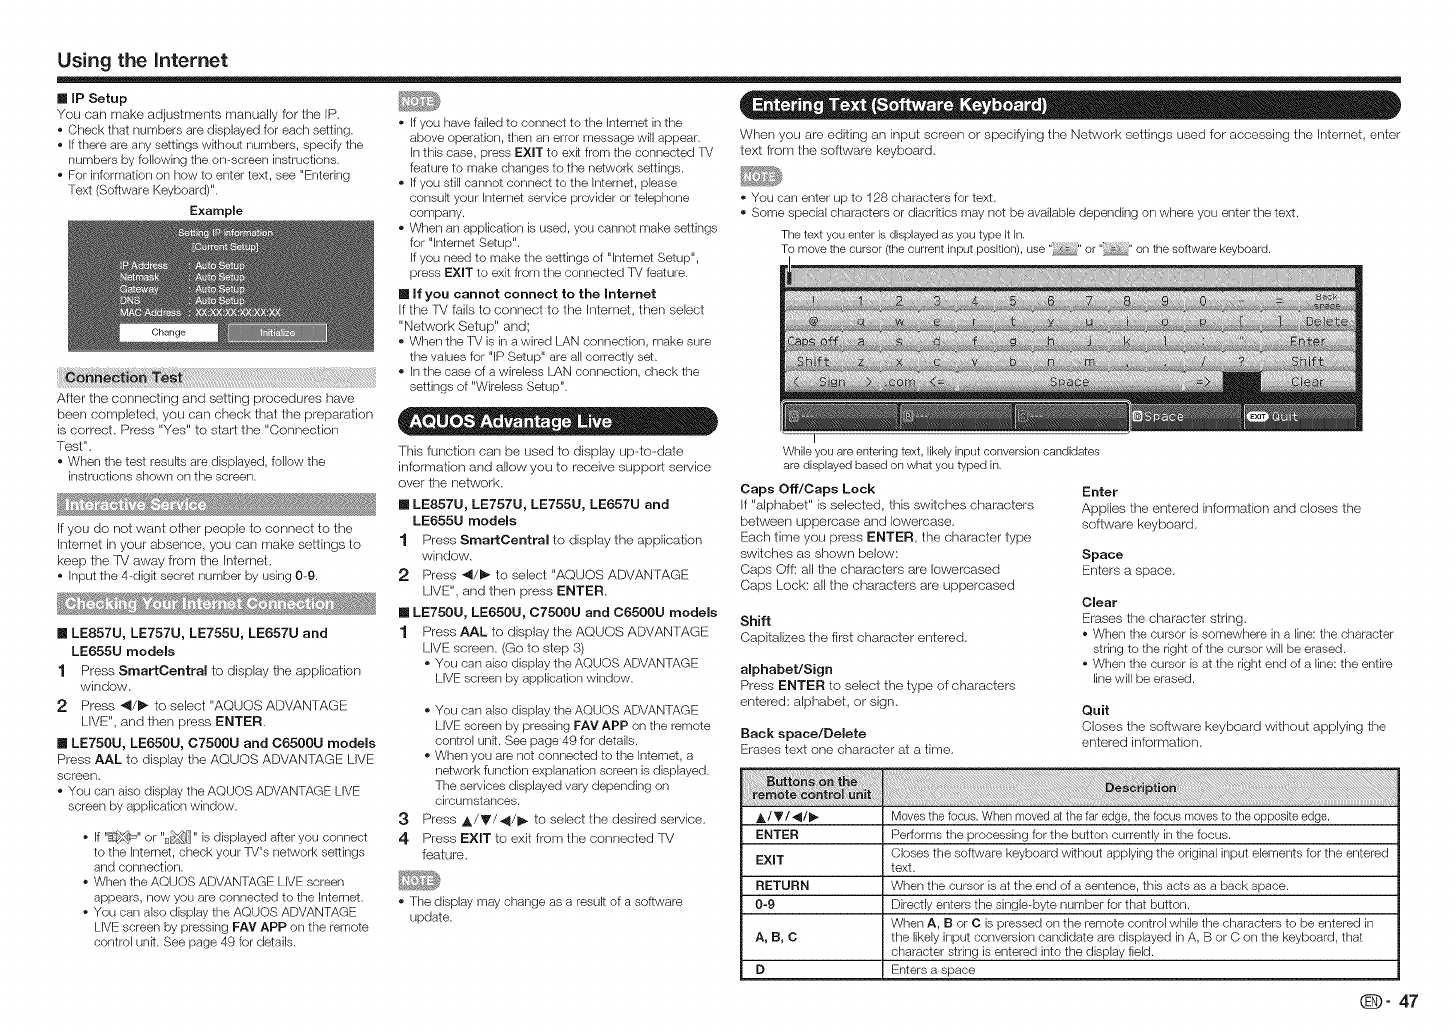
Using the Intemet
[] IP Setup
You can make adjustments manually for the IP.
• Check that numbers are displayed for each setting.
• If there are any settings wkhout numbers, specify the
numbers by following the on-screen instructions.
• For information on how to enter text, see "Entering
Text (Software Keyboard)".
Example
Change
ii_i_:iii_i_!_i_i_i_!i_!i_i___i_!_ ¸iiiiiii_i!!i!ililiiiiiiiiiiiiiiiiiiiiiiiiiiiiiiiiiiiiiiiiiiiiiiii!
After the cennecting and setting procedures have
been completed, you carl check that the preparation
is correct. Press "Yes" to start the "Connection
lest".
• When the test resuks are displayed, follow the
instructions shown on the screen.
If you do not want other people to connect to the
Internet in your absence, you carl make settings to
keep the TV away from the Interact.
• input the 4-digk secret number by using 0-9.
[] LE857U, LE757U, LE755U, LE657U and
LE655U models
1 Press SmartCentral to display the application
window.
2 Press 4/1_ to select "AQUOS ADVANTAGE
LIVE", and then press ENTER.
[] LE750U, LE650U, 07500U and 06500U models
Press AAL to display the AQUOS ADVAN TT_GE:.LIVE
screen.
• You can aiso display the AQUOS ADVANTAGE LiVE
screen by application window.
• If "R]p_t_" or "B_" is displayed after you connect
to the Interact, check your TV's network settings
and connection.
• When the AQUOS ADVANTAGE LIVE screen
appears, now you are connected to the Interact.
• You can also display the AQUOS ADVANTAGE
LIVE screen by pressing FAV APP on the remote
control unk. See page 49 for details.
• if you have failed to connect to the Interact in the
above operation, then an error message will appear.
In this case, press EXIT to exk from the connected TV
feature to make changes to the network settings.
• If you still cannot connect to the Internet, please
consult your Internet service provider or telephone
company.
• When an application is used, you cannot make settings
for "lnternet Setup".
If you need to make the settings of "Interact Setup",
press EXIT to exit from the connected TV feature.
[] If you cannot connect to the Internet
If the IV fails to connect to the Internet, then select
"Network Setup" and;
• When the TV is in a wired LAN connection, make sure
the values for "IP Setup" are all correctly set.
• In the case of a wireless LAN connection, check the
settings of "Wireless Setup".
* • @ _e . .e= =
This function can be used to display up-to-date
information and allow you to receive support service
over the network.
[] LE857U, LE757U, LE755U, LE657U and
LE655U models
1 Press SmartCentral to display the application
window.
2 Press _1/1_ to select "AQUOS ADVANTAGE
LIVE", and then press ENTER.
[] LE750U, LE650U, C7500U and C6500U models
1 Press AAL to display the AQUOS ADVANTAGE
LIVE screen. (Go to step 3)
• You can also display the AQUOS ADVANTAGE
LiVE screen by application window.
3
4
• You can also display the AQUOS ADVANTAGE
LIVE screen by pressing FAV APP on the remote
control unit. See page 49 for details.
• When you are not connected to the Internet, a
network function explanation screen is displayed.
The services displayed vary depending on
circumstances.
Press A/V/4/I_ to select the desired service.
Press EXIT to exit from the connected lV
feature.
• The display may change as a result of a software
update.
When you are editing an input screen or specifying the Network settings used for accessing the Interact, enter
text from the software keyboard.
• You can enter up to 128 characters for text.
• Some special characters or diacritics may not be available depending on where you enter the text.
The text you enter is displayed as you type it in.
To move the cursor {the current input position), use .... or .... on the software keyboard.
While you are entering text, likely input conversion candidates
are displayed based on what you typed in.
Caps Off/Caps Lock
If "alphabet" is selected, this switches characters
between uppercase and lowercase.
Each time you press ENTER, the character type
switches as shown below:
Caps Off: all the characters are leweroased
Caps Lock: all the characters are upperoased
Shift
Capitalizes the first character entered.
alphabet/Sign
Press ENTER to select the type of characters
entered: alphabet, or sign.
Back space/Delete
Erases text one character at a time.
Enter
Applies the entered information and closes the
software keyboard.
Space
Enters a space.
Clear
Erases the character string.
• When the cursor is somewhere in a line: the character
string to the right of the cursor will be erased.
• When the cursor is at the right end of a line: the entire
line will be erased.
Quit
Closes the software keyboard without applying the
entered information.
_L/V/41/I_ Moves the focus. When moved at the far edge, the focus moves to the opposite edge.
ENTER Performs the processing for the button currently in the focus.
EXIT Closes the software keyboard wkhout applying the original input elements for the entered
text.
RETURN When the cursor is at the end of a sentence, this acts as a back space.
0-g Directly enters the single-byte number for that button.
When A, B or C is pressed on the remote control while the characters to be entered in
A, B, C the likely input conversion candidate are displayed in A, B or C on the keyboard, that
character string is entered into the display field.
D Enters a space
(iD" 47
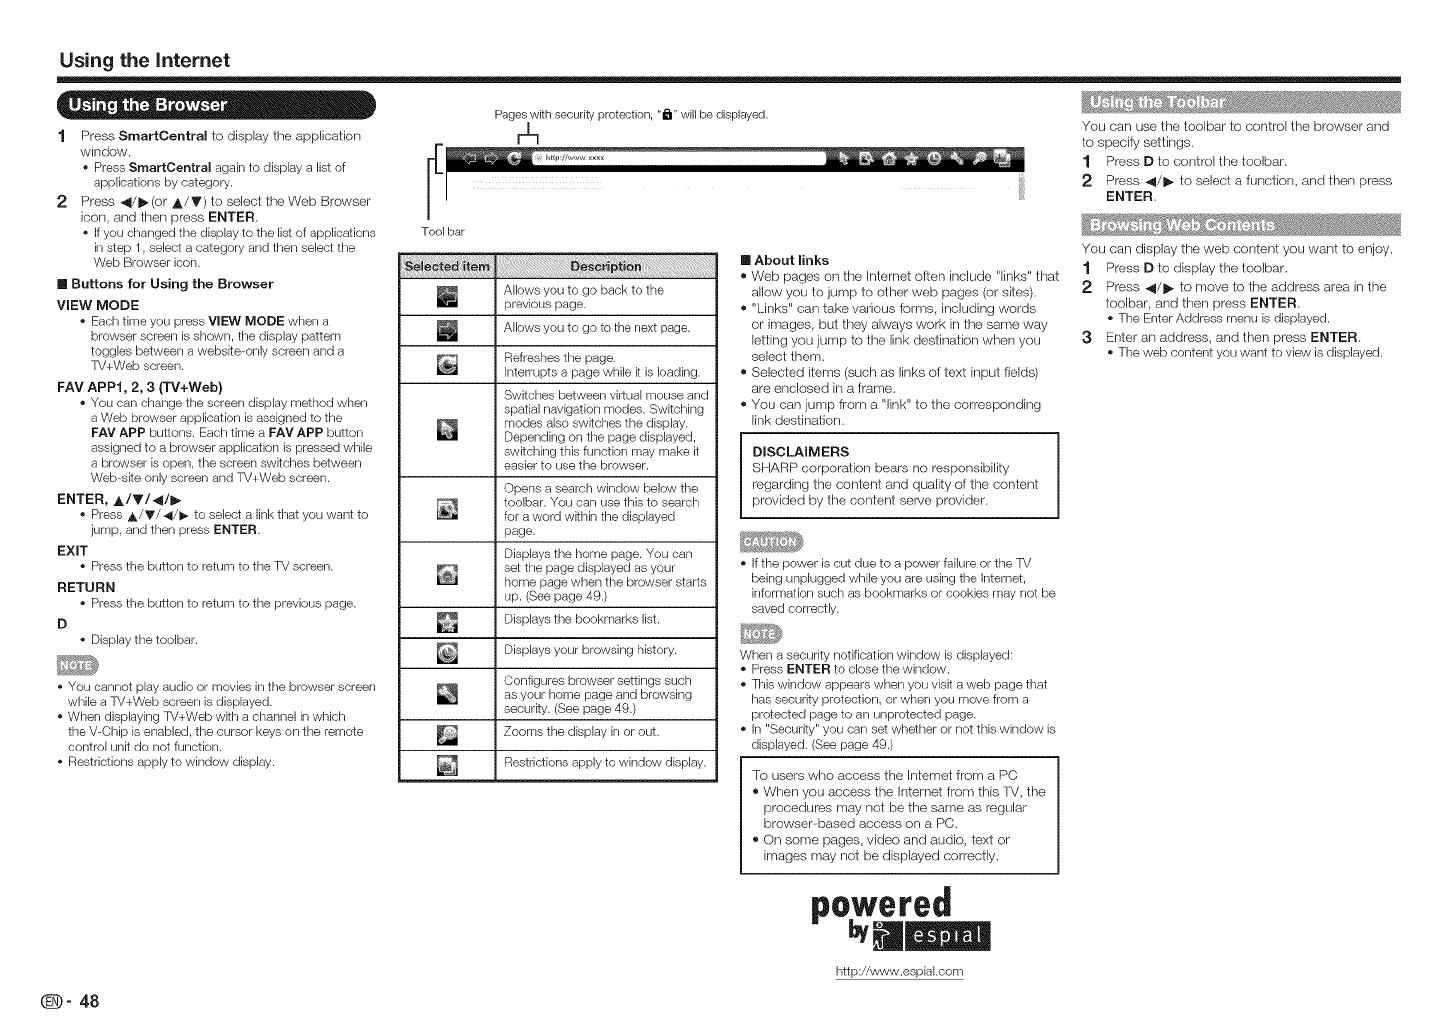
Using the Internet
=._, 0 - Pages with security protectiorl, "1_1"will be displayed.
1 Press SmartCentral to display the application
window.
Press SmartCentral again to display a list of
applications by category.
2 Press _/l_(or A/V) to select the Web Browser
icon, and then press ENTER.
If you changed tile display to the list of applications
in step 1, select a category and then select the
Web Browser icon.
[] Buttons for Using the Browser
VIEW MODE
Each time you press VIEW MODE when a
browser screen is shown, the display pattern
toggles between a webske-only screen and a
TV+Web screen.
FAV APPI, 2, 3 (TV+Web)
You can change the screen display method when
a Web browser application is assigned to the
FAV APP buttons. Each time a FAV APP button
assigned to a browser application is pressed while
a browser is open, the screen swkches between
Web-ske only screen and TV+Web screen.
ENTER, _,/Y/_/I_
Press A/T/_I/I_ to select a link that you want to
jump, and then press ENTER.
EXIT
Press the button to return to the TV screen.
RETURN
Press the button to return to the previous page.
D
o Display the toolbar.
You cannot play audio or movies in the browser screen
while a TV+Web screen is displayed.
When displaying TV+Web wkh a channel in which
the V-Chip is enabled, the cursor keys on the remote
control unit do not function.
Restrictions apply to window display.
Tool bar
Allows you to go back to the
previous page.
Allows you to go to the next page.
Refreshes the page.
Interrupts a page while k is loading.
Switches between virtual mouse and
spatial navigation modes. Swkching
modes also switches the display.
Depending on the page displayed,
swkching this function may make it
easier to use the browser.
Opens a search window below the
toolbar. You can use this to search
for a word w_hin the displayed
page.
Displays the home page. You can
set the page displayed as your
home page when the browser starts
up. (See page 49.)
Displays the bookmarks list.
Displays your browsing history.
Configures browser settings such
as your home page and browsing
securky. (See page 49.)
Zooms the display in or out.
Restrictions apply to window display.
[] About links
®Web pages on the Internet often include "links" that
allow you to jump to other web pages (or sites),
® "Links" can take various forms, including words
or images, but they always work in the same way
letting you jump to the link destination when you
select them,
®Selected items (such as links of text input fields)
are enclosed in a frame,
®You can jump from a "link" to the corresponding
link destination,
DISCLAIMERS
SHARP corporation bears no responsibility
regarding the content and quality of the content
provided by the content serve provider.
If the power is cut due to a power failure or the TV
being unplugged while you are using the Intemet,
information such as bookmarks or cookies may not be
saved correctly.
When a security notification window is displayed:
Press ENTER to close the window.
This window appears when you visit a web page that
has security protection, or when you move from a
protected page to an unprotected page.
In "Security" you can set whether or not this window is
displayed. (See page 49.)
To users who access the Internet from a PC
®When you access the Internet Item this TV, the
procedures may not be the same as regular
browser-based access on a PC,
®On some pages, video and audio, text or
images may not be displayed correctly.
You can use the toolbar to control the browser and
to specify settings.
1 Press D to control the toolbar.
2 Press _/_- to select a function, and then press
ENTER.
_,_, _ _ _
You can display the web content you want to enjoy.
1 Press D to display the toolbar.
2 Press 4/_ to move to the address area in the
teolbar, and then press ENTER.
* The Enter Address menu is displayed.
3Enter an address, and then press ENTER.
* The web content you want to view is displayed.
powered
htt p://www.espiai.com
(D" 48
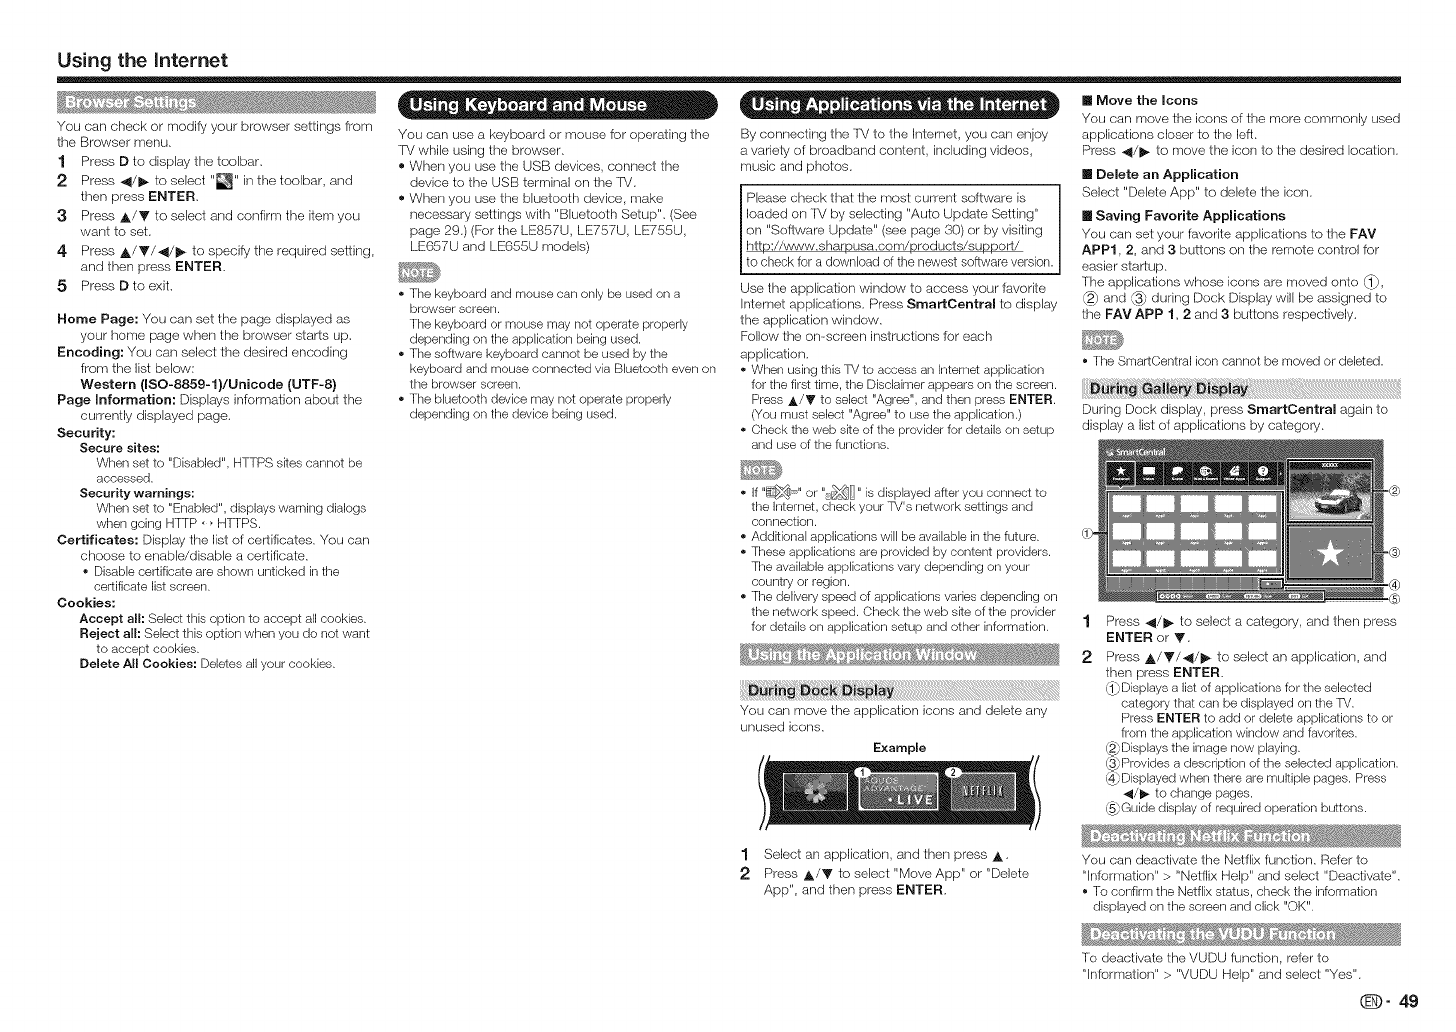
Using the Interact
You can check or modify your browser settings from
the Browser menu.
1 Press D to display the toolbar.
2 Press _1/1_ to select "_" in the toolbaL and
then press ENTER,
3 Press A/Y to select and confirm the item you
want to set.
4 Press ,A/Y/4/I_ to specify the required setting,
and then press ENTER.
5 Press D to exit.
•-co. • .•= =
You can use a keyboard or mouse for operating the
TM while using the browser.
®When you use the USB devices, connect the
device to the USB terminal on the IV.
®When you use the bluetooth device, make
necessary settings with "Bluetooth Setup". (See
page 29.) (For the LE857U, LE757U, LE755U,
LE657U and LE655U models)
• The keyboard and mouse can only be used on a
browser screen.
The keyboard or mouse may not operate propedy
depending on the application being used.
• The software keyboard cannot be used by the
keyboard and mouse connected via Bluetooth even on
the browser screen.
• The bluetoeth device may not operate properly
depending on the device being used.
Home Page: You can set the page displayed as
your borne page when the browser starts up.
Encoding: You carl select the desired encoding
from the list below:
Western (ISO-8859-1}/Unicode (UTF-8)
Page mnformation: Displays information about the
currently displayed page.
Security:
Secure sites:
When set to "Disabled", HTTPS skes cannot be
accessed.
Security warnings:
When set to "Enabled", displays warning dialogs
when going H]q_P, _ HTTPS.
Certificates: Display the list of certificates. You can
choose to enable/disable a certificate.
• Disable certificate are shown unticked in the
certificate list screen.
Cookies:
Accept all: Select this option to accept all cookies.
Reject all: Select this option when you do not want
to accept cookies.
Delete All Cookies: Deletes all your cookies.
•Aee .o.= = =
By connecting the TV to the klternet, you carl enjoy
a variety of broadband content, including videos,
music and photos.
Please check that the most current software is
loaded on 'f_/by selecting "Auto Update Setting"
on "Software Update" (see page 30) or by visiting
I http://www.sharpusa.com/products/support/
[to check for a download of tile newest software version.
Use the application window to access your Favorite
Interact applications. Press SmartCentrai to display
the application window.
Follow the on-screen instructions for each
application.
• When using this TV to access an Internet application
for the first time, the Disclaimer appears on the screen.
Press A/Y to select "Agree", and then press ENTER.
(You must select "Agree" to use the application.)
• Check the web ske of the provider for details on setup
and use of the functions.
[] Move the Icons
You can move the icons of the more commonly used
applications closer to the left.
Press 41/1_ to move the icon to the desired location.
[] Delete an Application
Select "Delete App" to delete the icon.
[] Saving Favorite Applications
You can set your Iavorite applications to the FAV
APPI, 2, and 3 buttons on the remote control for
easier startup.
The applications whose icons are moved onto _,
and _ during Dock Display will be assigned to
the FAV APP 1, 2 and 3 buttons respectively.
• The SmartCentral icon cannot be moved or deleted.
Dudng Dock display, press SmartCentraN again to
display a list of applications by category.
• If "_ ," or "rt_ " is displayed after you connect to
the Interact, check your TV's network settings and
connection.
• Addkional applications will be available in the future.
• These applications are provided by content providers.
The available applications vary depending on your
country or region.
• The delivery speed of applications varies depending on
the network speed. Check the web ske of the provider
for details on application setup and other information.
You carl move the application icons and delete any
unused icons.
Example
1 Select an application, and then press _,.
2 Press ,_/Y to select "Move App" or "Delete
App", and then press ENTER.
Press _1/1_ to select a category, and then press
ENTER or Y.
2 Press A/Y/41/I_ to select an application, and
then press ENTER.
(]_Displays a list of applications for the selected
category that can be displayed on the TV.
Press ENTER to add or delete applications to or
from the application window and favorites.
(2_Displays the image now playing.
(3_Provides a description of the selected application.
@Displayed when there are multiple pages. Press
41/i_ to change pages.
@Guide display of required operation buttons.
You can deactivate the Netfiix function. Refer to
"Information" > "Netflix Help" and select "Deactivate".
• To confirm the Netfiix status, check the information
displayed on the screen and click "OK".
To deactivate the VUDU function, refer to
"Information" > "VUDU Help" and select "Yes".
(i_)" 49
Using the Intemet
When you access tile Intemet application for the first time, the following appears.
® This message is available only in English.
DISCLAIMERS
® This SHARP device facilitates the access to content and services provided by third parties. The content
and services accessible via this device belong to and may be proprietary to third parties. Therefore, any
use of such third party content and services must be in accordance with any authorization or terms of
use provided by such content or service provider. SHARP sha, not be liable to you or any third party for
your failure to abide by such authorization or terrns of use. Unless otherwise specifically authorized by
the applicable content or service provider, all third party content and services provided are for personal
and non-commercial use; you may not modify, copy, distribute, transmit, display, perform, reproduce,
upload, publish, license, create derivative works from, transfer or sell in any manner or medium any
content or services available via this device.
® SHARP is not responsible, nor liable, for customer service related issues related to the third party
content or services. Any questions, comments or service-related inquiries relating to the third party
content or service should be made directly to the applicable content or service provider.
You may not be able to access content or services from the device for a variety of reasons which may
be unrelated to the device itself, including, but not limited to, power failure, other Internet conrlection, or
failure to configure your device properly. SHARP, its directors, officers, employees, agents, contractors
and affiliates shall not be liable to you or any third party with respect to such failures or maintenance
outages, regardless of cause or whether or not it could have been avoided.
® ALL THIRD PARTY CONTENT OR SERVICES ACCESSIBLE VIA THIS DEVICE IS PROVIDED TO YOU
ON AN "AS-IS" AND "AS AVAILABLE" BASIS AND SHARP AND ITS AFFILIATES MAKE NO WARRANTY
OR REPRESENIATION OF ANY KIND TO YOU, EITHER EXPRESS OR iMPLIED, iNCLUDiNG,
WITHOUT LIMF[7_TION, ANY WARRANTIES OF MERCHANTABILFfY, NON-INFRINGEMENT, FITNESS
FOR A PARTICULAR PURPOSE OR ANY WARRANTIES OF SUFfABILFT_, AVAILABILFfY, ACCURACY,
COMPLETENESS, SECURITY, TITLE, USEFULNESS, LACK OF NEGLIGENCE OR ERROR-FREE OR
UNINTERRUPIED OPERATION OR USE OF THE CONTENT OR SERVICES PROVIDED TO YOU OR
THAT THE CONTENT OR SERVICES WILL MEET YOUR REQUIREMENTS OR E!XPEC%_,TIONS.
• SHARP IS NOT AN AGENT OF AND ASSUMES NO RESPONSIBILFfY FOR THE ACTS OR OMISSIONS
OF THIRD PARTY CONTENT OR SERVICE PROVIDERS, NOR ANY ASPECT OF THE CONTENT OR
SERVICE RELATED TO SUCH THIRD PARTY PROVIDERS.
• IN NO E!VENT WILL SHARP AND/OR ITS AFFILIAIES BE LIABLE TO YOU OR ANY THIRD PARTY
FOR ANY DIRECT, INDIRECT, SPECIAL, INCDENIAL, PUNmVE, CONSEQUENTIAL OR OTHER
DAMAGES, WHETHER THE THEORY OF LIABILF[_ IS BASED ON CONTRACT, TORT, NEGLIGENCE,
BREACH OF WARRANTY, STRICT LIABILFfY OR OTHERWISE AND WHETrHER OR NOT SHARP AND/
OR ITS AFFILIATES HAVE BEEN ADVISED OF THE POSSIBILFFY OF SUCH DAMAGES.
Examples of Application Loges
v JJ
You
Q- 50
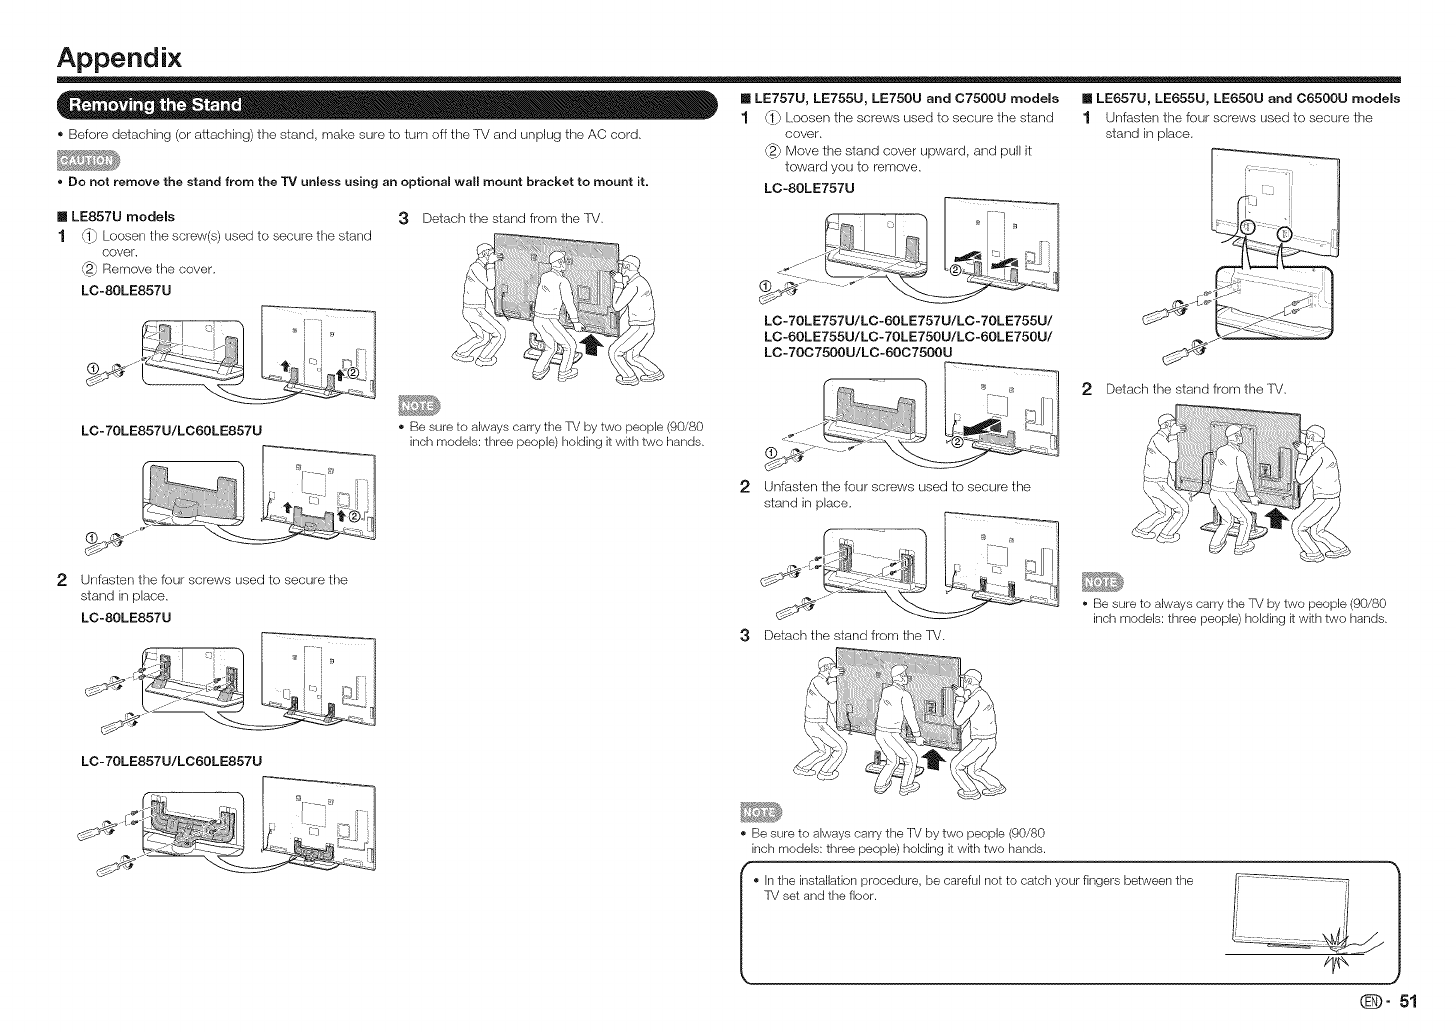
Appendix
® Before detaching (or attaching) the stand, make sure to turn off the TV and unplug the AC cord.
• Do not remove the stand from the TV unless using an optional wall mount bracket to mount it.
[] LE757U, LE755U, LE750U and C7500U modems
1 (1_ Loosen the screws used to secure the stand
cever.
@} Move the stand cover upward, and pull it
toward you to remove.
LC-80LE757U
[] LE657U, LE655U, LE650U and 06500U models
1 Unfasten the four screws used to secure the
stand in place.
[] LE857U models
1 _ Loosen the screw(s) used to secure the stand
cover.
_ Remove the cover.
LC-80LE857U
3Detach the stand from the 'f_L
LC-70LE757U/LC-60LE757U/LC-70LE755U/
LC-60LE755U/LC-70LE750U/LC-60LE750U/
LC -70C7500U/LC -60C7500U
2 Detach the stand from thef_/.
LC-70LE857U/LC60LE857U • Be sure to always carry the TV by two people (90/80
inch models: three people) holding it with two hands.
2Unfasten the four screws used to secure the
stand in place.
2Unfasten the four screws used to secure the
stand in place.
LC-80LE857U
3Detach the stand from the [V.
• Be sure to always carry the TV by two people (90/80
inch models: three people) holding k with two hands.
LC-70LE857U/LC60LE857U
• Be sure to always carry the TV by two people (90/80
inch models: three people) holding it wkh two hands.
f, in the k!stallation procedure, be careful not to catch your fingers between the
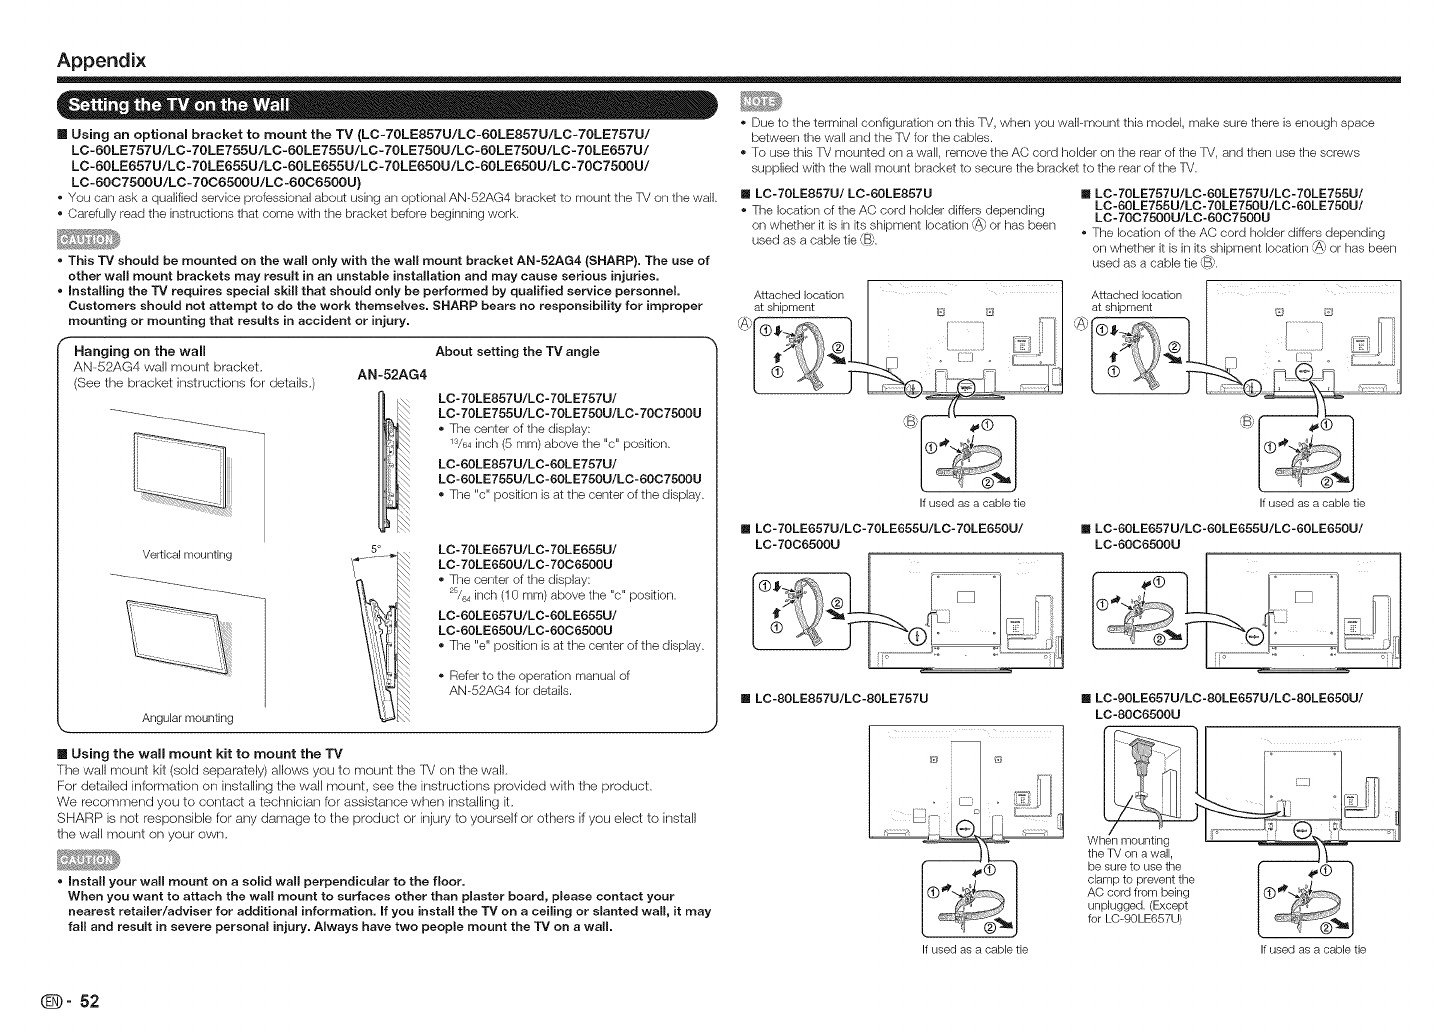
Appendix
m Using an optional bracket to mount the TV (LC-7OLE857U/LC-6OLE857U/LC-7OLE757U/
LC-60LE757U/LC-70LE755U/LC-60LE755U/LC-TOLE750U/LC-60LE750U/LC-7OLE657U/
LC-60LE657U/LC-70LE655U/LC-60LE655U/LC-70LE650U/LC-60LE650U/LC-70C7500U/
LC-60C7500U/LC- 70C6500U/LC -60C6500U)
• You carl ask a qualified service professional about using an optional AN%2AG4 bracket to mount the TV on the wall.
• Carefully read the instructions that come with the bracket before beginning work.
•This TV should be mounted on the wall only with the wall mount bracket AN-52AG4 (SHARP). The use of
other wall mount brackets may result in an unstable installation and may cause serious injuries.
• Installing the "IV requires special skill that should only be performed by qualified service personnel.
Customers should not attempt to do the work themselves, SHARP bears no responsibility for improper
mounting or mounting that results in accident or injury,
f
i Hanging on the wall About setting the TV angle
AN%2AG4 wall mount bracket. AN-52AG4
(See the bracket instructions for details,)
Vertical mounting
Angular mounting
I_i LC- 70LE857U/LC- 70LE757U/
LC- 70LE755U/LC- 70LE750U/LC- 70C7500U
• The center of the display:
lS/64inch (5 mm) above the "c" position.
LC-60LE857U/LC-60LE757U/
\\ LC-60LE755U/LC-60LE750U/LC- 6007500Uposition display.
• The "c" is at the center of the
LC- 70LE657U/LC- 70LE655U/
LC- 70LE650U/LC- 70C6500U
• The center of the display:
2s/64inch (10 mm) above the "c" poskion.
LC-60LE657U/LC-60LE655U/
LC-60LE650U/LC-60C6500U
• The "e" position is at tile center of the display.
, Refer to the operation manual of
AN-52AG4 for details.
ImUsing the wall mount kit to mount the TV
The wall mount kit (sold separately) allows you to mount the TV on the wall,
For detailed information on installing the wall mount, see the instructions provided with the product,
We recommend you to contact a technician for assistance when installing it,
SHARP is not responsible for any damage to the product or injury to yourself or others if you elect to install
the wall mount on your own,
• Install your wall mount on a solid wall perpendicular to the floor,
When you want to attach the wall mount to surfaces other than piaster board, please contact your
nearest retailer/adviser for additional information. If you install the TV on a ceiling or slanted wall, it may
fall and result in severe personal injury. Always have two people mount the TV on a wall,
• Due to the terminal configuration on this TV, when you wall-mount this model, make sure there is enough space
between the wall and the TV for the cables.
• To use this TV mounted on a wall, remove the AC cord holder on the rear of the TV, and then use the screws
supplied wkh the wall mount bracket to secure the bracket to the rear of the TV.
[] LC-70LE857U/LC-60LE857U
• The location of the AO cord holder differs depending
on whether it is in ks shipment location {A} or has been
used as a cable tie {B).
[] LC-70LE757U/LC-60LE757U/LC-70LE755U/
LC-60LE755U/LC- 70LE750U/LC-60LE750U/
LC- 70C7500U/LC-60C7500U
• The location of the AC cord holder differs depending
on whether it is in its shipment location {A} or has been
used as a cable tie {B}.
Ifused asacabletie
[] LO-70LE657U/LC-70LE655U/LC-70LE650U/
LO-70C6500U
Ifusedasacabletie
[] LC-60LE657U/LC-60LE655U/LC-60LE650U/
LC-60C6500U
[] LC-80LE857U/LC-80LE757U
If used as a cable tie
[] LC-90LE657U/LC-80LE657U/LC-80LE650U/
LC-80C6500U
Who °'' , ° [3
the TV on a wall, _ L_
be sure to use the _--'f_
clam;to?;;v;_;ithe . _f_ I
AC c
unpl
for L
If used as a cable tie
(D" 52

Appendix
Wall Mount Kit Specifications
Standard dimensions for wall mount kits are shown below.
® The illustration is based on the LC-80LE857U model as an example.
..al
I
I
ii i i i i i
ji
WALL
" WALL MOUNT KIT
¸¸¸¸¸¸2¸ I
I
LC-70LE857U/ LC-60LE857U/
LO-80LE657U/ LC-70LE757U/ LC-70LE657U/ LO-60LE757U/ LC-60LE657U/
LC@0LE657U LC-80LE857U/ LC-80LE650U/ LC-70LE755U/ LC-70LE655U/ LC-60LE755U/ LC-60LE655U/
LC-80LE757U LC-70LE650U/ LC-60LE650U/
LC-8006500U LC-70LE750U/ LC-7006500U LC-60LE750U/ LC-6006500U
LC-7007500U LC-6007500U
VESA screw
hole specs 23 s/s(600) - 15 s/4(400) 15 s/4(400) - 15 s/4 (400)
(A-B)
al 1 s7/64(40) 2 61/64(75)
Width a2 13 2s/64(340) 14 49/64(375) 10 2Vs_(275)
bl 7 7/s (200) 10 41/64(270) 7 7/s (200) 7 Sl/64(190) ! 7 7/s (200) 9 1/16(230)
Height b2 14 49/64(375) 13 19/s2(345) 11 1/s2(280) 14 11/64(360) 10 4V64(270) I 12 s9/64(320) 9 1/16(230)
b3 6 sTA4(175) 5 _s/s2(145) 5 sgA4(150) 6 s/16(160) 2 sA (60) 4 47/64(120) 2 sA (60)
ol 3 s/a_(80) 2 4%4(70)
al : Maximum distance from the mounting hole
a2: Maximum distance from the TV's center
bl : Distance between the TV's center and the mounting hole
b2: Maximum distance from the TV's center
b3: Maximum distance from the mounting hole
c1: Minimum gap
SCREW
WALL MOUNT
0N,T
MOUNTING I//" /I_ DEPTH OF
HO[:ES ......... /_ MOUNTING HOLES
,_ Do not install the wall mount kR while your TV is turned on. It may resuR in personal injury due
to electric shock.
For the screws, refer to the table shown below.
90/80 inch models 70/60 inch models
Standard screws M8 (Use 1.25 pRch screws.) M6 (Use 1.0 pitch screws.)
Length(Depth of mounting holes) 1s/s2(12)
Quantity 4 pcs.
Do not mount the TV at a tilt.
To use this TV mounted on a wall, remove the cable tie as needed.
Do not use screws that do not comply with the VESA standard screw specifications.
o Do not use screws that are longer than the standard length. Screws that are too long may cause damage to the inside of the TV.
o Do not fasten the screws too firmly or loosely. This may damage the product or cause the product to fall, leading to personal injury. SHARP is not liable for these kinds of accidents.
o SHARP is not liable for product damage or personal injury when a non-VESA or non-specified wall mount is used or the consumer fails to follow the product installation instructions.
(iD" 53
Appendix
Problem Possible Solution
Problem Possible Solution
• No power • Check if you pressed POWER on the remote control unk. =_ Page 16
• is the AC cord disconnected? • Page 9
• Has the power been turned on? _ Page 16
• Unit cannot be • External influences such as lightning, static electricity, may cause improper operation.
operated, in this case, operate the unk after first turning off the power of the TV or unplugging
the AC cord and replugging it in after 1 or 2 minutes.
• Remote control unk
does not operate.
• Is the equipment to be operated by the remote control unit set correctly? Press TV to
set the remote control unk to the setting for operating the TV.
• Are batteries inserted wkh polarky ( I , -) aligned? =_ Page t 0
• Are batteries worn out2 (Replace wkh new batteries.)
• Are you using k under strong or fluorescent lighting?
• Is a fluorescent light illuminated near the remote control sensor?
• Is "PC Control Lock" selected in "Operation Lock Out"? =$' Page 27
• Picture is cut off/with • Is the image poskion correct? _' Pages 27 and 44
sidebar screen. • Are screen mode adjustments such as picture size made correctly?
_' Pages 20 and 2t
• Strange color, • Adjust the picture tone. =_ Pages 24 and 25
light color, or color • Is the room too bright? The picture may look dark in a room that is too bright.
misalignment
• Power is suddenly • is the sleep timer set? =_ Page 19
turned off. • Check the power control settings. _ Page 26
o The unit's internal temperature has increased. Remove any objects blocking vent or clean.
• No picture • is connection to other components correct? =$' Pages t3 to 15 and 4t
• is the correct input selected? _' Pages 13 and 18
• is "On" selected in "Audio Only"? _ Page 26
• if the PC image is not displayed, check the following:
- When connecting a laptop PC to the TV, check that display output mode of the PC
is set to external monitor
- Check the resolution setting on the PC. Is a non-compatible signal being input?
_, Page 45
• Picture quality of HD
programs is poor.
• To enjoy HD images from external equipment, you are required to set up HDMI
CORReCtion or component connection.
• If the program content is not of HD quality, HD images cannot be displayed. Check
that the program you are viewing provides HD images.
• The HD cable/satellke set-top box may need to be configured to output HD images
via cable/satellite.
• The cable/satellite broadcast may not support a signal resolution of 1080p.
• The TV sometimes • This is not a malfunction. This happens when the cabinet slightly expands and
makes a cracking contracts according to change in temperature. This does not affect the TV's
sound, performance.
• The AQUOS • Is the ETHERNET cable connected correctly? =$' Page 46
ADVANTAGE LIVE • Check the settings of "lnternet Setup". _ Pages 46 to 47
cannot be displayed.
• Some Intemet • The TV has only linked functions compared with regular PC browsers, mS,Page 48
functions used on a PC
are not available from
the TV.
• No sound I " Is connection to other components correct? =#' Pages 13 to 15 and 4t
! • Is the volume too low? _ ' Page 18
i • Is "Variable" selected in "Output Select"? =_' Page 27
! • Have you pressed MUTE on the remote control unR? =_ Page 18
i • Check the audio output of the connected external equipment. Is the volume too low or
muted?
! • When external equipment is connected via an HDMI cable, you may need to configure
the audio to be output through the HDMI cable.
! • When audio is not output from external equipment connected to the PC IN or HDMI IN
2 terminal, check the "Audio Select" setting. _ Page 44
i • Even when external equipment is connected using an HDMPcertified cable, an audio
cable connection may be required depending on the type of equipment and the media
being played back. In this case, in addition to connecting an HDMI-certified cable to
the HDMI IN 2 terminal, connect a © 8.5 mm stereo minijack cable to the AUDIO IN
terminal and set "Audio Select" to "HDMl+Analog". _ Page 44
i • When connecting a PC via an HDMI-certified cable, check the following:
Is the audio output of the PC configured correctly? Check the audio output settings
and output audio format in Sound Properties on the PC.
The audio formats compatible with this TV are PCM, Dolby Digital and DTS. WRh
other formats, audio cannot be output.
Depending on the board, only video signals may be output. In this case, in addRion
to connecting an HDMl-certified cane to the HDMI IN 2 terminal, connect a ©
8.5 mm stereo minijack cable to the AUDIO IN terminal and set "Audio Select" to
"HDMl+Analog". ml_Page 44
! • If you are using a DVI-HDMI conversion cable to connect external equipment to the
TV, check the following:
Is an audio cable connected? The DVI-HDMI conversion cable is for video only.
Connect a © 8.5 mm stereo minijack cable to listen to the audio.
Is HDMI IN 2 being used2 When the TV is connected to another HDMI IN terminal,
the audio and video are not output together even if a © 8.5 mm stereo minijack
cable is connected to the shared AUDIO IN terminal for PC iN and HDMI iN 2.
Check the "Audio Select" setting. Set "Audio Select" to "HDMl+Analog". =$, Page 44
Problem Possible Solution
• 3D images are not I " Is "SD Auto Change" set to "Off"? Press 3D to switch to 8D mode. _ Page 33
displayed. _• If "SD Auto Change" is set to "Mode 1" or "Mode 2" but no 3D images are displayed,
check the display format of the content being viewed. Some 8D image signals may
not be recognized as 8D images automatically. Press 3D to select the appropriate
display format for the 3D image. IS' Pages 33 to 34
! • Is the power of the 3D Glasses turned on?
• Are the 3D Glasses set to 2D mode?
For further details, refer to the operation manual of your 8D Glasses.
(D" 54
Appendix
CLEARING THE SECRET NUMBER
The example of an error Error
message displayed on ncode
screen
Possible Solution
* Failed to receive E202
broadcast.
* No broadcast now. E203
*An incompatible
audio signal has been
received. Check the
output device settings.
*Check the antenna cable. Check that the antenna is correctly setup.
*Check the broadcast time in the program guide.
*This message is displayed when an audio format other than PCM, DTS or
Dolby Digkal is input.
Set the audio output format of connected external HDMI equipment to
PCM, DTS or Dolby Digkal.
Refer to the operation manual of the external equipment for setting
details.
You can read the software licenses in the on-screen display menu, Refer to "Information" > "Software
License",
If you forget the secret number, clear the secret number using the following procedure,
1 Select an item from the list below to display the secret number input screen, (For operating the on-
screen display menu, see page 22,)
* "Color system" (_ "Terminal Setting", System Options menu).
* "EZ Setup" or "Reset" {_ InRial Setup menu).
* "OH Setup" (_ "Broadcasting Setup" _ InRial Setup menu).
* "Parental CTRL" (_ "individual Setup", initial Setup menu).
* "Interactive Service" (_ "lntemet Setup" _ Initial Setup menu).
* "Software Update" {_ Information menu).
2 Press and hold both CH/X and VOL + on the TV simultaneously until the message appears on the
screen,
The secret number is _•
*As a precautionary measure, make a note of your secret number above, and keep R in a safe place.
m Software composition
The software included in this product is comprised of various software components whose individual
copyrights are held by SHARP or by third parties,
Cautions regarding use in high and low temperature environments
*When the unk is used in a low temperature space (e.g. room, office), the picture may leave trails or appear
slightly delayed. This is not a malfunction, and the unR will recover when the temperature returns to normal.
* Do not leave the unR in a hot or cold location. Also, do not leave the unit in a location exposed to direct sunlight
or near a heater, as this may cause the cabinet to deform and the front panel to malfunction.
Storage temperature: - 4°F to _ 140°F (- 20°0 to _ 60°0)
(i_)" 55
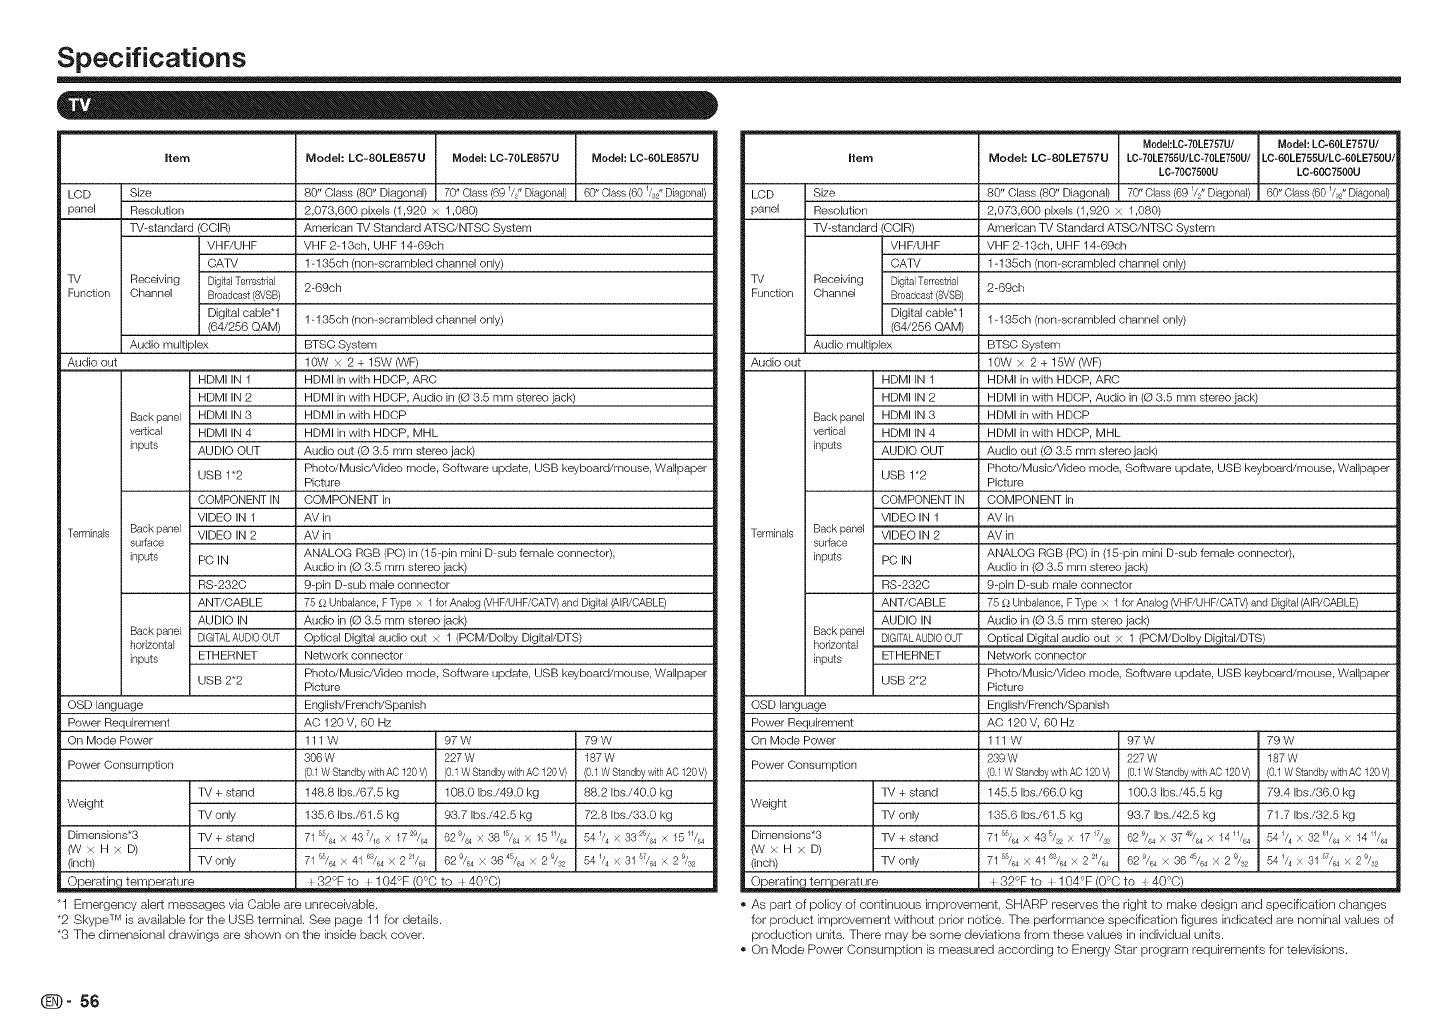
Specifications
item Model: LC-80LE857U Model: LC-70LE857U Model: LC-60LE857U
LCD Size 80" Class (80" Diagonal) 70" Class (691//, Diagoeal) 60" Class (B01/32"Diagonal)
panel Resolution 2,073,600 pixels (1,920 x 1,080)
T%standard (CCIR) American TV Standard ATSC/NTSC System
VHF/UHF VHF 2-13ch, UHF 14-69ch
OATV 1-136ch (non-scrambbd channel only)
TV Receiving DigitalTerrestrial 2-69ch
Function Channel Broadcast(SVSB)
Digital cable*l 1-135ch (non-scrambbd channel only)
(64/266 CAM)
Audio mult[pbx BTSC System
Audio out 10W × 2 + 15W ONF)
HDMI IN 1 HDMI in with HDCP, ARC
HDMI IN 2 HDMI in with HDCP, Audio in (@3.6 mm stereo jack)
Back panel HDMI IN 3 HDMI in with HDCP
vertical HDMI IN 4 HDMI in with HDCP, MHL
inputs AUDIO OUT Audio out (© 3.6 mm stereo jack)
USB 1"2 Photo/Music/Video mode, Software update, USB keyboard/mouse, Wallpaper
Picture
COMPONENT IN COMPONENT in
VIDEO IN 1 AV in
Terminab Back panel VIDEO IN 2 AV in
surface
inputs PC IN ANALOG RGB (PC) in (15-pin mini D-sub female connector),
Audio in (© 3.5 mm stereo jack)
RS=2320 9=pin D=sub male connector
ANT/CABLE 75 _ Unbalance, FType x 1for Analog (VHF/UHF/CATV)and Digital (AIR/SABLE)
AUDIO IN Audio in (© 3.5 mm stereo jack)
Back panel DIGITALAUDIOOUT Optical Digital audio out × 1 (POM/Dolby Dig[tal/DTS)
horizontal
inputs ETHERNET Network connector
USB 2*2 Photo/Music/Video mode, Software update, USB keyboard/mouse, Wallpaper
Picture
OSD language English/FrenctVSpanish
Power Requirement AO 120 V, 60 Hz
On Mode Power 111 W 97 W 79 W
306 W 227 W 187 W
PowerOonsumption (0.1WStandbywithAC120V) (0.1WStandbywithAC120V) (0.1WStandbywithAO120V)
148.8 Ibs./67.5 kg 108.0 bs./49.0 kg 88.2 Ibs./40.O kg
Weight 135.6 Ibs./61.5 kg 93.7 bs./42.5 kg 72.8 Ibs./33.0 kg
Dimensions*3 71 55/64x 437/16 x 1729/64 62 % X 3815/64X 1511/64 541/4 X 332% X 15 11/64
(VV× H X D)
(inch) 71 _5/_ x 41%4 X 2 21/_ 62 9/64X 36 45/64x 2 9/52 54 1/4X 31 _7/_ x 2 9/52
TV + stand
TV only
TV + stand
TV only
O)eratin tem)erature 32°Fto I 104°F(0°Oto I 40°_
"1 Emergency alert messages via Cable are unreceivable.
TM
*2 Skype is available for the USB terminal. See page 11 for details.
*3 The dimensional drawings are shown on the inside back cover.
ModeI:LC-70LE757U/ Model: LC-60LE757U/
item Model: LC-80LE757U LC-70LE755U/LC-70LE750U/LC-60LE755U/LC-60LE750U/
LC-70C7500U LC-60C7500U
LCD Size 80" Class (80" Diagonal) 70" Class (691/2" Diagonal) 60" Class (601/52"Diagonal)
panel Resolution 2,073,600 pixels (1,920 x 1,080)
T%standard (CCIR) American TV Standard ATSC/NTSC System
VHF/UHF VHF 2-13ch, UHF 14-69ch
OATV 1=135ch (non=scrambled channel only)
TV Receiving DigitalTerrestrial 2-69ch
Function Channel Broadcast(SVSB)
Digital cable* 1 1-135ch (non=scrambled channel only)
(64/256 CAM)
Audio multiplex BTSC System
Audio out 10W x 2 + 15W ONF)
HDMI IN 1 HDMI in with HDCP, ARC
HDMI IN 2 HDMI in with HDCP, Audio in (© 3.5 mm stereo jack)
Back panel HDMI IN 3 HDMI in with HDCP
vertical HDMI IN 4 HDMI in with HDCP, MHL
inputs AUDIO OUT Audio out (© 3.5 mm stereo jack)
USB 1"2 Photo/Music/Video mode, Software update, USB keyboard/mouse, Wallpaper
Picture
COMPONENT IN COMPONENT in
VIDEO IN 1 AV in
Terminals Back panel VIDEO IN 2 AV in
surface
inputs PC IN ANALOG RGB (PC) in (15@in mini D-sub female connector),
Audio in (© 3.5 mm stereo jack)
RS-2320 9-pin D-sub male connector
ANT/CABLE 75 £2Unbalance, F Type x 1for Analog (VHF/UHF/CATV)and Digital (AIR/CABLE)
AUDIO IN Audio in (© 3.5 mm stereo jack)
Back panel
horizontal DIGITALAUDIOOUT Optical Digital audio out x 1 (POM/DoIby Digital/DTS)
inputs ETHERNET Network connector
USB 2*2 Photo/Music/Video mode, Software update, USB keyboard/mouse, Wallpaper
Picture
OSD language English/French/Spanish
Power Requirement AC 120 V, 60 Hz
On Mode Power 111 W 97 W 79 W
239 W 227 W 187 W
PowerOonsumption (0.1WStandbywithAO120V) (0.1WStandbywithAC120V) (0.1WStandbywithAC120V)
TV + stand 145.5 Ibs./66.0 kg 100.3 Ibs./45.5 kg 79.4 Ibs./36.0 kg
Weight TV only 135.6 Ibs./61.5 kg 93.7 Ibs./42.5 kg 71.7 Ibs./32.5 kg
Dimensions*3 TV + stand 71 55/64X 43 5/52X 17 17/32 62 9/64X 37 49/64X 14 11/64 54 1/4 X 32 %4 X 14 11/64
ONxH xD)
(inch) TV only 71 55/64 X 41 5/64 X 2 21/64 62 9/64 X 36 45/64 X 2 9/32 54 1/4 x 31 57/64 X 2 9/32
O' eratinc terw _rature I 32_ to I 10_F/O°O to I 40°_
As part of policy of continuous improvement, SHARP reserves the right to make design and specification changes
for product improvement wkhout prior notice. The performance specification figures indicated are nominal values of
production units. There may be some deviations from these values in individual unks.
On Mode Power Consumption is measured according to Energy Star program requirements for televisions.
(D" 56
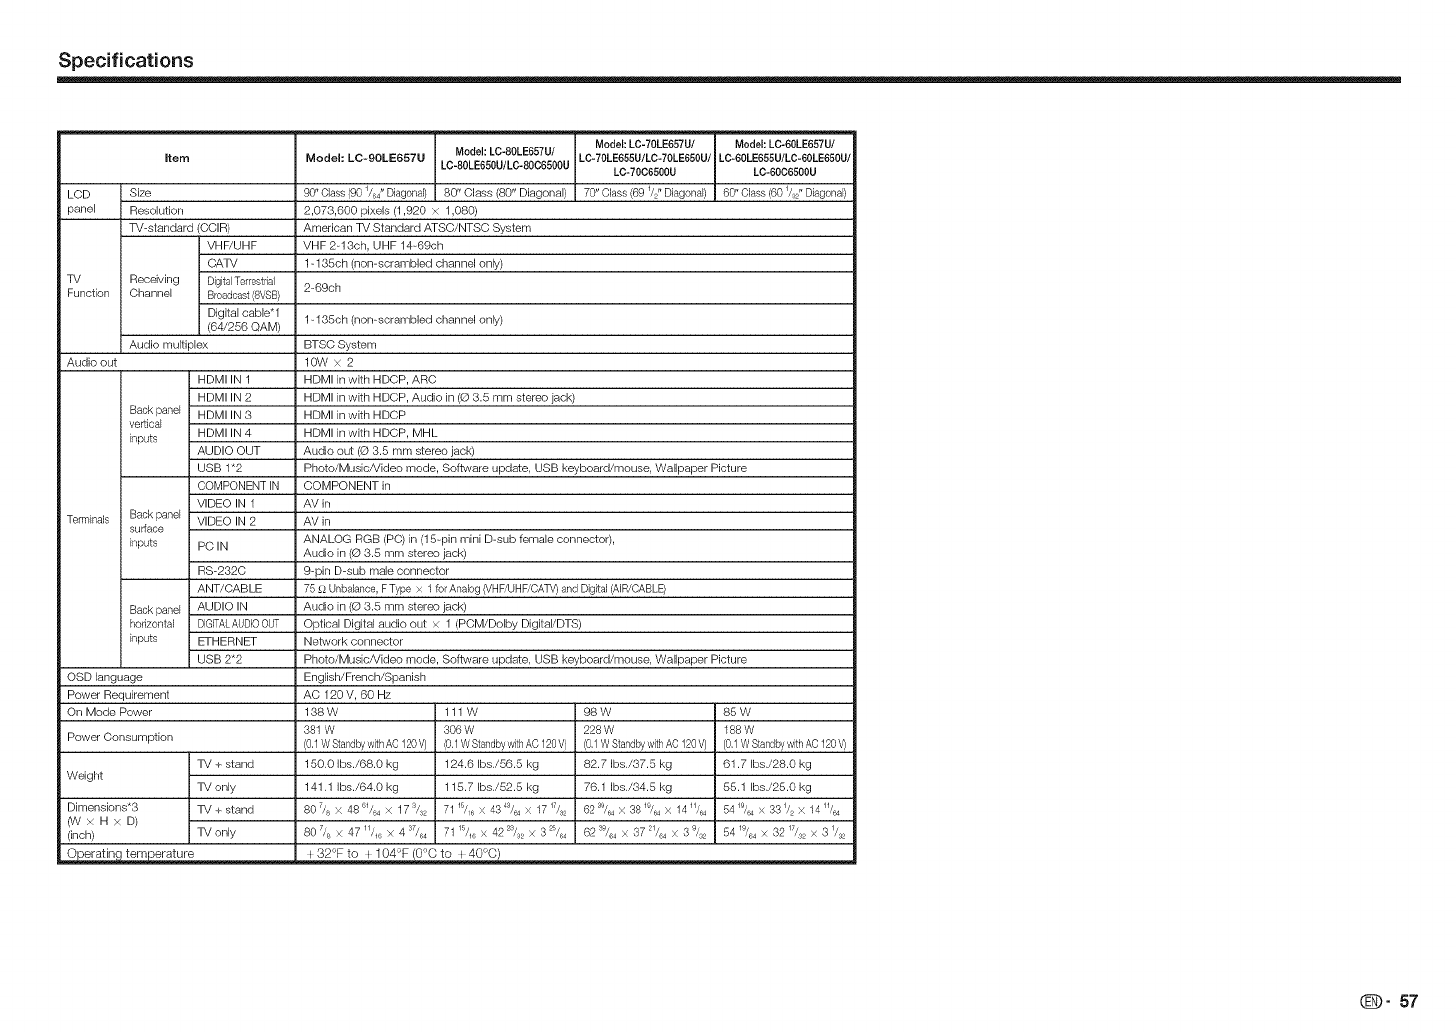
Specifications
Model: LC-70LE657U/ Model: LC-60LE657U/
Model: LC-80LE657U/
item Model: LC-90LE657U LC-70LE655U/LC-70LE650U/ LC-60LE655U/LC-60LE650U/
LC-80LE650U/LC-80C6500U LC-70C6500U LC-60C6500U
LCD Size 90" Class (901/64"Diagonal) 80" Class (80" Diagonal) 70" Class (69 1/2"Diagonal) 60" Class (601/82"Diagonal)
panel Resolution 2,073,600 pixels (1,920 × 1,080)
T%standard (CCIR) American TV Standard ATSC/NTSC System
VHF/UHF VHF 2-13ch, UHF 14-69ch
CATV 1-136ch (non-scrambled channel only)
TV Receiving DigitalTerrestrial 2-69ch
Function Channel Broadcast(8VSB)
Digital cabb*l 1-135ch (non-scrambled channel only)
(64/256 QAM)
Audio muRipbx BTSC System
Audio out lOW × 2
HDMI IN 1 HDMI in with HDCP, ARC
HDMI IN 2 HDMI in with HDCP, Audio in (© 3.5 mm stereo jack)
Back panel HDMI IN 3 HDMI in with HDCP
vertical
inputs HDMI IN 4 HDMI in with HDCP, MHL
AUDIO OUT Audio out (@ 3.5 mm stereo jack)
USB 1"2 Photo/Music/Video mode, Software update, USB keyboard/mouse, Wallpaper Picture
COMPONENT IN COMPONENT in
VIDEO IN 1 AV in
Terminals Back panel VIDEO IN 2 AV in
surface
inputs PC IN ANALOG RGB (PC) in (15=pin mini D=sub female connector),
Audio in (© 3.5 mm stereo jack)
RS=2320 9=pin D=sub male connector
ANT/CABLE 75 _,2Unbalance,F Type x 1 for Analog (VHF/UHF/CATV)and Digital (AIR/CABLE)
Back panel AUDIO IN Audio in (© 3.5 mm stereo jack)
horizontal BIGITALAUDIOOUT Optical Digital audio out × 1 (POM/Dolby Digital/DTS)
inputs ETHERNET Network connector
USB 2*2 Photo/Music/Video mode, Software update, USB keyboard/mouse, Wallpaper Picture
OSD language English/French/Spanish
Power Requirement AC 120 V, 60 Hz
On Mode Power 138 W 111 W 98 W 86 W
381 W 306W 228W 188W
PowerOonsumption (0,1WStandbywithAC120V) (0.1WStandbywithAO120V} (0,1WStandbywithAC120V) (0,1WStandbywithAC120V)
TV + stand 150.0 Ibs./68.0 kg 124.6 bs./SB.5 kg 82.7 Ibs./37.5 kg 61.7 bs./28.0 kg
Weight TV only 141.1 Ibs./64.0 kg 115.7 bs./52.5 kg 76.1 Ibs./34.5 kg 55.1 bs./25.O kg
Dimensions*3 TV + stand 80 7/s x 48 G1/64x 17 "%£ 71 s/l_ x 4348/6_x 17 17/82 62 sg/q X 3819/q X 14 "/64 5419/_4x 331/2 X 1411/6_
(WxHxD)
(inch) TV only 80 7/s x 47 11/IGx 437/64 711S/1_× 42 2% × 32S/_4 62 "%4 X37 21/64X 39/32 5419/64 X 3217/S2X 31/S2
O_irk tem)erature I 32°Fto I 104°F 0°Oto I 40°0
@- 57
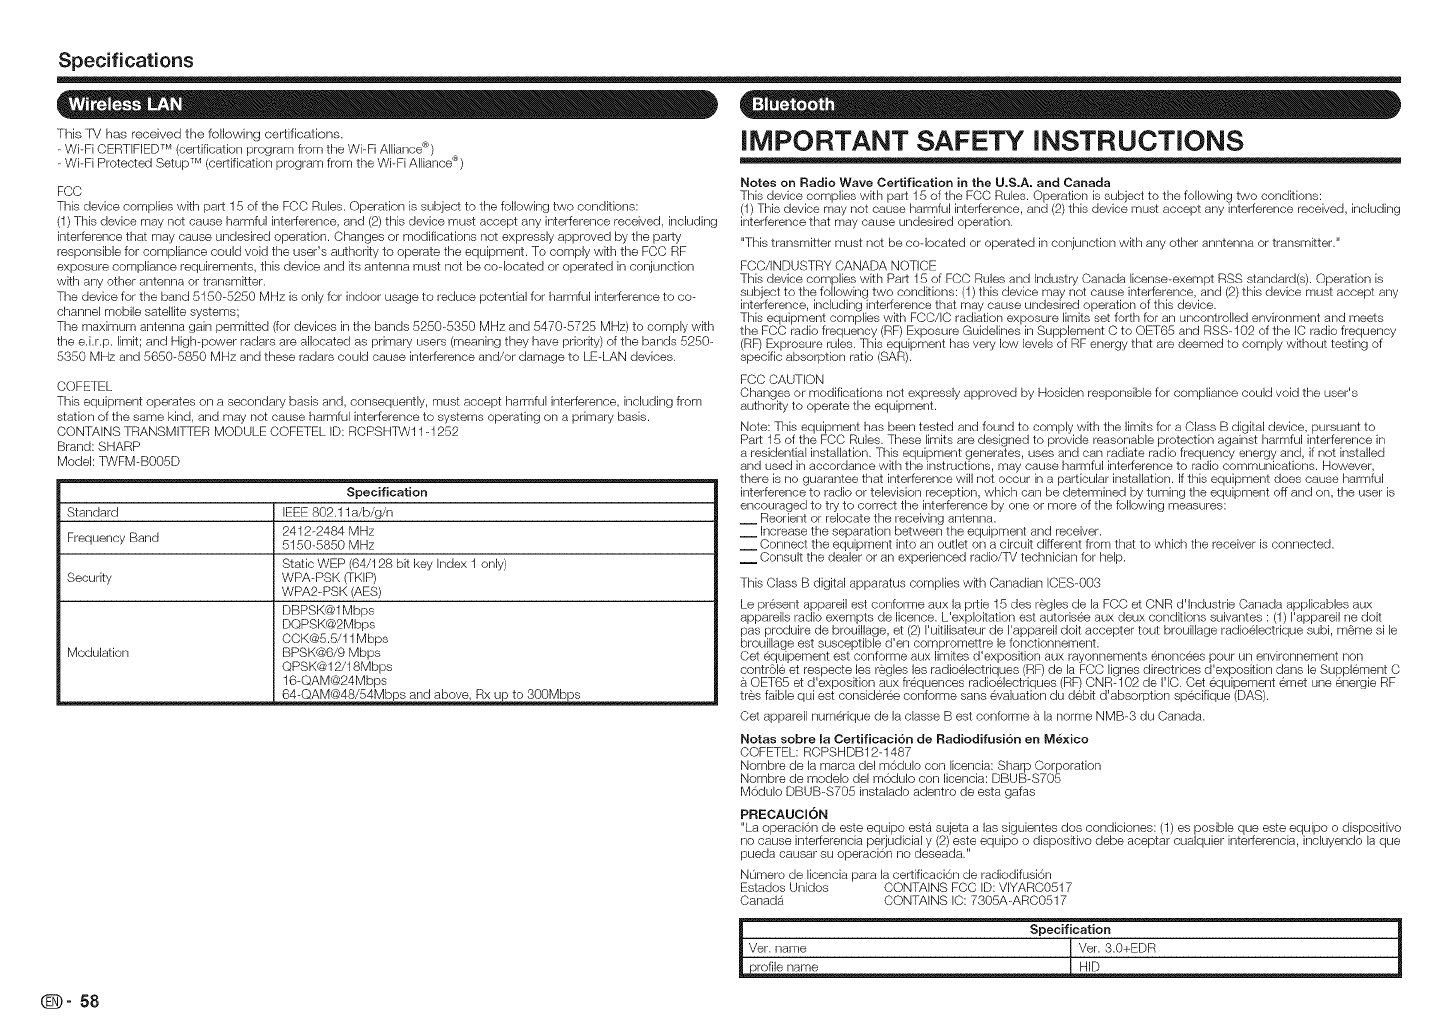
This TM has received the following certifications,
- Wi-Fi CERTIFIED TM (certification program from the Wi-Fi Alliance ®)
- Wi-Fi Protected Setup TM (certification program from the WPFi Alliance ®)
Specifications
IMPORTANT SAFETY INSTRUCTIONS
FCC
This device complies wkh part 15 of the FCC Rubs. Operation is subject to the following two condkions:
(1) This device may not cause harmful interference, and (2) this device must accept any interference received, including
interference that may cause undesired operation. Changes or modifications not expressly approved by the party
responsble for compliance could void the user's authorky to operate the equipment. To comply wkh the FCC RF
exposure compliance requirements, this device and ks antenna must not be codocated or operated in conjunction
wkh any other antenna or transmitter.
The device for the band 5150-5250 MHz is only for indoor usage to reduce potential for harmful interference to co-
channel mobile satellite systems;
The maximum antenna gain permitted (for devices in the bands 5250-5350 MHz and 5470-5725 MHz) to comply wkh
the e.i.r.p, limit; and High@ower radars are allocated as primary users (meaning they have priority) of tile bands 5250-
5350 MHz and 5650-5850 MHz and these radars could cause interference and/or damage to LE-LAN devices.
COFETEL
This equipment operates on a secondary basis and, consequently, must accept harmful interference, including from
station of the same kind, and may not cause harmful interference to systems operating on a primary basis.
CONTAINS TRANSMIWER MODULE COFETEL ID: RCPSHTW11-1252
Brand: SHARP
Model: TWFM-B005D
Specification
Standard IEEE 802.11a/b/g/n
2412-2484 MHz
Frequency Band 5150-5850 MHz
Static WEP (64/128 bit key Index 1 only)
Securky WPA-PSK (TKIP)
WPA2-PSK (AES)
DBPSK@I Mbps
DQPSK@2Mbps
00K@5.5/11Mbps
Modulation BPSK@6/9 Mbps
QPSK@I 2/18Mbps
16-QAM@24Mbps
__ 64-QAM@48/54Mbps and above, Rx up to 300Mbp_
Notes on Radio Wave Certification in the U.S.A. and Canada
This device complies wkh part 15 of the FCC Rubs. Operation is subject to the following two condkions:
(1) This device may not cause harmful interference, and (2) this device must accept any interference received, including
interference that may cause undesired operation.
"This transmitter must not be codocated or operated in conjunction with any other anntenna or transmitter."
FCC/INDUSTRY CANADA NOTICE
This device complies wkh Part 15 of FCC Rules and Industry Canada Ibense-exempt RSS standard(s). Operation is
subject to the following two condkions: (1) this device may not cause interference, and (2) this device must accept any
interference, including interference that may cause undesired operation of this device.
This equipment complies wkh FCC/IC radiation exposure limits set forth for an uncontrolled environment and meets
the FCC radio frequency (RF) Exposure Guidelines in Supplement C to OET65 and RSS- 102 of the IC radio frequency
(RF) Exprosure rubs. This equipment has very low levels of RF energy that are deemed to comply wkhout testing of
specific absorption ratio (SAR).
FCC CAUTION
Changes or modifications not expressly approved by Hosiden responsible for compliance could void the user's
authorky to operate the equipment.
Note: This equipment has been tested and found to comply wkh the limks for a Class B digital device, pursuant to
Part 15 of the FCC Rubs. These limits are designed to provide reasonable protection against harmful interference in
a residential installation. This equipment generates, uses and can radiate radio frequency energy and, if not installed
and used in accordance with the instructions, may cause harmful interference to radio communications. However,
there is no guarantee that interference will not occur in a particular installation. If this equipment does cause harmful
interference to radio or television reception, which can be determined by turning the equipment off and on, the user is
encouraged to try to correct the interference by one or more of the following measures:
__ Reorient or relocate the receiving antenna.
__ Increase the separation between the equipment and receiver.
__ Connect the equipment into an outlet on a circuit different from that to which the receiver is connected.
__ Consult the dealer or an experienced radio/TV technician for help.
This Class B digital apparatus complies wkh Canadian ICES-003
Le present appareil est conforme aux la prtie 15 des regles de la FCC et CNR d'lndustde Canada applbables aux
appareils radio exempts de licence. L'explokation est autodsee aux deux condkions suivantes : (1) I'appareil no dolt
pas produire de brouillage, et (2) I'uitilisateur de I'appareil doit accepter tout brouillage radioelectrique subi, memo si le
brouillage est susceptible d'en compromettre le fonctionnement.
Cot equipement est conforme aux limites d'exposition aux rayonnements enoncees pour un environnement non
contrele et respecte los regles les radioelectdques (RF) de la FCC lignes directrbes d'exposition dans le Supplement C
OET65 et d'exposkion aux frequences radioeiectriques (RF) CNR-102 de I'lC. Cet equipement emet une energie RF
tres faible qui est consideree conforme sans evaluation du debk d'absorption specifique (DAS).
Cot appareil numerique de la classe Best conforme a la norme NMB-3 du Canada.
Notas sobre la Certificaci6n de Radiodifusi6n en Mexico
COFETEL: RCPSHDB12-1487
Nombre de la marca del m6dulo con licencia: Sharp Corporation
Nombre de modelo del m6dulo con licencia: DBUB-S705
M6dulo DBUB-S705 instalado adentro de esta gafas
PRECAUCION
"La operacbn de este equipo esta sujeta alas siguientes dos condiciones: (1) es posble que este equipo o disposifivo
no cause interferencia perjudicial y (2) este equipo o disposkivo debe aceptar cualquier interferencia, incluyendo la que
pueda causar su operacbn no deseada."
NOmero de Ibencia para la certificacbn de radiodifusbn
Estados Unidos CONTAINS FCC ID: VIYARC0517
Canada CONTAINS IC: 7305A-ARC0517
Specification
Ver. narne I Ver. 3.0+EDR
_ofile name HID
(D" 58
Trademarks
* SmartCentral is a registered trademark of Sharp Corporation. i * Manufactured under license under U.S. Patent Nos: 5,956,674; 5,974,380; 6,487,535 & other U.S. and i
l1
Products that have earned the ENERGY STAR ® are designed to protect the environment through superior
energy efficiency.
Manufactured under license from Dolby Laboratories. Dolby and the double-D symbol are trademarks of
Dolby Laboratories.
The terms HDMI and HDMI High-Definition Multimedia Interface, and the HDMI Logo are trademarks or
registered trademarks of HDMI Licensing LLC in the United States and other countries.
DivX ®, DivX Certified ®, DivX Plus ® HD and associated loges are trademarks of Rovi Corporation or its
subsidiaries and are used under license.
The Wi-Fi CERTIFIED Logo is a certification mark of the Wi-Fi Alliance.
The Wi-Fi Protected Setup Mark is a mark of the Wi-Fi Alliance.
DLNA ®, the DLNA Logo and DLNA CERTIFIED TM are trademarks, service marks, or certification marks of
the Digital Living Network Alliance.
This product includes Home Networking Software 'DiXiM' developed by DigiOn, Inc.
L C 1721 _ l'-, L C F O N T, TJI>'_--C 7_ _ i" and LC logo mark are registered trademarks of SHARP
Corporation.
This product is embedded with LC Font technology, which was developed by SHARP Corporation for
clearly displaying easy-to-read characters on LCD screens. However, other fonts are used for some screen
pages, too.
"x.v.Color" and Xov.Co_or are trademarks of Sony Corporation.
worldwide patents issued & pending. DTS, the Symbol, & DTS and the Symbol together are registered
trademarks & DTS 2.0+Digital Out is a trademark of DTS, Inc. Product includes software. © DTS, Inc. All
Rights Reserved.
i * MHL, the MHL Logo, and Mobile High-Definition Link are trademarks or registered trademarks of MHL LLC i
in the United States and other countries. 1
MHL TM
i * The Sluetooth ® word mark and loges are registered trademarks owned by Bluetooth SIG, Inc. and any use j
of such marks by SHARP Corporation is under license. Other trademarks and trade names are those of 1their respective owners.
ABOUT DlVX VIDEO: DivX ¢ is a digital video format created by DivX, LLC, a subsidiary of Rovi Corporation.
This is an official DivX Certified e device that plays DivX video. Visit divx.com for more information and
software tools to convert your files into DivX videos.
ABOUT DIVX VIDEO-ON-DEMAND: This DivX Certified e device must be registered in order to play
purchased DivX Video-on-Demand (V©D) movies. To obtain your registration code, locate the DivX VOD
section in your device setup menu. Go to vod.divx.com for more information on how to complete your
registration.
Netflix and the Netflix logo are the registered trademarks of Netflix, Inc.
VUDU TM is a trademark of VUDU, Inc.
Skype TM, the Skype Logo and the S logo and other marks indicated on these instructions are trademarks of
Skype Limited or other related companies.
(D" 59
Calling for Service
F:or location of the nearest Sharp Authorized Service, or to obtain product literature, accessories, supplies, or
customer assistance, please call 1-800-BE-SHARP,
LIMITED WARRANTY
CONSUMER LiMiTED WARRANTY
SHARP ELECTRONICS CORPORATION warrants to the first consumer purchaser that this Sharp brand Liquid Crystal Display product
(the "Product"), when shipped in its original container, will be free from detective workmanship and materials, and agrees that it will,
at its option, either repair the defect or replace the detective Product or part thereof with a new or remanutactured equivalent at no
charge to the purchaser for parts or labor tor the period(s) set forth below.
This warranty does not apply to any appearance items of the Product or if the serial number or model number affixed to the Product has
been removed, defaced, changed, altered or tampered with. This warranty does not cover installation or signal reception problems. This
limited warranty will not apply if the Product has been or is being used in a commercial setting or application; this warranty is meant solely
for the non-commercial, household use of the Product by consumers in their home or residence, if you intend to or already use this Product
for commercial purposes or in a commercial setting, there are warranties available to cover your use of this Product, the terms of which may
vary. Please contact f-888-GO-SHARP for further information.
In order to eoforce your rights under this limited warranty, you should follow the steps set forth below. You must be able to provide
proof of purchase to the servicer, which proof must include the date ot purchase.
To the extent permitted by applicable state law, the warranties set forth are in lieu ot, and exclusive of, all other warranties, express
or implied. Specifically ALL OTHER WARRANTIES OTHER THAN THOSE SET FORTH ABOVE ARE EXCLUDED, ALL EXPRESS
AND IMPLIED WARRANTIES INCLUDING THE WARRANTIES OF MERCHANTABILITY, FITNESS FOR USE, AND FITNESS FOR A
PARTICULAR PURPOSE ARE SPECIFICALLY EXCLUDED. iF, UNDER APPLICABLE STATE LAW, IMPLIED WARRANTIES MAY NOT
VALIDLY BE DISCLAIMED OR EXCLUDED, THE DURATION OF SUCH IMPLIED WARRANTIES iS LIMITED TO THE PERIOD(S) FROM
THE DATE OF PURCHASE SET FORTH BELOW. THIS WARRANTY GIVES YOU SPECIFIC LEGAL RIGHTS. YOU MAY ALSO HAVE
OTHER RIGHTS WHICH VARY FROM STATE TO STATE.
The warranties given herein shall be the sole and exclusive warranties granted by Sharp and shall be the sole and exclusive remedy available to
the purchaser and only tot the time periods set forth herein. No other representations or promises made by anyone are permitted. Correction of
detects, in the manner and for the period of time described herein, shall constitute complete fulfillment of all liabilities and respensibilifies of Sharp to
the purchaser with respect to the Product, and shall constitute full satisfaction of all claims, whether based on contract, negligence, strict liability or
otherwise. Sharp does not warrant nor shall Sharp be liable, or in any way
responsible, for Products which have been subject to abuse (including, but not limited to, improper voltage), accident, misuse, negligence, lack of
reasonable care, alteration, modification, tampering, misuse, improper operation or maintenance or any damages or detects in the Product which
were caused W repairs or attempted repairs performed by anyone other than a Sharp authorized servicer. Nor shall Sharp be liable or in any way
responsible for any incidental or consequential economic or propedy damage. Some states do not allow limits on warranties or on remedies for
breach in certain transactions; in such states, the limits herein may not apply.
THiS LIMITED WARRANTY IS VALID ONLY iN THE FIFTY 150) UNITED STATES, THE DISTRICT OF COLUMBIA AND PUERTO RICO.
Model Specific Section
Your Product Model Number & Description: LC-80LE857U/LC-70LE857U/LC-60LE857U/LC-80LE757U/LC-70LE757U/
LC-60LE757U/LC-70LE755WLC-60LE755U/LC-70LE750U/LC-60LE750U/
LC-90LE657U/LC-80LE657WLC-70LE657U/LC-60LE657U/LC-70LE655U/
LC-60LE655U/LC-80LE650U/LC-70LE650U/LC-60LE650U/LC-70C7500U/
LC-60C7500U/LC-80C6500U/LC-70C6500U/LC-60C6500U
LCD Color Television
(Be sure to have this ioformation available when you need service for your Product.)
Warranty Period for this Product: One (1) year parts and labor from the date of purchase.
Additional Exclusions from In order tor the Product to be serviced, the Product must be readily available to
Warranty Coverage (if any): the servicer, free and clear of any complex or non-standard installation, mounting
or other encumbrance which would unreasonably interfere with servicing the
Product. The Servicer will remount the Product after service, provided that such
remounting is not into a complex or non-standard installation. Any additional labor
and materials required to remove and/or reinstall a Product above and beyond the
foregoing are not covered by this warranty, may result in additional charges and
are the responsibility of the consumer.
Image Retention resulting from a fixed image being displayed for long periods of time is
not covered by this Limited Warranty (see Operation Manual on how to prevent this).
Where to Obtain Service: From a Sharp Authorized Servicer located in the United States. To find the
location of the nearest Sharp Authorized Servicer, please call Sharp toll free at
1-800-BE-SHARP.
What to do to Obtain Service: Contact your Sharp Authorized Servicer to obtain in home service for this
product. The Servicer will come to your location and if necessary remove the unit
for repair at the Servicer's tacility and return the set to you once completed. Be
sure to have Proof of Purchase available.
TO OBTAIN PRODUCT INFORMATION OR PURCHASEACCESSORIESAND EXTENDEDWARRANTIES, CALL
1-800-BE-SHARP
OR VISIT www.sharpusa.com
®- 60
LIMITED WARRANTY
Consumer E/ectronics Products
Congratulations on your purchase!
Sharp Electronics of Canada Ltd. ("Sharp") warrants to the first purchaser for this Sharp brand product ("Product"), when sNpped in its
original container and sold or distributed in Canada by Sharp or by an authorized Sharp dealer, and Product was not sold "as is" or "sales
final" that the Product will during the applicable warranty period, be free from defects in material and workmanship, and will within the
applicable warranty period, either repair the defective Product or provide the first purchaser a replacement of the defective Product.
Conditions: This limited warranty shall not apply to:
(a) Any defects caused or repairs required as a result of abusive operation, negligence, accident, improper installation or inappropriate use
as outlined in the owner's manual or other applicable Product documentation.
(b) Any defects caused or repairs required as a result of any Product that has been tampered with, modified, adiusted or repaired by any
person other than Sharp, a Sharp authorized service centre or a Sharp authorized servicing dealer.
(c) Any defects caused or repairs required as a result of the use of the Product with items not specified or approved by Sharp, including but
not limited to, head cleaning tapes and chemical cleaning agents.
(d) Any replacement of accessories, glassware, consumable or peripheral items required through normal use of the Product, including but
not limited to, earphones, remote controls AC adapters, batteries, temperature probe, trays, filters, belts, ribbons, cables and paper.
re) Any cosmetic damage to the Product surface or exterior that has been defaced or caused by normal wear and tear.
(f) Any defects caused or repairs required as a result of damage caused by any external or environmental conditions, including but not
limited to, transmission line/power line voltage or liquid spillage or acts of God.
(g) Warranty claims for Products returned with illegible or without appropriate model, serial number and CSA/cUL markings.
(h) Any Products used for rental or commercial purposes.
(i) Any installation, delivery, setup and/or programming charges
(j) The removal and reinstallation of Over-The-Range Microwave or Microwave Drawer g it is installed in an inaccessible location or requiring
removal of cupboards, handles or other cosmetic parts, or is not installed in accordance with installation instructions included with Product.
Row to get service: Warranty service may be obtained upon delivery of the Product, together with proof of purchase (including date of
purchase) and a copy of this limited warranty statement, to an authorized Sharp service centre or an authorized Sharp servicing dealer. In
home warranty service will be carried out to locations accessible by on-road service vehicle and within 50 km of an authorized Sharp service
centre on any Sharp Television with the screen s_ze of 42" or larger and on any Over-The-Range Microwave Oven or Microwave Drawer
Oven. The servicer may if necessary take the unit for repair at the servicer's facility. No other person (including any Sharp dealer or service
centre) is authorized to extend, enlarge Or transfer this warranty on behalf of Sharp, The purchaser will be responsible for any and all
removal, reinstallation, transportation and insurance costs incurred with exception for Over-The-Range Microwave Oven or Microwave
Drawer Oven whereby Sharp will be responsible for the removal and reinstallation.
The express warranties in this limited warranty are, except for consumer purchasers domiciled in Quebec, in lieu of and, except to the
extent prohibited by applicable law, Sharp disclaims all other warranties and conditions, express or implied, whether arising by law, statute,
by course of dealing or usage of trade, including, without limitation, implied warranties or conditions of merchantability and/or quality,
fitness for a particular use or purpose, and/or non-infringement. Limitations (not applicable to consumer purchasers domiciled in Quebec
to the extent prohibited under Quebec law): (a) Sharp shall not be liable for any incidental, special, consequential, economic, exemplary or
indirect damages of any kind or nature (including lost profits or damages for loss of time or loss of use or loss of data) arising from or in any
connection with the use or performance of a Product or a failure of a Product, even if Sharp is aware of or has been advised of the
possibility of such damages: (b) the remedies described in this limited warranty constitute complete fulfillment of all obligations and
responsibilities of Sharp to the purchaser with respect to the Product and shall constitute full satisfaction of all claims, whether based on
contract, negligence, strict liability or otherwise. Some provinces may not allow the exclusion or limitation of certNn damages, or limits on
the duration or voiding of implied warranties or conditions; in such provinces, the exclusions and limits herein may not apply. This limited
warranty is, except for consumer purchasers domiciled in Quebec, governed by the laws of the Province in Canada in which the purchaser
has purchased the Product. For consumer purchasers domiciled in Quebec this limited warranty is governed by the laws of Quebec.
WARRANTY PERIODS (calculated from the date of original purchase): Parts & Labour (exceptions noted)
Audio Product 1 year
Blu-Ray Product 1 year
Projector 1 year (lamp 90 days)
LOD/LED TV 1 year
Microwave Oven 1 year (magnetron - 4 additional years)
Air Purifier 1 year
Portable Air Conditioner 1 year
Plasmacluster Ion Generator 1 year
3D Glasses 1 year
Wireless LAN Adapter 1 year
To obtain tile name axed address of the gearest Authorized 5harI) Service (entre or Dealer, or tbr more
inlbrmation on this Limited Warranty, Shaq_ Extended Warranty Og_rs, Sharp Canada Products or ,_O_. "_R_ _1,$_
Accessory 5a]es, please contact Shaq_:
• By writing to Sharp Electronics Of Canada Lid. at 335 Britannia Road East SHARP
Mississauga, Ontario L4Z lW9
•Calling: at 905-568-7140 _ _ ,_OZ
Visiting our Web site: www.sharp.ca _ SIERViCIE
THiS LIMITED WARRANTY IS VALID ONLY IN CANADA
Revision: 03/01113
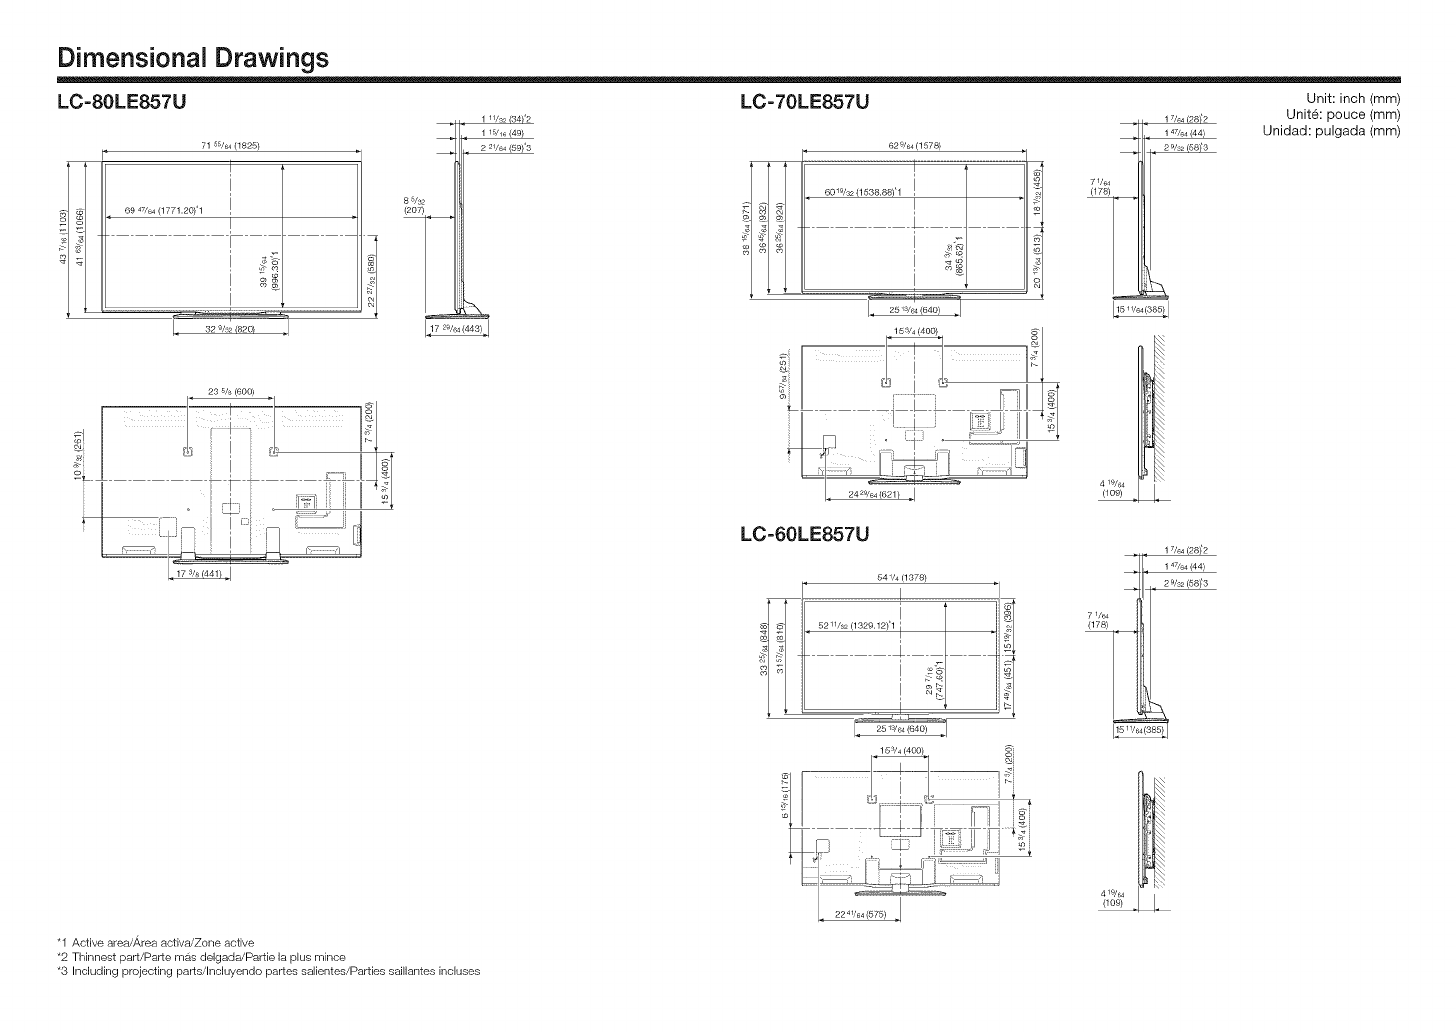
Dimensional Drawings
LC-80LE857U
71 55/64(1825)
.... ,
LC=70LE857U
629/64 (1576)
I
6019/2,2(1536.68)'1 !
I
I
Unit: inch (mm)
Unit6: pouce (mm)
Unidad: pulgada (mm)
LC-60LE857U
541/4 (1378)
I' I
. 52 /32(1329.12}'1
i I
'1
4 1_/64
(109)
7 1/64
(176)
1 47/64 (44)
2 9/32 (56)*3
"1 Active area/Area activaiZone active
*2 Thinnest part/Parte mas delgadaiPartie la plus mince
*3 Including projecting parts/Incluyendo partes salientes/Parties saillantes incluses
4w64
(109)
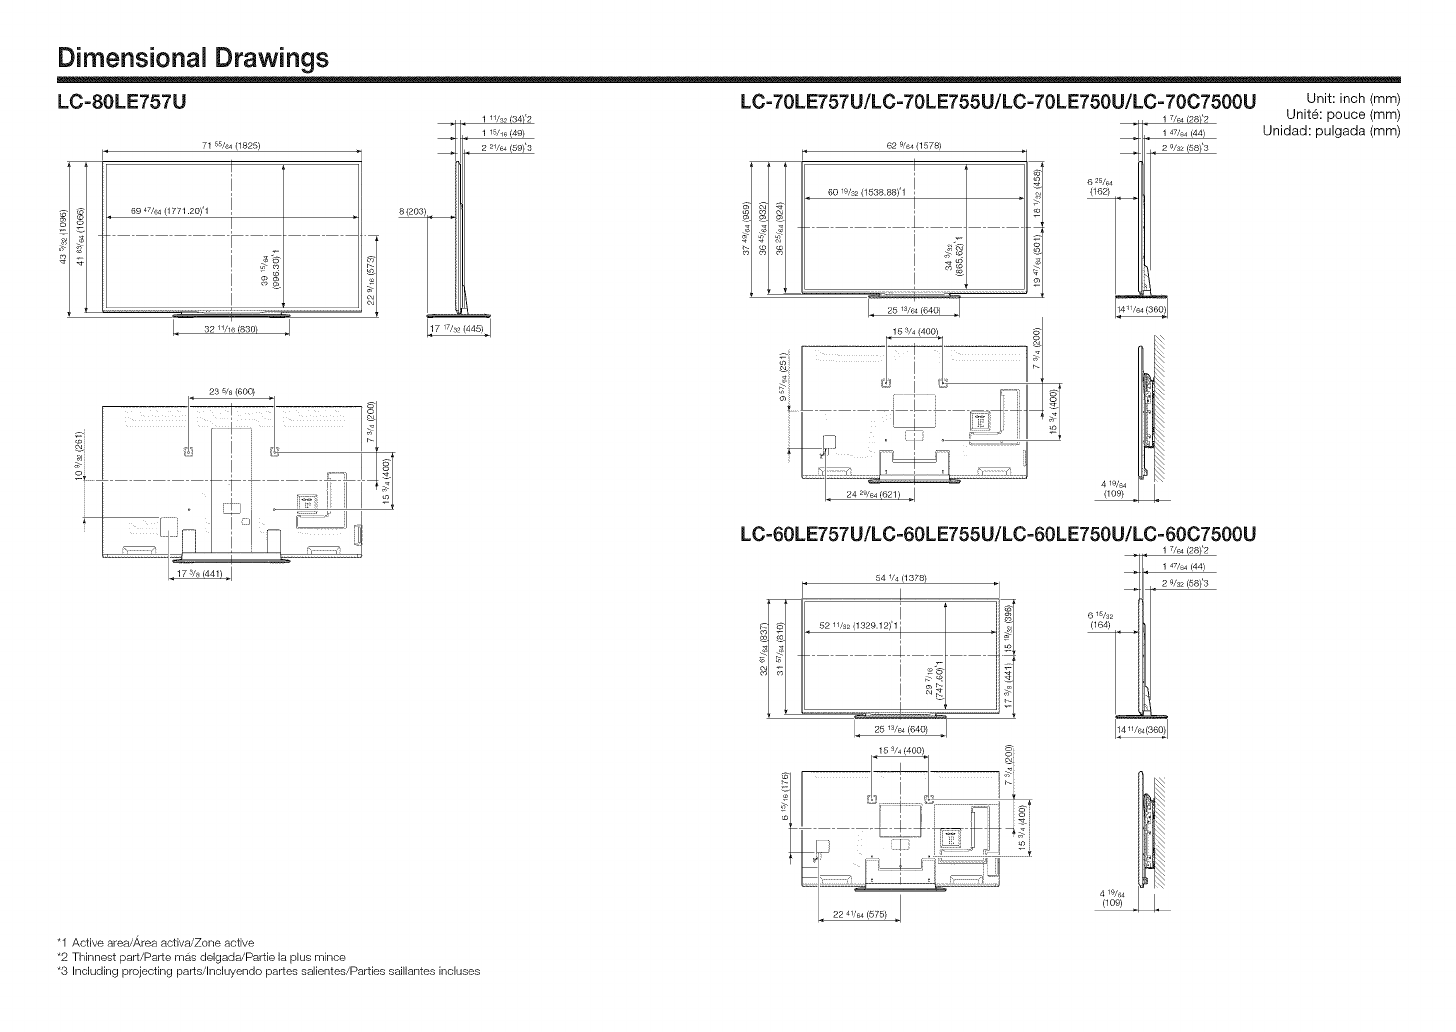
Dimensional Drawings
LC-80LE757U LC=70LE757U/LC=70LE755U/LC=70LE750U/LC=70C7500U Unit: inch (mm)
Unit6: pouce (mm)
Unidad: pulgada (mm)
71 55/64 (1625)
I' 62 9/64 (1578)
I'
IIIf
, 60 19/s2 (1538.86)'1
I_ 32 11/16(680)
153/4(400) _l
/, 84 /64(681!J 4 19/64
(lo8)
LC=60LE757U/LC=60LE755U/LC=60LE750U/LC=6007500U
54 1/4(1378)
I" i '1
L 851_/6,840/.I
6 15/32
(164)
147/64(44)
2 9/32 (56)*3
"1 Active area/Area activaiZone active
*2 Thinnest part/Parte mas delgadaiPartie la plus mince
*3 Including projecting parts/Incluyendo partes salientes/Parties saillantes incluses
4 19/64
(109)
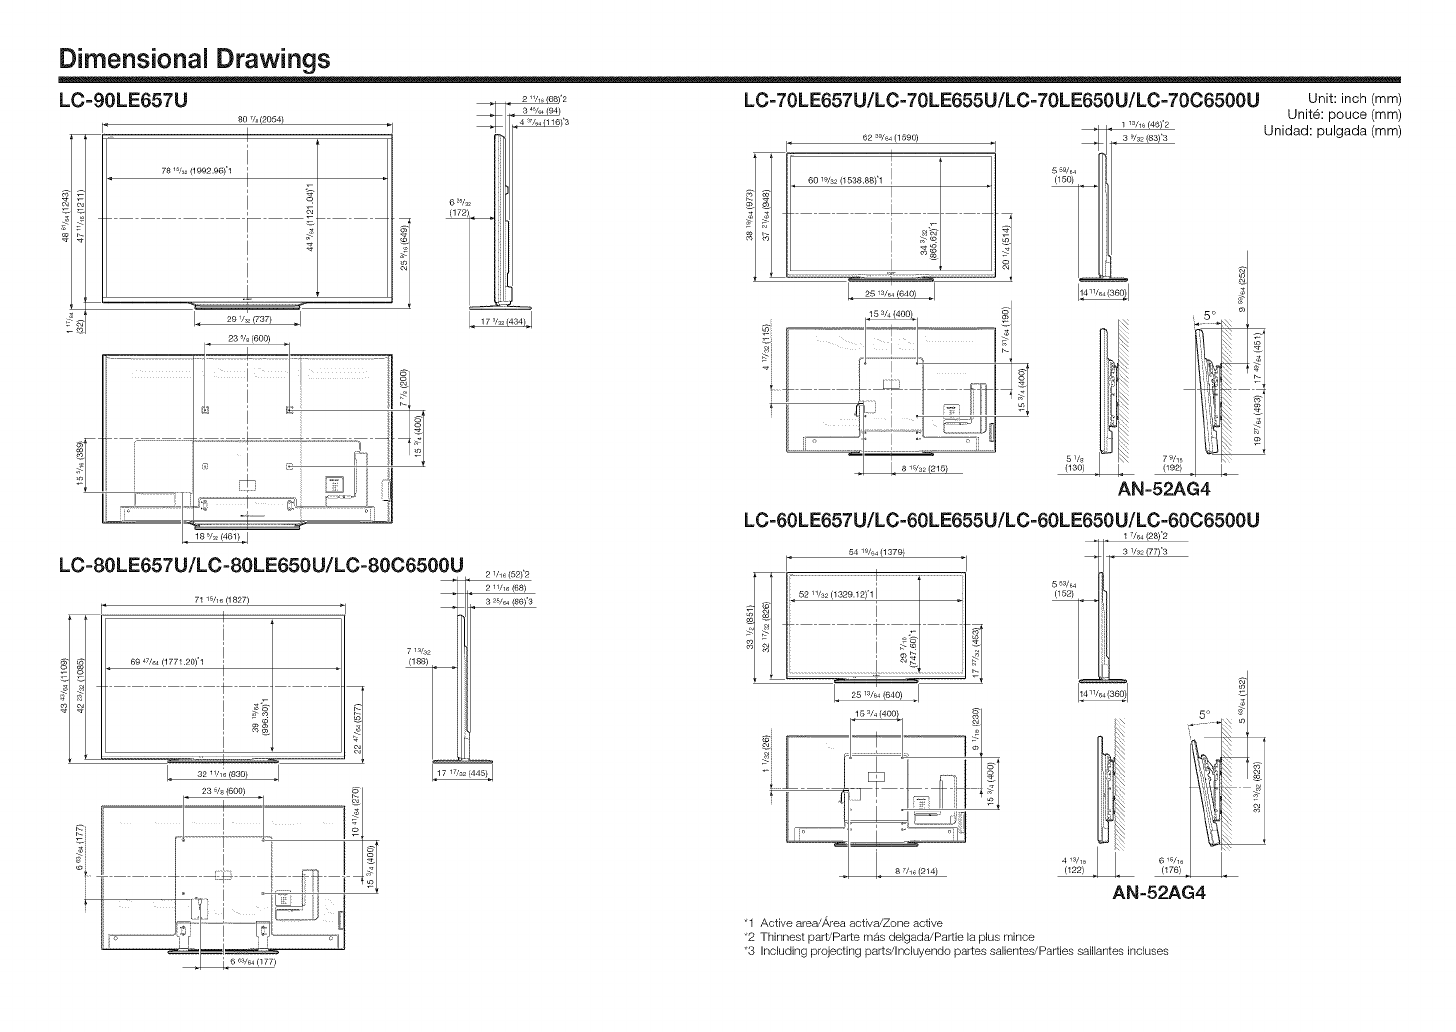
Dimensional Drawings
LC-90LE657U
80 7/a(2054)
I
781_/s2 (1992.96)'1 i
I o_
- i_ _
I
,i
..............................................._ !i1
LC-80LE657U/LC-80LE650U/LC-80C6500U
71 15/16 (1827)
I
!
69 47/64 (1771.20)'1 !
I
2
' 23 5/s] (6OO) '"
! !
' I" [,1,_I /_ ......
'_i 663/64(177)
LC=70LE657U/LC=70LE655U/LC=70LE650U/LC=70C6500U
62 a9/64 (1590)
I"
Unit: inch (mm)
Unit6: pouce (mm)
Unidad: pulgada (mm)
l, 25 13/614 (640) ,I
(13o) (192)
AN-52AG4
LC=60LE657U/LC=60LE655U/LC=60LE650U/LC=60C6500U
54 19/64 (1379)
I.... I
413JilL_
(122}
AN-52AG4
"1 Active area/_,rea activa!Zone active
*2 Thinnest part!PaRe mas delgada/Partie la plus mince
*3 Including projecting parts/Inciwendo partes salientes/Parties saillantes incluses

SI-IARR
SHARP ELECTRONICS CORPORATION
Sharp Plaza, Mahwah, New Jersey 07495-1163
SHARP CORPORATION
Printed in Mexico
Imprime au Mexique
Impreso en Mexico
TINS-F700WJN2
13P05-MX-ND
