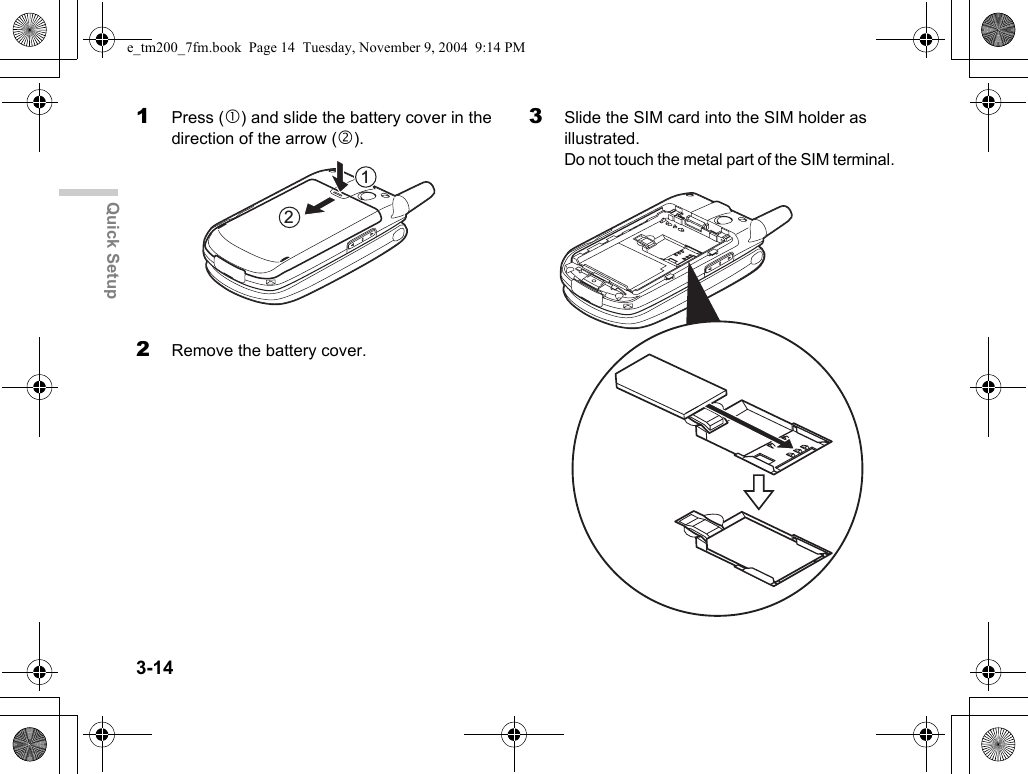
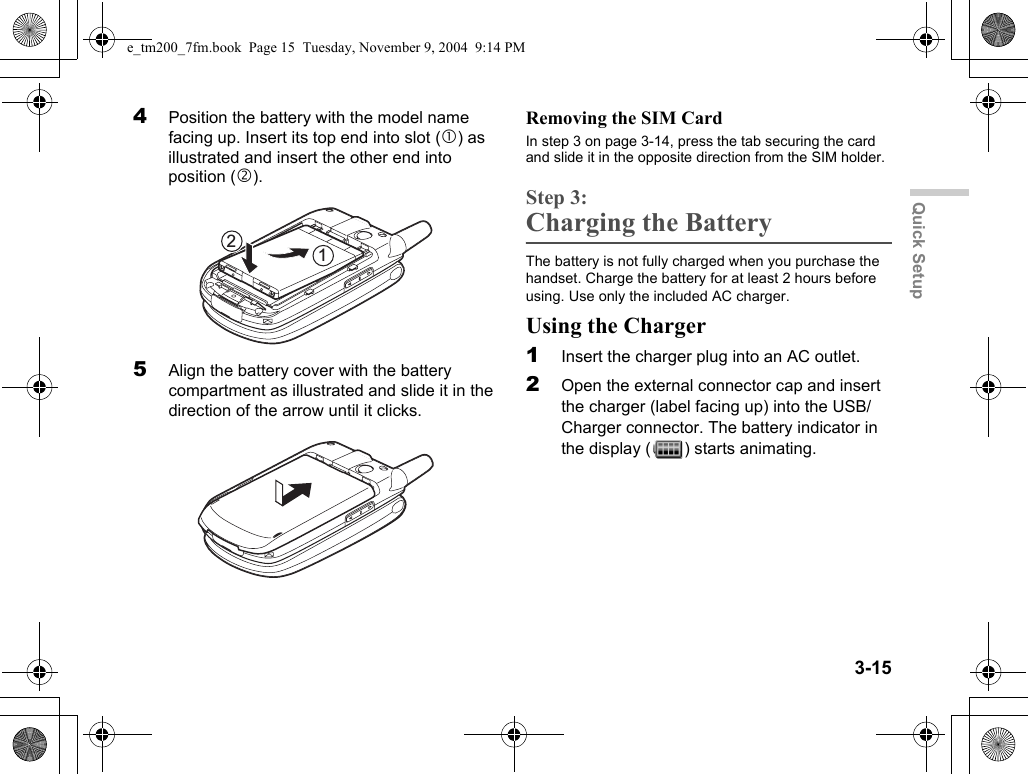
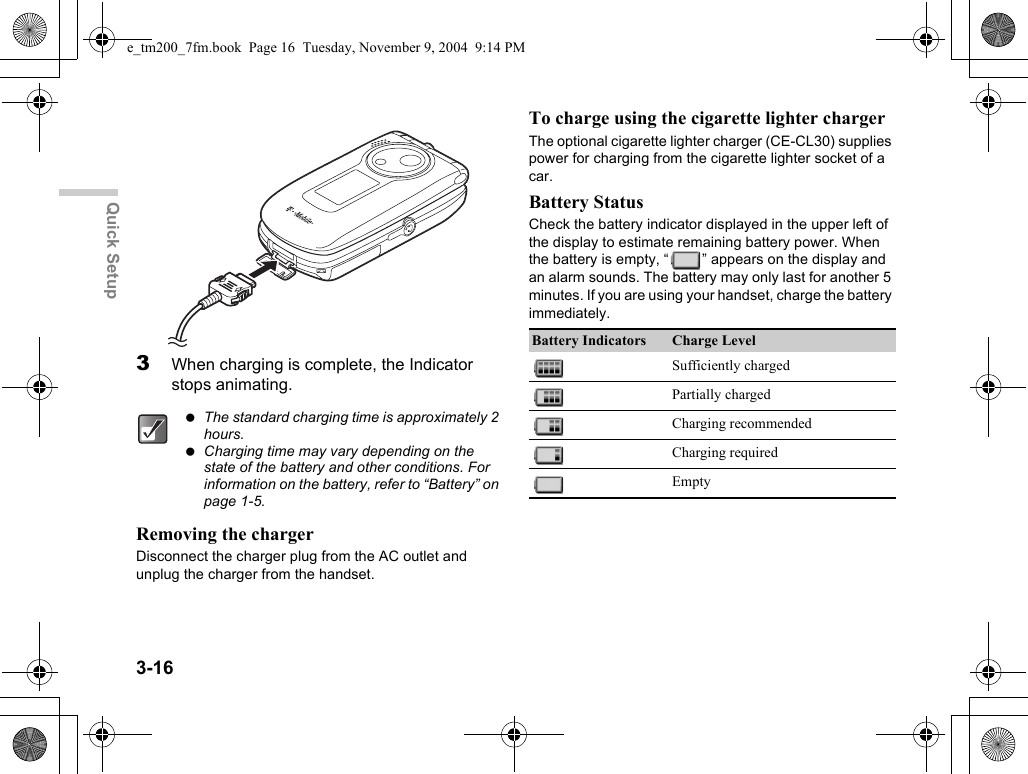
Sharp NAR0058 GSM900/DCS1800/PCS1900 Tri band cellular phone User Manual Manual 1
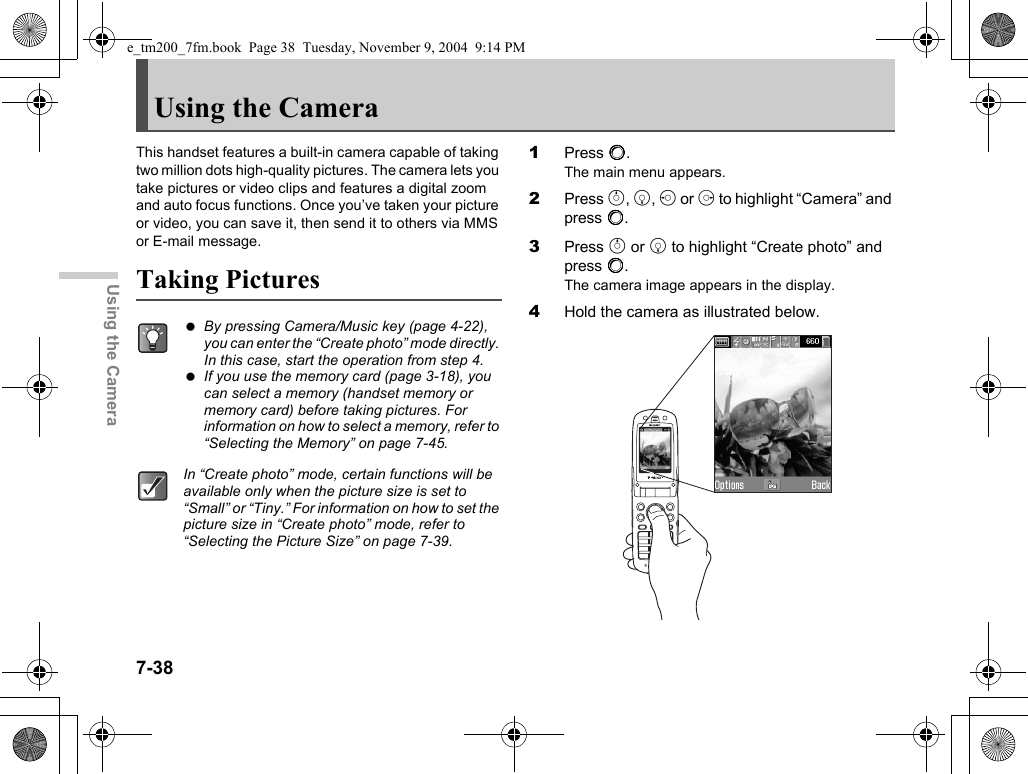
Sharp Corporation GSM900/DCS1800/PCS1900 Tri band cellular phone Manual 1
UserManual.wiki
>
Sharp
>
NAR0058 User Manual
>
Manual 1
Contents
1.
Manual revised 1
2.
Manual revised 2
3.
Manual 1
4.
Manual 2
Manual 1
Navigation menu
Upload a User Manual
Namespaces
Wiki Guide
HTML
PDF
Info
Views
User Manual
Discussion / Help
Navigation
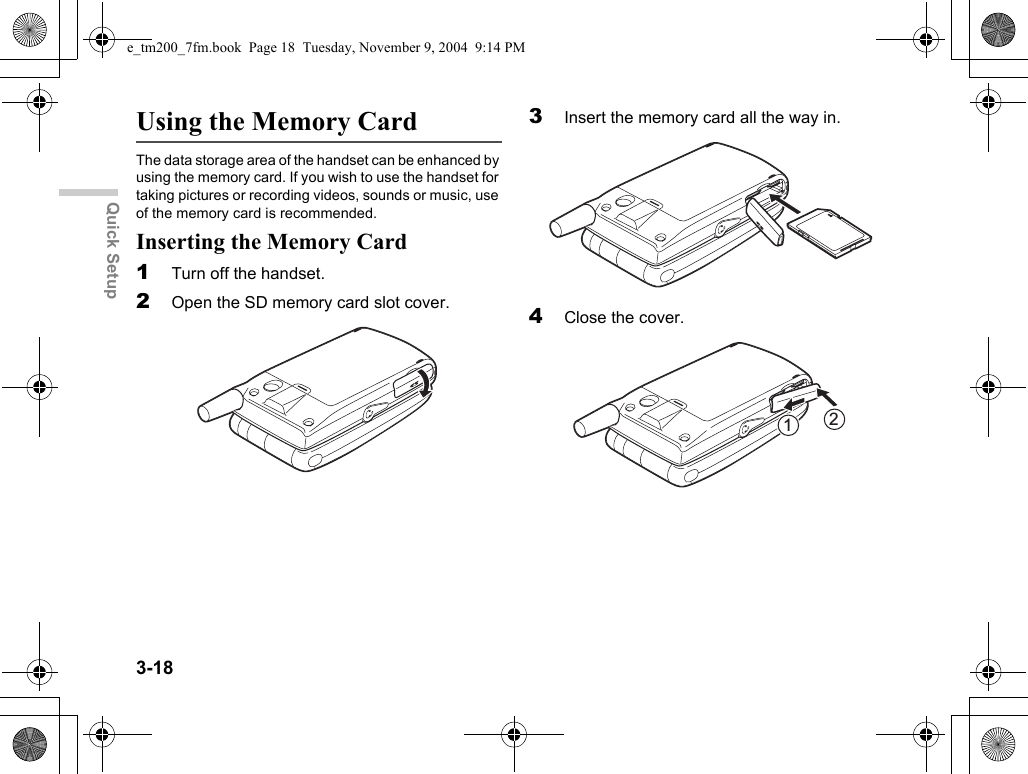
![1-1IntroductionIntroductionThank you for purchasing this SHARP mobile handset. Before and while using the handset, please read this manual thoroughly and retain it for future reference. This handset is your partner. Handle it carefully at all times to ensure its long-term performance.About this Operation ManualInstruction schemeInstructions in this manual are carefully designed to help you operate the handset smoothly and easily. At the beginning of each section, the steps that have to be followed to reach the function you wish to utilise are shown (Example 1). The steps for all subsequent subsections are simplified (Example 2). Make sure to press B to enter your selection.Example 1:(Excerpt from “Viewing the Contacts List” on page 9-54)1Press B.The main menu appears.2Press a, b, c or d to highlight “Contacts” and press B.3Press a or b to highlight “Contacts list” and press B.The index view of the “Contacts list” appears.In example 1, each step to reach the “Contacts list” is shown.Example 2:(Excerpt from “Selecting the Memory for saving” on page 9-55)1At the main menu, select in the following order:“Contacts” → “Contacts list.”2Press C [Options].The “Options” menu appears.In example 2, the steps to reach the “Contacts list” are simplified as shown above (step1).SymbolsB, a, b, c, d and C [Options] indicate the operation keys in this manual. For information on the keys and handset operations, refer to “Parts and Controls” on page 4-22.This indicates useful extra information for operating the handset.This indicates important background information or items that need to be recognised when operating the handset.This indicates operations that require extreme caution before performing on the handset.e_tm200_7fm.book Page 1 Tuesday, November 9, 2004 9:14 PM](https://usermanual.wiki/Sharp/NAR0058.Manual-1/User-Guide-487957-Page-1.png)
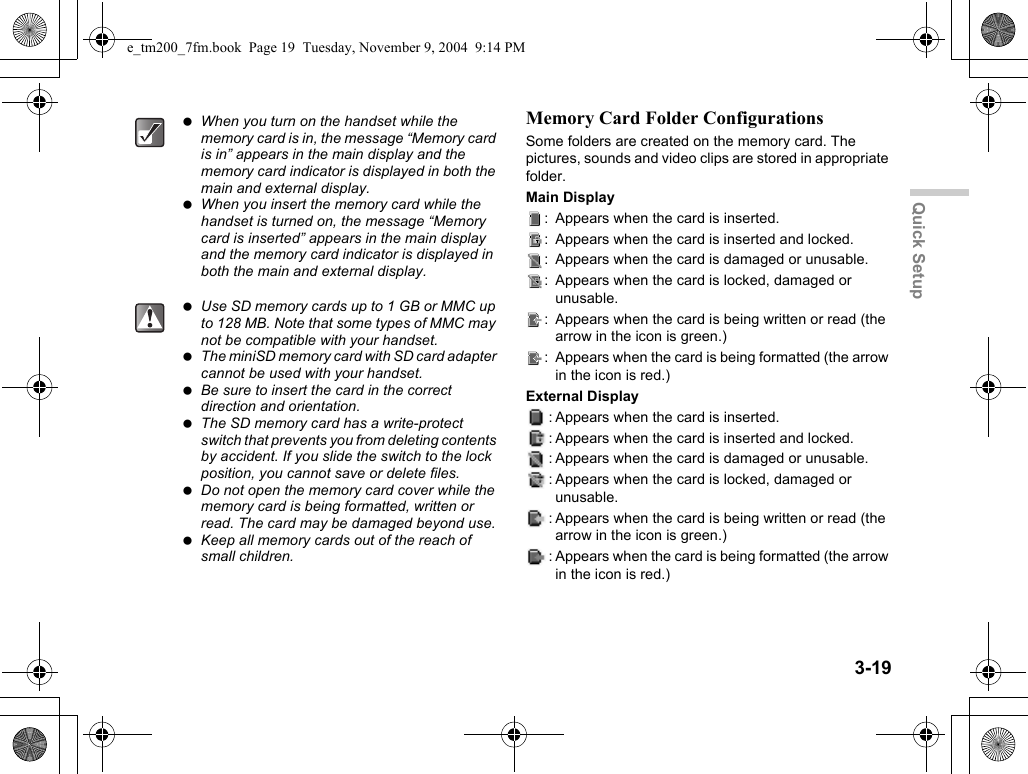
![3-20Quick SetupRemoving the Memory Card1Turn off the handset.2Open the SD memory card slot cover, remove the card and close the cover.Formatting the Memory CardIf you wish to clear all data stored in the memory card, format the memory card according to the following steps. The handset code is needed to format the memory card.For information on the handset code, refer to “Enabling the Handset Lock” on page 15-154.1Press B.The main menu appears.2Press a, b, c or d to highlight “Settings” and press B.3Press a or b to highlight “Memory card” and press B.4Press a or b to highlight “Format” and press B.5Enter your handset code and press B.If you wish to cancel, press A [Back] before entering the handset code. When you remove the memory card while the handset is turned on, the message “Memory card is removed” appears in the main display and the memory card icon disappears from both the main and external displays. Do not remove the memory card while the memory card is being formatted, written or read.e_tm200_7fm.book Page 20 Tuesday, November 9, 2004 9:14 PM](https://usermanual.wiki/Sharp/NAR0058.Manual-1/User-Guide-487957-Page-20.png)

![5-29Guide to the Main MenuBasic Key OperationsSoft keys and the centre keyYour handset uses soft keys (C and A) to help navigate the handset. At the bottom left and right side of the display, the respective operations of the keys are shown. The function of each soft key at any given time is displayed at the bottom left and right of the screen.The function of the centre key is displayed in the centre by a graphical icon.Example:When A [Back] is displayed:Press A [Back] to return to the previous menu.When C [Select] is displayed:Press C [Select] to select a menu item.Navigation keysa, b, c, d indicate the navigation keys. When you navigate the cursor to select an item, press a, b, c or d to highlight the item and press B.The end/power keyPress F to return to the standby screen.Camera/Music keyPress Y to enter the “Create photo” mode (page 7-38).Press and hold Y for approximately 2 seconds to activate “My Music” (page 12-110).Font Zoom keyPress h to change the display font size.By pressing the key, the display font size switches. To return to the previous menu, you can also press c except when returning to the standby screen. To select an item in the menu, C [Select] can be used instead of B. Also, d can be used to select an item when e is displayed at the right side of the display. When selecting items using a or b, and (scroll indicator) appear at the right edge of the display in case there are more menus that cannot be displayed at one time on the display. h may not be supported by some functions.e_tm200_7fm.book Page 29 Tuesday, November 9, 2004 9:14 PM](https://usermanual.wiki/Sharp/NAR0058.Manual-1/User-Guide-487957-Page-29.png)
![6-32Basic Handset OperationsBasic Handset OperationsThis section describes basic phone call functions. Confirm that the handset is on.Making a Call1Open the handset and enter a phone number with the keypad.2Confirm the number and press D.Start talking when the connection is established.If you enter a wrong numberPress A [Clear] to delete one digit. Press A [Clear] and hold for approximately 2 seconds to delete the last line. The handset returns to standby mode when all lines are deleted.Ending a CallPress F to end the call.Answering a Call1The handset rings for an incoming call.The handset vibrates when the vibration is set to “Enable” or “Link to sound.” For information on the vibration setting, refer to “Setting the Vibration” on page 15-137.2Press D or C [Answer].The call is connected and “ ” appears.When the Any Key Answer Function is ActivatedTo answer a call, press any key except F or A [Busy]. For information on “Any Key Answer,” refer to “Setting Any Key Answer” on page 15-142.When the hands free EARphone & MIC is connectedTo answer a call, press and hold the button of the hands free EARphone & MIC for approximately 2 seconds.Closing the handset also ends a call. For information on the other operations when handset is closed, refer to “Settings for Flipping the Handset Closed” on page 15-146.e_tm200_7fm.book Page 32 Tuesday, November 9, 2004 9:14 PM](https://usermanual.wiki/Sharp/NAR0058.Manual-1/User-Guide-487957-Page-32.png)
![6-34Basic Handset OperationsUseful FunctionsSpeed DiallingUp to 9 phone numbers from the “Contacts list” memory (Handset and SIM) can be assigned to speed dials. You can call the numbers using the digit keys. For information on the “Speed dial list,” refer to “Setting the Speed Dial List” on page 9-65.1To dial a number using speed dial, press and hold any of the digit keys (H to O and Q) for approximately 2 seconds.The phone number stored in the “Speed dial list” is dialled.Call WaitingThis service enables you to talk to a third party while you are in the middle of another call. After activating this service, a beep tone notifies you of the second call.To activate this service, refer to “Activating the Call Waiting Service” on page 15-143.1During a call, press C [Options].The “Options” menu appears.2Press a or b to highlight “Hold & Answer” and press B.The second party is put on hold and you can talk to the third party.3Press C [Options].The “Options” menu appears.4Press a or b to highlight “Swap calls” and press B.You can switch between the two calls.5Press C [Options].The “Options” menu appears.6Press a or b to highlight “Release call” and press B.The current call ends and return to the held call.G cannot be used as speed dial because it is already assigned to “Voice mail.” The call waiting service may not be available on all networks. Contact your service provider for more information. If you do not wish to answer the second call, press C [Options] and press a or b to highlight “Busy,” then press B in step 2.e_tm200_7fm.book Page 34 Tuesday, November 9, 2004 9:14 PM](https://usermanual.wiki/Sharp/NAR0058.Manual-1/User-Guide-487957-Page-34.png)
![6-35Basic Handset OperationsAccessing the SMS Menu During a Call1During a call, press C [Options].The “Options” screen appears.2Press a or b to highlight “SMS” and press B.3Press a or b to highlight one of following options.Selecting “Create message”:allows you to create an SMS message.Selecting “Inbox,” “Sent” or “Drafts”:allows you to access these folders. For more information on the SMS message, refer to “Using the Message Service” on page 11-68.Conference CallThis service enables you to call 2 people or more at the same time. You can talk with 5 participants at most with this service. To make a conference call, you must have one active call and one held call.1With one active call and one held call, press C [Options].The “Options” menu appears.2Press a or b to highlight “Multiparty” and press B.3Press a or b to highlight “Conference all” and press B to initiate the conference call.You can talk with all the people on the line.4Press F to end the conference call.The conference call ends.e_tm200_7fm.book Page 35 Tuesday, November 9, 2004 9:14 PM](https://usermanual.wiki/Sharp/NAR0058.Manual-1/User-Guide-487957-Page-35.png)
![6-36Basic Handset OperationsTo add new participants to the conference call1During the call, press C [Options] and select “Dial.”2Enter the phone number you wish to include in the conference call.3Press D.After the call is connected, continue from step 1 of “Conference Call” (page 6-35).If you wish to include other participants in the conference call, perform the process again.To put all the participants on hold1During the call, press C [Options] and select in the following order: “Multiparty” →“Conference all.”2Press a or b to highlight “Conference hold all” and press B.To reject adding participants1During the call, press C [Options].The “Options” menu appears.2Press a or b to highlight “Busy” to send the busy tone and press B.To put the current call on hold and continue having a conference call with the remaining participants1During the call, press C [Options] and select in the following order: “Multiparty” →“Conference all.”2Press a or b to highlight “Exclude” and press B.To end the call with all participants1During the call, press C [Options] and select in the following order: “Multiparty” →“Conference all.”2Press a or b to highlight “Release all” and press B.To end the call with a conference call participant1During a conference call, press a or b to highlight the person that you wish to disconnect from the conference call.2Press C [Options].The “Options” menu appears.3Press a or b to highlight “Release call” and press B.e_tm200_7fm.book Page 36 Tuesday, November 9, 2004 9:14 PM](https://usermanual.wiki/Sharp/NAR0058.Manual-1/User-Guide-487957-Page-36.png)
![6-37Basic Handset OperationsTo have a conversation with participants privatelyWhen you wish to have a conversation with one of the participants privately, you can select a person from the conference list and put others on hold.1During a conference call, press a or b to highlight the person that you wish to talk in private with.2Press C [Options].The “Options” menu appears.3Press a or b to highlight “Multiparty” and press B.4Press a or b to highlight “Private” and press B.5When you have finished the private conversation, continue from step 1 of “Conference Call” (page 6-35).The conference call service may not be available on all networks. Contact your service provider for more information.e_tm200_7fm.book Page 37 Tuesday, November 9, 2004 9:14 PM](https://usermanual.wiki/Sharp/NAR0058.Manual-1/User-Guide-487957-Page-37.png)
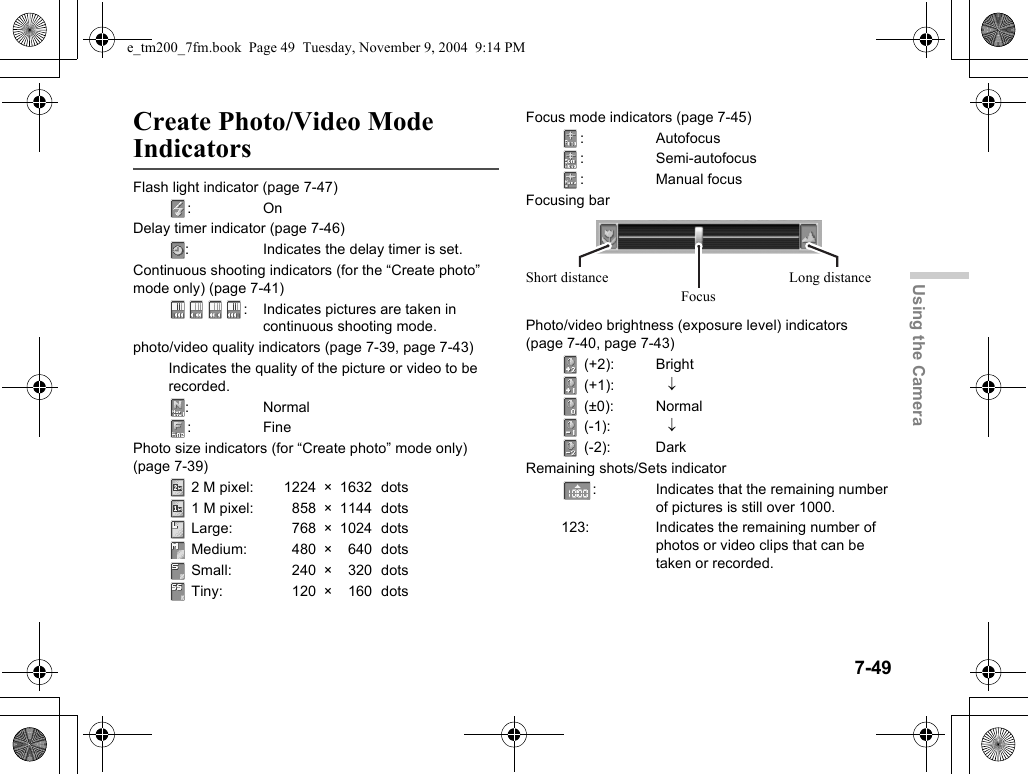
![7-39Using the Camera5Press B.The shutter sound is heard and the shot picture appears.6Press W to save the picture.The picture is saved to “My photos.”Press A [Cancel] in this step. You can take the picture again.If you wish to send the taken picture, refer to “Shooting and Sending a Picture/Video Function” on page 7-48.Selecting the Picture SizePictures are saved in JPEG format in the following six sizes.2 M pixel: 1224 × 1632 dots1 M pixel: 858 × 1144 dotsLarge: 768 × 1024 dotsMedium: 480 × 640 dotsSmall: 240 × 320 dotsTiny: 120 × 160 dots1At the main menu, select in the following order: “Camera” → “Create photo.”2Press C [Options].The “Options” menu appears.3Press a or b to highlight “Photo size” and press B.4Press a or b to highlight the picture size you wish to select and press B.Selecting the Picture Quality1At the main menu, select in the following order: “Camera” → “Create photo.”2Press C [Options].The “Options” menu appears. If you wish to leave “Create photo” mode without saving the taken picture, press F before step 6. While in “Create photo” mode, you can switch to “Create video” mode. Press C [Options] to display “Options” menu and select “Change to video mode,” then press B. This handset uses a CCD sensor. Although this handset has been manufactured carefully, some pictures may still appear too bright or too dark. If the handset has been left in a warm place for a long time before taking or registering a picture, the picture quality may be poor. Pictures taken with the camera may differ from the actual image of the subject in colour and brightness.e_tm200_7fm.book Page 39 Tuesday, November 9, 2004 9:14 PM](https://usermanual.wiki/Sharp/NAR0058.Manual-1/User-Guide-487957-Page-39.png)
![7-40Using the Camera3Press a or b to highlight “Photo quality” and press B.4Press a or b to highlight “Normal” or “Fine” and press B.Adjusting the Brightness of the Picture1At the main menu, select in the following order: “Camera” → “Create photo.”2Press a (brighter) or b (darker) to adjust the brightness (exposure level) of the picture.Selecting the Shutter SoundYou can select the shutter sound from three preset patterns.1At the main menu, select in the following order: “Camera” → “Create photo.”2Press C [Options].The “Options” menu appears.3Press a or b to highlight “Shutter sound” and press B.4Press a or b to highlight the sound you wish to select and press B.You can select from “Pattern 1,” “Pattern 2” or “Pattern 3.”To play back the shutter sound, press C [Play].Viewing the Saved PicturesYou can review the pictures saved in “My photos.”1At the main menu, select in the following order: “Camera” → “Create photo.”2Press C [Options].The “Options” menu appears.3Press a or b to highlight “My photos” and press B.The thumbnail index for saved pictures appears.4Press a, b, c or d to select the image you wish to view and press B.The selected picture appears.Return to the standby mode to reset the brightness setting to default. When you save pictures, the assigned file names are “YMMDDnnn.jpg” (YMMDD is Y (Year), M (Month), D (Day) and nnn is a 3 digit number). You can view the file name and size of your pictures in the thumbnail index.e_tm200_7fm.book Page 40 Tuesday, November 9, 2004 9:14 PM](https://usermanual.wiki/Sharp/NAR0058.Manual-1/User-Guide-487957-Page-40.png)
![7-41Using the CameraSelecting the FrameYou can select and set a frame from preset patterns or saved pictures.1At the main menu, select in the following order: “Camera” → “Create photo.”2Press C [Options].The “Options” menu appears.3Press a or b to highlight “Add frame” and press B.4Press a or b to highlight “Preset frames” or “Off” and press B.If you do not wish to add a frame, select “Off.”5Press a, b, c or d to select the frame you wish to view and press B.Using Continuous ShootingFour pictures are taken in succession. Auto shooting and manual shooting are available.1At the main menu, select in the following order: “Camera” → “Create photo.”2Press C [Options].The “Options” menu appears.3Press a or b to highlight “Continuous shooting” and press B.4Press a or b to highlight “Auto shooting” or “Manual shooting” and press B.“Auto shooting”: Four pictures are taken in a row by pressing B.“Manual shooting”:Pictures are taken one by one by pressing B.To cancel continuous shooting, select “Off” in this step.5Press B to start continuous shooting.When the continuous shooting is finished, the pictures taken are saved automatically.To end the function, press A [Cancel]. You can only select a frame when the picture size is set to “Small” or “Tiny.” If you activate “Continuous shooting,” you cannot set a frame. You can only use the continuous shooting function when the picture size is set to “Small” or “Tiny.” If you select a frame when taking pictures, you cannot use the continuous shooting function.e_tm200_7fm.book Page 41 Tuesday, November 9, 2004 9:14 PM](https://usermanual.wiki/Sharp/NAR0058.Manual-1/User-Guide-487957-Page-41.png)
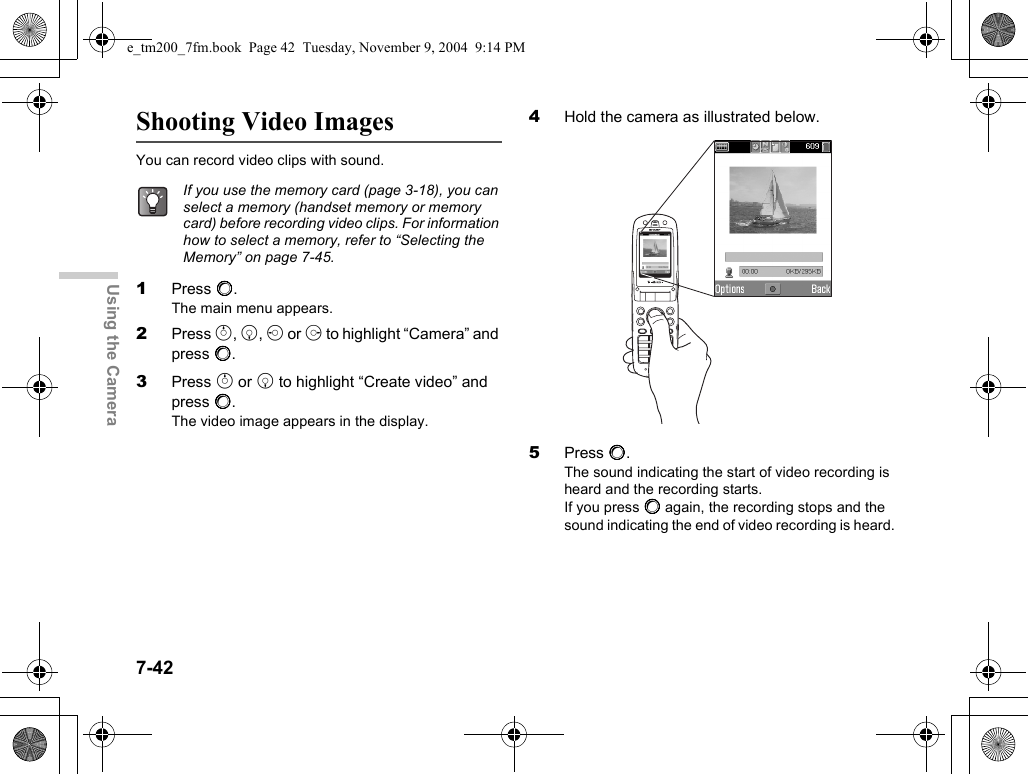
![7-43Using the Camera6Press C [Options] and select “Save” and press B to save the recorded video clip to “My videos.”If you wish to send saved video clips, refer to “Sending Videos as Attachments” on page 12-108.If you wish to send the video clip, refer to “Shooting and Sending a Picture/Video Function” on page 7-48.Selecting Video Size1At the main menu, select in the following order: “Camera” → “Create video.”2Press C [Options].The “Options” menu appears.3Press a or b to highlight “Video size” and press B. 4Press a or b to highlight “Large” or “Small” and press B.Selecting Video Quality1At the main menu, select in the following order: “Camera” → “Create video.”2Press C [Options].The “Options” menu appears.3Press a or b to highlight “Video quality” and press B.4Press a or b to highlight “Normal” or “Fine” and press B.Adjusting the Brightness of Video ClipsIn “Create video” mode, press a (brighter) or b (darker) to adjust the brightness (exposure level) of video clips. While in “Create video” mode, you can switch to “Create photo” mode. Press C [Options] to display “Options” menu, select “Change to camera mode,” then press B. If you wish to record video clips without sound, press C [Options], select “Voice record” and set it “Off.”The maximum size of a video clip that can be recorded at one time is 295 kbytes.Return to the standby mode to reset the brightness setting to default.e_tm200_7fm.book Page 43 Tuesday, November 9, 2004 9:14 PM](https://usermanual.wiki/Sharp/NAR0058.Manual-1/User-Guide-487957-Page-43.png)
![7-44Using the CameraViewing Saved Video ClipsYou can view saved video clips in “My videos.”1At the main menu, select in the following order: “Camera” → “Create video.”2Press C [Options].The “Options” menu appears.3Press a or b to highlight “My videos” and press B.The thumbnail index for saved video clips appears.4Press a, b, c or d to select the video clip you wish to playback and press B.5Press B.The selected video clip is played back.To pause playback, press B.To resume playback, press B again.To stop playback, press A [Back].6After you have viewed the video clip, press A[Back].The display returns to the thumbnail index. When you save video clips, the assigned file names are “YMMDDnnn.3gp” (YMMDD is Y (Year), M (Month), D (Day) and nnn is a 3 digit number). The file name and size of your pictures are displayed in the thumbnail index. If the video clip has been recorded with sound, the volume can be adjusted by pressing a or b. The volume depends on the “Ringing Volume” setting (page 15-136). The volume is 0 when “Ringing Volume” is set to “Silent” or “Step Tone.”e_tm200_7fm.book Page 44 Tuesday, November 9, 2004 9:14 PM](https://usermanual.wiki/Sharp/NAR0058.Manual-1/User-Guide-487957-Page-44.png)
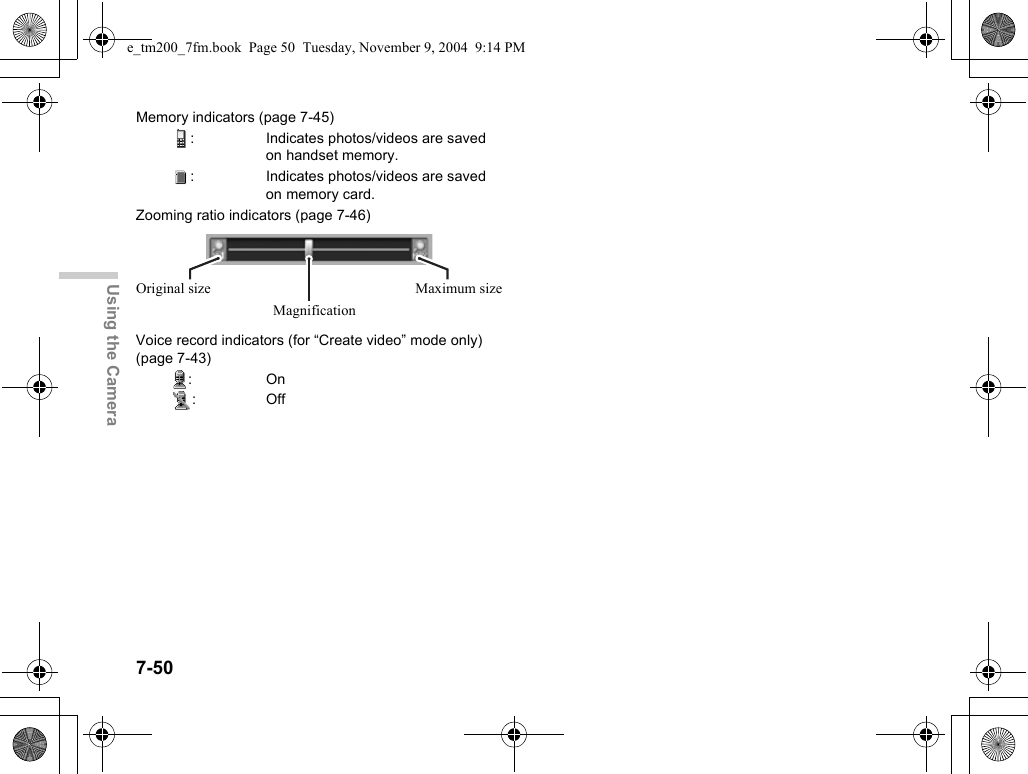
![7-45Using the CameraCommon Functions & InformationThis section describes useful common functions you can use for both camera and video.Selecting the MemoryIf you use the memory card (page 3-18), you can select a memory (handset memory or memory card) before taking pictures or recording videos for the data storage.7At the main menu, select in the following order: “Camera” → “Create photo” or “Create video.”8Press C [Options].The “Options” menu appears.9Press a or b to highlight “Save to” and press B.10 Press a or b to highlight “Handset” or “Memory card” and press B.Selecting Focus ModeYou can select a focus mode from the following three alternatives.1At the main menu, select in the following order: “Camera” → “Create photo” or “Create video.”2Press C [Options].The “Options” menu appears.3Press a or b to highlight “Focus mode” and press B.4Press a or b to highlight “Autofocus,” “Semi-autofocus” or “Manual focus” and press B.Autofocus: Focus automatically by pressing B.Semi-autofocus: Once B is pressed, the focal length will be fixed. Press B again to take the picture with fixed focus.Manual focus: By pressing V/W, focal length can be changed. Press B to take the picture with the focus set manually.Once you set “Semi-autofocus” in step 4, make sure that you have to press B twice to take a picture.e_tm200_7fm.book Page 45 Tuesday, November 9, 2004 9:14 PM](https://usermanual.wiki/Sharp/NAR0058.Manual-1/User-Guide-487957-Page-45.png)
![7-46Using the CameraUsing the Digital Zoom Function1At the main menu, select in the following order: “Camera” → “Create photo” or “Create video.”2Press d to zoom in (the subject becomes larger) or press c to zoom out (the subject becomes smaller.)The zooming ratio indicators appear automatically when c or d is pressed and disappear when the key is released.The available zooming steps depend on the camera settings.Using the Delay Timer1At the main menu, select in the following order: “Camera” → “Create photo” or “Create video.”2Press C [Options].The “Options” menu appears.3Press a or b to highlight “Delay timer” and press B.4Press a or b to highlight “On” and press B.“ ” appears and returns to “Create photo/video” mode.5Press B to start the delay timer.10 seconds after the timer starts, the shutter sounds and the camera takes a picture or starts recording video.To cancel the delay timer1Press C [Options] while the delay timer setting is on.The “Options” menu appears.2Press a or b to highlight “Delay timer” and press B.3Press a or b to highlight “Off” and press B.The delay timer turns off.The digital zoom function is not available when picture size is set to “2 M pixel” in “Create photo” mode. If B is pressed while the delay timer is operating, the picture is taken immediately. If you wish to stop taking pictures with the timer, press A [Cancel] while the delay timer is operating.e_tm200_7fm.book Page 46 Tuesday, November 9, 2004 9:14 PM](https://usermanual.wiki/Sharp/NAR0058.Manual-1/User-Guide-487957-Page-46.png)
![7-47Using the CameraUsing the Flash LightWhen taking a picture or recording video in a dark place, you can use the Flash light.1At the main menu, select in the following order: “Camera” → “Create photo” or “Create video.”2Press C [Options].The “Options” menu appears.3Press a or b to highlight “Flash light” and press B.4Press a or b to highlight “On” or “Off” and press B.Changing the View FinderYou can use the external display as the view finder. This function is convenient for taking a self-portrait or a group picture.1At the main menu, select in the following order: “Camera” → “Create photo” or “Create video.”2Press C [Options].The “Options” menu appears.3Press a or b to highlight “Change viewfinder” and press B.The main display is turned off and the image through the camera lens appears in the external display and focus mode is set to “Autofocus.”When taking a picture or stopping a video recording, the view finder automatically switches to the main display.Pressing Q also activates the Flash light.You can also change the view finder by pressing P (X) in “Create photo/video” mode.e_tm200_7fm.book Page 47 Tuesday, November 9, 2004 9:14 PM](https://usermanual.wiki/Sharp/NAR0058.Manual-1/User-Guide-487957-Page-47.png)
![8-51Entering TextEntering TextThis section provides information on how to enter text using the handset keypad for contacts list entries and messages, etc. Before you try to enter text, you should familiarise yourself with the different text input methods. In multi-tap input method, several characters are assigned to each key and you enter the desired character by pressing the key a few times.Text Table for Multi-tap InputThe table indicates how many times you need to press a certain key to display the character you wish to enter. Pressing the key changes the character in order as shown in the table. When you reach the last character, it returns to the first one.Example: Press H once. “A” appears. Press twice. “B” appears.English ModeQ-O: Press and hold to enter numbers 0-9.P: Press and hold to shift to sentence mode,Upper case, Lower case or Numeric (Abc, ABC, abc or 123).R: Press and hold to shift between multi-tap and T9 mode.Key Upper Case CharactersLower Case CharactersNumericG. (full stop) , (comma) - (hyphen) ? !’ (apostrophe) @ :1 1HABC2 abc2 2IDEF3 def3 3JGHI4 ghi4 4KJKL5 jkl5 5LMNO6 mno6 6MPQRS7 pqrs7 7NTUV8 tuv8 8OWXYZ9 wxyz9 9Q(space) + = < > € £ $ ¥ % & 0 0P* + P?R.,?!:;-+#*@' '' ( ) _ & € £ $% / < > § = \ | ¥¿¡ ^ [ ] { } ¤ Å ÄÆ å ä æ à Ç É è é ìÑ ñ Ö Ø ö ø ò ß Ü üù ∆ Φ Γ Λ Ω Π Ψ ∑ ΘΞ (space) (return)Key Upper Case CharactersLower Case CharactersNumeric˜e_tm200_7fm.book Page 51 Tuesday, November 9, 2004 9:14 PM](https://usermanual.wiki/Sharp/NAR0058.Manual-1/User-Guide-487957-Page-51.png)
![8-52Entering TextSelecting the Input MethodT9 Text InputT9 text input method is a shortcut to enter text easily and quickly.1In the text entry screen, press C [Options].The “Options” menu appears.2Press a or b to highlight “Input method” and press B.3Press a or b to highlight the T9 mode (T9 Abc,T9 ABC, T9 abc) you wish to select and press B.“ ” appears at the top of the display.4Press each key once for any letter on that key.Example: To enter the word “How,” press J L O.5If the word shown isn’t the one you want, press a or b and highlight the correct one.6Press B to select the word.Entering Symbols and PunctuationTo enter symbols or punctuation, press R.Selecting the Input LanguageYou can select the input language in the text entry screen.1In the text entry screen, press C [Options].The “Options” menu appears.2Press a or b to highlight “Input language” and press B.3Press a or b to highlight the language you wish to select and press B.If the correct word is not shown in step 5, enter the correct word again after switching to the multi-tap input method.If you press Q instead of step 6, a space is inserted next to the selected word.e_tm200_7fm.book Page 52 Tuesday, November 9, 2004 9:14 PM](https://usermanual.wiki/Sharp/NAR0058.Manual-1/User-Guide-487957-Page-52.png)
![8-53Entering TextUsing Text TemplatesYou can use the sentences registered in “Text templates” when entering text. For information on how to create the text templates, refer to “Saving Phrases to the Text Template” on page 11-81.1In the text entry screen, press a, b, c or d to move the cursor to the point you wish to insert the template.2Press C [Options].The “Options” menu appears.3Press a or b to highlight “Text template” and press B.4Press a or b to highlight the text template you wish to select and press B.The selected text template is inserted.Copying, Cutting and Pasting TextThe options help you complete editing smoothly.Copying and Cutting1When you are editing text, press C [Options].The “Options” menu appears.2Press a or b to highlight “Copy” or “Cut” and press B.3Press a, b, c or d to move the cursor to the first letter to be copied or cut and press B.4Press a, b, c or d to move the cursor to the last letter to be copied or cut and press B.Pasting1After the “Copy” and “Cut” operation, press a, b, c or d to move the cursor to the point you wish to insert the letters and press C [Options].The “Options” menu appears.2Press a or b to highlight “Paste” and press B.“Cut” removes the information from its original location and relocates it when you use “Paste.” “Copy” leaves the information in its original location and makes another copy of the information when you use “Paste.”e_tm200_7fm.book Page 53 Tuesday, November 9, 2004 9:14 PM](https://usermanual.wiki/Sharp/NAR0058.Manual-1/User-Guide-487957-Page-53.png)
![9-55Using the Contacts ListSelecting the MemoryYou can store new entries in the “Contacts list.” Before saving new entries or viewing stored entries in the “Contacts list,” you can select the handset memory or the SIM card memory.Selecting the Memory for saving1At the main menu, select in the following order: “Contacts” → “Contacts list.”2Press C [Options].The “Options” menu appears.3Press a or b to highlight “Advanced” and press B.4Press a or b to highlight “Save to” and press B.5Press a or b to highlight “Handset,” “Selection” or “SIM” and press B.If you select “Selection,” you can select the memory (handset or SIM card) each time a new entry is saved. For information on how to select the memory when saving a new entry, refer to “Saving Information to the Contacts List” on page 9-56.Selecting the Memory for viewing1At the main menu, select in the following order: “Contacts” → “Contacts list.”2Press C [Options].The “Options” menu appears.3Press a or b to highlight “Advanced” and press B.4Press a or b to highlight “Source” and press B.5Press a or b to highlight “Handset,” “SIM” or “SIM + Handset” and press B.e_tm200_7fm.book Page 55 Tuesday, November 9, 2004 9:14 PM](https://usermanual.wiki/Sharp/NAR0058.Manual-1/User-Guide-487957-Page-55.png)
![9-56Using the Contacts ListSaving Information to the Contacts List1At the main menu, select in the following order: “Contacts” → “Contacts list.”2Press C [Options].The “Options” menu appears.3Press a or b to highlight “Add new contact” and press B.The “New Entry” screen appears.If you select “Selection” in step 5 of “Selecting the Memory for saving” (page 9-55), specify the memory (Handset or SIM) each time before making an entry.When selecting “Handset entry”:Items you can enter are “Name,” “Phone 1,” “Phone 2,” “Phone 3,” “E-mail 1,” “E-mail 2,” “Group,” “Address” and “Note.”When selecting “SIM entry”:Items you can enter are only “Name” and “Phone.”4Press a or b to highlight the item you wish to enter and press B.The entry screen appears. For information on how to enter text, refer to “Entering Text” on page 8-51.5When you finish entering the information, press A [Save].Adding a Phone Number from Call Register EntriesYou can enter the phone numbers and names of the caller in the “Contacts list” from “Call Register” logs such as “Missed calls,” “Received calls” or “Dialled numbers.”1Display the “Call Register” log you wish to select from.For information on “Call Registers,” refer to “Using the Call History” on page 14-122.2Press a or b to highlight the number you wish to save in the “Contacts list” and press C [Options].The “Options” menu appears.3Press a or b to highlight “Save to Contacts” and press B.4Follow the steps from step 3 of “Saving Information to the Contacts List” to complete the operation.For information on items or the number of the characters you can enter in the handset or SIM card memory, refer to “Contacts List Basics” on page 9-54.e_tm200_7fm.book Page 56 Tuesday, November 9, 2004 9:14 PM](https://usermanual.wiki/Sharp/NAR0058.Manual-1/User-Guide-487957-Page-56.png)
![9-57Using the Contacts ListSaving an Input Phone Number to the Contacts List1After you enter the phone number in standby mode, press C [Save].2Follow the steps from step 3 of “Saving Information to the Contacts List” (page 9-56) to complete the operation.Dialling from the Contacts ListWhen dialling from the “Contacts list,” display the index view of the “Contacts list” first.Dialling from the Contacts List1At the main menu, select in the following order: “Contacts” → “Contacts list.”2Press a or b to highlight the name you wish to call and press D to dial.If there are two or more entries registered in the selected entry, press a or b to highlight the phone number you wish to call and press D.If no entries are found in the list, you can create an entry from the list. Press C [Options] and follow step 3 onward of “Saving Information to the Contacts List” (page 9-56).Dialling from the Details Screen1At the main menu, select in the following order: “Contacts” → “Contacts list.”2Press a or b to highlight the name which contains the phone number you wish to dial and press B.The detail screen appears.3Press a or b to highlight the phone number you wish to dial and press D to dial.If you cannot find the name you wish to dial or send messages to, follow the steps in “Searching a Name and Number in the Contacts List” (page 9-58).e_tm200_7fm.book Page 57 Tuesday, November 9, 2004 9:14 PM](https://usermanual.wiki/Sharp/NAR0058.Manual-1/User-Guide-487957-Page-57.png)
![9-58Using the Contacts ListSending Messages from the Details Screen1At the main menu, select in the following order: “Contacts” → “Contacts list.”2Press a or b to highlight the name you wish to call and press B.The detail screen appears.3Press a or b to highlight the phone number or E-mail address of the recipient you wish to send a message to.4Press C [Options].The “Options” menu appears.5Press a or b to highlight “Send message” and press B.6Press a or b to highlight “via SMS,” “via MMS” or “via E-mail” and press B.Searching a Name and Number in the Contacts ListIf you cannot find the name or number you wish to call at a glance in index view, you can search for it by entering the first few characters.1At the main menu, select in the following order: “Contacts” → “Contacts list.”2Press C [Options].The “Options” menu appears.3Press a or b to highlight “Search” and press B.4Enter the first few characters of the name you wish to call.Matched results appear in alphabetical order. If there is no exact entry in the “Contacts list,” the similar names appear alphabetically.5Press a or b to scroll through the list for selecting the name you wish to call and press B.The detail screen of the “Contacts list” appears.You can also dial by pressing D when the name you wish to call is highlighted in step 4.e_tm200_7fm.book Page 58 Tuesday, November 9, 2004 9:14 PM](https://usermanual.wiki/Sharp/NAR0058.Manual-1/User-Guide-487957-Page-58.png)
![9-59Using the Contacts ListEditing the Contacts ListEditing a Contacts List Entry1At the main menu, select in the following order: “Contacts” → “Contacts list.”2Press a or b to highlight the name you wish to edit.3Press C [Options].The “Options” menu appears.4Press a or b to highlight “Edit” and press B.The “Edit Entry” screen appears.5Press a or b to highlight the item you wish to edit and press B.6When you have finished editing, press B.If you wish to edit another item, repeat steps 5 and 6.7Press A [Save].The changes are saved.If you do not wish to save the changes, press C [Options] before step 7 and press a or b to highlight “Cancel,” then press B.Adding a Thumbnail Image to Entries (for the handset entry only)You can add a thumbnail image to entries in the handset memory.1At the main menu, select in the following order: “Contacts” → “Contacts list.”2Press a or b to highlight the entry you wish to add a thumbnail image to and press B.The detail screen appears.3Press C [Options].The “Options” menu appears.4Press a or b to highlight “Caller ID” and press B.5Press a or b to highlight “My photos” or “My pictures” and press B.The thumbnail list you selected appears.If you cannot find the name you wish to edit, follow the steps in “Searching a Name and Number in the Contacts List” (page 9-58).e_tm200_7fm.book Page 59 Tuesday, November 9, 2004 9:14 PM](https://usermanual.wiki/Sharp/NAR0058.Manual-1/User-Guide-487957-Page-59.png)
![9-60Using the Contacts List6Press a, b, c or d to highlight a thumbnail image you wish to add and press B.7Press A [Save] to add a thumbnail image to the entry.To change the thumbnail image in the “Contacts list” entrySelect “Change” after step 4 and select “My photos” or “My pictures.”To remove the thumbnail image in the “Contacts list” entrySelect “Remove” after step 4.Setting the Ringtone for a Contacts List Entry (for the handset entry only)You can set a ringtone or the vibration to a “Contacts list” entry in the handset memory.1At the main menu, select in the following order: “Contacts” → “Contacts list.”2Press a or b to highlight the name you wish to set and press BThe detail screen appears.3Press C [Options].The “Options” menu appears.4Press a or b to highlight “Ringtone” and press B.5Press a or b to highlight “On” and press B.If you wish to cancel the ringtone setting, select “Off” in this step.6Press a or b to highlight “Assign melody” and press B.7Press a or b to highlight “My sounds,” “My music” or “T-Mobile” and press B.The files in “T-Mobile” are preset data. Picture up to 150 kbytes can be added to entries as a thumbnail image. You cannot add thumbnail images to entries in the SIM Memory.The “Options” menu items “Change” and “Remove” appear only when a thumbnail image is added to the selected entry.If you delete an image added as a thumbnail in “My photos” or “My pictures,” the corresponding thumbnail image is also removed.e_tm200_7fm.book Page 60 Tuesday, November 9, 2004 9:14 PM](https://usermanual.wiki/Sharp/NAR0058.Manual-1/User-Guide-487957-Page-60.png)
![9-61Using the Contacts List8Press a or b to highlight the ringtone you wish to set and press C [Select].For more information on how to select a ringtone, refer to “Setting a Melody as the Ringtone” on page 15-137.9Press a or b to highlight “Vibration” and press B.10 Press a or b to highlight “Enable,” “Disable” or “Link to sound” and press B.For information on how to set the vibration, refer to “Setting the Vibration” on page 15-137.11 When setting is complete, press A [Back] and A [Save].Copying Entries Between MemoriesYou can copy entries between the handset and SIM card memories. This function is useful when you wish to backup entries or organise your memory space. Before copying, make sure which memory’s entries are displayed on the display.1At the main menu, select in the following order: “Contacts” → “Contacts list.”2Press a or b to highlight the name which you wish to copy to another memory.3Press B to display the detail screen and press a or b to highlight the phone number you wish to copy.4Press C [Options].The “Options” menu appears.5Press a or b to highlight “Copy to SIM” to copy the entry to the SIM card or “Copy to handset” to copy the entry to the handset memory and press B.The name and the phone number selected in step 2 are copied to the other memory.If you select “Copy to SIM,” the message “Some data may be lost. OK?” appears. Press C [Yes] to complete the operation.Even if multiple phone numbers are registered to one name, you can copy only one phone number per name to the SIM card.e_tm200_7fm.book Page 61 Tuesday, November 9, 2004 9:14 PM](https://usermanual.wiki/Sharp/NAR0058.Manual-1/User-Guide-487957-Page-61.png)
![9-62Using the Contacts ListCopying All Entries from the SIM Card to the Handset MemoryYou can copy all entries from the SIM card to the handset memory at once. This function is useful when you restore the handset memory with the backup copy in the SIM Card.1At the main menu, select in the following order: “Contacts” → “Contacts list.”2Press C [Options].The “Options” menu appears.3Press a or b to highlight “Advanced” and press B.4Press a or b to highlight “Copy all from SIM” and press B.5Press C [Yes].If you wish to cancel, press A [No] in this step.Swapping the Location Number of the Phone Number (for SIM card entries only)1At the main menu, select in the following order: “Contacts” → “Contacts list.”2Press a or b to highlight the desired name and press B.3Press a or b to highlight the desired phone number and press C [Options].The “Options” menu appears.4Press a or b to highlight “Swap” and press B.5Enter the location number you wish to swap and press B.Deleting a Contacts List Entry1At the main menu, select in the following order: “Contacts” → “Contacts list.”2Press a or b to highlight the name you wish to delete.If you cannot find the desired name, follow the steps in “Searching a Name and Number in the Contacts List” (page 9-58).e_tm200_7fm.book Page 62 Tuesday, November 9, 2004 9:14 PM](https://usermanual.wiki/Sharp/NAR0058.Manual-1/User-Guide-487957-Page-62.png)
![9-63Using the Contacts List3Press C [Options].The “Options” menu appears.4Press a or b to highlight “Delete” and press B.5Press C [Yes].If you wish to cancel, press A [No] in this step.Deleting All Contacts List EntriesYou can delete all entries in the “Contacts list.” Before deleting all “Contacts list” entries, ensure that you are accessing the memory you wish to delete. For information on how to select the memory for “Contacts list” entries, refer to “Selecting the Memory” on page 9-55.1At the main menu, select in the following order: “Contacts” → “Contacts list.”2Press C [Options].The “Options” menu appears.3Press a or b to highlight “Advanced” and press B.4Press a or b to highlight “Delete all entries” and press B.5Enter your handset code and press B.For information on the handset code, refer to “Enabling the Handset Lock” on page 15-154.6Press a or b to highlight “Handset entries” or “SIM entries” and press B.7Press C [Yes].If you wish to cancel, press A [No] in this step.Setting the GroupsYou can set group icons when saving the “Contacts list” entries to the handset memory so that you can easily find and edit them.Viewing Groups1At the main menu, select in the following order: “Contacts” → “Contacts list.”2Press C [Options].The “Options” menu appears.3Press a or b to highlight “Group” and press B.4Press a or b to highlight “View groups” and press B.Once you delete a “Contacts list” entry, it cannot be restored. Once you delete all entries in the “Contacts list,” they cannot be restored.e_tm200_7fm.book Page 63 Tuesday, November 9, 2004 9:14 PM](https://usermanual.wiki/Sharp/NAR0058.Manual-1/User-Guide-487957-Page-63.png)
![9-64Using the Contacts List5Press a or b to highlight the group name you wish to hide/view and press B.The check box indicates that the group has been selected.Group CallYou can set different ringtones for each group. When you purchase this handset, groups are set to off. If you do not set a group ringtone, the ringtone assigned in “Profiles” is used. For information on “Profiles,” refer to “Setting the Profiles” on page 15-136.1At the main menu, select in the following order: “Contacts” → “Contacts list.”2Press C [Options].The “Options” menu appears.3Press a or b to highlight “Group” and press B.4Press a or b to highlight “Group call” and press B.5Press a or b to highlight the group name you wish to set and press B.6Press a or b to highlight “On” and press B.If you wish to cancel the ringtone setting, select “Off” in this step.7Press a or b to highlight “Assign melody” and press B.8Press a or b to highlight “My sounds,” “My music” or “T-Mobile” and press B.The files in “T-Mobile” are preset data.9Press a or b to highlight the ringtone you wish to set and press C [Select].For more information on how to select a ringtone, refer to “Setting a Melody as the Ringtone” on page 15-137.10 Press a or b to highlight “Vibration” and press B.11 Press a or b to highlight “Enable,” “Disable” or “Link to sound” and press B.For information on how to set the vibration, refer to “Setting the Vibration” on page 15-137.In step 5, press C [Options] to display the “Options” menu and select “Select current only” to view only the selected group or “Select all” to view all groups.e_tm200_7fm.book Page 64 Tuesday, November 9, 2004 9:14 PM](https://usermanual.wiki/Sharp/NAR0058.Manual-1/User-Guide-487957-Page-64.png)
![9-65Using the Contacts ListMemory StatusYou can check the number of entries registered in the “Contacts list.”1At the main menu, select in the following order: “Contacts” → “Contacts list.”2Press C [Options].The “Options” menu appears.3Press a or b to highlight “Memory status” and press B.You can check the memory status of the handset memory and SIM card.Setting the Speed Dial ListYou can set a maximum of 9 phone numbers in the “Speed dial list.”Setting Contacts List entries in the Speed Dial List1At the main menu, select in the following order: “Contacts” → “Contacts list.”2Press a or b to highlight the name you wish to add to the “Speed dial list” and press B.The “Contacts list” screen appears.3Press a or b to highlight the phone number you wish to add to the “Speed dial list” and press C [Options].The “Options” menu appears.4Press a or b to highlight “Add to Speed dial” and press B.5Press a or b to highlight the Speed dial number you wish to set and press B.For information on making a call with Speed dialling, refer to “Speed Dialling” on page 6-34.The nine digit keys correspond to list numbers.e_tm200_7fm.book Page 65 Tuesday, November 9, 2004 9:14 PM](https://usermanual.wiki/Sharp/NAR0058.Manual-1/User-Guide-487957-Page-65.png)
![11-70Using the Message ServiceAddress OptionsIn step 5 of “Basic Operation” (page 11-69), you can use following useful optional functions.To select a destination from “Contacts list”1Press C [Options] (or press b) in step 5.The “Options” menu appears.2Press a or b to highlight “Contacts list” press B.The “Contacts list” appears and you can search for the phone number entering only the first few characters. For information on how to search “Contacts list” entries, refer to “Searching a Name and Number in the Contacts List” on page 9-58.To select a destination from “History”In “History,” the last 8 destinations sent using messages (SMS, MMS or E-mail messages) are recorded.1Press C [Options] in step 5.The “Options” menu appears.2Press a or b to highlight “History” press B.The destination list appears. 3Press a or b to highlight the destination you wish to send the message to and press B.If you wish to delete one of the destinations from the list, press C [Options] and select “Delete” and press B.To reselect the message type After selecting “SMS,” “MMS” or “E-mail message” in step 4 of “Basic Operation” (page 11-69), you can change to another type of message later on.3Press C [Options].The “Options” menu appears.4Press a or b to highlight “Change to SMS,” “Change to MMS” or “Change to E-mail” and press B.The message type is reselected. Follow the operation from step 6 of “Basic Operation” on page 11-69.To add recipients to the message1After entering a destination, press C [Options].The “Options” menu appears. When sending SMS message of more than 160 characters, a confirmation message appears. Press C [Yes] to send or A [No] to cancel. If the MMS or E-mail messages cannot be sent for some reason, the message stays in the “Outbox” and “ ” is displayed on the standby screen.e_tm200_7fm.book Page 70 Tuesday, November 9, 2004 9:14 PM](https://usermanual.wiki/Sharp/NAR0058.Manual-1/User-Guide-487957-Page-70.png)
![11-71Using the Message Service2Press a or b to highlight “Add another contact” and press B.3Press a or b to highlight “To,” “Cc” or “Bcc” and B.If you are sending an SMS message, only the “To” list screen appears. If you are sending an MMS message, you cannot select “Bcc.”4Enter the phone number or E-mail address of the additional recipient and press B.If you are sending an SMS message, select a blank line from the “To” list and enter a phone number.5When adding recipients is complete, press A [Back].Message OptionsIn step 6 of “Basic Operation” (page 11-69), you can use following useful optional functions.To use the text templatesThe text templates you have created and stored in the handset are also available when creating messages. For information on how to create text templates, refer to “Making Text Templates” on page 11-81.1When making a message in any message type (“SMS,” “MMS” or “E-mail”), press a, b, c or d to move the cursor to the point you wish to insert the text template, and press C [Options].2Press a or b to highlight “Text template” and press B.3Press a or b to highlight the template you wish to enter from the list and press B.You can continue to make the message. If you wish to end the message, go to step 7 of “Basic Operation” on page 11-69.To attach data (for MMS and E-mail only)You can send photos, pictures, sounds and video clips by attaching them to MMS or E-mail message.You can enter up to 60 characters for “To,” “Cc” or “Bcc.” This may be limited depending on your service provider. Contact your service provider if you have a problem sending mail. When attaching video clips, “Slide show” is automatically set to “Off.” NVA (e-Animation file), AAC and MP3 cannot be attached to the message. When attaching a photo/picture file to a message, the size of the file is automatically reduced if exceeding the maximum (295 kbytes) size to send. e_tm200_7fm.book Page 71 Tuesday, November 9, 2004 9:14 PM](https://usermanual.wiki/Sharp/NAR0058.Manual-1/User-Guide-487957-Page-71.png)
![11-72Using the Message Service1In step 6, of “Basic Operation” (page 11-69), press C [Options].The “Options” menu appears.2Press a or b to highlight “Attach” and press B.3Press a or b to highlight “Photo,” “Picture,” “Sound,” “Video” or “Music” and press B.The list of “My photos,” “My pictures,” “My sounds,” “My videos” or “My music” appears.4Press a or b to highlight the file you wish to attach and press B.The selected picture, sound or video clip is attached. 5Press B to return to the message edit screen.If you wish to remove the attached data, press a or b to highlight the file name you wish to remove and press C [Options]. Press C [Yes] to remove or press A [No] to cancel.To send a message using the message template (for MMS only)You can send message templates with an image and voice attached.1In step 6 of “Basic Operation” (page 11-69), press C [Options].The “Options” menu appears.2Press a or b to highlight “Message template” and press B.“Discard message?” appears. Press C [Yes] to go to next step or press A [No] to go back to text editor.3Press a or b to highlight a template you wish to send and press B.To Create the slide show (for MMS only)This function enables you to create messages that have up to 10 slides. Each slide can contain one picture, one sound file and up to 1000 characters (up to the message total of 295 kbytes.)1In step 6 of “Basic Operation” (page 11-69), press C [Options].The “Options” menu appears.2Press a or b to highlight “Slide control” and press B.The options available for the slide are:Add: Add a new slide.Remove: Remove the active slide.Previous: Navigate to the previous slide.Next: Navigate to the next slide.e_tm200_7fm.book Page 72 Tuesday, November 9, 2004 9:14 PM](https://usermanual.wiki/Sharp/NAR0058.Manual-1/User-Guide-487957-Page-72.png)
![11-73Using the Message ServiceTo add the subject of the message (for MMS and E-mail only)You can add a subject for the message before sending. 1After entering a message, press B in step 6 of “Basic Operation” (page 11-69).2Press a or b to highlight “Subject” and press B.3Enter the subject of the message and press B.To preview the message before sending (for MMS and E-mail only)You can preview the message before sending.1After entering a message, press B in step 6 of “Basic Operation” (page 11-69).2Press a or b to highlight “Preview message” and press B.To reselect the message typeYou can change to another message type in step 6 of “Basic Operation” (page 11-69).For information on reselecting message type, refer to “To reselect the message type” on page 11-70.Sending a Message from the Drafts Box1At the main menu, select in the following order: “Messages” → “Drafts.”2Press a or b to highlight the message you wish to send and press C [Options].The “Options” menu appears.3Press a or b to highlight “Send” and press B.If you wish to modify the message, press “Edit message” instead of selecting “Send” in this step. Video clip data cannot be attached to the message as slide data. If you select “Off,” you can attach 20 pictures, sounds or video clips up to 295 kbytes in total. To enable the slide show you must set “On” in the “Slide show” setting. For information on the “Slide show” setting, refer to “Settings for the Messages” on page 11-79. You can enter up to 40 characters as the subject. This may be limited depending on your network service. Contact your service provider if you have problem sending mail.e_tm200_7fm.book Page 73 Tuesday, November 9, 2004 9:14 PM](https://usermanual.wiki/Sharp/NAR0058.Manual-1/User-Guide-487957-Page-73.png)
![11-74Using the Message ServiceReceiving and Reading MessagesReceiving MessagesWhen the handset is within the service area, SMS and MMS messages are automatically received and saved in the “Inbox.” Meanwhile, you need to operate manually to receive E-mail messages held at the service provider. For information on how to receive E-mail messages, refer to “To receive E-mail messages.”Also, you may need to download MMS messages manually. For information on how to download MMS messages manually, refer to “To retrieve a message (for MMS only)” on page 11-78.When receiving messages, the following indicators appear at the top of the standby screen depending on the type of the received message.SMS: MMS: E-mail: To receive E-mail messages1At the main menu, select in the following order: “Messages” → “Inbox.”“New E-mail check” appears. If you select C [Yes], the messages are delivered.For information on “Check confirmation,” refer to “The E-mail message settings” on page 11-80.Reading MessagesChoose message in the “Inbox” to read the received messages.1At the main menu, select in the following order: “Messages” → “Inbox.”MMS messages marked with a clip denote messages with attachments.2Press a or b to highlight the message you wish to read and press B.3Press a or b to scroll through the message.When you receive an SMS message, the sender’s phone number and a part of the message appears. When the sender’s phone number is stored in the “Contacts list,” the sender’s name appears instead of the phone number. A message with “ ” (SMS message), “ ” (MMS) or “ ” (MMS with attachment) icon indicates an unread message. If the “Inbox,” “Sent” or “Drafts” box is full, a red icon is displayed. Delete unwanted messages. For information on how to delete messages, refer to “Deleting Messages” on page 11-78.e_tm200_7fm.book Page 74 Tuesday, November 9, 2004 9:14 PM](https://usermanual.wiki/Sharp/NAR0058.Manual-1/User-Guide-487957-Page-74.png)
![11-75Using the Message Service4When you have finished reading the message, press A [Back].Replying and Forwarding MessagesYou can reply to the sender of a received message or forward the received message to another destination. Also, you can modify the received message when replying or forwarding. You can also call the sender of the message using the phone number contained in the message.To reply to a message1After reading a message or selecting a message in “Inbox,” press C [Options].The “Options” menu appears.2Press a or b to highlight “Reply” and press B.3Enter your message.For information on how to enter text, refer to “Entering Text” on page 8-51.4Press B and select “Send.”To forward a message1At the main menu, select in the following order: “Messages”→ select “Inbox” or “Sent.”2Press a or b to highlight the message you wish to forward.3Press C [Options].The “Options” menu appears.4Press a or b to highlight “Forward” and press B.5Enter the phone number or E-mail address of the recipient and press B.If you wish to select the phone number (for SMS and MMS message) or E-mail address (for MMS and E-mail message) in the “Contacts list,” refer to “Searching a Name and Number in the Contacts List” on page 9-58.If you wish to reply to all addresses on an MMS or E-mail message, select “Reply All” in step 3. When you forward a message, the attached data is also sent to the recipient. However, the handset will not send AAC, MP3 and any data it recognises as having copyrights. The “Subject” field is automatically filled with the original subject preceded by “Fw:.” The original message cannot be changed.e_tm200_7fm.book Page 75 Tuesday, November 9, 2004 9:14 PM](https://usermanual.wiki/Sharp/NAR0058.Manual-1/User-Guide-487957-Page-75.png)
![11-76Using the Message ServiceTo call the senderYou can call the sender of an SMS or MMS message in the “Inbox” whose address (From) is the phone number.1At the main menu, select in the following order: “Messages” → “Inbox.”2Press a or b to highlight the message from the sender you wish to call and press C [Options].The “Options” menu appears.3Press a or b to highlight “Call sender” and press B.To extract the phone number from the received messageYou can call using phone number contained only in the received SMS message.1At the main menu, select in the following order: “Messages” → select “Inbox,” “Drafts” or “Sent.”2Press a or b to highlight the message that contains the phone number you wish to extract and press B.3Press C [Options].The “Options” menu appears.4Press a or b to highlight “Extract numbers” and press B.Phone numbers embedded in the message appear.5Press C [Options].6Press a or b to highlight “Call” and press B.The handset starts to call the number.Modifying a messageYou can modify an original message you made before or after sending it if the message you wish to modify is in the “Drafts,” “Sent” or “Outbox.”1At the main menu, select in the following order: “Messages” → “Drafts,” “Sent” or “Outbox.”2Press a or b to highlight a message you wish to modify.3Press C [Options].The “Options” menu appears.4Press a or b to highlight “Edit message” and press B.5Modify the message and press B.If you select “Send via SMS/MMS” in step 6, you can use the number to make message. If you select “Save to Contacts,” you can save the number in the “Contacts list.”e_tm200_7fm.book Page 76 Tuesday, November 9, 2004 9:14 PM](https://usermanual.wiki/Sharp/NAR0058.Manual-1/User-Guide-487957-Page-76.png)
![11-77Using the Message ServiceSaving the Phone Number or E-mail Address of a Sender1At the main menu, select in the following order: “Messages” → select “Inbox,” “Drafts,” “Sent” or “Outbox.”2Press a or b to highlight the message from the sender you wish to save.3Press C [Options].The “Options” menu appears.4Press a or b to highlight “Save to Contacts” and press B.For information on how to enter name and other information, refer to “Saving Information to the Contacts List” on page 9-56.To check sender/receiver information (for MMS and E-mail only)1At the main menu, select in the following order: “Messages” → select “Inbox,” “Drafts,” “Sent” or “Outbox.”2Press a or b to highlight the message you wish to check and press C [Options].The “Options” menu appears.3Press a or b to highlight “Details” and press B.The sender’s or receiver’s phone number or E-mail address, time and date stamp, subject and size appear.To resend a message in the Outbox1At the main menu, select in the following order: “Messages” → “Outbox.”2Press a or b to highlight the message you wish to resend and press C [Options].The “Options” menu appears.3Press a or b to highlight “Re-send” and press B. You can also modify received messages when replying or forwarding them. For information on how to reply or forward messages, refer to “Replying and Forwarding Messages” on page 11-75. You cannot modify a “Slide show” message that is created on another handset.e_tm200_7fm.book Page 77 Tuesday, November 9, 2004 9:14 PM](https://usermanual.wiki/Sharp/NAR0058.Manual-1/User-Guide-487957-Page-77.png)
![11-78Using the Message ServiceTo lock messages (for MMS and E-mail only)MMS and E-mail messages can be locked so they are not deleted by accident.1At the main menu, select in the following order: “Messages” → select “Inbox” or “Sent.”2Press a or b to highlight the message you wish to lock or unlock and press C [Options].The “Options” menu appears.3Press a or b to highlight “Lock/Unlock” and press B.To retrieve a message (for MMS only)1At the main menu, select in the following order: “Messages” → “Inbox.”2Press a or b to highlight the alert you wish to download.3Press C [Options].The “Options” menu appears.4Press a or b to highlight “Download” and press B.Deleting MessagesDeleting a message1At the main menu, select in the following order: “Messages” → select “Inbox,” “Drafts,” “Sent” or “Outbox.”2Press a or b to highlight the message you wish to delete and press C [Options].The “Options” menu appears.3Press a or b to highlight “Delete” and press B.Deleting messages by message typeIf you wish to delete all of a certain type of message in a box at one time, the following deleting option meets the need.1At the main menu, select in the following order: “Messages” → “Delete messages.”2Press a or b to highlight “Inbox,” “Sent,” “Drafts” or “Outbox” and press B.Each delete option is categorised by message type. Select one of menu items (SMS, MMS or E-mail) and press B to delete all messages of a certain selected type.You can press B to start downloading instead of steps 3 and 4.e_tm200_7fm.book Page 78 Tuesday, November 9, 2004 9:14 PM](https://usermanual.wiki/Sharp/NAR0058.Manual-1/User-Guide-487957-Page-78.png)
![11-79Using the Message ServiceDeleting All messagesIf you wish to delete all messages in “Inbox/Drafts/Sent/Outbox” at one time, perform the following operation.1At the main menu, select in the following order: “Messages” → “Delete messages.”2Press a or b to highlight “All messages” and press B.Settings for the MessagesThe steps below are instructions on SMS, MMS and E-mail message settings.1Press B.The main menu appears.2Press a, b, c or d to highlight “Messages” and press B.The “Messages” menu appears.3Press a or b to highlight “Settings” and press B.4Press a or b to highlight “SMS” or “MMS message” and press B.The SMS message settingsAfter step 4 of “Setting for the Messages,” set the following items.When you finish making settings, press A [Back].Message centre:Enter the message centre number to enable the service.Message lifetime:Set the time span that the message service centre continually tries to send the message to the recipient you specified.If you wish to delete all messages in a certain box, select “All Inbox/Drafts/Sent/Outbox messages.”Once you have deleted messages, they cannot be restored.You cannot delete locked messages. For information on how to lock messages, refer to “To lock messages (for MMS and E-mail only).”e_tm200_7fm.book Page 79 Tuesday, November 9, 2004 9:14 PM](https://usermanual.wiki/Sharp/NAR0058.Manual-1/User-Guide-487957-Page-79.png)
![11-80Using the Message ServiceMessage format:Select a message format from the 7 choices.Connection type:Select a connection type.Optimisation:Converts double-byte characters (such as European characters with an accent) into single-byte characters before sending the message. Note that you may be charged double for sending double-byte character messages.The MMS message settingsAfter step 4 of “Setting for the Messages,” set the following items. When you finish making settings, press A [Back].Account setting:Refer to “Setting an Account” on page 15-158.Home network:Defers MMS message downloads when you use your home network.Roaming download:Defers MMS message download when roaming outside of your network.Allow delivery report:Enables “Delivery report” when receiving a message that applies to the “Delivery report” function.Anonymous reject:Rejects messages from unknown or empty addresses.Auto delete:Deletes the oldest message automatically when the “Sent” box is full.Slide show:Enables slide show when sending a message.Advanced: Priority: prioritises composed messages. Delivery report: enables delivery report. Expiry time: sets the expiry time for messages stored in the server. Slide interval: sets the slide display time when sending a message.The E-mail message settingsAccount settings:Refer to “Setting an Account” on page 15-158.Check confirmation:Select “Inbox” and Check your new E-mail.e_tm200_7fm.book Page 80 Tuesday, November 9, 2004 9:14 PM](https://usermanual.wiki/Sharp/NAR0058.Manual-1/User-Guide-487957-Page-80.png)
![11-81Using the Message ServiceMaking Text TemplatesYou can register up to 20 text templates for frequently used text on the handset.1Press B.The main menu appears.2Press a, b, c or d to highlight “Messages” and press B.3Press a or b to highlight “Text templates” and press B.The list of the text templates appear.Saving Phrases to the Text Template120 characters may be saved in any text template.1At the main menu, select in the following order: “Messages” → “Text templates.”2Press a or b to highlight the item you wish to register and press B.3Enter the text and press B.For information on how to enter text, refer to “Entering Text” on page 8-51.Editing Text Templates1At the main menu, select in the following order: “Messages” → “Text templates.”The list of the text templates appear.2Press a or b to highlight the item you wish to edit and press B.3Edit the text template and press B.For more information on how to enter text, refer to “Entering Text” on page 8-51.Viewing Text Templates1At the main menu, select in the following order: “Messages” → “Text templates.”2Press a or b to highlight the item you wish to view and press C [Options].The “Options” menu appears.3Press a or b to highlight “View” and press B.The selected text template is displayed.When you have finished confirmation, press A [Back].You cannot edit the text template in step 3.e_tm200_7fm.book Page 81 Tuesday, November 9, 2004 9:14 PM](https://usermanual.wiki/Sharp/NAR0058.Manual-1/User-Guide-487957-Page-81.png)
![11-82Using the Message ServiceDeleting Text Templates1At the main menu, select in the following order: “Messages” → “Text templates.”2Press a or b to highlight the item you wish to delete and press C [Options].The “Options” menu appears.3Press a or b to highlight “Delete” and press B.4Press C [Yes].The selected text template is deleted.If you wish to cancel deletion, press A [No] in this step.Using Voice MailYou can use the voice mail service depending on the service provider you use. For information on the voice mail service, contact your service provider.Calling Voice Mail1Press B.The main menu appears.2Press a, b, c or d to highlight “Messages” and press B.The “Messages” menu appears.3Press a or b to highlight “Voice mail” and press B.The “Voice mail” menu appears.4Press a or b to highlight “Call Voice mail” and press B.Setting Voice Mail1At the main menu, select in the following order: “Messages” → “Voice mail.”2Press a or b to highlight “Voice mail setting” and press B.Once you delete the text template, it cannot be restored.e_tm200_7fm.book Page 82 Tuesday, November 9, 2004 9:14 PM](https://usermanual.wiki/Sharp/NAR0058.Manual-1/User-Guide-487957-Page-82.png)

![11-84Using the Message ServiceReading Cell Broadcast Messages1When you receive a cell broadcast message, press B.A popup is displayed over the standby screen.2Press a or b to scroll through the message.3When you finish reading, press B.Subscribing to Cell BroadcastsSelect the page of the cell broadcast message that you want.1At the main menu, select the following order: “Messages” → “Cell Broadcasts.”2Press a or b to highlight “Settings” and press B.3Press a or b to highlight “Set info subjects” and press B.4Press a or b to highlight “Add/Remove” and press B.5Press a or b to highlight the page you wish to view and press B.When you have finished viewing, press A [Back]. You can set a maximum of four subjects for subscription in step 5. When you cannot find the page you wish to view in the list that appears in step 5, select “Create subject” in step 4 and enter the subject code to add a page. For details on the subject code, contact your service provider.e_tm200_7fm.book Page 84 Tuesday, November 9, 2004 9:14 PM](https://usermanual.wiki/Sharp/NAR0058.Manual-1/User-Guide-487957-Page-84.png)
![12-87Enjoying Multi MediaViewing Pictures1At the main menu, select in the following order: “My Media” → “Photos” → “My photos,” or “Pictures” → “My pictures.”The thumbnail index appears.2Press a, b, c or d to select an image in the thumbnail index you wish to view and press B.The selected picture is displayed.When you have finished viewing the picture, press A [Back].To scroll the pictureAfter displaying the picture in step 2, press a, b, c or d to scroll the picture.To view the pictures saved in memory card2After step 1, press C [Options].The “Options” menu appears.3Press a or b to highlight “Switch to memory card” and press B.The thumbnail index shows the pictures saved in memory card.Sending Pictures as AttachmentsYou can attach the pictures to the MMS or E-mail message.1At the main menu, select in the following order: “My Media” → “Photos” → “My photos,” or “Pictures” → “My pictures.”The thumbnail index appears.To access pictures taken with the built-in digital camera, select “My photos.” To access pictures downloaded through the mobile Internet, select “My pictures.”When viewing a picture from “My pictures,” the maximum size of the picture that can be displayed is 295 kbytes.Some pictures cannot be scrolled depending on the picture size. When you view the pictures saved in memory card, the menu item switches to “Switch to Handset.” Pictures stored in memory card may not be viewed, edited, moved or copied depending on its file size or picture size.e_tm200_7fm.book Page 87 Tuesday, November 9, 2004 9:14 PM](https://usermanual.wiki/Sharp/NAR0058.Manual-1/User-Guide-487957-Page-87.png)
![12-88Enjoying Multi Media2Press a, b, c or d to select an image in the thumbnail index you wish to attach and press B.The selected picture is displayed.3Press C [Options].The “Options” menu appears.4Press a or b to highlight “Send via MMS” or “Send via E-mail” and press B.Following procedure is the same as making a message. For information on how to make a message, refer to the “Basic Operation” on page 11-69. Perform the operation from step 5 (Entering a phone number or an E-mail address.)Setting the stored image as wallpaper1At the main menu, select in the following order: “My Media” → “Photos” → “My photos,” or “Pictures” → “My pictures.”The thumbnail index appears.2Press a, b, c or d to select an image in the thumbnail index you wish to view and press C [Options].The “Options” menu appears.3Press a or b to highlight “Set as Wallpaper” and press B.4Press a or b to highlight “Main Display” or “External Display” and press B.5Press B.The displayed picture is set as the wallpaper. To access pictures taken with the built-in digital camera, select “My photos.” To access pictures downloaded through the mobile Internet, select “My pictures.” When attaching a photo/picture file to a message, the size of the file is automatically reduced if exceeding the maximum (295 kbytes) size to send. If you wish to view the full picture before sending it, press B to display the image in step 2 before pressing C [Options]. Then select “Send via MMS” or “Send via E-mail” in the “Options” menu.To access pictures taken with the built-in digital camera, select “My photos.” To access pictures downloaded through the mobile Internet, select “My pictures.”If you wish to view the full size image of the picture before setting it as the wallpaper, press B to display the image in step 2 before pressing C [Options]. Then select “Wallpaper” in the “Options” menu.e_tm200_7fm.book Page 88 Tuesday, November 9, 2004 9:14 PM](https://usermanual.wiki/Sharp/NAR0058.Manual-1/User-Guide-487957-Page-88.png)
![12-89Enjoying Multi MediaEditing PicturesYou can edit pictures by retouching, adding frames or stamps or rotating. Also, you can adjust the size of the picture or rename the picture file.To reduce picture size1At the main menu, select in the following order: “My Media” → “Photos” → “My photos,” or “Pictures” → “My pictures.”The thumbnail index appears.2Press a, b, c or d to select an image in the thumbnail index you wish to reduce the size of and press B.The selected picture is displayed.3Press C [Options].The “Options” menu appears.4Press a or b to highlight “Edit photo” and press B.If you are in “My picture,” the menu item in step 4 is “Edit picture.”5Press a or b to highlight “Reduce photo size” and press B.If you are in “My picture” the menu item in step 5 is “Reduce picture size.”The options for reducing the picture size appear. The following shows the menu items depending on the size of picture or photo selected. When “2M pixel” is selected:1M pixel (858×1144)Large (768×1024)Medium (480×640)Small (240×320)Tiny (120×160)When “1M pixel” is selected:Large (768×1024)Medium (480×640)Small (240×320)Tiny (120×160)When “Large” is selected:Medium (480×640)Small (240×320)Tiny (120×160)The picture size may change after the editing operation.To access pictures taken with the built-in digital camera, select “My photos.” To access pictures downloaded through the mobile Internet, select “My pictures.”e_tm200_7fm.book Page 89 Tuesday, November 9, 2004 9:14 PM](https://usermanual.wiki/Sharp/NAR0058.Manual-1/User-Guide-487957-Page-89.png)
![12-90Enjoying Multi MediaWhen “Medium” is selected:Small (240×320)Tiny (120×160)When “Small” is selected:Tiny (120×160)6Press a or b to highlight one of the menu items and press B.The picture size is reduced.To reduce picture quality1At the main menu, select in the following order: “My Media” → “Photos” → “My photos,” or “Pictures” → “My pictures.”The thumbnail index appears.2Press a, b, c or d to select an image in the thumbnail index you wish to reduce the size of and press B.The selected picture is displayed.3Press C [Options].The “Options” menu appears.4Press a or b to highlight “Edit photo” and press B.If you are in “My picture,” the menu item in step 4 is “Edit picture.”5Press a or b to highlight “Reduce photo quality” and press B.The picture quality is reduced.To retouch pictures1At the main menu, select in the following order: “My Media” → “Photos” → “My photos,” or “Pictures” → “My pictures.”The thumbnail index appears.2Press a, b, c or d to select an image in the thumbnail index you wish to retouch and press B.The selected picture is displayed.3Press C [Options].The “Options” menu appears.4Press a or b to highlight “Edit picture” and press B.To access pictures taken with the built-in digital camera, select “My photos.” To access pictures downloaded through the mobile Internet, select “My pictures.”To access pictures taken with the built-in digital camera, select “My photos.” To access pictures downloaded through the mobile Internet, select “My pictures.”e_tm200_7fm.book Page 90 Tuesday, November 9, 2004 9:14 PM](https://usermanual.wiki/Sharp/NAR0058.Manual-1/User-Guide-487957-Page-90.png)
![12-91Enjoying Multi Media5Press a or b to highlight “Retouch” and press B.6Press a or b to highlight one of the options below and press B.The “Retouch” options:Sepia, Sparkling, Ripples, Tile, Emboss, Oil painting, Clear frame, Round frame, Soft frame, Zigzag frame7The selected option is confirmed on the display. Press B to apply.If you wish to cancel, press A [Cancel].To add a frame to pictures1At the main menu, select in the following order: “My Media” → “Photos” → “My photos,” or “Pictures” → “My pictures.”The thumbnail index appears.2Press a, b, c or d to select an image in the thumbnail index you wish to add a frame to and press B.The selected picture is displayed.3Press C [Options].The “Options” menu appears.4Press a or b to highlight “Edit picture” and press B.5Press a or b to highlight “Add frame” and press B.6Press a, b, c or d to select a frame and press B.7The selected option is confirmed on the display. Press B to apply.If you wish to cancel, press A [Cancel].To add stamps to pictures1At the main menu, select in the following order: “My Media” → “Photos” → “My photos,” or “Pictures” → “My pictures.”The thumbnail index appears.When you retouch a picture, a new retouched picture is created as the other file and the original picture is saved.To access pictures taken with the built-in digital camera, select “My photos.” To access pictures downloaded through the mobile Internet, select “My pictures.”When you add a frame to a picture, a new picture with a frame is created as the other file and the original picture is saved.e_tm200_7fm.book Page 91 Tuesday, November 9, 2004 9:14 PM](https://usermanual.wiki/Sharp/NAR0058.Manual-1/User-Guide-487957-Page-91.png)
![12-92Enjoying Multi Media2Press a, b, c or d to select an image in the thumbnail index you wish to add stamps to and press B.The selected picture is displayed.3Press C [Options].The “Options” menu appears.4Press a or b to highlight “Edit picture” and press B.5Press a or b to highlight “Add stamps” and press B.6Press a, b, c or d to select a stamp and press B.7Press a, b, c or d to move the cursor to the point you wish to add the stamp and press B.To add more stamps, press C [Options] and select “Other Stamps,” and then repeat steps 6 and 7.8To finish stamping, press C [Options] and select “Save.”To rotate pictures1At the main menu, select in the following order: “My Media” → “Photos” → “My photos,” or “Pictures” → “My pictures.”The thumbnail index appears.2Press a, b, c or d to select an image in the thumbnail index you wish to rotate and press B.The selected picture is displayed.3Press C [Options].The “Options” menu appears.4Press a or b to highlight “Edit picture” and press B.5Press a or b to highlight “Rotate” and press B.The picture is rotated 90° counterclockwise.To access pictures taken with the built-in digital camera, select “My photos.” To access pictures downloaded through the mobile Internet, select “My pictures.”When you add stamps to a picture, a new picture with stamps is created as the other file and the original picture is saved.To access pictures taken with the built-in digital camera, select “My photos.” To access pictures downloaded through the mobile Internet, select “My pictures.”e_tm200_7fm.book Page 92 Tuesday, November 9, 2004 9:14 PM](https://usermanual.wiki/Sharp/NAR0058.Manual-1/User-Guide-487957-Page-92.png)
![12-93Enjoying Multi Media6Press B once to rotate the picture 90° counterclockwise.7Press C [Save].Adjusting the size of picturesYou can adjust the size of pictures for any purpose such as for displaying in the external display.1At the main menu, select in the following order: “My Media” → “Photos” → “My photos,” or “Pictures” → “My pictures.”The thumbnail index appears.2Press a, b, c or d to select an image you wish to adjust the size of and press C [Options].The “Options” menu appears.3Press a or b to highlight “Adjust size” and press B.4Press a or b to highlight one of the size options and press B.The “Adjust size” options:Main display, External display, Power on/off, Incoming, AlarmRenaming the picture1At the main menu, select in the following order: “My Media” → “Photos” → “My photos,” or “Pictures” → “My pictures.”The thumbnail index appears.2Press a, b, c or d to select an image in the thumbnail index you wish to change the name of and press C [Options].The “Options” menu appears.3Press a or b to highlight “Rename” and press B.The text entry screen appears. For more information on how to enter text, refer to “Entering Text” on page 8-51.4When you have finished renaming, press B to save.To access pictures taken with the built-in digital camera, select “My photos.” To access pictures downloaded through the mobile Internet, select “My pictures.”To access pictures taken with the built-in digital camera, select “My photos.” To access pictures downloaded through the mobile Internet, select “My pictures.”e_tm200_7fm.book Page 93 Tuesday, November 9, 2004 9:14 PM](https://usermanual.wiki/Sharp/NAR0058.Manual-1/User-Guide-487957-Page-93.png)
![12-94Enjoying Multi MediaSetting Pictures as Caller IDYou can add pictures to the “Contacts list” and set the pictures as Caller ID.1At the main menu, select in the following order: “My Media” → “Photos” → “My photos,” or “Pictures” → “My pictures.”The thumbnail index appears.2Press a, b, c or d to select an image in the thumbnail index you wish to add to the “Contacts list” and press C [Options].The “Options” menu appears.3Press a or b to highlight “Set as Caller ID” and press B.Two options appear. Select “Existing entry” or “New entry” according to your purpose.To save the picture to an existing entry4After step 3, press a or b to highlight “Existing entry” and press B.To save the picture in a new entry4After step 3, press a or b to highlight “New Entry” and press B.Checking the Picture Information1At the main menu, select in the following order: “My Media” → select “My photos” or “My pictures.”The thumbnail index appears.If you wish to view the full picture before renaming it, press B to display the image in step 2 before pressing C [Options]. Then select “Rename” in the “Options” menu.The following characters cannot be used for the file name: /, \, :, *, ?, “, <, >, | and . (full stop).To access pictures taken with the built-in digital camera, select “My photos.” To access pictures downloaded through the mobile Internet, select “My pictures.”When adding the picture to “Contacts list” as the Caller ID, the maximum size of the picture that can be added is 150 kbytes. Only pictures stored in the handset memory are available for the Caller ID.To access pictures taken with the built-in digital camera, select “My photos.” To access pictures downloaded through the mobile Internet, select “My pictures.”e_tm200_7fm.book Page 94 Tuesday, November 9, 2004 9:14 PM](https://usermanual.wiki/Sharp/NAR0058.Manual-1/User-Guide-487957-Page-94.png)
![12-95Enjoying Multi Media2Press a, b, c or d to select an image in the thumbnail index whose details you wish to check and press B.The selected picture is displayed.3Press C [Options].The “Options” menu appears.4Press a or b to highlight “Photo details” and press B.If you are in “My picture,” the menu item in step 4 is “Picture details.”Moving or Copying Pictures to Memory Card1At the main menu, select in the following order: “My Media” → “Photos” → “My photos,” or “Pictures” → “My pictures.”The thumbnail index appears.2Press a, b, c or d to select an image you wish to move or copy to memory card and press C [Options].The “Options” menu appears.3Press a or b to highlight “Move to memory card” or “Copy to memory card” and press B.To access pictures taken with the built-in digital camera, select “My photos.” To access pictures downloaded through the mobile Internet, select “My pictures.”If you view the pictures saved in memory card, the menu items switch to “Move to Handset” and “Copy to Handset,” and you can move or copy pictures from memory card to the handset memory.e_tm200_7fm.book Page 95 Tuesday, November 9, 2004 9:14 PM](https://usermanual.wiki/Sharp/NAR0058.Manual-1/User-Guide-487957-Page-95.png)
![12-96Enjoying Multi MediaDeleting Pictures1At the main menu, select in the following order: “My Media” → “Photos” → “My photos,” or “Pictures” → “My pictures.”The thumbnail index appears.2Press a, b, c or d to select an image in the thumbnail index you wish to delete and press C [Options].The “Options” menu appears.3Press a or b to highlight “Delete” and press B.4Press a or b to highlight “One photo/picture” or “All pictures” and press B.5Press C [Yes].If you wish to cancel deletion, press A [No] in this step.Using SoundsIn the “Sounds” function mode, you can download various sounds and ringtones from the “t-zones” web site.The sound formats available on the handset are:: Original Ringtones (composed in Melody Editor):SMAF format: MIDI format: i Melody format: WAVE format: AMR formatTo access pictures taken with the built-in digital camera, select “My photos.” To access pictures downloaded through the mobile Internet, select “My pictures.”Once you delete a picture, it cannot be restored.If you wish to view the full picture before deleting, press B to display the image in step 2 before pressing C [Options] and then select “Delete” in the “Options” menu. SMAF (Synthetic music Mobile Application Format) is a music data format for handsets. AAC & MP3 format files are also supported. For information on these file formats, refer to “Using Music” on page 12-110.e_tm200_7fm.book Page 96 Tuesday, November 9, 2004 9:14 PM](https://usermanual.wiki/Sharp/NAR0058.Manual-1/User-Guide-487957-Page-96.png)
![12-97Enjoying Multi MediaDownloading Sounds1Press B.The main menu appears.2Press a, b, c or d to highlight “My Media” and press B.3Press a or b to highlight “Sounds” and press B.The “Sounds” menu appears.4Press a or b to highlight “t-music” and press B.The download channel for sounds and ringtones appears.Playing Back Sounds1At the main menu, select in the following order: “My Media” → “Sounds” → “My sounds.”The list of “My sounds” appears.2Press a or b to highlight an item you wish to playback and press B.Playback of the selected sound file starts.When you wish to stop playback, press B.Playing Back sounds saved in memory card1At the main menu, select in the following order: “My Media” → “Sounds” → “My sounds.”The list of “My sounds” appears.2Press C [Options].The “Options” menu appears.3Press a or b to highlight “Switch to memory card” and press B.The list of “My sounds” shows the sound file names saved in memory card.You can playback or stop the sound file in the “Options” menu by pressing C [Options] in step 2.When you access sound files saved in the memory card, the menu item switches to “Switch to handset.”e_tm200_7fm.book Page 97 Tuesday, November 9, 2004 9:14 PM](https://usermanual.wiki/Sharp/NAR0058.Manual-1/User-Guide-487957-Page-97.png)
![12-98Enjoying Multi MediaSending Sounds as Attachments1At the main menu, select in the following order: “My Media” → “Sounds” → “My sounds.”The list of “My sounds” appears.2Press a or b to highlight the file you wish to send as an attachment and press C [Options].The “Options” menu appears.3Press a or b to highlight “Send via MMS message” or “Send via E-mail”and press B.For information on how to create messages, refer to “Using the Message Service” on page 11-68.Checking the Sound Information1At the main menu, select in the following order: “My Media” → “Sounds” → “My sounds.”The list of “My sounds” appears.2Press a or b to highlight a file whose details you wish to check and press C [Options].The “Options” menu appears.3Press a or b to highlight “Sound details” and press B.Changing the Name of Sound Files1At the main menu, select in the following order: “My Media” → “Sounds” → “My sounds.”The list of “My sounds” appears.2Press a or b to highlight a file whose name you wish to change and press C [Options].The “Options” menu appears.3Press a or b to highlight “Rename” and press B.The text entry screen appears. For information on how to enter text, refer to “Entering Text” on page 8-51.4When you have finished renaming, press B to save.Sounds with a red icon cannot be sent as an attachment.The following characters cannot be used for a file name: /, \, :, *, ?, ", <, >, | and . (full stop).e_tm200_7fm.book Page 98 Tuesday, November 9, 2004 9:14 PM](https://usermanual.wiki/Sharp/NAR0058.Manual-1/User-Guide-487957-Page-98.png)
![12-99Enjoying Multi MediaMoving or Copying Sounds to Memory Card1At the main menu, select in the following order: “My Media” → “Sounds” → “My sounds.”The list of “My sounds” appears.2Press a or b to select a sound file you wish to move or copy to the memory card and press C [Options].The “Options” menu appears.3Press a or b to highlight “Move to memory card” or “Copy to memory card” and press B.Moving or Copying Sounds to My music1At the main menu, select in the following order: “My Media” → “Sounds” → “My sounds.”2The list of “My sounds” appears.3Press a or b to select a sound file you wish to move or copy to “My music” and press C [Options].4The “Options” menu appears.5Press a or b to highlight “Move to My music” and press B.Deleting Sounds1At the main menu, select in the following order: “My Media” → “Sounds” → “My sounds.”The list of “My sounds” appears.2Press a or b to highlight an item you wish to delete and press C [Options].The “Options” menu appears.3Press a or b to highlight “Delete” and press B.4Press a or b to highlight “One sound” or “All sounds” and press B.5Press C [Yes].If you wish to cancel, press A [No] in this step.If you access sound files saved in a memory card, the menu items switch to “Move to handset” and “Copy to handset,” and you can move or copy sounds from memory cards to the handset memory.Once you delete a sound file, it cannot be restored.e_tm200_7fm.book Page 99 Tuesday, November 9, 2004 9:14 PM](https://usermanual.wiki/Sharp/NAR0058.Manual-1/User-Guide-487957-Page-99.png)
![12-100Enjoying Multi MediaUsing Melody EditorYou can create original ringtones by using “Melody editor.”Your original ringtone is registered in “My sounds.”To create an original ringtoneEnter the name of the melody1At the main menu, select in the following order: “My Media” → “Sounds” → “Melody editor.”2Press a or b to highlight “Create new” and press B.3Enter the title of your original ringtone and press B.You can enter up to 24 characters as the title. For information on how to enter text, refer to “Entering Text” on page 8-51.Setting tempo and the type of chords4Press a or b to highlight one of the tempos below and press B.The tempos: “Allegro (Fast)” 150“Moderato (Normal)” 125“Andante (Slow)” 107“Adagio (Very Slow)” 94Tempo is defined by the number of crochet beats ( ) played per minute (bpm).5Press a or b to highlight “8 chords,” “16 chords” or “32 chords” and press B.The “Score input” screen appears.Input melody6Press the digit key to specify the pitch of the musical note or rest.For more information, refer to “To input a melody” on page 12-101.7Press P or R to specify the length of the musical note or rest.For more information, refer to “To input a melody” on page 12-101.8Press d after inputting one note.Input the next note after the cursor moves to the right.9Repeat steps 6 to 8 to complete the melody.When you press B during input, the melody that you have entered is played back.Press C [Options] and select “Play before Cursor” while entering notes to playback the melody displayed on the screen up to the cursor position.Press C [Options] and select “Select Chord” to select another chord. Repeat steps 6 to 8 to input notes for the new chord.e_tm200_7fm.book Page 100 Tuesday, November 9, 2004 9:14 PM](https://usermanual.wiki/Sharp/NAR0058.Manual-1/User-Guide-487957-Page-100.png)
![12-101Enjoying Multi MediaSave the ringtone10 When you finish inputting, press C [Options].The “Options” menu appears.11 Press a or b to highlight “Save” and press B.12 Press a or b to highlight “Save to My sounds” and press B.To input a melodySpecifying the pitch of the musical noteYou can specify the pitch of a musical note and rest by pressing the keys shown below.Pressing the keys above once specifies a crotchet ( ) in middle scale (no mark).Pressing the same key repeatedly shifts the note through the available octave range ( or added corresponding to octave range).Pressing a or b while a note is selected causes the note to move a semitone higher or lower.Pressing Q enters a Crochet rest .You can copy, cut, and paste notes by using the “Options” menu in the “Score input” screen.If the capacity or memory in “My sounds” becomes insufficient, the message “Maximum capacity: 250 Not registered.” or “Not registered. Memory full.” is displayed. The display returns to the screen of step 12. Try again after deleting unnecessary items.C(Do)D(Re)E(Mi)F(Fa)G(Sol)A(La)B(Si) RestGHIJKLMQGGGGababababe_tm200_7fm.book Page 101 Tuesday, November 9, 2004 9:14 PM](https://usermanual.wiki/Sharp/NAR0058.Manual-1/User-Guide-487957-Page-101.png)
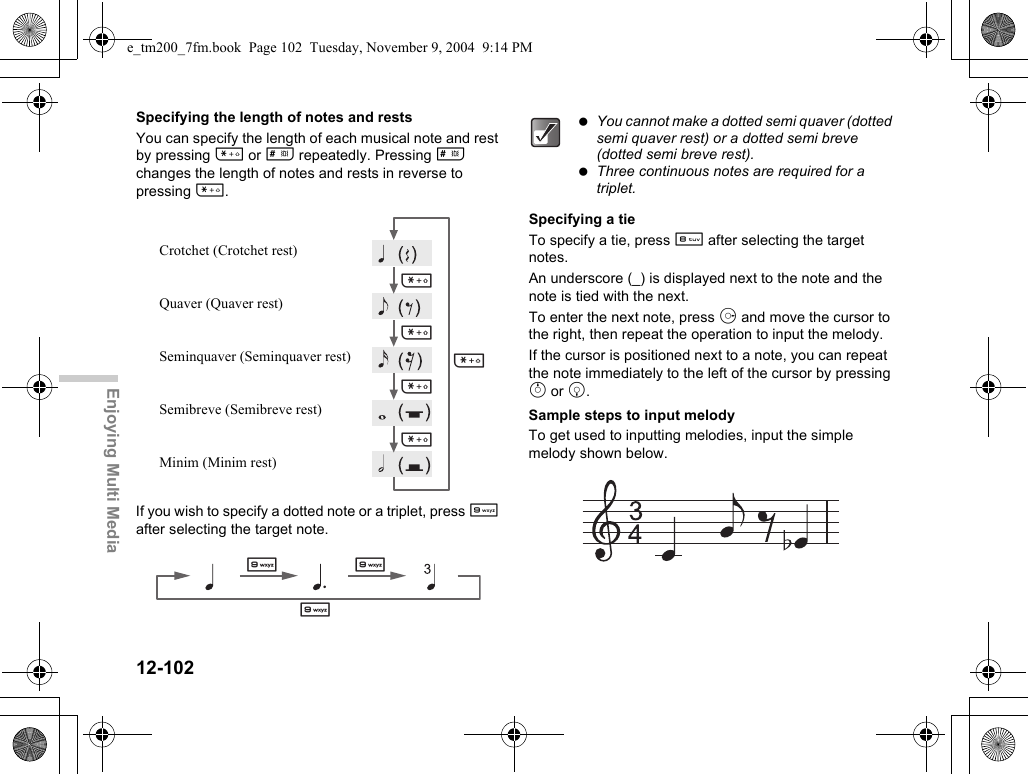
![12-103Enjoying Multi Media1At the main menu, select in the following order: “My Media” → “Sounds” → “Melody editor” → “Create new.”2Enter the title of your original ringtone and press B.3Select the tempo and the type of chords.The “Score input” screen appears. For information on selecting the tempo and the type of chords, refer to “Setting tempo and the type of chords” on page 12-100.4Press G to input “C.”The “C” note sounds and the “C” crotchet appears in the “Score input” screen.5Press d to move the cursor.6Press K to input “G.”7While selecting “G” crotchet, press P to change the length of the note.“G” crotchet changes to “G” quaver.8Press d to move the cursor.9Press Q to input a crotchet rest and press P to change the crochet rest to a quaver rest.A quaver rest appears next to the “G” note in the “Score input” screen.10 Press d to move the cursor.11 Press I to input an “E” note and press b to move the note one semitone lower.12 Press B to play back the melody.To edit the existing melody1At the main menu, select in the following order: “My Media” → “Sounds” → “Melody editor.”2Press a or b to highlight “Existing melodies” and press B.The list of “Existing melodies” appears.3Press a or b to highlight the melody you wish to edit and press C [Options].The “Options” menu appears.4Press a or b to highlight “Edit data” and press B.The title entry (edit) screen appears.After this step, follow the steps from step 6 of “To create an original ringtone” on page 12-100.You can also start editing the existing melody from “My sounds” by following the next steps.e_tm200_7fm.book Page 103 Tuesday, November 9, 2004 9:14 PM](https://usermanual.wiki/Sharp/NAR0058.Manual-1/User-Guide-487957-Page-103.png)
![12-104Enjoying Multi Media1At the main menu, select in the following order: “My Media” → “Sounds” → “My sounds.”2Press a or b to highlight the item you wish to edit and press C [Options].The “Options” menu appears.3Press a or b to highlight “Edit data” and press B.Only a user created melody can be selected in this step.To set the tone of each chord1In the “Score input” screen, press C [Options]. (Refer to “To create an original ringtone” on page 12-100.)The “Options” menu appears.2Press a or b to highlight “Set tone” and press B.The “Set tone” screen appears.3Press c or d to change the category of tones.You can select tones from the following 16 categories:Pianos, Organs, Basses, Chimes, Guitars, Strings 1, Strings 2, Reeds, Synth Leads, Brasses, Flutes/Pipes, Synth Pads, Synth Effects, Percussions, Ethnics, Effects4Press a or b to highlight a tone.The selected tone is applied to the selected chord.Press C [Options] in this step and select “Play current chord” to play back the melody input in the selected tone.Press C [Options] in this step and select “Confirm tones” to play back the scale (1 octave from C) in the selected tone.5Press B to set the tone and go back to the “Score input” screen.1At the main menu, select in the following order: “My Media” → “Sounds” → “My sounds.”2Press a or b to highlight the item whose tone you wish to set and press C [Options].The “Options” menu appears.Only a user created melody can be selected in this step.3Press a or b to highlight “Set tone” and press B.4Press a or b to highlight the chord whose tone you wish to set and press B.The “Set tone” screen appears.You can also reach the “Set tone” screen for the existing melodies from “My sounds” by following the next steps.e_tm200_7fm.book Page 104 Tuesday, November 9, 2004 9:14 PM](https://usermanual.wiki/Sharp/NAR0058.Manual-1/User-Guide-487957-Page-104.png)
![12-105Enjoying Multi MediaTo set the strength of each chord1In the “Score input” screen, press C [Options]. (Refer to “To create an original ringtone” on page 12-100.)The “Options” menu appears.2Press a or b to highlight “Set strength” and press B.The “Set strength” screen appears.3Press a or b to highlight “Loud,” “Medium” or “Soft” and press B.By pressing C [Play] in this step before pressing B, you can check the strength of the selected chord.1At the main menu, select in the following order: “My Media” → “Sounds” → “My sounds.”2Press a or b to highlight the item whose strength you wish to set and press C [Options].The “Options” menu appears.Only a user created melody can be selected in this step.3Press a or b to highlight “Set strength” and press B.4Press a or b to highlight the chord whose strength you wish to set and press B.The “Set strength” screen appears.You can also reach the “Set strength” screen for existing melodies from “My sounds” by following the next steps.e_tm200_7fm.book Page 105 Tuesday, November 9, 2004 9:14 PM](https://usermanual.wiki/Sharp/NAR0058.Manual-1/User-Guide-487957-Page-105.png)
![12-107Enjoying Multi MediaTo suspend the game or application1While you are running the application, press F.2Press a or b to highlight “Suspend” and press B.Viewing the Game or Application information1At the main menu, select in the following order: “My Media” → “Games & more” → “My games & more.”The list of “My games & more” appears.2Press a or b to highlight a game or application whose information you wish to view and press C [Options].The “Options” menu appears.3Press a or b to highlight “Application details” and press B.The detailed information screen appears.Deleting the Game or Application1At the main menu, select in the following order: “My Media” → “Games & more” → “My games & more.”The list of “My games & more” appears.2Press a or b to highlight a game or application you wish to delete and press C [Options].The “Options” menu appears.3Press a or b to highlight “Delete” and press B.4Press C [Yes].The selected game or application is deleted.If you wish to cancel, press A [No] in this step.Using VideosThe “Videos” function enables you to play back the video clips created using the built-in digital camera. Also, more video clips for the handset are available via the mobile Internet service.Downloading Video Clips1Press B.The main menu appears.2Press a, b, c or d to highlight “My Media” and press B.You cannot delete preinstalled applications.Once you delete a game or application, it cannot be restored.e_tm200_7fm.book Page 107 Tuesday, November 9, 2004 9:14 PM](https://usermanual.wiki/Sharp/NAR0058.Manual-1/User-Guide-487957-Page-107.png)
![12-108Enjoying Multi Media3Press a or b to highlight “Videos” and press B.The “Videos” menu appears.4Press a or b to highlight “t-movies” and press B.Playing Back Videos1At the main menu, select in the following order: “My Media” → “Videos” → “My videos.”The thumbnail index for “My videos” appears.2Press a, b, c or d to select the image of the video clip in the thumbnail index you wish to play back and press B.The selected video clip is displayed and press B.To play back the videos saved in memory card2After step 1, press C [Options].The “Options” menu appears.3Press a or b to highlight “Switch to memory card” and press B.The thumbnail index appears.Changing the name of the video1At the main menu, select in the following order: “My Media” → “Videos” → “My videos.”The thumbnail index for “My videos” appears.2Press a, b, c or d to select the image of the video clip in the thumbnail index you wish to change the name of and press C [Options].The “Options” menu appears.3Press a or b to highlight “Rename” and press B.The text entry screen appears. For information on how to enter text, refer to “Entering Text” on page 8-51.4After renaming, press B to save.Sending Videos as Attachments1At the main menu, select in the following order: “My Media” → “Videos” → “My videos.”The thumbnail index for “My videos” appears.2Press a, b, c or d to select the image of the video clip in the thumbnail index you wish to send with a message and press C [Options].The “Options” menu appears.When you access the video clip files saved in the memory card, the menu item switches to “Switch to handset.”The following characters cannot be used for a file name: /, \, :, *, ?, ", <, >, | and . (full stop).e_tm200_7fm.book Page 108 Tuesday, November 9, 2004 9:14 PM](https://usermanual.wiki/Sharp/NAR0058.Manual-1/User-Guide-487957-Page-108.png)
![12-109Enjoying Multi Media3Press a or b to highlight “Send via MMS” or “Send via E-mail” and press B.For more information on creating messages, refer to “Using the Message Service” on page 11-68.Checking Video Information1At the main menu, select in the following order: “My Media” → “Videos” → “My videos.”The thumbnail index for “My videos” appears.2Press a, b, c or d to select the image of the video clip in the thumbnail index you wish to check the details of and press C [Options].The “Options” menu appears.3Press a or b to highlight “Video details” and press B.Moving or Copying Videos to Memory Card1At the main menu, select in the following order: “My Media” → “Videos” → “My videos.”The thumbnail index for “My videos” appears.2Press a, b, c or d to select a video clip file you wish to move or copy to the memory card and press C [Options].The “Options” menu appears.3Press a or b to highlight “Move to memory card” or “Copy to memory card” and press B.Deleting Videos1At the main menu, select in the following order: “My Media” → “Videos” → “My videos.”The thumbnail index for “My videos” appears.2Press a, b, c or d to select the thumbnail image of the video clip you wish to delete and press C [Options].The “Options” menu appears.3Press a or b to highlight “Delete” and press B.4Press a or b to highlight “One video clip” or “All video clips.”5Press C [Yes].If you wish to cancel, press A [No] in this step.When you access video clip files saved in the memory card, the menu items switch to “Move to handset” and “Copy to handset,” and you can move or copy videos from memory card to the handset memory.Once you delete a video file, it cannot be restored.e_tm200_7fm.book Page 109 Tuesday, November 9, 2004 9:14 PM](https://usermanual.wiki/Sharp/NAR0058.Manual-1/User-Guide-487957-Page-109.png)