Sharp NAR0072 Mobile Phone User Manual
Sharp Corporation Mobile Phone
UserManual.wiki
>
Sharp
>
NAR0072 User Manual
User Manual
Navigation menu
Upload a User Manual
Namespaces
Wiki Guide
HTML
PDF
Info
Views
User Manual
Discussion / Help
Navigation
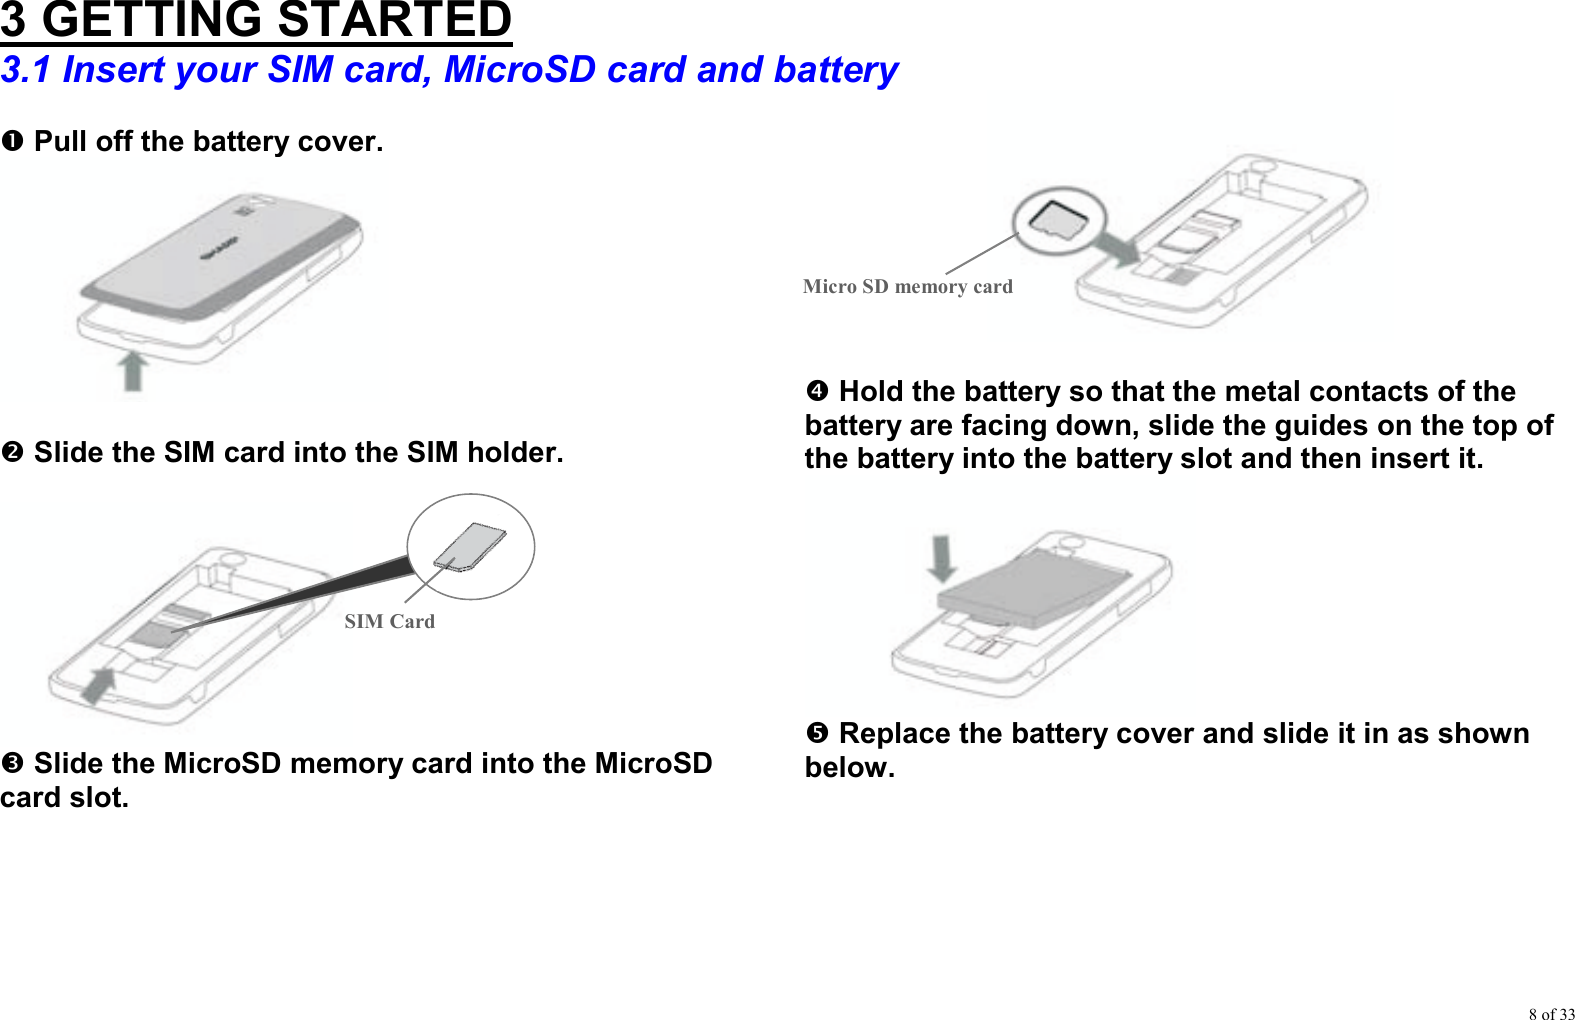


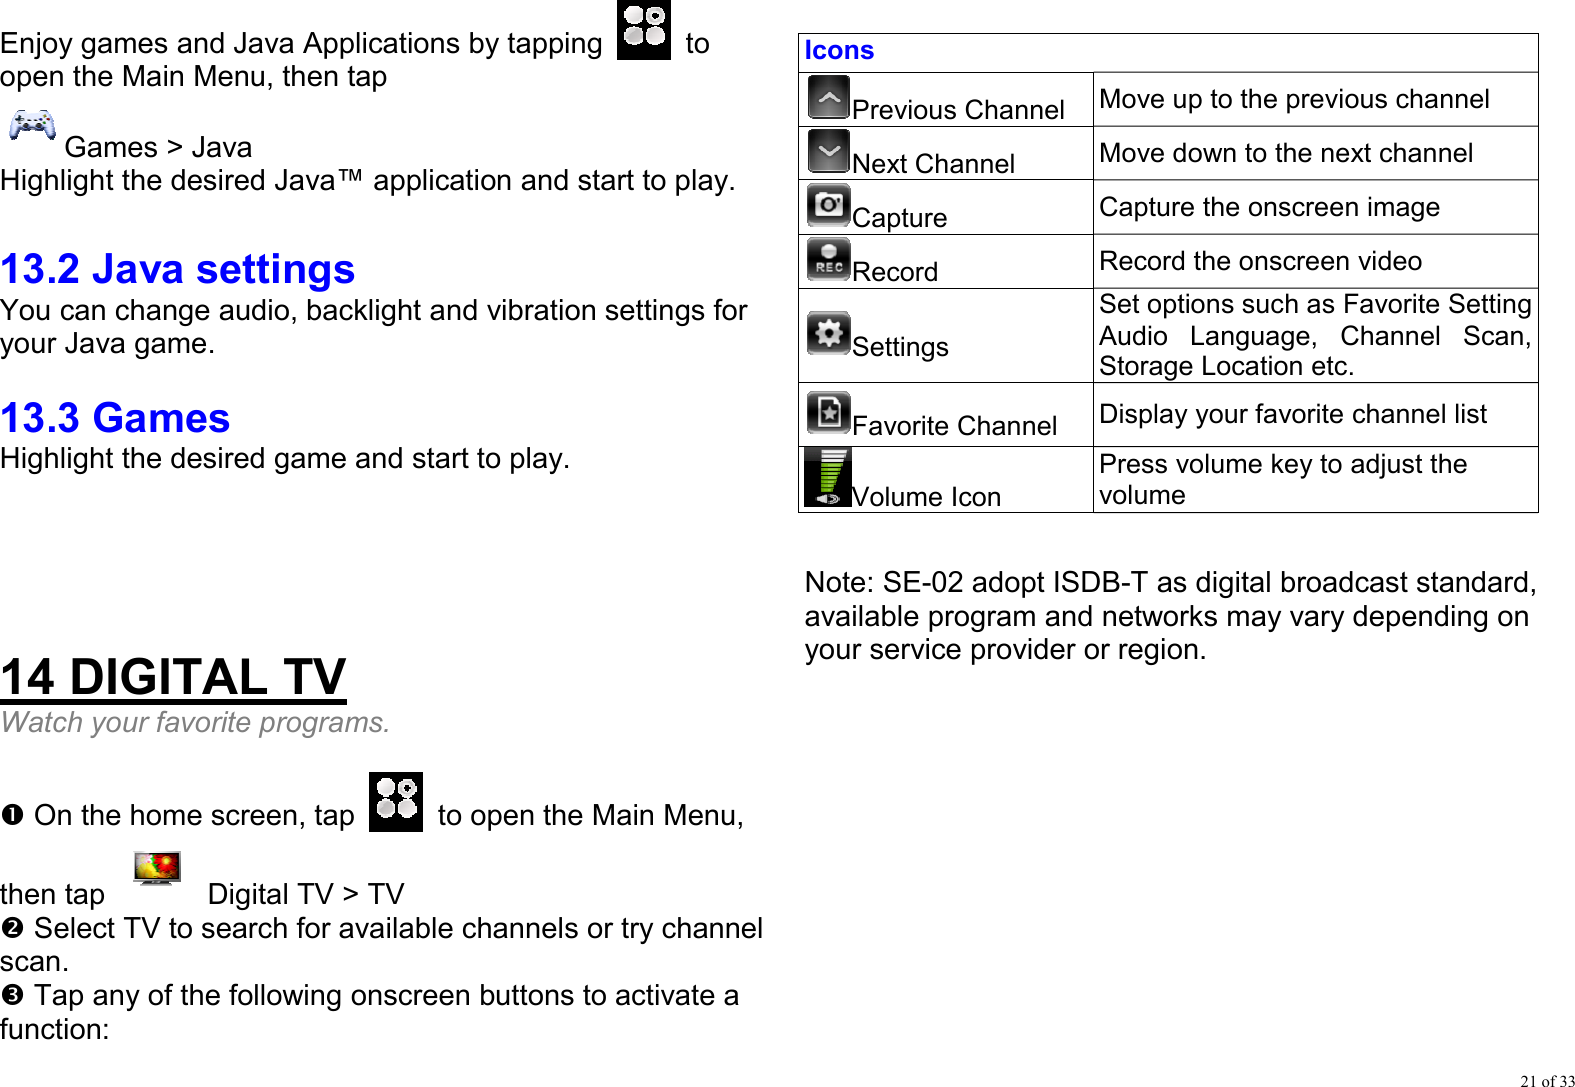
![20 of 33 n Highlight the file you wish to use as a ringtone. o Press [Options] > Use as > User profiles. p Select “OK”. 12.2 Photos Pictures that are taken by your camera phone or images can be viewed, edited and organized. 12.2.1 Viewing Pictures Gallery > Phone (or Memory card) > Picture Gallery Select the file you wish to view. The selected picture will be displayed. 12.2.2 Using Images as Wallpaper Gallery > Phone (or Memory card) > Picture Gallery The list of pictures will display. n Highlight the file you wish to use as wallpaper. o Press [Options] > Use as > Wallpaper. p Select “OK”. 12.2.3 Editing Pictures Gallery > Picture n Highlight the file you wish to edit. o Press [Options] and select “Edit”. 12.3 Video Video clips that are recorded by your phone’s video camera or video clips that are downloaded from mobile Internet sites can be viewed and organized. 12.3.1 Playing Back Video Clip Files Gallery > Video Gallery Select the file you wish to play back. 12.3.2 Using a Video Clip as a Caller Video Clip Gallery > Video Gallery You can set your video clip to play back when the phone rings. n Highlight the file you wish to use as Caller video. o Press [Options] -> Use as -> Caller video p Select OK 13 GAMES 13.1 Java games](https://usermanual.wiki/Sharp/NAR0072/User-Guide-1368094-Page-20.png)
![23 of 33 If you receive a call while playing music, the music pauses automatically. You can answer or reject the call and send the caller to voicemail. Playing will resume when you end the call. 15.2 FM Radio Listen to your favorite channels. n Plug a wired headset into your phone. Note: The FM radio works only when the headset is plugged in. o On the home screen, tap to open the Main Menu, then tap Multimedia > FM radio. p Tap to set these options: y Channel list: Bookmark up to 30 radio channels. y Manual input: Key in channel frequency. y Auto search: Automatically search for available radio channels and store them to the channel list. y Settings: Change the switch of the loudspeaker button, the recording format and the audio quality. y Record: Record your favorite radio programs. y Append: Access a previously recorded file in order to edit it. y File List: Manage the previously recorded files. 16 ORGANIZER Manage your life with these handy tools. 16.1 Calendar Calendar allows you to easily schedule appointments or events at any given date or time. Main Menu > Organizer > Calendar. n Tap Options to add, delete or view the event. You can set six types of event including Reminder, Meeting, Course. Date, Call and Anniversary. o When you highlight an event in the calendar, more details appear at the bottom. 16.2 Tasks You can register your schedule as task entries for a given date or time. 16.2.1 Creating a New Entry Main Menu > Organizer > Tasks n Select “Add”. (When one or more entries are already registered, Option must be selected before selecting the “Add” menu.) o Enter the due date and then due time. p Enter the subject. q Select the reminder time. r Press [Save]. 16.3 Alarm The alarm function allows you to be alerted at a specified time. Note that you need to set the current](https://usermanual.wiki/Sharp/NAR0072/User-Guide-1368094-Page-23.png)
![24 of 33 date and time before setting the alarm function if it has not been done already. 16.3.1 Setting the Alarm Main Menu > Organizer > Alarm n Select an available setting. o Enter the desired time. p Press “Done” and touch “Yes” in order to save the entry data 16.4 World clock 16.4.1Setting the Time Zone Main Menu > Organizer > World clock. You can press and to select the time zone and city. 16.4.2 Set the Daylight Saving Time Main Menu > Organizer > World clock. n Press [Options] and you can switch On/Off by clicking “Daylight saving time for foreign city”. o You can also select “On” or “Off” by left software key. 16.5 Notes You can take notes here. Main Menu > Organizer > Notes n Press “Add” to start taking notes. o When finished, select “Option” and press “Done”. 16.6 Calculator The calculator function performs the 4 arithmetic calculations using up to 12 digits. Main Menu > Organizer > Calculator The calculator will display on the screen. The key operations for calculation are as follows.](https://usermanual.wiki/Sharp/NAR0072/User-Guide-1368094-Page-24.png)
![25 of 33 16.7 Currency converter You can also use the currency converter to convert from/to a home currency using a conversion rate that you enter. Main Menu > Organizer > Currency converter n Enter “Exchange Rate” and press “OK”. o Enter local currency amount to be exchanged and press ”OK”. To delete all digits, press [Clear]. 16.8 Ebook reader This function allows you to view E-Book files (XMDF or Text files) stored on a memory card. Organizer > Ebook reader Select the desired file and you can read the text file. 16.8.1 Adding a Bookmark You can add up to two bookmarks to each E-Book file. Organizer > Ebook reader n Select the desired file. o Press “Options” and select “Add Bookmark”. p Select “Bookmark1” or “Bookmark2”. qPress “Options” and select “OK”. 17 SETTINGS Create your own personal style. 17.1 User profiles Your phone provides 6 different profiles to adapt to different environments conditions. In each profile, you can set the desired ring tones and alert types. n On the home screen, tap to open the Main Menu,, tap Settings > User profiles. y General: The General profile is the default setting. After activating this profile, your phone shows an indicator . y Meeting: Turns the Ring tone off. Only vibrator is activated. After activating this profile, your phone shows an indicator . y Outdoor: The volume of the ring tone and key tone is set to maximum. After activating this profile, your phone shows an indicator . y Indoor: Turns the Vibrator off. Only ring tone is activated. After activating this profile, your phone shows an indicator . y Silent: Turn the ring tone and vibration off. After activating this profile, your phone shows an indicator y Headset: After plugging a wired headset into your phone, your phone shows an indicator . y Bluetooth: You can set the desired ring tone and alert type when using Bluetooth headset or hands-free car kit.](https://usermanual.wiki/Sharp/NAR0072/User-Guide-1368094-Page-25.png)