Sharp El 6890 Owners Manual PC Link User's Guide
2015-03-09
: Sharp Sharp-El-6890-Owners-Manual-645723 sharp-el-6890-owners-manual-645723 sharp pdf
Open the PDF directly: View PDF ![]() .
.
Page Count: 2
What Does PC Interface Software Do?
Backup Backs up all EL-6890 data to
your PC.
Restore Restores data from a backup
file into an EL-6890.
Address Utility Allows you to type in an
address, E-mail or WWW
entry on a PC and download it
into your EL-6890.
Supplied Items
* One 3.5" Floppy Disk (PC Interface Software)
* PC Interface Cable
* PC Interface Software User's Guide (this sheet)
Please contact your nearest SHARP dealer if
any of the above items are missing from the
EL-6890P package or are damaged.
EL-6890
PC Interface Software
User’s Guide
Setting the COM port
1. Connect your EL-6890 to a PC.
2. Click [Start] ➝ [Program] ➝ [Sharp EL-6890]
➝ [EO-Utility].
The PC Interface Software Main Screen
appears.
3. Click [COM port...].
The COM port setting dialog box appears.
* Click the radio button to select an
appropriate port, or
* Click [Auto Detect...]
to allow an
appropriate port to
be selected
automatically.
Getting Started
Known Incompatibilities
• While you are backing up or restoring data, a
transfer error may occur with certain 3D
screen saver utility programs enabled. Before
transferring data, disable any 3D screen saver
utility programs you may be running.
• PC Interface Software may not run reliably
with certain virus scanning programs enabled.
If you have problems in transferring data with
your EL-6890, disable any virus checking
software you may be running.
• PC Interface Software may not run reliably
with certain power management features
enabled. If you have problems in transferring
data with your EL-6890, disable any power
management features you may have turned
on.
PC Interface Software Main Screen
All operations can be accessed from the Main
Screen.
To access the Main Screen, click [Start] ➝
[Program] ➝ [Sharp EL-6890] ➝ [EO-Utility].
NOTE
* When you are using a notebook PC, an error
message may be displayed when you click
[Auto Detect...]. Check the BIOS setting on
your notebook PC and set it to the serial port.
Even when the BIOS setting is correctly
made, you may need to select an appropriate
port manually.
Installing
1. Insert the PC Interface Software disk into
your disk drive.
2. Click on the Windows [Start] button and then
click [Run].
3. Type in a:\Setup.exe and click on [OK].
• Type in your disk drive name ("a:" in this
example).
4. Follow the on-screen instructions.
The software is installed into the following
location and can be accessed in the
following directory:
C:\Program Files\Sharp EL-6890\
Application: [Start] ➝ [Program] ➝ [Sharp
EL-6890] ➝[EO-Utility]
ReadMe : [Start] ➝ [Program] ➝ [Sharp
EL-6890] ➝[ReadMe]
You are recommended not to change the
default folder name: [Sharp EL-6890].
5. Click [Finish].
Before You Begin
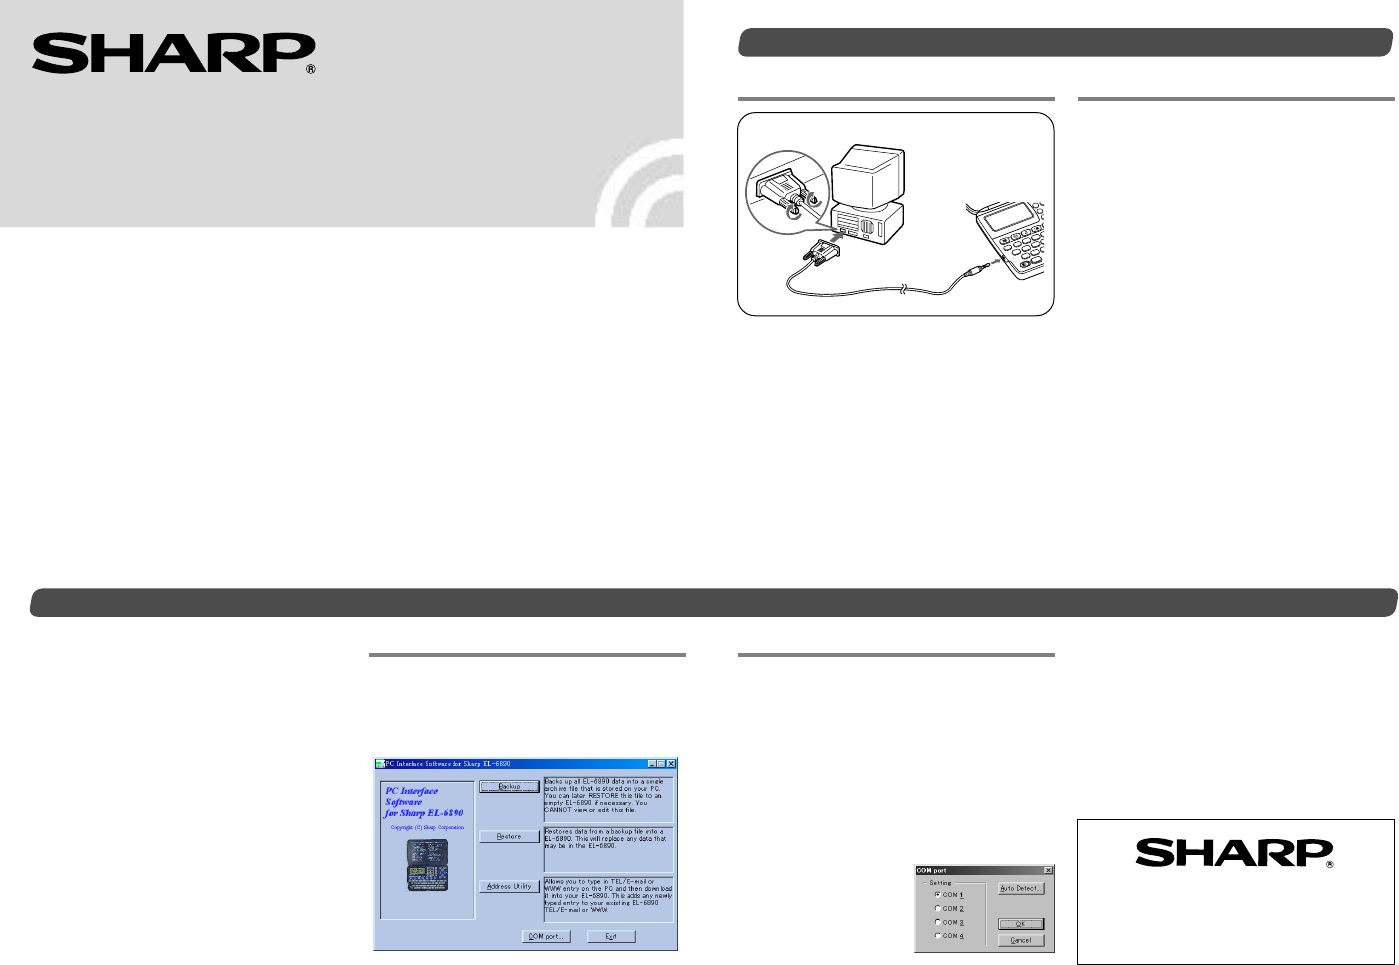
Connecting Your EL-6890 to a PC
1. Turn off your PC and the EL-6890.
2. Connect the standard 9-pin connector of the
PC interface cable into a COM port on your
PC.
NOTE
* Using a 25-pin connector instead of the
standard 9-pin connector requires an
additional adaptor.
3. Connect the other end of the PC Interface
Cable into the PC interface connector
located on the left side of the EL-6890.
EL-6890
PC Interface Cable
(supplied)
Your PC
SHARP CORPORATION
PRINTED IN CHINA
00CTO(TINSE0385EHZZ)
System Requirements
• Windows® 2000 Professional, Windows® 98,
or Windows® 95
• 8MB free hard disk space
• VGA monitor or better
• Microsoft® Mouse or compatible Pointing
Device
• 3.5” disk drive
• One available serial port with D-sub 9-pin
connector
And for Windows® 2000 Professional:
• 133MHz or higher Pentium-compatible CPU
• 64MB RAM available
And for Windows® 98, Windows® 95:
• IBM-compatible 486 or Pentium-compatible
CPU (66MHz or higher)
• 24MB RAM available
ASD
ZX
COMPUTER LINK
R
E
W
Q
2nd
1
1
45
Backup and Restore
Making a Backup File
1. Connect your EL-6890 to a PC.
2. Click [Start] ➝ [Program] ➝ [Sharp EL-6890]
➝ [EO-Utility].
The PC Interface Software Main Screen
appears.
3. Click [Backup].
The dialog box appears asking you to enter
the backup file name, if necessary.
* The default name is determined according
to the PC clock system, in the format of
"YYYYMMDD.BKE", for example,
20010101.BKE.
* [Browse...] allows you to change the
backup file, its file name and its destina-
tion.
NOTE
* When the COM port has not been selected,
the warning message dialog box appears.
Click [OK]. Then click [COM port...] on the
Main Screen and select the appropriate port.
4. Click [NEXT >>] to start the backup process.
The instructions screen appears.
• To cancel the backup process, click [Abort]
on the instructions screen.
5. On your EL-6890:
Press 2nd OPTION and 4 to select
“4: BACKUP”. Then press Y to start the
backup process.
Restoring a Backup File
"Restore" function replaces all the data in the
EL-6890 with the backup file saved on a PC.
NOTE
* Make sure you really want to delete all the
data in your EL-6890 before executing the
"Restore" function. Once you start the
restoration process, all the data in the EL-
6890 will be deleted, even if you cancel the
restoration process.
1. Connect your EL-6890 to a PC.
2. Click [Start] ➝ [Program] ➝ [Sharp EL-6890]
➝ [EO-Utility].
The PC Interface Software Main Screen
appears.
3.Click [Restore].
The dialog box appears asking you to
choose the backup file name.
4. Click [NEXT >>] to start the restoration
process.
The confirmation dialog box appears.
• To cancel the restoration process, click
[NO].
5. Click [YES].
The instructions screen appears.
• To cancel the restoration process, click
[Abort] on the instructions screen.
6. On your EL-6890:
Press 2nd OPTION and 5 to select
“5: RESTORE”.
The data transfer is started.
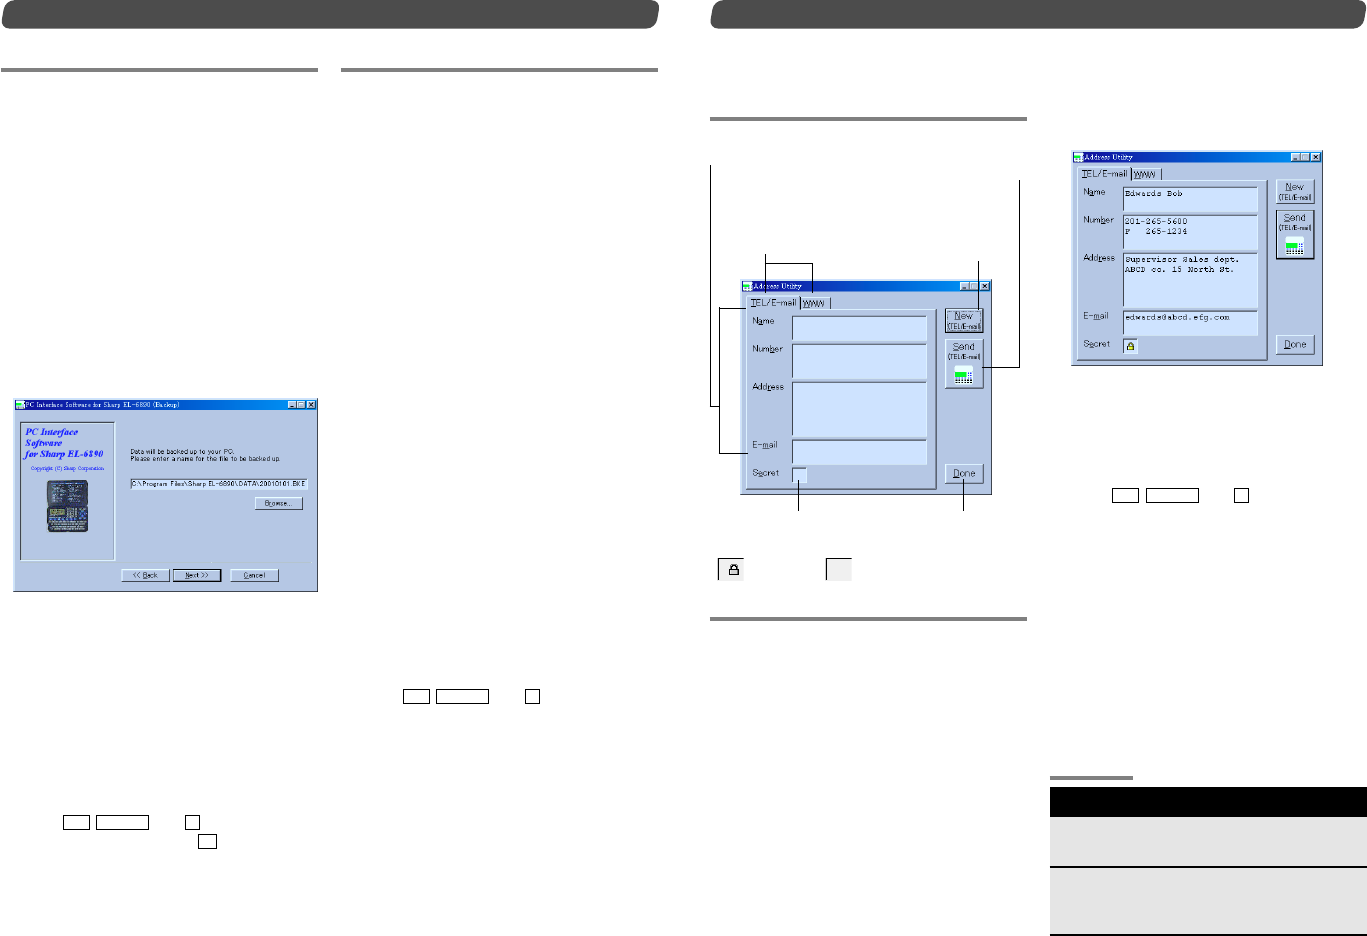
Address Utility
Click [Address Utility] on the Main Screen to
open the Address Utility window.
Command Buttons
Entering an Address
<Example> Enter the following data as secret
data in TEL/E-mail mode.
Name Edwards Bob
Number 201-265-5600
F
265-1234
Address Supervisor Sales dept.
ABCD co. 15 North St.
E-mail edwards@abcd.efg.com
1. Connect your EL-6890 to a PC.
2. Click [Start] ➝ [Program] ➝ [Sharp EL-6890]
➝ [EO-Utility].
The PC Interface Software Main Screen
appears.
3. Click [Address Utility].
4. Click [TEL/E-mail] tab.
5. Click [New] to clear the input data in all entry
fields.
6. Enter the information.
• The cursor appears in the entry field you
click for input.
7. (After entering the information), click [Send].
The instructions screen appears.
• To cancel the transferring process, click
[Abort] on the instructions screen.
8. On your EL-6890:
Press 2nd
OPTION
and 2 to select
“2: RECV ” (RECEIVE).
If the transferred data is displayed on the
display of the EL-6890, the transferring
process is completed.
NOTES
* Do not forget to fill in the Name field before
clicking [Send]. Otherwise, the data you typed
in can not be sent.
* You can not enter the characters or symbols
not supported by the EL-6890 in the entry
fields.
New button
Clears the input
data in all entry
fields to create
new data.
Secret button
Sets this data as secret.
Click on this area.
: Secret ON : Secret OFF
Done button
Closes the
dialog window.
Mode tabs
Switch the mode window
between TEL/E-mail mode
and WWW mode.
Send button
Transfers the data
to your EL-6890.
Entry fields of TEL/E-mail
mode
Customer Support
www.sharp-usa.com Sharp Web Site
Information and FAQs
1-630-378-3590 Sharp Customer Assistance
Center
(7am to 7pm CST M-F)
In U.S.A.
