Sharp Lc 20Sh21U Users Manual Operation
LC-20SH21U tel_man_LC20SH21U
LC-20SH21U to the manual 8a621492-3d7b-4d09-bf09-dc16d4378afe
2015-01-23
: Sharp Sharp-Lc-20Sh21U-Users-Manual-284570 sharp-lc-20sh21u-users-manual-284570 sharp pdf
Open the PDF directly: View PDF ![]() .
.
Page Count: 36
1
ENGLISHFRANÇAISESPAÑOLPORTUGUÊS
LIQUID CRYSTAL TELEVISION
OPERATION MANUAL
CAUTION
IMPORTANT:
To aid reporting in case of loss or theft, please record the
TV’s model and serial numbers in the space provided. The
numbers are located at the rear of the TV.
Model No.:
Serial No.:
ENGLISH
IMPORTANT INFORMATION
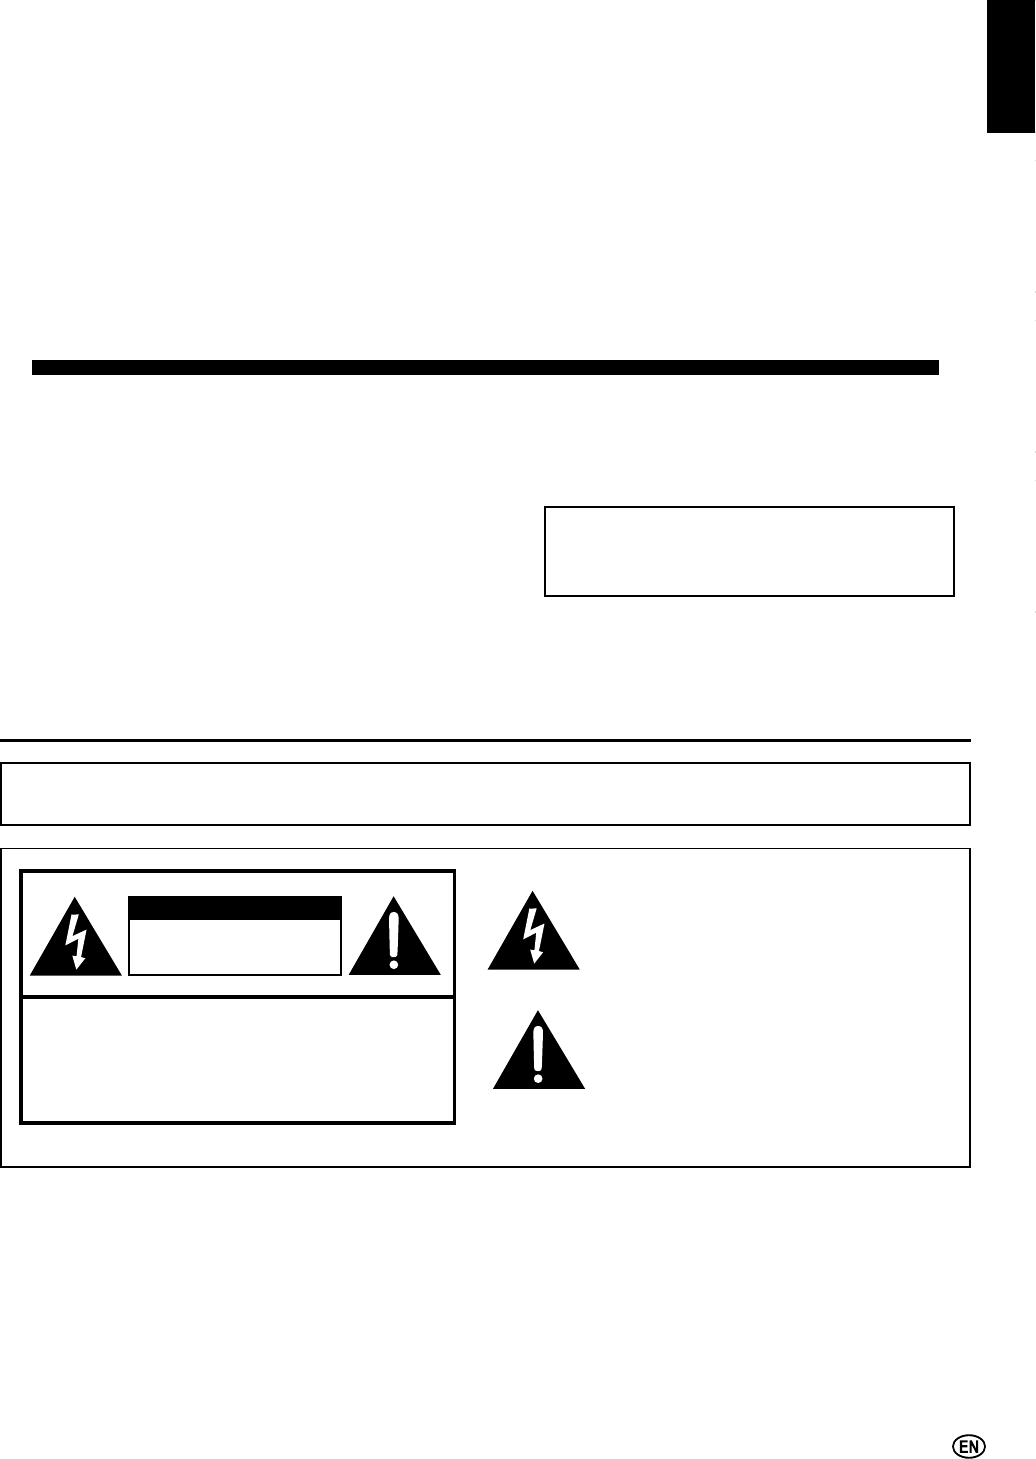
WARNING: TO REDUCE THE RISK OF FIRE OR ELECTRIC SHOCK, DO NOT
EXPOSE THIS PRODUCT TO RAIN OR MOISTURE.
RISK OF ELECTRIC SHOCK
DO NOT OPEN
CAUTION: TO REDUCE THE RISK OF ELECTRIC SHOCK,
DO NOT REMOVE COVER (OR BACK).
NO USER-SERVICEABLE PARTS INSIDE.
REFER SERVICING TO QUALIFIED SERVICE
PERSONNEL.
7KHOLJKWQLQJÀDVKZLWKDUURZKHDGV\PERO
ZLWKLQDQHTXLODWHUDOWULDQJOHLVLQWHQGHGWR
alert the user to the presence of uninsulated
³GDQJHURXVYROWDJH´ZLWKLQWKHSURGXFW¶V
HQFORVXUHWKDWPD\EHRIVXI¿FLHQWPDJQLWXGH
to constitute a risk of electric shock to persons.
7KHH[FODPDWLRQSRLQWZLWKLQDWULDQJOHLV
intended to alert the user to the presence
of important operating and maintenance
(servicing) instructions in the literature
DFFRPSDQ\LQJWKHSURGXFW
-$4)6
2
IMPORTANT INFORMATION (Continued)
WARNING:)&&5HJXODWLRQVVWDWHWKDWDQ\XQDXWKRUL]HGFKDQJHVRUPRGL¿FDWLRQVWRWKLVHTXLSPHQWQRWH[SUHVVO\
DSSURYHGE\WKHPDQXIDFWXUHUFRXOGYRLGWKHXVHU¶VDXWKRULW\WRRSHUDWHWKLVHTXLSPHQW U.S.A. ONLY
CAUTION: TO PREVENT ELECTRIC SHOCK, MATCH WIDE BLADE OF PLUG TO WIDE
SLOT, FULLY INSERT.
CAUTION:
DO NOT PLACE THIS PRODUCT ON AN UNSTABLE CART, STAND, TRIPOD, BRACKET, OR TABLE.
THE PRODUCT MAY FALL CAUSING SERIOUS PERSONAL INJURY AND SERIOUS DAMAGE TO
THE PRODUCT. USE ONLY WITH A CART, STAND, TRIPOD, BRACKET, OR TABLE RECOMMENDED
BY THE MANUFACTURER OR SOLD WITH THE PRODUCT. FOLLOW THE MANUFACTURER’S
INSTRUCTIONS WHEN INSTALLING THE PRODUCT AND USE MOUNTING ACCESSORIES
RECOMMENDED BY THE MANUFACTURER. A PRODUCT AND CART COMBINATION SHOULD BE
MOVED WITH CARE. QUICK STOPS, EXCESSIVE FORCE, AND UNEVEN SURFACES MAY CAUSE
THE PRODUCT AND CART COMBINATION TO OVERTURN.
1RWHWR&$79V\VWHPLQVWDOOHU7KLVUHPLQGHULVSURYLGHGWRFDOOWKH&$79V\VWHPLQVWDOOHU¶VDWWHQWLRQWR$UWLFOHRIWKH1DWLRQDO
(OHFWULFDO&RGHWKDWSURYLGHVJXLGHOLQHVIRUSURSHUJURXQGLQJDQGLQSDUWLFXODUVSHFL¿HVWKDWWKHFDEOHJURXQGVKDOOEHFRQQHFWHGWRWKH
JURXQGLQJV\VWHPRIWKHEXLOGLQJDVFORVHWRWKHSRLQWRIFDEOHHQWU\DVSUDFWLFDO
7KLVSURGXFWXWLOL]HVWLQOHDGVROGHUDQGÀXRUHVFHQWODPSFRQWDLQLQJDVPDOODPRXQWRIPHUFXU\'LVSRVDORIWKHVH
PDWHULDOVPD\EHUHJXODWHGGXHWRHQYLURQPHQWDOFRQVLGHUDWLRQV)RUGLVSRVDORUUHF\FOLQJLQIRUPDWLRQSOHDVHFRQWDFW
\RXUORFDODXWKRULWLHVRUWKH(OHFWURQLF,QGXVWULHV$OOLDQFHZZZHLDRUJ
INFORMATION:
7KLVHTXLSPHQWKDVEHHQWHVWHGDQGIRXQGWRFRPSO\ZLWKWKHOLPLWVIRUD&ODVV%GLJLWDOGHYLFHSXUVXDQWWR
Part 15 of the FCC Rules. These limits are designed to provide reasonable protection against harmful
LQWHUIHUHQFHLQDUHVLGHQWLDOLQVWDOODWLRQ7KLVHTXLSPHQWJHQHUDWHVXVHVDQGFDQUDGLDWHUDGLRIUHTXHQF\
HQHUJ\DQGLIQRWLQVWDOOHGDQGXVHGLQDFFRUGDQFHZLWKWKHLQVWUXFWLRQVPD\FDXVHKDUPIXOLQWHUIHUHQFHWR
UDGLRFRPPXQLFDWLRQV+RZHYHUWKHUHLVQRJXDUDQWHHWKDWLQWHUIHUHQFHZLOOQRWRFFXULQDSDUWLFXODU
LQVWDOODWLRQ,IWKLVHTXLSPHQWGRHVFDXVHKDUPIXOLQWHUIHUHQFHWRUDGLRRUWHOHYLVLRQUHFHSWLRQZKLFKFDQEHGHWHUPLQHGE\
WXUQLQJWKHHTXLSPHQWRIIDQGRQWKHXVHULVHQFRXUDJHGWRWU\WRFRUUHFWWKHLQWHUIHUHQFHE\
RQHRUPRUHRIWKHIROORZLQJPHDVXUHV
—Reorient or relocate the receiving antenna.
²,QFUHDVHWKHVHSDUDWLRQEHWZHHQWKHHTXLSPHQWDQGUHFHLYHU
²&RQQHFWWKHHTXLSPHQWLQWRDQRXWOHWRQDFLUFXLWGLIIHUHQWIURPWKDWWRZKLFKWKHUHFHLYHULVFRQQHFWHG
—Consult the dealer or an experienced radio/TV technician for help.
DECLARATION OF CONFORMITY
6+$53/,48,'&5<67$/7(/(9,6,2102'(//&6+8
7KLVGHYLFHFRPSOLHVZLWK3DUWRIWKH)&&5XOHV2SHUDWLRQLVVXEMHFWWRWKHIROORZLQJWZRFRQGLWLRQV
7KLV GHYLFH PD\ QRW FDXVH KDUPIXO LQWHUIHUHQFH DQG WKLV GHYLFH PXVW DFFHSW DQ\ LQWHUIHUHQFH
UHFHLYHGLQFOXGLQJLQWHUIHUHQFHWKDWPD\FDXVHXQGHVLUHGRSHUDWLRQ
RESPONSIBLE PARTY:
SHARP ELECTRONICS CORPORATION
6KDUS3OD]D0DKZDK1HZ-HUVH\
7(/%(6+$53
For Business Customers: URL KWWSZZZVKDUSXVDFRP U.S.A. ONLY
U.S.A. ONLY
U.S.A. ONLY
Trademark
+'0,WKH+'0,ORJRDQG+LJK'H¿QLWLRQ0XOWLPHGLD,QWHUIDFHDUHWUDGHPDUNVRUUHJLVWHUHGWUDGHPDUNVRI+'0,
Licensing LLC.
Products that have earned the ENERGY STAR®DUHGHVLJQHGWRSURWHFWWKHHQYLURQPHQWWKURXJKVXSHULRUHQHUJ\HI¿FLHQF\

3
DEAR SHARP CUSTOMER
Thank you for your purchase of the Sharp Liquid Crystal Television. To ensure safety and many years
of trouble-free operation of your product, please read the Important Safety Precautions carefully
before using this product.
IMPORTANT SAFETY PRECAUTIONS
(OHFWULFLW\LVXVHGWRSHUIRUPPDQ\XVHIXOIXQFWLRQVEXWLWFDQDOVRFDXVHSHUVRQDOLQMXULHVDQGSURSHUW\GDPDJHLI
LPSURSHUO\KDQGOHG7KLVSURGXFWKDVEHHQHQJLQHHUHGDQGPDQXIDFWXUHGZLWKWKHKLJKHVWSULRULW\RQVDIHW\+RZHYHU
LPSURSHUXVHFDQUHVXOWLQHOHFWULFVKRFNDQGRU¿UH,QRUGHUWRSUHYHQWSRWHQWLDOGDQJHUSOHDVHREVHUYHWKHIROORZLQJ
LQVWUXFWLRQVZKHQLQVWDOOLQJRSHUDWLQJDQGFOHDQLQJWKHSURGXFW7RHQVXUH\RXUVDIHW\DQGSURORQJWKHVHUYLFHOLIHRI
\RXU/&'FRORU79SURGXFWSOHDVHUHDGWKHIROORZLQJSUHFDXWLRQVFDUHIXOO\EHIRUHXVLQJWKHSURGXFW
ƇRead instructions—All operating instructions must be read and understood before the product is operated.
Ƈ .HHSWKLVPDQXDOLQDVDIHSODFH²7KHVHVDIHW\DQGRSHUDWLQJLQVWUXFWLRQVPXVWEHNHSWLQDVDIHSODFHIRUIXWXUH
reference.
Ƈ 2EVHUYHZDUQLQJV²$OOZDUQLQJVRQWKHSURGXFWDQGLQWKHLQVWUXFWLRQVPXVWEHREVHUYHGFORVHO\
Ƈ )ROORZLQVWUXFWLRQV²$OORSHUDWLQJLQVWUXFWLRQVPXVWEHIROORZHG
Ƈ $WWDFKPHQWV²'RQRWXVHDWWDFKPHQWVQRWUHFRPPHQGHGE\WKHPDQXIDFWXUHU8VHRILQDGHTXDWHDWWDFKPHQWV
can result in accidents.
Ƈ 3RZHUVRXUFH²7KLVSURGXFWPXVWRSHUDWHRQDSRZHUVRXUFHVSHFL¿HGRQWKHVSHFL¿FDWLRQODEHO,I\RXDUH
QRWVXUHRIWKHW\SHRISRZHUVXSSO\XVHGLQ\RXUKRPHFRQVXOW\RXUGHDOHURUORFDOSRZHUFRPSDQ\)RUXQLWV
GHVLJQHGWRRSHUDWHRQEDWWHULHVRUDQRWKHUSRZHUVRXUFHUHIHUWRWKHRSHUDWLQJLQVWUXFWLRQV
Ƈ $&FRUGSURWHFWLRQ²7KH$&FRUGPXVWEHURXWHGSURSHUO\WRSUHYHQWSHRSOHIURPVWHSSLQJRQLWRUREMHFWVIURP
resting on it. Check the cord at the plugs and product.
Ƈ 2YHUORDGLQJ²'RQRWRYHUORDG$&RXWOHWVRUH[WHQVLRQFRUGV2YHUORDGLQJFDQFDXVH¿UHRUHOHFWULFVKRFN
Ƈ (QWHULQJRIREMHFWVDQGOLTXLGV²1HYHULQVHUWDQREMHFWLQWRWKHSURGXFWWKURXJKYHQWVRURSHQLQJV+LJKYROWDJH
ÀRZVLQWKHSURGXFWDQGLQVHUWLQJDQREMHFWFDQFDXVHHOHFWULFVKRFNDQGRUVKRUWLQWHUQDOSDUWV)RUWKHVDPH
UHDVRQGRQRWVSLOOZDWHURUOLTXLGRQWKHSURGXFW
Ƈ 6HUYLFLQJ²'RQRWDWWHPSWWRVHUYLFHWKHSURGXFW\RXUVHOI5HPRYLQJFRYHUVFDQH[SRVH\RXWRKLJKYROWDJHDQG
RWKHUGDQJHURXVFRQGLWLRQV5HTXHVWDTXDOL¿HGVHUYLFHSHUVRQWRSHUIRUPVHUYLFLQJ
Ƈ 5HSDLU²,IDQ\RIWKHIROORZLQJFRQGLWLRQVRFFXUVXQSOXJWKH$&FRUGIURPWKH$&RXWOHWDQGUHTXHVWDTXDOL¿HG
service person to perform repairs.
a. When the AC cord or plug is damaged.
E:KHQDOLTXLGZDVVSLOOHGRQWKHSURGXFWRUZKHQREMHFWVKDYHIDOOHQLQWRWKHSURGXFW
F:KHQWKHSURGXFWKDVEHHQH[SRVHGWRUDLQRUZDWHU
G:KHQWKHSURGXFWGRHVQRWRSHUDWHSURSHUO\DVGHVFULEHGLQWKHRSHUDWLQJLQVWUXFWLRQV
'RQRWWRXFKWKHFRQWUROVRWKHUWKDQWKRVHGHVFULEHGLQWKHRSHUDWLQJLQVWUXFWLRQV,PSURSHUDGMXVWPHQWRI
FRQWUROVQRWGHVFULEHGLQWKHLQVWUXFWLRQVFDQFDXVHGDPDJHZKLFKRIWHQUHTXLUHVH[WHQVLYHDGMXVWPHQWZRUN
E\DTXDOL¿HGWHFKQLFLDQ
e. When the product has been dropped or damaged.
I :KHQWKHSURGXFWGLVSOD\VDQDEQRUPDOFRQGLWLRQ$Q\QRWLFHDEOHDEQRUPDOLW\LQWKHSURGXFWLQGLFDWHVWKDWWKH
product needs servicing.
ƇReplacement parts—In case the product needs replacement parts, make sure that the service person uses
UHSODFHPHQWSDUWVVSHFL¿HGE\WKHPDQXIDFWXUHURUWKRVHZLWKWKHVDPHFKDUDFWHULVWLFVDQGSHUIRUPDQFHDVWKH
RULJLQDOSDUWV8VHRIXQDXWKRUL]HGSDUWVFDQUHVXOWLQ¿UHHOHFWULFVKRFNDQGRURWKHUGDQJHU
Ƈ 6DIHW\FKHFNV²8SRQFRPSOHWLRQRIVHUYLFHRUUHSDLUZRUNUHTXHVWWKHVHUYLFHWHFKQLFLDQWRSHUIRUPVDIHW\
checks to ensure that the product is in proper operating condition.
Ƈ :DOORUFHLOLQJPRXQWLQJ²:KHQPRXQWLQJWKHSURGXFWRQDZDOORUFHLOLQJEHVXUHWRLQVWDOOWKHSURGXFW
DFFRUGLQJWRWKHPHWKRGUHFRPPHQGHGE\WKHPDQXIDFWXUHU
Ƈ 3RODUL]DWLRQ²7KLV$&FRUGPD\EHHTXLSSHGZLWKDSRODUL]HGDOWHUQDWLQJFXUUHQWOLQHSOXJDSOXJKDYLQJRQH
EODGHZLGHUWKDQWKHRWKHU7KLVSOXJZLOO¿WLQWRWKHSRZHURXWOHWRQO\RQHZD\7KLVLVDVDIHW\IHDWXUH,I\RXDUH
XQDEOHWRLQVHUWWKHSOXJIXOO\LQWRWKHRXWOHWWU\UHYHUVLQJWKHSOXJ,IWKHSOXJVKRXOGVWLOOIDLOWR¿WFRQWDFW\RXU
HOHFWULFLDQWRUHSODFH\RXUREVROHWHRXWOHW
'RQRWGHIHDWWKHVDIHW\SXUSRVHRIWKHSRODUL]HGSOXJ
4
IMPORTANT SAFETY PRECAUTIONS (Continued)
Ƈ 7KH/LTXLG&U\VWDOSDQHOLVDYHU\KLJKWHFKQRORJ\SURGXFWZLWKWKLQ¿OPWUDQVLVWRUVJLYLQJ\RX¿QHSLFWXUH
details.
2FFDVLRQDOO\DIHZQRQDFWLYHSL[HOVPD\DSSHDURQWKHVFUHHQDVD¿[HGSRLQWRIEOXHJUHHQRUUHG
3OHDVHQRWHWKDWWKLVGRHVQRWDIIHFWWKHSHUIRUPDQFHRI\RXUSURGXFW
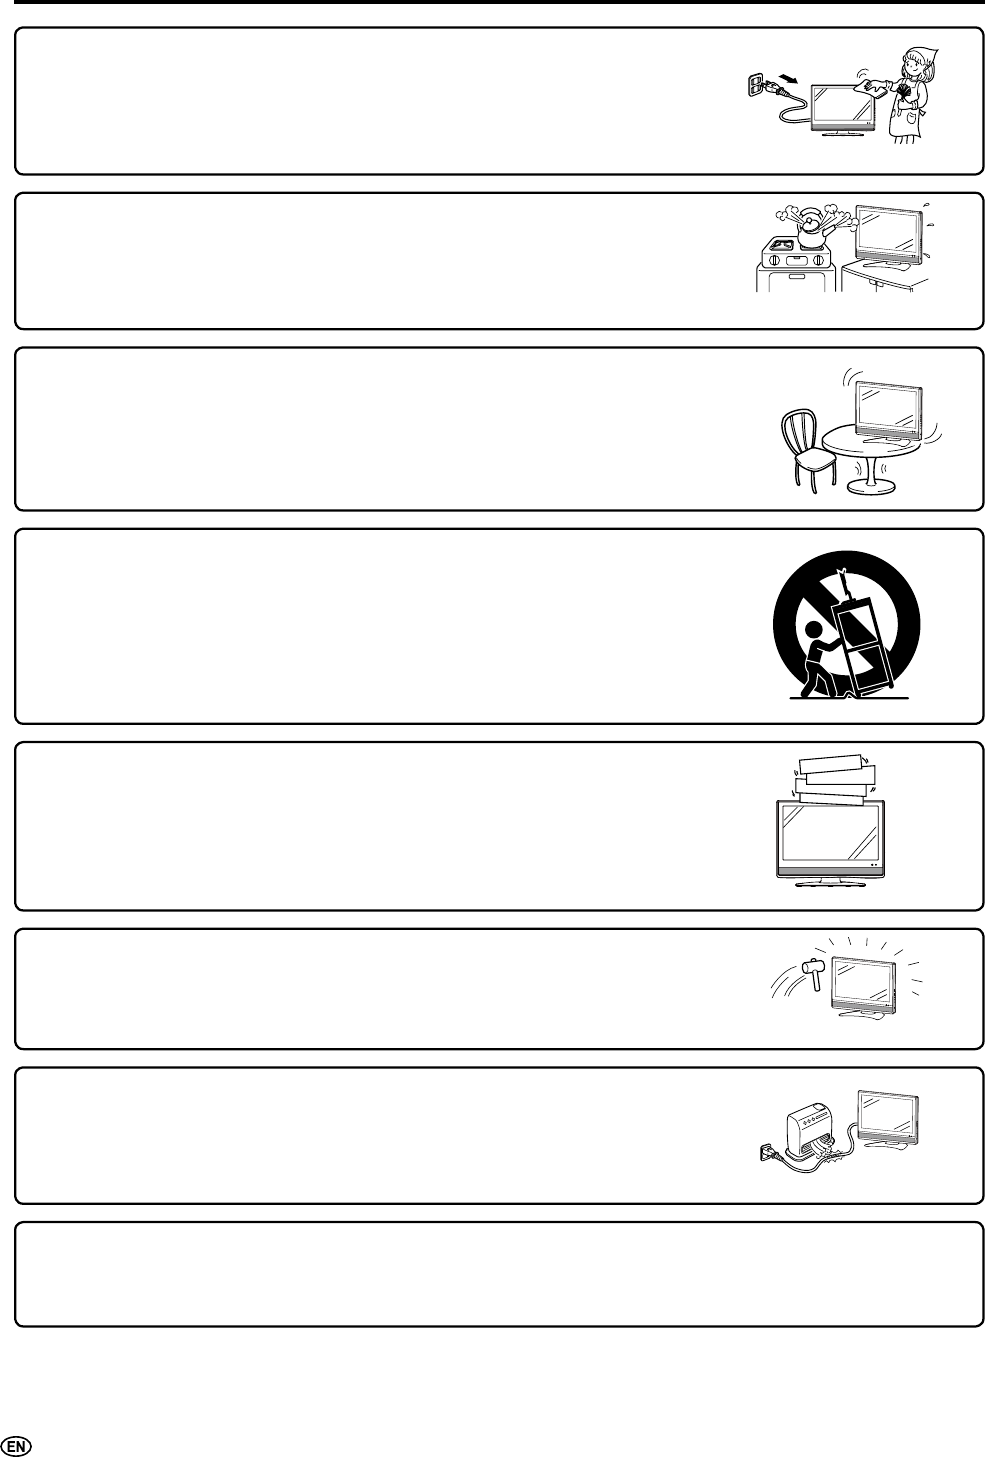
ƇCleaning—Unplug the AC cord from the AC outlet before cleaning the product.
8VHDGDPSFORWKWRFOHDQWKHSURGXFW'RQRWXVHOLTXLGFOHDQHUVRUDHURVRO
cleaners.
Ƈ :DWHUDQGPRLVWXUH²'RQRWXVHWKHSURGXFWQHDUZDWHUVXFKDVEDWKWXE
ZDVKEDVLQNLWFKHQVLQNDQGODXQGU\WXEVZLPPLQJSRRODQGLQDZHWEDVHPHQW
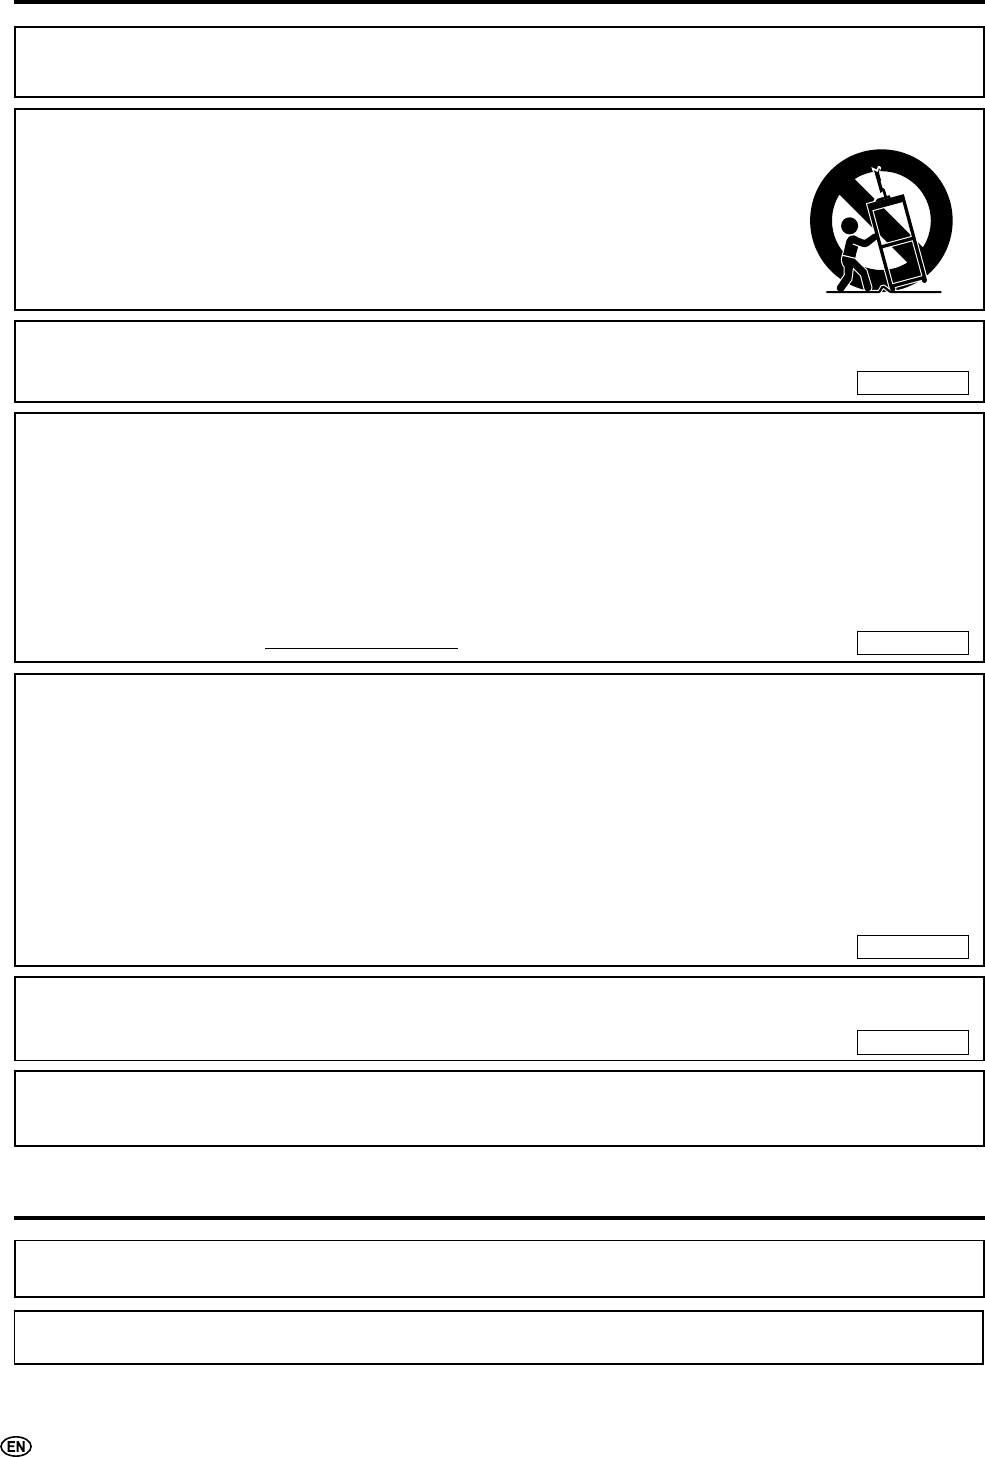
ƇStand—Do not place the product on an unstable cart, stand, tripod or table.
Placing the product on an unstable base can cause the product to fall, resulting
LQVHULRXVSHUVRQDOLQMXULHVDVZHOODVGDPDJHWRWKHSURGXFW8VHRQO\D
FDUWVWDQGWULSRGEUDFNHWRUWDEOHUHFRPPHQGHGE\WKHPDQXIDFWXUHURUVROG
ZLWKWKHSURGXFW:KHQPRXQWLQJWKHSURGXFWRQDZDOOEHVXUHWRIROORZWKH
PDQXIDFWXUHU¶VLQVWUXFWLRQV8VHRQO\WKHPRXQWLQJKDUGZDUHUHFRPPHQGHGE\
the manufacturer.
Ƈ :KHQUHORFDWLQJWKHSURGXFWSODFHGRQDFDUWLWPXVWEHPRYHGZLWKXWPRVW
FDUH6XGGHQVWRSVH[FHVVLYHIRUFHDQGXQHYHQÀRRUVXUIDFHFDQFDXVHWKH
product to fall from the cart.
ƇVentilation—The vents and other openings in the cabinet are designed for
YHQWLODWLRQ'RQRWFRYHURUEORFNWKHVHYHQWVDQGRSHQLQJVVLQFHLQVXI¿FLHQW
ventilation can cause overheating and/or shorten the life of the product. Do not
SODFHWKHSURGXFWRQDEHGVRIDUXJRURWKHUVLPLODUVXUIDFHVLQFHWKH\FDQ
block ventilation openings. This product is not designed for built-in installation; do
not place the product in an enclosed place such as a bookcase or rack, unless
SURSHUYHQWLODWLRQLVSURYLGHGRUWKHPDQXIDFWXUHU¶VLQVWUXFWLRQVDUHIROORZHG
Ƈ 7KH/LTXLG&U\VWDOSDQHOXVHGLQWKLVSURGXFWLVPDGHRIJODVV7KHUHIRUHLWFDQ
EUHDNZKHQWKHSURGXFWLVGURSSHGRUDSSOLHGZLWKLPSDFW%HFDUHIXOQRWWREH
LQMXUHGE\EURNHQJODVVSLHFHVLQFDVHWKH/LTXLG&U\VWDOSDQHOEUHDNV
Ƈ +HDWVRXUFHV².HHSWKHSURGXFWDZD\IURPKHDWVRXUFHVVXFKDVUDGLDWRUV
KHDWHUVVWRYHVDQGRWKHUKHDWJHQHUDWLQJSURGXFWVLQFOXGLQJDPSOL¿HUV
5
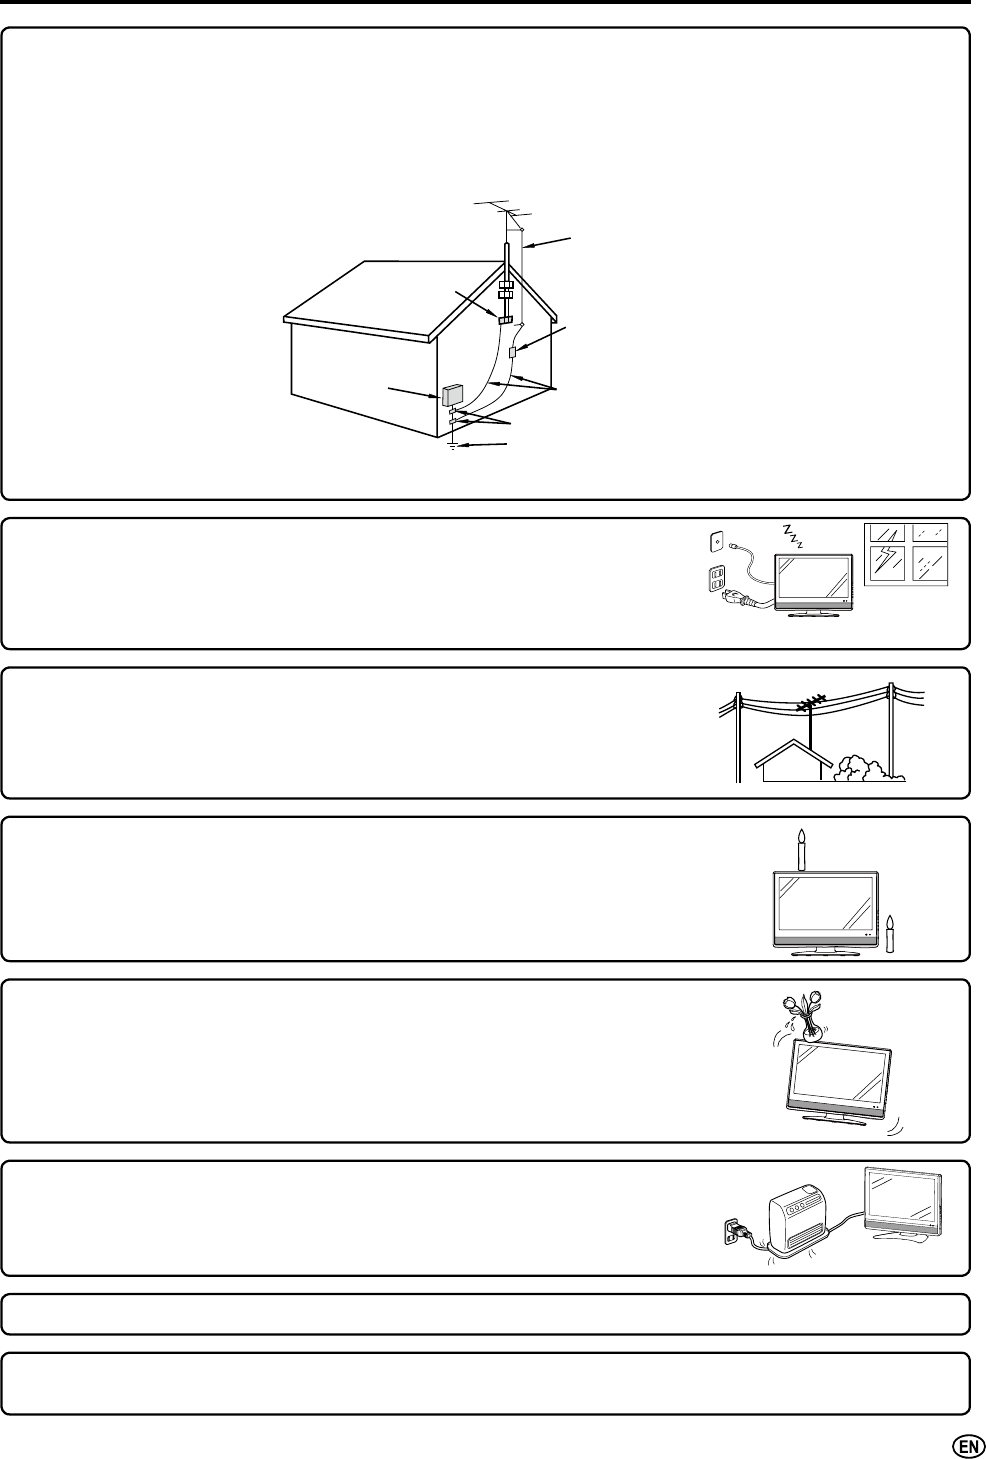
Ƈ ,IDQRXWVLGHDQWHQQDLVFRQQHFWHGWRWKHWHOHYLVLRQHTXLSPHQWEHVXUHWKHDQWHQQDV\VWHPLVJURXQGHGVRDVWR
SURYLGHVRPHSURWHFWLRQDJDLQVWYROWDJHVXUJHVDQGEXLOWXSVWDWLFFKDUJHV6HFWLRQRIWKH1DWLRQDO(OHFWULFDO
&RGHSURYLGHVLQIRUPDWLRQZLWKUHVSHFWWRSURSHUJURXQGLQJRIWKHPDVWDQGVXSSRUWLQJVWUXFWXUHJURXQGLQJRI
WKHOHDGLQZLUHWRDQDQWHQQDGLVFKDUJHXQLWVL]HRIJURXQGLQJFRQGXFWRUVORFDWLRQRIDQWHQQDGLVFKDUJHXQLW
FRQQHFWLRQWRJURXQGLQJHOHFWURGHVDQGUHTXLUHPHQWVIRUWKHJURXQGLQJHOHFWURGH
Ƈ 3RZHU/LQHV±$QRXWVLGHDQWHQQDV\VWHPVKRXOGQRWEHORFDWHGLQWKHYLFLQLW\
RIRYHUKHDGSRZHUOLQHVRURWKHUHOHFWULFOLJKWRUSRZHUFLUFXLWVRUZKHUHLWFDQ
IDOOLQWRVXFKSRZHUOLQHVRUFLUFXLWV:KHQLQVWDOOLQJDQRXWVLGHDQWHQQDV\VWHP
H[WUHPHFDUHVKRXOGEHWDNHQWRNHHSIURPWRXFKLQJVXFKSRZHUOLQHVRUFLUFXLWV
DVFRQWDFWZLWKWKHPPLJKWEHIDWDO
ANTENNA
LEAD-IN
WIRE
ANTENNA
DISCHARGE UNIT
1(&6(&7,21
GROUNDING CONDUCTORS
1(&6(&7,21
GROUND CLAMPS
POWER SERVICE GROUNDING
ELECTRODE SYSTEM
(NEC ART3ART H)
ELECTRIC
SERVICE
EQUIPMENT
NEC—NATIONAL ELECTRICAL CODE
GROUND
CLAMP
EXAMPLE OF ANTENNA GROUNDING AS PER
NATIONAL ELECTRICAL CODE
Ƈ /LJKWQLQJ±)RUDGGHGSURWHFWLRQIRUWKLVWHOHYLVLRQHTXLSPHQWGXULQJDOLJKWQLQJ
VWRUPRUZKHQLWLVOHIWXQDWWHQGHGDQGXQXVHGIRUDORQJSHULRGRIWLPHXQSOXJ
LWIURPWKHZDOORXWOHWDQGGLVFRQQHFWWKHDQWHQQD7KLVZLOOSUHYHQWGDPDJHWR
WKHHTXLSPHQWGXHWROLJKWQLQJDQGSRZHUOLQHVXUJHV
Ƈ 7RSUHYHQW¿UHQHYHUSODFHDQ\W\SHRIFDQGOHRUÀDPHVRQWKHWRSRUQHDUWKH
TV set.
Ƈ 7RSUHYHQW¿UHRUVKRFNKD]DUGGRQRWH[SRVHWKLVSURGXFWWRGULSSLQJRU
VSODVKLQJ1RREMHFWV¿OOHGZLWKOLTXLGVVXFKDVYDVHVVKRXOGEHSODFHGRQWKH
product.
Ƈ 7RSUHYHQW¿UHRUVKRFNKD]DUGGRQRWSODFHWKH$&FRUGXQGHUWKH79VHWRU
RWKHUKHDY\LWHPV
IMPORTANT SAFETY PRECAUTIONS (Continued)
Ƈ 'RQRWGLVSOD\DVWLOOSLFWXUHIRUDORQJWLPHDVWKLVFRXOGFDXVHDQDIWHULPDJHWRUHPDLQ
Ƈ ,QVWDOOWKHSURGXFWRQWKHSODFHZKHUHWKH$&FRUGFDQEHXQSOXJJHGHDVLO\IURPWKH$&RXWOHWRUIURPWKH$&
INPUT terminal on the rear of the product.

6
IMPORTANT INFORMATION..................................... 1
Trademark .................................................................. 2
DEAR SHARP CUSTOMER....................................... 3
IMPORTANT SAFETY PRECAUTIONS..................... 3
Supplied Accessories............................................... 6
Before Using the LCD TV Set................................... 7
Preparation ................................................................ 8
Installing Batteries in the Remote Control.............
Using the Remote Control.....................................
Antenna Connection.............................................. 9
3RZHU&RQQHFWLRQ...............................................
Part Names of the Main Unit ...................................11
Controls................................................................11
Terminals.............................................................
Part Names of the Remote Control ....................... 13
Connecting with External Devices........................ 14
Outputting Audio .................................................
SETUP ...................................................................... 15
Basic Operation....................................................... 16
7XUQLQJ2QDQG2IIWKH0DLQ3RZHU....................
6ZLWFKLQJWKH,QSXW0RGHV
,1387,1387,1387,1387,13873&79
.....
Sound Volume.....................................................
Changing Channels.............................................
Selecting Menu Items..........................................
Menu setting screens ..........................................
Basic Adjustment Settings .................................... 19
Picture ................................................................. 19
Audio ...................................................................
Channels .............................................................
Settings ...............................................................
Locks...................................................................
Guide...................................................................
Connecting a PC ..................................................... 31
9LHZLQJDQ,PDJHIURPD3& ..............................
'LVSOD\LQJDQ,PDJHIURPD3&...........................
Troubleshooting ...................................................... 32
6SHFL¿FDWLRQV.......................................................... 34
Calling for Service .................................................. 35
LIMITED WARRANTY.............................................. 35
Dimensional Drawings
x7KHGLPHQVLRQDOGUDZLQJVIRUWKH/&'79VHWDUH
VKRZQRQWKHLQVLGHEDFNFRYHU
0DNHVXUHWKHIROORZLQJDFFHVVRULHVDUHSURYLGHGZLWKWKH/&'79VHW
Supplied Accessories
Contents
³$$´VL]HEDWWHU\u Operation manual
ENGLISHFRANÇAISESPAÑOL
LIQUID CRYSTAL TELEVISION
TÉLÉVISEUR ACL
TELEVISOR CON PANTALLA DE
CRISTAL LÍQUIDO
OPERATION MANUAL
MODE D’EMPLOI
MANUAL DE OPERACIÓN
AC cordRemote control unit Cable clamp
7
7RXVH\RXU/&'79VHWSHUIRUPVWHSVEHORZ
&KHFNWKHVXSSOLHGDFFHVVRULHV6HH3
,QVHUWWZR³$$´VL]HEDWWHULHVLQWRWKHUHPRWHFRQWURO6HH3
2SHQWKHEDWWHU\FRYHUDQGWKHQLQVHUWEDWWHULHVZLWKWKHLUWHUPLQDOVFRUUHVSRQGLQJWRWKHDQGLQGLFDWLRQVLQWKH
EDWWHU\FRPSDUWPHQW
Connect the antenna cable. (See P. 9)
&RQQHFWZLWKH[WHUQDOGHYLFHV6HH3
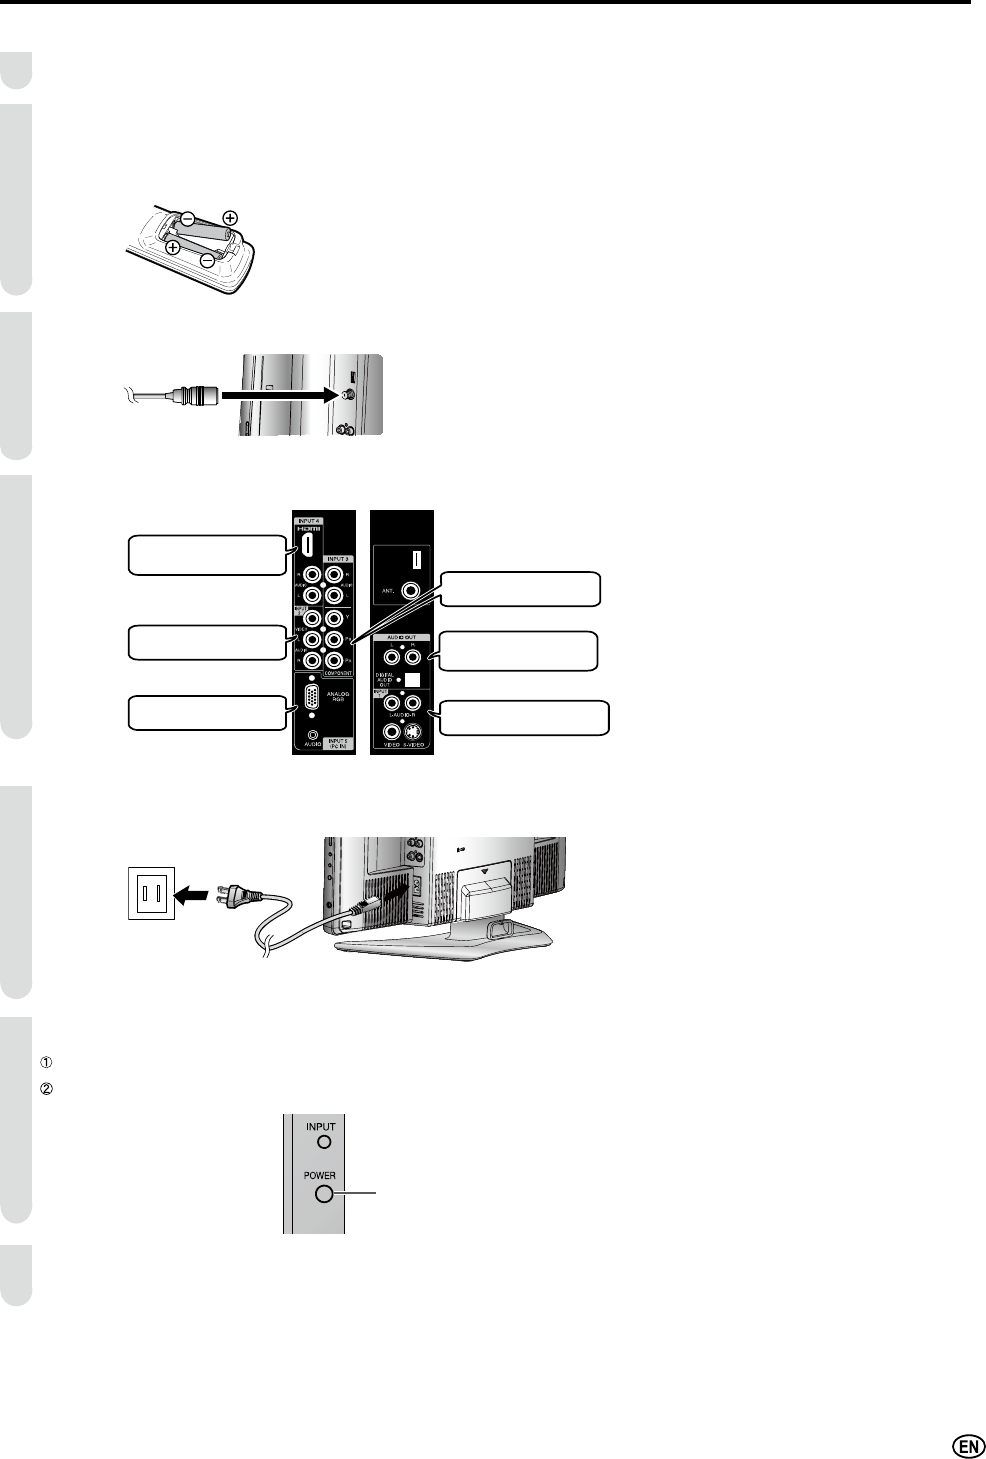
&RQQHFWWKH$&FRUGWRWKH$&,1387WHUPLQDORIWKH/&'79VHWDQGSOXJLQWKH$&FRUGWRWKHZDOORXWOHW
6HH3
7XUQRQWKHPDLQSRZHU6HH3
Press POWER on the right hand side of the main unit.
The POWER indicator located on the front of the main unit turns on to blue.
Start SETUP. (See P. 15)
Before Using the LCD TV Set
1
2
3
4
5
6
7
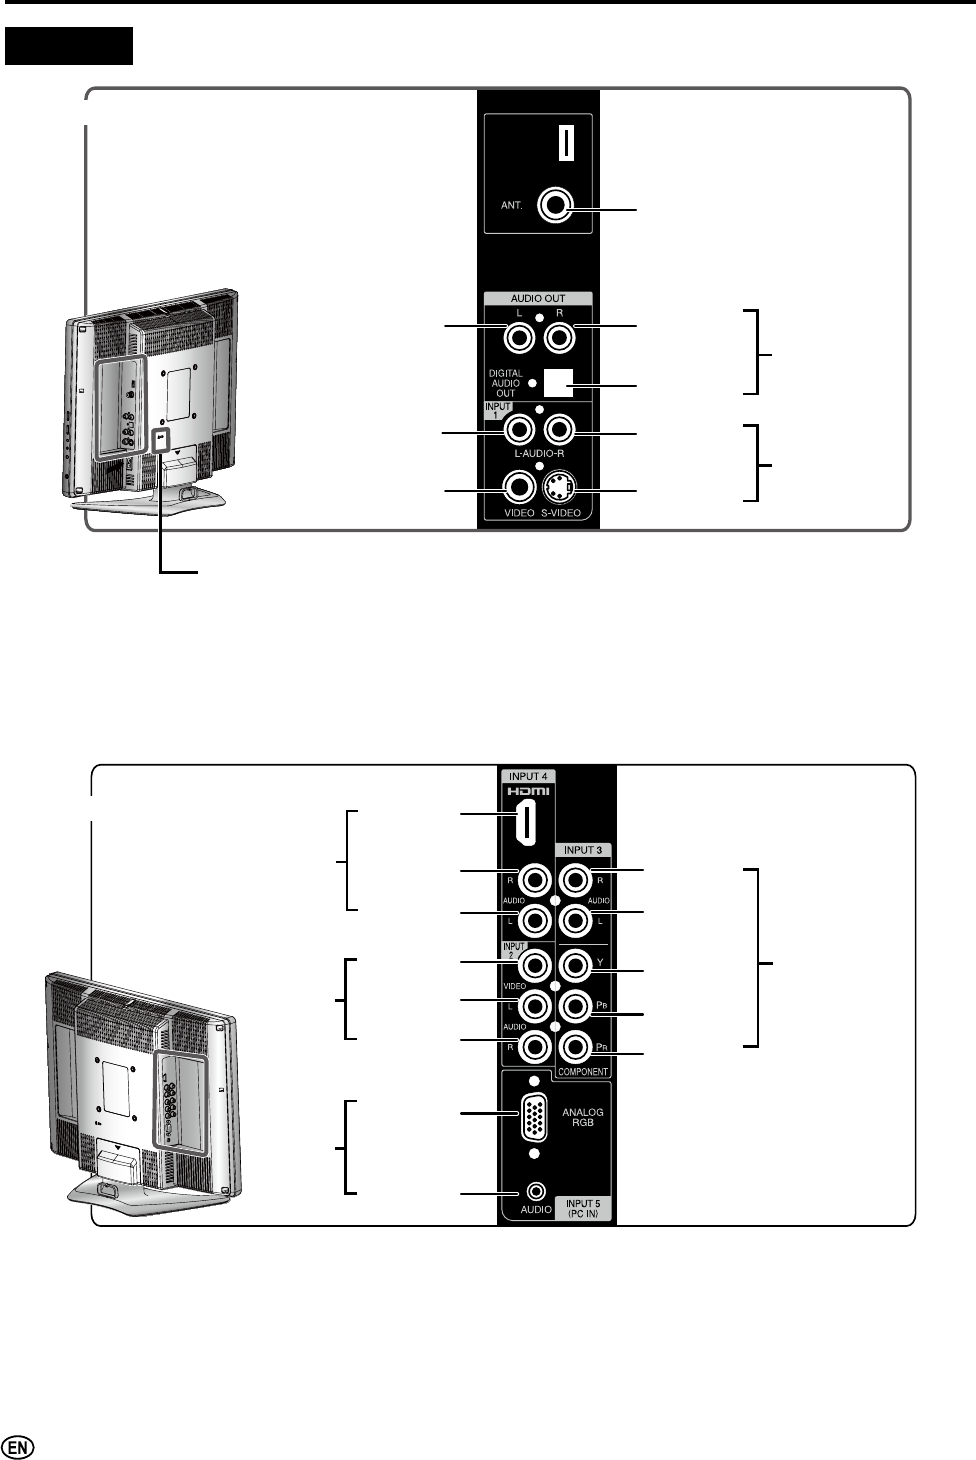
INPUT 4 Terminal (HDMI)
Terminal for HDMI connection
OUTPUT Terminal
Terminal for Audio line output
and Digital Audio output
INPUT 1 Terminal
Terminal for S-Video or Video Input
INPUT 2 Terminal
Terminal for Video connection
INPUT 5 Terminal
Terminal for PC connection
INPUT 3 Terminal
Terminal for component connection
POWER
8
Installing Batteries in the Remote Control
%HIRUHXVLQJWKH/&'79VHWIRUWKH¿UVWWLPHLQVWDOOWKHWZRVXSSOLHG³$$´VL]HEDWWHULHVLQWKHUHPRWHFRQWURO:KHQWKH
EDWWHULHVEHFRPHGHSOHWHGRUWKHUHPRWHFRQWUROIDLOVWRRSHUDWHUHSODFHWKHEDWWHULHVZLWKQHZ³$$´VL]HEDWWHULHV
1 2SHQWKHEDWWHU\FRYHU 2 ,QVHUWWZR³$$´VL]HEDWWHULHV
VXSSOLHGZLWKWKHSURGXFW 3 &ORVHWKHEDWWHU\FRYHU
Ƈ 3ODFHWKHEDWWHULHVZLWKWKHLUWHUPLQDOV
FRUUHVSRQGLQJWRWKHDQG±
LQGLFDWLRQVLQWKHEDWWHU\FRPSDUWPHQW
Caution!
Precautions regarding batteries
Ƈ ,PSURSHUXVHRIEDWWHULHVFDQUHVXOWLQDOHDNDJHRIFKHPLFDOVDQGRUH[SORVLRQ%HVXUHWRIROORZWKHLQVWUXFWLRQVEHORZ
3ODFHEDWWHULHVZLWKWKHLUWHUPLQDOVFRUUHVSRQGLQJWRWKHDQG±LQGLFDWLRQV
'LIIHUHQWW\SHVRIEDWWHULHVKDYHGLIIHUHQWFKDUDFWHULVWLFV'RQRWPL[EDWWHULHVRIGLIIHUHQWW\SHV
'RQRWPL[ROGDQGQHZEDWWHULHV0L[LQJROGDQGQHZEDWWHULHVFDQVKRUWHQWKHOLIHRIQHZEDWWHULHVDQGRUFDXVHROG
EDWWHULHVWROHDNFKHPLFDOV
5HPRYHEDWWHULHVDVVRRQDVWKH\DUHGHSOHWHG&KHPLFDOVWKDWOHDNIURPEDWWHULHVFDQFDXVHDUDVK,IFKHPLFDO
OHDNDJHLVIRXQGZLSHLWRIIZLWKDFORWK
7KHEDWWHULHVVXSSOLHGZLWKWKH/&'79VHWPD\KDYHDVKRUWHURSHUDWLQJWLPHGXHWRVWRUDJHFRQGLWLRQV
,IWKHUHPRWHFRQWUROLVQRWWREHXVHGIRUDORQJSHULRGRIWLPHUHPRYHWKHEDWWHULHVIURPWKHUHPRWHFRQWURO
Preparation
Using the Remote Control
Ƈ 8VHWKHUHPRWHFRQWUROE\SRLQWLQJLWWRZDUGVWKHUHPRWHVHQVRU
ZLQGRZRIWKHPDLQXQLW2EMHFWVEHWZHHQWKHUHPRWHFRQWURODQG
5HPRWHVHQVRUPD\SUHYHQWSURSHURSHUDWLRQ
Cautions regarding use of the remote control
Ƈ 'RQRWDSSO\VKRFNWRWKHUHPRWHFRQWURO,QDGGLWLRQGRQRW
H[SRVHWKHUHPRWHFRQWUROWROLTXLGVDQGGRQRWSODFHLWLQDQDUHD
ZLWKKLJKKXPLGLW\
Ƈ 'RQRWLQVWDOORUSODFHWKHUHPRWHFRQWUROLQGLUHFWVXQOLJKW7KH
KHDWPD\FDXVHGHIRUPDWLRQRIWKHXQLW
Ƈ 7KHUHPRWHFRQWUROPD\QRWZRUNSURSHUO\LIWKHUHPRWHVHQVRU
ZLQGRZLVLQGLUHFWVXQOLJKWRUVWURQJOLJKWLQJ,QVXFKDFDVH
FKDQJHWKHDQJOHRIWKHOLJKWLQJRUPDLQXQLWRURSHUDWHWKH
UHPRWHFRQWUROFORVHUWRWKHUHPRWHVHQVRU
Ƈ 6OLGHWKHFRYHUZKLOH
SUHVVLQJWKHSDUW
17' (5m)
30°
30° Remote
sensor
9
Preparation (Continued)
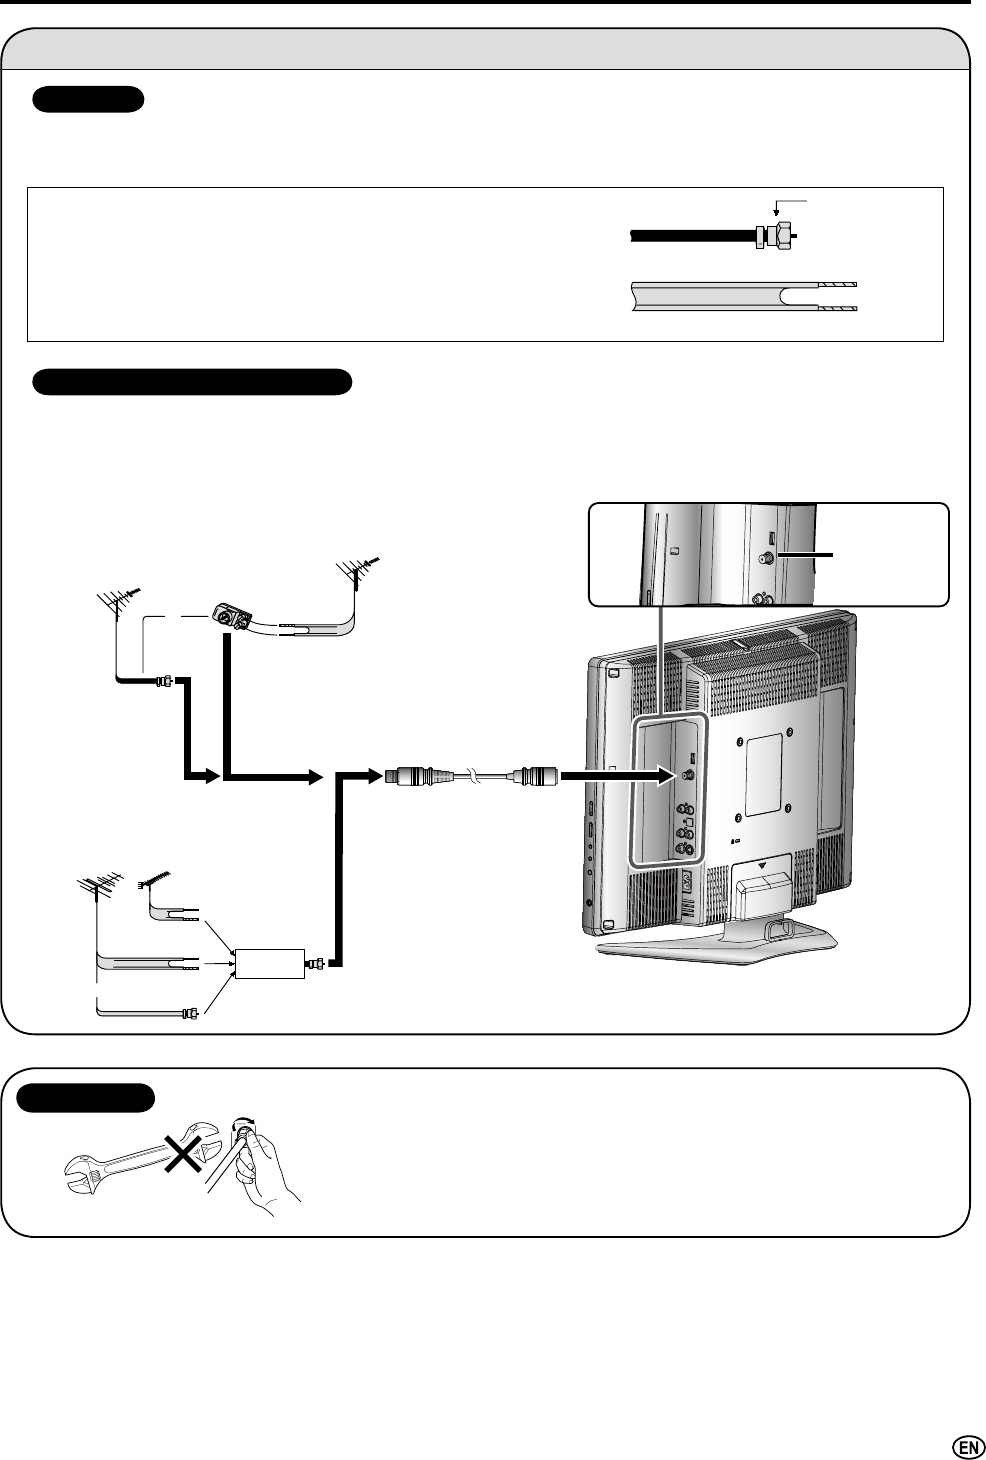
Antenna Connection
OUTDOOR ANTENNA CONNECTION
$RKPV\VWHPLVJHQHUDOO\DURXQGFDEOHZLWK)W\SHFRQQHFWRUWKDW
FDQHDVLO\EHDWWDFKHGWRDWHUPLQDOZLWKRXWWRROVQRWVXSSOLHG
$RKPV\VWHPLVDÀDW³WZLQOHDG´FDEOHWKDWFDQEHDWWDFKHGWRD
RKPWHUPLQDOWKURXJKDRKPDGDSWHUQRWVXSSOLHG
7KHDQWHQQDUHTXLUHPHQWVIRUJRRGFRORUWHOHYLVLRQUHFHSWLRQDUHPRUHLPSRUWDQWWKDQWKRVHIRUEODFNZKLWHWHOHYLVLRQ
UHFHSWLRQ)RUWKLVUHDVRQDJRRGTXDOLW\RXWGRRUDQWHQQDLVVWURQJO\UHFRPPHQGHG
7KHIROORZLQJLVDEULHIH[SODQDWLRQRIWKHW\SHRIFRQQHFWLRQVWKDWDUHSURYLGHGZLWKWKHYDULRXVDQWHQQDV\VWHPV
ANTENNAS
75-ohm
coaxial cable
300-ohm
twin-lead
VHF/UHF
antenna
VHF/UHF
antenna
300/75-ohm
adapter
(not supplied)
300-ohm
twin-lead
300-ohm
twin-lead
75-ohm
coaxial cable
IN OUT
VHF
antenna UHF
antenna
Combiner
(not supplied)
or
or
A. Combination VHF/UHF antenna
B. Separate VHF and/or UHF antennas
Antenna Cable
(commercially available)
ANT.
(Antenna
terminal)
)W\SHFRQQHFWRUVKRXOGEH¿QJHUWLJKWHQHGRQO\
:KHQFRQQHFWLQJWKH5)FDEOHWRWKH/&'79VHWGRQRWWLJKWHQ)W\SHFRQQHFWRU
ZLWKWRROV
,IWRROVDUHXVHGLWPD\FDXVHGDPDJHWR\RXU/&'79VHW
EUHDNLQJRILQWHUQDOFLUFXLWHWF
NOTICE
)W\SHFRQQHFWRU
RKPFRD[LDOFDEOHURXQG
RKPWZLQOHDGFDEOHÀDW
8VHRQHRIWKHIROORZLQJWZRGLDJUDPVLI\RXFRQQHFWDQRXWGRRUDQWHQQD
$8VLQJD9+)8+)FRPELQDWLRQRXWGRRUDQWHQQD
%8VLQJVHSDUDWH9+)DQGRU8+)RXWGRRUDQWHQQDV
&RQQHFWWKHRXWGRRUDQWHQQDFDEOHOHDGLQWR$17$QWHQQDWHUPLQDORQWKHUHDURIWKHPDLQXQLW
)W\SHFRQQHFWRU
RKPFRD[LDOFDEOH

10
Preparation (Continued)
Antenna Connection (Continued)
$RKPFRD[LDOFDEOHFRQQHFWRULVEXLOWLQWRWKH/&'79VHWIRUHDV\KRRNXS:KHQFRQQHFWLQJWKHRKPFRD[LDO
FDEOHWRWKH/&'79VHWVFUHZWKHRKPFDEOHWRWKH$17WHUPLQDO
6RPHFDEOH79FRPSDQLHVRIIHU³SUHPLXPSD\FKDQQHOV´6LQFHWKHVLJQDOVRIWKHVHSUHPLXPSD\FKDQQHOVDUH
VFUDPEOHGDFDEOH79FRQYHUWHUGHVFUDPEOHULVJHQHUDOO\SURYLGHGWRWKHVXEVFULEHUE\WKHFDEOH79FRPSDQ\
7KLVFRQYHUWHUGHVFUDPEOHULVQHFHVVDU\IRUQRUPDOYLHZLQJRIWKHVFUDPEOHGFKDQQHOV6HW\RXU79WRFKDQQHO
RUW\SLFDOO\RQHRIWKHVHFKDQQHOVLVXVHG,IWKLVLVXQNQRZQFRQVXOW\RXUFDEOH79FRPSDQ\)RUPRUHVSHFL¿F
LQVWUXFWLRQVRQLQVWDOOLQJFDEOH79FRQVXOW\RXUFDEOH79FRPSDQ\2QHSRVVLEOHPHWKRGRIXWLOL]LQJWKHFRQYHUWHU
GHVFUDPEOHUSURYLGHGE\\RXUFDEOH79FRPSDQ\LVH[SODLQHGEHORZ
3OHDVHQRWH$Q5)VZLWFKQRWVXSSOLHGZLWKWZRLQSXWV$DQG%LVUHTXLUHG
³$´SRVLWLRQRQWKH5)VZLWFKQRWVXSSOLHG<RXFDQYLHZDOOXQVFUDPEOHGFKDQQHOVE\XVLQJWKH79¶VFKDQQHONH\V
³%´SRVLWLRQRQWKH5)VZLWFKQRWVXSSOLHG<RXFDQYLHZWKHVFUDPEOHGFKDQQHOVYLDWKHFRQYHUWHUGHVFUDPEOHUE\
XVLQJWKHFRQYHUWHU¶VFKDQQHONH\V
CABLE TV (CATV) CONNECTION
$
8QSOXJWKH$&FRUGIURPWKH/&'79VHWDQGZDOORXWOHWZKHQ/&'79VHWLVQRWWREHXVHGIRUDORQJSHULRGRIWLPH
Power Connection
OUT ,1
&DEOH79OLQH
&DEOH79FRQYHUWHU
GHVFUDPEOHU
QRWVXSSOLHG
7ZR VHW
VLJQDO
VSOLWWHU
(not
VXSSOLHG
5)VZLWFKQRWVXSSOLHG
$
&RQVXOW\RXU6+$53'HDOHURU6HUYLFH&HQWHUIRUWKHW\SHRIVSOLWWHU5)VZLWFKRUFRPELQHUWKDWPLJKWEHUHTXLUHG
AC INPUT terminal
(AC 120 V)
AC cord
Wall outlet
11
Headphones
Speaker
( )/( )
( )/( )
Speaker
Remote sensor
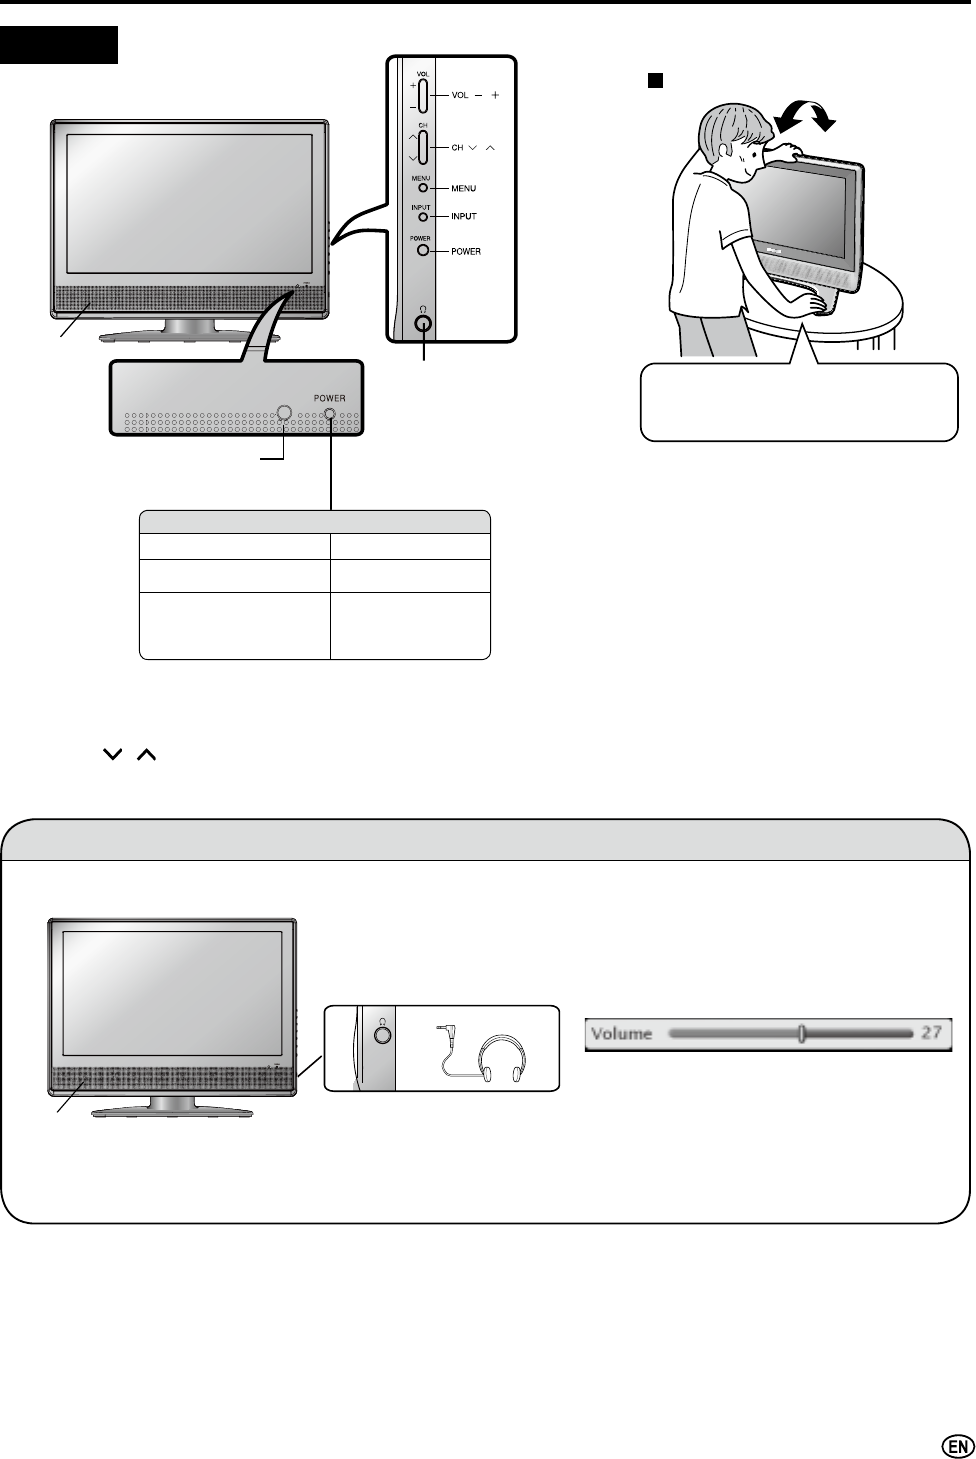
Part Names of the Main Unit
Controls
$
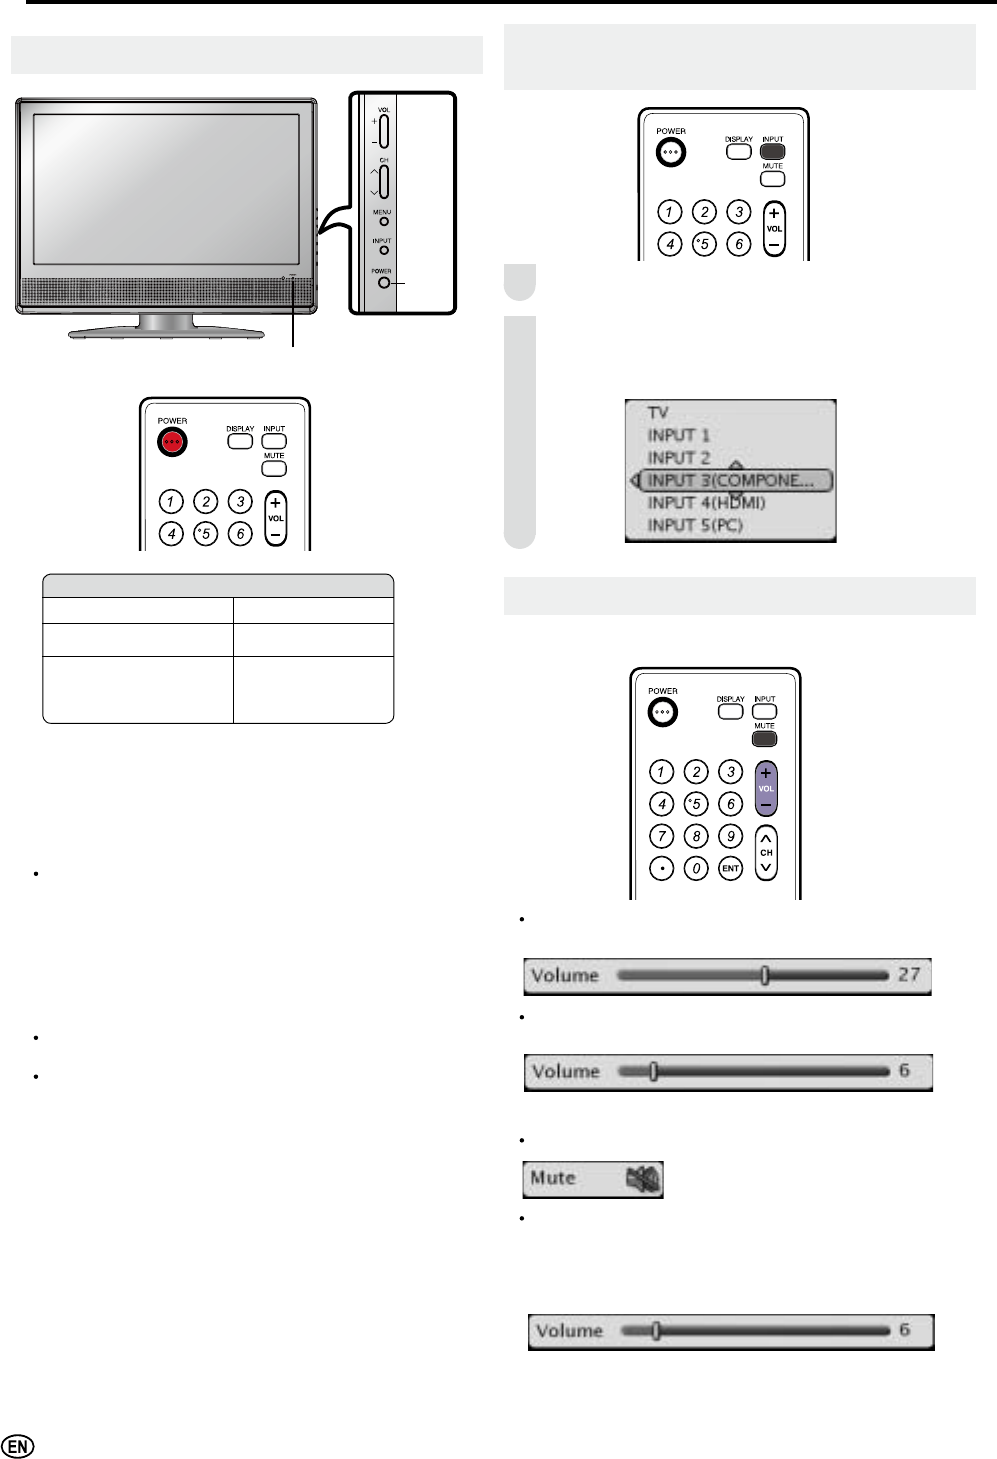
• INPUT, CH ( )/( ), VOL (–)/()DQGMENURQWKHPDLQXQLWKDYHWKHVDPHIXQFWLRQVDVWKHVDPHEXWWRQVRQWKHUHPRWHFRQWURO
)XQGDPHQWDOO\WKLVRSHUDWLRQPDQXDOSURYLGHVDGHVFULSWLRQEDVHGRQRSHUDWLRQXVLQJWKHUHPRWHFRQWURO
Headphone jack
3OXJWKHKHDGSKRQHPLQL
SOXJLQWRWKHKHDGSKRQH
MDFNORFDWHGRQWKHVLGHRI
WKHPDLQXQLW
Listening with Headphones
Ƈ 3OXJWKHKHDGSKRQHPLQLSOXJLQWRWKHKHDGSKRQHMDFNORFDWHGRQWKHIURQWRIWKHPDLQXQLW
$
+HDGSKRQHVDUHQRWLQFOXGHGLQWKHVXSSOLHGDFFHVVRULHV
1RVRXQGLVKHDUGIURPWKHPDLQXQLWVSHDNHUVZKHQDKHDGSKRQHPLQLSOXJLVFRQQHFWHGWRWKHKHDGSKRQHMDFN
'RQRWVHWWKHYROXPHDWDKLJKOHYHO+HDULQJH[SHUWVDGYLVHDJDLQVWH[WHQGHGOLVWHQLQJDWKLJKYROXPHOHYHOV
$GMXVWWKHVRXQGYROXPHXVLQJVOL ()/(–)on the
UHPRWHFRQWURO
7RFKDQJHWKHYHUWLFDODQJOHRIWKH/&'
79VHWWLOWWKHVFUHHQXSWRGHJUHHV
IRUZDUGRUGHJUHHVEDFNZDUG3OHDVH
DGMXVWWKHDQJOHVRWKDWWKH/&'79VHW
FDQEHZDWFKHGPRVWFRPIRUWDEO\
Tilt the display by grabbing onto the
carrying handle while securely holding
down the stand with your other hand.
How to adjust the angle
POWER Indicator
3RZHU21 /LJKWLQJ%OXH
3RZHU2))6WDQGE\ Light Off
1R6LJQDO
3RZHU2))
([FHSW79PRGH
/LJKWLQJ$PEHU
12
Part Names of the Main Unit (Continued)
Terminals
AUDIO
OUT (L)
AUDIO
OUT (R)
ANT.
(Antenna terminal)
S-VIDEO
VIDEO
AUDIO (L) AUDIO (R)
DIGITAL
AUDIO
OUT
INPUT 1
AUDIO
OUTPUT
Rear View
Round lock for Kensington Security Standard slot*
* Using the Kensington Lock
This LCD TV set has a Kensington Security Standard slot for use with a Kensington
MicroSaver Security System. Refer to the information that came with the system for
instructions on how to use it to secure the LCD TV set.
ANALOG
RGB
AUDIO IN
VIDEO
AUDIO (L)
AUDIO (R)
AUDIO (R)
AUDIO (L)
AUDIO (R)
AUDIO (L)
Y
Pb
Pr
HDMI
INPUT 3
(COMPONENT)
INPUT 4
INPUT 2
INPUT 5
(PC IN)
Rear View
13
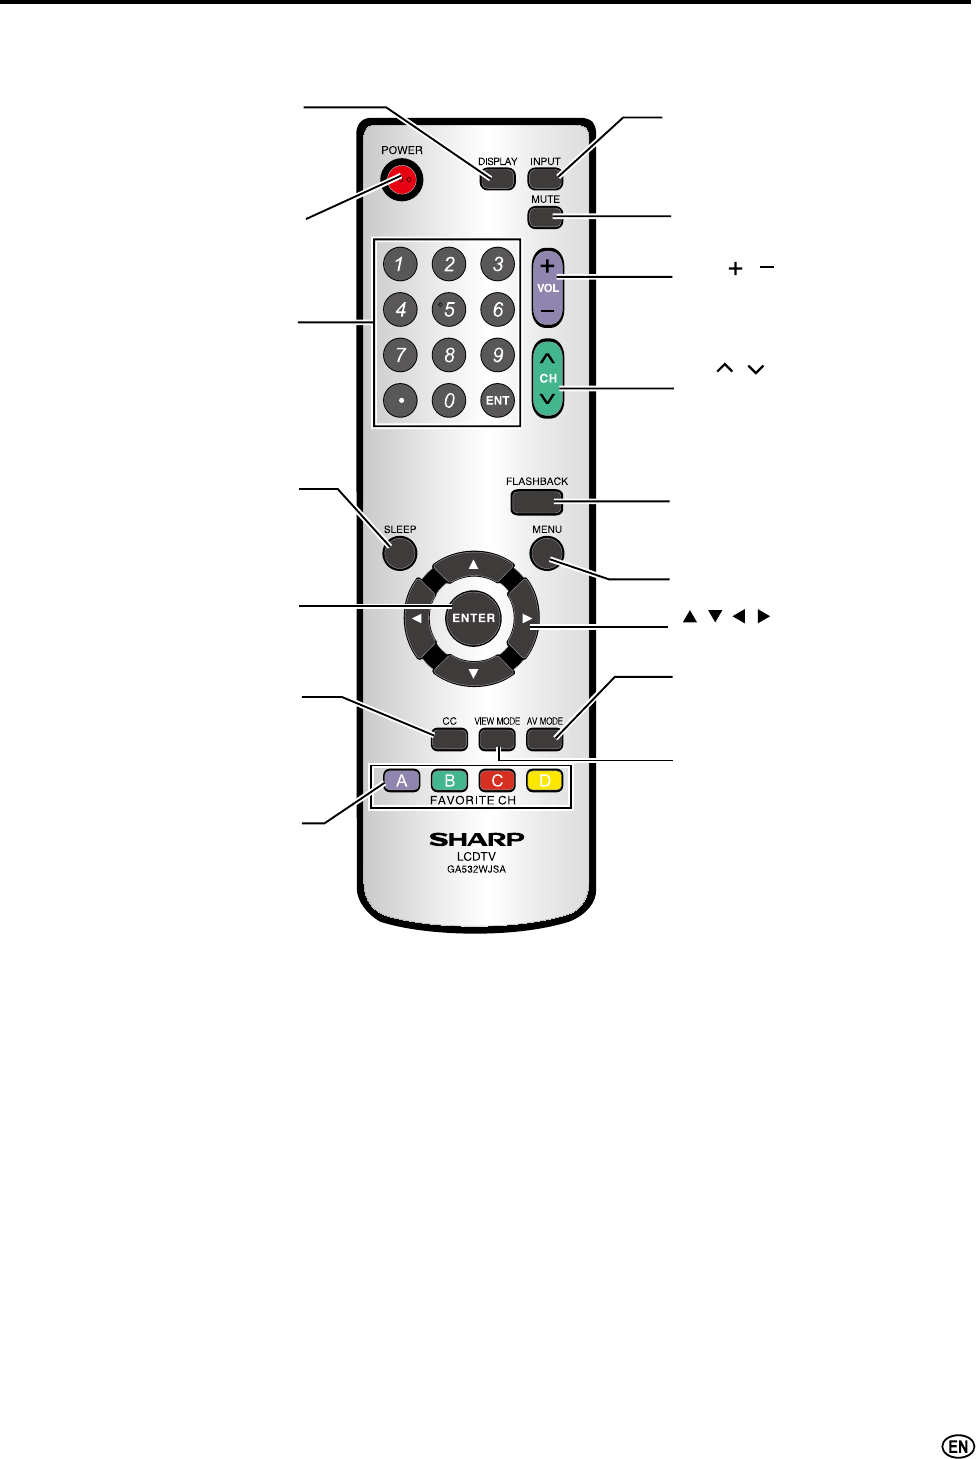
Part Names of the Remote Control
POWER (P. 16)
Switches the Liquid Crystal
Television power on or standby.
Channel Select (P. 17)
Sets the channel.
MUTE (P. 16)
Mutes the sound.
AV MODE (P. 19)
Selects preferred AV MODE.
FAVORITH CH (P. 23)
Recalls and edits Favorite Channel.
SLEEP (P. 26)
Sets the sleep timer.
VIEW MODE (P. 19)
Selects the screen size.
INPUT (P. 16)
Switches the input source between
INPUT1, INPUT2, INPUT3, INPUT4,
INPUT5 (PC) and TV mode.
FLASHBACK (P. 17)
Returns to the previous channel.
DISPLAY
Displays the receiving channel
(or input source).
ENTER
Executes a command.
MENU (P. 18)
Displays the menu screen.
CC (P. 25)
Displays Closed Caption subtitles.
CH ( )/( ) (P. 17)
Selects a channel.
VOL ( )/( ) (P. 16)
Sets the volume.
/ / / (Cursor control)
Selects a desired item on the screen.
14
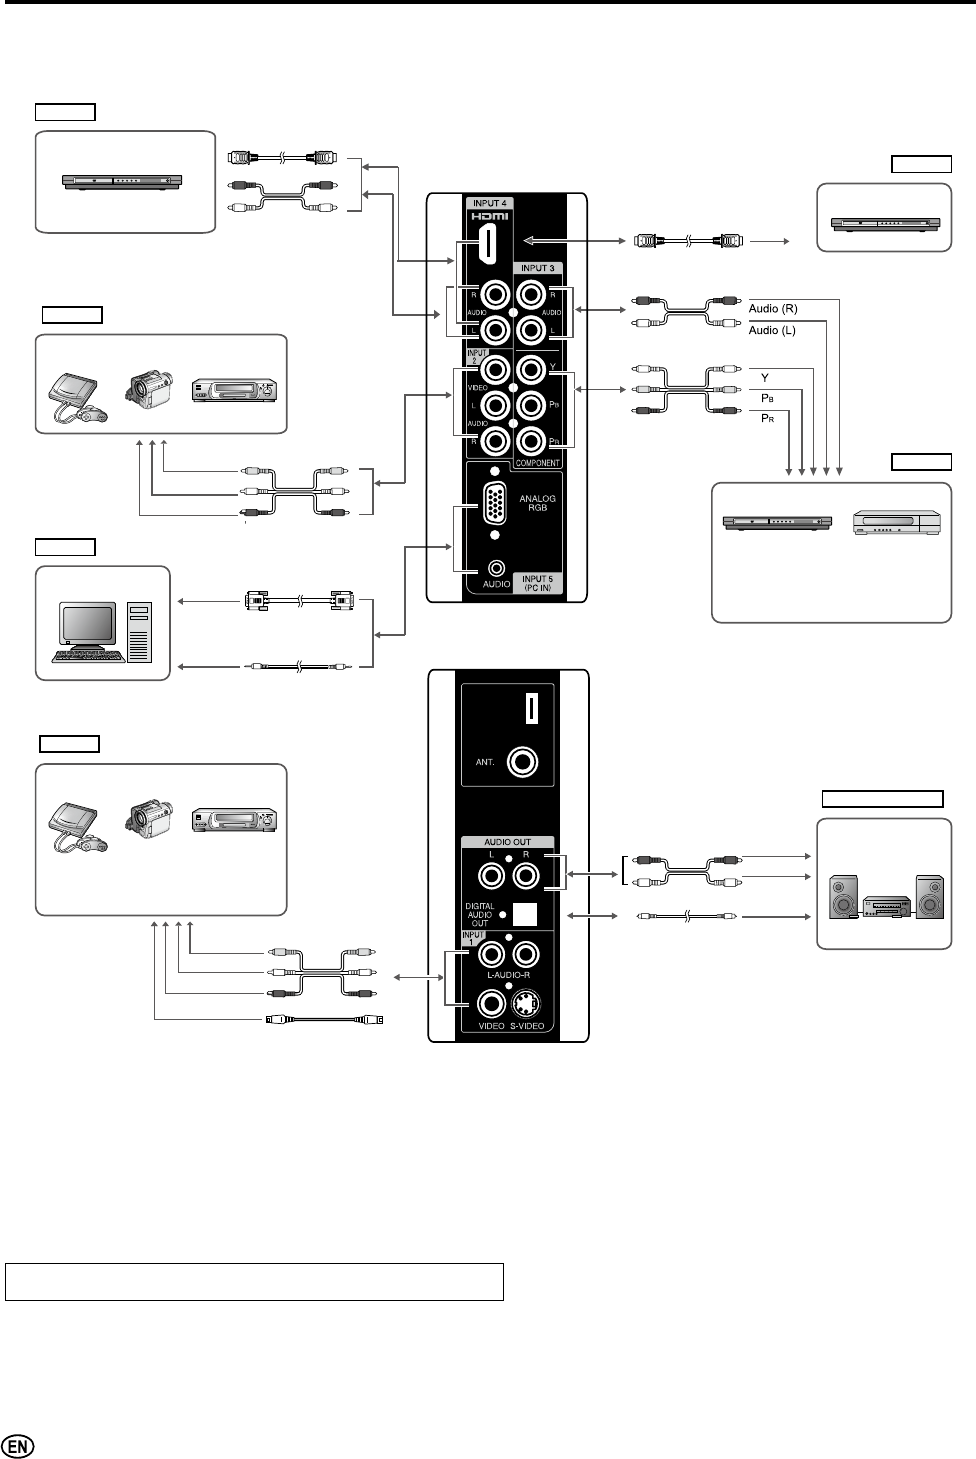
Connecting with External Devices
<RXFDQHQMR\SLFWXUHDQGVRXQGE\FRQQHFWLQJD9&5RUDKRPHYLGHRJDPHV\VWHPWRWKHWHUPLQDOVORFDWHGRQWKHUHDURI
WKH/&'79VHW
:KHQFRQQHFWLQJDQH[WHUQDOGHYLFHWXUQRIIWKHSRZHURIWKH/&'79VHW¿UVWWRSUHYHQWDQ\SRVVLEOHGDPDJH
$
)RUWKHFDEOHXVHDFRPPHUFLDOO\DYDLODEOHDXGLRYLGHRFDEOH
)RUPRUHLQIRUPDWLRQDERXWH[WHUQDOGHYLFHFRQQHFWLRQVVHHWKHRSHUDWLRQPDQXDOVRI\RXUH[WHUQDOGHYLFHV
0DNHVXUHWKDWWKHFRUUHVSRQGLQJFDEOHVDUHFRQQHFWHGWRHDFKWHUPLQDO&RQQHFWLQJRWKHUFDEOHVPD\UHVXOWLQDPDOIXQFWLRQ
,1387KDVWZRYLGHRLQSXWWHUPLQDOV9,'(2DQG69,'(2WHUPLQDOV,I\RXUH[WHUQDOGHYLFHKDVDQ69,'(2WHUPLQDO69,'(2
FRQQHFWLRQLVUHFRPPHQGHG69LGHRSURYLGHVD¿QHUPRUHGHWDLOHGSLFWXUH,IERWKWHUPLQDOVDUHFRQQHFWHG69,'(2WHUPLQDOWDNHVD
SULRULW\
)RUWKH,1387PRGHSLFWXUHFDQEHGLVSOD\HGRQO\ZKHQI33RUIVLJQDOLVUHFHLYHG
)RUWKH,1387PRGHSLFWXUHFDQEHGLVSOD\HGRQO\ZKHQî33RUIVLJQDOLVUHFHLYHG
:KHQ\RXFRQQHFWWRWKH+'0,WHUPLQDOZLWKWKH'9,+'0,FRQYHUVLRQFDEOHLWPD\QRWEHSRVVLEOHWRGLVSOD\WKHSLFWXUHFRUUHFWO\
7KLV79GRHVQRWVXSSRUW'76DXGLRIRUPDW<RXPD\QRWKHDUSURSHUDXGLRRXWSXWIURP79VSHDNHUVLIFKRRVLQJ'76DXGLRIRUPDW
Outputting Audio
<RXFDQRXWSXWDXGLRVLJQDOVIURPWKH/&'79VHWWKURXJKWKH$1$/2*$8',2287WHUPLQDOVDQGWKH',*,7$/$8',2
287WHUPLQDO
INPUT5
INPUT2 terminal
INPUT2
VCR
Camcorder
Home video
game system
Video
Audio (L)
Audio (R) Audio/Video cable
Audio cable
DVI-HDMI conversion cable
PC
INPUT5 terminal
(PC IN)
RGB cable
DVD Player
( with DVI terminal)
INPUT4 terminal
(HDMI)
DVD player
INPUT4 terminal
(HDMI)
INPUT4
INPUT4
HDMI cable
HDMIDVI
HDMI
VGA
Audio
INPUT3 terminal (COMPONENT)
DVD player
* If your external device has a
component terminal, COMPONENT
connection is recommended
(you can view high-quality pictures).
Digital TV tuner
INPUT3
Audio cable
Component cable
Audio amplifier
AUDIO OUTPUT
terminal
AUDIO OUT
Audio (R)
Audio (L)
Audio/Video cable
Optical fiber cable
INPUT1
VCR
Camcorder
* If your external device has an S-video
terminal, S-VIDEO connection is
recommended.
INPUT1 terminal
Home video
game system
Video
Audio (L)
Audio (R)
S-Video
S-Video cable
Audio/Video cable
ø 3.5 mm stereo
mini jack cable
15
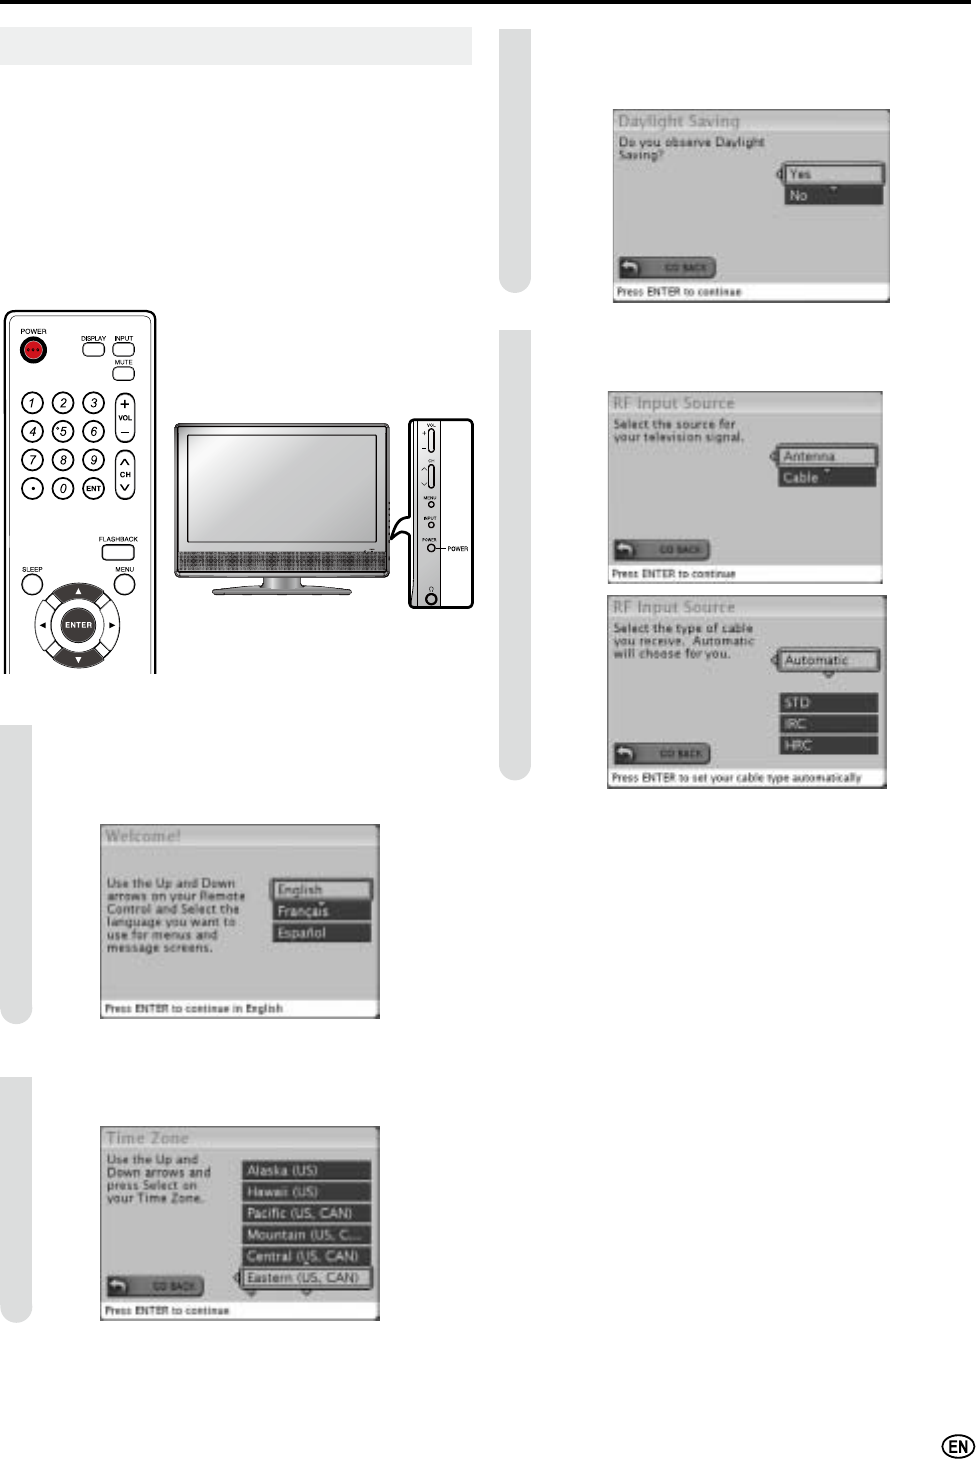
Press ENTER to access Daylight Saving screen.
Press / to select “Yes” or “No”, when you observe
daylight saving.
Press ENTER to access RF Input Source screen.
Press / to select the source for your TV signal.
$
• Select STD(Standard) for majority of cable systems.
Press POWER on the right side of the main unit to turn
on the TV. The SELECT LANGUAGE screen will be
displayed.
Press / to select “English”, “Français” (French) or
“Español” (Spanish).
Press ENTER to access Time Zone mode.
Press / to select on your time zone.
SETUP
1
2
3
4
Initial Setup
:KHQ\RXWXUQRQWKH/&'79VHWIRUWKH¿UVWWLPHLWZLOO
automatically memorize the broadcasting channels and
clock.
Please perform the following instructions before you press
POWER.
(1)
Insert the batteries into the remote control. (See page 8.)
(2)
Connect the antenna cable to the LCD TV set. (See page 9.)
(3) Connect the AC cord to the AC INPUT terminal of the
LCD TV set and plug in the AC cord to the wall outlet.
(See page 10.)
16
Basic Operation
Sound Volume
Ƈ To adjust the volume
Press VOL (+) to increase the sound volume.
The bar indicator shifts right.
Press VOL (–) to decrease the sound volume.
The bar indicator shifts left.
Ƈ To mute the sound
Press MUTE to temporarily turn off the sound.
Press MUTE or VOL (+)/(–) to turn the sound back to
the previous level.
The mute function is automatically turned off when any
of the following buttons are pressed: POWER, MUTE,
VOL(+)/(–) .
Turning On and Off the Power
Ƈ Turning On the Power
Press POWER on the TV or POWER on the remote
control.
POWER indicator (Blue): The TV is on. ("Please wait.."
Please wait will appear for a few seconds on the
screen.)
Ƈ Turning Off the Power
Press POWER on the TV or POWER on the remote
control.
The TV enters standby mode and the image on the
screen disappaers.
The POWER indicator on the TV turns off.
$
• If you are not going to use this TV for a long time, be sure to
remove the AC cord from the wall outlet.
• Small amount of electric power is still consumed even when the
power is turned off.
POWER
POWER indicator
Switching the Input Modes (INPUT1/
INPUT2/INPUT3/INPUT4/INPUT5(PC)/TV)
Turn on the power of the connected video equipment.
Press INPUT to select the applicable input source. The
screen changes in order of INPUT1, INPUT2, INPUT3,
INPUT4, INPUT5 (PC) and TV each time INPUT is
pressed.
1
2
POWER indicator
Power ON Lighting (Blue)
Power OFF / Standby Light Off
No Signal
Power OFF
(Except TV mode)
Lighting (Amber)
17
Basic Operation (Continued)
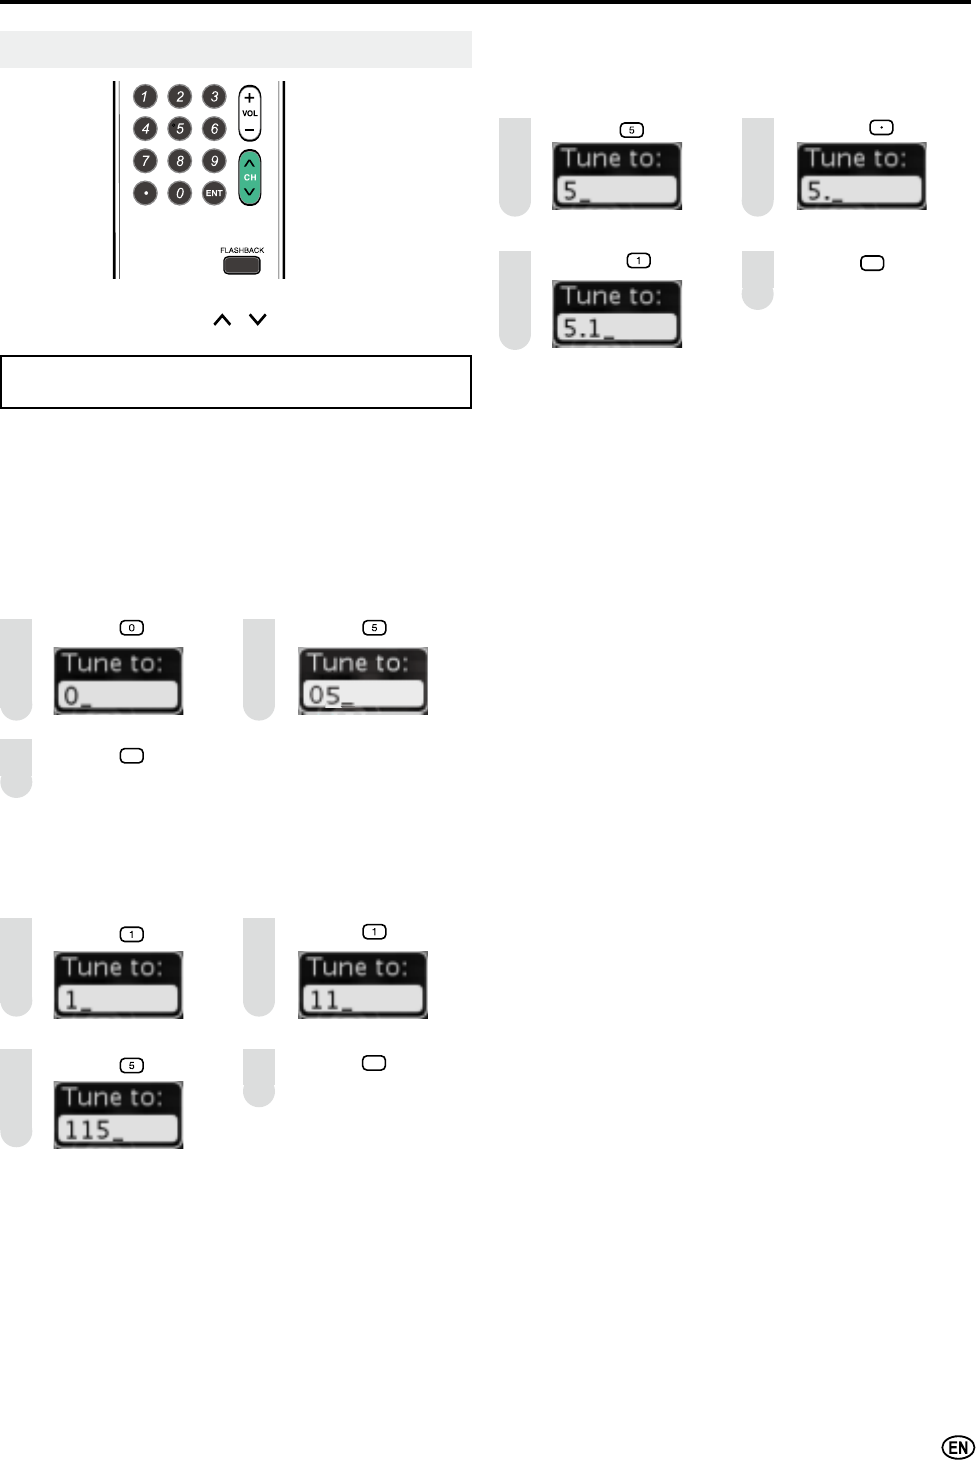
To select a digit channel number (e.g. Channel 5.1):
Complete the following procedure within 4 seconds.
Press the button. Press the button.
Press the button. Press the ENT button.
Ƈ Using FLASHBACK
ƇPress FLASHBACK to switch the currently tuned
channel to the previously tuned channel.
ƇPress FLASHBACK again to switch back to the currently
tuned channel.
Changing Channels
You can select channels using Channel Select
(0-9, • (DOT), ENT) or CH ( )/( ).
• This LCD TV set allows you to select up to 125 channels
(1 to 125). To select a channel, enter a 2- or 3-digit number.
Ƈ Using Channel Select (0-9, • (DOT), ENT)
When selecting the channel using Channel Select,
complete input of the channel number by holding down the
button for the last digit for a moment.
To select a 1- or 2-digit channel number (e.g., Channel 5):
Complete the following procedure within 4 seconds.
Press the button. Press the button.
Press the ENT button.
To select a 3-digit channel number (e.g. Channel 115):
Complete the following procedure within 4 seconds.
Press the button. Press the button.
Press the button. Press the ENT button.
1
1
3
2
2
1
3
2
3
4
4
18
Basic Operation (Continued)
For details of each menu item, refer to the page number
indicated below.
$
•The illustrations and on-screen displays in this manual are
for explanation purposes and may vary slightly from the
actual appearance.
• Depending on the setting condition, such as an input mode, it
may not be possible to adjust or set some items.
Picture
Audio
Channels
Settings
Locks
Page
Rating Locks............................................................ 27
Channel Locks......................................................... 30
Change PIN............................................................. 30
Reset Locks............................................................. 30
Page
Menu Language ......................................................24
Closed Captions...................................................... 25
Sleep Time ..............................................................26
Input Labels............................................................. 26
Daylight Saving .......................................................26
System Info .............................................................26
Reset All .................................................................. 26
Page
Master List............................................................... 23
Favorites.................................................................. 23
Scan Channels ........................................................ 23
Find Channels ......................................................... 24
Channel Name Edit ................................................. 24
Page
Bass, Treble & Balance........................................... 21
Optical Out (SPDIF) ................................................ 21
Analog Preference ..................................................22
Digital Preference.................................................... 22
Audio Track .............................................................22
TV Speaker .............................................................22
Audio Out ................................................................22
Reset Audio............................................................. 22
Page
Picture Settings....................................................... 19
Aspect Ratio............................................................ 19
Color Temp.............................................................. 20
Cinemotion .............................................................. 20
3D Comb Filter ........................................................ 20
Deinterlaced ............................................................ 20
Noise Reduction...................................................... 20
ADC Settings........................................................... 21
Reset Picture........................................................... 21
Guide
Page
Guide....................................................................... 30
Selecting Menu Items
The menus can be used to adjust the various settings of the
LCD TV set. Select the desired menu item by following the
steps below.
$
• The items displayed differ depending on the setting conditions.
• The item selected is displayed in blue.
• Last setting will be saved in memory.
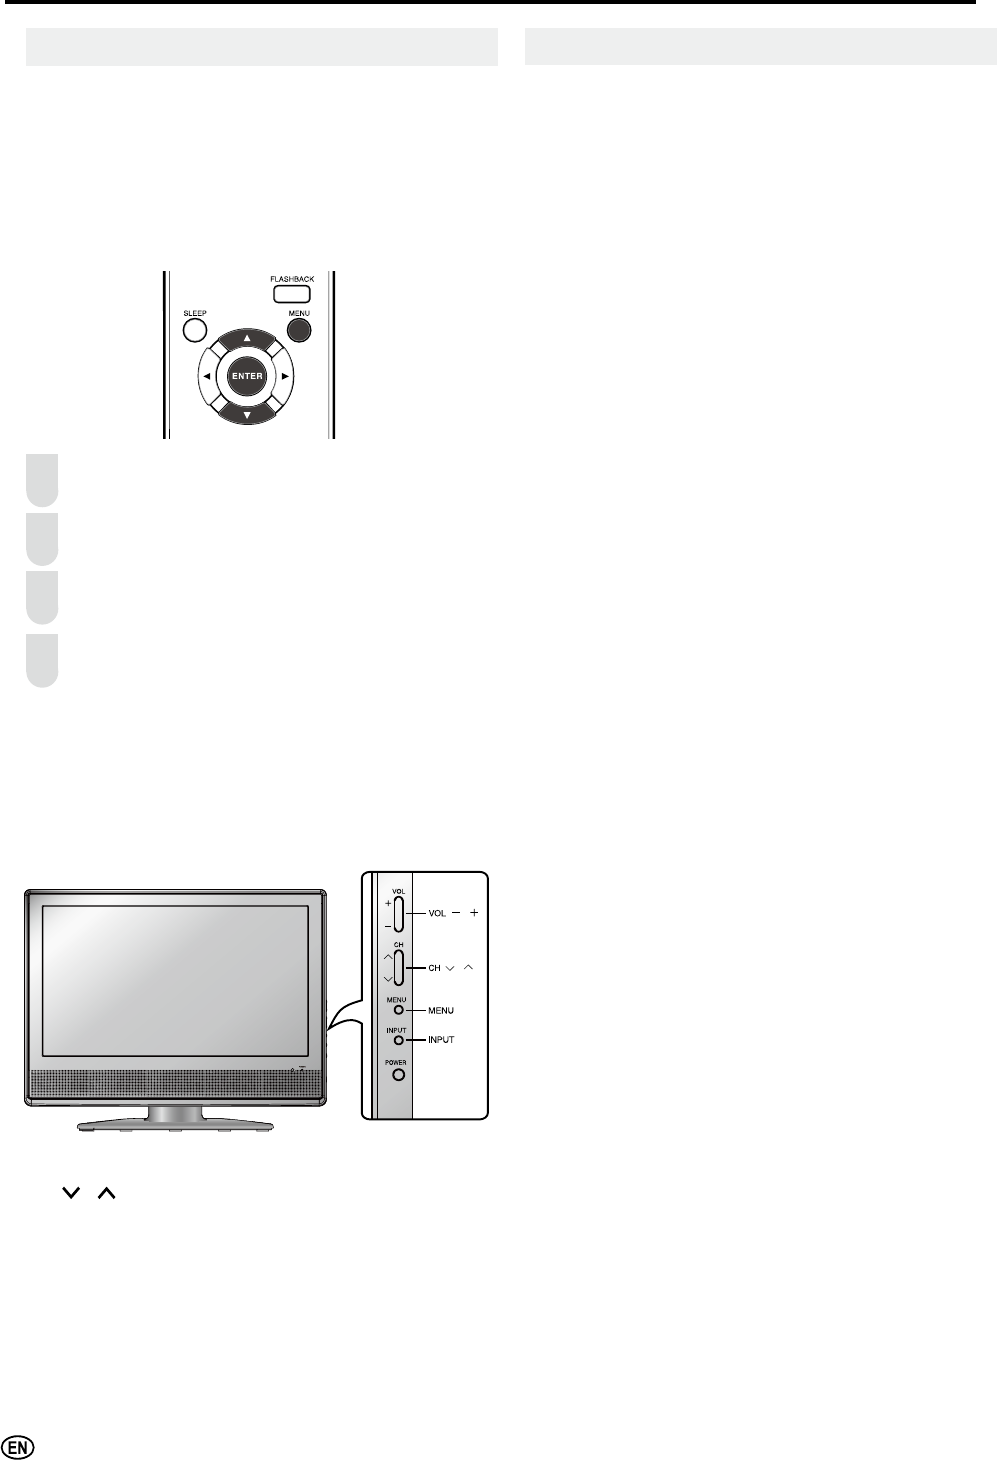
Ƈ Using the remote control
Press MENU on the remote control to display the Menu
screen.
Press / to select the desired menu item.
Press MENU to select the menu item.
Press ENTER to exit.
ƇUsing the control panel of the main unit
You can also operate the menu with the control panel of the
main unit.
Button operations on the control panel correspond to the
ones on the remote control as shown below.
Control panel of the main unit
VOL (–)/(+): Cursor ?/_ on the remote control
CH ( )/( ): Cursor / on the remote control
MENU: MENU on the remote control
INPUT: ENTER on the remote control
1
( )/( )
( )/( )
3
4
2
Menu Setting screens
19
Basic Adjustment Settings
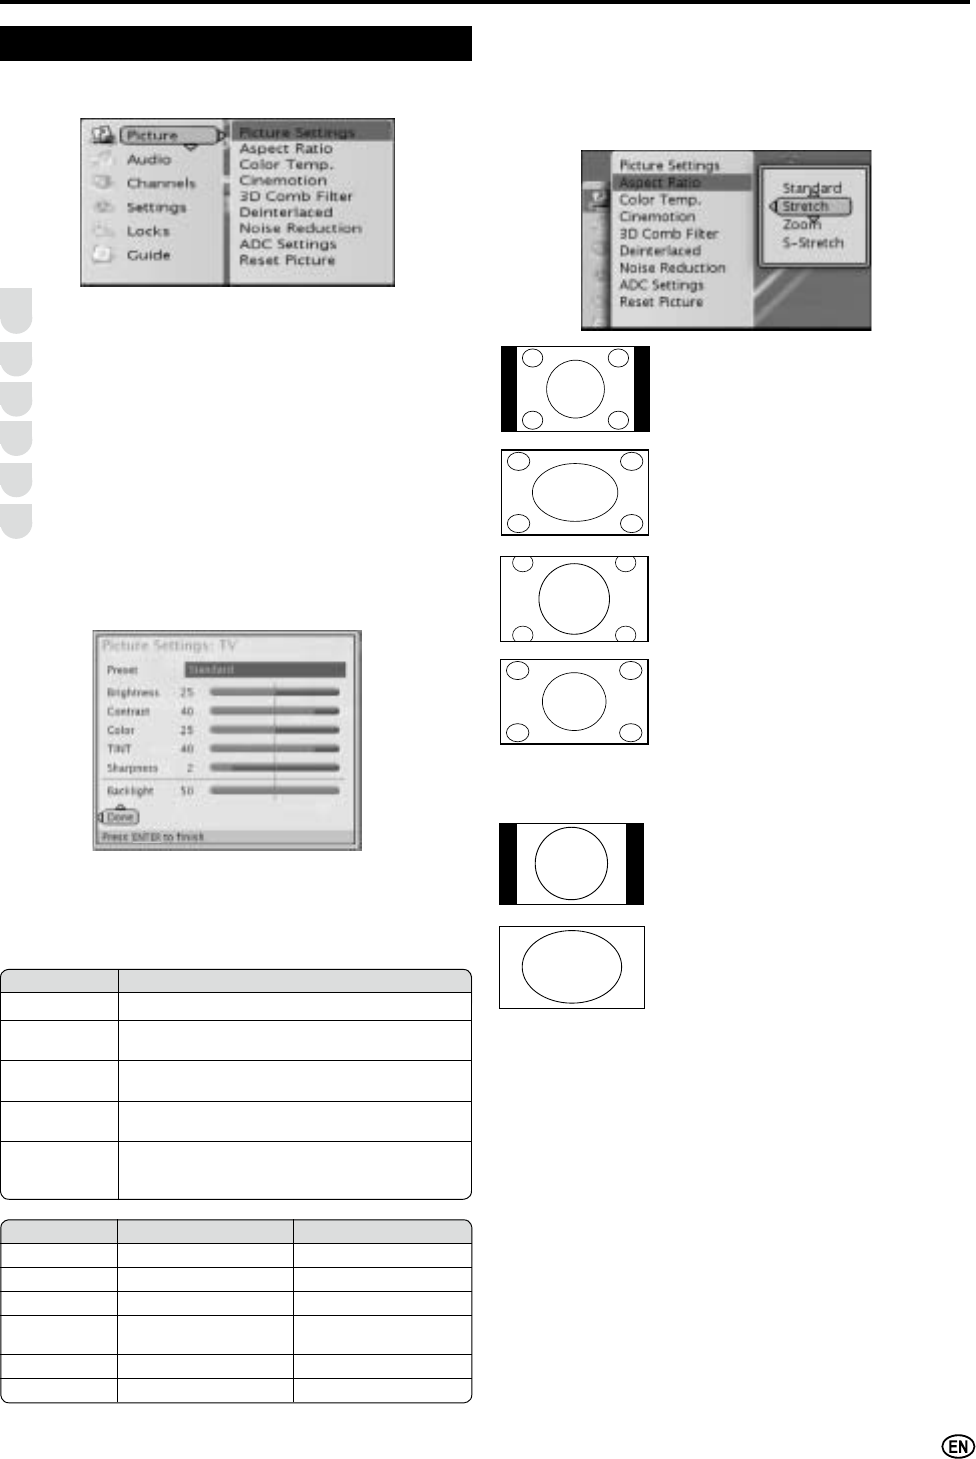
Aspect Ratio (VIEW MODE):
You can adjust the picture to your prefered display size.
*
You can also use VIEW MODE on your remote control for
this function.
Standard:
Keep the original aspect ratio in a full screen
display.
Stretch:
Suitable for viewing wide-screen 1.78:1
aspect ratio programs.
When viewing 1.85:1 programs, stretch
mode will still show very thin black bands at
the top and bottom of the screen.
ZOOM:
Suitable for viewing wide-screen 2.35:1
aspect ratio programs in full screen.
S-Stretch (Smart stretch):
Suitable for stretching 4:3 programs to
¿OOWKHVFUHHQ
Aspect Ratio (VIEW MODE) for INPUT 5(PC):
You can select the picture display size for INPUT 5(PC).
Standard:
Keep the original aspect ratio in a full screen
display.
Stretch, Zoom, S-Stretch:
$QLPDJHIXOO\¿OOVWKHVFUHHQ
$
• Connect the PC before making adjustments. (See page 14.)
You can adjust the picture to your preference with
the following picture settings.
Press MENU on the remote control to display the menu
screen.
Press / to select the “Picture” menu.
Press ENTER to enter the Picture menu list.
Press / to select the desired menu item.
Press ENTER to select the menu item.
Press MENUWRH[LWDIWHU¿QLVKDGMXVWPHQW
Picture
1
2
3
4
5
6
Picture Settings:
Press //?/_ to select or adjust your favorite picture
settings, select Done button then press ENTER to close
Picture Setting menu.
Selected item ? button _ button
Brightness For less brightness For more brightness
Contrast For less contrast For more contrast
Color For less color intensity
For more color intensity
TINT Skin tones become
purplish
Skin tones become
greenish
Sharpness For less sharpness For more sharpness
Backlight The screen dims The screen brightens
Preset (AV MODE):
• Select the Preset and press ENTER.
• Then, select the desired AV MODE.
*
You can also use AV MODE on your remote control for
this function.
Selected item Description
Standard Changing image settings to standard values.
Dynamic For a clear-cut image emphasizing high
contrast for sports viewing.
Movie Controlling the contrast to enable easier
viewing of dark images.
Game Controlling the brightness of video games and
other images for easier viewing.
Custom Allows the user to customize settings as
desired. You can set the mode for each input
source.
20
Basic Adjustment Settings (Continued)
$
• When resetting the items in the “USER” setting to factory preset
values, perform the “Reset Picture” procedure.
Selected item ? button _ button
Red Weaker red Stronger red
Green Weaker green Stronger green
Blue Weaker blue Stronger blue
* When you select “USER”, the following items are adjustable.
Selected item Description
High White with bluish tone
Middle
Low White with reddish tone
User Adjust the color to your preference
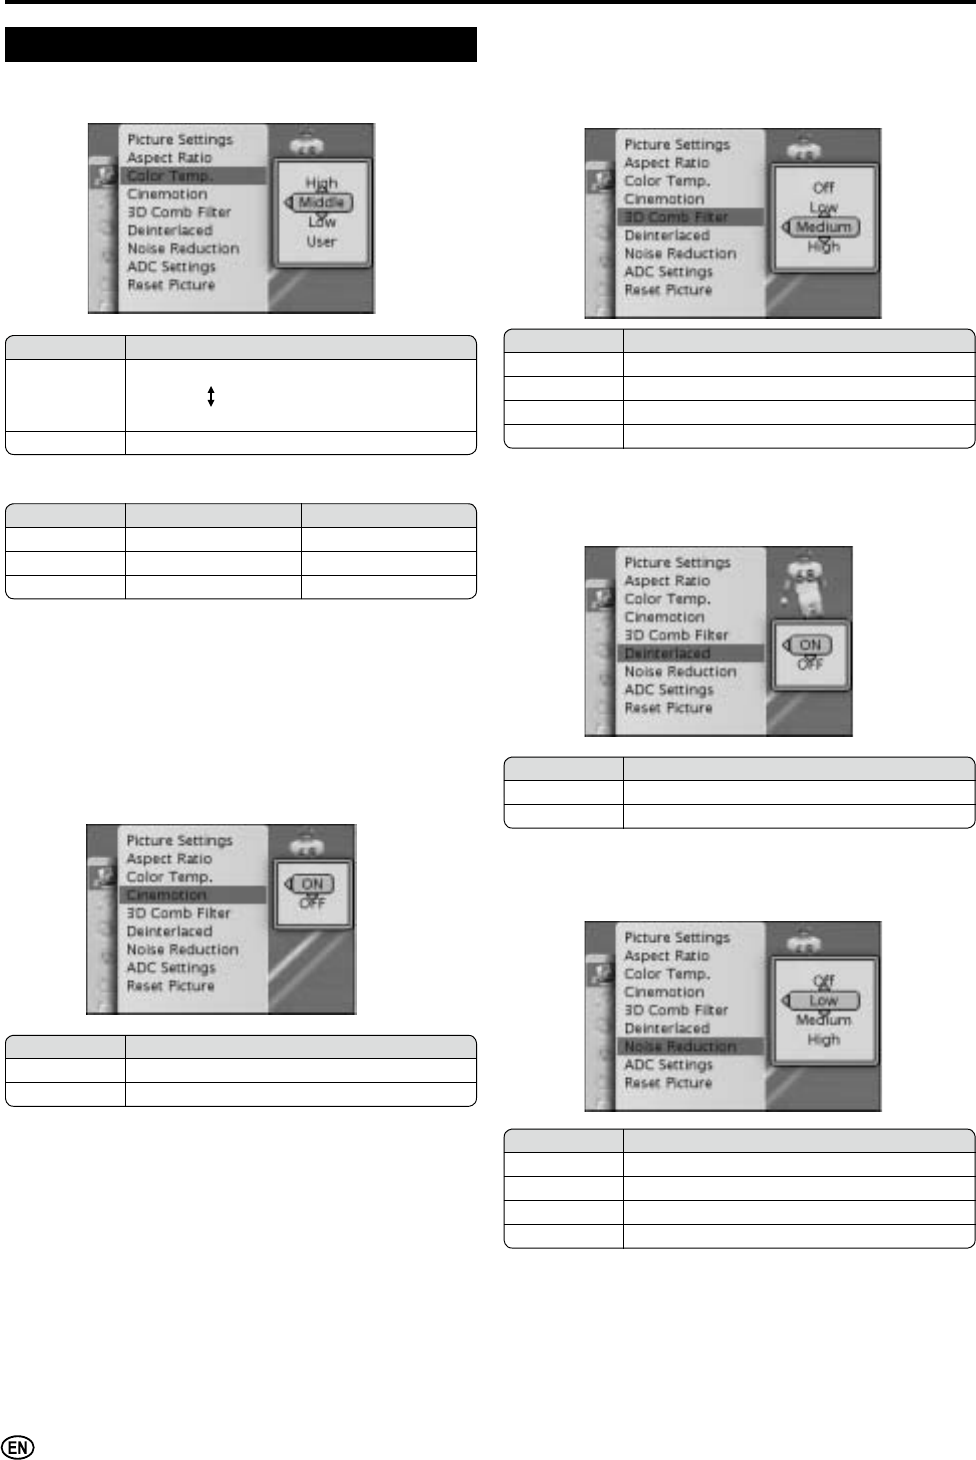
Color Temp.:
Adjust Color Temp. of your TV (High, Middle, Low, User).
Picture (countinued)
Cinemotion:
'HWHFWD¿OPEDVHGVRXUFHRULJLQDOO\HQFRGHGDWIUDPHV
VHFRQGDQGWKHQUHFUHDWHHDFKVWLOO¿OPIUDPHWRFLQHPDWLFQ
picture quality (ON, OFF).
Selected item Description
ON Set Cinemotion to ON
OFF Set Cinemotion to OFF
3D Comb Filter:
Seperate the TV signal luminance and chrominance (Off,
Low, Medium, High).
Selected item Description
Off Set 3D Comb Filter to Off
Low Set 3D Comb Filter to Low level
Medium Set 3D Comb Filter to Medium level
High Set 3D Comb Filter to High level
Deinterlaced:
Select image display mode to Progressive or Interlace (ON,
OFF)
Selected item Description
ON Display image in Progressive mode
OFF Display image in Interlace mode
Noise Reduction:
Reduce Noise from TV screen (Off, Low, Mediun, High).
Selected item Description
Off Set Noise Reduction to OFF
Low Set Noise Reduction to Low level
Medium Set Noise Reduction to Medium level
High Set Noise Reduction to High level

21
Basic Adjustment Settings (Continued)
Reset Picture:
Reset picture settings to factory preset values.
ADC Settings:
Adjust ADC Settings of your TV (Horizontal, Vertical, Phase,
Auto Sync).
$
• Make sure to select the input signal from the following PC
Compatibility Chart before connecting a PC.
$
• ADC Settings is only available when selecting
INPUT 3(Component) or INPUT 5(PC).
Optical Out (SPDIF)
Select the audio format for Optical Out (AC3, PCM).
You can adjust the audio to your preference with the
following audio settings.
Press MENU on the remote control to display the menu
screen.
Press / to select the “Audio” menu.
Press ENTER to enter the Audio menu list.
Press / to select the desired menu item.
Press ENTER to select the menu item.
Press MENUWRH[LWDIWHU¿QLVKDGMXVWPHQW
Audio
Bass, Treble & Balance
Use //?/_ to select or adjust your favorite bass, treble
and balance settings.
Selected item ? button _ button
Bass For weaker bass For stronger bass
Treble For weaker treble For stronger treble
Balance Decrease audio from
the left speaker
Decrease audio from
the right speaker
Selected item Description
AC3 Select surround audio format
PCM Select stereo audio format
$
• Optical Out (SPDIF) is only available when receiving digital
broadcasting.
Selected item ? button _ button
Horizontal
Move the image
Horizontal position to
the left.
Move the image
Horizontal position
to the right.
Vertical
Move the image
Vertical position
down.
Move the image
Vertical position up.
Phase Adjust image clarity
1
2
3
4
5
6
Selected item Description
Auto Sync Automatically adjust the settings for the cur-
rent input signal
PC Compatibility Chart
$
• The numerical values of resolutions and frequencies mentioned
above are standard. They may differ from the values when actually
displayed.
PC/MAC
Resolution
Horizontal
Frequency
(kHz)
Vertical
Frequen-
cy
(Hz)
PC
VGA
720 u 400 31.5 70
640 u 480
31.5 60
37.9 72
37.5 75
SVGA 800 u 600
35.1 56
37.9 60
48.1 72
46.9 75
XGA 1,024 u 768 48.4 60
WXGA 1,280 u 720 45.0 60
1360 u 768 47.368 60
MAC 13" VGA 640 u 480 34.9 67
22
Basic Adjustment Settings (Continued)
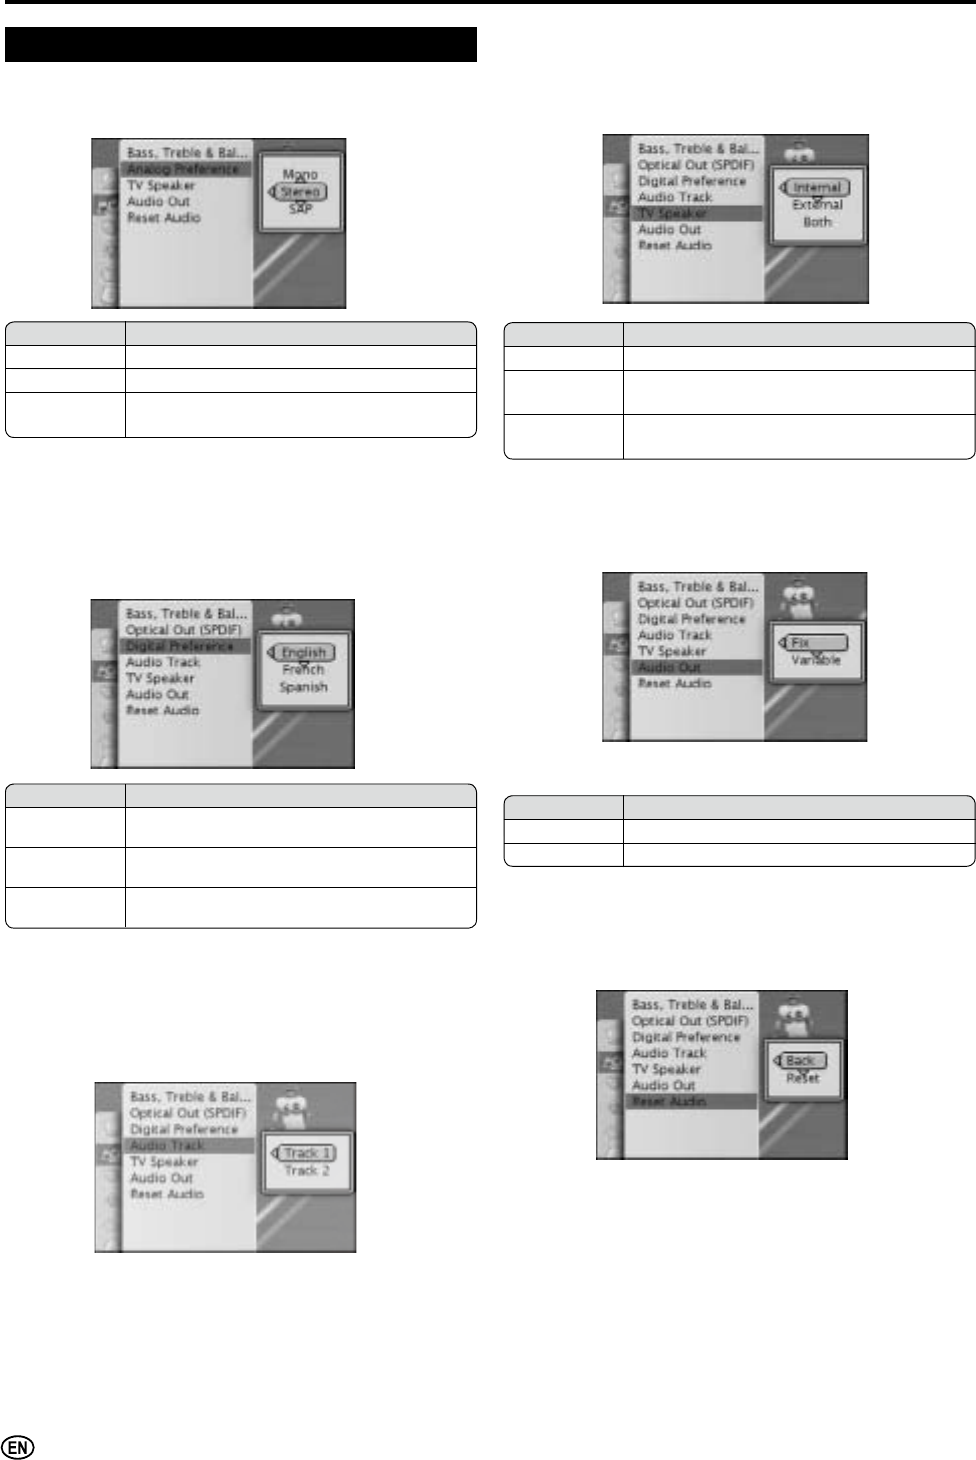
Analog Preference
Select the analog audio preference (Mono, Stereo, SAP).
Audio (countinued)
Selected item Description
Mono Set prefered audio format to Mono
Stereo Set prefered audio format to Stereo
SAP Set prefered audio format to Secondary Audio
Program
Digital Preference
Select the digital Broadcasting prefered language (English,
French, Spanish).
Selected item Description
English Set Digital Broadcasting prefered language to
English
French Set Digital Broadcasting prefered language to
French
Spanish Set Digital Broadcasting prefered language to
Spanish
$
• Digital Preference is only available when receiving the digital
broadcasting.
TV Speaker
Select the audio output speaker (Internal, External, Both).
Selected item Description
Internal Audio from internal speaker only
External Audio from external speaker if your TV is
connected to a home theater or stereo
Both Audio from both internal and external
speakers
Audio Out
Select the analog audio out value (Fix, Variable).
Selected item Description
Fix $QDORJDXGLRRXWSXWYROXPHLV¿[HG
Variable Analog audio output volume is adjustable
Reset Audio:
Reset audio settings to factory preset values.
Audio Track
Select the audio tracks available in digital broadcasting.
$
• Audio Track is only available when receiving digital broadcasting.
• Selectable number of tracks in OSD screen is varied depending
on the number of tracks avalible in the digital broadcasting
received.
$
• Analog Preference is only available when receiving the analog
broadcasting.
23
Basic Adjustment Settings (Continued)
You can adjust the channel settings to your
preference with the following items.
Press MENU on the remote control to display the menu
screen.
Press / to select the “Channels” menu.
Press ENTER to enter the Channels menu list.
Press / to select the desired menu item.
Press ENTER to select the menu item.
Press MENUWRH[LWDIWHU¿QLVKDGMXVWPHQW
Channels
1
2
3
4
5
6
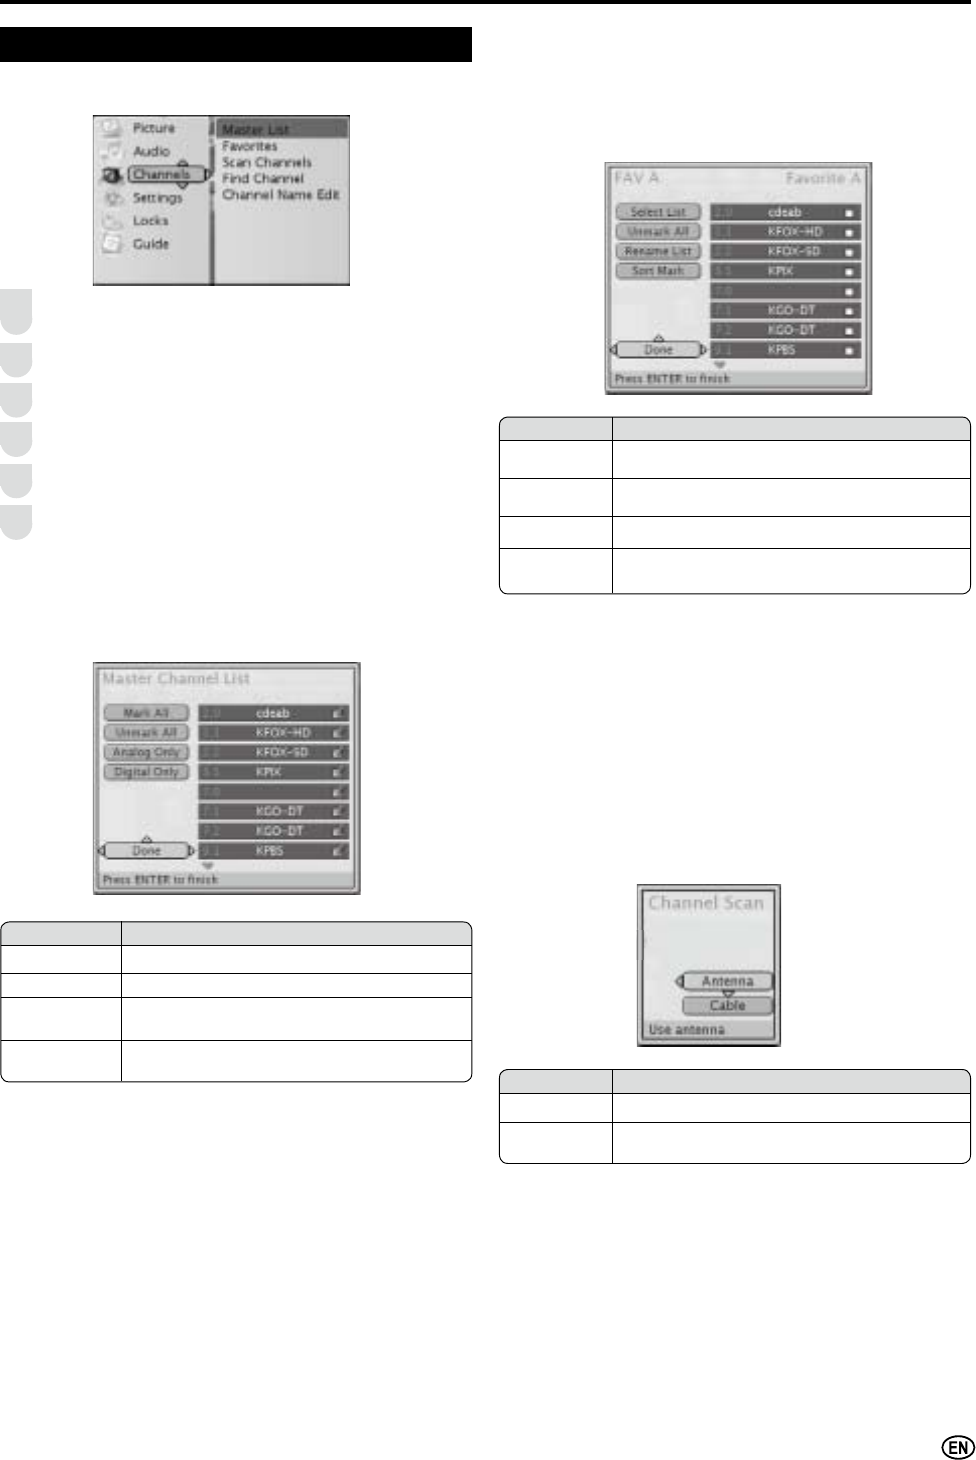
Master List
Displays the Master Channel List of all scanned channels,
you can also edit the list.
Selected item Description
Select List Select which favorite channel list you want to
edit
Unmark All Remove all channels from current favorite
channel list
Rename List Rename the favorite channel list
Sort Mark/
Undo Sort Sort or unsort marked channel in the list
Selected item Description
Mark All Select all channels from Master Channel List
Unmark All Unselect all channels from Master Channel List
Analog Only Select all analog channels from Master
Channel List
Digital Only Select all digital channels from Master Channel
List
Favorites: (FAVORITE CH)
This function allows you to program channels in 4 different
lists (FAV A~D). By setting the favorite channels in advance,
you can select your favorite channels easily.
<<Example:>> How to add channels to the list.
1. Select the Select List and Press ENTER.
2. Press / to select the desired list (FAV A~D) and
press ENTER.
3. Press / to select channel and press ENTER to add
channel to the favorite channel list.
* You can also use FAVORITE CH A~D on your remote
control to add or remove the current channel from the
favorite channel list.
Selected item Description
Antenna Scan channels from Antenna Signal
Cable Scan channels from Cable Signal (Automatic,
STD, IRC, HRC)
Scan Channels:
Automatically search and add the broadcasting channels to
the Master Channel List.
<<Example:>> How to perform Scan Channels.
1. Select the Scan Channels and press ENTER.
2. Press / to select Antenna or Cable and press
ENTER.
3. Select Scan and press ENTER to start Channel Scan.
4. All searched channels will be added to the Master
Channel List.
$
• Depends on the setting, you may be requested to enter PIN
number to select Scan Channels.
24
Basic Adjustment Settings (Continued)
Channels (countinued)
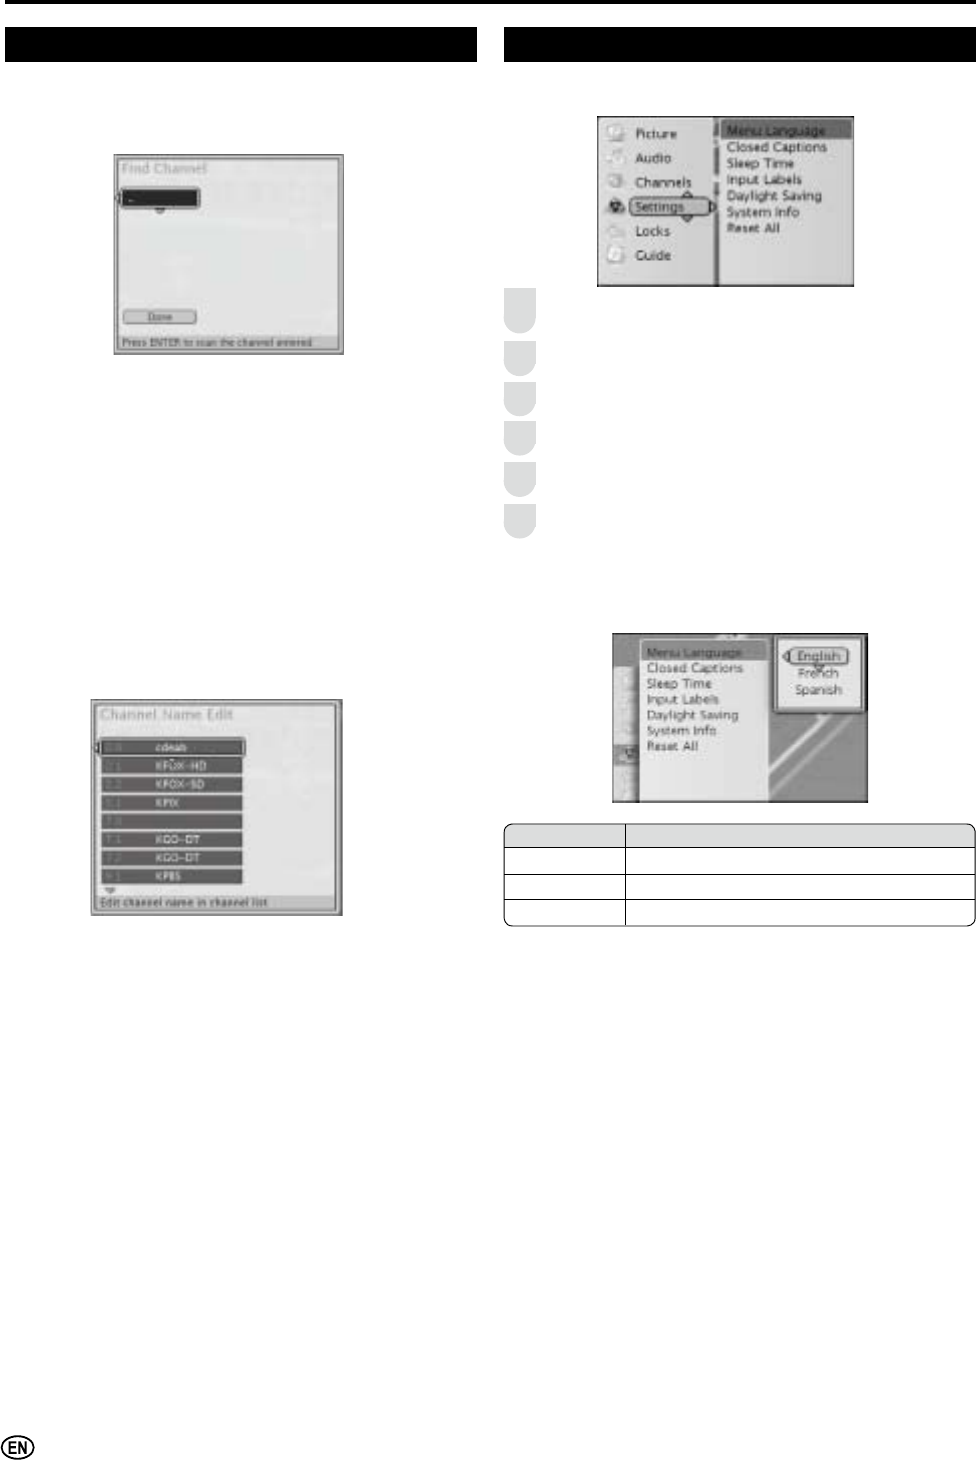
Find Channel:
Manually search and add the broadcasting channels to the
Master Channel List.
<<Example:>> How to perform Find Channel
1. Select the Find Channel and press ENTER.
2. Enter the channel number and then press ENTER.
3. If the channel is available, it will be added to the Master
Channel List.
Channel Name Edit:
This function allows you to edit channel name in channel list.
<<Example:>> How to perform Channel Name Edit.
1. Select the Channel Name Edit and Press ENTER.
2. Press / to select the desired channel and press
ENTER.
3. Select “Done” and press ENTERDIWHU¿QLVK&KDQQHO
Name Edit.
$
• Depends on the setting, you may be requested to enter PIN
number to select Find Channels.
Settings
You can adjust the system settings to your
preference with the following items.
Press MENU on the remote control to display the menu
screen.
Press / to select the “Settings” menu.
Press ENTER to enter the Settings menu list.
Press / to select the desired menu item.
Press ENTER to select the menu item.
Press MENUWRH[LWDIWHU¿QLVKDGMXVWPHQW
1
2
3
4
5
6
Menu Language
Select the language for menu (English, French, Spanish).
Selected item Description
English Set Menu Language to English
French Set Menu Language to French
Spanish Set Menu Language to Spanish
$
• Channel Name is limited to 7 characters.
25
Basic Adjustment Settings (Continued)
Settings (countinued)
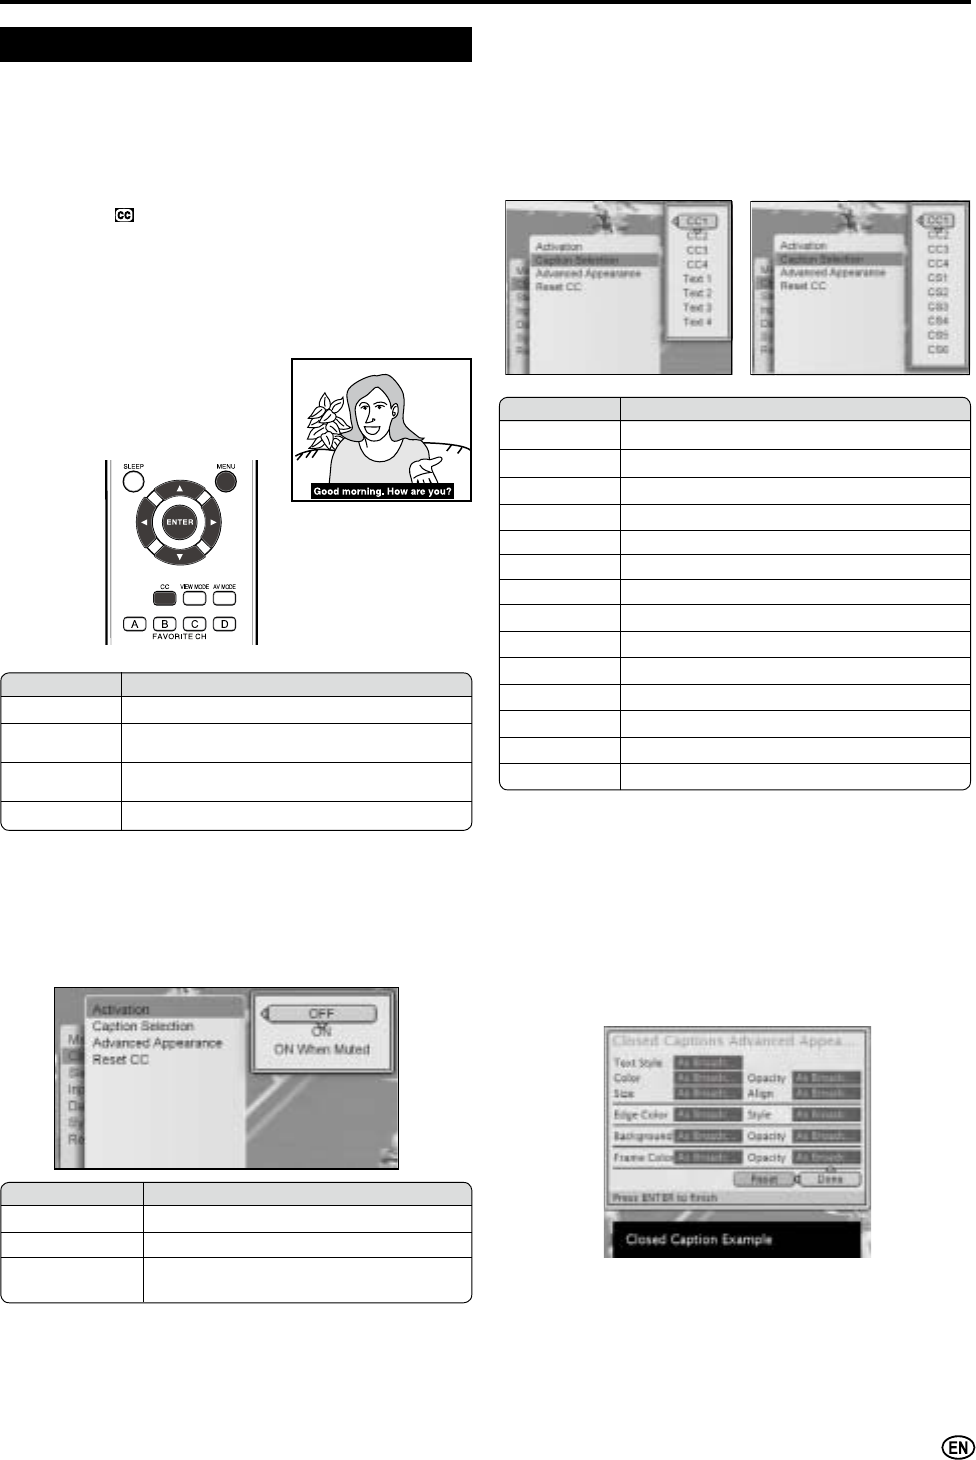
Closed Captions:
Selected item Description
Activation Activate Closed Caption
Caption
Selection Select type of Closed Caption
Advanced
Appearance Adjust Closed Caption appearance
Reset CC Reset Closed Caption Settings
• Activation (CC)
Activate Closed Caption.
Selected item Description
OFF Set Closed Caption to OFF
ON Set Closed Caption to ON
ON When Muted Set Closed Caption to ON when
Audio Volume is set to MUTE
• Advanced Appearance
Adjust Closed Caption appearance to your
preference with the following settings.
• Caption Selection
Select Type of Closed Caption (CC1, CC2, CC3, CC4,
Text 1, Text 2, Text 3, Text 4, CS1, CS2, CS3, CS4,
CS5, CS6).
Selected item Description
CC1 Closed Caption mode for CH1 data
CC2 Closed Caption mode for CH2 data
CC3 Closed Caption mode for CH3 data
CC4 Closed Caption mode for CH4 data
Text 1 Text mode for CH1 data
Text 2 Text mode for CH2 data
Text 3 Text mode for CH3 data
Text 4 Text mode for CH4 data
CS1 Caption Service mode for CH1 data
CS2 Caption Service mode for CH2 data
CS3 Caption Service mode for CH3 data
CS4 Caption Service mode for CH4 data
CS5 Caption Service mode for CH5 data
CS6 Caption Service mode for CH6 data
•This LCD TV set is equipped with an internal Closed
Caption decoder. “Closed Caption” is a system which allows
conversations, narration, and sound effects in TV programs and
home videos to be viewed as captions on the TV screen (see
the illustration).
•Not all programs and videos will offer closed captioning. Please
look for the “ ” symbol to ensure that captions will be shown.
•The Closed Caption broadcasts can be viewed in two modes:
CAPTION and TEXT. For each mode, four channels are
available: CH1, CH2, CH3 and CH4.
The CAPTION mode shows subscripts of dialogs and
commentaries of TV dramas and news programs while allowing
a clear view of the picture.
The TEXT mode displays various information over the picture
(such as TV program schedules
and weather forecasts, etc.) that is
independent of the TV programs.
*
You can also use CC on your remote control for this
function.
* Analog Broadcasting * Digital Broadcasting
$
• Text 1~4 are only available when receiving Analog Broadcasting.
• CS 1~6 are only available when receiving Digital Broadcasting.
26
Basic Adjustment Settings (Continued)
Settings (countinued)
• Reset CC
Reset Closed Caption settings to factory preset
values.
Sleep Time: (SLEEP)
This function allows you to set the sleep time to
automatically turn off the TV (Leave TV on, 15 minutes, 30
minutes, 45 minutes, 60 minutes, 90 minutes).
Selected item Description
Leave TV on Set Sleep Time to off
15 minutes Automatically turn off the TV after 15 minutes
30 minutes Automatically turn off the TV after 30 minutes
45 minutes Automatically turn off the TV after 45 minutes
60 minutes Automatically turn off the TV after 60 minutes
90 minutes Automatically turn off the TV after 90 minutes
Input Labels:
This function allows you to edit Input Labels.
<<Example:>> How to edit Input Labels.
1. Select the Input Labels and press ENTER.
2. Press / to select the desired Input Label and press
ENTER.
3. Press / to select the desired Input name and press
ENTER to complete the edit.
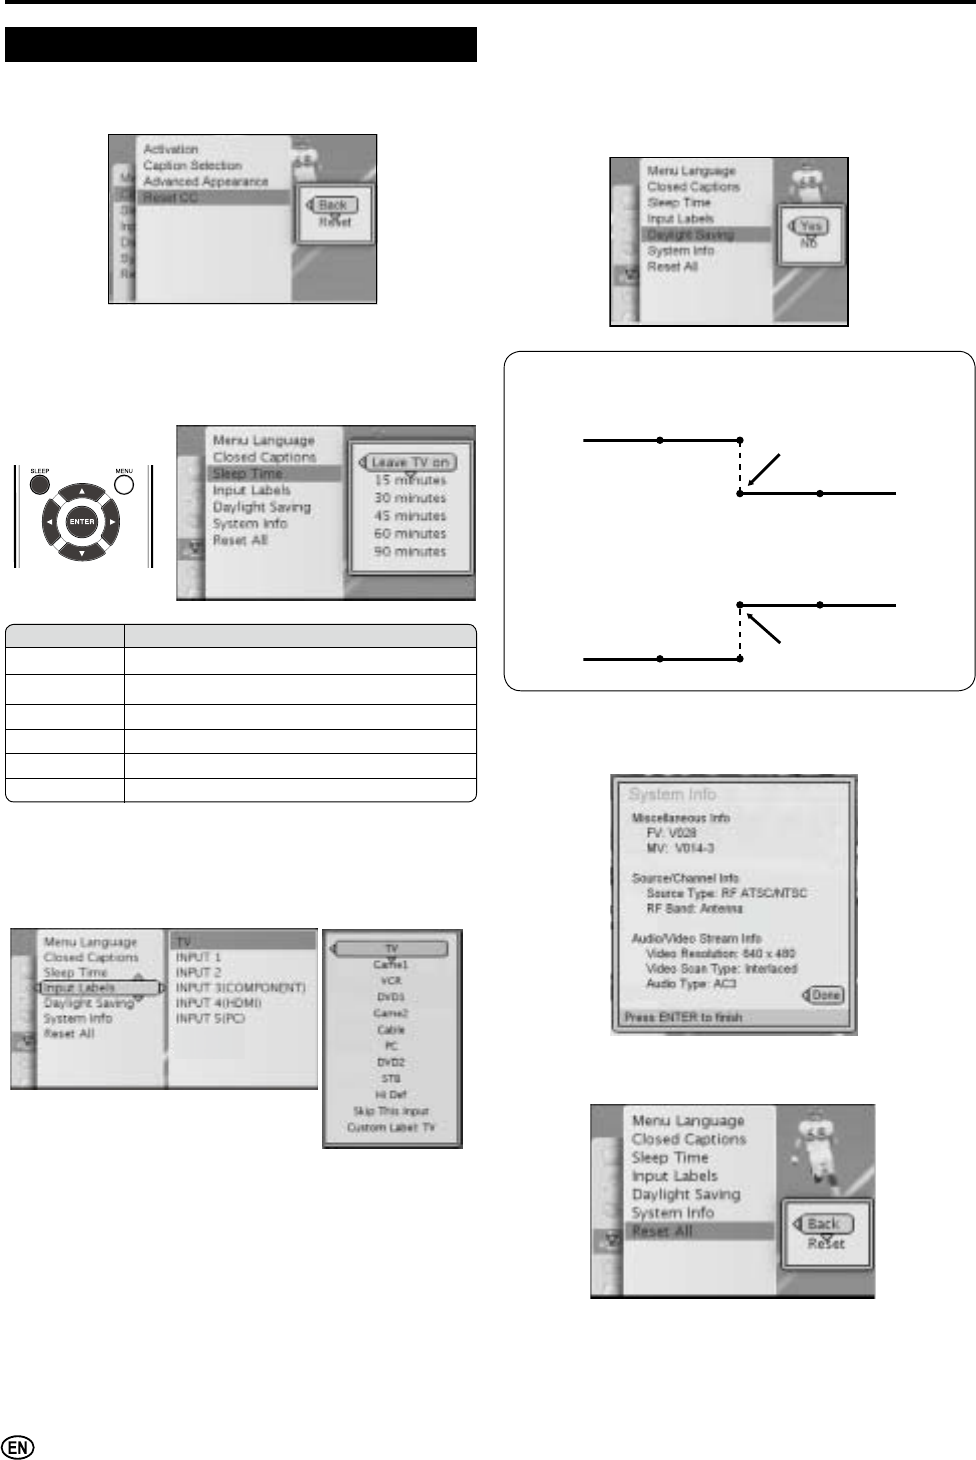
Daylight Saving:
The Daylight Saving-Time changes as shown below. Set the
Daylight Saving to “Yes” to forward the clock by 1 hour. To
rewind the clock by 1 hour, set the Daylight Saving to “No”.
Reset All:
Reset all settings to factory preset values.
System lnfo:
Display the system information on the screen.
(Spring)
2QWKH¿UVW6XQGD\LQ$SULO'D\OLJKW6DYLQJ7LPHVWDUWV
1:00AM 2:00AM
3:00AM 4:00AM
(Autumn)
2QWKHODVW6XQGD\LQ2FWREHU'D\OLJKW6DYLQJ7LPH¿QLVKHV
1:00AM 2:00AM
1:00AM 2:00AM
Advances 1 hour.
Rewinds 1 hour.
* You can also use SLEEP on your remote control for this
function.
$
• You must start SETUP (see page 15) after performing ResetAll.
$
• Custom label is limited to 8 characters.
27
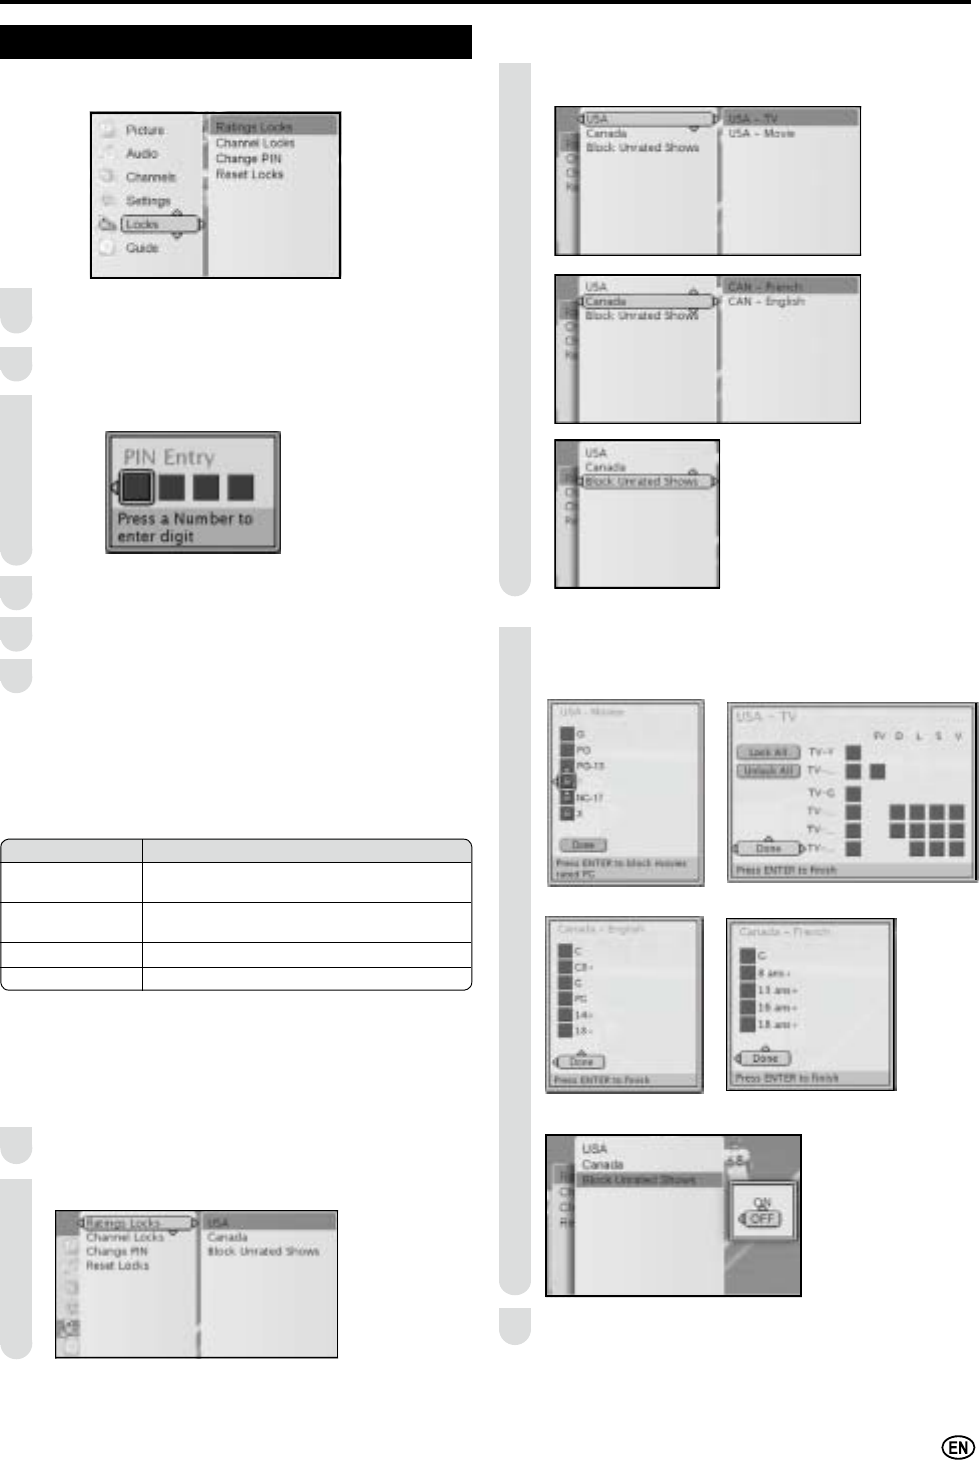
Basic Adjustment Settings (Continued)
You can adjust the Locks settings to your preference
with the following items.
Press MENU on the remote control to display the locks
menu screen.
Press / to select the “Locks” menu and press
ENTER.
Enter 4-digit PIN number to enter "Locks" menu.
Press / to select the desired menu item.
Press ENTER to select the menu item.
Press MENUWRH[LWDIWHU¿QLVKDGMXVWPHQW
Locks
1
2
3
4
5
6
$
•You must enter 4-digit PIN number to enter "Locks"
menu.
•The factory preset value for PIN number is 0000.
Selected item Description
Rating Locks Set restriction of TV programs with Rating
Locks
Channel Locks Set restriction of TV programs with Channel
Locks
Change PIN Edit PIN number
Reset Locks Reset Locks settings
Press / to select the desired item, and press
ENTER.
Press //?/_to select the desired item, press
ENTER to select Lock.
USA Movie USA TV
Canada - English Canada - French
Block Unrated Shows
Press MENU WRH[LWDIWHU¿QLVKDGMXVWPHQW
4
3
5
Rating Locks (V-CHIP Settings)
Enter Locks menu.
Press / to select Ratings Locks.
1
2
28
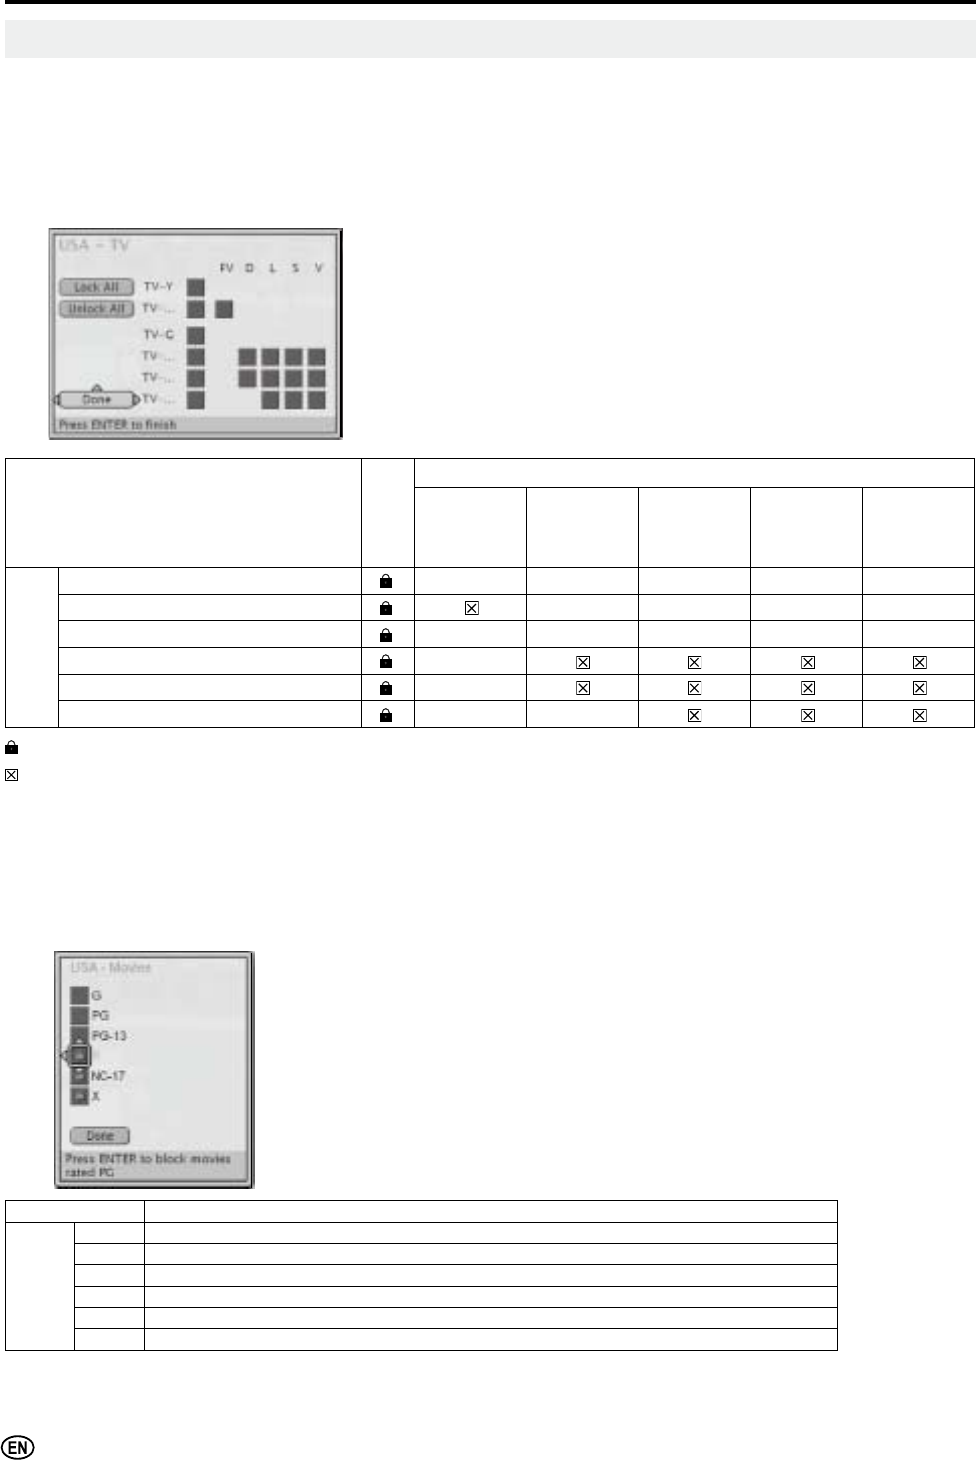
Basic Adjustment Settings (Continued)
Rating Locks (V-CHIP Settings) (Continued)
• This function allows TV programs to be restricted and TV usage to be controlled based on FCC data. It prevents children from watching
violent or sexual scenes that may be harmful.
• Restriction of TV programs includes two ratings that contain information about the program: the MPAA (Motion Picture Association of
America) rating and the TV Parental Guidelines. The MPAA rating is restricted by age. TV Parental Guidelines are restricted by age and
content.
• Since a TV program may use either the MPAA rating or the TV Guidelines, both should be adjusted for complete control.
USA TV (USA Parental Guide)
Rating Lock
content-based
FV
(Fantasy
Violence)
D
(Sexually
Suggestive
Dialog)
L
(Adult
Language)
S
(Sexual
Situation)
V
(Violence)
age-
based
TV-Y (All children) X X X X X
TV-Y7 (Direct to Older Children) X X X X
TV-G (General Audience) X X X X X
TV-PG (Parental Guidance Suggested) X
TV-14 (Parents Strongly Cautioned) X
TV-MA (Mature Audience Only) X X
: Select to block rating or undesired content.
: The content will be blocked if Lock is selected. You can manually set content to be unblocked.
X : The content will be blocked if Lock is selected. You can not manually set content to be unblocked.
$
$JHEDVHGUDWLQJVFDQEHPRGL¿HGE\WKHFRQWHQWEDVHGUDWLQJVEXWRQO\LQWKHFRPELQDWLRQVLQGLFDWHGE\UHGORFNVLQWKHWDEOHDERYH
• Choosing a lower age-based rating blocks the higher age-based ratings regardless of content rating settings.
• If you set TV-Y or TV-Y7 to BLOCK, BLOCK CONTENT will display all items.
USA Movie (MPAA rating)
Rating Description
age-
based
G GENERAL AUDIENCES. All ages admitted.
PG PARENTAL GUIDANCE SUGGESTED. Some material may not be suitable for children.
PG-13 PARENTS STRONGLY CAUTIONED. Some material may be inappropriate for children under 13.
R RESTRICTED. Under 17 requires accompanying parent or adult guardian.
NC-17 NO ONE 17 AND UNDER ADMITTED.
X;LVDQROGHUUDWLQJWKDWLVXQL¿HGZLWK1&EXWPD\EHHQFRGHGLQWKHGDWDRIROGHUPRYLHV
$
• The MPAA rating is only age-based.
29
Basic Adjustment Settings (Continued)
Canadian Rating Systems
• The TV rating systems in Canada are based on the Canadian Radio-Television and Telecommunications
Commission (CRTC) policy on violence in television programing.
• While violence is the most important content element to be rated, the structure developed takes into consideration
other program content like language, nudity, sexuality and mature themes.
• When setting the V-CHIP on the Canadian system you can choose either the Canadian English ratings or the
Canadian French ratings.
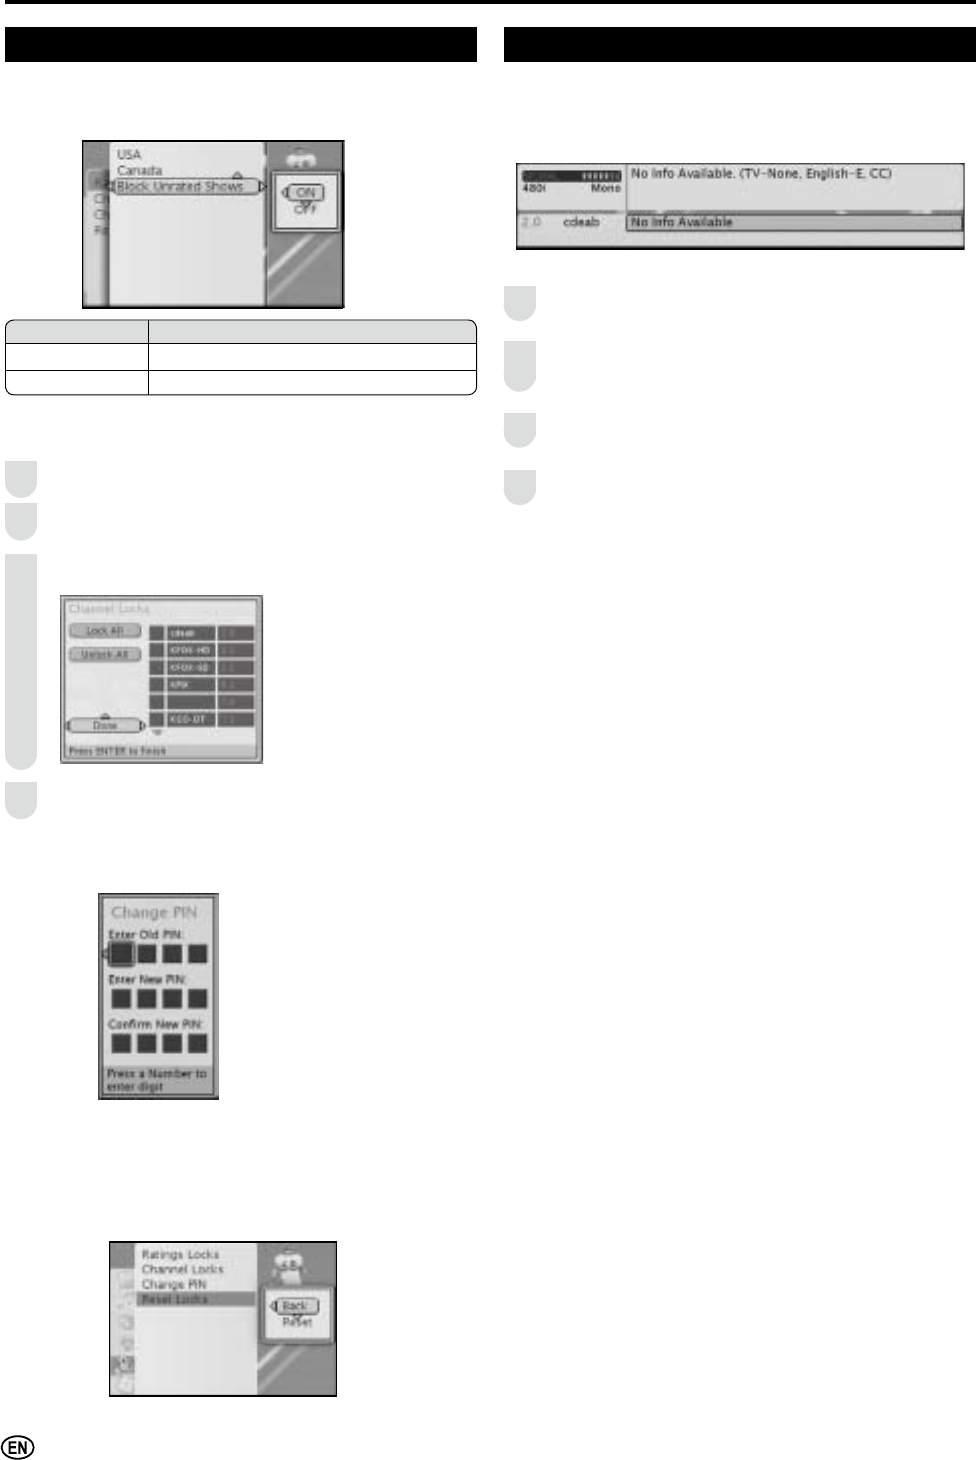
Canada-English (Canadian English ratings)
Rating Description
age-based
CChildren: Intended for younger children under the age of 8 years. Pays careful attention to
themes that could threaten their sense of security and well-being.
C8H
Children over 8 years old: Contains no portrayal of violence as the preferred, acceptable,
RURQO\ZD\WRUHVROYHFRQÀLFWQRUHQFRXUDJHFKLOGUHQWRLPLWDWHGDQJHURXVDFWVZKLFKWKH\
may see on the screen.
GGeneral: Considered acceptable for all age groups. Appropriate viewing for the entire family,
contains very little violence, physical, verbal or emotional.
PG Parental Guidance: Intended for a general audience, but may not be suitable for younger
children (under the age of 8) because it could contain controversial themes or issues.
14H
Over 14 Years: Could contain themes where violence is one of the dominant elements of the
storyline, but it must be integral to the development of plot or character. Language usage
could be profane and nudity present within the context of the theme.
18H
Adults: Intended for viewers 18 years and older and might contain depictions of violence,
which while related to the development of plot, character or themes, are intended for adult
viewing. Could contain graphic language and portrayals of sex and nudity.
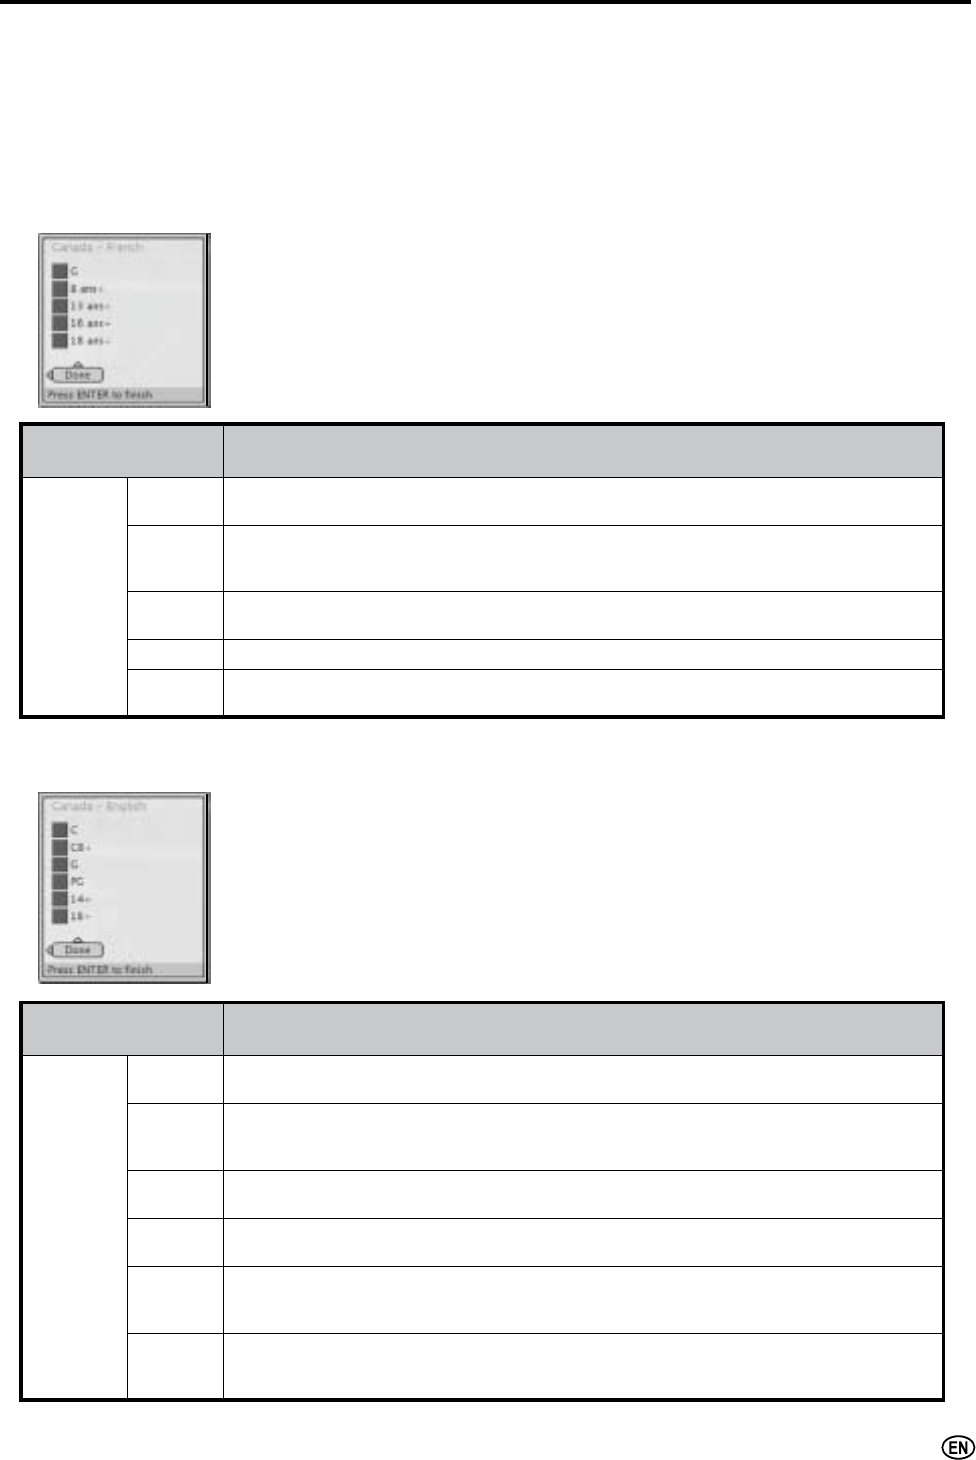
Canada-French (Canadian French ratings)
Rating Description
age-based
GGeneral: All ages and children, contains minimal direct violence, but may be integrated into
the plot in a humorous or unrealistic manner.
8 ansH
General but inadvisable for young children: May be viewed by a wide public audience,
but could contain scenes disturbing to children under 8 who cannot distinguish between
imaginary and real situations. Recommended for viewing with parent.
13 ans HOver 13 years: Could contain scenes of frequent violent scenes and therefore recommended
for viewing with parent.
16 ansHOver 16 years: Could contain frequent violent scenes and intense violence.
18 ansHOver 18 years: Only for adult viewing. Could contain frequent violent scenes and extreme
violence.
30
Basic Adjustment Settings (Continued)
Locks (Continued)
Block Unrated Shows
This function allows you to set restriction to block unrated TV
programs.
Reset Locks
Reset locks settings to factory preset values.
Change PIN
Edit PIN to the desired 4-digit number.
$
•The factory preset value for PIN number is 0000.
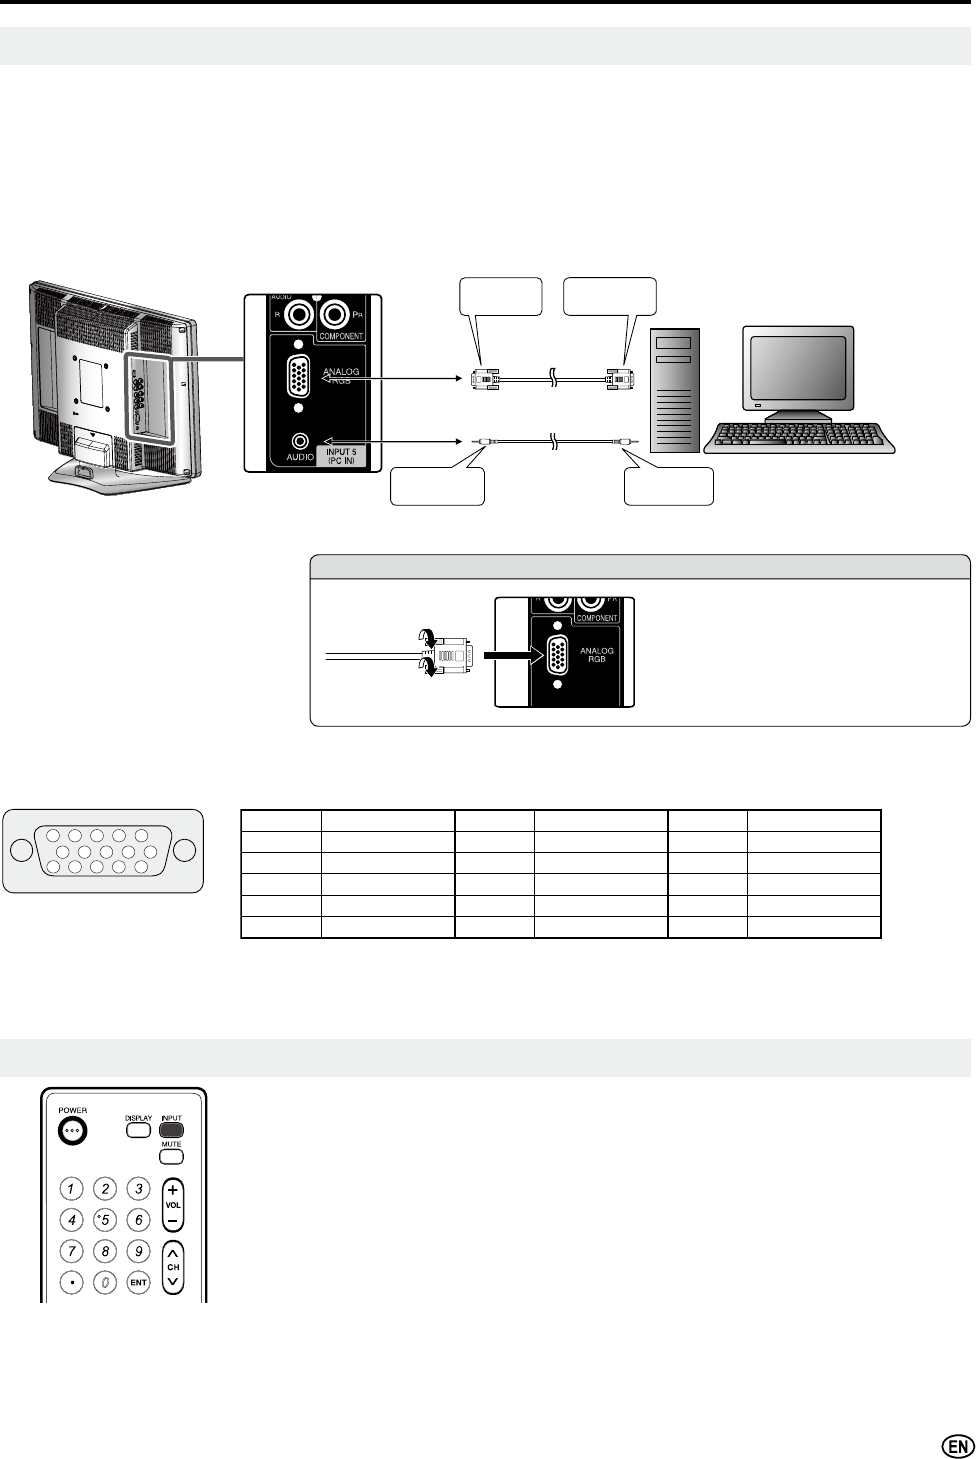
Channel Locks
Enter Locks menu.
Press / to select Channel Locks and press
ENTER.
Press / to select the desired channel, and press
ENTER to block the channel.
Press MENU WRH[LWZKHQ¿QLVK
1
2
3
4
Selected item Description
ON Block all unrated TV programs
OFF No TV program will be blocked
Guide
Display TV channel and TV program information on
screen.
<<Example:>>
Press MENU on the remote control to display the menu
screen.
Press / to select the “Guide” menu and press
ENTER. TV Channel Information window will appear on
screen.
Press ENTER again. TV Program Information window
will appear on screen.
Press ENTER again. The information windows will
disappear.
2
3
4
1
31
Viewing an Image from a PC
Use the INPUT 5 (PC) terminal to connect a PC.
$
• The PC input terminals are DDC1/2B-compatible.
•Refer to P. 2 1 for a list of PC signals compatible with the System.
• Make sure to select the same signal values for the output signal of a PC and the input signal of the LCD TV set before connecting with
the PC. (See P. 21)
• Depending on the PC being used, images may not be shown without converting the output signals into external output. Please refer to
your PC’s manuals regarding converting to external output.
Connecting a PC
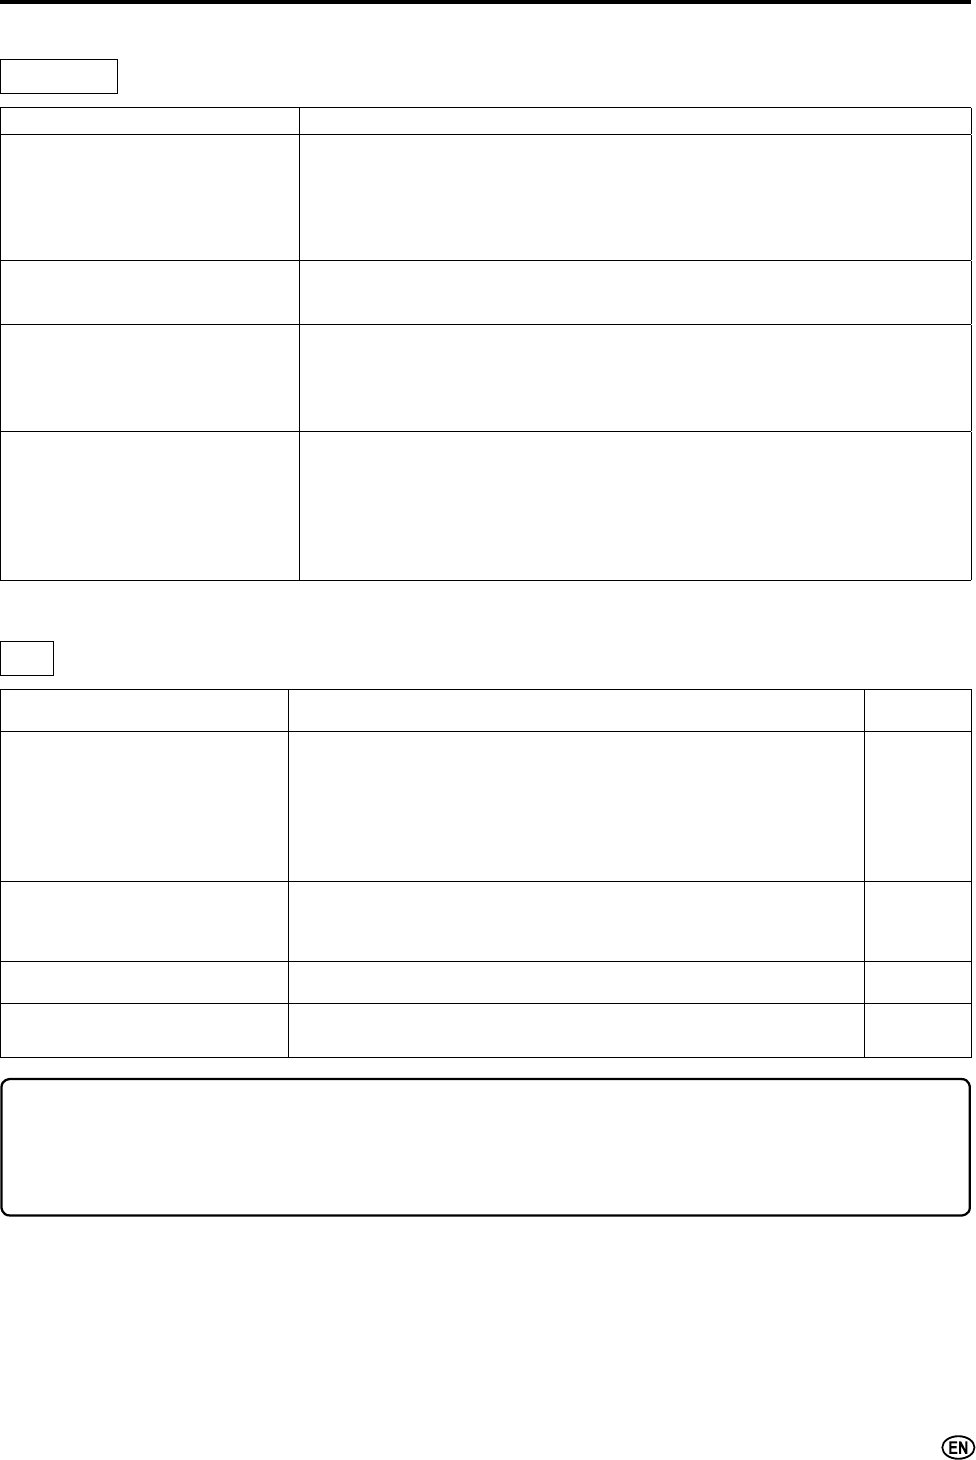
Signal names for 15-pin mini D-sub connecter
15 14 13 12
9
11
10
876
54 3 21Pin No.Signal namePin No.Signal namePin No.Signal name
RGND (Ground) TNot connected
GGND (Ground) ZSDA
BGND (Ground) HHD
Not connected +5V UVD
CSYNC GND (Ground) WSCL
$
• Pin No. 5 is not used for inputting the signal.
• Pin No. 9 is not connected with the supplied RGB cable.
Displaying an Image from a PC
Connecting the RGB cable
• Connect the RGB cable making sure
WKDWLW¿WVFRUUHFWO\LQWRWKHWHUPLQDO
7KHQ¿UPO\VHFXUHWKHFRQQHFWRUV
by tightening the screws on both
sides of the plug.
To view an image from a PC, perform the following procedure.
Select the INPUT5 mode using INPUT on the remote control or the LCD TV set.
(See P. 16)
Select the PC input signal. (See P. 21)
Adjust the “Auto SYNC.” items if the PC image does not come in clearly. (See P. 21)
PC
RGB cable
(commercially available)
To AUDIO
input terminal
To Audio output
terminal
To ANALOG
RGB terminal
To ANALOG RGB
output terminal
ø 3.5 mm stereo minijack cable
(commercially available)

32
Troubleshooting
ƇBefore calling for repair services, make the following checks for possible remedies to the encountered symptoms.
Problem Check item Reference page
There is no
picture or
sound.
• Make sure the AC cord is properly inserted in the power
outlet.
• Reception other than those of broadcasting stations can
be considered.
• Make sure the input mode is set to TV.
• Make sure the POWER switch of the main unit is on.
10
–
16
16
There is no
picture.
There is no
picture from
INPUT1/2/3/4.
• Make sure the Brightness is properly adjusted.
• Fluorescent lamp may have reached the end of service
life.
19
34
There is no
sound.
• Make sure the volume is not set to minimum.
• Make sure the sound is not set to mute.
• Make sure that headphones are not connected.
16
16
11
There is no
picture or
sound, just
noise.
• Make sure the antenna cable is properly connected.
• Bad reception could be the problem.
9, 10
–
Picture is not
clear.
• Make sure the antenna cable is properly connected.
• Bad reception could be the problem.
9, 10
–
Picture is light
or improperly
tinted.
• Check Color Settings. 19
The picture is
too dark.
• Check Brightness, Contrast and Backlight Settings.
• Fluorescent lamp may have reached the end of service
life.
19
34
Remote control does not work.
• Check the batteries of the remote control.
• Make sure the remote sensor window is not in strong
lighting.
8
8
Unit cannot be operated.
([WHUQDOLQÀXHQFHVVXFKDVOLJKWQLQJVWDWLFHOHFWULFLW\
etc., may cause improper operation. In this case,
RSHUDWHWKHXQLWDIWHU¿UVWWXUQLQJWKHSRZHURIIRU
unplugging the AC cord and re-plugging it in 1 or 2
minutes.
–
Sound Picture
Picture
LCD TV set
33
Troubleshooting (Continued)
Problem Check item Reference
page
There is no image.
• Make sure the RGB cable is properly connected.
• Make sure the output signal of the PC and the input signal
setting of the LCD TV set are matched.
• Some software prohibit video playback on an external display
when playing back a video with a notebook PC. This is not
attributable to a problem with the LCD TV set.
31
31
–
There is no sound.
• Make sure the PC audio cable is properly connected.
• Check if the mute function activates, or if the volume is set to
minimum.
31
16
The text is blurred. • Adjust “Phase” using the Auto Sync menu. 21
The image is not displayed in
the center of the screen.
• Adjust “Horizontal position” and “Vertical position” using the
Auto Sync menu. 21
ƇBefore calling for repair services, make the following checks for possible remedies to the encountered symptoms.
Problem Check item
The picture is not sharp.(NTSC)
The picture moves.(NTSC)
The picture have block
noise. (ATSC)
The audio sound is
discontinuous.
• The reception may be weak.
• The quality of the broadcast may also be bad.
• Make sure the antenna is facing the right direction.
• Make sure the outside antenna is connected.
The picture is doubled or
tripled. • Make sure the antenna is facing the right direction.
7KHUHPD\EHUHÀHFWHGHOHFWULFZDYHVIURPPRXQWDLQVRUEXLOGLQJV
The picture is spotted.
• There may be interference from automobiles, trains, high voltage lines,
neon lights, etc.
• There may be interference between the antenna cable and AC cord. Try
positioning them further apart.
There are stripes on the screen
or colors fade.
• Is the unit receiving interference from other devices?
Transmission antennas of radio broadcasting stations, transmission
antennas of amateur radios and cellular phones may also cause
interference.
• Use the unit as far apart as possible from devices that may cause
possible interference.
ƇCautions regarding use in high and low temperature environments
:KHQWKHXQLWLVXVHGLQDORZWHPSHUDWXUHVSDFHHJURRPRI¿FHWKHSLFWXUHPD\OHDYHWUDLOVRUDSSHDUVOLJKWO\GHOD\HG7KLVLVQRW
a malfunction, and the unit will recover when the temperature returns to normal.
• Do not leave the unit in a hot or cold location. Also, do not leave the unit in a location exposed to direct sunlight or near a heater, as
this may cause the cabinet to deform and the LCD panel to malfunction.
Storage temperature: –4°F to +140°F (–20°C to +60°C)
Antenna
PC
34
Troubleshooting (Continued)
6SHFL¿FDWLRQV
Items Model LC-20SH21U
LCD panel 20" BLACK TFT LCD TN
Number of dots 3,147,264 dots WXGA
Video color systems N358 only
TV function
TV Standard (CCIR) NTSC-M, ATSC, clear-QAM
TV Tuning System PLL 181 ch.
STEREO MTS+SAP
CATV 125 ch.
Y/C FILTER 3D adaptive comb FILTER
Lamp life (Fluorescent lamp) 50,000 hours*
$XGLRDPSOL¿HU 2.5 W u 2
Speakers 243
/
64 u 25
/
64 in. (ø5 cm), 2 pcs.
Terminals
INPUT1 AUDIO-IN, VIDEO-IN, S-VIDEO-IN
INPUT2 AUDIO-IN, VIDEO-IN
INPUT3 AUDIO-IN, COMPONENT-IN
INPUT4 HDMI-IN with HDCP (640 u 480, 480P, 720P, 1080I), AUDIO IN
INPUT5 PC Connector: 15-pin mini D-sub PC AUDIO: Mini-jack for stereo (ø3.5 mm)
ANALOG AUDIO OUT AUDIO-OUT
DIGITAL AUDIO OUT OPTICAL AUDIO-OUT
Antenna F-Type
Headphone Mini-jack for stereo (ø3.5 mm)
OSD language English/Spanish/French
Power supply AC 120V, 60Hz
Power consumption 70 W (0.5 W standby): AC 120V
Weight Display only 12.10 lbs./5.5 kg
Display with stand 14.10 lbs./6.4 kg
Operating temperature +32°F to +104°F (0°C to +40°C)
* Typical time for power output decrease of about one-half assuming continuous use in a room with normal lighting, normal brightness and
temperature at 77°F/25°C
Dimensional Drawings
• The dimensional drawings are shown on the inside back cover.
Ƈ$VDSDUWRISROLF\RIFRQWLQXRXVLPSURYHPHQW6+$53UHVHUYHVWKHULJKWWRPDNHGHVLJQDQGVSHFL¿FDWLRQFKDQJHVIRUWKH/&'79VHW
LPSURYHPHQWZLWKRXWSULRUQRWLFH7KHSHUIRUPDQFHVSHFL¿FDWLRQ¿JXUHVLQGLFDWHGDUHQRPLQDOYDOXHVRISURGXFWLRQXQLWV7KHUHPD\EH
some deviations from these values in individual units.

35
CONSUMER LIMITED WARRANTY
6+$53(/(&7521,&6&25325$7,21ZDUUDQWVWRWKH¿UVWFRQVXPHUSXUFKDVHUWKDWWKLV6KDUSEUDQGSURGXFW
(the “Product”), when shipped in its original container, will be free from defective workmanship and materials, and
agrees that it will, at its option, either repair the defect or replace the defective Product or part thereof with a new or
remanufactured equivalent at no charge to the purchaser for parts or labor for the period(s) set forth below.
This warranty does not apply to any appearance items of the Product nor to the additional excluded item(s) set forth
below nor to any Product the exterior of which has been damaged or defaced, which has been subjected to improper
YROWDJHRURWKHUPLVXVHDEQRUPDOVHUYLFHRUKDQGOLQJRUZKLFKKDVEHHQDOWHUHGRUPRGL¿HGLQGHVLJQRUFRQVWUXFWLRQ
In order to enforce the rights under this limited warranty, the purchaser should follow the steps set forth below and
provide proof of purchase to the servicer.
The limited warranty described herein is in addition to whatever implied warranties may be granted to purchasers by
law. ALL IMPLIED WARRANTIES INCLUDING THE WARRANTIES OF MERCHANTABILITY AND FITNESS FOR
USE ARE LIMITED TO THE PERIOD(S) FROM THE DATE OF PURCHASE SET FORTH BELOW. Some states do
not allow limitations on how long an implied warranty lasts, so the above limitation may not apply to you.
Neither the sales personnel of the seller nor any other person is authorized to make any warranties other than those
described herein, or to extend the duration of any warranties beyond the time period described herein on behalf of Sharp.
The warranties described herein shall be the sole and exclusive warranties granted by Sharp and shall be the sole and
exclusive remedy available to the purchaser. Correction of defects, in the manner and for the period of time described
KHUHLQVKDOOFRQVWLWXWHFRPSOHWHIXO¿OOPHQWRIDOOOLDELOLWLHVDQGUHVSRQVLELOLWLHVRI6KDUSWRWKHSXUFKDVHUZLWKUHVSHFW
to the Product, and shall constitute full satisfaction of all claims, whether based on contract, negligence, strict liability
or otherwise. In no event shall Sharp be liable, or in any way responsible, for any damages or defects in the Product
which were caused by repairs or attempted repairs performed by anyone other than an authorized servicer. Nor shall
Sharp be liable or in any way responsible for any incidental or consequential economic or property damage. Some
states do not allow the exclusion of incidental or consequential damages, so the above exclusion may not apply to
you.
THIS WARRANTY GIVES YOU SPECIFIC LEGAL RIGHTS. YOU MAY ALSO HAVE OTHER RIGHTS WHICH
VARY FROM STATE TO STATE.
0RGHO6SHFL¿F6HFWLRQ
Your Product Model Number & Description:
Warranty Period for this Product:
Additional Item(s) Excluded from
Warranty Coverage (if any):
Where to Obtain Service:
What to do to Obtain Service:
LC-20SH21U LCD Color Television
(Be sure to have this information available when you need ser-
vice for your Product.)
One (1) year parts and ninety (90) days labor from the date of
purchase.
Non-rechargeable batteries.
From a Sharp Authorized Servicer located in the United States.
7R¿QGWKHORFDWLRQRIWKHQHDUHVW6KDUS$XWKRUL]HG6HUYLFHU
call Sharp toll free at 1-800-BE-SHARP.
Ship prepaid or carry in your Product to a Sharp Authorized
Servicer. Be sure to have Proof of Purchase available. If you
ship the Product, be sure it is insured and packaged securely.
For location of the nearest Sharp Authorized Service, or to obtain product literature, accessories, supplies, or
customer assistance, please call 1-800-BE-SHARP.
LIMITED WARRANTY
TO OBTAIN PRODUCT INFORMATION, CALL 1-800-BE-SHARP OR VISIT www.sharpusa.com
SHARP ELECTRONICS CORPORATION
Sharp Plaza, Mahwah, New Jersey 07430-2135
SHARP CORPORATION
Calling for Service

36
LIMITED WARRANTY
Consumer Electronics Products
Congratulations on your purchase!
Sharp Electronics of Canada Ltd. (hereinafter called “Sharp”) gives the following express warranty to the first consumer purchaser for this
Sharp brand product, when shipped in its original container and sold or distributed in Canada by Sharp or by an Authorized Sharp Dealer:
Sharp warrants that this product is free, under normal use and maintenance, from any defects in material and workmanship. If any such
defects should be found in this product within the applicable warranty period, Sharp shall, at its option, repair or replace the product as
specified herein.
This warranty shall not apply to:
(a) Any defects caused or repairs required as a result of abusive operation, negligence, accident, improper installation or inappropriate
use as outlined in the owner’s manual.
(b) Any Sharp product tampered with, modified, adjusted or repaired by any party other than Sharp, Sharp’s Authorized Service Centres
or Sharp’s Authorized Servicing Dealers.
(c) Damage caused or repairs required as a result of the use with items not specified or approved by Sharp, including but not limited to
head cleaning tapes and chemical cleaning agents.
(d) Any replacement of accessories, glassware, consumable or peripheral items required through normal use of the product including but
not limited to earphones, remote controls, AC adapters, batteries, temperature probe, stylus, trays, filters, belts, ribbons, cables and
paper.
(e) Any cosmetic damage to the surface or exterior that has been defaced or caused by normal wear and tear.
(f) Any damage caused by external or environmental conditions, including but not limited to transmission line/power line voltage or liquid
spillage.
(g) Any product received without appropriate model, serial number and CSA/cUL markings.
(h) Any products used for rental or commercial purposes.
(i) Any installation, setup and/or programming charges.
Should this Sharp product fail to operate during the warranty period, warranty service may be obtained upon delivery of the Sharp product
together with proof of purchase and a copy of this LIMITED WARRANTY statement to an Authorized Sharp Service Centre or an
Authorized Sharp Servicing Dealer. In home warranty service may be provided at Sharp’s discretion on any Sharp television with the
screen size of 27” or larger and on any Sharp Over-the-Range Microwave Oven.
This warranty constitutes the entire express warranty granted by Sharp and no other dealer, service centre or their agent or employee is
authorized to extend, enlarge or transfer this warranty on behalf of Sharp. To the extent the law permits, Sharp disclaims any and all
liability for direct or indirect damages or losses or for any incidental, special or consequential damages or loss of profits resulting from a
defect in material or workmanship relating to the product, including damages for the loss of time or use of this Sharp product or the loss
of information. The purchaser will be responsible for any removal, reinstallation, transportation and insurance costs incurred. Correction of
defects, in the manner and period of time described herein, constitute complete fulfillment of all obligations and responsibilities of Sharp
to the purchaser with respect to the product and shall constitute full satisfaction of all claims, whether based on contract, negligence, strict
liability or otherwise.
WARRANTY PERIODS: Parts & Labour (exceptions noted)
Audio Products 1 year
Camcorder 1 year
DVD Products 1 year
Projector 1 year (lamp 90 days)
LCD & Plasma Display TV 1 year
Microwave Oven 1 year (magnetron component-4 additional years)
Television Products 1 year (picture tube component-1 additional year)
VCR Products 1 year
Vacuum Cleaner 1 year
To obtain the name and address of the nearest Authorized Sharp Service Centre or Dealer, please contact:
SHARP ELECTRONICS OF CANADA LTD. 335 Britannia Road East, Mississauga, Ontario L4Z 1W9
For more information on this Warranty, Sharp Extended Warranty
Offers, Sharp Canada Products, Accessory Sales, Dealer or Service
Locations, please call (905) 568-7140
Visit our Web site: www.sharp.ca
VALID IN CANADA ONLY
Revision 04/22/03
