Sharper Image 205896
User Manual: Sharper Image Micro Plus 3-D Printer @ Sharper Image
Open the PDF directly: View PDF ![]() .
.
Page Count: 10
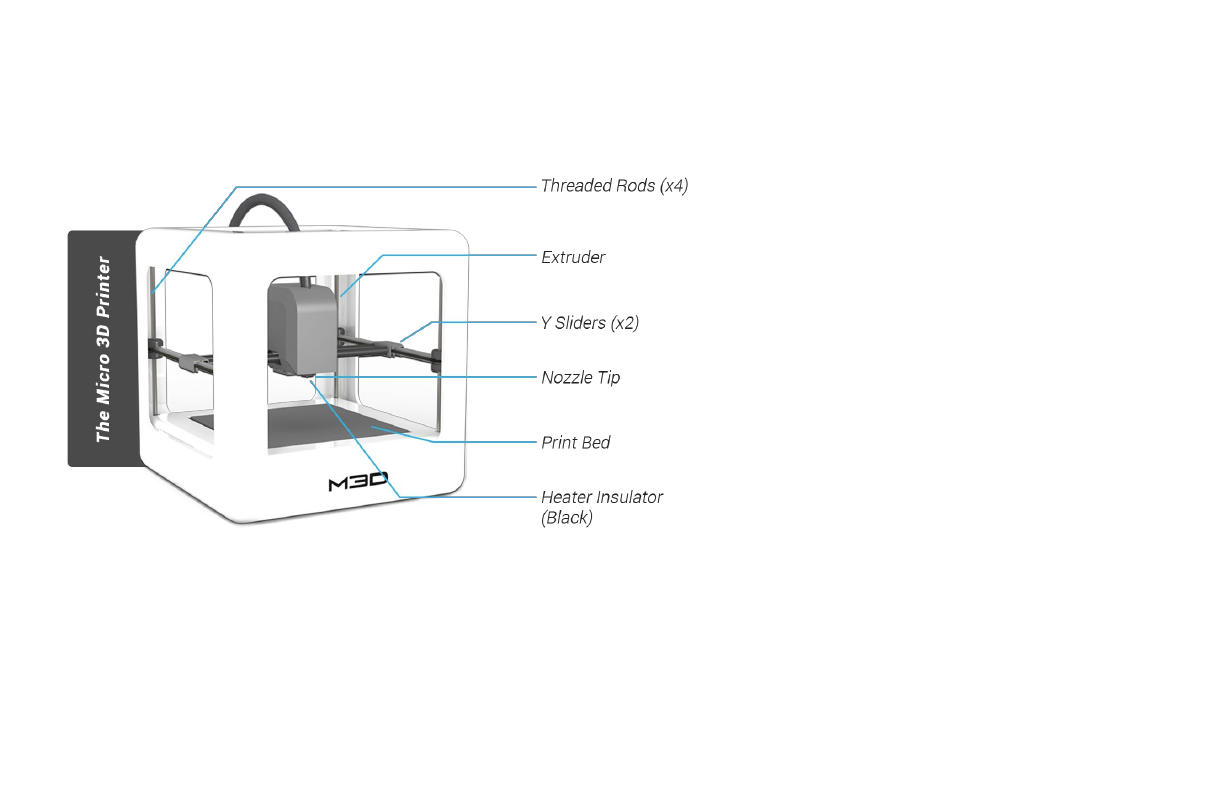
The Micro+ 3D Printer User Manual
Welcome to 3D Printing! Thank you for purchasing The Micro+ 3D Printer, the first truly consumer 3D printer. The Micro+ is ready right out
of the box to make your custom creations come to life. Just plug in the printer, download the models, hit print, and watch as you bring an object into the
world through 3D printing. Let’s see what you print!
Specifications
Lower Build Volume: 110 mm x 107 mm x 73.5 mm
Upper Build Volume: 80 mm x 68 mm x 38 mm Layer
Resolution: 50 to 350 Microns
Filament Diameter: 1.75 mm
Nozzle Diameter: 0.35 mm
Layer Thickness: 0.05 mm
Speed: Up to 55 mm/s
Position Precision: XY - 15 microns; Z - 3 Microns
Software: M3D
Supported File Types: .STL and .OBJ System
Compatibility: Windows/Mac/Linux
Power Supply: 20W UL/CE listed power supply USB: 2.0
or above
Weight: 2.0 lbs
www.PrintM3D.com
Visit and explore our website for new content,
features, and news related to The Micro+!
www.PrintM3D.com/Downloads
Find new software, 3D models, and in-depth
documentation.
www.PrintM3D.com/Support
View our expansive customer support network,
technical articles, and FAQ.
This Manual is subject to change. For updated specifications, languages, and information visit www.printM3D.com/support.
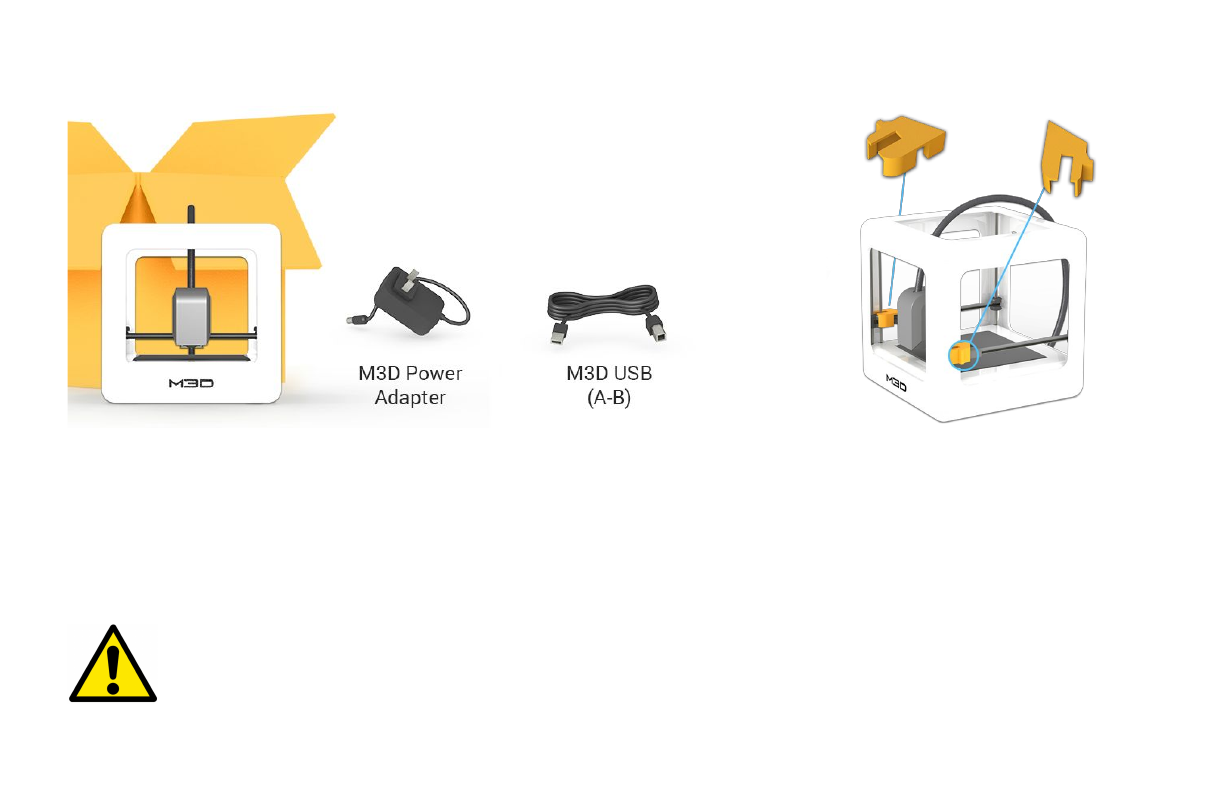
1.0 Unboxing The Micro+
1. Lift The Micro+ from its packaging box. Remove all bubble wrap, foam, and tape (may
require scissors).
2. Inside The Micro+ is an accessories box with a USB A-B cable and your country
specific power supply.
Be sure to remove the “Gantry Clips” located
on the front left and front right corners of the
printer.
Safety Considerations
Caution: Hot! Keep your fingers away from the Nozzle Tip and Black Insulator when the printer is on as these areas reach
temperatures over 200 degrees Celsius. Always be sure to keep your hands away from moving parts when The Micro+ is in operation.
2.0 Downloading M3D Software
1. Please visit http://www.PrintM3D.com/downloads to download your Operating
System specific M3D Software. Download the M3D Software to a known location,
like your Desktop. Run the installer and continue through all windows and
prompts.
2. Run the M3D Software after it has fully installed. Your computer is now ready to
automatically detect any M3D printers that are connected.
3. Please allow your printer to update to the most recent firmware. DO NOT turn
off your printer or computer during firmware and software updates.
*Turn Windows Automatic Updates to Inform Only* When
running a Windows PC, turn Automatic Updates to “Check for
updates, but let me choose whether to download and install
them” from the Control Panel; this will prevent Windows
Automatic Updates from restarting your computer (resulting
in a print failure) while The Micro+ is in operation.
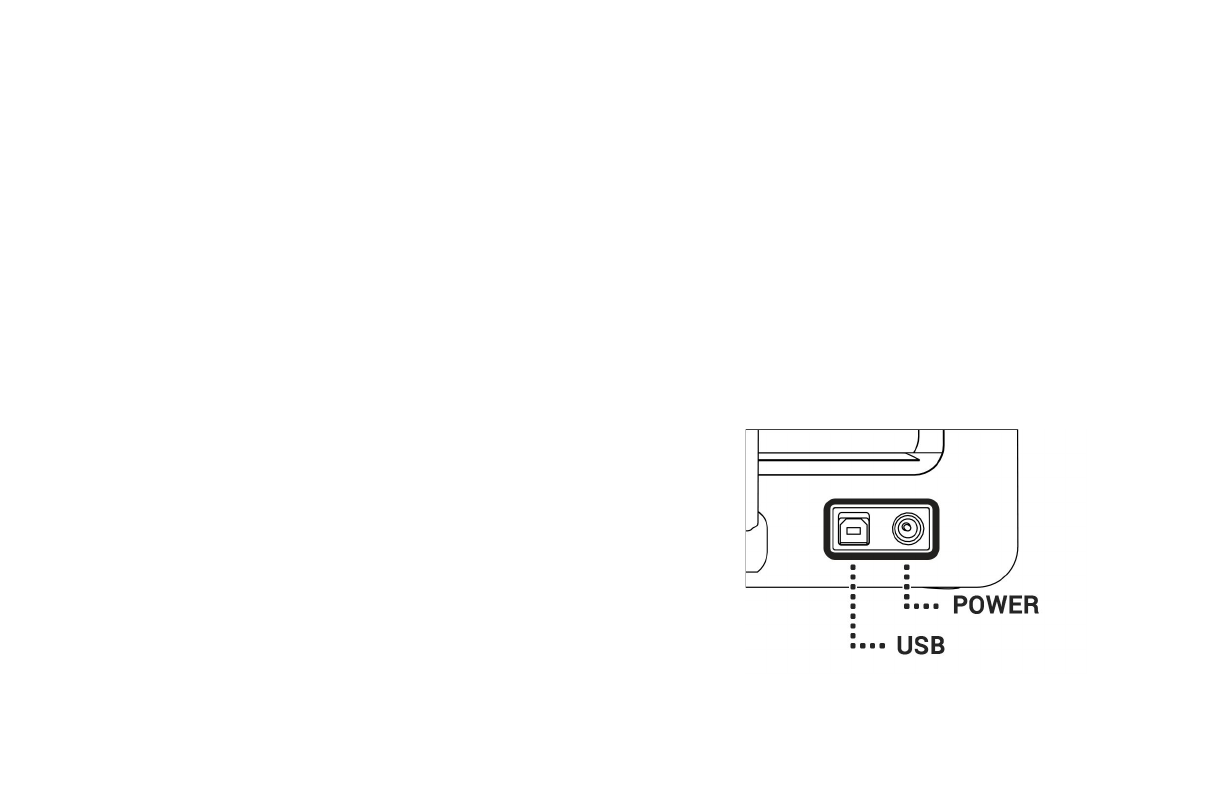
3.0 Connect and Power The Micro+
1. Insert the provided M3D USB cable into the USB port at the back of the printer.
2. Insert the other end of the USB cable into an available USB port on your computer . If you
have issues with USB 3.0, go to our support page at www.PrintM3D.com/support a nd
search “USB 3” for solutions.
3. Insert the provided genuine M3D power supply into the round hole on the back of the
printer. DO NOT use another power supply!
4. Plug the country-specific external power supply into a wall socket, and the M3D logo on
the front of The Micro+ should light up.
Power Off* To power off The Micro+, disconnect the USB first. Then, wait at least 10
seconds before detaching the power supply from the back of the printer.
Figure. Rear view of The Micro+ showing the USB
and Power ports.
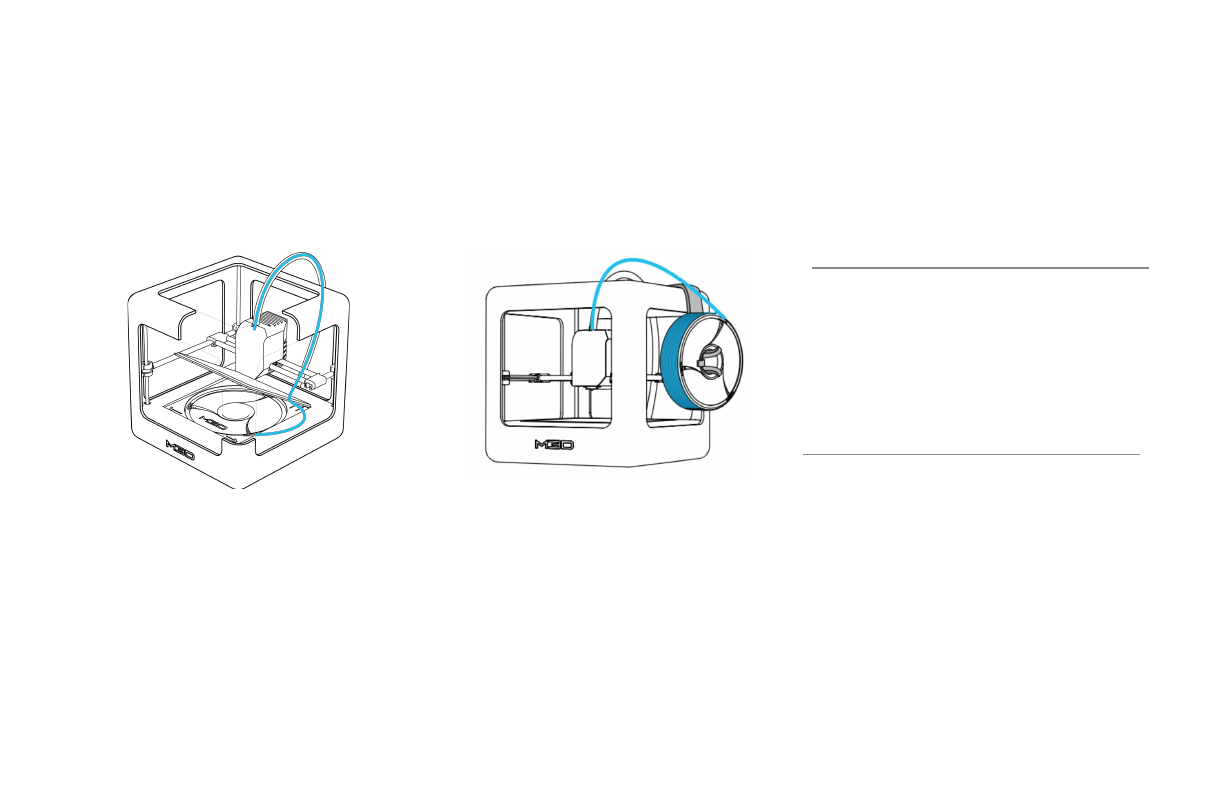
4.0 Installing 3D Ink (Filament)
Filament Installation is accessed by selecting the 3D Ink button in the top left
corner of the M3D Software. You will be guided to install filament Externally or
Internally. DO NOT attempt to load both ports at the same time during printing.
*NOTE Factory Filament *
There may be factory filament installed externally, let the
printer extrude this first and then insert your filament of
choice.
Internal Filament
Figure. Showing the filament path taken
when installing internal filament. The path
begins underneath the print bed through the
black filament tube.
External Filament
Figure. An example of an ideal external
filament path. External filament is installed
via the external feed port located at the top
of the extruder head. Always keep a clear
path between your filament spool and the
print head.
Notes for Loading Filament
In both scenarios, you need to feel the filament
“catch” the extruder gear. When you are loading
filament, apply constantforce on the filament to
push it forward into the extruder gear. A good way
to test if the filament is “caught” is to lightly pull
back and forth on the filament. If the filament does
not pull out, then you have engaged with the gear.
3D Ink Cheat Code
Your 3D Ink™ Cheat Code is written on the
front of your Micro+ Spool. If it is not, you
can type in either ABS or PLA depending on
which filament type you are using.
5.0 The First Print!
1. Quick Calibrate
Often a successful first print layer leads to a
successful print! To be sure your printer is
ready for its first print, select the Gear Icon to
open the printer settings. Then go to the
Calibration section where you can select
Advanced Calibration. Now select the
Recalibrate Bed Location button. This will begin
the Quick Calibration process, which should
take no more than 5 minutes.
*DO NOT TOUCH The Micro+ During
Calibration*
Keep the printer on a level/stable surface during any
calibration sequence. There is the option in the M3D
Software to manually adjust the calibration height of
your Micro. Please visit www.PrintM3D.com/
support for detailed videos and documents regarding
calibrating The Micro+.
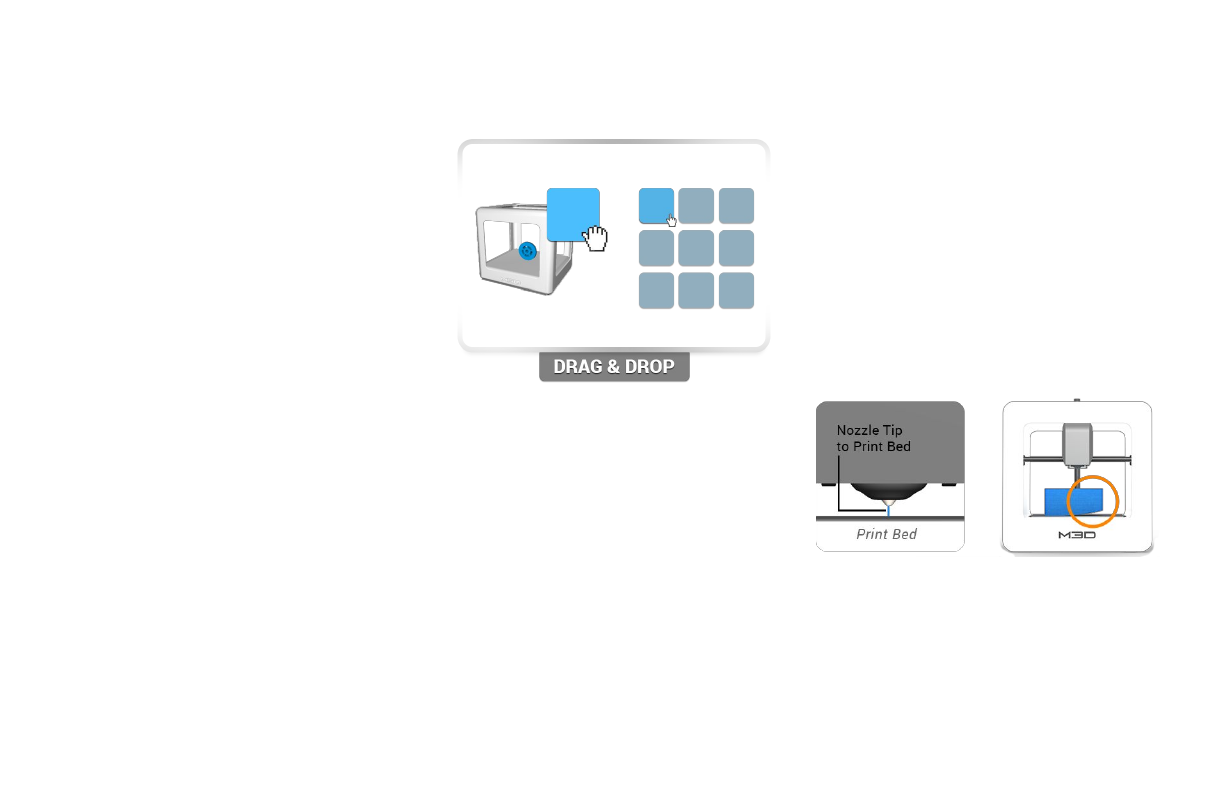
2. Load the First Model
Loading a model into the printer is
simple; just drag the model from the
Recent Models library to the printer. Your
first model is already loaded in the M3D
Software. We recommend printing this
model first as a test calibration.
Select the
Open Model
button in the top left
corner of the M3D Software to browse for
other 3D Models on your computer.
Other models can be downloaded from sites
like Thingiverse.com and Yeggi.com. These
files must be .STL or .OBJ file types.
3. Watch Your First MicroPrint!
Click the Green Button to open the print
settings menu and begin your first print. For
your first model, we have already
pre-loaded the best settings, so all you have
to do is press print!
*Look Out!*
We encourage you to get into the habit of
watching the first few layers of your print and
paying attention to two things:
Nozzle Height
Only a piece of paper
should fit between
the print bed and
nozzle tip. If not,
Recalibrate!
Peeling/Warp
You should typically
stop your print and
adjust the User
Offset Values in that
corner.
6.0 Troubleshooting
In the event of printer issues, visit the M3D support page online at http://www.PrintM3D.com/support. Search our technical articles, videos,
and documentation for troubleshooting solutions or contact customer support.
For additional language support please visit http://www.PrintM3D.com/support to find documentation in your language.
7.0 Print Settings
What is Print Quality?
Print Quality refers to the height of a layer. With higher quality prints you
will have smaller layer heights and longer print times.
What is Fill Density?
Fill Density of a print is the amount of filament printed inside the model
(the part of the model you do not see). A hollow print will have nothing on
the interior, it will weigh less but can be easier to break. A high density
print will weigh more, require more filament, but is stronger.
Can I adjust my model size, position, and orientation?
Yes, you can! To adjust models click on The Micro+ Printer to enter
adjustment mode. You will see a menu on your left where models can be
scaled, rotated, or moved by adjusting the options on the left. Models can
be scaled by all three dimensions simultaneously by using the right-mouse
button, individually adjusted using the scale bar, or manually entered into
the number box.
What is Support Material, and when should I have it turned on?
Support Material is needed when printing 3D models with overhangs. An
extreme case is if a sphere is floating in mid air in the 3D model, you would
turn support on in this situation to print the model properly.
I want faster prints; how do I do this?
Select the “Ultra Low” print quality and use “Hollow, Thick Walls” for your
Fill Density. Often these settings are great for printing models.
What is my Bed Location, and why should I care?
The bed location is the position of the Nozzle Tip relative to the Print Bed.
The printer needs to know where the print bed is when printing, otherwise
you could be printing in mid air or digging into your bed. Use the
Calibration Program to “Zero” the bed location. The “Zero” position is
when the nozzle tip is hovering just above the print bed, only a piece of
paper should slide between the nozzle tip and print bed. Good bed location
usually means good prints! If your first layer is lifting, often this means the
Bed Location is off.
Safety
SAFETY AND WARNINGS: CHOKING HAZARD - The Micro+3D Printer and its consumables may include small parts that may constitute a
choking hazard; additionally, these products may be used to manufacture objects that may themselves constitute a choking hazard. The
Micro+ 3D Printer is NOT A TOY; children under the age of 14 should use the product under adult supervision. CAUTION! The printhead,
exposed nozzle, extruded plastic, and areas near the nozzle may be extremely hot. Keep fingers away from the printhead and extruded
material unless it has been unplugged for at least 10 minutes. Use M3D’s products only as intended, as described by the user manual
and/or this agreement and/or described within the software. Use M3D’s products in a well-ventilated area. Do not leave M3D’s products
running while unattended. PRECAUTION - None of components of The Micro+ 3D Printer or parts printed from it or using M3D filaments
are certified for food safety nor should they be regarded as food-safe therefore should not come in contact with the mouth or
foods/liquids that will be ingested by humans or animals. PRECAUTION - None of components of The Micro+ 3D Printer or parts printed
from it should be used for medical applications, such as but not limited to implantation, drug delivery, or ingestion. PRECAUTION - If any
allergy develops as a result of direct or indirect contact using M3D’s products, or from the 3D printed objects, discontinue use
immediately. MAINTENANCE - After extended or improper use, the nozzle and/or its cover may need to be replaced or cleaned; the print
bed and/or the Buildtak sheets covering it may need to be replaced; the extruder may need to be purged or cleaned; and the filaments
may need to be purged or replaced. REPAIR/SERVICE: Repair/Service terms were provided to the purchasing customer in the customer
purchase agreement. This agreement may be found by logging into their user account at www.printm3d.com. All parts of the
Repair/Service section apply to the purchasing customer / first end-user and are non-transferrable. RETURNS: Return terms were
provided to the purchasing customer in the customer purchase agreement. This agreement may be found by logging into their user
account at www.printm3d.com. All parts of the Repair/Service section apply to the purchasing customer / first end-user and are
non-transferrable. All software sales or licenses are final, non-refundable, and/or non-transferrable.
PART REMOVAL: During part removal be mindful of your fingers when using sharp objects. M3D recommends removing the bed from the
printer when possible before attempting to remove a 3D printed object. For tips on removing 3D printed objects see the support page at
http://www.printM3D.com/support.
Legal Conditions
M3D END USER AGREEMENT: This agreement between M3D LLC (a company incorporated under
the laws of the State of Maryland in the United States), and you, the END-USER, which describes
important disclaimers, indemnity, safety instructions, software information, and limited warranty
information about its products and govern the conditions of use. PLEASE READ THESE TERMS
CAREFULLY as continuing this installation process and using M3D products and software indicates
agreement with these terms. You acknowledge that you have read and understand this agreement in
its entirety, and accept the terms of this end-user agreement.
INDEMNITY: You understand that 3D printers are an experimental technology and that they were
intended for use under the guidelines provided in the user manual and this agreement. You
understand and acknowledge that the user manual only describes the best practice for operating
The Micro 3D Printer, and that even the best practice for operating the printer is not always
presumed as safe. You agree to hold harmless and indemnify M3D from any personal injury that
results from using its products. You are responsible for any damage or injury that may occur as a
result of using M3D products. You understand and agree that M3D is not responsible for any injury,
damage and/or loss of accessories, components, consumables, and information that may occur
during the use of the product. You agree to hold harmless and indemnify M3D from any liabilities
that result from any of the following conditions: 1) modification of The Micro 3D Printer, its
consumables, and/or software; 2) use of third-party software; 3) use of any custom 3D models; 4)
use of third-party power supplies or USB cables; 5) use of third-party consumables such as print
beds, print bed surfaces sheets, print bed adhesives, and filaments; 6) use of The Micro 3D Printer
and/or its components in any way other than intended, as described in the user’s manual; 7)
operation of The Micro 3D Printer or use of M3D filaments; and 8) Printing of custom objects which
results in any physical hazard, legal suit, and/or intellectual property infringement. You agree that
there is no circumstance where M3D will be held liable for any damages, including but not limited to
loss of anticipated profits, business, opportunities, saving, or deals due to late delivery, performance
characteristics, repair, business interruption, or any other disapproval of M3D’s products or services.
You agree to hold harmless and indemnify M3D from having any additional responsibilities to
anyone other than you, the end-user.
INTELLECTUAL PROPERTY: M3D and its products and services include proprietary and privileged
information, also known as trade secrets. M3D® is a registered trademark of M3D LLC. Design and
utility patents pending.
CONDITIONS OF USE: You understand and acknowledge that the user manual for M3D’s products,
this end-user agreement, and the limited warranty may have been provided as a physical copy where
required by law, with the initial customer purchase. A digital copy of this agreement and the end-user
agreement can be found online at www.printm3d.com if you are not the purchasing customer.
Before attempting to use The Micro 3D Printer, you agree to read the Micro 3D Printer user manual,
which contains important disclaimers, warranty, and safety information. If you are not the
purchasing customer and first end-user, you must access a digital copy of the manual from our
website. All terms and conditions of this agreement are subject to change, such as may be
necessary by law. M3D reserves the right to log your acceptance of this agreement locally in your
computer or as needed and allowed by law. M3D Consumables will be made available by M3D and
its distributors. Any consumables included as part of an initial purchase does not imply inclusion of
those consumables with a future purchase. As an end-user, you agree that without the written
consent of M3D, you will not disassemble, decompile, modify, enhance, reverse engineer, or tamper
with, attempt to identify trade secrets, or attempt to circumvent safety features of M3D products
and software. M3D is bound by US law and cannot send its products to any customers in
embargoed locations, and individuals, entities, and corporations are screened against various export
enforcement, a.k.a. “blacklists.” This includes links or access to software products. If you are on the
blacklist, you must not accept this agreement.
SOFTWARE: M3D software will be included with a limited, non-exclusive license as part of each
purchase of a Micro 3D Printer. The M3D software is under development and is supported by M3D
through downloadable updates. Specifications of the printer and software functionality may be
expanded or modified by the software through updates. These include but are not limited to:
operating system functionality; printer speed; print quality; build volume; and print resolution and
accuracy. Software development updates are intended for ongoing product performance
improvement and may require temporary reversion to older performance parameters as other
features are tested, improved, or enabled. M3D reserves the right to contact our remote server in
future versions of the software for the purpose of comparing software versions and downloading
remote software updates. M3D software updates include firmware updates which may be pushed to
The Micro 3D Printer. The M3D software includes terms and agreements that differ from the
customer purchase agreement. The M3D software is proprietary and its design and contents are
protected by law. Attempts to deconstruct / reverse engineer the software are considered illegal as
provided by copyright law and fair use; trade secrets; patents pending; and additional local, state,
and federal laws where applicable. All parts of this section apply to any end-user and are fully
transferrable to any user.

www.printM3D.com
"M3D", 3D Ink, and Print Anything" are registered trademarks of
M3D LLC in Fulton, MD
