Sharper Image 205979
User Manual: Sharper Image Bluetooth VR Headset with Earphones @ Sharper Image
Open the PDF directly: View PDF ![]() .
.
Page Count: 8

Item No. 205979
BLUETOOTH VR HEADSET WITH EARPHONES
User’s Guide
- 1 -
HEADSET DIAGRAM
FEATURES
• Built-in Bluetooth wireless headphones with
immersive sound
• Fits smartphones with 4.7” to 6.2” (diagonal)
screens
• New and improved interactive gaming button
Thank you for purchasing the Sharper Image Bluetooth VR Headset with Earphones.
Please read this guide carefully and store for future reference.
Top View Bottom View
A. Adjustable Velcro and Nylon
headstrap
B. Built-in wireless headphones
C. Head cushion
D. Memory foam cushion
E. Adjustable foal point dial
• Built-in volume control and call answer
button
• Adjustable focal point and lens distance
• Comfortable, adjustable head strap
F. Adjustable lens distance knob
G. Next track button
H. Previous track button
I. Multifunction button
J. Enclosure release button
K. Smartphone enclosure
L. Adjustable volume dial
M. Interactive gaming button
N. Micro USB charge port
O. LED indicator light
- 2 -
CHARGING THE HEADSET
POWER ON / OFF
PAIRING THE DEVICE
The Bluetooth VR Headset with Earphones comes with a built-in rechargeable battery. Before using this
device for the first time, we recommend you charge the battery fully. Only use the supplied USB cable to
charge the device.
NOTE: When the battery is LOW, the red LED will flash and you will hear 3 tones every 20 seconds. When this
occurs, please charge the headset. (When using an iPhone, the top right corner will display the battery life.
NOTE: If pairing is unsuccessful, turn off the headset first and re-try the steps above. Once you have paired
the headset with a mobile device, the headset will remember the device and pair automatically when the
mobile device’s Bluetooth is activated and in range. You do not need to re-pair any previously connected
devices.
TIP: If you do not wish to use Bluetooth you can plug in the built-in 3.5mm auxiliary line in cable instead.
Simply press the volume button to switch between Bluetooth mode and auxiliary line in mode.
• Connect the USB side to a computer USB port and the Micro USB side to the charging jack of the
headset. The red LED will illuminate while the device is charging. When the battery is fully charged, the
LED will turn OFF.
• A full charge may take up to 2 hours.
• When the battery is fully charged, disconnect the charging cable. The device is now ready for use.
• Turn the power on by pressing and holding the multifunction button for 5 seconds, until the red and blue
LED flash alternately.
• To turn the power off, hold the multifunction button for 3 seconds, until the red and blue LEDs
stop flashing.
• Start with the device is powered OFF.
• Press and hold the multifunction button for 5 seconds, until the red and blue LEDs flash alternately. This
indicates you are in pairing mode.
• Place the headset and your smartphone in close proximity (about 3 feet or less).
• Make sure Bluetooth is enabled on your smartphone (see manufacturer’s instructions if necessary).
• Once you have activated Bluetooth on your device, select the headset “SHARPER IMAGE” from the list of
available Bluetooth devices.
• If you are asked for a PIN code, enter 0000 and confirm the entry.
- 3 -
VIEWING VR APPS AND MOVIES
• Download a virtual reality (VR) app from the Apple iTunes App Store or Google Play. You can search using
the keyword “VR.”
• Install the app(s) on your smartphone. Be sure to read any instructions in the app before use.
• Launch the app you wish to use.
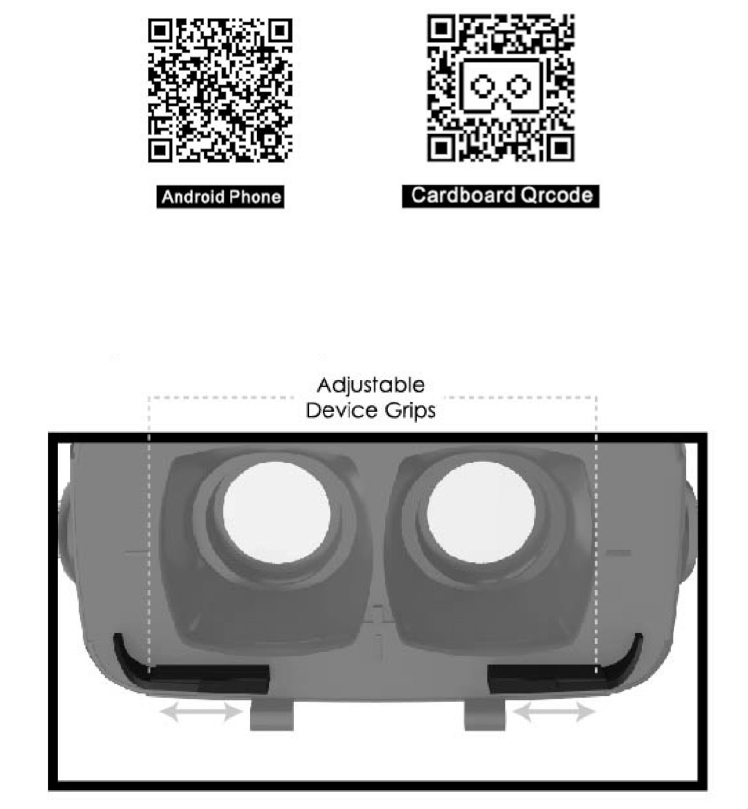
• Press the enclosure release button and insert your smartphone. You will need to adjust the device grips
to fit your phone. Simply slide each grip to the left or right until your phone sits securely in them.
• Close the enclosure once you have adjusted the device grips to fit. The enclosure will make a “click”
sound when fully closed.
NOTE: Some apps may request you scan a QR code to set the profile of your headset. If asked, use one of
these QR codes:
VIEWING YOUR PHOTOS AND VIDEOS IN 3-D
- 4 -
• To view your own personal photos and videos in three dimensions (3-D), you must first download a VR
viewing app such as “VR Viewer.”
• Load your photo/video into the VR viewing app using these instructions:
1. Launch the VR viewing app and tap the goggle icon on the bottom of the screen.
2. Tap the “switch” button and pair your headset using the provided QR code in this manual.
3. Return to the VR viewing app home screen and tap the folder icon on the top of the screen. This
will bring up a source menu where you can select the location of your photos/videos.
4. Select the “photo and video gallery” to choose a photo or video from your camera roll.
5. Tap on the photo or video that you would like to view in 3-D. Then tap the “choose” button. Your
selected photo or video will then be loaded into the app. Wait until the upload is complete.
6. Tap the goggle icon. This will create your photo/video in a split screen format.
7. Insert your smartphone into the headset as described above and enjoy seeing your personal
photos and videos in 3-D!
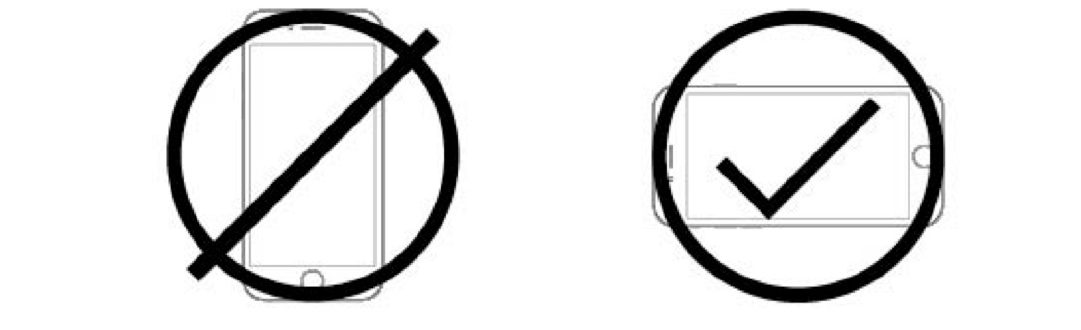
NOTE: For videos, you must tap the screen to play your video before placing it into the headset. Photos and
videos should be in landscape format before using this app.
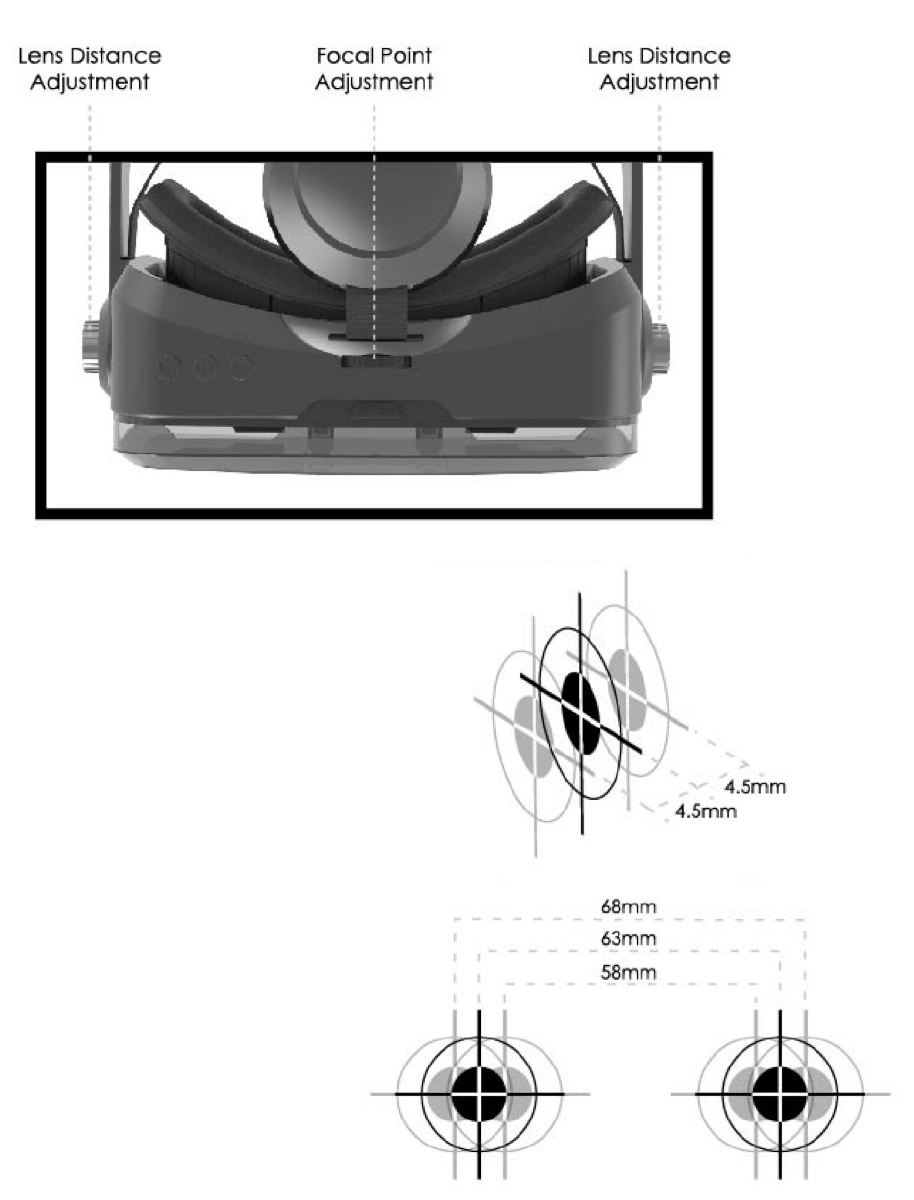
ADJUSTING THE VIEW
To fully experience VR apps or movies, you will need to ensure the image is focused. Each wearer of this
headset may need to adjust the focal point and lens distance to accommodate his or her eyesight.
• To adjust the lens distance, simultaneously
rotate the lens distance knobs forward and
backward while you are using the headset.
Continue to adjust the focal point until the
image comes into focus.
• To adjust the focal pint, rotate the small focal
point dial left and right while you are using the
headset. Continue to adjust the focal point until
the image comes into focus.
- 5 -
- 6 -
VOLUME CONTROL
CALL WAITING
LISTENING TO MUSIC
WARNING!
INTERACTIVE GAMING BUTTON
ANSWERING/REJECTING/ENDING A PHONE CALL
• Move the volume dial to the LEFT to INCREASE volume.
• Move the volume dial to the RIGHT to DECREASE volume.
If there is an incoming call while a call is in progress, press the multifunction button quickly to accept the
waiting call and end the current call.
• Once the headset is paired with your smartphone, you can use it to stream music.
• Select the music track and place your smartphone into the headset.
• Press the next track button so skip to the next song.
• Press the previous track button to go back to the previous track.
• Do not wear this device without a smartphone inside it. The powerful lenses may damage your eyes if you
look at the sun or another bright light.
• NEVER LOOK AT THE SUN WHILE WEARING ANY VR HEADSET.
The Bluetooth VR Headset with Earphones has a new and improved interactive gaming button on the bottom
of the headset, opposite the volume button. This button is used for apps that require a button press while
your headset is on. Simply press the button once to execute an action in certain apps.
• If your smartphone rings while you are using the headset, press the multifunction button once to answer
the incoming call.
• To reject an incoming call, press and hold the multifunction button for 2 seconds.
• To end a phone call, press the multifunction button once to hang up and end a phone call.
NOTE: Press the volume button to switch between Bluetooth mode and auxiliary line in mode.
NOTE: This button was recently improved for better performance with iPhone touchscreens, however we
recommend you remove any screen cover / screen sticker from your iPhone.

- 7 -
WATCHING 3-D VIDEOS
CARE AND MAINTENANCE
CAUTION
SPECIFICATIONS
• Videos must be in split screen format to be compatible with the VR headset.
• Select and launch a VR app with split screen video capability.
• Do not expose this unit to excessive heat or humidity.
• Do not use abrasive cleaning solvent to clean the unit.
• Do not expose this unit to fire, excessively high temperatures or low excessively temperatures.
• Do not expose unit to sharp objects that could scratch or puncture the unit.
• Do not drop the unit.
• Do not attempt to disassemble the unit. There are no user-serviceable parts.
• Do not use this device for anything other than its intended purpose.
• This device is not a toy. Keep out of the reach of children.
• Do not use the headset at excessive levels, as this may damage hearing.
• Do not wear this device without a smartphone inside it. The powerful lenses may damage your eyes if you
look at the sun or another bright light.
• NEVER LOOK AT THE SUN WHILE WEARING ANY VR HEADSET.
• Be sure to take frequent breaks from virtual reality. If you experience nausea, dizziness or discomfort,
discontinue use immediately.
• Do not use if you are pregnant, have high blood pressure or a fear of heights or crowds.
• If you have had seizures or are prone to seizures, consult your doctor before using this device.
• Not for use by children under 13.
• Sharper Image and SharperImage.com are not responsible for any damages or personal injuries that
result from improper use of this device.
Bluetooth version V4.1
Operating System iOS® & Android®
Field of view 120°
Objective lens 1.65” (42mm)
Minimum interpupilary adjustment 2.28”
Maximum interpupilary adjustment 2.68”
Compatibility Smartphones up to 6.2” H

- 8 -
The SHARPER IMAGE® name and logo are registered trademarks.
©Sharper Image. All Rights Reserved.
WARRANTY / CUSTOMER SERVICE
FCC STATEMENT
FCC INSTRUCTIONS FOR A CLASS B DIGITAL DEVICE OR PERIPHERAL
Sharper Image branded items purchased from SharperImage.com include a 1-year limited
replacement warranty. For Customer Service, please call 1 (877) 210-3449.
This device complies with part 15 of the FCC Rules. Operation is subject to the following two
conditions: (1) This device may not cause harmful interference, and (2) this device must accept any
interference received, including interference that may cause undesired operation.
Note: This equipment has been tested and found to comply with the limits for a Class B digital device,
pursuant to part 15 of the FCC Rules. These limits are designed to provide reasonable protection
against harmful interference in a residential installation. This equipment generates, uses and can
radiate radio frequency energy, and, if not installed and used in accordance with the instructions,
may cause harmful interference to radio communications. However, there is no guarantee that
interference will not occur in a particular installation. If this equipment does cause harmful
interference to radio or television reception, which can be determined by turning the equipment
off and on, the user is encouraged to try to correct the interference by one or more of the following
measures:
• Reorient or relocate the receiving antenna.
• Increase the separation between the equipment and receiver.
• Connect the equipment into an outlet or on a circuit different from that to which the receiver
is connected.
• Consult the dealer or an experiences radio/TV technician for help.
