Sharper Image 205987
User Manual: Sharper Image Cassette to MP3 Converter @ Sharper Image
Open the PDF directly: View PDF ![]() .
.
Page Count: 4
Item No. 205987
CASSETTE TO MP3 CONVERTER
User’s Manual and Quick Start Guide
Thank you for purchasing the Sharper Image Cassette to MP3 Converter. This new standalone
device is easier to use than previous models, because it does not require a computer or
software to convert your analog cassette tapes to the digital MP3 format.
Just insert a cassette, plug in a USB flash drive and press the “record” button.
- 1 -
FEATURES
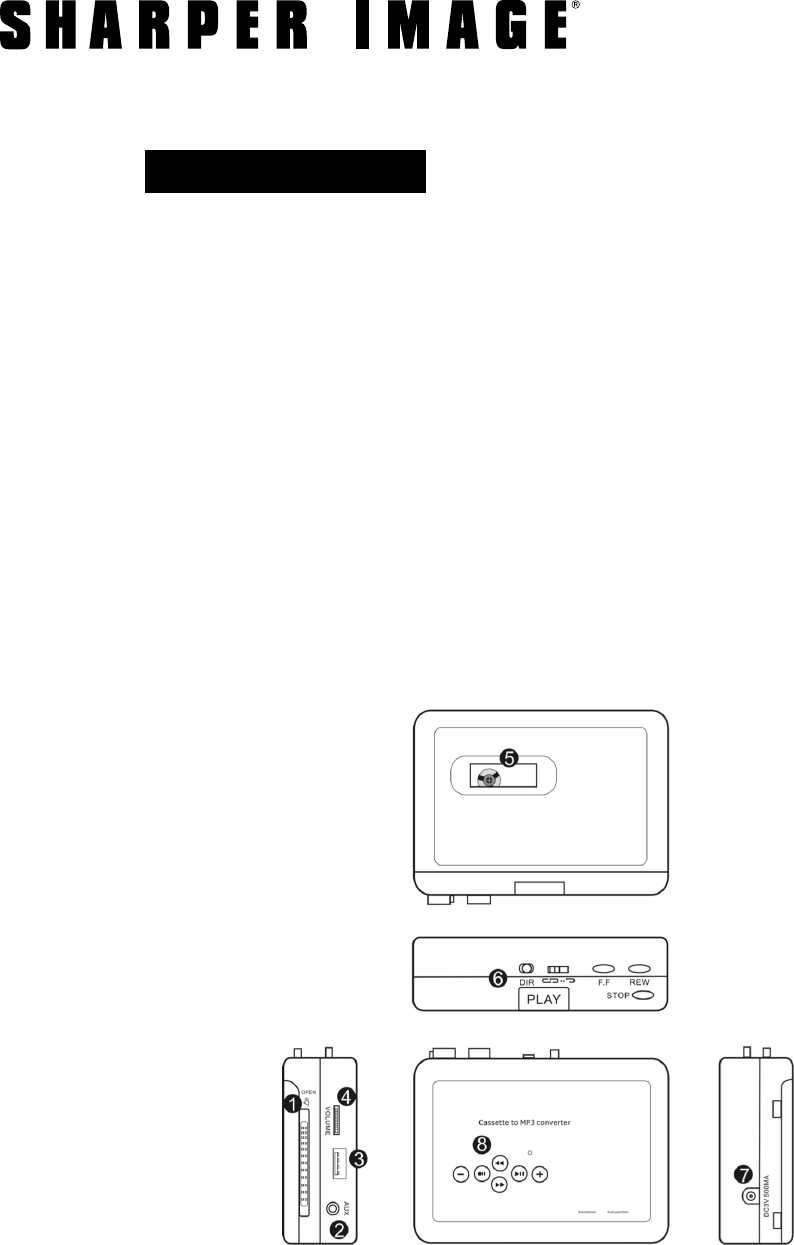
IDENTIFICATION OF PARTS
• Easy to use
• Converts cassettes to MP3 files without a computer or additional software
• Makes high-quality 128 Kbps recordings
• Auto and Manual recording modes
• AUX line in port lets you convert audio from other sources (radio, CD player, etc.)
• Operates on 2 AA batteries or plugs into a USB port
• Includes 8GB USB flash drive (about 2,000 songs)
1. Cassette lid lock switch
2. AUX port (line out to headphones or an
external speaker, OR line in from audio source)
3. OTG port (“On the go” — plug in your USB flash
drive or a USB card with card reader)
4. Volume control
5. Tape viewing window
6. Cassette operation buttons:
• PLAY
• STOP
• FAST FORWARD
• REWIND
• DIRECTION (Change direction of tape
to switch from Side A to Side B)
• AUTO REVERSE (Slide to engage Auto
Reverse Mode)
- 2 -
IDENTIFICATION OF PARTS (CONT.)
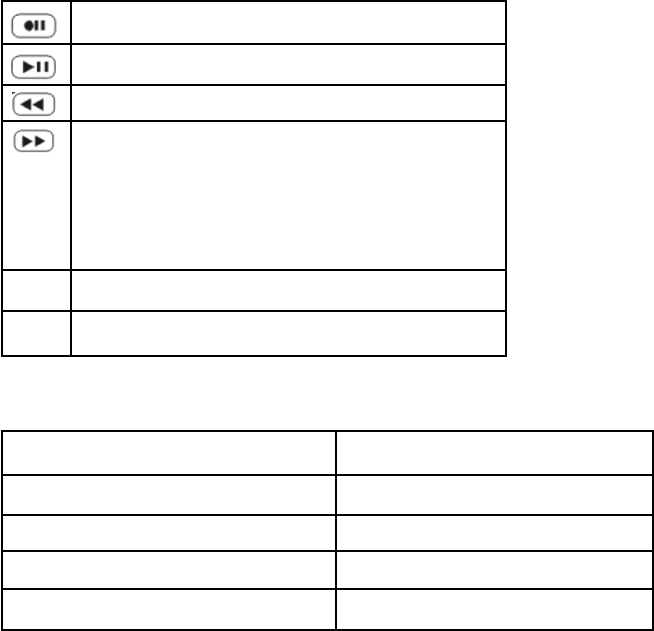
LED INDICATOR LIGHTS
7. DC port (5V DC power)
8. Converter operation buttons
POWER SUPPLY
CONVERTING YOUR CASSETTE TO MP3
For your convenience there are two power options:
1. Use the included USB cable.
2. Insert 2 AA batteries. Note: You must open the lid of the cassette player to access the
battery compartment. Please follow the polarity illustrations (“+” or “-”) when inserting batteries.
1. Insert a cassette.
2. Connect a speaker, headphones or earbuds to the “AUX” port.
3. Plug your USB flash drive into the “OTG” port. You will see the GREEN indicator light.
NOTE: To conserve battery power, the conversion mechanism will only work when there is a USB drive
connected. You can still play cassettes without a USB drive, but you cannot record without a USB
drive.
4. Press the “PLAY” button on the top of the device. You should hear music from your cassette.
5. Adjust the volume to your comfort.
Press to Start/Stop recording
Press to Start/Stop playback
Previous track
1. Advance to next track during playback.
2. Long press to change recording modes
(Manual or Auto) in Standby mode.
3. Short press to manually insert a track
break in Manual recording mode.
+Playback volume increase
_Playback volume decrease
Constant on Standby mode
Quick flash (2X per second) Recording
Slow flash (1X per second) Playback
Green Manual mode
Blue Automatic mode

- 3 -
After powering on, this device defaults to Manual Mode. In Manual Mode, you can start and stop the
recording any time you like. You can also manually split the recording, to end one track and begin
recording a new track.
When the cassette is playing and a USB flash drive is connected, the device is in standby mode. The
solid GREEN LED shows that it is in manual mode.
Press the recording button and the device will begin to convert your cassette to MP3. The
GREEN LED will be flashing during recording. Press the recording button again to stop recording and
save the MP3 file in your USB flash drive.
If you would like to end one track and begin recording a new track, short press the button.
The flashing GREEN LED will be off for about 2 seconds, then quick flash again to save in another file.
EXAMPLE: If you are converting a music cassette to MP3, you probably want each song to be a separate
MP3 file. As the tape is playing, wait for the pause between songs, then quick press the button.
The device will save the song that just ended, and start a new track with the next song.
NOTE: Your files will be in a folder called “TAPEMP3” in your USB drive. The files will be called “FV0001” to
“FV9999.”
In Auto Mode, the device will detect pauses between songs and automatically create new tracks for
each song. To turn on Auto Mode, long press the button 3 to 5 seconds, until the LED turns
from GREEN to BLUE. Press Play on the cassette, and press record on the device as described above.
EXAMPLE: It you have 6 songs on one side of the cassette, the device will create 7 MP3 files. Files 1
through 6 will be the songs, and file 7 is an empty track (the blank space after song number 6).
To switch back to Manual Mode, long press the button 3 to 5 seconds, until the LED turns from
BLUE back to GREEN.
Use the auxiliary line in port (“AUX”) to record music from other sources, such as the radio, mini disc,
CD players, or anything with an audio line out. Use Manual or Auto Mode as described above.
This device has a playback function so you can check your new MP3 audio conversions.
• In standby mode, the press playback button.
• The device will start to play the recorded music, and the indicator will be flashing slowly.
• Press the playback button again, to stop playback and go back to standby mode.
• During playback, use the up/down button to play previous or next file.
• You can also use this device to play other MP3 files, but they must be in the “TAPEMP3” folder.
RECORDING IN MANUAL MODE
RECORDING IN AUTO MODE
RECORDING VIA AUX PORT
PLAYBACK

- 4 -
This device works by detecting the level of music. You may encounter these two issues when
recording in Auto Mode:
1. If there is a long pause during the song, this device may “think” it is detecting two different songs
and split the recording into two separate files. In this case, we recommend using Manual Mode.
2. If the pause between two songs is too short, this device may “think” it is one song, and save both
songs as one file. In this case, we recommend using Manual Mode.
TROUBLESHOOTING
SPECIFICATIONS
Converter format MP3
Power supply 2X AA batteries or USB port
Format of USB flash Support FAT, FAT32, exFAT
Working time 2 hours with 2X AA batteries
Audio channel Stereo L/R
Bit Rate 128 Kbps
Dimensions 4.4” L x 3.2” W x 1.25” H
Weight 0.4 lbs. (without batteries)
WARRANTY / CUSTOMER SERVICE
Sharper Image branded items purchased from SharperImage.com include a 1-year limited
replacement warranty. For Customer Service, please call 1 (877) 210-3449.
The SHARPER IMAGE® name and logo are registered trademarks.
©Sharper Image. All Rights Reserved.
