Sharx Security SCNC2900 Sharx Security VIPcella-IR Network Camera User Manual
Sharx Security, Inc. Sharx Security VIPcella-IR Network Camera Users Manual
UserManual.wiki
>
Sharx Security
>
SCNC2900 User Manual
User Manual
Navigation menu
Upload a User Manual
Namespaces
Wiki Guide
HTML
PDF
Info
Views
User Manual
Discussion / Help
Navigation


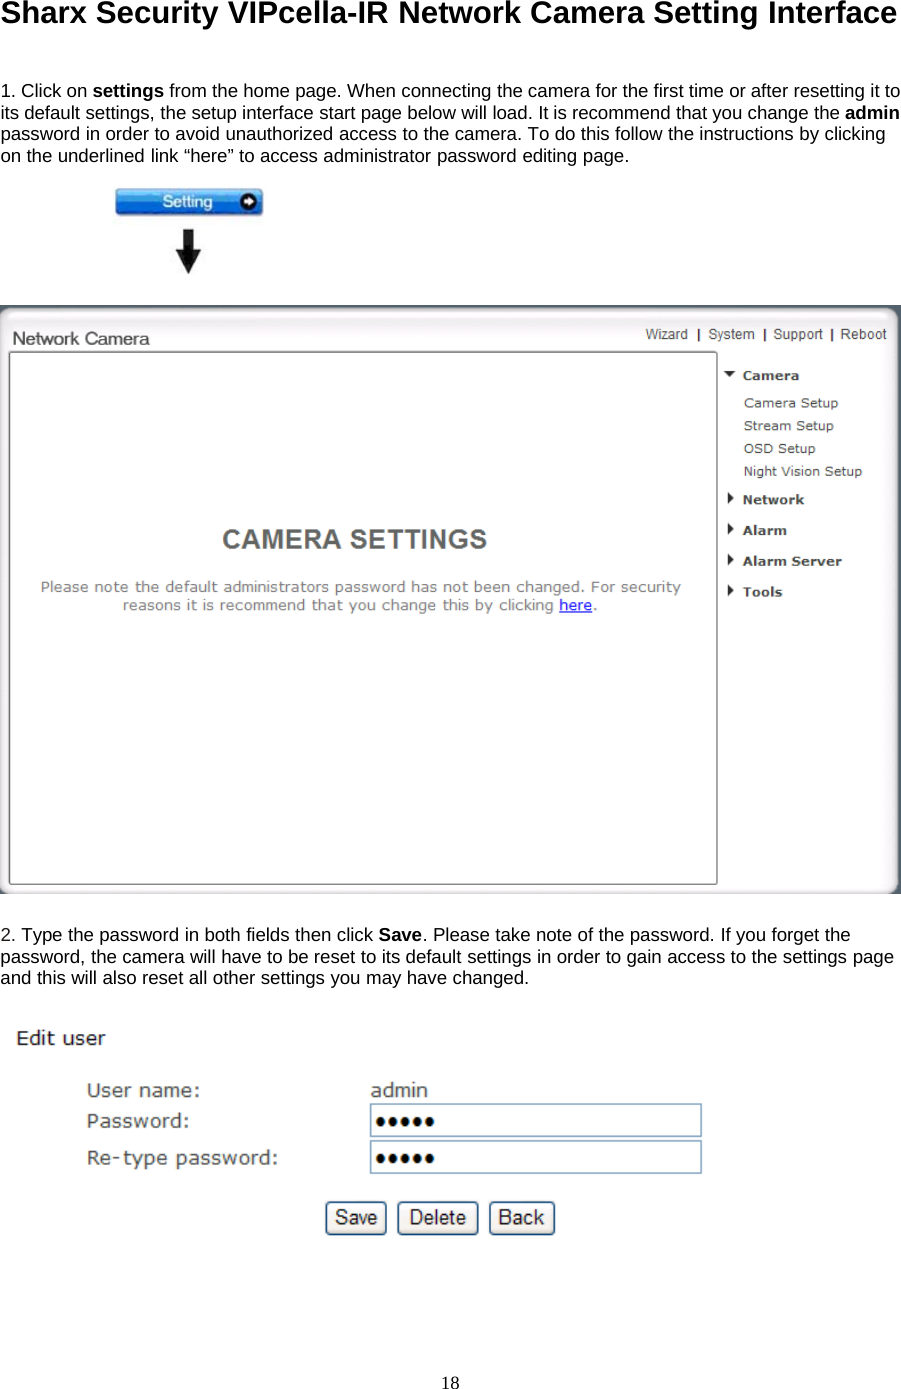
![11[Refresh] Click Refresh to search for cameras on the local network.[Setup] Select the required camera and click Setup to configure the network settings for the camera.[Open] Select the required camera and click Open to access the camera via a web browser.[Exit] Click Exit to exit the Camera Setup window.Note: Select and double click one of the cameras from the Device list, to open the camera view via the webbrowser.Assigning an IP address to the Camera with Camera Setup1. Launch Camera Setup program to detect cameras on the local network.2. Click on “Setup” button and the following setup interface will pop up.3. Enter a unique name for the camera, the location (optional) and leave the default port number as80.“Obtain an IP address automatically” and “Obtain DNS server address automatically” are selected bydefault, if you are confident enough to enter your own settings, you can do so by selecting “Use the followingIP address” and follow the guidelines on the next page. If however you wish to leave the default settingsplease skip to NETWORK CAMERA SCREEN AND SETUP WINDOW.](https://usermanual.wiki/Sharx-Security/SCNC2900/User-Guide-2296525-Page-11.png)


![142. If your OS is Windows XP, click [My Network Places], double click the icon Youwill see the home page.3. Run the Camera Setup and double-click the relevant camera item.](https://usermanual.wiki/Sharx-Security/SCNC2900/User-Guide-2296525-Page-14.png)
![20CameraCamera SetupFrom the home page click settings and enter the administrator user name and password. Click on CameraSetup under the title Camera to change the image and audio parameters of the camera.[Moonlight mode] Adjust the brightness setting according to the light intensity of the area being monitoredmanually.[Image rotation] Display images upside down.[Light frequency] Two options: 50Hz & 60Hz. Set according to the mains frequency in the country of use.For UK this would be 50Hz.[Power LED light] Turn on/off the power & network LED indicator of camera.[Show FPS in ActiveX]Show FPS On/Off in ActiveX control.[Microphone] Turn on/off the built-in microphone.[Mic volume] Adjusts the volume of the microphone from 0~14 where 0 is the lowest.[Audio bit rate] Four options: 16, 24, 32, 40(kbps). Determines the quality of the audio being transmitted.Click Apply toconfirmyoursettings.](https://usermanual.wiki/Sharx-Security/SCNC2900/User-Guide-2296525-Page-20.png)
![21Stream SetupThe camera supports three streams: primary stream, secondary stream and mobile stream.[Image size] Three image resolutions available: 640 x 480(VGA), 320 x 240(QVGA), 160 x 120.[Frame rate] Twelve options: 1/2/3/4/5/6/8/10/15/20/25/30 frames per second (fps).[MPEG4 bit rate] Select MPEG4 bit rate.Eight options: 64, 128, 256, 512, 768, 1024, 1536, 2048 (kbps).[MJPEG quality] Type MJPEG video quality. (20 – 100), 20 is low quality, 100 is high quality.[Snapshot quality] Type snapshot quality. (20 – 100) , 20 is low quality, 100 is high quality.The above five settings determine the image quality, however higher bit rates require greater bandwidth.Please select the appropriate settings according to your connection speed and network traffic. If you areexperiencing jerky video it may be necessary to decrease the bit rate.[Audio] Enable or disable audio.[RTSP authentication] Enable or disable RTSP authentication.You can use Mobile phone to play the mobile stream from camera,but generally Mobile phone do notsupport authentication, so we have to disable the RTSP authentication.](https://usermanual.wiki/Sharx-Security/SCNC2900/User-Guide-2296525-Page-21.png)
![22A stream list page will be shown after clicking the stream name such as “Primary stream”.[Primary stream] can not be disabled.A sample of primary stream list as below:You can use RealPlayer, VLC Player or QuickTime Player to play the live stream from camera inIntranet or Internet.[Secondary stream] Enable or disable secondary stream.[Mobile stream] Enable or disable Mobile stream.You can use mobile phone, Realplayer and QuickTime Player to play the live stream from camera.The size of video is 176x144.Click Apply toconfirmyoursetting.](https://usermanual.wiki/Sharx-Security/SCNC2900/User-Guide-2296525-Page-22.png)
![23OSD SetupThis function can display system name, date and time, or use-defined on screen.[OSD] Enable or disable OSD function.[Transparent] Users can select whether change OSD to transparent or not.[Display date and time] OSD is date and time of camera.[Display system name] OSD is system name of camera.[Display the text below] OSD is user-defined text.[Display the text below with date and time] OSD is user-defined text with date and time of camera.Click Apply toconfirmyoursettings.](https://usermanual.wiki/Sharx-Security/SCNC2900/User-Guide-2296525-Page-23.png)
![24Night Vision Setup (IP207W / IP208W)Only IP207W and IP208W have infrared LED, which can be opened automatically when camera check darkenvironment.[Infrared LED control] When the environment is dark, the LED will be opened automatically due to aphotosensitive component. Users also can select open or close the infrared LED manually.[Black and white mode] When the environment is dark, the moving images will be changed to Black andWhite automatically. Users also can select whether change the images to black and white or color manually.Click Apply toconfirmyoursettings.](https://usermanual.wiki/Sharx-Security/SCNC2900/User-Guide-2296525-Page-24.png)
![25NetworkWireless SetupThe camera corresponds to the wireless system based on IEEE802.11b/g. Encryption establishes thesecurity to prevent unauthorized users to access the wireless data communication.[SSID] Type the ID of the wireless network you want to connect to using up to 32 ASCⅡcharacters or clickSearch to search for available networks.[Mode] Infrastructure mode and Adhoc modeAdhoc Mode: Select Adhoc mode when the camera is directly connected to your computer.Infrastructure Mode: Select Infrastructure mode when the camera is connected via an access point orrouter.](https://usermanual.wiki/Sharx-Security/SCNC2900/User-Guide-2296525-Page-25.png)
![26When select Adhoc mode. Seefigureabove.[Security mode] WEP64bit or WEP 128bit[Authentication] Select WEP authentication mode.[WEP Key type] Select the WEP key type. Either in hexadecimal or ASCⅡcharacters.[WEP key Index] Specify up to 4 WEP keys.[WEP Key] Type the password.[R-type WEP Key] Re-confirm the password.When select Infrastructure mode. See figure above.[Security mode] Security mode is not only WEP64bit or WEP128bit but also WPA-PSK or WPA2-PSK.[Encryption type] TKIP and AES.[WPA key]Type 8-63 characters as password.[Re-type WPA key] Re-confirm the password.](https://usermanual.wiki/Sharx-Security/SCNC2900/User-Guide-2296525-Page-26.png)
![27When click search ,see figure above.[SSID] select the network name you searched .[Mode] Infrastructure mode and Adhoc mode[signal]It show out the strength of signal[Encryption ] on and off.Click Apply to save changes.Click Test to test whether connection is successful.Note: These settings have to match those of your access point or router. Please consult your access point orrouter manual on how to verify or modify these settings.TCP/IP SetupThe camera is set up to obtain the IP address automatically (DHCP) by default. Should you may wish toassign the IP address manually, use the TCP/IP Setup page to enter the address details.](https://usermanual.wiki/Sharx-Security/SCNC2900/User-Guide-2296525-Page-27.png)
![28Obtain an IP address automatically(DHCP):If your network supports a DHCP server (e.g. router) select this option to have the IP address is assignedautomatically.If you select Obtain an IP address automatically you should select Obtain a DNS Server addressautomatically.Use the following IP address:Select this option when a fixed IP is required.[IP address] Type the IP address of your camera.[Subnet mask] Type the subnet mask.[Default gateway] Type the default gateway.Obtain DNS Server address automatically:If your network supports a DHCP server (e.g. router) select this option to have the DNS Server address isassigned automatically.Use the following DNS server address:[Primary DNS IP address] Type the IP address of the primary DNS server.[Secondary DNS IP address] Type the IP address of the secondary DNS server, if necessary.[HTTP/RTSP port]The default HTTP port number is 80, it is also be used as RTSP port.[RTP port range] It is for UPnP port forwarding, 1 camera actually use 2 RTP ports, one for video, the otherfor audio. (See UPnP setup)[HTTP/RTSP Authentication method] Select Basic Authentication or Digest Access Authentication.PPPoE SetupThe camera can be installed without a PC on the network. Some XDSL services use PPPoE(Point-to-Point Protocol over Ethernet).[PPPoE dial-up] Enable or disable PPPoE connection.[Service name] Either an ISP name or a class of services that is configured on the PPPoE server. This fieldmay be left empty.](https://usermanual.wiki/Sharx-Security/SCNC2900/User-Guide-2296525-Page-28.png)
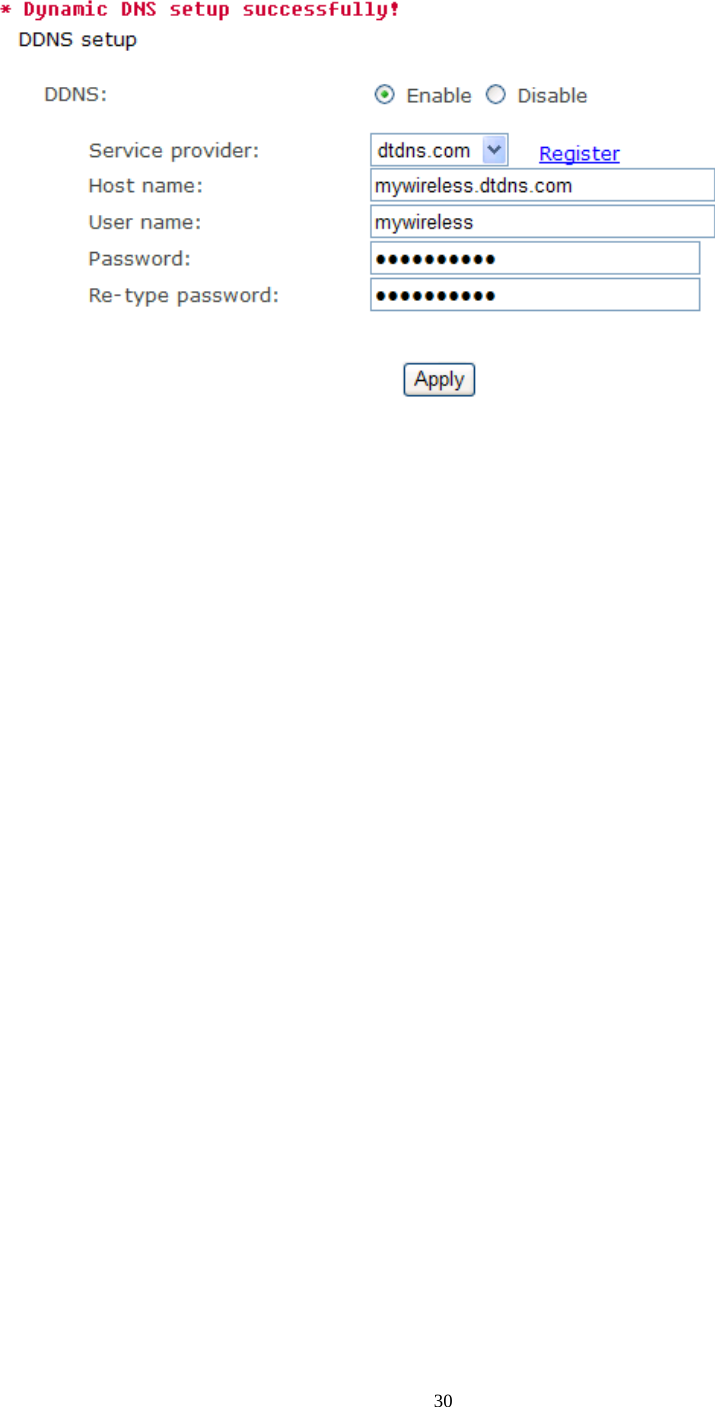
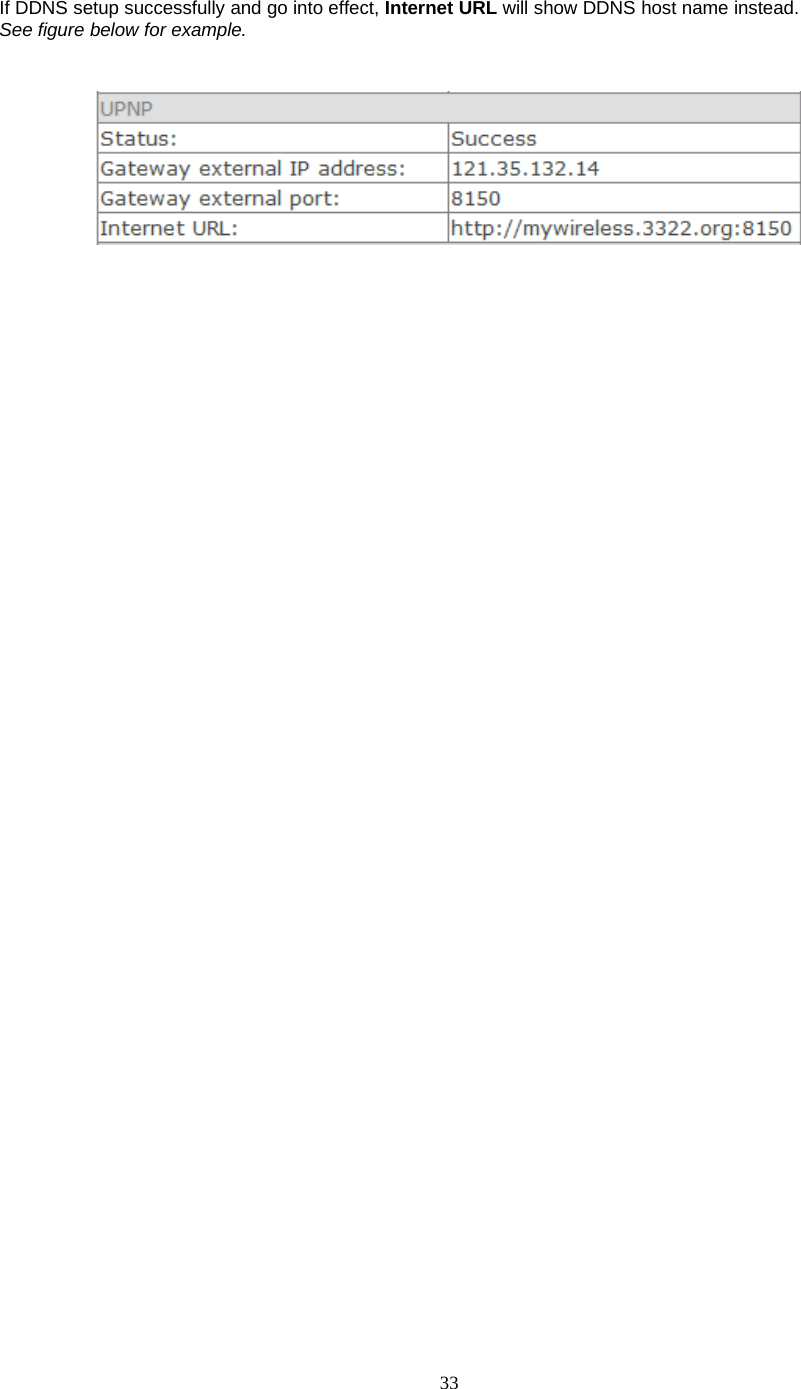
![29[User name] Type the user name.[Password] Type the password.[Re-type password] Re-confirm the password.Click Apply toconfirmyoursettings.DDNS SetupDynamic DNS (DDNS) is simply a way of using a static hostname to connect to a dynamic IP address. Whenconnected to your ISP, you are assigned a temporary IP address. DDNS services keep track of your IPaddress and route your Domain name to that address when you wish to connect to the camera from aremote location.[DDNS] Enable or disable DDNS connection.How to add DDNS1. Enable the Dynamic DNS function.2. Select your preferred DDNS service provider from the list then click Register.3. Enter the Host Name details and password supplied by your DDNS service provider when you registered.4. Click Apply to confirm your settings.e.g.](https://usermanual.wiki/Sharx-Security/SCNC2900/User-Guide-2296525-Page-29.png)
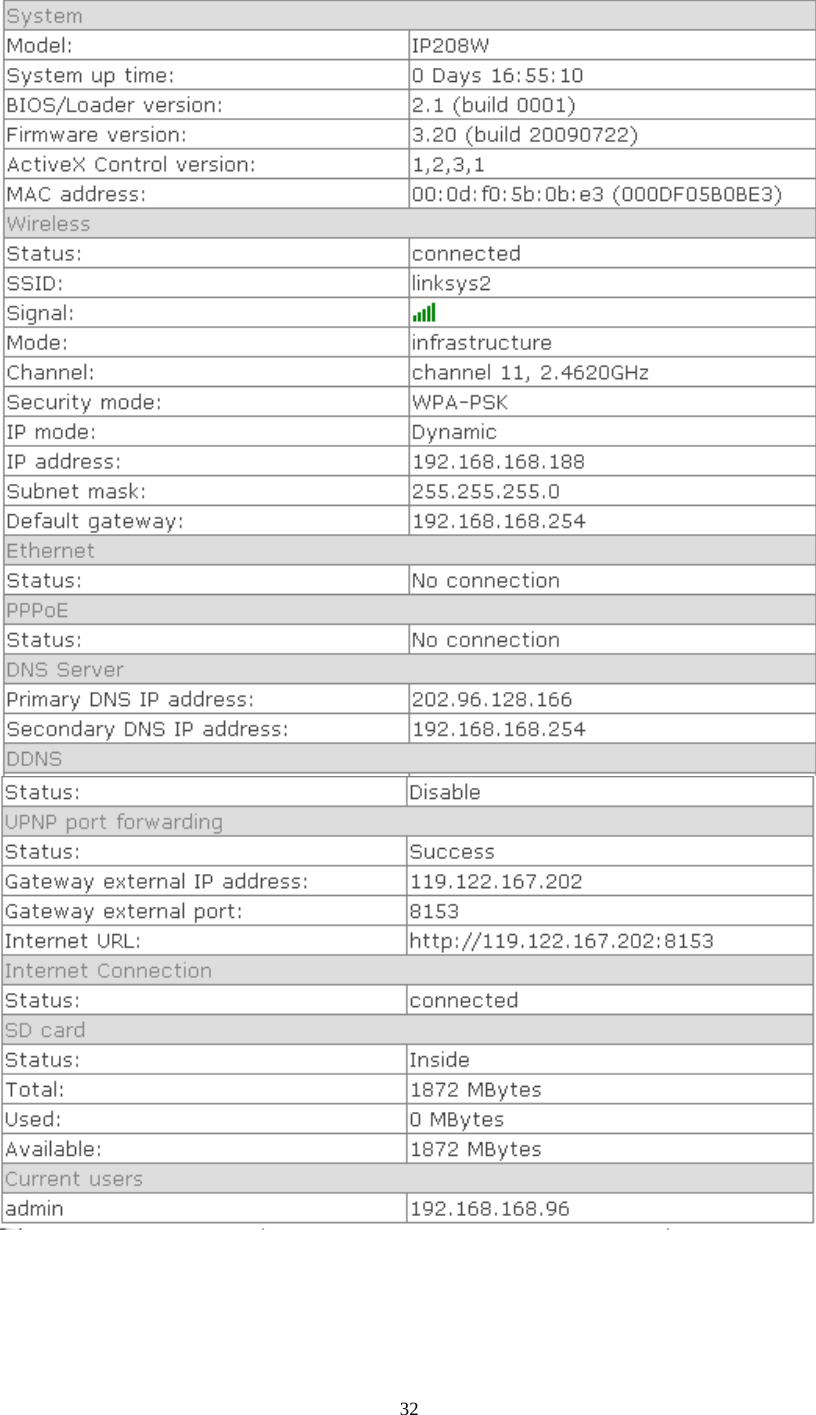
![31UPNP SetupThe camera supports UPnP which is enabled by default. This function requires a Windows XP/Vistaoperating system. It is a quick way to discover the camera on your network. Please make sure that the UPnPfunction is enabled on your PC.[UPnP] Enable or disable the UPnP function.[Gateway HTTP/RTSP port forwarding] Enable or disable this function.[External HTTP/RTSP port range] Using this port, automatically adds a port forwarding rule to a router viaUPnP protocol. Please note that not all routers support this function. Refer to your router manual for furtherdetails.If set port range is 8150~8350, camera will ask router to add a port forwarding rule automatically. In this rule,the internal port is camera default port 80, the external port is 8150, IP address is camera's IP. Use thissetting, users can visit the camera from Internet through the router with this URL http://routeripaddress:8150.If there are several cameras in Local Network, the first one which first be opened will use 8150 as externalport, and second one will use 8151, third one use 8152, etc. Every camera will remember its port, it willpreferentially use this port in next power on.[Gateway RTP port forwarding] Enable this function, users can use mobile phone , RealPlayer orQuickTime Player to visit the camera from Internet through the router.[External RTP port range] 30000—30200 default. (See TCP/IP setup)Click Apply toconfirmyoursetting.Click System at the top right of Settings page to show the System information. See figure below.](https://usermanual.wiki/Sharx-Security/SCNC2900/User-Guide-2296525-Page-31.png)
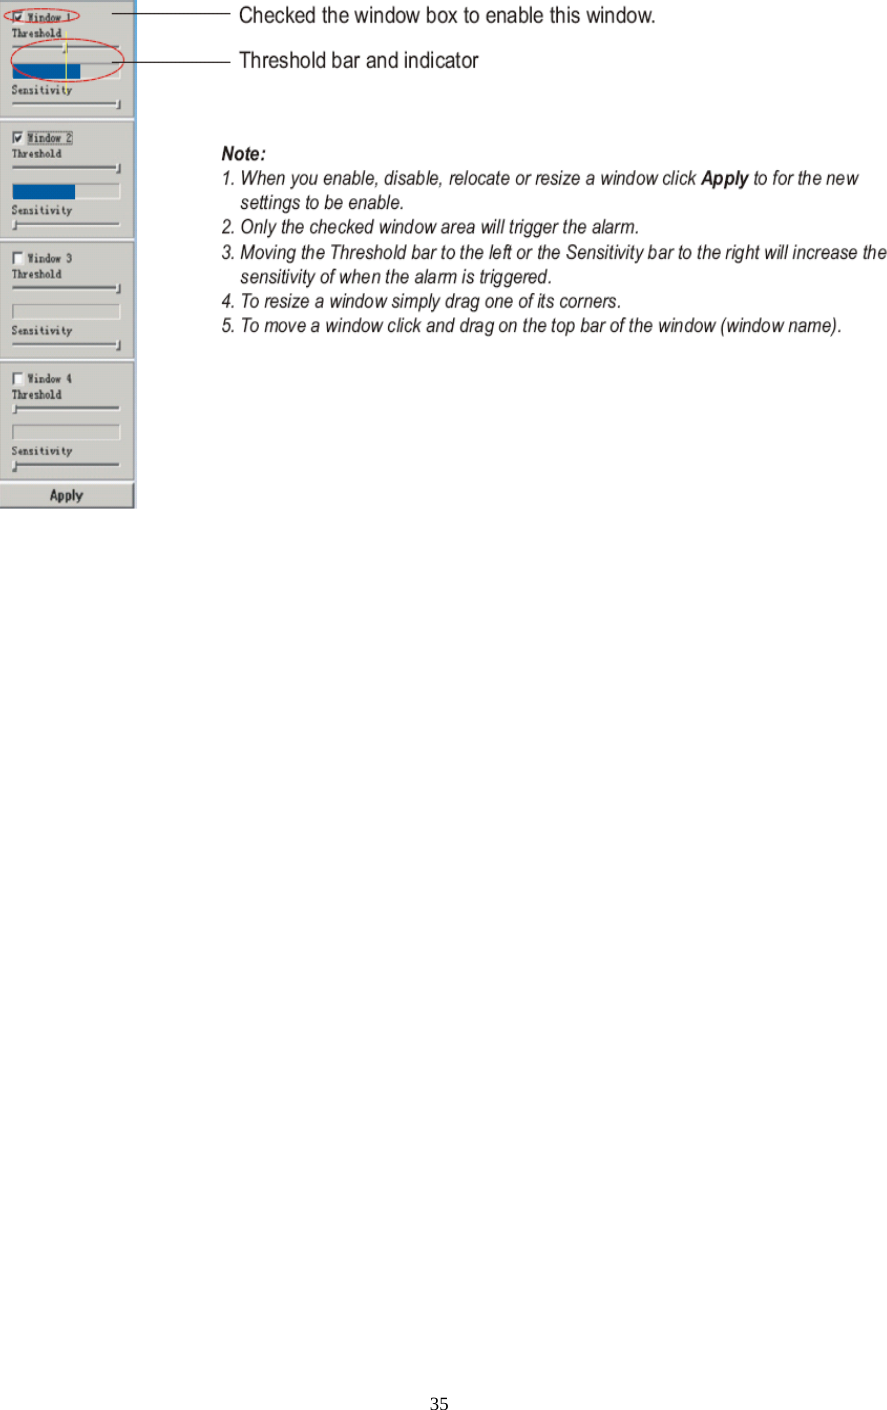
![34AlarmMotion DetectionMotion Detection can trigger an alarm that sends images or video feed via e-mail or FTP (File TransferProtocol). You can set up to four different Motion Detection windows.[Window] Check this box to enable the window.[Threshold] Set the threshold bar to the amount of motion required to trigger the alarm.[Sensitivity] Set the measurable difference between two sequential images that would indicate motion.Click Apply toconfirmyoursetting.](https://usermanual.wiki/Sharx-Security/SCNC2900/User-Guide-2296525-Page-34.png)
![36Schedule SetupAlarm Sending,Periodical Sending and Buffer Sending sends images via e-mail or FTP according toschedule setup.[Every day] Select every day or not.[Sunday ~ Saturday] Select Sunday ~ Saturday or not.[Always] Enable in any time.[Range] Enable between start time and end time.[Except] Enable except start time to end time.Click Apply toconfirmyoursetting.](https://usermanual.wiki/Sharx-Security/SCNC2900/User-Guide-2296525-Page-36.png)
![37Alarm ManagementMotion Detection can trigger an alarm that sends images via FTP or e-mail and send URL via HTTP.[Alarm mode] Enable or disable all alarm.[FTP alarm sending] Enable or disable FTP alarm sending function.[e-Mail alarm sending] Enable or disable e-Mail alarm sending function.[HTTP event alarm sending] Enable or disable HTTP event alarm function.[Trigger time] How many seconds does camera keep snapshot the images after get a motion alarm.[Trigger FPS] How many images does camera snapshot every second after get a motion alarm.[FTP server ID] Select one FTP server, click Setting to set FTP server.[Remote path] Path where to save the image file on the FTP server.[Snapshot from] Select source stream that snapshot from.[Image file name] Type image file name.[Suffix of file name] Select suffix of file name.[Effective period] Select Effective period. If select schedule, click Setting to set schedule.](https://usermanual.wiki/Sharx-Security/SCNC2900/User-Guide-2296525-Page-37.png)
![38[Trigger time] How many seconds does camera keep snapshot the images after get a motion alarm.[Trigger FPS] How many images does camera snapshot every second after get a motion alarm.[e-Mail server ID] Select one e-Mail server, click Setting to set e-Mail server.[File attachment] Switch file attachment on or off.[Snapshot from] Select source stream that snapshot from.[Image file name] Type image file name.[Suffix of file name] Select suffix of file name.[Effective period] Select Effective period. If select schedule, click Setting to set schedule.[HTTP server ID] Select HTTP server ID, click Setting to set HTTP server.[Sending URL] Type URL which will be sent to HTTP server.[Use MAC address as URL suffix] Enable or disable this function.[Effective period] Select effective period. If select schedule, click Setting to set schedule.Click Apply toconfirmyoursetting.](https://usermanual.wiki/Sharx-Security/SCNC2900/User-Guide-2296525-Page-38.png)
![39Periodic SendingThe camera can send images via FTP or e-mail and send URL via HTTP periodically.[FTP periodic sending] Enable or disable FTP upload periodically.[e-Mail periodic sending] Enable or disable e-Mail upload periodically.[HTTP periodic sending] Enable or disable HTTP upload periodically.[Interval time] Type the interval at which you want to send the images periodically.[FTP server ID] Select one FTP server, click Setting to set FTP server.[Remote path] Path where to save the image file on the FTP server.[Snapshot from] Select stream that snapshot from.[Image file name] Type image file name.[Suffix of file name] Select suffix of file name.[Effective period] Select Effective period. If select schedule, click Setting to set schedule.](https://usermanual.wiki/Sharx-Security/SCNC2900/User-Guide-2296525-Page-39.png)
![40[Interval time] Type the interval at which you want to send the images periodically.[e-Mail server ID] Select one e-Mail server, click Setting to set e-Mail server.[File attachment] switch file attachment on or off.[Snapshot from] Select stream that snapshot from.[Image file name] Type image file name.[Suffix of file name] Select suffix of file name.[Effective period] Select Effective period. If select schedule, click Setting to set schedule.[Interval time] Type the interval at which you want to send the URL periodically.[HTTP server ID] Select HTTP server ID, click Setting to set HTTP server.[Sending URL] Type URL which can be sent to HTTP server..[Use MAC address as URL suffix] Enable or disable this function.[Effective period] Set Effective period. If select schedule, click Setting to set schedule.Click Apply toconfirmyoursetting.Note:The notifications use the camera’s internal clock. Please make sure the camera’s Date and Time are correct.](https://usermanual.wiki/Sharx-Security/SCNC2900/User-Guide-2296525-Page-40.png)
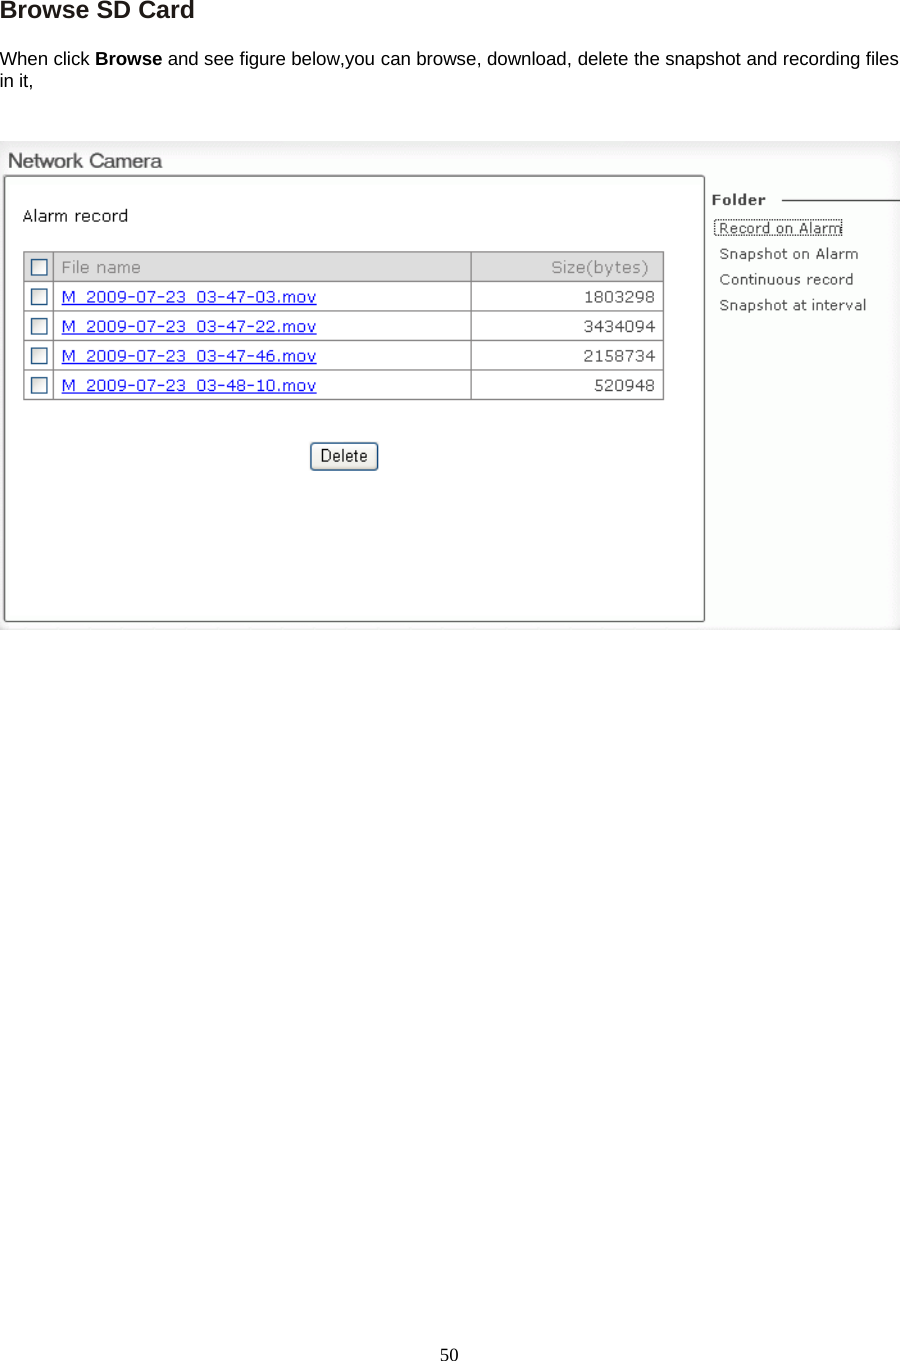
![41Buffer ManagementThe camera can be configured to send images via FTP when the Motion Detection alarm is triggered.Note: This function just can be used when SD card does not plug in the SD slot of cameras.[Image buffer] Enable or disable this function. Click Browse to preview images.[Buffer time] Type buffer time.[Buffer FPS] Type buffer FPS.[Snapshot from] Select stream that snapshot from.[Image file name] Type image file name.[Suffix of file name] Select suffix of file name.[FTP automatic sending] Enable or disable this function.[FTP server ID] Select one FTP server, click Setting to set FTP server.[Remote path] Path where to save the image file on the FTP server.[Estimate sending time] Type estimate time that all buffer images send completed.[Effective period] Select Effective period. If select schedule, click Setting to set schedule.Click Apply toconfirmyoursetting.](https://usermanual.wiki/Sharx-Security/SCNC2900/User-Guide-2296525-Page-41.png)
![42Alarm ServerFTP Server[FTP server ID] Select FTP server ID.[FTP server name] Type the name or IP address of the FTP server.[FTP server port] The default port number is 21.[Anonymous] Enable or disable anonymous login.[User name] Type your user name.[Password] Type your password.[Re-type password] Re-type your password.[Passive mode] Switch passive mode on or off.[Keep alive] Type the time which keep alive with FTP server.Click Apply toconfirmyoursettings.](https://usermanual.wiki/Sharx-Security/SCNC2900/User-Guide-2296525-Page-42.png)
![43e-Mail Server[e-Mail server ID] Select e-Mail server ID.[SMTP server name] Type the name or IP address of the SMTP server you want to use for sending thee-Mails. Please note that networks do not allow e-mail relaying. Check with your system administrator formore details.[SMTP server port] The default value is 25.[Secure SSL connection] Select whether use SSL connection.[Authentication] Select the authentication required by the SMTP server.[User name] &[Password] Type the user name and password of the e-Mail account you wish to use.This field is required if your SMTP server requires authentication.[Re-type password] Re-type the password.[Sender e-mail address] Type the e-mail address of the account you are using to send the e-Mail. [Receivere-mail address] Type the recipients’ e-mail addresses (Up to 3 address can be entered).[Subject] Subject of the e-mail,entering a relevant subject will help identify the alarm better.[Message] Type the text you wish to appear in the e-mail.Click Apply toconfirmyoursettings.](https://usermanual.wiki/Sharx-Security/SCNC2900/User-Guide-2296525-Page-43.png)
![44HTTP Server[HTTP server ID] Select HTTP server ID.[HTTP server name] Type the HTTP server name.[HTTP server port] Type the HTTP server port.[Authentication] Select the authentication required by the HTTP server.[User name] Type the user name.[Password] Type the password.[Re-type password] Re-confirm the password.Click Apply toconfirmyoursettings.](https://usermanual.wiki/Sharx-Security/SCNC2900/User-Guide-2296525-Page-44.png)
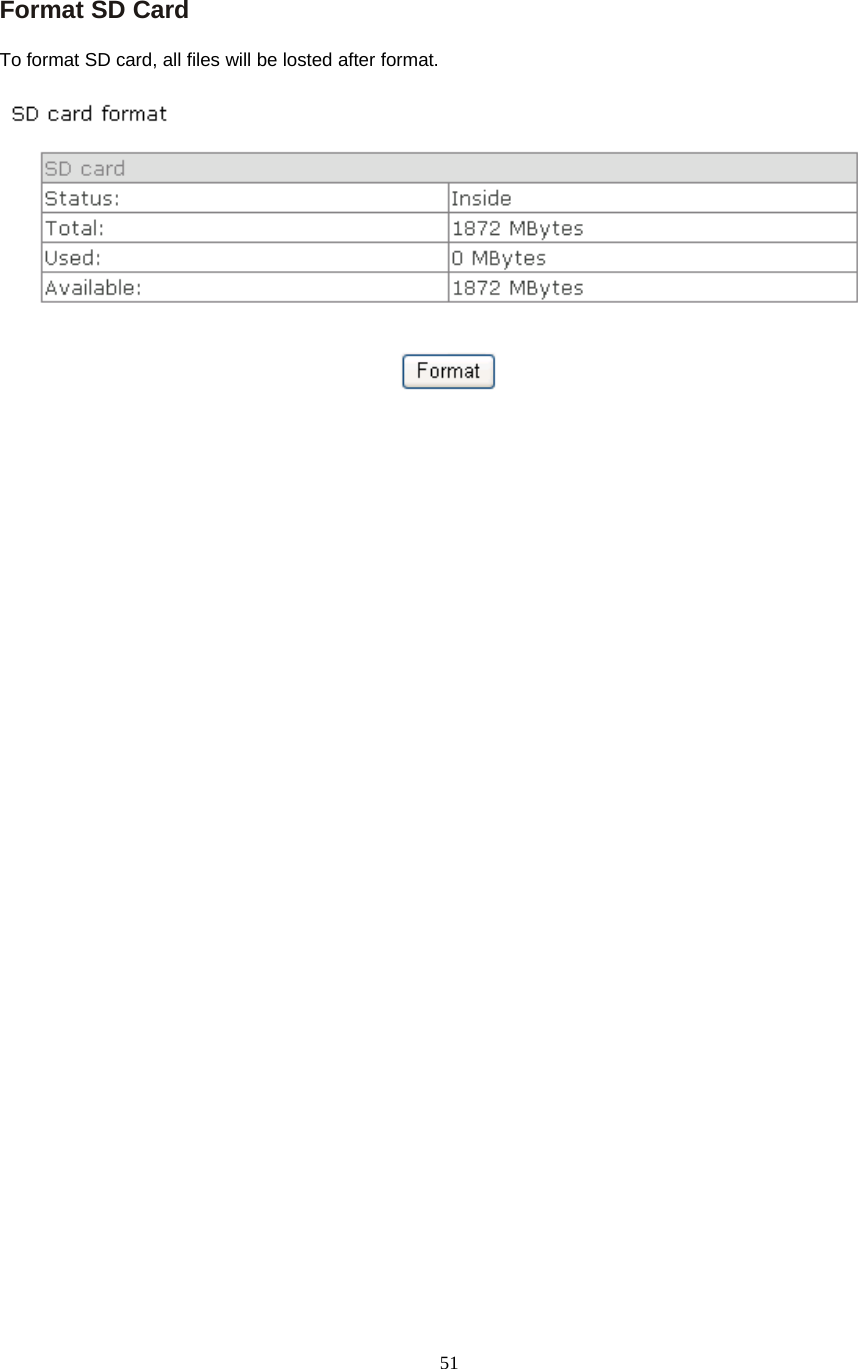
![45SD FunctionsRecord on Alarm[Alarm mode] Enable or disable all alarm.[Record on alarm] Enable or disable alarm recording function.Click Apply toconfirmyoursettings.](https://usermanual.wiki/Sharx-Security/SCNC2900/User-Guide-2296525-Page-45.png)
![46[Recordr time] how many seconds does camera keep recording after a motion alarm.[Record from] Select source stream that record from.[Record file name] Type record file name.[Suffix of file name] Select suffix of file name.[Split time of record file ] How many seconds does every recording file save video and audio.[Effective period] Select Effective period. If select schedule, click Setting to set schedule](https://usermanual.wiki/Sharx-Security/SCNC2900/User-Guide-2296525-Page-46.png)
![47Snapshot on Alarm[Alarm mode] Enable or disable all alarm.[Snapshot on alarm] Enable or disable alarm snapshot function.Click Apply toconfirmyoursettings.[Trigger time] How many seconds does camera keep snapshot the images after get a motion alarm.[Trigger FPS] How many images does camera snapshot every second after get a motion alarm.[Snapshot from] Select source stream that snapshot from.[Image file name] Type image file name.[Suffix of file name] Select suffix of file name.[Effective period] Select Effective period. If select schedule, click Setting to set schedule.Click Apply toconfirmyoursettings.](https://usermanual.wiki/Sharx-Security/SCNC2900/User-Guide-2296525-Page-47.png)
![48Continuous Record[continuous record] Enable or disable continuous recording function.Click Apply toconfirmyoursettings.[Record from] Select source stream that record from.[Record file name] Type record file name.[Suffix of file name] Select suffix of file name.[Split time of record file ] How many seconds does every recording file save video and audio.[Record period time] Select record period time. If select schedule, click Setting to set schedule.Click Apply toconfirmyoursettings.](https://usermanual.wiki/Sharx-Security/SCNC2900/User-Guide-2296525-Page-48.png)
![49Snapshot at Interval[Snapshot at interval] enable or disable interval snapshot function[Interval time] Type the interval at which you want to save snapshot to SD card periodically.[Snapshot from] Select stream that snapshot from.[Image file name] Type image file name.[Suffix of file name] Select suffix of file name.[Effective period] Select Effective period. If select schedule, click Setting to set schedule.Click Apply toconfirmyoursettings.](https://usermanual.wiki/Sharx-Security/SCNC2900/User-Guide-2296525-Page-49.png)
![52ToolsSystem Identity[System Name] Type a name to easily identify the camera.[System Contact] Type the contact name of the administrator of the camera.[System Location] Type the location of the camera.TIP: The information you fill in can be displayed on the camera. It can help to distinguish different SharxSecurity VIPcella-IR Network Cameras in the network. See figure below.](https://usermanual.wiki/Sharx-Security/SCNC2900/User-Guide-2296525-Page-52.png)
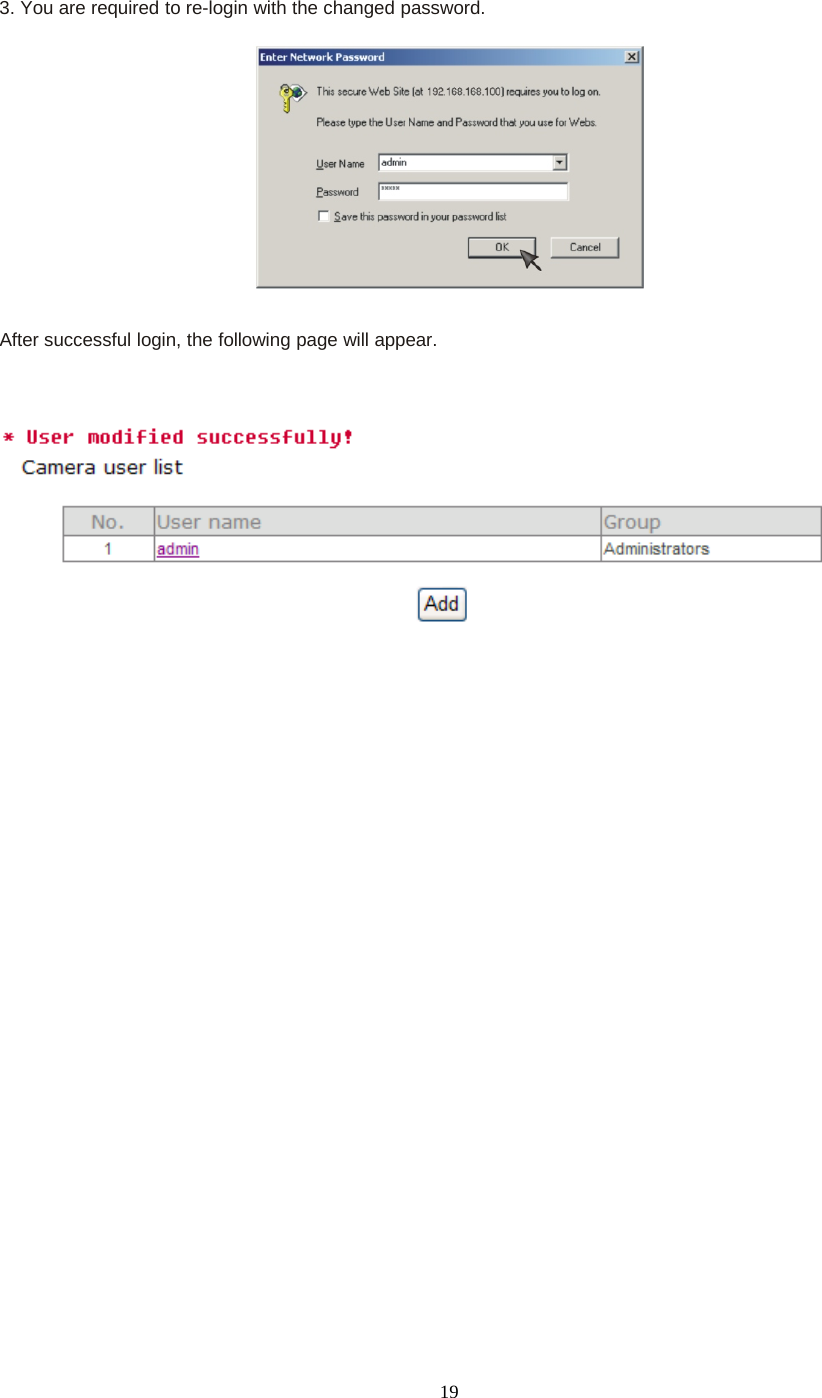
![53User Management[Add] Up to 64 users (including the admin) can createdNote:1. A maximum of 16 users are allowed to access the camera simultaneously.2. As the number of simultaneously users increase, the overall performance will decrease. This is dependanton the Network bandwidth.Adding users1. Click Add on the Camera User List page.2. Enter the User name, Password and re-confirm the password then click Add.To edit a user’s password, click on the user name then enter the new password for that user twice and clickSave. To delete a user, click on the user name then click Delete.](https://usermanual.wiki/Sharx-Security/SCNC2900/User-Guide-2296525-Page-53.png)
![54Date & Time[Current device time] Internal time for camera.[Proposed device time] PC system time. On clicking Apply the internal time of the camera will be changedto this time.[Select to change the time zone for the device location] choose proper time zone.[Daylight saving time]Daylight Saving Time (or summertime as it is called in many countries) is a way ofgetting more light out of the day by advancing clocks by one hour during the summer.[Date and time format] Select date and time format.[Auto time setting(SNTP)] Enable or disable this function.[Time server] Type one SNTP server name in the box.Click Apply toconfirmyoursettings.Note:1. If the SNTP server is not found the camera’s time will be synchronized with the PC time.2. The camera has a built-in RTC(Real-time Clock) that keeps track of the time even when power isdisconnected.](https://usermanual.wiki/Sharx-Security/SCNC2900/User-Guide-2296525-Page-54.png)
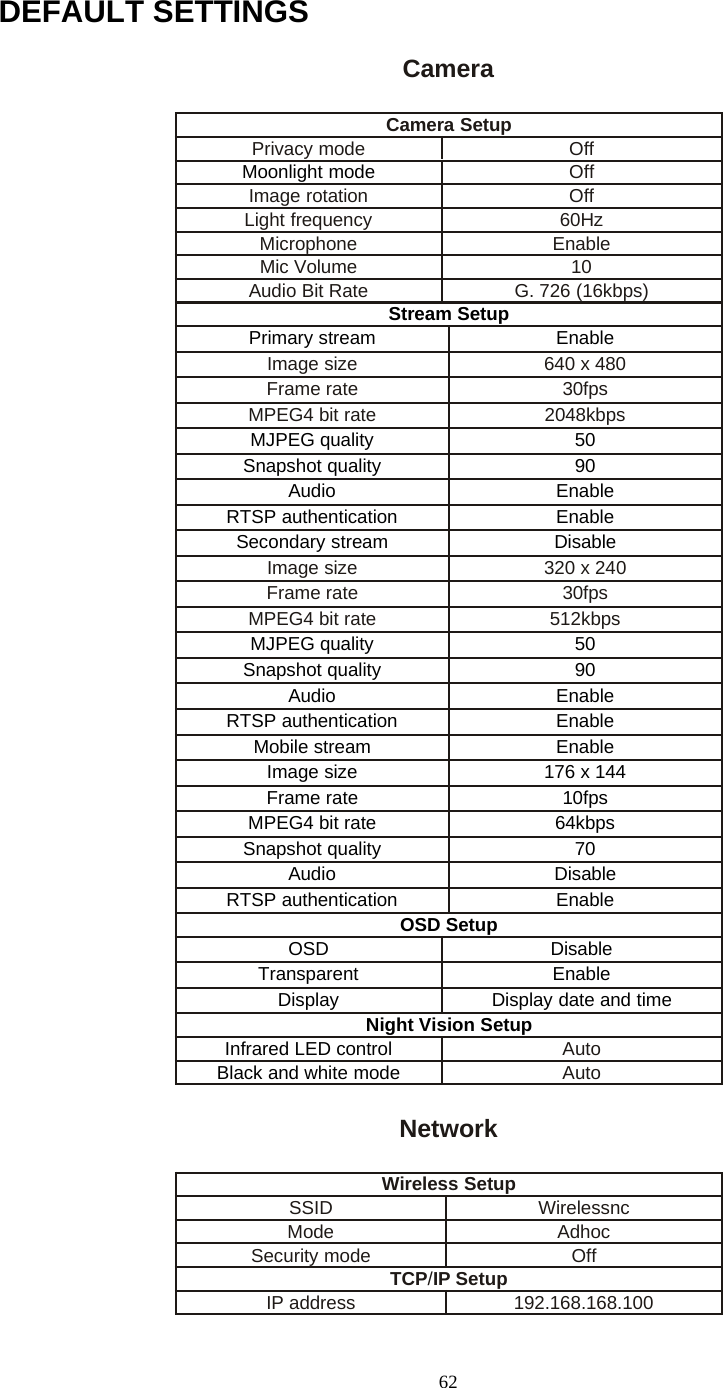
![55Backup or Reset[Reset] Click Reset to initialize the camera to default factory setting. All users and settings will belost, requiring you to reconfigure the camera.[Backup] Click Backup to backup the current configuration of the camera for future reference.[Browse...] Click Browse... to search for a backup configuration you wish to upload to the camera, thenclick Restore.Note:Do not turn off the power during the Reset, Backup or Restore functions since this might corrupt the camera’sfirmwareTip:The camera can also be reset to the default settings by pressing the reset switch on the side of the camera.](https://usermanual.wiki/Sharx-Security/SCNC2900/User-Guide-2296525-Page-55.png)


![60Proxy Server SettingA proxy server may prevent you from connecting to the camera in some corporate environments. The webbrowser can set up the IP address communication without using a proxy server. Consult your ISP or networkadministrator for further details.Note: A proxy server is generally used to maintain security on a network when connected to the internet. Theproxy server may cause lack of image quality and delays in refresh intervals. Consult your ISP or networkadministrator for further details.1. Start Internet Explorer.2. Select [Tools] –> [Internet Options...] –> [Connections] tab and click [LAN Settings].Verify that the Use a proxy server check box is not checked. When checked, click [Advanced...].When not checked, click [Cancel]. Your proxy server settings should not cause any problems.3. Enter the IP address of your camera into the Do not use proxy server for addresses beginningwith data field.4. Click [OK] on all of the opened windows.](https://usermanual.wiki/Sharx-Security/SCNC2900/User-Guide-2296525-Page-60.png)