Shearwell Data SDL130 RFID Intelligent Reader User Manual SDL130 manual issue 5 FCC 2012 updated 260213
Shearwell Data Limited RFID Intelligent Reader SDL130 manual issue 5 FCC 2012 updated 260213
SDL130 manual issue 5 FCC 2012 updated 260213
Shearwell Data Ltd, Putham, Wheddon Cross, Minehead,
Somerset, TA24 7AS. Tel: +44 (0)1643 841611
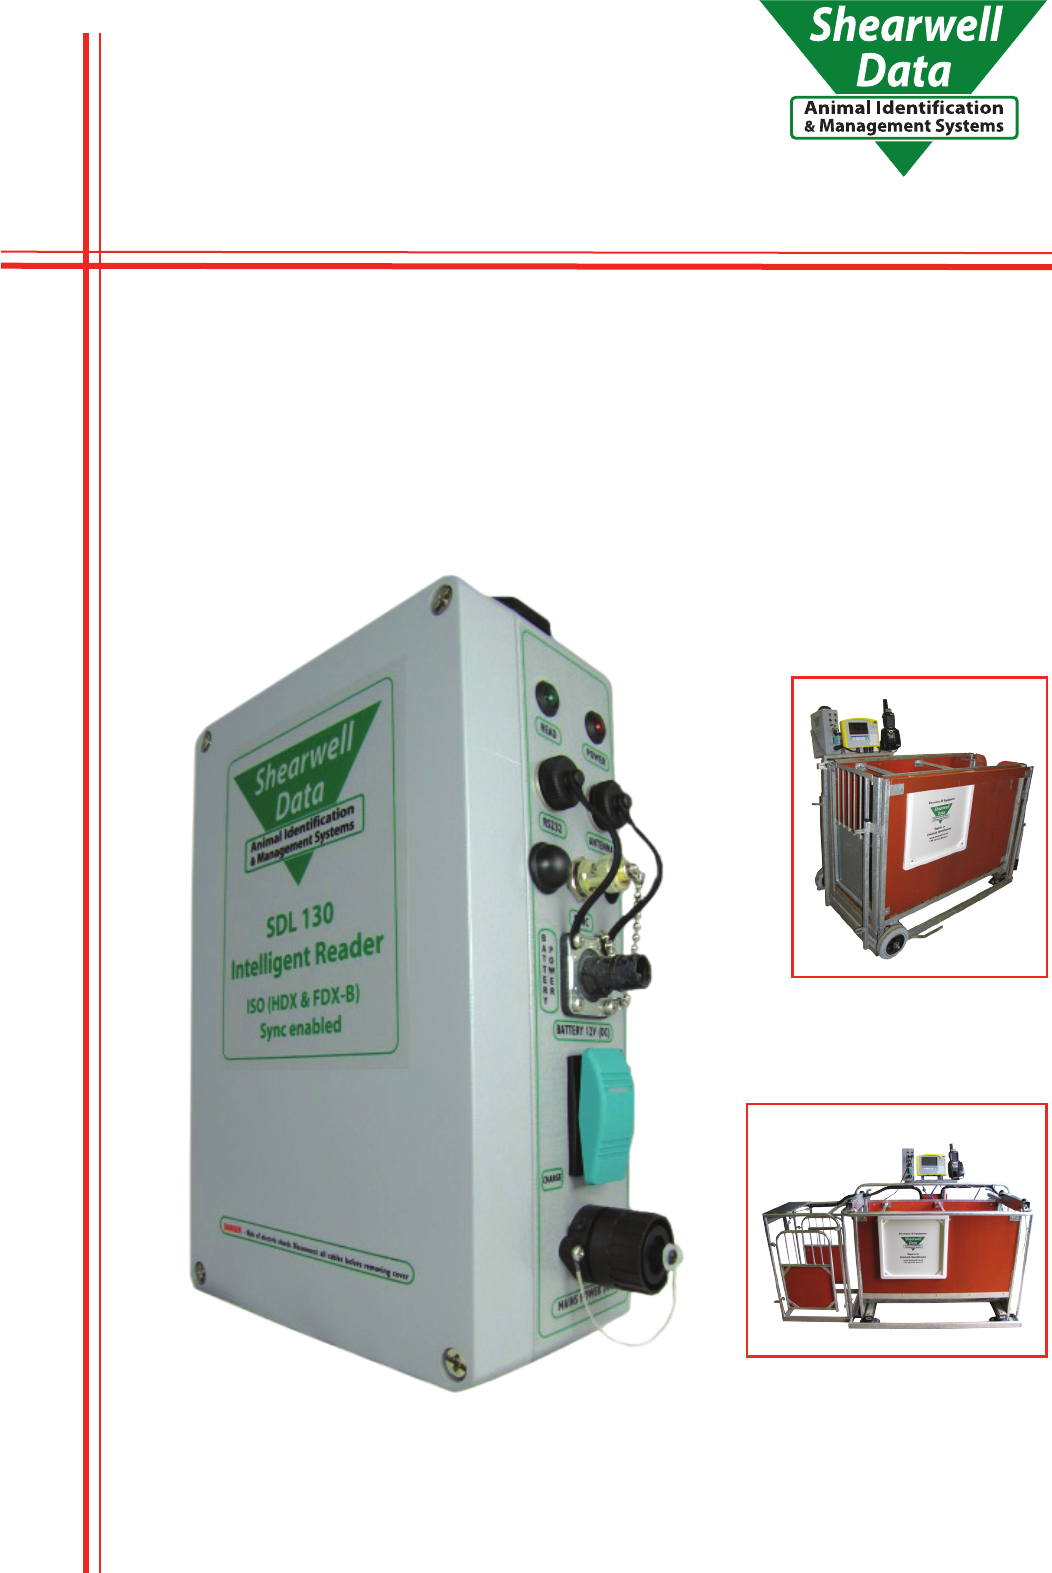
ISO (HDX & FDX-B)
SDL 130 Intelligent Reader
Instruction Manual
Sync enabled
Shearwell Data Limited
SDL 130 Intelligent Reader
Page 2Issue 5 - revised November ‘12
!
Warning
!
Caution
Information
i
Preface - Read This First
If you would like further information or assistance you can contact us via:
Phone:
Fax: Mail:
Web:
Email:
+44 (0)1643 841611
Shearwell Data Ltd, Putham, Wheddon
Cross, Minehead, Somerset, TA24 7AS
www.shearwell.co.uk
support@shearwell.co.uk
Contacting Shearwell Data Limited
+44 (0)1643 841628
About This Manual
This manual should be followed to correctly install and operate the SDL 130 Intelligent Reader,
produced by Shearwell Data Ltd.
Explanation of the symbols used in this manual to display important information:
A WARNING is used where care must be
taken, or a certain procedure must be
followed, in order to prevent injury or
harm to your health.
A CAUTION indicates information on conditions,
which must be met, or a procedure, which must
be followed, which if not heeded could cause
permanent damage to the system.
INFORMATION indicates conditions which must be
met, or procedures that should be followed to ensure
proper functioning of the system. This symbol is also
used to indicate general information which may be of
interest to the user.
i
Thank you for purchasing an SDL130 Intelligent Reader
Shearwell Data Limited
SDL 130 Intelligent Reader
Page 3Issue 5 - revised November ‘12
Preface - Safety Notices
240 V AC or 110 V AC installation should be in accordance with the current IEE wiring regulations.
The SDL 130 should be installed in accordance with the instructions in this manual.
It is strongly advised that suitable protection is provided for the mains supply, such as RCD.
Only use the power cables supplied with the Reader.
The lid of the Reader should only be removed for installation purposes. Ensure that the mains
power supply is disconnected before opening the case. Do not reconnect the power supply until
the lid has been retted.
Do not remove the clear plastic cover inside the enclosure.
Do not attempt to repair or replace any part of the Reader.
Do not allow the Reader or cables to stand in water.
!
Warning
There are no operator serviceable parts inside the SDL130 Intelligent Reader or the Antenna.
This equipment has been designed, constructed, and tested for compliance with FCC Rules
that regulate intentional and unintentional radiators. The user is not permitted to make
any modications to this equipment or use it in any manner inconsistent with the methods
described in this User Manual without the express approval from Shearwell Data Ltd. Doing so
will void the user’s authority to operate this equipment.
The SDL 130 is intended to be used in an agriculatural or indusrtrial environment, contact
Shearwell Data if operation in other environments is required.
Caution:

Shearwell Data Limited
SDL 130 Intelligent Reader
Page 4Issue 5 - revised November ‘12
Index
2
3
Reader Description
Antennae
5
6
Problem Solving
FDX-B and HDX Problem Solving
7
4
10
Industry Standards
11
Warranty
1
9
7 - 9
9
11
12 - 13
13
10
15
16 -17
5 - 6
14
8Servicing the SDL 130 Intelligent Reader 14
Appendix 1
Installation & Operation
User Notes
Technical Data
Shearwell Data Limited
SDL 130 Intelligent Reader
Page 5Issue 5 - revised November ‘12
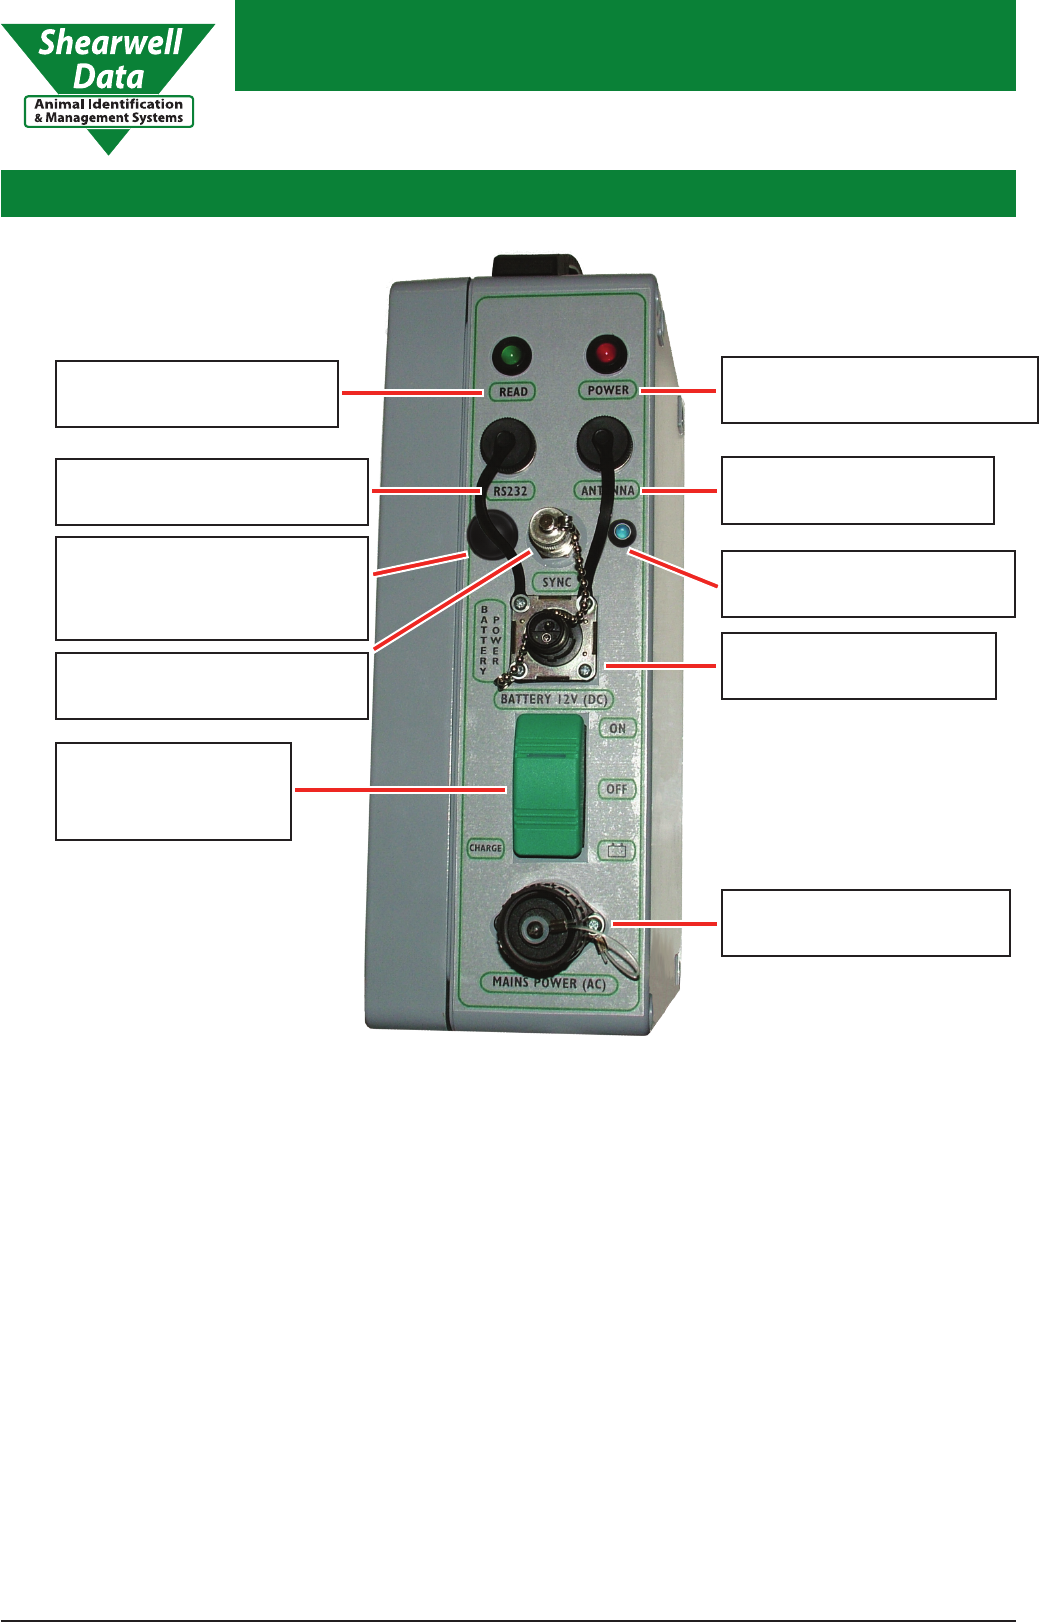
Reader Description1.
1.1
The Red LED indicates the Reader is powered. In charge mode it will not be illuminated.
Red LED
RED LED
POWER INDICATOR
ANTENNA
CONNECTOR
SYNCHRONISATION
CONNECTOR
GREEN LED
READ INDICATOR
BATTERY POWER
CONNECTOR
SR232
HOST CONNECTOR
MAINS POWER
CONNECTOR
THREE WAY
ROCKER
SWITCH
1.2
The Green LED ashes once when: every time the unit is stitched on and each time an EID has
been succesfully received and transmitted by the Reader.
Green LED
1.3
Socket for attaching the antenna cable.
Antenna Connector
1.4
Integrated Bluetooth Antenna
1.5
Socket for attaching the host (PC / Laptop / Hand Held computer) it carries the power and trigger
signal to the phase switcher.
SR232 Host Connector
1.1 1.2
1.3 1.4
1.7
1.9
1.8
2.0
BLUETOOTH LED
INDICATOR
1.6
1.5 INTEGRATED
BLUETOOTH
CONNECTOR

Shearwell Data Limited
SDL 130 Intelligent Reader
Page 6Issue 5 - revised November ‘12
1.9.1
In this position the Reader is ‘On’.
If only ‘Mains Power (AC)’ connected then the mains electric will power the reader.
If only ‘Battery 12V (DC)’ connected then the battery will power the reader.
If both ‘Mains Power (AC)’ and ‘Battery 12V (DC)’ are connected, the battery will charge.
Rocker Switch - ON
1.9.2
In this position the Reader and the charger are ‘O’.
Rocker Switch - OFF
1.9.3
In this position the Reader is ‘O’.
If both ‘Mains Power (AC)’ and ‘Battery 12V (DC)’ are connected, the reader will be powered up
and the battery will charge.
Rocker Switch - Battery Charge
1.8 Battery Power Connector - 12V DC
Socket for attaching the battery power cable (12V DC).
Rocker Switch
1.9
2.0
Socket for attaching the mains power cable (240V AC).
Mains Power Connector - AC
Reader Description
-+
The Blue LED illuminates when Bluetooth connection has been established
Bluetooth LED Indicator
1.6
Socket for attaching the synchronisation cable, for synchronising with other SDL130 Readers.
Synchronisation Connector
1.7
Shearwell Data Limited
SDL 130 Intelligent Reader
Page 7Issue 5 - revised November ‘12
What you will need
2.3
Power source - 240 V AC e.g. mains supply (UK) or 12 V DC @ 1.3 Amp e.g. automotive battery.
(or 110 V AC where appropriate.)
Host - e.g. Laptop / PC / Hand Held Computer (loaded with FarmWorks by Shearwell Data -
see section 9 & 10).
When more than one reader is going to be used, BNC type cables are required to connect to the
Synchronisation connector. Please contact Shearwell Data Ltd on 01643 841611 for further
information.
Optional accessories
2.2
See section 6.2 for further
details on host settings.
Information
i
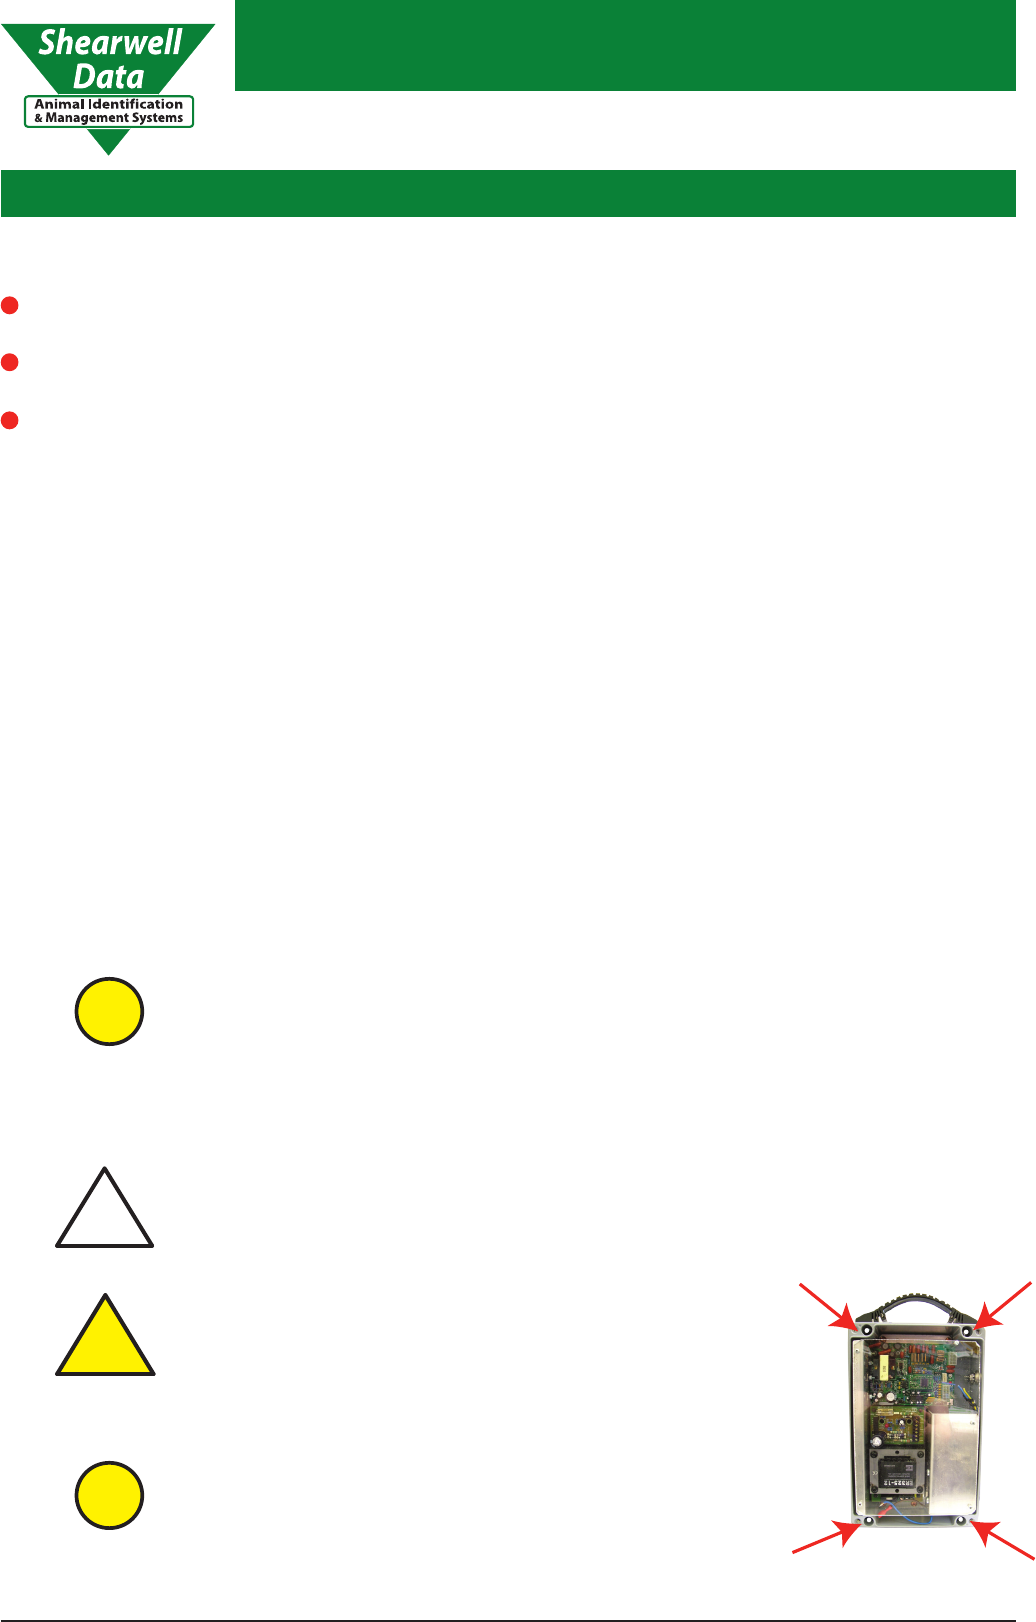
1. Remove lid to gain access to the pre drilled xing
holes in each of the corners.
2. Use screw size up to m8 to mount the reader in
the desired location.
3. Replace the lid.
When moving the SDL130, the carrying handle should always be used.
The following instructions are for permanently mounting the reader in a xed
position:
Permanent Mounting of the SDL 130 Intelligent Reader
2.4
!
Caution
Ensure that the mains power supply is disconnected
BEFORE opening the case. Do not reconnect the power
supply until the lid has been retted.
There are no operator serviceable parts inside the SDL130.
!
Warning
Information
i
Installation & Operation
The following items are supplied with the SDL 130 Intelligent Reader
2.1
A Power cable for connection to a 240 AC mains supply (section 1.8).
A Power cable for connection to a 12V DC Battery (section 1.6).
An Antenna cable (part of the Antenna) which is used to connect the Antenna to the SDL 130
(section 1.4). An antenna is required for the reader to function and there are dierent antenna
options available for purchase.
2.
Shearwell Data Limited
SDL 130 Intelligent Reader
Page 8Issue 5 - revised November ‘12
Operation of the SDL 130
2.6
Refer to the diagram on page 5 for the position of the terminals.
Please follow this order:
Make sure ALL the connections are made BEFORE you switch the reader on.
Damage may occur to the system if you use cables other than those supplied by
Shearwell Data Ltd.
!
Warning
Connect the Antenna to the SDL 130.
Connect the SDL 130 Reader to a power source - ‘Mains Power (AC)’ or ‘Battery 12V (DC)’ .
Switch the Rocker switch to ‘ON’ (section 1.7.1). The Red LED will illuminate and the Green LED
will briey illuminate, indicating the Auto tune is complete and a report has been sent.
Connect the host (PC / Laptop / Hand Held computer) to the SDL 130. If bluetooth is being used
to form the connection to the host, please see Appendix 1.
The Reader is now ready to use.
To set up your host correctly please refer to your host manual.
Information
i
Installation & Operation
2.5 Where best to operate the SDL 130 Intelligent Reader and Antenna
There are two factors that can have a signicant eect on the operation of an RFID System.
The rst of these is the presence of metal in the form of steel paneling or reinforcing bar if
the antennae is mounted close to a wall or cut into the surface of a oor. This has the eect of
signicantly modifying the magnetic elds produced by the Antennae coils and may cause distortion
which result in reduced read range as the eld no longer extends in the correct direction.
The second eect is one caused by interference from other electrical or electronic equipment.
Interference can also be caused by variable frequency motor drives. These are likely to be
encountered on industrial sites with conveyors. The simplest method of avoiding this cause of
system failure is to relocate the reader.
Information
i
2.6.1
2.6.2
2.6.3
2.6.4
2.6.5
Shearwell Data Limited
SDL 130 Intelligent Reader
Page 9Issue 5 - revised November ‘12
!
Warning
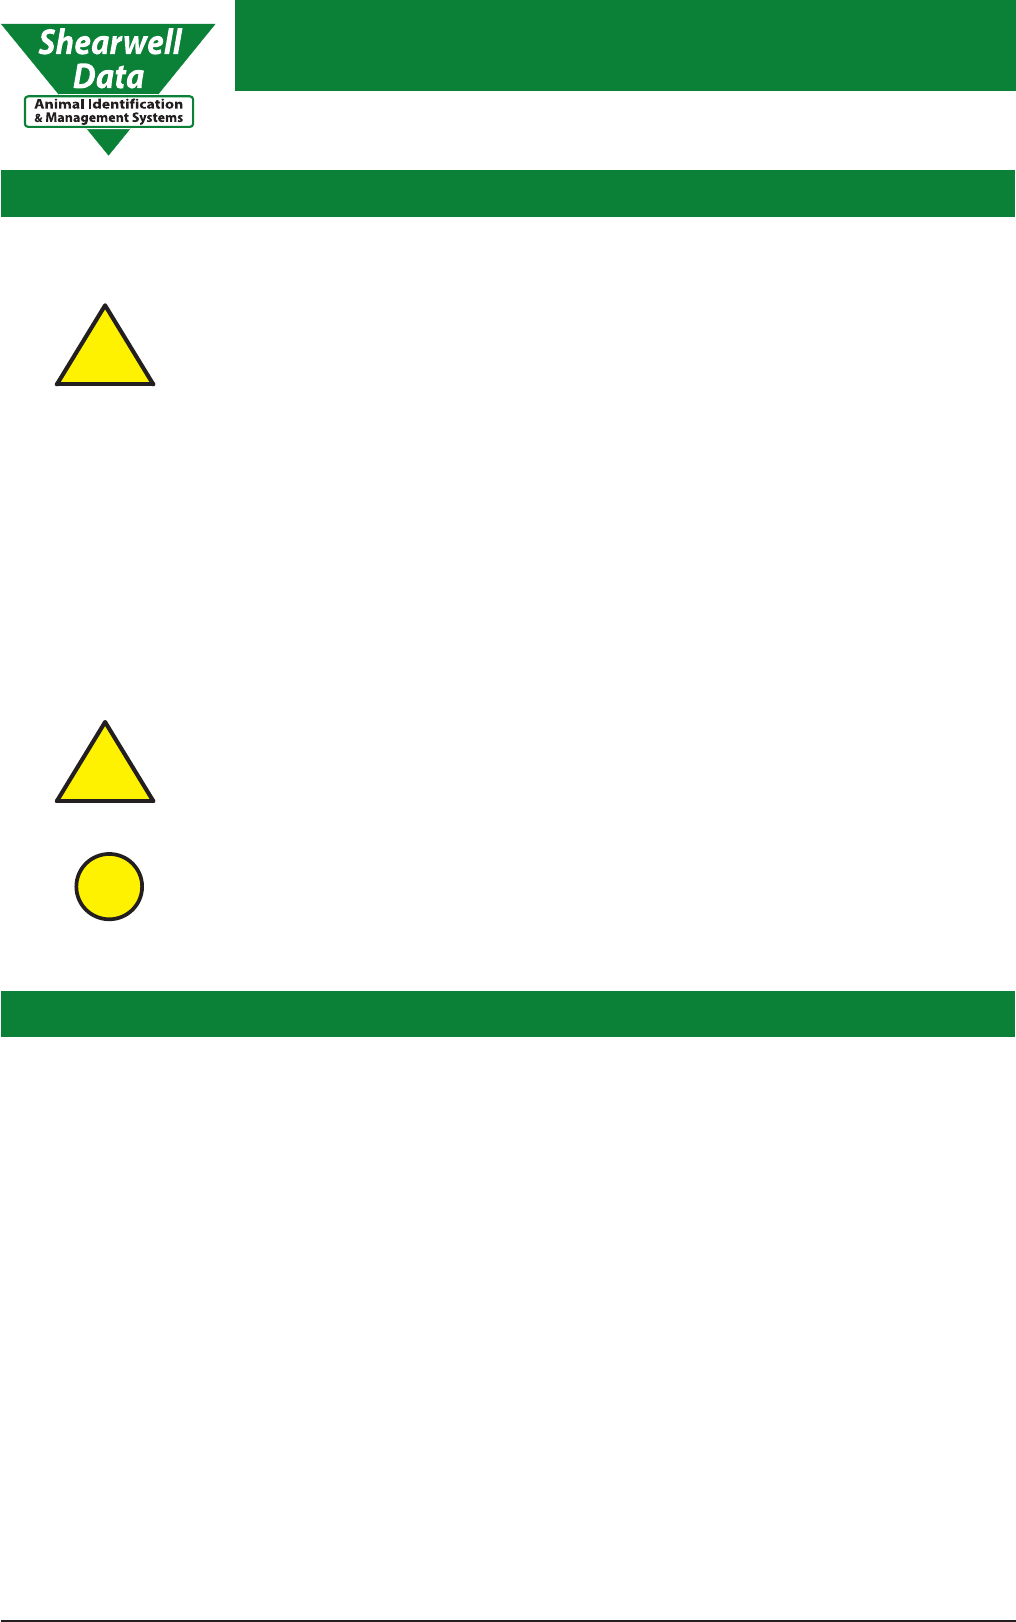
Antenna
3.
Twin Plate Antenna
Curved Antenna
There are no user
serviceable parts in
the Antennae.
Installation & Operation
2.7 Auto Tuning
The SDL 130 Intelligent Reader requires Auto Tuning prior to use. The reader
is equipped with a sophisticated self tune facility or auto-tune. The reader
performs an auto-tune shortly after power up. This takes less than 1 second.
Temperature changes can aect the accuracy of the antenna tuning.
The auto tune considers its environment at the time of tuning, if you change the
conditions, such as altering the equipment or metal objects present, the auto
tune may become invalid.
Restarting the reader will allow it to tune to the new conditions.
Information
i
!
Caution
Synchronising
Where it is desired to operate 2 or more SDL 130 Intelligent Readers in close
proximity they will require synchronizing or the readers will not work properly
particularly HDX (TIRIS). The synchronization allows readers to communicate
to each other and plan their cycles with virtually no degradation in the
performance for either FDX-B or HDX. The BNC type connector allows the
SDL 130 to be connected in daisy chain fashion on a practically innite network.
The SDL 130 will carry out syschronisation automatically without intervention
by the user - provided the correct cable is connected to the Reader.
2.8
Information
i
Only antennas approved by Shearwell should be used with the SDL130. Two examples of
antennas available form Shearwell are shown below.

Shearwell Data Limited
SDL 130 Intelligent Reader
Page 10Issue 5 - revised November ‘12
Problem Solving
4.1
4.
4.2
4.3
Problem Solution
No green indicator (read)
Nothing is being displayed
on the host computer
No red indicator (power) Check all cables are correctly connected and the
power is switched on.
Check the rocker switch is in the ‘On’ position,
(section 1.7.1).
If using the battery to power the reader check that it
is charged up and correctly connected.
If solutions 4.1.1 to
4.1.3 do not solve the
problem please refer to
section 7.3 on fuses.
4.1.1
4.1.2
4.1.3
Check as for problem 4.1 above.
Check the antenna is connected to the reader.
Remove sources of interference, including consealed
microchips (see section 5 for further details)
4.2.1
4.2.2
4.2.3 Check the animals being read have either a bolus or
an electronic tag.
4.2.4
If solutions 4.2.1 to
4.2.6 do not solve
the problem please
contact Shearwell on
01643 841611.
Check as for problems 4.1 and 4.2 above.
Check the host is fully charged / plugged in correctly.
4.3.1
4.3.2
If solutions 4.3.1 to
4.3.5 do not solve
the problem please
contact Shearwell on
01643 841611.
If applicable check that the host is functioning
normally when used independently.
4.3.3
If you have a replacement cable, try switching cables.
4.3.5
If FDX-B works but HDX does not please see section
2.8 on synchronisation.
4.2.6
Check the host is set up correctly and is set to the
correct port (see section 6.2 for further details).
4.3.4
Information
i
Information
i
Information
i

Shearwell Data Limited
SDL 130 Intelligent Reader
Page 11Issue 5 - revised November ‘12
FDX-B and HDX Problem Solving
Both the FDX and the HDX systems are susceptible to interference and can
suer loss of range when interference is present. Below are listed the main
points to check if the range is low. Before doing anything it is a good idea to
check the DC current being drawn. If it is the range 0.7-1.3 Amps then it is likely
that the RF (radio frequency) eld is being generated and that that the antenna
is OK.
FDX-B Problem Solving
Make sure the antenna is kept away from mains supply wires. This can induce RF into the lines that
may be modulated by the rectier circuits in electronic equipment, even when the equipment is
quite remote.
5.1.1
Do not place the antenna in close proximity to computer monitors.5.1.2
Do not run two SDL 130 Intelligent Readers or a SDL 130 Intelligent Reader and another
commercial reader closer than 20 yards (18.29 metres) unless they are synchronised.
5.1.3
If two SDL 130 Intelligent Readers are used in close proximity then try to rotate one of the
antenae so that the two are 90 degrees to each other.
5.1.4
HDX Problem Solving
Make sure the antenna is kept away from mains supply wires. Mains borne switching interference
can reduce the range.
5.2.1
Do not place the antenna in close proximity to computer monitors.5.2.2
Do not run two SDL 130 Intelligent Readers or a SDL 130 Intelligent Reader and another
commercial reader closer than 60 yards (54.86 metres) unless they are synchronised.
5.2.3
If two SDL 130 Intelligent Readers are used in close proximity then try to rotate one of the
antenae so that the two are 90 degrees to each other.
5.2.4
HDX will not work if two readers are operating in the same locality and they have not been
synchronized. Check the synchronization cable is properly connected.
5.2.5
5.1
5.2
5.
Information
i
Information
i
Information
i

Shearwell Data Limited
SDL 130 Intelligent Reader
Page 12Issue 5 - revised November ‘12
Technical Data
Specication
6.1
Power requirements Mains Power 240 V AC, 110 V AC or Battery Power 12 V DC
Interface Full duplex RS232 @ 19,200 baud
Frequency 134.2KHz
Transponder ISO Transponder
Auto-tune Internal on switch on
Read Indication LED and customer connection
Weight 4.85 Kg
Operating Temperature -5C to 60C
6.
How the Host should be setup
6.2
19,200 Board
8 data bits
1 stop bit
no parity or ow control
6.2.1
Additional data output formats avaialbe
6.3
To set up your host correctly
please refer to your host manual.
6.2.2 The default data output format is set to Hexidecimal Raw data which contains the information
stored on the EID device. On request Shearwell Data can supply the conguration information
required to change the output format to any of the following. See 6.3.
The SDL130 output format must be congured correctly to meet the requirments of the host.
Information
i
Hexidecimal
6.3.1
All information stored on the microchip. This includes the retag counter, species identier and
three reserved digits.
Decimal
6.3.2
Full 16 digits EID device number in decimal format. An example of this is 0940123456789012.

Shearwell Data Limited
SDL 130 Intelligent Reader
Page 13Issue 5 - revised November ‘12
Result
6.4
Upon switch-on the reader sends a report down the RS232 line. The report indicates the Software
Revision and the Tuning Variable. A typical report will be as follows.
A = 1 - F
FULL ISO
6.3.4
EID device number is sent in a fully ISO compliant format which contains the 6 ISO standard digits,
(retag counter, species identier and three reserved digits) and 15 digit device number.
An example of this would be 1004000940123456789012.
ISO Decimal
6.3.3
EID device number is sent in decimal minus the rst 0 of the country code and with a space
between the country code and the remaining twelve digits.
An example of this would be 940 123456789012.
WYSIWYG
6.3.4
EID device with country code 0826i are sent as ‘UK’ followed by 7 digit ock number, followed by
a space and the individual 5 digit animal number.
An example of this would be UK0123456 12345.
If the EID read is not a UK EID the device number will be displayed in decimal.
Technical Data
Industry Standards7.
The SDL130 complies with parts 15.207 and 15.209 of the FCC rules CFR 47:2009. The SDL130 oper-
ates at a frequency 0f 134.2KHZ and complies with part 15C emission requirements. These limits are
designed to provide reasonable protection against harmful interference when the equipment is oper-
ated in a commercial environment. This equipment generates, uses, and can radiate radio frequency
energy, and if not installed and used in accordance with the instruction manual, may cause harmful
interference in which case the user will be required to correct the interference at his own expense.
The SDL130 also complies with Industry Canada RSS-210 issue 7.
This SDL130 complies with Industry Canada license-exempt RSS standard(s). Operation is subject to
the following two conditions: (1) this device may not cause interference, and (2) this device must accept
any interference, including interference that may cause undesired operation of the device
Shearwell Data Limited
SDL 130 Intelligent Reader
Page 14Issue 5 - revised November ‘12
Warranty
SDL 130 Intelligent Reader Warranty
9.1
The SDL 130 is guaranteed against defects in materials and workmanship for one year from the
original date of purchase.
9.
9.1.1
9.1.2
9.1.3
9.1.5
Any component part or parts which become defective in normal use due to faulty materials or
workmanship, will be repaired or replaced at our discretion free of charge.
All costs relating to despatch, transport and insurance will be at the owner’s expense.
This guarantee is in addition to and does not aect your statutory rights as a consumer.
9.1.6 In the case of a defect covered by this warranty please telephone Shearwell Data Ltd 01643 841611.
9.1.4 This guarantee will be null and void if the item has been interfered with in any way by any
unauthorised party, or misused in any way. Damage caused by external sources will not constitute a
part of this guarantee and is therefore excluded.
Servicing the SDL 130
Servicing
8.1
Servicing should only be carried out by qualied personnel.
8.
Spares
8.2
Spare parts can be obtained directly from Shearwell Data Limited, please ring 01643 841611.
Fuses
Under no circumstances should unqualied personnel
remove the perspex safety cover and tamper with the fuses
as serious injury or death could occur.
!
Warning
!
Warning
8.3
The SDL 130 Intelligent Reader has three fuses: a 3 Amp fuse in the mains plug and two fuses (500
mA AC fuse and a 2 A DC fuse) situated behind the perspex safety cover.
Information
i
The 3 Amp fuse in the mains plug can safely be changed if it is blown.
However, the cause of the blown fuse should be established by qualied personnel.
There are no operator serviceable parts inside the SDL130 Intelligent Reader
or the Antenna.

Shearwell Data Limited
SDL 130 Intelligent Reader
Page 15Issue 5 - revised November ‘12
Users Notes
10.

Shearwell Data Limited
SDL 130 Intelligent Reader
Page 16Issue 5 - revised November ‘12
Appendix 1
11.
Bluetooth connection
The SDL130 comes tted with a Bluetooth module, which enables wireless connection to numerous devices. The
SDL130’s Bluetooth can be used to connect to a host (PC / Laptop / Hand Held computer) with the appropriate
Bluetooth wireless software. To allow the SDL130 to communicate with the host you will be required to establish
a Bluetooth connection.
If you are using a computer and it does not already have a Bluetooth adapter, then Shearwell Data Ltd recommends
a Bluetooth adapter by Belkin. These can be supplied on request. The instructions below refer to establishing a
Bluetooth connection with a Belkin adapter, but the principles are the same for most adapters.
Set up of Belkin Bluetooth Adapter
For help installing the Belkin Bluetooth adapter please consult the installation guide on the CD provided with the
adapter. If the CD automatically runs, the guide can be found by selecting the ‘View Installation Guide’ option. If
the CD does not automatically run, the document ‘Quick Install Guide’ can be found on the Belkin Bluetooth CD,
within the folder titled ‘QIG’.
Adding a Bluetooth Device
In order to be able to connect a Bluetooth enabled device to a computer with Bluetooth, it must rst be added to
the recognised list of Bluetooth devices in ‘My Bluetooth Places’ on the PC.
Bluetooth may be displayed by the symbol as shown.
Ensure the SDL130 is switched on, so that it may be discovered by the computer.
Go to ‘My Bluetooth Places’ via the Bluetooth displayed on your desktop or present in the toolbar at the bottom
right hand conrner of the computer screen.
If these options are not present ‘My Bluetooth Places’ may also be accessed from ‘My Computer’ or for Windows
7 left click on the button and select ‘Control Panel’, ‘Devices and Printers’.
With the ‘My Bluetooth Places’ window open, choose the option to ‘Add a Bluetooth Device’.
The ‘Bluetooth Setup’ wizard will run, please follow the steps as prompted. When the ‘Bluetooth Device Selection’
screen appears wait for the PC to stop searching for devices, then select the device corresponding to the SDL130
you wish to connect to.
On the next screen you will be prompted to type the ‘Passkey’, this is 1111.
Shearwell Data Limited
SDL 130 Intelligent Reader
Page 17Issue 5 - revised November ‘12
Appendix 1
Having followed the steps for ‘Adding a Bluetooth Device’ it will now be possible to connect the SDL130 to the PC
within a few simple steps.
Turn on the Stick Reader. Go to ‘My Bluetooth Places’ within ‘My Computer’ and right click on the shortcut for the
SDL130.
From the menu, choose to ‘Connect’. You may be prompted to enter the Bluetooth ‘Passkey’ again, if so enter 1111.
When completed the SDL130 will be connected. Use this method each time you wish to connect the SDL130 to
a PC.
Make a note of the com port number the PC has used to establish Bluetooth connection. This will be required when
connecting software.
Continue to follow the instructions and at the ‘Bluetooth Service Selection’ screen make sure that the ‘AT Serial’
option is selected.
After selecting ‘next’ to continue, a window will pop up to conrm that a shortcut for the device has been created
in ‘My Bluetooth Places’.
The ‘Bluetooth Setup Wizard Completion’ Page will conrm completion of the Bluetooth setup.
The SDL130 will now be connected to the PC via Bluetooth. When attempting to connect the SDL130 again use
the method detailed in the ‘Connecting via Bluetooth’ section below.
Please note that for Windows 7, only one established bluetooth connection is allowed at any time. If other bluetooth
devices have been connected please remove before proceeding. This can be done by left clicking the bluetooth
icon displayed in the tool bar at the bottom of the computer screen. Select ‘Show Bluetooth Devices’ to display
all devices currently connected. To remove a device right click on selected item and ‘Remove’, until only one
connection to the SDL130 remains.
Please note this next step is not required for Windows 7. A bluetooth device added to Windows 7 remains
permanently connected.
Connecting via Bluetooth
SDL130
Bluetooth
number