Shen Zhen MTC 5065864 LED TV User Manual MUAV6550Y 65864
Shen Zhen MTC Co., LTD LED TV MUAV6550Y 65864
User manual

USER MANUAL
MUAV5061Y-65864
Please read this User Manual carefully to ensure use of this product and keep this
manual for future reference
LED TV

Contents
Safety and warnings......................................................................................1-3
Introduction................................................................................... ..............4
Installation...................................................................................................5-8
...................................................................................................9
General Description............................................................................ ..........10-13
External Connection......................................................................................14-17
Basic Operations...........................................................................................18-19
Menu System Instruction................................................................................20-37
Digital Media Player.......................................................................................38
Trouble Shooting...........................................................................................39-40
Reference.....................................................................................................41
Wall Mount
-1-
SAFETY AND WARNINGS
IMPORTANT SAFETY INSTRUCTION
TO REDUCE THE RISK OF ELECTRIC SHOCK, DO
NOT REMOVE COVER (OR BACK).NO USER
SERVICEABLE PARTS INSIDE. REFER SERVICING
TO QUALIFIED SERVICE PERSONNEL.
RISK OF ELECTRIC SHOCK
DO NOT OPEN!
CAUTION
CAUTION
The symbol indicates that dangerous
voltages constituting a risk of electric
shock are present within this unit.
The symbol indicates that there are
important operating and maintenance
instructions in the literaturaccompanying
this unit.
To reduce the risk of fire or electric
shock, do not expose this apparatus to
rain or moisture.
WARNING:
1) Read these instructions.
2) Keep these instructions.
3) Heed all warnings.
4) Follow all instructions.
5) Do not use this apparatus near water.
6) Clean only with dry cloth.
7) Do not block any ventilation openings,
install in accordance with the instructions.
8) Do not install near any heat sources such as
radiations, heat registers, stoves, or other
apparatus (including amplifiers) that produce
heat.
9) Do not defeat the safety purpose of the
polarized plug. If the provided plug does not fit
into your outlet, consult an electrician for
replacement of the obsolete outlet.
10) Protected the power cord from being
walked on or pinched particularly at plugs,
convenience receptacles, and the point where
they exit from the apparatus.
11) Only use attachments/accessories
specified by the manufacturer.
12) Unplug this apparatus during lighting
storms or when unused for long periods of
time.
13) Refer all servicing to qualified service
personnel. Servicing is required when the
apparatus has been damaged in any way, such
as power-supply cord or plug is damaged,
liquid has been spilled or objects have fallen
into the apparatus, the apparatus has been
exposed to rain or moisture, does not operate
normally, or has been dropped.
14) Mains plug is used as the disconnect
device, the disconnect device shall remain
readily operable.
15) The ventilation should not be impeded by
covering the ventilation openings with items,
such as newspapers, table-cloth, curtains, etc.
16) No naked flame sources, such as lighted
candles, should be placed on the apparatus.
17) Attention should be drawn to the
environmental aspects of battery disposal.
18) The use of apparatus in moderate climate.
19) The apparatus shall not be exposed to
dripping or splashing and that no objects filled
with liquids, such as vases, shall be placed on
the apparatus.
Warning: To avoid any injury caused by lean of
the product, please always ensure the whole
product was placed within the table surface in
horizontal.
The batteries shall not be exposed to
excessive heat such as sunshine, fire or
the like.
WARNING:
WARNING
Never place a television set in an unstable
location. A television set may fall, causing serious
personal injury or death. Many injuries,
particularly to children, can be avoided by taking
simple
precautions such as:
– Using cabinets or stands recommended by the
manufacturer of the television set.
– Only using furniture that can safely support the
television set.
– Ensuring the television set is not overhanging
the edge of the supporting furniture.
– Not placing the television set on tall furniture
(for example, cupboards or bookcases) without
anchoring both the furniture and the television set
to a suitable support.
– Not placing the television set on cloth or other
materials that may be located between the
television set and supporting furniture.
– Educating children about the dangers of
climbing on furniture to reach the television set or
its controls.
If your existing television set is being retained and
relocated, the same considerations as above
should be applied.
SAFETY AND WARNINGS
Step one: Use the expansion
bolts(4*36PWA) to fix the wall mount
brackets into the wall
Step Two: Fix the wall mount screws
(M6x8mm/4pcs) into the rear side of the LCD
TV,using the tongue
of 8kgf.cm.
* The TV appearance subject to material
object.
Step Three: Put the LCD TV with wall mount
screws onto the wall mount brackets.
Warning: the angle between the TV and wall
must not be bigger than 3º.
This symbol indicates that this product
incorporates double insulation between
hazardous mains voltage and user
accessible parts. When servicing use only
identical replacement parts.
This marking indicates that this product
should not be disposed with other
household wastes throughout the EU. To
prevent possible harm to the environment
or human health from uncontrolled waste
disposal, recycle it responsibly to promote
the sustainable reuse of material
resources. To return your used device,
please use the return and collection
systems or contact the retailer where the
product was purchased. They can take this
product for environmental safe recycling.
Warning: Changes or modifications to this unit not
expressly approved by the party responsible for
compliance
could void the user’s authority to operate
the equipment.
NOTE: This equipment has been tested and found to
comply with the limits for a Class B digital device,
pursuant to Part 15 of the FCC Rules.
These limits are designed to provide
reasonable protection against harmful interference in
a residential installation.
This equipment generates, uses and can
radiate radio frequency energy and, if not installed and
used in accordance
with the instructions, may cause harmful
interference to radio communications.
However, there is no guarantee that interference will
not occur in a particular installation. If this equipment
does cause harmful interference
to radio or television reception, which can be
determined by turning the equipment off and on, the
user is encouraged to try to
correct the interference by one or more of the
following measures:
o Reorient or relocate the receiving antenna.
o Increase the separation between the equipment and
receiver.
o Connect the equipment into an outlet on a circuit
different from that to which the receiver is
connected.
Consult the dealer or an experienced radio/TV
technician for help.
This device complies with Part 15 of the FCC Rules.
Operation is subject to the following two conditions:
(1) this device may not cause harmful interference,
and
(2) this device must accept any interference received,
including interference that may cause undesired
operation.
SAFETY AND WARNINGS
IMPORTANT SAFETY INSTRUCTIONS
The symbol indicates that dangerous
voltages constituting a risk of electric shock
are present within this unit.
The symbol indicates that there are
important operating and maintenance
instructions in the literature
accompanying this unit.
To reduce the risk of fire or electric shock, do
not expose this apparatus to rain or moisture.
WARNING:
Important Safety Instructions
1) Read these instructions.
2) Keep these instructions.
3) Heed all warnings.
4) Follow all instructions.
5) Do not use this apparatus near water.
6) Clean only with dry cloth.
7) Do not block any ventilation openings, install
in accordance with the instructions.
8) Do not install near any heat sources such as
, heat registers, stoves, or other
apparatus (including amplifiers) that produce
heat.
9) Do not defeat the safety purpose of the
polarized plug. If the provided plug does not fit
into your outlet, consult an electrician for
replacement of the obsolete outlet.
10) the power cord from being walked on
or pinched particularly at plugs, convenience
receptacles, and the point where they exit from
the apparatus.
11) Only use attachments/accessories specified
by the manufacturer.
12) Unplug this apparatus during lighting storms
or when unused for long periods of time.
13) Refer all servicing to qualified service
personnel. Servicing is required when the
apparatus has been damaged in any way, such
as power-supply cord or plug is damaged,
liquid has been spilled or objects have fallen into
the apparatus, the apparatus has been exposed
to rain or moisture, does not operate normally, or
has been dropped.
14) Mains plug is used as the disconnect device,
the disconnect device shall remain readily
operable.
15) Do not the ventilation openings with
items such as newspapers, table-cloth, curtains,
etc.
16) No naked flame sources, such as lighted
candles, should be placed on the apparatus.
17) Attention should be drawn to the
environmental aspects of battery disposal.
18) apparatus in moderate climate.
19) The apparatus shall not be exposed to
dripping or splashing and that no objects filled
with liquids, such as vases, shall be placed on
the apparatus.
20) Use only with a cart , stand, tripod, bracket,
or table specified by the manufacturer, or sold
with the apparatus. When a cart is used, use
caution when moving the cart/apparatus
combination to avoid injury from tip-over.
non abrasive
radiators
Protect
when
cover
Use
The batteries shall not be exposed to
excessive heat such as, fire or the like.
WARNING:
The excessive sound pressure from earphones
and headphones can cause hearing loss.
WARNING:
This symbol indicates that this product
incorporates double insulation between
hazardous mains voltage and user accessible
parts. When servicing use only
identical replacement parts.
This marking indicates that this product
should not be disposed with other
household wastes. To prevent possible
harm to the environment or human health
from uncontrolled waste disposal, recycle it
responsibly to promote the sustainable
reuse of material resources. To return your
used device, please use the return and
collection systems or contact the retailer
where the product was purchased. They
can take this product for environmental
safe recycling.
-2-
SAFETY AND WARNINGS
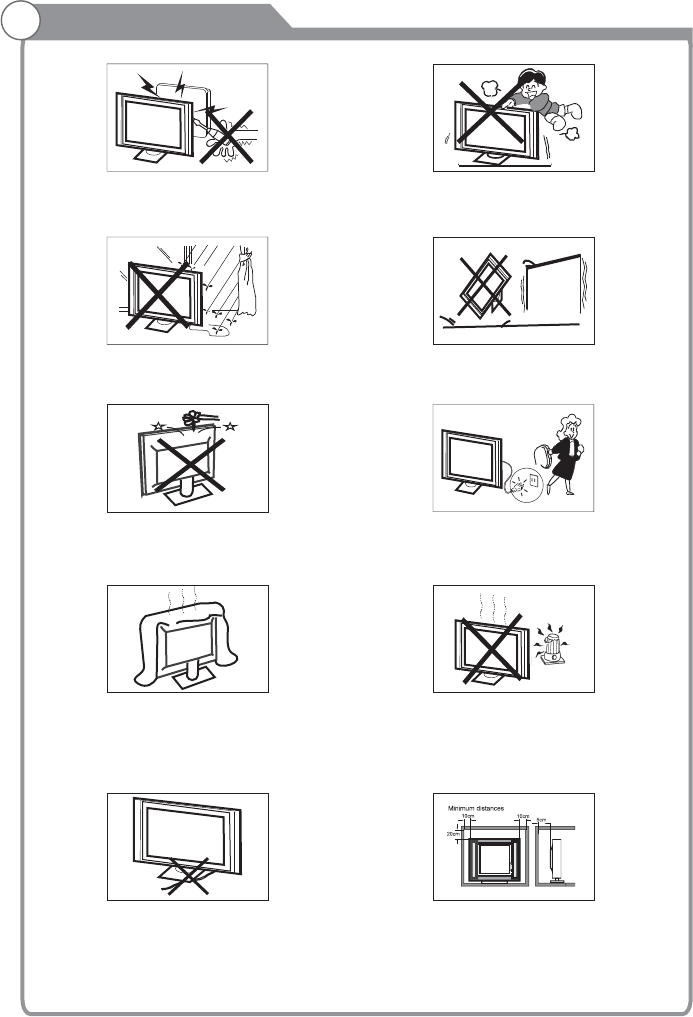
High voltages are used in the operation of this television
receiver. Do not remove the cabinet back from your set.
Refer servicing to qualified service personnel.
To prevent fire or electrical shock hazard, do not expose
the television receiver to rain or moisture.
Do not drop or push objects into the television cabinet
slots or openings. Never spill any kind of liquid on the
television receiver.
Do not block the ventilation holes in the back cover.
Adequate ventilation is essential to prevent failure of
electrical components.
Do not trap the power supply cord under the television
receiver.
Never stand on, lean on, or suddenly push the television or
its stand. You should pay special attention to children.
Serious injury may result if it falls.
Do not place your television on an unstable cart, stand, shelf
or table. Serious injury to an individual , and damage to the
television, may result if it falls.
Recommended to utilize rear
mount screw holes for anti-tipping (hardware not included).
When the television receiver is not used for an
extended period of time, it is advisable to disconnect
the AC power cord from the AC outlet.
Avoid exposing the television receiver to direct sunlight
and other sources of heat. Do not stand the television
receiver directly on other products which give off heat,
e.g. video cassette players and audio amplifiers. Do not
place naked flame sources, such as lighted candles on
the television.
Dim:515*320mm(不包括底座)
If the television is to be built into a compartment or similar
enclosure, the minimum distances must be maintained. Heat
build-up can reduce the service life of your television, and
can also be dangerous.
-3-
INTRODUCTION
Antenna
Main features Accessories
43" wide screen for a complete home theater experience
Super slim LCD TV with LED backlight
3840 x 2160 native resolution for UHD performance
Integrated ATSC TV tuner for HDTV broadcast reception
Beautiful color depth with a contrast ratio of 1200:1
HDMI inputs for true digital connections
®
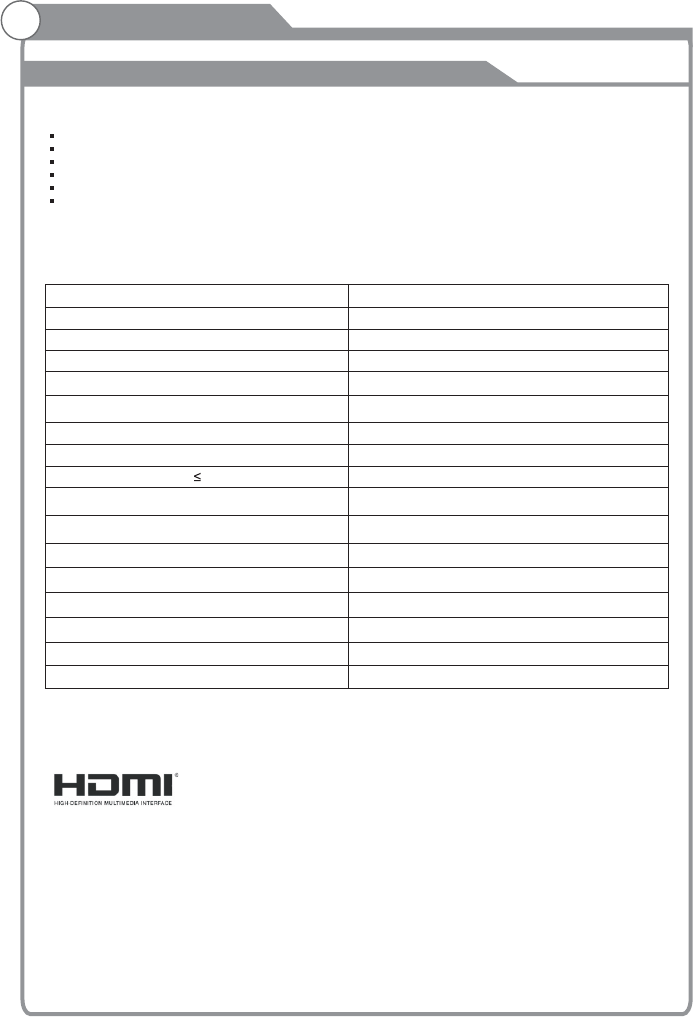
Specifications
Resolution:
Aspect Ratio:
TV System:
Video Signal System:
Receiving Channel:
Input Power Voltage:
Maximum Power Consumption:
YCb(Pb)Cr(Pr) Input
3840 x 2160
16:9
120W
Audio Output Power(THD 7%):
2 x 8W
NTSC
Cable :1-135/ Air: 2-69(ATV&DTV)
High-Definition Multimedia Interface(HDMI) Input x 3
x 1
Composite Video Input
AC 100-240V 50/60Hz
ATSC Digital system and NTSC Analog system
x 1
Audio Input
Headphone Output
Coaxial
USB In2.0 put
x 1
x 1
x 2
x 1
The terms HDMI and HDMI High-Definition Multimedia Interface, and the HDMI Logo are
trademarks or registered trademarks of HDMI Licensing in the United
States and other countries.
Administrator, Inc.
Manufactured under license from Dolby Laboratories. Dolby, and the
double-D symbol are trademarks of Dolby Laboratories.
Dolby Audio,
Infrared Remote Control...................
1
User’sM anual ...............................
1
Battery(AAA) ........................ . 2.........
Screws........................................... 4
Base stand......................................2
Component adaptor cable.................2
“This product is manufactured, distributed, serviced and warranted exclusively by SHENZHEN
MTC CO., LTD.. “JVC” is the trademark of JVC KENWOOD Corporation, used by such company
under license.”
-4-
LAN x 1
INSTALLATION
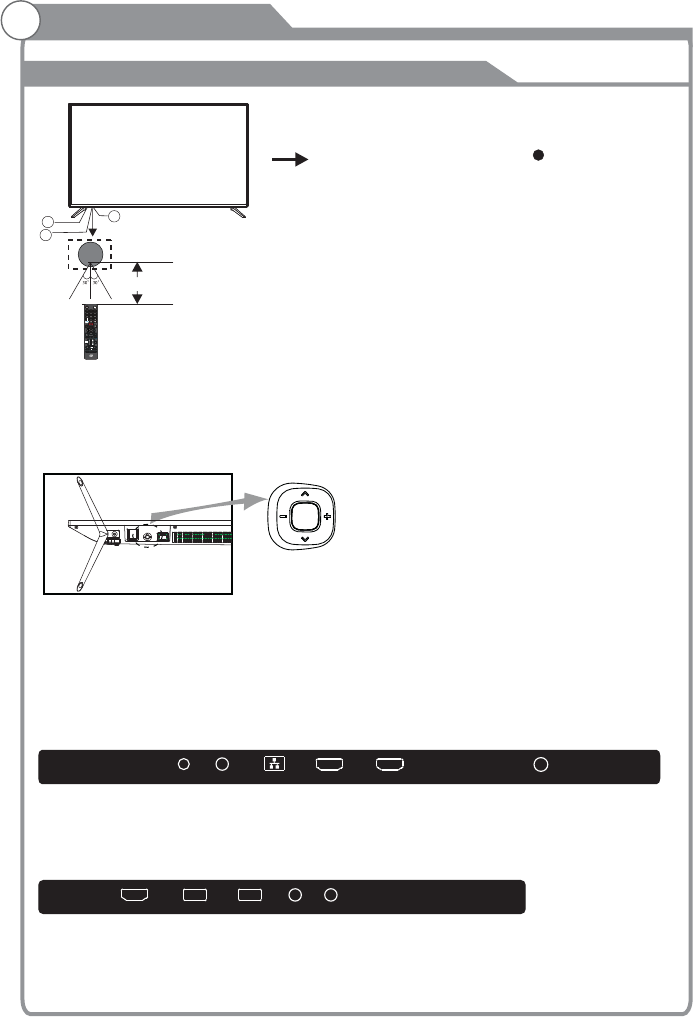
Front panel
REAR Connections
SIDE Connections
All the terminals are(from left to right): HEADPHONE, COAXIAL, LAN, HDMI3, HDMI2, RF.
VIDEO L ROPTICAL
All the terminals are (from left to right):
, USB2.0, VIDEO/YPbPr, AUDIO.
HDMI1(ARC)
1: Remote control sensor.
2: Indicator LED: RED STANDBY.
3: Key board
3
2
1
≤8m
Bottom
1. Middle Button: press longtime for “power” function;
2. Up/Down: CH+/-
3. Left/Righ: VOL-/+
press once for “source” function
The keyboard is located at the bottom left near the right side of signal indicator.
KEYBOARD
Rocker
HDMI3 HDMI2
HEADPHONE COAXIAL LAN RF
HDMI1(ARC) USB2.0 USB2.0 V/YPbPr AUDIO
0
789
456
123
VOL CH
MTS/AUDIO
CC/SUBTITLE
TTS
CH
EXIT
OK
INFO
PICTURE
SOUNDASPECT
-5-
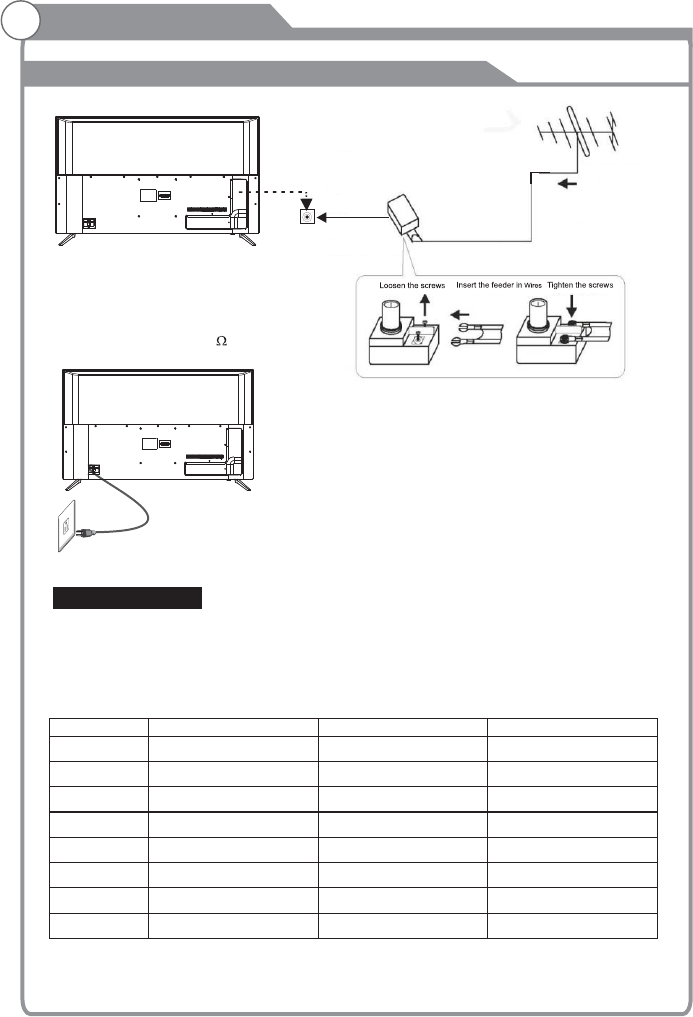
INSTALLATION
Antenna
PRESET MODE (HDMI)
1
2
3
800*600
1024*768
60
60
37.88
48.36
RESOLUTION V.Freq.(Hz) H.Freq.(KHz)
1366*768 60 47.7
41280*768 60 47.3
5
1920*1080
60 67.5
63840*2160 30 67.5
750 112.5
860 135
3840*2160
3840*2160
CABLE
When shipped from the factory, the Signal Type option is for the RF connector (F-type) set to
the"AIR" (Over-the air antenna) mode.
Power connection
Please note: After unpacking, allow the TV to reach ambient room temperature before
connection the TV to the mains power socket.
Connect the power cord plug to the mains power socket.
OUTDOOR OR INDOOR ANTENNA
Note:
Aerial connections:F connector.
Input impendance:75 unbalanced.
PLUG
75Ω CABLE
ANTENNA OR CABLE TV
ADAPTER (NOT SUPPLIED)
TWIN-LEADER FEEDER (300Ω)
OUTDOOR OR INDOOR ANTENNA
(NOT SUPPLIED)
-6-
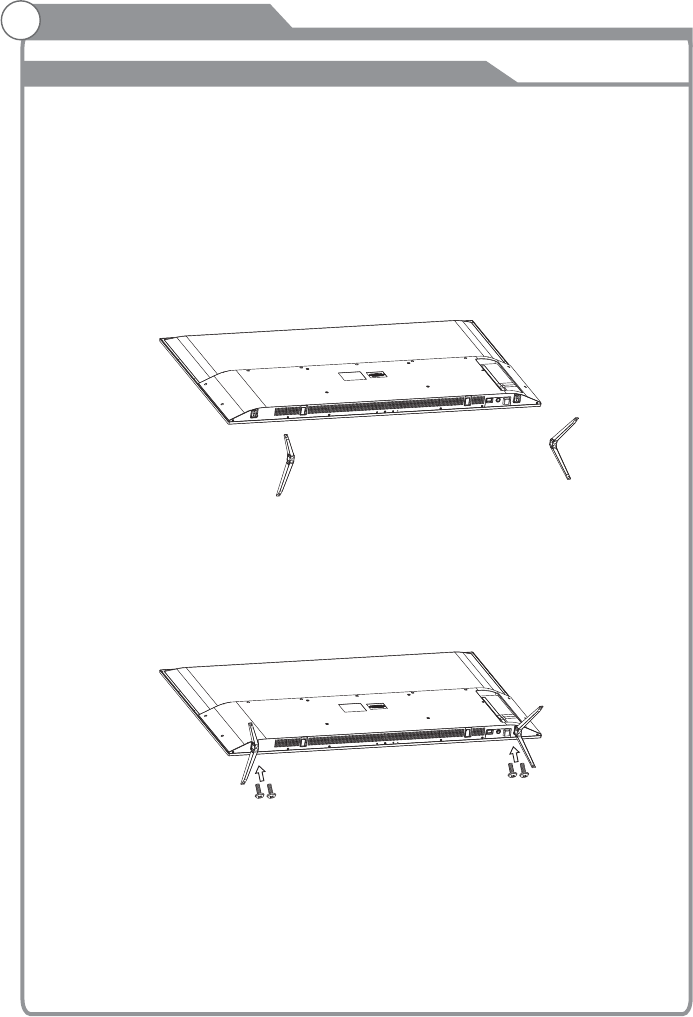
Prepare to place the TV with the display side down on a flat surface. Due to the size and
weight of this TV, the use of 2 people is recommended when moving it. Ensure the table or
desk you use provides a flat, totally clean surface, and use a soft cloth between the face of the
TV and the table to protect the TV's screen.
1. Locate the 2PCS of the base stand and the gap in the bottom of the TV , and
check that it is securely held in place as per a) below.
2.Lock in the designated location as per b) below and check each screw is firmly
tightened
insert it into
4 screws
INSTALLATION
Base Stand Assembly Instruction
The base stand
b)
a)
4 x Screws( )M4X14MM
-7-
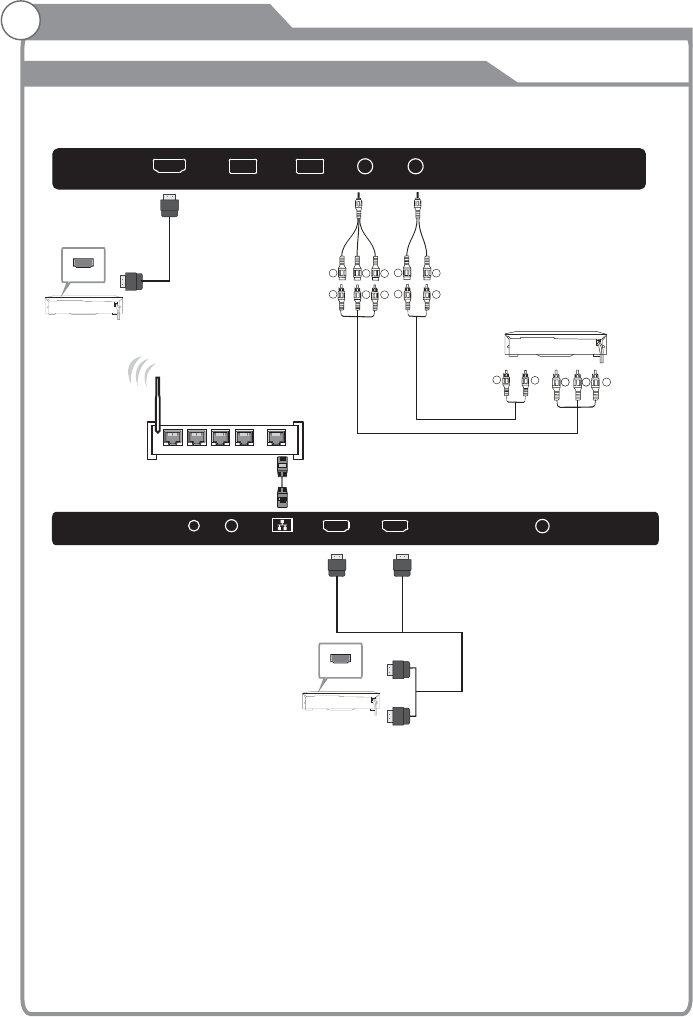
INSTALLATION
AV Equipment
You can use the input terminals as follows.rear
Video Equipments: VCR, Multi Disc Player, DVD Player, Camcorder, Video Game, etc.
Video format that YPbPr supports: 480i, 576i, 480p, 720p, 1080i, 1080p, 2160p.
HDMI
VIDEO EQUIPMENT with YPbPr
GBR
G
B
R
G
B
R
HDMI1(ARC) USB2.0 USB2.0 V/YPbPr AUDIO
HDMI3 HDMI2
HEADPHONE COAXIAL LAN RF
HDMI
-8-
1WA N2
3
4
W
R
W
R
W
R

Wall Mount
Instruction for Wall Mount
Dimensions for Mounting Hole Pattern
A wall mount kit (purchased separately) would allow you to mount your JVC
TV on the wall. For detailed information on installing the wall mount, refer
to the instructions provided by the wall mount manufacturer. It is strongly
recommended to contact a technician for professional assistance for wall mount
installation. is not responsible for any damagJVC e to the product or injury to
yourself or others resulting from the wall-mounting.
200
200
64.3
This TV is compatible with a mounting hole pattern.JVC 200mm x 200mm
- Do not mount your TV at more than a 15 degree tilt.JVC
-Always use two people to mount the TV to a wall.
- Do not install your Wall Mount Kit while your TV is turned on. It may result in
personal injury due to electric shock.
- 4 pcs of type M6 screws are required for installing the wall mount bracket to
your TV. Do not use screws that are longer than 10 mm. Screws that JVC
are too long may cause damag e to the inside of the TV set.
- Do not fasten the screws too tight for this may damage the TV or cause the
TV to fall, resulting in personal injury. is not liable for these kinds of JVC
incidents.
-9-
0
789
456
123
VOL CH
MTS/AUDIO
CC/SUBTITLE
TTS
CH
EXIT
OK
INFO
PICTURE
SOUNDASPECT
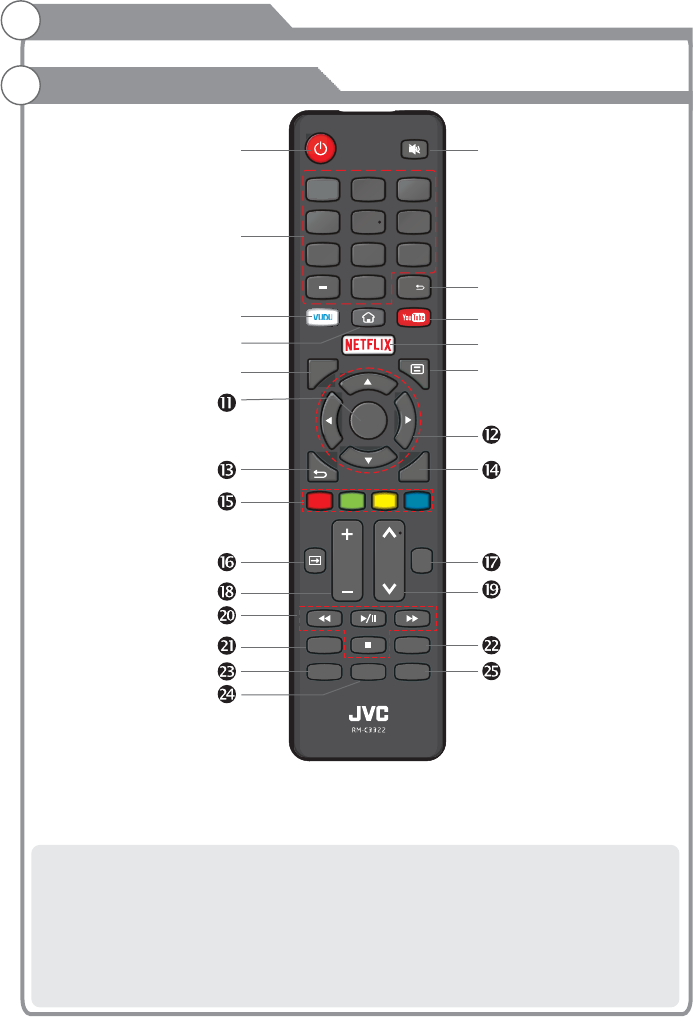
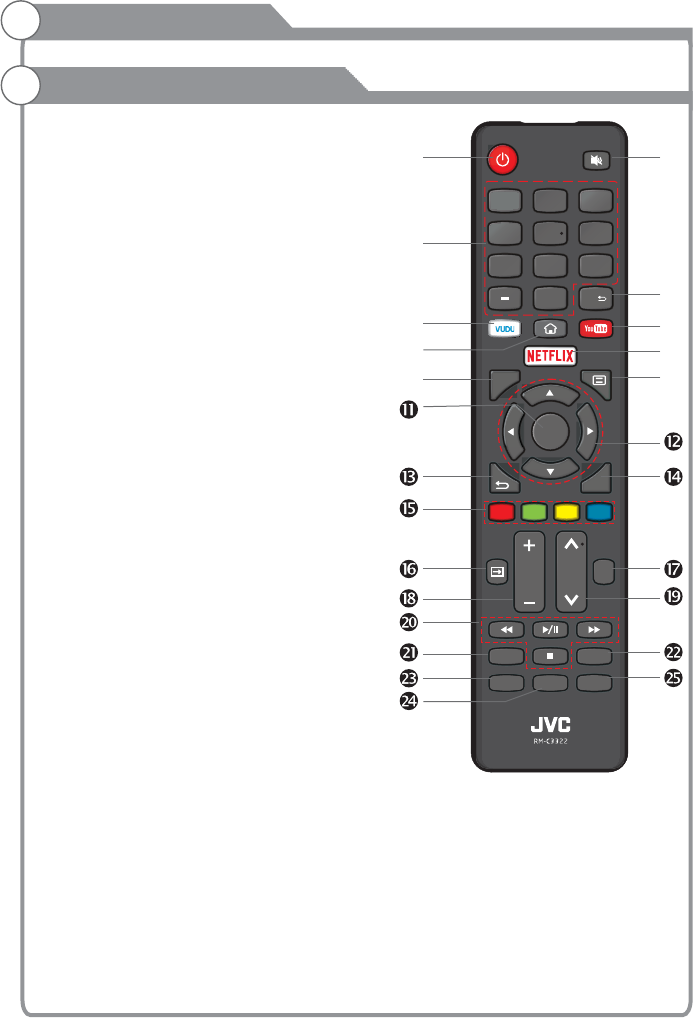
Overview of remote control
General Description
Loading batteries:
1) Remove the lid of the battery compartment.
2) Insert 2 size AAA batteries with polarities as indicated inside the compartment.
3) Replace the lid.
Note:
1) A loading of batteries should be last one year under normal use.
2) If you don't intend to use the remote control for a long period of time, remove batteries
to avoid damage due to leakage.
3) Do not mix old and new batteries or different types.
4) Do not throw batteries into fire or water.
5) The batteries (battery pack or batteries installed) should not be exposed to excessive
heat such as sunshine, fire or the like.
-10-

0
789
456
123
VOL CH
MTS/AUDIO
CC/SUBTITLE
TTS
CH
EXIT
OK
INFO
PICTURE
SOUNDASPECT
1. POWER: Turn the TV on and off.
2. MUTE: Press this button to cut off the sound of
the TV set temporarily, press again to resume.
3. Digital Buttons(0-9, -): Directly select channel
with digital buttons.
4. CH : Switch to the previous program.
5. YouTube: If network connects, press this key
to view YouTube directly.
6. VUDU: Press it to show channel list and favorite
list on screen.
7. : Press it to go to App home page.
8. NETFLIX: If network connects, press this key
to view NETFLIX directly.
9. INFO: Display the program information
: Display the main menu or exit the
current menu.
11. OK: Validation key.
12. Arrow button : Use to select
on-screen menu items and change menu
values.
13. : Return.
14. EXIT: Exit the menu.
15. COLOR It's used as it's showed
in the EPG or Program Edit menu.
16. : This button is used to switch among
different sources, Select a source and press
OK button to confirm
.
10.
s pqtu
BUTTONS:
General Description
Overview of remote control
-11-
0
789
456
123
VOL CH
MTS/AUDIO
CC/SUBTITLE
TTS
CH
EXIT
OK
INFO
PICTURE
SOUNDASPECT
ICTURE icture mode17. P: Select p .
18. VOL -: Press these buttons to adjust the
volume.
19. CH :
20. DIGITAL MEDIA PLAYER CONTROL
BUTTON: Include play/pause, stop,
backward, forward is used in USB mode .
Please refer to relevnat instructions in
the section of multimed player.
21. CC/SUBTITLE:
MTS/AUDIO: In USB mode, press this
button to switch audio track when movie
is playing. In TV mode, press this button
to switch MTS or Audio Language.
23. ASPECT: Press this button to set aspect,
such as 16:9,4:3,native,ect.
24. TTS: Press this button to set TTS on or off.
25. SOUND: Press this button to select sound
mode.
+/
˄/˅ Press these buttons to change
channel upward or downward.
In USB mode, press this
button to switch subtitles when movie is
playing.
22.
General Description
Overview of remote control
-12-
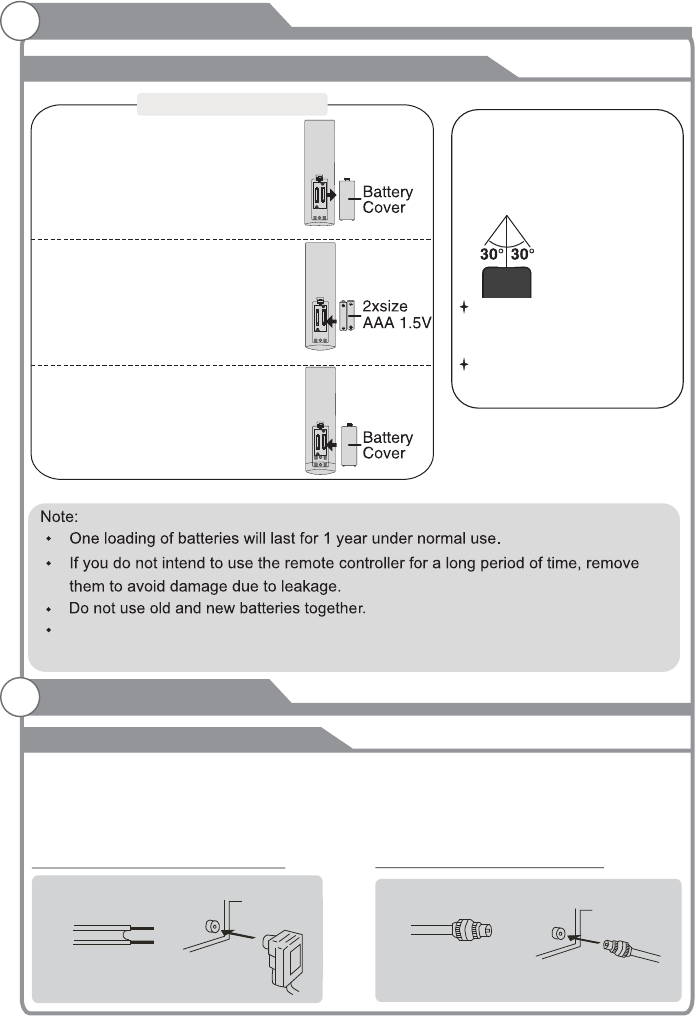
Installing Batteries in the Remote Control
General Description
Antenna connection
Antenna input impedance of this unit is 75ohm. VHF/UHF 75ohm coaxial cable can be
connected to the antenna jack directly, if the antenna cable is 300ohm parallel flat feeder
cable, you need to use the 300ohm/75ohm converter to connect the antenna cable to the
antenna jack. For details Please refer to the following drawing.
Use a 75ohm - 300ohm converter
300ohm coaxial cable
Antenna feeder
ANT IN
75ohm coaxial cable
Antenna cable
Antennas with 300 W flat twins Leads Antennas with 75 W Round Leads
External Connection
The batteries (battery pack or batteries installed) shall not be exposed to
excessive heat such as sunshine, fire or the like.
Installing Batteries
1Open the battery compartment
cover on the back side.
2Insert two 1.5V AAA size batteries in
correct polarity. Don´t mix old or used
batteries with new ones.
3Closed the cover.
Point the remote towards the remote
control sensor of the TV and use it
within 8 meters.
Put the used batteries into the recyc-
ling bin since they can negatively
affect the environment.
External Connection
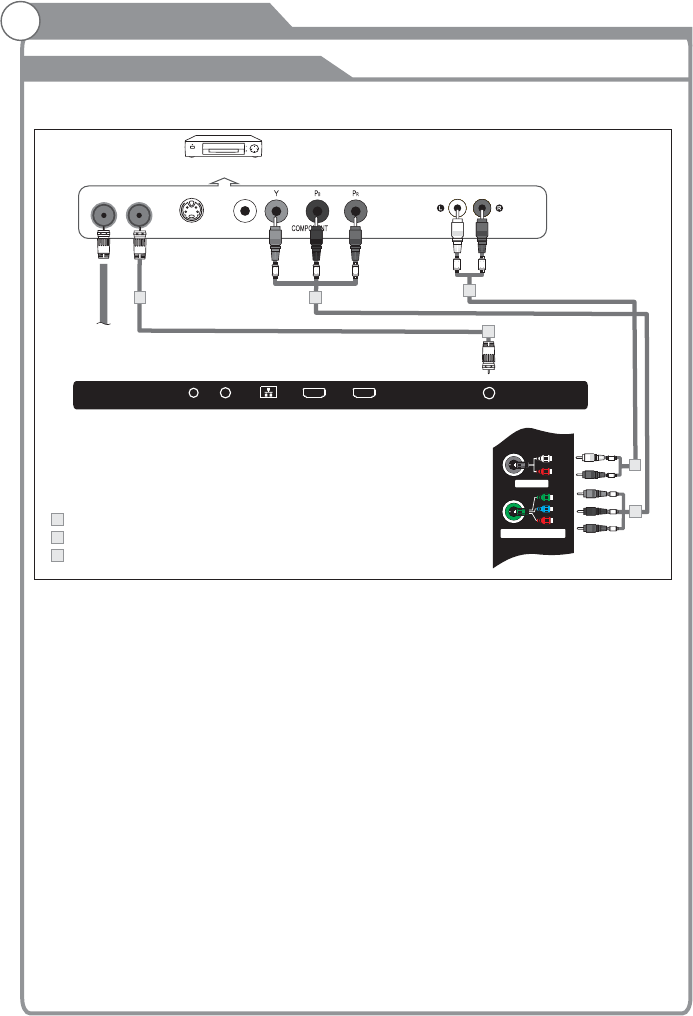
Connecting VCR
These instructions assume that you have already connected your TV to an antenna or a cable
TV system. Skip step 1 if you have not yet connected to an antenna or a cable system.
VCR Rear Panel
TV Rear Panel
White
Red
ANT ANT OUT S-VIDEO AUDIO OUT
Red
Blue
Green
VIDEO OUT
23
1
2
1
3Audio Cable (Not supplied)
YPbPr cable( supplied) Not
RF Cable (Not supplied)
Follow the instructions in Viewing a VCR or Camcorder Tape to view your VCR tape.
Each VCR has a different back panel configuration.
When connecting a VCR, match the color of the connection terminal to the cable.
1. Unplug the cable or antenna from the back of the TV.
2. Connect the cable or antenna to the ANT IN terminal on the back of the VCR.
3. Connect an RF Cable between the ANT OUT terminal on the VCR and the ANT IN terminal on the
TV.
4. Connect a Component Cable between the COMPONENT [Y, Pb, Pr] jacks on the DVD player and
YPbPr jack on the TV.
5. Connect Audio Cables between the AUDIO OUT jacks on the VCR and the AUDIO L and
AUDIO R jacks on the TV.
Note:
1. Whenever you connect an external device to your TV, make sure that power on the unit
is turned off.
2. When connecting an external device, match the color of the connection terminal to the
cable.
Pb
Pr
Y/V
L
R
V/YPbPr
AUDIO
Red
Blue
Green
Red
White
2
3
1
-14-
HDMI3 HDMI2
HEADPHONE COAXIAL LAN RF
External Connection
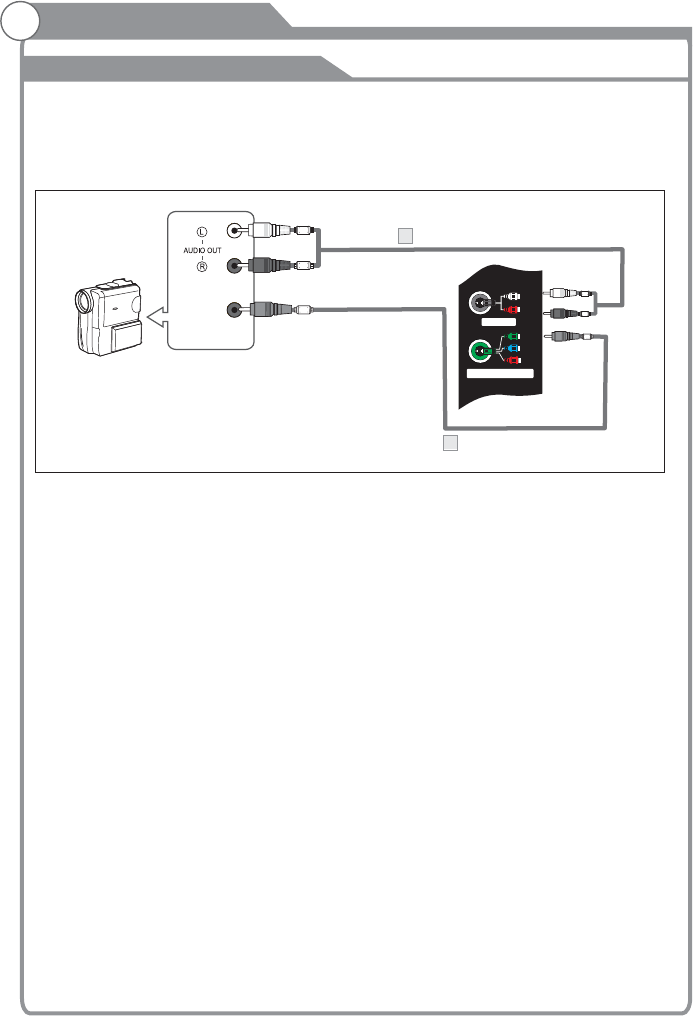
Connecting a Camcorder
The rear panel jacks on your TV make it easy to connect a camcorder to your TV. They allow you
to view the camcorder tapes without using a VCR.
Each Camcorder has a different back panel configuration.
When connecting a Camcorder or DVD, match the color of the connection terminal to the cable.
Video
Green
1. Connect a Video Cable between the AV VIDEO in jacks on the TV and the VIDEO OUT jack
on the camcorder.
2. Connect Audio Cables between the AUDIO L and AUDIO R jacks on the TV and the AUDIO
OUT jacks on the camcorder.
3. Connect a Video Cable between the AV VIDEO IN jacks on the TV and the VIDEO OUT jack
on the DVD.
4. Connect Audio Cables between the component IN AUDIO L and R jacks on the TV and the
AUDIO OUT jack on the DVD.
Notes:
1. Whenever you connect an external device to your TV, make sure that power on the unit
is turned off.
2. When connecting an external device, match the color of the connection terminal to the
cable.
White
Red
Camcorder
Video Cable (Not supplied)
1
Audio Cable (Not supplied)
2
Pb
Pr
Y/V
L
R
V/YPbPr
AUDIO
Green
Red
White
-15-
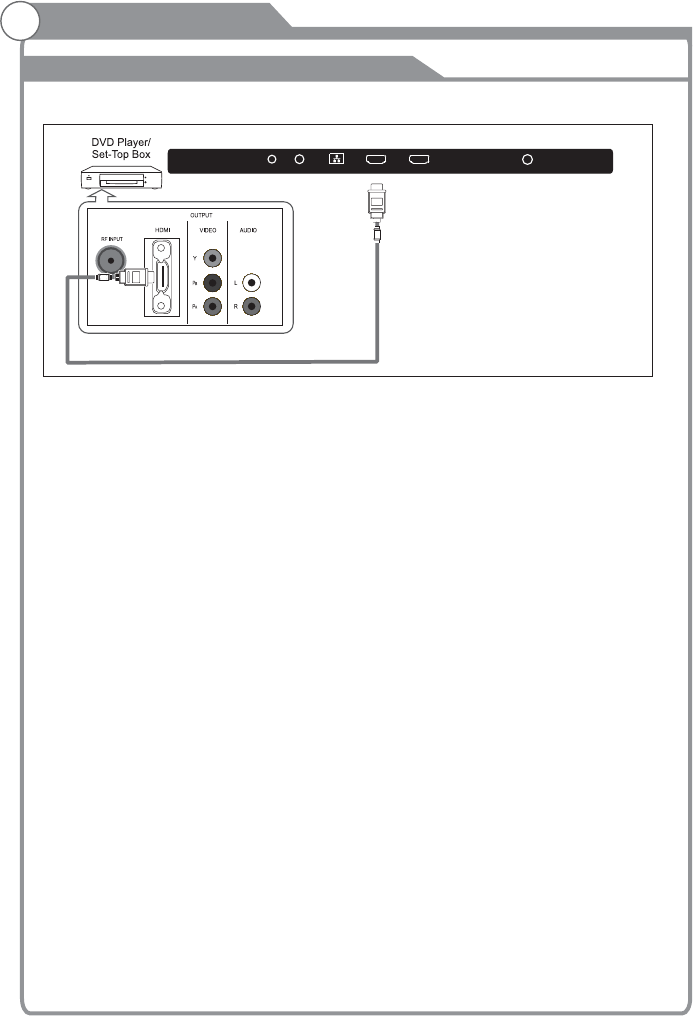
External Connection
Connecting Digital Audio System
This connection can only be made if there is a HDMI Output connector on the external device.
HDMI Cable (Not supplied)
What is HDMI?
HDMI, or high-definition multimedia interface, is a next-generation interface that enables the
transmission of digital audio and video signals using a single cable without compression.
Multimedia interface is a more accurate name for it especially because it allows multiple channels
of digital audio (5.1 channels).
The difference between HDMI and DVI is that the HDMI device is smaller in size, has the HDCP
(High Bandwidth Digital Copy Protection) coding feature installed, and supports multi-channel digital
audio.
Each DVD player/STB has a different back panel configuration.
Connect an HDMI Cable between the HDMI1, HDMI2, HDMI3 connector on the TV and the HDMI
connector on the DVD player/Set-Top Box.
Notes:
1.Whenever you connect an external device to your TV, make sure that power on the unit
is turned off.
2.When connecting an external device, match the color of the connection terminal to the
cable.
-16-
HDMI3 HDMI2
HEADPHONE COAXIAL LAN RF
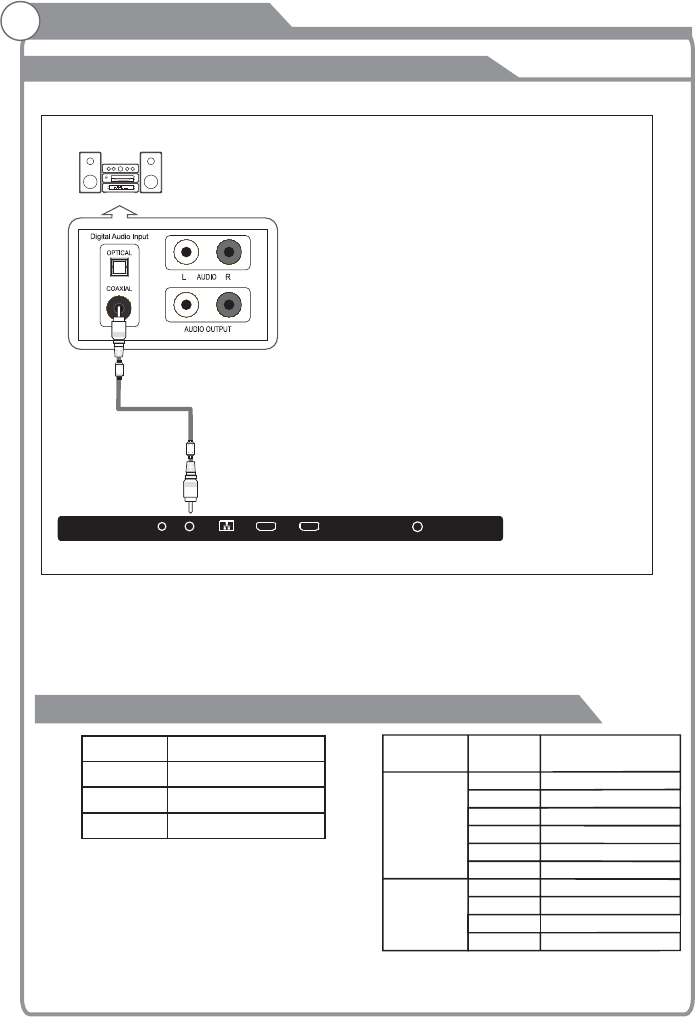
Connecting PC
External Connection
Supporing Signals
Input Mode
Digital
Analog
ATSC
CVBS PAL/NTSC
PAL-M/PAL-N/NTSC M
The rear panel jacks on your TV make it easy to connect a Digital Audio System to your TV.The rear panel jacks on your TV make it easy to connect a Digital Audio System to your TV.
5.1 CH audio is possible when the TV is connected to an external device supporting 5.1 CH.
Connect an OPTICAL Cable between the OPTICAL jacks on the TV and the Digital Audio Input jacks
on the Digital Audio System. When a Digital Audio System is connected to the OPTICAL terminal:
Decrease the gain (volume) of the TV, and adjust the volume level with the
volume control.
Digital Audio System's
Digital Audio System
(Black)
TV Rear Panel
COAXIAL
Resolution
Input
Component
60Hz
60Hz
50Hz/60Hz
480i
480p
720p
50Hz/60Hz
1080i
HDMI 50Hz/60Hz
50Hz/60Hz
480p
720p
60Hz
1080i
Vertical
Frequency
50Hz/60Hz
1080p
50Hz/60Hz
1080p
3840x2160 24Hz/25Hz/30Hz/60Hz
-17-
HDMI3 HDMI2
HEADPHONE COAXIAL LAN RF
(Not included)
Basic Operations
Menu Operation
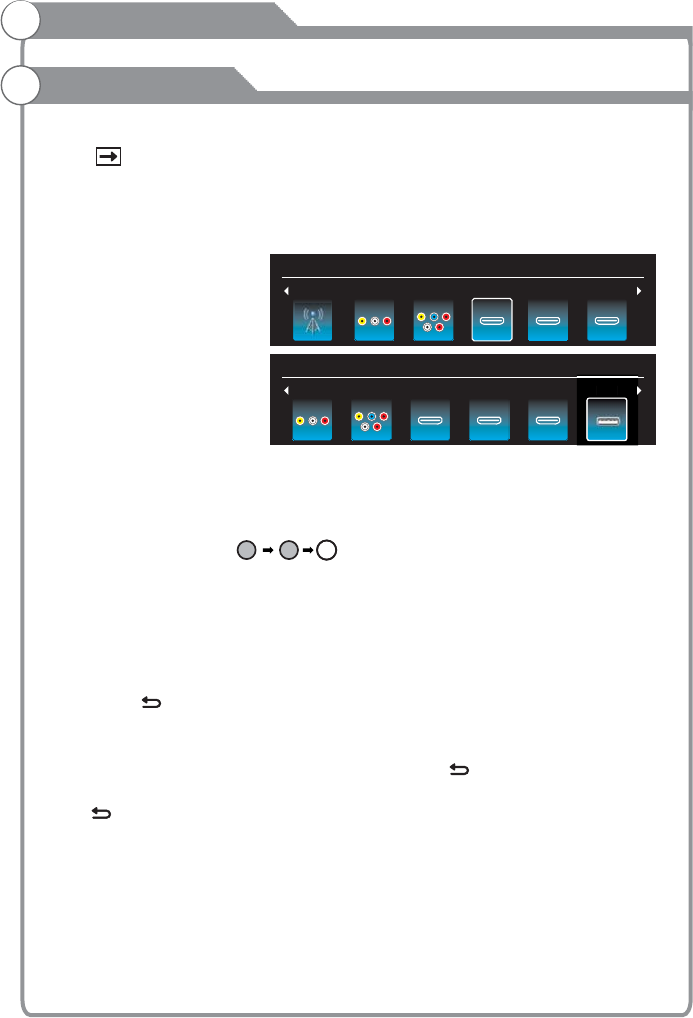
1 Input Setup
Press key on the remote control to enter "INPUT SOURCE" menu. There are
these options for you to select: "TV", "AV","Component", "HDMI1", “HDMI2",
“HDMI3", “USB".
Use t/ukey to select a input source and press OK key to confirm.
2 Channels Selection
There are four ways to select channel:
1) Using number keys, and OK keys on the remote control
to select channel directly.
To select channel 90, press .
When you use the number buttons, you can directly select channels that were either erased
or not memorized.
2) Using CHr/s key on the remote control or on your TV to select channel.
When you press the CHr/s key, the TV changes channels in sequence. You will see all
the channels that the TV has memorized.
You will not see channels that were either erased or not memorized.
3) Press CH key to return to previous channel, press it again to return to
current channel.
To quickly switch between two channels that are far apart, tune to one channel, then use the
number keys to select the second channel. Then use the CH button to quickly
alternate between them.
CH is not activated if no channel has been changed after TV turning on.
4) Select channels from "Channels List" or "Favorite List".
Press OK key to choose from "Channel List" menu.
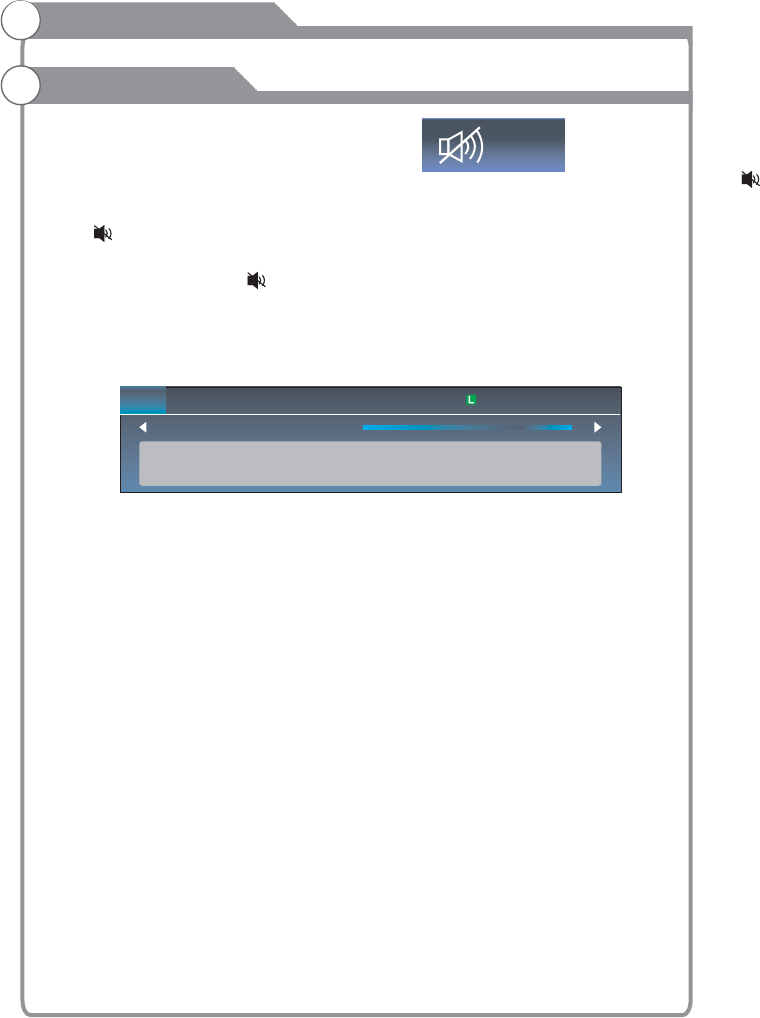
3 Volume Adjustment and Mute Setup
Volume adjustment
Press VOLr/s key on the remote control or the TV to display "Volume" menu,
adjust the volume of TV between 0 to 100 by using VOLr/skey:
Input Source
90OK
HDMI 2AV Component HDMI 1
Input Source
TV AV Component HDMI 2 HDMI 3
Input Source
HDMI 3 USB
US
B
HDMI 1
-18-
Basic Operations
Menu Operation
4 Current Channel Information
Press “INFO” key on the remote control to view current
channel information, the indications of channel
information are listed in the following table.
Press “EXIT” key on the remote control to exit this OSD.
00:00 01/01/1970
( To increase the volume, press VOLr key;
( To decrease the volume, press VOLs key;
Mute
Press “ ” and the sound cuts off. The MUTE icon will appear in the lower-left
corner of the screen.
To resume sound, press the “ ” button again, or simply press the VOLr key.
Mute
-19-
Picture Mode
Comtrast 70
Brightness
Color
Sharpness
Tint
Backlight
Color Temperature
50
70
0
100
20
1. Press key to display the main menu on the screen.
2. Press p/q key to select "Picture" option.
3. Press u key to enter "Picture" submenu.
4. You can also press the PICTURE key on the
remote control to select one of the picture settings.
Picture Mode
Your TV has four picture settings (Sports, Normal,Mild,Save,
User) that are preset at the factory. Only "User" mode can be
set to your preference by adjusting particular items such as
Contrast, Brightness, Color, Sharpness.
1. Press p/q key to select "Picture Mode" option.
2. Press p/q key to select one picture mode.
User settings for PICTURE
(Contrast, Brightness, Color, Sharpness,Tint)
Your set has several settings which allow you to control picture
quality.
1. Press ▲/▼ key to select a particular item.
2. Press t/u key to decrease or increase the value of a particular
item.
Note: The adjusted values are stored according to the selected
particular item.
Backlight
You can Change the brightness of the entire screen according to your preference.
1. Press p/q key to select "Backlight" option.
2. Presst/u key to increace or decreace the backlight value.
Color Temperature
You can change the color of the entire screen according to your preference.
1. Press p/q key to select "Color Temperature" option.
2. Press p/q key to select one color temp.
Contrast: Adjusts the lightness and darkness between objects and the background.
Brightness: Adjusts the brightness of the picture.
Color: Adjusts the colors, making them lighter or darker.
Sharpness: Adjusts the outline of objects to either sharpen them or make them
more dull.
Tint: Adjusts the Tint of the picture.
Backlight: Adjusts the brightness of the whole screen.
Picture
Menu system instruction
Cool: Makes whites bluish.
Standard: Makes whites nature
Warm: Makes whites reddish.
Picture
Sound
Function
Time
Options
Parent Control
Channel
-20-
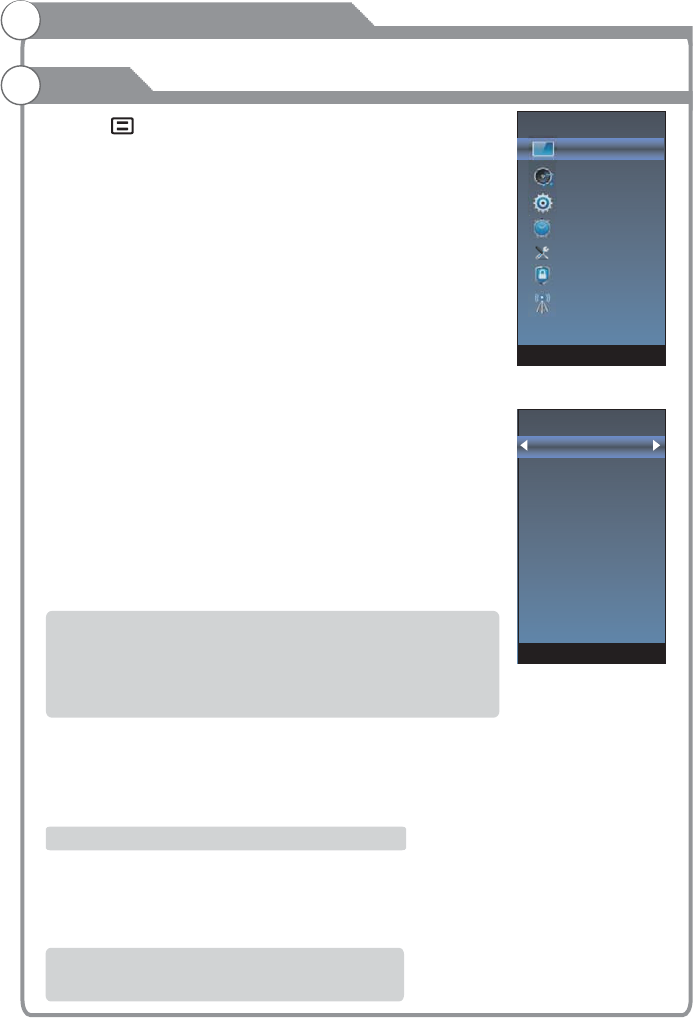
1. Press key to display the main menu on the
screen.
2. Press p/q key to select "Sound" option.
3. Press u key to enter "Sound" submenu.
4. You can also press the SOUND key on the remote
control to select one of the sound.
Sound Mode
You can select the type of the special sound effect
to be used when watching a given broadcast.
Your TV has five sound settings (“Standard”, “Music”,“Movie”,
“Sports”,“User”) that are preset at the factory.
1. Press p/q key to select "Sound Mode" option.
2. Press p/q key to select one sound mode.
Equalizer
Only can be adjusted in User mode.
1. Press p/q key to select “Equalizer" option.
2. Press t/u key to decrease or increase the value of the item.
Balance
If the volumes of the left speaker and the right speaker are not the same, you can adjust
the "Balance" to suit your personal preference.
1. Press p/q key to select "Balance" option.
2. Press t/u key to decrease or increase the value of the item.
AVL
Each broadcasting station has its own signal conditions, and it is inconvenient to adjust the
volume every time the channel is changed. “AVL” automatically adjusts the volume of the
desired channel by lowering the sound output when the modulation signal is high or by
raising the sound output whenthe modulation signal is low.
1. Press p/q key to select “AVL” option.
2. Press p/q key to select “On” or “Off”.
1. Press p/q key to select "Surround sound” option.
2. Press p/q key to select “Surround” or “Off”.
Video Description
1. Press p/q key to select "Video Description” option.
2. Press p/q key to select “On” or “Off”.
Surround sound
This is used to turn on surround sound to gain better sound effect.
Sound
Menu system instruction
l Standard: Selects the normal sound mode.
l Music: Provides clear and live sound for music.
l Movie: Provides live and full sound for movies.
l Sports: Emphasizes bass over other sounds.
l User: Selects your custom sound settings.
Sound Mode
Equalizer
Balance
AVL
Surround Sound
Digital Audio Output
Audio Language
DAP
HDMI ARC
0
Video Description
-21-
Menu system instruction
SOUND
This is used to .
This is used to DAP.
Digital Audio Output
set digital audio output
1. Press p/q key to select "Digital Audio Output” option.
2. Press p/q key to select “Auto” or “PCM”.
Audio Language
You can set the first and secondary language for audio.
DAP
set
1. Press p/q key to select "DAP” option.
2. Press key to enter “DAP” submenu.
HDMI ARC
Turn on or turn off the HDMI ARC function.
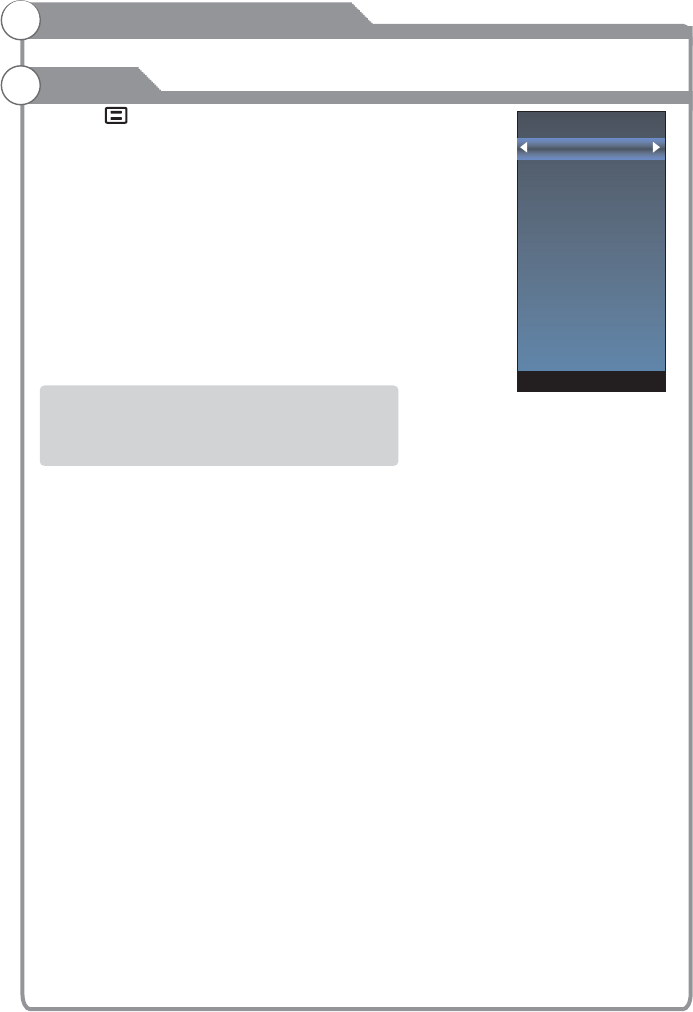
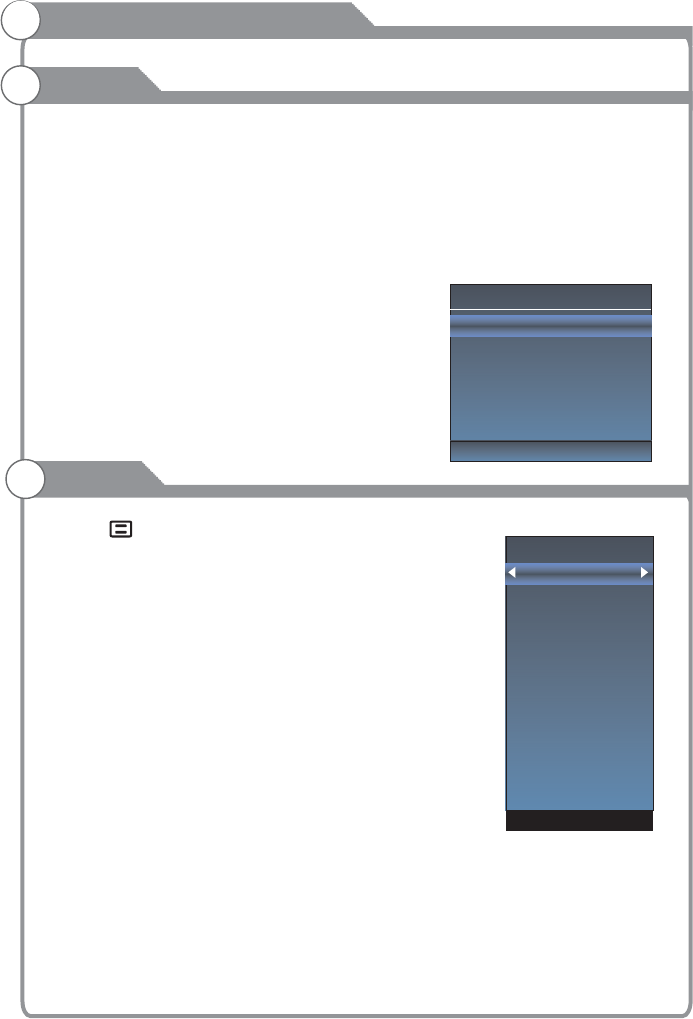
1. Press key to display the main menu
on the screen.
2. Press p/q key to select “Function” option.
3. Press key to enter “Function” submenu.
Noise Reduction
Press p/q key to select the
Noise Reduction mode. You can select the right
mode to match the pictures.
MPEG Noise Reduction
Press key to select the
mode: off/low/middle/high. The picture
will be better when it is in “high” mode.
Aspect Ratio
1. Press p/q key to select “Aspect Ratio” option.
2. Press p/q key to change the size of the picture
on the size of the picture on the screen.
u
u
t/u
Function
Noise Reduction
MPEG Noise Reduction
Aspect Ratio
CEC Link Setup
HDMI EDID
Netflix Deactive
Netflix ESN
Netflix Version
VUDU Deactivation
TTS
DAP
DAP Enable
DAP Mode
Surround Virtualizer
Dialog Enhancer
Auto Volume Control
Off
Standard
High
Low
Off
-22-
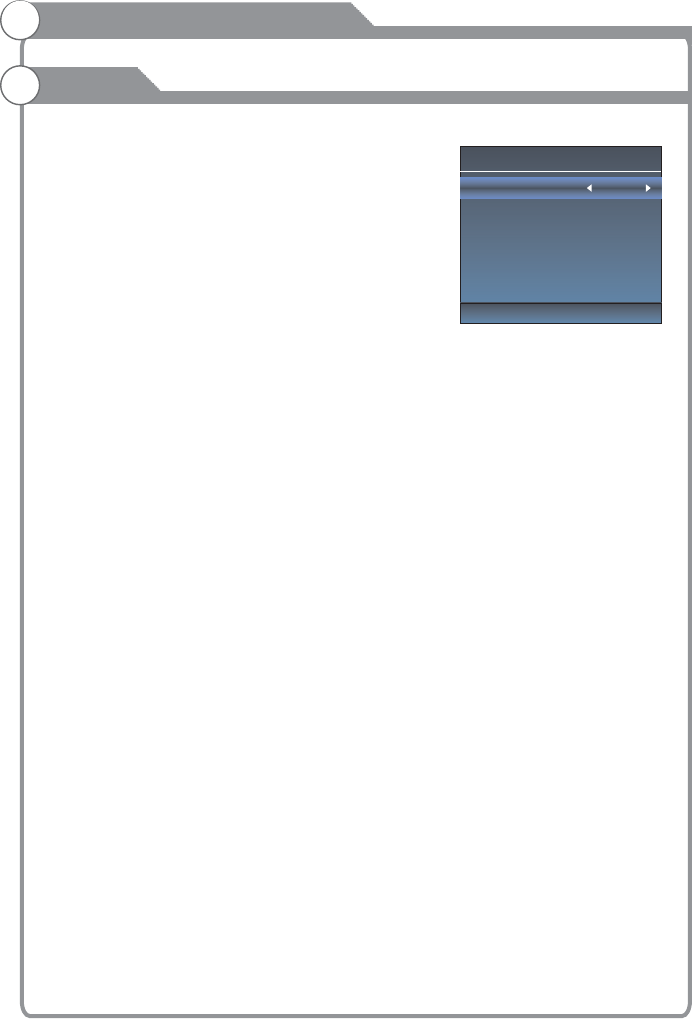
CEC Link Setup
Enable CEC link
Auto Power On
Auto Standby
On
Off
Off
Menu system instruction
Function
DTVi
Turn on/off ginga function
CEC Link Setup
1. Press p/q key to select “Link Setup” option.
2. Press OK or ukey to enter “Link Setup”
submenu.
Enable Link: Press t/u to turn on/off the
link setup.
Auto Power On: When this option is “On” and the
TV is in standby mode. To turn on the DVD can also
turn the TV at the same time.
Auto Standby: When this Option is “On” and the TV
is on, to turn off TV can also turn the DVD into
standby mode.
HDMI EDID
This function is only used in HDMI mode.
1. Press p/q key to select “ HDMI EDID” option.
2. Press p/q key to select “ 4K” or “ 2K”.
Netflix Deactive
1. Press “p/q" key to select “Netflix Deactive" option.
2. Press “u” or "OK" key to confirm.
3. Press "Yes" to confirm again, the Netflix will be activated.
Netflix ESN
Display the Netflix Esn information.
Netflix Version
Display the Netflix version.
-23-
Off Time
On Time
Sleep Timer
Auto Sleep
Auto Sync
Clock --:--
Time Zone
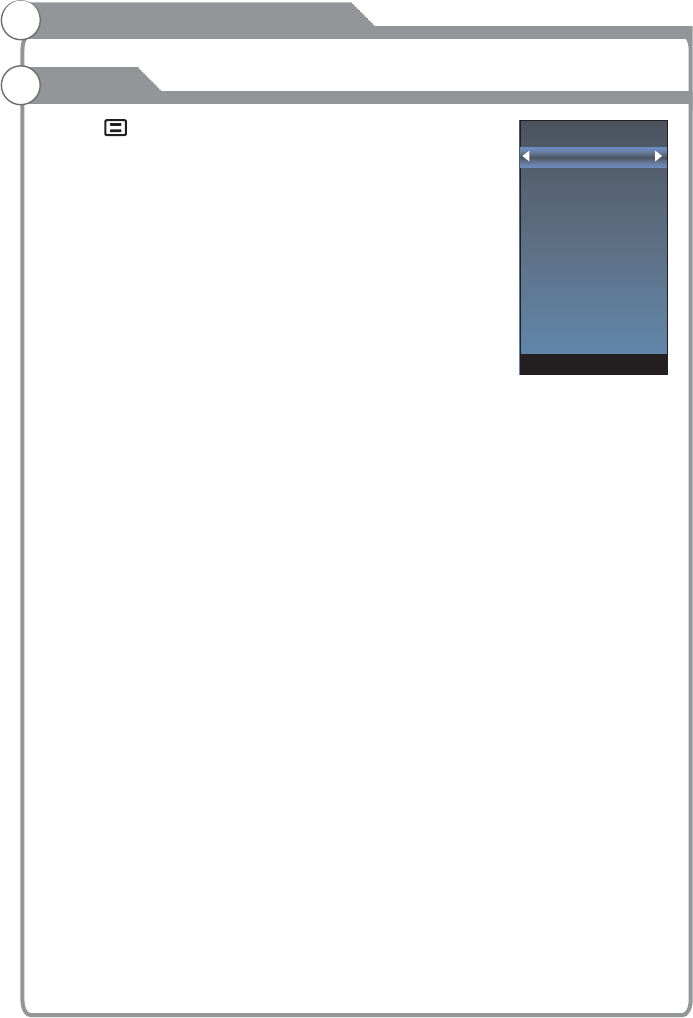
1. Press key to display the main menu on the screen.
2. Press p/q key to select "Time" option.
3. Press u key to enter "Time" submenu.
OK
OK
Sleep Timer
1. Press p/q key to select "Sleep Timer" option.
2. Press p/q key repeatedly until the desired time appears (Off, 10mins, 20mins, 30mins,
60mins, 90mins, 120mins, 180mins, 240mins).
Notes: The sleep timer you have set will be cancelled when the TV turns off or if a power
failure occurs.
Press p/q key to select whether to open the Nosignal Power off features. If this function is
opened, the TV will power off in ten minutes when there is no signal.
When Auto Sync is on, the clock is got from DTV streams; Set the clock when Auto Sync is
off.
1. Press p/q key to select "Time Zone" option.
2. Press p/q key to select time zone.
Off Time
In "Off Time” item, press ubutton or button
to enter the submenu, set the day & time to turn off
the TV set.
On Time
In "On Time” item, press ubutton or button
to enter the submenu, set the time to turn on the TV
set, when the TV set is in the standby mode. You
can also choose which day to control you TV set in a week.
Notes: When the time is less than 60 seconds, remind information will be displayed on
the screen. Press any key button to cancel timer function.
Auto Sleep
Auto Sync
You can modify the time of your TV set in Manual mode. In Auto mode, the “clock” is
decided by the DTV signal.
Clock --:--
Time Zone
You can choose it to modify your time zone in the TV set.
Menu system instruction
Time
-24-
Menu system instruction
Options
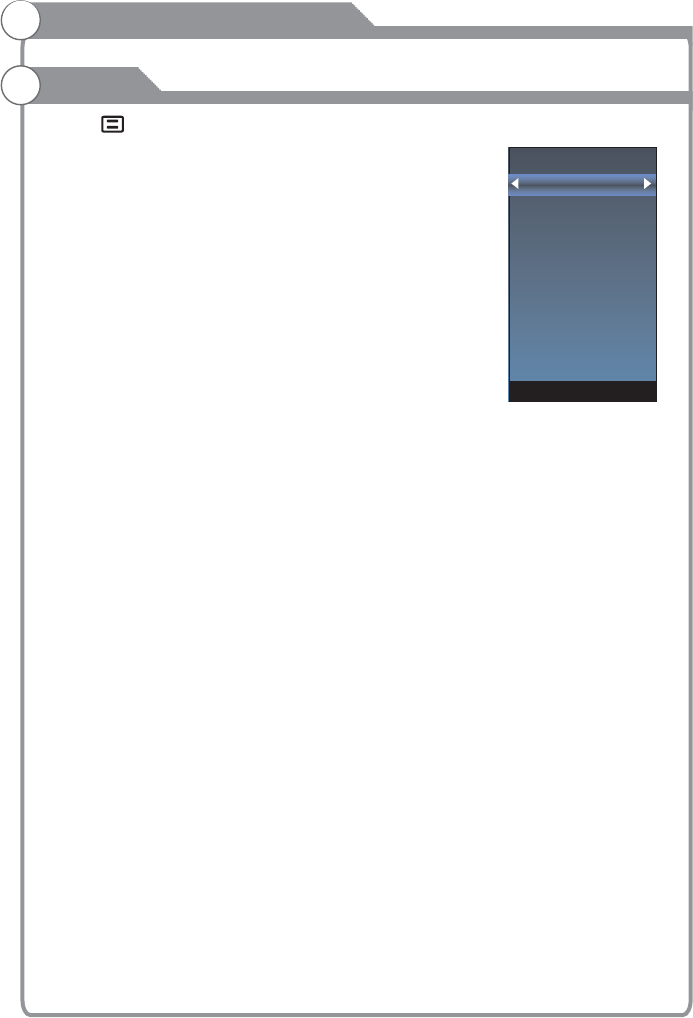
1. Press key to display the main menu on the screen.
2. Press p/q key to select "Option" option.
3. Press u key to enter “Option" submenu.
1. Press p/q key to select “ " option.
2. Press OK or u key to select a proper language for OSD
OSD Time
Set the preferred amount of time
for the OSD to be displayed on the screen.
1. Press p/q key to select “Closed Caption" option.
2. Pressp/q key to select CC mode.
Reset
1.Press “p/q" key to select "Reset" option.
2.Press “u" or "OK" key to confirm.
3.Press "Yes" to confirm again, TV will turn off automaticly and change all setting to factory
setting.
Network Configuration
Please refer to "Network setting"behind.
Software Update(USB)
When the TV need to be updated, please copy the new software to a USB storage and
inset the USB storage to TV, then operating by following steps.
1.Press “p/q" key to select "Software Update" option.
2.Press “u” or "OK" key to confirm.
3.Press "Yes" to confirm again, the TV will update by USB, Please wait a few minutes
and don't turn off the power, it will turn off automaticly when updating is finish.
Internet Update Check
This can update TV through internet.
Network Update Information
Display the .
User Mode
1.Press “p/q" key to select "User Mode" option.
2.Press “u” or "OK" key to confirm.
OSD Language
OSD Language
Closed Caption
Network Update Information
OSD Language
OSD Time
Closed Caption
Reset
Network Configuration
Software Update(USB)
Internet Update Check
Network Update Information
User Mode
-25-
The " " feature automatically locks out programming that is
deemed inappropriate for children. The user must first enter a Password before any
of the lock restrictions can be set up or changed.
1
(the
default 0000 and universal password is 1980)
Set the Lock function on or off.
key to select "On" or "Off".
Set Password
Password
"Set
Password" submenu. Choose any 4-digits for your
new password and enter them. As soon as the 4
digits are entered, the cursor skipped to “Confirm
Password” item, re-enter the same 4 digits, and
your new password has been memorized.
USA TV
USA TV
key to open USA TV menu.
USA MPAA
USA MPAA
key to open USA MPAA menu.
Canada English
Canada English
key to open Canada English menu.
Parent Control
. Press p/q key to select “Parent Control" option.
2. Press or u key to enter “Parent Control" submenu, "Enter Password" menu
will appear,enter your 4-digit password to enter “Parent Control” submenu \
password is , the .
Parent Control
1. Press p/q key to select “Parent Control " option.
2. Press p/q
1. Press p/q key to select "Set " option.
2. Enter your 4-digit password to enter
When the programs is locked, you can also press the menu
key, Info key and so on. Then you can press t/u key to call
back the input-password window.
Parental Guidance
This option only used in DTV mode.
1. Press p/q key to select “Parental Guidance" option.
2.Prsee p/q key to select the lock level of the Parental Rate.
1. Press p/q key to select " " option.
2. Press OK
1. Press p/q key to select " " option.
2. Press OK
1. Press p/q key to select " " option.
2. Press OK
OK
Menu system instruction
Parent Control
Please Enter Password
Parent Control
Set Password
USA TV
USA MPAA
Canada English
Canada French
RRT Setting
RRT Reset
Block Unrated TV
-26-
Canada French
Canada French
key to open Canada French menu.
RRT Setting
RRT Setting
key to open RRT Setting menu.
RRT Reset
RRT Seset
key to open RRT Seset menu.
to
1. Press p/q key to select " " option.
2. Press OK
1. Press p/q key to select " " option.
2. Press OK
1. Press p/q key to select " " option.
2. Press OK
Block Unrated TV
1. Press p/q key to select “Block Unrated TV " option.
2. Press p/q key select “On” or “Off”.
Menu system instruction
Parent Control
Parent Control
Set Password
USA TV
USA MPAA
Canada English
Canada French
RRT Setting
RRT Reset
Block Unrated TV
-27-
Before your television can begin memorizing the
available channels, you must specify the type of
signal source that is connected to the TV (i.e. an
antenna or a cable system).
1. Press key to display the main menu on
the screen.
2. Press p/q key to select "Channel" option.
3. Press OK or u key to enter "Channel" submenu.
Antenna
1.Press p/q key to select "Antenna" option.
2.Press p/q key to select "Antenna" or "CABLE".
Auto Search
1. Press p/q key to select "Auto Search" option.
2. Press u or OK key to confirm. then a notice
window will be displayed on the screen.
Select "Start" to start search or "Cancel" to cancel it.
When searching, press EXIT key to exit tuning at any
moment. Press key to skip DTV tuning when
searching DTV, skip ATV tuning when searching ATV,
skip CATV tuning when searching CATV.
3. After all the available channels are stored,
the searching menu will exit.
Program
After the program is searched, select “Program Edit”
in the “Channel” menu, press “OK” button,
program can be edited such as delete or skip
according to the user's habit.
Skip (Blue) Button
This function can help shield certain program. Program skips
when selecting program by the “ / button on the TV or
remote control.
1. Select the program to be shielded in the“Program Edit”.
2. Press “Skip” (Blue) button, the skip mark is displayed at the left side of the
program and this program is shielded.
3. To cancel the Skip function, enter the channel edit menu, select the shielded
program and press “Skip” (Blue) button, the skip mark at the left side of the program
disappears then program is recovered.
Delete (Red) Button
This function can help delete program.
1. Select the program to be deleted in the "Program Edit".
2. Press "Delete"(Red) button, the program will be deleted.
Edit
pq”
Menu system instruction
Channel
Program Edit
5.1 Globo HD
5.2 Globo HD
12
Delete Return
EXIT
Skip
Fav
Antenna
Auto Seacin
DTV Manual Search
ATV Manual Search
Signal Information
Program Edit
-28-
Favorite(Yellow) button
This function can help store the favorite program then these programs can be quickly
selected.
1. Select the program which is favorite.
2. Press “Fav”(Yellow) Button, the favorite mark is displayed at the left side of the program
and this program is store into the Favorites.
3.To cancel the Favorite function, enter the program edit menu, select the program and
press “Fav”(Yellow) button, the favorite mark at the left side of the program disappears.
DTV Manual Search
Enter digital number and press “OK” to
select DTV Channel.
ATV Manual Search
1. Press p/q key to select "ATV Manual Search"
option.
2. Press u or OK key to enter submenu.
1. Press p/q key to select the second item.
2. Press t/u key to select current channel.
1. Press p/q key to select the third item.
2. Press t/u key to select a better frequency for
current channel.
1. Press p/q key to select “ "
option.
2. Press “OK”or u key ,you can see the
i of the DTV channel.
Current CH
Fine-Tune
Signal Information(Used only in DTV)
Signal Information
nformation
Menu system instruction
Channel
Channel 40
Name TV Globo
Modulation ATSC
Quality 100
Strength 100
DTV Manual Search
UHF CH 40
ENTER
Search
Bad Normal Good
DTV 0
No Signal
Return
ATV Manual Search
Current CH 12
Fine-Tune
Save Return
Frequency 205.25 MHz
MENU
MENU
-29-
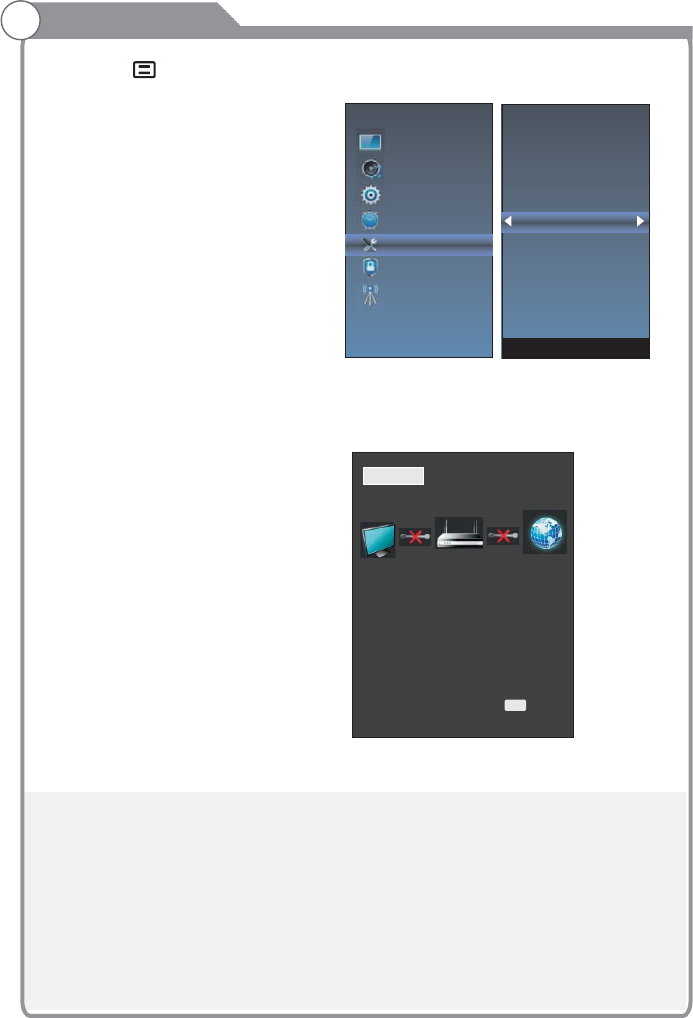
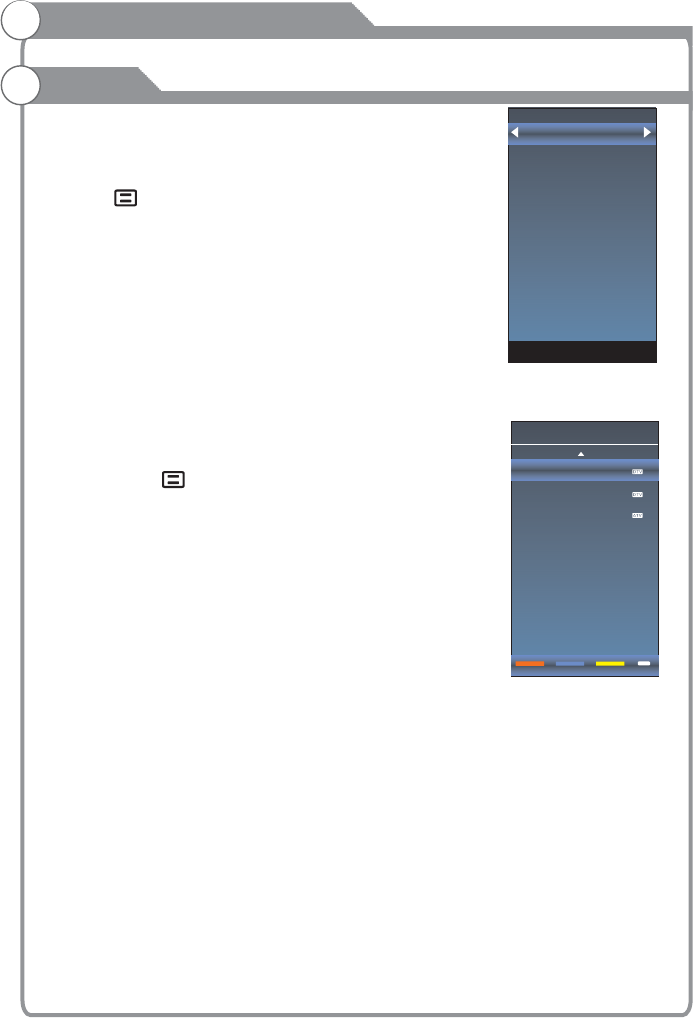
1.Press the “ ” to enter, then pitch on the ”Options”,and press “OK” or click the
right button to enter the submenu.
2.Pitch on the "Network Configuration",and press "OK" or click right button to
enter the "Network Configuration".
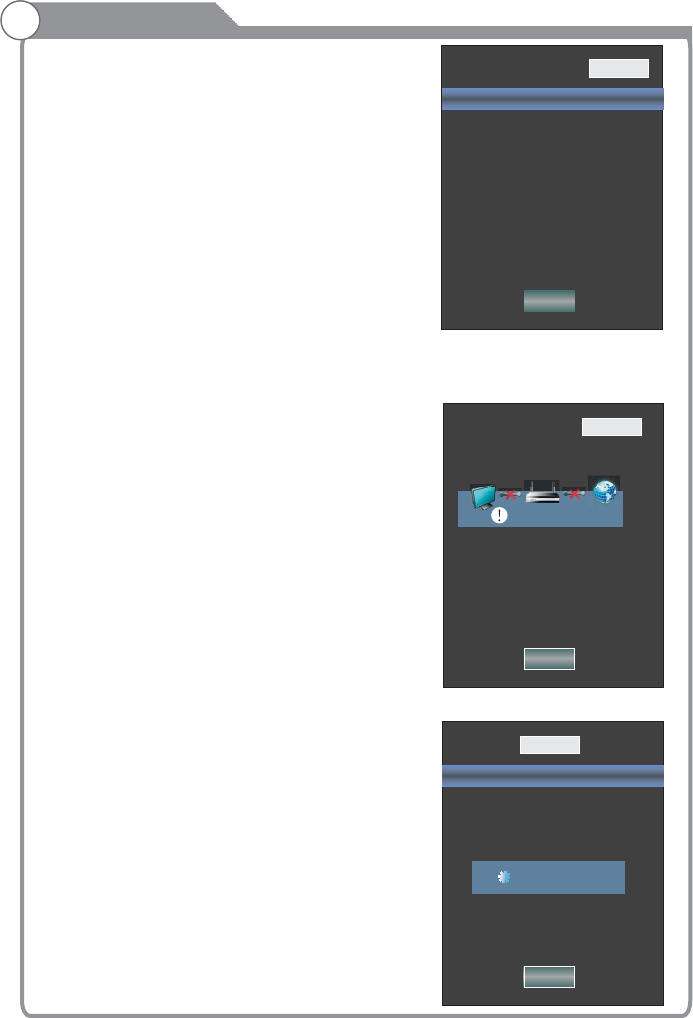
3.When the wired network is used, if select dynamic IP address setting, pitch on the
"DHCP" in the "Network Configuration", then click the "Setting", and press
the "OK"button to enter.
If select static IP address setting,pitch on the "Static" in the "Network configuration",
then setting up the IP,Nemask,Gateway and DNS in sequence.When the setting
complete,pitch on the "setting" and press the"Enter".
Network Setting
Picture
Sound
Function
Time
Options
Parent Control
Channel
STATUS WIFI LAN
MODE: LAN
IP: 172.16.67.130
DNS: 172.16.66.254
GATEWAY: 255.255.254.0
Fail
EXIT Exit
OSD Language
OSD Time
Closed Caption
Reset
Network Configuration
Software Update(USB)
Internet Update Check
Network Update Information
User Mode
-30-
Setting
IP 169. 254. 018. 061
Netmask 255. 255. 255. 000
Gateway 172. 016. 088. 254
DNS 172. 016. 064. 058
STATUS WIFI LAN
Network Configuration DHCP
2
5
5
5
5
5
5
5
5
5
5
5
5
5
5
5
5
5
5
5
5
5
5
5
5
5
5
5
4
4
4
4
4
4
4
4
4
4
4
4
4
4
4
4
4
4
4
4
4
4
4
4
4
4
4
4
4
4
4
4
4
4
4
4
4
4
4
4
4
4
4
4
0
0
0
0
0
0
0
0
0
0
0
.
.0
.
.
.
.0
.
0
0
0
.0
.0
.0
0
0
.
0
0
0
0
. 0
0
0
.
0
0
0
0
0
0
0
0
0
0
0
0
.
.
.
0
0
0
0
0
0
0
.
.
.
0
0
0
0
0
0
0
1
1
1
1
1
1
1
1
1
1
1
Fail
Network Setting
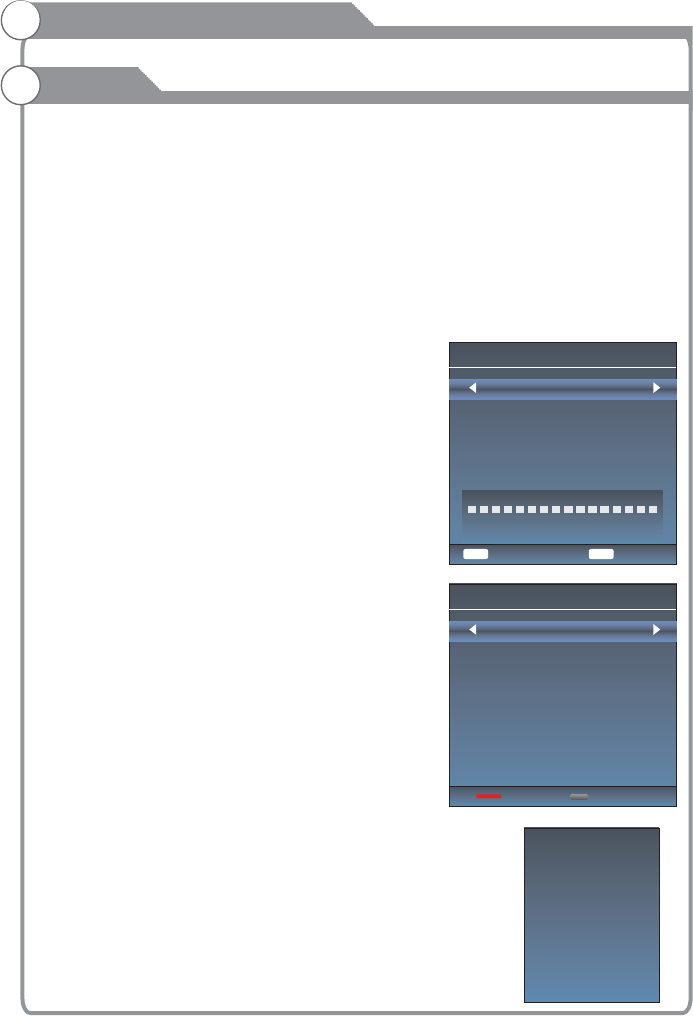
4.If shows "Success",the "WLAN" on the bottom right corner will turn to green from
red, and it means the network connect successfully; If shows "Fail",
it means the network can not connect, please check whether the net wire and router
connect successfully or not.
5. Select the "WIFI" in the Network Configuration before using WIFI connecting.
STATUS WIFI LAN
Setting
Network Configuration Static
IP 172. 016. 067. 130
Netmask 255. 255. 254. 000
Gateway 172. 016. 066. 254
DNS 172. 016. 064. 081
STATUS
SSID Not Connected
Password
Network Configuration DHCP
IP 000. 000. 000. 000
Netmask 000. 000. 000. 000
Gateway 000. 000. 000. 000
DNS 000. 000. 000. 000
Scan AP
Setting
WIFI LAN
Scanning...
-31-
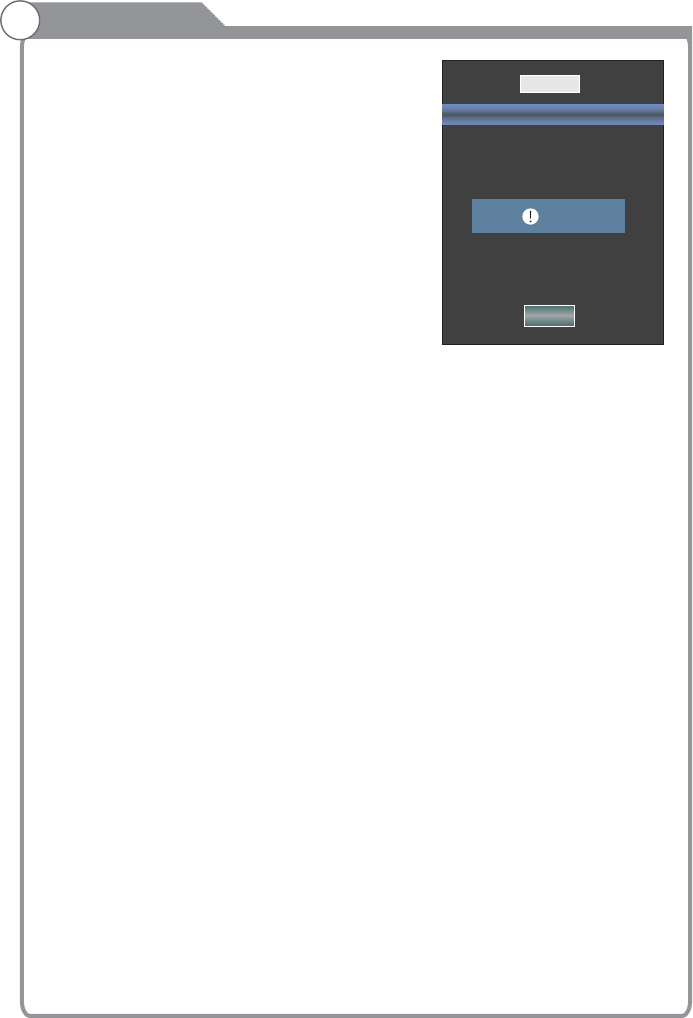
Pitch on the "Setting",press the "OK" to confirm.
If shows "Success", the "WIFI" on the bottom right
corner will turn to green from red, and it means the
network connect successfully; If shows "Fail",
it means the network can not connect, please check
whether the wireless router connects successfully or
not.
Network Setting
STATUS
SSID Not Connected
Password
Network Configuration DHCP
IP 000. 000. 000. 000
Netmask 000. 000. 000. 000
Gateway 000. 000. 000. 000
DNS 000. 000. 000. 000
Scan AP
Setting
WIFI LAN
Fail
-32-

Sign in
Get ready to watch thousands of TV shows and movies.
Enter your email address
1234567890
qwertyuiop
as
dfghjkl
l
l
zx
cvbnm
@gmail.com @yhoo.com.tw @hotmail.com
!#$ @
com
³
x
Back Next
Remember Email
ê
Email address
Need help signing in? Visit http://help.netflix.com
Internet
Press “ ” key to enter internet interface
1. NETFLIX
Use arrow key to Select button, then press “ ” key to enter NETFLIX.
Use arrow button to select one video and press “OK” key to play.
Press “ ” key to exit playing.
Use arrow key to browse the pages. press “ ” key to return to main menu and
press “EXIT” key to exit.
2. Youtube
Use arrow key to Select button, then press “OK” key to enter Youtube.
Use arrow button to select one video and press “OK” key to play.
Press “ ” key to exit playing.
Press key to open or close control menu when playing.
OK
q
-33-
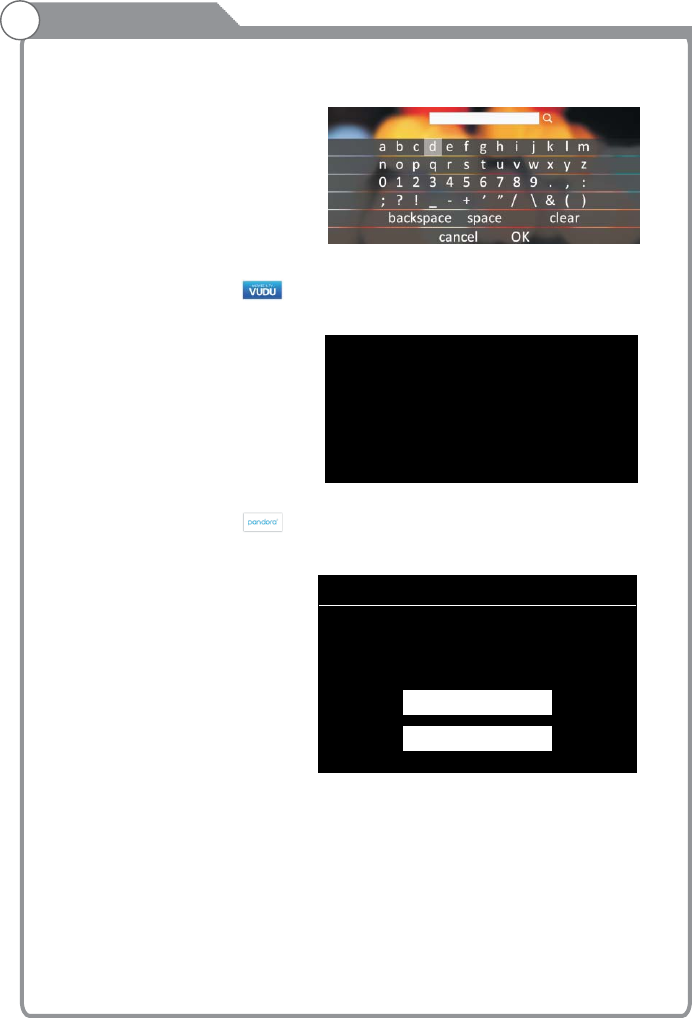
Internet
Press key to enter search interface, input the keyword and then press “OK” to
search videos.
p
VUDU
Discover, Watch & Collect the Latest Movies & TV
PANDORA
Welcome to pandora
Do you have a pandora account?
I have a Pandora Account
I am new to Pandora
3.VUDU
Use arrow key to Select button, then press “OK” key to enter VUDU.
4.pandora
Use arrow key to Select button, then press “OK” key to enter pandora.
-34-
Internet
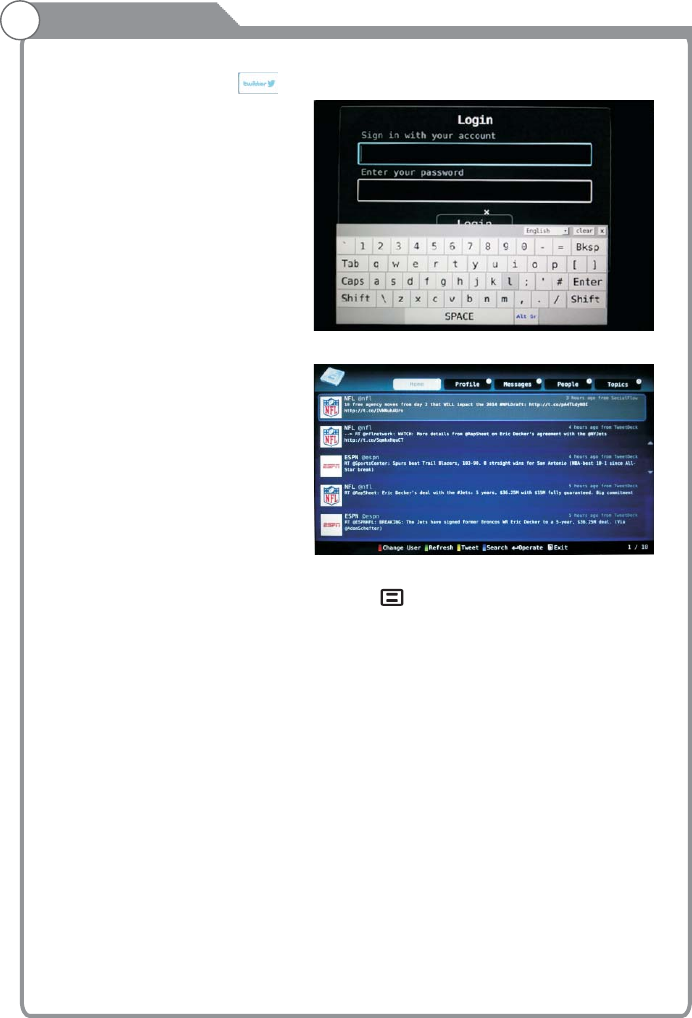
5.Twitter
Use arrow key to Select button, then press “OK” key to enter Twitter.
“OK” key to log in.
Use arrow key to browse the pages. press “ ” key to return to main menu and
press “EXIT” key to exit twitter.
Red key: log in or log out twitter.
Green key: refresh current page.
Yellow key: write new tweet.
Blue key: Search tweet.
Input the right Email and password, then select “Authorize app” button and press
-35-
Internet
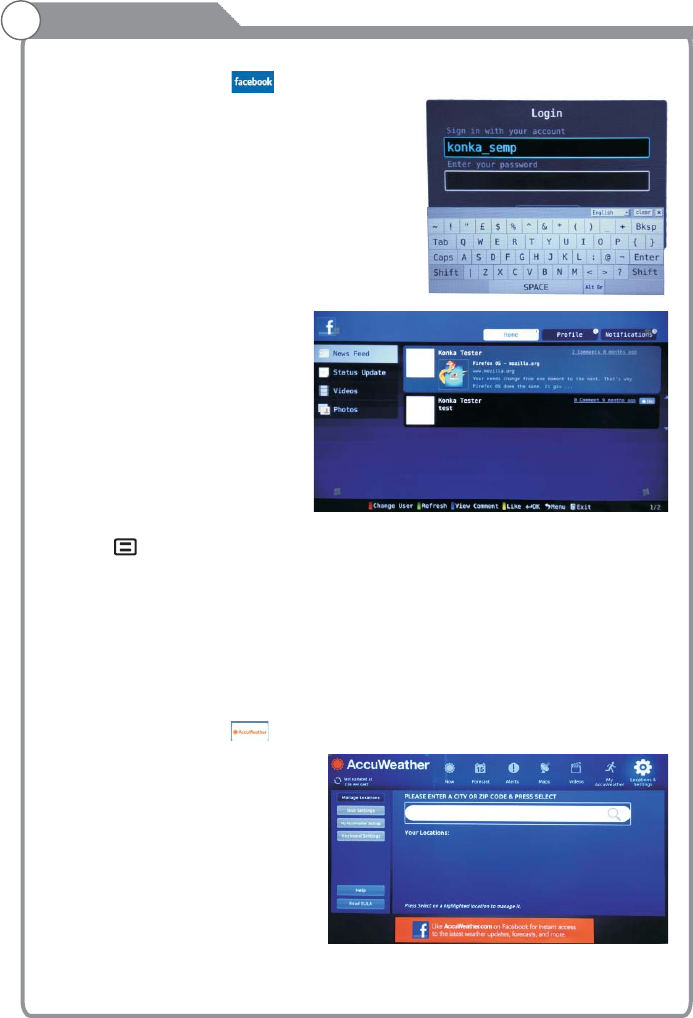
6.Facebook
Use arrow key to Select button, then press “OK” key to enter Facebook.
Input the right Email and password,
select “log In” button, then press
“OK” key to log in.
Press arrow key to browse the pages and press “OK” key to view.
Press “ ” key to return the main menu.
Press “EXIT” key to exit Facebook.
Red key: log in or log out Facebook.
Green key: refresh current page.
Yellow key: sign “like” or “unlike” for current content.
Blue key: view comments and add comments.
7.Accuweather
Use arrow key to Select button, then press “OK” key to enter .
Input a city or zip code press select to get the weather information.
Accuweather
-36-
Internet
8.Screencast
Use arrow key to Select button, then press “OK” key to enter .
Screencast
-37-
0
789
456
123
VOL CH
MTS/AUDIO
CC/SUBTITLE
TTS
CH
EXIT
OK
INFO
PICTURE
SOUNDASPECT
Digital Media Player
This TV is embedded with one USB port digital media player. It can find the devices
support USB1.1/2.0,including flash disk, USB hard disk and digital camera. It supports
functions as: Display pictures. Play music files, Play video files, Display text files.
Notice:
1. In order to avoid affecting the user's viewing experience, please use the better quality
and shorter USB cable
2. Play, preview some of the non-standard files may appear abnormal, please understand.
Explain:
1. Under the USB channel,you can use only the remote control.
2. Play Control menu to enter the playing surface to press the menu button pop-up menu
.
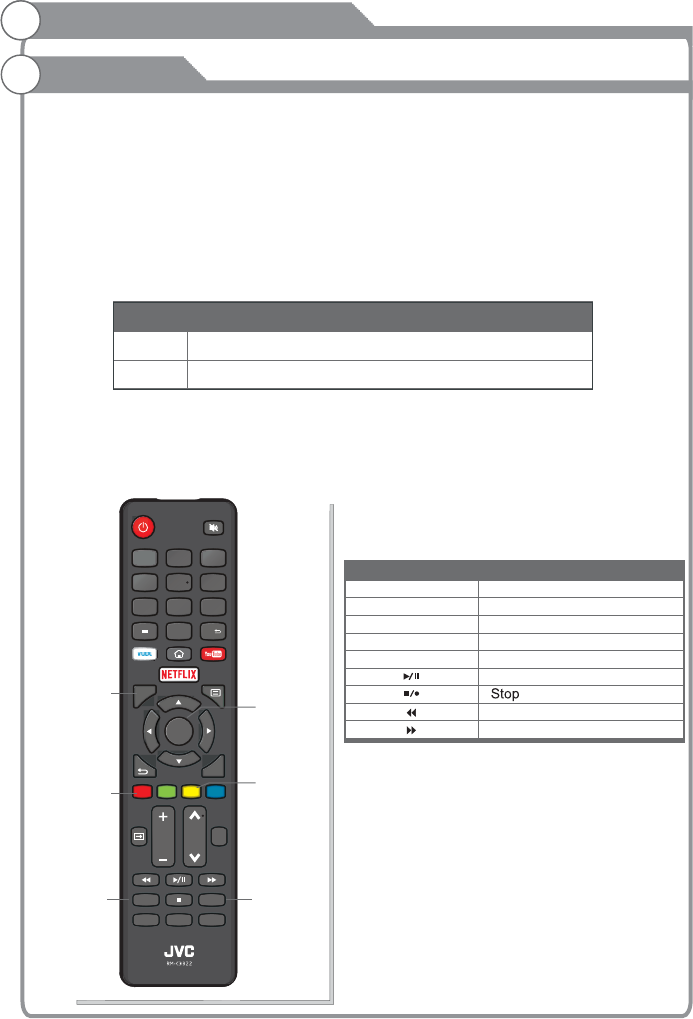
Remote Control Button
Description of Buttons:
Introduction
Buttons Function
MTS/AUDIO
CC/SUBTITLE
Track switch (video)
Subtitle switch (video)
Play/Pause
Backward
Forward
RED
YELLOW AB Loop(Video)
Goto Time( )Video
INFO Show/Hide movie info (video)
MTS/AUDIO
RED
YELLOW
INFO
OK
CC/SUBTITLE
Motion-JPEG
Data
Picture
Video
Format
JPEG
-38-
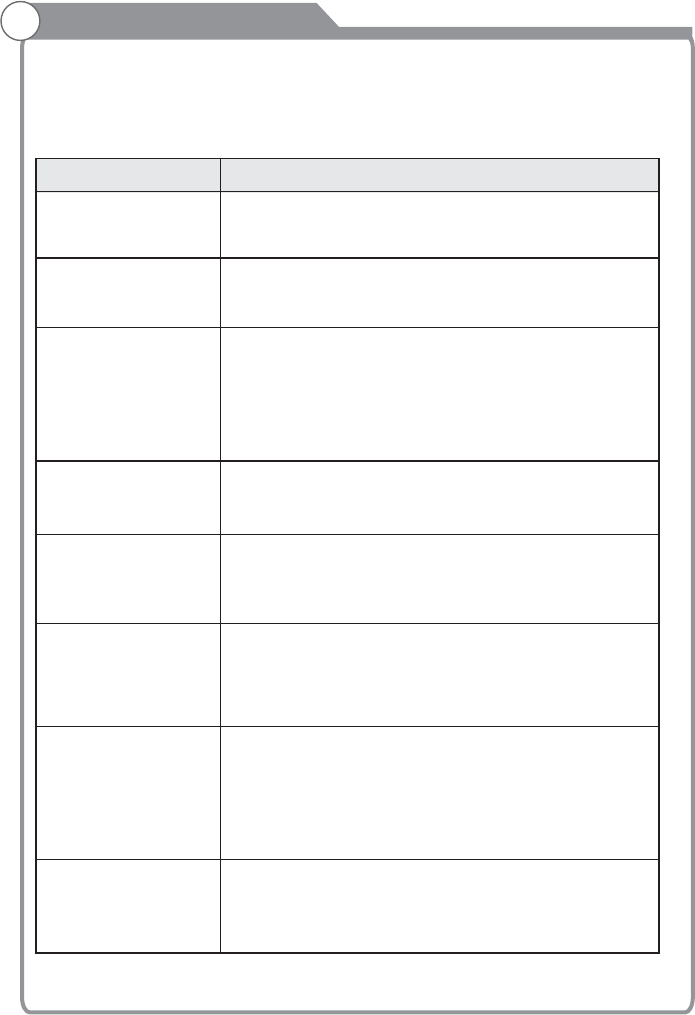
Troubleshooting
If you have any problem, check the couter measures for each symptom listed below.
The following symptoms may have . adjustment rather
than actual malfunction of the unit. If the trouble persists, contact the
.
been caused by inappropriate
Customer Care
Centre, see back page for contact details
Symptoms
No power
No picture
Good picture but no
sound
Good sound but abnormal
color or no picture
No response to remote
control
Colored dots may be
present on the screen
Possible solutions
Please check the power cord
.
Unplug the power cord and plug it in after 60 seconds and
restart the TV.
plugged in and that the power
outlet works
Please check antenna connection.
Station may problems, please tune to
another station.
Please adjust the settings of contrast and brightness.
be experiencing
Please increase the volume.
Please check TV is under mute mode, press MUTE button
on the remote control.
Please check sound settings
If external devices are being used, check their volumes are
not set too low or turned off.
If using AVI or Component inputs, please make sure cables
are connected properly and not loose.
Batteries of remote control may have exhausted, if
necessary, please change the batteries.
Clean the remote control lens. The distance between
LED TV and remote control should be within 8m, within
recommended operating angle and path is free of obstructions.
Although the LED screen is made with high-precision
technology and 99.99% or more of the pixels are effective,
black dots may appear or bright points of light
(red, blue, or green) may appear constantly on the LED
screen. This is a structural property of the LED screen
and not a malfunction.
Please check antenna connection and antenna condition.
If using Component input, please check Component
connections, incorrect or loose connections may cause
colour problems or cause the screen to be blank.
Keep the TV away from noisy electrical sources such as cars,
hair dryers, welders, and all optional equipment.
Electrical atmospheric interference such as local or distant
lightning storms may cause picture to break up.
When installing optional equipment, leave some space
between the optional equipment and the TV.
Check the antenna and connection.
Keep the antenna away from any power or input/output cables.
Picture is breaking up
Check your area is covered by Digital Video Broadcasts.
Try re-tuning or manually tuning missing channels.
Check that you are using the correct antenna type - please
see pg.16 'Antenna connection'.
After Auto Tuning only
some channels are
available
-39-
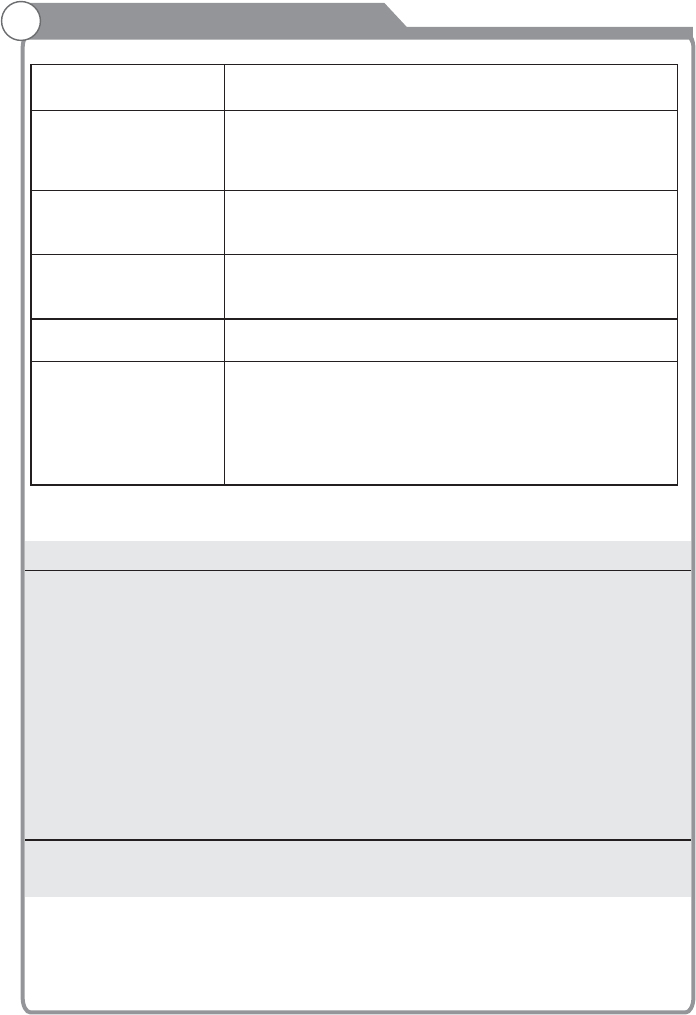
Troubleshooting
Check if the channel has been blocked in the main menu
settings.
Please check connecting USB cable and power supply is
connected. Hard drive has not been formatted. Please make
sure USB disk is compatible and the multimedia data formats
are supported.
Channel cannot be
selected
USB not playing
Compression of video contents may cause distortion
especially on fast moving pictures such as sports and action
movies.
Picture is distorted,
macroblock, small block,
dots, pixelization, etc
Black bars on each side will be shown on HD channels when
displaying SD (4:3) contents.
Black bars on Top & Bottom will be shown on movies that
have aspect ratios different from your TV.
Adjust picture size option on your external device or TV to full
screen.
Noise from speaker
Check cable connections, make sure a video cable is not
connected to an audio input.
Low signal level may cause sound distortion.
TV turns on
automatically Check if the On Timer is set to On in the Setup menu.
Picture is not shown in
full screen
Never place a television set in an unstable location. A television set may fall, causing serious
personal injury or death. Many injuries, particularly to children, can be avoided by taking simple
precautions such as:
- Using cabinets or stands recommended by the manufacturer of the television set.
- Only using furniture that can safety support the television set.
- Ensuring the television set is not overhanging the edge of the supporting furniture.
- Not placing the television set on tall furniture (for example, cupboards or
bookcases) without anchoring both the furniture and the television set to a suitable support.
- Not placing the television set on cloth or other materials that may be located
between the television set and supporting furniture.
- Educating children about the dangers of climbing on furniture to reach the television set or its
controls
If your existing television set is being retained and relocated, the same considerations as above
should be applied.
The plug or appliance coupler is used as the disconnect device, the disconnect
device shall remain readily operable.
WARNING
-40-
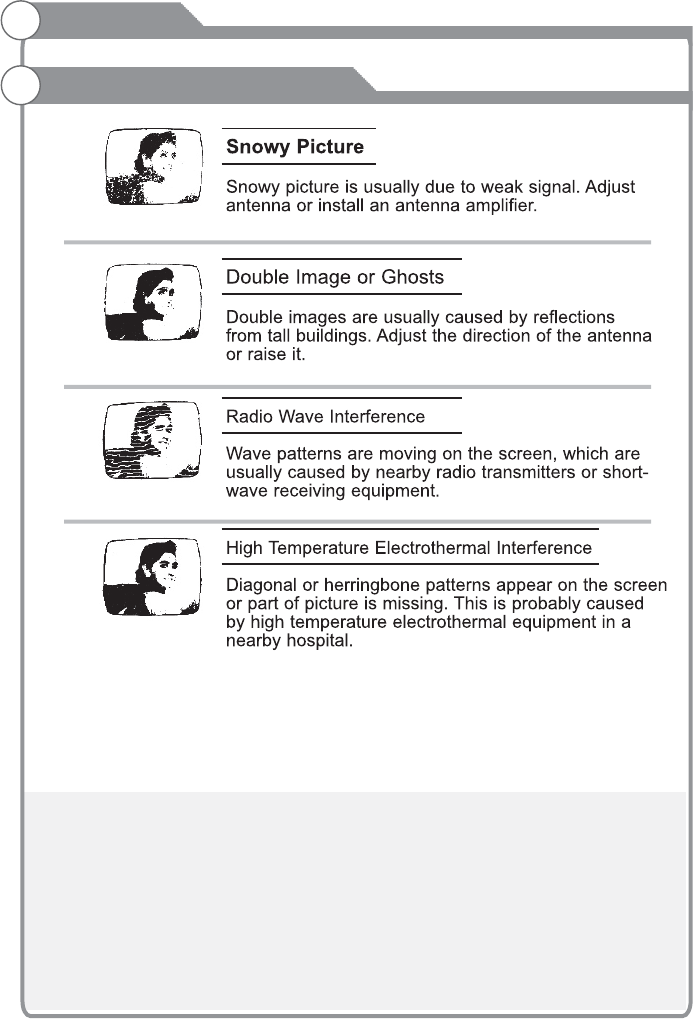
Picture defects and the reason
Reference
-41-
WARNING: &
15?@6&&$
(
%
A
B
G $
G %
G &A
,2
J/J
B
G 3
G )
G .
G ,!
"
G ,
G .
G & M0
CAUTION: &N
6&&$=
-42-