Shenyang Tongfang Multimedia Technology SE48UXC4T LED TV User Manual SY16076 LE 48GDXC B4 4K OTT EN V0
Shenyang Tongfang Multimedia Technology Co., Limited LED TV SY16076 LE 48GDXC B4 4K OTT EN V0
Users Manual

SE48UXC4T
Read the User Manual carefully before using the TV and keep it for further reference.
Avant d’utiliser le téléviseur, lisez attentivement le manuel d’utilisation et conservez-le pour consultation future.
Lea el Manual del usuario antes de utilizar el televisor y consérvelo para futuras consultas.
USER MANUAL
MANUEL D’UTILISATION
MANUAL DEL USUARIO

1
En -
CONTENTS
Important Safety Instructions
Safety Information
Preparation
What's Included
Front View
Rear View
Installing the Stand
Removing the Stand for Wall-Mounting
Remote Control
Connecting External Devices
Customizing TV Settings
Initial Setup
Navigating the Setup Settings
Streaming
Media
Viewing Photos
Listening to Music
Source
Setup
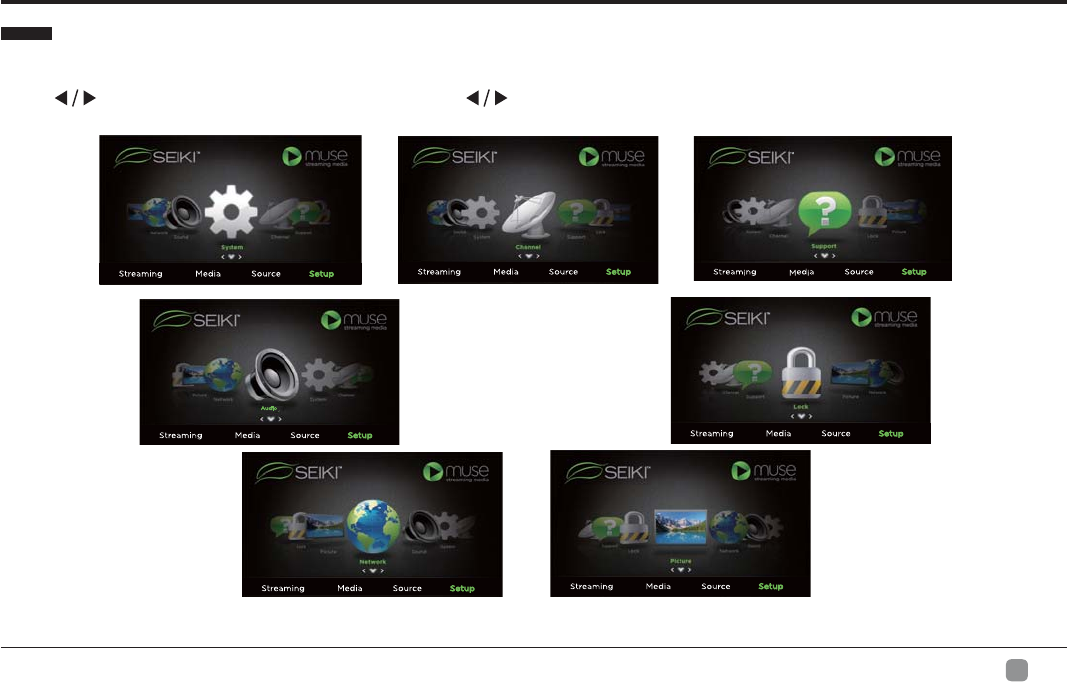
System
Channel
Support
Lock
Picture
Network
Audio
Parental Control
Troubleshooting
Maintaining
Limited Warranty
OTT APP Service
2
3
4
4
5
6
7
7
8
9
10
10
11
12
13
13
14
14
15
15
17
17
18
19
20
22
23
25
27
27
29
30
2
En -
IMPORTANT SAFETY INSTRUCTIONS
Read these instructions – All the safety and operating instructions should be read
before this product is operated.
Keep these instructions – The safety and operating instructions should be retained
for future reference.
Heed all warnings – All warnings on the appliance and in the operating instructions
should be adhered to.
Follow all instructions – All operating and use instructions should be followed.
Do not use this apparatus near water – The appliance should not be used near
water or moisture – for example, in a wet basement or near a swimming pool, and the
like.
Clean only with dry cloth.
Do not block any ventilation openings. Install in accordance with the manufacturer’s
instructions.
Do not install near any heat sources such as radiators, heat registers, stoves, or other
Do not defeat the safety purpose of the polarized or grounding-type plug. A polarized
plug has two blades with one wider than the other. A grounding-type plug has two
blades and a third grounding prong. The wide blade or the third prong are provided for
replacement of the obsolete outlet.
Protect the power cord from being walked on or pinched particularly at plugs,
convenience receptacles, and the point where they exit from the apparatus.
or sold with the apparatus. When a cart is used, use caution when moving the cart/
apparatus combination to avoid injury from tip-over.
Please keep the unit in a well-ventilated environment.
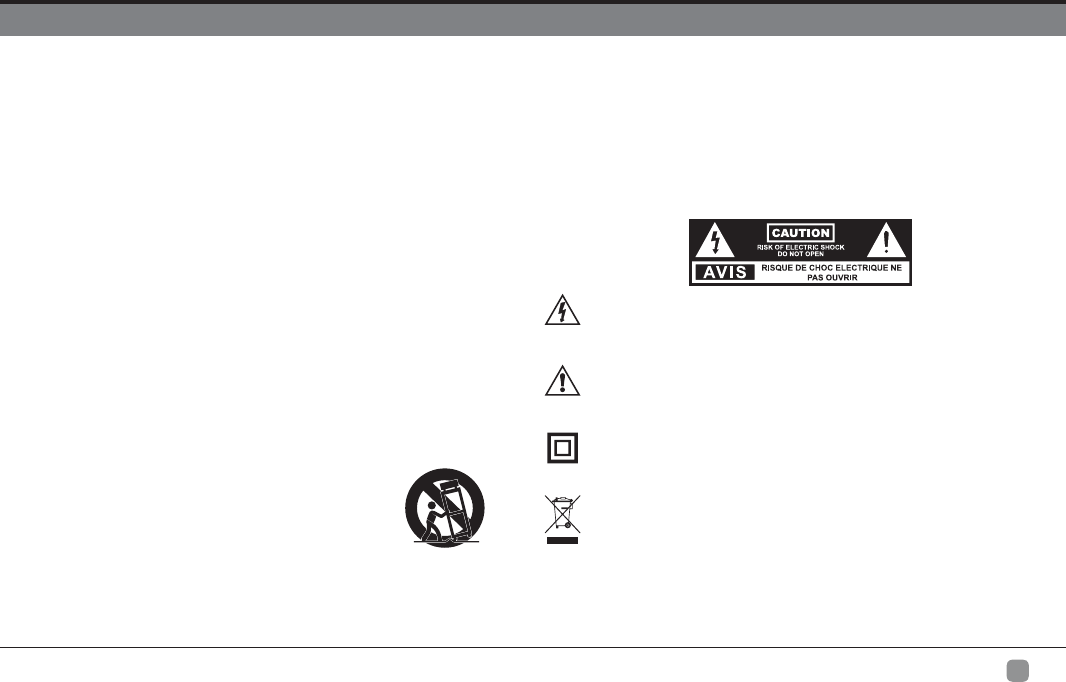
WARNING:
with liquids, such as vases should not be placed on apparatus.
WARNING:
the like.
WARNING: The mains plug is used as disconnect device, the disconnect device shall
remain readily operable.
WARNING:
to alert the user to the presence of non-insulated “dangerous voltage” within the
product’s enclosure that may be of sufficient magnitude to constitute a risk of
electric shock.
The exclamation point within an equilateral triangle is intended to alert the user to
the presence of important operating and maintenance instructions in the literature
accompanying the appliance.
This equipment is a Class II or double insulated electrical appliance. It has been
designed in such a way that it does not require a safety connection to electrical
earth.
This product contains electrical or electronic materials. The presence of these
materials may,if not disposed of properly, have potential adverse effects on the
environment and human health.
Presence of this label on the product means it should not be disposed of as
unsorted waste and must be collectedseparately. As a consumer, you are responsible
for ensuring that this product is disposed of properly.
Unplug this apparatus during lightning storms or when unused for long periods of time.
Refer all servicing to qualified service personnel. Servicing is required when the
apparatus has been damaged in any way, such as the power-supply cord or plug
is damaged, liquid has been spilled or objects have fallen into the apparatus, the
apparatus has been exposed to rain or moisture, does not operate normally, or has
been dropped.

3
En -
SAFETY INFORMATION
To ensure reliable and safe operation of this equipment, please carefully read all the instructions in this user guide, especially the safety information below.
Electrical Safety
The TV set should only be connected to a main power supply with voltage that matches the label at the rear of the product.
To prevent overload, do not share the same power supply socket with too many other electronic components.
Do not place any connecting wires where they may be stepped on or tripped over.
Do not place heavy items on any connecting wire, which may damage the wire.
Hold the main plug, not the wires, when removing from a socket.
During a thunderstorm or when not in using the television for long periods, turn off the power switch on the back of the television.
Do not allow water or moisture to enter the TV or power adapter. Do not use in wet, moist areas, such as bathrooms, steamy kitchens or near swimming pools.
Pull the plug out immediately, and seek professional help if the main plug or cable is damaged, liquid is spilled onto the set, if the TV set accidentally exposed to water or moisture, if anything
accidentally penetrates the ventilation slots or if the TV set does not work normally.
only service this apparatus.
To avoid a battery leakage, remove batteries from the remote control, when the remote is not use for long period, or when the batteries are exhausted.
Install only new batteries of the same type in your product.
Failure to insert batteries in the correct polarity, as indicated in the battery compartment, may shorten the life of the batteries or cause batteries to leak.
Do not mix old and new batteries.
Batteries should be recycled or disposed of as per state and local guidelines.
Do not attempt to recharge disposable batteries.
Do not short circuit battery terminals.
Keep away from children.
Physical Safety
Do not tap or shake the TV screen, or you may damage the internal circuits. Take good care of the remote control.
Do not defeat the safety purpose of the polarized or grounding-type plug. A polarized plug has two blades with one wider than the other. A grounding plug has two blades and a third grounding
Protect the power cord from being walked on or pinched particularly at plugs.
Unplug the apparatus during lightning storms or when unused for long periods.
damaged in any way.
Servicing is also required if liquid has been spilled, or objects have fallen into the apparatus; when the apparatus has been exposed to rain or moisture; or if the apparatus has been dropped.
Always connect your television to a power outlet with protective ground connection.
4
En -
PREPARATION
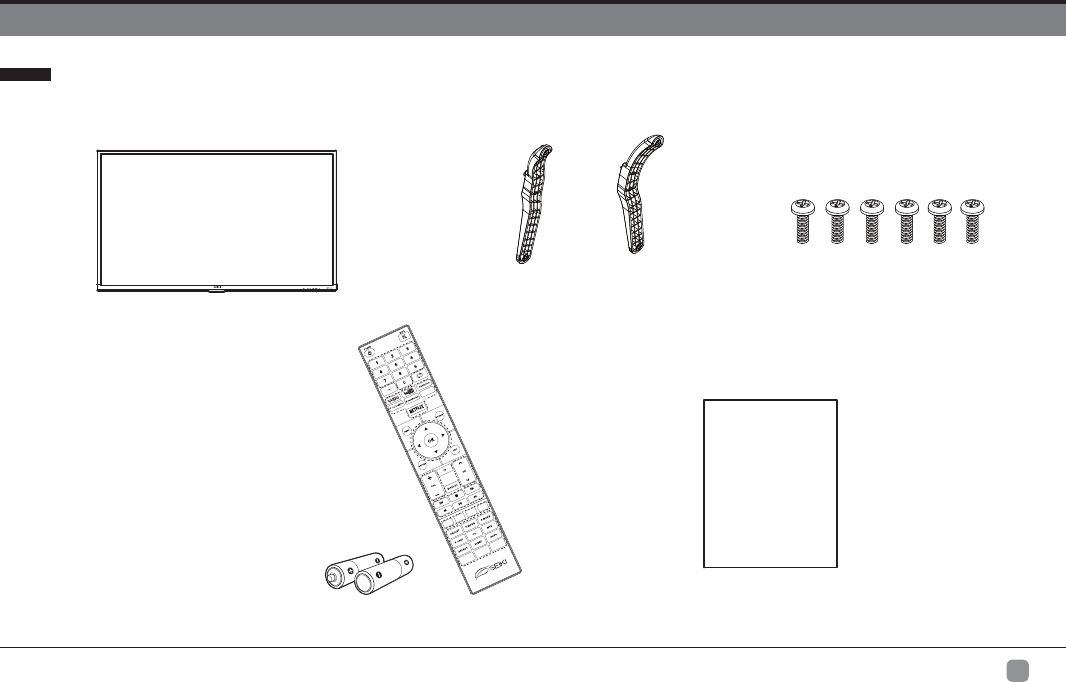
What's Included
TV Set
Quick Start Guide
002-LEM-SEIKI
Quick
Start Guide
Remote Control with Batteries
845-058-02B01
Base Stand
154-701-DC4873
154-702-DC4873
108-620-4031
5
En -
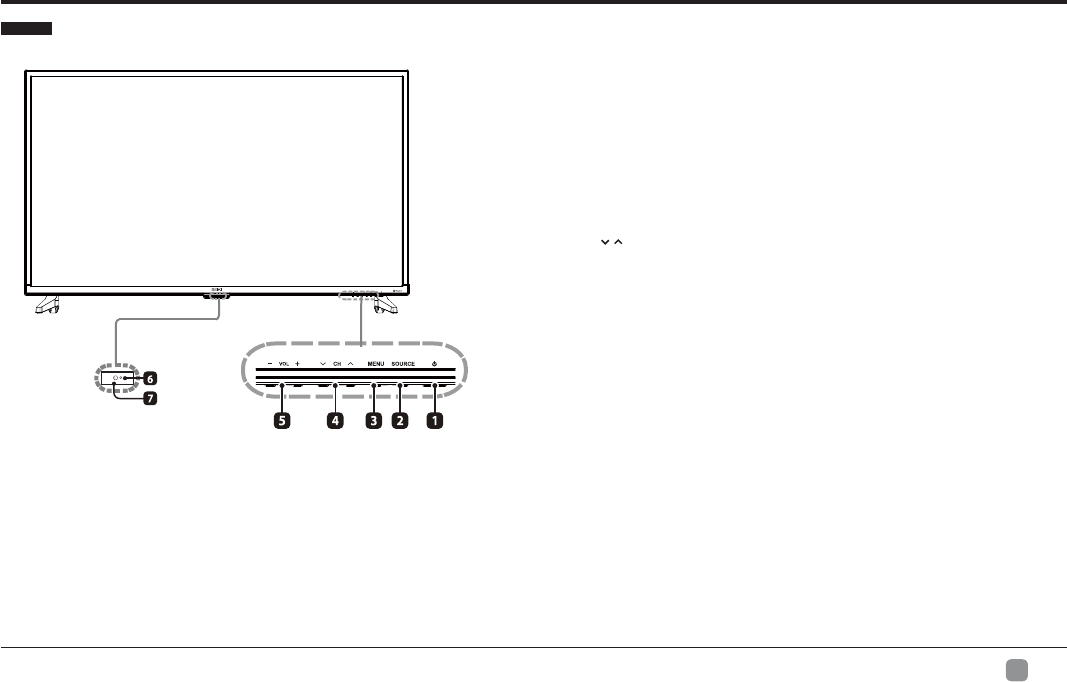
Front View
1. POWER
Switch the TV between On / Standby mode.
2. SOURCE
Press to select among different input signal sources.
3. MENU
Display the main menu.
4. CH /
Press to select a channel.
5. VOL -/+
Press to adjust the volume.
6. POWER Indicator
Illuminate blue when the TV is turned on. Illuminate red when the TV
is in standby mode.
7. IR
Receive IR signals from the remote control.
PREPARATION
6
En -
PREPARATION
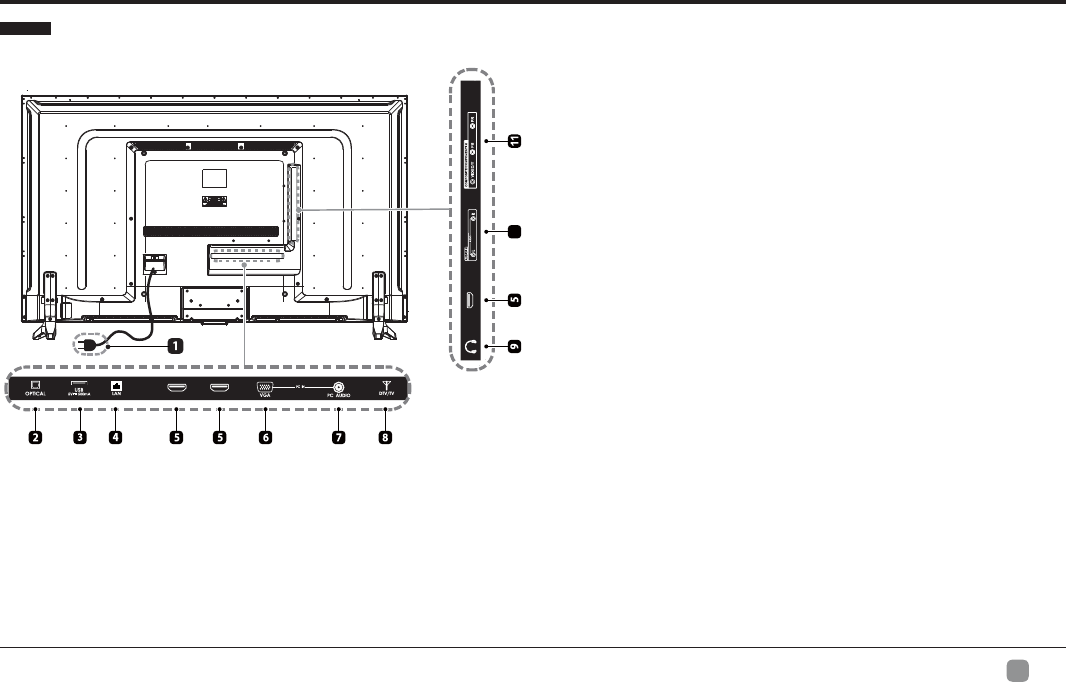
Rear View
1. Power Cord
Connect to AC power outlet.
2. OPTICAL Output
Connect a digital sound system to this jack.
3. USB Port
Connect to a USB storage device to play compatible audio and photo
4. LAN
Network connection port.
5. HDMI Input
6. VGA Input
Connect to a computer or other devices with a VGA interface.
7. PC AUDIO Input
Connect to a computer audio output.
8. DTV/TV Input
cable.
9. Headphone Socket
Connect to the Headphones.
10. AUDIO Input
devices.
11. COMPOSITE/COMPONENT IN
5V 900mA
4K@60Hz
3
4K@60Hz
2
4K@60Hz
1
10
7
En -
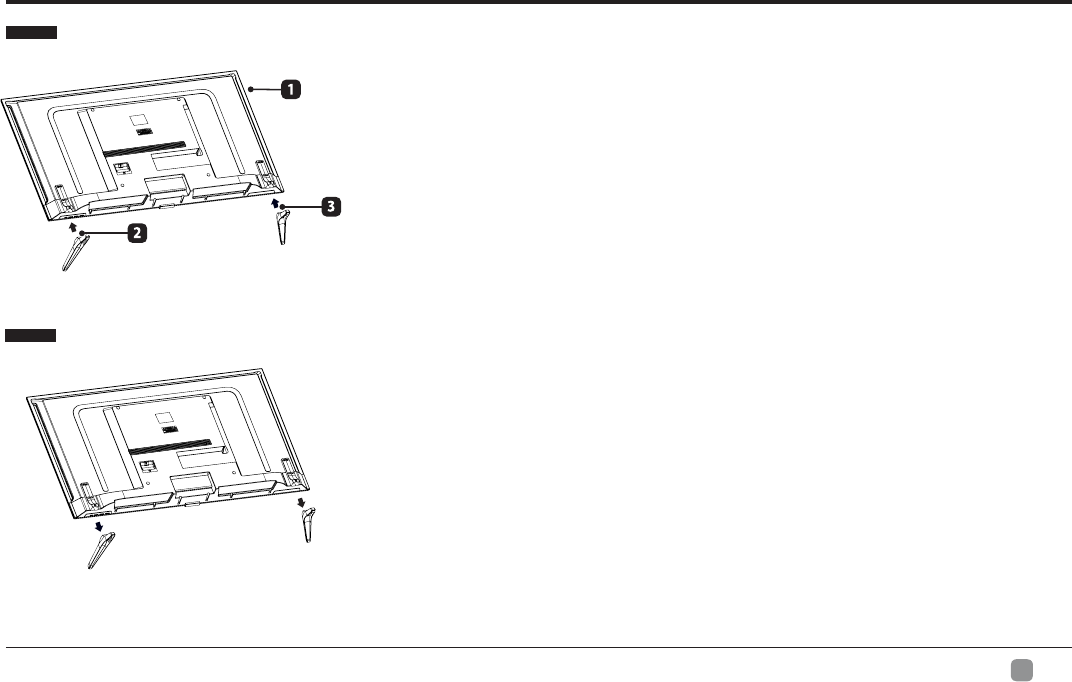
Installing the Stand
Fix the left base stand to the TV using the 3 pcs provided screws.
Fix the right base stand to the TV using the 3 pcs provided screws.
WARNING: This apparatus is intended to be supported by UL Listed wall mount bracket.
1.damaging or scratching.
2.Untighten the 6 pcs screws holding the stand assembly and remove them.
3.Attach the wall-mount bracket to the TV using the mounting holes on the back of the
TV. Mount this TV according to the instructions included in the wall-mount bracket.
Removing the Stand for Wall-Mounting
PREPARATION
8
En -
PREPARATION
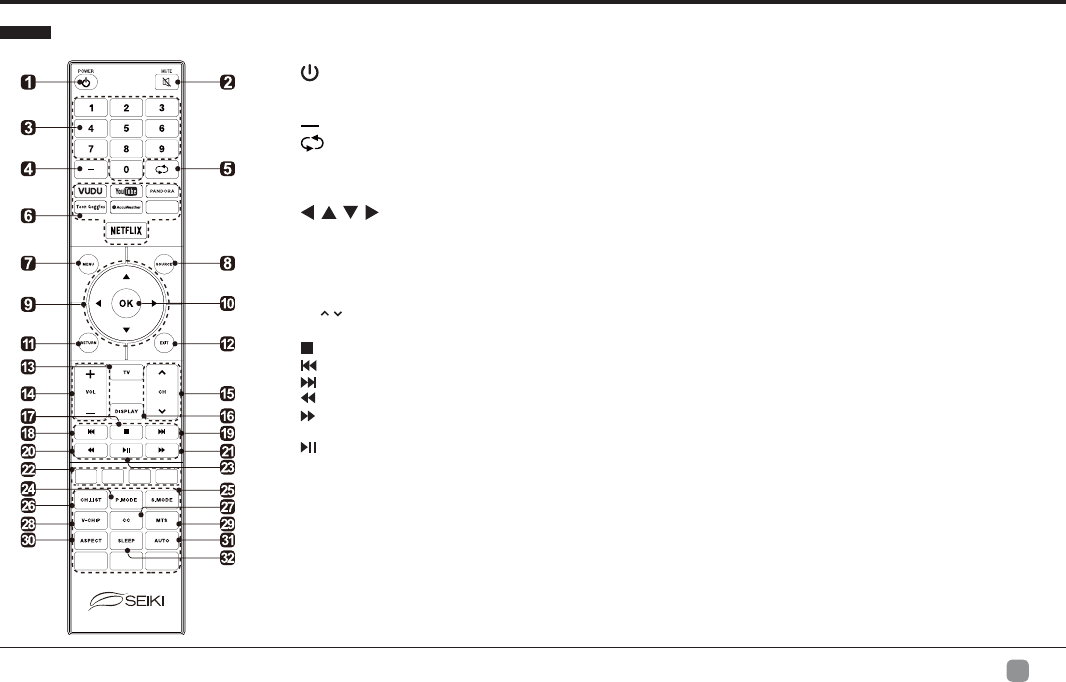
Remote Control
1. : Switch the TV between On and Standby mode.
2. MUTE: Mute and restore TV sound.
3. 0~9:
4. : Enter multiple program channel number such as 2-1.
5. : Return to the previous viewing channel.
6. APP: Press to select the desired APP.
7. MENU: Display the main menu.
8. SOURCE: Select among the different input signal sources:TV/ HDMI1/ HDMI2/ HDMI3/ USB/ VGA/ AV/ Component.
9. : Allows you to navigate the on screen display menus and adjust the system settings to your preference.
10. OK:
11. RETURN: Return to previous menu.
12. EXIT: Exit the on screen display menu.
13. TV: Press to turn to TV mode.
14. VOL+/-: Adjust the volume.
15. CH / : Select the channel.
16. DISPLAY: Display the present screen information such as the current channel and input source.
17. : Stop the playback.
18. : Skip to the beginning of the previous chapter/track/photo.
19. : Skip to the beginning of the next chapter/track/photo.
20. : Reverse playback rapidly.
21. : Advance playback rapidly.
22. COLORED BUTTONS: Press to access directly to the corresponding function in APP service.
23. : Start playback or pause.
24. P.MODE: Select picture mode: Dynamic/Standard/Movie/PC Mode/User.
25. S.MODE: Select sound mode: Standard/Music/Movie/User.
26. CH.LIST: Display program list.
27. CC: Closed Caption selection: On/Off/CC On Mute.
28. V-CHIP: Set up parental control.
29. MTS: Switch among different audio channels: STEREO/MONO/SAP.
30. ASPECT:
31. AUTO: Press to adjust the picture automatically in VGA source.
32. SLEEP: Set the TV sleep timer: OFF/5/10…/180/240 min.
9
En -
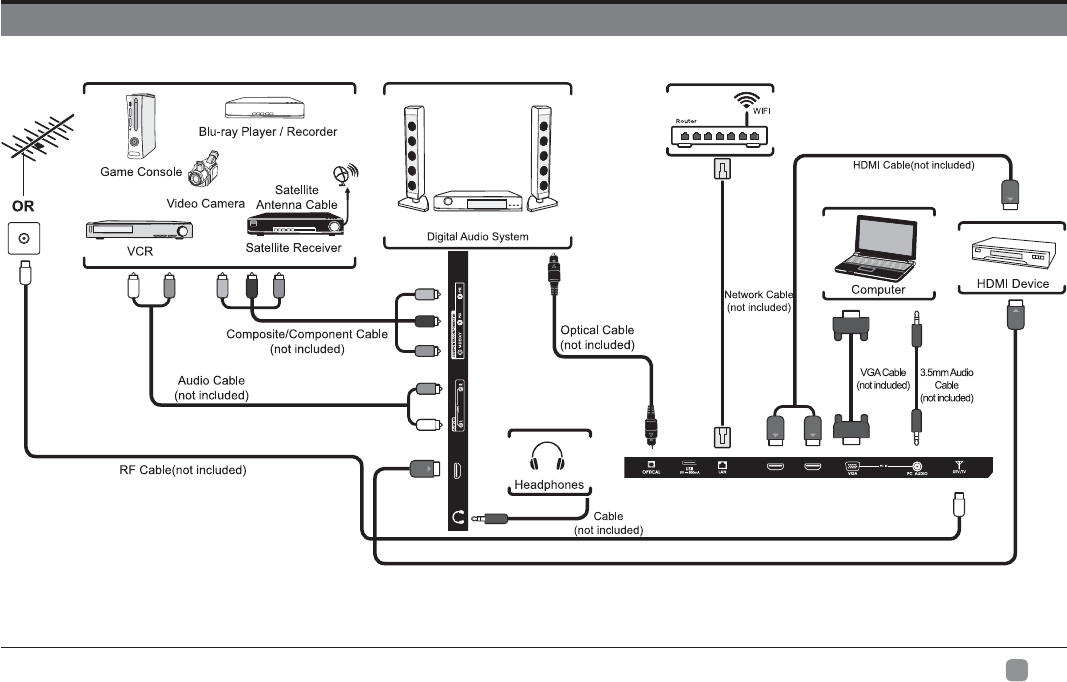
CONNECTING EXTERNAL DEVICES
Remarks:Component/AV is sharing with Audio in (L/R).
4K@60Hz
2
4K@60Hz
1
4K@60Hz
3
10
En -
CUSTOMIZING TV SETTINGS
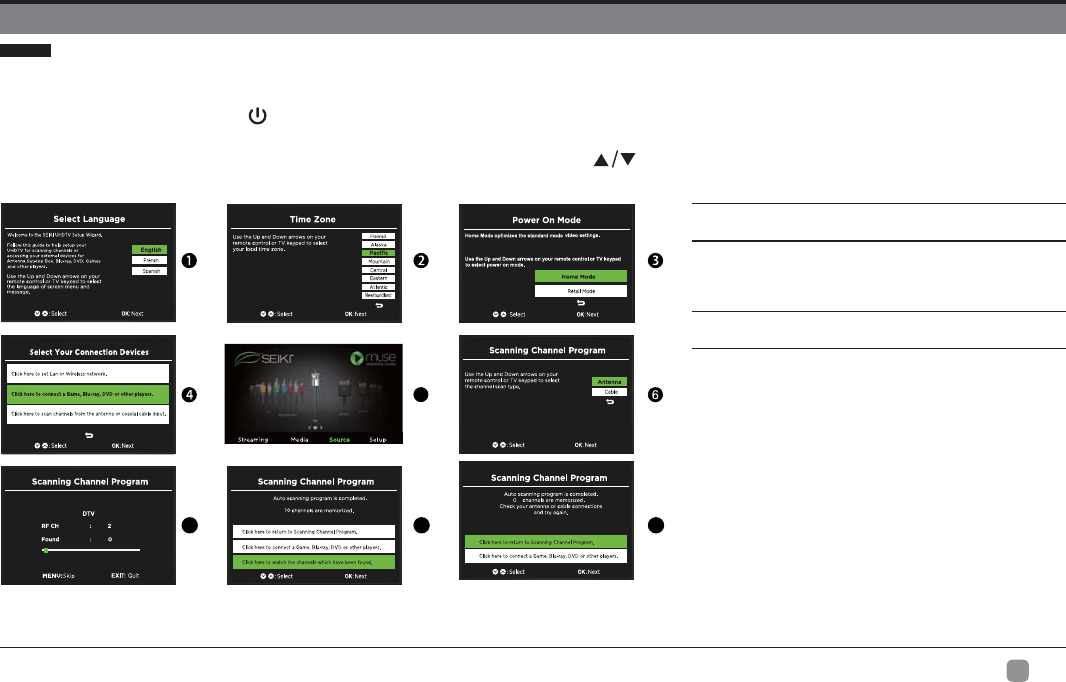
Initial Setup
Connect the power cord to the power socket after you have completed all the physical connections. At this stage, the TV will enter
Standby Mode and the red LED indicator will illuminate.
In Standby Mode, press the button on the main unit or on the remote control to turn the TV on. The red LED indicator will turn
blue.
buttons to select your desired mode and press OK to
Home Mode : The picture mode will be Standard if
you select this mode.
Retail Mode : Select Dynamic Mode if you would
like your picture to be brighter. At times this mode
may use more energy to operate the Volume/Sound
Mode and Picture Mode.
The SLEEP-MODE Power should be less than
0.5 W.
5
789 If channels can not be found, this
frame will be displayed automatically.
11
En -
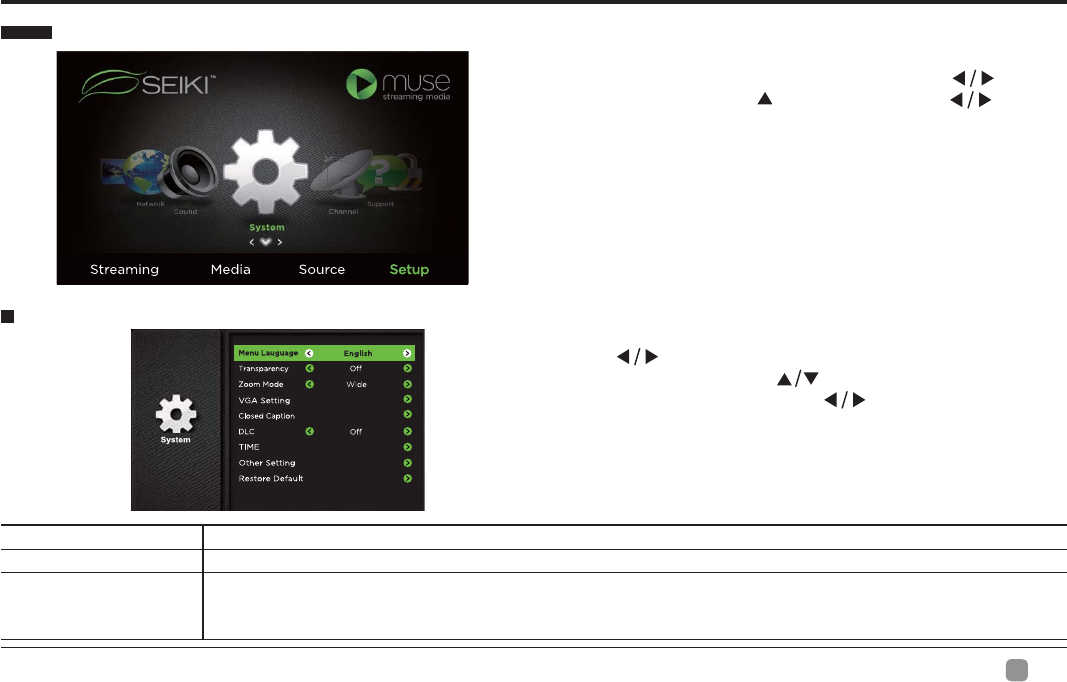
Navigating the Setup Settings
Press the MENU button to display the main menu.
Use buttons to select Setup menu and then press buttons to navigate and select the available menu.
CUSTOMIZING TV SETTINGS
12
En -
CUSTOMIZING TV SETTINGS
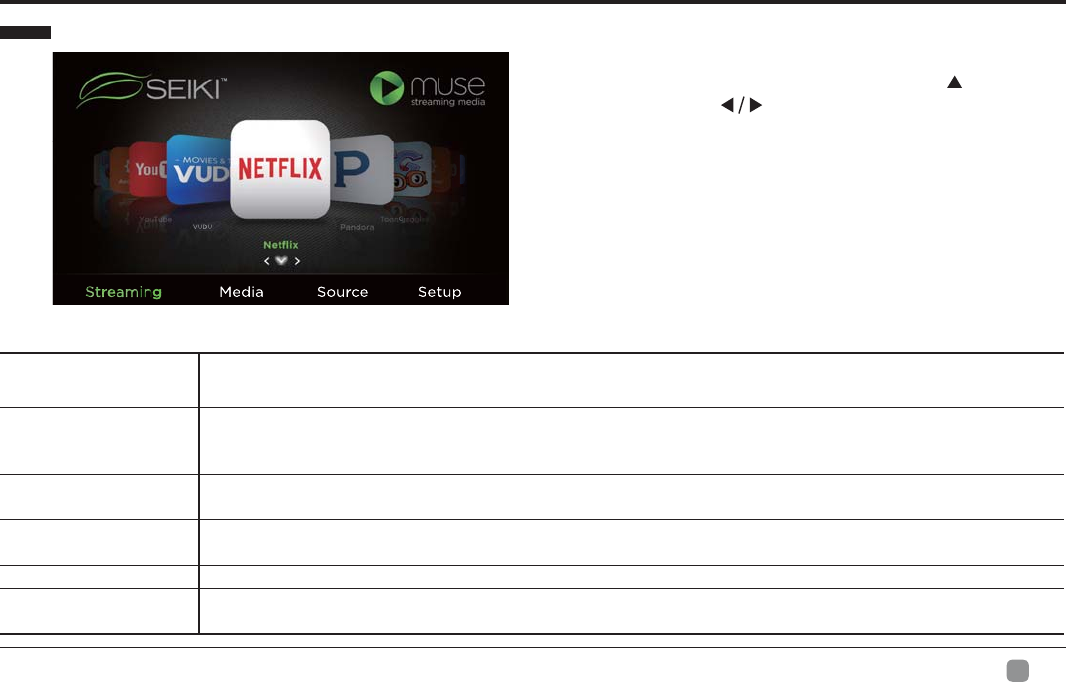
Streaming
Press the MENU button on the main unit or on the remote
control to display the Streaming. Then press to enter the
streaming and use to select the desired APP and press
OK button to view. Or press the hotkey on the remote control to
enter the APP directly.
Enjoys TV shows & movies streamed instantly over the Internet.
Pandora
Free personalized radio that offers effortless and endless music enjoyment and discovery. Just start with
the name of one of your favorite artists, songs, genres or composers and Pandora will do the rest. It’s
easy to create personalized stations that play only music you’ll love.
Toon Goggles A subscription video on-demand platform that offers animated, fun and educational cartoons, engaging
games and songs from all over the world and in many different languages to children.
AccuWeather Displays the current weather conditions and the temperature anywhere in the world in centigrade or
Fahrenheit.
YouTube YouTube your way on the best screen in your house.
VUDU Discover, watch and collect the latest movies and TV shows in high quality 1080p. Free to sign up. No
subscriptions, late fees or commitments.
13
En -
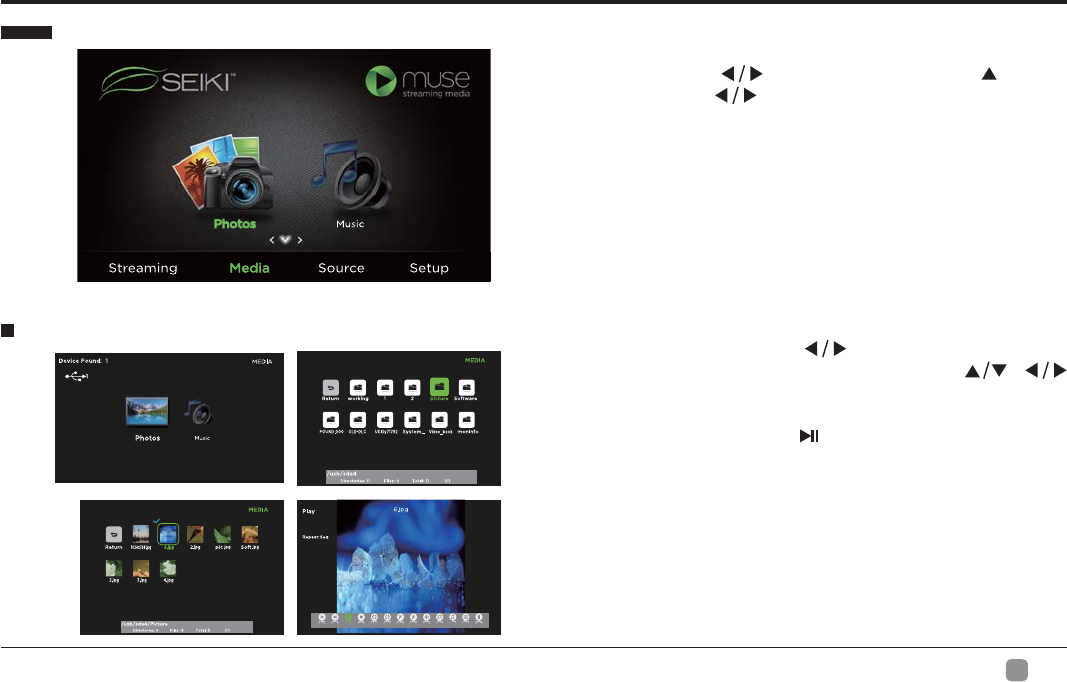
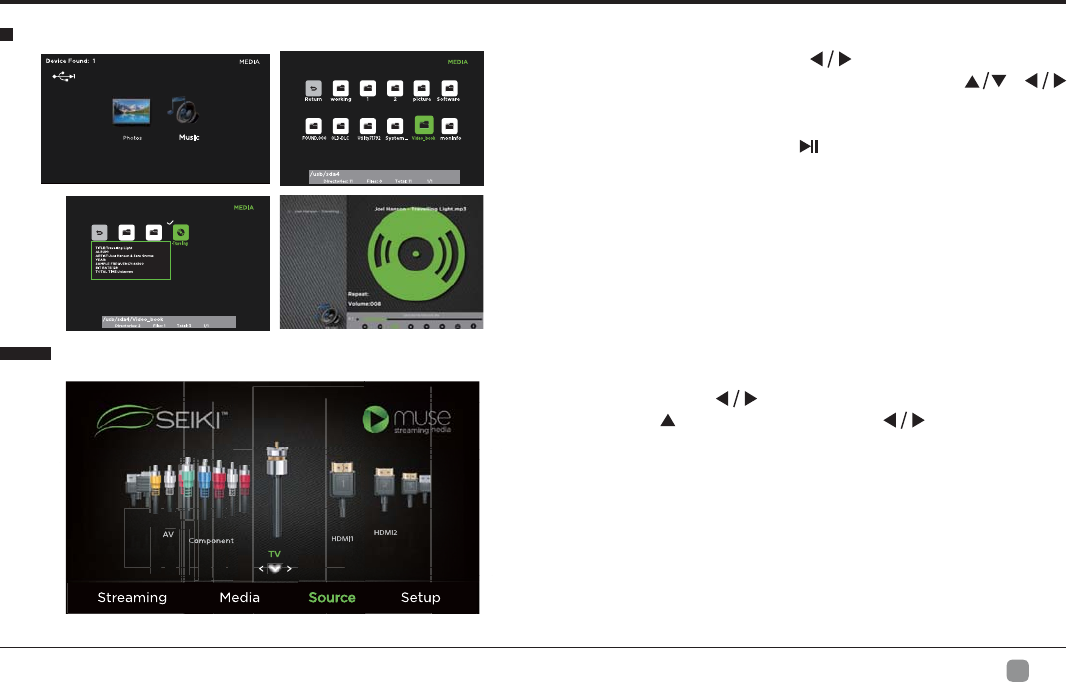
After entering Media, press buttons to select Photos
and then select the disk type to enter. Then use /
buttons to navigate in the picture folder to select the desired
photo, then a subscreen will pop up. Press OK
appears on the top left, press to display the photo.
Media
NOTE:Portable storage devices( USB disk or Hard disk) should be inserted.
Press the MENU button on the main unit or on the remote
control, then press to select Media, and use to enter
the media and use to select the desired option.
Viewing Photos
Note: File format supported: JPEG.
CUSTOMIZING TV SETTINGS
14
En -
CUSTOMIZING TV SETTINGS
After entering Media, press buttons to select Music
and then select the disk type to enter. Then use /
buttons to navigate in the music folder to select the desired
music, then a subscreen will pop up. Press OK
appears on the top left, press to display the music.
Listening to Music
Note: File format supported: MP3.
Source
Press the MENU button on the main unit or on the remote
control and press buttons to select the Source menu.
Then press to enter source,and use buttons to select
different input sources among: TV/ HDMI1/ HDMI2/ HDMI3/
USB/ VGA/ AV/ Component and press OK
15
En -
Setup
Press the MENU button on the main unit or on the remote
control to display the main interface. Then press to select
Setup menu and press to enter. Then press to select
the desired option.
System
Press buttons to select System menu and then press
OK button to enter. Press buttons to select the following
setting options and then press buttons to adjust each
option’s setting.
Menu Language Select menu language : English, Français or Español. The default on-screen menu language is English.
Transparency Select to turn On/Off transparency function.
Zoom Mode
Note: Different input source, the zoom mode options may differ.
CUSTOMIZING TV SETTINGS
16
En -
VGA Setting Adjust advanced option’s setting: H-POS, V-POS, Clock, Phase or Auto. (VGA source mode only)
Closed Caption
CC Mode Select CC mode : CC On, CC Off , CC on Mute.
Basic Selection Basic Selection: CC1, CC2, CC3, CC4, Text1, Text2, Text3, Text4.
Advanced Selection Advanced Selection: Service1, Service2, Service3, Service4, Service5, and
Service6.
OPTION Options: Mode, Font Style , Font Size, Font Edge Style, Font Edge Color, FG_
Color, BG_Color, FG_ Opacity, BG_Opacity.
DLC Select to turn On/Off the dynamic luminance control.
TIME
Sleep Timer:Select a period of time after which the TV automatically switches to standby mode:
Off/5/10/…/180/240 min. Alternative: You may press the SLEEP button repeatedly to select the number of
minutes directly.
Time Zone:
Daylight Saving Time:Select to turn On/Off daylight saving time.
Other Setting
Set other settings:
HDMI EDID: select the HDMI version: HDMI 2.0/HDMI 1.4.
INlink: set the following settings: INlink Control, Device Power Off, TV Power On, Audio Receiver, INlink
Device List, Root Menu.
Restore Default Restore the TV to factory default settings.
CUSTOMIZING TV SETTINGS
17
En -
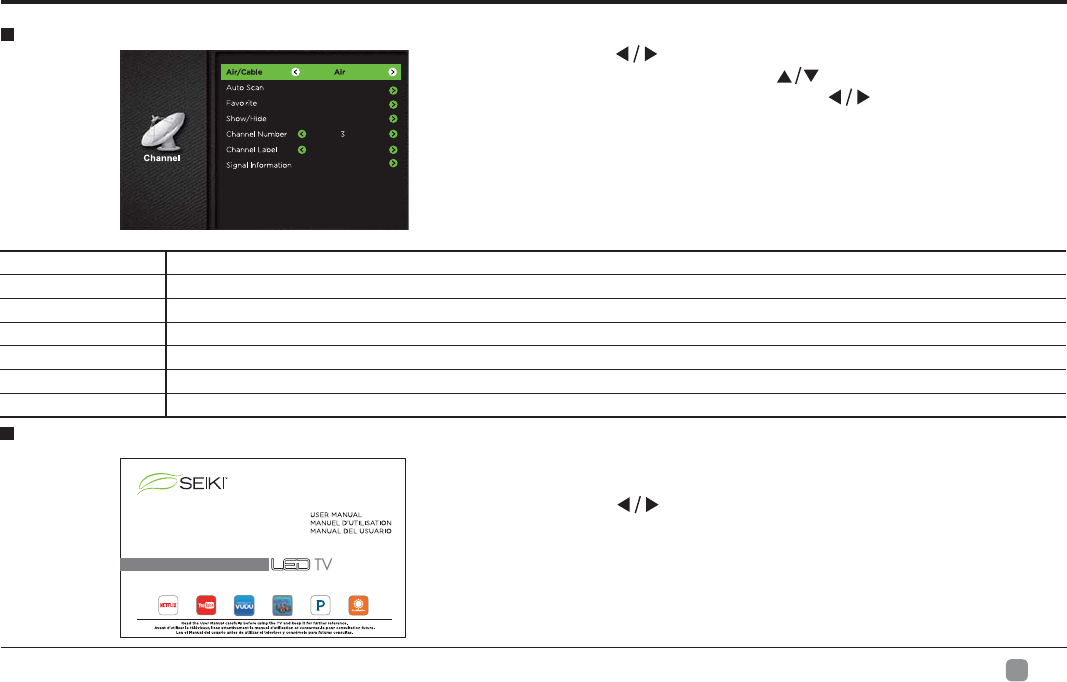
Press buttons to select Support menu and then press
OK button to view the built-in user manual.
Support
Air/Cable Select antenna between Air and Cable.
Auto Scan Select Auto Scan to search the available Air or Cable channels.
Favorite Set the selected channel as favorite channels.
Show/Hide Show/Hide the selected channel.
Channel Number Display the current channel number.
Channel Label Display the current channel label.
Signal Information Display the information of current signal.
CUSTOMIZING TV SETTINGS
Press buttons to select Channel menu and then press
OK button to enter. Press buttons to select the following
channel options and then press buttons to adjust each
option’s setting.
Channel
SE48UXC4T
18
En -
CUSTOMIZING TV SETTINGS
Press buttons to select Lock menu and then press OK
button to enter. Use the 0-9 buttons to input 4-digit password to
enter the Lock menu.
Press buttons to select the following lock options and
then press buttons to adjust each option’s setting.
Lock
Note: the default password is “0000”.
Change Password Use 0-9 buttons to input the old password and then input the new 4-digit password. Re-enter new password
Lock System
only be accessible when you turn the system lock on.
USA TV TV RATING: Press OK button to lock or unlock TV rating.
MPAA Select MPAA rating : N/A,G, PG, PG-13, R, NC-17,or X.
Canada
Canada
English Select MPAA rating for English-speaking Canada : E, C, C8+, G, PG, 14+, 18+.
Canada
French Select MPAA rating for Quebec Canada : E, G, 8 ans+, 13 ans+, 16 ans+, 18 ans+.
RRT Setting Set Rating Region Table.
Reset RRT Select to reset the RRT setting.
Clear Lock Clear all lock settings.

19
En -
Press buttons to select Picture menu and then press
OK button to enter. Press buttons to select the following
picture options and then press buttons to adjust each
option’s setting.
Picture
CUSTOMIZING TV SETTINGS
Picture Mode Cycle among picture mode: Dynamic/Standard/Movie/PC Mode/User.
Alternative: you may press the P.MODE button to select the picture mode directly.
Blue Screen Allow the blue background to turn On/Off during weak or no signal conditions.
Brightness Increase or decrease the amount of white in the picture. (For User mode)
Contrast Adjust the difference between light and dark levels in the pictures. (For User mode)
Color Control the color intensity. (For User mode)
Sharpness Adjust the level of crispness in the edges between light and dark areas of the picture. (For User mode)
Tint Adjust the balance between red and green levels.
Color Temp Cycle among color temperatures: Normal/Warm/Cool.
Advanced Setting
Noise Reduction:Reduce the noise level of the connected device: Off/Weak/Middle/Strong.
Color Space: To adjust the following settings: Color Mode, Color, Hue, Saturation, Brightness and Reset.
White Balance: To adjust the settings of white balance.
MEMC Cycle among Motion Estimate and Motion Compensation modes:Middle/High/Off/Low.
20
En -
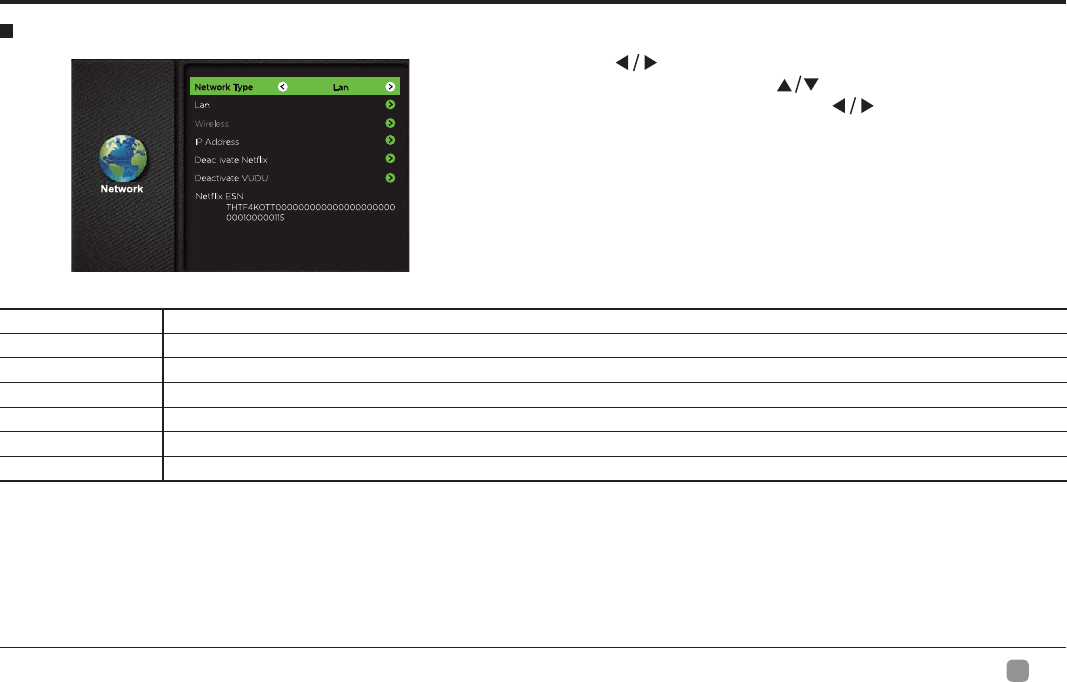
Press buttons to select Network menu and then press
OK button to enter. Press buttons to select the following
network options and then press buttons to adjust each
option’s setting.
Network
CUSTOMIZING TV SETTINGS
Network Type Select two types of network: Wireless or Lan.
Lan Connect the TV to the wired Lan: Auto Get IP/Manual Get IP.
Wireless
IP Address Display the current IP information.
Deactivate VUDU Deactivate Vudu and clear the account information.
Electronic Serial Number.
21
En -
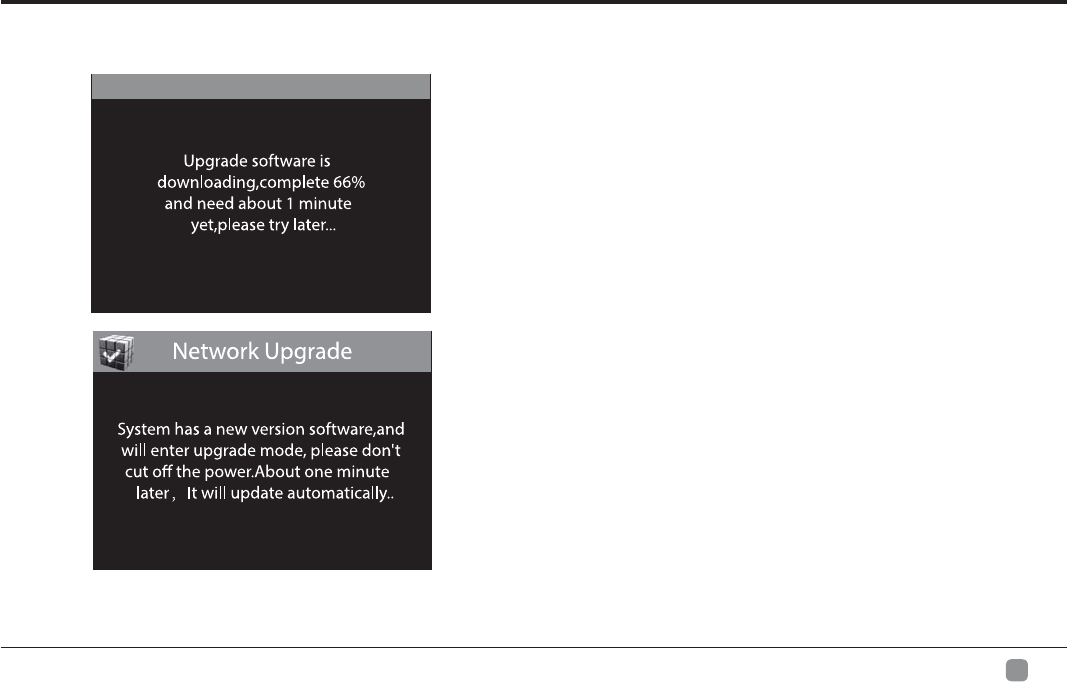
If there is a new version, it will be downloaded in the
background. When you want to enter the app, a menu bar will
pop up reminding you that upgrade software is downloading.
Please try later...
After the download completed, it can upgrade automatically
after users press the standby button.
Note: This procedure is fully automatic, and remember not to cut
off the power.
Auto Upgrade
After the TV connects to network, the system will automatically detect software version.
CUSTOMIZING TV SETTINGS
22
En -
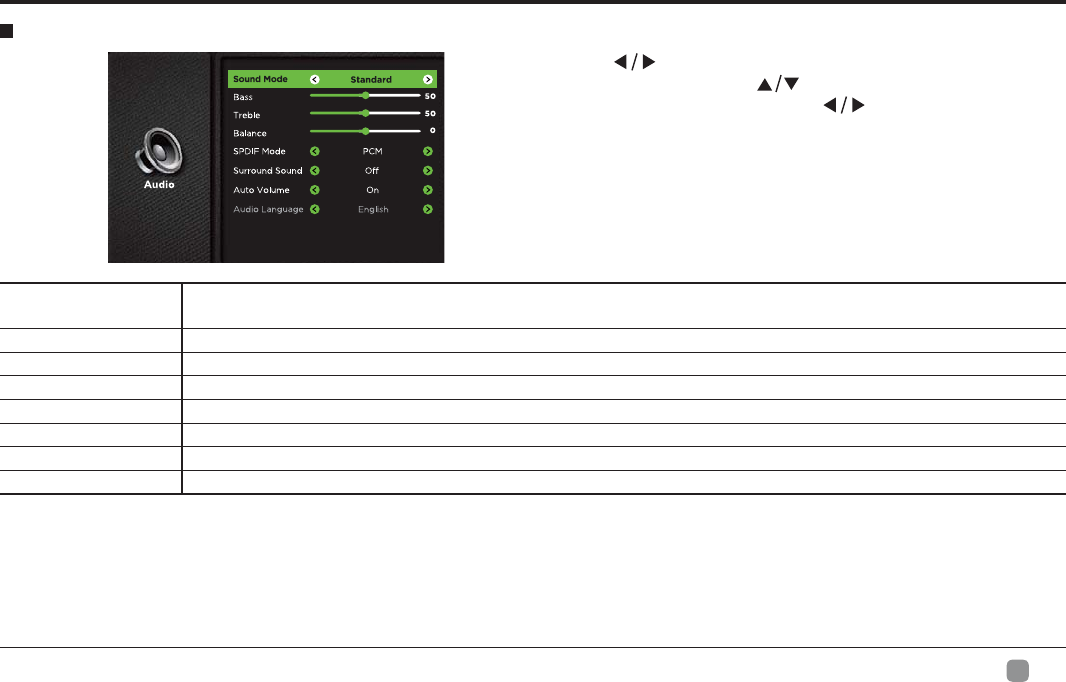
Press buttons to select Audio menu and then press OK
button to enter. Press buttons to select the following
audio options and then press buttons to adjust each
option’s setting.
Audio
Sound Mode Allow the selection of an audio-enhancement technique: Standard/Music/Movie/User.
Alternative: you may press the S.MODE button to select the sound mode directly.
Bass Control the relative intensity of lower-pitched sounds. (For User mode)
Treble Control the relative intensity of higher-pitched sounds. (For User mode)
Balance Adjust the relative volume of the speaker in a multiple speaker system.
SPDIF Mode Select the digital audio output mode between PCM/RAW.
Surround Sound Turn On/Off to provide an enhanced listening experience.
Auto Volume Turn On/Off to automatically control volume levels.
Audio Language Select audio language among: English, French, Spanish.
CUSTOMIZING TV SETTINGS

23
En -
PARENTAL CONTROL
Press the MENU button on the main unit or on the remote control and then press buttons to select Lock menu. Use the 0-9 buttons to input
the 4-digit password to enter the Lock menu. If used, this option feature can "block'' undesirable programming from appearing on the TV. Parental
Control offers the user a wide variety of options and settings that restrict or "block'' the programming that can appear on the TV. Parental Control
both rating systems should be used and based on the ages of children.
Overview
ratings from the TV Parental Guidelines Rating Systems below, using the Age Block option for General Audiences, and for children.In addition, you
may wish to add additional restrictions from the content block menu, and submenus examples below.
Things to Consider before Setting up Parental Control
Determine which rating you consider acceptable to the viewer. (For example,if you choose TV-PG, more restrictive ratings will be automatically
Block program "Content" based on individual parameters such as: Strong Dialog, Bad Language, Sex Scenes,Violence Scenes or Fantasy. Violent
Scenes; in Content Blk option. Select a secret password, in the Set Password option, using the numbers keys on the remote control.Save the
password, it is the only way to access the Parental Control menu and change rating setting, or turn off Parental Control.
You can set different Parental Control viewing restrictions for general audiences and for children, both can be active at the same time.
Simply specifying one content block such as Sex Scenes, will not automatically restrict the programming that appears from the video sources.
Even If you choose to leave the AUX Inputs unblocked, the ratings you specify will automatically restrict the programming that appears from the
video sources.
You cannot disable Parental Control by disconnecting the TV from power. Block hours will be automatically reset to the original block time
24
En -
PARENTAL CONTROL
Motion Picture Association of America (MPAA) Rating System
Grade Meaning
GGeneral Audiences Content not offensive to most viewers.
PG Parental Guidance
Suggested Content is such that parents may not want their children to view the program.
PG-13 Parents Strongly
Cautioned
Program is inappropriate for preteens, with a greater degree of offensive material suggested than a PG rated
program.
RRestricted Not for children under 17-contains strong element of sex and/or violence.
NC-17 No children under
age 17 Not for children under 17-under any circumstances. Contains strong sexual content.
XHard Core Films Same as NC-17 rating.
No Rating No Rating MPAA did not rate
TV Parental Guideline Rating System
Grade Meaning
TV-Y All Children Content not offensive to most viewers.
TV-Y7 Directed to Older
Children Considered suitable for children over 7- may contain fantasy violence scenes.
TV-G General Audience Considered suitable for all audience; children may watch unattended.
TV-PG Parental Guidance
Suggested
Suggested unsuitable for younger children-may contain suggestive language, bad language, sex and
violence scenes.
TV-14 Parents Strongly
Cautioned unsuitable for children under 14 - may contain strong language, bad language, sex, and violence scenes.
TV-MA Mature Audience
Only Adults only- may contain strong language, bad language, sex, and violence scenes.
Canadian Rating:
Canadian English is used throughout all English-speaking Canada (E,C, C8+,G, PG,14+, 18+).
Canadian French is used in Quebec (E,G,8 ans+, 13 ans+,16 ans+, 18 ans+)
Note: The V-Chlp will automatically block certain categories that are "more restrictive".If you block TV-Y category,then TV-Y7 will be automatically blocked. Similarly,if you
block TV-G category,then all the categories in the "young adult" will be blocked (TV-G, TV-PG,TV-14,and TV-MA).
TV-NO:The channel is not locked
25
En -
TROUBLESHOOTING
If your TV does not operate normally or cannot be turned on, please check the following troubleshooting questions. Remember also to check any
other connected electronic device, such as DVD or Blu-ray player to pinpoint the problem. If the TV still fails to operate normally, please contact
technical support.
The TV does not operate properly
The TV does not respond
when pressing any
buttons
The TV may freeze up during use. Disconnect the power cord from the power socket for a few minutes. Reconnect
the power cord and try to operate it again as usual.
TV cannot be switched on Check that the TV is connected to the power supply.
Make sure all connected AV devices are switched off before switching on your TV.
The remote control does
not work
Check to see if there are any objects between the TV and the remote control causing an obstruction. Ensure that you
are pointing the remote control directly at the TV.
Install new batteries.
Power is suddenly turned
off
Check the power of the TV. The power supply maybe interrupted.
Check if the sleep timer is set.
Check whether the Auto Standby is activated.
The video function does not work
No picture & No Sound Check whether the TV is switched on.
Try another channel. The problem may be caused by the broadcaster.
Picture appears slowly
after switching on
This is normal; the image is muted during the TV startup process. Please contact your service centre if the picture
No or poor color or poor
picture
Adjust the settings in the Picture menu.
Try another channel. The problem may be caused by the broadcaster.
Check if video cables are connected properly.
Horizontal/Vertical bar or
picture shaking Check for local interference such as an electrical appliance or power tool.
Poor reception on some
channels
The station or cable channel may be experiencing problems; tune to another station.
Station signal may be weak, reposition the antenna for better reception.
Check for sources of possible interference.
26
En -
TROUBLESHOOTING
The audio function does not work
Picture OK but no sound
Press the VOL +/- buttons.
Sound muted? Press the MUTE button.
Try another channel. The problem may be caused by the broadcaster.
No output from one of the
speakers Adjust the Balance settings in the Audio menu.
Unusual sound from
inside the TV
A change in ambient humidity or temperature may result in an unusual noise when the TV is switched on or off and
does not indicate a fault with the TV.
No sound when
connecting HDMI Check if the input source is HDMI1/HDMI2/HDMI3.
Audio noise Keep the RF coaxial cable away from the other connected cables.
Password
Lost password Select the SET Password setting in the Lock menu, then enter the following master password “8899”. The master
password clears your previous password and allows you to enter a new password.
There is a problem in PC mode
The signal is out of range
Adjust the resolution, horizontal frequency, or vertical frequency.
Vertical bar or stripe on
background & Horizontal
Noise & Incorrect position
Screen color is unstable
or show a single color
Check the signal cable.
Reinstall the PC video card.
Lines or streaks in
pictures
No pictures when
connecting HDMI Check if the input source is HDMI1/HDMI2/HDMI3.
Pictures appear in wrong
ratio Adjust the Aspect Ratio settings in the Setup menu or press the ASPECT button on the remote control.
27
En -
MAINTAINING
works best in temperatures that are comfortable to you.
SPECIFICATION
Panel Size 48 inch diagonally
Display Type LED
Panel Technology TFT
Panel 60 Hz Vs. 120 Hz 60 Hz
Display Resolution 3840 x 2160
HDMI Support 3840 x 2160 60Hz
Panel Resolution 3840 x 2160
Aspect Ratio 16:9
Dynamic Contrast Ratio-Panel 3000~4000:1
8 ms
30,000 hours
89
89

28
En -
The FCC Wants You to Know
NOTE: This equipment has been tested and found to comply with the limits for a Class B digital device, pursuant to Part 15 of the FCC Rules. These
limits are designed to provide reasonable protection against harmful interference in a residential installation.
This equipment generates uses and can radiate radio frequency energy and, if not installed and used in accordance with the instructions, may cause
harmful interference to radio communications. However, there is no guarantee that interference will not occur in a particular installation.
If this equipment does cause harmful interference to radio or television reception, which can be determined by turning the equipment off and on, the
FCC Radiation Exposure Statement
This equipment complies with FCC radiation exposure limits set forth for an uncontrolled environment. This equipment should be installed and
operated with minimum distance 20cm between the radiator & your body.

29
En -
30
En -
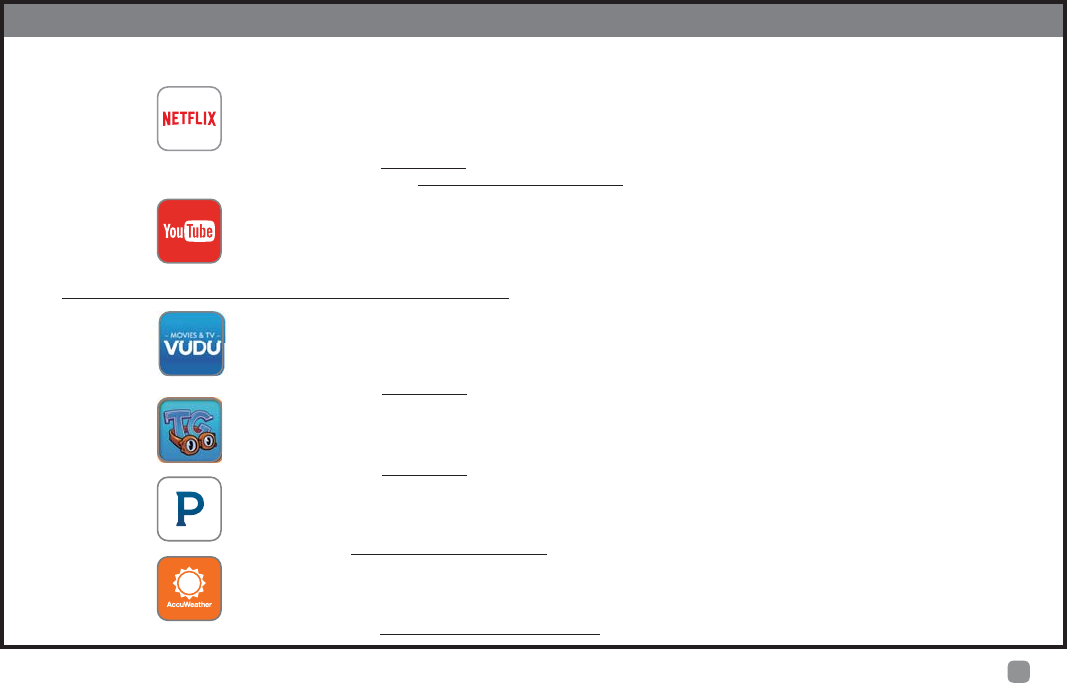
If you want to know about these APP information or get more service. Please refer to following content.
t Netix
You can call the following telephone for more help: 866-579-7172
If your matter is regarding customer service, please refer to https://contactus.netix.com/help for alternative contact information.
t YouTu be
You can browse the following website for more help:
https://productforums.google.com/forum/#!categories/youtube/smart-tvs
t VUDU
You can call the following telephone for more help: 888-554-8838
t TG
You can call the following telephone for more help: 888-874-5411
t Pandora
You can send E-mail to Pandora for more help: pandora-support@pandora.com
t AccuWeather
You can send E-mail to AccuWeather for more help: CustomerService@AccuWeather.com
OTT APP SERVICE

www.SEIKI.com
© 2015 Seiki LLC All rights reserved.
Service Hotline:
Ligne d’assistance téléphonique:
Línea de servicio:
1-855-MY-SEIKI(1-855-697-3454)