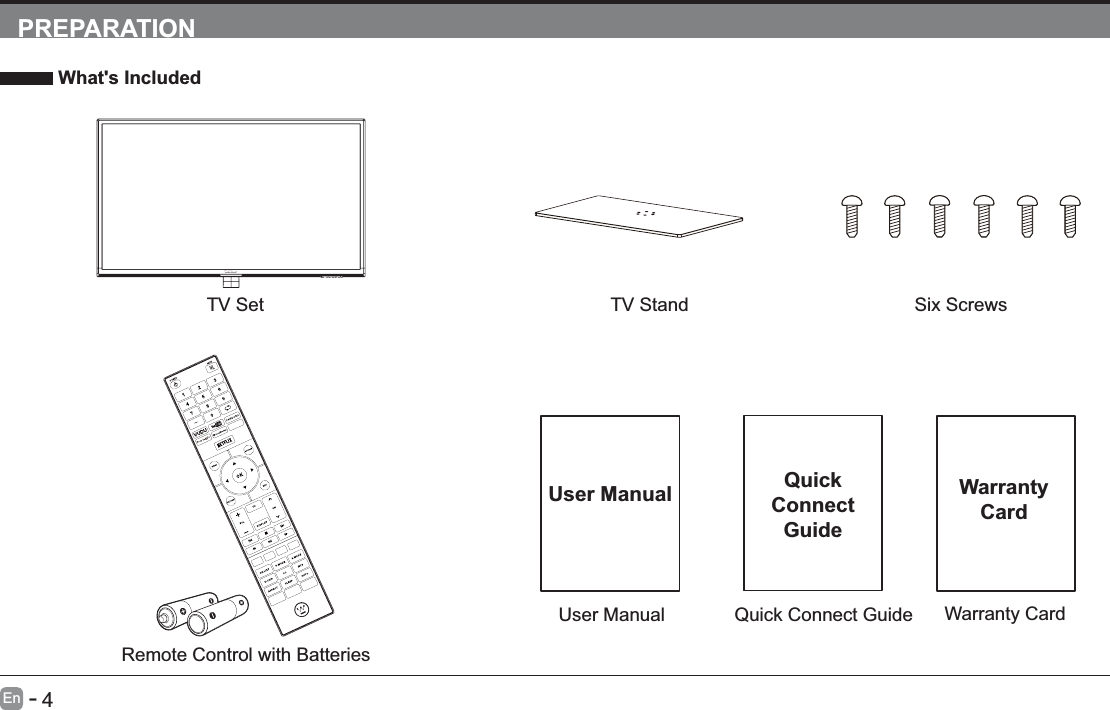
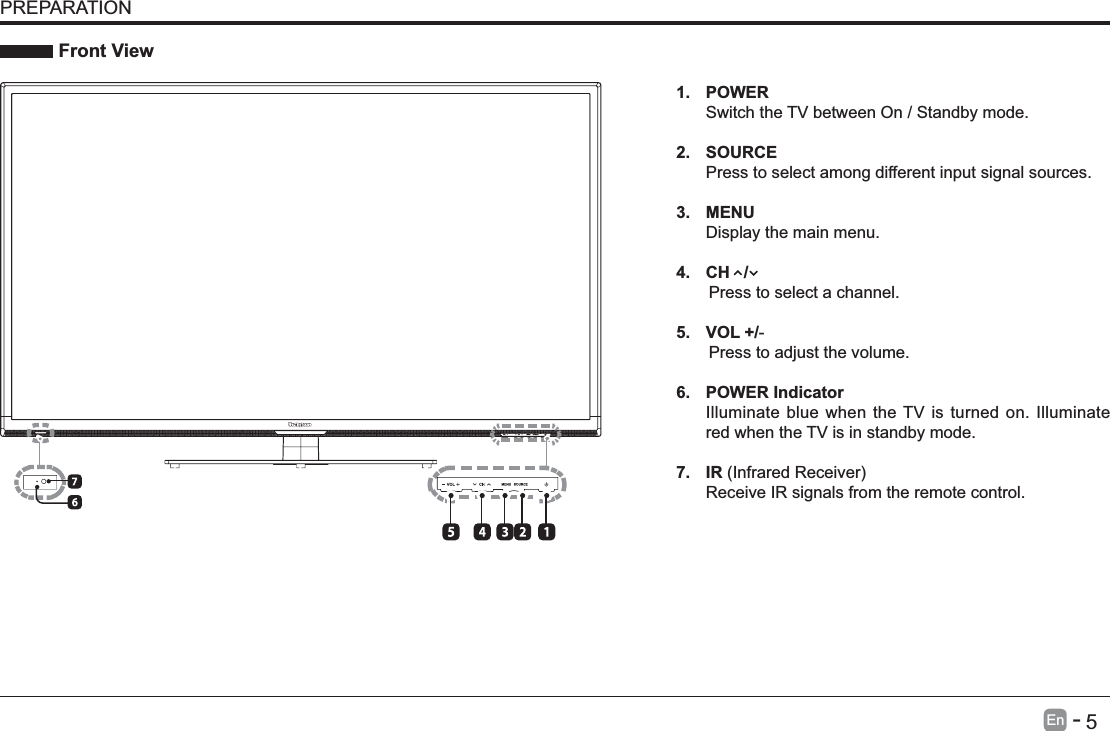
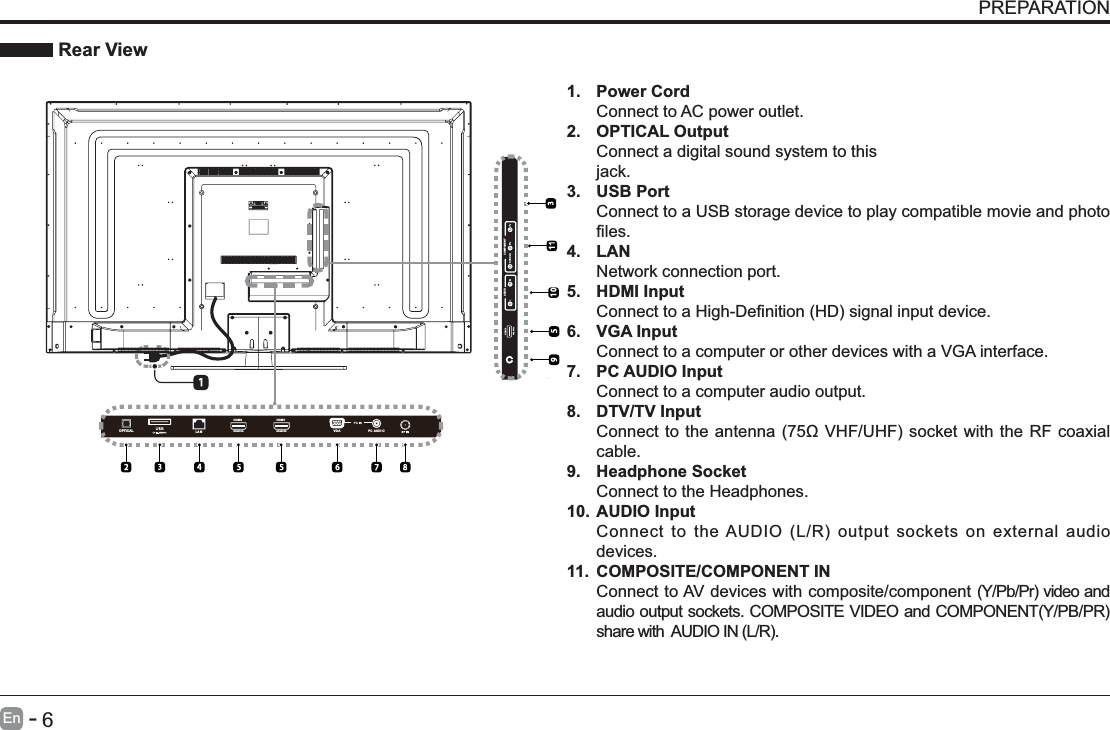
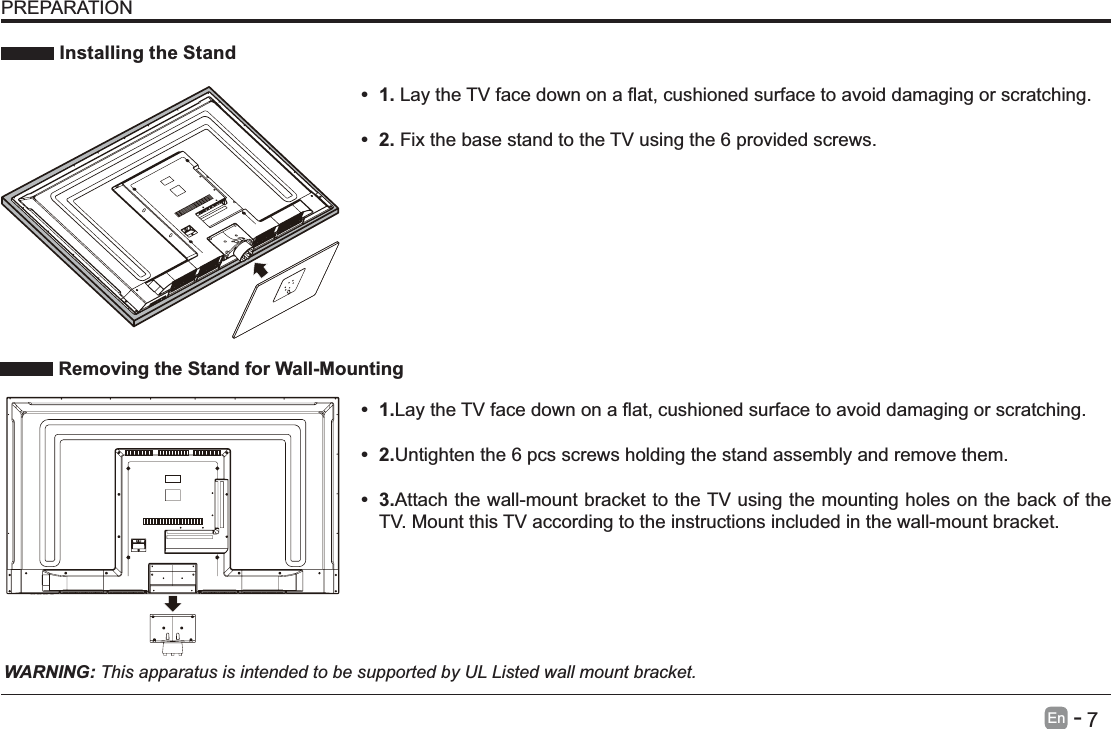
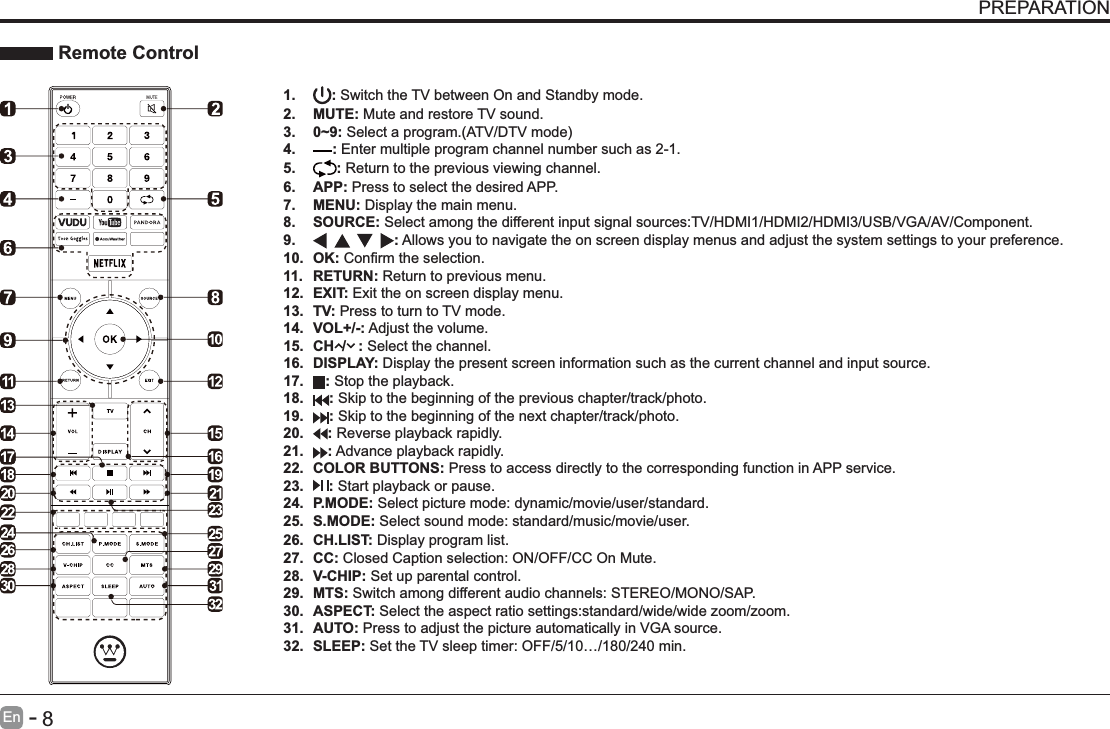
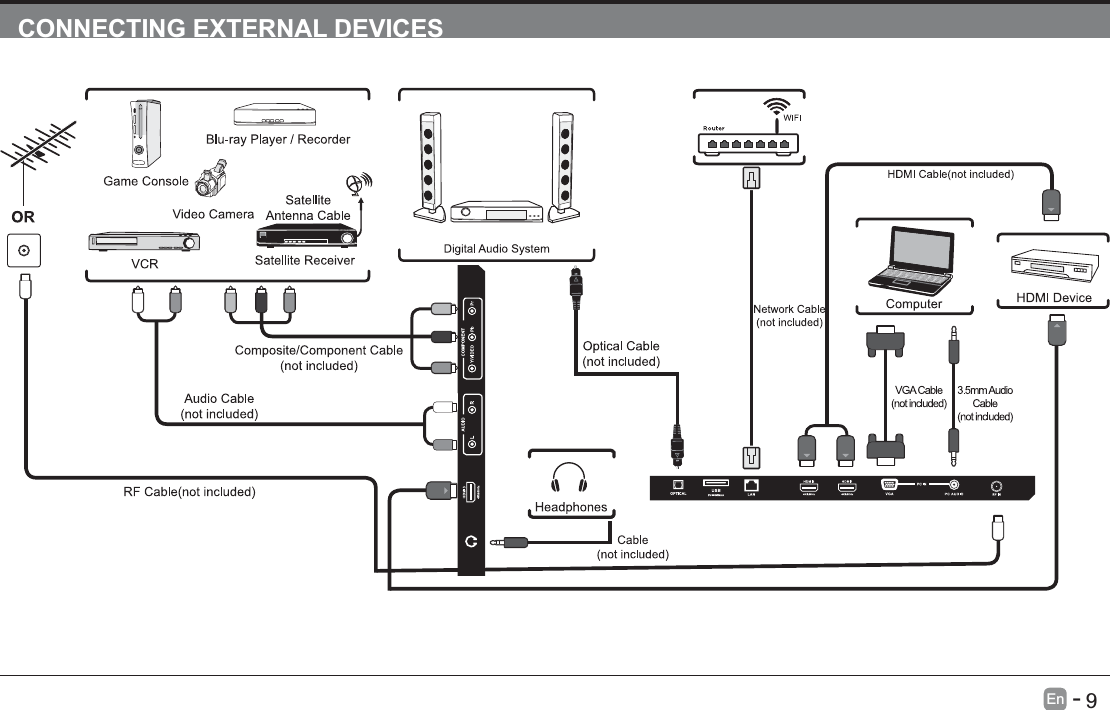
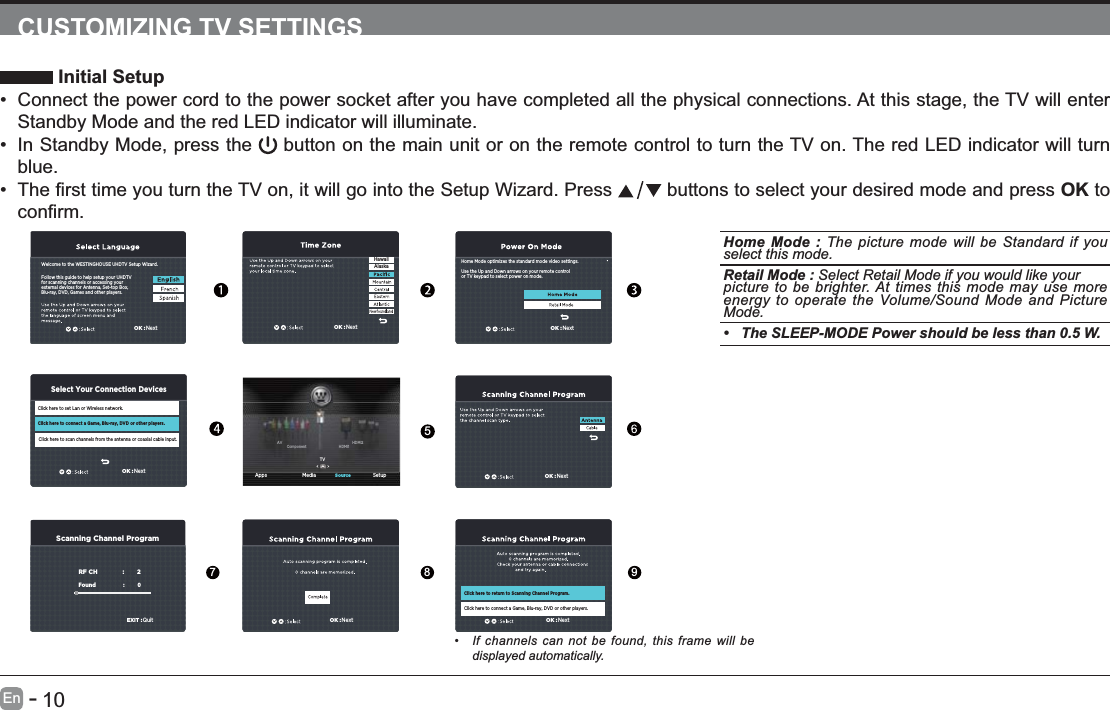
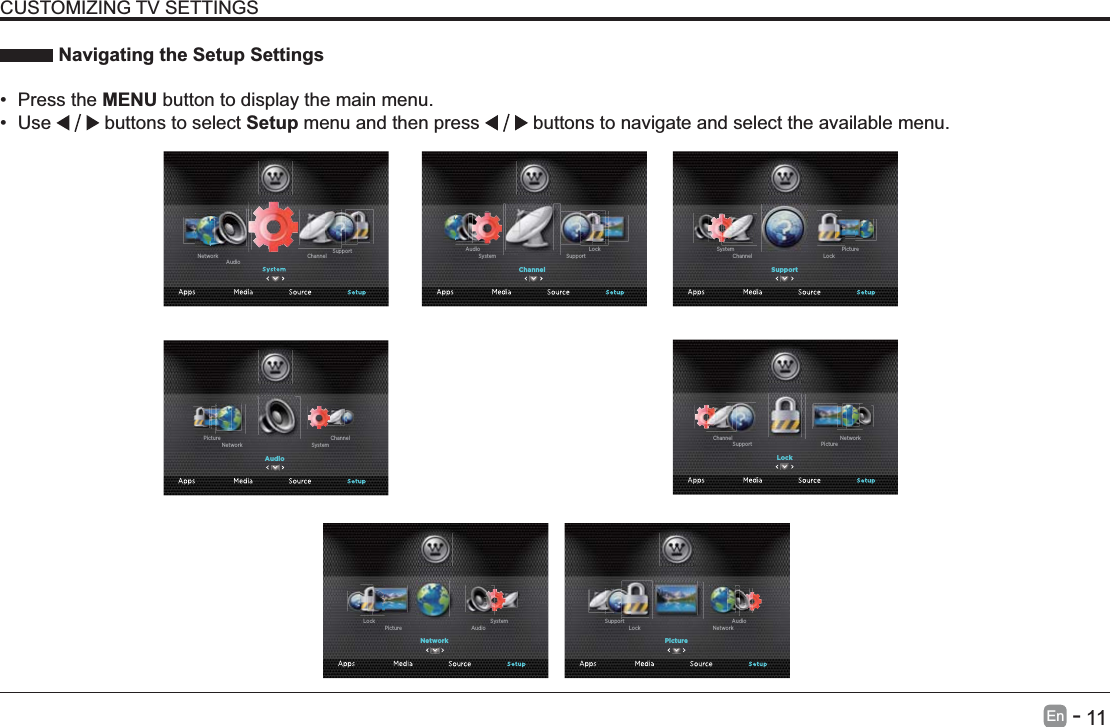
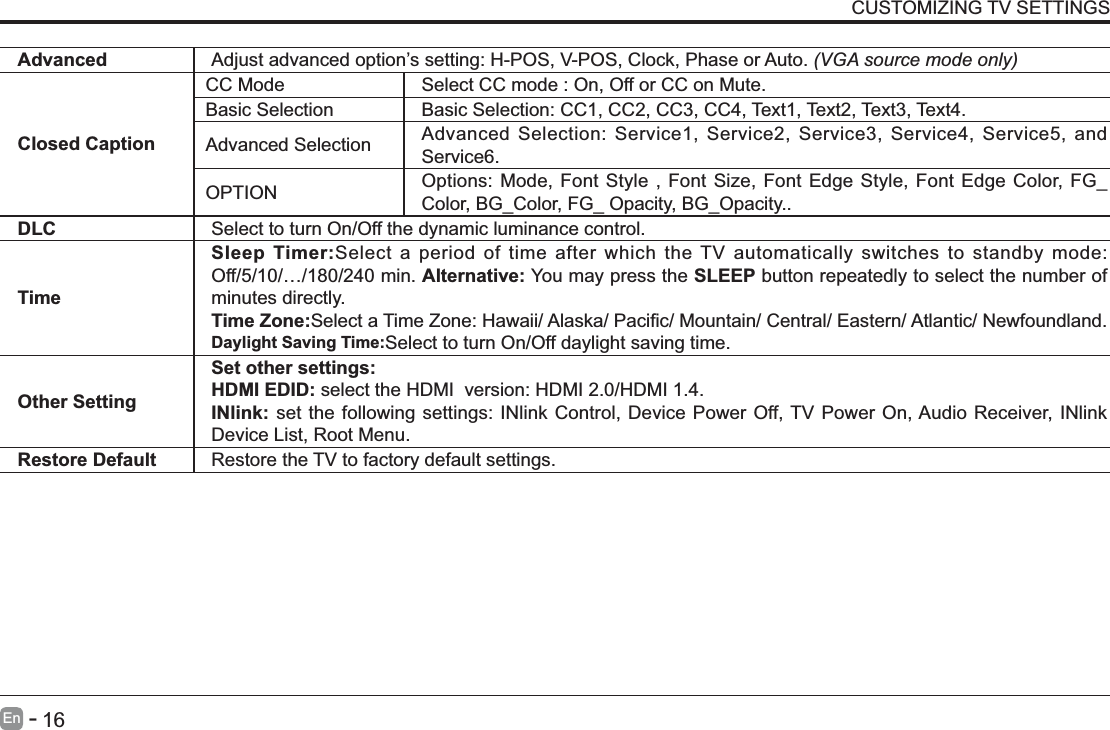
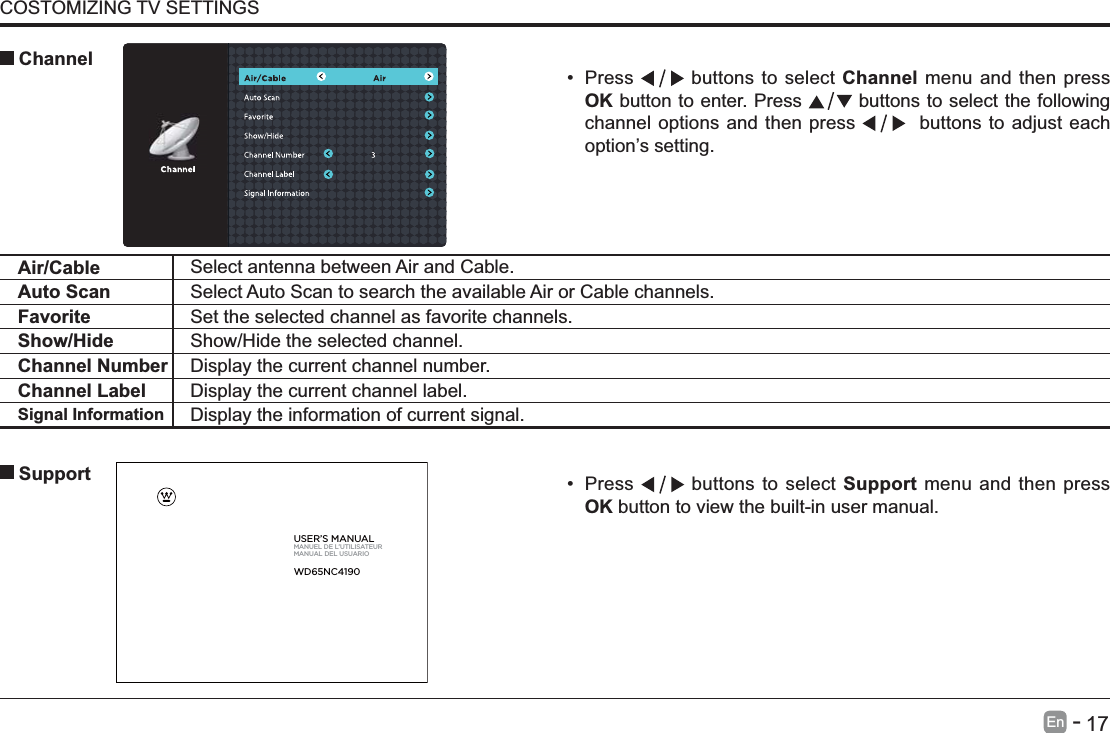
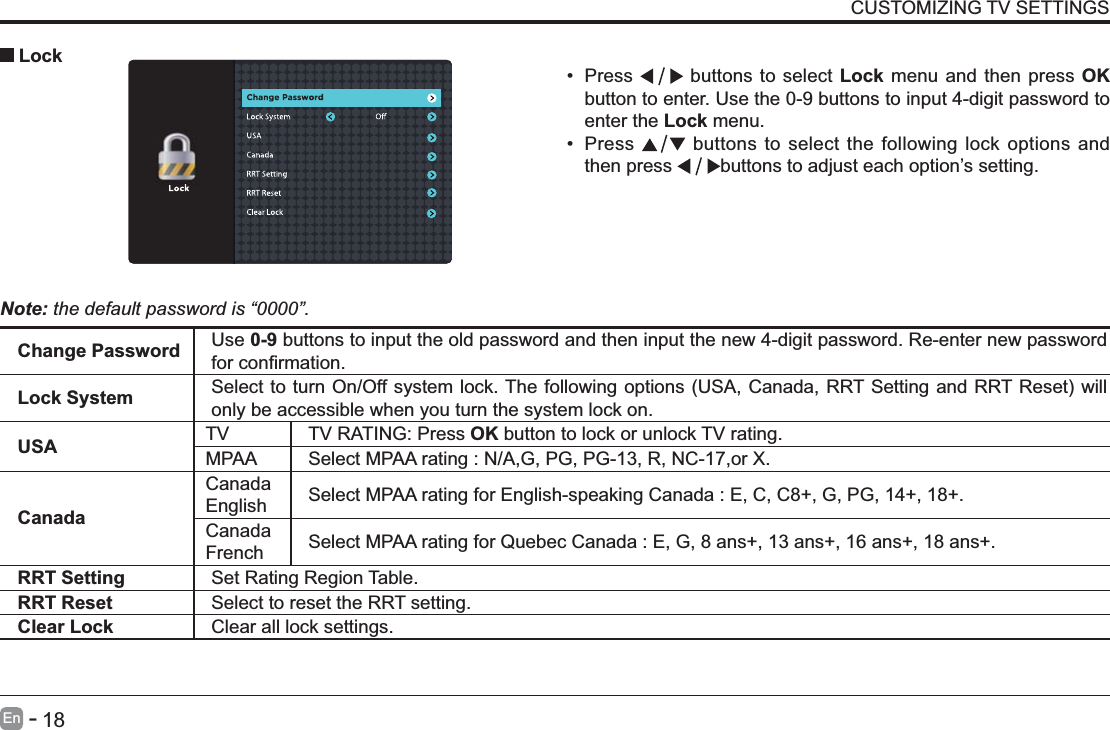
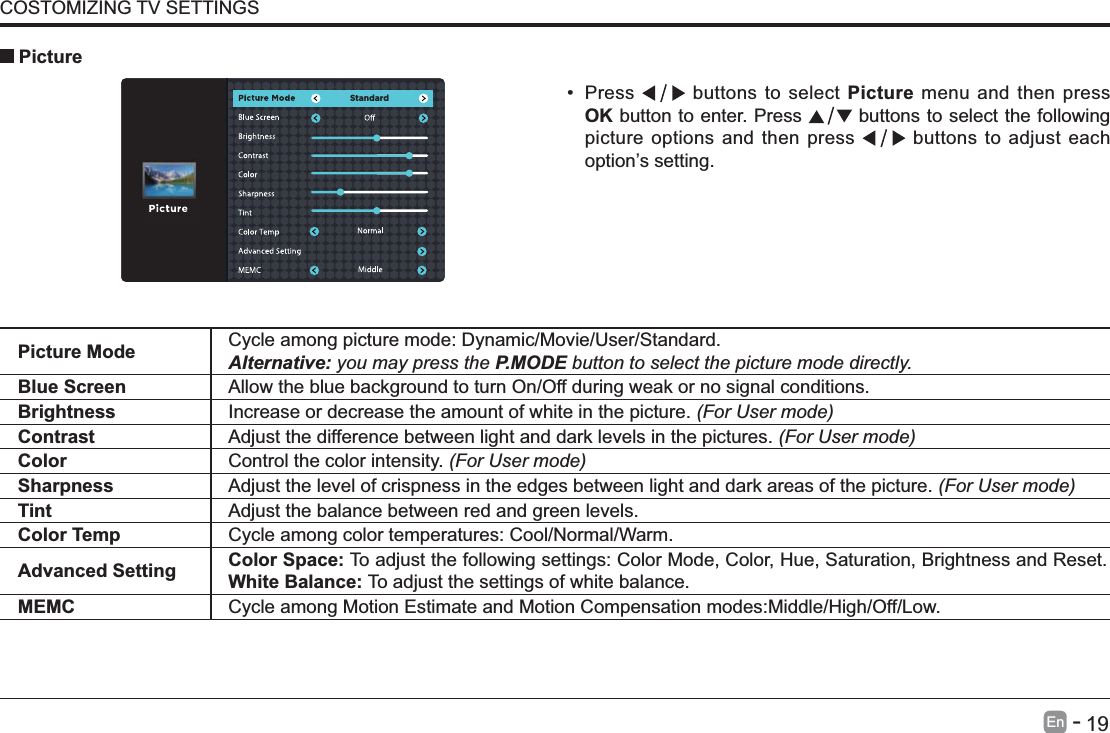
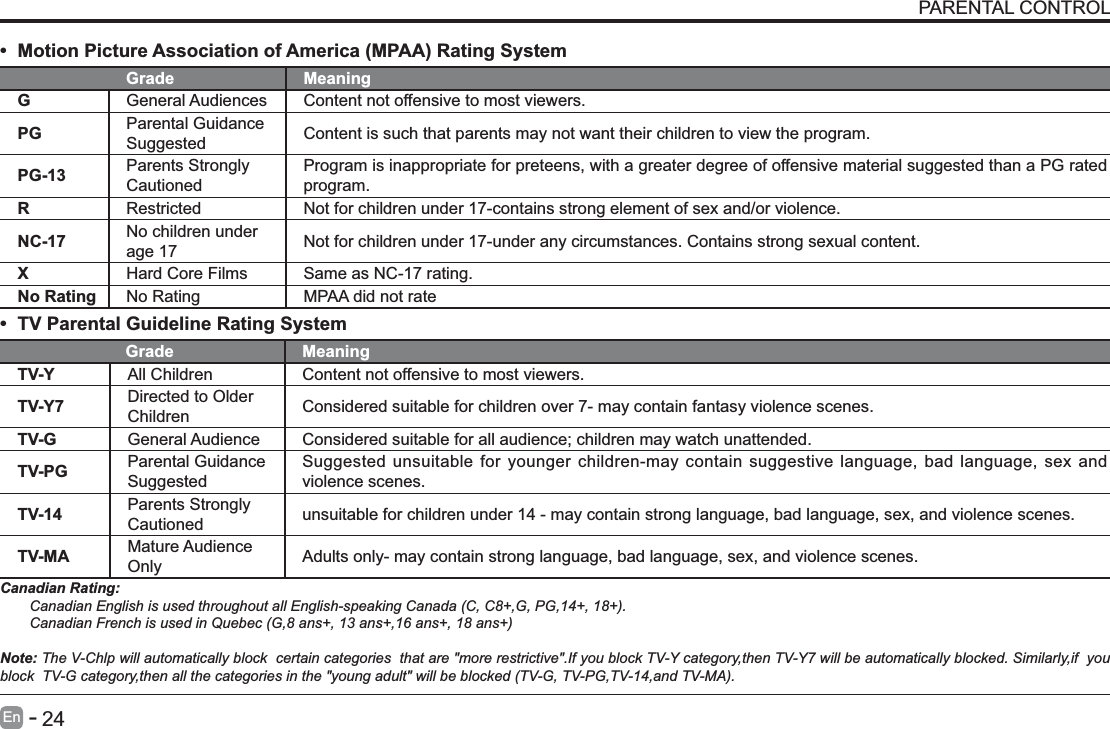
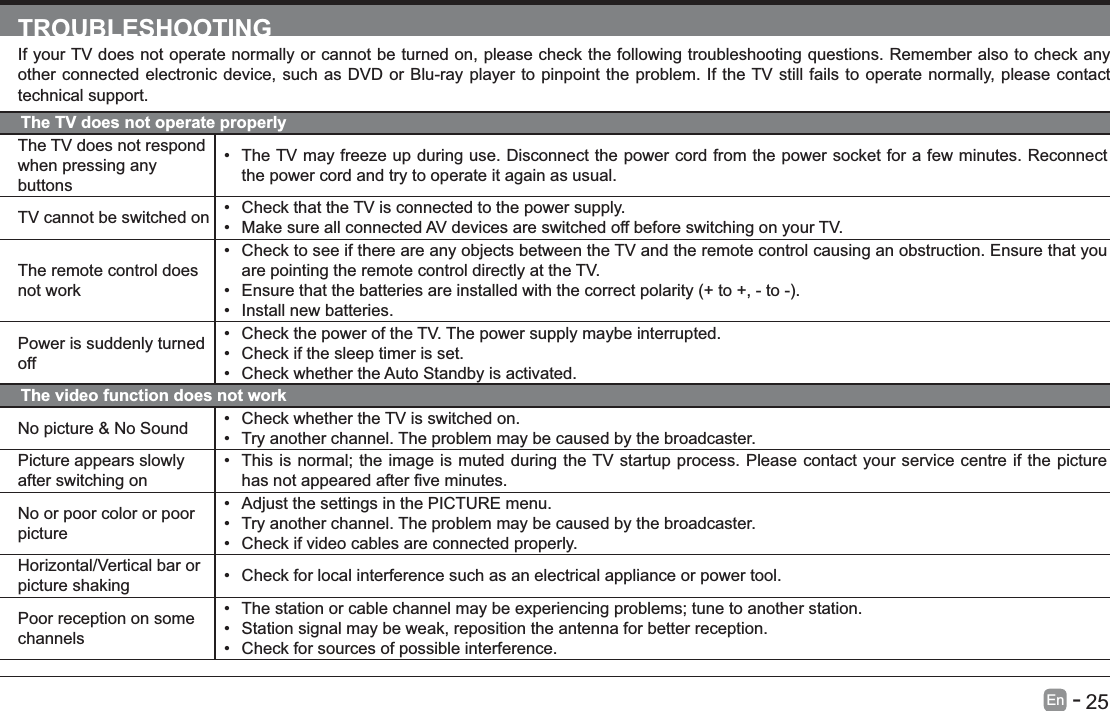
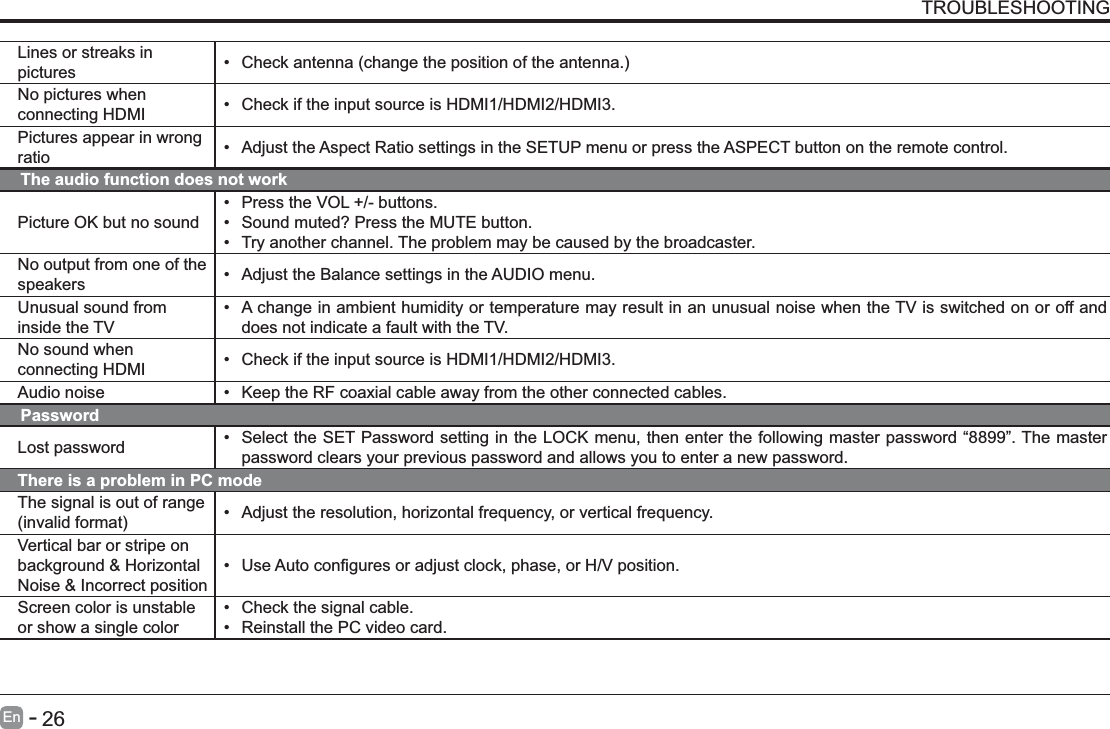
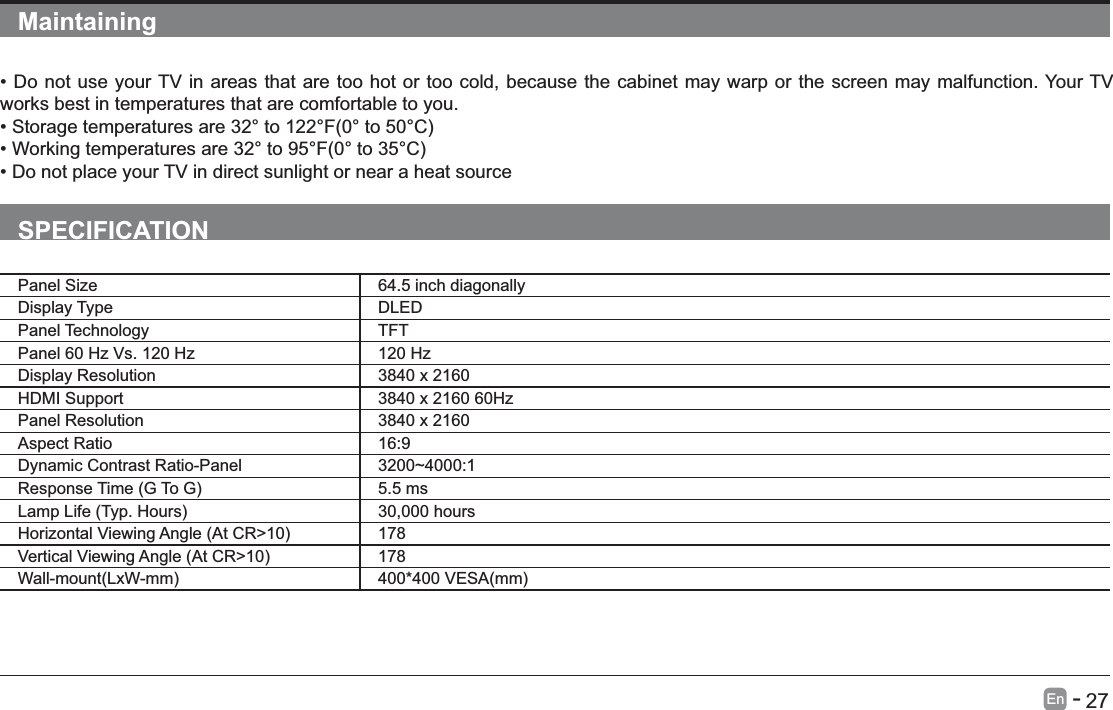
Shenyang Tongfang Multimedia Technology WD65NC419 LED TV User Manual User s Manual

Shenyang Tongfang Multimedia Technology Co., Limited LED TV User s Manual

User manual

USER’S MANUALMANUEL DE L’UTILISATEURMANUAL DEL USUARIOWD65NC4190
Westinghouse Electronics, LLCDiamond Bar, CA SE-UM-6503-1501www.westinghouseelectronics.comS/N:
      1En   -   Important Safety InstructionsSafety InformationPreparationWhat's IncludedFront ViewRear ViewInstalling the StandRemoving the Stand for Wall-MountingRemote ControlConnecting External DevicesCustomizing TV SettingsInitial SetupNavigating the Setup SettingsAppsMediaViewing PhotosPlaying Motion JPGSourceSetupSystemChannelSupportLockPictureNetworkAuto UpgradeAudioParental ControlTroubleshootingMaintainingOTT APP ServiceCONTENTS234456778910101112131314141515171718192021222325272729
      2En   -   IMPORTANT SAFETY INSTRUCTIONS Read these instructions – All the safety and operating instructions should be read before this product is operated.  Keep these instructions – The safety and operating instructions should be retained for future reference.  Heed all warnings – All warnings on the appliance and in the operating instructions should be adhered to.  Follow all instructions – All operating and use instructions should be followed.  Do not use this apparatus near water – The appliance should not be used near water or moisture – for example, in a wet basement or near a swimming pool, and the like. Clean only with dry cloth. Do not block any ventilation openings. Install in accordance with the manufacturer’s instructions. Do not install near any heat sources such as radiators, heat registers, stoves, or other  Do not defeat the safety purpose of the polarized or grounding-type plug. A polarized plug has two blades with one wider than the other. A grounding-type plug has two blades and a third grounding prong. The wide blade or the third prong are provided for replacement of the obsolete outlet. Protect the power cord from being walked on or pinched particularly at plugs, convenience receptacles, and the point where they exit from the apparatus.  or sold with the apparatus. When a cart is used, use caution when moving the cart/apparatus combination to avoid injury from tip-over.  Unplug this apparatus during lightning storms or when unused for long periods of time. Please keep the unit in a well-ventilated environment.WARNING:with liquids, such as vases should not be placed on apparatus. WARNING:the like.WARNING: The mains plug is used as disconnect device, the disconnect device shall remain readily operable.WARNING:to alert the user to the  presence of non-insulated “dangerous voltage” within the product’s enclosure that may be of sufficient magnitude to constitute a risk of electric shock.The exclamation point within an equilateral triangle is intended to alert the user to the presence of important operating and maintenance instructions in the literature accompanying the appliance. This equipment is a Class II or double insulated electrical appliance. It has been designed in such a way that it does not require a safety connection to electrical earth.This product contains electrical or electronic materials. The presence of these materials may,if not disposed of properly, have potential adverse effects on the environment and human health. Presence of this label on the product means it should not be disposed of as unsorted waste and must be collectedseparately. As a consumer, you are responsible for ensuring that this product is disposed of properly. Unplug this apparatus during lightning storms or when unused for long periods of time. Refer all servicing to qualified service personnel. Servicing is required when the apparatus has been damaged in any way, such as the power-supply cord or plug is damaged, liquid has been spilled or objects have fallen into the apparatus, the apparatus has been exposed to rain or moisture, does not operate normally, or has been dropped.
      3En   -   SAFETY INFORMATIONTo ensure reliable and safe operation of this equipment, please carefully read all the instructions in this user guide, especially the safety information below.Electrical Safety The TV set should only be connected to a main power supply with voltage that matches the label at the rear of the product.To prevent overload, do not share the same power supply socket with too many other electronic components.Do not place any connecting wires where they may be stepped on or tripped over.Do not place heavy items on any connecting wire, which may damage the wire.Hold the main plug, not the wires, when removing from a socket.During a thunderstorm or when not in using the television for long periods, turn off the power switch on the back of the television.Do not allow water or moisture to enter the TV or power adapter. Do not use in wet, moist areas, such as bathrooms, steamy kitchens or near swimming pools.Pull the plug out immediately, and seek professional help if the main plug or cable is damaged, liquid is spilled onto the set, if the TV set accidentally exposed to water or moisture, if anything accidentally penetrates the ventilation slots or if the TV set does not work normally.Do not remove the safety covers. There are no user serviceable parts inside. Trying to service the unit yourself is dangerous and may invalidate the To avoid a battery leakage, remove batteries from the remote control, when the remote is not use for long period, or when the batteries are exhausted.Physical Safety Do not tap or shake the TV screen, or you may damage the internal circuits. Take good care of the remote control.Do not defeat the safety purpose of the polarized or grounding-type plug. A polarized plug has two blades with one wider than the other. A grounding plug consult an electrician for replacement of the obsolete outlet. Protect the power cord from being walked on or pinched particularly at plugs. Unplug the apparatus during lightning storms or when unused for long periods.supply cord or pulg, has been damaged in any way.Servicing is also required if liquid has been spilled, or objects have fallen into the apparatus; when the apparatus has been exposed to rain or moisture; or if the apparatus has been dropped.Always connect your television to a power outlet with protective ground connection.
      4En   -   PREPARATION What's IncludedTV SetQuick Connect GuideQuickConnect GuideUser ManualUser ManualRemote Control with BatteriesTV Stand Six ScrewsWarranty CardWarranty Card
      5En   -    Front View1. POWER Switch the TV between On / Standby mode.2. SOURCEPress to select among different input signal sources.3. MENUDisplay the main menu.4.  CH   /        Press to select a channel.5. VOL +/-       Press to adjust the volume.6. POWER IndicatorIlluminate blue when the TV is turned on. Illuminate red when the TV is in standby mode.7. IRReceive IR signals from the remote control.PREPARATION
      6En   -   PREPARATION Rear View1. Power CordConnect to AC power outlet.2. OPTICAL OutputConnect a digital sound system to thisjack.3. USB PortConnect to a USB storage device to play compatible movie and photo 4. LANNetwork connection port.5. HDMI Input6. VGA InputConnect to a computer or other devices with a VGA interface.7. PC AUDIO InputConnect to a computer audio output.8. DTV/TV Input cable.9. Headphone SocketConnect to the Headphones.10. AUDIO Inputdevices.11.  COMPOSITE/COMPONENT IN   LANOPTICAL PC AUDI OVGAHDMI14K&60HzHDMI24K&60Hz10COMPONENTAUDIOHDMI 34K&60Hz
      7En   -    Installing the StandWARNING: This apparatus is intended to be supported by UL Listed wall mount bracket. Removing the Stand for Wall-MountingPREPARATION damaging or scratching.      Fix the base stand to the TV using the 6 provided screws.  1.damaging or scratching. 2.Untighten the 6 pcs screws holding the stand assembly and remove them.     3.Attach the wall-mount bracket to the TV using the mounting holes on the back of the TV. Mount this TV according to the instructions included in the wall-mount bracket.
      8En   -   PREPARATION Remote Control1.  : Switch the TV between On and Standby mode.2. MUTE: Mute and restore TV sound.3. 0~9:4.  : Enter multiple program channel number such as 2-1.5.  : Return to the previous viewing channel.6. APP: Press to select the desired APP.7. MENU: Display the main menu.8. SOURCE: Select among the different input signal sources:TV/HDMI1/HDMI2/HDMI3/USB/VGA/AV/Component.9.  : Allows you to navigate the on screen display menus and adjust the system settings to your preference.10. OK:11. RETURN: Return to previous menu.12. EXIT: Exit the on screen display menu.13. TV: Press to turn to TV mode.14. VOL+/-: Adjust the volume.15.  CH  /   : Select the channel.16. DISPLAY: Display the present screen information such as the current channel and input source. 17.  : Stop the playback. 18.  : Skip to the beginning of the previous chapter/track/photo. 19.  : Skip to the beginning of the next chapter/track/photo.20.  : Reverse playback rapidly. 21.  : Advance playback rapidly. 22. COLOR BUTTONS: Press to access directly to the corresponding function in APP service.23.  : Start playback or pause.24. P.MODE: Select picture mode: dynamic/movie/user/standard.25. S.MODE: Select sound mode: standard/music/movie/user.26. CH.LIST: Display program list.27. CC: Closed Caption selection: ON/OFF/CC On Mute.28. V-CHIP: Set up parental control.29. MTS: Switch among different audio channels: STEREO/MONO/SAP.30. ASPECT: Select the aspect ratio settings:standard/wide/wide zoom/zoom.31. AUTO: Press to adjust the picture automatically in VGA source.32. SLEEP: Set the TV sleep timer: OFF/5/10…/180/240 min.
      9En   -   CONNECTING EXTERNAL DEVICES
      10En   -   CUSTOMIZING TV SETTINGS Initial Setup Connect the power cord to the power socket after you have completed all the physical connections. At this stage, the TV will enter Standby Mode and the red LED indicator will illuminate.  In Standby Mode, press the   button on the main unit or on the remote control to turn the TV on. The red LED indicator will turn blue.   buttons to select your desired mode and press OK to OK :NextOK :NextScanning Channel ProgramRF CH                       :          2Found :           0   EXIT :QuitOK :NextOK :NextHome Mode optimizes the standard mode video settings.Use the Up and Down arrows on your remote controlor TV keypad to select power on mode.OK :NextHawaiiAlaska Apps Media SetupSourceTVHDMI1HDMI2ComponentAVFollow this guide to help setup your UHDTV for scanning channels or accessing your external devices for Antenna, Set-top Box, Blu-ray, DVD, Games and other players.Welcome to the WESTINGHOUSE UHDTV Setup Wizard.Click here to set Lan or Wireless network.Click here to scan channels from the antenna or coaxial cable input.Click here to connect a Game, Blu-ray, DVD or other players.Select Your Connection DevicesOK :NextOK :NextClick here to return to Scanning Channel Program.Click here to connect a Game, Blu-ray, DVD or other players.Home Mode : The picture mode will be Standard if you select this mode.  Retail Mode : Select Retail Mode if you would like yourpicture to be brighter. At times this mode may use more energy to operate the Volume/Sound Mode and Picture Mode. The SLEEP-MODE Power should be less than 0.5 W.5789 If channels can not be found, this frame will be displayed automatically.
      11En   -    Navigating the Setup Settings Press the MENU button to display the main menu.  Use   buttons to select Setup menu and then press   buttons to navigate and select the available menu.CUSTOMIZING TV SETTINGSChannel SupportAudioNetworkChannelSupportSystemLockAudioSupportLockChannelPictureSystemLockPictureSupportNetworkChannelPictureNetworkLockAudioSupportNetworkAudioPictureSystemLockAudioSystemNetworkChannelPicture
      12En   -   CUSTOMIZING TV SETTINGS Apps Press the MENU button on the main unit or on the remote control to display the Apps. Then press   to enter the streaming and use   to select the desired APP and press OK button to view. Or press the hotkey on the remote control to enter the APP directly. Enjoys TV shows & movies streamed instantly over the Internet.PandoraFree personalized radio that offers effortless and endless music enjoyment and discovery. Just start with the name of one of your favorite artists, songs, genres or composers and Pandora will do the rest. It’s easy to create personalized stations that play only music you’ll love.Toon Goggles A subscription video on-demand platform that offers animated, fun and educational cartoons, engaging games and songs from all over the world and in many different languages to children. AccuWeather Displays the current weather conditions and the temperature anywhere in the world in centigrade or Fahrenheit.YouTube YouTube your way on the best screen in your house.VUDU Discover, watch and collect the latest movies and TV shows in high quality 1080p. Free to sign up. No subscriptions, late fees or commitments.VUDUToon Goggles
      13En   -    After entering Media, press   buttons to select Photos and then select the disk type to enter. Then use   /   buttons to navigate in the picture folder to select the desired photo, then a subscreen will pop up.  Press OKappears on the top left, press   to display the photo. MediaNOTE:Portable storage devices( USB disk or Hard disk) should be inserted. Press the MENU button on the main unit or on the remote control, then press   to select Media, and use   to enter the media and use   to select the desired option. Viewing PhotosNote: File format supported: JPEG. CUSTOMIZING TV SETTINGS
      14En   -   CUSTOMIZING TV SETTINGS After entering Media, press   buttons to select Motion JPG and then select the disk type to enter. Then use   /  buttons to navigate in the motion JPG folder to select the desired video, then a subscreen will pop up.  Press OK button,   to display the video.     Playing Motion JPGNote: File format supported: Motion JPG. Source Press the MENU button on the main unit or on the remote control and press   buttons to select the Source menu. Then press   to enter source,and use   buttons to select different input sources among: TV/ HDMI1/ HDMI2/ HDMI3/ USB/ VGA/ AV/ Component  and press OK
      15En   -    Setup Press the MENU button on the main unit or on the remote control to display the main interface. Then press   to select Setup menu and press   to enter. Then press   to select the desired option.  System Press   buttons to select System menu and then press OK button to enter. Press   buttons to select the following setting options and then press    buttons to adjust each option’s setting. Menu Language Select menu language : English, Français or Español. The default on-screen menu language is English.Transparency Select to turn On/Off transparency function.Zoom Mode Select zoom mode : Standard/Wide/Wide Zoom/Zoom.Note: Different input source, the zoom mode options may differ.Noise Reduction Reduce the noise level of the connected device: Off/Weak/Middle/Strong.CUSTOMIZING TV SETTINGSWide
      16En   -   CUSTOMIZING TV SETTINGSAdvanced Adjust advanced option’s setting: H-POS, V-POS, Clock, Phase or Auto. (VGA source mode only)Closed CaptionCC Mode Select CC mode : On, Off or CC on Mute.Basic Selection Basic Selection: CC1, CC2, CC3, CC4, Text1, Text2, Text3, Text4.Advanced Selection Advanced Selection: Service1, Service2, Service3, Service4, Service5, and Service6.OPTION Options: Mode, Font Style , Font Size, Font Edge Style, Font Edge Color, FG_Color, BG_Color, FG_ Opacity, BG_Opacity..DLC Select to turn On/Off the dynamic luminance control.TimeSleep Timer:Select a period of time after which the TV automatically switches to standby mode: Off/5/10/…/180/240 min. Alternative: You may press the SLEEP button repeatedly to select the number of minutes directly.Time Zone:Daylight Saving Time:Select to turn On/Off daylight saving time.Other SettingSet other settings:HDMI EDID: select the HDMI  version: HDMI 2.0/HDMI 1.4.INlink: set the following settings: INlink Control, Device Power Off, TV Power On, Audio Receiver, INlink Device List, Root Menu.Restore Default Restore the TV to factory default settings.
      17En   -   COSTOMIZING TV SETTINGS Press   buttons to select Support menu and then press OK button to view the built-in user manual.      SupportAir/Cable Select antenna between Air and Cable. Auto Scan Select Auto Scan to search the available Air or Cable channels.Favorite Set the selected channel as favorite channels.Show/Hide Show/Hide the selected channel.Channel Number Display the current channel number.Channel Label Display the current channel label.Signal Information Display the information of current signal. Press   buttons to select Channel menu and then press OK button to enter. Press   buttons to select the following channel options and then press    buttons to adjust each option’s setting.  ChannelUSER’S MANUALMANUEL DE L’UTILISATEURMANUAL DEL USUARIOWD65NC4190
      18En   -   CUSTOMIZING TV SETTINGS Press   buttons to select Lock menu and then press OK button to enter. Use the 0-9 buttons to input 4-digit password to enter the Lock menu. Press   buttons to select the following lock options and then press  buttons to adjust each option’s setting. LockNote: the default password is “0000”. Change Password Use 0-9 buttons to input the old password and then input the new 4-digit password. Re-enter new password Lock System only be accessible when you turn the system lock on.USA TV TV RATING: Press OK button to lock or unlock TV rating.MPAA Select MPAA rating : N/A,G, PG, PG-13, R, NC-17,or X.CanadaCanada English Select MPAA rating for English-speaking Canada : E, C, C8+, G, PG, 14+, 18+.Canada French Select MPAA rating for Quebec Canada : E, G, 8 ans+, 13 ans+, 16 ans+, 18 ans+.RRT Setting Set Rating Region Table.RRT Reset Select to reset the RRT setting.Clear Lock Clear all lock settings.
      19En   -    Press   buttons to select Picture menu and then press OK button to enter. Press   buttons to select the following picture options and then press   buttons to adjust each option’s setting.  PicturePicture Mode Cycle among picture mode: Dynamic/Movie/User/Standard.Alternative: you may press the P.MODE button to select the picture mode directly.Blue Screen Allow the blue background to turn On/Off during weak or no signal conditions.Brightness Increase or decrease the amount of white in the picture. (For User mode)Contrast Adjust the difference between light and dark levels in the pictures. (For User mode)Color Control the color intensity. (For User mode)Sharpness Adjust the level of crispness in the edges between light and dark areas of the picture. (For User mode)Tint Adjust the balance between red and green levels.Color Temp Cycle among color temperatures: Cool/Normal/Warm.Advanced Setting Color Space: To adjust the following settings: Color Mode, Color, Hue, Saturation, Brightness and Reset.White Balance: To adjust the settings of white balance.MEMC Cycle among Motion Estimate and Motion Compensation modes:Middle/High/Off/Low.COSTOMIZING TV SETTINGSStandard
      20En   -    Press   buttons to select Network menu and then press OK button to enter. Press   buttons to select the following network options and then press   buttons to adjust each option’s setting.   NetworkLan Connect the TV to the wired Lan: Auto Get IP/Manual Get IP. Wireless IP Address Display the current IP information.Network Type Select two types of network: Wireless or Lan.Network Upgrade Upgrade the TV software through the network. Deactivate Vudu Deactivate Vudu and clear the account information. Electronic Serial NumberCUSTOMIZING TV SETTINGSNetix ESN                    THTF4KOTT00000000000000000000              000100000001
      21En   -    If there is a new version, it will be downloaded in the background. When you want to enter the app, a menu bar will pop up reminding you that upgrade software is downloading. Please try later... After the download completed, it can upgrade automatically after users press the standby button.Note: This procedure is fully automatic, and remember not to cut off the power. Manual Upgrade After the TV connects to network, users can detect whether there is a new version through network manual option.  Auto Upgrade After the TV connects to network, the system will automatically detect software version. COSTOMIZING TV SETTINGSUpgrade software isdownloading,complete 66%and need about 1 minuteyet,please try later... System has a new version software,andwill enter upgrade mode, please don’tcut o the power.About one minutelater, lt will update automatically.. Network Upgrade
      22En   -    Press   buttons to select Audio menu and then press OK button to enter. Press   buttons to select the following audio options and then press   buttons to adjust each option’s setting.  AudioSound Mode Allow the selection of an audio-enhancement technique: Standard/Music/Movie/User.Alternative: you may press the S.MODE button to select the sound mode directly.Bass Control the relative intensity of lower-pitched sounds. (For User mode)Treble Control the relative intensity of higher-pitched sounds. (For User mode)Balance Adjust the relative volume of the speaker in a multiple speaker system.SPDIF Mode Select the digital audio output mode between RAW/PCM.Surround Sound Turn On/Off to provide an enhanced listening experience.Auto Volume Turn On/Off to automatically control volume levels.Audio Language Select audio language among: English, French, SpanishCUSTOMIZING TV SETTINGSReminder for internet connection:non-smooth picture.Recommended 10Mb above internet speed
      23En   -   PARENTAL CONTROLPress the MENU button on the main unit or on the remote control and then press   buttons to select LOCK menu. Use the 0-9 buttons to input the 4-digit password to enter the LOCK menu. If used, this option feature  can "block'' undesirable programming from appearing on the TV. Parental Control offers the user a wide  variety  of options and settings that restrict or "block'' the programming that can appear on the TV. Parental Control both rating systems should be used and based on the ages of children.Overviewratings from the TV Parental Guidelines Rating Systems below, using the Age Block option for General Audiences, and for children.In addition, you may wish to add additional restrictions from the content block menu, and submenus examples below.Things to Consider before Setting up Parental ControlDetermine which rating you consider acceptable to the viewer. (For example,if you choose TV-PG, more restrictive ratings will be automatically Block program "Content" based on individual parameters such as: Strong Dialog, Bad Language, Sex Scenes,Violence Scenes or Fantasy. Violent Scenes; in Content Blk option. Select a secret password, in the Set Password option, using the numbers keys on the remote control.Save the password, it is the only way to access the Parental  Control menu and change rating setting, or turn off Parental Control. You can set different Parental Control viewing restrictions for general audiences and for children, both can be active at the same time. Simply specifying one content block such as Sex Scenes, will not automatically restrict the programming that appears from the video sources. Even If you choose to leave the AUX Inputs unblocked, the ratings you specify will automatically restrict the programming that appears from the video sources. You cannot disable Parental Control by disconnecting the TV from power. Block hours will be automatically reset to the original block time 
      24En   -   PARENTAL CONTROL Motion Picture Association of America (MPAA) Rating SystemGrade MeaningGGeneral Audiences Content not offensive to most viewers.PG Parental Guidance Suggested Content is such that parents may not want their children to view the program.PG-13 Parents Strongly CautionedProgram is inappropriate for preteens, with a greater degree of offensive material suggested than a PG rated program.RRestricted  Not for children under 17-contains strong element of sex and/or violence.NC-17 No children under age 17 Not for children under 17-under any circumstances. Contains strong sexual content.XHard Core Films Same as NC-17 rating.No Rating No Rating MPAA did not rate TV Parental Guideline Rating System Grade MeaningTV-Y All Children Content not offensive to most viewers.TV-Y7 Directed to Older Children Considered suitable for children over 7- may contain fantasy violence scenes.TV-G General Audience Considered suitable for all audience; children may watch unattended.TV-PG Parental Guidance SuggestedSuggested unsuitable for younger children-may contain suggestive language, bad language, sex and violence scenes.TV-14 Parents Strongly Cautioned unsuitable for children under 14 - may contain strong language, bad language, sex, and violence scenes.TV-MA Mature Audience Only Adults only- may contain strong language, bad language, sex, and violence scenes.Canadian Rating:Canadian English is used throughout all English-speaking Canada (C, C8+,G, PG,14+, 18+).Canadian French is used in Quebec (G,8 ans+, 13 ans+,16 ans+, 18 ans+)Note: The V-Chlp will automatically block  certain categories  that are "more restrictive".If you block TV-Y category,then TV-Y7 will be automatically blocked. Similarly,if  you block  TV-G category,then all the categories in the "young adult" will be blocked (TV-G, TV-PG,TV-14,and TV-MA).
      25En   -   TROUBLESHOOTINGIf your TV does not operate normally or cannot be turned on, please check the following troubleshooting questions. Remember also to check any other connected electronic device, such as DVD or Blu-ray player to pinpoint the problem. If the TV still fails to operate normally, please contact technical support.The TV does not operate properlyThe TV does not respond when pressing any buttons The TV may freeze up during use. Disconnect the power cord from the power socket for a few minutes. Reconnect the power cord and try to operate it again as usual.TV cannot be switched on  Check that the TV is connected to the power supply. Make sure all connected AV devices are switched off before switching on your TV.The remote control does not work Check to see if there are any objects between the TV and the remote control causing an obstruction. Ensure that you are pointing the remote control directly at the TV.  Install new batteries. Power is suddenly turned off Check the power of the TV. The power supply maybe interrupted. Check if the sleep timer is set. Check whether the Auto Standby is activated. The video function does not workNo picture & No Sound  Check whether the TV is switched on. Try another channel. The problem may be caused by the broadcaster.Picture appears slowly after switching on This is normal; the image is muted during the TV startup process. Please contact your service centre if the picture No or poor color or poor picture Adjust the settings in the PICTURE menu. Try another channel. The problem may be caused by the broadcaster. Check if video cables are connected properly.Horizontal/Vertical bar or picture shaking  Check for local interference such as an electrical appliance or power tool.Poor reception on some channels The station or cable channel may be experiencing problems; tune to another station. Station signal may be weak, reposition the antenna for better reception. Check for sources of possible interference.
      26En   -   TROUBLESHOOTINGThe audio function does not workPicture OK but no sound Press the VOL +/- buttons. Sound muted? Press the MUTE button. Try another channel. The problem may be caused by the broadcaster.No output from one of the speakers  Adjust the Balance settings in the AUDIO menu.Unusual sound from inside the TV A change in ambient humidity or temperature may result in an unusual noise when the TV is switched on or off and does not indicate a fault with the TV. No sound when connecting HDMI  Check if the input source is HDMI1/HDMI2/HDMI3.Audio noise  Keep the RF coaxial cable away from the other connected cables.PasswordLost password  Select the SET Password setting in the LOCK menu, then enter the following master password “8899”. The master password clears your previous password and allows you to enter a new password.There is a problem in PC modeThe signal is out of range   Adjust the resolution, horizontal frequency, or vertical frequency.Vertical bar or stripe on background & Horizontal Noise & Incorrect position Screen color is unstable or show a single color Check the signal cable. Reinstall the PC video card.Lines or streaks in pictures  No pictures when connecting HDMI  Check if the input source is HDMI1/HDMI2/HDMI3.Pictures appear in wrong ratio  Adjust the Aspect Ratio settings in the SETUP menu or press the ASPECT button on the remote control.
      27En   -   Maintainingworks best in temperatures that are comfortable to you.SPECIFICATIONPanel Size 64.5 inch diagonally Display Type DLEDPanel Technology  TFTPanel 60 Hz Vs. 120 Hz 120 HzDisplay Resolution  3840 x 2160HDMI Support 3840 x 2160 60HzPanel Resolution  3840 x 2160Aspect Ratio 16:9Dynamic Contrast Ratio-Panel 3200~4000:1 5.5 ms 30,000 hours 178 178 
      29En   -    If you want to know about these APP information or get more service. Please refer to following content.t Netix          You can call the following telephone for more help: 866-579-7172         If your matter is regarding customer service, please refer to https://contactus.netix.com/help for  alternative contact information.t YouTu b e           You can browse the following website for more help:         https://productforums.google.com/forum/#!categories/youtube/smart-tvst VUDU          You can call the following telephone for more help: 888-554-8838t TG          You can call the following telephone for more help: 888-874-5411t Pandora          You can send E-mail to Pandora for more help: pandora-support@pandora.comt AccuWeather          You can send E-mail to AccuWeather for more help: CustomerService@AccuWeather.com  OTT APP SERVICE

Navigation menu