Shiji Technology P70VRA 2.4G QUADCOPTER User Manual VR IM
Guangdong Shiji Technology Co.,Ltd 2.4G QUADCOPTER VR IM
User Manual
VIRTUAL REALITYDRONE
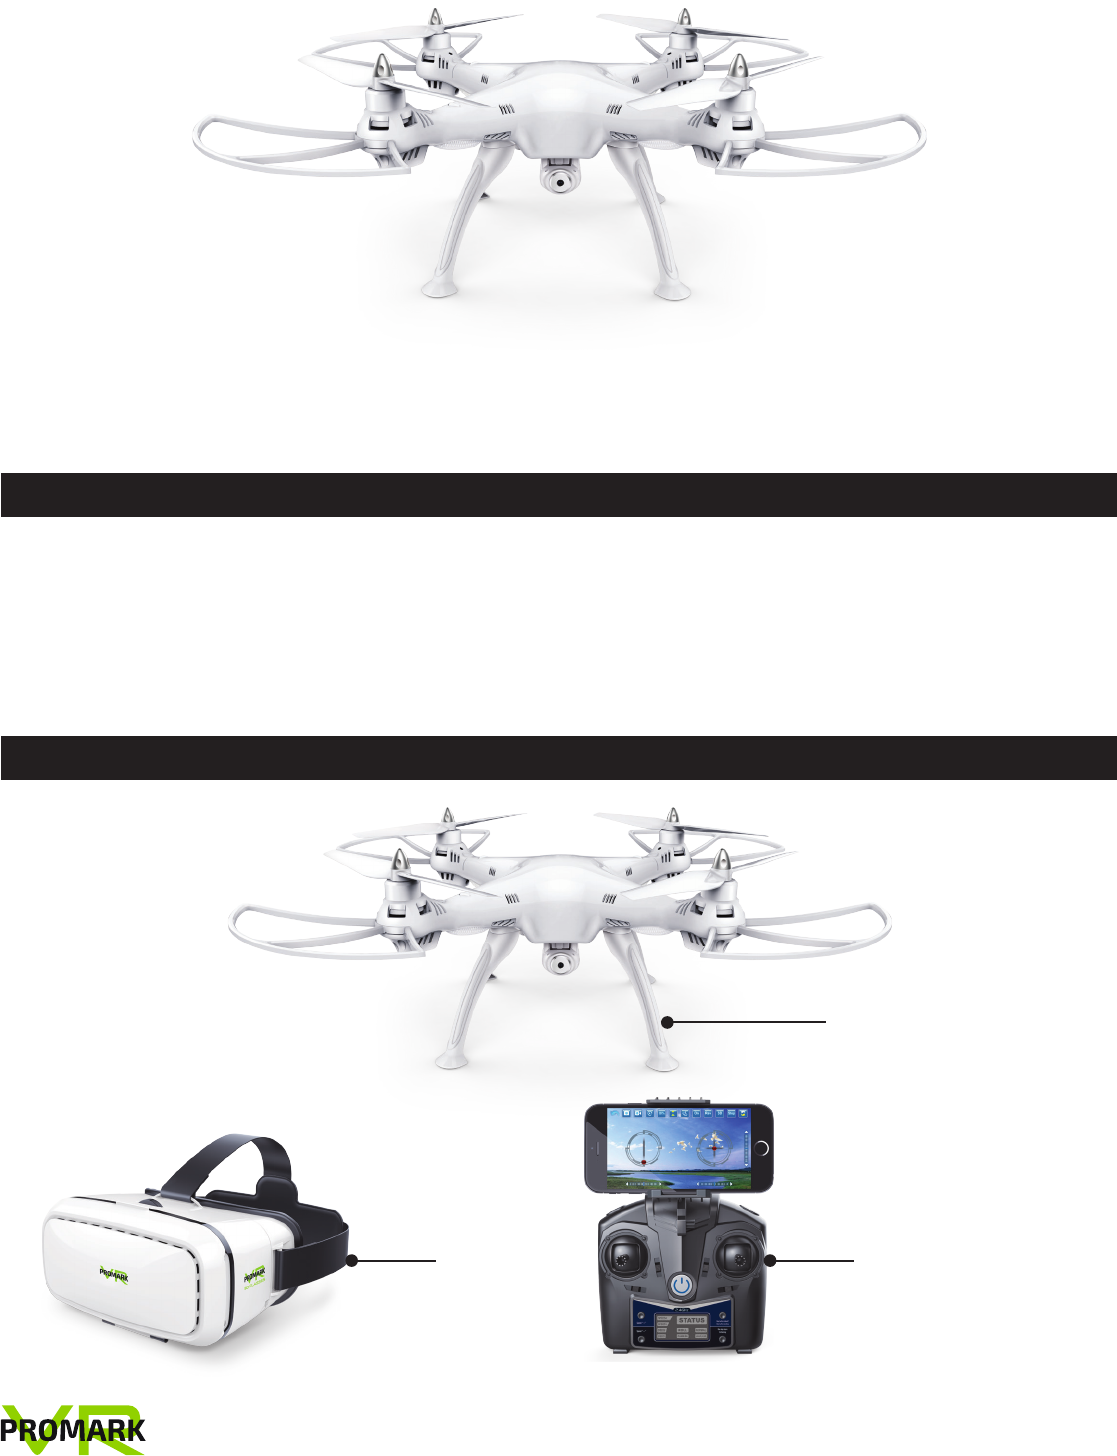
PACKING LIST
CONTENTS
P70-VR
INSTRUCTION MANUAL
VR Drone Quadcopter
Page 1
VR Remote Control Console
(Smartphone not included)
VR 3D Glasses
VIRTUAL REALITY DRONE
PACKING LIST.....................................................................1
QUICK START...................................................................2-3
IMPORTANT THINGS TO KNOW BEFORE YOU FLY..................3
VR DRONE FEATURES ..........................................................4
VR REMOTE CONTROL CONSOLE FEATURES.........................5
PROMARK VR APP FEATURES ..............................................5
PREPARATION FOR FLIGHT..................................................6
OPERATION INSTRUCTIONS.................................................6
MODES ...............................................................................7
FLYING ACTION ...................................................................7
3D TUMBLING ACTION.........................................................7
CLEANING TIPS...................................................................7
WARNINGS..........................................................................8
VIRTUAL REALITY DRONE
QUICK START
Page 2
2
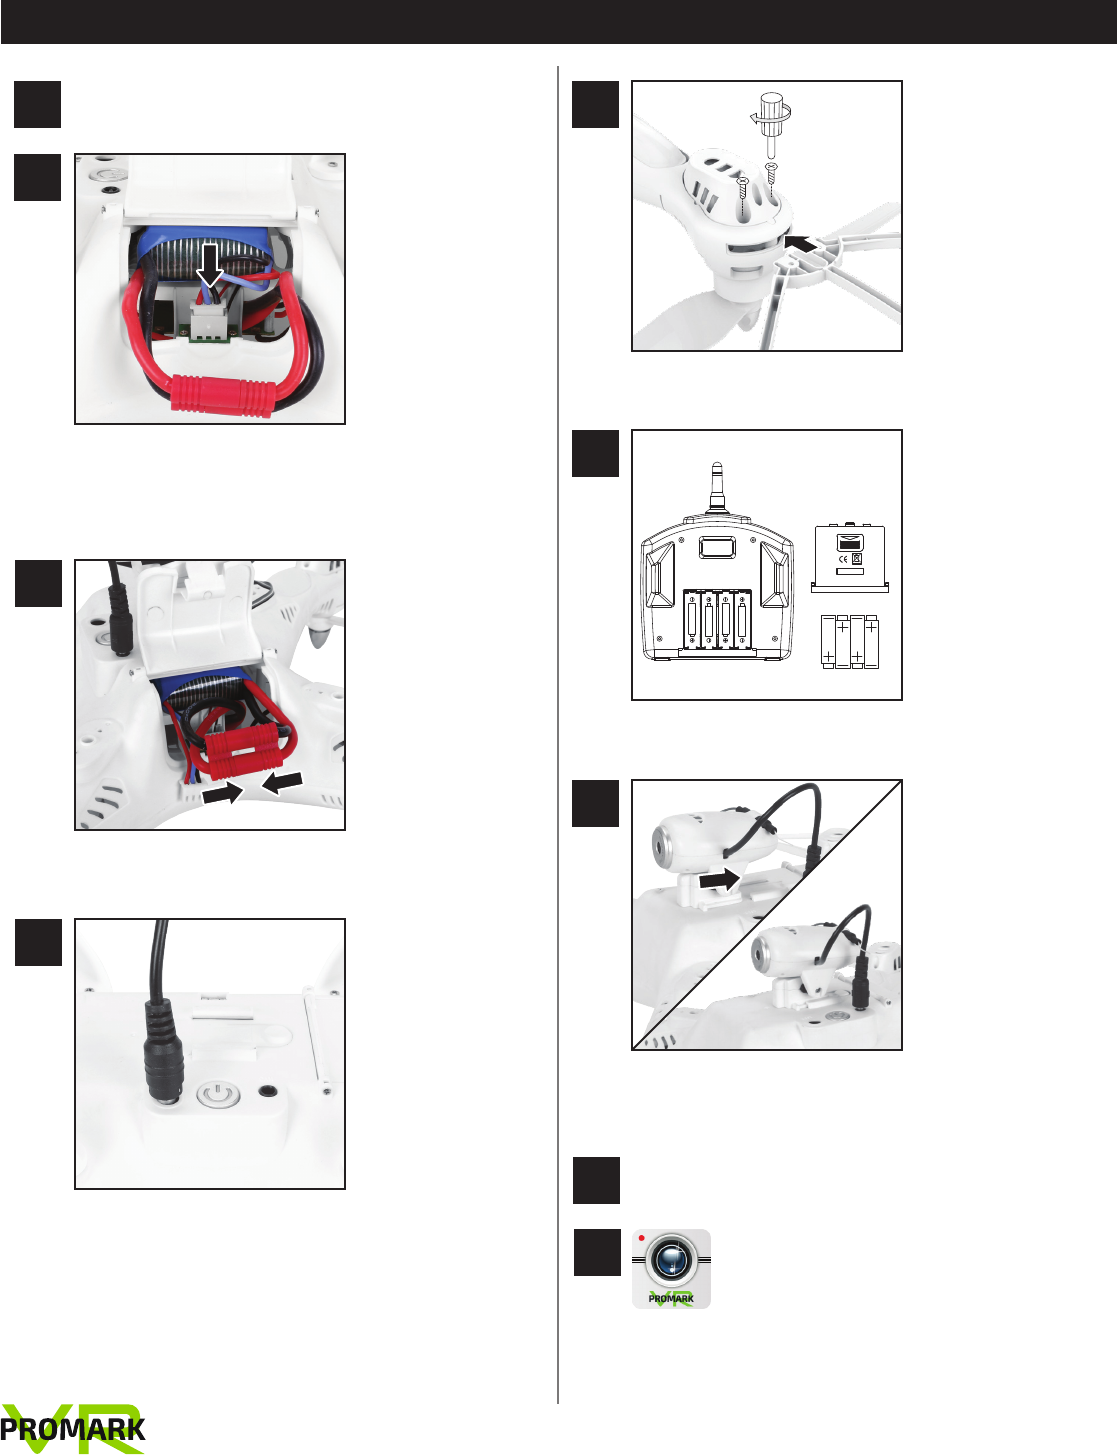
Open battery compartment and slide battery in. Plug 3
color battery cable into port. No need to remove
battery when charging!
3
Connect black and red power cables to each other
4
Connect USB power cord to drone and to power
source.
Connect protective rings
1Charge drone battery up to 5 hours (red light will turn
off when fully charged).
6
7
Add 4AA batteries to remote control console
Slide camera onto bottom of drone and attach black
power cord
8Attach head strap to VR 3D Glasses
9Download the Promark VR aerial-photography
app to stream real-time video direct from
your Promark VR Drone to your smartphone.
The Promark VR app works as both a 2D FPV
(First Person Viewer) and 3D virtual reality
device (VR glasses required, included).
5
1.5V SIZE AA/LR6
1.5V SIZE AA/LR6
1.5V SIZE AA/LR6
1.5V SIZE AA/LR6
OPEN
MADE IN CHINA
VIRTUAL REALITY DRONE
QUICK START (CONTINUED)
IMPORTANT THINGS TO KNOW BEFORE YOU FLY
Page 3
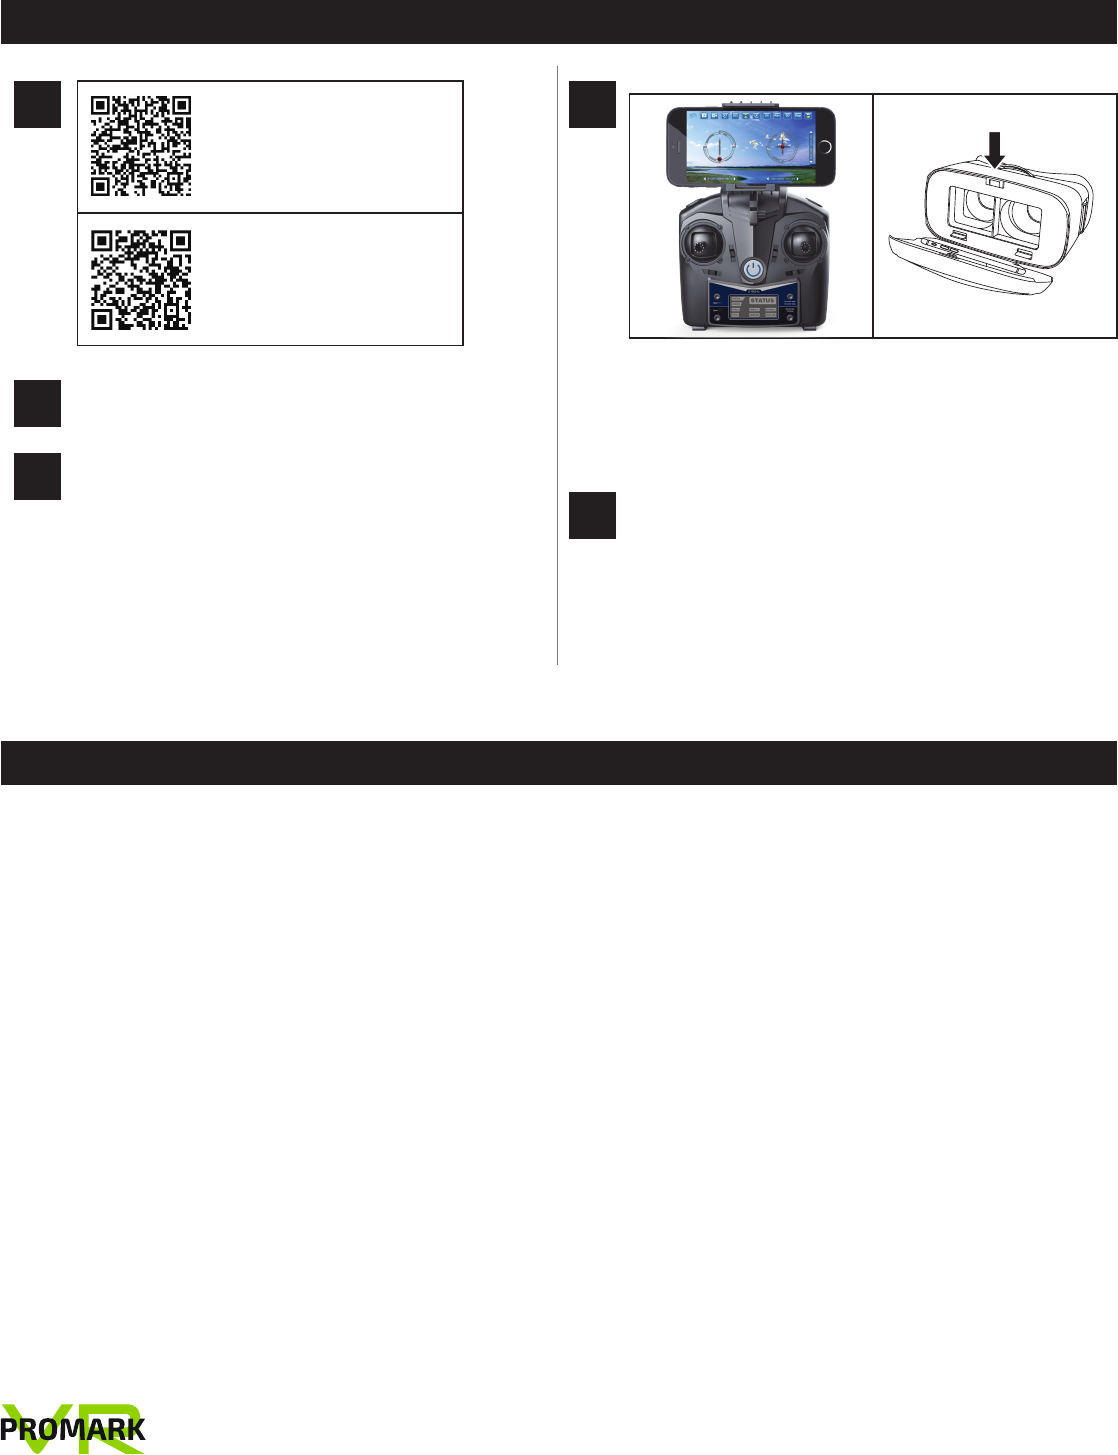
12
For Live viewing: Open app and place in phone holder
on remote.
For Live 3D virtual reality viewing: open app and place
phone in goggles compartment.
13 Connecting to the Drone: 1. Power on the drone (all
lights will be blinking slowly). 2. Place the drone on a
FLAT surface. 3. Power on the remote (all lights will
be blinking rapidly). 4. Press Up/Down on the left
joystick (you will hear a beep). 5. Drone is ready to fly
(all lights pulsing slowly). 6. Press the One-button
Takeoff (drone will automatically take off).
• Follow community-based safety guidelines, as developed by organizations such as the Academy of Model Aeronautics (AMA).
• Fly no higher than 400 feet and remain below any surrounding obstacles when possible.
• Keep your sUAS in eyesight at all times, and use an observer to assist if needed.
• Remain well clear of and do not interfere with manned aircraft operations, and you must see and avoid other aircraft and
obstacles at all times.
• Do not intentionally fly over unprotected persons or moving vehicles, and remain at least 25 feet away from individuals and
vulnerable property.
• Contact the airport or control tower before flying within five miles of an airport.
• Do not fly in adverse weather conditions such as in high winds or reduced visibility.
• Do not fly under the influence of alcohol or drugs.
• Ensure the operating environment is safe and that the operator is competent and proficient in the operation of the sUAS.
• Do not fly near or over sensitive infrastructure or property such as power stations, water treatment facilities, correctional
facilities, heavily traveled roadways, government facilities, etc.
• Check and follow all local laws and ordinances before flying over private property.
• Do not conduct surveillance or photograph persons in areas where there is an expectation of privacy without the individual’s
permission
FOR AGES 14 AND UP ONLY - WARNING! Choking Hazard - Small Parts - Not Suitable For Children Under 3.
10
11 Once the drone lights up, go to your smartphone and
access your “SETTINGS” and then “WIFI” and search
for the “P70-VR” wireless signal. Once connected to
the drone, exit your settings and open the “PROMARK
VR” app and click “PLAY” to access the control
interface and real-time video.
10 Press the power button
SCAN
to download and install
Apple IOS system software.
SCAN
to download and install
Android system software.
VIRTUAL REALITY DRONE
DRONE FEATURES
Page 4
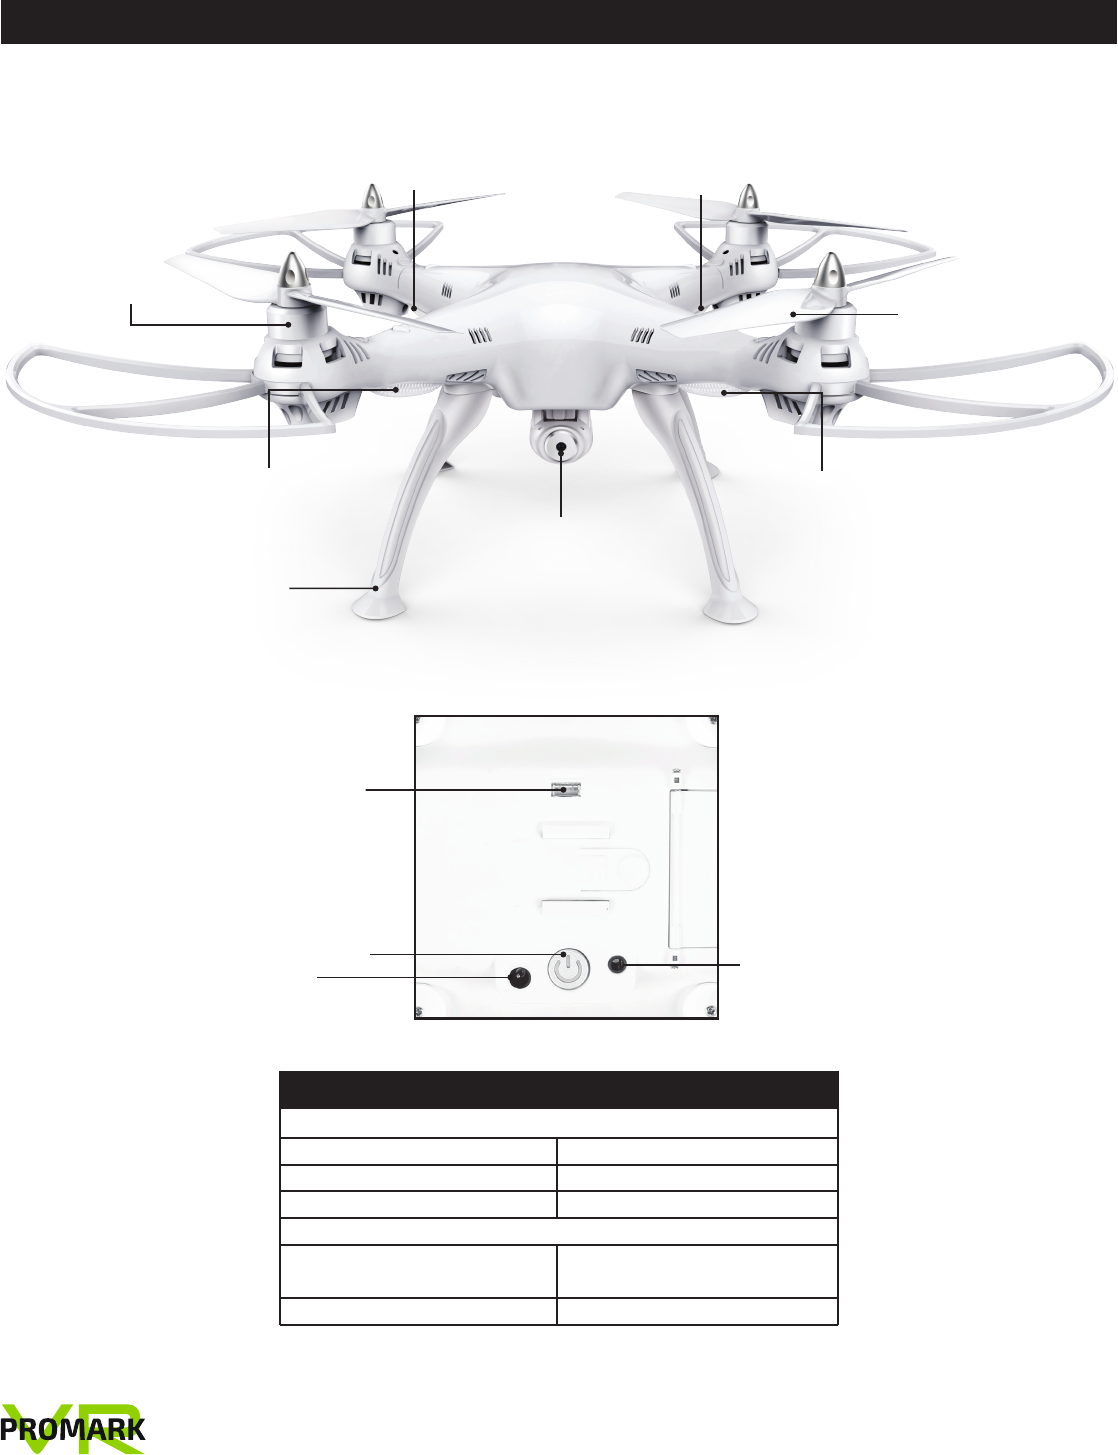
Back LED indicator is
flashing (Red)
Motor
Front LED indicator is on (White)
Landing rack
75°angle-adjustable
R/C camera
Front LED indicator is on (White)
Blade
Back LED indicator
is flashing (Green)
Charging socket
7.4V
One button switch on/off Socket for the rudder
wire of the Camera
Socket of the Camera
LIGHT INDICATOR LEGEND
CONNECTING:
Slow blinking lights (all colors) Drone powered on, ready to pair
Rapid Blinking lights (all colors) Pairing with remote*
Slow pulsing lights Ready to fly
IN FLIGHT:
Solid front lights (white); double
blinking rear lights (red & green) Normal Flight
Blinking lights (all colors) Low battery; return to recharge
*NOTE: Drone must be placed on a flat surface to pair.
VIRTUAL REALITY DRONE
REMOTE CONTROL CONSOLE FEATURES
PROMARK VR APP FEATURES
Page 5
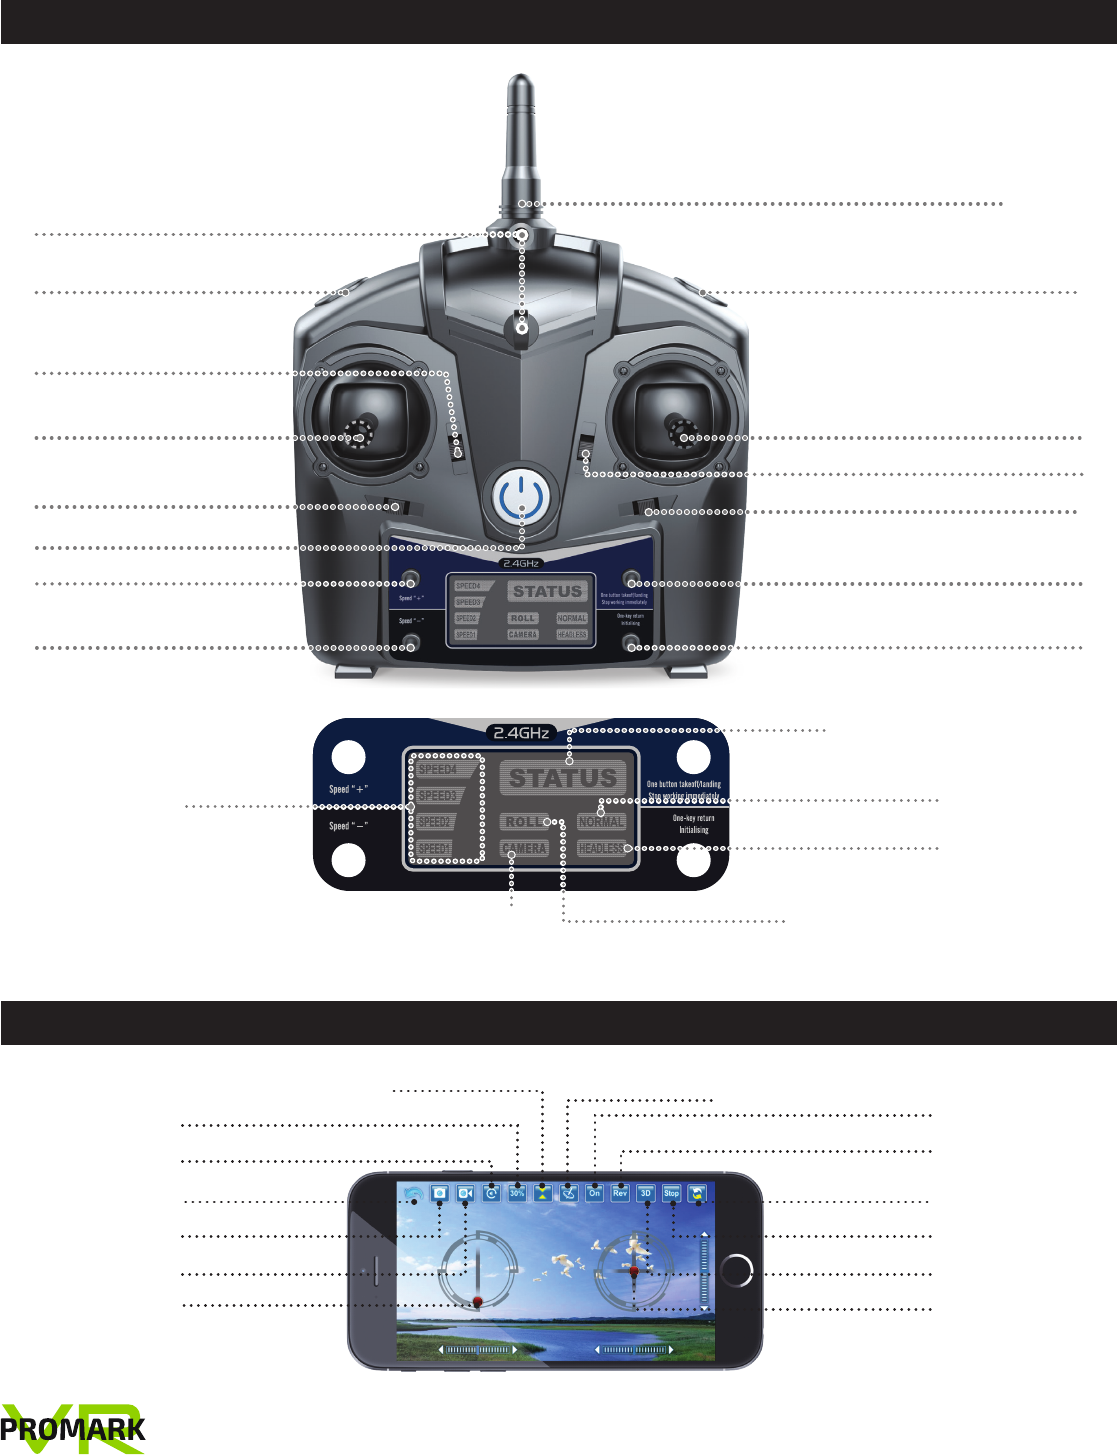
Forward/Backward/Left/Right
Control Lever
Antenna
Throttle and Rotating
Lever
Left/Right Trimmer
Forward/Backward Trimmer
Headless/Normal mode switch
Adjust the angle of
camera
High speed switch “+”
Low speed switch “-”
3D Rolling Eversion (Press shortly and
then choose the direction by pulling
the Forward /Backward /Left/Right
Control Lever)
Press shortly:One button auto return*
Hold to reset to factory settings
Press shortly: Photo
Keep pressing: Video
Mount WIFI mobile phone holder
Press shortly: one button takeoff/landing
Double click/Hold for emergency stop
Press shortly: ON
Keep pressing: OFF
Return to Interface
Photo Library
Speed Model
Normal Mode Gravity Sensor Mode
Photo Function
Video Function
Throttle Control
3D Mode
Direction Control
Emergency Stop
Normal vs Headless
Mode Switch
Rotating Image
Console Display
*WARNING: When the drone is 2-3 meters away, regain control of the drone by moving the right joystick in any direction.
*NOTE: Drone will return to ORIGINAL launch site.
Camera Display
State Display
Normal Mode Display
Headless Mode Display
Tumbling Display
Speed Display
VIRTUAL REALITY DRONE
PREPARATION FOR FLIGHT
OPERATING INSTRUCTIONS
Page 6
1) Turn power on. Lights will blink
2) Place drone on flat surface.
3) Turn on remote.
4) Push left throttle lever all the way forward and then all the way back twice to connect to drone. You will hear a beep on
remote and the drone lights will flash. Press one button take off.
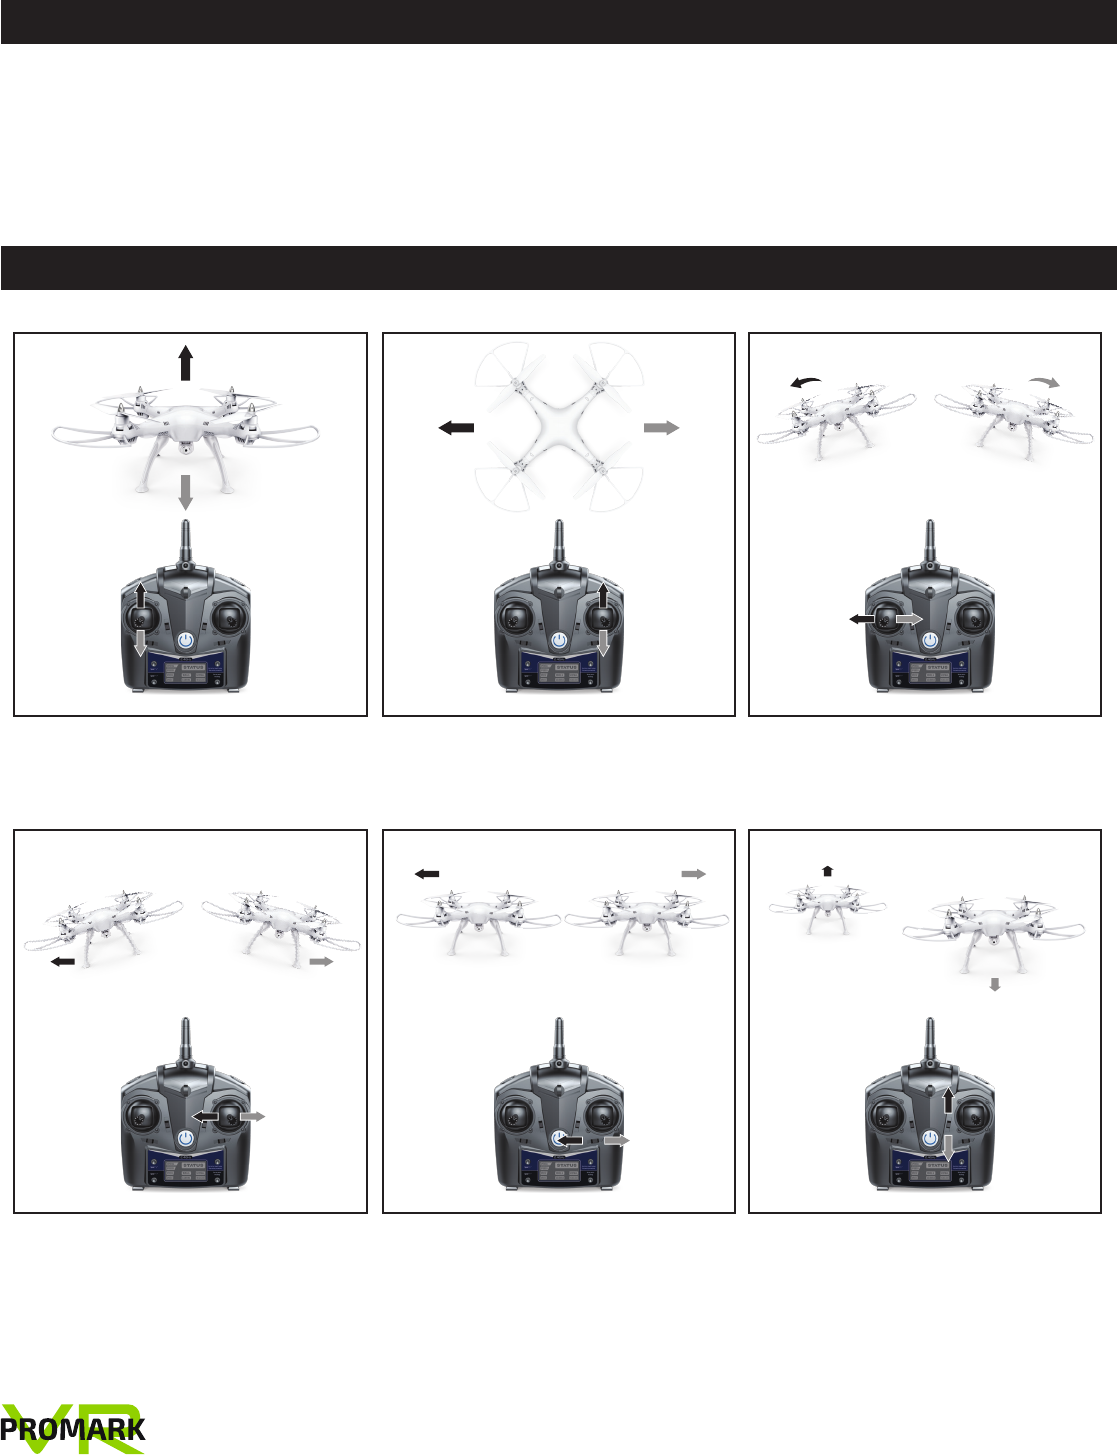
HOVER UP AND DOWN
Push the throttle up or down,the quad-
copter flies upward or downward.
FORWARD AND BACKWARD
Push the direction lever up or down, the
quadcopter flies forward or backward.
TURN LEFT AND RIGHT
Pull the throttle left or right, the quad-
copter turns to left or right.
SIDEWARD FLY
Pull the direction lever left or right, the
quadcopter flies to left side or right
side.
LEFT/RIGHT-TUNING FLY FINE-TUNING
You can adjust left/right flight by
pressing the fine-tuning button right/left.
FORWARD/BACKWARD FLY
FINE-TUNING
You can adjust forward/backward flight
by pressing the fine-tuning button up or
down.
NORMAL MODE
Normal flight mode is turned on by default,and conventional flying quadcopter fly.
ALTITUDE - HOLDING MODE
Press the Camera Key to access the Pressure Height-setting Mode. This will keep the height of the quadcoptor at it’s current
height. Push throttle lever upward and the quadcoptor will begin ascending. Push downward on the throttle lever and the
quadcoptor will begin descending. When the throttle lever is returned back to the neutral position the quadcoptor will automati-
cally set the height. Press the Camera Key to exit the Pressure Height-setting Mode.
HEADLESS MODE
Place the quadcoptor in the front forward. After finish decoding and taking off, press shortly the Headless Mode Key on the
transmitter to access into the Headless Mode. Press shortly once again to exit the Headless Mode.
1) Use soft clean cloth to wipe clean
2) Avoid excessive heat
3) Do not get wet
4) Check plug and other accessories regularly. If damage has occurred, stop using quadcopter immediately until repaired.
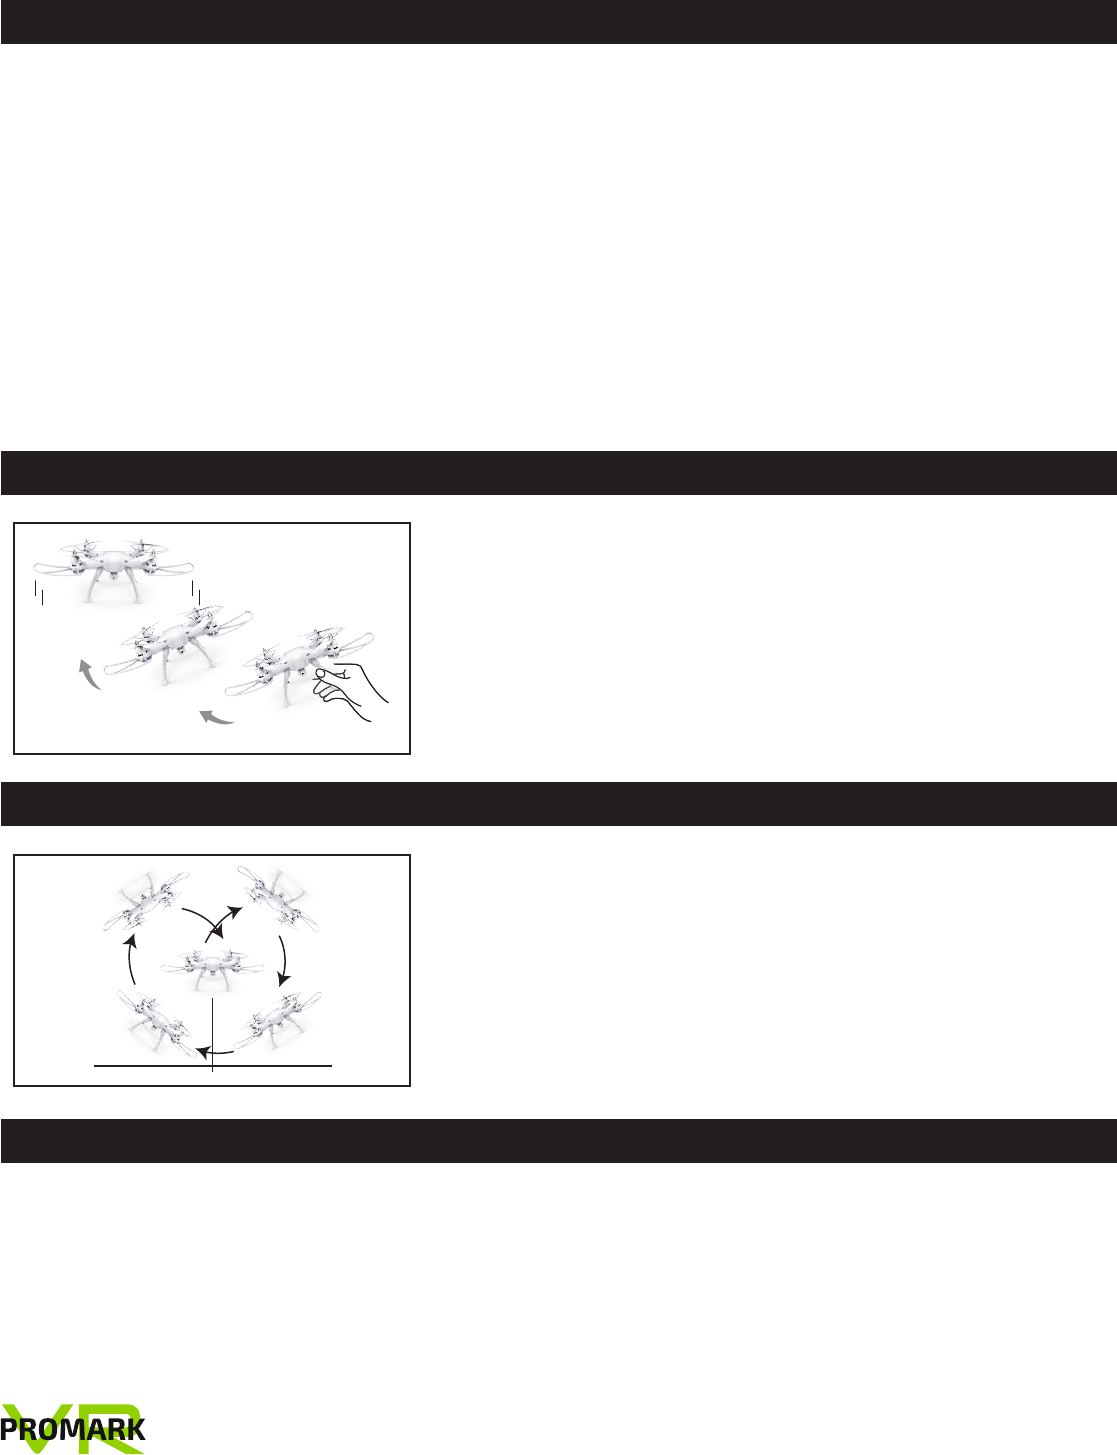
Thanks of the 6 axis gyroscope, you can throw the quadcopter and push the
throttle right up, it will automatically level out and hover smoothly in the sky,
this can also be done when the quadcopter is rolling.
VIRTUAL REALITY DRONE
MODES
FLYING ACTION
Page 7
Fly to about 30 feet. and hit the 360 degree one touch flip button. Flip and push
right controller to highest position.
3D TUMBLING FUNCTION
CLEANING TIPS

1. There is important information contained in this package and instruction manual, please well keep it for future reference.
2. You have the responsibility to make sure that this model of aircraft won’t cause injury to others’ body or cause any loss to the property.
3. Please operate strictly as the instruction shown on the instruction manual when debugging or assembling this aircraft. During the process of flying or landing, please pay
more attention to keep 1-2 meters away between the user and the aircraft so as to avoid colliding to the head or face or body, etc. or even cause injury.
4. Our company and distributors or sale agent won’t be responsible for any loss due to incorrect operation,which may cause any loss or damage or injury to the body.
5. Children should use this product under the guidance of the adult. This product is FORBIDDEN to be used by children under 14 years old.
6. Please correctly assemble it or use this product as the correct instruction shown on the instruction manual or packing instruction. Some parts should be assembled by the
adult.
7. Small parts are contained in this product. Please place it beyond the reach of the children so as to avoid CHOKING HAZARD or mistakenly swallowed.
8. Playing on the road or water place is highly FORBIDDEN so as not to cause accident.
9. Please collect the packing material timely so as not to cause injury to the children.
10. Please DO NOT disassemble or re-equip the aircraft as it may cause the breakdown of the aircraft during flying.
11. Batteries in the battery compartment of the charger should be inserted into the designated power which has the same logo with the product.
12. Please use the screwdriver to loosen the screws in counter-clockwise direction on the battery compartment of the transmitter; please also load the batteries into the
transmitter as per the correct polarity of the battery. Close the battery cover and wrench tightly the screws in clockwise direction.
13. Only the original charger made from our factory can be used.
14. Charger is not a toy.
15. Please pay more attention to the battery polarity when loading or removing the batteries.
16. “AA” non-chargeable batteries or “AA” chargeable battery can be used in the transmitter.
17. Non-chargeable battery can not be charged. Only the battery of the same brand or the battery the same as recommended can be used.
18. When charging the chargeable battery, please conduct it under the surveillance of the adult. Please also keep it far away from the combustible object when charging.
Please keep this aircraft within the eyes scope of the guardian when charging.
19. Please DO NOT make it short-circuited or squeeze the battery so as not to cause explosion.
20. New batteries are NOT to be mixed with batteries of different types.
21. Exhausted batteries should be removed timely. Please DO NOT litter around the exhausted batteries.
22. The connecting end of the power is NOT to be removed from this model. The connecting port is NOT to be short-circuited.
23. Please DO NOT make the battery short-circuited or decompose the battery or throw the battery into the fire; Please DO NOT place the batteries near the high temperature or
heated area (such as near the fire or near the electric heating device).
24. Please remove the batteries if it is not used for a long time so as not to cause damaged to this product due to battery leakage.
25. Aircraft should be kept far away from any other electric compliance or equipment as far as possible or kept far away from the place where having the magnetic object
nearby as they may cause interference with each other.
26. Please keep the safe distance from the high-speed rotating rotor so as not to cause twisted or danger of being wounded or being cut.
27. The Light Emitting Diode can send out laser radiation, please DO NOT shoot the light beam directly.
28. Please DO NOT close this product to your ear as it may cause injury to your hearing.
29. Mini USB 5V.
30. In order to comply with the command of the magnetic environment requirement formulated by the Aviation Radio Bureau and the related authority, during the regulated
period in certain area, please stop using the transmitter of this model when such regulation command is issued.
31. Drone operator should have a clear line-of-site to the drone at all times.
32. Always stay 2-3 meters away from the drone while blades are spinning to avoid injury.
33. Outdoor use only — do not fly drone indoors or near buildings.
WARNING: Changes or modifications to this unit not expressly approved by the party responsible for compliance could void the user’s authority to operate the equipment.
NOTE: This equipment has been tested and found to comply with the limits for a Class B digital device, pursuant to Part 15 of the FCC Rules. These limits are designed to
provide reasonable protection against harmful interference in a residential installation. This equipment generates, uses and can radiate radio frequency energy and, if not
installed and used in accordance with the instructions, may cause harmful interference to radio communications.
However, there is no guarantee that interference will not occur in a particular installation. If this equipment does cause harmful interference to radio or television reception,
which can be determined by turning the equipment off and on, the user is encouraged to try to correct the interference by one or more of the following measures:
• Reorient or relocate the receiving antenna.
• Increase the separation between the equipment and receiver.
• Connect the equipment into an outlet on a circuit different from that to which the receiver is connected.
• Consult the dealer or an experienced radio/TV technician for help.
CAUTION: To maintain compliance with the FCC’s RF exposure guidelines, place the product (P70-VR Drone) at least 20cm from nearby persons.
NOTE: The 2.4GHz remote signal is meant to control the P70-VR drone ONLY and should not be used for any other purpose.
VIRTUAL REALITY DRONE Page 8
FAA REGISTRATION: PLEASE FOLLOW ALL FEDERAL, STATE AND LOCAL FAA LAWS. YOU MAY BE REQUIRED TO REGISTER YOURSELF AND YOUR DRONE
WITH THE FAA. MORE INFO CAN BE FOUND AT: HTTPS://WWW.FAA.GOV/UAS/GETTING_STARTED/
After receiving the certificate of registration, you must mark your unique FAA registration number on the Drone by any means, such as permanent marker,
label, engraving. This number must be readily accessible and maintained in a condition that is readable and legible upon close visual inspection.
WARNING: Do NOT fly drone near airports or any other un-authorized areas.
Follow all rules for Federal Aviation Administration (FAA) regulation summary for Small Unmanned Aircraft Systems (sUAS).
Read: Academy of Model Aeronautics (AMA) Know Before You Fly important information brochure.