Shining Bright Technology SG Shining Genius User Manual
Shenzhen Shining Bright Technology Co., Ltd Shining Genius
User Manual

User Manual
Description
Shining Genius is the perfect combination of LED Symphony and Bluetooth
speakers, built-in large capacity battery, make it small, exquisite, portable.Multi-
functional properties, make Shining Genius be the favourite of outdoor enthusiasts.
Features
-Perfect combination of LED Symphony and high quality Bluetooth speakers.
-210*34*26mm,Small ,exquisite,and portable,best partner of outdoor enthusiasts.
-Double speakers,play for high quality life.
-26 pcs of gold wire copper bracket 5050 Symphony lamp,colorful and magical light
effect
-Built-in high-capacity 1800mAh battery,very long working-time
Specifications
Luminous mode
17 kinds
transmission distance
10M
Battery capacity
1800mAh
Charging time
2H
Lighting time(Max brightness)
3H
dimension
210*34*26mm
Packing List

1 x Shining Genius Multi-function LED Bluetooth Speaker
1 x User Manual
1 xcharging cable
1 xLanyard
Usage Guide
1.Recharging
When battery is in low capacity,there will be “LO” on digital display.Please charge in
time.
When charging, digital display character "C + power".(Battery in working mode,
digital display character "B + power")
2.LED Lighting mode
(1) Long press button for 3s to turn on Shining Genius, automatically enter
bluetooth mode.Digital display character "BLUE", you can search for Bluetooth
device "SG" to pair.
(2) Short press button to enter lighting mode, brightness can switch to “low,
medium, high” in turn.
(3) Short press MODE button to enter “Light stick” mode, light effect is cool white.
Long press button for 5s to enter “I ♥ U” mode, shaking Shining Genius, light
effect will display “I ♥ U”; keep on long press button for 5s to enter “SOS”
mode,Shaking Shining Genius, light effect will display “SOS”.
(4) Continue short press MODE button to enter “ self-timer fill” mode, short press
MODE button ,color of light will switch "red, orange, yellow, green, blue, purple,
powder" in turn.
(5) Continue short press MODE button to enter “gravity sensing mode”, direction of
light flow will change with the direction of gravity.
(6) Continue short press MODE button to enter “ Symphony of light flow” mode, this
mode is Symphony of light flow.
(7) Continue short press MODE button to enter “ music rhythm”mode, when play
music, light flashing with the music rhythm.
(8) Continue short press MODE button to enter “ bicycle” mode.
(9) Continue short press MODE button to enter “warning light” mode.

3. Alarm function settings
Before setting, Shining Genius must already enter standby mode, digital display ECO
(when power on, long press MODE button for 3s into standby mode, digital display
ECO)
(1) Long press MODE button for 1s, enter “alarm clock setting” mode, digital tube
hours (24 hours system) flashing, short press or button to adjusthour, short
press MODE button to confirm“Hour “(if not press or button,after 5swill
exit Hour), enter the minute adjustment mode, after setting minutes, (if not press
or button, after 5s will exit Minutes), complete the alarm clock settings,digital
tube will display a “.” , often bright.
(2) Aafter re-shutdown, turn on,Shinging Genius should remember and restore last
alarm state.
(3) To cancel alarm, standby mode (non-alarm clock setting mode), short press
MODE button to cancel the alarm set.
(4) Short press POWER button to exit standby mode, enter boot mode.
4. Clock function setting
Before setting, Shining Genius must already enter standby mode, digital display ECO
(power on, long press MODE button for 3s into standby mode, digital display ECO)
(1) long press button for 5s, enter clock setting mode, digital tube hours (24
hours system) flashing, short press or button to adjust hour, short press
button to confirm Hour (if not press or button,after 5swill exit Hour), then
enter minute adjustment mode, after setting minutes, (if not press or button,
after 5s will exit Minutes), complete clock set.
(2) Short press POWER to exit standby mode, enter boot mode.
5. Countdown function
When is countdown function mode, shaking 1 time for 2 minutes countdown, time
can be superimposed (10 minutes should shake 5 times)
6. Emergency charging function
In case of emergency situations, mobile devices such as mobile phones can be
charged when urgently
7. Music play function
(1) Bluetooth connection to play music
(2) Use USB drive to play music
Functions of button
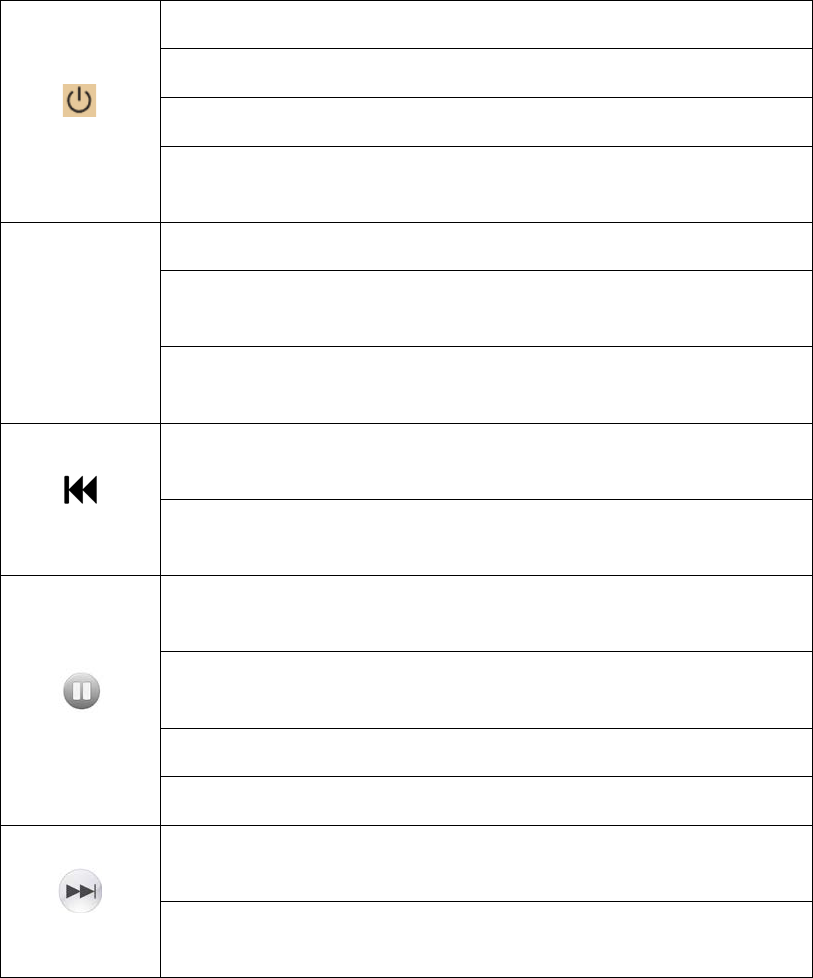
1.Shutdown mode, short press to turn on
2.When power on, long press 2s to turn off
3.Standby mode, short press to exit standby and enter boot mode
4.When power on, short press to switch
brightness(low,medium,high) of LED light
MODE
1.When power on, short press to switch LED Lighting mode
2.When power on, Long press 3s, will enter standby mode, LED
lights off, Bluetooth off, only digital display "ECO"
3.When standby mode, short press to turn on/off clock function,
display alarm time
1.When bluetooth mode, short press to change music, long press
to change volume
2.When standby mode, short press to change hour and minute,
long press invalid
1.When bluetooth mode, short press music on/off, long press 1s
to bluetooth pair, long press 5s to switch “light stick” mode
2.When standby mode, long press 5s to enter clock function
setting
3.When using USB drive play music, short press to change music
4.When “light stick” mode, long press 5s to switch mode
1.When bluetooth mode, short press to change music, long press
to change volume
2.When standby mode, short press to change hour and minute,
long press invalid
FCC Caution:
This device complies with part 15 of the FCC Rules. Operation is subject to the
following two conditions: (1) This device may not cause harmful interference, and (2)
this device must accept any interference received, including interference that may
cause undesired operation.
Any Changes or modifications not expressly approved by the party responsible for
compliance could void the user's authority to operate the equipment.
Note: This equipment has been tested and found to comply with the limits for a Class
B digital device, pursuant to part 15 of the FCC Rules. These limits are designed to
provide reasonable protection against harmful interference in a residential installation.
This equipment generates uses and can radiate radio frequency energy and, if not
installed and used in accordance with the instructions, may cause harmful interference
to radio communications. However, there is no guarantee that interference will not
occur in a particular installation. If this equipment does cause harmful interference to
radio or television reception, which can be determined by turning the equipment off
and on, the user is encouraged to try to correct the interference by one or more of the
following measures:
-Reorient or relocate the receiving antenna.
-Increase the separation between the equipment and receiver.
-Connect the equipment into an outlet on a circuit different from that to which the
receiver is connected.
-Consult the dealer or an experienced radio/TV technician for help.