Shinwa BM-6018AM 2.4 GHz Baby Monitor Receiver User Manual
Shinwa Industries (China) Ltd. 2.4 GHz Baby Monitor Receiver Users Manual
Shinwa >
User Manual

婴儿监护器简易说明手册
Baby Monitor Operating Instructions
使用前请仔细阅读本说明书
以确保安全和正确使用
并请妥善保管以供日后参考
Please read the user manual carefully
before you use for your safety and correct
operation, and please keep it
properly for reference in future.
135x90mm 封面

135x90mm 内页
FCC Statement
Radiation Exposure Statement
This equipment has been tested and found to comply with
the limits for a Class B digital device, pursuant to part 15 of
the FCC rules. These limits are designed to provide
reasonable protection against harmful interference in a
residential installation. This equipment generates, uses and
can radiate radio frequency energy and, if not installed and
used in accordance with the instructions, may cause harmful
interference to radio communications. However, there is no
guarantee that interference will not occur in a particular
installation. If this equipment does cause harmful interference
to radio or television reception, which can be determined by
turning the equipment off and on, the user is encouraged to
try to correct the interference by one or more of the following
measures:
-Reorient or relocate the receiving antenna.
-Increase the separation between the equipment and receiver.
-Connect the equipment into an outlet on a circuit different
from that to which the receiver is connected.
-Consult the dealer or an experienced radio/TV technician
for help.
To assure continued compliance, any changes or
modifications not expressly approved by the party responsible
for compliance could void the user’s authority to operate this
equipment. (Example- use only shielded interface cables
when connecting to computer or peripheral devices).
set forth for an uncontrolled environment and it also complies
with Part 15 of the FCC RF Rules.
Operation is subject to the following two conditions:
(1) This device may not cause harmful interference, and
(2) This device must accept any interference received,
including interference that may cause undesired operation.
The camera should be installed and operated with a
minimum distance of 20 centimeters between the radiator
and your body.
This device complies with FCC radiation exposure limits

135x90mm 内页
Declaration of Conformity
Hereby,Shinwa Industries(China) Ltd. declares that this
device is in compliance with the essential requirements and
other relevant provisions of Directive 1999/5/EC.
The manufacturer is not responsible for any radio or TV
interference caused by unauthorized modifications to this
equipment. Such modifications could void the user authority
to operate the equipment.
Caution!
135x90mm 内页
The product can not be used as a children's toy.
Keep the product out of reach from children.
The cable may cause potential safety hazard to children.
Use only approved accessories and batteries. Do not
connect incompatible products.
Your device is not water-resistant.keep it dry.
Follow any restrictions. switch the device off in aircraft,
near medical equipment, fuel, chemicals, or blasting
areas.
All wireless devices may be susceptible to interference,
which could affect performance.
Power adaptor warning: “Use only provided power
adaptor
Caution: Risk of explosion if battery is replaced by an
incorrect type. Dispose of used batteries according to
the instructions
Do not dispose of electrical products in the general
waste and ensure the used product or batteries are
disposed safely according to your local authority and
regulations.
Please do not use the product for illegal monitoring or
recording. Our company will not undertake any relative
legal liability that caused by illegal use.
WARNING:
135x90mm 内页
勿将本产品作为儿童 玩具玩 耍。
请保持一定距离或放置儿童不易拿取到的地方。
电线可能会对儿童带 来潜在 的安全 隐患。
本产品不防水,请保 持干燥 。
请遵守限制使用的规 定:在 医院/加油 站/飞机/化学 品易
燃易爆品周围请保持 关机。
请使用原装适配器和 电池。
废旧电池的处理及产 品报废 处理请 遵守当 地法律 法规。
请勿将本品用于非法 监控或 录像。 由非法 使用引 发的法
律问题,本司不负任 何责任 !
警 告:

目 录
Contencs
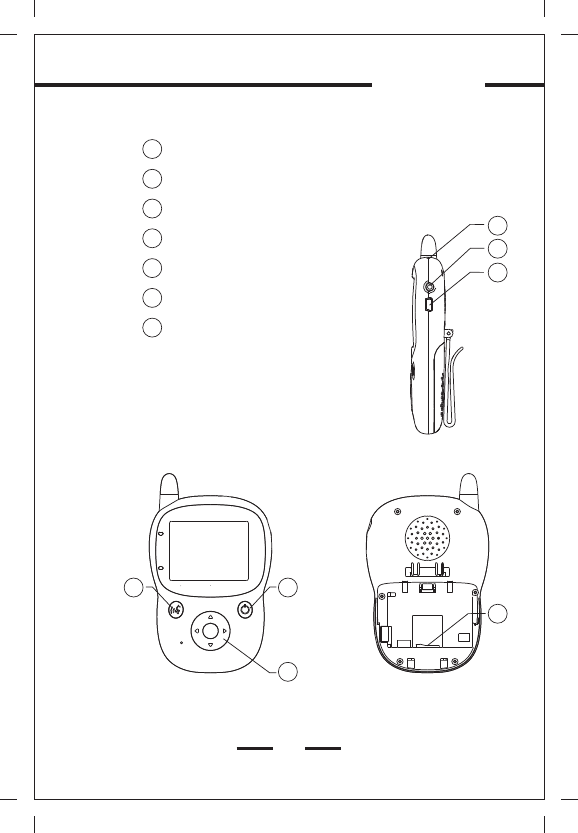
摄像端
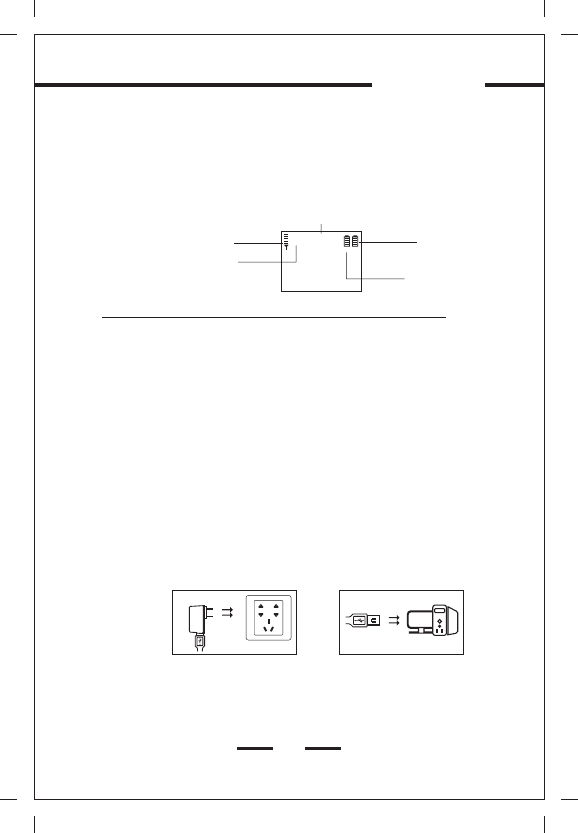
监控端
如何开 关机
如何注 册/注销
如何充 电
电池如 何安装拆 除
Micro Sd卡如何安装拆除
按键说 明
135x90mm 内页
Camera
Receiver
Power on/off
Register/Logout
Recharge
Installed and remove the batteries
Place/Remove Micro SD card
Operate instruction
10
11
12
12
12
12
13
13
01
02
03
03
04
04
04
05
135x90mm 内页
Operating Instructions
The care for children from family is the most
considerate for every family. Shinwa baby monitor is
designed specially for your children. It will give you
unlimited free space and let you take care of your
children’s every action. It supports the function of video
recording (AVI), which can record children’s every funny
action in their happy growth. It will help your children
grow-up under your protection in a comfortable
environment without any influence by any interference.
2.4GHz wireless digital signal transmission, with 2.4”
colorful LCD, portable and small, easy to carry;
Microphone equipped inside of camera, which help you
hear your children’s voice, it can monitor multiple
images simultaneously and play music(e.g. lullaby)
by remote control.
01
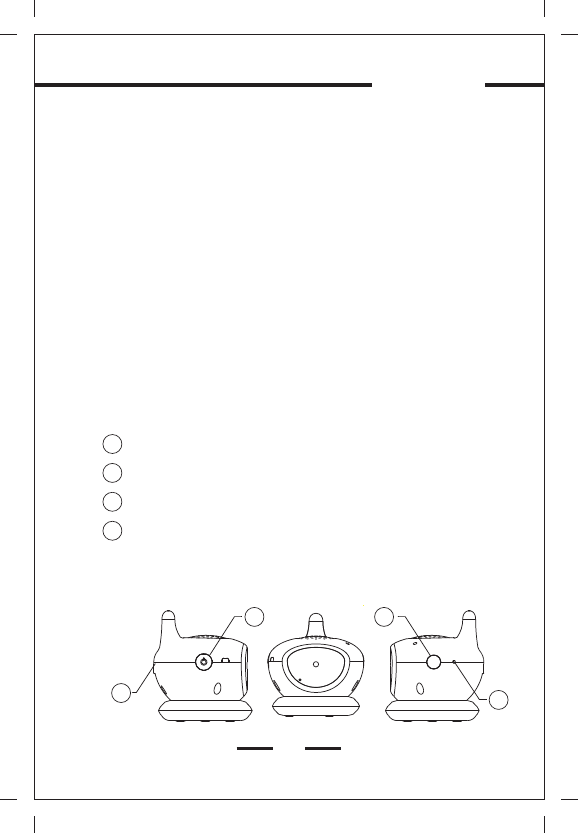
Baby Monitor
01
02
03
04
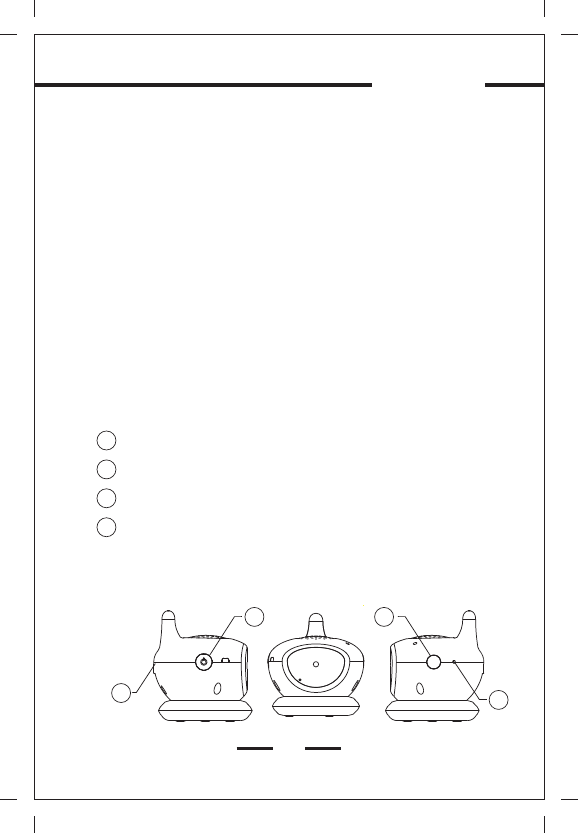
Power Switch
Register
USB port
Reset
Camera
03 0 4
0201
02
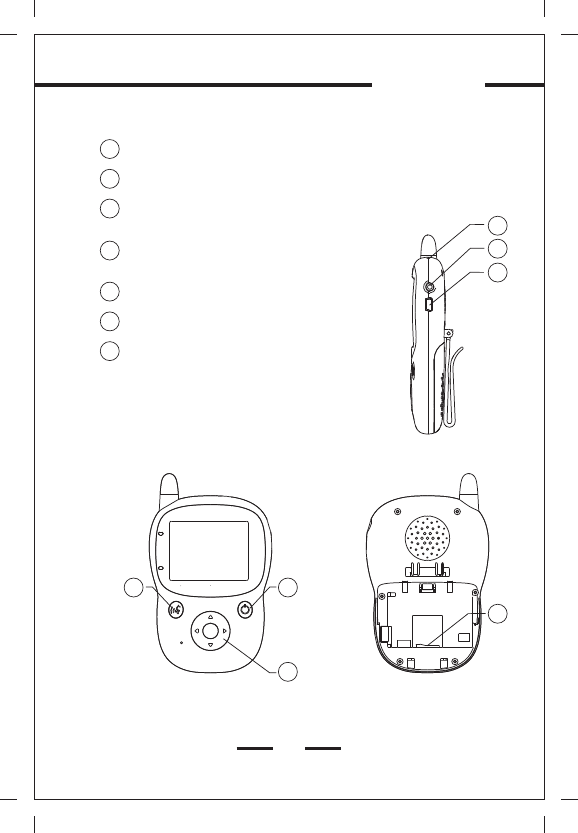
01
02
03
04
05
06
07
Baby Monitor
Operating Instructions
Receiver
VOX/Delete
Power/ESC
Five direction key
(up/down/left/right/OK)
Micro SD card slot
(on the underside of the battery)
USB port
Earphone jack
Reset
135x90mm 内页
01 0 2
03
06
07
05
04
03
Baby Monitor
Operating Instructions
Ⅱ. Power on/off
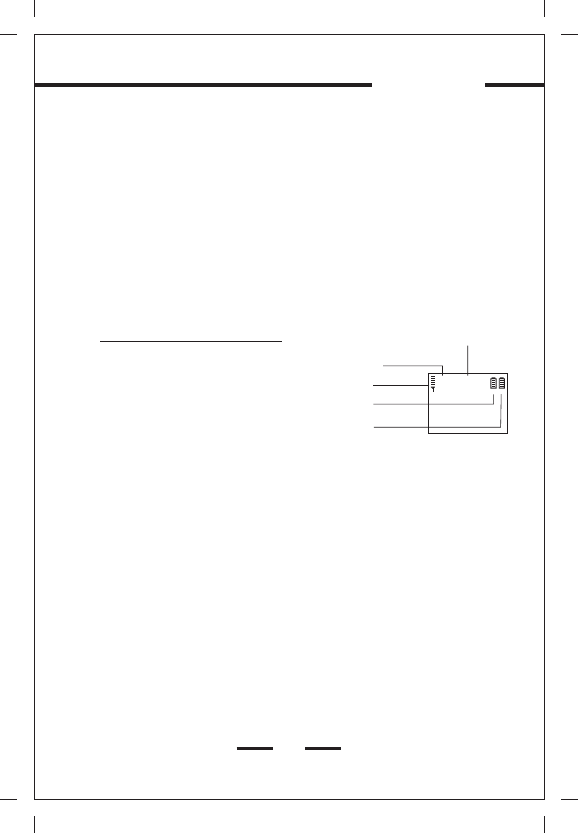
Camera: Press the switch to power ON/OFF. When
the power indicator LED is green, the product is ready to
be operated. If the LED doesn’t light please replace the
battery or recharge.
Receiver: Press the Power switch to Power on/off. When
the power indicator LED is blue means the receiver is
now ready to operate, if not, please replace the batteries
or recharge the receiver. The first time to power on, you
should to register the camera to the receiver successfully.
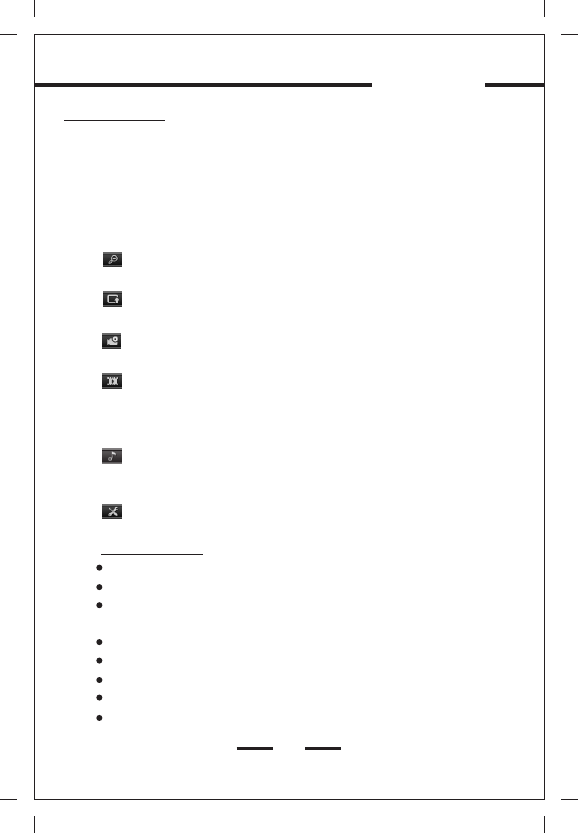
Ch1
Intensity of the single
Battery capacity of the camera
Battery capacity of the receiver
Ⅲ.Register/Logout
Video monitoring status:
Register: Power on the transmitter and the receiver.
Press “Ok” button of the receiver, choose “setting” and
then choose “register”. Select the transmission number
and press “OK”, there will be the register information
from the transmitter camera. Press “OK” to turn to the
register position. At the same time, press the register
key on the transmitter camera and hold for seconds. The
register function is activated automatically, if the
transmitter camera has been register success, there will
be hint on the receiver interface. If failed please repeat
this process or check the capacity of the battery.
Logout: Turn on the transmitter. Press “OK” button of the
indication of two-way communication:
Channel of the camera
A+
135x90mm 内页
04
Baby Monitor
Operating Instructions
receiver, choose “setting” and choose “logout” item,
select the number of the camera and press “OK” to
logout the camera.
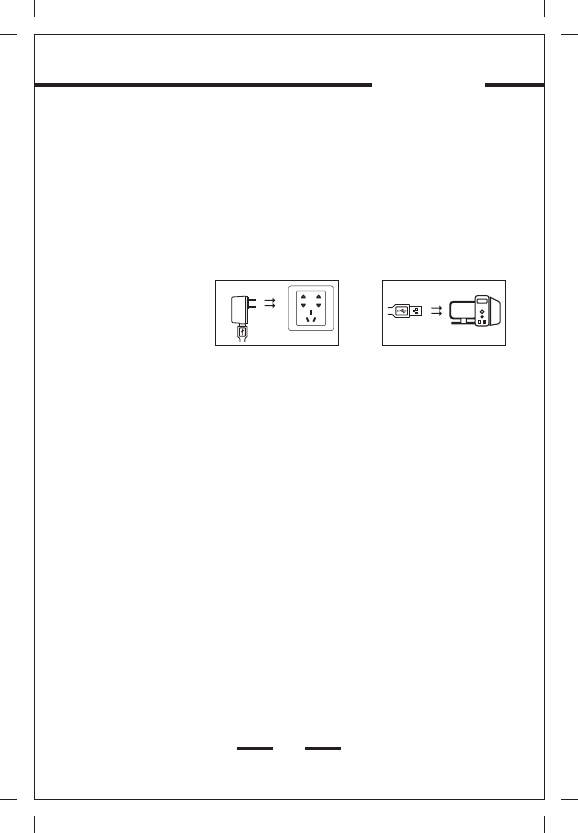
Ⅳ.Recharge
Recharge through the USB port by two methods as follows:
1. Recharge with a power adapter plug.
2. Recharge through a USB cable connected with computer
Method 1 Method 2
Ⅴ.Installed and remove the batteries
Install: open the receiver’s battery compartment on
the rear side. Insert the battery, paying attention to
correct polarity. Close the battery compartment again.
Remove: turn off the receiver. Open the battery
compartment. Take off the battery. Close the battery
compartment again.
Ⅵ.Place/Remove Micro SD card
Place: (Receiver side can extend storage with
Micro SD card up to 4G.)
Shut down the monitor, open the battery cover and
remove the battery, then put the Micro SD card face up
into the Micro SD card slot; When the card is locked,
you can hear the click.
Remove: Shut down the monitor, open the battery
cover and remove the battery. Then gently press the
Micro SD card, and it will pop up from the slot.
135x90mm 内页

05
Baby Monitor
Operating Instructions
Ⅶ.Operate instruction
1.Camera side button instruction
Power switch: Power on/off, the indicator LED will
light.
Register: Press and hold on can register the camera
side with receiver side, when registering the indicator
LED will flicker. You can loose the button when it is
registered successfully.
Reset button: Press this button will reset system.
2.Receiver side button instruction
Reset button: Reset system in any case when press
this button.
The functions of other buttons are different when in
different status. Detailed instructions are as follows:
Under the video monitoring status:
(1)Up/Down: Used to change channels by different
sequence. When changed channel, it will display the
number of current channel (CH1, CH2, CH3, CH4 or 4
images viewing). The receiver can maximum register 4
cameras at the same time.
Channel changes as below:
4 registered cameras: Ch1 Ch2 Ch3 Ch4
images
Ch1 Ch2 Ch3
images
Ch1 Ch2
images
images
Ch1 Ch1
3 registered cameras:
2 registered cameras:
1 registered cameras:
135x90mm 内页

06
Baby Monitor
Operating Instructions
(2)Left/Right: To adjust the volume, and status
displayed with icons.
(3)OK: Only by pressing this button can open the menu,
and the video keep in active status when the menu is
opened. The menu will be closed when there is no operation
within 5 seconds or by pressing Power/ESC button.
(4)Power/ESC: Shut down the menu when press this
button.
(5)Speak/Delete: To open or close the
voice transmission from the monitor to the camera.
Under the menu status:
(1)
(2)
the settings.
(3)OK: To select, confirm and enter.
(4)Power/ESC: Press this button to cancel or return,
press and hold on for a few seconds to power on or off.
(5)Speak/Delete: When operating the video files, it can
be used to delete files; Otherwise used to open or close
the voice transmission.
Up/Down: To change channels.
Left/Right: To move to the left and right or change
The menu is active during the period of validity,
and you can operate as follows:
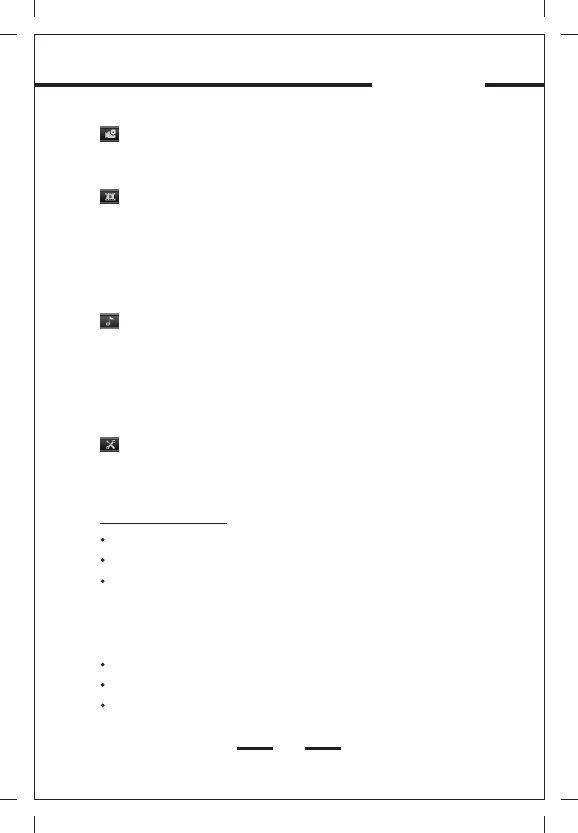
Zoom in/out function: Press the OK button can enter
it. And then use the left/right button to select one from 5
different areas of the screen, then press the OK button
to execute.
Images move function: Press the OK button to enter
it. And then use the left/right/up/down button to move
the image to corresponding direction. It can be used
135x90mm 内页
07
Baby Monitor
Operating Instructions
only when the image is under zoom in status.
Record function: Press OK button to start or stop
recording, also can press Power/ESC button to stop
recording and exit the menu at the same time.
Playback function: Press the OK button can enter the
submenu and display the files list, and the list is arrayed
by the found date. Use the Up/Down button to select file,
use the Speak/Delete button to delete file; Press the
OK button can play or suspend, press Power/ESC
button can return to the video monitoring interface.
Lullaby, press OK button to enter the lullaby interface,
Select the lullaby tracks, then press OK button to play
the lullaby selected and exit to the main menu
meanwhile. There is a playing indication on the lullaby
menu. Stop playing by pressing OK button under playing
condition.
System setting function: Press OK button to enter,
use Up/Down button to select and then use OK button to
confirm. Press Power/ESC button can cancel or return.
System Settings:
Register: Camera register/unregister
Video store location: Micro SD card or local disk
PC link: Connect to the PC through a USB cable, it can
be used like a USB disk, then your can operate the
video files you recorded.
Power saving: Set the auto power saving time.
Language setting: Set the language.
Backlight: Set the brightness of the LCD display.
Voice trigger control : on/off
135x90mm 内页

Baby Monitor
Operating Instructions
08
135x90mm 内页
Movement trigger control: on/off
Camera setting: Set the parameter for the camera of
each channel. Such as the brightness, contrast,
saturation, frame rate and night-vision control.
Capacity: View the capacity of internal storage and
external Micro SD card.
Version: View the version of the software.
Default: Restore the default settings.
Standby and hibernation mode:
Enter the hibernation mode: When the hibernation
time you set in the Power saving mode of system setting,
it will enter the hibernation mode automatically and
shut down the audio, video and LCD.
Exit the hibernation mode: When press anyone
button of the monitor or the camera side is warning, it will
exit the hibernation mode automatically. Then warning
can be triggered by voice trigger function or movement
sensitive function.
Voice trigger function
Under working situation of voice trigger function, the
receiver will shock when the voice reach a certain range
that detected by the camera.
Movement trigger function
Under working situation of movement sensitivity
function, the receiver will shock when the movement
reach a certain range that detected by the camera.

Baby Monitor
Operating Instructions
09
135x90mm 内页
Night vision function
In dark surroundings, pictures can be viewed clearly by
turning on night vision function automatically or manually.
Setting of night vision: under setting menu, select the
camera channel needed, select auto, on or off when you
see the night vision control bar.
“auto” means the camera perceive the light degree
through sensor type and the night vision automatically on or
off when the surrounding is dark or bright.
“on” means on the night vision directly;
“off” means off the night vision directly;
135x90mm 内页
婴儿监护器简易说明手册 Baby Monitor
10
每个家庭都希望给予 孩子最 为周 到 的照顾 ,本品 是一款
专门为您的家庭设计 的既优 秀又可 爱的幼 儿监护 产品。 她简
化了复杂的操作,给 您无限 的自由 空间, 使您在 享受舒 适生
活的同时对孩子的每 一个行 为都了 如指掌 。这款 产品支 持录
像功能,可以记录孩 子们愉 快的成 长过程 。孩子 们在舒 适的
环境中不会受到任何干扰,在您的保护下茁壮成长。
本品采用2.4GHz无 线数字 信号发射;2.4英寸彩色L CD显示
屏;体积小便于携带 ,摄像 端内设 麦克风 ,随时 随地帮 助您
聆听孩子的声音;摄 像端和 监控端 可以独 立使用 ;监控 端可
同时监控4个摄像端;可 将声音 及视频 录制成A VI格式 输出;
具有双向通话功能, 并可远 程控制 播放音 乐。
摄像端( CAM ERA )
01
02
03
04
电源键
对码键
USB接口
复位键
03 0 4
0201
婴儿监护器简易说明手册 Baby Monitor
11
监控端( REC EIV ER)
01
02
03
04
通话键/删除键
五向功能键(上/下/左/右/OK键)
POWER/ESC键
USB接口
Micro SD卡插口(位于 电池底 部)
耳机接口
复位键
05
06
07
135x90mm 内页
01 0 2
03
06
07
05
04
婴儿监护器简易说明手册 Baby Monitor
12
二、如 何开关 机:
摄像端:按电源键开 、关机 ;开机 成功红 色指示 灯亮、
若无反应请充电或更 换电池 。
监控端:长按电源键 开、关机;开机后显示视频主界面,
进入视频监控 状态;初次开机需要待摄像注册成功才可
显示监控画面。开机 成功蓝 色指示 灯亮、 若无反 应请充
电或更换电池。
视频监控状态:
注:当系统出现按键功能失效或死机时,可按复位键进行复位。
三、如 何注册/注 销:
注册 :在摄 像端、 监控端开机状态下,监控端按“OK”键
打开菜单、进入 “系统设置”项,选择“注册”子菜单项,
选择需注册的摄像 端号,按“OK”键弹出注册摄像端信息,
再按 “OK”键 确定进 入注册状态;此时按住摄像端 的对码
键 , 进 行 对码, 注册成 功监控 端 有 提 示 成功 , 若 失 败可
以 重 复 此过 程再试 或确认 电量 情况再 试。
注销 :在监 控端开 机状态 下,打开菜 单 、 进 入 “ 系 统 设
置”项 ,选择“注册”子菜单项,选择需注销的摄像端号,
按“OK” 键弹出 注销摄 像端信 息,再 按 “O K” 键 确 定 执
行注销。
四、如 何充电 :
摄像端与监控端充电 时从US B接口接 入
方式一:通过电源适 配器充 电
方式二:通过USB线连 接电脑 充电
五、电 池如何 安装拆 除:
安装:打开电池盖, 按正负 指示放 置电池 ,扣好 盖。
拆除:关机,打开电 池盖取 出电池 ,扣好 盖。
方式 一 方式二
摄像端通道指示
信号强 度 指示
摄像端 电 量指 示
监控端 电 量指 示
Ch1
A+
双向通 话 指示
135x90mm 内页

婴儿监护器简易说明手册 Baby Monitor
13
六、Mi cro S D卡如何 安装拆 除:
安装:监控端扩充存 储可外 接Mic ro SD卡 ,目前 支持最
大4G。打开电池盖、取 出电池 、将Mi cro S D卡正面 插 入
M i c r o S D卡 槽 、 听 到咔嚓锁住声音即可 。
拆除:打开电池盖、 取出电 池、轻压Micro SD会从卡槽
中弹出、即 可将Mi cro S D卡从Mi cro S D卡槽取 出。
七、按 键说明
(一)、摄像端按键 说明:
电源键:开、关机, 开机成 功有电 源指示 灯亮。
对码键:按住此键启 动对码 、对码 过程中 绿 色 指 示 灯 闪
烁、对码成功即可松 开。
复位键:系统复位。
(二)、监控端按键 操作说 明:
复位键:系统复位, 任何状 态下都 可对系 统进行 复位处
理。其余键的功能依 据所处 状态情况,功能定义有区别,
具体说明如下:
在视频监控状态下
1、上、下键:用 于 切 换 通 道 , 向 上 或 向 下 顺序 切 换 通道。
切换 通道之后,显示当前通道号 (Ch1或C h 2或C h 3或C h 4
或 四 画面显示)本品 监控端 最大支持同时注册4个摄像端。
上键切换通道举例:
如果有四个摄像端:C h1 Ch 2 Ch3 C h4
如果只注册三个摄像 端:Ch 1 Ch2 C h3
如果只有一个摄像端 :Ch1 四 画面 Ch 1
2、左、右键:用于调 节音量 ,有音 量增、 减图标 显示。
3、OK键:按此键弹出菜 单,其 它任 何 情 况 下 都 不 出 菜 单 。
菜单出现的时候,图像 保持活 动状态 。5秒没有 操作菜 单
会自动消隐或短按PO WER /ES C键关闭菜单。菜单有效期间
本机处于菜单 状态。
4、POWER/ESC键 :短按 此键关 闭菜单,长 按开、 关机
5、通话键/删除键:用于 启动、 关闭监 控端往 摄像端 通话
四画面
四画面
135x90mm 内页
婴儿监护器简易说明手册 Baby Monitor
14
键停止同时消隐菜单 。
:回放功能,按OK键进 入播放子界面,显示文件列表。
上、下键选择文件, 文件按 新 到 旧 排 列。 按通话键/删除
键可 删除选中的文件。OK键为播放或者暂停,POWER/ESC
键退出,回到视频监 控界面 。
:睡眠曲,按OK键进入,选择睡眠曲目再按OK键启动睡
眠曲播放同时退回到主菜单,并且睡眠曲菜单上有播放标识。
当在播放状态下按OK键可控制播放停止。
:系统设置,按OK键进 入,上 、下键 选择,OK键确认
执行;POWER/E SC键取 消或退 回。
系统设置项有:
注册:摄像端注册/注销
存储位置设置:本机 或者Mi cro S D卡。
连接电脑:先用USB线 连接好 电脑, 再执行 此功能 。相
当于U盘,可操作录制的 视频文 件
节电模式:
语言设置
背光(LCD亮度调节)
声控控制:开/关
动作识别控制:开/关
POWER/ESC
在菜单状态下
1、上、下键:用于移 动选择 菜单项 。
2、左、右键:用于向 左、向 右移动 或改变 设置值 。
3、OK键:用于选择确认 执行。
4、POWER/ESC键 :短按 此键用 于取消 或返回 功能。
5、通话键/删除键,在操作视频文件时可做删除功能,其
它用于启动关闭通话 。
菜单有效期间本机处 于菜单 状态, 界面的 菜单功 能操作 说明:
:放大功能,按OK键进 入后使 用左、 右键顺 序选
择监控画面区域(五 个区域 ),OK键 执行放 大。
:平移功能,按OK键进入后上、下、左、右键移动图像。
(监控画面放大后,此菜单 才有效)
:录像功能,按OK键启 动录像 、暂停 录像; 也可按
135x90mm 内页

135x90mm 内页
婴儿监护器简易说明手册 Baby Monitor
15
待机/休眠状态
休眠进入:系统设置 中的节 电时间 到达休 眠时间 后 , 进
入 休眠状 态,会 关闭音 视频, 关闭LC D。
休眠退出:发射端报 警或按 监控端 的任意 键;报 警是由
于声控或动作识别的 功能引 发。
声控功能
在监控端声控打开的 情况下 ,当摄 像端 检 测 到 声 音 达 到
一 定 幅 度 时 ,监控 端会有 震动提 示。
动作识别功能
在监控端动作识别打 开的情 况下, 当摄像 端检测 到有动
作时,动作达 到 一定程 度,监 控端会 有震动 提示。
摄像头设置:设置各 通道的 摄像头 参数(亮度/对比度/
饱和度/帧率/红外夜视控制 )
容量显示:包括本机 容量与 扩展Mi cro S D卡容量 信息
版本信息:包括监控端、摄像端与厂家信息
恢复出厂设置
夜视功能
当环境光较暗时,可 自动或 人为手 动开启 红外夜 视,让
视频清晰可见。
夜视功能设置:在设 置菜单 下,进 入到摄 像头控 制子菜
单项,选择需控制的 摄像头 通道, 可看到 红外开 关控制
栏,可设置成自动、 开或关 。
“自动”就是摄像端 通过感 光器件 感知环 境光亮 程度,
光线较暗时自动开启 或光线 亮时关 闭红外 夜视;
“开”就是直接控制 红外夜 视开启 ;
“关”就是直接控制 红外夜 视关闭 。

135x90mm 封底
abnormal condition solution
can not power on
1, ple ase r ech arg e, sw it ch on a fte r
ch arg ed.
2, che ck th e res et bu tto n
video interface
not available after
power on
1,make sure the camera has enough
power and correctly registered
2,switch to the registered camera
channel or register the camera with the
existing channel
Receiving distance
shortened
1,supply power by adapter or recharge
2,reselect position of the receiver and
camera.
3,keep away from other electrical
equipments.
squealing during
working
Enlarge the distance between the
camera and receiver
can not hear the voice
from the camera
1,turn up the volume of receiver
2,exit playing “lullaby”
Micro SD card
nonrecognition Use branded SD card that less than 4GMicro
system halted Please press the reset button
1
2
3
4
5
6
7
1
2
3
4
5
6
7
异常 情况 解决 办法
无法 开机 1、请充电,电量足再开机
2、检查复位键
开机看不到视频界面
1、确 保摄像 头有电 ,并正 确注册
2、切 换到已 注册摄 像头的 通道, 或者在
此通 道上注 册摄像 头
接收 距离变 短
1、使 用适配 器供电 或充电
2、重 新选择 监控端 和摄像 端位置
3、尽 量远离 其它电 器
工作中出现啸叫 加大 监控端 、摄像 端之间 的距离
听不 到摄像 头端的 声音 1、主 机声音 调大
2、退 出“催 眠曲” 播放
Micro S D卡不识 别 建议 使用4G以 内的正 规品牌 S D卡Micro
意外 死机 请按 复位键 复位