Shure orporated ADX2FDG57 Digital Transmission System User Manual Exhibit D Users Manual per 2 1033 b3
Shure Incorporated Digital Transmission System Exhibit D Users Manual per 2 1033 b3
Contents
- 1. Exhibit D Users Manual per 2 1033 c3
- 2. Exhibit D Users Manual per 2 1033 b3
Exhibit D Users Manual per 2 1033 b3
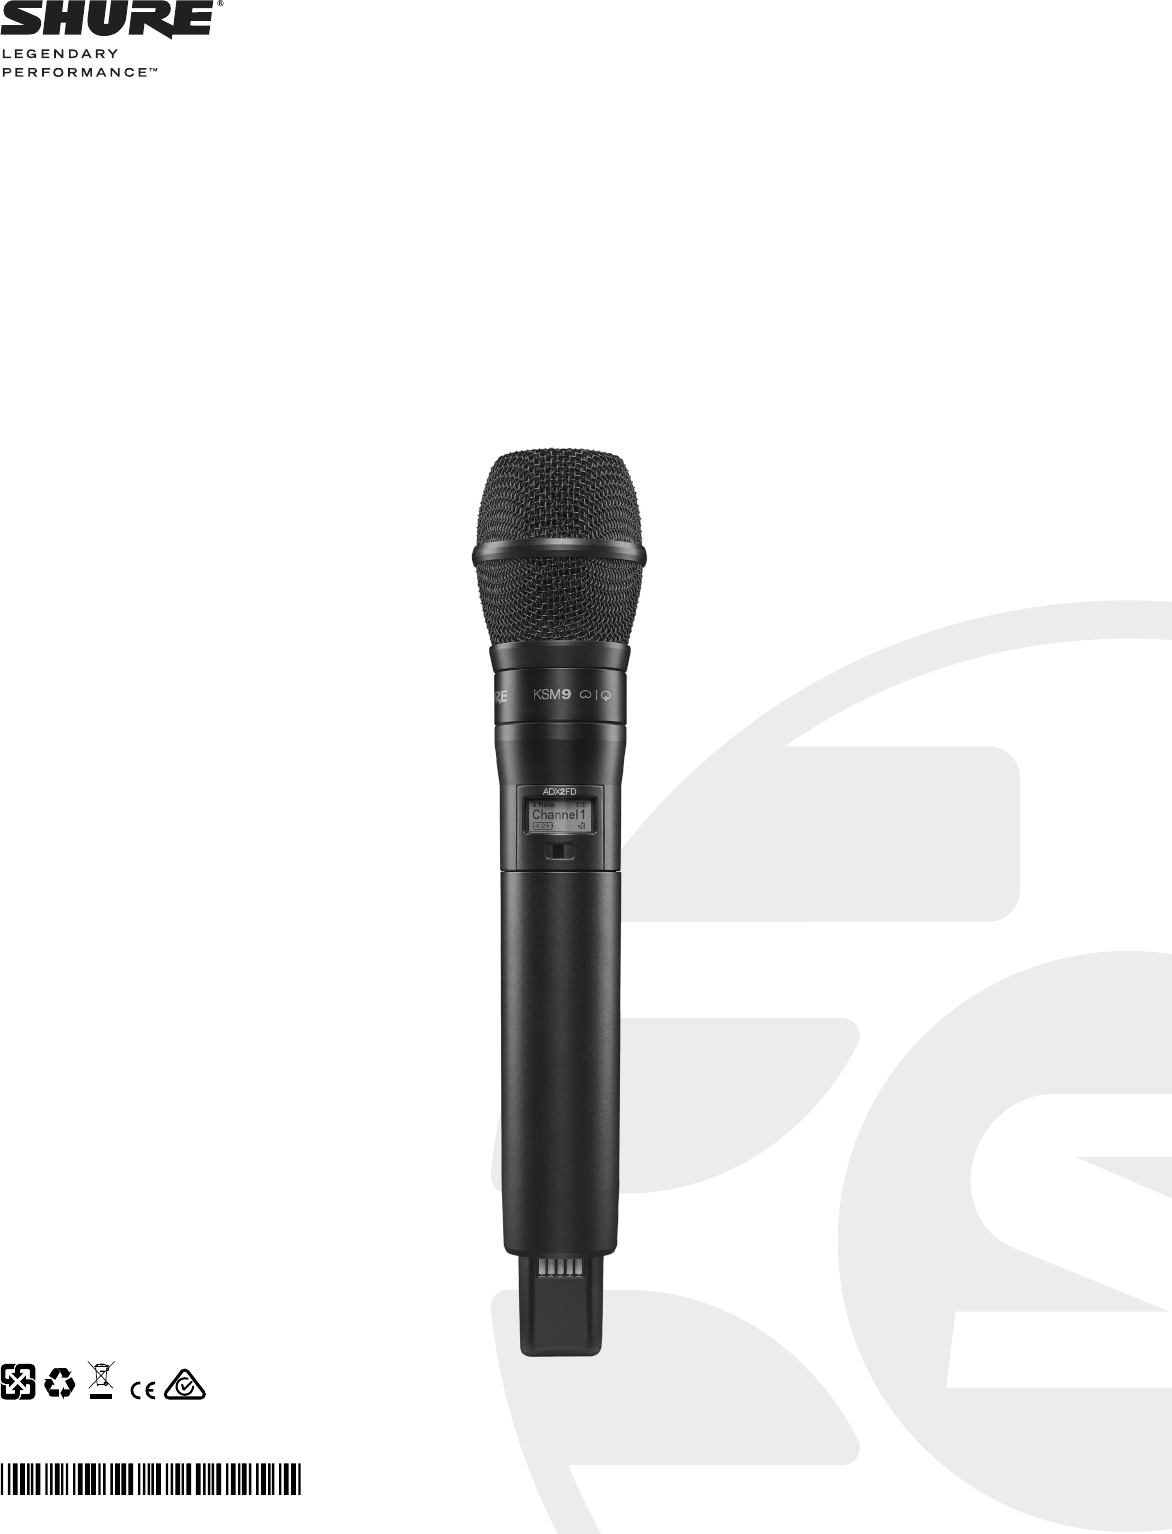
ADX2FD Axient Digital Handheld Transmitter
USER GUIDE
© 2017 Shure Incorporated
27A36586 (Rev. Preliminary)
Printed in U.S.A.
AXIENT® DIGITAL
WARNING
• Battery packs may explode or release toxic materials. Risk of fire or burns. Do not open, crush, modify, disassemble, heat above 140°F (60°C), or
incinerate.
• Follow instructions from manufacturer
• Only use Shure charger to recharge Shure rechargeable batteries
• WARNING: Danger of explosion if battery incorrectly replaced. Replace only with same or equivalent type.
• Never put batteries in mouth. If swallowed, contact your physician or local poison control center
• Do not short circuit; may cause burns or catch fire
• Do not charge or use battery packs other than Shure rechargeable batteries
• Dispose of battery packs properly. Check with local vendor for proper disposal of used battery packs.
• Batteries (battery pack or batteries installed) shall not be exposed to excessive heat such as sunshine, fire or the like
Note: Use only with the included power supply or a Shure-approved equivalent.
Please follow your regional recycling scheme for batteries, packaging, and electronic waste.
WARNING: This product contains a chemical known to the State of California to cause cancer and birth defects or other reproductive harm.
低功率電波輻射性電機管理辦法
第十二條
經型式認證合格之低功率射頻電機,非經許可,公司、商號或使用者均不得擅自變更頻率、加大功率或變更原設計之特性及功能。 第十四條
低功率射頻電機之使用不得影響飛航安全及干擾合法通信;經發現有干擾現象時,應立即停用,並改善至無干擾時方得繼續使用。前項合法通信,指依電
信法規定作業之無線電通信。低功率射頻電機須忍受合法通信或工業、科學及醫療用電波輻射性電機設備之干擾。
IMPORTANT SAFETY INSTRUCTIONS
1. READ these instructions.
2. KEEP these instructions.
3. HEED all warnings.
4. FOLLOW all instructions.
5. DO NOT use this apparatus near water.
6. CLEAN ONLY with dry cloth.
7. DO NOT block any ventilation openings. Allow sufficient distances for adequate ventila-
tion and install in accordance with the manufacturer’s instructions.
8. DO NOT install near any heat sources such as open flames, radiators, heat registers,
stoves, or other apparatus (including amplifiers) that produce heat. Do not place any open
flame sources on the product.
9. DO NOT defeat the safety purpose of the polarized or grounding type plug. A polarized
plug has two blades with one wider than the other. A grounding type plug has two blades
and a third grounding prong. The wider blade or the third prong are provided for your
safety. If the provided plug does not fit into your outlet, consult an electrician for replace-
ment of the obsolete outlet.
10. PROTECT the power cord from being walked on or pinched, particularly at plugs, conve-
nience receptacles, and the point where they exit from the apparatus.
11. ONLY USE attachments/accessories specified by the manufacturer.
12. USE only with a cart, stand, tripod, bracket, or table specified by the manu-
facturer, or sold with the apparatus. When a cart is used, use caution when
moving the cart/apparatus combination to avoid injury from tip-over.
13. UNPLUG this apparatus during lightning storms or when unused for long
periods of time.
14. REFER all servicing to qualified service personnel. Servicing is required when the ap-
paratus has been damaged in any way, such as power supply cord or plug is damaged,
liquid has been spilled or objects have fallen into the apparatus, the apparatus has been
exposed to rain or moisture, does not operate normally, or has been dropped.
15. DO NOT expose the apparatus to dripping and splashing. DO NOT put objects filled with
liquids, such as vases, on the apparatus.
16. The MAINS plug or an appliance coupler shall remain readily operable.
17. The airborne noise of the Apparatus does not exceed 70dB (A).
18. Apparatus with CLASS I construction shall be connected to a MAINS socket outlet with a
protective earthing connection.
19. To reduce the risk of fire or electric shock, do not expose this apparatus to rain or
moisture.
20. Do not attempt to modify this product. Doing so could result in personal injury and/or
product failure.
21. Operate this product within its specified operating temperature range.
This symbol indicates that dangerous voltage constituting a risk of
electric shock is present within this unit.
This symbol indicates that there are important operating and mainte-
nance instructions in the literature accompanying this unit.
4
ADXFD2 Handheld Transmitter
ADX series transmitters deliver impeccable audio quality and RF performance, and are equipped with ShowLink® remote control for real-time parameter
adjustments and interference avoidance. This transmitter additionally features Frequency Diversity for seamless audio in even the most challenging en-
vironments. Light-weight aluminum construction, AA or SB920 rechargeable power options (with dockable charging).
Included Components
SB920 Shure Rechargeable
Battery
95A25763
Zipper Bag 95B2313
Euro-Threaded Adapter 31B1856
Swivel Adapter, black 90F4046
Choice of (1) of the following Shure
microphone cartridges:
SM58 (RPW112) KSM9 Nickel (RPW188)
BETA 87C (RPW122) BETA 87A (RPW120)
BETA 58A (RPW 118) KSM9 Black (RPW184)
KSM8 Black (RPW174) KSM8 Nickel (RPW170)
KSM9HS Black (RPW186) KSM9HS Nickel (RPW190)
Optional Accessories
Radome Color ID Kit for AD2 WA617M
Battery Contact Cover for AD2 WA618
Microphone stand adapter WA371
Optional Shure microphone cartridges:
SM58 (RPW112)
SM86 (RPW114)
SM87A (RPW116)
BETA 58A (RPW118)
BETA 87A (RPW120)
BETA 87C (RPW122)
VP68 (RPW124)
KSM9 Nickel (RPW188)
KSM9HS Nickel (RPW190)
KSM9 Black (RPW184)
KSM9HS Black (RPW186)
Features
Performance
• 184 MHz tuning range
• Frequency Diversity enables simultaneous transmission on two inde-
pendent frequencies to ensure seamless, uninterrupted audio for mis-
sion-critical applications. Single carrier mode is available if Frequency
Diversity is not required.
• 20 Hz to 20 kHz range with flat frequency response
• Automatic input staging optimizes gain setting
• Diversity ShowLink-enabled for remote transmitter control and automat-
ic interference avoidance
• AES 256-bit encryption-enabled for secure transmission
• >120 dB, A-weighted, System Gain @ +10
• Dante Output: >130dB, A-weighted, System Gain @ +10
• 100 meter (300 feet) line-of-sight operating range
• Selectable modulation modes optimize performance for spectral effi-
ciency or audio quality:
- Standard – optimal coverage, low latency
- High density – dramatic increase in max system channel count
• Switchable Power Levels in single carrier mode = 2/10/50 mW (region
dependent)
• Power Level 2x20 mW in frequency diversity mode (region dependent)
• Built-in tone generator and RF markers to facilitate range-testing
Design
• Interchangeable Shure microphone cartridges
• Backlit LCD with easy to navigate menu and controls
• Rugged metal construction
• Menu and power lockout
Power
• Shure SB920 rechargeable batteries for up to 9 hours of runtime, preci-
sion metering, and zero memory effect
• AA-compatible battery sled available
• External charging contacts for docked charging
5
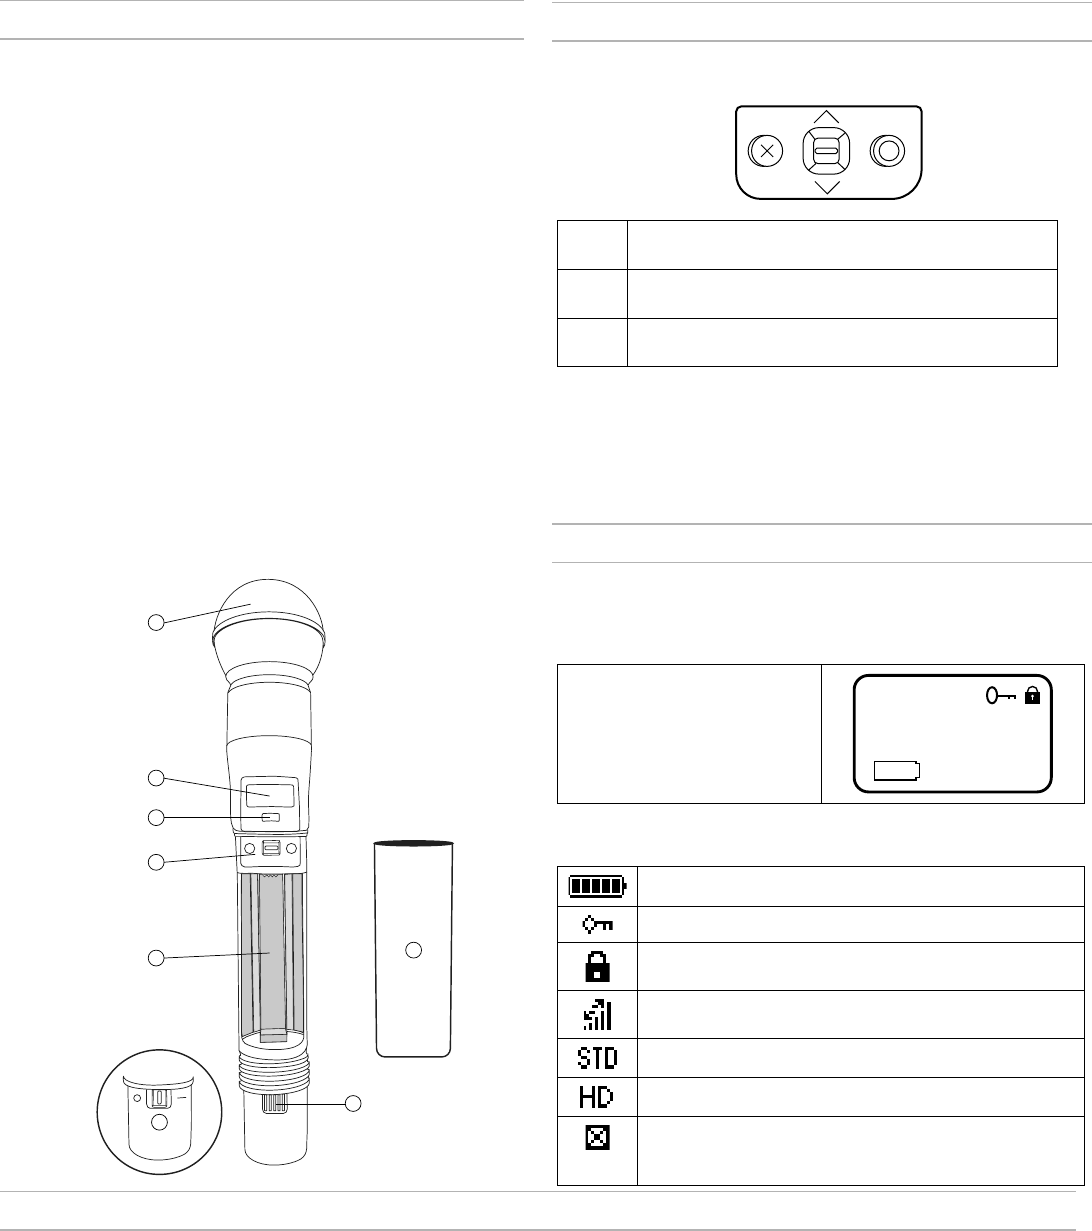
ADX2FD Transmitter Overview
① Microphone Cartridge
See Optional Accessories for a list of compatible cartridges.
② Display
View menu screens and settings. Press any control button to activate
the backlight.
③ Infrared (IR) Port
Align with the receiver IR port during an IR Sync for automated
transmitter programming.
④ Control Buttons
Use to navigate through parameter menus and change values.
⑤ Battery Compartment
Requires Shure rechargeable battery.
⑥ On/Off Switch
Powers the unit on or off.
⑦ Handle
Unscrew to access controls and batteries.
⑧ Battery Charging Contacts
Charging contacts for use with docking battery chargers.
1
2
3
4
5
8
6
7
Transmitter Controls
Use to navigate through parameter menus and change values.
XExit: Acts as a 'back' button to return to previous menus or
parameters without confirming a value change
OEnter: Selects menu screens and confirms parameter
changes
∨∧ Use to scroll through menu screens and to change param-
eter values
Tip: Use the following control shortcuts for quick set up:
• Hold the ∧ button while powering-on to lock the transmitter controls
• Hold the X button while powering-on to set the transmitter RF output to
mute
Home Screen Display
The home screen shows transmitter information and status.
Tip: There are four options to choose the information shown on the home
screen. Use the arrow buttons to select one of the following choices:
• Name
• F1 and F2 Frequency Settings
• F1 and F2 Group (G) and
Channel (C)
• Device ID
Shure
470.200MHz
7:45
The following icons appear to indicate transmitter settings:
Battery runtime in hours and minutes or bar display
Key: Displayed when encryption is enabled
Displayed when controls are locked. Icon will flash if access
is attempted to a locked control (power or menu).
ShowLink signal strength displays 0 to 5 bars
STD: Standard Transmission Mode
HD: High Density Transmission Mode
Box: When the box has an "x", Mute Mode is on and
engaged. If the box is empty, Mute Mode is on, but not
engaged.
Locking the Interface
Lock transmitter interface controls to prevent accidental or unauthorized changes to parameters. The lock icon is shown on the home screen when the
interface lock in enabled.
1. From the Utilities menu, navigate to Lock and select one of the following lock options:
- None: The controls are unlocked
- Power: The power switch is locked
- Menu: The menu parameters are locked
- All: The power switch and menu parameters are locked
2. Press O to save.
Tip: To quickly unlock a transmitter: Press O twice, select Unlocked, and press O.
6
Shure Rechargeable Batteries
Shure lithium-ion batteries offer a rechargeable option for powering the transmitters. Batteries quickly charge to 50% capacity in one hour and reach full
charge within three hours.
Single chargers and multiple bay chargers are available to recharge the Shure batteries.
Caution: Only charge Shure rechargeable batteries with a Shure battery charger.
Checking Battery Info
When using a Shure rechargeable battery, the receiver and transmitter
home screens display the number of hours and minutes remaining.
Detailed information for the battery is displayed Battery menu of the
transmitter: Utilities > Battery
• Battery: The chemistry type of for the installed battery (Shure,
Alkaline, Lithium, NiMH)
• Bars: Indicates the number of bars displayed
• Time: Battery runtime
• Charge: Percentage of charge capacity
• Health: Percentage of current battery health
• Cycle Count: Total of the number of charging cycles for the installed
battery
Charge
85%
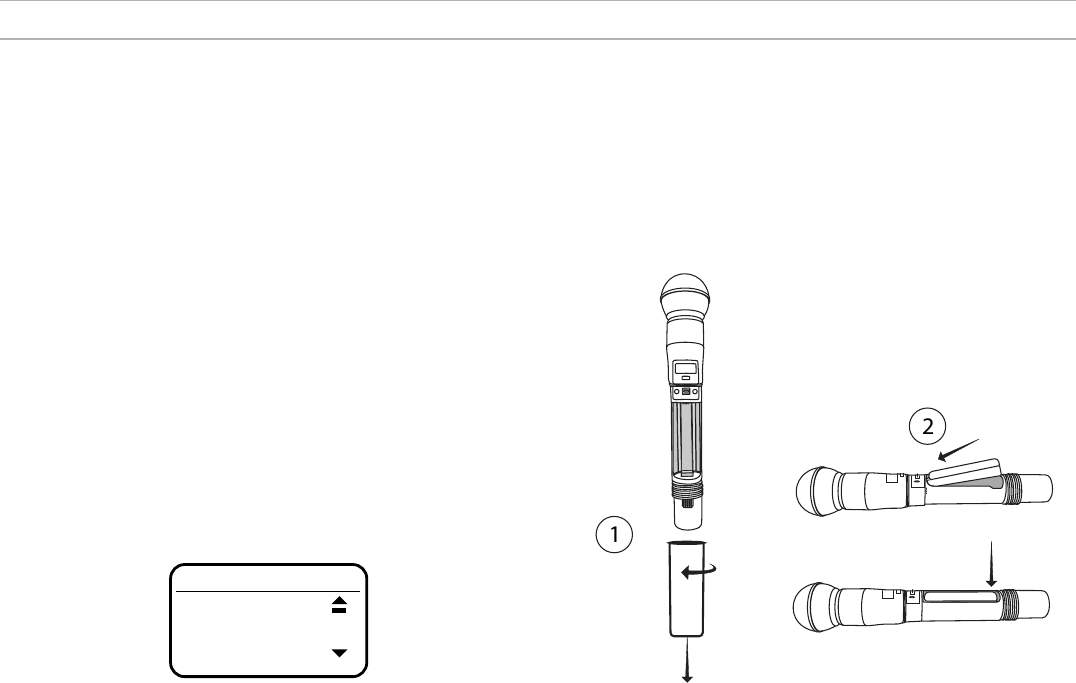
Battery Installation
① Accessing the Battery Compartment
Unscrew and remove the handle as shown.
② Inserting the Battery
Insert the battery, contracts first into the battery compartment. Press
down on the tab to fully seat the battery, and then reinstall the handle.
Tip: To remove the battery, pull up on the tab on the bottom of the
battery.
Important Tips for Care and Storage of Shure
Rechargeable Batteries
Proper care and storage of Shure batteries results in reliable performance
and ensures a long lifetime.
• Always store batteries and transmitters at room temperature
• Ideally, batteries should be charged to approximately 40% of capacity
for long-term storage
• Periodically clean the battery contacts with alcohol to maintain ideal
contact
• During storage, check batteries every 6 months and recharge to 40% of
capacity as needed
For additional rechargeable battery information, visit www.shure.com.

7
Menu Parameters
Menu Map
Audio
Oset
Mute
Tone Gen
Level
Utilities
Device ID
Lock
Marker
About
Battery
Talk Sw
Reset All
Radio
F2 Ctrl
F2 Freq
F1 Freq
Power
Output
The Main menu organizes the avail-
able transmitter parameters into
three categories:
• Radio
• Audio
• Utilities
Main
Radio
Tips for Editing Menu
Parameters
• To access the menu options from
the home screen, press O . Use
the arrow buttons to access addi-
tional menus and parameters.
• A menu parameter will blink when
editing is enabled
• To increase, decrease or change
a parameter, use the arrow
buttons
• To save a menu change, press O
• To exit a menu without saving a
change, press X
Radio Menu
F1 Freq
Press the enter button to enable editing of a group (G:) channel (C:) or frequency (MHz). Use the arrow buttons to
adjust the values. To edit the frequency, press the O button once to edit the first 3 digits, or twice to edit the second 3
digits.
F2 Freq
Press the enter button to enable editing of a group (G:) channel (C:) or frequency (MHz). Use the arrow buttons to
adjust the values. To edit the frequency, press the O button once to edit the first 3 digits, or twice to edit the second 3
digits.
F2 Ctrl
Turns F2 (F2 Freq) On or Off.
Power
Higher power settings can extend the range of the transmitter.
Output
- On: RF signal is active
- Mute: RF signal is inactive
Audio Menu
Offset
Adjust Offset level to balance mic levels when using two transmitters for frequency diversity or when assigning
multiple transmitters to receiver slots. Adjustment range: -12 dB to +21 dB.
Mute
When enabled, the power switch is configured as a mute switch for the audio:
- Power switch on: audio signal on
- Power switch off: audio signal muted
Tone Gen
Transmitter will generate a continuous test tone:
- Freq: The tone can be set to 400 Hz or 1000 Hz.
- Level: Allows for adjustment of the output level of the test tone.
Utilities Menu
Device ID
Assign a device ID of up to 9 letters or numbers.
Locks
- None: The controls are unlocked
- Power: The power switch is locked
- Menu: The menu parameters are locked
- All: The power switch and menu parameters are locked
Locks the transmitter controls and power switch.
Link Info
Displays the following information about the link between a transmitter and receiver:
- Not Linked: The transmitter is not linked to a receiver
- Linked: The transmitter is linked to a receiver. Select Unlink? to free the transmitter from the receiver link.
- Unlinked: The transmitter is not linked to a receiver
SL Test
ShowLink test tool to measure the boundaries of ShowLink coverage.
Talk Sw
Indicates the status of the talk switch.
Marker
When enabled, press the enter button to drop a marker in Wireless Workbench.
Battery
Displays battery information:
- Battery: The chemistry type of for the installed battery (Shure Rechargeable, Alkaline, Lithium, NiMH)
- Bars: Indicates the number of bars displayed
- Time: Battery runtime
- Charge: Percentage of charge capacity
- Health: Percentage of current battery health
- Cycle Count: Record of the number of charging cycles for the installed battery
About
Displays the following transmitter information:
- Model Displays the model number
- Band Displays the tuning band of the transmitter
- FW Version Installed firmware
- HW Version Hardware version
- Serial Num Serial number
Reset All
Restores all transmitter parameters to factory settings.
8
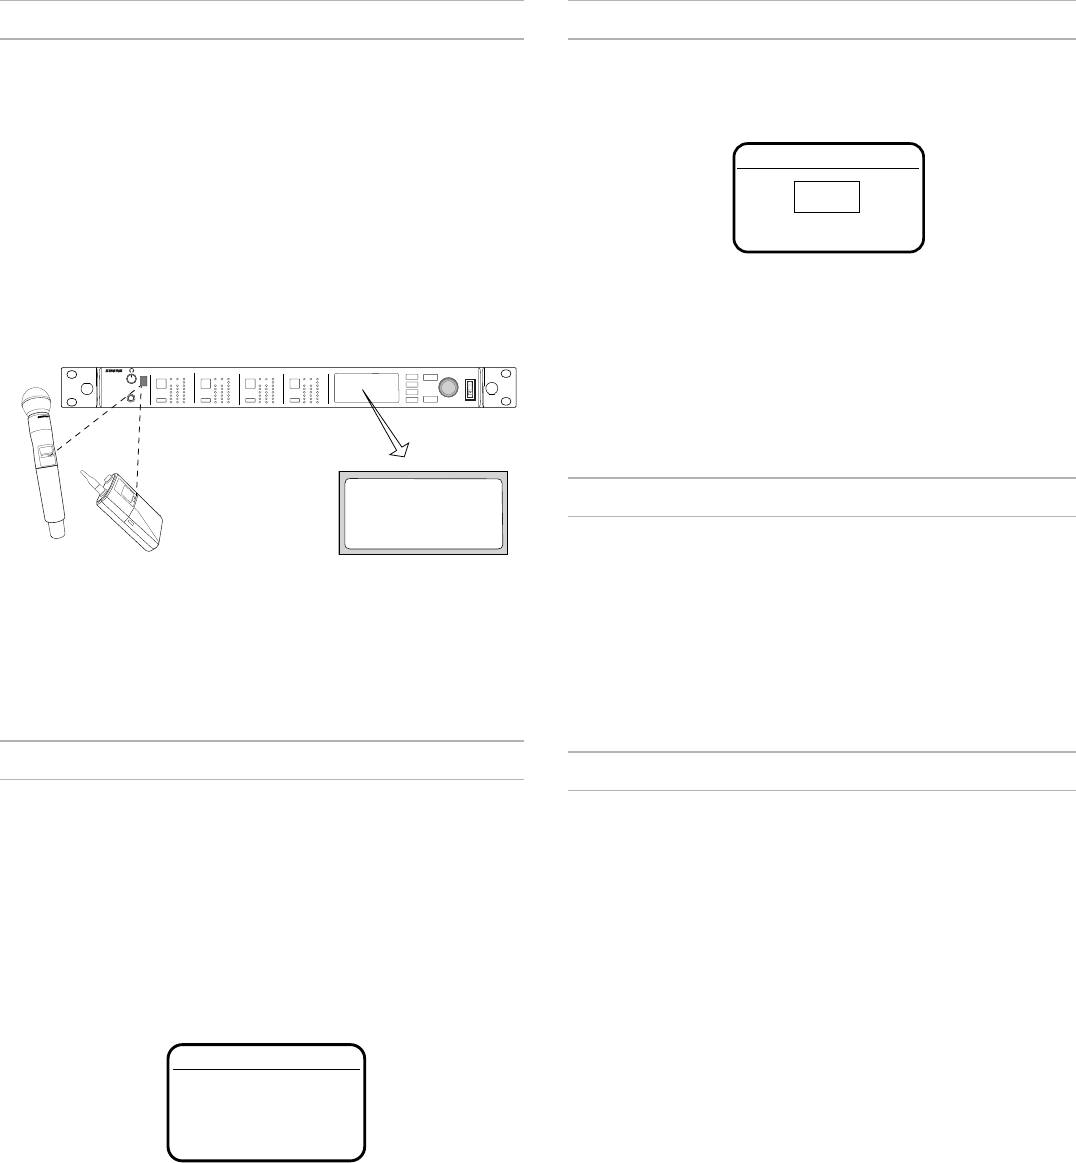
IR Sync
Use IR Sync to form an audio channel between the transmitter and
receiver.
Note: The receiver band must match the band of the transmitter.
1. Select a receiver channel.
2. Tune the channel to an available frequency using group
scan or manually turn to an open frequency.
3. Power on the transmitter.
4. Press the SYNC button on the receiver.
5. Align the IR windows between the transmitter and the receiver so that
the IR LED illuminates red. When complete, Sync Success! appears.
The transmitter and receiver are now tuned to the same frequency.
<15 cm (6 in.)
AD4Q
Axient Digital
Wireless Receiver
POWER
PUSH
CONTROL
NAVIGATE
IR RF
A B
OL
AUDIO
SYNC
4
RX 4RF
A B
OL
AUDIO
SYNC
3
RX 3RF
A B
OL
AUDIO
SYNC
2
RX 2RF
A B
OL
AUDIO
SYNC
1
RX 1
ULXD4
Digital Wireless Receiver
sync
Sync Success!
Note:
Any change to the encryption status on the receiver (enabling/disabling
encryption) requires a sync to send the settings to the transmitter. New
encryption keys for the transmitter and receiver channel are generated
on every IR sync, so to request a new key for a transmitter, perform an IR
sync with the desired receiver channel.
Setting the Frequency Manually
The transmitter can be manually tuned to a specific frequency, group, or
channel.
1. Navigate to the Radio menu and select F1 Freq or F2 Freq.
2. Scroll to select G: and C: to edit the group and chan-
nel, or select the frequency parameter (MHz). When ed-
iting the frequency, press O one to enable editing of the
first three digits, or twice to edit the last three digits.
3. Use the ∧∨ buttons to adjust the group, channel, or frequency.
4. Press O to save, and then press X when finished.
F1 Freq
G: 1 C:1
470.450 MHz
RF Mute
RF Mute prevents transmission of the audio by suppressing the RF
signal, while allowing the transmitter to remain powered-on. The home
screen displays RF MUTED in this mode.
RF Output
Mute
1. From the Radio menu, navigate to Output.
2. Choose one of the following options:
- On: RF signal is active
- Mute: RF signal is disabled
3. Press O to save.
Turning the transmitter off and on, or replacing the battery will restore
Output to On.
Power-on RF Mute
Power-on RF Mute places the transmitter in RF Mute mode immediately
when turned on.
• Starting with the transmitter off, press and hold the X button, and then
switch on the power
• Continue to hold the X button until the RF Muted message appears on
the home screen
Tip: To turn the RF Output on, navigate to Radio > Output and select
On.
Operating in Frequency Diversity Mode
Operating the AXDFD2 in frequency diversity mode with an Axient
Digital receiver enables simultaneous transmission of audio on 2 inde-
pendent frequencies.
1. Select a channel and navigate to the Frequency Diversity
setting: Advanced > Frequency Diversity .
2. Use the control wheel to select the Combining option.
3. Press ENTER to confirm and save.
4. Perform an IR sync to link the transmitter to the receiver.
In Frequency Diversity, the transmitter will operate on two adjacent re-
ceiver channels (1 and 2 or 3 and 4).
Turning Off Frequency 2 (Freq 2)
If a problem develops with one of the frequencies being used by the
transmitter, you can lock on to a single frequency by turning off frequen-
cy 2. Turning off one frequency allows the transmitter to continue pass-
ing audio while a clear frequency can be found for the second channel.
1. From the Radio menu navigate to F2 Ctrl.
2. Use the controls to set F2 to On or Off. When set to
On, the transmitter will pass audio using Freq 2.

9
Input Overload
The OVERLOAD message is displayed when the audio input experiences a
high-level signal. The power LED will turn red as an additional indicator of
an overload. Reduce the input signal or enable the input pad to remove
the overload.
Tip: To enable the input pad, navigate to Audio > Pad and select -12 dB.
Shure
OVERLOAD
7:45
Tone Generator
The transmitter contains an internal tone generator that produces a contin-
uous audio signal. The tone is helpful when conducting a sound check or
for troubleshooting the audio signal chain. The level of the tone is adjust-
able from -60 dB to 0 dB and the frequency can be set to 400 Hz or 1000
Hz.
1. From the Audio menu select Tone Gen.
2. Set the frequency to 400 Hz or 1000 Hz.
3. Select Level and use the arrow buttons ad-
just the value between -60 dB and 0 dB.
Tip: Always start with the level set to -60 dB to avoid overloading speakers
or headphones.
Turn off the tone by selecting Off from the menu or by cycling the trans-
mitter power.
Tone Gen
Tone: 400Hz
Level: -60db
Matching Audio Levels with Mic Offset
When linking two or more transmitters to a receiver, there may be a differ-
ence in volume levels between microphones or instruments. If this occurs,
use the Offset function to match the audio levels and eliminate audible
volume differences between transmitters. If using a single transmitter, set
Offset to 0 dB.
1. Turn on the first transmitter and perform a sound check to test
the audio level. Turn off the transmitter when finished.
2. Turn on the second transmitter and perform a sound check to
test the audio level. Repeat for any additional transmitters.
3. If there is an audible difference in the sound level be-
tween the transmitters, navigate to the Offset menu (Audio
> Offset) in the transmitter to increase or decrease
the Offset in realtime to match the audio levels.
Mic Offset
+3 dB
ShowLink Test
The ShowLink Test is a tool to find the boundaries of the ShowLink cov-
erage area. When the ShowLink test is activated, a five-bar display indi-
cating level of the signal quality is shown on the screen. As the transmit-
ter moves away from the access point, the number of bars will decrease.
ShowLink control is maintained as long as 1 bar is displayed.
If the transmitter is beyond the coverage range, ShowLink control will
not be possible; however, the audio signal will not be affected or inter-
rupted as long as the transmitter is within range of the RF signal. To
improve coverage, adjust the location of your access points or place ad-
ditional access points to extend coverage.
To activate the ShowLink Test:
1. From the Utilities menu, navigate to SL Test.
2. Press the O button to start the test and walk the transmitter
around the coverage area. Monitor the number of bars displayed
and the state of the ShowLink icon. Coverage boundaries are
indicated by 0 bars displayed or the ShowLink icon is empty.
3. Press the X button to exit the ShowLink test.
Tip: During a ShowLink test, press O (enter) to drop a marker in Wireless
Workbench.
Updating Firmware
Firmware is embedded software in each component that controls
functionality. Periodically, new versions of firmware are developed to
incorporate additional features and enhancements. To take advantage
of design improvements, new versions of the firmware can be uploaded
and installed using the Shure Update Utility. The Shure Update Utility is
available for download from http://www.shure.com/.
Firmware Versioning
When performing an update, download firmware to the receiver first, and
then update transmitters to the same firmware version to ensure consis-
tent operation.
The firmware numbering for Shure devices uses the following format:
MAJOR.MINOR.PATCH (e.g., 1.2.14). At a minimum, all devices on
the network (including transmitters), must have the same MAJOR and
MINOR firmware version numbers (e.g., 1.2.x).
Updating the Transmitter
1. Download the firmware to the receiver.
2. Access the following menu from the receiver:
Device Conguration > Tx Firmware Update.
3. align the IR ports between the transmitter and the re-
ceiver. IR ports must be aligned for the entire down-
load, which can take 50 seconds or longer.
Tip: The red alignment LED will turn on when the alignment is correct.
4. Press ENTER on the receiver to begin the download to the transmitter.
The receiver will display the progress of the update as a percentage.

10
Specifications
Mic Offset Range
-12 to 21 dB (In 1 dB steps)
Battery Type
Shure SB920 Rechargeable Li-Ion
Battery Runtime
@ 10 mW
Shure
SB920
up
to 9 hours
Dimensions
256 mm x 51 mm (10.1 in. x 2.0 in.) L x Dia.
Weight
340 g (12.0 oz.), without batteries
Housing
Cast Aluminum
Audio Input
Configuration
Unbalanced
Maximum Input Level
1 kHz at 1% THD
145 dB SPL (SM58), typical
Note: Dependent on microphone type
RF Output
Antenna Type
Integrated Single Band Helical
Occupied Bandwidth
<200 kHz
Modulation Type
Shure Axient Digital Proprietary
Power
2 mW, 10 mW, 50 mW in single carrier mode. Powel level 2x20 mW in frequency diversity mode.
See Frequency Range and Output Power table, varies by region
Mode
Frequency
Diversity
Dual
Carrier
Single
Carrier
Single
Carrier
ShowLink
Network Type
IEEE 802.15.4
Frequency Range
2.40 to 2.4835 GHz (16 Channels)
RF Output Power
10 dBm (ERP)
Frequency Bands and Transmitter RF
Power
Band Frequency Range
(MHz)
RF Power (mW)***
G53 470 to 510 2/10/40
G54 479 to 565 2/10/20
G55† 470 to 636* 2/10/40
G56 470 to 636 2/10/40
G57 470 to 616* 2/10/50
G62 510 to 530 2/10/40
H54 520 to 636 2/10/40
K53 606 to 698* 2/10/40
K54 606 to 663** 2/10/40
K55 606 to 694 2/10/40
K56 606 to 714 2/10/40
K57 606 to 790 2/10/40
K58 622 to 698 2/10/40
L54 630 to 787 2/10/40
R52 794 to 806 2/10/40
JB 806 to 810 2/10
X51 925 to 937.5 2/10
X55 941 to 960 2/10/40
Note: *with a gap between 608 to 614 MHz.
Note: **with a gap between 608 to 614 MHz and a gap between 616 to
653 MHz.
Note: ***power delivered to the antenna port.
Note: †operation mode varies according to region. In Brazil, High Density
mode is used.

11
K55 606-694 MHz
Country Code
Code de Pays
Codice di paese
Código de país
Länder-Kürzel
Frequency Range
Gamme de frequences
Gamme di frequenza
Gama de frequencias
Frequenzbereich
A, B, BG, CH, CY, CZ, D, DK, EST, F *
FIN, GB, GR, H, HR, I, IRL, IS, L, LT *
M, N, NL, P, PL, RO, S, SK, SLO, TR *
all other countries *
* This equipment may be capable of operating on some frequencies not
authorized in your region. See Licensing Information.
G56 470-636 MHz
Country Code
Code de Pays
Codice di paese
Código de país
Länder-Kürzel
Frequency Range
Gamme de frequences
Gamme di frequenza
Gama de frequencias
Frequenzbereich
A, B, BG, CH, CY, CZ, D, DK, EST, F *
FIN, GB, GR, H, HR, I, IRL, IS, L, LT *
M, N, NL, P, PL, RO, S, SK, SLO, TR *
all other countries *
* This equipment may be capable of operating on some frequencies not
authorized in your region. See Licensing Information.
K57 606-790 MHz
Country Code
Code de Pays
Codice di paese
Código de país
Länder-Kürzel
Frequency Range
Gamme de frequences
Gamme di frequenza
Gama de frequencias
Frequenzbereich
A, B, BG, CH, CY, CZ, D, DK, EST, F *
FIN, GB, GR, H, HR, I, IRL, IS, L, LT *
M, N, NL, P, PL, RO, S, SK, SLO, TR *
all other countries *
* This equipment may be capable of operating on some frequencies not
authorized in your region. See Licensing Information.

12
Certifications
Certified under FCC Part 74 and Part 15.
Certified in Canada to RSS-210.
FCC ID: DD4ADX2FDG57
This device complies with Industry Canada licence-exempt RSS standard(s). Operation of this device is subject to the following two conditions: (1) this
device may not cause interference, and (2) this device must accept any interference, including interference that may cause undesired operation of the
device. Le présent appareil est conforme aux CNR d'Industrie Canada applicables aux appareils radio exempts de licence. L'exploitation est autorisée
aux deux conditions suivantes : (1) l'appareil ne doit pas produire de brouillage, et (2) l'utilisateur de l'appareil doit accepter tout brouillage radioélec-
trique subi, même si le brouillage est susceptible d'en compromettre le fonctionnement.
Meets essential requirements of the following European Directives:
• WEEE Directive 2002/96/EC, as amended by 2008/34/EC
• RoHS Directive 2011/65/EU
Note: Please follow your regional recycling scheme for batteries and electronic waste
This product meets the Essential Requirements of all relevant European directives and is eligible for CE marking.
Hereby, Shure Incorporated declares that the radio equipment is in compliance with Directive 2014/53/EU. The full text of the EU declaration of confor-
mity is available at the following internet address: http://www.shure.com/europe/compliance
Authorized European representative:
Shure Europe GmbH
Headquarters Europe, Middle East & Africa
Department: EMEA Approval
Jakob-Dieffenbacher-Str. 12
75031 Eppingen, Germany
Phone: +49-7262-92 49 0
Fax: +49-7262-92 49 11 4
Email: EMEAsupport@shure.de
LICENSING INFORMATION
Licensing: A ministerial license to operate this equipment may be required in certain areas. Consult your national authority for possible requirements.
Changes or modifications not expressly approved by Shure Incorporated could void your authority to operate the equipment. Licensing of Shure wireless
microphone equipment is the user’s responsibility, and licensability depends on the user’s classification and application, and on the selected frequency.
Shure strongly urges the user to contact the appropriate telecommunications authority concerning proper licensing, and before choosing and ordering
frequencies.
Information to the user
This equipment has been tested and found to comply with the limits for a Class B digital device, pursuant to Part 15 of the FCC Rules. These limits are
designed to provide reasonable protection against harmful interference in a residential installation. This equipment generates uses and can radiate radio
frequency energy and, if not installed and used in accordance with the instructions, may cause harmful interference to radio communications. However,
there is no guarantee that interference will not occur in a particular installation. If this equipment does cause harmful interference to radio or television
reception, which can be determined by turning the equipment off and on, the user is encouraged to try to correct the interference by one or more of the
following measures:
• Reorient or relocate the receiving antenna.
• Increase the separation between the equipment and the receiver.
• Connect the equipment to an outlet on a circuit different from that to which the receiver is connected.
• Consult the dealer or an experienced radio/TV technician for help.
Australia Warning for Wireless
This device operates under an ACMA class licence and must comply with all the conditions of that licence including operating frequencies. Before 31
December 2014, this device will comply if it is operated in the 520-820 MHz frequency band. WARNING: After 31 December 2014, in order to comply,
this device must not be operated in the 694-820 MHz band.
This device complies with Industry Canada licence-exempt RSS standard(s). Operation of this device is subject to the following two conditions: (1) this
device may not cause interference, and (2) this device must accept any interference, including interference that may cause undesired operation of the
device.
Le présent appareil est conforme aux CNR d'Industrie Canada applicables aux appareils radio exempts de licence. L'exploitation est autorisée aux deux
conditions suivantes : (1) l'appareil ne doit pas produire de brouillage, et (2) l'utilisateur de l'appareil doit accepter tout brouillage radioélectrique subi,
même si le brouillage est susceptible d'en compromettre le fonctionnement.

PT. GOSHEN SWARA INDONESIA
Kompleks Harco Mangga Dua Blok L No. 35 Jakarta Pusat
I.16.GSI31.00501.0211
Europe, Middle East, Africa: