Shure orporated GLXD4 Wireless microphone receiver User Manual Exhibit D Users Manual per 2 1033 b3
Shure Incorporated Wireless microphone receiver Exhibit D Users Manual per 2 1033 b3
Exhibit D Users Manual per 2 1033 b3
GLXD User Guide
Shure Incorporated Confidential
DRAFT
7.6.12
DRAFT
7.6.12

IMPORTANT SAFETY INSTRUCTIONS
1. READ these instructions.
2. KEEP these instructions.
3. HEED all warnings.
4. FOLLOW all instructions.
5. DO NOT use this apparatus near water.
6. CLEAN ONLY with dry cloth.
7. DO NOT block any ventilation openings. Allow sufficient distances for adequate ventila-
tion and install in accordance with the manufacturer’s instructions.
8. DO NOT install near any heat sources such as open flames, radiators, heat registers,
stoves, or other apparatus (including amplifiers) that produce heat. Do not place any open
flame sources on the product.
9. DO NOT defeat the safety purpose of the polarized or groundingtype plug. A polarized
plug has two blades with one wider than the other. A grounding type plug has two blades
and a third grounding prong. The wider blade or the third prong are provided for your
safety. If the provided plug does not fit into your outlet, consult an electrician for replace-
ment of the obsolete outlet.
10. PROTECT the power cord from being walked on or pinched, particularly at plugs, conve-
nience receptacles, and the point where they exit from the apparatus.
11. ONLY USE attachments/accessories specified by the manufacturer.
12. USE only with a cart, stand, tripod, bracket, or table specified by the manu-
facturer, or sold with the apparatus. When a cart is used, use caution when
moving the cart/apparatus combination to avoid injury from tip-over.
13. UNPLUG this apparatus during lightning storms or when unused for long
periods of time.
14. REFER all servicing to qualified service personnel. Servicing is required when the ap-
paratus has been damaged in any way, such as power supply cord or plug is damaged,
liquid has been spilled or objects have fallen into the apparatus, the apparatus has been
exposed to rain or moisture, does not operate normally, or has been dropped.
15. DO NOT expose the apparatus to dripping and splashing. DO NOT put objects filled with
liquids, such as vases, on the apparatus.
16. The MAINS plug or an appliance coupler shall remain readily operable.
17. The airborne noise of the Apparatus does not exceed 70dB (A).
18. Apparatus with CLASS I construction shall be connected to a MAINS socket outlet with a
protective earthing connection.
19. To reduce the risk of fire or electric shock, do not expose this apparatus to rain or
moisture.
20. Do not attempt to modify this product. Doing so could result in personal injury and/or
product failure.
21. Operate this product within its specified operating temperature range.
This symbol indicates that dangerous voltage constituting a risk of
electric shock is present within this unit.
This symbol indicates that there are important operating and mainte-
nance instructions in the literature accompanying this unit.
DRAFT
7.6.12
4
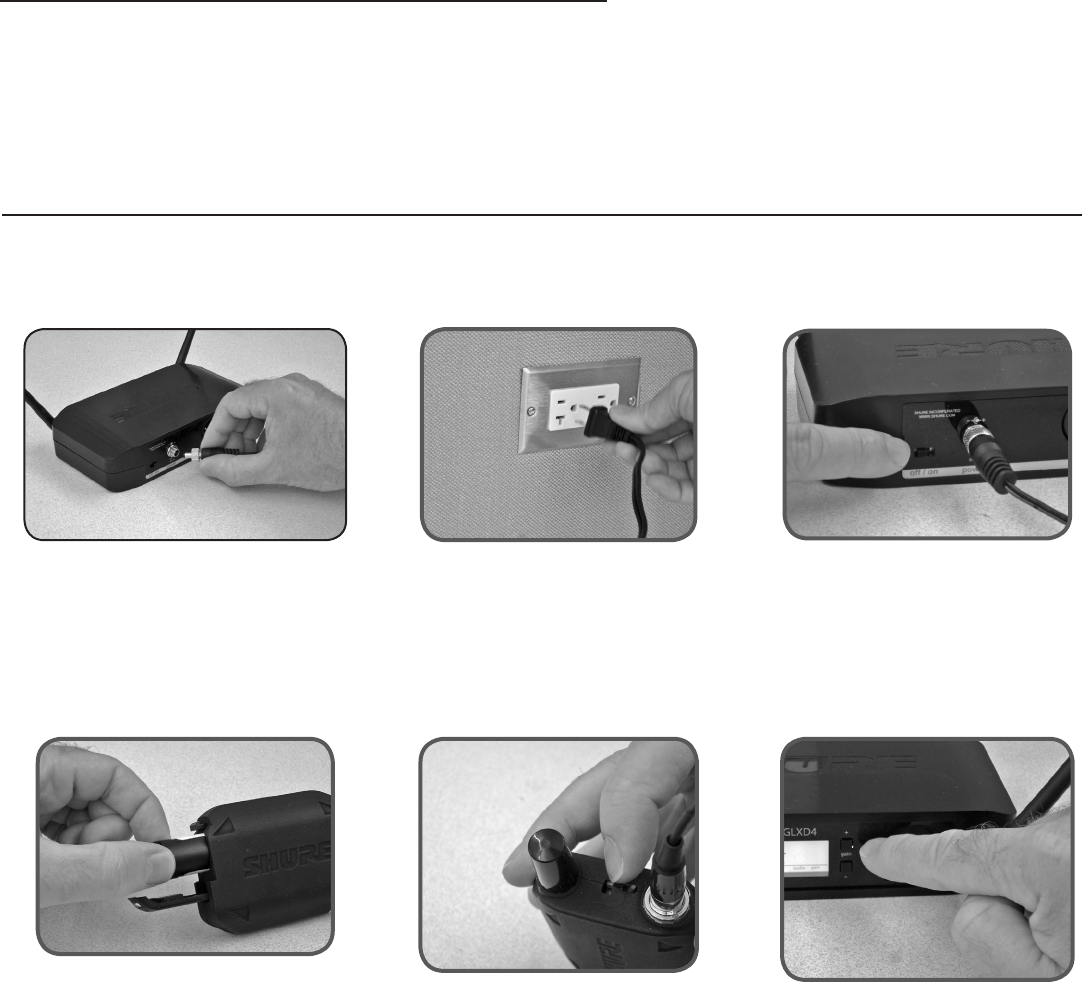
GLXD Wireless Audio System
The GLXD is a versatile wireless audio system offering quality sound and easy setup.
Back channel control between the transmitter and receiver enables real-time parameter changes. Compact size maximizes freedom of movement.
① Connect power supply to the receiver. ② Plug the power supply into
an AC power source.
③ Turn on the receiver.
④ Install charged batteries into the
transmitter.
⑤ Turn on transmitter to create a
link with the receiver.
⑥ The system is now ready to use.
Test the audio and adjust the gain if
necessary.
Receiver Quick Start
DRAFT
7.6.12
5
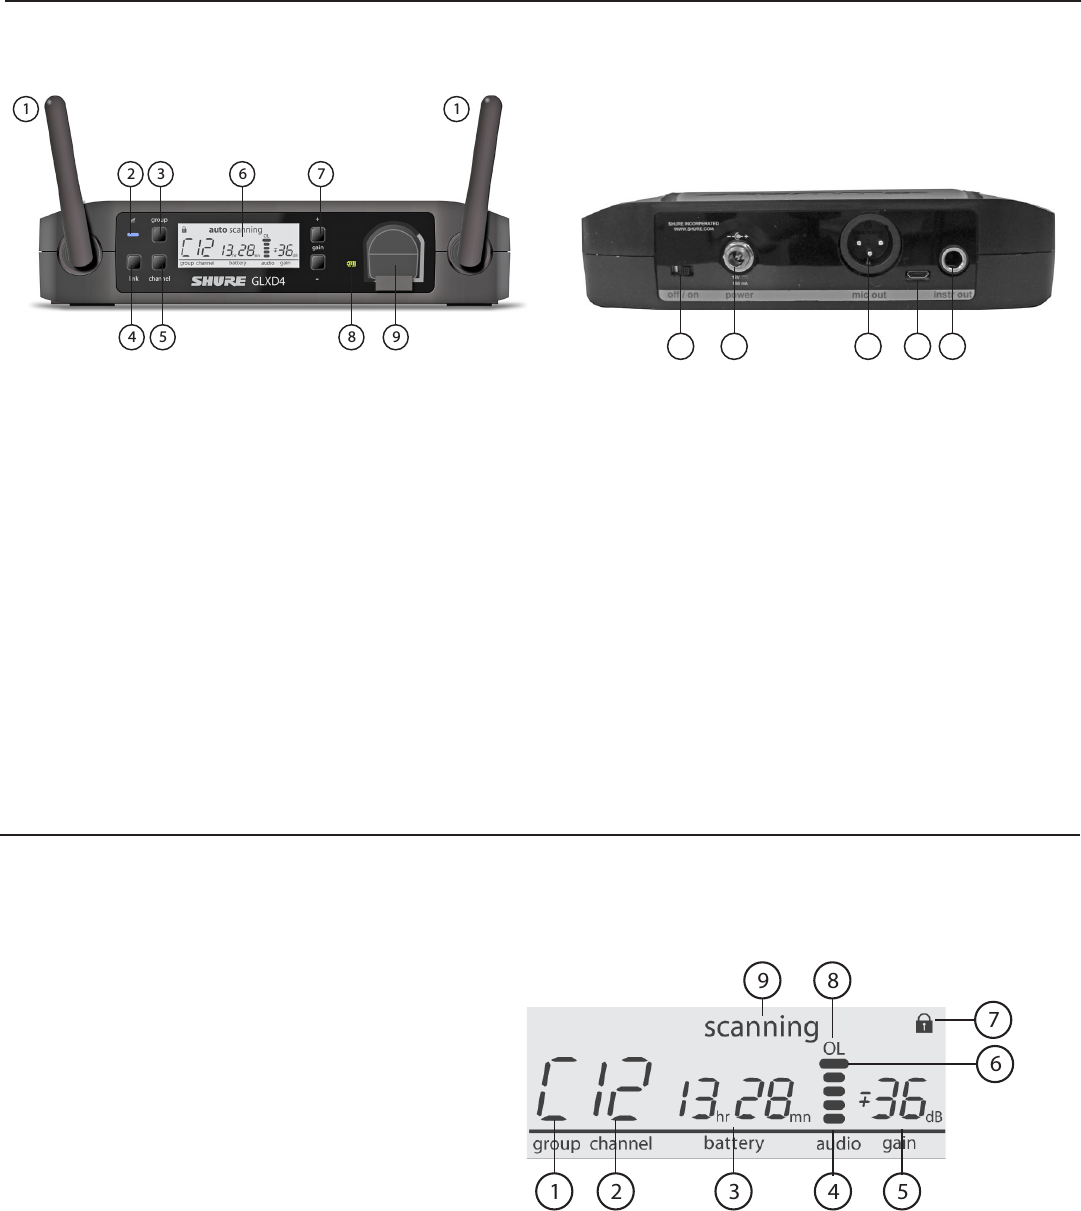
GLXD4 Receiver
Rear Panel
Receiver Screen
① Group
Displays the selected group.
② Channel
Displays the selected channel.
③ Transmitter Battery Runtime
Displays remaining battery life in hours and minutes.
④ Audio Meter
Indicates audio signal level
⑤ Gain
Displays transmitter gain setting in 1 dB increments.
⑥ Top Indicator
Indicates audio signal peak.
⑦ Lock
Displayed when a linked transmitter controls are
locked, flashes when the controls of a locked receiver
are pressed.
⑧ OL Indicator
Indicates audio overload.
⑨ Scanning
Indicates a scan is in process.
Front Panel
10 11 12 13 14
① Antenna
Carries the wireless signal, 2 per receiver.
② RF LED
• Blue = RF link OK
• Flashing = Linking in progress
• Off = No RF link or transmitter off
③ Group Button
• Momentary press to start Group Scan
• Press and hold 2 seconds for manual
group edit
④ Link Button
• Press for 2 seconds to activate linking
• Press momentarily for remote ID
⑤ Channel
• Momentary press to start Channel Scan
• Press and hold 2 seconds for manual
Channel edit
⑥ LCD Screen
Displays receiver and transmitter status
⑦ Gain Buttons
Press to increase or decrease receiver
gain in 1 dB increments
⑧ Battery Indicator
Illuminates when battery is in charging
bay:
• Red = battery charging
• Green Flashing =
• Green = battery charged
⑩ Battery Charging Bay
Charges transmitter battery while receiver
is powered.
⑪ Power Switch
Powers the unit on and off.
⑫ Power Supply Jack
Connect the supplied 15 V DC external
power supply.
⑬ Mic Out XLR Microphone Output Jack
Supplies microphone-level audio output.
⑭ USB Port
⑮ Instr Out Balanced ¼" (6.35mm) TRS
Audio Output
Powers the unit on and off.
DRAFT
7.6.12
6
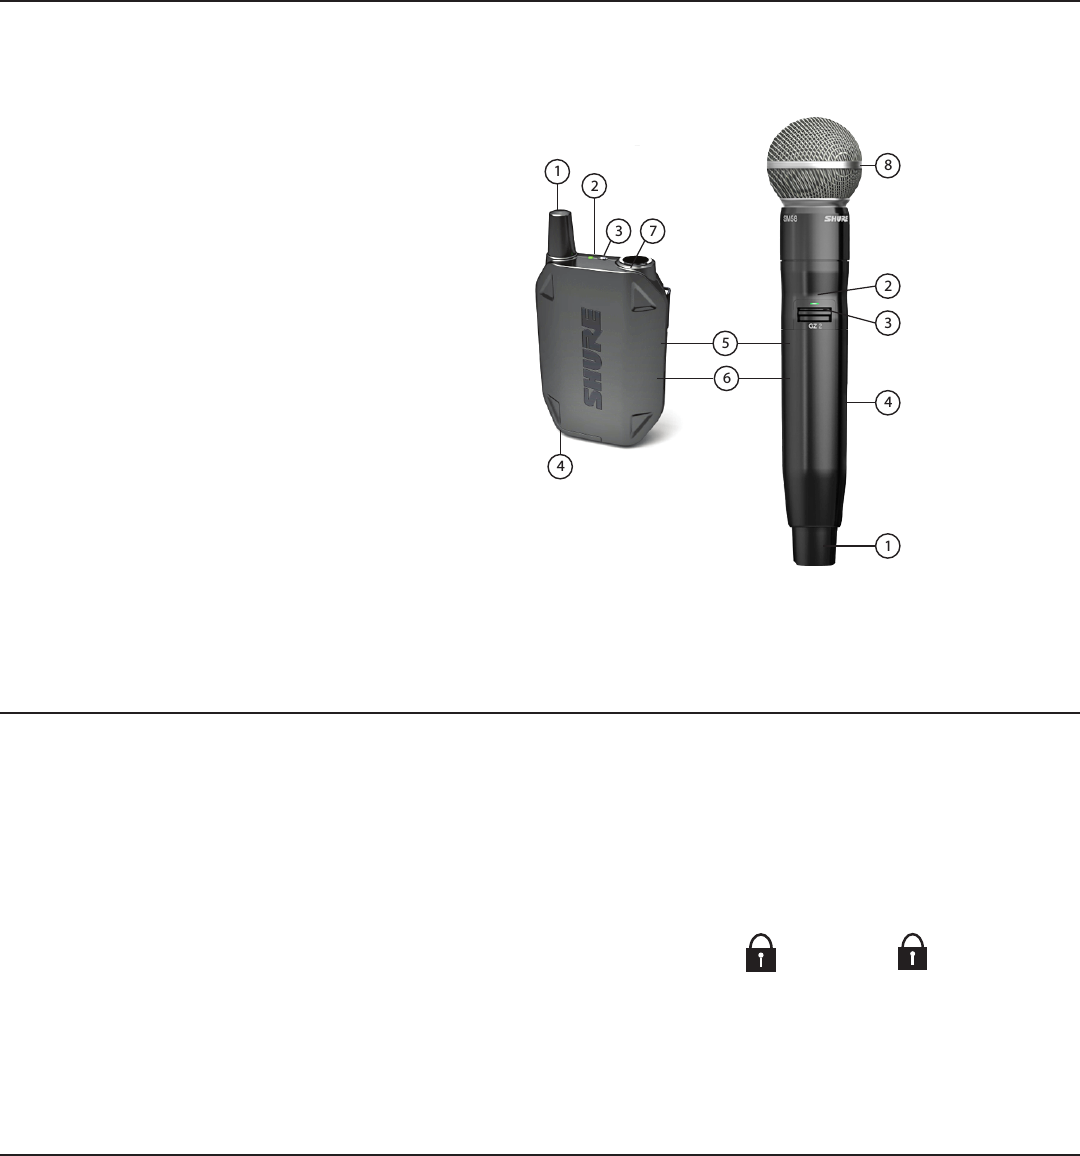
Transmitters
Locking and Unlocking the controls
The controls of the transmitter and receiver can be locked to prevent accidental or unauthorized changes to settings.
① Antenna
Carries wireless signal.
② Power LED
• Green = transmitter on
• Green Flashing = tranmitter power switch locked
• Red = remaining transmitter runtime less than 1 hour
• Flashing Red = replace transmitter batteries
• Flashing Green/Red = link identification
• Off = transmitter off
③ Power Switch
Turns the transmitter on/off.
④ Battery Compartment
Holds 1 Shure rechargeable battery.
⑤ USB Charging Door
Connection point for USB battery charging options.
⑥ Link Button
• Press for 2 seconds to activate linking
• Press momentarily for remote ID
⑦ TA4M Input Jack
Connects to a 4-Pin Mini Connector (TA4F) microphone
or instrument cable.
⑧ Microphone Cartridge
Models available: SM58, Beta58, SM86, Beta 87.
Bodypack Handheld
Locking the Transmitter Power Switch
To lock the transmitter power switch from the receiver, simultaneously press and
hold the group and channel buttons until the lock icon appears on the LCD. Repeat
to unlock.
i
i
i
i
i
i
i
i
i
i
i
i
i
i
i
i
i
i
i
i
i
i
i
i
i
i
i
i
i
i
i
i
i
i
Lock Icon
The lock icon appears on the LCD when the controls of a linked
transmitter have been locked.
• Replace the transmitter batteries
• Choose a different frequency channel
• Reposition the antennas so there is nothing obstructing a line of
sight to the transmitter (including the audience)
• Avoid placing transmitter and receiver where metal or other dense
materials may be present
• Move the receiver to the top of the equipment rack
• Remove nearby sources of wireless interference, such as cell
phones, two-way radios, computers, media players, and digital signal
processors
• Keep transmitters more than two meters (6 feet) apart
• Keep the transmitter and receiver more than 5 meters (16 feet) apart
• Keep them away from large metal objects
• During sound check, mark trouble spots and ask presenters or
performers to avoid those areas
Locking the Receiver Controls
To lock the receiver controls, simultaneously press and hold the group and chan-
nel buttons for 2 seconds. Repeat to unlock.
If the receiver controls have been locked, the icon
flashes to indicate that the lock is enabled on the
receiver.
Wireless Tips to Improve System Performance
If you encounter wireless interference or dropouts, try the following suggestions:
DRAFT
7.6.12
7
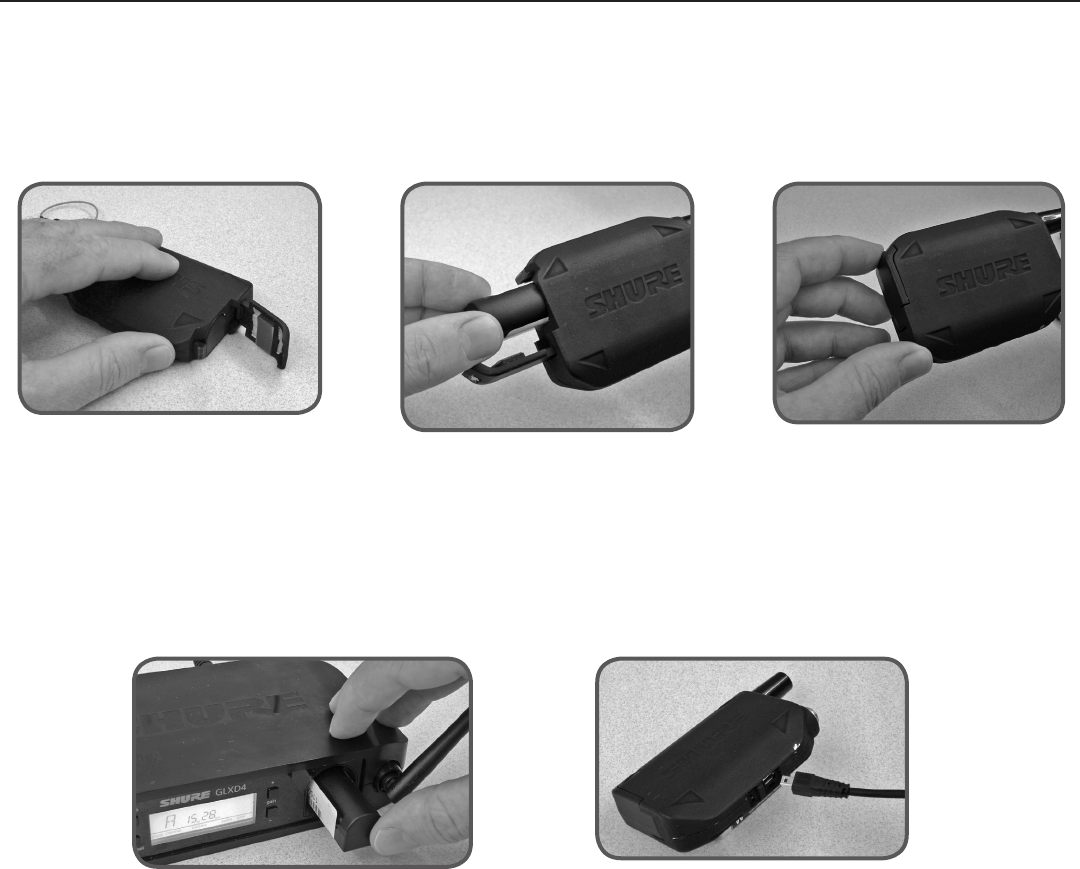
Batteries
Installing Batteries in the Transmitter
1. Release the latch on the battery door.
To install transmitter batteries:
Receiver Charging Bay
1. Remove the battery from the transmitter.
2. insert the battery into the receiver battery
charging bay
3. Monitor the battery status LED until charging is
complete:
• Red = battery charging
• Green Blinking =
• Green = battery charged
USB Computer Charging Cable
1. Plug the USB computer charging cable
into the USB port on the transmitter.
2. Plug the cable into a USB port on the
computer.
2. Slide out the battery and replace with a
charged battery.
3. Close and latch the battery door.
Charging Batteries
Note: If using the USB charger, the transmitter will not pass RF signal unless the USB cable is disconnected when charging has completed.
DRAFT
7.6.12
8
Scanning to Automatically Find an Available Frequency
Use the scan function to automatically find an available frequency for a wireless audio channel.
Manual Frequency Selection
Use manual mode to set up groups and channels for wireless audio.
Group Scan
Group Scan displays the best available group and channels.
1. Press the Group button once.
2. Allow the Group and Channel scan to complete.
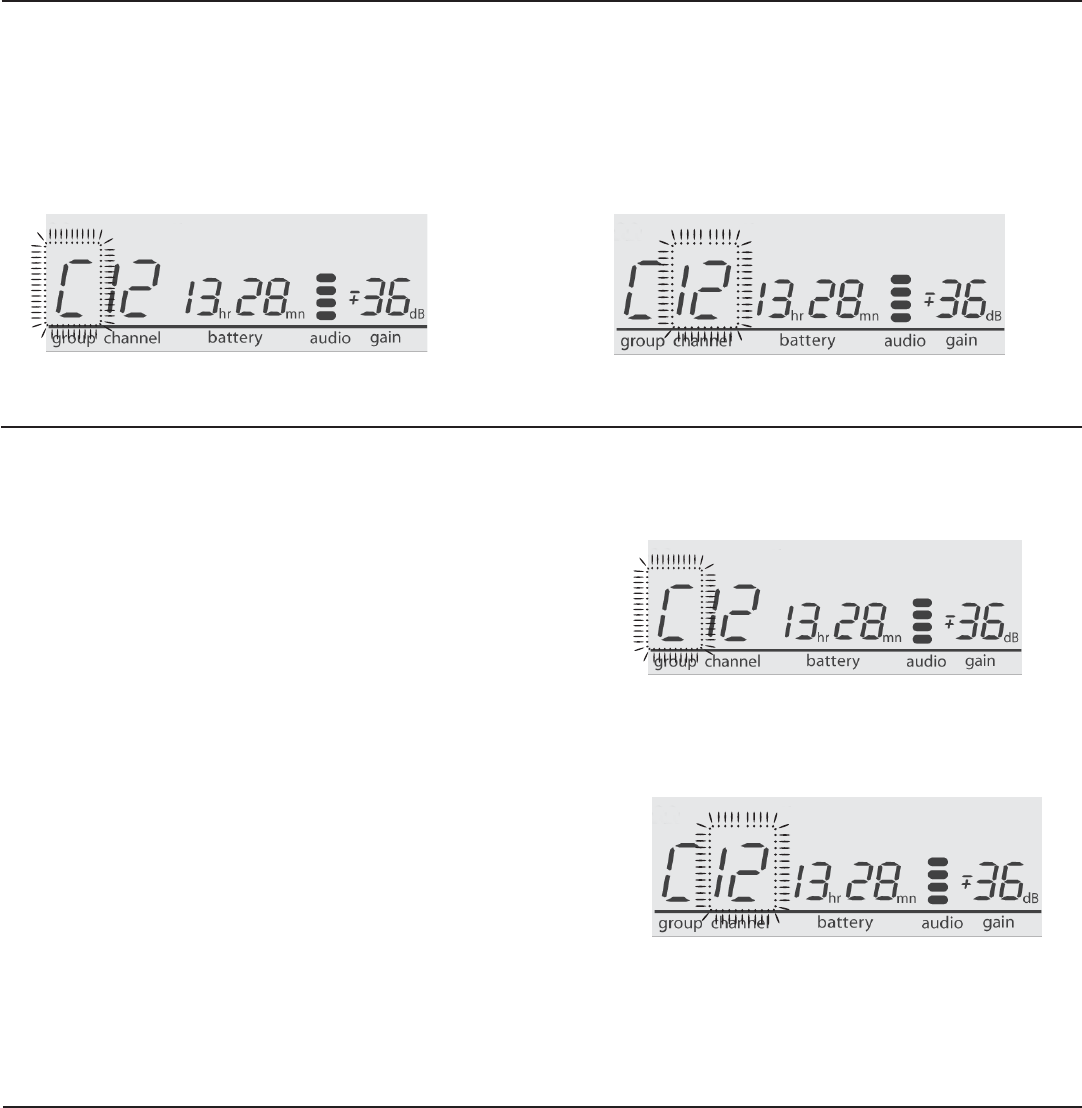
Selecting a Group
1. Press and hold the Group button for 2 seconds until the group display flashes.
2. Press the group button to scroll though the available groups:
• Select Auto to enter Autoscan mode
• Select groups A to H to enter Max Channel mode
Note: The receiver will automatically save the selected group 2 seconds after
the button is pushed.
3. Allow the receiver to scan to find the best channel with in the selected group.
Selecting a Channel
1. Press and hold the Channel button for 2 seconds until the Channel display
flashes.
2. Press the Channel button to scroll through the available channels.
3. The receiver will automatically save the selected channel 2 seconds after the
button is pushed.
Setting Up a Multi-Receiver System
Additional channels of wireless audio can be created by using multiple receivers:
Channel Scan
Channel Scan finds the best available channel when the receiver is set to
Autoscan mode.
1. Press the Channel button once.
2. Allow the Channel Scan to complete.
1. Turn off all transmitters.
2. Press group scan on each receiver to find a frequency.
3. Turn on transmitters and test audio.
DRAFT
7.6.12
9
Correct Microphone Placement
• Hold the microphone within 12 inches from the sound source. For a warmer sound with increased bass presence, move the microphone closer.
• Do not cover grille with hand.
Wearing the Headworn Microphone
• Position the headworn microphone 13 mm (1/2 in.) from the corner
of your mouth.
• Position lavalier and headworn microphones so that clothing,
jewelry, or other items do not bump or rub against the microphone.
Linking a Transmitter and Receiver
Gain Adjustment
Use the receiver gain controls to increase or decrease the audio signal level:
• Momentarily press the gain button to increase or decease the gain in 1 dB
increments
• Press and hold the gain button for faster gain changes
Tip: Observe the receiver audio meter level while adjusting the gain to prevent
signal overload.
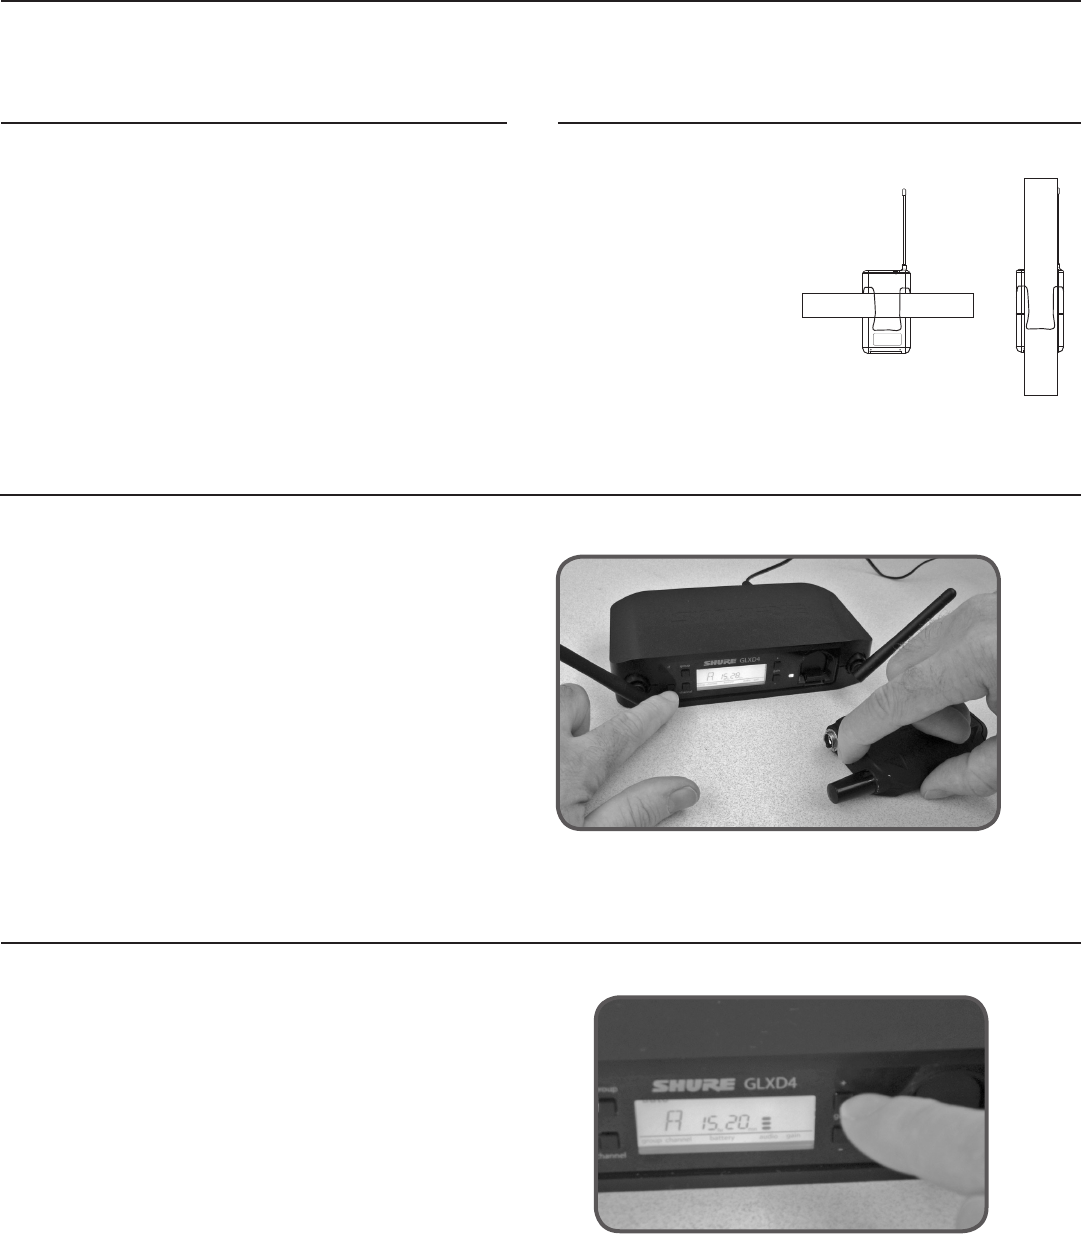
The transmitter and receiver automatically form a link the first time
they are powered on.
Optionally, use the following steps to manually link a transmitter and
receiver:
1. Press and hold the link button on the receiver until the rf LED be-
gins to flash.
2. press and hold the link button on the transmitter.
3. Linking is complete when the blue RF LED remains on.
Wearing the Bodypack Transmitter
Clip the transmitter to a belt or
slide a guitar strap through the
transmitter clip as shown.
For best results, the belt
should be pressed against the
base of the clip.
DRAFT
7.6.12

10
Troubleshooting
Issue Indicator Status Solution
No sound or faint sound Receiver RF LED on • Verify all sound system connections or adjust gain as needed
(see Adjusting Gain)
• Verify that the receiver is connected to mixer/amplifier
Receiver RF LED off • Turn on transmitter
• Make sure the batteries are installed correctly
• Link transmitter and receiver (see Linking topic)
• Insert fresh batteries
Receiver LCD screen off • Make sure AC adapter is securely plugged into electrical outlet.
• Make sure receiver is powered on.
Transmitter indicator LED flashing red Replace transmitter batteries (see Changing Batteries).
Audio artifacts or dropouts Ready LED flickering or off • Change receiver and transmitter to a different group and/or
channel.
• Identify nearby sources of RF interference, and shutdown or
remove source.
• Replace transmitter batteries.
• Ensure that receiver and transmitter are positioned within
system parameters
• System must be set up within recommended range and receiver
kept away from metallic surfaces.
• Transmitter must be used in line of sight from receiver for
optimal sound
Distortion OL indicator appears on receiver LCD Reduce transmitter gain (see Adjusting Gain).
Sound level variations when switch-
ing to different sources
N/A Adjust transmitter gain as necessary (see Adjusting Gain).
Receiver/transmitter won't turn off Transmitter LED flashing rapidly See Locking and Unlocking Controls.
*System must be set up within recommended range and receiver kept away from metallic surfaces.
DRAFT
7.6.12

11
Certifications
GLXD1, GLXD2, GLXD4
This device complies with part 15 of the FCC Rules. Operation is subject to the following two
conditions: (1) This device may not cause harmful interference, and (2) this device must accept
any interference received, including interference that may cause undesired operation.
This Class B digital apparatus complies with Canadian ICES-003. Cet appareil numérique de la
classe B est conforme à la norme NMB-003 du Canada.
Meets requirements of the following standards: EN 300 328, EN 301 489, EN60065.
Meets essential requirements of the following European Directives:
• R&TTE Directive 99/5/EC
• WEEE Directive 2002/96/EC, as amended by 2008/34/EC
• RoHS Directive 2002/95/EC, as amended by 2008/35/EC
Note: Please follow your regional recycling scheme for batteries and electronic waste
Certified by IC in Canada under RSS-210 and RSS-GEN.
IC: 616A-GLXD1, 616A-GLXD2, 616A-GLXD4
Certified under FCC Part 15C.
FCC ID: DD4GLXD1, DD4GLXD2, DD4GLXD4
This device complies with Industry Canada licence-exempt RSS standard(s). Operation of this
device is subject to the following two conditions: (1) this device may not cause interference, and
(2) this device must accept any interference, including interference that may cause undesired
operation of the device.
Le présent appareil est conforme aux CNR d'Industrie Canada applicables aux appareils radio
exempts de licence. L'exploitation est autorisée aux deux conditions suivantes : (1) l'appareil ne
doit pas produire de brouillage, et (2) l'utilisateur de l'appareil doit accepter tout brouillage ra-
dioélectrique subi, même si le brouillage est susceptible d'en compromettre le fonctionnement.
The CE Declaration of Conformity can be obtained from Shure Incorporated or any of its
European representatives. For contact information please visit www.shure.com
The CE Declaration of Conformity can be obtained from: www.shure.com/europe/compliance
Authorized European representative:
Shure Europe GmbH
Headquarters Europe, Middle East & Africa
Department: EMEA Approval
Jakob-Dieffenbacher-Str. 12
75031 Eppingen, Germany
Phone: 49-7262-92 49 0
Fax: 49-7262-92 49 11 4
Email: EMEAsupport@shure.de
Information to the user
This equipment has been tested and found to comply with the limits for a Class B digital de-
vice, pursuant to Part 15 of the FCC Rules. These limits are designed to provide reasonable
protection against harmful interference in a residential installation. This equipment generates
uses and can radiate radio frequency energy and, if not installed and used in accordance with
the instructions, may cause harmful interference to radio communications. However, there is
no guarantee that interference will not occur in a particular installation. If this equipment does
cause harmful interference to radio or television reception, which can be determined by turning
the equipment off and on, the user is encouraged to try to correct the interference by one or
more of the following measures:
• Reorient or relocate the receiving antenna.
• Increase the separation between the equipment and the receiver.
• Connect the equipment to an outlet on a circuit different from that to which the receiver is
connected.
• Consult the dealer or an experienced radio/TV technician for help.
DRAFT
7.6.12