Siemens Simotion A4027118 A0414 Users Manual Manual_SIMOTION Flying Saw_V1.4
A4027118-A0414 to the manual 384a7547-433c-4eb9-a6d9-8f1227985e67
2015-02-05
: Siemens Siemens-Simotion-A4027118-A0414-Users-Manual-410490 siemens-simotion-a4027118-a0414-users-manual-410490 siemens pdf
Open the PDF directly: View PDF ![]() .
.
Page Count: 107 [warning: Documents this large are best viewed by clicking the View PDF Link!]

User Manual Flying Saw
SIMOTION Flying Saw V1.4
Application number: A4027118 -A0414

General Notes
SIMOTION Flying Saw A4027118-A0414
V 1.4 Release 06/06/08 2/107
Copyright © Siemens AG 2008 All rights reserved
Manual_SIMOTION Flying Saw_V1.4.doc
We reserve the right to make technical changes to this product.
Copyright
Reproduction, transmission or use of this document or its contents is not
permitted without express written authority. Offenders will be liable for
damages. All rights, including rights created by patent grant or registration
or a utility model or design, are reserved.

General Notes
SIMOTION Flying Saw A4027118-A0414
V 1.4 Release 06/06/08 3/107
Copyright © Siemens AG 2008 All rights reserved
Manual_SIMOTION Flying Saw_V1.4.doc
General Notes
Note The standard applications are not binding and do not claim to be
complete regarding the circuits shown, equipping and any eventuality.
The standard applications do not represent customer-specific solutions.
They are only intended to pro-vide support for typical applications. You
are responsible in ensuring that the de-scribed products are correctly
used. These standard applications do not relieve you of the responsibility
in safely and professionally using, installing, operating and servicing
equipment. When using these application examples, you recognize that
Siemens cannot be made liable for any damage/claims beyond the
liability clause described. We reserve the right to make changes to these
standard applications at any time without prior notice. If there are any
deviations between the recommendations provided in these standard
applications and other Siemens publications - e.g. Catalogs - then the
contents of the other documents have priority.
Warranty, liability and support
We do not accept any liability for the information contained in this
document.
Any claims against us - based on whatever legal reason - resulting from the
use of the examples, information, programs, engineering and performance
data etc., described in this standard application shall be excluded. Such an
exclusion shall not apply in the case of mandatory liability, e.g. under the
German Product Liability Act (“Produkthaftungsgesetz”), in case of intent,
gross negligence, or injury of life, body or health, guarantee for the quality
of a product, fraudulent concealment of a deficiency or breach of a
condition which goes to the root of the contract (“wesentliche
Vertragspflichten”). However, claims arising from a breach of a condition
which goes to the root of the contract shall be limited to the foreseeable
damage which is intrinsic to the contract, unless caused by intent or gross
negligence or based on mandatory liability for injury of life, body or health
The above provisions does not imply a change in the burden of proof to
your detriment.
Copyright© 2008 Siemens A&D. It is not permissible to transfer or copy
these standard applications or excerpts of them without first having prior
authorization from Siemens A&D in writing.
For questions regarding this application please contact us at the following
e-mail address:
mailto:applications.erlf@siemens.com

General Notes
SIMOTION Flying Saw A4027118-A0414
V 1.4 Release 06/06/08 4/107
Copyright © Siemens AG 2008 All rights reserved
Manual_SIMOTION Flying Saw_V1.4.doc
Qualified personnel
In the sense of this documentation qualified personnel are those who are
knowledgeable and qualified to mount/install, commission, operate and
service/maintain the products which are to be used. He or she must have
the appropriate qualifications to carry-out these activities
e.g.:
• Trained and authorized to energize and de-energize, ground and tag
circuits and equipment according to applicable safety standards.
• Trained or instructed according to the latest safety standards in the care
and use of the appropriate safety equipment.
• Trained in rendering first aid.
There is no explicit warning information in this documentation. However,
reference is made to warning information and instructions in the Operating
Instructions for the particular product.
Reference regarding export codes
AL: N
ECCN: N

Foreword
SIMOTION Flying Saw A4027118-A0414
V 1.4 Release 06/06/08 5/107
Copyright © Siemens AG 2008 All rights reserved
Manual_SIMOTION Flying Saw_V1.4.doc
Foreword
Standard SIMOTION application
A standard SIMOTION application comprises the following components:
• One or several software objects or code blocks with defined interfaces
that can be simply integrated into other software projects – without
requiring any significant programming – in order to fulfill a precisely
defined technology task there. (Core functions)
• A software project based on a demonstration case to show the
functionality and possible uses of the standard application - including
the associated WinCCflex screen for demonstration. (Demonstration
project)
• A document to describe the functionality, background information and
handling of the standard application. Further, its use as demonstration
model is explained. (Description)
Foreword
SIMOTION Flying Saw A4027118-A0414
V 1.4 Release 06/06/08 6/107
Copyright © Siemens AG 2008 All rights reserved
Manual_SIMOTION Flying Saw_V1.4.doc
Document structure
The documentation of this application is sub-divided into the following main
section:
Sec-
tion Description Note
A Section A will provide you with everything that
you require to obtain an overview of this
standard application. This Section explains the
prerequisites and the objective when using this
application.
Some of the uses of this standard application are
explained as well as situations where this
application cannot be used.
B Section B is interesting if you wish to use this
standard application for demonstration purposes.
Here, you are provided with information about
how you can download this application from your
PC/PG to the demonstration case step-by-step
and how it then used.
C Section C provides you with all of the necessary
steps to integrate the core functions of the
standard application into your user project.
Preparations and parameterizing operations are
also explained. Further, you are also told how to
integrate the core functions into your application
step-by-step.
In addition, tips are provided on how to use the
core functions.
D Section D is interesting if you wish to
expand/adapt the functionality of the core
functions provided for your particular application.
E Section E “Appendix” provides you with detailed
information including a detailed fault/error
description, a description of a test program for
the core standard application functions as well as
references. A feedback sheet is also provided
which you can use to give us your comments
and suggestions on this document.

List of contents
SIMOTION Flying Saw A4027118-A0414
V 1.4 Release 06/06/08 7/107
Copyright © Siemens AG 2008 All rights reserved
Manual_SIMOTION Flying Saw_V1.4.doc
List of contents
Section A: Prerequisites and objectives .................................................................. 10
1 Basic information ......................................................................................... 11
1.1 Prerequisites................................................................................................... 11
1.1.1 Target group ................................................................................................... 11
1.1.2 Knowledge base ............................................................................................. 11
1.1.3 Technical environment.................................................................................... 11
1.2 Objective and purpose of this standard application........................................ 11
1.2.1 Task description.............................................................................................. 11
1.2.2 Solution using the standard “flying saw” application....................................... 12
1.2.3 Advantages of the standard "flying saw" application ...................................... 13
1.3 Components included in the standard application.......................................... 13
2 Uses ............................................................................................................... 15
2.1 Applications .................................................................................................... 15
2.1.1 Controls that are permitted ............................................................................. 15
2.1.2 Tasks that can be implemented using the core functions............................... 15
2.1.3 Properties and features of the core “flying saw” functions.............................. 16
2.2 Application environment ................................................................................. 17
3 Structure and function ................................................................................. 18
3.1 Design of the "flying saw" ............................................................................... 18
3.1.1 General design ............................................................................................... 18
3.1.2 Physical quantities that can be parameterized ............................................... 18
3.2 Operating states of the "FlyingSaw-FB".......................................................... 20
Section B: The application example as demonstration system............................ 22
4 Installing the hardware and software ......................................................... 23
4.1 Regarding your safety..................................................................................... 23
4.1.1 Safety information and instructions................................................................. 23
4.1.2 Responsibilities of the operator ...................................................................... 24
4.2 Hardware structure and mounting/installation ................................................ 25
4.3 Installing the standard SIEMENS software..................................................... 28
4.4 Downloading the user program and parameterizing the drive in the SIMOTION
D demonstration case ................................................................................ 28
4.4.1 De-archiving the SIMOTION project ............................................................... 28
4.4.2 Resetting SIMOTION D435 to the factory settings ......................................... 28
4.4.3 Re-configuring the double-axis motor module from 3A/3A to 5A/5A .............. 30
4.4.4 Setting the Ethernet interface of the PG/PC................................................... 32
4.4.5 Downloading the hardware configuration after a factory setting..................... 37
4.4.6 Downloading the SIMOTION project of the standard application ................... 38
5 Operator control of the application example ............................................. 41

List of contents
SIMOTION Flying Saw A4027118-A0414
V 1.4 Release 06/06/08 8/107
Copyright © Siemens AG 2008 All rights reserved
Manual_SIMOTION Flying Saw_V1.4.doc
5.1 Brief instructions to demonstrate .................................................................... 41
5.1.1 Structure overview.......................................................................................... 42
5.1.2 Brief instructions ............................................................................................. 43
5.2 Detailed operating instructions ....................................................................... 47
5.2.1 Structure overview.......................................................................................... 48
5.2.2 Start ................................................................................................................ 48
5.2.3 Machine parameter settings ........................................................................... 51
5.2.4 Operator control functions in the setting-mode............................................... 53
5.2.5 Operator functions of the process in the automatic mode .............................. 54
5.2.6 Technology view............................................................................................. 59
5.2.7 Operator control functions in the status display.............................................. 60
Section C: Integrating the core “flying saw” functions ......................................... 61
6 Program environment and interfaces ......................................................... 62
6.1.1 Function and identification of the program groups.......................................... 62
6.1.2 Program structure........................................................................................... 63
6.2 Call environment............................................................................................. 65
6.3 Interfaces........................................................................................................ 65
6.3.1 Classifying the interfaces................................................................................ 65
6.3.2 Block interface of the FB_BGD_TEMPLATE_FlyingSaw()............................. 66
6.3.3 Structure of the global data area of the data unit FS_Var .............................. 68
7 Integrating the core “flying saw” functions ............................................... 72
7.1 This is how you integrate core functions into your project.............................. 72
7.2 Prerequisites................................................................................................... 72
7.2.1 SIMOTION SCOUT with SIMATIC STEP 7 .................................................... 72
7.2.2 SIMOTION control .......................................................................................... 73
7.2.3 Technology objects required and synchronous relationships......................... 74
7.3 Preparations ................................................................................................... 75
7.3.1 De-archiving the standard "flying saw" application ......................................... 75
7.3.2 Downloading the core functions into your SCOUT project.............................. 75
7.4 Setting-up the required technology objects .................................................... 76
7.4.1 Flying saw axis ............................................................................................... 76
7.4.2 Axis, material web........................................................................................... 77
7.5 Assigning the synchronous relationships........................................................ 78
7.5.1 FlyingSawAxis_SYNCHRONOUS_OPERATION........................................... 78
7.6 Integrating into your application...................................................................... 79
7.6.1 Calling the “FlyingSaw FB” in the user program ............................................. 79
7.6.2 Integrating the template block in the processing sequence............................ 80
8 Using the "FB_BGD_TEMPLATE_FlyingSaw()"......................................... 81
8.1 General information and instructions.............................................................. 81
8.2 Initial state of the "FB_BGD_TEMPLATE_FlyingSaw()"................................. 81
8.3 Mode changeover sequence .......................................................................... 81

List of contents
SIMOTION Flying Saw A4027118-A0414
V 1.4 Release 06/06/08 9/107
Copyright © Siemens AG 2008 All rights reserved
Manual_SIMOTION Flying Saw_V1.4.doc
8.4 Using the restart bit......................................................................................... 83
8.5 Error messages .............................................................................................. 83
8.6 Help functions within the core “flying saw” functions ...................................... 85
Section D: Program description............................................................................... 86
9 Information and instructions to adapt the core “flying saw” functions.. 87
9.1 Information and warnings ............................................................................... 87
10 Description of important program elements.............................................. 88
10.1 Program structure........................................................................................... 88
10.2 Declaration part FS_Var ................................................................................. 88
10.3 Functions of the FB_BGD_Template_FlyingSaw() ("FlyingSaw-FB")............. 89
10.3.1 Declarations.................................................................................................... 89
10.3.2 Start identification, axis monitoring and automatic state change chains ........ 90
10.3.3 Checking the input parameters and parameterization of the technology
settings that are absolutely necessary....................................................... 91
10.3.4 State machine of the “FlyingSaw FB” ............................................................. 91
10.4 Properties/features of startup_SAP ................................................................ 98
10.5 Help routines................................................................................................... 98
10.5.1 Features and characteristics of the MT_FS1_PrintmarkDetection (print mark
sensing)...................................................................................................... 98
10.5.2 Properties/features of the IPO_FS1_IPO_Routine ......................................... 98
10.5.3 SyncPos buffer ............................................................................................... 98
Section E: Appendix................................................................................................100
11 General information on the application.................................................... 100
11.1 Scope of supply ............................................................................................ 100
11.2 Revisions/Author........................................................................................... 100
12 Error messages........................................................................................... 101
12.1 Signaling error events at the “FlyingSaw FB” of the core “flying saw” functions101
12.2 Possible error messages at the error code output ErrorID of the
„FB_BGD_TEMPLATE_FlyingSaw()“ ...................................................... 101
13 Contact partner........................................................................................... 106
14 Please help us to become even better...................................................... 107
Section A: Prerequisites and objectives
Basic information
Flying Saw with SIMOTION A4027118-A0414
V 1.4 Release 06/06/08 10/107
Copyright © Siemens AG 2008 All rights reserved
Manual_SIMOTION Flying Saw_V1.4.doc
Section A: Prerequisites and objectives
Content
Section A will provide you with everything that you require to obtain an
overview of this standard application. The prerequisites and the objective
for using this standard application are presented.
The applications shown will give you a good understanding for what this
standard application can be used for. Further, some applications will be
listed for which this standard application cannot be used. In addition, the
performance limits of this standard application will be shown.
Objective
Section A of this document should provide the user with the following
information:
• The objective and purpose of this standard application
• List several applications
• Indicate the performance limits of this standard application.
Subjects discussed
Chap. Title Contents
1 Basic information
The necessary prerequisites to use the standard “flying saw”
application.
The use of this application.
Software components and code blocks of the standard
“flying saw” application.
2 Uses Tasks and properties of the core functions of the standard
“flying saw” application
Exclusions and restrictions
Hardware components required
3 Structure and
function Type of design and physical quantities for which the “flying
saw” core function can be used.
Type of cams that the “flying saw” core functions calculate
and used.
Operating states at the FlyingSaw FB.
4 Program
environment and
interfaces
Call environment of the FlyingSaw FB
Description of the interfaces and the parameters of the
FB_BGD_TEMPLATE_FlyingSaw()

Section A: Prerequisites and objectives
Basic information
Flying Saw with SIMOTION A4027118-A0414
V 1.4 Release 06/06/08 11/107
Copyright © Siemens AG 2008 All rights reserved
Manual_SIMOTION Flying Saw_V1.4.doc
1 Basic information
1.1 Prerequisites
1.1.1 Target group
The standard application is conceived for all programmers and users who
wish to quickly and simply implement a flying saw using SIMOTION.
1.1.2 Knowledge base
In order to use this technology template, you should be able to use SCOUT
and technology objects and technology function calls in SIMOTION.
This document does not provide an introduction into these subjects and is
solely restricted to providing information and data on how to use this
standard application.
1.1.3 Technical environment
This standard application can only be used, without having to make any
changes, in conjunction with SIMOTION D and the SINAMICS
demonstration case.
1.2 Objective and purpose of this standard application
1.2.1 Task description
Using SIMOTION, a material web, fed using the material feed mechanism
is to be cut into identical parts and sections. As a result of the
characteristics of the material, the material cannot be cut at once across
the whole width of the web with just one cut. In order that the motion of the
material web does not have an impact on the cut, either the material web
must be stopped during the cut, or the cutting device must be moved in
synchronism with the material web – i.e. the material web is cut "on the fly".
Why flying processing/machining?
"Flying" processing/machining is required, if
• If the flow of products were to be stopped due to a sub-process
(generally a thermal process) this would result in a reduction in quality
or even waste.
• Stopping the product flow cannot be justified as a result of the energy
demand when decelerating and accelerating.
• The individual processing/machining steps are too different so that a
standard delay time cannot be justified from a cost-effective
perspective.
Section A: Prerequisites and objectives
Basic information
Flying Saw with SIMOTION A4027118-A0414
V 1.4 Release 06/06/08 12/107
Copyright © Siemens AG 2008 All rights reserved
Manual_SIMOTION Flying Saw_V1.4.doc
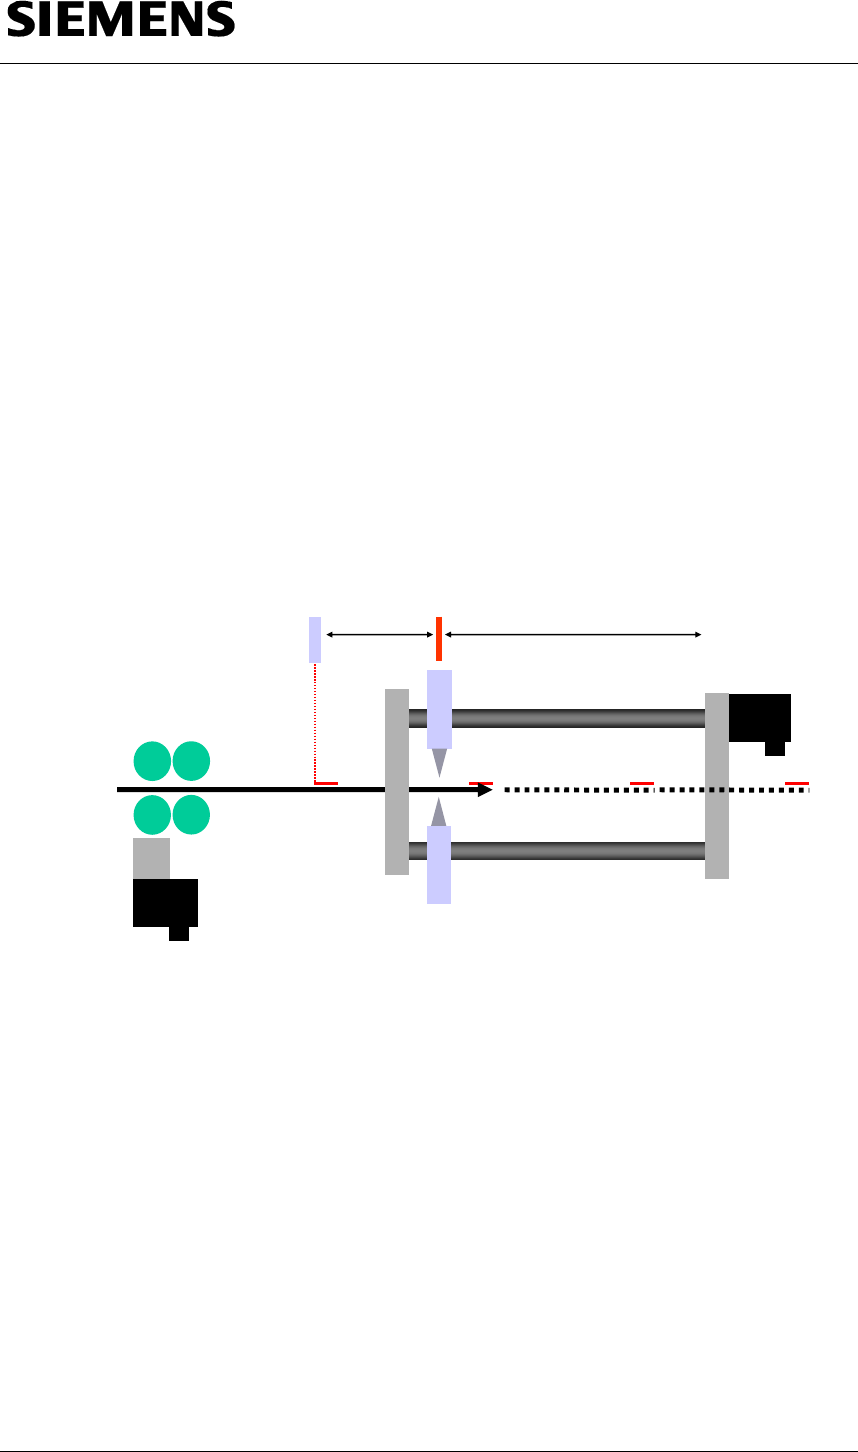
Principle design of a "flying saw"
The material is fed-in as an endless web (e.g. plastic, sheet steel or fiber
board) using a conveyor belt that runs with a constant velocity.
The position of the cut on the material web is either sensed using a print
mark using a sensor or is specified by the control after a cut length has
been passed that can be adjusted. The synchronous position is
simultaneously defined. From this point onwards, the shears slide of the
flying saw synchronously follows the material at the position to be cut and
the cut can be started. After the cut has been completed, the shears slide is
returned to its starting position where it waits for the next cut position.
Fig. 1-1: Principle of operation of the “flying saw”
Drive of flying saw
Web drive
or
measuring system
Sensor Starting position
1.2.2 Solution using the standard “flying saw” application
The standard “flying saw” application discussed here can be used to
implement such applications, and to develop a functioning "flying saw" as
quickly as possible.
The standard application already includes, as core function, a pre-
configured motion control of the flying saw axis. This can be adapted to the
particular application using the appropriate parameters. The core function is
responsible for completely controlling the flying saw axis.

Section A: Prerequisites and objectives
Basic information
Flying Saw with SIMOTION A4027118-A0414
V 1.4 Release 06/06/08 13/107
Copyright © Siemens AG 2008 All rights reserved
Manual_SIMOTION Flying Saw_V1.4.doc
The user program only has to control the material feed and to supply the
core function with the correct parameters.
Additional function of the standard application
Further, using this standard application, after the material has been cut with
the cutting device, a gap can be created between the individual cut pieces.
This function can also be set at the core function and commissioned by
simply entering the appropriate parameters.
1.2.3 Advantages of the standard "flying saw" application
When the standard “flying saw” application is used, it offers users the
following advantages:
Programs can be quickly generated
When the standard “flying saw” application is used, it is simple to quickly
implement a "flying saw" functionality when programming with SIMOTION.
The core functions provided in the standard application can be transferred
into the application to be generated quickly and simply by copying. The
description of this standard application explains the additional configuring
steps that are necessary.
Automatic motion control
The core functions of the standard “flying saw” application can be used to
realize all of the flying saw axis motion control using SIMOTION technology
functions. The user only programs a execution sequence that corresponds
to the actual behavior of the machine function to be implemented.
Possibility of adaptation
The standard “flying saw” application includes all of the source codes in a
commented form. This means that the existing core functions can be
quickly and simply expanded by the user's own particular functions.
This description also provides you with an explanation of the background
required to expand the core functions.
1.3 Components included in the standard application
The standard “flying saw” application is implemented as SIMOTION project.
It is a program that can be executed for a (demonstration) machine for the
SIMOTION D and PC demonstration case with WinCCflex for visualization.

Section A: Prerequisites and objectives
Basic information
Flying Saw with SIMOTION A4027118-A0414
V 1.4 Release 06/06/08 14/107
Copyright © Siemens AG 2008 All rights reserved
Manual_SIMOTION Flying Saw_V1.4.doc
The program fulfills the following tasks:
• Operating mode manager for the complete (demonstration) machine
• The control of the (demonstration) machine
• The core functions of the "flying saw" functionality with absolute gearing
• All of the machine functions that are relevant for the demonstration case
environment are simulated
• The (demonstration) machine is displayed on the WinCCflex screen
This means that the user immediately sees which program modules are
required to implement his particular flying saw application; these program
modules are sub-divided into program groups and are appropriately
designated.
This means that the core functions of the standard “flying saw” application
can be quickly and simply integrated into user projects.

Section A: Prerequisites and objectives
Uses
Flying Saw with SIMOTION A4027118-A0414
V 1.4 Release 06/06/08 15/107
Copyright © Siemens AG 2008 All rights reserved
Manual_SIMOTION Flying Saw_V1.4.doc
2 Uses
2.1 Applications
2.1.1 Controls that are permitted
The standard “flying saw” application has only been tested for use in the
following control system:
• SIMOTION D 435
However, it can also be used – without any significant additional costs –
also in the SIMOTION P or SIMOTION C controls.
2.1.2 Tasks that can be implemented using the core functions
These core functions are used to control flying equipment and mechanisms
to
• Cut
• Perforate
• Emboss
• Seal
• Saw
• Drill
• Paint
• etc.
The core “flying saw” function completely handles the motion control of the
flying axis used for cutting/sawing. The functionality associated with the
material feed is implemented outside the core functions in the user
program.
Definition In the following text, the “flying saw” term is used to represent all of the
other conceivable machine versions.
The term “saw” is used for all parts of the machine where direct contact
is made to the material when “cutting”.

Section A: Prerequisites and objectives
Uses
Flying Saw with SIMOTION A4027118-A0414
V 1.4 Release 06/06/08 16/107
Copyright © Siemens AG 2008 All rights reserved
Manual_SIMOTION Flying Saw_V1.4.doc
2.1.3 Properties and features of the core “flying saw” functions
The following properties and features were taken into account when
implementing the core functions, and can also be used in a user program
that you generate yourself:
• Precisely synchronizing at a specific position
The "flying" axis is accelerated to the velocity of the material web so
that this reaches this velocity above a position on the material that can
be specified.
• Flying axis
The "flying" axis and the material move at the same velocity while
sawing/cutting.
• The starting position of the "flying" axis can be set
The starting position of the "flying" axis between two cuts can be set
using a parameter at the core function.
• "Cutting" at a print mark
The synchronous position is detected using a measuring probe and
print mark.
• "Cutting" to length
The synchronous position is calculated from the distance that the
material has moved through.
• Immediate cut
A cut is initiated by an operator function independently of the distance
that the material has moved. (This function is only possible for "cut" to
length!)
• Creating a gap
After a cut has been made, the cutting unit additionally moves the cut
material in the direction in which the material is moving until a certain
distance is reached to the rest of the material. This distance can be
specified. The cutting unit only returns to its starting position after this
operation has been completed.
• Asymptotic synchronizing
The “flying” axis is accelerated to the velocity of the material web
without overshoot in velocity.
• Gearing Ratio
Ratio between measured and effective velocity of the material web.
Section A: Prerequisites and objectives
Uses
Flying Saw with SIMOTION A4027118-A0414
V 1.4 Release 06/06/08 17/107
Copyright © Siemens AG 2008 All rights reserved
Manual_SIMOTION Flying Saw_V1.4.doc
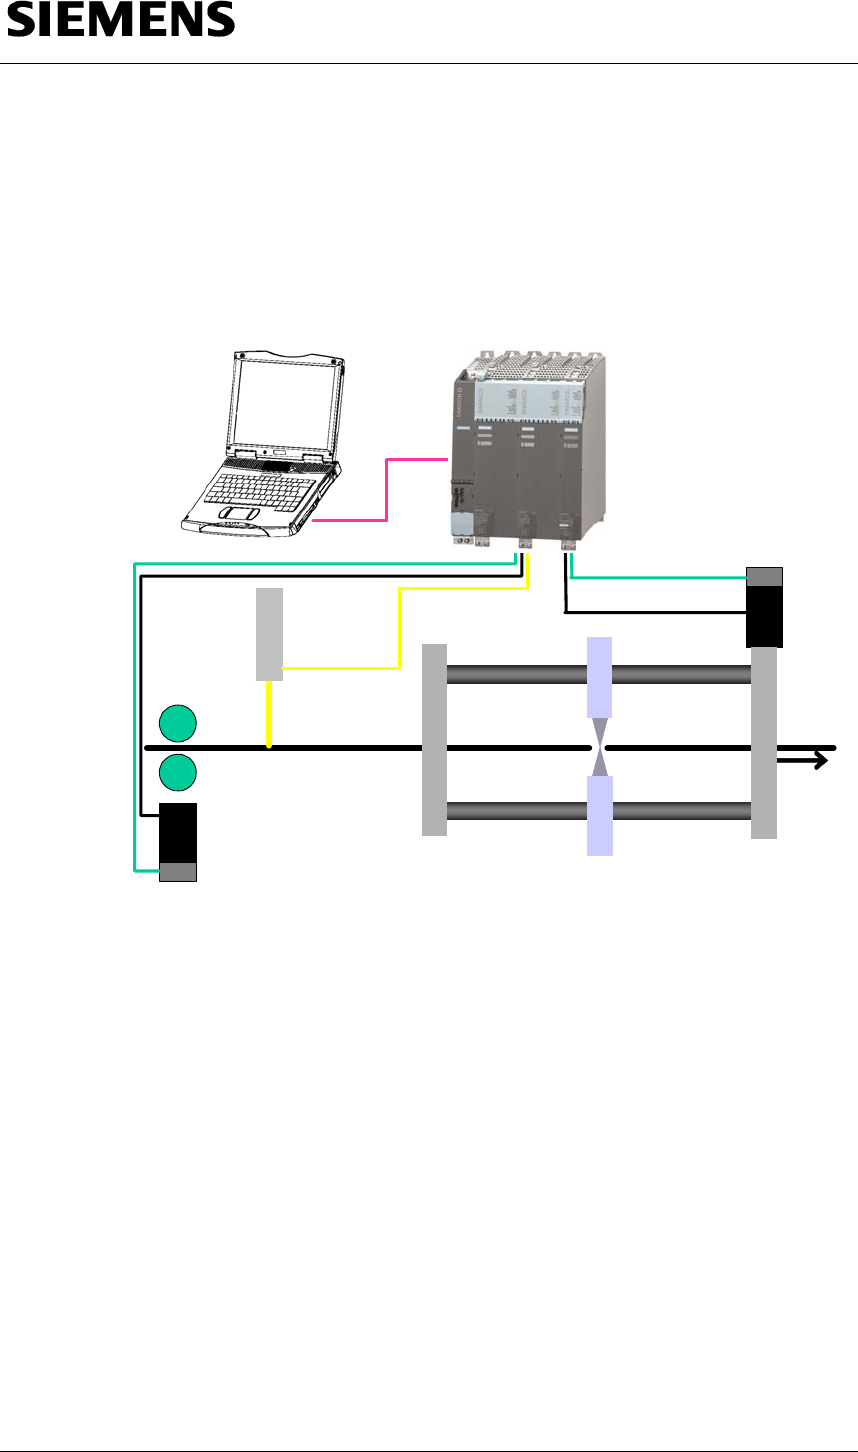
2.2 Application environment
The standard “flying saw” application can be used in the following hardware
environment:
Fig. 2-1 Application environment of the standard “flying saw” application
Sensor
Motor
Encoder
Motor
Encoder
PG / PC
SIMOTION D
Material web
SIMOTION D used to control the material feed of the material web and to
control the "flying" axis.

Section A: Prerequisites and objectives
Structure and function
Flying Saw with SIMOTION A4027118-A0414
V 1.4 Release 06/06/08 18/107
Copyright © Siemens AG 2008 All rights reserved
Manual_SIMOTION Flying Saw_V1.4.doc
3 Structure and function
3.1 Design of the "flying saw"
3.1.1 General design
The "flying saw", which is based on the "flying saw" core function comprises
a spindle axis that is mounted on the cutting unit.
3.1.2 Physical quantities that can be parameterized
The following physical quantities of the “flying saw” (designations in white)
are used in the “flying saw” core function:
Fig 3-1 Physical quantities for the standard “flying saw”
Sensor
Sync position EndSync-
position
Starting position
DistanceToSensor
Synchronous range
Section A: Prerequisites and objectives
Structure and function
Flying Saw with SIMOTION A4027118-A0414
V 1.4 Release 06/06/08 19/107
Copyright © Siemens AG 2008 All rights reserved
Manual_SIMOTION Flying Saw_V1.4.doc
Table 3-1: Explanation of the parameterizable physical quantities
Physical quantity Description
DistanceToSensor
[mm] Distance (clearance) between the axis zero of the "flying saw"
and the sensor to sense the material and print mark
StartPos
[mm] Starting position of the cutting unit referred to the axis zero
point of the "flying saw".
SyncPos
[mm] Position where the cutting unit reaches the specified material
position and material velocity. Starting point of the
synchronous range
EndSyncPos
[mm]
End point of the synchronous range. If, at this particular
position, sawing/cutting has still not been completed, then it is
now interrupted.
EndPos
[mm] End point (end position) of the traversing range of the "flying
saw"
(software limit switch)
ToStartposVelocity
[mm/s] Velocity for travel to the starting position
ToBackposVelocity
[mm/s]
Velocity with which the flying saw returns to its starting position
GapLength
[mm]
Length of the gap after the cutting unit has made a cut. This
gap is to be additionally created between the cut material and
the material web.
GapVelocity
[mm/s]
Superimposed velocity with which the gap is to be created
GearingRatio Ratio between measured and effective velocity of the material
web.
AccelerationCut
[mm/s²]
Acceleration value for synchronization motion
AccelerationBack
[mm/s²]
Acceleration value for positioning motion back to the starting
position
AccelerationGap
[mm/s²]
Acceleration value for the higher-level positioning to create the
"gap"
Synchronous range
The synchronous range is located between SyncPos and the
EndSyncPos. The material is cut within this range.
Section A: Prerequisites and objectives
Structure and function
Flying Saw with SIMOTION A4027118-A0414
V 1.4 Release 06/06/08 20/107
Copyright © Siemens AG 2008 All rights reserved
Manual_SIMOTION Flying Saw_V1.4.doc
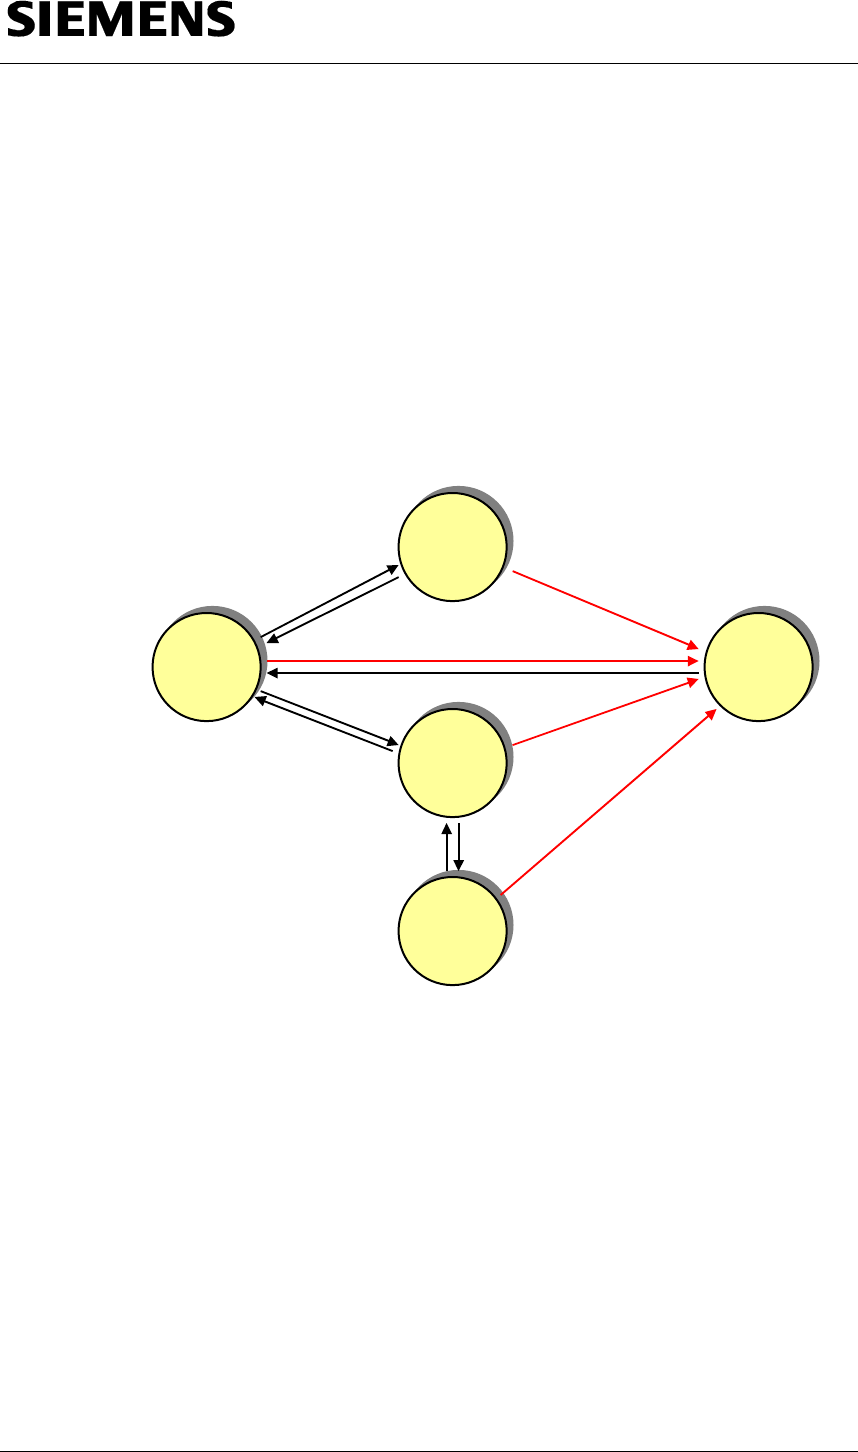
3.2 Operating states of the "FlyingSaw-FB"
The “FlyingSaw FB” automatically controls the “flying saw” axis to
implement the required level of functionality.
This functionality is sub-divided into five operating states so that the
sequences at the “flying saw” are implemented as a result of the states or
also as a result of the transitions between the states.
This means the user only influences the “flying saw” by specifying the
required operating mode with the required parameters.
Fig. 3-2 Operating modes
1
Disable
1
Disable
2
Startposi-
tion
2
Startposi-
tion
4
Manual
4
Manual
0
Error
0
Error
3
Auto-
matic
3
Auto-
matic
A differentiation is made between the following operating modes:
• Error (0)
The “FlyingSaw FB” has detected an error and brought the flying saw
axis into a safe state. The fault is still available and the user can
evaluate it.
The flying saw axis is stopped and is in the “disable” state.
• Disable (1)
The “FlyingSaw FB” is already being used but is in the safety operating
state. All of the faults/errors present have been successfully
acknowledged.
After a reset, the flying saw axis is in the disabled and stopped state.
• Starting position (2)
The flying saw axis moves to the starting position or is located at the

Section A: Prerequisites and objectives
Structure and function
Flying Saw with SIMOTION A4027118-A0414
V 1.4 Release 06/06/08 21/107
Copyright © Siemens AG 2008 All rights reserved
Manual_SIMOTION Flying Saw_V1.4.doc
starting position and is ready to synchronize to the material web.
The flying saw axis waits in the “enable” state.
• Automatic (3)
The flying saw axis has been synchronized to the material web and cuts
the material as specified.
• Manual (4)
The flying saw axis is in the manual mode and the user can manually
move the shaft.
The flying saw axis waits in the “enable” state.
These operating modes are available to users to implement their "flying
saw" functionality in a user program and can be signaled to the "FlyingSaw
FB“ using input parameters.
The “FlyingSaw FB” indicates the currently reached status using an output
parameter.
Section B: The application example as demonstration
system
St t
d
fti
Flying Saw with SIMOTION A4027118-A0414
V 1.4 Release 06/06/08 22/107
Copyright © Siemens AG 2008 All rights reserved
Manual_SIMOTION Flying Saw_V1.4.doc
Section B: The application example as demonstration
system
Contents
All of the necessary steps to commission the standard “flying saw”
application as demonstration system are explained in Section B.
Preparations and parameterizing operations are also explained. Further,
you are told how you can use the WinCCflex Pro man-machine interface
(screen) of the application example step-by-step.
Objective
Section B of this document provides the reader with the following
• The prerequisites to use this standard SIMOTION application as
demonstration system
• Preparations and parameterizing operations are explained
• Describes the steps necessary when presenting this standard
application.
• Provides tips for using this standard application.
Subjects discussed
Chap. Title Contents
5 Installing the
hardware and
software
Safety information and instructions
Components and their interconnections required for the
presentation
Installation of standard SIEMENS software
Downloading the user program in SIMOTION D435
Downloading drive parameters in SINAMICS
6 Operator control of
the application
example
Brief instructions on how to use the demonstration system
Detailed operating instructions
Section B: The application example as demonstration
system
I t lli
th
hd
d
ft
Flying Saw with SIMOTION A4027118-A0414
V 1.4 Release 06/06/08 23/107
Copyright © Siemens AG 2008 All rights reserved
Manual_SIMOTION Flying Saw_V1.4.doc
4 Installing the hardware and software
4.1 Regarding your safety
4.1.1 Safety information and instructions
Pictograms, signal words and text
Every piece of safety information/instruction in this document is designated
by text graphics – comprising pictogram and signal word, and
supplemented by explanatory text. A clear classification according to the
degree of the potential hazard is provided as a result of the combination of
pictogram and signal word. Safety information/instructions are provided in
front of the information regarding activities to be executed.
Classification
There are three different stages regarding safety information/instructions.
These are designated by the same pictogram. They differ by the signal
word.
!
Danger
This safety information/instruction indicates an immediate hazard. If
the information/instruction is not carefully followed, this results in
severe bodily injury or even death.
!
Warning
This safety information/instruction indicates a potential hazard. If
the information/instruction is not carefully followed, this can result
in severe bodily injury or even death.
!
Caution
This safety information/instruction indicates a potentially hazardous
situation, which can result in slight to average bodily injury. This
pictogram/text word can also warn about potential material damage.

Section B: The application example as demonstration
system
I t lli
th
hd
d
ft
Flying Saw with SIMOTION A4027118-A0414
V 1.4 Release 06/06/08 24/107
Copyright © Siemens AG 2008 All rights reserved
Manual_SIMOTION Flying Saw_V1.4.doc
4.1.2 Responsibilities of the operator
Correct use
The correct use of the application components exclusively relates to the
open-loop and closed-loop control of test set-ups that were adapted to the
power/performance of the application components. In order that the
application functions perfectly, the required standard SIMATIC components
as well as also the necessary hardware and software components must be
installed.
The company/person operating the system may only make changes to the
application components after having received written authorization from the
suppliers.
Misuse
The following are considered to be misuse:
• Inadmissible loads applied to the application components.
• Any application deviating from the use specified above, or applications
that go beyond the specified use.
• Non-observance of the safety information and instructions.
• If faults that could have a negative impact on the safety are not
immediately resolved/removed.
• Any changes/modifications to equipment/devices that are used to
ensure perfect function and operation, unrestricted use as well as active
or passive safety.
• If recommended hardware and software components are not used.
• If the application components are not in a perfect technical condition are
not operated conscious of safety and hazards, and not taking into
account all of the instructions provided in the documentation.
The manufacturer assumes no liability for incorrect use (misuse).
Responsible for monitoring
The company or person operating the system is responsible in continually
monitoring the overall technical status of the application components
(defects and damage that can be externally identified as well as changes in
the operating behavior).
The company/person operating the system is responsible in ensuring that
the application is only operated in a perfect state. He must check the state
of the application components before they are used and must ensure that
any defect is removed before commissioning.
Section B: The application example as demonstration
system
I t lli
th
hd
d
ft
Flying Saw with SIMOTION A4027118-A0414
V 1.4 Release 06/06/08 25/107
Copyright © Siemens AG 2008 All rights reserved
Manual_SIMOTION Flying Saw_V1.4.doc
Qualification of personnel
The operating company/person may only deploy trained, authorized and
reliable personnel. In so doing, all safety regulations must be carefully
observed.
Personnel must receive special instructions regarding the hazards/dangers
that can occur.
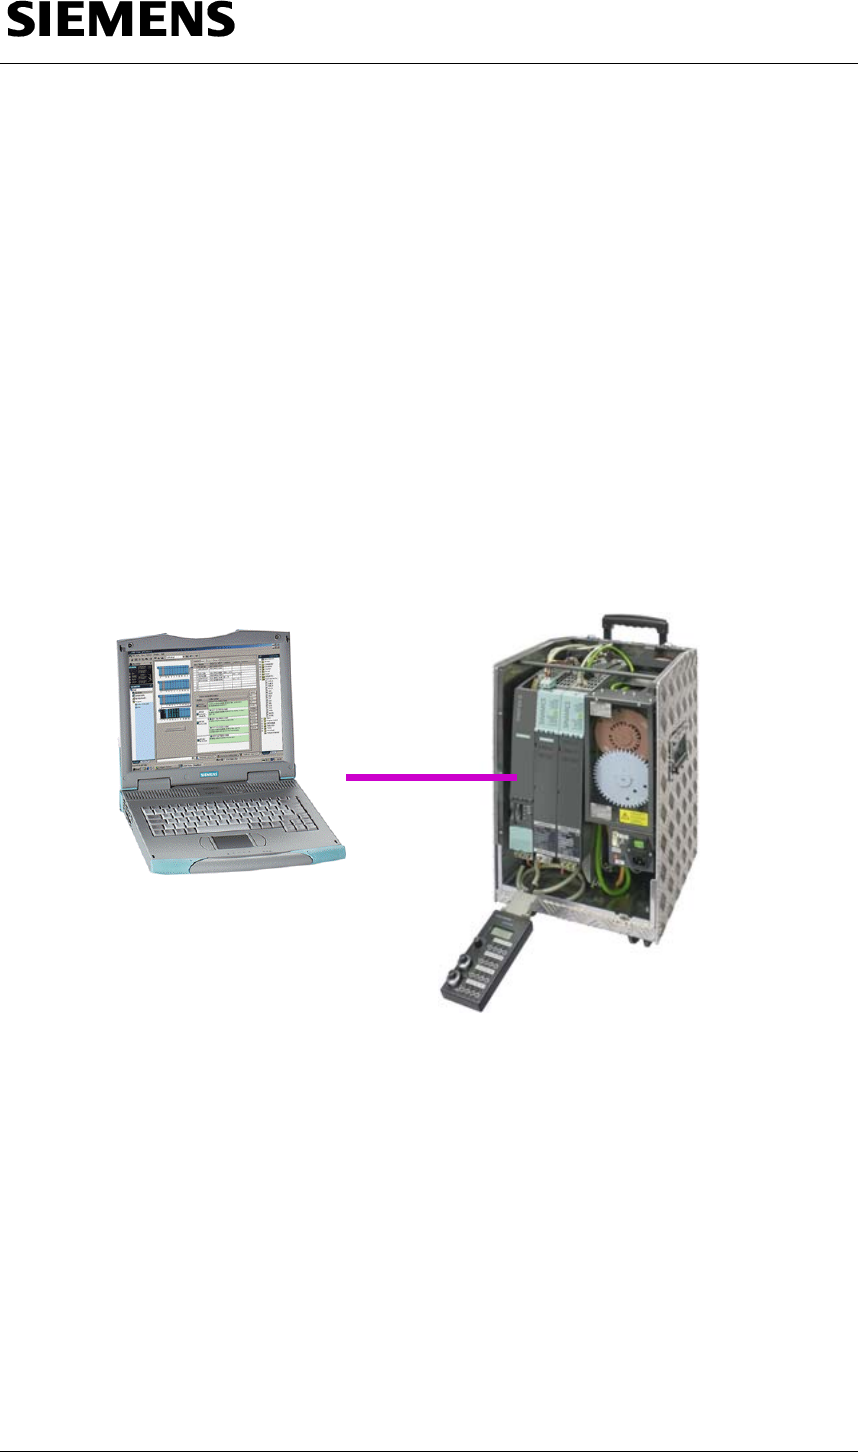
4.2 Hardware structure and mounting/installation
Overview
Fig. 4-1 Hardware components (without power cable!)
MPI/DP
Section B: The application example as demonstration
system
I
t lli
th
hd
d
ft
Flying Saw with SIMOTION A4027118-A0414
V 1.4 Release 06/06/08 26/107
Copyright © Siemens AG 2008 All rights reserved
Manual_SIMOTION Flying Saw_V1.4.doc
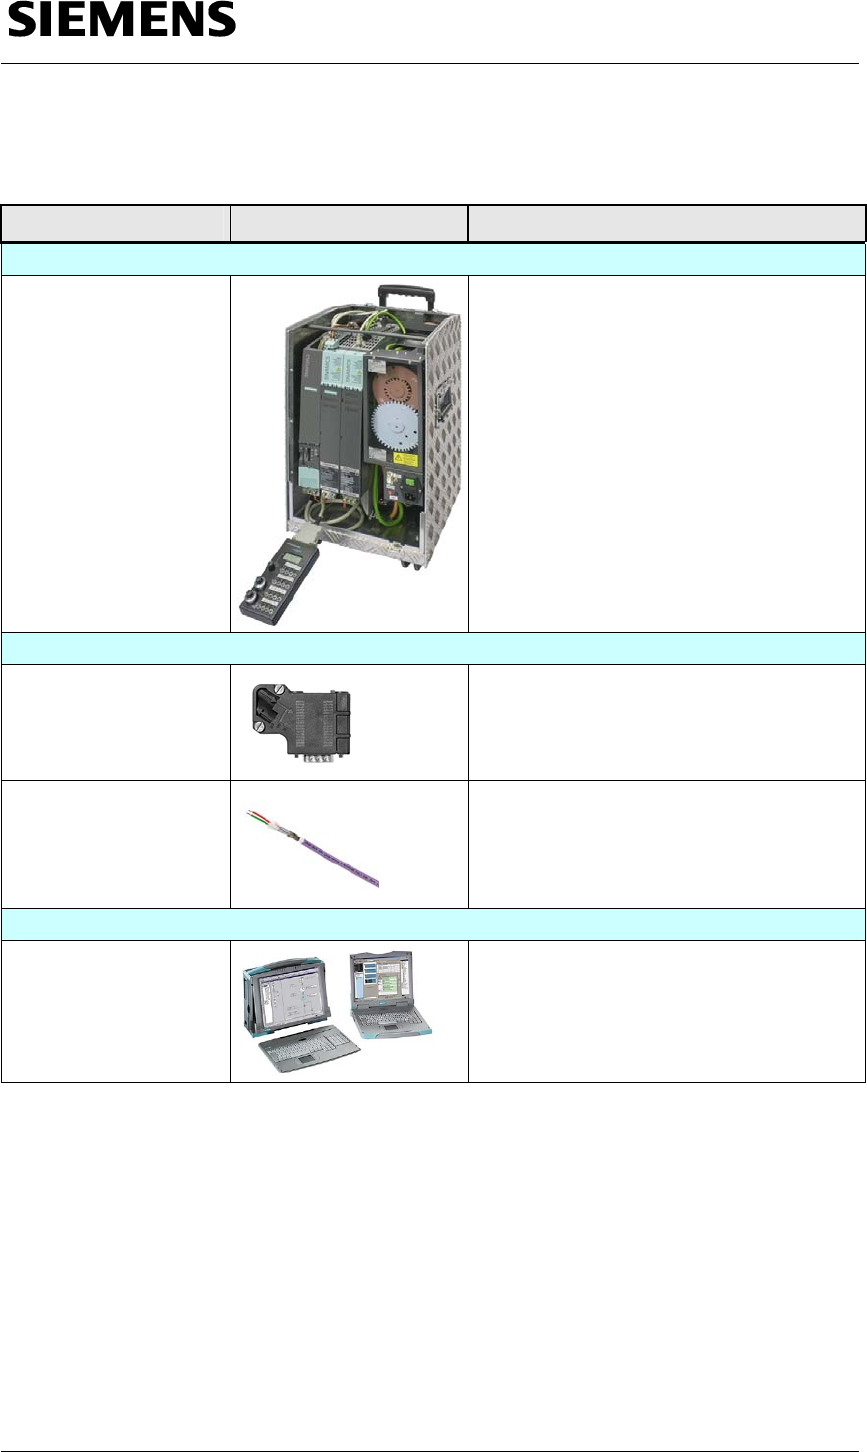
Table 4-1 Hardware components
Hardware element Diagram Order No./MLFB and functions
Training case, SIMOTION D435 with SINAMICS S120
SIMOTION D
demonstration and
training case
6ZB2 470-0AE00
The SIMOTION D training case comprises
standard components (SIMOTION D435,
two SINAMICS axes with motors) and has
two axes. These are used to demonstrate
the application.
The case is already pre-configured and
connected-up. It only has to be connected
to the HMI system via PROFIBUS.
Communications
PROFIBUS connector
up to 12 Mbit/s
6ES7972-0BA41-0XA0
The connector is used to establish a
connection between the HMI system and
the SIMOTION D435 training case
PROFIBUS cable
6XV1830-0EH10 (sold by the meter, from
20m)
The cable is used to establish a connection
between the HMI system and the
SIMOTION D435 training case
HMI system
PG/PC with MPI
interface
-
The PG/ PC is used as the HMI display
screen.
Procedure
Please proceed as follows to configure and install the hardware
components for the application example:

Section B: The application example as demonstration
system
I t lli
th
hd
d
ft
Flying Saw with SIMOTION A4027118-A0414
V 1.4 Release 06/06/08 27/107
Copyright © Siemens AG 2008 All rights reserved
Manual_SIMOTION Flying Saw_V1.4.doc
Table 4-2 Hardware configuration and mounting
No. Action Comment
1 Connect the MPI/DP interface of your PG/PC
to the righthand MPI/DP interface (contact
X136) of the SIMOTION D435 using a
PROFIBUS cable and switch the terminating
resistors in the two terminating connectors of
the cable to “On”.
Do not use the standard MPI cable,
supplied with the PG/PC to connect the
PG/PC to the SIMOTION D435!
The connection should be operated with a
12Mbit/s baud rate. Under all
circumstances, a PROFIBUS cable must
be used between the PG/PC and
SIMOTION D435 with the terminating
resistors switched-in. If this is not done,
communication problems can occur
between the PG/PC and the SIMOTION
D435.
2 Connect the SIMOTION D training case to
the power supply.
3 Power-up all of the equipment/devices.

Section B: The application example as demonstration
system
I t lli
th
hd
d
ft
Flying Saw with SIMOTION A4027118-A0414
V 1.4 Release 06/06/08 28/107
Copyright © Siemens AG 2008 All rights reserved
Manual_SIMOTION Flying Saw_V1.4.doc
4.3 Installing the standard SIEMENS software
Minimum required releases
Table 4-3 Versions
Component Version.
STEP 7 V5.4 + SP2
SIMOTON SCOUT V4.1.1.6
WinCCflex Advanced 2007 Hotfix 4
Installation
Please install the following
• Step 7 V5.4 incl. SP2
• SIMOTION SCOUT V4.1.1.6
• WinCCflex 2007 Hotfix 4 Advanced
(with the option: Integration in Step 7)
Please follow the instructions of the installation programs.
4.4 Downloading the user program and parameterizing the drive in
the SIMOTION D demonstration case
4.4.1 De-archiving the SIMOTION project
• Open SIMOTION SCOUT
• De-archive the SIMOTION project and open it using SIMOTION
SCOUT
4.4.2 Resetting SIMOTION D435 to the factory settings
In order to obtain a fixed starting point for the description on how to
download the user program into the demonstration case, restore the factory
setting at the demonstration case as described below:
• Power-down the demonstration case
• Set the mode switch SIMOTION D435 to setting 3 (MRES)
• Power-up the demonstration case
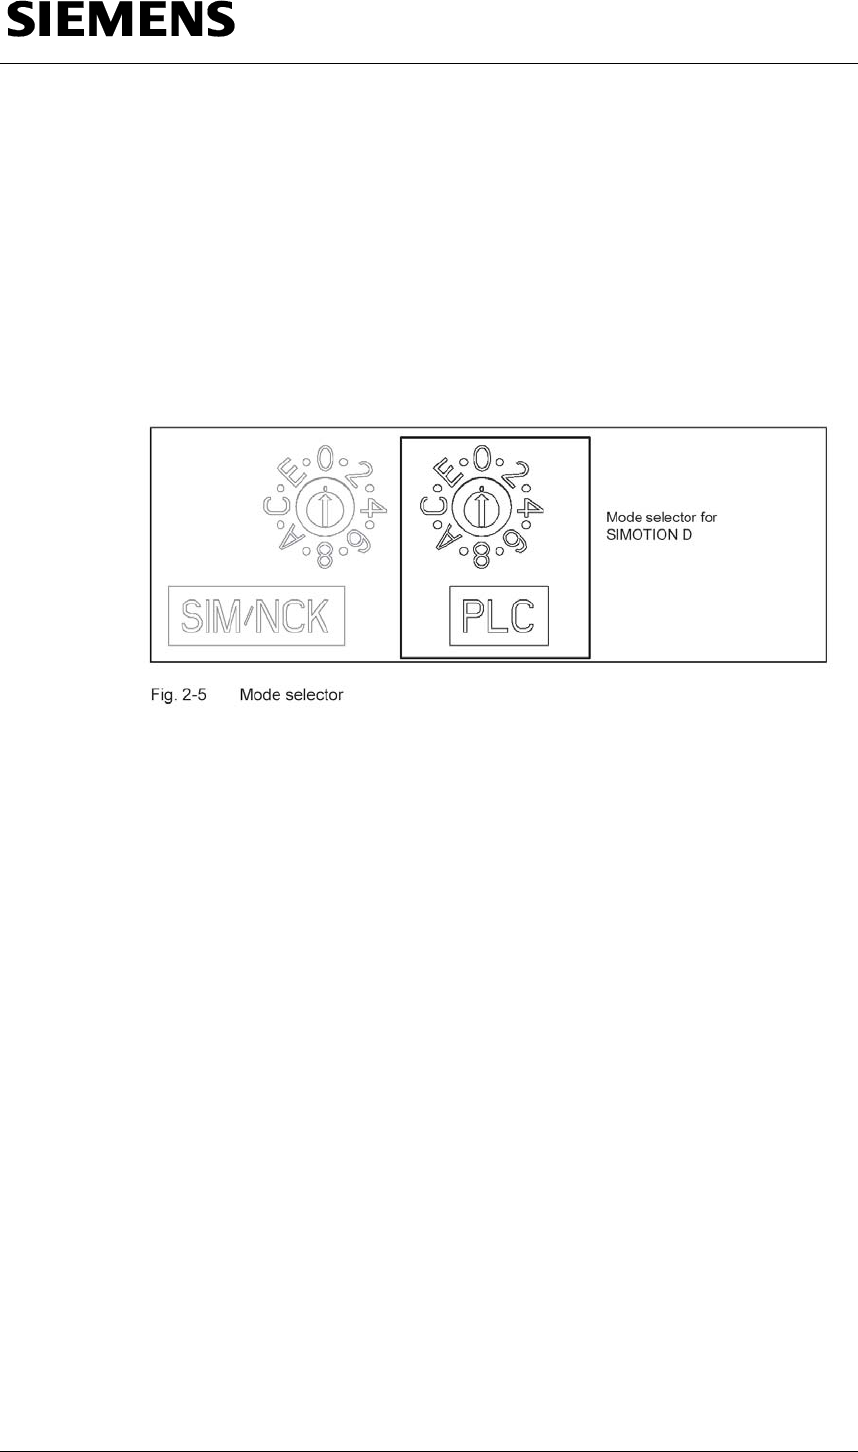
Section B: The application example as demonstration
system
I t lli
th
hd
d
ft
Flying Saw with SIMOTION A4027118-A0414
V 1.4 Release 06/06/08 29/107
Copyright © Siemens AG 2008 All rights reserved
Manual_SIMOTION Flying Saw_V1.4.doc
• When RDY lights green and STOP lights orange, set the SIMOTION
D435 mode switch to the 0 position (RUN)
• RDY and RUN are green
Once the factory setting has been restored, the SIMOTION D435 has
PROFIBUS address 2 and the baud rate is 1.5 Mbit/s.
Fig. 4-2 Mode selector switch, SIMOTION D435

Section B: The application example as demonstration
system
I t lli
th
hd
d
ft
Flying Saw with SIMOTION A4027118-A0414
V 1.4 Release 06/06/08 30/107
Copyright © Siemens AG 2008 All rights reserved
Manual_SIMOTION Flying Saw_V1.4.doc
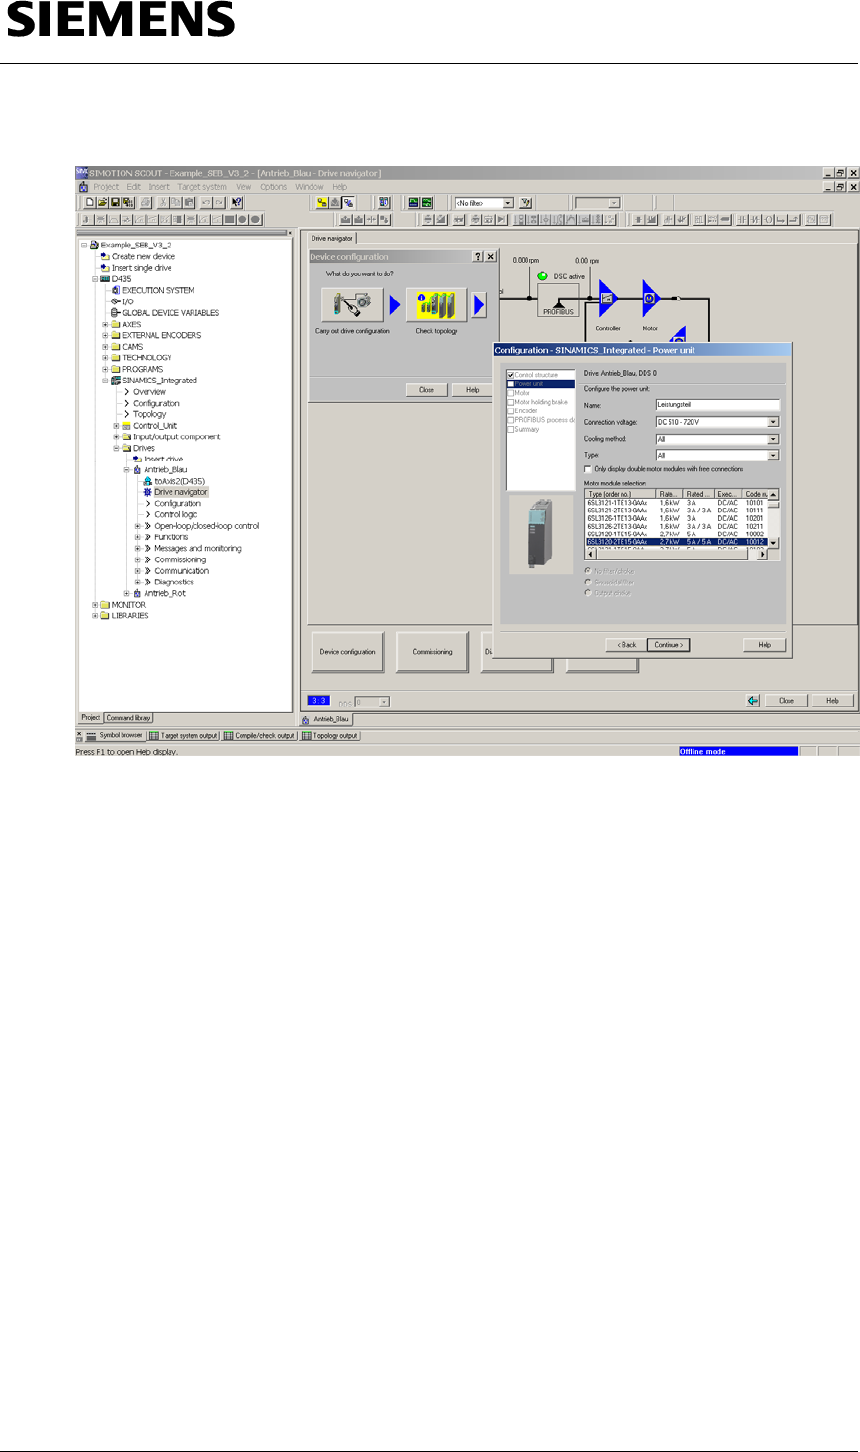
4.4.3 Re-configuring the double-axis motor module from 3A/3A to 5A/5A
This application example is configured as standard using a 3A/3A motor
module. However, there are demonstration cases in the field, which are still
equipped with a 5A/5A motor module. The hardware should be carefully
checked before the project is downloaded! If a 3A/3A motor module is not
used in the demonstration case, then the project can be re-configured by
following the subsequent instructions:
• Go offline
• In the project tree, open the “Drive Navigator”
• A selection window opens when the “Device configuration” button is
pressed
• Open the Configurator by pressing the “Execute drive configuration"
button
• Scroll in the selection menu of the power unit by pressing the
“Continue” button
• Select the power unit being used from the list – refer to the serial
number on the front of the double motor module, e.g. 6SL3120-2TE15-
0AA0 (5A/5A)
• Press “Continue” and acknowledge the alarm messages
• Press the “Continue” button – without making any additional changes –
until the “Complete” button appears; also press this
• Close the Device Configurator
• In the Expert list of the red and blue drives (select the particular drive ->
righthand mouse key -> Expert -> Expert list), reduce parameter p210
from 600V to 345V
• Compile and save the project, go online and load the project into the
target system
Section B: The application example as demonstration
system
I t lli
th
hd
d
ft
Flying Saw with SIMOTION A4027118-A0414
V 1.4 Release 06/06/08 31/107
Copyright © Siemens AG 2008 All rights reserved
Manual_SIMOTION Flying Saw_V1.4.doc
Fig. 4-3: Re-configuring the motor module
Section B: The application example as demonstration
system
I t lli
th
hd
d
ft
Flying Saw with SIMOTION A4027118-A0414
V 1.4 Release 06/06/08 32/107
Copyright © Siemens AG 2008 All rights reserved
Manual_SIMOTION Flying Saw_V1.4.doc
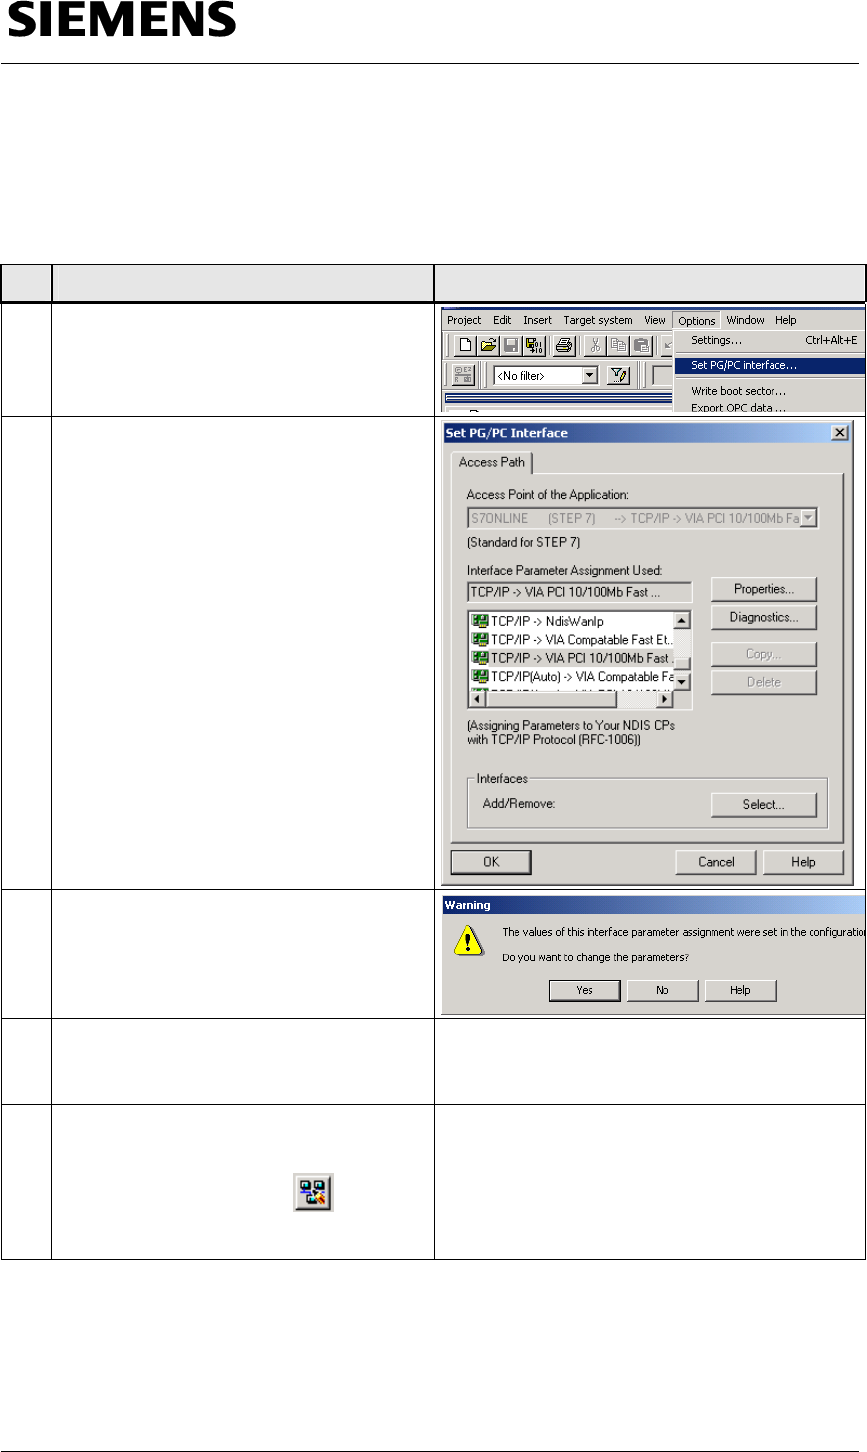
4.4.4 Setting the Ethernet interface of the PG/PC
Setting the PG/PC interface
Table 3-5: Setting the PG/PC interface
No. Action Comment
1 In SIMOTION SCOUT open the interface
configuration using OPTIONS Æ SET
PG/PC INTERFACE...
2 In the “Interface Parameter Assignment
Used” area, select your Ethernet
card/interface of the PG/PC using the
interface setting “TCP/IP Æ ......”.
(e.g. "TCP/IP Æ VIA PCI 10/100 Fast
Ethernet Adapter“)
3 Acknowledge (possible) warning with
Yes.
4
Acknowledge your change with OK
5 Now return to SIMOTION SCOUT and
open the network configuration
NETPRO using the button or the
menu PROJECT Æ OPEN NETPRO .
Section B: The application example as demonstration
system
I t lli
t
h
hd
d
ft
Flying Saw with SIMOTION A4027118-A0414
V 1.4 Release 06/06/08 33/107
Copyright © Siemens AG 2008 All rights reserved
Manual_SIMOTION Flying Saw_V1.4.doc
6 Open Properties by double-clicking on
the PG/PC(1).
7 Under the “Assignment” tab (this is
already automatically selected), the
ETHERNET interface used must be listed
under “Assigned”. If this is already the
case, then select this and set the
checkmark for S7ONLINE access active.
In this case, you skip steps 8 and 9!
Acknowledge your entry with OK.
Under certain
circumstances, the
Ethernet line of the
PG/PC will have a
”yellow border”.
If the ETHERNET interface used is still
not listed under “Assigned” then
execute steps 8 and 9 (but only then!).
8 The ETHERNET interface is still not
“assigned”:
The configured interface of the control is
listed under “Configured Interfaces” and
all of the available interfaces of the
PG/PC are under “Interface Parameter
Assignments in the PG/PC”.
Select the ETHERNET interface to be
used under “Interface Parameter
Assignments in the PG/PC” (just the
same as set in “Set PG/PC interface”)
and press the Assign button.
If a warning is displayed, then
acknowledge this with OK.
Section B: The application example as demonstration
system
I t lli
th
hd
d
ft
Flying Saw with SIMOTION A4027118-A0414
V 1.4 Release 06/06/08 34/107
Copyright © Siemens AG 2008 All rights reserved
Manual_SIMOTION Flying Saw_V1.4.doc
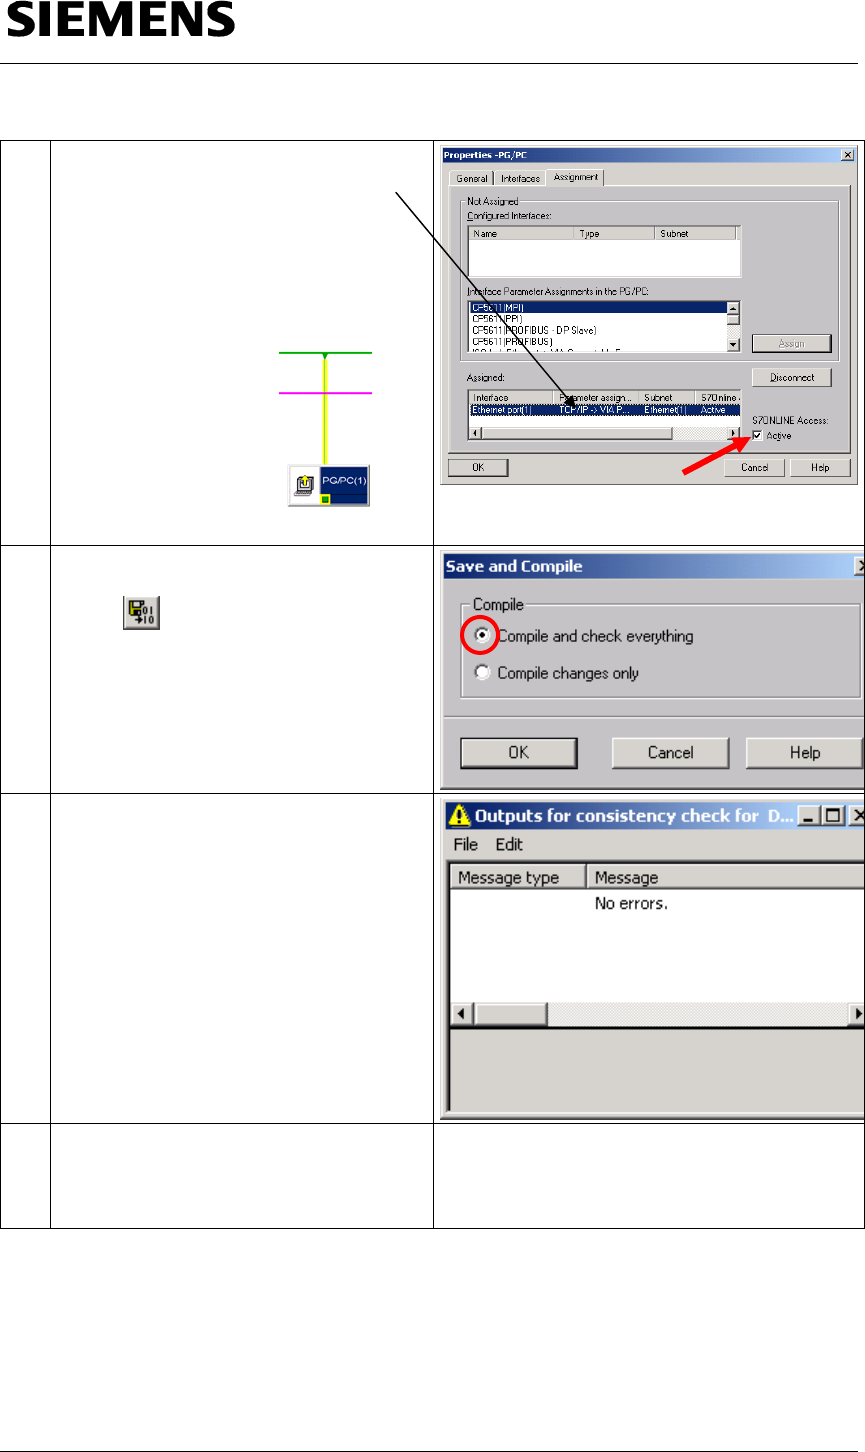
9 The interface of the control is now
assigned the interface of the PG/PC.
Select this and if it has still not been set,
then set the checkmark for S7ONLINE
access Active.
Acknowledge your entry with OK.
Under certain
circumstances, the
Ethernet line of the
PG/PC will have a
”yellow border”.
10 Please select “Compile and check
everything”
(button ) and acknowledge with OK
11 If any references are made to alarms,
then please close.
12 Before you load the project, please close
NETPRO and set the Ethernet address of
your PG/PC.
Refer to the next Section
Setting the Ethernet address of the PG/PC
Section B: The application example as demonstration
system
I t lli
th
hd
d
ft
Flying Saw with SIMOTION A4027118-A0414
V 1.4 Release 06/06/08 35/107
Copyright © Siemens AG 2008 All rights reserved
Manual_SIMOTION Flying Saw_V1.4.doc
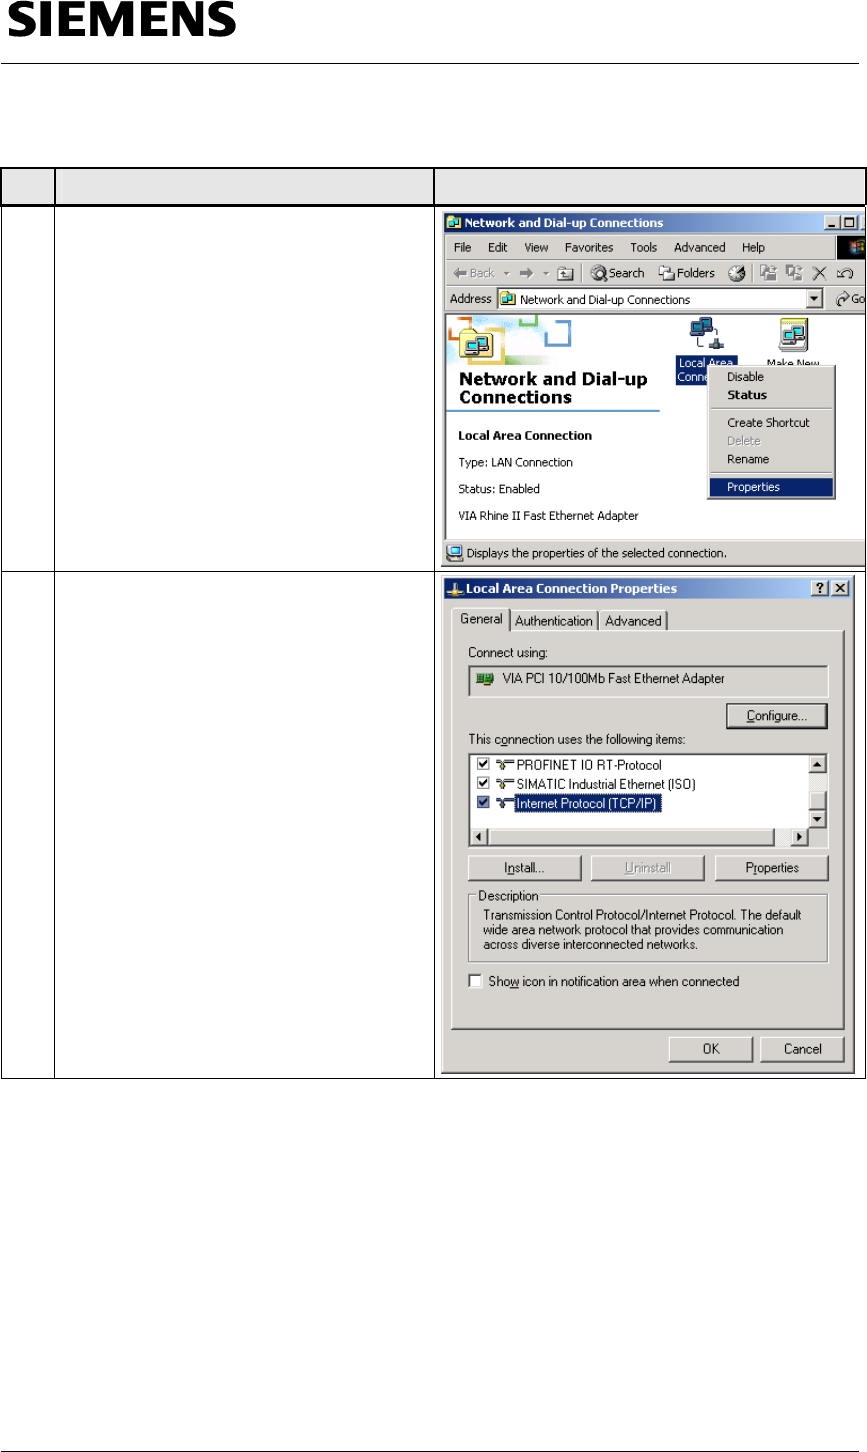
Table 3-6: Ethernet address
No. Action Comment
1 Open the window Network and Dial-up
Connections of your PG/PC and select
the network connection to SIMOTION
D435 and open its properties.
(righthand mouse click Æ Properties – or
select the symbol and then FILE Æ
PROPERTIES).
2 In the window “This connection uses the
following items” select “Internet Protocol
(TCP/IP)” and open its properties.
Section B: The application example as demonstration
system
I t lli
th
hd
d
ft
Flying Saw with SIMOTION A4027118-A0414
V 1.4 Release 06/06/08 36/107
Copyright © Siemens AG 2008 All rights reserved
Manual_SIMOTION Flying Saw_V1.4.doc
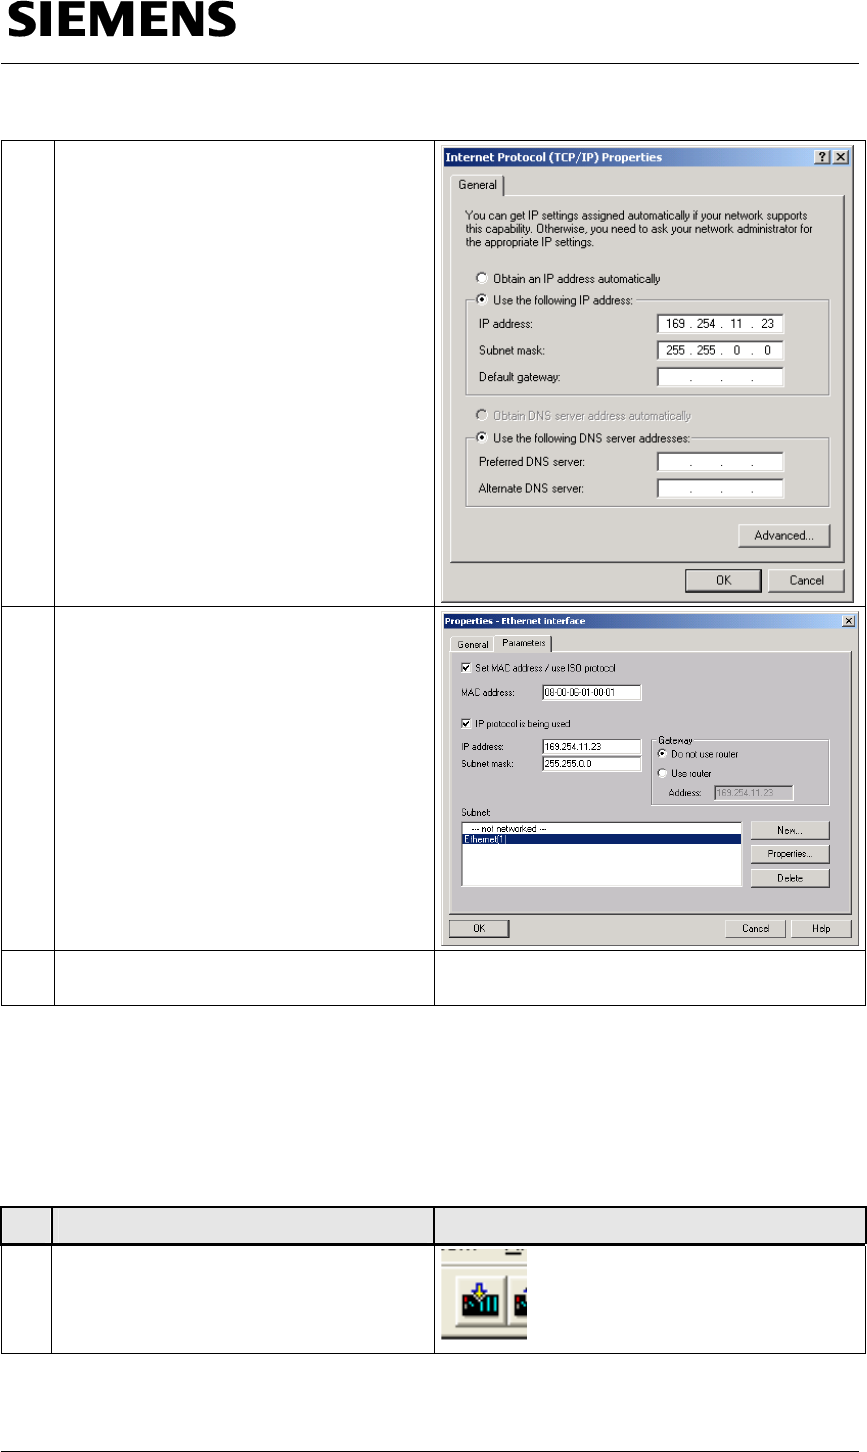
3 The Ethernet interface IE2 (X130) of
SIMOTION D435 has, as standard, the
IP address 169.254.11.22.
Select “Use the following IP address”
and enter the IP address 169.254.11.23.
Enter 255.255.0.0 as “Subnet mask”.
4 The address set above must be identical
to the address for the PG/PC. Check this
address by selecting the PG/PC
interface in Netpro and, if required,
modify this.
5 Acknowledge your changes by pressing
twice on OK.
4.4.5 Downloading the hardware configuration after a factory setting
To download the hardware configuration, please proceed as follows
Table 4-4: Downloading the hardware configuration after a factory setting
No. Action Comment
1 Now go into the hardware configuration
and press the Download to target
module button
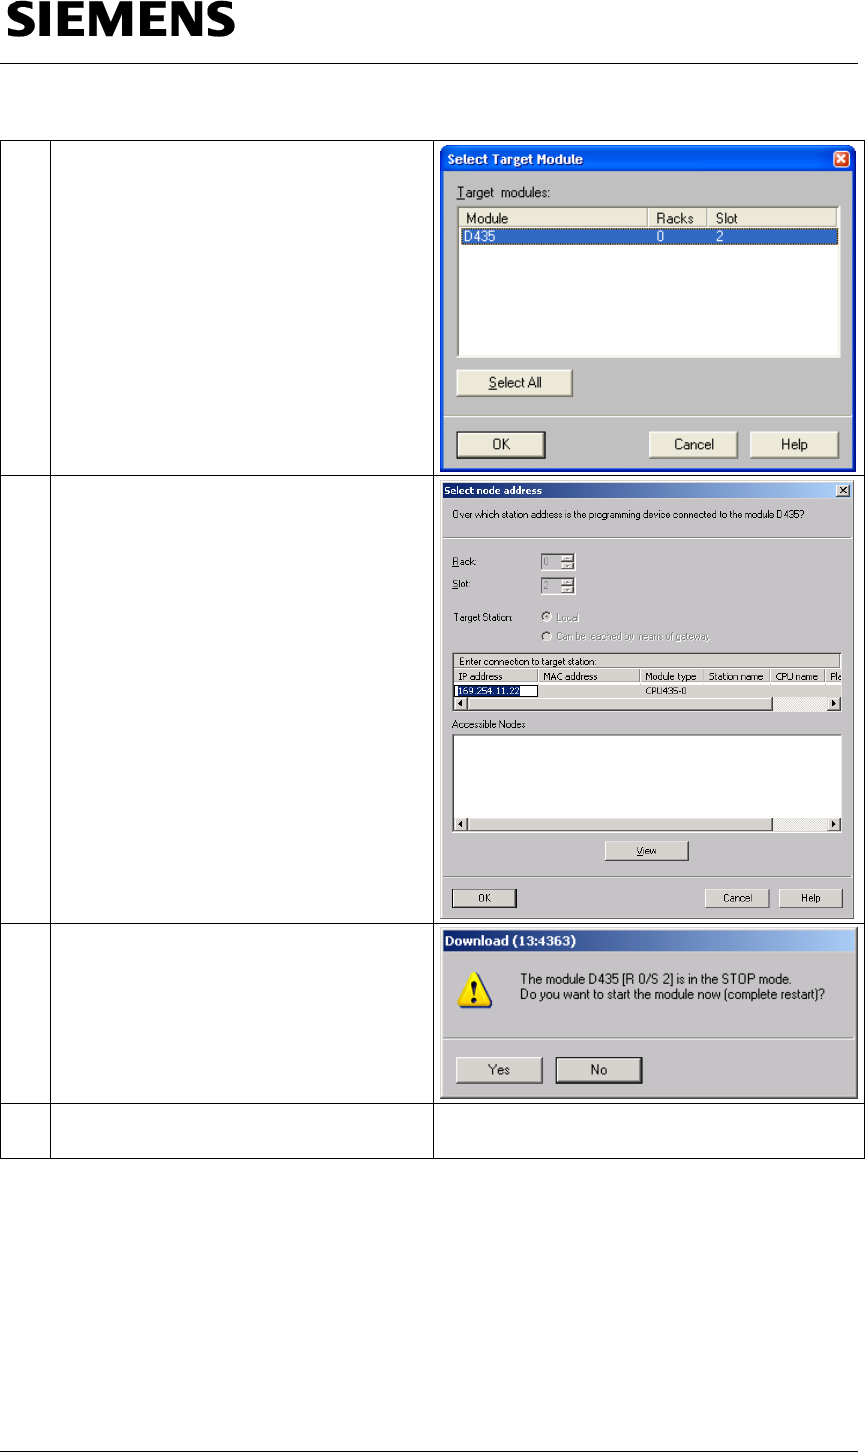
Section B: The application example as demonstration
system
I t lli
th
hd
d
ft
Flying Saw with SIMOTION A4027118-A0414
V 1.4 Release 06/06/08 37/107
Copyright © Siemens AG 2008 All rights reserved
Manual_SIMOTION Flying Saw_V1.4.doc
2 Acknowledge with OK
3 Acknowledge with OK
4 Press No and do not restart
5 Close the hardware configuration and
change to Scout
Section B: The application example as demonstration
system
I t lli
th
hd
d
ft
Flying Saw with SIMOTION A4027118-A0414
V 1.4 Release 06/06/08 38/107
Copyright © Siemens AG 2008 All rights reserved
Manual_SIMOTION Flying Saw_V1.4.doc
4.4.6 Downloading the SIMOTION project of the standard application
Table 4-5: Downloading the SIMOTION project
No. Action Comment
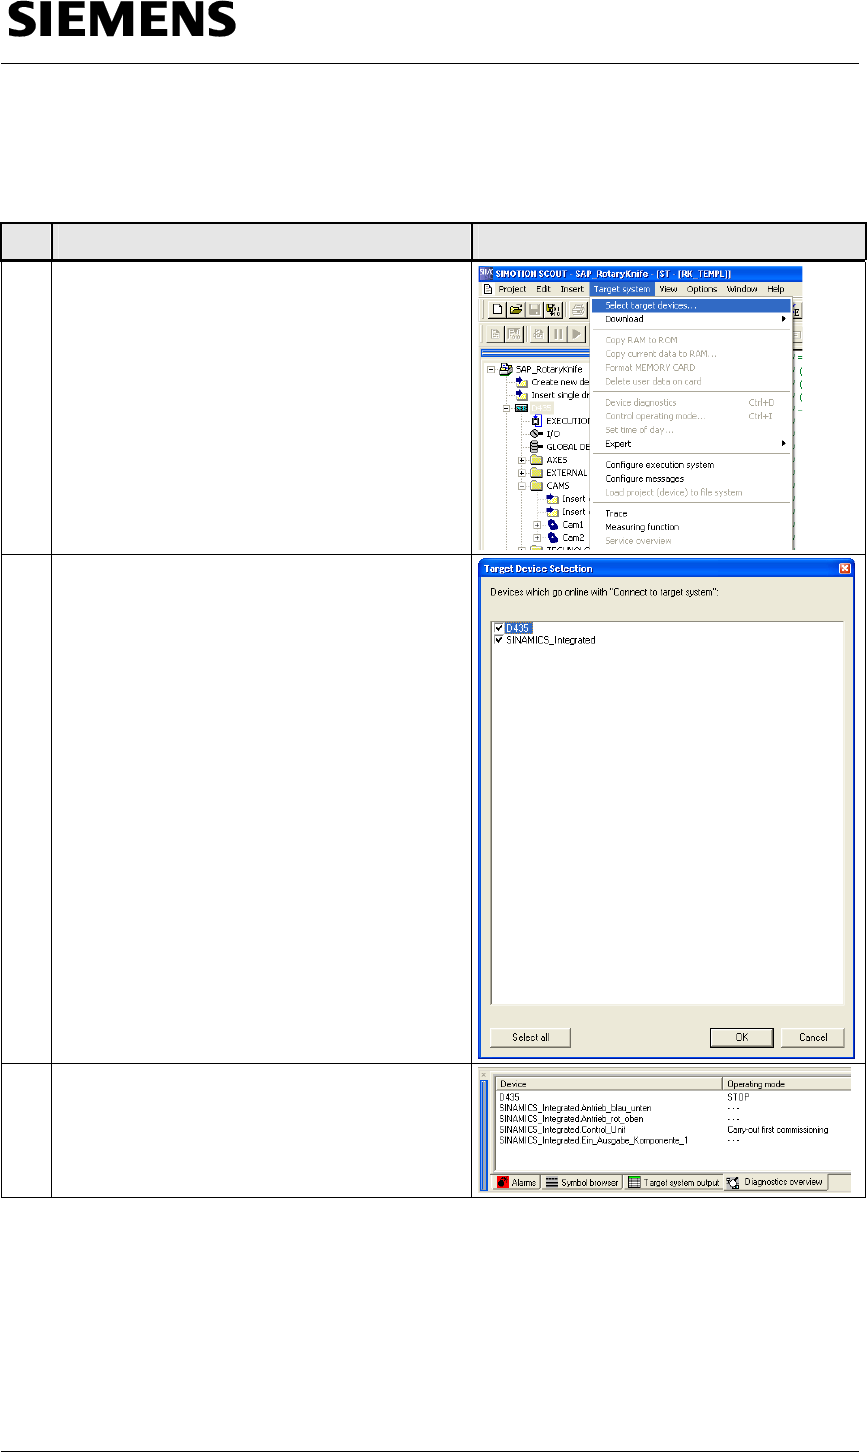
1 Before you download the project, in the offline
mode, please check under Target
system/Select target devices
4 Whether both SIMOTION D435 as well as
also SINAMICS_Integrated are selected.
Please acknowledge changes with OK.
5 After establishing the ONLINE connection,
the operating states of the devices accessed
are displayed in the diagnostics overview.
Section B: The application example as demonstration
system
I t lli
th
hd
d
ft
Flying Saw with SIMOTION A4027118-A0414
V 1.4 Release 06/06/08 39/107
Copyright © Siemens AG 2008 All rights reserved
Manual_SIMOTION Flying Saw_V1.4.doc
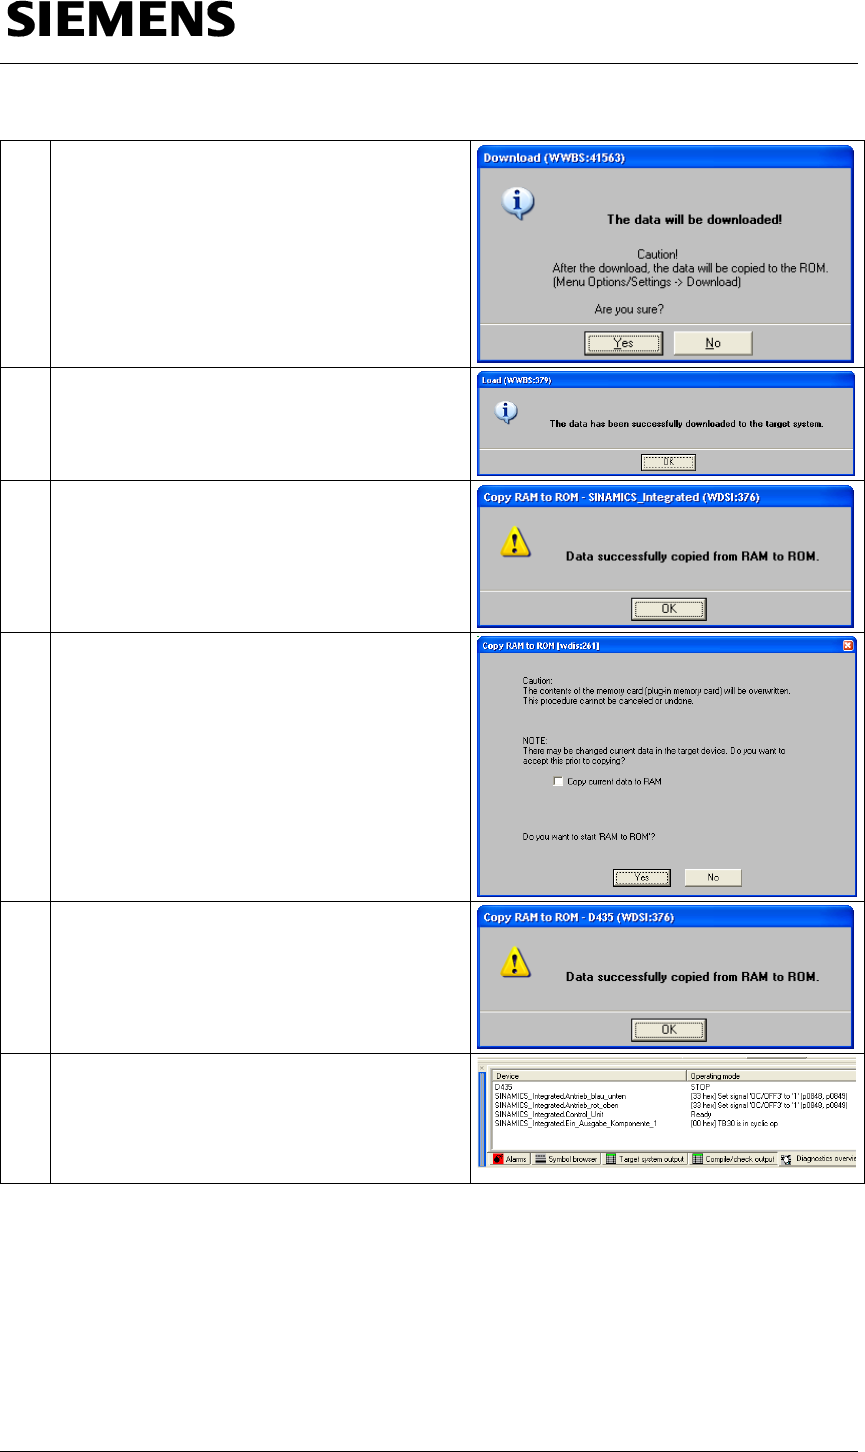
6 After starting the download, you will be
prompted as to whether you wish to “copy
RAM to ROM“ after the download. Always
answer this question with Yes as otherwise
your program must be again downloaded
after power ON/OFF.
This copy operation only refers to the
SIMOTION part of the project
7 Once the download has been completed,
please acknowledge with OK
8 Also acknowledge the data that has been
successfully copied from the RAM to ROM
with OK
9 The system now prompts you whether you
wish to also copy the parameters of
SINAMICS_Integrated from the RAM to the
ROM.
Also answer this with Yes
10 Also acknowledge the data that has been
successfully copied from the RAM to ROM
with OK
11 After the download has been completed, you
will see the adjacent diagnostics overview.
Section B: The application example as demonstration
system
I t lli
th
hd
d
ft
Flying Saw with SIMOTION A4027118-A0414
V 1.4 Release 06/06/08 40/107
Copyright © Siemens AG 2008 All rights reserved
Manual_SIMOTION Flying Saw_V1.4.doc
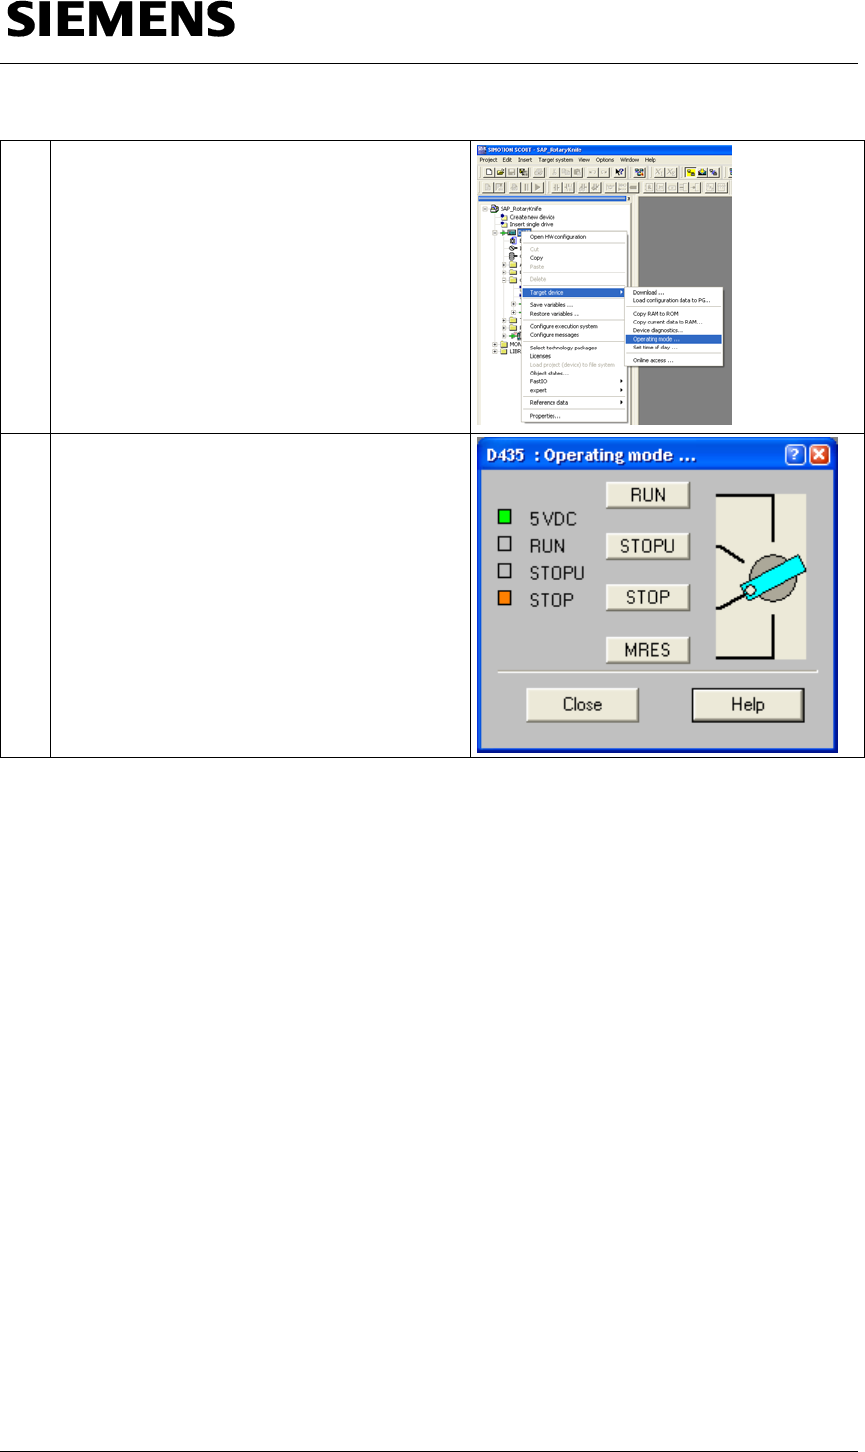
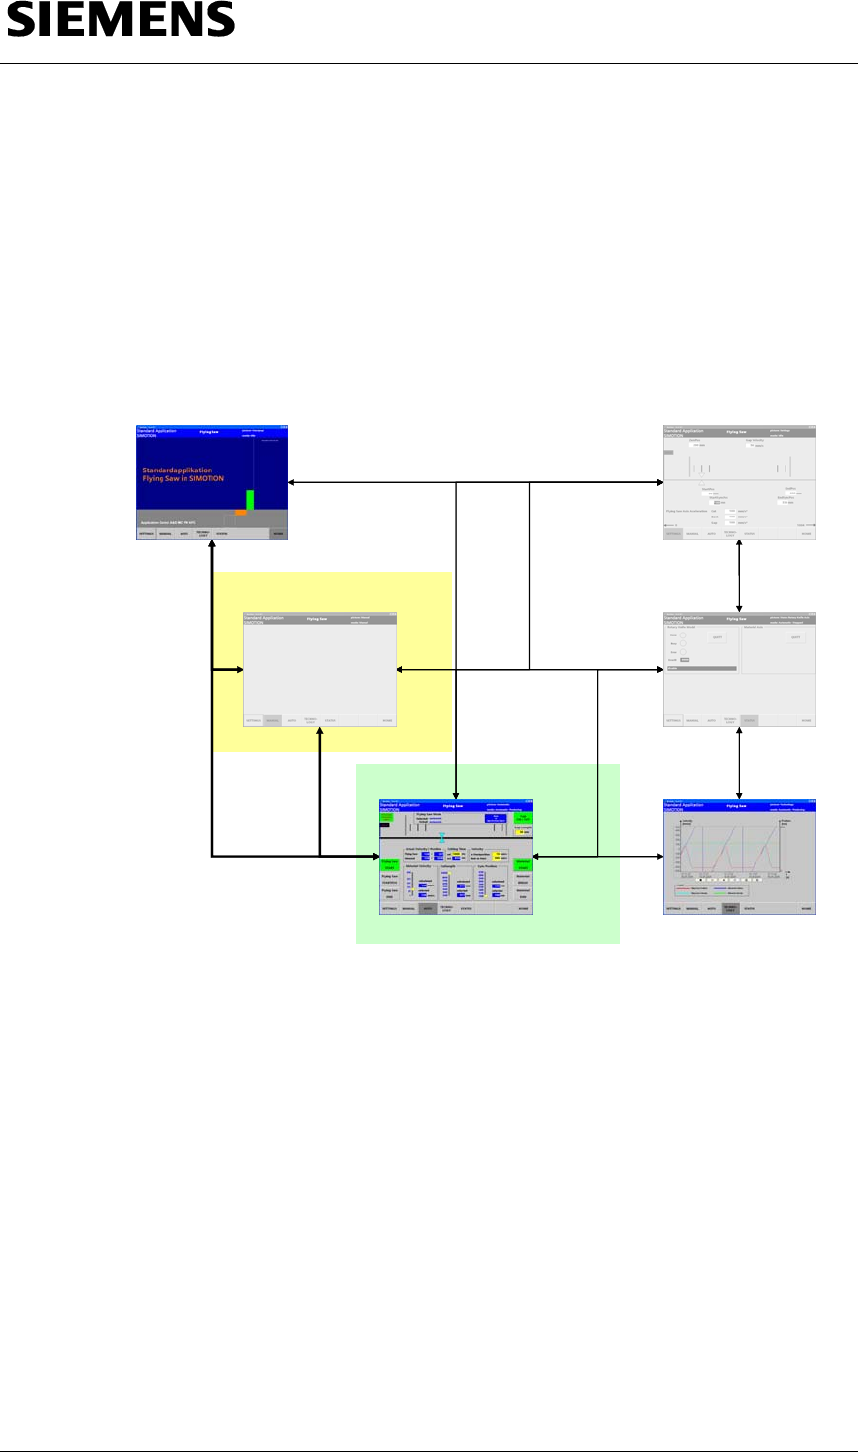
12 Now switch the SIMOTION D435 into the
RUN state.
To do this, click on the SIMOTION-CPU and
with the righthand mouse key and target
device/operating state, go to the operating
state display.
13 Here, click on the RUN button
The SIMOTION D435 is then in RUN and the
demonstration case is now ready to be used
for the presentation!

Section B: The application example as demonstration
system
Ot
tl
f
th
li ti
l
Flying Saw with SIMOTION A4027118-A0414
V 1.4 Release 06/06/08 41/107
Copyright © Siemens AG 2008 All rights reserved
Manual_SIMOTION Flying Saw_V1.4.doc
5 Operator control of the application example
The application can be used to present SIMOTION D with SINAMICS and
get to know and test the functions of the CPU D435.
You will find brief instructions on how to demonstrate and present the
application in the following Chapter 5.1 Brief instructions to
demonstrate.
You will find a detailed description of all of the operator screens in Chapter
5.2 Detailed operating instruction
5.1 Brief instructions to demonstrate
Here, in these instructions you will only be shown and explained the steps
necessary to demonstrate the application. Not all of the operator screens
are discussed.. A detailed description of all operator screens is provided in
Chapter 5.2 Detailed operating instruction.
Prerequisites
The following prerequisites must be fulfilled to use the application example:
• The SIMOTION project is provided online in SIMOTION D435.
• The parameterization for the applications has been downloaded into
SINAMICS. (also included in the SIMOTION project!)
• All of the devices are powered-up.
• The SIMOTION D435 has been switched into the “Run” state using the
online function of SIMOTION SCOUT.
• At least WinCCflex Advanced 2007 Hotfix 4 is installed on the PC/PG.
Note WinCCflex requires the appropriate authorization. Authorization for at
least 256 power tags is required.
Section B: The application example as demonstration
system
Ot
tl
f
th
li ti
l
Flying Saw with SIMOTION A4027118-A0414
V 1.4 Release 06/06/08 42/107
Copyright © Siemens AG 2008 All rights reserved
Manual_SIMOTION Flying Saw_V1.4.doc
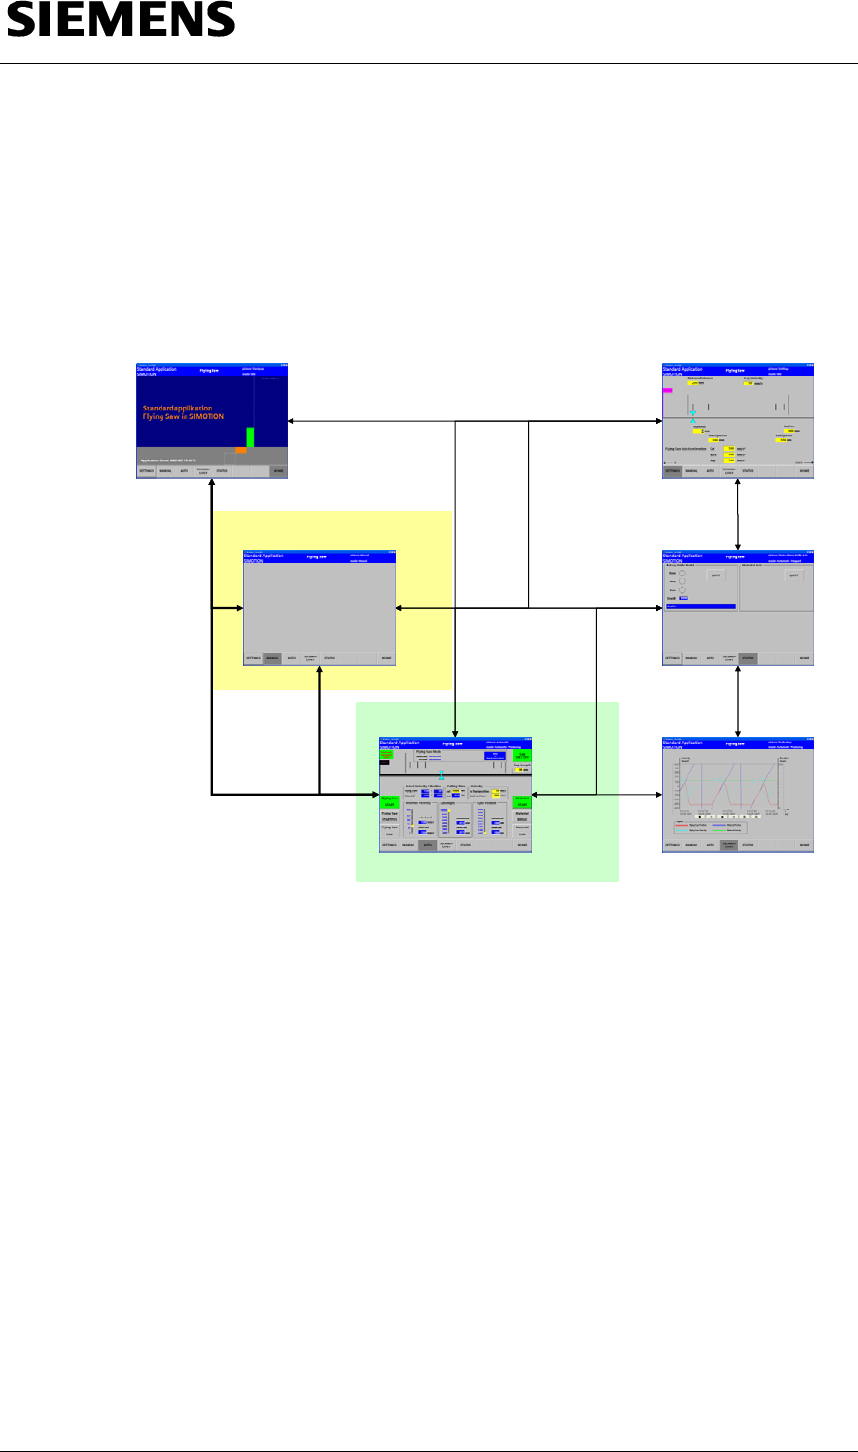
5.1.1 Structure overview
Please refer to the following diagram for the basic operator control structure
with all of the operator areas of the application.
The SETTINGS, STATUS and MANUAL displays are not required when
presenting the application and are therefore not described in the detailed
Operating Instructions.
Fig. 5-1 Structure overview to demonstrate the application
Manual-Mode
Automatic-Mode
STATUS
TECHNOLOGY
SETTINGS
HOME
MANUAL
AUTO
Section B: The application example as demonstration
system
Ot
tl
f
th
li ti
l
Flying Saw with SIMOTION A4027118-A0414
V 1.4 Release 06/06/08 43/107
Copyright © Siemens AG 2008 All rights reserved
Manual_SIMOTION Flying Saw_V1.4.doc
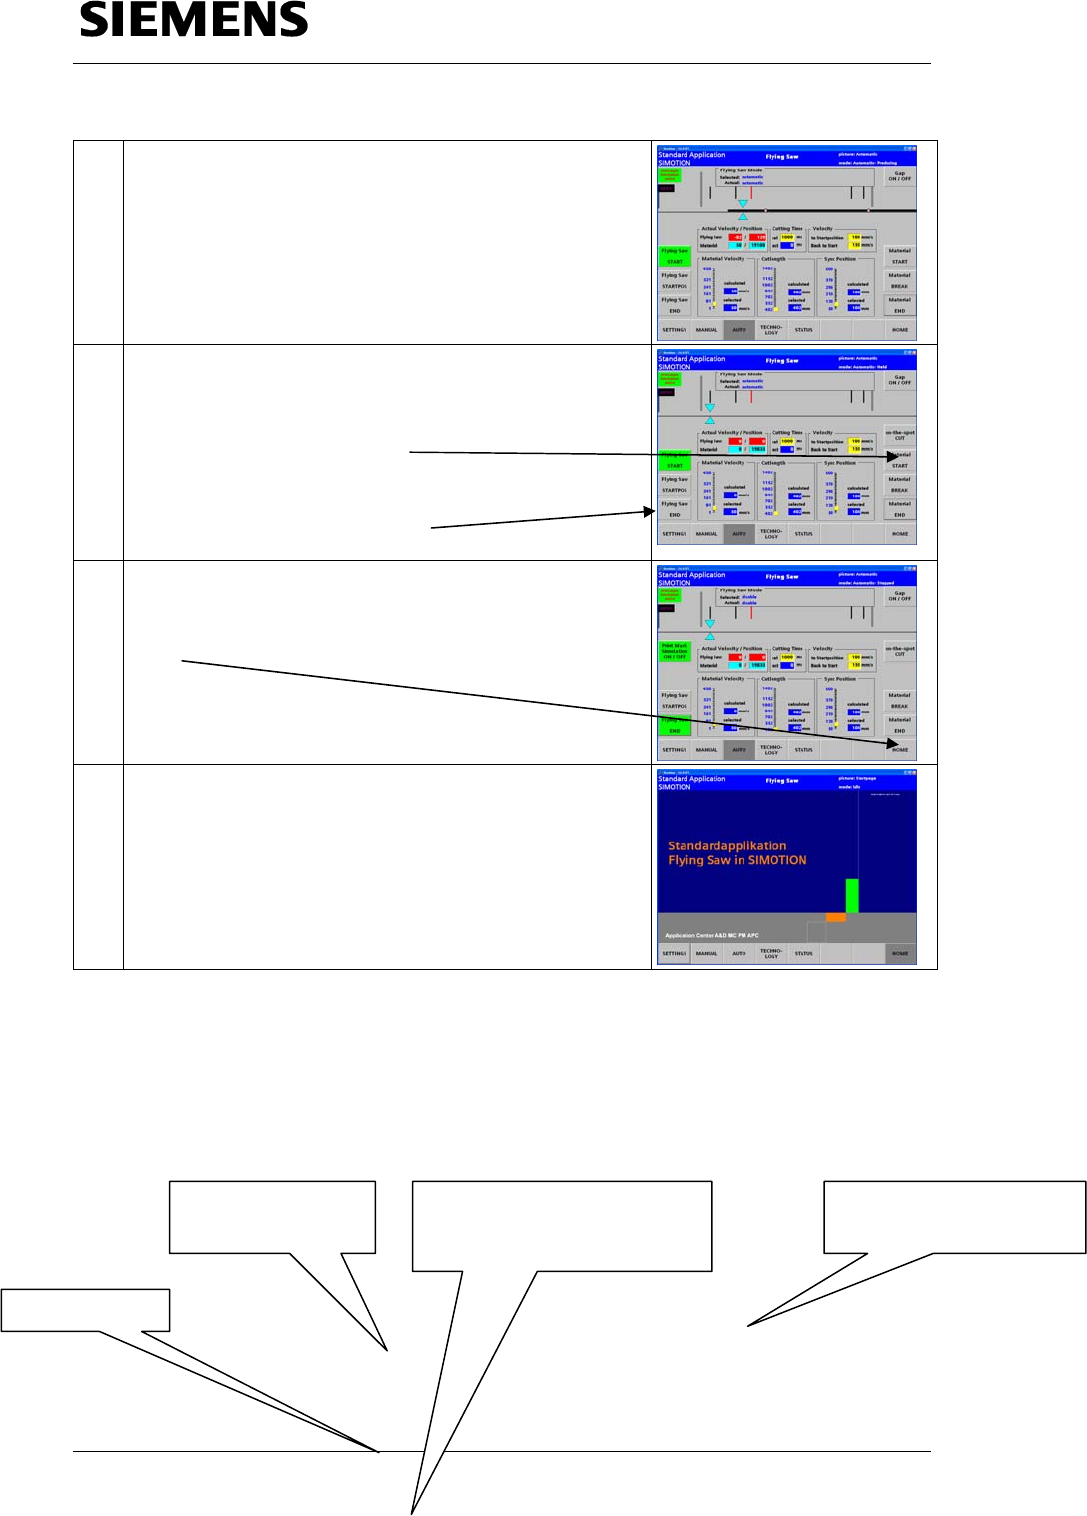
5.1.2 Brief instructions
Execute the following steps in the sequence as listed in the following table
to demonstrate the application example:
Table 5-1: Brief instructions to demonstrate/present the “flying saw” application example
No. Action Comment
1 Call the following file
"C:\Siemens\Step7\S7Proj\SAP_FlyingSaw\TDOP\
PRO__00.fwd".
As an alternative, you can also select the operator panel
using Step 7. In the SIMATIC Manager, open the
SAP_FlyingSaw project. You will find the HMI object
OP1 at the project level. Start the runtime from the
context menu (righthand mouse key).
2 If the connection to the CPU was able to be established,
the screen form appears at the top left - mode: Idle Check that your PG/PC is set
to PROFIBUS with 12 Mbit/s.
3 At the bottom left, please click on AUTO
(3rd button from the left!)
4 First activate the print mark simulation by pressing the
Print Mark Simulation ON / OFF
button.
5 Next, activate the travel to the starting position using the
button Flying Saw STARTPOS
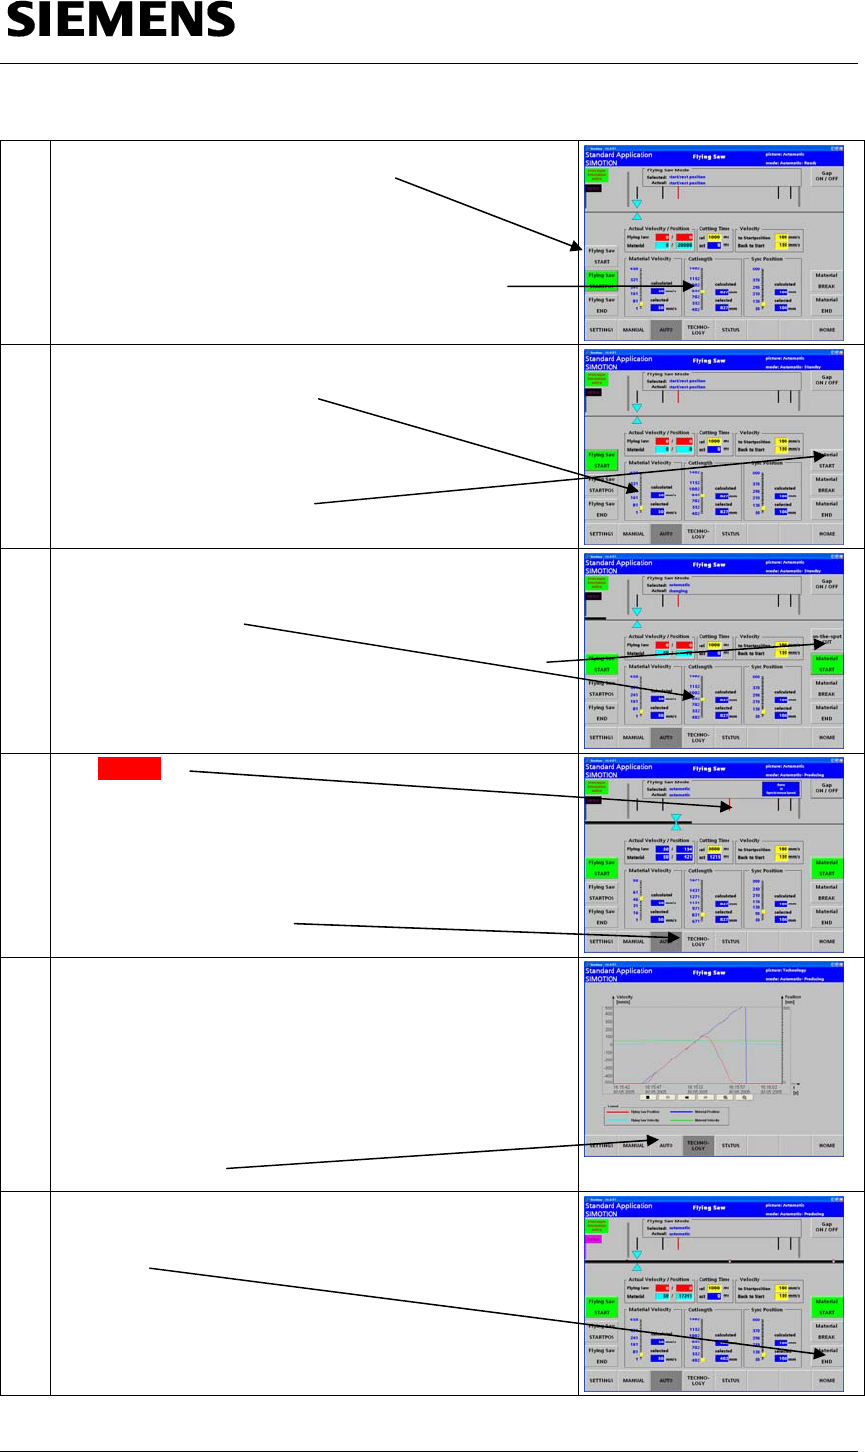
Section B: The application example as demonstration
system
Ot
tl
f
th
li ti
l
Flying Saw with SIMOTION A4027118-A0414
V 1.4 Release 06/06/08 44/107
Copyright © Siemens AG 2008 All rights reserved
Manual_SIMOTION Flying Saw_V1.4.doc
6 Once the “flying saw” has reached its starting position,
the Flying Saw START button is
displayed to activate the “flying saw”
Before you activate the “flying saw”, the required cut
length should be selected using the Cutlength
slider.
7 Now you can start the material feed!
Select the Material Velocity
using the
Material Velocity slider
You can start the
material feed by pressing
the Material START button
8 After the material web starts, the material enters the unit
and the print mark simulation generates, after the length,
set using the Cutlength slider switch, a print mark. The
flying saw then makes a cut.
You can immediately generate a print mark using the on-
the-spot CUT button – which is also then cut by the flying
saw.
9 The red bar
indicates how far the
flying saw must travel with the material web with the
current setting for one cut.
Activate the technology screen
by pressing the TECHNOLOGY button
10 The following are displayed in the technology screen:
• The actual material velocity
• The actual velocity of the "flying saw"
• The actual position of the "flying saw"
• The position of the material referred to the actual cut
•
You can return to the
automatic screen by pressing
the AUTO button
11 The material can be removed
by pressing the
Material END button
Section B: The application example as demonstration
system
Ot
tl
f
th
li ti
l
Flying Saw with SIMOTION A4027118-A0414
V 1.4 Release 06/06/08 45/107
Copyright © Siemens AG 2008 All rights reserved
Manual_SIMOTION Flying Saw_V1.4.doc
12 After the last cut, the “flying saw” automatically moves to
its starting position and waits for new material.
13 Once the material has been completely removed
from the screen area, then you can
either
allow new material to enter by pressing
the Material START button
and continue with Step 8,
or
end the “flying saw” by pressing
the Flying Saw END button.
14 After the “flying saw” has been ended, you can
return to the welcome screen
by pressing the
HOME button
15
Process screen
The process screen is the main screen in the automatic mode of the
application example to control (operator control) the “flying saw”.
Fig. 5-2 Process screen in the automatic mode of the “flying saw”
Mode of the
"FlyingSaw FB“
Flying Saw
Operating state (OMAG)
application example
Position and velocity of the
material and "Flying Saw“
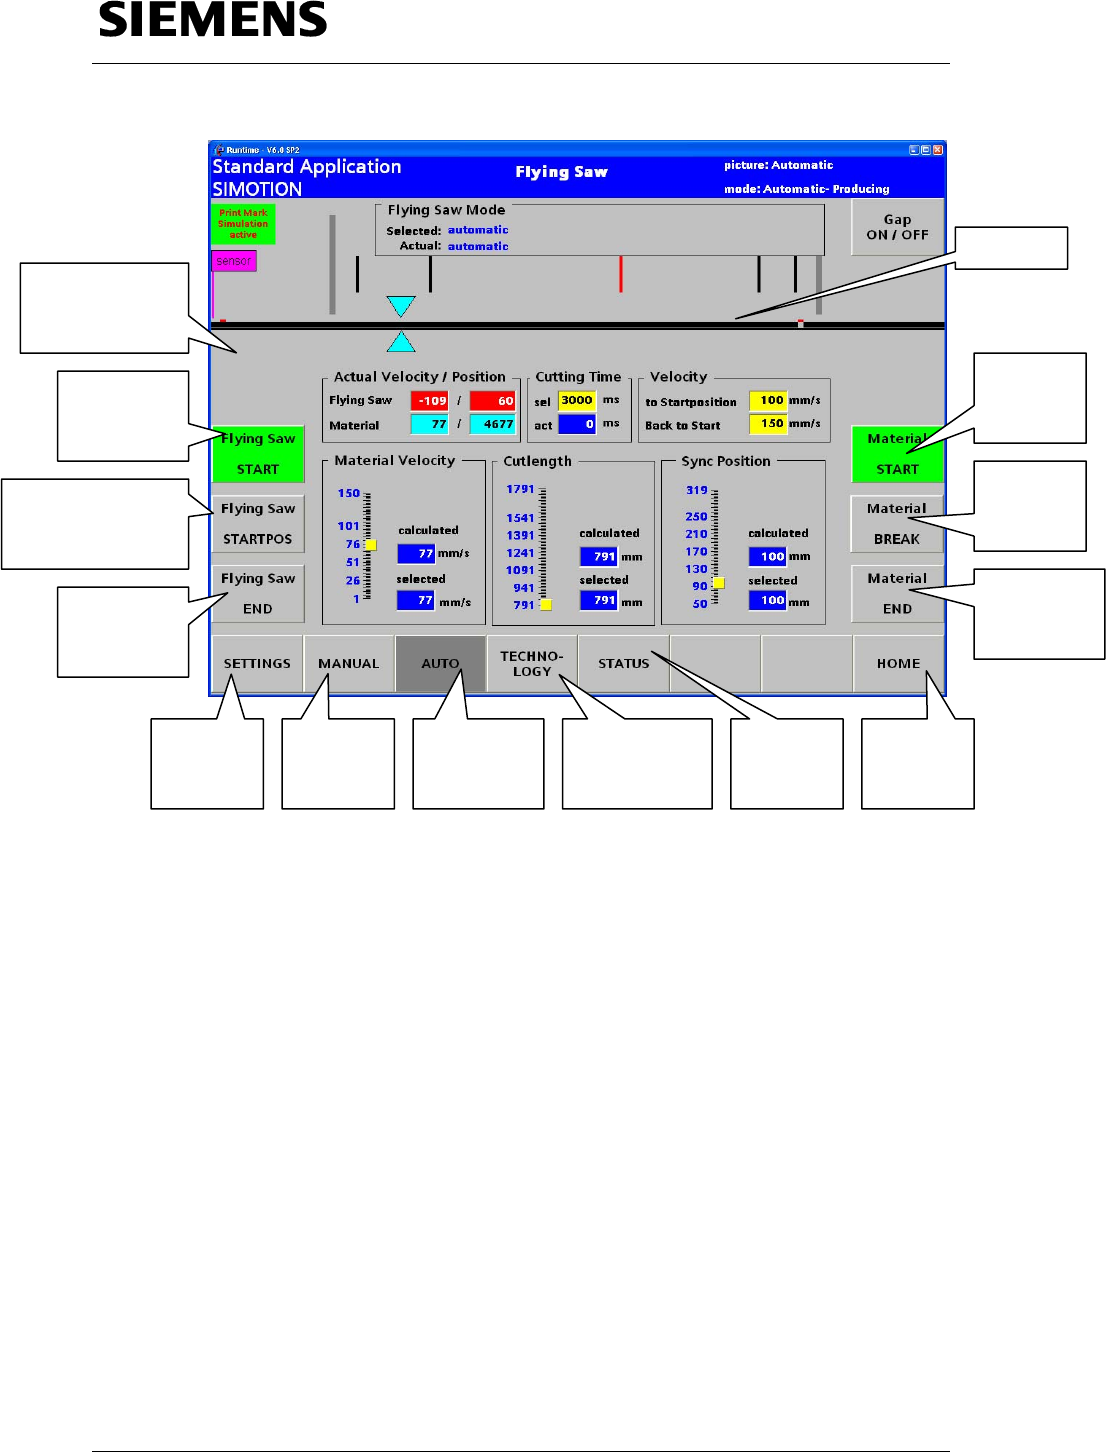
Section B: The application example as demonstration
system
Ot
tl
f
th
li ti
l
Flying Saw with SIMOTION A4027118-A0414
V 1.4 Release 06/06/08 46/107
Copyright © Siemens AG 2008 All rights reserved
Manual_SIMOTION Flying Saw_V1.4.doc
The material and the “flying saw” can be started, terminated (exited) and
monitored in the process screen.
The material (material web) is started, stopped (held) and terminated
(exited) on the righthand side; the “flying saw” is started and exited on the
lefthand side.
Basic
settings Automatic
mode Calls-up the
technology
screen
To the
status
display
Manual
mode
Material
To the
start
screen
Start
Material
Stop
Material
Allow
material to
run-out
Random print
mark offset
Start flying
saw
Move flying saw
to the starting
position
Terminate
flying saw
(end)

Section B: The application example as demonstration
system
Ot
tl
f
th
li ti
l
Flying Saw with SIMOTION A4027118-A0414
V 1.4 Release 06/06/08 47/107
Copyright © Siemens AG 2008 All rights reserved
Manual_SIMOTION Flying Saw_V1.4.doc
5.2 Detailed operating instructions
A detailed description of the application is provided in these instructions.
This is necessary so that you can get to know and test the CPU functions.
Prerequisites
The following prerequisites must be fulfilled to use the application example:
• The STEP7 project is available online in the S7-CPU.
• The parameterization for the application has been downloaded into
SIMODRIVE.
• All of the devices are powered-up.
• At least WinCCflex Advanced 2007 Hotfix 4 is installed on the PC/PG.
Note WinCCflex requires the appropriate authorization. Authorization for at
least 256 power tags is required.
Section B: The application example as demonstration
system
Ot
tl
f
th
li ti
l
Flying Saw with SIMOTION A4027118-A0414
V 1.4 Release 06/06/08 48/107
Copyright © Siemens AG 2008 All rights reserved
Manual_SIMOTION Flying Saw_V1.4.doc
5.2.1 Structure overview
Please refer to the following diagram for the basic operator control structure
with all of the operator areas of the application.
Fig. 5-3 Structure overview
Manual-Mode
Automatic-Mode
STATUS
TECHNOLOGY
SETTINGS
HOME
MANUAL
AUTO
5.2.2 Start
In the SIMATIC Manager, open the SAP_FlyingSaw project. You will find
the HMI object OP1 at the project level. Start the runtime from the context
menu (righthand mouse key).
or
Call the following file
C:\Siemens\Step7\S7Proj\SAP_FlyingSaw\TDOP\PRO__00.fwd".
Section B: The application example as demonstration
system
Ot
tl
f
th
li ti
l
Flying Saw with SIMOTION A4027118-A0414
V 1.4 Release 06/06/08 49/107
Copyright © Siemens AG 2008 All rights reserved
Manual_SIMOTION Flying Saw_V1.4.doc
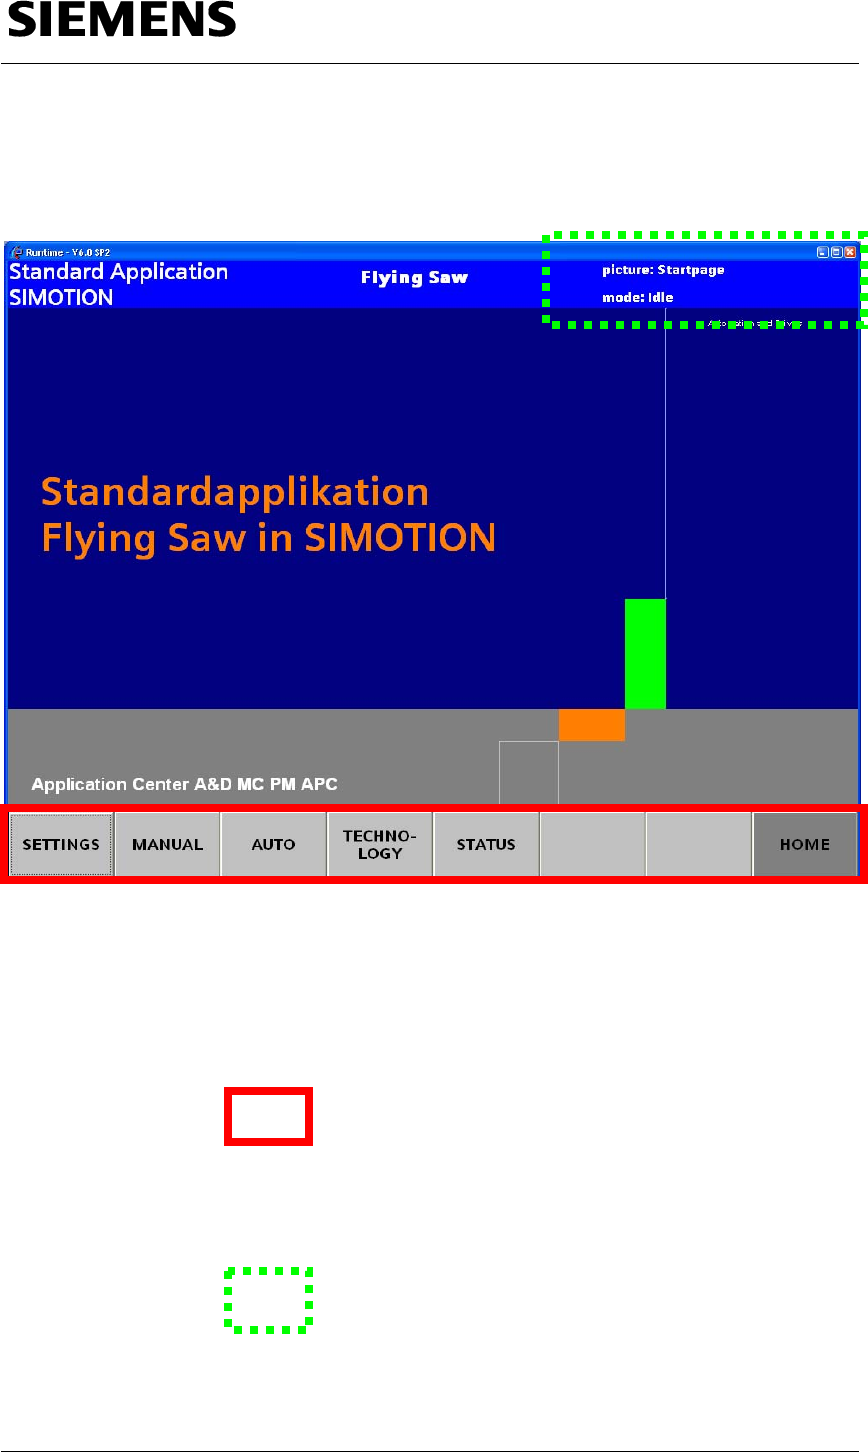
The welcome screen is displayed
Fig. 5-4 Welcome screen
General screen areas
The screen forms of the application are handled using buttons at the lower
edge of each of the screen forms.
Refer to
The name of the actual operator screen form and the presently valid mode
are displayed in the upper righthand corner of the screen forms.
Refer to
Section B: The application example as demonstration
system
Ot
tl
f
th
li ti
l
Flying Saw with SIMOTION A4027118-A0414
V 1.4 Release 06/06/08 50/107
Copyright © Siemens AG 2008 All rights reserved
Manual_SIMOTION Flying Saw_V1.4.doc
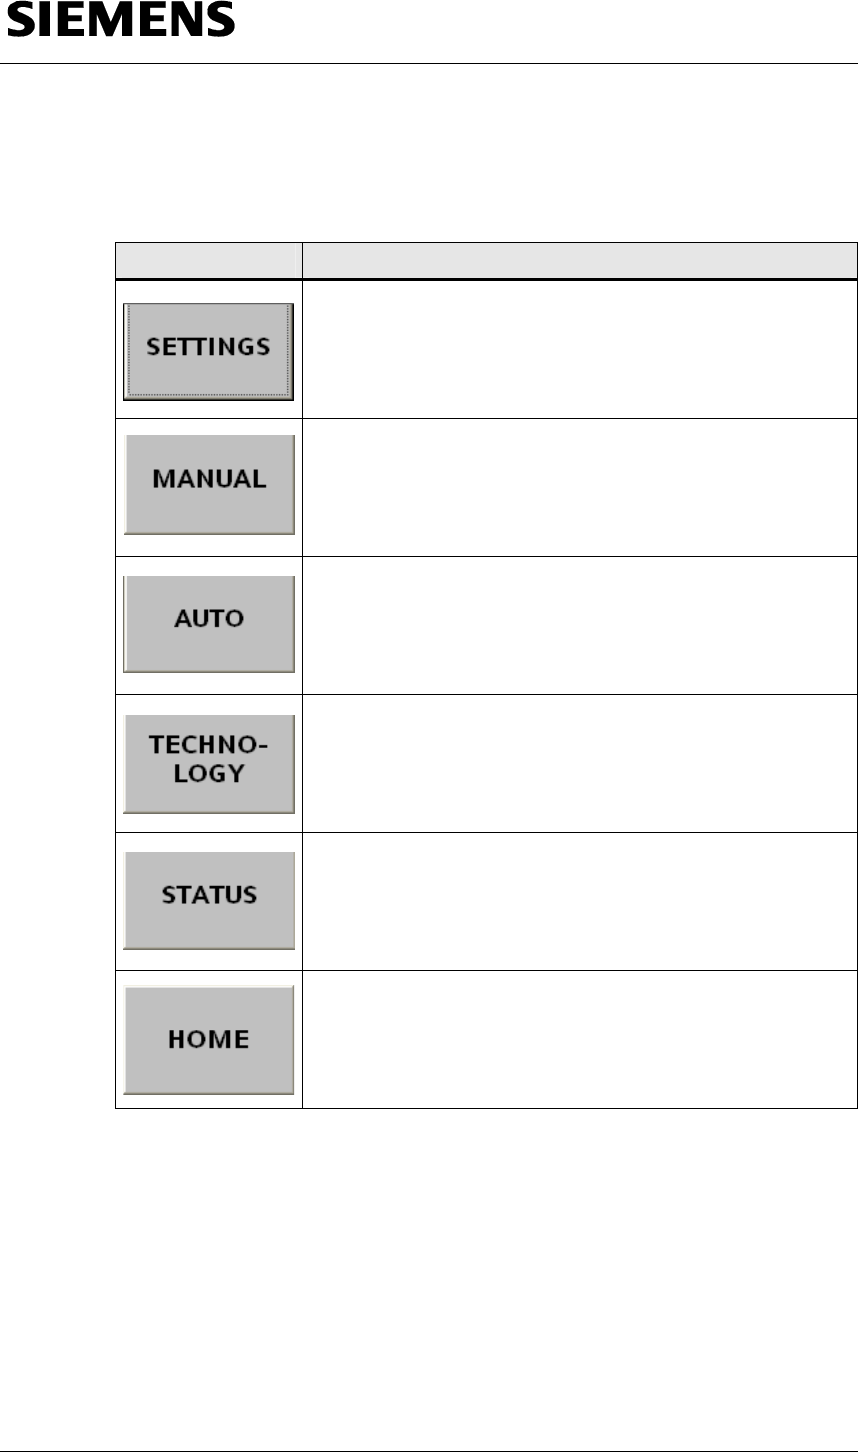
The following functions can be selected using the individual buttons:
Table 5-2 General buttons to control/handle the screen forms
Button Function
You can access the pre-setting screen from every operator
screen using the SETTINGS button.
You can access the setting-up screen from every operator
screen using the MANUAL button.
If the application is in the IDLE or AUTOMATIC-STOPPED
modes, the MANUAL mode is selected
You can access the automatic screen from every operator
screen using the AUTO button.
If the application is in the IDLE or MANUAL modes, the
AUTOMATIC-STOPPED mode is selected
You can access the technology screen from every operator
screen using the TECHNOLOGY button.
You can access the status screen from every operator
screen using the STATUS button.
You can access the welcome screen (home) from every
operator screen using the HOME button.
If the application is in the MANUAL or AUTOMATIC-
STOPPED modes, the IDLE mode is selected

Section B: The application example as demonstration
system
Ot
tl
f
th
li ti
l
Flying Saw with SIMOTION A4027118-A0414
V 1.4 Release 06/06/08 51/107
Copyright © Siemens AG 2008 All rights reserved
Manual_SIMOTION Flying Saw_V1.4.doc
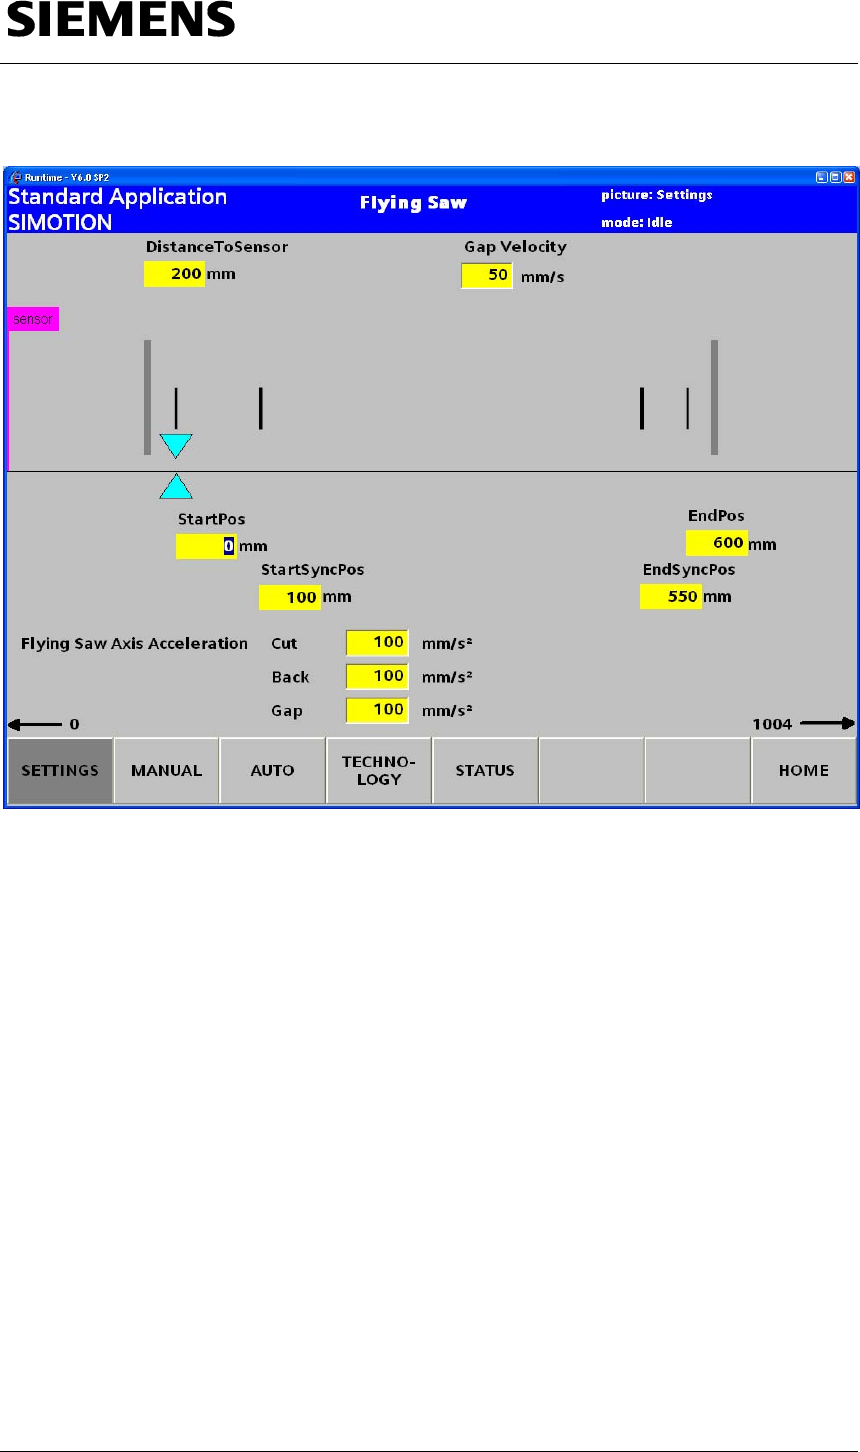
5.2.3 Machine parameter settings
The standard application allows the following parameters to be adapted:
Machine geometry
• Distance to sensor
Distance between the flying saw axis and the sensor of the material and
print mark detection
• StartPosition
Position from which the flying saw starts motion to achieve synchronism
(with the material web)
• StartSyncPosition
Position at which the flying saw is synchronized, start of the
synchronous traversing range
• EndSyncPosition
End of the synchronous traversing range
• EndPosition
Maximum traversing range of the flying saw
Flying Saw Axis Accelerations
• Cut
Acceleration value for synchronization
• Back
Acceleration value for return motion
• Gap
Acceleration value for creating a "gap".
Creating a "gap"
• GapVelocity
Additional velocity in order to create a gap between the material and the
cut piece
Section B: The application example as demonstration
system
Ot
tl
f
th
li ti
l
Flying Saw with SIMOTION A4027118-A0414
V 1.4 Release 06/06/08 52/107
Copyright © Siemens AG 2008 All rights reserved
Manual_SIMOTION Flying Saw_V1.4.doc
Fig. 5-5 SETTINGS operator screen for machine geometry settings
Section B: The application example as demonstration
system
Ot
tl
f
th
li ti
l
Flying Saw with SIMOTION A4027118-A0414
V 1.4 Release 06/06/08 53/107
Copyright © Siemens AG 2008 All rights reserved
Manual_SIMOTION Flying Saw_V1.4.doc
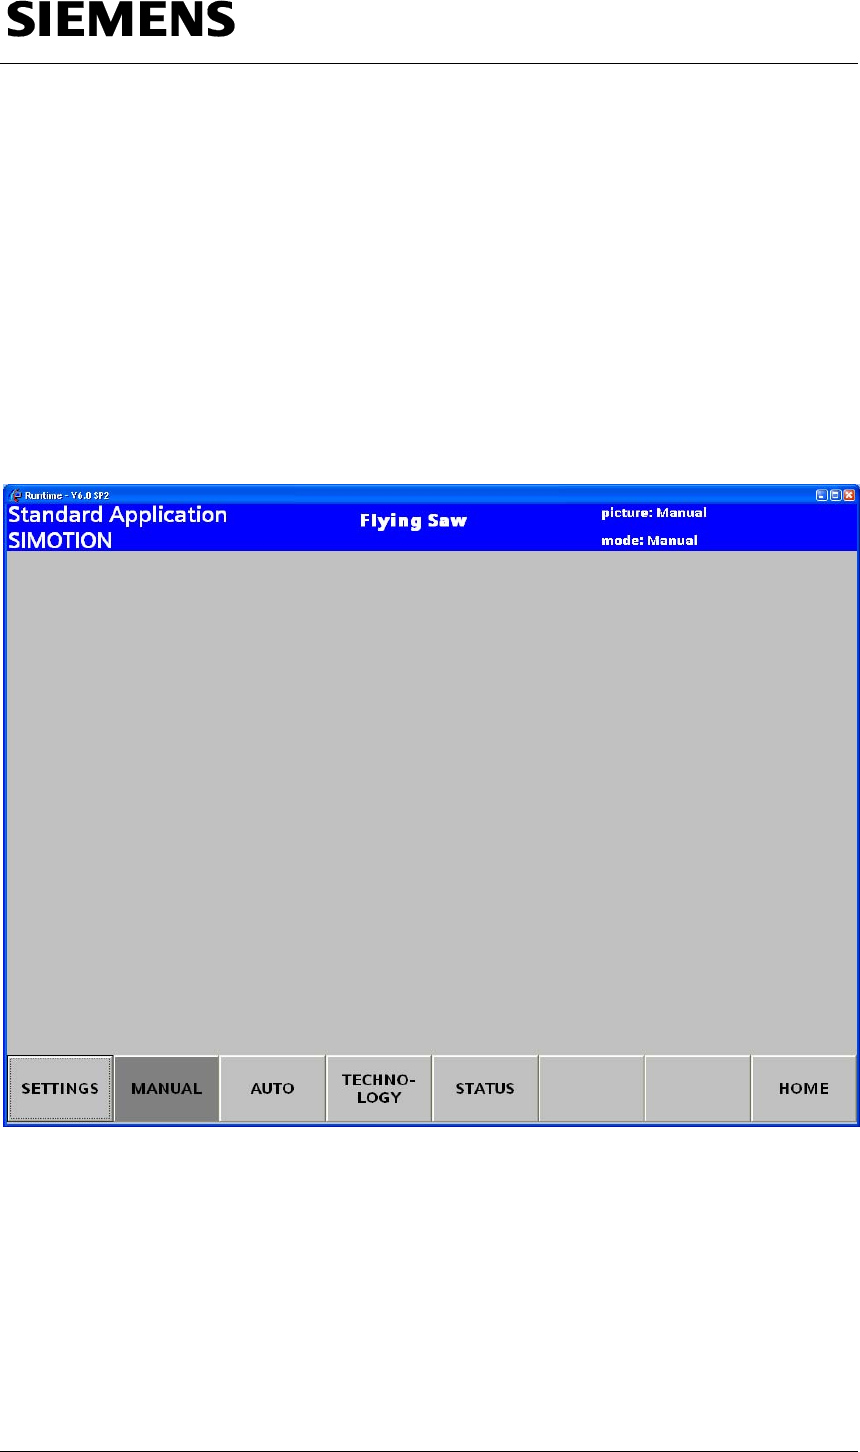
5.2.4 Operator control functions in the setting-mode
In the manual mode, the material web and flying saw can be manually
moved.
This standard application does not require any functions that may only be
executed in the setting-up mode. This is the reason that we are only
providing users with an empty screen form that can be adapted, when
required - to the specifications and requirements of the user’s application.
Fig. 5-6 MANUAL operator control screen form for the operator functions in the setting-up mode
Section B: The application example as demonstration
system
Ot
t
l
f
th
li ti
l
Flying Saw with SIMOTION A4027118-A0414
V 1.4 Release 06/06/08 54/107
Copyright © Siemens AG 2008 All rights reserved
Manual_SIMOTION Flying Saw_V1.4.doc
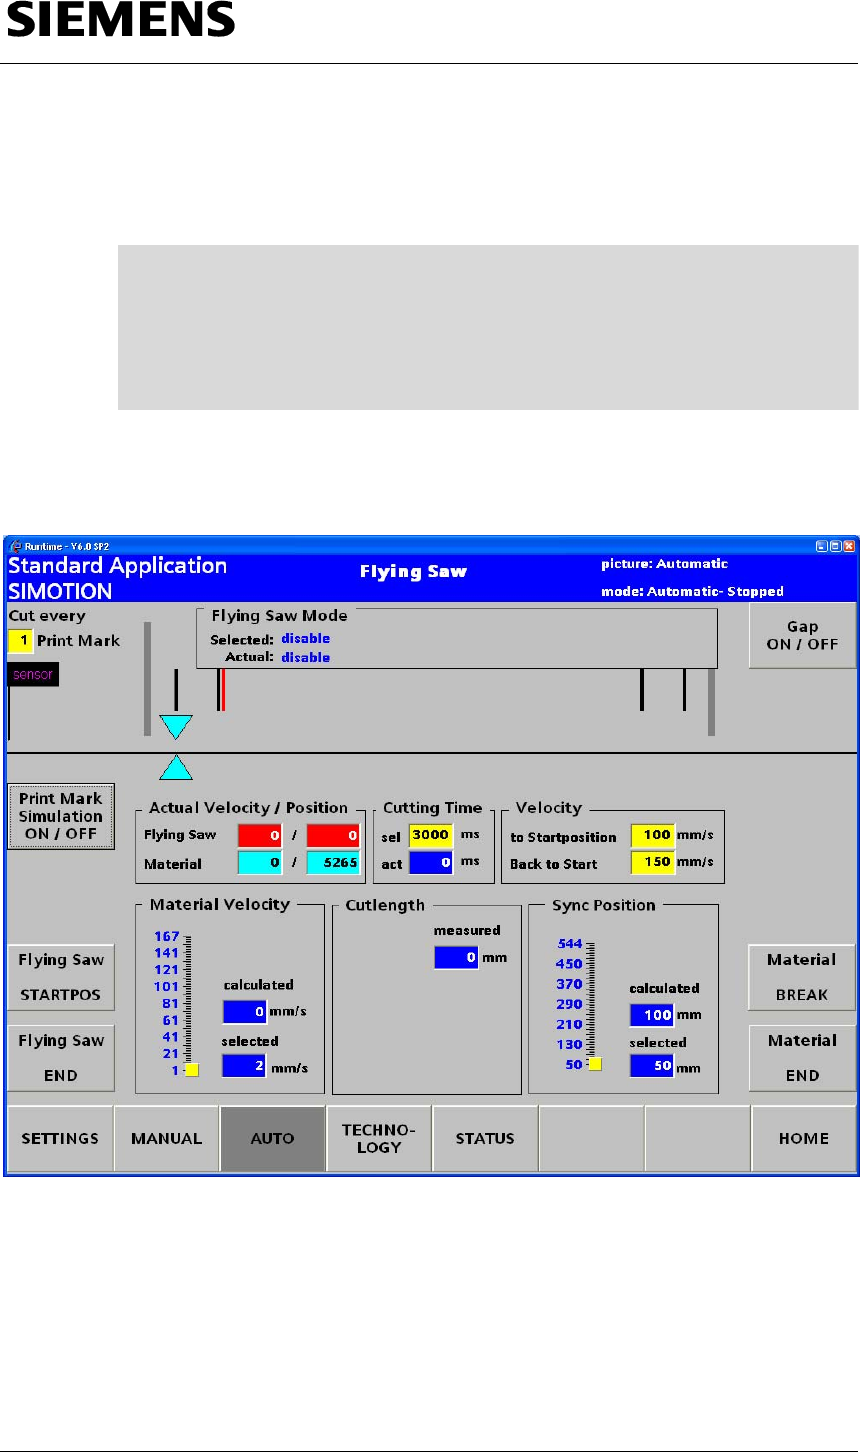
5.2.5 Operator functions of the process in the automatic mode
Note The automatic mode is only available, if
• There is no fault,
• Both axes are enabled, and
• For both of these axes, no manual operator control functions are
active.
Fig. 5-7 AUTOMATIC operator screen form for operator functions in the automatic mode
Section B: The application example as demonstration
system
Ot
tl
f
th
li ti
l
Flying Saw with SIMOTION A4027118-A0414
V 1.4 Release 06/06/08 55/107
Copyright © Siemens AG 2008 All rights reserved
Manual_SIMOTION Flying Saw_V1.4.doc
Standard operator control
Table 5-3: Standard operator control in the automatic mode
No. Action Comment
1 Initial situation:
The “flying saw” is in the AUTOMATIC-STOPPED mode
2 Using the Sync Position slider switch, enter the position
at which the flying saw reaches the position where the
material web is to be cut.
3 The flying saw starts to move to the starting position by
pressing the Flying Saw STARTPOS button
4 After the starting position has been reached, the flying
saw is in the AUTOMATIC-READY mode
5 The flying saw is enabled for operation using the Flying
Saw START button.
6 The flying saw is in the AUTOMATIC-STANDBY mode
and waits for material.
7 Select the required material web velocity using the
Material Velocity slider.
Section B: The application example as demonstration
system
Ot
tl
f
th
li ti
l
Flying Saw with SIMOTION A4027118-A0414
V 1.4 Release 06/06/08 56/107
Copyright © Siemens AG 2008 All rights reserved
Manual_SIMOTION Flying Saw_V1.4.doc
8 Depending on the material velocity and the cutting
duration, an actual maximum position of the flying saw is
obtained, which is identified by a
red bar.
9 You can start to thread the material web or continue
motion after the material web was stopped by pressing
the Material START button.
10 If the flying saw has synchronized itself to the motion of
the material web, the flying saw is in the AUTOMATIC-
PRODUCING mode.
11 Here, you can select whether a cutting position is to be
generated at each print mark (sensor signal) or only after
n print marks.
12 You can stop the material web using the Material BREAK
button.
13 When the material web has been stopped, the flying saw
is in the AUTOMATIC-HELD mode
14 You can start to remove the material web from the system
by pressing the Material END button.
15 The flying saw then waits in the AUTOMATIC-STANDBY
mode for the next material web.
Section B: The application example as demonstration
system
Ot
tl
f
th
li ti
l
Flying Saw with SIMOTION A4027118-A0414
V 1.4 Release 06/06/08 57/107
Copyright © Siemens AG 2008 All rights reserved
Manual_SIMOTION Flying Saw_V1.4.doc
Expanded operator control
Table 5-4: Expanded operator control in the automatic mode
No. Action Comment
1 If the flying saw is in the AUTOMATIC-STOPPED,
operating mode, you can select one of two possibilities:
1. Print Mark Simulation OFF
i.e. the demonstration case itself
generates print marks using sensors. The
cut length can only be changed in steps
of complete revolutions.
2. Print MARK simulation ON
this means that the print marks – and
therefore also the cut length – can be
freely selected .
2 If the print mark simulation has been activated, this
character is displayed at the top left edge of the screen.
3 You can change the cut length with the Cutlength slider.
The system automatically calculates the minimum cut
length from the data specified for the material velocity, cut
duration, velocity for return positioning and the actual
acceleration values. The maximum cut length is obtained
from the minimum plus 1000!
4 You can enter the cutting time using sel
For act
the remaining
cutting time is displayed during the cut itself.
5 You can activate/deactivate the "gap" function using the
Gap ON / OFF button
You can define the size of the gap by entering
Gap Length
Section B: The application example as demonstration
system
Ot
tl
f
th
li ti
l
Flying Saw with SIMOTION A4027118-A0414
V 1.4 Release 06/06/08 58/107
Copyright © Siemens AG 2008 All rights reserved
Manual_SIMOTION Flying Saw_V1.4.doc
6 Here, you can set the velocities for the return to the
starting position and also when returning to the starting
position in the automatic mode
Display areas
Fig. 5-8: Flying saw mode
This area informs you about the selected and presently active operating
mode of the FlyingSaw FB.
Fig. 5-9: Actual velocity / position
In this area, the actual velocity [mm/s] and the actual position [mm] are
displayed for the material and flying saw axis.
Section B: The application example as demonstration
system
Ot
tl
f
th
li ti
l
Flying Saw with SIMOTION A4027118-A0414
V 1.4 Release 06/06/08 59/107
Copyright © Siemens AG 2008 All rights reserved
Manual_SIMOTION Flying Saw_V1.4.doc
5.2.6 Technology view
The technology view of the application can be selected from every operator
screen using the TECHNOLOGY button.
Fig. 5-10 Technology view of the flying saw
Using the trace function on the HMI screen, the actual position and velocity
of the flying saw, the starting position, its velocities and position of the
material web referred to the particular cut can be monitored and traced in
the technology view.
It can also be easily seen how the position of the flying saw precisely
corresponds to that of the material web during the cut itself.
Using the trace-
record function
Actual position of the
flying saw
Velocity of the flying
saw
Velocity of the
material web
Quiescent position of
the flying saw
Section B: The application example as demonstration
system
Ot
tl
f
th
li ti
l
Flying Saw with SIMOTION A4027118-A0414
V 1.4 Release 06/06/08 60/107
Copyright © Siemens AG 2008 All rights reserved
Manual_SIMOTION Flying Saw_V1.4.doc
5.2.7 Operator control functions in the status display
The status display of the application can be selected from every operator
screen using the STATUS button.
Fig. 5-11: Status
You can see the actual state of the FlyingSaw FB in the status display.
The error numbers that are displayed under ErrorID can be viewed under
Chapter 12.2 Possible error messages at the error output ErrorID of the
„FB_BGD_TEMPLATE_FlyingSaw()“.
Errors can be acknowledged using the QUITT button.
If the FlyingSaw-FB is in the “error” state, then the Quitt button should be
pressed until the FlyingSaw-FB is in the “disable” state.
Section C: Integrating the core “flying saw” functions
Operator control of the application example
Flying Saw with SIMOTION A4027118-A0414
V 1.4 Release 06/06/08 61/107
Copyright © Siemens AG 2008 All rights reserved
Manual_SIMOTION Flying Saw_V1.4.doc
Section C: Integrating the core “flying saw” functions
Content
All of the steps necessary to integrate the core “flying saw” functions into
your application are explained in Section C.
Preparations and parameterizing operations are also explained. Further,
you are also told how to integrate the “FlyingSaw FB” into your application
step-by-step.
Objective
Section C of this document is intended to provide the user with
• The prerequisites to use this standard SIMOTION application
• Preparations and parameterizing operations are explained
• The necessary steps to integrate this standard application into their
application.
• Information and references to possible error messages and tips on how
to use this standard application.
Subjects discussed
Chap. Title Contents
6 Program
environment and
interfaces
Structure of the standard application
Function and identification of the program groups
Call environment of the FlyingSaw FB
Description of the interfaces and the parameters of the
FB_BGD_TEMPLATE_FlyingSaw()
7 Integrating the core
“flying saw”
functions
Prerequisites that are absolutely necessary to use the core
“flying saw” functions
Preparations to use the core functions in your application
Technology objects required and their parameterization
Synchronous objects required and their parameterization
Integrating core functions into your application
8 Using the
„FB_BGD_TEMPLA
TE_FlyingSaw()“
General information and instructions
Basic state of the function block
“FB_BGD_TEMPLATE_FlyingSaw()” and when this state occurs.
Mode changeover at the "FB_BGD_TEMPLATE_FlyingSaw()".
Using the restart bit of the block.
Function of the "immediate cut" of
FB_BGD_TEMPLATE_FlyingSaw()“.
Function of the "create gap" of the
FB_BGD_TEMPLATE_FlyingSaw()“.
Display of block errors
Function of the synchronizing mechanism of the
FB_BGD_TEMPLATE_FlyingSaw ()

Section C: Integrating the core “flying saw” functions
Program environment and interfaces
Flying Saw with SIMOTION A4027118-A0414
V 1.4 Release 06/06/08 62/107
Copyright © Siemens AG 2008 All rights reserved
Manual_SIMOTION Flying Saw_V1.4.doc
6 Program environment and interfaces
6.1.1 Function and identification of the program groups
The standard “flying saw” application is sub-divided into the following
program groups:
• OMAC
• SAP
• FS
• SIM
• HMI
OMAC
In the OMAC program group, the operating mode manager is used
according to the OMAC standard of the standard SIMOTION Easy Basics
(SEB) application.
SAP
Program group to solve automation tasks (demo) machine with the
application example of the standard “flying saw” application. Based on the
SIMOTION D demonstration case, the mode of operation and core
functions of the standard application are presented/demonstrated in
conjunction with a WinCCflex-base visualization system.
FS
Program group with the core functions of the standard “flying saw”
application.
This program group includes the "flying saw" TEMPLATE and
supplementary functions to manage the synchronous position.
SIM
Program group to simulate system signals in the demonstration case
environment
HMI
Program group to display system sequences on the WinCCflex operator
interface (screen)

Section C: Integrating the core “flying saw” functions
Program environment and interfaces
Flying Saw with SIMOTION A4027118-A0414
V 1.4 Release 06/06/08 63/107
Copyright © Siemens AG 2008 All rights reserved
Manual_SIMOTION Flying Saw_V1.4.doc
6.1.2 Program structure
All of the functions, implemented in the standard “flying saw” application are
listed in the following table according to their assignment to a particular
program group and program unit.
Table 6-1: Program structure of the standard “flying saw” application
Pro-
gram
Section
Program
unit Program
module Data
unit
OmacMain OmacMain()
OmacVar
OMAC
OmacStUp OmacStUp()
SAP SAP_FS
BGD_SAP_FlyingSaw()
Startup_SAP()
SAP_Var
SAP SAPState FC_SAP_FlyingSaw_AutomaticAborted()
FC_SAP_FlyingSaw_AutomaticAborting()
FC_SAP_FlyingSaw_AutomaticHeld()
FC_SAP_FlyingSaw_AutomaticHolding()
FC_SAP_FlyingSaw_AutomaticProducing()
FC_SAP_FlyingSaw_AutomaticStandby()
FC_SAP_FlyingSaw_AutomaticReady()
FC_SAP_FlyingSaw_AutomaticStarting()
FC_SAP_FlyingSaw_AutomaticStopping()
FC_SAP_FlyingSaw_AutomaticStopped()
FC_SAP_FlyingSaw_AutomaticManual()
FC_SAP_FlyingSaw_AutomaticIdle()
FC_SAP_FlyingSaw_AutomaticEStop()
Section C: Integrating the core “flying saw” functions
Program environment and interfaces
Flying Saw with SIMOTION A4027118-A0414
V 1.4 Release 06/06/08 64/107
Copyright © Siemens AG 2008 All rights reserved
Manual_SIMOTION Flying Saw_V1.4.doc
Pro-
gram
Section
Program
unit Program
module
Data
unit
FS_TEMPL FB_BGD_TEMPLATE_FlyingSaw()
FS_Var
FS_PMIPO MT_FS1_PrintmarkDetection()
IPO_FS1_IPO_routine()
FS
FS_SPB FB_BGD_FS_SPB_in()
FB_BGD_FS_SPB_reset()
FB_BGD_FS_SPB_read()
FB_BGD_FS_SPB_out()
SIM SIM_PM IPO_SIM_Printmarks()
Startup_SIM()
SIM_Var
HMI HMI_SAP BGD_HMI_FlyingSaw()
Startup_HMI()
FB_BGD_HMI_Printmarks()
FB_BGD_HMI_Cuts()
FB_BGD_HMI_Material()
HMI_Var
The meanings are as follows:
FB: The program module is programmed as function block
FC: The program module is programmed as function
MT: The program must be called in the motion task
BGD: Programming function or function block is used to make a call in
the background task.
IPO: Program is used to make a call in the IPO task.
Startup Program is used to make a call in the start-up task.
Core functions, which the user can use, unchanged in his
application.
Section C: Integrating the core “flying saw” functions
Program environment and interfaces
Flying Saw with SIMOTION A4027118-A0414
V 1.4 Release 06/06/08 65/107
Copyright © Siemens AG 2008 All rights reserved
Manual_SIMOTION Flying Saw_V1.4.doc
6.2 Call environment
The function block FB_BGD_TEMPLATE_FlyingSaw() of the “flying saw”
core function must be cyclically called in the user program. This is the
reason that the call can only be made from a program that is incorporated
in the background task.
Fig. 6-1 Call environment of the FB_BGD_TEMPLATE_FlyingSaw()
SIMOTION
„FB_BGD_
TEMPLATE_
FlyingSaw()“ TO
B
a
c
k
g
r
o
u
n
d
T
a
s
k
TO specific
commands
TO specific
commands
TO
in mode (4)
Manual only
Flying Saw Axis
other Axes
Central Function Flying Saw
U
s
e
r
s
P
r
o
g
r
a
m
Unit „FS_Var“
The technology object “FlyingSawAxis”, influenced by the function block
FB_BGD_TEMPLATE_FlyingSaw(), may only be addressed by the user
program if, beforehand, the user switched the core “flying saw” function into
Mode 4 “Manual”. In all of the other modes, it is not permissible that the
user program influences the technology object “FlyingSawAxis”.
6.3 Interfaces
6.3.1 Classifying the interfaces
The function block FB_BGD_TEMPLATE_FlyingSaw() can be influenced
using several parameters and interfaces that are classified/sub-divided into
the following areas:
Section C: Integrating the core “flying saw” functions
Program environment and interfaces
Flying Saw with SIMOTION A4027118-A0414
V 1.4 Release 06/06/08 66/107
Copyright © Siemens AG 2008 All rights reserved
Manual_SIMOTION Flying Saw_V1.4.doc
• Block interfaces
• User interface in the global data area (data unit FS_Var)
The function block is signaled changing tasks and modes using the block
interface. The function block signals the actual status and possibly
occurring faults back to the user program also via this interface.
The function block is mainly signaled the physical quantities of the “flying
saw” to be controlled via the user interface in the global data area. In
normal “flying saw” operation, these quantities are not changed.
6.3.2 Block interface of the FB_BGD_TEMPLATE_FlyingSaw()
The following interfaces are provided at the block to control the flying saw
using the function block FB_BGD_TEMPLATE_FlyingSaw():
FB_BGD_TEMPLATE_FlyingSaw()
Execute
Mode
Done
Busy
Error
ErrorID
State
StopCutting
Gap
OnTheSpotCut
Cut
OnTheSpotCutPossible
OnTheSpotCutDone
IN OUT
IN / OUT
UsersInterface
ErrorInterface
InternalData
SyncPosManagement
TimeCalc
KnifeOut EndSyncPosReached
PMGenerationMode
TypeOfSynchronization
Table 6-2 Interfaces of the FB_BGD_TEMPLATE_FlyingSaw()
Parameter Data type Initial value Description
Input parameter (IN)
Execute BOOL False
A queued mode changeover is
activated using this input.
Section C: Integrating the core “flying saw” functions
Program environment and interfaces
Flying Saw with SIMOTION A4027118-A0414
V 1.4 Release 06/06/08 67/107
Copyright © Siemens AG 2008 All rights reserved
Manual_SIMOTION Flying Saw_V1.4.doc
Parameter Data type Initial value Description
Mode INT 0 Using Mode, the mode is pre-
selected that is activated with
the next positive signal edge at
the execute input.
StopCutting BOOL False When this bit is set, the module
is informed that cutting has
been completed and a gap can
be created or the cutting device
can be withdrawn from the
material.
KnifeOut BOOL False
When this bit is set, the module
is signaled that the cutting
device is no longer in contact
with the material and the
cutting device can be returned
to its starting position.
Gap BOOL False
If this bit is set, after a cut, the
flying saw generates a gap
between the cut piece of
material web and the material
web using a superimposed
motion of the cutting device.
OnTheSpotCut BOOL False When this bit is set, a
synchronous position is
immediately generated on the
material web for the next cut.
PMGenerationMod
e INT PM_CALCULA
TED PM_CALCULATED:
The next cut position is defined
automatically after running one
cutlength.
PM_MEASURED:
The next cut position is defined
by printmark detection.
TypeOfSynchronis
ation INT BY_TIME
BY_TIME:
The synchronizing is done
according to dynamic values
entered.
BY_LEADING_AXIS_VALUE:
The synchronizing is done
according to leading axis
values. The master synclength
is set to a value as twice as
slave synclength automatically.
This causes an asymptotic
synchronization.
Section C: Integrating the core “flying saw” functions
Program environment and interfaces
Flying Saw with SIMOTION A4027118-A0414
V 1.4 Release 06/06/08 68/107
Copyright © Siemens AG 2008 All rights reserved
Manual_SIMOTION Flying Saw_V1.4.doc
Parameter Data type Initial value Description
Input/output parameter (IN/OUT)
UsersInterface STRUCT User interface
ErrorInterface STRUCT ErrorID of the technology
functions
InternalData STRUCT Internal data of the sequence
control
SyncPos
Management STRUCT Data of the synchronous
position management
TimeCalc STRUCT Time calculation data
Output parameter (OUT)
Done BOOL False
Selected mode has been
activated.
Busy BOOL False Mode changeover is active.
Error BOOL False
Indicates faults/errors within
the FBs and at the cross-cutter
axes.
Cut BOOL False
The flying saw moves in
synchronism with the material
web – cutting can start.
EndSyncPos
Reached BOOL False Alarm, if the flying saw
passes/exceeds the upper limit
value of the synchronous range
when in the automatic mode
OnTheSpotCut
Possible BOOL False The flying saw is in its starting
position and an immediate cut
is possible
OnTheSpotCut
Done BOOL False The immediate cut was carried-
out
SyncNotPossible BOOL False The last synchronization
operation could not be
executed with the secondary
conditions/constraints present.
ErrorID WORD 0 Fault code
State INT 0 Actual operating mode
6.3.3 Structure of the global data area of the data unit FS_Var
The interconnection and links with the technology objects required and the
physical reference quantities and control information are saved in the user
interface of the instance data area.
The parameters saved here are generally not changed during fault-free
operation of the “flying saw”.
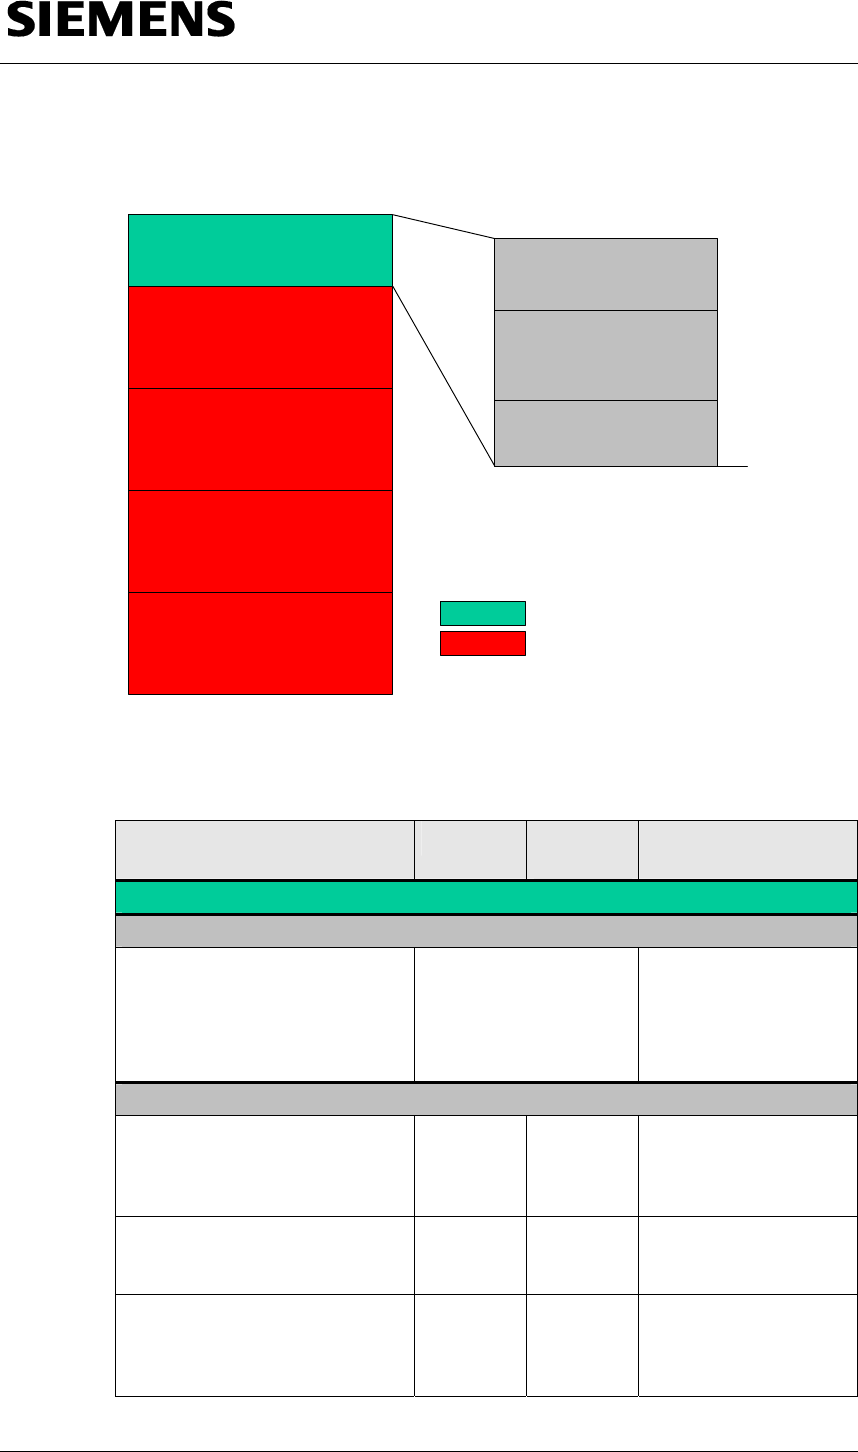
Section C: Integrating the core “flying saw” functions
Program environment and interfaces
Flying Saw with SIMOTION A4027118-A0414
V 1.4 Release 06/06/08 69/107
Copyright © Siemens AG 2008 All rights reserved
Manual_SIMOTION Flying Saw_V1.4.doc
Fig. 6-2 Structure of the global data area of the core “flying saw” function
Internal data of the
sequence control
Unit FS_Var
User rinterface
Data of the synchronous
position management
Data of the time calculation
TOs used
Physical quantities
Control information
User must adapt values
User may not change values
ErrorID of the technology
functions
DW24
DW34
DW58
DW60
Table 6-3 User interface in the global data area of the unit FS_Var
Parameter Data type Initial
value Description
User interface
Matrix of the TOs used
FS_AxesTOs StructAxesTOs
Matrix to reference the
technology objects
relevant for the “flying
saw”.
Physical quantities
DistanceToSensor [mm] LREAL 200.0 Clearance between
the sensor and zero
position of the
FlyingSawAxis
StartPos [mm] LREAL 0.0 Circumference of the
cross-cutter / number
of knives
SyncPos [mm] LREAL 100.0 Position from where
the flying saw moves
in synchronism with
the material web.
Section C: Integrating the core “flying saw” functions
Program environment and interfaces
Flying Saw with SIMOTION A4027118-A0414
V 1.4 Release 06/06/08 70/107
Copyright © Siemens AG 2008 All rights reserved
Manual_SIMOTION Flying Saw_V1.4.doc
Parameter Data type Initial
value Description
EndSyncPos [mm] LREAL 20.0 End position of the
synchronous range
EndPos [mm] LREAL 125.0 Starting position of the
cross-cutter
ToStartposVelocity [mm/s] LREAL 100.0 Velocity of the travel
back to the starting
position
ToBackposVelocity [mm/s] LREAL 150.0 Velocity of the travel
back to the starting
position
AccelerationCut [mm/s²] LREAL 100.0 Acceleration value for
synchronization motion
AccelerationBack [mm/s²] LREAL 100.0 Acceleration value for
return motion to the
starting position
AccelerationGap [mm/s²] LREAL 100.0 Acceleration value for
motion to create a
"gap".
GearingRatio LREAL 1.0
Ratio between
measured and
effective velocity of the
material web.
CutEverySensorSignal DINT 1 Specifies after how
many sensor signals a
synchronous position
is to be generated.
GapLength LREAL 10.0
Length of the gap that
should be located
between the cut pieces
GapVelocity LREAL 50.0
Higher-level velocity
with which the gap is
to be created
Section C: Integrating the core “flying saw” functions
Program environment and interfaces
Flying Saw with SIMOTION A4027118-A0414
V 1.4 Release 06/06/08 71/107
Copyright © Siemens AG 2008 All rights reserved
Manual_SIMOTION Flying Saw_V1.4.doc
Parameter Data type Initial
value Description
Control information
Restart BOOL false
If the bit is set (e.g. in
the StartUp task), then
the template executes
a re-initialization and
resets the bit.
This bit must be set
for each new start!
MaterialIn BOOL false
If the bit is set, the
material web is in the
flying saw area.
MaterialInMotion BOOL false
If the bit is set, the
material web in the
flying saw area.is
moving.
Fig. 6-3 Matrix of the relevant technology objects (TOs)
Axis_FlyingSawAxis_Material
Pos_Axis
Following_Axis
External_Encoder
Following_Objekt
Printmark
X--
-- X
(X) --
-- X
X--
(X) In realen Anwendungen kann auch auf einen
externen Geber zugegriffen werden
Section C: Integrating the core “flying saw” functions
Integrating the core “flying saw” functions
Flying Saw with SIMOTION A4027118-A0414
V 1.4 Release 06/06/08 72/107
Copyright © Siemens AG 2008 All rights reserved
Manual_SIMOTION Flying Saw_V1.4.doc
7 Integrating the core “flying saw” functions
7.1 This is how you integrate core functions into your project
Please proceed as follows to integrated core functions into your project:
• Check whether your equipment fulfills the software and hardware
prerequisites listed in Chapter 7.2 Prerequisites.
• De-archive and load the relevant project sections as described in
Chapter 7.3 Preparations.
• Set-up the required technology objects as described in Chapter 7.4
Setting-up the required technology objects.
• Assign the synchronous relationships as described in Chapter 7.5
Assigning the synchronous relationships.
• Call-up the core functions as listed in Chapter 7.6 Integrating into
your application.
• Information and instructions on how you must integrate core functions
into the sequence of your user program are provided in Chapter 8
Using the "FB_BGD_TEMPLATE_FlyingSaw()".
7.2 Prerequisites
7.2.1 SIMOTION SCOUT with SIMATIC STEP 7
In order to use this standard SIMOTION application, the SIMOTION
SCOUT programming interface must be correctly installed on your
computer.
You have two possibilities to do this:
• You can install SIMOTION SCOUT in its standalone version - the STEP
7 functions required will be automatically installed.
Table 7-1 Software components
Software Diagram Order No./MLFB and functions Version used
SIMOTION
SCOUT
standalone
6AU1810-0CA40-0XA0
SCOUT standalone is the engineering
tool to program all SIMOTION controls
without STEP 7
V4.0.0
or
• You install STEP 7 followed by SIMOTION SCOUT.
Section C: Integrating the core “flying saw” functions
Integrating the core “flying saw” functions
Flying Saw with SIMOTION A4027118-A0414
V 1.4 Release 06/06/08 73/107
Copyright © Siemens AG 2008 All rights reserved
Manual_SIMOTION Flying Saw_V1.4.doc
Table 7-2 Software components
Software Diagram Order No./MLFB and functions Version used
STEP 7
6ES7810-4CC07-0YA5
Step7 is the basis package for all
optional software packages and is used
to program the SIMATIC S7.
V5.3 SP3 HF1
SIMOTION
SCOUT
6AU1810-0BA40-0XA0
SCOUT is the engineering tool to
program all SIMOTION controls
V4.0.0
This form of the installation has been used when generating the standard
“flying saw” application and should therefore be the preferred one for users.
7.2.2 SIMOTION control
A SIMOTION control is required to operate the core “flying saw” functions.
All SIMOTION D, SIMOTION P and SIMOTION C controls can be used.
.
Note The application example has been developed and tested for use in
conjunction with the SIMOTION D training case with CPU D435.
Modifications and changes may have to be made when used in another
hardware environment
.
In order to correctly use the program elements in this document, you should
be knowledgeable about handling, and programming the control being used
as well as its functions.
Table 7-3 Hardware components of the core “flying saw” functions
Hardware element Diagram Order No./MLFB and functions
SIMOTION CPU
D435
6AU1435-0AA00-0AA0 Version C
The CPU D435 processes the user
program, the technology and checks the
drives.
SIMOTION
D435
32MB CF-Card
6AU1400-2JA00-0AA0
The SIMOTION program and the
SINAMICS configuring are saved on the
CF card.
Section C: Integrating the core “flying saw” functions
Integrating the core “flying saw” functions
Flying Saw with SIMOTION A4027118-A0414
V 1.4 Release 06/06/08 74/107
Copyright © Siemens AG 2008 All rights reserved
Manual_SIMOTION Flying Saw_V1.4.doc
7.2.3 Technology objects required and synchronous relationships
The following technology objects must be set-up and interconnected with
one another in the following fashion in order to use the core “flying saw”
functions:
Technology objects
The required technology objects are listed according to their function within
the core “flying saw” functions in the following:
• Generating the master (leading) value from the motion of the material
web:
– TO Achse “MaterialAxis” as real positioning or synchronous axis
(maximum configuration)
To determine the position and velocity of the material web as
master (leading) value of the core “flying saw” functions and to
coordinate the motion of the axis – material web from the same
control.
• Coordinating the flying saw axis
– TO axis “FlyingSawAxis” as real synchronous axis
Synchronous relationships
The "flying saw" core functions require the following synchronous
relationships:
Fig. 7-1 Synchronous relationship required for the “FlyingSaw FB”
Material
Axis
Flying
Saw
Axis
1:1
External encoder
or positioning
axis
Synchronous
axis
Gearing
The MaterialAxis is the reference quantity for the “flying saw”. For this
purpose, it must be made available to the “flying saw FB” as “positioning
axis”.
Section C: Integrating the core “flying saw” functions
Integrating the core “flying saw” functions
Flying Saw with SIMOTION A4027118-A0414
V 1.4 Release 06/06/08 75/107
Copyright © Siemens AG 2008 All rights reserved
Manual_SIMOTION Flying Saw_V1.4.doc
The FlyingSawAxis is connected, for the cut, as “synchronous axis” with the
MaterialAxis in a 1:1 (gearing) synchronous relationship.
The technology objects and synchronous relationships listed above must
be set-up and configured/engineered by the user in SIMOTION SCOUT.
7.3 Preparations
7.3.1 De-archiving the standard "flying saw" application
The standard “flying saw” application is supplied as STEP 7/SCOUT
project. In order to use the template, this project must be de-archived either
using STEP 7 or SCOUT.
7.3.2 Downloading the core functions into your SCOUT project
In order to quickly and simply transfer the core “flying saw” functions into
your SCOUT project, you should proceed as shown in the following steps.
Table 7-4 This is how you download the core functions into your project
No Action Comment
1 Open the standard “flying saw” application using SCOUT
2 Open your user project with SCOUT SCOUT is opened a second
time!
3 Copy the program units
FS_SPB
FS_PMIPO
FS_TEMPL
FS_VAR
from the standard application into your user project
By dragging and dropping
4 Close SCOUT using the standard application Ready!

Section C: Integrating the core “flying saw” functions
Integrating the core “flying saw” functions
Flying Saw with SIMOTION A4027118-A0414
V 1.4 Release 06/06/08 76/107
Copyright © Siemens AG 2008 All rights reserved
Manual_SIMOTION Flying Saw_V1.4.doc
7.4 Setting-up the required technology objects
Prerequisite
SIMOTION SCOUT has been started.
The user knows how to apply the SIMOTION SCOUT program.
7.4.1 Flying saw axis
Configuration
• Insert a new axis with the name FlyingSawAxis
• Parameterize the axis as synchronous axis
• Set the axis type as linear
• Parameterize as modulo axis with a modulo length greater than the
maximum traversing distance (this is monitored from the FlyingSaw-FB
Æ “parameterizing error”)
• All of the additional parameters should be set corresponding to the drive
and encoder data.
Mechanical system
• For the parameter “distance for each spindle revolution” enter the
distance that the knife tip of the “flying saw” moves through for one
motor revolution.
• Appropriately supplement the other parameters as well as geometry
and design.
Pre-assignment
• Please enter this parameter corresponding to the drive dynamic
performance.
Limits
• Please enter these parameters corresponding to the system layout and
configuration.
Referencing (homing)
• Please enter these parameters corresponding to the encoder
(the template assumes a referenced/homed axis). If an incremental
encoder is used, it is necessary to reference/home the axis in mode 4
“Manual” before additional operating modes are selected. )

Section C: Integrating the core “flying saw” functions
Integrating the core “flying saw” functions
Flying Saw with SIMOTION A4027118-A0414
V 1.4 Release 06/06/08 77/107
Copyright © Siemens AG 2008 All rights reserved
Manual_SIMOTION Flying Saw_V1.4.doc
Monitoring functions – closed-loop control
• Please set these parameters corresponding to the system layout and
configuration.
7.4.2 Axis, material web
Configuration
• Insert a new axis with the name MaterialAxis
• Parameterize the axis as positioning axis
• Set the axis type as linear
• Parameterize as modulo axis with a modulo length greater than the
maximum product length
• All of the additional parameters should be set corresponding to the drive
and encoder data.
Mechanical system
• For the parameter “distance for each spindle revolution”, the distance
that the material web moves through for one revolution of the drive roll
should be entered.
• Appropriately supplement the other parameters as well as geometry
and design.
Pre-assignment - limits
• Please enter these parameters corresponding to the system / drive
relationships.
Referencing (homing)
• Parameterize “not required”
Monitoring functions – closed-loop control
• Please set these parameters corresponding to the system layout and
configuration.

Section C: Integrating the core “flying saw” functions
Integrating the core “flying saw” functions
Flying Saw with SIMOTION A4027118-A0414
V 1.4 Release 06/06/08 78/107
Copyright © Siemens AG 2008 All rights reserved
Manual_SIMOTION Flying Saw_V1.4.doc
7.5 Assigning the synchronous relationships
7.5.1 FlyingSawAxis_SYNCHRONOUS_OPERATION
Configuration
• Select the MaterialAxis as master (leading) axis
• Select setpoint coupling as coupling type.
Pre-assignment (gear synchronization)
• Synchronizing:
Enter the synchronizing position of the master (leading) axis and
slave (following) axis
(this is checked and corrected by the FlyingSaw FB)
• Position reference:
Synchronize before the synchronizing position
(this is checked and corrected by the FlyingSaw FB)
• SyncPos master (leading) value:
0.0
(the FlyingSaw FB enters the actual value)
• SyncPos slave (following) axis:
0.0
(the FlyingSaw FB enters the actual value)
• The other values are no longer relevant.
Pre-assignment (dynamic)
• Profile input: Time-related synchronizing profile
(this is checked and corrected by the FlyingSaw FB)
• Please select the dynamic parameters of the time-related
synchronization so that the FlyingSawAxis does not reach the dynamic
limits when synchronizing and de-synchronizing.
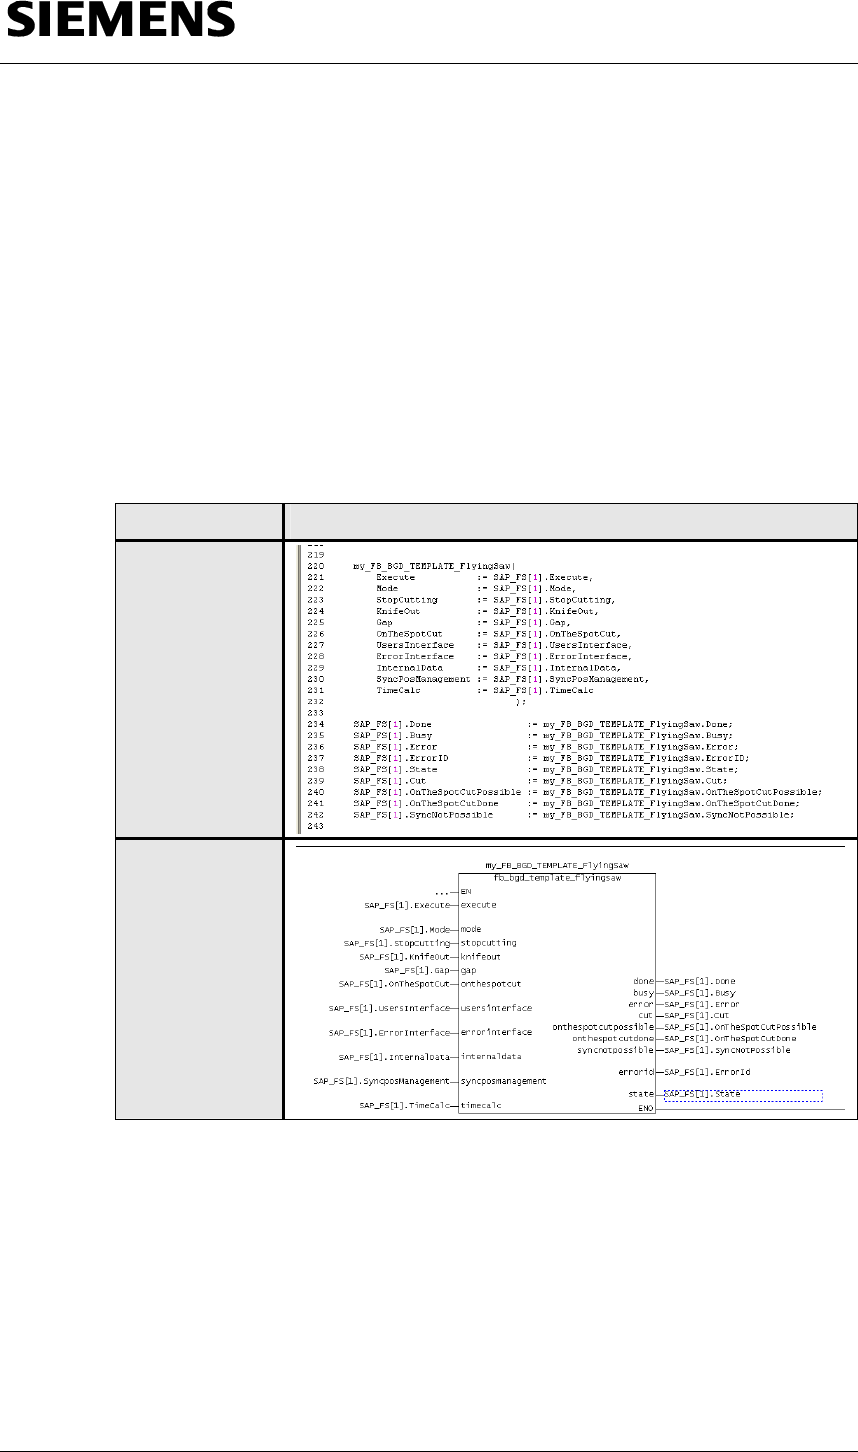
Section C: Integrating the core “flying saw” functions
Integrating the core “flying saw” functions
Flying Saw with SIMOTION A4027118-A0414
V 1.4 Release 06/06/08 79/107
Copyright © Siemens AG 2008 All rights reserved
Manual_SIMOTION Flying Saw_V1.4.doc
7.6 Integrating into your application
7.6.1 Calling the “FlyingSaw FB” in the user program
The function block of the core “flying saw” functions can also be simply
called in the program after integration into your SIMOTION project.
Calling the “FB_BGD_TEMPLATE_FlyingSaw()” in ST and FBD
As an example, the calls of the function block
“FB_BGD_TEMPLATE_FlyingSaw()” of the core “flying saw” functions in
the ST and FBD programming languages are shown here:
Table 7-5 Calling the function block “_BGD_TEMPLATE_FlyingSaw()“
FB_BGD_TEMPLATE_FlyingSaw()
ST
FUP
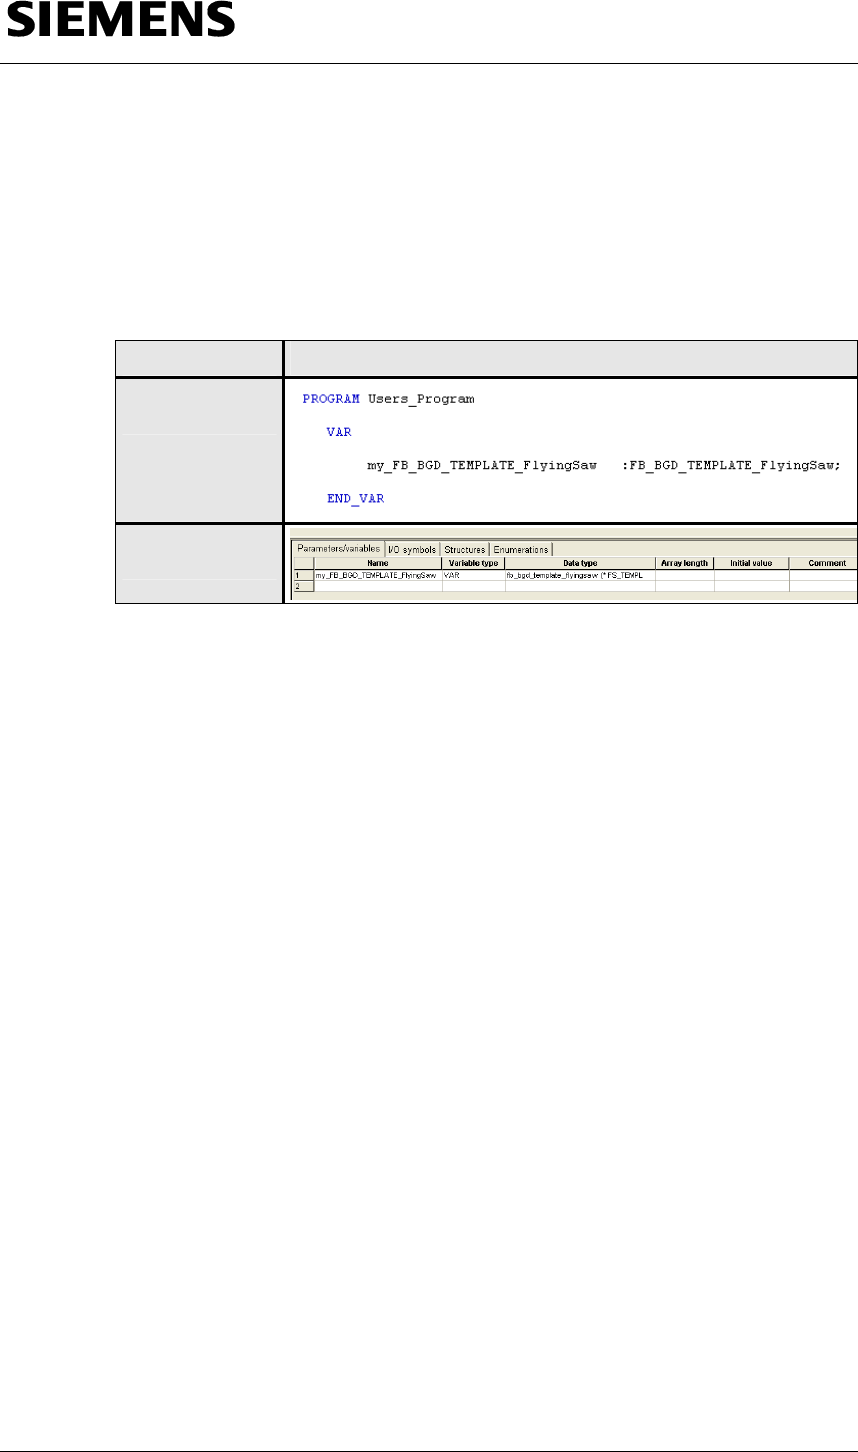
Section C: Integrating the core “flying saw” functions
Integrating the core “flying saw” functions
Flying Saw with SIMOTION A4027118-A0414
V 1.4 Release 06/06/08 80/107
Copyright © Siemens AG 2008 All rights reserved
Manual_SIMOTION Flying Saw_V1.4.doc
Assigning the instance
In the calling user program, the function block
“FB_BGD_TEMPLATE_FlyingSaw()” must be assigned an instance. The
following table includes examples in ST and FBD.
Table 7-6 Generating an instance of the “FB_BGD_TEMPLATE_FlyingSaw()”
Instance
ST
FUP
7.6.2 Integrating the template block in the processing sequence
The core “flying saw” function is integrated in the processing sequence
using a simple function block call and transferring the required parameters.
This call strategy corresponds to that of PLC-Open standard function
blocks.

Section C: Integrating the core “flying saw” functions
Using the "FB_BGD_TEMPLATE_FlyingSaw()"
Flying Saw with SIMOTION A4027118-A0414
V 1.4 Release 06/06/08 81/107
Copyright © Siemens AG 2008 All rights reserved
Manual_SIMOTION Flying Saw_V1.4.doc
8 Using the "FB_BGD_TEMPLATE_FlyingSaw()"
8.1 General information and instructions
The most important element of the technology template is the function
block “FB_BGD_TEMPLATE_FlyingSaw()”. The connected “flying saw” is
parameterized and controlled using this block.
In the user program, the block must therefore be parameterized and the
block mode changed-over in order to initiate that the
“FB_BGD_TEMPLATE_FlyingSaw()” executes the required functions.
The "FB_BGD_TEMPLATE_FlyingSaw()“ is parameterized as described in
Chapter 6.3 Interfaces. When parameterizing (assigning parameter
values), basic values of the “flying saw” are defined that normally do not
change; for example, the name of the flying saw axis, the starting position,
the synchronous position etc. These values may only be changed when the
system is at a standstill and changes require a re-initialization (restart) of
the "FB_BGD_TEMPLATE_FlyingSaw()“!
The individual modes of the"FB_BGD_TEMPLATE_FlyingSaw()“ are
described in Chapter 3.2 Operating states of the "FlyingSaw-FB". The
procedure to change over the mode is described in more detail in the
following Chapters.
8.2 Initial state of the "FB_BGD_TEMPLATE_FlyingSaw()"
After a “restart”, the “FB_BGD_TEMPLATE_FlyingSaw()” is in the “disable”
state.
Each time that the control is started, “restart” must be run by setting the
restart bit in the startup task. (this is realized automatically when using the
program startup_SAP() in the UNIT SAP_FS)
This means that the template is transitioned into its initial state and
important technology parameters are checked regarding plausibility, if
possible adapted, and if not possible, parameterizing errors are flagged to
the user at the fault output.
8.3 Mode changeover sequence
The functions of the function block “FB_BGD_TEMPLATE_FlyingSaw()”
and therefore the functions of the connected “flying saw” are controlled
using the various state modes of the block.
The following state modes and status transitions can be called at the block:
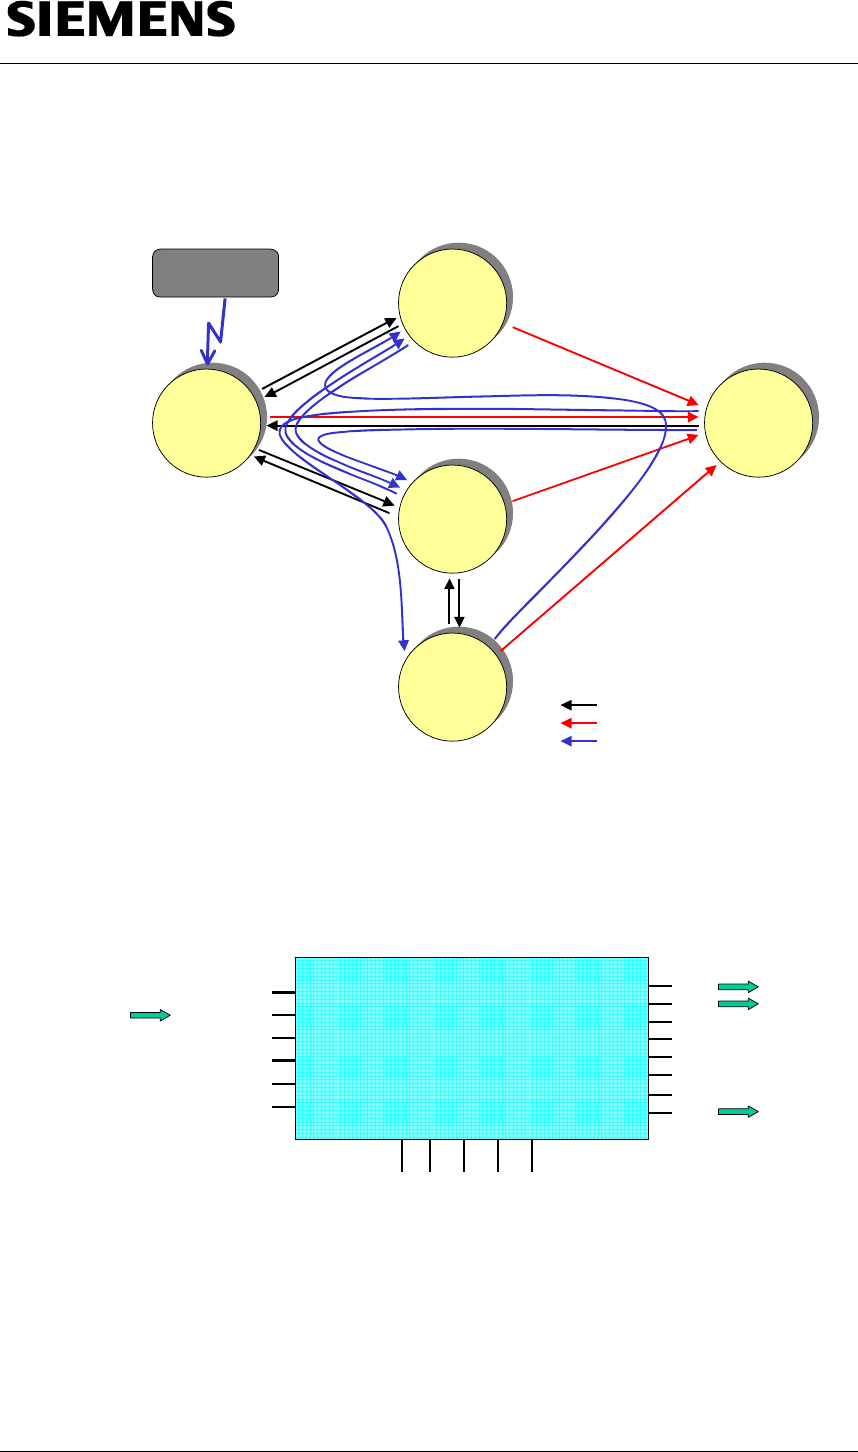
Section C: Integrating the core “flying saw” functions
Using the "FB_BGD_TEMPLATE_FlyingSaw()"
Flying Saw with SIMOTION A4027118-A0414
V 1.4 Release 06/06/08 82/107
Copyright © Siemens AG 2008 All rights reserved
Manual_SIMOTION Flying Saw_V1.4.doc
Fig. 8-1 Possible state transitions at the "FB_BGD_TEMPLATE_FlyingSaw()"
1
Disable
1
Disable
2
Startposi-
tion
2
Startposi-
tion
4
Manual
4
Manual
0
Error
0
Error
3
Automa-
tic
3
Automa-
tic Standard Zustandsübergang
Fehlerzustandsübergang
Automatische Zustandswechselkette
RESTART
The actual block state is displayed at the state output.
Fig. 8-2 Inputs and outputs of the mode changeover
FB_BGD_TEMPLATE_FlyingSaw()
Execute
Mode
Done
Busy
Error
ErrorID
State
StopCutting
Gap
OnTheSpotCut
Cut
OnTheSpotCutPossible
OnTheSpotCutDone
IN OUT
KnifeOut
Changing-over the mode
In order to transition the block into a new state, the number of the required
target state must be specified at the mode input. The changeover is
activated using a high signal at Execute input. The block signals the active
changeover into the new state using a high signal at the Busy output. If all
of the actions associated with the changeover have been successfully

Section C: Integrating the core “flying saw” functions
Using the "FB_BGD_TEMPLATE_FlyingSaw()"
Flying Saw with SIMOTION A4027118-A0414
V 1.4 Release 06/06/08 83/107
Copyright © Siemens AG 2008 All rights reserved
Manual_SIMOTION Flying Saw_V1.4.doc
carried-out and the new state has been reached, this is flagged by a high
signal at the done block output. The number of the new state can be read-
off at the state output.
The sequences and actions that are executed during the changeover are
described in detail in Chapter 10.3.4 of this document.
8.4 Using the restart bit
Restart after a new start
The restart bit must be set at each new start of the SIMOTION D435 or
when changing the parameterization. This is the reason that an initialization
routine is run in the “FB_BGD_TEMPLATE_FlyingSaw()” and a parameter
check is made and the block is brought into a defined state.
Note In the startup task, we recommend that the program startup_SAP() of the
unit SAP_FS is used in order to initialize the
"FB_BGD_TEMPLATE_FlyingSaw()" block.
The restart bit should also be set there in order to bring the block into a
defined state!
Note At restart, the block checks essential technology parameters as well as
the existence of saved technology objects
After the block has been successfully initialized, the restart bit is
automatically reset.
8.5 Error messages
If faults occur in the block itself or in technology objects and technology
functions involved while FB_BGD_TEMPLATE_FlyingSaw() is operational,
then these are signaled using the block outputs error and ErrorID.
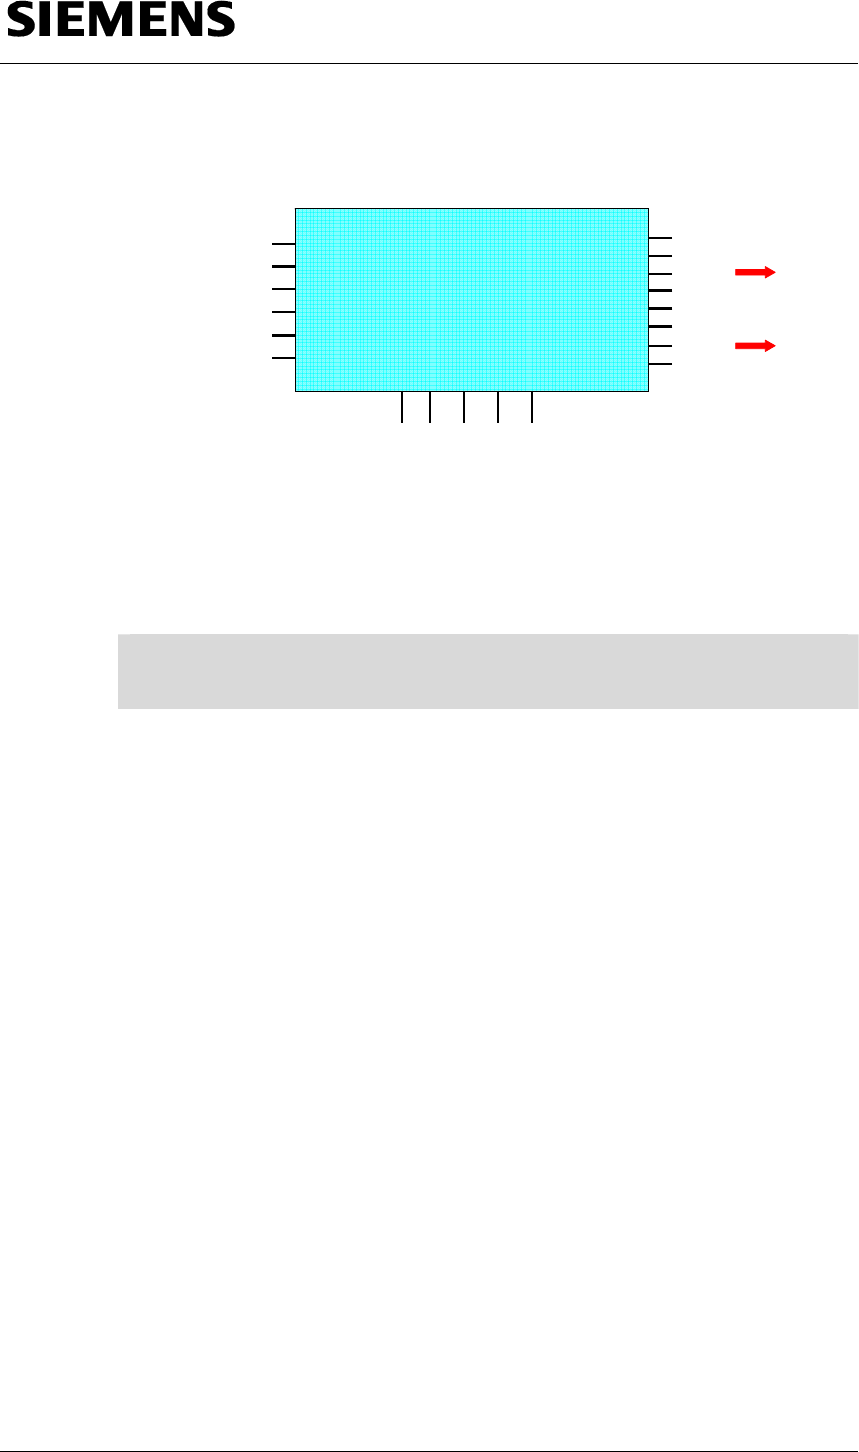
Section C: Integrating the core “flying saw” functions
Using the "FB_BGD_TEMPLATE_FlyingSaw()"
Flying Saw with SIMOTION A4027118-A0414
V 1.4 Release 06/06/08 84/107
Copyright © Siemens AG 2008 All rights reserved
Manual_SIMOTION Flying Saw_V1.4.doc
Fig. 8-3 Block outputs for fault messages
FB_BGD_TEMPLATE_FlyingSaw()
Execute
Mode
Done
Busy
Error
ErrorID
State
StopCutting
Gap
OnTheSpotCut
Cut
OnTheSpotCutPossible
OnTheSpotCutDone
IN OUT
KnifeOut
The error bit signals an error while an error code is output at output
ErrorID; this can be analyzed using the error analysis function.
A list of the possible error codes with a description of the error causes is
provided in the Appendix of this document, Chapter 12.2.
Note The error output is only set if the execute input is set. The ErrorID and
state 0 are still output even after execute has been reset!

Section C: Integrating the core “flying saw” functions
Using the "FB_BGD_TEMPLATE_FlyingSaw()"
Flying Saw with SIMOTION A4027118-A0414
V 1.4 Release 06/06/08 85/107
Copyright © Siemens AG 2008 All rights reserved
Manual_SIMOTION Flying Saw_V1.4.doc
8.6 Help functions within the core “flying saw” functions
As part of the core functions, there are also help functions that make it
easier for you to implement your “flying saw” application.
It provides you with solutions for the following functions:
• The synchronous position is sensed using sensors/measuring probes
• Buffer to save the measured synchronous positions for sequential
execution of several cuts by the "flying saw".
The names and description of these functions are listed in Chapter 10.5
Help routines.
Section D: Program description
Using the "FB_BGD_TEMPLATE_FlyingSaw()"
Flying Saw with SIMOTION A4027118-A0414
V 1.4 Release 06/06/08 86/107
Copyright © Siemens AG 2008 All rights reserved
Manual_SIMOTION Flying Saw_V1.4.doc
Section D: Program description
Content
Section D is interesting if you wish to expand/adapt your application based
on the technology templates available.
Objectives
This part of the documentation should
• Explain to readers the special features/issues when generating a
program
• Describe in detail the program structure of the FlyingSaw FB
• Illustrate and describe important program elements
Provide information and instructions on how this template can be adapted.
Prerequisite
Before possibly expanding this template it is helpful to have read the
chapters in Section A and B in order to get to know the basic functions and
applications of the template.
Subjects discussed
Chap. Title Contents
9 Information and instructions to adapt the core “flying saw”
functions
10 Description of important program elements
Note Before you make changes to the template, please observe the
information and warnings listed in the following Chapter as well as the
associated restrictions regarding support!

Section D: Program description
Information and instructions to adapt the core “flying saw”
fti
Flying Saw with SIMOTION A4027118-A0414
V 1.4 Release 06/06/08 87/107
Copyright © Siemens AG 2008 All rights reserved
Manual_SIMOTION Flying Saw_V1.4.doc
9 Information and instructions to adapt the core “flying
saw” functions
9.1 Information and warnings
Before carrying-out changes
Before you carry-out changes to the components included in the core
functions, you should get to know how the components function by referring
to and reading the ST/MMC documentation.
Uncontrolled, incorrect changes and modifications to core functions can
result in death and severe bodily injury!
Restrictions regarding support when changing components of the core functions
The Application Center can only provide support for core functions that
have not been changed
If changes have been made to the code, then support can no longer be
provided for core functions.
This also applies for the revision and adaptation recommendations listed in
this Chapter.

Section D: Program description
Description of important program elements
Flying Saw with SIMOTION A4027118-A0414
V 1.4 Release 06/06/08 88/107
Copyright © Siemens AG 2008 All rights reserved
Manual_SIMOTION Flying Saw_V1.4.doc
10 Description of important program elements
10.1 Program structure
The core functions of the standard “flying saw” application are sub-divided
into two sections
• Declaration section
• Instruction section
All of the interfaces, constants, instance data and multi-instance of the
function blocks called from the block are described in the Declaration
section. Er besteht aus der Unit FS_Var.
All program instructions of the code that can be run are provided in the
Instruction section. This Section is sub-divided into four units.
• FS_TEMPL with the "FlyingSaw FB“.
• FS_PMIPO with the print mark sensing and the ipo-synchronous
functions.
• FS_SPB with the FBs to manage the synchronous positions in the
SyncPo buffer
10.2 Declaration part FS_Var
The structure of all of the data required for the FlyingSaw FB is saved in the
unit FS_Var. Instances will be the data in the user unit SAP_Var. When
required, in this unit, this data area can also be instantiated several times
so that the FlySaw FB can also be called for several flying saws within one
project.
Constants
• Axis numbers
• Operating states of the flying saw
• Sequence phases of the parameter check
• Sequence phases of the automatic parameterization
• Sequence phases when changing from the “error” to “disable”
• Sequence phases when changing from the “error” to “disable” state
• Sequence phases when changing from the “disable” to “error”
• Sequence phases when changing from the “disable” to “starting
position”

Section D: Program description
Description of important program elements
Flying Saw with SIMOTION A4027118-A0414
V 1.4 Release 06/06/08 89/107
Copyright © Siemens AG 2008 All rights reserved
Manual_SIMOTION Flying Saw_V1.4.doc
• Sequence phases when changing from the “disable” to “manual”
• Sequence phases when changing from the “starting position” to
“disable”
• Sequence phases when changing from the “starting position” to “error”
• Sequence phases when changing from the “starting position” to
“automatic”
• Sequence phases when changing from the “automatic” to “disable”
• Sequence phases when changing from the “automatic” to “starting
position”
• Sequence phases when changing from the “manual” to “disable”
• Sequence phases in "automatic" operation.
• Maximum length of the SyncPos buffer
Static variables
• Description of the data structure of the TO parameters
• Description of the data structure of the user interface with the geometry,
machine data and control bits
• Description of the data structure of the error interface with the error IDs
of the state change and the RetDINT and FR values of the system
commands.
• Description of the data structure of the internal data area of the
FlyingSaw FBs. Under no circumstances may users change these
values.
• Description of the data structure to manage synchronous positions.
• Description of the data structure for time calculations within the
FlyingSaw FBs
• Description of the data structure of the synchronous position detection
using measuring function.
10.3 Functions of the FB_BGD_Template_FlyingSaw()
("FlyingSaw-FB")
10.3.1 Declarations
• Input interface
• Input/output interface
• Output interface
• Internal program data

Section D: Program description
Description of important program elements
Flying Saw with SIMOTION A4027118-A0414
V 1.4 Release 06/06/08 90/107
Copyright © Siemens AG 2008 All rights reserved
Manual_SIMOTION Flying Saw_V1.4.doc
10.3.2 Start identification, axis monitoring and automatic state change
chains
Start identification
Identify whether a restart is present.
If yes, then
• Activate the monitoring of the parameterization of the technology
objects as well as auto-parameterization.
• Control the state machines in the “manual” state via the state sequence
– Error
(if activated, the monitoring and auto-parameterization are realized
in the error state)
– Disable
– Manual
From any state.
If no, then
• Transfer the selected operating state with a positive edge at the
execute input
• Reset all block outputs with a negative signal edge at the execute input
Axis monitoring functions
The flying saw axis has an error, the "FlyingSaw FB“ is forced into the error
state.
However, the monitoring function is only active after the technology objects
have been successfully completed.
Automatic state change sequences
The following automatic state change sequences have been implemented:
• From the “error” state into the “starting position” state.
“Error“ Æ “Disable” Æ “Starting position”
• From the “error” state into the “automatic” state.
“Error“ Æ “Disable” Æ “Starting position” Æ “Automatic”
• From the “error” state into the “manual” state.
“Error“ Æ “Disable” Æ “Manual”
• From the “starting position” state into the “manual” state.
“Starting position” Æ “Disable” Æ “Manual”
• From the “automatic” state into the “manual” state.
“Automatic” Æ “Error” Æ “Disable” Æ “Manual”

Section D: Program description
Description of important program elements
Flying Saw with SIMOTION A4027118-A0414
V 1.4 Release 06/06/08 91/107
Copyright © Siemens AG 2008 All rights reserved
Manual_SIMOTION Flying Saw_V1.4.doc
• From the “manual” state into the “starting position” state.
“Manual” Æ “Disable” Æ “Starting position”
10.3.3 Checking the input parameters and parameterization of the
technology settings that are absolutely necessary
This program function is only active in the error state if it was activated by
the user using the restart bit.
The following are monitored:
• The existence of specified TOs.
• The function (positioning axis, synchronous axis, …)
• Special properties/features required for the template, such as: Modulo
axis and modulo value.
Deviations with respect to the template are displayed as fault messages.
Parameterization of the technology objects absolutely required is carried-
out in another program part.
The parameters that are therefore changed are described in Chapter 7.4
Setting-up the required technology objects and Chapter 7.5 Assigning
the synchronous relationships.
10.3.4 State machine of the “FlyingSaw FB”
The state machines of the “FlyingSaw FB” are described in the following
diagram. It includes possible operating states that can be activated and
clearly shows the possible state transitions that may be initiated by the
user.

Section D: Program description
Description of important program elements
Flying Saw with SIMOTION A4027118-A0414
V 1.4 Release 06/06/08 92/107
Copyright © Siemens AG 2008 All rights reserved
Manual_SIMOTION Flying Saw_V1.4.doc
Fig. 10-1 State model of the "FlyingSaw FB"
1
Disable
1
Disable
2
Startposi-
tion
2
Startposi-
tion
4
Manual
4
Manual
0
Error
0
Error
3
Automa-
tic
3
Automa-
tic
RESTART
Standard Zustandsübergang
Fehlerzustandsübergang
Automatische Zustandswechselkette
The functional sequences that are hidden behind the states and state
changes (transitions) are listed in the following table.
Table 10-1 Description of the sequences at the state change (state transition) in the “FlyingSaw FB”
Step Function Comment
Mode Error (0)
0
Error
Error Æ Disable
0
Error 1
Disable
0 All ErrorID memories are reset
1 Calls the _resetAxisError() for the flying saw axis
Calls the _resetFollowingObject() for the flying saw axis
If the axis and the synchronous object have no error
condition, then the "disable“ mode is activated.

Section D: Program description
Description of important program elements
Flying Saw with SIMOTION A4027118-A0414
V 1.4 Release 06/06/08 93/107
Copyright © Siemens AG 2008 All rights reserved
Manual_SIMOTION Flying Saw_V1.4.doc
Step
Function Comment
Mode Disable (1)
1
Disable
Disable Æ Disable
1
Disable 1
Disable
0 The stop command is prepared
1 _stop() is called for the flying saw axis
2 _disableAxis() is called for the flying saw axis
If the axis is disabled, then the “disable” mode is activated.
Disable Æ Error
1
Disable 0
Error
0 Preparation
1 _disableAxis() is called for the flying saw axis
If the axis is disabled, then the “error” mode is activated
Disable Æ Starting position
1
Disable
2
Startpo-
sition
0 The enable command is prepared
1 _enableAxis() is called for the flying saw axis
If the axis is enabled, then advance to step 2
2 _resetAxisError() is called for the flying saw axis
If the axis is OK, advance to step 3
3 _pos() is called for the flying saw axis with the direction of
rotation for the shortest path
If the starting position is reached, then the “starting
position” mode is activated.

Section D: Program description
Description of important program elements
Flying Saw with SIMOTION A4027118-A0414
V 1.4 Release 06/06/08 94/107
Copyright © Siemens AG 2008 All rights reserved
Manual_SIMOTION Flying Saw_V1.4.doc
Step
Function Comment
Disable Æ Manual
1
Disable 4
Manual
0 The enable command is prepared.
1 _enableAxis() is called for the flying saw axis
If the axis is enabled, then the “manual” mode is activated
Mode, starting position (2)
2
Startpo-
sition
Starting position Æ Error
2
Startpo-
sition
0
Error
0 Preparation
1 _disableAxis() is called for the flying saw axis
If the axes are disabled, then the “error” mode is activated
Starting position Æ Disable
2
Startpo-
sition
1
Disable
0 The stop command is prepared.
1 _stop() is called for the flying saw axis
2 _disableAxis() is called for the flying saw axis
If the axis is disabled, then the “disable” mode is activated
Starting position Æ Automatic
2
Startpo-
sition
3
Automa-
tic
0 The SyncPosBuffer is reset
1 Wait until a valid synchronous position is available
If yes, then advance to step 2
2 _enableGearing() is called to synchronize the flying saw
axis to the material web at the master and slave positions
If successfully synchronized, then advance with step 4,
if not, then advance with step 3
Section D: Program description
Description of important program elements
Flying Saw with SIMOTION A4027118-A0414
V 1.4 Release 06/06/08 95/107
Copyright © Siemens AG 2008 All rights reserved
Manual_SIMOTION Flying Saw_V1.4.doc
Step
Function Comment
3 _disableGearing() is called to delete (clear) the command
from the command queue.
If required, then continue with step 1
4 The "cut" output bit is set
The actual synchronous position is deleted (cleared) from
the SyncPosBuffer
5 Wait until "StopCutting" signal appears
If the "Gap" signal is present, then continue with step 6
If not, then continue with step 7
6 _pos() is called for the flying saw axis with the
"superimposed" merge mode in order to create a gap with
the superimposed motion.
When completed, then continue with step 7.
7 If the "KnifeOut" signal appears, then _pos() is called for
the flying saw axis to position back to the starting position.
When completed, then continue with step 1.
Starting position Æ Manual
2
Startpo-
sition
4
Manual
This state change is achieved using an automatic state
change sequence that reaches the manual state through
the disable state.
Mode, automatic (3)
3
Automa-
tic
Automatic cycle
0 Wait until a valid synchronous position is available
If yes, then advance to step 1
Section D: Program description
Description of important program elements
Flying Saw with SIMOTION A4027118-A0414
V 1.4 Release 06/06/08 96/107
Copyright © Siemens AG 2008 All rights reserved
Manual_SIMOTION Flying Saw_V1.4.doc
Step
Function Comment
1 _enableGearing() is called to synchronize the flying saw
axis to the material web at the master and slave positions
If synchronization was successful, then continue with step
3,
if not, then continue with step 2
2 _disableGearing() is called to delete (clear) the command
from the command queue.
If this is successful, then continue with step 0
3 The "cut" output bit is set
The actual synchronous position is deleted (cleared) from
the SyncPosBuffer
4 Wait until "StopCutting" signal appears
If the "Gap" signal is present, then continue with step 5
If not, then continue with step 6
5 _pos() is called for the flying saw axis using the merge
mode "SUPERIMPOSED_MOTION_MERGE" in order to
create a gap with the superimposed motion.
When completed, then continue with step 6.
6 If the "KnifeOut" signal appears, then _pos() is called for
the flying saw axis to return to the starting position.
When completed, then continue with step 1.
Automatic Æ Error
3
Automa-
tic
0
Error
_disableAxis() is called for the flying saw axis
If the axis is disabled, then the “error” mode is activated
Automatic Æ Disable
3
Automa-
tic
0
Error
0 The stop command is prepared
Section D: Program description
Description of important program elements
Flying Saw with SIMOTION A4027118-A0414
V 1.4 Release 06/06/08 97/107
Copyright © Siemens AG 2008 All rights reserved
Manual_SIMOTION Flying Saw_V1.4.doc
Step
Function Comment
1 _stop() is called for the flying saw axis
If the axis is disabled, then advance to step 2
2 _disableAxis() is called for the flying saw axis
If the axis is disabled, then the “disable” mode is activated
Automatic Æ Starting position
3
Automa-
tic
2
Startposi-
tion
0 Resets the "cut" output bit
If the "KnifeOut" signal is present, then prepare the
position command and advance to step 1
1 _pos() is called to return the flying saw axis back to its
starting position.
Mode, manual (4)
4
Manual
Manual Æ Error
4
Manual 0
Error
_disableAxis() is called for the auxiliary axis and the flying
saw axis
If the axes are disabled, then the “error” mode is activated.
Manual Æ Disable
4
Manual 1
Disable
0 The stop command is prepared
2 _stop() is called for the flying saw axis
3 _disableAxis() is called for the flying saw axis
If the axes are disabled, then the “disable” mode is
activated
Manual Æ Starting position
4
Manual
2
Startposi-
tion
This state change is achieved using an automatic state
change sequence where the starting position state is
reached via the disable state.

Section D: Program description
Description of important program elements
Flying Saw with SIMOTION A4027118-A0414
V 1.4 Release 06/06/08 98/107
Copyright © Siemens AG 2008 All rights reserved
Manual_SIMOTION Flying Saw_V1.4.doc
10.4 Properties/features of startup_SAP
The startup_SAP program is located in the unit SAP_FS
• Assigns the actual TO instances
• Assigns the machine-specific parameters
• Resets the restart bit.
• Deletes the SyncPos buffer.
• Resets all internal program flags.
10.5 Help routines
10.5.1 Features and characteristics of the MT_FS1_PrintmarkDetection
(print mark sensing)
The program MT_FS1_PrintmarkDetection is in the unit RK_PMIPO and
must be called from a motion task.
The following functions are executed:
• Waits for a valid measured value
• Determines the synchronous position for the actual print mark
• Enters the synchronous position into the SyncPos buffer
10.5.2 Properties/features of the IPO_FS1_IPO_Routine
The program IPO_FS1_IPO_Routine is located in the RK_PMIPO unit and
must be called from the IPO task.
• Calculates the position of the MaterialAxis referred to the flying saw
• Edge detection.
10.5.3 SyncPos buffer
Using the following FBs of the FS_SPB unit,
the SyncPos buffer is managed
• FB_BGD_FS_SPB_reset()
• FB_BGD_FS_SPB_in()

Section D: Program description
Description of important program elements
Flying Saw with SIMOTION A4027118-A0414
V 1.4 Release 06/06/08 99/107
Copyright © Siemens AG 2008 All rights reserved
Manual_SIMOTION Flying Saw_V1.4.doc
• FB_BGD_FS_SPB_out()
• FB_BGD_FS_SPB_read()
FB_BGD_FS_SPB_reset()
The SyncPos buffer is deleted (cleared) using this FB.
FB_BGD_FS_SPB_in()
Using this FB, when the print mark is sensed, a new synchronous position
is entered into the buffer.
FB_BGD_FS_SPB_out()
Using this FB, after every cut, a synchronous position is deleted (cleared)
from the buffer (FIFO)
FB_BGD_FS_SPB_read()
This FB is used to check as to whether a new synchronous position is
available for the next cut and the flying saw must be synchronized.
Section E: Appendix
General information on the application
Flying Saw with SIMOTION A4027118-A0414
V 1.4 Release 06/06/08 100/107
Copyright © Siemens AG 2008 All rights reserved
Manual_SIMOTION Flying Saw_V1.4.doc
Section E: Appendix
11 General information on the application
11.1 Scope of supply
The "flying saw" package comprises:
• Program
S7/Scout project as ZIP file:
FlyingSaw_for_SIMOTION_V4.1.1_V1.4.zip
• Documentation
Implementation/Operating Instructions as PDF file
FlyingSaw_with_SIMOTION_V4.1.1_V1.4.pdf
11.2 Revisions/Author
Table 11-1: Revisions/Author
Version Date/Revision Author
V 1.0 Generation H.-E. Böhm
V 1.1 Change-over Ethernet H.-E. Böhm
V 1.2 Protool templates trilingual Ch. Pabst
H.-E. Böhm
V 1.2 Changes General Notes A. Hagelauer
V 1.3 13.04.06 Scout V4.0 H.-E. Böhm
V 1.3
(V 2.0!)
04.04.07 Functional Changes:
- synchronization according to
leading axis values.
(asymptotic synchronization)
- Ratio between measured and
effective velocity of material web
H.-E. Böhm
V 1.4 06.06.08 Replacing ProTool by
WinCflex / SCOUT V4.1.1.6 P. Tabori
H.-E. Böhm
Section E: Appendix
Error messages
Flying Saw with SIMOTION A4027118-A0414
V 1.4 Release 06/06/08 101/107
Copyright © Siemens AG 2008 All rights reserved
Manual_SIMOTION Flying Saw_V1.4.doc
12 Error messages
12.1 Signaling error events at the “FlyingSaw FB” of the core “flying
saw” functions
If an error occurs when calling the “FB_BGD_TEMPLATE_FlyingSaw()” of
the core “flying saw” functions, then this is displayed using an error code at
output ErrorID of the FB.
If the error is caused by a TO-specific command called from the Flying Saw
FB, then its RetDINT or FR is documented in the data area FS_Var for
evaluation by the user.
12.2 Possible error messages at the error code output ErrorID of the
„FB_BGD_TEMPLATE_FlyingSaw()“
A reference is made to the internal block error source of the “FlyingSaw FB”
in the Explanation column.
Table 12-1 Error codes of the flying saw template
ErrorID
error code Explanation
C001 There is an error at a flying saw axis
C005 Position of the flying saw axis greater than that specified under
UsersInterface.g_r_EndPos.
C011 Disable to Disable
Error when stopping the FlyingSawAxis ( _stop )
Details in FS_Var structure under RetDINT_stop_FSA
C012 Disable to disable
Error when stopping the FlyingSawAxis ( _stop )
Details in FS_Var structure under FR_stop_FSA
Section E: Appendix
Error messages
Flying Saw with SIMOTION A4027118-A0414
V 1.4 Release 06/06/08 102/107
Copyright © Siemens AG 2008 All rights reserved
Manual_SIMOTION Flying Saw_V1.4.doc
ErrorID
error code Explanation
C021 Disable to starting position
Error when positioning the FlyingSawAxis ( _pos )
Details in FS_Var structure under RetDINT_pos_FSA
C022 Disable to starting position
Error when positioning the FlyingSawAxis ( _pos )
Details in FS_Var structure under FR_pos_FSA
C031 Starting position to disable
Error when stopping the FlyingSawAxis ( _stop )
Details in FS_Var structure under RetDINT_stop_FSA
C032 Starting position to disable
Error when stopping the FlyingSawAxis ( _stop )
Details in FS_Var structure under FR_stop_FSA
C041 Starting position to Startpos
Error when positioning the FlyingSawAxis ( _pos )
Details in FS_Var structure under RetDINT_pos_FSA
C042 Starting position to Startpos
Error when positioning the FlyingSawAxis ( _pos )
Details in FS_Var structure under FR_pos_FSA
C051 Starting position to automatic
Error when activating gearing of the FlyingSawAxis
( _enablegearing )
Details in FS_Var structure under RetDINT_enablegearing_FSA
C052 Starting position to automatic
Error when de-activating gearing after unsuccessful
synchronization of the FlyingSawAxis
( _disablegearing )
Details in FS_Var structure under RetDINT_disablegearing_FSA
C053 Starting position to automatic
Error when de-activating gearing after unsuccessful
synchronization of the FlyingSawAxis
( _disablegearing )
Details in FS_Var structure under FR_disablegearing_FSAFSA
C054 Starting position to automatic
Error for superimposed positioning of the FlyingSawAxis to create
"gap" ( _pos )
Details in FS_Var structure under RetDINT_possuperimp_FSA

Section E: Appendix
Error messages
Flying Saw with SIMOTION A4027118-A0414
V 1.4 Release 06/06/08 103/107
Copyright © Siemens AG 2008 All rights reserved
Manual_SIMOTION Flying Saw_V1.4.doc
C055
Starting position to automatic
Error for superimposed positioning of the FlyingSawAxis to create
"gap" ( _pos )
Details in FS_Var structure under FR_possuperimp_FSA
C056 Starting position to automatic
Error when positioning the FlyingSawAxis ( _pos )
Details in FS_Var structure under RetDINT_pos_FSA
C057 Starting position to automatic
Error when positioning the FlyingSawAxis ( _pos )
Details in FS_Var structure under FR_pos_FSA

Section E: Appendix
Error messages
Flying Saw with SIMOTION A4027118-A0414
V 1.4 Release 06/06/08 104/107
Copyright © Siemens AG 2008 All rights reserved
Manual_SIMOTION Flying Saw_V1.4.doc
ErrorID
error code Explanation
C061 Automatic Run
Error when activating gearing of the FlyingSawAxis
( _enablegearing )
Details in FS_Var structure under RetDINT_enablegearing_FSA
C062 Automatic Run
Error when de-activating gearing after unsuccessful
synchronization of the FlyingSawAxis ( _disablegearing )
Details in FS_Var structure under RetDINT_disablegearing_FSA
C063 Automatic Run
Error when de-activating gearing after unsuccessful
synchronization of the FlyingSawAxis ( _disablegearing )
Details in FS_Var structure under FR_disablegearing_FSAFSA
C064 Automatic Run
Error for superimposed positioning of the FlyingSawAxis to create
"gap" ( _pos )
Details in FS_Var structure under RetDINT_possuperimp_FSA
C065 Automatic Run
Error for superimposed positioning of the FlyingSawAxis to create
"gap" ( _pos )
Details in FS_Var structure under FR_possuperimp_FSA
C066 Automatic Run
Error when positioning the FlyingSawAxis ( _pos )
Details in FS_Var structure under RetDINT_pos_FSA
C067 Automatic Run
Error when positioning the FlyingSawAxis ( _pos )
Details in FS_Var structure under FR_pos_FSA
C071 Automatic to Disable
Error when stopping the FlyingSawAxis ( move mit v=0)
Details in FS_Var structure under RetDINT_stop_FSA
C072 Automatic to Disable
Error when stopping the FlyingSawAxis ( move mit v=0)
Details in FS_Var structure under FR_stop_FSA
C081 Automatic to Starting position
Error when positioning the FlyingSawAxis ( _pos )
Details in FS_Var structure under RetDINT_pos_FSA
C082 Automatic to Starting position
Error when positioning the FlyingSawAxis ( _pos )
Details in FS_Var structure under FR_pos_FSA
Section E: Appendix
Error messages
Flying Saw with SIMOTION A4027118-A0414
V 1.4 Release 06/06/08 105/107
Copyright © Siemens AG 2008 All rights reserved
Manual_SIMOTION Flying Saw_V1.4.doc
ErrorID
error code Explanation
C091 Manual to Disable
Error when stopping the FlyingSawAxis ( move mit v=0)
Details in FS_Var structure under RetDINT_stop_FSA
C092 Manual to Disable
Error when stopping the FlyingSawAxis ( move mit v=0)
Details in FS_Var structure under FR_stop_FSA
C0A1 Manual to Starting position
Error when positioning the FlyingSawAxis ( _pos )
Details in FS_Var structure under RetDINT_pos_FSA
C0A2 Manual to Starting position
Error when positioning the FlyingSawAxis ( _pos )
Details in FS_Var structure under FR_pos_FSA
C0F1 Incorrect mode selection from “error” mode
C0F2 Incorrect mode selection from “disable” mode
C0F3 Incorrect mode selection from “starting position” mode
C0F4 Incorrect mode selection from “automatic” mode
C0F5 Incorrect mode selection from “manual” mode
C101 Parameterizing error at the flying saw axis
Axis is not parameterized as synchronous axis.
C201 Parameterizing error at the material axis/external encoder
The material master (leading) value is neither a positioning axis
nor an external encoder

Section E: Appendix
Contact partner
Flying Saw with SIMOTION A4027118-A0414
V 1.4 Release 06/06/08 106/107
Copyright © Siemens AG 2008 All rights reserved
Manual_SIMOTION Flying Saw_V1.4.doc
13 Contact partner
Applicationcenter
SIEMENS
Siemens AG
Automation & Drives
A&D MC PM APC
Frauenauracher Str. 80
Erlangen
Fax: 09131-98-1297
mailto: applications.erlf@siemens.com

Section E: Appendix
Please help us to become even better
Flying Saw with SIMOTION A4027118-A0414
V 1.4 Release 06/06/08 107/107
Copyright © Siemens AG 2008 All rights reserved
Manual_SIMOTION Flying Saw_V1.4.doc
14 Please help us to become even better
A&D MC PM APC From:
Application Center Name:
Department:
D – 91056 Erlangen City:
Fax: +49 (0) 9131/98–1297 Telephone:
E-Mail: applications@erlf.siemens.de E-Mail:
Evaluation of the document
Is this subject helpful/ beneficial for you? ❏ Yes ❏ No
How high are the benefits of this application for you in the following working phases?
– own training/ information ❏ ❏ ❏ ❏ ❏ ❏
– conceptual phase ❏ ❏ ❏ ❏ ❏ ❏
– engineering/writing code ❏ ❏ ❏ ❏ ❏ ❏
– commissioning ❏ ❏ ❏ ❏ ❏ ❏
How is this application from the didactic perspective?
– scope ❏ ❏ ❏ ❏ ❏ ❏
– layout/design ❏ ❏ ❏ ❏ ❏ ❏
– clarity ❏ ❏ ❏ ❏ ❏ ❏
Can the application be transferred to your own application?
❏ ❏ ❏ ❏ ❏ ❏
Do you require support for this application?
❏ Yes ❏ No
Other comments ..............................................................
.........................................................................................................................................................
Very high Very low
Very good Very bad
Very good Very bad
