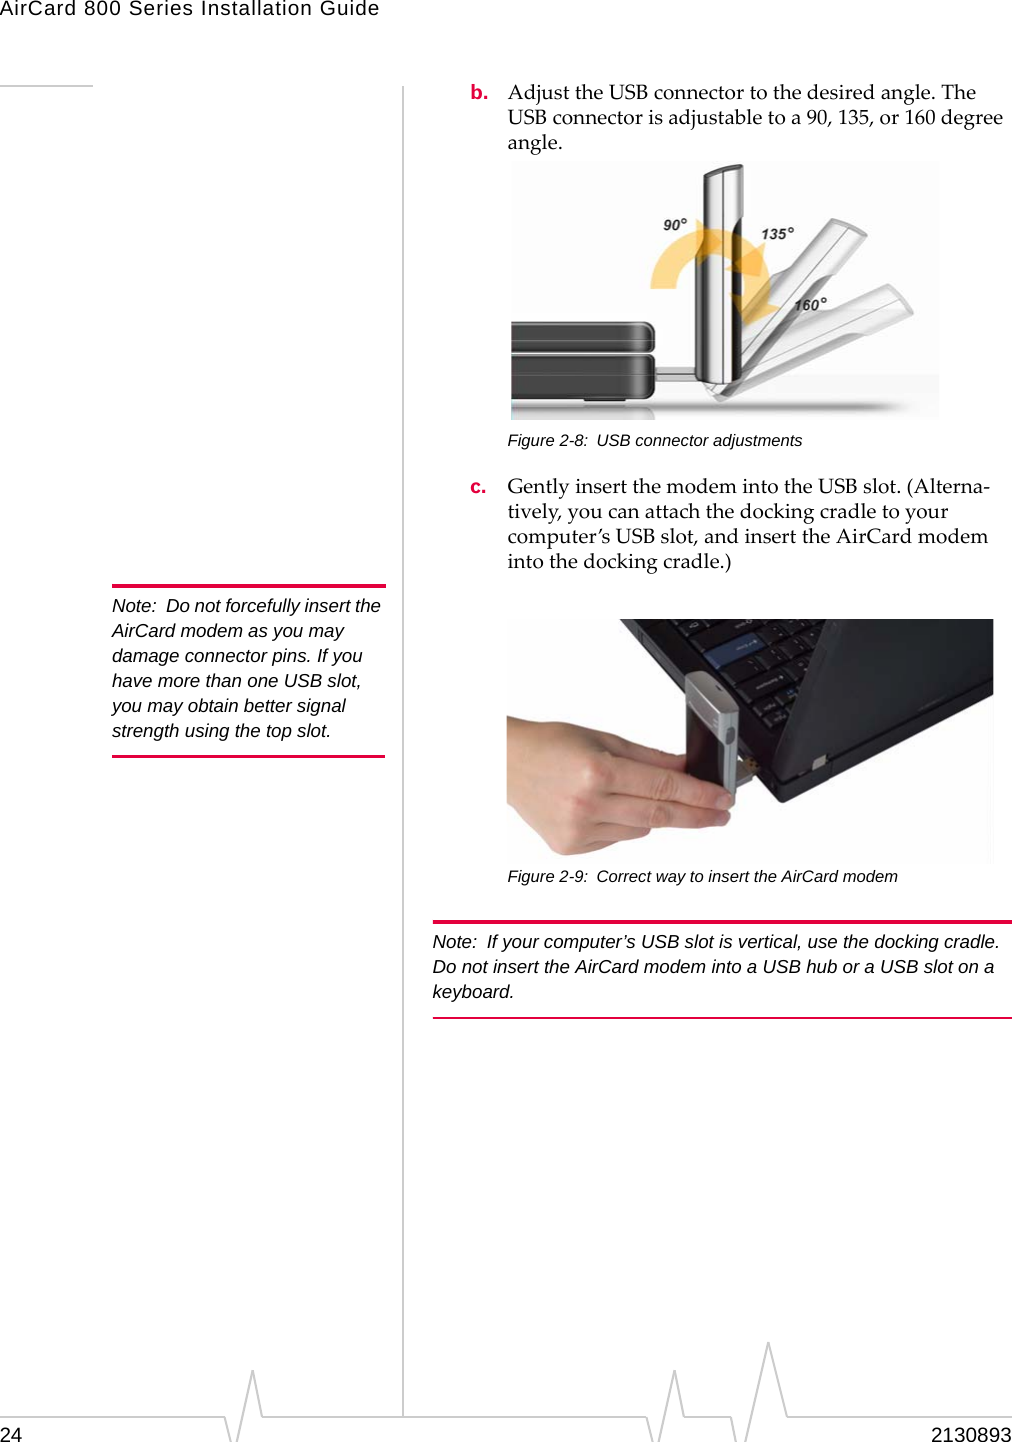
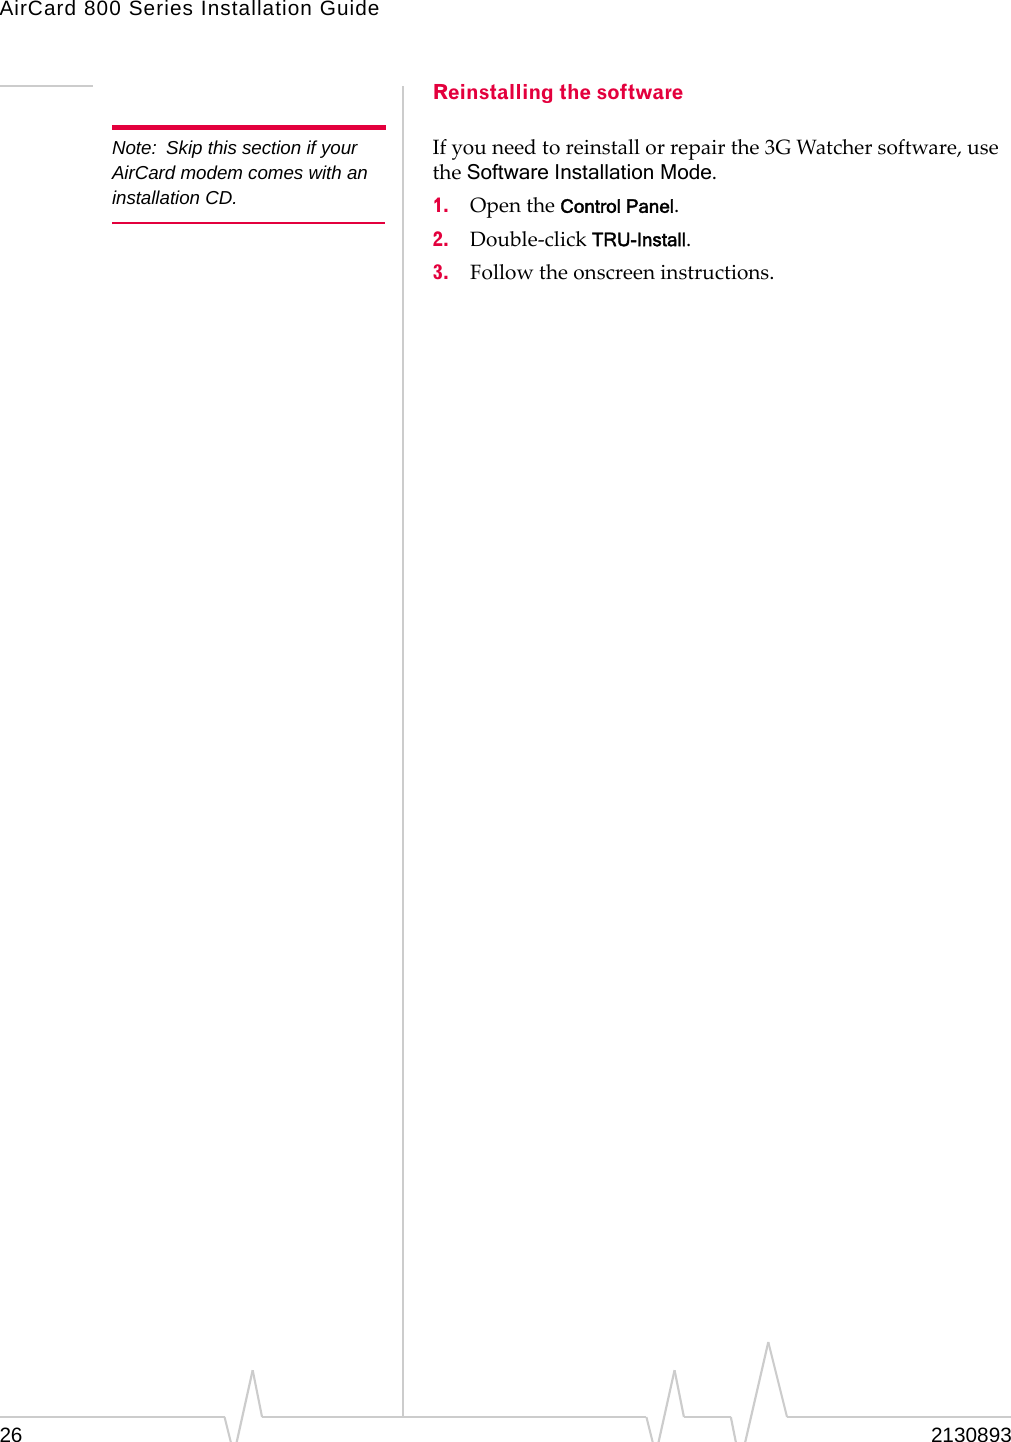
Sierra Wireless AC881 PC Card Wireless Modem User Manual 2130893 AirCard 800 Series Installation Guide 1 1

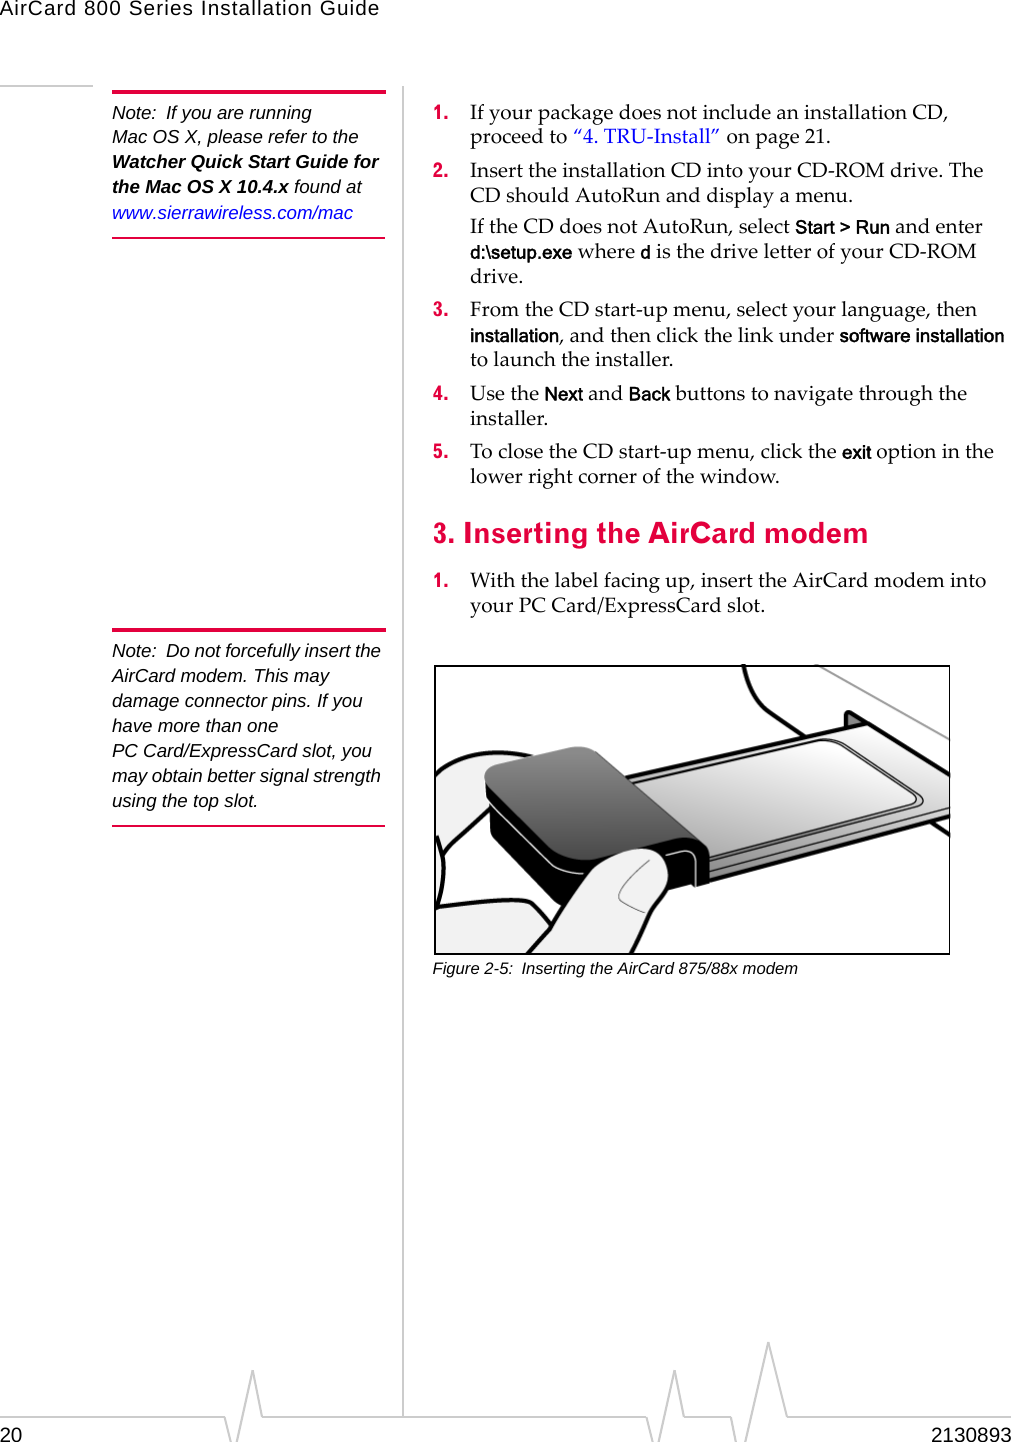
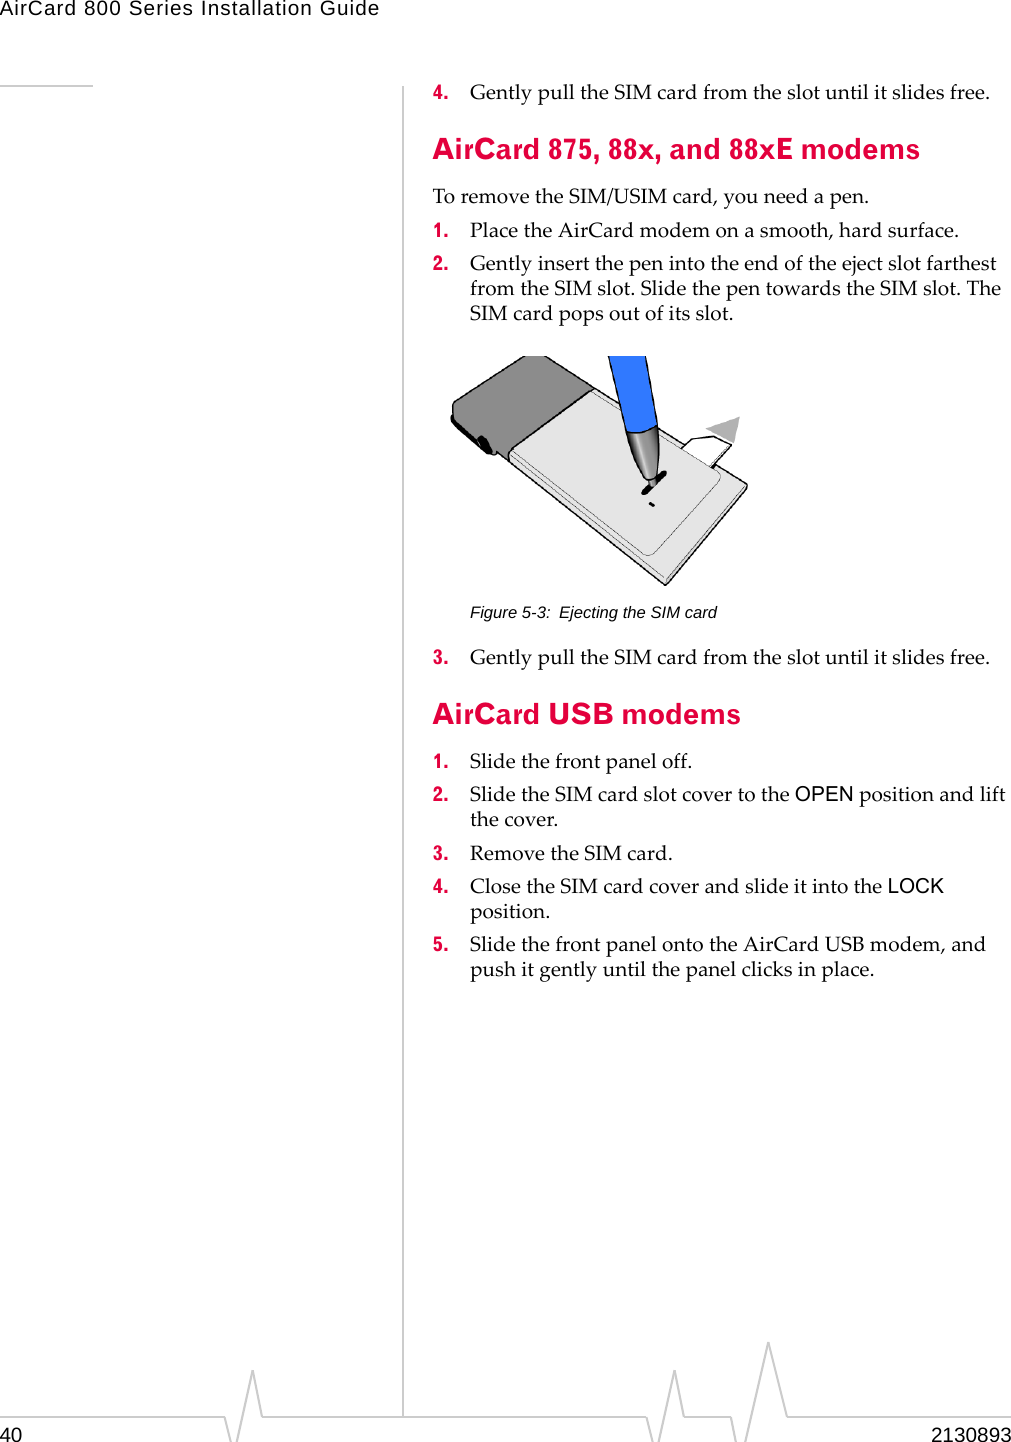
Sierra Wireless Inc. PC Card Wireless Modem 2130893 AirCard 800 Series Installation Guide 1 1
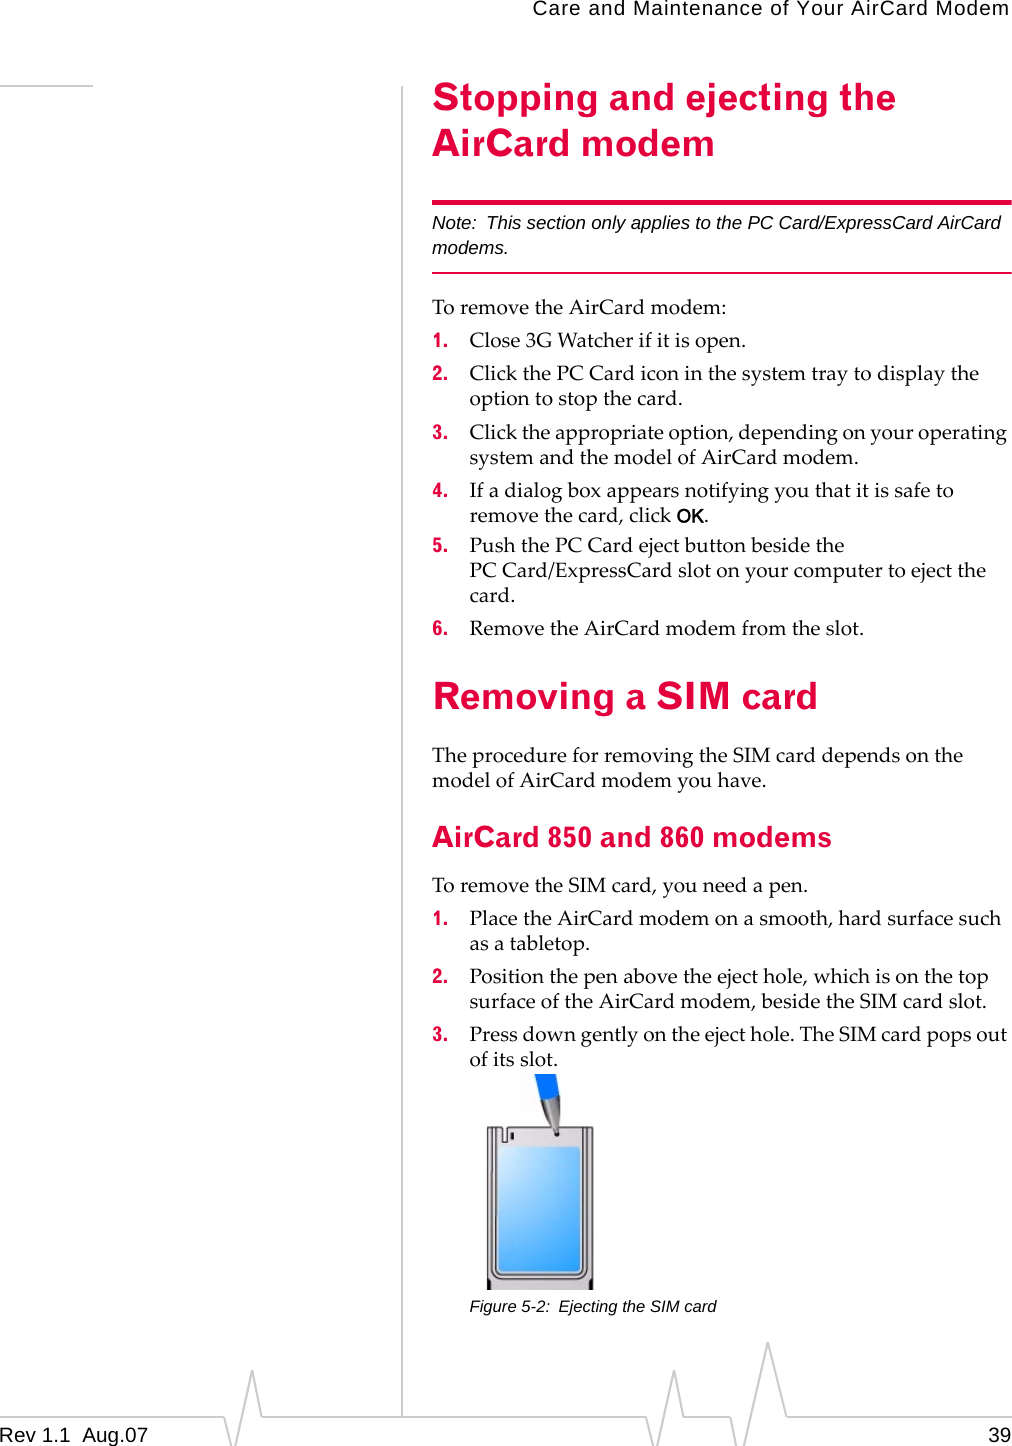
Contents

Updated User Manual

2130893 Rev 1.1 AirCard® 800 Series Installation Guide Products covered: AirCard 881 Wireless PC Card Modem AirCard 880 Wireless PC Card Modem AirCard 881E Wireless ExpressCard Modem AirCard 880E Wireless ExpressCard Modem AirCard 881U Wireless USB Modem AirCard 880U Wireless USB Modem AirCard 875 Wireless PC Card Modem AirCard 875U Wireless USB modem AirCard 860 Wireless PC Card Modem AirCard 850 Wireless PC Card Modem
Preface Important Notice Safety and Hazards Limitation of Liability Due to the nature of wireless communications, transmission and reception of data can never be guaranteed. Data may be delayed, corrupted (i.e., have errors) or be totally lost. Although significant delays or losses of data are rare when wireless devices such as the Sierra Wireless modem are used in a normal manner with a well-constructed network, the Sierra Wireless modem should not be used in situations where failure to transmit or receive data could result in damage of any kind to the user or any other party, including but not limited to personal injury, death, or loss of property. Sierra Wireless accepts no responsibility for damages of any kind resulting from delays or errors in data transmitted or received using the Sierra Wireless modem, or for failure of the Sierra Wireless modem to transmit or receive such data. Do not operate the Sierra Wireless modem in areas where blasting is in progress, where explosive atmospheres may be present, near medical equipment, near life support equipment, or any equipment which may be susceptible to any form of radio interference. In such areas, the Sierra Wireless modem MUST BE POWERED OFF. The Sierra Wireless modem can transmit signals that could interfere with this equipment. Do not operate the Sierra Wireless modem in any aircraft, whether the aircraft is on the ground or in flight. In aircraft, the Sierra Wireless modem MUST BE POWERED OFF. When operating, the Sierra Wireless modem can transmit signals that could interfere with various onboard systems. Note:  Some airlines may permit the use of cellular phones while the aircraft is on the ground and the door is open. Sierra Wireless modems may be used at this time. The driver or operator of any vehicle should not operate the Sierra Wireless modem while in control of a vehicle. Doing so will detract from the driver or operator's control and operation of that vehicle. In some states and provinces, operating such communications devices while in control of a vehicle is an offence. The information in this manual is subject to change without notice and does not represent a commitment on the part of Sierra Wireless. SIERRA WIRELESS AND ITS AFFILIATES SPECIFICALLY DISCLAIM LIABILITY FOR ANY AND ALL DIRECT, INDIRECT, SPECIAL, GENERAL, INCIDENTAL, CONSEQUENTIAL, PUNITIVE OR EXEMPLARY DAMAGES INCLUDING, BUT NOT LIMITED TO, LOSS OF PROFITS OR Rev 1.1  Aug.07  3
AirCard 800 Series Installation Guide Patents Copyright Trademarks REVENUE OR ANTICIPATED PROFITS OR REVENUE ARISING OUT OF THE USE OR INABILITY TO USE ANY SIERRA WIRELESS PRODUCT, EVEN IF SIERRA WIRELESS AND/OR ITS AFFILIATES HAS BEEN ADVISED OF THE POSSIBILITY OF SUCH DAMAGES OR THEY ARE FORESEEABLE OR FOR CLAIMS BY ANY THIRD PARTY. Notwithstanding the foregoing, in no event shall Sierra Wireless and/or its affiliates aggregate liability arising under or in connection with the Sierra Wireless product, regardless of the number of events, occurrences, or claims giving rise to liability, be in excess of the price paid by the purchaser for the Sierra Wireless product. Portions of this product may be covered by some or all of the following US patents: 5,515,013  5,629,960  5,845,216  5,847,553  5,878,234 5,890,057  5,929,815  6,169,884  6,191,741  6,199,168 6,339,405  6,359,591  6,400,336  6,516,204  6,561,851 6,643,501  6,653,979  6,697,030  6,785,830  6,845,249 6,847,830  6,876,697  6,879,585  6,886,049  6,968,171 6,985,757  7,023,878  7,053,843  7,106,569  7,145,267 7,200,512  D442,170  D459,303 and other patents pending. This product includes technology licensed from: QUALCOMM® 3G Licensed by QUALCOMM Incorporated under one or more of the following United States patents and/or their counterparts in other nations: 4,901,307  5,056,109  5,101,501  5,109,390  5,228,054 5,267,261  5,267,262  5,337,338  5,414,796  5,416,797 5,490,165  5,504,773  5,506,865  5,511,073  5,535,239 5,544,196  5,568,483  5,600,754  5,657,420  5,659,569 5,710,784  5,778,338 Manufactured or sold by Sierra Wireless or its licensees under one or more patents licensed from InterDigital Group. © 2007 Sierra Wireless. All rights reserved. AirCard® and “Heart of the Wireless Machine®” are registered  trademarks of Sierra Wireless. Watcher® is a trademark of  Sierra Wireless, registered in the European Community. Sierra Wireless, the Sierra Wireless logo, the red wave design,  the red-tipped antenna, and TRU-Install are trademarks of  Sierra Wireless. 4  2130893
Preface Rev 1.1  Aug.07  5 Windows® is a registered trademark of Microsoft Corporation. QUALCOMM® is a registered trademark of QUALCOMM Incorporated. Used under license. Other trademarks are the property of the respective owners. Contact Information Consult our website for up-to-date product descriptions, documentation, application notes, firmware upgrades, trouble-shooting tips, and press releases: www.sierrawireless.com Revision History Revision number  Release date  Changes 1.0  TBD  •  Combines PC Card/ExpressCard (document #2130623) and USB (document #2130784) Installation Guides. •  Adds TRU-Install feature. Sales Desk:  Phone:  1-604-232-1488 Hours:  8:00 AM to 5:00 PM Pacific Time E-mail:  sales@sierrawireless.com Post:  Sierra Wireless 13811 Wireless Way Richmond, BC Canada    V6V 3A4 Fax:  1-604-231-1109 Web:  www.sierrawireless.com
AirCard 800 Series Installation Guide 6  2130893
Contents Introducing the AirCard 800 Series Modems  . . . . . . . . . . . . . . . . . . . . . . . . . . .11 AirCard 800 Series modems  . . . . . . . . . . . . . . . . . . . . . . . . . . . . . . . . . . . . . . . .  11 Services supported . . . . . . . . . . . . . . . . . . . . . . . . . . . . . . . . . . . . . . . . . . . . . . . .  11 GPRS, EDGE, UMTS,  and  HSDPA/HSUPA service support  . . . . . . . . . . . . . . . . . . . . . . . . . . . . . . . . . 11 Your account and coverage area. . . . . . . . . . . . . . . . . . . . . . . . . . . . . . . . . . . . .  12 AirCard modem software . . . . . . . . . . . . . . . . . . . . . . . . . . . . . . . . . . . . . . . . . . .  13 Frequency band support  . . . . . . . . . . . . . . . . . . . . . . . . . . . . . . . . . . . . . . . . . . .  14 Installing the Software  . . . . . . . . . . . . . . . . . . . . . . . . . . . . . . . . . . . . . . . . . . . . . .15 System requirements . . . . . . . . . . . . . . . . . . . . . . . . . . . . . . . . . . . . . . . . . . . . . .  15 The SIM card and your account . . . . . . . . . . . . . . . . . . . . . . . . . . . . . . . . . . . . .  16 AirCard 850/860 modems . . . . . . . . . . . . . . . . . . . . . . . . . . . . . . . . . . . . . . . . . . .  16 1. Attaching the antenna . . . . . . . . . . . . . . . . . . . . . . . . . . . . . . . . . . . . . . . .  16 2. Inserting the SIM card . . . . . . . . . . . . . . . . . . . . . . . . . . . . . . . . . . . . . . . .  17 3. Installing the 3G Watcher software  . . . . . . . . . . . . . . . . . . . . . . . . . . . . . 17 4. Inserting the AirCard modem . . . . . . . . . . . . . . . . . . . . . . . . . . . . . . . . . .  18 5. TRU-Install™  . . . . . . . . . . . . . . . . . . . . . . . . . . . . . . . . . . . . . . . . . . . . . . . .  18 Reinstalling the software . . . . . . . . . . . . . . . . . . . . . . . . . . . . . . . . . . . . .  19 AirCard 875, 88x, and 88xE modems  . . . . . . . . . . . . . . . . . . . . . . . . . . . . . . . . . 19 1. Inserting the SIM card . . . . . . . . . . . . . . . . . . . . . . . . . . . . . . . . . . . . . . . .  19 2. Installing the 3G Watcher software  . . . . . . . . . . . . . . . . . . . . . . . . . . . . . 19 3. Inserting the AirCard modem . . . . . . . . . . . . . . . . . . . . . . . . . . . . . . . . . .  20 4. TRU-Install   . . . . . . . . . . . . . . . . . . . . . . . . . . . . . . . . . . . . . . . . . . . . . . . . .  21 Reinstalling the software . . . . . . . . . . . . . . . . . . . . . . . . . . . . . . . . . . . . .  21 Rev 1.1  Aug.07  7
AirCard 800 Series Installation Guide AirCard USB modems  . . . . . . . . . . . . . . . . . . . . . . . . . . . . . . . . . . . . . . . . . . . . .  22 1. Inserting the battery  . . . . . . . . . . . . . . . . . . . . . . . . . . . . . . . . . . . . . . . . .  22 2. Inserting the SIM card . . . . . . . . . . . . . . . . . . . . . . . . . . . . . . . . . . . . . . . .  22 3. Installing the 3G Watcher software  . . . . . . . . . . . . . . . . . . . . . . . . . . . . .  23 4. Inserting the AirCard USB modem  . . . . . . . . . . . . . . . . . . . . . . . . . . . . .  23 5. TRU-Install   . . . . . . . . . . . . . . . . . . . . . . . . . . . . . . . . . . . . . . . . . . . . . . . . .  25 Reinstalling the software . . . . . . . . . . . . . . . . . . . . . . . . . . . . . . . . . . . . .  26 Configuring Your Account   . . . . . . . . . . . . . . . . . . . . . . . . . . . . . . . . . . . . . . . . . . .27 Setting up a profile . . . . . . . . . . . . . . . . . . . . . . . . . . . . . . . . . . . . . . . . . . . . . . . .  28 Determining whether you have a profile   . . . . . . . . . . . . . . . . . . . . . . . . . .  28 Creating a profile  . . . . . . . . . . . . . . . . . . . . . . . . . . . . . . . . . . . . . . . . . . . . . .  28 The AirCard modem as a network card . . . . . . . . . . . . . . . . . . . . . . . . . . . . . . .  30 3G Watcher Basics  . . . . . . . . . . . . . . . . . . . . . . . . . . . . . . . . . . . . . . . . . . . . . . . . . .31 Launching 3G Watcher. . . . . . . . . . . . . . . . . . . . . . . . . . . . . . . . . . . . . . . . . . . . .  31 The 3G Watcher window  . . . . . . . . . . . . . . . . . . . . . . . . . . . . . . . . . . . . . . . . . . .  32 Icons and indicators in the main 3G Watcher window:. . . . . . . . . . . . . . . . . .  32 Indicators in 3G Watcher . . . . . . . . . . . . . . . . . . . . . . . . . . . . . . . . . . . . . . . .  33 View options  . . . . . . . . . . . . . . . . . . . . . . . . . . . . . . . . . . . . . . . . . . . . . . . . . . . . .  34 Status icons . . . . . . . . . . . . . . . . . . . . . . . . . . . . . . . . . . . . . . . . . . . . . . . . . . . . . .  34 Turning the radio on and off . . . . . . . . . . . . . . . . . . . . . . . . . . . . . . . . . . . . .  35 Frequency band and network selection. . . . . . . . . . . . . . . . . . . . . . . . . . . . . . .  35 Frequency band selection . . . . . . . . . . . . . . . . . . . . . . . . . . . . . . . . . . . . . . .  35 Network selection   . . . . . . . . . . . . . . . . . . . . . . . . . . . . . . . . . . . . . . . . . . . . .  36 Care and Maintenance of Your AirCard Modem  . . . . . . . . . . . . . . . . . . . . . . . .37 Battery  . . . . . . . . . . . . . . . . . . . . . . . . . . . . . . . . . . . . . . . . . . . . . . . . . . . . . . . . . .  38 Stopping and ejecting the AirCard modem  . . . . . . . . . . . . . . . . . . . . . . . . . . .  39 8  2130893
Contents Removing a SIM card . . . . . . . . . . . . . . . . . . . . . . . . . . . . . . . . . . . . . . . . . . . . . .  39 AirCard 850 and 860 modems . . . . . . . . . . . . . . . . . . . . . . . . . . . . . . . . . . . .  39 AirCard 875, 88x, and 88xE modems  . . . . . . . . . . . . . . . . . . . . . . . . . . . . . .  40 AirCard USB modems  . . . . . . . . . . . . . . . . . . . . . . . . . . . . . . . . . . . . . . . . . .  40 Regulatory and Safety Information  . . . . . . . . . . . . . . . . . . . . . . . . . . . . . . . . . . .41 Important notice . . . . . . . . . . . . . . . . . . . . . . . . . . . . . . . . . . . . . . . . . . . . . . . . . .  41 Safety and hazards . . . . . . . . . . . . . . . . . . . . . . . . . . . . . . . . . . . . . . . . . . . . .  41 Important safety/compliance information for North American users. . . . . .  42 Information pertaining to OEM customers . . . . . . . . . . . . . . . . . . . . . . . . .  44 AirCard 850/860 wireless network cards  . . . . . . . . . . . . . . . . . . . . . . . .  44 AirCard 875, 880, 881, 880E, and 881E. . . . . . . . . . . . . . . . . . . . . . . . . . .  45 AirCard USB modems  . . . . . . . . . . . . . . . . . . . . . . . . . . . . . . . . . . . . . . .  45 EU regulatory conformity . . . . . . . . . . . . . . . . . . . . . . . . . . . . . . . . . . . . . . . . . . .  46 Technical Specifications   . . . . . . . . . . . . . . . . . . . . . . . . . . . . . . . . . . . . . . . . . . . .47 LEDs  . . . . . . . . . . . . . . . . . . . . . . . . . . . . . . . . . . . . . . . . . . . . . . . . . . . . . . . . . . . .  47 Radio frequency and electrical specifications . . . . . . . . . . . . . . . . . . . . . . . . .  48 Environmental specifications . . . . . . . . . . . . . . . . . . . . . . . . . . . . . . . . . . . . . . .  49 Rev 1.1  Aug.07  9
AirCard 800 Series Installation Guide 10  2130893
1: Introducing the AirCard 800 Series   1 Modems Caution:  The 3G Watcher® software must be installed before using your AirCard modem. AirCard 800 Series modems The AirCard 800 Series third generation (3G) wireless modems allow you to connect to the Internet, send and receive email, connect to a corporate network or virtual private network (VPN), or view streaming video, without the need for a network cable or phone line. The AirCard PC Card modem (AirCard 850, 860, 875, and 88x) fits into a standard (Type II) PC Card slot. The AirCard ExpressCard modem (AirCard 88xE) fits into standard ExpressCard/34 and ExpressCard/54 slots. The AirCard USB modem (AirCard 8xxU) fits into Type A USB ports. Services supported The services supported on your AirCard modem depend on the model and your service provider. (See www.sierrawireless.com for details) GPRS, EDGE, UMTS,  and HSDPA/HSUPA service support GPRS, EDGE, UMTS, and HSDPA/HSUPA are add-on data services to Global System for Mobile Communications (GSM) mobile phone networks. The maximum theoretical data speeds when connected on these services are: •  High Speed Download Packet Access (HSDPA)—up to 7.2 Megabits per second (Mbps) •  High Speed Upload Packet Access (HSUPA1)—up to 2.0 Mbps (available for AirCard 88x, 88xE, and 88xU modems) •  Universal Mobile Telecommunications System (UMTS)— 384 kilobits per second (kbps) 1.  HSUPA is only available for the 88x, 88xE, and 88xU AirCard modems. 11Rev 1.1  Aug.07
AirCard 800 Series Installation Guide Note:  If you purchased the AirCard modem from a GSM service provider, you may already have an account and a SIM card. Otherwise, your retailer should be able to give you the names of companies that provide these items. •  Enhanced Data GSM Environment (EDGE)—236 kbps •  General Packet Radio Service (GPRS)—56 kbps GPRS and EDGE are second generation (2G) data services. UMTS and HSDPA/HSUPA are 3G data services. When establishing a connection, your AirCard modem uses the fastest available service. If, for example, you are using an AirCard modem in an area that has GPRS and EDGE service but not UMTS or HSDPA/HSUPA service, the AirCard modem connects using EDGE service. Once the connection is established, you have access to all Internet services. Your account and coverage area Companies that operate GSM networks and provide access to those networks are called service providers. You must have an account with a GSM service provider to use the AirCard modem. To use the modem’s 3G capability, your account must be with a service provider that offers HSDPA/HSUPA or UMTS service. (The AirCard modem is backwards compatible with 2G service.) When you obtain your account, you are given a Subscriber Identity Module (SIM) card, also called a smart card or smart chip. The SIM card contains account information and must be inserted in the AirCard modem before you use it. Before you can use the AirCard modem, you must install the AirCard modem software and ensure that your AirCard modem is configured to use your account. Once the software is installed and your AirCard modem is configured, you can connect to the Internet with the AirCard modem in any area where you can obtain GPRS, EDGE, UMTS, or HSDPA/HSUPA service. 12  2130893
Note:  The fee for service is usually higher when you are roaming (connected to a network other than the one belonging to your service provider). Introducing the AirCard 800 Series Modems Your ability to obtain service depends on these factors: •  GSM network coverage—You must be within the coverage area of a GSM network in order to use the AirCard modem. •  Service provider—If you are within the coverage area of a network that is not operated by your own service provider, you can obtain service only if there is a roaming agreement between your service provider and the network operator. •  Account provisions—Your account may restrict your usage to certain networks or limit the amount of time you can use the network. •  Frequency band—You cannot connect to networks operating in bands not supported by your AirCard modem, regardless of roaming agreements or account provisions. Most service providers have coverage maps on their web sites. AirCard modem software The AirCard modem comes with this software (made by Sierra Wireless): •  The 3G Watcher program for Windows® that you use to manage the AirCard modem and monitor your connec-tions. •  The driver software that forms the interface between the AirCard modem and your Windows operating system. Rev 1.1  Aug.07  13
AirCard 800 Series Installation Guide 14  2130893 Frequency band support The following table shows the frequency bands supported by the various AirCard products. Table 1-1:  Frequency band support Technology  Bands  Products  Location 2G  850 MHz (cellular band)  All  North America 900 MHz  All  Europe 1800 MHz  All  Europe and Asia 1900 MHz (PCS band)  All  North America 3G  WCDMA 850ab  AirCard 88x AirCard 88xE AirCard 8xxU AirCard 875 AirCard 860 North America WCDMA 1900b  AirCard 88x AirCard 88xE AirCard 8xxU AirCard 875 AirCard 860 North America WCDMA 2100a  AirCard 88x AirCard 88xE AirCard 8xxU AirCard 875 AirCard 850 Europe, Asia, and Australia a.  Receive diversity (AirCard 880 and 880E) b.  Receive diversity (AirCard 881 and 881E) See “Radio frequency and electrical specifications” on page 48 for more detailed information.
2: Installing the Software  2 Note:  If you are running Mac OS X, please refer to the Watcher Quick Start Guide for the Mac OS X 10.4.x found at www.sierrawireless.com/mac This chapter guides you through the steps to install the AirCard modem software on your computer. It is divided by AirCard modem families: •  “AirCard 850/860 modems” on page 16 •  “AirCard 875, 88x, and 88xE modems” on page 19 •  “AirCard USB modems” on page 22 Note:  If a CD is provided with your AirCard modem, do not insert the modem into your computer before installing the software on the CD. If there is no CD, follow the installation instructions for TRU-Install for your particular AirCard modem. System requirements The AirCard modem is supported on: •  Windows® Vista™ •  Windows XP (Home and Professional versions) •  Windows 2000 For information on using the AirCard modem with other operating systems, contact Sierra Wireless Technical Support (support@sierrawireless.com). To install the AirCard modem, you require the following: Table 2-1:  System resource requirements Card slots  1 Type II PCMCIA (PC Card) slot for AirCard 850, 860, 875, 88x 1 ExpressCard/34 or ExpressCard/54 slot for AirCard 88xE USB port  1 USB Type A slot (USB 1.1 or 2.0) Disk drive  CD-ROM (not required for TRU-Install™) I/O resources  1 IRQ, 40 bytes I/O space Memory  32 MB Rev 1.1  Aug.07  15
AirCard 800 Series Installation Guide Note:  Without a valid SIM card and account, your AirCard modem will not work. Note:  Keep a written record in a secure place of the account information that your service provider gives you. The SIM card and your account To use your AirCard modem, you need a GSM account and a SIM card. The SIM card is a small chip about the size of a postage stamp that you insert into the AirCard modem. The SIM card contains account information used by the network to validate your access. Depending on how you purchased your AirCard modem, you may already have an account. In this case, the SIM card should be included in your package. Otherwise, your retailer can direct you to a local company that provides GSM service. To activate an account, the service provider needs: •  Billing information (such as a credit card number) to collect payment for your network usage. •  The International Mobile Equipment Identity (IMEI), though this requirement depends on your service provider. This number, printed on the AirCard modem box and on the AirCard modem label, identifies your AirCard modem model on the GSM network. If you change GSM service providers you will need a new SIM card from your new service provider. You will also need to set up a new profile. See “Setting up a profile” on page 28 for instructions on creating a new profile. AirCard 850/860 modems 1. Attaching the antenna Attach the antenna to the gold-plated connector on the end of the AirCard modem. Figure 2-1:  Attaching the antenna to the AirCard 850/860 modem 16  2130893
Installing the Software Note:  Users of Windows 2000 must be logged in with adminis-trative privileges. Users of Windows XP may require admin-istrative privileges. Note:  If you are running Mac OS X, please refer to the Watcher Quick Start Guide for the Mac OS X 10.4.x found at www.sierrawireless.com/mac 2. Inserting the SIM card 1.  If your SIM card is attached to a larger card, detach the SIM card and remove any fragments stuck to it. 2.  Position the SIM card above the slot as shown in figure 2-2 (below). Figure 2-2:  Inserting the SIM card into an AirCard 850/860 modem 3.  Gently push the SIM card into the slot until you hear a click. 3. Installing the 3G Watcher software Note:  If you are running Windows 2000, Windows Installer Redistrib-utable 2.0 must be installed. This is available on the Microsoft web site, www.microsoft.com. Note:  You may require your Windows CD. 1.  If your package does not include an installation CD, proceed to “5. TRU-Install™” on page 18. 2.  Insert the installation CD into your CD-ROM drive. The CD should AutoRun and display a menu. If the CD does not AutoRun, select Start > Run and enter  d:\setup.exe where d is the drive letter of your CD-ROM  drive. 3.  From the CD start-up menu, select your language, then installation, and then click the link under software installation to launch the installer. 4.  Use the Next and Back buttons to navigate through the installer. Rev 1.1  Aug.07  17
AirCard 800 Series Installation Guide Note:  Do not forcefully insert the AirCard modem. This may damage connector pins. If you have more than one PC Card/ExpressCard slot, you may obtain better signal strength using the top slot. Note:  If you are running Mac OS X, please refer to the Watcher Quick Start Guide for the Mac OS X 10.4.x found at www.sierrawireless.com/mac 5.  To close the CD start-up menu, click the exit option in the lower right corner of the window. 4. Inserting the AirCard modem 1.  With the label facing up, insert the AirCard modem into your PC Card/ExpressCard slot. Figure 2-3:  Inserting the AirCard 850/860 modem 5. TRU-Install™ Note:  Skip this section if your AirCard modem came with an instal-lation CD. TRU-Install™ is a Sierra Wireless feature that installs the necessary software the first time you insert the AirCard modem into your computer. An installation CD is not required. 1.  Insert the SIM card into your AirCard modem as shown on page 17. 2.  Insert the AirCard modem into your computer. 3.  The installation process starts automatically. If it does not, select Start > Run and type d:\setup.exe (where d is your TRU-Install CD-ROM drive letter). 4.  Follow the onscreen instructions. The AirCard modem is ready to use once the software is successfully installed. On subsequent insertions of the AirCard modem, TRU-Install verifies that the correct software is already installed. If it is, then the modem is ready to use. This process takes a few seconds. 18  2130893
Note:  Skip this section if your AirCard modem comes with an installation CD. Note:  Users of Windows 2000 must be logged in with adminis-trative privileges. Users of Windows XP may require admin-istrative privileges. Installing the Software If you have any problems with the TRU-Install process, please refer to the Sierra Wireless website at: www.sierrawireless.com/TRU-Install. Reinstalling the software If you need to reinstall or repair the 3G Watcher software, use the Software Installation Mode. 1.  Open the Control Panel. 2.  Double-click TRU-Install. 3.  Follow the onscreen instructions. AirCard 875, 88x, and 88xE modems 1. Inserting the SIM card 1.  If your SIM card is attached to a larger card, detach the SIM card and remove any fragments stuck to it. 2.  Position the SIM card as shown in figure 2-4 (below). Figure 2-4:  Inserting the SIM card in an AirCard 875/88x modem 3.  Gently push the SIM card into the slot until the card will not go in any further. 2. Installing the 3G Watcher software Note:  If you are running Windows 2000, Windows Installer Redistrib-utable 2.0 must be installed. This is available on the Microsoft web site, www.microsoft.com. Note:  You may require your Windows CD. Rev 1.1  Aug.07  19
AirCard 800 Series Installation Guide Note:  If you are running Mac OS X, please refer to the Watcher Quick Start Guide for the Mac OS X 10.4.x found at www.sierrawireless.com/mac Note:  Do not forcefully insert the AirCard modem. This may damage connector pins. If you have more than one PC Card/ExpressCard slot, you may obtain better signal strength using the top slot. 1.  If your package does not include an installation CD, proceed to “4. TRU-Install” on page 21. 2.  Insert the installation CD into your CD-ROM drive. The CD should AutoRun and display a menu. If the CD does not AutoRun, select Start > Run and enter  d:\setup.exe where d is the drive letter of your CD-ROM  drive. 3.  From the CD start-up menu, select your language, then installation, and then click the link under software installation to launch the installer. 4.  Use the Next and Back buttons to navigate through the installer. 5.  To close the CD start-up menu, click the exit option in the lower right corner of the window. 3. Inserting the AirCard modem 1.  With the label facing up, insert the AirCard modem into your PC Card/ExpressCard slot. Figure 2-5:  Inserting the AirCard 875/88x modem 20  2130893
Installing the Software Note:  If you are running Mac OS X, please refer to the Watcher Quick Start Guide for the Mac OS X 10.4.x found at www.sierrawireless.com/mac Note:  Skip this section if your AirCard modem comes with an installation CD. 4. TRU-Install Note:  Skip this section if your AirCard modem comes with an instal-lation CD. TRU-Install is a Sierra Wireless feature that installs the necessary software the first time you insert the AirCard modem into your computer. An installation CD is not required. 1.  Insert the SIM card into your AirCard modem as shown on page 19. 2.  Insert the AirCard modem into the computer. 3.  The installation process starts automatically. If it does not, select Start > Run and type d:\setup.exe (where d is your TRU-Install CD-ROM drive letter). 4.  Follow the onscreen instructions. The AirCard modem is ready to use once the software is successfully installed. On subsequent insertions of the AirCard modem, TRU-Install verifies that the correct software is already installed. If it is, then the modem is ready to use. This process takes a few seconds. If you have any problems with the TRU-Install process, please refer to the Sierra Wireless website at: www.sierrawireless.com/TRU-Install. Reinstalling the software If you need to reinstall or repair the 3G Watcher software, use the Software Installation Mode. 1.  Open the Control Panel. 2.  Double-click TRU-Install. 3.  Follow the onscreen instructions. Rev 1.1  Aug.07  21
AirCard 800 Series Installation Guide Caution:  To avoid the risk of explosion, use the same battery model as the one that originally came with your AirCard USB modem. Dispose of a used battery according to the instruc-tions on it. Note:  To prevent the SIM card from becoming jammed in its slot, ensure the edge of the card is smooth before inserting it. Do not attach labels to your SIM card as this may also cause it to become jammed. AirCard USB modems 1. Inserting the battery 1.  Slide the front panel off the AirCard USB modem. 2.  Hold the battery so that the side with two white arrows faces up and the gold contact points on the end of the battery line up with the gold contact points on the modem. Insert the battery into the AirCard USB modem. 3.  If you have not inserted your SIM card, proceed to the next section, ”2. Inserting the SIM card”. Otherwise, gently slide the front panel onto the AirCard USB modem until it clicks in place. For additional battery information, see page 38. 2. Inserting the SIM card 1.  If your SIM card is attached to a larger card, detach the SIM card and remove any fragments stuck to it. 2.  Slide the front panel off. 3.  Slide the SIM card slot cover to the OPEN position and lift the cover. 4.  Insert the SIM card with the gold contact points facing down (as shown in figure 2-6 belore). Figure 2-6:  Inserting the SIM card in an AirCard USB modem 5.  Close the SIM card cover and slide it into the LOCK position. 6.  Slide the front panel onto the AirCard USB modem, and push it gently until the panel clicks in place. 22  2130893
Note:  Users of Windows 2000 must be logged in with adminis-trative privileges. Users of Windows XP may require admin-istrative privileges. Note:  If you are running Mac OS X, please refer to the Watcher Quick Start Guide for the Mac OS X 10.4.x found at www.sierrawireless.com/mac Installing the Software 3. Installing the 3G Watcher software Note:  If you are running Windows 2000, Windows Installer Redistrib-utable 2.0 must be installed. This is available on the Microsoft web site, www.microsoft.com. Note:  You may require your Windows CD. 1.  If your package does not include an installation CD, proceed to “5. TRU-Install” on page 25. 2.  Insert the installation CD into your CD-ROM drive. The CD should AutoRun and display a menu. If the CD does not AutoRun, select Start > Run and enter  d:\setup.exe where d is the drive letter of your CD-ROM  drive. 3.  From the CD start-up menu, select your language, then installation, and then click the link under software installation to launch the installer. 4.  Use the Next and Back buttons to navigate through the installer. 5.  To close the CD start-up menu, click the exit option in the lower right corner of the window. 4. Inserting the AirCard USB modem 1.  If the battery and the SIM card are not already inserted in your AirCard modem, insert them. (See ”1. Inserting the battery” and“2. Inserting the SIM card” on page 22.) 2.  Insert the AirCard modem into the USB slot: a.  Slide the lever on the back of the AirCard modem in the direction indicated by the triangle to release the modem's USB connector. Figure 2-7:  USB connector Rev 1.1  Aug.07  23
AirCard 800 Series Installation Guide Note:  Do not forcefully insert the AirCard modem as you may damage connector pins. If you have more than one USB slot, you may obtain better signal strength using the top slot. b.  Adjust the USB connector to the desired angle. The USB connector is adjustable to a 90, 135, or 160 degree angle. Figure 2-8:  USB connector adjustments c.  Gently insert the modem into the USB slot. (Alterna-tively, you can attach the docking cradle to your computer’s USB slot, and insert the AirCard modem into the docking cradle.) Figure 2-9:  Correct way to insert the AirCard modem Note:  If your computer’s USB slot is vertical, use the docking cradle. Do not insert the AirCard modem into a USB hub or a USB slot on a keyboard. 24  2130893
Note:  If you are running Mac OS X, please refer to the Watcher Quick Start Guide for the Mac OS X 10.4.x found at www.sierrawireless.com/mac Installing the Software Warning:  If the orientation of your computer’s USB port or the thickness of your computer are such that pressure is applied to the modem’s end or side (as shown by the red circles in the drawings below), you may damage the modem or your computer. In such cases do not insert the modem directly into your computer’s USB port; use the docking cradle instead.. Figure 2-10:  Incorrect ways to insert the USB modem 5. TRU-Install Note:  Skip this section if your AirCard modem comes with an instal-lation CD. TRU-Install is a Sierra Wireless feature that installs the necessary software the first time you insert the AirCard modem into your computer. An installation CD is not required. 1.  Insert the SIM card into your AirCard modem as shown on page 22. 2.  Insert the AirCard modem into the computer. 3.  The installation process starts automatically. If it does not, select Start > Run and type d:\setup.exe (where d is your TRU-Install CD-ROM drive letter). 4.  Follow the onscreen instructions. The AirCard modem is ready to use once the software is successfully installed. On subsequent insertions of the AirCard modem, TRU-Install verifies that the correct software is already installed. If it is, then the modem is ready to use. This process takes a few seconds. If you have any problems with the TRU-Install process, please refer to the Sierra Wireless website at: www.sierrawireless.com/TRU-Install. Rev 1.1  Aug.07  25
AirCard 800 Series Installation Guide Note:  Skip this section if your AirCard modem comes with an installation CD. Reinstalling the software If you need to reinstall or repair the 3G Watcher software, use the Software Installation Mode. 1.  Open the Control Panel. 2.  Double-click TRU-Install. 3.  Follow the onscreen instructions. 26  2130893
3: Configuring Your Account  3 Note:  If you are running Mac OS X, please refer to the Watcher Quick Start Guide for the Mac OS X 10.4.x found at www.sierrawireless.com/mac Profiles contain account information used by the AirCard modem to establish connections. At least one profile must be set up on the AirCard modem before you can use it. The profile(s) may have been stored on the AirCard modem before you purchased it. Otherwise, your service provider should give you all the information you need to set up the profile(s) you require. Depending on your service provider, some or all of this infor-mation must be entered into your profile: •  User Name •  Password •  Access Point Name (APN) •  Internet Protocol (IP) Address (if the address is not automatically assigned by the network) •  Use of IP header compression •  Domain Name Server (DNS) address or addresses Your service provider may give you only one APN, in which case you require only one profile. Some service providers assign separate APNs for separate purposes. For example, some service providers supply one APN to use for Internet browsing and a different APN to use with a Virtual Private Network (VPN). In this case you must set up multiple profiles. The AirCard modem allows for up to sixteen profiles. Most service providers have one or two standard profiles that all or most of their subscribers are expected to use. Most of these standard profiles have been pre-defined in 3G Watcher, allowing you to select a standard profile, rather than creating it manually. One of your profiles must be set as the “default” profile. This is the one that is used if you select the Connect button without selecting a profile. The default profile is also used if you set the AirCard modem to autoconnect when 3G Watcher launches, but only if the connection type for the default profile has been set to autoconnect. If you are using the AirCard modem to access a network that requires you to provide a password each time you connect, you must set your connection profile to prompt for password (in which case you must also connect manually). Rev 1.1  Aug.07  27
AirCard 800 Series Installation Guide Setting up a profile Determining whether you have a profile 1.  Insert the SIM card into the AirCard modem if it is not already inserted. 2.  Insert the AirCard modem into your computer. 3.  If 3G Watcher is not running, start 3G Watcher by selecting Start > Programs > Sierra Wireless > 3G Watcher > 3G Watcher or by double-clicking the desktop shortcut  . 4.  Click Connect. If 3G Watcher detects that no profile has been set up, you are prompted, “Would you like to configure a profile now?”  Select Yes. If this prompt does not appear, your AirCard modem may have been preconfigured. You can verify that you have a profile by selecting Tools > Connections to access the Profiles tab of the Connections window, which lists all profiles. Creating a profile 1.  In the Connections window, Click the add button  and click WWAN profile. 2.  If you want to use a pre-defined profile, select the profile from the drop-down list in the Profile Name field. Then skip to Step 5. 3.  Complete the fields in the General window by entering a Profile Name (any meaningful description of the profile, such as the name of your service provider) and User Name, Password, and/or APN, if applicable. 4.  Select whether you want to make connections automati-cally, manually, or whether you are required to provide a password each time you make a connection: ·  If you select Autoconnect for the default profile, a connection is established automatically whenever you insert the AirCard modem. ·  If you select Manual, you must click the Connect button on the main 3G Watcher window to make a connection. ·  If you select Prompt for Password, you must click Connect and enter a password each time you make a connection. Use this option if you have an external device that provides a time-scheduled secure password for your corporate network. 2130893 28
Configuring Your Account 5.  Select the Advanced folder if you want to set 3G Watcher to launch your Internet browser, VPN, or any other program automatically, or if your service provider specified an IP address or DNS address(es). Otherwise, click OK and skip to Step 10. 6.  Select the Launch after connecting field, and from the drop-down list, select which application, if any, you want 3G Watcher to automatically launch when a connection is established with this profile: ·  None—No application is autolaunched. ·  Browser—3G Watcher autolaunches your default Internet browser. ·  MS VPN—3G Watcher autolaunches a VPN connection. ·  Application—3G Watcher autolaunches an installed VPN program, or any other program. 7.  Complete the appropriate field, depending on the option you chose in the Launch after connecting field: ·  If you selected Browser —in the URL field, type the URL for the web site you want to view on connection (such as www.sierrawireless.com). ·  If you selected Microsoft VPN—in the Microsoft VPN (PPTP) connection field, select the VPN connection from the drop-down list. ·  If you selected Application —in the Application field, enter the path to the program or use the browse button  to locate the .exe file for the software application you want to autolaunch. 8.  If your service provider has given you an IP address, in the Advanced folder, select TCP/IP. Select Static IP and enter the address in the field below. Otherwise, select Dynamic IP. (This is the default because most networks use dynamic IP addressing.) Use the data compression or IP header compression fields if supported by your service provider. Note:  Do not select the Use IP header compression field unless your service provider is using this compression. The AirCard modem cannot maintain a connection if this is enabled but not supported on the network. 9.  If you have a DNS address or addresses, click DNS Settings and enter the address(es). (In most cases, it is not necessary to enter a DNS address.) 10.  If you have more than one profile, select Profiles, and in the Default Profile field choose the default profile from the drop-down list. (The “default” profile is the one used by the Autoconnect feature, and is also used if you click Connect without selecting a profile.) Rev 1.1 Aug.07  29
AirCard 800 Series Installation Guide 11.  Click Apply to save the change without exiting the window, or click OK to save the change and exit the window. The AirCard modem as a network card The AirCard modem can be configured to provide the always on data connection that an Ethernet card or other wired LAN card provides. That is, you can set options in 3G Watcher that cause the AirCard modem to establish a network connection whenever you insert it, assuming GSM, GPRS, EDGE, UMTS, or HSDPA/HSUPA service is available. Otherwise, you can configure 3G Watcher to connect only when you click the Connect button. The AirCard modem connection provides access to the Internet. Once the connection is established, you can open your browser and connect to any web site available on the Internet, or access other Internet services such as email. 2130893 30
4: 3G Watcher Basics  4 Note:  It takes up to 20 seconds for 3G Watcher to become fully functional after launch. 3G Watcher is the program you use to manage and monitor your AirCard modem connections. 3G Watcher allows you to: •  Create an account profile. •  Determine signal strength, roaming status, GPRS, EDGE, UMTS, or HSDPA/HSUPA availability, and other network connection parameters. •  Monitor the status of the AirCard modem and GSM service. •  Initiate data connections. •  Make and receive phone calls. (Availability dependent on your AirCard modem model and service provider.) •  Send and receive SMS messages. •  Enable or disable SIM security that prevents others from using your SIM card if it is lost or stolen. •  Set options related to notifications and the 3G Watcher window. If you set your account profile to autoconnect, you do not need to run 3G Watcher when you use the AirCard modem, but 3G Watcher does provide useful status information. Launching 3G Watcher Unless this feature has been disabled, 3G Watcher launches automatically anytime you insert the AirCard modem. You can also launch 3G Watcher by: •  Double-clicking the desktop shortcut,  or •  Selecting Start > Programs > Sierra Wireless > 3G Watcher > 3G Watcher Depending on how your profile is configured, your browser, VPN, or other program may launch automatically anytime you launch 3G Watcher. To view the 3G Watcher online help, press <F1> or select Help > Help Topics. Rev 1.1  Aug.07  31
AirCard 800 Series Installation Guide Note:  To get help in 3G Watcher, select Help > Help Topics. You can also display help by pressing <F1>. The 3G Watcher window Compact GPRS, EDGE, UMTS, or  Roaming  Minimize  view  Close HSDPA/HSUPA coverage Signal strength Indicator area Profile drop-down list Figure 4-1:  The 3G Watcher window. Icons and indicators in the main 3G Watcher window: Table 4-1:  Icons in 3G Watcher Device status. If an icon of the AirCard modem with an “X” is displayed, 3G Watcher is unable to detect the AirCard modem. This indicates that the AirCard modem is not fully inserted into the computer or the device is powered down. You may be able to resolve this problem by restarting 3G Watcher, stopping, ejecting, and reinserting the AirCard modem, or restarting your computer. Signal strength and service status. The number of bars beside the antenna increases as signal strength increases, to a maximum of five bars. The ToolTip that displays when you position the mouse pointer over this indicator shows the numeric value of the RSSI (Received Signal Strength Indication) in dBm. An antenna with a line through it indicates no service is available (Not in Service). You are outside of the coverage area or have insufficient signal strength to maintain a GSM data connection. 32  2130893
3G Watcher Basics Table 4-1:  Icons in 3G Watcher (cont.) Coverage. The icon indicates the fastest service that is: - Available in your current coverage area. - Supported by your AirCard modem. •  GPRS icon—General Packet Radio Service (GPRS) •  EDGE icon—Enhanced Data for GSM Evolution (EDGE) •  3G icon—Universal Mobile Telecommuni-cations System (UMTS) •  HSDPA icon—High-Speed Downlink Packet Access (HSDPA) •  HSUPA icon—High-Speed Uplink Packet Access (HSUPA) •  HSPA icon—concurrent HSDPA and HSUPA When only the letters are displayed, (for example  ), you are within the coverage area, but have not yet acquired the service. When the indicator has an outline (  ), you have acquired service and are able to establish a data connection. When the indicator is filled (  ), you have a data connection on the wireless service. Roaming. You are connected to a network other than your local service provider's. There may be a surcharge for roaming service. (This service may not be available.) New SMS message. Click the icon to open the SMS Express window and read your messages. When your SIM becomes full, this icon flashes and turns red. (Supported only on selected devices.) Indicators in 3G Watcher Data transmission. When the modem is connected to the network, the main 3G Watcher window shows you the amount of data received and sent. Rev 1.1  Aug.07  33
AirCard 800 Series Installation Guide View options You have these options for the 3G Watcher window: •  Enable/disable “Always on top” from the View menu. When enabled, the 3G Watcher window always appears in front of other application windows. •  Switch between the full 3G Watcher window and the compact window from the View menu or by using the Compact View button: Compact view Minimize Close Compact view •  Use the Minimize button to close the 3G Watcher window but leave the program running. Status icons These icons appear in the system tray (usually in the lower right corner of your screen). Watcher cannot detect the AirCard modem. Ensure that the AirCard modem is inserted properly and powered on. You do not have an active high-speed connection. You have an active high-speed connection. You have new (unread) SMS messages. 34  2130893
3G Watcher Basics Turning the radio on and off This option allows you to conserve your computer’s battery by turning off the AirCard modem’s radio transmitter/receiver when you are not using it. To turn off the radio: 1.  Select Tools > Turn Radio Off. When the radio is turned off, the menu option switches to Turn Radio On and the message “Radio is off” is displayed in the 3G Watcher window. To turn on the radio: 1.  Select Tools > Turn Radio On. Frequency band and network selection 3G Watcher has two options that affect your ability to obtain GPRS, EDGE, UMTS, or HSDPA/HSUPA service: •  The frequency band you want to use. •  The network you want to use, if you are within the coverage area of more than one network. Frequency band selection Every GSM network operates on one set of frequency bands. (See“Frequency band selection” on page 35). The AirCard modem is designed to change frequency bands automatically to obtain network service. You can also change frequency bands manually from the Network tab of the User Options window (Tools > Options > Network). Note:  Unless your service provider specifies otherwise, it is recom-mended that you use the Automatic setting. Rev 1.1  Aug.07  35
AirCard 800 Series Installation Guide Network selection This option is set in the Network pane of the User Options window (Tools > Options > Network > Network Selection Mode). Depending on your location, you may be within the coverage area of several networks. Your ability to obtain service on each network is dependent on your account. Your options for network selection are: •  Automatic—The AirCard modem automatically selects a network based on your account and network availability. •  Manual—The AirCard modem scans the area and displays a list of detected GSM networks. If you select a network on which you cannot obtain service the message, “Failed to register with network” appears.  Choose a different network. 36  2130893
5: Care and Maintenance of Your AirCard Modem 5 As with any electronic device, the AirCard modem must be handled with care to ensure reliable operation. Follow these guidelines when you use and store your AirCard modem: •  Do not apply adhesive labels to the AirCard modem or SIM card. This may cause the AirCard modem or SIM card to become jammed inside the slot, or prevent it from being inserted properly. •  When not installed in your computer, store the AirCard modem and SIM card in a safe place. •  The AirCard modem should fit easily into your computer’s PC Card/ExpressCard slot or USB port. Forcing the AirCard modem into the slot/port may damage the connector pins. •  Protect the AirCard modem from liquids, dust, and excessive heat. (See the Environmental specifications on page 49 for the maximum tolerances.) •  For AirCard modem with external antennas, optimal signal strength is usually obtained when the antenna is pointing straight up. The antenna should bend easily at the hinge. Do not forcefully bend the antenna. Figure 5-1:  Proper positioning of the AirCard modem antenna for the AirCard 850/860 modems. Rev 1.1  Aug.07  37
AirCard 800 Series Installation Guide Battery Note:  This section only applies to AirCard USB modems. We recommend that you fully charge the battery for three hours before using it for the first time. Use only Sierra Wireless AirCard USB modem batteries intended for use with your device. Using other batteries and chargers could be dangerous. Avoid dropping the modem or battery. If you do drop it, especially on a hard surface, and you suspect damage, take it to a service center for inspection. If the battery leaks or emits an odor, immediately remove it from the proximity of any exposed flame. The leaking electrode could ignite and cause a fire or explosion. Dispose of used batteries according to local regulations. Supervise children when they use batteries. Do not: •  let the metal contacts on the battery touch another metal object. Doing so could short circuit and damage the battery. •  disassemble, open, crush, bend, deform, puncture, or shred the battery. •  modify or remanufacture the battery. •  attempt to insert foreign objects into the battery. •  immerse or expose the battery to water or other liquids. •  expose the battery to fire, explosions, or other hazards. Warning:  Improper battery use may result in a fire, explosion, or other hazard. 38  2130893
Care and Maintenance of Your AirCard Modem Stopping and ejecting the AirCard modem Note:  This section only applies to the PC Card/ExpressCard AirCard modems. To remove the AirCard modem: 1.  Close 3G Watcher if it is open. 2.  Click the PC Card icon in the system tray to display the option to stop the card. 3.  Click the appropriate option, depending on your operating system and the model of AirCard modem. 4.  If a dialog box appears notifying you that it is safe to remove the card, click OK. 5.  Push the PC Card eject button beside the PC Card/ExpressCard slot on your computer to eject the card. 6.  Remove the AirCard modem from the slot. Removing a SIM card The procedure for removing the SIM card depends on the model of AirCard modem you have. AirCard 850 and 860 modems To remove the SIM card, you need a pen. 1.  Place the AirCard modem on a smooth, hard surface such as a tabletop. 2.  Position the pen above the eject hole, which is on the top surface of the AirCard modem, beside the SIM card slot. 3.  Press down gently on the eject hole. The SIM card pops out of its slot. Figure 5-2:  Ejecting the SIM card Rev 1.1  Aug.07  39
AirCard 800 Series Installation Guide 4.  Gently pull the SIM card from the slot until it slides free. AirCard 875, 88x, and 88xE modems To remove the SIM/USIM card, you need a pen. 1.  Place the AirCard modem on a smooth, hard surface. 2.  Gently insert the pen into the end of the eject slot farthest from the SIM slot. Slide the pen towards the SIM slot. The SIM card pops out of its slot. Figure 5-3:  Ejecting the SIM card 3.  Gently pull the SIM card from the slot until it slides free. AirCard USB modems 1.  Slide the front panel off. 2.  Slide the SIM card slot cover to the OPEN position and lift the cover. 3.  Remove the SIM card. 4.  Close the SIM card cover and slide it into the LOCK position. 5.  Slide the front panel onto the AirCard USB modem, and push it gently until the panel clicks in place. 40  2130893
6: Regulatory and Safety Information 6 Important notice Because of the nature of wireless communications, trans-mission and reception of data can never be guaranteed. Data may be delayed, corrupted (that is, have errors), or be totally lost. Although significant delays or losses of data are rare when wireless devices such as the Sierra Wireless network card are used in a normal manner with a well-constructed network, the Sierra Wireless network card should not be used in situations where failure to transmit or receive data could result in damage of any kind to the user or any other party, including but not limited to personal injury, death, or loss of property. Sierra Wireless and its affiliates accept no responsi-bility for damages of any kind resulting from delays or errors in data transmitted or received using the Sierra Wireless network card, or for failure of the Sierra Wireless network card to transmit or receive such data. Safety and hazards The AirCard modem MUST BE POWERED OFF in all areas that may be susceptible to radio interference, in particular: •  Prohibited areas Obey all signs and notices and follow all rules and regula-tions. Power off the AirCard modem when instructed to do so or when you suspect that it may cause interference or danger. •  In areas where blasting is in progress •  Where explosive atmospheres may be present Areas with a potentially explosive atmosphere are not always clearly marked. Such areas include gas stations, fuel depots, chemical transfer or storage facilities, areas where blasting is in progress, areas where the air contains chemicals or particles such as grain, dust, or metal pow-ders, and any other area where you would normally be advised to turn off your cellular phone or vehicle engine. •  Near medical or life-support equipment Medical equipment may be susceptible to any form of radio interference. In such areas the AirCard modem can transmit signals that could interfere with this equipment. •  On board aircraft Rev 1.1  Aug.07  41
AirCard 800 Series Installation Guide In addition to Federal Aviation Authority (FAA) require-ments, many airline regulations state that you must sus-pend wireless operations before boarding an aircraft. The AirCard modem is capable of transmitting signals that could interfere with various onboard systems and controls. Failure to observe this instruction may lead to suspension or denial of cellular telephone services to the offender, legal action, or both. Some airlines may permit the use of cellular phones while the aircraft is on the ground and the door is open. The Air-Card modem may be used normally at this time. •  While operating a vehicle The driver or operator of any vehicle should not use a wireless data device while in control of a vehicle. Doing so detracts from the driver or operator's ability to control and operate the vehicle. In some countries, using such commu-nications devices while in control of a vehicle is an offence. Important safety/compliance information for North American users CAUTION: Unauthorized modifications or changes not expressly approved by Sierra Wireless, Inc. could void compliance with regulatory rules, and thereby your authority to use this equipment. The design of the AirCard 850, 860, 875, 880, 881, 880E, and 881E modem complies with U.S. Federal Communications Commission (FCC) and Industry Canada (IC) guidelines respecting safety levels of radio frequency (RF) exposure for portable devices, which in turn are consistent with the following safety standards previously set by Canadian, U.S. and international standards bodies: •   ANSI/IEEE C95.1-1999, IEEE Standard for Safety Levels with Respect to Human Exposure to Radio Frequency Electromag-netic Fields, 3kHz to 300 GHz •  National Council on Radiation Protection and Measure-ments (NCRP) Report 86, -1986, Biological Effects and Exposure Criteria for Radio Frequency Electromagnetic Fields •  Health Canada, Safety Code 6, 1999, Limits of Human Exposure to Radio frequency Electromagnetic Fields in the Frequency Range from 3 kHz to 300 GHz •  International Commission on Non-Ionising Radiation Protection (ICNIRP) 1998, Guidelines for limiting exposure to 2130893 42
Regulatory and Safety Information time-varying electric, magnetic, and electromagnetic fields (up to 300 GHz) These devices are only authorized to be used in laptop computers that are identical or substantially similar to those in its grant application. These devices comply with Part 15 of the FCC Rules. Operation is subject to the condition that these devices do not cause harmful interference. Where appropriate, the use of the equipment is subject to the following conditions: Warning:  (EMI) – United States FCC Information – This equipment has been tested and found to comply with the limits pursuant to Part 15 of the FCC Rules. These limits are designed to provide reasonable protection against harmful interference in an appropriate installation. This equipment generates, uses, and can radiate radio frequency energy and, if not installed and used in accordance with the instructions, may cause harmful inter-ference to radio communication. However, there is no guarantee that interference will not occur in a particular installation. If this equipment does cause harmful interference to radio or television reception, which can be determined by turning the equipment off and on, the user is encouraged to try to correct the interference by one or more of the following measures: •  Reorient or relocate the receiving antenna •  Increase the separation between the equipment and receiver •  Connect the equipment into an outlet on a circuit different from that to which the receiver is connected •  Consult the dealer or an experienced radio/TV technician for help If you have purchased this product under a United States Government contract, it shall be subject to restrictions as set forth in subparagraph (c)(1)(ii) of Defense Federal Acquisitions Regulations (DFARs) Section 252.227-7013 for Department of Defense contracts, and as set forth in Federal Acquisitions Regulations (FARs) Section 52.227-19 for civilian agency Rev 1.1 Aug.07  43
AirCard 800 Series Installation Guide contracts or any successor regulations. If further government regulations apply, it is your responsibility to ensure compliance with such regulations. Information pertaining to OEM customers The AirCard 850, 860, 875, 880, 881, 880E, and 881E wireless network cards have been granted modular approval for mobile applications. Integrators may use the AirCard 850, 860, 875, 880, 881, 880E, and 881E wireless network cards in their final products without additional FCC/IC certification if they meet the following conditions. Otherwise, additional FCC/IC approvals must be obtained. 1.  At least 20 cm separation distance between the antenna and the user’s body must be maintained at all times. 2.  The AirCard 850, 860, 875, 880, 881, 880E, and 881E wireless network cards and their antennas must not be colocated with any other transmitter or antenna within a host device. 3.  A user manual with the end product must clearly indicate the operating requirements and conditions that must be observed to ensure compliance with current FCC/IC RF exposure guidelines. 4.  The end product with an embedded AirCard 850, 860, 875, 880, 881, 880E, 881E wireless network card must pass the unintentional emission testing and properly authorized per FCC Part 15 requirements where applicable. Note:  If these wireless network cards are intended for use in a portable device, you are responsible for separate approval to satisfy the SAR requirements of FCC Part 2.1093 and IC RSS-102. AirCard 850/860 wireless network cards 1.  To comply with FCC/IC regulations limiting both maximum RF output power and human exposure to RF radiation, the maximum antenna gain must not exceed 8 dBi in the Cellular band and 4 dBi in the PCS band. 2.  A label must be affixed to the outside of the end product into which the AirCard wireless network card is incorpo-rated, with a statement similar to the following: •  For an end product with an embedded AirCard 850 wireless network card: This device contains FCC ID: N7NAC850. •  For an end product with an embedded AirCard 860 wireless network card: 2130893 44
Regulatory and Safety Information This device contains FCC ID: N7NAC860. This equipment contains equipment certified under IC: 2417C-AC860. AirCard 875, 880, 881, 880E, and 881E 1.  To comply with FCC/IC regulations limiting both maximum RF output power and human exposure to RF radiation, the maximum antenna gain must not exceed 5 dBi in the Cellular band and 4 dBi in the PCS band. 2.  A label must be affixed to the outside of the end product into which the AirCard wireless network card is incorpo-rated, with a statement similar to the following: •  For an end product with an embedded AirCard 875 wireless network card: This device contains FCC ID: N7NAC875. This equipment contains equipment certified under IC: 2417C-AC875. •  For an end product with an embedded AirCard 880 wireless network card: This device contains FCC ID: N7NAC880. •  For an end product with an embedded AirCard 881 wireless network card: This device contains FCC ID: N7NAC881. This equipment contains equipment certified under IC: 2417C-AC881. •  For an end product with an embedded AirCard 880E/881E ExpressCard wireless network card: This device contains FCC ID: N7NAC880E. This equipment contains equipment certified under IC: 2417C-AC880E. AirCard USB modems 875U  FCC ID: N7N-MC8775U IC: 2417C-MC8775U 880U  FCC ID: N7NMC8780U 881U  FCC ID: N7NMC8781U IC: 2417C-MC8781U Rev 1.1 Aug.07  45
AirCard 800 Series Installation Guide EU regulatory conformity Sierra Wireless hereby declares that the AirCard 850, 875, 875U, 880, 880U, and 880E wireless modems conform to all the essential requirements of Directive 1999/5/EC: AirCard 875 and 880 Wireless modems AirCard 875U and 880U Wireless USB modems AirCard 880E ExpressCard AirCard 850 Wireless modem The Declaration of Conformity made under Directive 1999/5/ EC is available for viewing at the following location in the EU community: Sierra Wireless (UK), Limited Lakeside House 1 Furzeground Way, Stockley Park East Uxbridge, Middlesex UB11 1BD England 46  2130893
7: Technical Specifications LEDs For a description of LED operation for the AirCard 875, 880, 880E, 881, and 881E modems, please see the online Help in 3G Watcher. The following table describes the LED operation for the AirCard USB modem: Table 7-1:  LEDs for the AirCard USB modem 7 LED  State  Indicates Data  Off  The modem has no power. The modem is not completely inserted into the USB slot or the computer is in suspend mode (which powers down the modem). Solid green  The modem has power, has found a signal, and is ready to connect. Green, blinking slowly The modem is powering up, or no service is available. See the online Help (“Not in Service”). Green, blinking rapidly The modem is sending or receiving data. PWR  Off  The modem has no power. The modem is not completely inserted into the USB slot or the computer is in suspend mode (which powers down the modem). Red  The modem has power; the battery is low. The battery recharges whenever the modem is connected to the PC. You can continue to use the modem while the battery is recharging. Green  The modem has power. Rev 1.1  Aug.07  47
AirCard 800 Series Installation Guide 48  2130893 Radio frequency and electrical specifications Table 7-2:  Radio frequency and electrical specifications Compliance  GSM Release 5 Transmit  PCS: 1850 to 1910 MHz DCS1800: 1710 to 1785 MHz EGSM900: 880 to 915 MHz GSM850: 824 to 849 MHz WCDMA2100: (AirCard 850, 875, 88x, 88xE, 8xxU modems) 1920 to 1980 MHz WCDMA850: (AirCard 850, 875, 88x, 88xE, 8xxU modems) 824 to 849 MHz WCDMA1900: (AirCard 850, 875, 88x, 88xE, 8xxU modems) 1850 to 1910 MHz Receive  PCS: 1930 to 1990 MHz DDCS1800: 1805 to 1880 MHz EGSM900: 925 to 960 MHz GSM850: 869 to 894 MHz WCDMA2100: (AirCard 850, 875, 88x, 88xE, 8xxU modems) 2110 to 2170 MHz WCDMA850: (AirCard 850, 875, 88x, 88xE, 8xxU modems) 869 to 894 MHz WCDMA1900: (AirCard 850, 875, 88x, 88xE, 8xxU modems) 1930 to 1990 MHz Channel spacing  200 kHz (GSM) 5 MHz (WCDMA) Channel raster  200 kHz Frequency stability  0.1 ppm
Technical Specifications Environmental specifications Table 7-3:  Environmental specifications for PC_Card/ExpressCard AirCard modems Operating temperature  -20°C to +60°C (-4°F to +140°F) Storage temperature  -30°C to +85°C (-22°F to +185°F) Humidity  95%, non-condensing Vibration  15 g peak 10 to 2000 Hz (non-operating) Table 7-4:  Environmental specifications for AirCard USB modems Operating temperature  -20°C to +60°C Storage temperature  -20°C to +85°C Humidity  85%, non-condensing Vibration  Random vibration, 10 to 1000 Hz, nominal 6G RMS in each of 3 mutually perpendicular axes. Test duration of 60 minutes for each axis, for a total test time of 3 hours (non-operating) Drop  1 m on concrete on each of 6 faces, 2 times Rev 1.1  Aug.07  49
AirCard 800 Series Installation Guide 50  2130893
Index Numerics 3G Watcher introduction,  31 launching,  31 A account,  12 always-on data connection,  30 antenna attaching,  16,  23 icon,  32 APN,  27 autoconnect,  28 autolaunch on high-speed connection,  29 B battery, install,  22 C care and maintenance,  37 channel raster,  48 channel spacing,  48 compact view,  34 connect automatically,  28 Coverage,  33 coverage,  33 coverage area,  12 D data transmission,  33 device not available,  32 device not responding,  32 DNS,  27 DNS settings, entering,  29 driver,  13 E EDGE connection status,  33 indicator,  33 ejecting a SIM card for AirCard 850/860 modem,  39 AirCard PC Card and ExpressCard,  40 AirCard USB modem,  40 ejecting the AirCard modem,  39 electrical specifications,  48 envelope icon main window,  33 system tray,  34 environmental specifications,  49 F frequencies receive,  48 transmit,  48 frequency stability,  48 G GPRS connection status,  33 indicator,  33 H HSDPA connection status,  33 indicator,  33 HSDPA / HSUPA connection status,  33 HSDPA / HSUPA indicator,  33 HSPA connection,  33 HSUPA connection status,  33 HSUPA indicator,  33 humidity,  49 I I/O space (input/output space),  15 icon antenna,  32 device status,  32 roaming,  33 signal strength,  32 SMS message,  33 IMEI,  16 Rev 1.1  Aug.07  51
AirCard 800 Series Installation Guide indicator device status,  32 EDGE coverage,  33 GPRS coverage,  33 HSDPA / HSUPA coverage,  33 HSDPA coverage,  33 HSUPA coverage,  33 roaming,  33 signal strength,  32 SMS message,  33 status,  34 UMTS coverage,  33 installation of software,  15 IP address,  27 entering static IP address,  29 IRQ (interrupt request),  15 L launch automatically on high-speed connection,  29 launching 3G Watcher,  31 LEDs,  47 M maintenance,  37 memory required,  15 N network overview,  12 selection,  36 notebook PC inserting AirCard modem,  23 removing the AirCard modem,  39 system requirements,  15 O online help,  32 P password overview,  27 prompt for,  28 PC / Express Card slots required,  15 power options, power up/down,  35 profile default,  27 overview,  27 setting default,  29 prompt for password,  28 R radio frequency specifications,  48 receive frequencies,  48 regulatory information,  41 removing AirCard modem,  39 SIM card for AirCard 850/860 modem,  39 SIM card for AirCard PC Card and ExpressCard, 40 SIM card for AirCard USB modem,  40 RF specifications,  48 roaming,  13 roaming indicator,  33 RSSI,  32 S safety notice,  41 service,  33 HSDPA,  33 UMTS,  33 signal strength indicator,  32 SIM card removing for AirCard 850/860 modem,  39 removing for AirCard PC Card and ExpressCard, 40 removing for AirCard USB modem,  40 SMS messages indicator,  33 status,  34 software installation,  15 specifications,  47– 49 electrical,  48 environmental,  49 radio frequency,  48 status concurrent HSDPA / HSUPA service,  33 connection,  34 data transmission,  33 device,  32 EDGE connection,  33 EDGE service,  33 GPRS connection,  33 GPRS service,  33 HSDPA / HSUPA,  33 HSDPA connection,  33 HSDPA service,  33 HSUPA connection,  33 HSUPA service,  33 roaming,  33 signal strength,  32 SMS messages,  33,  34 system tray icons,  34 UMTS connection,  33 UMTS service,  33 storage temperature,  49 when not using card,  37 52  2130893
Index system requirements, notebook PCs,  15 system tray icons,  34 T technical specifications,  47– 49 temperature,  49 time-scheduled password,  28 transmit frequencies,  48 triangle icon,  33 U UMTS connection status,  33 UMTS indicator,  33 user name,  27 V vibration,  49 W Watcher compact view,  34 icons and indicators,  33 main window,  32 Windows 2000 as a supported operating system, service pack,  15 Windows 98 as a supported operating system,  15 Rev 1.1 Aug.07  53
AirCard 800 Series Installation Guide 54  2130893

Navigation menu