Sierra Wireless EM7355-D1 Radio Module User Manual Junction indd
Sierra Wireless Inc. Radio Module Junction indd
Contents
user manual setup and featurei nfo T07G
LATITUDE XX
Setup and Features Information
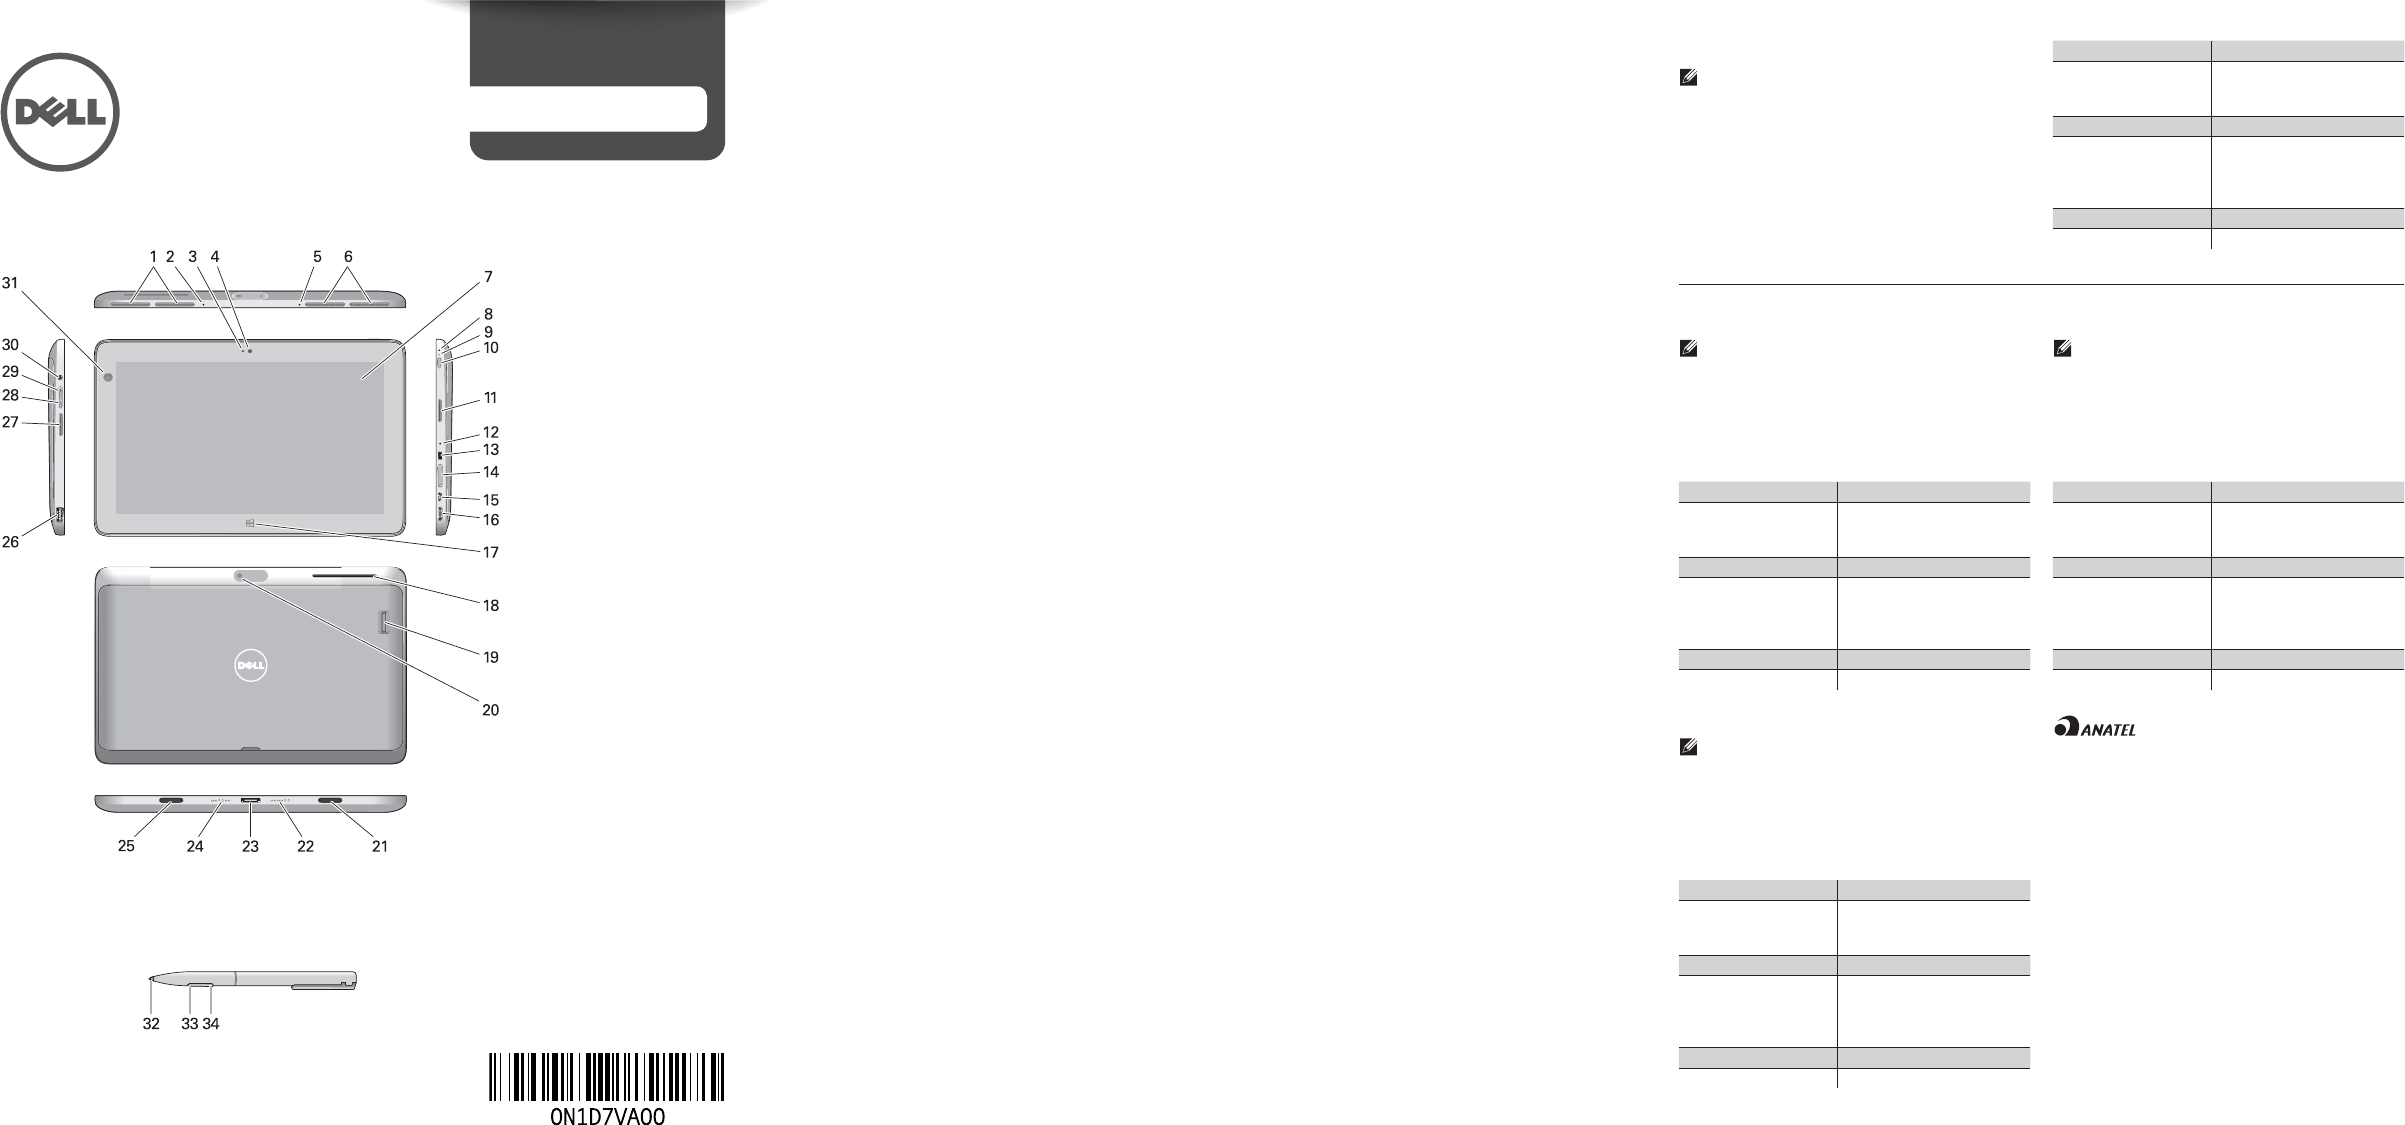
cooling vents1
microphone2
camera LED3
front camera4
microphone5
cooling vents6
touch screen7
microphone8
power LED9
power button10
speaker11
microphone12
Noble security lock 13
slot
memory card reader14
micro USB/power 15
connector
mini HDMI connector16
start button17
security card reader18
fi nger print reader19
rear camera20
docking guide slot21
dock pins22
keyboard connector23
dock pins24
docking guide slot25
USB 3.0 connector26
speaker27
volume decrease 28
button
volume increase 29
button
audio connector30
Ambient Light Sensor31
Pen Tip (replaceable)32
Programmable button 33
Programmable button 34
Views | Views | Views | Views | Views
Language | Language | Language | Language
Language1
Language2
Language3
Language4
Language5
Language6
Language7
Language8
Language9
Language10
Language11
Language12
Language13
Language14
Language15
Language16
Language17
Language18
Language19
Language20
Language21
Language22
Language23
Language24
Language25
Language26
Language27
Language28
Language29
Language30
Language31
Language32
Language33
Language34
Language1
Language2
Language3
Language4
Language5
Language6
Language7
Language8
Language9
Language10
Language11
Language12
Language13
Language14
Language15
Language16
Language
17
Language18
Language19
Language20
Language21
Language22
Language23
Language24
Language25
Language26
Language27
Language28
Language29
Language30
Language31
Language32
Language33
Language34
Language1
Language2
Language3
Language4
Language5
Language6
Language7
Language8
Language9
Language10
Language11
Language12
Language13
Language14
Language15
Language16
Language17
Language18
Language19
Language20
Language21
Language22
Language23
Language24
Language25
Language26
Language27
Language28
Language29
Language30
Language31
Language32
Language33
Language34
Language1
Language2
Language3
Language4
Language5
Language6
Language7
Language8
Language9
Language10
Language11
Language12
Language13
Language14
Language15
Language16
Language17
Language18
Language19
Language20
Language21
Language22
Language23
Language24
Language25
Language26
Language27
Language28
Language29
Language30
Language31
Language32
Language33
Language34
Language
LANGUAGE: O erings may vary by region. The
following specifi cations are only those required
by law to ship with your tablet. For more
information regarding the confi guration of your
tablet, go to Start Screen Help and Support
and select the option to view information about
your tablet.
Power
Coin-cell battery
Input voltage
Output Power
3 V CR2025 lithium ion
100 VAC - 240 VAC
19.5V, 1.2A
Physical
Height
Width
Depth
Weight (Minimum)
12.2mm (0.48 inch)
279.74mm (11.01 inches)
176.76mm (6.96 inches)
870grams (1.91 lbs)
Environmental
Operating Temperature 0 °C to 35 °C (32 °F to 95 °F)
Bateria integrada de íon de lítio recarregável:
Marca: Dell Modelo: FWRM8 (7.4Vdc, 30Wh)/
PPNPH (7.4Vdc, 60Wh).
Carregador: PA-1300-04.
Este produto está homologado pela Anatel, de
acordo com os procedimentos regulamentados
pela Resolução nº 242/2000 e atende aos
requisitos técnicos aplicados, incluindo os limites
de exposição da Taxa de Absorção Específi ca
referente a campos elétricos, magnéticos
e eletromagnéticos de radiofreqüência, de acordo
com as Resoluçãos nº 303/2002 e 533/2009.
Este dispositivo está em conformidade com as
diretrizes de exposição à radiofreqüência quando
posicionado a pelo menos 1,0 centímetro de
distância do corpo. Para maiores informações,
consulte o site da ANATEL - www.anatel.gov.br
Specifi cations
NOTE: O erings may vary by region. The
following specifi cations are only those required
by law to ship with your tablet. For more
information regarding the confi guration of your
tablet, go to Start Screen Help and Support
and select the option to view information about
your tablet.
Power
Coin-cell battery
Input voltage
Output Power
3 V CR2025 lithium ion
100 VAC - 240 VAC
19.5V, 1.2A
Physical
Height
Width
Depth
Weight (Minimum)
12.2mm (0.48 inch)
279.74mm (11.01 inches)
176.76mm (6.96 inches)
870grams (1.91 lbs)
Environmental
Operating Temperature 0 °C to 35 °C (32 °F to 95 °F)
Stylus (optional) | Stylus (optional) | Stylus (optional) |
Stylus (optional) | Stylus (optional)
2013 - 08
For Proof Only
Dell Confi dential
2
Connect the AC adapter to the
AC adapter connector on the
tablet and to the electrical outlet.
Press the power button to turn
on the tablet.
Connect the AC adapter to the
AC adapter connector on the
tablet and to the electrical outlet.
Press the power button to turn
on the tablet.
Connect the AC adapter to the
AC adapter connector on the
tablet and to the electrical outlet.
Press the power button to turn
on the tablet.
Connect the AC adapter to the
AC adapter connector on the
tablet and to the electrical outlet.
Press the power button to turn
on the tablet.
Connect the AC adapter to the
AC adapter connector on the
tablet and to the electrical outlet.
Press the power button to turn
on the tablet.
More Information
For regulatory and safety best
practices see the safety and
regulatory documents that
shipped with your tablet and the
regulatory compliance website
at www.dell.com/regulatory_
compliance.
See www.dell.com for additional
information.
More Information
For regulatory and safety best
practices see the safety and
regulatory documents that
shipped with your tablet and the
regulatory compliance website
at www.dell.com/regulatory_
compliance.
See www.dell.com for additional
information.
More Information
For regulatory and safety best
practices see the safety and
regulatory documents that
shipped with your tablet and the
regulatory compliance website
at www.dell.com/regulatory_
compliance.
See www.dell.com for additional
information.
More Information
For regulatory and safety best
practices see the safety and
regulatory documents that
shipped with your tablet and the
regulatory compliance website
at www.dell.com/regulatory_
compliance.
See www.dell.com for additional
information.
More Information
For regulatory and safety best
practices see the safety and
regulatory documents that
shipped with your tablet and the
regulatory compliance website
at www.dell.com/regulatory_
compliance.
See www.dell.com for additional
information.
© 2013 Dell Inc.
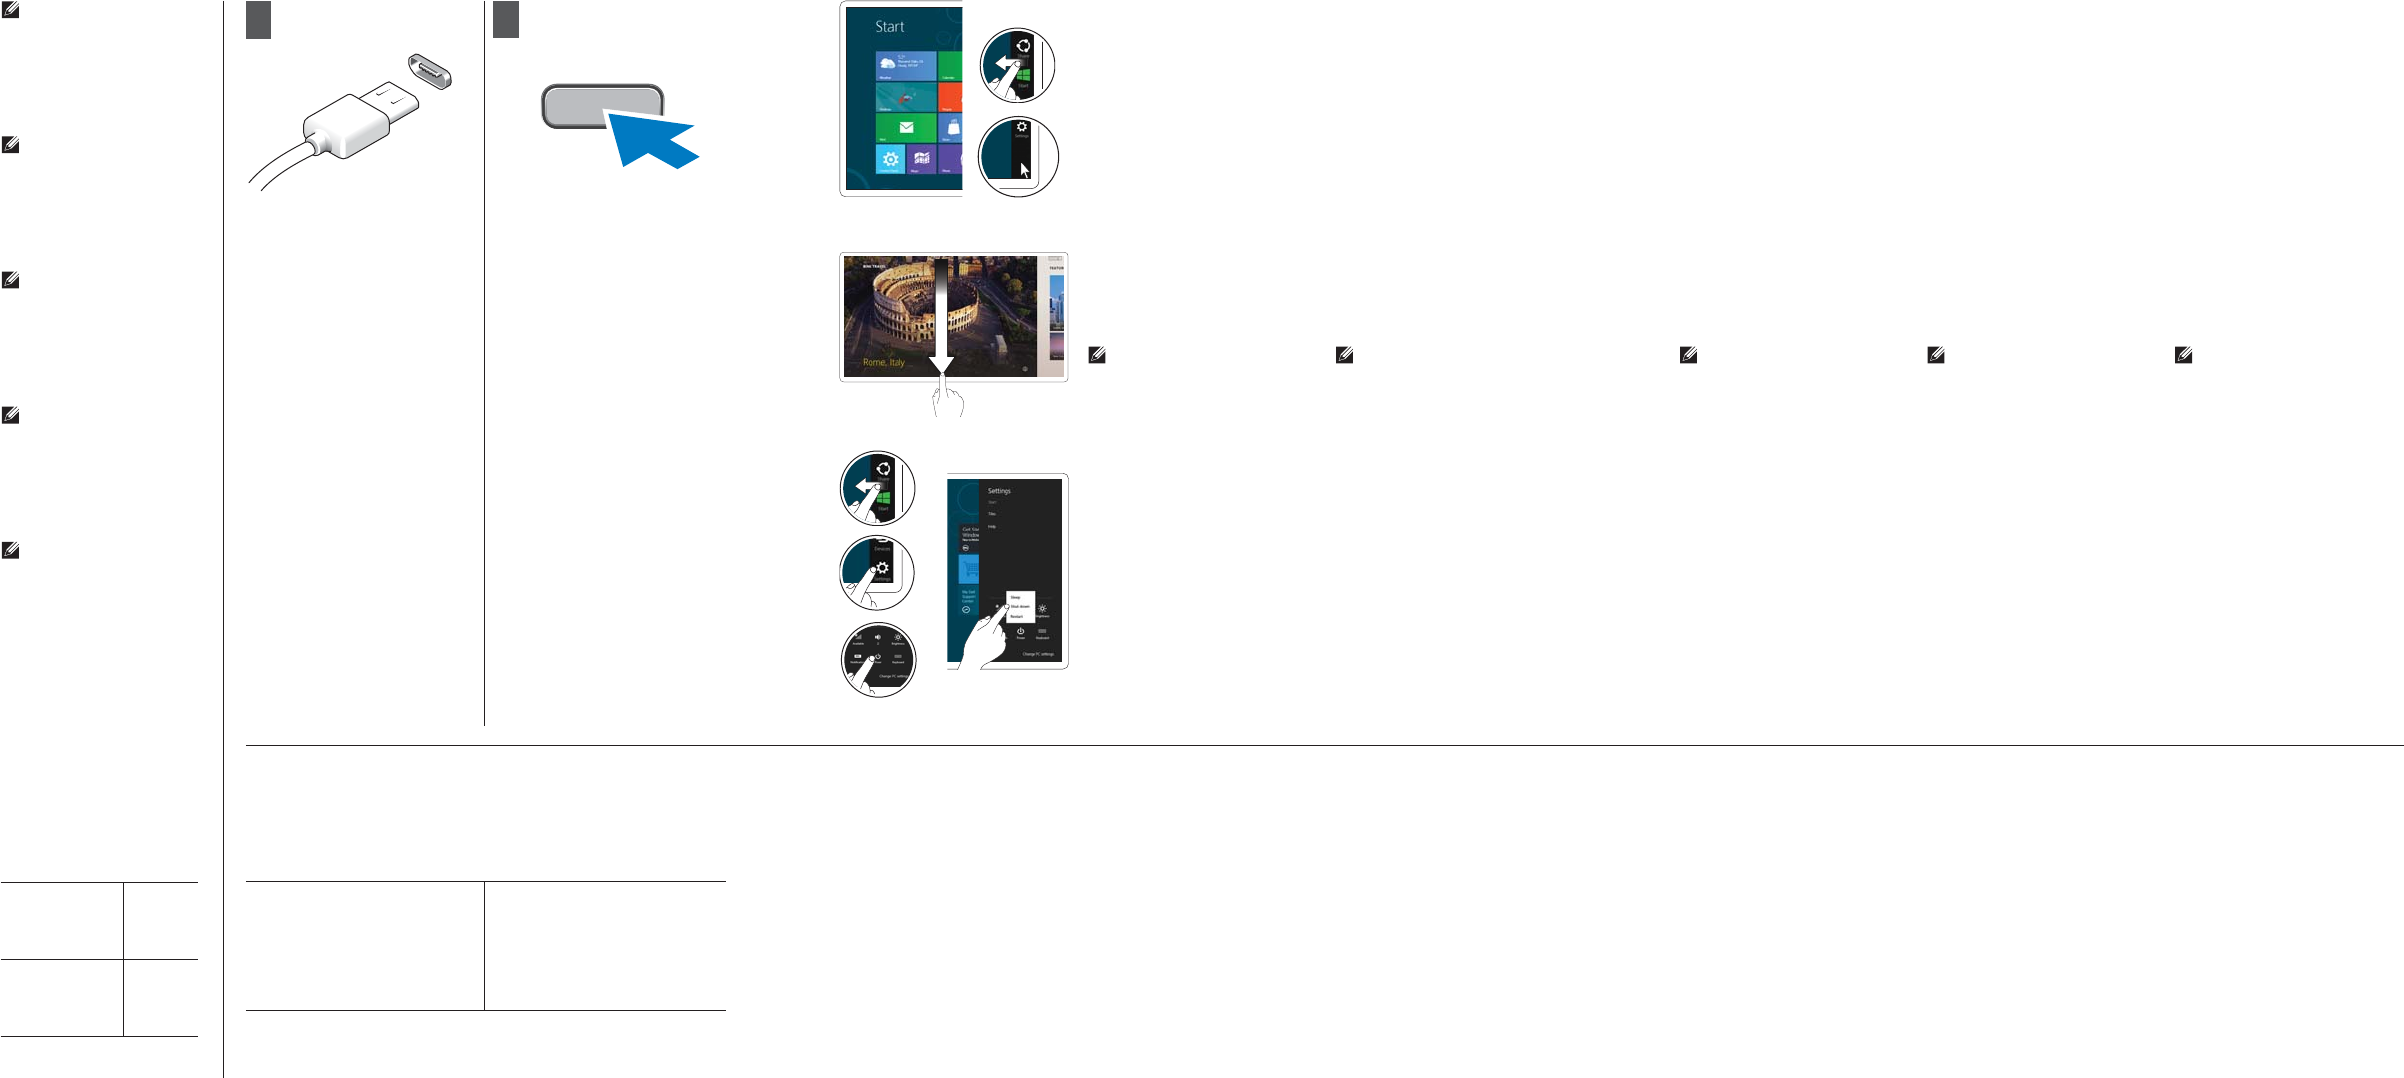
Start screen
You can get to the Start screen
by swiping in from the right edge
of your screen and tapping the
Start charm.
Language
You can get to the Start screen
by swiping in from the right edge
of your screen and tapping the
Start charm.
Close App
If you’re using a mouse, click the
top of the app and drag it to the
bottom of the screen. If you’re
using touch, drag the app to the
bottom of the screen.
NOTE: When you’re not using
an app, Windows will remain
open in the background and
it will close eventually.
Language
If you’re using a mouse, click the
top of the app and drag it to the
bottom of the screen. If you’re
using touch, drag the app to the
bottom of the screen.
NOTE: When you’re not using
an app, Windows will remain
open in the background and
it will close eventually.
Shutdown
Swipe in from the right •
edge of the screen, and
then tap Settings. If you’re
using a mouse, point to the
upper-right corner of the
screen, move the mouse
pointer down, and then
click Settings.
Tap or click • Power, and
then tap or click Shut
down.
Language
Swipe in from the right •
edge of the screen, and
then tap Settings. If you’re
using a mouse, point to the
upper-right corner of the
screen, move the mouse
pointer down, and then
click Settings.
Tap or click • Power, and
then tap or click Shut
down.
Language
If you’re using a mouse, click the
top of the app and drag it to the
bottom of the screen. If you’re
using touch, drag the app to the
bottom of the screen.
NOTE: When you’re not using
an app, Windows will remain
open in the background and
it will close eventually.
Language
If you’re using a mouse, click the
top of the app and drag it to the
bottom of the screen. If you’re
using touch, drag the app to the
bottom of the screen.
NOTE: When you’re not using
an app, Windows will remain
open in the background and
it will close eventually.
Language
If you’re using a mouse, click the
top of the app and drag it to the
bottom of the screen. If you’re
using touch, drag the app to the
bottom of the screen.
NOTE: When you’re not using
an app, Windows will remain
open in the background and
it will close eventually.
Language
Swipe in from the right •
edge of the screen, and
then tap Settings. If you’re
using a mouse, point to the
upper-right corner of the
screen, move the mouse
pointer down, and then
click Settings.
Tap or click • Power, and
then tap or click Shut
down.
Language
Swipe in from the right •
edge of the screen, and
then tap Settings. If you’re
using a mouse, point to the
upper-right corner of the
screen, move the mouse
pointer down, and then
click Settings.
Tap or click • Power, and
then tap or click Shut
down.
Language
Swipe in from the right •
edge of the screen, and
then tap Settings. If you’re
using a mouse, point to the
upper-right corner of the
screen, move the mouse
pointer down, and then
click Settings.
Tap or click • Power, and
then tap or click Shut
down.
Or point the mouse at the
lower or upper right corner of
the screen and then click the
Start charm.
Or point the mouse at the
lower or upper right corner of
the screen and then click the
Start charm.
Language
You can get to the Start screen
by swiping in from the right edge
of your screen and tapping the
Start charm.
Language
You can get to the Start screen
by swiping in from the right edge
of your screen and tapping the
Start charm.
Language
You can get to the Start screen
by swiping in from the right edge
of your screen and tapping the
Start charm.
Or point the mouse at the
lower or upper right corner of
the screen and then click the
Start charm.
Or point the mouse at the
lower or upper right corner of
the screen and then click the
Start charm.
Or point the mouse at the
lower or upper right corner of
the screen and then click the
Start charm.
Information para NOM
(únicamente para México)
The following information provided on the device described in
this document in compliance with the requirements of the o cial
Mexican standards (NOM)
Voltaje de alimentación
Frecuencia
Consumo eléctrico
Voltaje de salida
Intensidad de salida
100 V AC - 240 V AC
50 - 60 Hz
0,6 A
5 V de CC ~ 19,5 V de CC
2 A ~ 1,2 A
NOTE: It is recommended
that you immediately
backup the operating
system image using the
USB device through Dell
Backup and Recovery
(DBAR) application.
NOTE: It is recommended
that you immediately
backup the operating
system image using the
USB device through Dell
Backup and Recovery
(DBAR) application.
NOTE: It is recommended
that you immediately
backup the operating
system image using the
USB device through Dell
Backup and Recovery
(DBAR) application.
NOTE: It is recommended
that you immediately
backup the operating
system image using the
USB device through Dell
Backup and Recovery
(DBAR) application.
NOTE: It is recommended
that you immediately
backup the operating
system image using the
USB device through Dell
Backup and Recovery
(DBAR) application.
Regulatory Model
Language
Language
Language
Language
T07G
Regulatory Type
Language
Language
Language
Language
T07G001
Printed in Poland | Printed in Poland | Printed in Poland | Printed in Poland | Printed in Poland
1
For Proof Only
Dell Confi dential