Sierra Wireless MHS801 WiMAX + WiFi Router User Manual User Guide AirCard W801 for FCC
Sierra Wireless Inc. WiMAX + WiFi Router User Guide AirCard W801 for FCC
UserManual.wiki
>
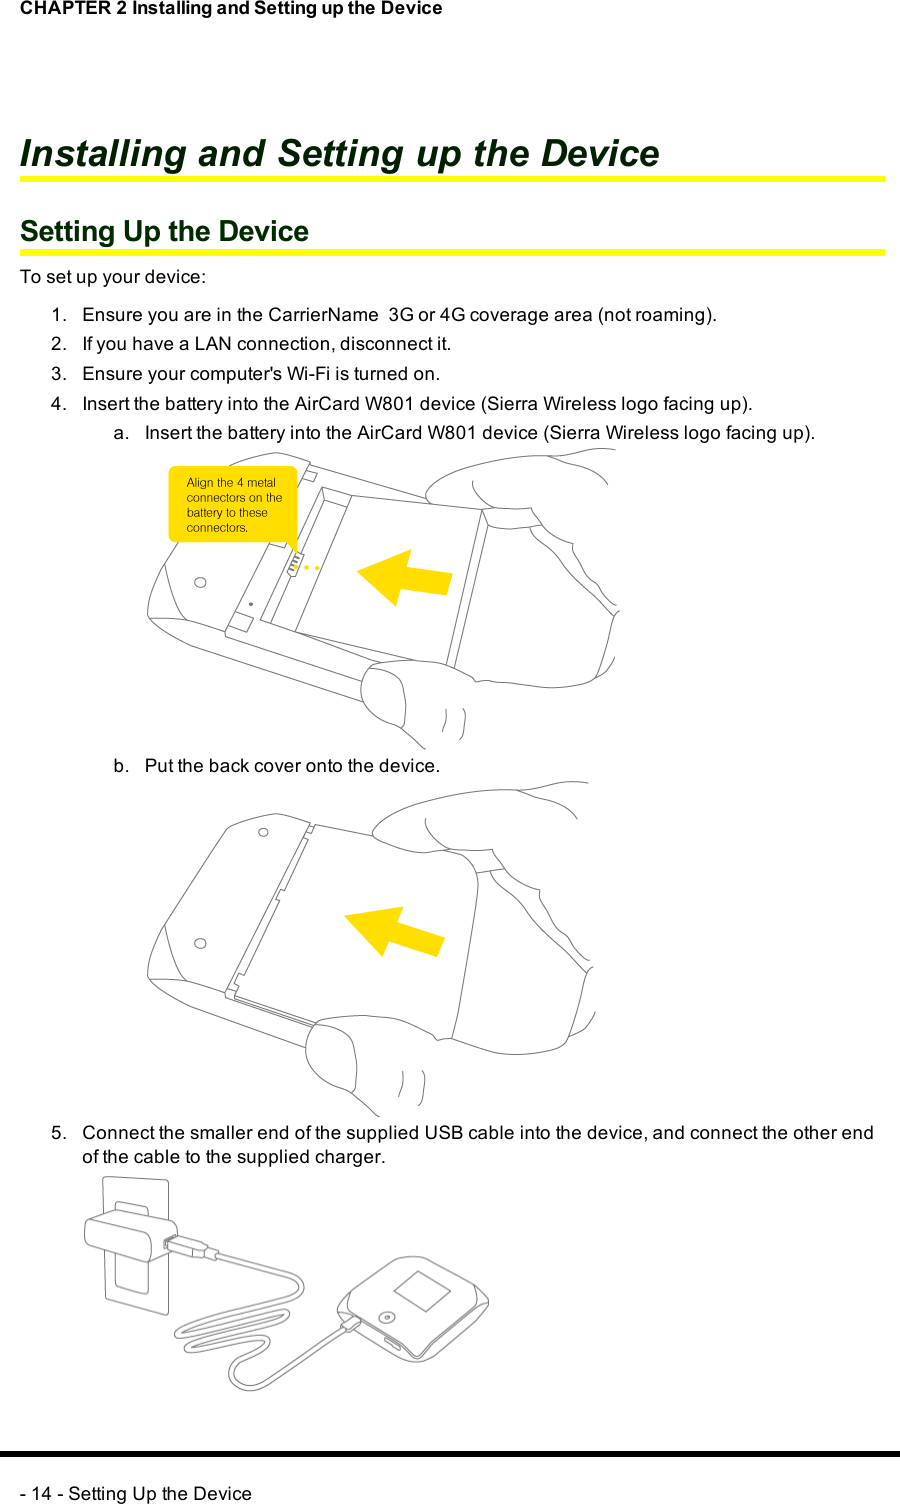
Sierra Wireless
>
MHS801 User Manual
>
Manual
Contents
1.
Manual
2.
Users Manual
Manual
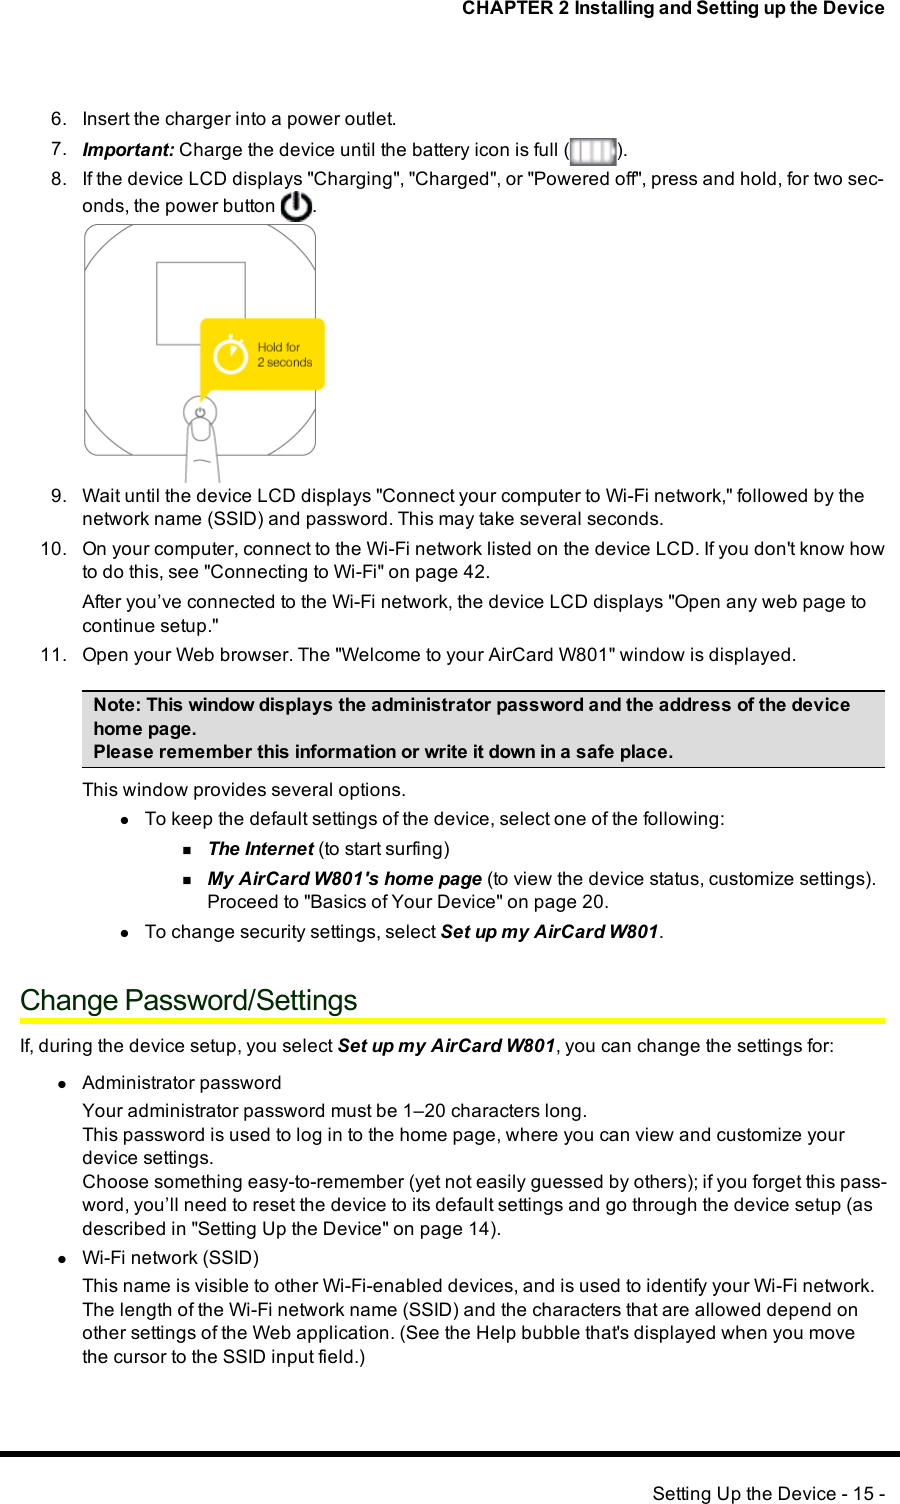
Navigation menu
Upload a User Manual
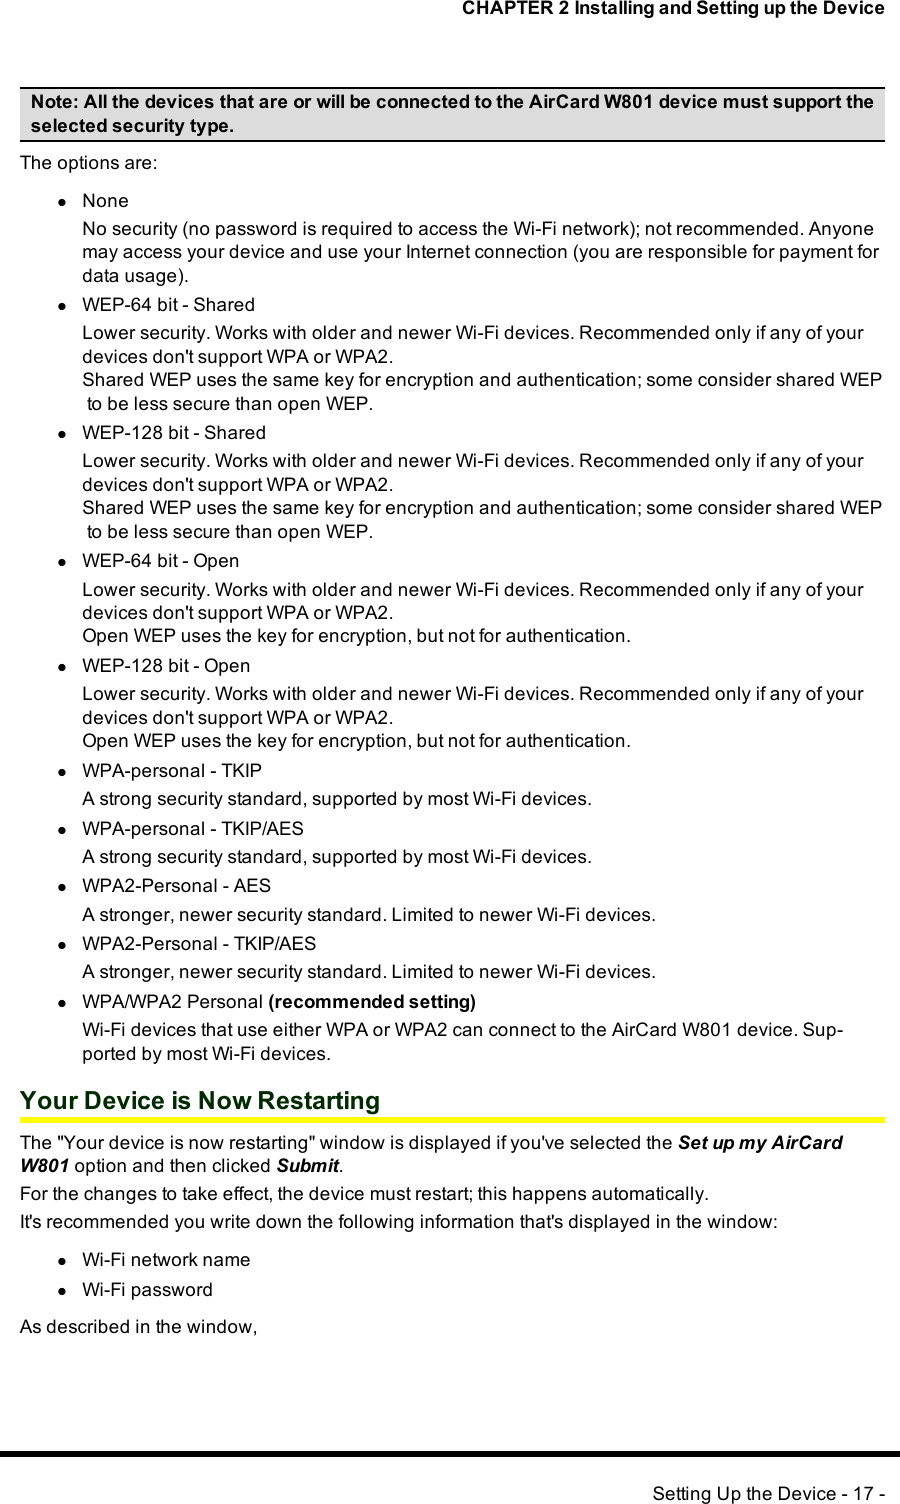
Namespaces
Wiki Guide
HTML
PDF
Info
Views
User Manual
Discussion / Help
Navigation


![CHAPTER 3 Basics of Your DevicelThe active network: the network that is currently being used for your data connection. For exam-ple:"4G" or "3G (EVDORev A)".l3G and 4G status:nConnection status. For example: "Connected".nBrief description of the signal strength. For example:"Good signal (60%)".lIf you're logged in: Connection Preferences (see below).Configuring the 3G/4G Connection PreferencesThe value that you select determines which network(s) to connect to, and in what order:l4G Preferred—Connection can be established to either 3G or 4G; if both are available, 4G isused. This setting is recommended if your service provider has no data limit for 4G, but does for3G, or you want to take advantage of the faster data transfer speeds of 4G.l3GPreferred—Connection can be established to either 3G or 4G; if both are available, 3G isused.l4GOnly—Connection will be established only to 4G.l3G Only—Connection will be established only to 3G.If you don’t have 4G coverage, you can save power by selecting "3G only".To automatically connect to the network upon loss of connection or when the device powers on, selectConnect Automatically.3G Roaming Information and SettingsThe roaming indicator shows whether you are roaming. The text near the icon may indicate additionaldetails.The icon is on the left side of the home page.Icon DescriptionNot roamingRoaming[flashing] Enhanced roaming indicatorNote:Roaming on 4G is not supported.When you click the roaming indicator, the 3G Roaming Information window is displayed.The window displays:lRoaming status.lAllow 3G roaming field (if you're logged in).nIf you select this field, you can roam and connect when outside of CarrierName cov-erage, but additional charges may occur. (To roam outside of North America, you mustalso select Allow international access [subject to feature availability]).nIf you do not select this field, you can connect only when you're inside the CarrierNamecoverage area.lAllow international access field (if you're logged in, and subject to feature availability)—allowsroaming outside of North America.nIf this field is displayed but not available, select Allow 3G roaming.Alert InformationThe alerts icon indicates whether there are any alerts (situations that require your attention).- 34 - Home Page - the Information Center for Your Device and Internet Connection](https://usermanual.wiki/Sierra-Wireless/MHS801.Manual/User-Guide-1210704-Page-34.png)
![CHAPTER 3 Basics of Your DeviceInternet Connection InformationNote:Data usage amounts are approximate and should not be used for billing purposes. Foraccurate data usage amounts, check with CarrierName.When you click the data icon ( on the left side of the home page), the Internet Connection Infor-mation window is displayed.The window displays:lData statistics for the current connection session:nData sentnData receivednTotal transferrednSession durationlThe WWAN IP address of the device—the external IPaddress of the modem [3G or 4G] (that is,the IP address of the modem as seen from the Internet).Viewing and Configuring Detailed Internet Connection InformationWhen you're logged in, the Internet Connection Information window additionally displays a table thatyou can use to determine data use:lIn the currently billing cycle. These numbers get automatically reset to 0 on the day specified bythe Starts on day drop-down list.lOver the lifetime of the device.lBy network [3G/4G], and by sent/received/total.The window also allows you to:lImmediately reset the data usage figures for the current billing cycle (click the Reset button).lChange the start day of the billing cycle (Starts on day drop-down list).SD Card Information and SettingsThe microSD icon ( ) is on the left side of the home page.The text next to the icon indicates whether the card is:lEnabledlDetectedlAccessible by all ("shared") or only the administratorlAccessible with or without a password (security)When you click the icon, the SD Card Information and Settings window is displayed. The windowdisplays:lThe card status (see the above list)lStorage capacity of the card, and space availableWhen you're logged in, from this window you can:lEnable/disable the microSDcard slot. See "Enabling the microSDCard Slot" on page 46.lSet up access to the card. See "Setting Up Access to the microSD Card" on page 46.Sounds Information and SettingsThe sounds icon ( ) shows whether the device speaker is on.- 38 - Home Page - the Information Center for Your Device and Internet Connection](https://usermanual.wiki/Sierra-Wireless/MHS801.Manual/User-Guide-1210704-Page-38.png)
![CHAPTER 3 Basics of Your Device10. If you want to confirm that the upgrade was successful, compare the current version information(in Device > About) to the values you wrote down earlier (before the upgrade).11. If you've saved the current configuration, reload it.a. Next to the Import Router Settings field, click the Browse button and select the fileyou've saved.b. Click Import.12. Reconnect to Wi-Fi. See "Connecting to Wi-Fi" on page 42.Alerts3G Activation Required (Alert)If only 3G coverage is available, you won't be able to connect to the Internet until 3G activation hasbeen completed.To activate 3G on your device:1. Ensure you have 3G coverage.2. Ensure you're logged in to the home page.3. In the 3G Activation Required alert window, click Activate now.Activation is then performed over the network; no user interaction is required.lIf activation is successful, "Activation complete!" is displayed. You can now connect to the 3Gnetwork. If the connection is not established automatically, click the Connect button in thehome page or Mini Window.lIf activation was not successful, "Activation failed" is displayed. Prepare the following, and con-tact CarrierName:lYour billing information.lESNof the AirCard W801 device (displayed on the packaging, on the device [under thebattery], and at Advanced Settings >Device >About).3G Network Update Available (Alert)The 3G Network Update Available alert is displayed if a PRL update is available for your device. Theupdate may improve your 3G network service.Note: During installation of the update:• DONOT turn off or unplug the device.• Your 3G connection won’t be available. (Your 4G connection won't be affected.)To install the update:1. Ensure you have 3G coverage.2. Ensure you're logged in to the home page.3. In the 3G Network Update Available alert window, click Update now.GPS Privacy Agreement (Alert)The GPS Privacy Agreement alert is displayed if the GPSprivacy agreement hasn't been accepted.(You cannot use GPS until you accept the GPSprivacy agreement and then enable GPS.)To accept the GPSprivacy agreement:- 54 - Alerts](https://usermanual.wiki/Sierra-Wireless/MHS801.Manual/User-Guide-1210704-Page-54.png)
![CHAPTER 4 Resources (FAQs, Tips, and More)Questions about GPS and Location ServicesWhat is LBS?LBS (Location-Based Services) is used to provide enhanced Local Search functionality via internetmapping services. For more information, see "Performing a Location Search" on page 50.What is GPS?GPS stands for Global Positioning System, which is a system that uses a series of 24 geosynchronoussatellites to provide location data.GPS satellites transmit signals to equipment on the ground. GPS receivers passively receive satellitesignals, but do not transmit.How do I Use the Enhanced Local Search Feature?See "Performing a Location Search" on page 50.Where Can I Use GPS?GPS works wherever there is line-of-sight access to the GPS satellites.How do I Enable/disable GPS?By default, Location Services are disabled.To enable Location Services, see "Enabling GPS" on page 49.Location-Based Services LimitationsWeather conditions may affect your ability to get a clear view of the satellites and thus to acquire aGPS fix.Other QuestionsAre Terminal Sessions Supported?Terminal sessions (for example, via telnet or ssh) are not supported.Improving Signal StrengthTo improve the signal strength, try the following:lEnsure you're inside the network coverage area.lTry reorienting your device.lMove the device and your computer to another location—you may be in or near a structure thatis blocking the signal. (Every obstacle [for example, walls, ceilings, furniture] between the Air-Card W801 device and other wireless devices decreases the signal strength.)lPlace the AirCard W801 device in a centralized location, as high as possible in the room.lMake sure there’s plenty of space around your device to provide the best signal reception.lKeep the device at least 3-6 feet away from electrical devices that generate RF interference (forexample, microwaves, TVs, 2.4 GHz cordless phones, cellular phones, baby monitors, wirelessspeakers). If you're not using these electrical devices, turn them off.Frequently Asked Questions and Tips - 63 -](https://usermanual.wiki/Sierra-Wireless/MHS801.Manual/User-Guide-1210704-Page-63.png)

![CHAPTER 4 Resources (FAQs, Tips, and More)1. Ensure you're in 3G coverage and the signal strength is strong.2. Power the device off and on. See "Powering the Device Off" on page 22 and "Powering theDevice On" on page 22.3. If the "Activation failed" message is still displayed, prepare the following, and contact Car-rierName:lYour billing information.lESNof the AirCard W801 device (displayed on the packaging, on the device [under thebattery], and at Advanced Settings >Device >About).Connection ErrorIf this message persists on the device LCD, update the 3G profile:1. Log in to the home page.2. Click the Advanced Settings button.3. Select WAN > Setup.4. Click Update 3G profile.5. If an error message and number are displayed on the LCD after the update, note the infor-mation and contact CarrierName.Searching for NetworkThis message is displayed on the LCD until a 3G or 4G network is acquired.If this message persists, see the tips in Cannot Connect to the / Network.Update FailedIf this message is displayed on the device LCD or in the 3G Network Update Available or SoftwareUpdate Available alert windows (after you've attempted the update):1. Ensure your AirCard W801 device is connected to a charger or computer, through the USBcable.2. Retry the update.3. If the "Update failed" message is still displayed, contact CarrierName.LCD Is DarkThe LCDis dark and is not displaying any text or icons if:lThe device is powered on and:lThe LCD is turned off (Advanced Settings>Device >Display > LCD Backlight).lThe LCDis turned on, but the LCDis dormant (inactivity timeout). To make the LCDactive, briefly press the power button on the device.lThe device is in standby (low power) mode. To exit this mode, briefly press the powerbutton on the device.lThe device is powered off.To power on the device:1. Ensure a battery is inserted into the device.2. Press the power button on the device for approximately two seconds.Troubleshooting Tips - 65 -](https://usermanual.wiki/Sierra-Wireless/MHS801.Manual/User-Guide-1210704-Page-65.png)
![Index: network operator – Router setting reset4G, overview 10active network 33protocols supported 69network operator 56-57network serviceactivating 18Network Time Protocol (NTP) 59Network Update Available (alert) 39, 54no serviceicon 33not connected 33notice, important 74noticesregulatory 70NTP (Network Time Protocol) 59Oone-time fix 36, 50online Helpdisplaying 62getting updates 52Oops! This link appears to be broken 31Opera browser 12operating temperature 69operator, network 56-57original activation date 56-57OTAPA 69OTASP 69overview of this document 11overview of your device 20Ppackage contents 10password reminder, Wi-Fi 43password, administratorforgotten; what do I do? 62password, Wi-Fireminder 43patents 70Performance (GPS setting) 51Power button (on the device) [LED]description 21interpreting 22location 21Power Off button 22, 42power settingstips on extending battery life 64powering the device off 22powering the device on 22Preferred Roaming List (PRL)updateSee PRLupdatePRI versionrouter 56PRL updatealert (update available) 54PRL version3G modem 56problems See troubleshootingprotocols, network, supported 69Qquestions, frequently asked (FAQ) 62Rradio frequency (RF) specifications 68receive frequencies 68recharging the battery 24regulatory notices 70Remember me 32reminder, Wi-Fi password 43replacing the battery 27requirementsGPS 49installation 11USB 26reset button 28-29resetting the router component to factorydefault settings (through the reset buttonon the device)28resources 62RF (Radio Frequency) specifications 68roaming3G Roaming Information window 34international access, allow 34routerfirmware version 56PRI version 56resetting to factory default settings(through the reset button on thedevice)28Router setting reset 39Index - 81 -](https://usermanual.wiki/Sierra-Wireless/MHS801.Manual/User-Guide-1210704-Page-81.png)