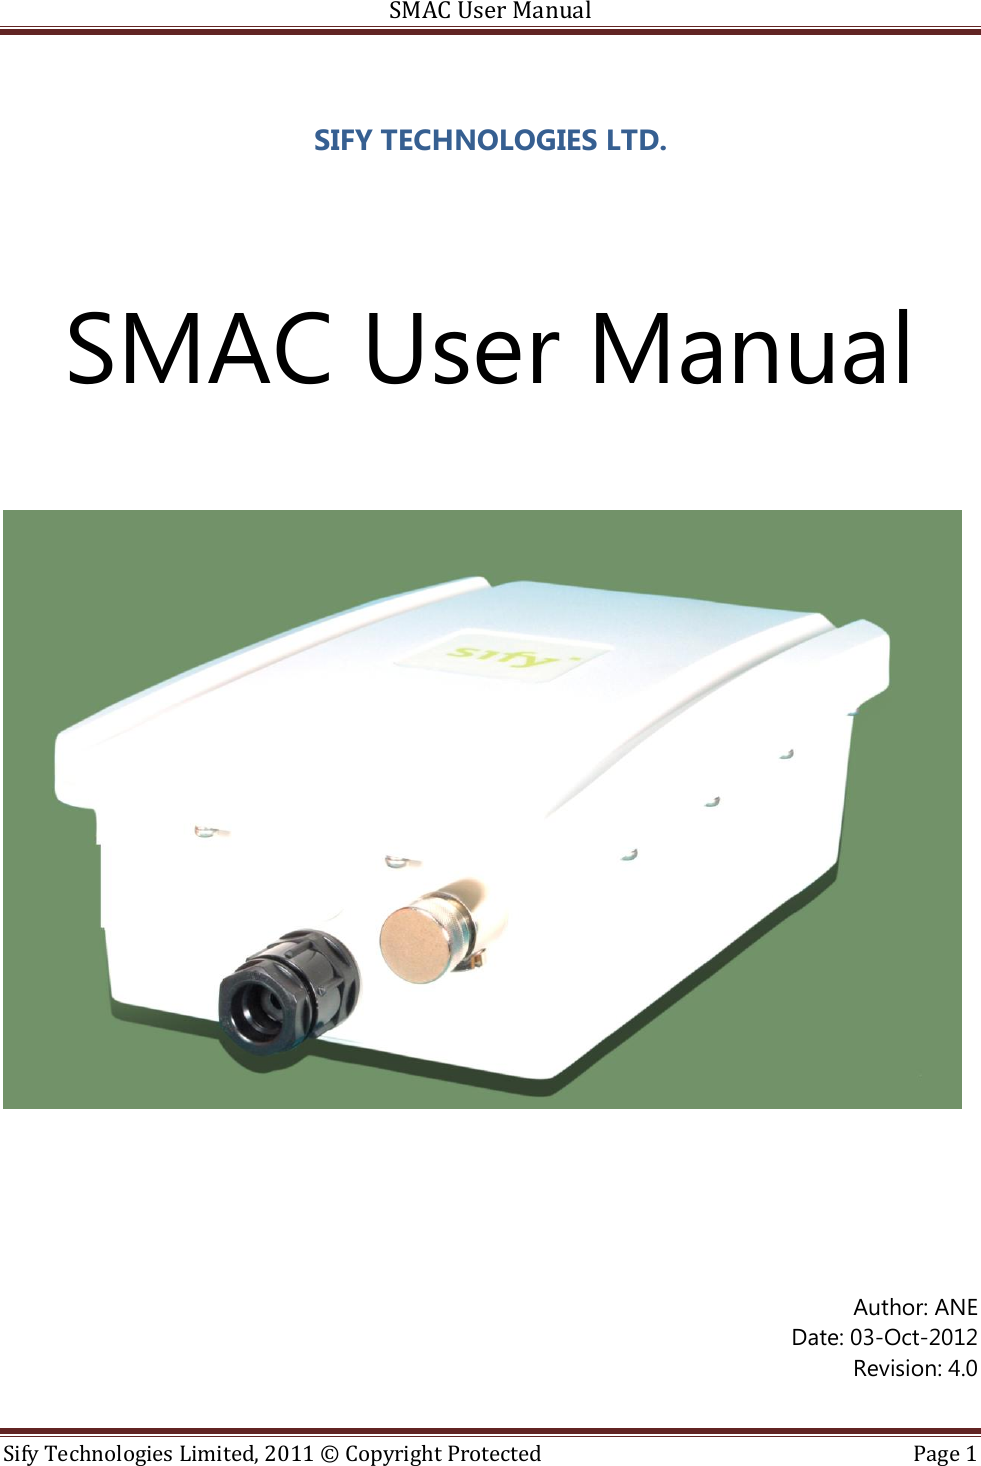
Sify Technologies SMAC-5800 APX-58200-D User Manual SMAC Usage description

Sify Technologies Ltd APX-58200-D SMAC Usage description

User Manual.pdf

SMAC User Manual  Sify Technologies Limited, 2011 © Copyright Protected  Page 1  SIFY TECHNOLOGIES LTD.   SMAC User Manual          Author: ANE Date: 03-Oct-2012 Revision: 4.0
SMAC User Manual  Sify Technologies Limited, 2011 © Copyright Protected  Page 2     Revision History Revision Date Author Change description 1.0 19-Jul-2011 ANE Initial revision. 2.0 22-Dec-2011 ANE 1. Separated operation mode specific settings.  3.0 10-Jul-2012 ANE 1. Enterprise features added  4.0 03-Oct – 2012 ANE 2. Monitoring tab added.
SMAC User Manual  Sify Technologies Limited, 2011 © Copyright Protected  Page 3  Contents Federal Communication Commission Interference Statement ............................................................. 6 1 Product Overview .................................................................................................................................... 8 1.1 Feature ............................................................................................................................................... 8 1.2 Package Contents ........................................................................................................................... 10 1.3 System Requirement ...................................................................................................................... 10 1.4 Hardware Overview ........................................................................................................................ 10 2 Computer Configuration Instruction .................................................................................................. 11 2.1 Assign a Static IP ............................................................................................................................ 11 2.2 Logging Method ............................................................................................................................. 12 3 Status ...................................................................................................................................................... 13 3.1 Save/Load ........................................................................................................................................ 13 3.2 Main ................................................................................................................................................. 14 3.3 Statistics ........................................................................................................................................... 15 3.4 Wireless Client List ......................................................................................................................... 15 3.5 Connection Status .......................................................................................................................... 17 4 System ..................................................................................................................................................... 18 4.1 Switching Operation Mode ........................................................................................................... 18 4.2 IP Settings: ....................................................................................................................................... 19 4.3 Ethernet Settings: ........................................................................................................................... 20 5 Wireless Configuration ......................................................................................................................... 20 5.1.0 Wireless Settings ......................................................................................................................... 20 5.1.1 Outdoor Base Mode.................................................................................................................... 20 5.1.2 Outdoor Subscriber ..................................................................................................................... 21 5.2 Wireless Security Settings ............................................................................................................. 22 5.3 Wireless MAC Filter ........................................................................................................................ 23 5.4 Wireless Advanced Settings .......................................................................................................... 24 6.0.0 Enterprise Features ...................................................................................................................... 26 6.0.1 Access VLAN mode ..................................................................................................................... 26
SMAC User Manual  Sify Technologies Limited, 2011 © Copyright Protected  Page 4  6.0.2 Trunk mode .................................................................................................................................. 27 6.0.3 QinQ mode ................................................................................................................................... 28 7.0.0 Radius ........................................................................................................................................... 29 7.0.1 Primary Server .............................................................................................................................. 29 7.0.2 Secondary Server ......................................................................................................................... 30 7.0.3 Radius settings ............................................................................................................................. 30 8.0 Filtering ................................................................................................................................................ 31 8.0.1 Global filtering ................................................................................................................................. 31 8.0.2 IP Filtering......................................................................................................................................... 32 8.0.3 MAC Filtering ................................................................................................................................... 33 9.0 Routing ................................................................................................................................................ 33 9.0.1 Static Routing................................................................................................................................... 35 9.0.2 RIP (Routing Information Protocol) .............................................................................................. 36 9.0.3 Routing mode access VLAN ........................................................................................................... 37 10 Management Settings .................................................................................................................... 38 10.1 Administration .............................................................................................................................. 38 10.2 Management VLAN ...................................................................................................................... 40 10.3 SNMP Settings .............................................................................................................................. 41 10.4 Backup/Restore Settings ............................................................................................................. 42 10.5 Firmware Upgrade ........................................................................................................................ 42 10.6 Time Settings ................................................................................................................................ 43 10.7 Log ................................................................................................................................................. 44 10.8 Diagnostics .................................................................................................................................... 45 11. Failsafe Mode ...................................................................................................................................... 46 12. LED Indication ..................................................................................................................................... 46 12. Monitoring .......................................................................................................................................... 47 12.1 System ........................................................................................................................................... 47 12.2 Ethernet ......................................................................................................................................... 47 12.3 Wireless ......................................................................................................................................... 48
SMAC User Manual  Sify Technologies Limited, 2011 © Copyright Protected  Page 5  12.4 ARP Table ...................................................................................................................................... 49 12.5 Learn Table .................................................................................................................................... 49       About This Document  This document is written by SIFY. SIFY has rights to change any of this document without notice and all rights reserved. This document can only be used for guiding the configuration setup of SIFY products. This document is to demonstrate the SIFY’s SMAC5800 Wireless Access Point & Client Bridge. Please read the document carefully before setup the SMAC5800. If the damage is caused by the inappropriate behaviors, the repair will not be included in the warranty.  Formats                                                       This document uses following symbols to indicate and highlight special message.  Caution:  This symbol  represents the Vital  message  and  it  could  be harmful  for  the device or settings.  Note: This symbol represents the important message for the settings.  Tip: This symbol represents the alternative choice that can save time or resources.  Before you start__________________________________________________
SMAC User Manual  Sify Technologies Limited, 2011 © Copyright Protected  Page 6  The following equipments are essential to setup the SMAC5800: 1. One Computer/Notebook and internet accessible. 2. Two Ethernet Cables. 3. One SIFY device – SMAC5800.    Federal Communication Commission Interference Statement  This equipment has been tested and found to comply with the limits for a Class B digital device, pursuant  to  Part  15  of  the  FCC  Rules.    These  limits  are  designed to  provide reasonable  protection  against  harmful  interference  in  a  residential  installation.  This equipment generates, uses and can radiate radio frequency energy and, if not installed and used in accordance with the instructions, may cause harmful interference to radio communications.  However, there is no guarantee that interference will not occur in a particular  installation.    If  this  equipment  does  cause  harmful  interference  to  radio  or television reception, which can be determined by turning the equipment off and on, the user is encouraged to try to correct the interference by one of the following measures:  -  Reorient or relocate the receiving antenna. -  Increase the separation between the equipment and receiver. -  Connect the equipment into an outlet on a circuit different from that to which the receiver is connected. -  Consult the dealer or an experienced radio/TV technician for help.  FCC  Caution:  Any  changes  or  modifications  not  expressly  approved  by  the  party responsible for compliance could void the user's authority to operate this equipment.  This device complies with Part 15 of the FCC Rules. Operation is subject to the following two conditions: (1) This device may not cause harmful interference, and (2) this device must accept any interference received, including interference that may cause undesired operation.
SMAC User Manual  Sify Technologies Limited, 2011 © Copyright Protected  Page 7   This  transmitter  must  not  be  co-located  or  operating  in  conjunction  with  any  other antenna or transmitter.  Operations in the 5.15-5.25GHz band are restricted to indoor usage only.   IMPORTANT NOTE: FCC Radiation Exposure Statement: This equipment complies with FCC radiation exposure limits set forth for an uncontrolled environment. This equipment should be installed and operated with minimum distance 20cm between the radiator & your body.  Note: The country code selection is for non-US model only and is not available to all US model. Per FCC regulation, all WiFi product marketed in US must fixed to US operation channels only.   The equipments listed above are only for setup the SMAC5800, you will need more equipment to connect the internet and it is depend on your internet network structure. You may refer to the chapter 2 for more information.
SMAC User Manual  Sify Technologies Limited, 2011 © Copyright Protected  Page 8  1 Product Overview Thank you for using SMAC5800. It is a powerful, enhanced, enterprise scale product with functions Outdoor Base and Outdoor Subscriber.  SMAC5800 uses the latest wireless technology 802.11n standard. It has faster transmit/receive wireless speed. SMAC5800 gives you a great advantage to save your time and cost to expend your network. It is also compatible with 802.11a.  SMAC5800 is easily to install almost anywhere with Power over Ethernet for quick indoor installation and regular Power by Adapter. SMAC5800 can manage power level control, Narrow bandwidth selection, Traffic shaping and Real-time RSSI indicator. SMAC5800 is fully support of security encryption including Wi-Fi Protected Access (WPA2-PSK), 128 bit - AES Encryption and IEEE 802.1x with RADIUS. 1.1 Feature The following list describes the design of the SMAC5800 made possible through the power and flexibility of wireless LANs:  a) Difficult-to-wire environments There are many situations where wires cannot be laid easily. Historic buildings, older  buildings,  open  areas  and  across  busy  streets  make  the  installation  of LANs either impossible or very expensive. b) Temporary workgroups Consider  situations  in  parks,  athletic  arenas,  exhibition  centers,  disaster-recovery,  temporary  offices  and  construction  sites  where  one  wants  a temporary WLAN established and removed. c) The ability to access real-time information Doctors/nurses,  point-of-sale  employees,  and  warehouse  workers  can  access real-time  information  while  dealing  with  patients,  serving  customers  and processing information. d) Frequently changed environments Show  rooms,  meeting  rooms,  retail  stores,  and  manufacturing  sites  where frequently rearrange the workplace. e) Wireless extensions to Ethernet networks Network  managers  in  dynamic  environments  can  minimize  the  overhead
SMAC User Manual  Sify Technologies Limited, 2011 © Copyright Protected  Page 9  caused  by  moves,  extensions  to  networks,  and  other  changes  with  wireless LANs. f) Wired LAN backup Network  managers  implement  wireless  LANs  to  provide  backup  for  mission-critical applications running on wired networks. g) Training/Educational facilities Training  sites  at  corporations  and  students  at  universities  use  wireless connectivity  to  ease  access  to  information,  information  exchanges,  and learning. VLAN Specify a VLAN number for each SSID to separate the services Benefits High Speed Data Rate Up to 300Mbps Capable of handling heavy data payloads such as MPEG video streaming High Output Power up to 23 dBm Extended excellent Range and Coverage. Maximum Tx power will be limited based on country code selection and EIRP limit is applicable based on the frequency band.  IEEE 802.11a/n Compliant Fully Interoperable with IEEE 802.11a/IEEE 802.11n compliant devices Multi-Function Users can use different mode in various environment Point-to-point, Wireless Connectivity Let users transfer data between two buildings Support RSSI Indicator Users can select the best signal to connect with AP easily Power-over-Ethernet Flexible Access Point locations and cost savings. SMAC5800 must uses the adapter provided in the package. WPA2-PSK (AES) 802.1x support support advanced encryption system MAC address filtering in AP mode Ensures secure network connection SNMP Remote Configuration Management Help administrators to remotely configure or manage the Access Point easily.
SMAC User Manual  Sify Technologies Limited, 2011 © Copyright Protected  Page 10  among clients. Wi-Fi Protect Access Wi-Fi Protect Access is a standard-based interoperable security enhancement that increases the level of data protection and access control for existing and future wireless LAN system.  1.2 Package Contents Open the package carefully, and make sure that none of the items listed below are missing. Do not  discard  the  packing  materials,  in  case  of  return;  the  unit  must  be  shipped  in  its  original package.   1* Wireless Access Point / Client Bridge (SMAC5800)  1* Three Pin Indian type power cord  1* PoE Injector 24V/1A Power Adapter (PA1022-3T3)  1* Pole Mounting kit  1* Earthing cable with AP only     Using other Power Adapter than the one included with SMAC5800 may cause damage of the device.  1.3 System Requirement The following conditions are the minimum system requirement.  A computer with an Ethernet interface and operating under Windows XP, Vista, 7 or Linux.  Internet Browser that supports HTTP and JavaScript.  1.4 Hardware Overview Physical Interface - 1 x LAN Port with PoE support - 1 x RF port
SMAC User Manual  Sify Technologies Limited, 2011 © Copyright Protected  Page 11  2 Computer Configuration Instruction The default operating mode is Outdoor Base for AP hardware and Outdoor Subscriber for SU hardware. Device will not assign an IP address to the computer/notebook. Therefore, follow the steps to assign an IP address to your Ethernet card. 2.1 Assign a Static IP In order to configure SMAC5800, please follow the instruction below:  1. In the Control Panel, double click Network Connections and then double click on the connection of your Network Interface Card (NIC). You will then see the following screen.   2. Select Internet Protocol (TCP/IP) and then click on the Properties button. This will allow you to configure the TCP/IP settings of your PC/Notebook     3. Select Use the following IP address radio button and then enter the IP address and subnet mask. Ensure that the IP address and subnet mask are on the same subnet as the device.   4. Click on the OK button to close this window, and then close LAN properties window.
SMAC User Manual  Sify Technologies Limited, 2011 © Copyright Protected  Page 12   IP Address entered in the TCP/IP Properties needs to be at the same subnet of the SMAC5800 IP Address. For example: SMAC5800’s default IP Address is 192.168.1.1 so the IP Address in the TCP/IP settings could be 192.168.1.10. 2.2 Logging Method After complete the IP settings from last section, you can now access the web-based configuration menu.  1. Open web browser  2. Enter IP 192.168.1.1 into you address filter.  Caution: If you have changed the SMAC5800 LAN IP address, make sure you enter the correct IP Address.   3. After connected to the SMAC5800 successfully, browser will pop out a Windows Security window. Please enter the correct Username and Password.
SMAC User Manual  Sify Technologies Limited, 2011 © Copyright Protected  Page 13  4. The default Username and Password are both admin. If you have changed the Username and Password, please enter your own Username and Password. Password length should be minimum 8 and maximum 16. 3 Status Status section is on the navigation drop-down menu. You will then see the options: Main, Statistics, Wireless Client List, System Log and Connection Status. Each option is described in detail below.  3.1 Save/Load This page allows viewing the modified changes. The changes show in the Unsaved changes list table. You can decide to cancel all the changes or to compile to the new setting.     You cannot cancel the specific settings. You can only compile all the settings or revert to the previous settings.
SMAC User Manual  Sify Technologies Limited, 2011 © Copyright Protected  Page 14  3.2 Main Click on the Main link under the Status drop-down menu or click Home from the top-right of the webpage. The status that is displayed corresponds with the operating mode that is selected. Information such as operating mode, system up time, firmware version, serial number, kernel version and application version are displayed in the ‘System’ section. LAN IP address, subnet mask, and MAC address are displayed in the ‘LAN’ section. In the ‘Wireless section, the frequency, channel is displayed. The details of each SSID and its security settings are displayed.
SMAC User Manual  Sify Technologies Limited, 2011 © Copyright Protected  Page 15  3.3 Statistics         Under the Status drop-down menu Click Statistics we can see the Ethernet and wireless interface statistics.    3.4 Wireless Client List Click on the Wireless Client List link under the Status drop-down menu. This page displays the list of Clients that are associated to the SMAC5800.  The MAC addresses and signal strength for each client is displayed. Click on the Refresh button to refresh the client list. Default refresh time will be 10 seconds.        This will be shown in Outdoor Base mode only.
SMAC User Manual  Sify Technologies Limited, 2011 © Copyright Protected  Page 16  3.5 System Log Click on the System Log link under the Status drop-down menu. The device automatically logs (records) events of possible interest in its internal memory. If there is not enough internal memory for all events, logs of older events are deleted, but logs of the latest events are retained.
SMAC User Manual  Sify Technologies Limited, 2011 © Copyright Protected  Page 17  3.5 Connection Status Click on the Connection Status link under the Status drop-down menu. This page displays the current status of the network, including network type, SSID,  BSSID, connection status, wireless mode, current channel, security, data rate, noise level and signal strength.            This will be shown in Outdoor Subscriber mode only.
SMAC User Manual  Sify Technologies Limited, 2011 © Copyright Protected  Page 18  4 System 4.1 Switching Operation Mode The SMAC5800 supports operation modes: Outdoor Base, Outdoor Subscriber. In order to switching between the operating modes, please go to System -> click Operation mode.    Country/Region: Select a Country/Region to conform local regulation.  Operation Mode: Select an operation mode via Radio Button.  Click Accept to confirm the changes.   Accept does not compile the changes, you must go to Status -> Save/Load to apply the new settings.
SMAC User Manual  Sify Technologies Limited, 2011 © Copyright Protected  Page 19  4.2 IP Settings:     Go to System -> Click IP settings     IP Network Setting Select Radio button for Obtain an IP address automatically or Specify an IP address. IP Address Specify LAN port IP address. IP Suet Mask Specify Subnet Mask. Default Gateway Specify Default Gateway Primary DNS Specify Primary DNS Secondary DNS Specify Secondary DNS Accept / Cancel Press Accept to confirm the changes or Cancel to return previous settings.   Accept does not compile the changes, you must go to Status -> Save/Load to apply the new settings.
SMAC User Manual  Sify Technologies Limited, 2011 © Copyright Protected  Page 20  4.3 Ethernet Settings:        Go to System -> Ethernet settings to change the speed and duplex of the device SMAC5800.   5 Wireless Configuration This section will guide you through all the wireless settings. Please read the instruction carefully. Inappropriate setting could lower the performance or affect the network structure. Before you continue, please make sure you have chosen the correct operating mode. 5.1.0 Wireless Settings This section is the basic wireless settings. Please read the description carefully and check the steps on chapter 10 in case you need more detail information. 5.1.1 Outdoor Base Mode Under Wireless  Click wireless Network     Wireless Mode The wireless mode supports 802.11a/n mixed modes. It is compatible with the most common known wireless band.
SMAC User Manual  Sify Technologies Limited, 2011 © Copyright Protected  Page 21  Channel HT Mode The default channel bandwidth is 20 MHz. The larger channel can provide better transmit quality and speed. 5/10/20 and 40 Mhz options are available Extension Channel Specify the upper channel or lower channel selection. It may influence the Auto channel function Channel / Frequency The channel availability is based on the country’s regulation. Auto Place a Check mark to enable Auto channel selection. Current Profile  Configure the SSID, it can help to divide group of clients to access the network. Just Edit to configure the profile.   Accept does not compile the changes, you must go to Status -> Save/Load to apply the new settings.  5.1.2 Outdoor Subscriber Under Wireless  Click wireless Network     Wireless Mode The wireless mode supports 802.11a/n mixed modes. It is compatible with the most common known wireless band.
SMAC User Manual  Sify Technologies Limited, 2011 © Copyright Protected  Page 22  Channel HT Mode Automatically detect the change when changed on Outdoor base Channel / Frequency Automatically detect the change when changed on Outdoor base Accept / Cancel Press Accept to confirm the changes or Cancel to return previous settings. Current Profile Configure the SSID, it can help to divide group of clients to access the network .Just Edit to configure the profile.   Accept does not compile the changes, you must go to Status -> Save/Load to apply the new settings. Please refer to the chapter 4.1 for more detail. 5.2 Wireless Security Settings Wireless Security Settings section will guide you to the entire Security mode configuration:   We strongly recommend that WPA2-PSK as your security settings.  For Outdoor Base: Under Wireless  Click wireless Network   Security Mode Select Enabled from the drop down list to begin the configuration.
SMAC User Manual  Sify Technologies Limited, 2011 © Copyright Protected  Page 23  Encryption Advanced Encryption System. Passphrase Specify the security password. Passphrase Length 64 Hexadecimal characters password length.(minimum 8 characters)  For Outdoor Subscriber: Under Wireless  Click wireless Network   Security Mode Select WPA-PSK from the drop down list to begin the configuration. Encryption Select AES for Encryption type. Passphrase Specify the security password. Passphrase Length 64 Hexadecimal characters password length.(minimum 8 characters)  5.3 Wireless MAC Filter Wireless MAC Filters is used to Allow or Deny wireless clients, by their MAC addresses, accessing the Network. You can manually add a MAC address to restrict the permission to access SMAC5800. The default setting is Disable Wireless MAC Filters.
SMAC User Manual  Sify Technologies Limited, 2011 © Copyright Protected  Page 24   ACL Mode ACL Mode can help to deny or allow certain Client to access the network. Select Disable Deny MAC in the list or Allow MAC in the list from the drop down list. MAC Address Filter Specify the Wireless MAC address manually. Add Press Add to add the Wireless MAC address in the table. Apply Press Apply to apply the changes.   5.4 Wireless Advanced Settings Under Wireless  Click Wireless Advanced Settings   Data Rate Select Data Rate from the drop down list. Data rate will affect the efficiency of the throughput. If the data rate is set to a small number, the lower through will get but it can transmit to longer distance.
SMAC User Manual  Sify Technologies Limited, 2011 © Copyright Protected  Page 25  Transmit Power Select Transmit Power to increase or decrease Transmit Power. Higher transmit power will sometimes cause unable to connect to the network. On the other hand, the lower transmit power will cause client unable to connect to the device. RTS/CTS Threshold Specify Threshold package size for RTC/CTS. Using small number of the threshold will cause RTS/CTS packets to be sent more often to consuming more of the available bandwidth. In addition, if the heavy load traffic occurs, the wireless network can be recovered easily from interferences or collisions. Distance Specify distance rage between AP and Clients. Longer distance may lose high connection speed. Short GI Short GI is improved of 802.11n and 802.11a/g. It can increase 10% of the internet speed during the data transmission. For example, the 802.11a/g’s GI is 800us; the short GI will be 400us. Aggregation Aggregation is to merge the typical size of data’s header to one data. It is useful for the small size but larger amount packets. Wireless Traffic Shaping Place a Check to enable Wireless Traffic Shaping function. Incoming Traffic Limit Specify the wireless transmission speed for downloading in Kbits/seconds Outgoing Traffic Limit Specify the wireless transmission speed for uploading in kbits/seconds Accept / Cancel Press Accept to confirm the changes or Cancel to return previous settings.    1. Changing Wireless Advanced Settings may cause insufficient wireless connection quality.  2. Accept does not compile the changes; you must go to Status -> Save/Load to apply the new settings.
SMAC User Manual  Sify Technologies Limited, 2011 © Copyright Protected  Page 26  6.0.0 Enterprise Features  10.1.0 VLAN Configuration Three VLAN modes are supported in Bridge mode SU 1.) Access VLAN mode 2.) Trunk mode 3.) Q-in-Q mode Click on the VLAN settings under the Network Features menu. This function allows you to configure the different VLAN modes. VLAN mode will be available in Outdoor Subscriber mode only.       6.0.1 Access VLAN mode   Under the VLAN settings, select the VLAN mode as Access.  Enable/Disable Select Enable or Disable function from the drop down list. VLAN Mode Select as Access for configuring in Access VLAN mode.
SMAC User Manual  Sify Technologies Limited, 2011 © Copyright Protected  Page 27  Management VLAN Select the ID as one. Access VLAN Specify the access VLAN ID Note All the VLAN related changes will take effect immediately after clicking on ‘accept’ tab.  6.0.2 Trunk mode Under the VLAN settings, select the mode as Trunk.  Enable/Disable Select Enable or Disable function from the drop down list. VLAN Mode Select as Trunk for configuring in Access VLAN mode. Management VLAN Select the ID as one. Allow trunk vlans (trunk mode) Select ‘ALL’ option for allowing all the tagged packets. Select ‘List’ option for allow the VLANs mentioned in the boxes  Allowed trunk vlans       (trunk mode) Specify the trunk VLAN IDs. (maximum 16 VLANs allowed) Note All the VLAN related changes will take effect immediately after clicking on ‘accept’ tab.
SMAC User Manual  Sify Technologies Limited, 2011 © Copyright Protected  Page 28  6.0.3 QinQ mode Under the VLAN settings, select the mode as QinQ.   Enable/Disable Select Enable or Disable function from the drop down list. VLAN Mode Select as QinQ for configuring in QinQ mode. Management VLAN Select the ID as one. Q-in-Q service VLAN Specify the service vlan id (outer vlan id) Server VLAN Ethernet Type Specify the Ethernet type  Allow client VLANs (Q-in-Q mode) Select ‘ALL’ option for allowing all the tagged packets. Select ‘List’ option for allow the VLANs mentioned in the boxes  Allowed client VLANs(Q-in-Q mode) Specify the client VLAN IDs. (maximum 16 VLANs allowed) Note All the VLAN related changes will take effect immediately after clicking on ‘accept’ tab.
SMAC User Manual  Sify Technologies Limited, 2011 © Copyright Protected  Page 29   7.0.0 Radius Whenever a new subscriber tries to associate with AP, the AP will forward this request to the primary radius server and if Primary server is down, the request will be forwarded to the secondary server. If SU details are valid in the RADIUS server, it will associate with AP or else it will be rejected. Radius server option will be available in the outdoor Base mode (AP) only.   7.0.1 Primary Server  This configuration is used to specify the primary radius server IP address.  Enable/Disable Select Enable or Disable function from the drop down list. Primary server Specify the primary server IP (Data Type: IP address). Primary server port Specify the primary server ort (Data Type: Integer, range 1 – 65535) Primary shared server secret Specify the primary secret (Data Type: String)
SMAC User Manual  Sify Technologies Limited, 2011 © Copyright Protected  Page 30    7.0.2 Secondary Server  This configuration is used to specify the primary radius server IP address.    Request timeout Specify the secondary server IP (Data Type: IP address). Secondary server port Specify the secondary server ort (Data Type: Integer, range 1 – 65535) Secondary shared server secret Specify the secondary secret (Data Type: String)  7.0.3 Radius settings   Re-authentication time Specify the number of seconds after which the SU is re-authenticated in case of successful/unsuccessful authentications. Data Type: Integer (default 300 seconds) Retry Time  Specify the number of seconds after which an attempt will be made to reach the primary and secondary server. AP will not forward any request to primary and secondary server for the time duration configured in retry time. Data Type: Integer (default 300 seconds) Retry count  Specify the number of times Radius Client should try to connect to the Radius Server before giving up. Data Type: Integer (default 3 times) Request count period   Specify the time gap between two requests retries. Data Type: Integer (default 3 seconds)
SMAC User Manual  Sify Technologies Limited, 2011 © Copyright Protected  Page 31  Note All the radius related changes will take effect immediately after clicking on ‘accept’ tab.    8.0 Filtering     Click on the filtering option under the Network features menu. This page displays IP, MAC, multicast, broadcast, etc based filtering options. Filtering option is available in Outdoor base (AP) and Subscriber mode (SU).    8.0.1 Global filtering
SMAC User Manual  Sify Technologies Limited, 2011 © Copyright Protected  Page 32  Enable/Disable Select Enable or Disable function from the drop down list. Drop All L2 Multicast Select Enable or Disable function from the drop down list. By default it’s disabled. Drop All L3 Multicast Select Enable or Disable function from the drop down list. . By default it’s enabled. Drop All L2 Broadcast Select Enable or Disable function from the drop down list. By default it’s disabled. Drop All L3 Broadcast Select Enable or Disable function from the drop down list. . By default it’s disabled. Filtering Type Select White list/Blacklist from the drop down list. Black list – By default all the data traffic is allowed, it will block the traffic based on the filter rule is applied. White list – By default all the data traffic is blocked, it will allow the traffic based on the filter rule is applied. Note All the filter related changes will take effect immediately after clicking on ‘accept’ tab.  8.0.2 IP Filtering   IP Specify the IP address. MASK Specify the IP sub mask. SOURCE IP Specify the Source IP address. SOURCE MASK Specify the Source sub mask. DESTINATION IP Specify the Destination IP address DESTINATION MASK Specify the Destination sub mask Protocol Specify the protocol name
SMAC User Manual  Sify Technologies Limited, 2011 © Copyright Protected  Page 33  Port Specify the port number. Source port Specify the Source port number Destination port Specify the Source port number Note All the filter related changes will take effect immediately after clicking on ‘accept’ tab. 8.0.3 MAC Filtering   MAC Specify the MAC address. SOURCE MAC Specify the Source MAC address. DESTINATION MAC Specify the Destination MAC address Note All the filter related changes will take effect immediately after clicking on ‘accept’ tab.  9.0 Routing    Click on the Routing option under the Network features menu and uncheck the disabled dialogue box. This page displays Static, RIP functions; Routing option will be available in Outdoor Subscriber (SU mode only)
SMAC User Manual  Sify Technologies Limited, 2011 © Copyright Protected  Page 34   Click on the WAN Settings option under the Router menu for configuring the Wireless IP address.   Internet Connection Type Specify the Internet connection type from the drop down menu. Default is Static IP. Account Name (If required) Specify the Account Name if required.  Domain Name(If required) Specify the Domain Name if required. MTU Specify the MTU value. Suggest remain in Auto configuration IP Address Specify the IP address. IP Subnet Mask Specify the Subnet Mask. Gateway IP Address Specify Gateway IP address. Primary DNS Specify Primary DNS server IP address Secondary DNS Specify Secondary DNS server IP address
SMAC User Manual  Sify Technologies Limited, 2011 © Copyright Protected  Page 35    Click on the LAN Settings option under the Router menu for configuring the LAN IP address.   IP Address Specify the IP address. IP Subnet Mask Specify the Subnet Mask. Note All the filter related changes will take effect immediately after clicking on ‘accept’ tab. Maximum it can support 100 routes in static routing mode.  9.0.1 Static Routing  Check the dialogue box of static option for enabling the static routing function. RIP dialogue box has to be unchecked.
SMAC User Manual  Sify Technologies Limited, 2011 © Copyright Protected  Page 36  Destination Specify the Destination IP address. Mask Specify the Destination Mask. Next Hop Specify the next hop IP address. Metric Specify the metric value if required. Note All the filter related changes will take effect immediately after clicking on ‘accept’ tab. Maximum it can support 100 routes in static routing mode.  9.0.2 RIP (Routing Information Protocol)  Check the dialogue box of RIP option for enabling the static routing function. Static dialogue box has to be unchecked.
SMAC User Manual  Sify Technologies Limited, 2011 © Copyright Protected  Page 37  Version Specify the version 1 or 2 from the drop down menu Passive interface Specify the passive interface as Both/Wireless/Ethernet from the drop down menu Update timer(sec) Specify the update timer in seconds. Suggest remain in default configuration Default Metric Specify the default metric value if required. Suggest remain in default configuration value as one.  RIP Neighbour Specify the neighbor IP address. Suggest remain in default configuration value as one. Note All the filter related changes will take effect immediately after clicking on ‘accept’ tab. Maximum it can support 100 routes in static routing mode.  9.0.3 Routing mode access VLAN   Routing mode access VLAN option will get enabled after configuring the Outdoor Subscriber (SU) in Routing mode only. Click on the VLAN settings under the Network features menu for access VLAN settings option.
SMAC User Manual  Sify Technologies Limited, 2011 © Copyright Protected  Page 38  Enable/Disable Select Enable or Disable function from the drop down list. VLAN Mode Select as Access for configuring in Access VLAN mode. Management VLAN Select the ID as one. Access VLAN Specify the access VLAN ID Access IP Address Specify the access IP Address Access IP Mask Specify the access IP MASK Note All the VLAN related changes will take effect immediately after clicking on ‘accept’ tab.   10 Management Settings  Management section is on the navigation drop-down menu. You will then see seven options: administration, management VLAN, SNMP settings, backup/restore settings, firmware upgrade, time settings, and log. Each option is described below. 10.1 Administration Click on the Administration link under the Management menu. This option allows you to create a user name and password for the device. By default, this device is configured with a user name and password admin. For security reasons it is highly recommended that you create a new user name and password.
SMAC User Manual  Sify Technologies Limited, 2011 © Copyright Protected  Page 39  Name Specify Username for login. Password Specify a Password for login Confirm Password Re-enter the Password for confirmation. Password length should be minimum 8 and maximum 16. Save/Apply / Cancel Press Save/Apply to apply the changes or Cancel to return previous settings.  Press Save/Apply will change the setting immediately. It will not be able to undo the action.
SMAC User Manual  Sify Technologies Limited, 2011 © Copyright Protected  Page 40   10.2 Management VLAN Click on the Management VLAN link under the Management menu. This option allows you to assign a VLAN tag to the packets. A VLAN is a group of computers on a network whose software has been configured so that they behave as if they were on a separate Local Area Network (LAN). Computers on VLAN do not have to be physically located next to one another on the LAN   Management VLAN ID If your network includes VLANs and if tagged packets need to pass through the Access Point, specify the VLAN ID into this field. If not, select the No VLAN tag radio button.  Accept / Cancel Press Accept to confirm the changes or Cancel to return previous settings.   1. If you reconfigure the Management VLAN ID, you may lose connection to the SMAC5800. Verify DHCP server can support the reconfigured VLAN ID, and then re-connect to the new IP address. 2. Accept does not compile the changes; you must go to Status -> Save/Load to apply the new settings. Please refer to the chapter 4.1 for more detail.
SMAC User Manual  Sify Technologies Limited, 2011 © Copyright Protected  Page 41  10.3 SNMP Settings Click on the SNMP Settings link under the Management menu. This is a networking management protocol used to monitor network-attached devices. SNMP allows messages (called protocol data units) to be sent to various parts of a network. Upon receiving these messages, SNMP-compatible devices (called agents) return data stored in their Management Information Bases.  Enable/Disable Select the Radio button to Enable or Disable SNMP function. Contact Specify the contact details of the device. Location Specify the location of the device. Community Name(Read only) Specify the password for access the SNMP community for read only access. By default its public; better keep it in default password. Community Name(Read/Write) User cant able to change the default SNMP Read/Write password. Trap Destination IP Address Specify the IP address that will receive the SNMP trap. Trap Destination Community Name Specify the Destination Community name. Save/Apply / Cancel Press Save/Apply to apply the changes or Cancel to return previous settings.  Press Save/Apply will change the setting immediately. It will not be able to undo the action.
SMAC User Manual  Sify Technologies Limited, 2011 © Copyright Protected  Page 42  10.4 Backup/Restore Settings Click on the Backup/Restore Setting link under the Management menu. This option is used to save the current settings of the device in a file on your local disk or load settings on to the device from a local disk. This feature is very handy for administrators who have several devices that need to be configured with the same settings.  Save A Copy of Current Settings Click on Backup to save current configured settings. Restore Saved Settings from a File SMAC5800 can restore a previous setting that has been saved. Click on Browse to select the file and Restore. Revert to Factory Default Settings Click on Factory Default button to reset all the settings to the default values. 10.5 Firmware Upgrade Click on the Firmware Upgrade link under the Management menu. This page is used to upgrade the firmware of the device. Make sure that downloaded the appropriate firmware from your vendor.    Upgrade process may take few minutes (approximate 3 minutes); please do not power off the device and it may cause the device crashed or unusable. SMAC5800 will restart automatically once the upgrade is completed.
SMAC User Manual  Sify Technologies Limited, 2011 © Copyright Protected  Page 43  10.6 Time Settings Click on the Time Settings link under the Management menu. This page allows you to configure the time on the device. You may do this manually or by connecting to a NTP server.   Manually Set Date and Time Manually setup the date and time. Automatically Get Date and Time Specify the Time Zone from the drop down list and Place a Check to specify the IP address of the NTP Server manually or uses default NTP Server. Save/Apply / Cancel Press Save/Apply to apply the changes or Cancel to return previous settings.   Press Save/Apply will change the setting immediately. It will not be able to undo the action.
SMAC User Manual  Sify Technologies Limited, 2011 © Copyright Protected  Page 44   10.7 Log Click on the Log link under the Management menu. The Log page displays a list of events that are triggered on the Ethernet and Wireless interface. This log can be referred when an unknown error occurs on the system or when a report needs to be sent to the technical support department for debugging purposes.    Syslog Select Enable or Disable Syslog function from the drop down list. Log Server IP Address Specify the Log Server IP address. Local Log Select Enable or Disable Local Log service. Save/Apply / Cancel Press Save/Apply to apply the changes or Cancel to return previous settings.   Press Save/Apply will change the setting immediately. It will not be able to undo the action.
SMAC User Manual  Sify Technologies Limited, 2011 © Copyright Protected  Page 45   10.8 Diagnostics Click on the Diagnostics link under the Management menu. This function allows you to detect connection quality and trace the routing table to the target.
SMAC User Manual  Sify Technologies Limited, 2011 © Copyright Protected  Page 46    11. Failsafe Mode  Any interruption is happening while firmware upgrade, device will go to failsafe mode. In this mode radio will be reachable with default ip – 192.168.1.1/24. Only web access can be done in this stage and firmware can upload through web. Click on Browse and select the firmware from the storage location and click on upload button.   12. LED Indication  LED indication in Outdoor Subscriber (SU) mode and LED blinking format is given below.       NAME Condition  Signal Strength GREEN blinking fast Excellent (less than -63) GREEN blinking slow Good (-64 to -74 dBm) Alternate GREEN and AMBER Average (-75 to -80 dBm) AMBER blinking Poor (above -81 dBm) WLAN_LED OFF Wireless Link DOWN
SMAC User Manual  Sify Technologies Limited, 2011 © Copyright Protected  Page 47  12. Monitoring  12.1 System Click on the System link under the Monitoring menu for monitoring the CPU and Memory usage of AP/SU in the System tab.  The graph representation will help to find out the current usage of CPU and Memory in percentage.            12.2 Ethernet Click on the Ethernet link under the Monitoring menu for monitoring the Drop/error counts increasing in the IN and OUT tab of Ethernet side. Based on the counters we can able to conclude any ethernet side issue on the AP/SU side. We can able to check the Ethernet status (UP/Down) in the ethernet tab.  Graphical representation of current utilization and PPS of IN and OUT can be monitored in the Ethernet interface.
SMAC User Manual  Sify Technologies Limited, 2011 © Copyright Protected  Page 48    12.3 Wireless Click on the Wireless link under the Monitoring menu for monitoring the Drop/error counts increasing in the IN and OUT tab of wireless side. Based on the counters we can able to conclude any wireless side issue on the AP/SU side. We can able to check the wireless status (UP/Down) in the wireless tab.  Graphical representation of current utilization and PPS of IN and OUT can be monitored in the wireless interface.
SMAC User Manual  Sify Technologies Limited, 2011 © Copyright Protected  Page 49   12.4 ARP Table Click on the ARP link under the Monitoring menu for ARP entries learned in AP/SU.    12.5 Learn Table Click on the Learn link under the Monitoring menu for learn entries in AP/SU.

Navigation menu