Sig Sauer K18 Laser range finder User Manual
Sig Sauer, Inc. Laser range finder Users Manual
Users Manual
OWNERS MANUAL
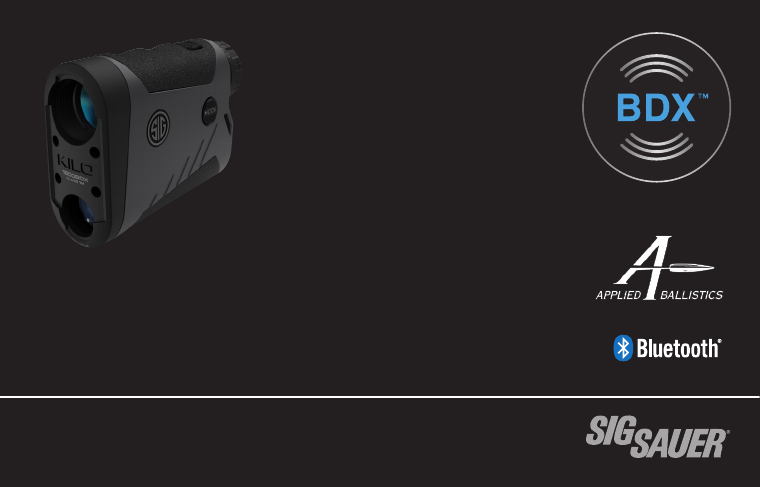
KILO®
KILO1800BDX™ 6x20mm LASER RANGEFINDER
WITH BALLISTIC DATA XCHANGE™

2
TABLE OF CONTENTS
This manual is available in the following languages: French, Spanish, German, Italian, Portuguese,
Russian, Afrikaans, Swedish, and Norwegian. Please visit sigsauer.com for Owners Manual downloads ,
or download to your Smart device with the SIG BDX App.
Introduction .............................................. 3
Contents ................................................4
Key Features .............................................5
Product Identification ......................................6
Operation ..............................................17
Display Information .......................................21
Changing Modes of Operation ..............................22
Programming Sequence ...................................23
Frequently Asked Questions (FAQs) ..........................38
Specifications ...........................................40
SIG SAUER® Electro-Optics Infinite Guarantee™ ................46
3
sigsauer.com
INTRODUCTION
Congratulations on the purchase of your SIG SAUER® Laser Rangefinder. The KILO1800BDX™ is part of
a new, advanced family of rangefinders from SIG SAUER that feature Low Energy Bluetooth embedded
Applied Ballistics Ultralight and the free downloadable SIG™ BDX App as part of SIG SAUER’s new
Ballistic Data Xchange™ technology. All of SIG SAUER’s rangefinders feature the most advanced digital
signal processing engine while streamlining the user interface for a no hassle, out of the box experience.
Scan mode refreshes at
ultra-fast 4x/second
Twist eyecup for individualized,
custom fit
Rear-loading CR2 Battery
Compact form
factor easily fits in
pocket

4
CONTENTS:
• KILO1800BDX™ Digital Laser Rangefinder
• CR2 Battery (1)
• Premium Padded Ballistic Nylon Case
• Lanyard
• Quick Start Guide

5
sigsauer.com
KEY FEATURES:
• SIG SAUER’S Patent Pending Ballistic Data Xchange™ Technology utilizes, low energy LE Bluetooth
with embedded Applied Ballistics Ultralight and the free BDX™ App to sync custom gun profiles
and environmental conditions to your KILO® and pair your KILO to any BDX enabled riflescope or
sight for shots out to 800 yards.
• 6x20mm monocular with SpectraCoat™ anti-reflection coatings for superior light transmission and
optical clarity.
• Revolutionary Lightwave™ DSP Technology for the fastest and longest distance rangefinder engine.
• HyperScan provides 4 range updates per second in scan mode while RangeLock reports the last
range result when ranging distant targets.
• Features line of sight or angle modified range. Units in yards or meters to tenth Y/M resolution.
• High Transmittance HT-LCD display for superior low-light performance.
• Compact, lightweight polymer housing with diopter adjustment.
• Simplified user interface with RANGE and MODE buttons only.
• Rangefinder configuration can now be done through the free SIG BDX™ App.
• Displays windage and elevation within KILO HUD for every target that is scanned.
6
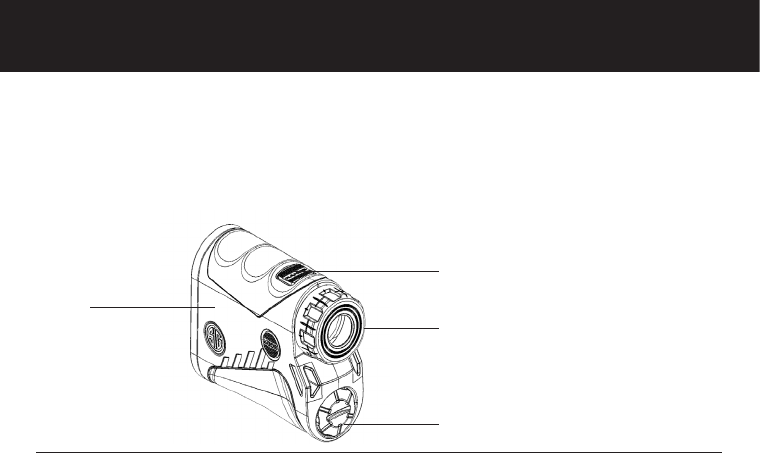
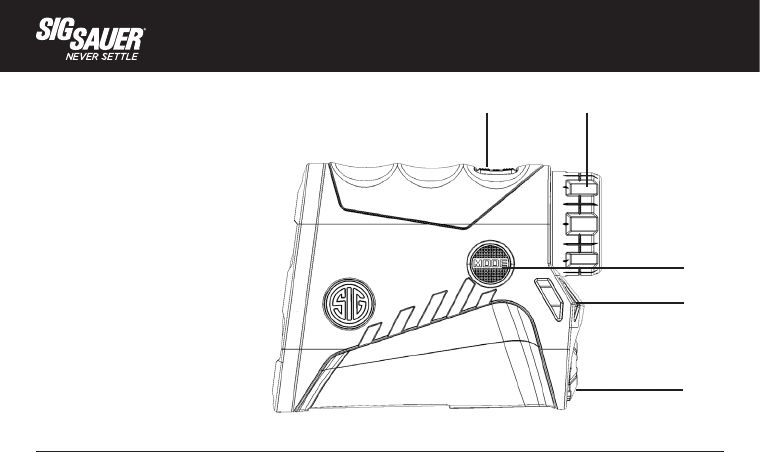
PRODUCT IDENTIFICATION:
A- Power/Range Button
B- Eyecup / Diopter Focus Adjustment
C- Mode Button
D- Battery Compartment
E- Lanyard
A B
C
E
D
7
sigsauer.com
LIGHTWAVE™ DSP TECHNOLOGY
SIG SAUER’s proprietary Lightwave DSP engine leverages HyperScan – an advanced power
management technique that provides the fastest refresh rate in scan mode (4 times per second)
even at distances up to a mile. Our DSP engine uses the latest generation field programmable gate
array (FPGA) running sophisticated signal processing algorithms to reduce false positives while
finding weak or distant targets.
RANGING ACCURACY, RESOLUTION AND MAXIMUM RANGES
The KILO1800BDX™ provides line of sight or angle modified range information accurate to ±0.5 yards
or meters out to 500 yards; ±1 yard from 500 - 1000 yards and ±2 yards beyond 1000 yards. Range is
displayed in 0.1 yard or meter resolution.
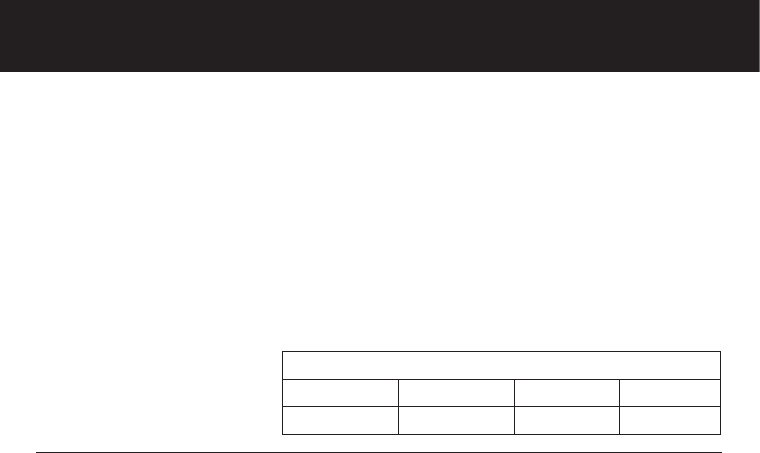
RANGING PERFORMANCE IN HYPERSCAN MODE
Reflective Trees Deer
KILO1800BDX™ Up to 1,600 yds Up to 950 yds Up to 750 yds

8
SIG SAUER BALLISTIC DATA XCHANGE (BDX)
SIG SAUER’s Patent Pending BDX system takes the guesswork out of determining the proper range
and ballistics solution for hitting your target with the first round. Low Energy Bluetooth combined
with an embedded ballistic calculator (Applied Ballistics Ultralight) allows the user to configure up to
25 bullet profiles on the free BDX App and sync to your KILO. Line of sight range, elevation and wind
hold information is calculated instantly and displayed based on the active profile. When combined
with one of SIG SAUER’s BDX enabled riflescopes, the user ranges a target and the firing solution is
instantly shared with the BDX riflescope where the holdover dot is selectively illuminated.

9
sigsauer.com
GENERAL OPERATION
Your rangefinder provides 3 modes of operation: AMR, LOS and ABU. AMR and LOS will be explained
on the next page. When ABU is selected the user can pair the KILO with a nearby smartphone where
the BDX App should already be installed. The user configures a bullet profile in the app, which is
actively synced with a paired rangefinder. For example, the user downloads and installs the BDX
App, selects a 0.308 caliber bullet and chooses a Barnes LRXBT 200 gr bullet – this profile is selected
and saved in real-time. The user will then configure the muzzle velocity, zero range, temperature and
altitude within the BDX App.

10
APPLIED BALLISTICS ULTRALIGHT (ABU)
Your rangefinder has an embedded ballistics solver developed by Sig Sauer, Applied Ballistics and
nVisti. By pairing your KILO with the free BDX App you can enter custom ballistics information for
up to 25 bullet profiles and sync one at a time to your KILO. The active ballistic profile is now saved
on your KILO, and when in ABU mode, will provide an accurate ballistic solution out to 800 yards
maximum. The LOS range and angle of incline will be displayed for 2 seconds, then the elevation
holdover value and finally the windage hold. This range and holdover information will continue to be
displayed for 30 seconds or longer depending upon the timeout setting in the BDX App.
Wind direction and wind speed can also be configured within the App. The smartphone will actively
sync all inputs with the KILO and the KILO can then be used without a smartphone. BDX provides
a firing solution out to a maximum of 800 yards. Custom drag curves are not provided within the
BDX App. For users that require more precision or will be shooting further than 800 yards, the
KILO1800ABS with Applied Ballistics Elite is the preferred solution. When in ABU mode, paired
and bonded with a BDX enabled sight the Bluetooth icon will be visible and will flash when a new
ballistic solution is calculated – which confirms your BDX enabled sight received the new holdover
information.
11
sigsauer.com
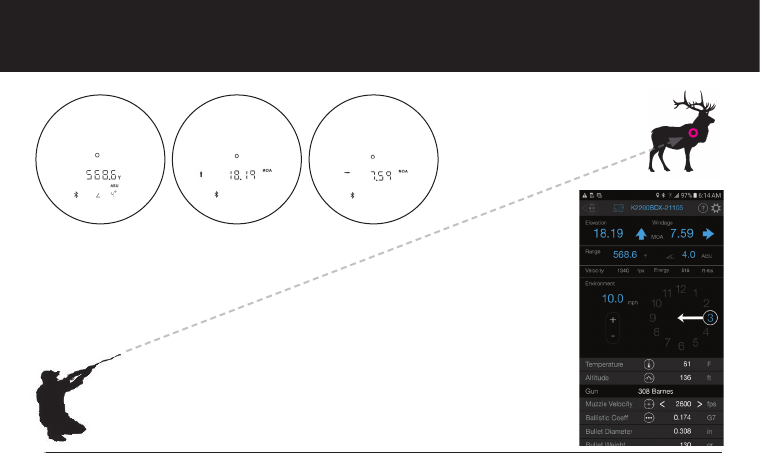
Example: LOS range = 568.6 yards with 0.308 Barnes
Elevation adjustment = 18.19 MOA Up
Windage adjustment = 7.59 MOA Right
Line of Sight (LOS) range of 568.6 yards at 4 degrees incline

12
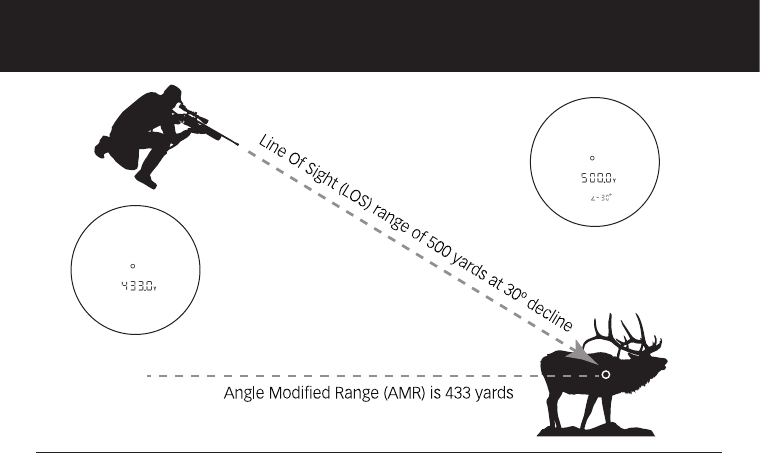
MODES OF OPERATION - ANGLE MODIFED RANGE (AMR) AND LINE OF SIGHT (LOS)
Angle modified range is the equivalent horizontal range to the target and is comparable to the
“horizontal leg” of a triangle. AMR is also known as “rifleman’s rule” and uses the LOS range and
angle of incline to calculate the horizontal distance the projectile travels between shooter and
target. AMR is very accurate for shorter distances (i.e. < 400 yards) and archery.
Line of sight is the range to the target independent of angle. It is comparable to the “hypotenuse”
of a triangle. When ranging in LOS mode, the distance is displayed in addition to the angle of incline.
This method is preferred for those long range shooters and hunters wanting to use the LOS range
and angle of incline to calculate a very precise holdover using a ballistic calculator smartphone
application and/or wind measurement device.
For example, if the rangefinder is in LOS mode the line of sight range of 500 yards would be
displayed along with the angle of -30 (degrees decline). Use LOS in combination with a ballistic
calculator to calculate an exact holdover in minutes of angle or milliradians.
If the rangefinder is in AMR mode the angle modified range of 433.0 yards would be displayed. This is
the equivalent horizontal range and can be used in combination with a ballistic / holdover reticle or
with the SIG Ballistic Turret SBT™ dial.
13
sigsauer.com
Example:
LOS range of 500
yards at 30’ decline is
equivalent to an AMR
range of 433 yards
ANGLE MODIFIED RANGE

14
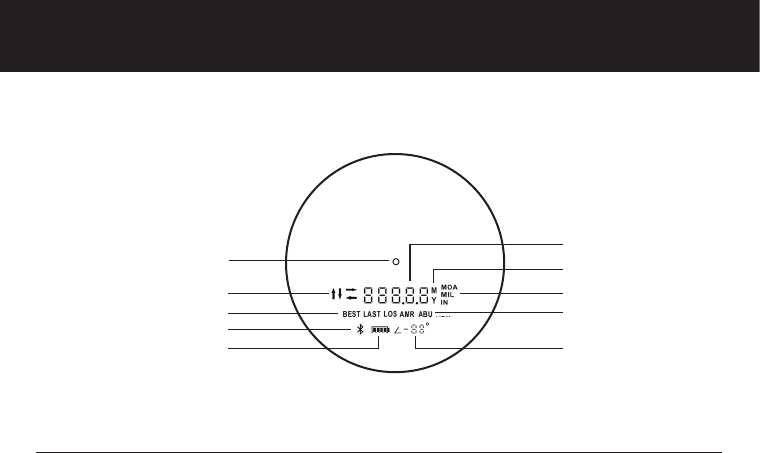
LIQUID CRYSTAL DISPLAYS (LCD)
The KILO1800BDX™ rangefinder features a High-Transmittance LCD for superior low-light
performance.
A – Circle center aiming feature
B – Holdover Directional indicators (Up, Down, Left or Right)
C – Target Selection: BEST or LAST target
D – Low Energy Bluetooth indicator (on with ABU)
E – Battery Status indicator
F – Angle of incline / decline
G – Mode Selection: LOS, AMR, ABU
H – Holdover Unit of Measure: MOA, MIL or IN (on with ABU)
I – Range Unit of Measure: Y or M
J – 5 Character alphanumeric digits for range and holdover information
15
sigsauer.com
A
B
C
D
E
J
I
H
G
F

16
Safety and Operation Procedures
The KILO is classified as a Class 3R product.
Do not depress the RANGE button while aiming at the human eye or while looking into the
transmitting optics on the objective side
• Do not leave the KILO within reach of small children
• Do not take the product apart or modify the product in any way to expose internal electronics that
might cause damage or electric shock
• Do not use any other power source other than a CR2 battery or equivalent.
W WARNING

17
sigsauer.com
OPERATION
The KILO1800BDX is designed to get you up and running without the typical complexity of buried
menus and programming modes. The rangefinders come out of box in the following configuration
and can also be configured with the free BDX App:
(a) Angle Modified Range (equivalent horizontal range)
(b) Best Target (rangefinder returns the best or most likely target, not the first or last)
(C) Units of Measure in Yards
18
SET UP
Installing the Battery
Remove the battery cap by turning the cap in a counter-clockwise direction. Insert (1) CR2 Primary
Lithium battery (-) terminal side first. The (+) terminal should be facing out. Place the cap onto the (+)
battery terminal and reinstall the battery cap by turning the cap in the clockwise direction.
W CAUTION - Be careful to not cross-thread the cap.
19
sigsauer.com
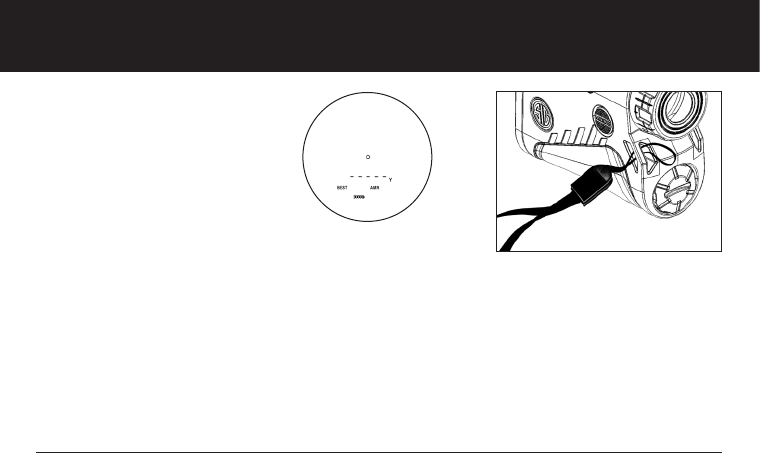
After installation of the battery and depressing the RANGE button, the status of the rangefinder is
displayed:
Installing the Lanyard
Install the lanyard loop through the lanyard attachment point.
Pass the lanyard back through the loop for secure attachment.
20
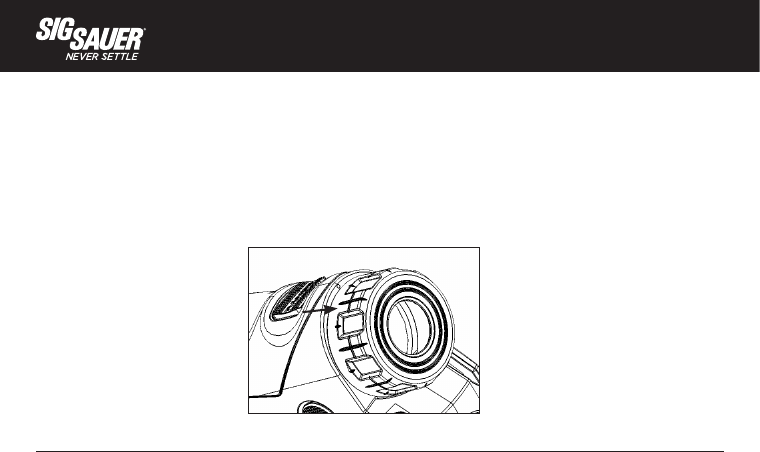
Diopter Adjustment
The diopter or focus adjustment is integral to the eyecup. The focus adjustment is used to bring the
LCD display into sharp focus along with the target image. The diopter adjustment can turn clockwise
or counter-clockwise depending upon the user’s prescription
21
sigsauer.com
DISPLAY INFORMATION
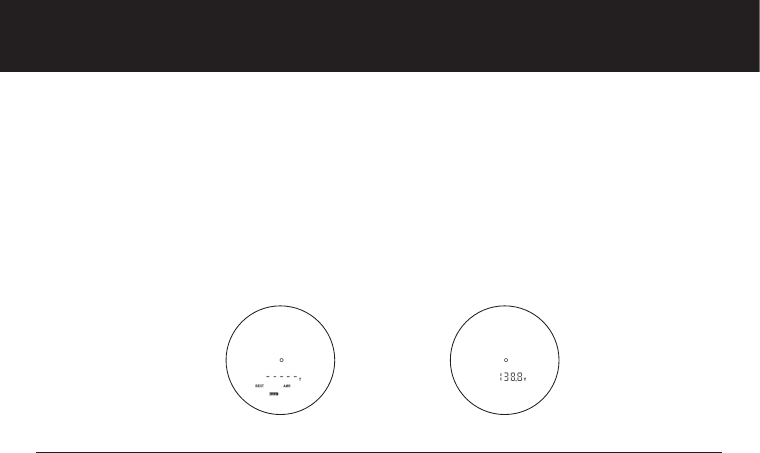
The LCD displays show you the center aiming circle, the unit of measure (Y), Angle Modified Range
mode (AMR) and the remaining battery status. The display will remain active for up to 10 seconds ,
or whatever timeout has been set within in the SIG BDX App. You can then press the RANGE button
to determine range to target.
If you press the RANGE button while the rangefinder is off and continue to hold the RANGE button
down, the rangefinder will automatically switch into SCAN mode within 1 second.
After determining the distance to the target, the rangefinder will continue to display the center
aiming circle and range data for 10 seconds – and only the range data. All other information is not
Display at initial wakeup Display when ranging

22
shown after initial wakeup to prevent clutter in the field of view.
HyperScan MODE
While the rangefinders support single button push ranging operation, it is highly recommended that
you push and hold the RANGE button down to activate HyperScan mode. This mode allows you to
scan targets at 4X/second which significantly improves ranging performance at extreme distances.
As the ranging distances are updated very quickly in HyperScan mode, once you release the RANGE
button the last acquired distance will be displayed. When in HyperScan mode ranging distant targets,
the display may update between no result and a distant range - by using RangeLock technology the
rangefinder will report the last range result when the RANGE button is released.
CHANGING MODES OF OPERATION
The rangefinder ships with the most common modes already configured. However, you can access
and change the following features:
• Line of Sight (LOS), Angle Modified Range (AMR) or Applied Ballistics Ultralight (ABU)
• Best or Last Target
• Units of Measure (Y or M)

23
sigsauer.com
RANGEFINDER CONFIGURATION – PROGRAMMING SEQUENCE
Note – the rangefinder can more easily be programmed and configured by using the
free Sig BDX App.
1. Mode Selection (AMR, LOS or ABU)
To enter programming mode, press and release the RANGE button to wakeup the rangefinder.
Once the display is visible, press and hold the MODE button for 2 seconds – then release the MODE
button and the current selection will be flashing (AMR is the default setting). You can switch
between AMR, LOS or ABU by pressing and releasing the RANGE button. Confirm your selection by
pressing and releasing the MODE button which will save your setting and index to the next setting
for configuration. If you do not press and release the MODE button the rangefinder will save your
selection and turn off. If the user intends to use a calculated ballistic solution, the rangefinder must
be in ABU mode. Instructions for downloading and configuring the BDX App on your smartphone will
be detailed later in the instructions.

24
2. Target Selection (BEST or LAST)
BEST or LAST should be flashing (BEST is the default setting). You can toggle between BEST or LAST
by pressing and releasing the RANGE button. Confirm your selection by pressing and releasing the
MODE button which will save your setting and index to the next setting for configuration. If you do
not press and release the MODE button the rangefinder will save your selection and turn off. BEST
Target can be used for most situations, however, when hunting through foliage or in high grass the
LAST Target is recommended.
3. Unit of Measure Selection (Y or M)
Your current selection will be flashing (Yards is default). You can toggle between Y or M by pressing
and releasing the RANGE button. Confirm your selection by pressing and releasing the MODE button
which will save your setting and index to the next setting for configuration. If you do not press and
release the MODE button the rangefinder will save your selection and turn off.
25
sigsauer.com
DIGITAL BALLISTICS XCHANGE – DOWNLOADING AND CONFIGURING THE FREE BDX APP
In this section you will download the BDX App, pair the App with your KILO and create a custom
bullet profile.
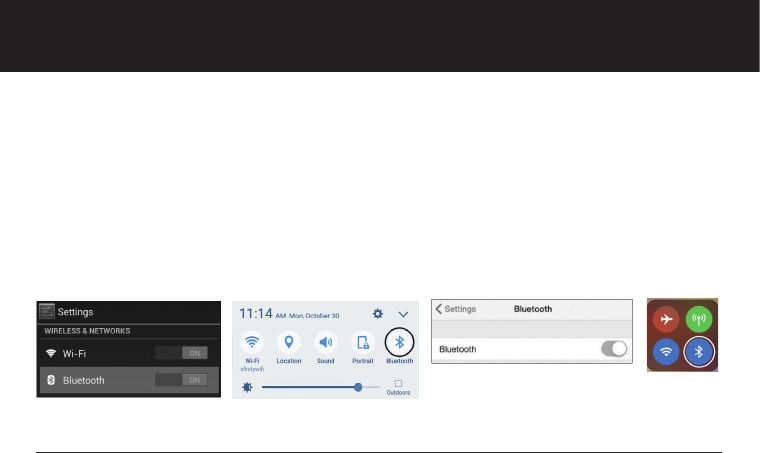
1. Turn Bluetooth on
Check in Settings on your Android or iOS device to make sure that Bluetooth is on. If Bluetooth is off,
switch it on.
26
2. Download the BDX App from the App Store / Google Play Store
Go to the App Store or the Google Play store and download the SIG SAUER BDX App.
27
sigsauer.com
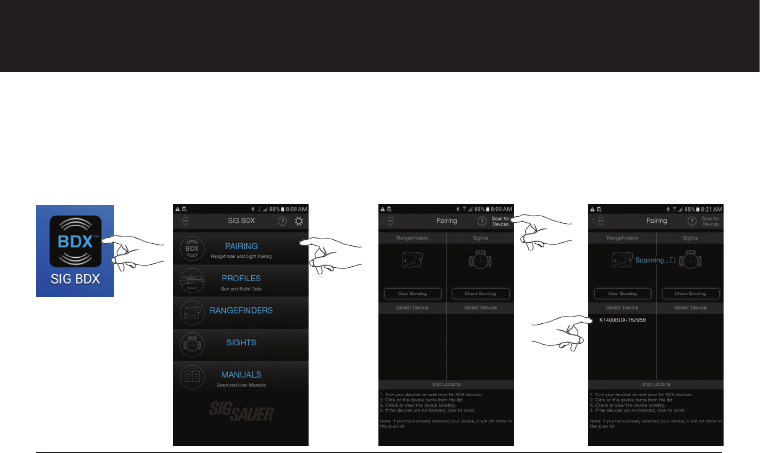
3. Launch the free SIG SAUER BDX App and Pair with your KILO (Enter your PIN code)
On your smartphone, open the BDX App, click on PAIRING, turn on your KILO by pressing and
releasing the RANGE button and then press “Scan for Devices” on the App. Your KILO should be
listed below the KILO icon and “Select Device”. Your rangefinder ID should be listed in white letters.
Touch the ID in white. (continued on next page)
28
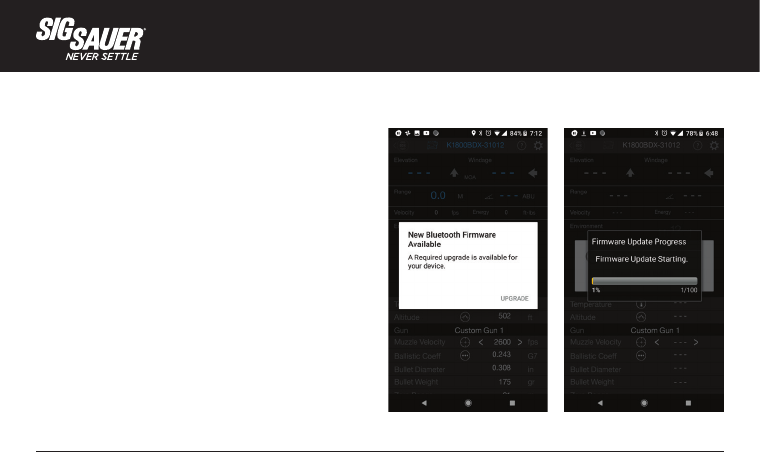
3a. Updating your KILO to the latest software during Pairing
You may be prompted to update the software
on your KILO. These software updates are
mandatory and allow Sig Sauer to ensure that
your BDX App and KILO perform optimally. Most
updates take less than 1 minute. Ensure that
your KILO is turned on and that your smartphone
has at least 25% battery life remaining before
installing any software updates. For best
operation be sure to keep your smartphone
awake during the entire installation process.
29
sigsauer.com
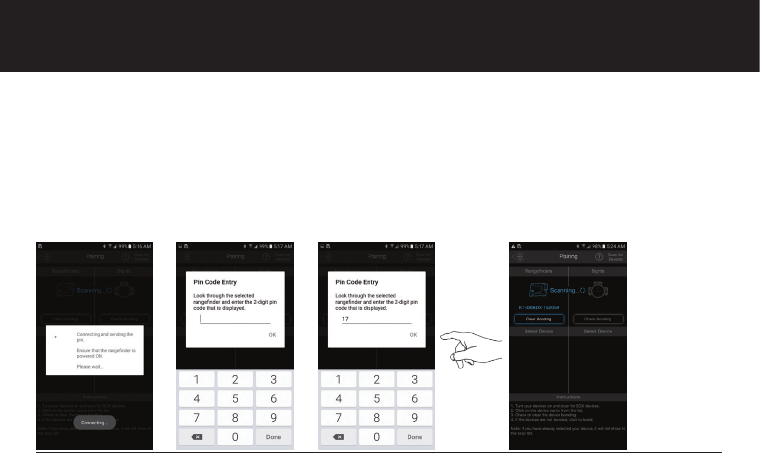
Make sure your KILO stays on during the pairing process by periodically pressing and releasing the
RANGE button. You will be prompted to look through your KILO for a PIN number. Type this PIN
number into the open dialogue box within the App. The PIN in your KILO and the PIN entered on your
smartphone must match. Press OK to complete the pairing operation. You will now see your KILO ID
in blue listed below the KILO icon. You can now exit this screen. If you enter the incorrect PIN code
you can restart this process over again. If you encounter any problems during this process close your
App and let the KILO time out; restart the process over.
30
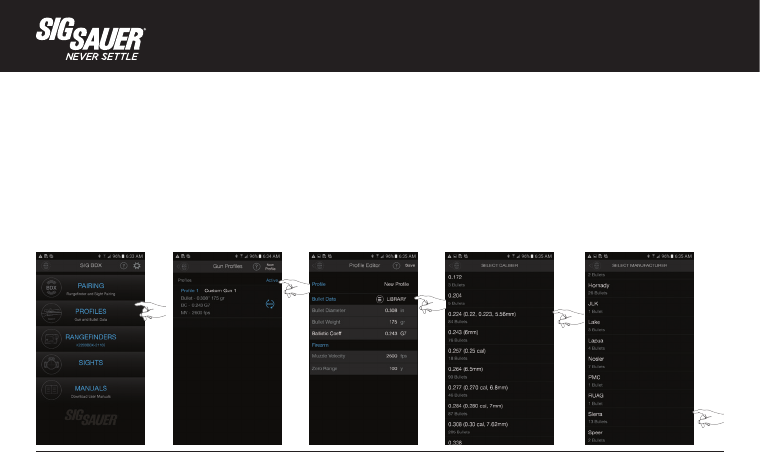
4. Configure up to 25 custom bullet profiles
The BDX App allows you to create and modify up to 25 profiles. From the home screen of the App
touch PROFILES. Only one profile can be active at any time and is denoted by the BDX Icon in blue to
the right of the screen. The BDX App comes with one default 0.308 profile. You can edit this profile
by touching “Profile 1” or create a new one by touching the “New Profile” in the upper right corner
of the App. Next, touch LIBRARY then select a caliber and bullet manufacturer. On the Gun Profiles
page you can rename the profile by touching on the “Custom Gun 1” and typing in a new name.
31
sigsauer.com
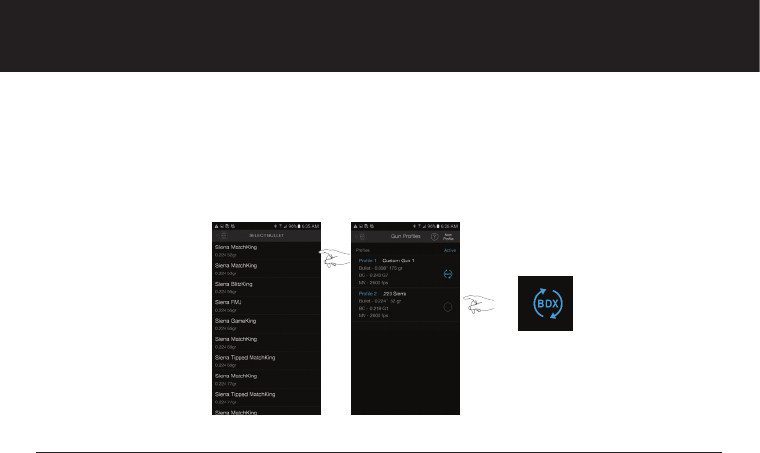
After selecting a bullet manufacturer, select the actual bullet you intend to use. Once selected
you will return to the Gun Profile page where you will need to click on the sync icon to the right to
activate this profile. In this example the new profile is called “.223 Sierra” – be sure to activate this
profile.
32
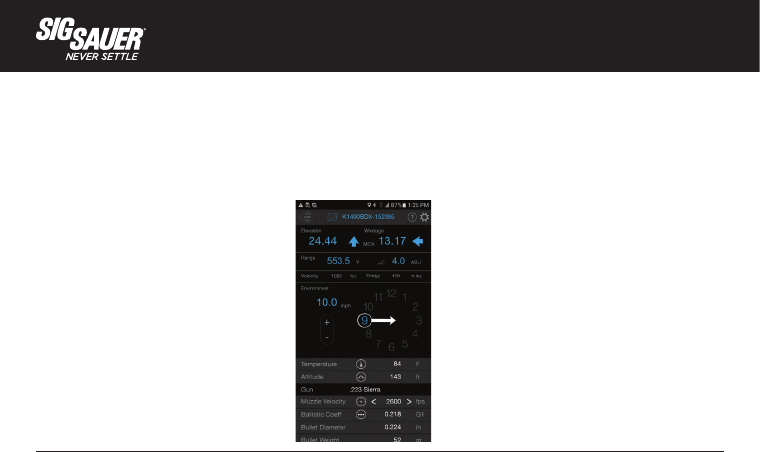
RANGEFINDER HEADS-UP DISPLAY (HUD)
From the home screen of your BDX App select RANGEFINDERS to display the HUD. The HUD displays
all range, environmental and ballistic information and allows you to configure your KILO.
KILO ID and Status
Grey = disconnected / Blue = connected
Back to Home Screen
Elevation data
Range to target and unit of measure
Bullet velocity at target range
Wind speed
Ambient temperature
Active gun profile
Ballistic coaefficient
Bullet weight
Help and Settings menu
Windage data
Angle of include and Mode of Operation
Bullet energy at target range
Wind direction
Local altitude
Muzzle velocity and MV Calibration
Bullet diameter

33
sigsauer.com
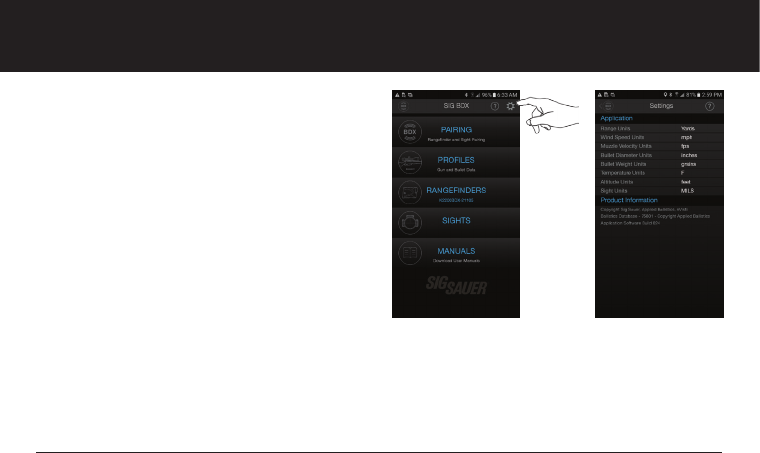
KILO SETTINGS
From the Settings menu you can fully configure the following:
1. Mode of Operation (LOS, AMR or ABU)
2. Target Mode (BEST or LAST)
3. Unit of Measure (Yards or Meters)
4. Sleep Timeout (30, 60, 120 or 180 seconds)
5. Holdover / Sight unit of Measure (MOA or MILS)
You can toggle all fields by simply touching the letters in white. Your KILO
must be turned on and paired. To save your settings touch the BDX icon in
the upper left corner of the display. This will save your settings. You can
also access the help menu by clicking on the “?” icon in the upper right of
the screen.
Note – The KILO will not range when the Settings menu is open and active.
Note – The rangefinder must be in ABU mode to calculate Real time ballistic
solutions and send them to the SIG BDX Riflescope with Bluetooth.
34
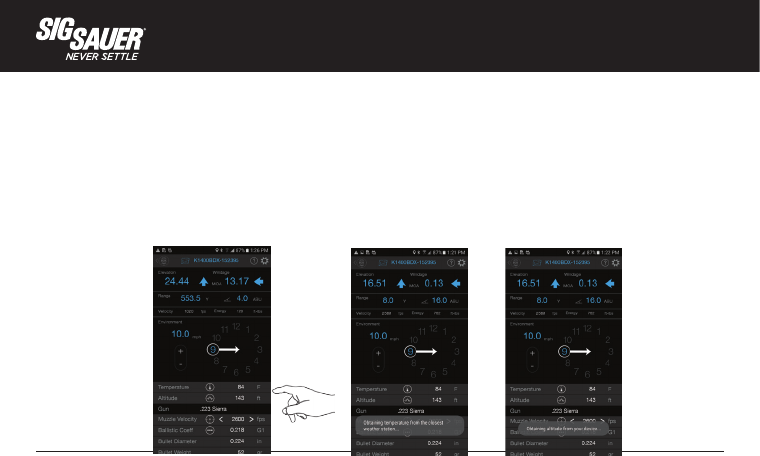
TEMPERATURE AND ALTITUDE
Once your KILO is paired and actively synced with your smartphone, when you enter the
RANGEFINDER HUD screen your smartphone will automatically pull the local temperature and
altitude from the closest weather station. If you are not in cell range you can manually update both
temperature and altitude by touching on the white numbers in each field and manually updating
these environmental conditions.
35
sigsauer.com
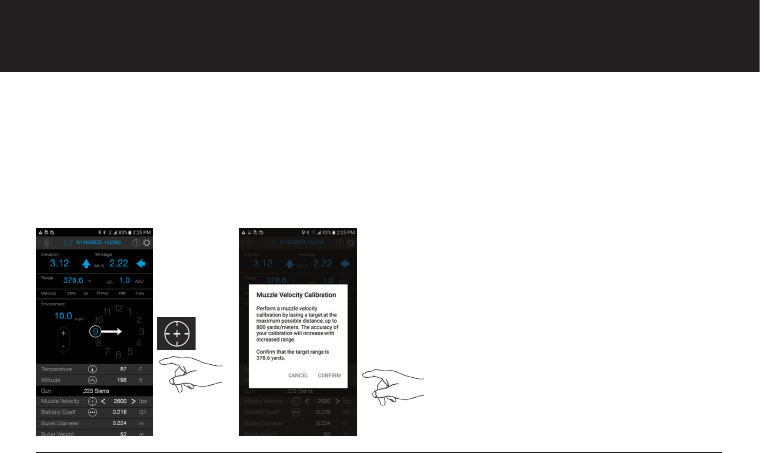
MUZZLE VELOCITY (MV) CALIBRATION
The most important input for calculating accurate Applied Ballistics solutions is getting your
MV correct. You need to either chronograph your firearm or use the embedded MV Calibration
routine built into the BDX App. To use the MV Calibration routine make sure your scope is
zeroed (i.e. at 100 yards) and verify that the BDX App is showing zero holdover values at the
zero distance by ranging the target at the zero range and verifying the your holds are in fact zero
Use the MV Calibration routine at the
farthest distance you intend to shoot.
The greater the distance the more
accurate the MV calculation will be.
In this example the target was at 378
yards. Confirm your max target range.
Note – ABU only provides ballistic
solutions out to 800 yards maximum.
36
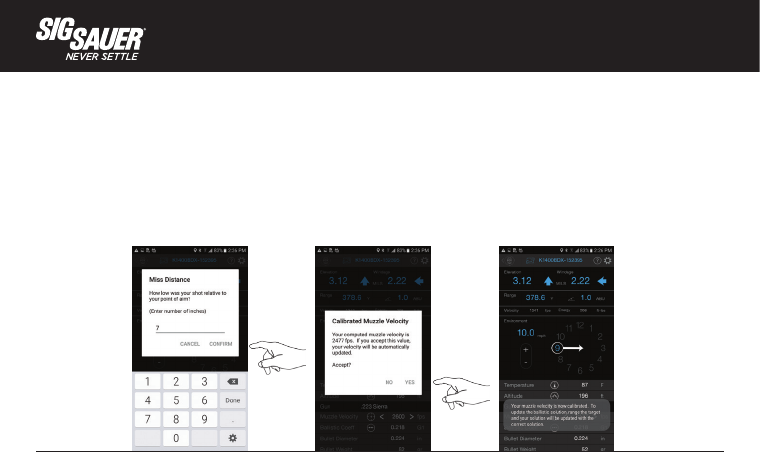
MUZZLE VELOCITY (MV) CALIBRATION (continued)
Now enter the elevation offset between point of impact and point of aim and select CONFIRM.
In this example the 3 shot group was 7 inches low. A new MV of 2477 fps was calculated.
Select YES to confirm and this MV will now be used for ballistic solutions going forward. See the
confirmation dialogue box in the image below right.
37
sigsauer.com
CONFIGURING GLOBAL SETTINGS IN THE BDX APP
From the Home Screen of the BDX App you can configure Global Settings. Any field that is in
white can be changed by touching on the unit of measure and toggling between values. The
help menu is available to assist you. Global Settings include:
1. Range Unit (Y, M)
2. Wind Speed Unit (mph, m/s, kph)
3. Muzzle Velocity Unit (fps, m/s)
4. Bullet Diameter Unit (inches, cm)
5. Bullet Weight Unit (grains, grams)
6. Temperature Units (F / C)
7. Altitude Units (feet, meters)
8. Sight Units (MOA, MILS)

38
FREQUENTLY ASKED QUESTIONS (FAQ):
Q: I can’t get the display to focus.
A: You need to adjust the diopter ring to your vision. Rotate the eyecup / diopter ring in either direction
until the display comes into sharp focus.
Q: I can’t seem to range very far past trees or animals.
A: Your KILO will perform differently based on changes in ambient conditions such as bright sunlight or
snow, rain or fog, temperature and the reflectivity of the target being ranged. For example, at dusk and
dawn your rangefinder may be able to range trees at over 1000 yards but in bright sunlight may only
achieve 500 yards. If your KILO will not range at least 400 yards under normal conditions (fog and rain
excluded) please contact customer service. Your product may have fallen out of alignment.
Q: I can’t get my KILO to pair with the BDX App on my smartphone.
A: Delete the BDX App from your smartphone. Download and reinstall on your phone. Make sure you have
a fresh battery in your KILO. Relaunch the App, turn on your KILO and repeat the Pairing instructions in this
manual.
Q: I can’t locate the BDX App on the Apple or Android Stores.
A: Search for Sig Sauer or BDX at the store.

39
sigsauer.com
Q: My battery drains too fast.
A: Most rangefinders will provide over 4000 individual range calculations using a fresh CR2 primary lithium
battery. Your KILO exceeds this specification. When heavily using SCAN mode the battery may appear to
drain faster since your KILO is ranging 4x per second in HyperScan mode. This is normal operation but you
should keep a spare CR2 battery when heading out to remote locations.
Q: My ballistic solution in the HUD and displayed in the KILO is always off a few inches.
A: For accurate ballistic solutions make sure you have updated the temperature and altitude within the
App to your current location, you have the correct bullet caliber (diameter) and weight selected, your zero
distance is correct and that your muzzle velocity is correct. Using the MV Calibration routine provides the
most accurate MV and will improve the accuracy of the ballistic calculator. It is always best to use the MV
Calibration routine at the farthest distance you intend to shoot. Calibrating at 500 yards will yield a better
MV than calibrating at 200 yards.
Q: My blue LED on the power selector ring on my SIERRA3 will not turn on.
A: Look through our SIERRA3. You most likely have the Digital Ballistic Reticle turned on. Go into your BDX
App, make sure you are paired with your SIERRA3. Click on the SIGHTS link and turn DBR OFF.
40
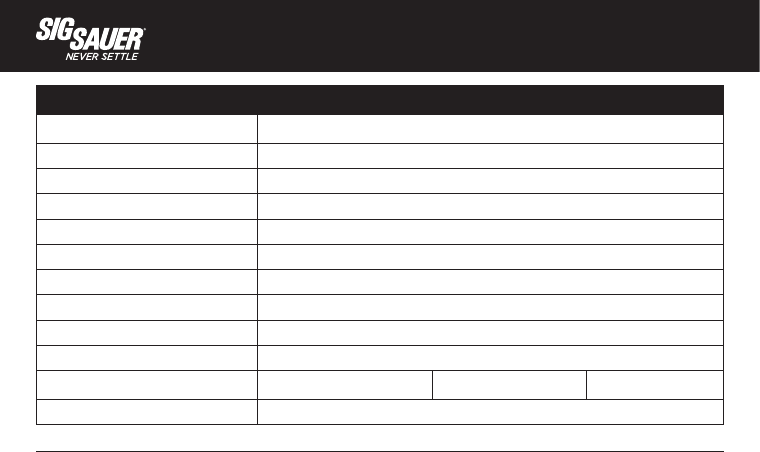
KILO1800BDX™ 6x20mm SPECIFICATIONS
Magnification 6x
Objective Clear Aperture 20mm
Exit Pupil 3.33mm
Eye Relief 15mm
Angular (FOV) 6.5°
FOV @ 100yds 34.18 ft
Laser Divergence 1.9 mrad
Range Response Time .25 sec
Scanning Yes
Range Resolution Under 100 yds .1 yds
Max Range Reflective up to 1,600 yds Trees up to 950 yds Deer up to 750 yds
Weight with Battery 5 oz / 140 g

41
sigsauer.com
KILO1800BDX™ 6x20mm SPECIFICATIONS
Magnification 6x
Objective Clear Aperture 20mm
Exit Pupil 3.33mm
Eye Relief 15mm
Angular (FOV) 6.5°
FOV @ 100yds 34.18 ft
Laser Divergence 1.9 mrad
Range Response Time .25 sec
Scanning Yes
Range Resolution Under 100 yds .1 yds
Max Range Reflective up to 1,600 yds Trees up to 950 yds Deer up to 750 yds
Weight with Battery 5 oz / 140 g
NOTES:
42
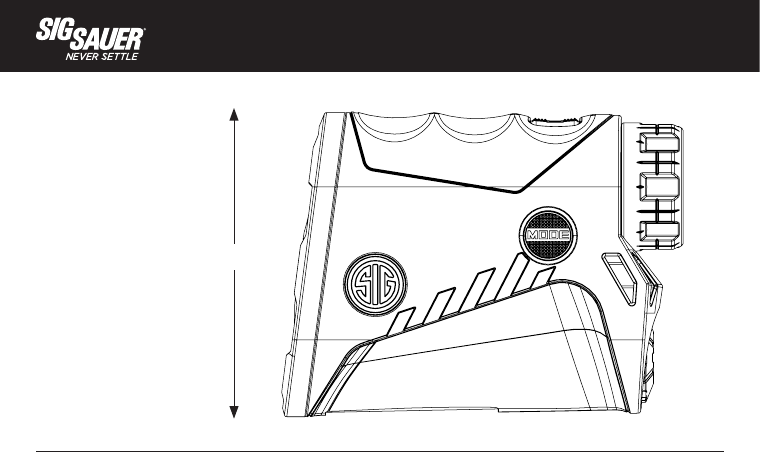
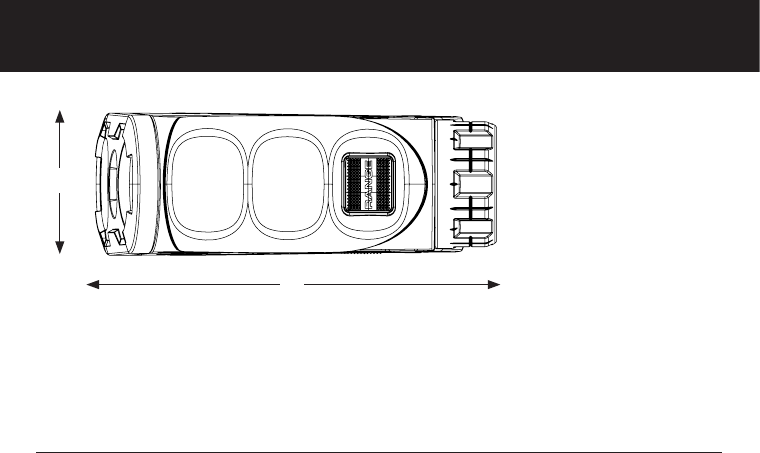
A – 2.9 in / 76mm
B – 3.9 in / 107mm
C – 1.4in / 33mm
A
43
sigsauer.com
C
B

44
FCC STATEMENT:
This device complies with Part 15 of the FCC rules.
Operation is subject to the following two conditions:
• This device may not cause harmful interference, and
• This device must accept any interference received,
including interference that may cause undesired operation.
Changes or modifications not expressly approved by the
party responsible for compliance could void your authority to
operate the equipment.
NOTE:
This equipment has been tested and found to comply with
the limits for a Class B digital device, pursuant to Part 15
of the FCC Rules. These limits are designed to provide
reasonable protection against harmful interference in a
residential installation.
This equipment generates uses and can radiate radio
frequency energy and, if not installed and used in
accordance with the instructions, may cause harmful
interference to radio communications. However, there
is no guarantee that interference will not occur in a
particular installation. If this equipment does cause harmful
interference to radio or television reception, which can be
determined by turning the equipment off and on, the user is
encouraged to try to correct the interference by one or more
of the following measures:
• Reorient or relocate the receiving antenna.
• Increase the separation between the equipment and
receiver.

45
sigsauer.com
• Connect the equipment into an outlet on a circuit different
from that to which the receiver is connected.
• Consult the dealer or an experienced radio/TV technician
for help.
INDUSTRY CANADA:
This device complies with Industry Canada’s licence-exempt
RSSs. Operation is subject to the following two
conditions:
• This device may not cause interference, and
• This device must accept any interference, including
interference that may cause undesired operation of the
device.
Le present appareil est conforme aux CNR d’Industrie Canada
applicable aux appareil radio exempts de licence.
L’exploitationestautorisée aux deux conditions suivantes:
• l’appareil ne doit pas produire de brouillage, et
• l’utilisateur de l’appareildoit accepter tout brouillage
radio électrique subi, mêmesi le brouillage est susceptible
d’encompromettre le fonctionnement
The device meets the exemption from the routine evaluation
limits in section 2.5 of RSS 102 and compliance with RSS-102
RF exposure,users can obtain Canadian information on RF
exposure and compliance.
46
This product has been tested and found to comply with the limits for a Class B digital device,
pursuant to Part 15 of the FCC Rules. The equipment generates, uses and can radiate radio
frequency energy and, if not installed and used in accordance with these instructions, may cause
harmful interference to radio communications. However, there is no guarantee that interference will
not occur in a particular installation. If this product does cause interference to radio or television
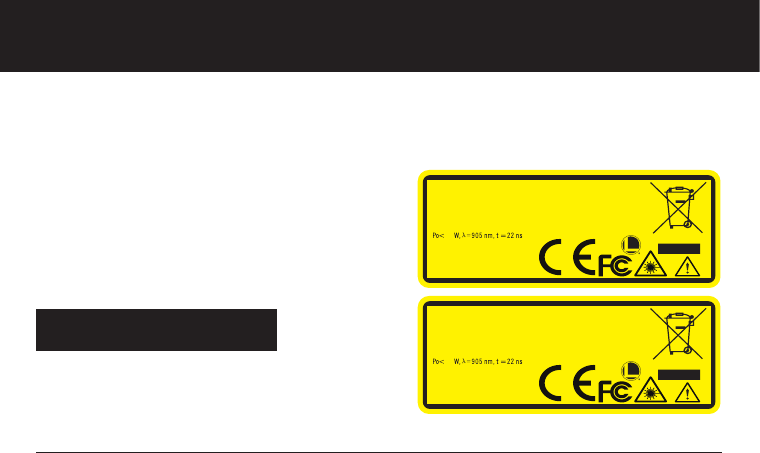
CLASS 3R LASER PRODUCT INVISIBLE LASER RADIATION - AVOID DIRECT EYE
EXPOSURE
This product complies with IEC 60825-1: 2014-05 Ed 3.0 and complies with FDA performance
standards for laser products except for deviations pursuant to Laser Notice No. 50, dated June 24,
2007.
Class 3R: P o < 18W, λ = 905 nm, t = 22 ns
FCC ID: 2AP8SK18 IC: 24032-K18
Class1M: P o < 13W, λ = 905 nm, t = 22 ns
W DANGER
47
sigsauer.com
reception the user is encouraged to try to correct the interference by one or more of the following:
• Reorient or relocate the receiving antenna
• Increase the separation between this product and the receiver
• Connect the equipment to an alternative outlet or receiver
• Consult a technician.
Shielded interference cable must be used with the
equipment in order to comply with the limits for a
digital device pursuant to Subpart B of Part 15 of
FCC Rules.Specifications and designsare subject to
change without any notice or obligation on the part of
the manufacturer.
W CAUTION
LASER APERTURE
CLASS 3R L ASER PRODUCT INVISIBLE LASER
RADIATION AVOID DIRECT EYE EXPOSURE
SIG SAUE R Inc.
27100 SW P ar k way Avenue
Wilsonville, O regon 97070
This product complies with IEC 60825-1:2014 Ed.3 and complies
with FDA per formance standards for laser products except for
deviations pursuant to Laser Notice No .50,dated June 24,2007.
FCC ID:2AP8SK18 IC:24032-K18
18
CLASS 1M LASER P RODUCT INVISIBLE LASER
RADIATION AVOID DIRECT EYE EXPOSURE
SIG SAUE R Inc.
27100 SW P ar k way Avenue
Wilsonville, O regon 97070
This product complies with IEC 60825-1:2014 Ed.3 and complies
with FDA per formance standards for laser products except for
deviations pursuant to Laser Notice No .50,dated June 24,2007.
FCC ID:2AP8SK18M IC:24032 -K18M
13
Use of controls or adjustments
or performance of procedures
other than those specified herein
may result in hazardous radiation
exposure.
48
I
N
F
I
N
I
T
E
G
U
A
R
A
N
T
E
E
S
I
G
S
A
U
E
R
SIG SAUER Electro-Optics Infinite Guarantee™
SIG SAUER has manufactured the most rugged, dependable high-performance
firearms for over two centuries. Our heritage of design, engineering and precision-
manufactured quality predates the existence of any other optics company
worldwide. We understand the importance of quality in the line of fire, at the
shooting range or on your next hunt. SIG SAUER Electro-Optics had to earn the
right to wear that badge and the Infinite Guarantee has your back, forever. Period.
We will repair or replace your SIG SAUER product in the event it becomes damaged or defective,
at no charge to you. If we cannot repair your product, we will replace it with a product in perfect
working order of equal or better physical condition. It doesn’t matter how it happened, whose fault it
was, or where you purchased it.
SIG SAUER Infinite Guarantee™
• Unlimited Lifetime Guarantee
• Fully Transferable
• No Warranty Card Required
• No Receipt Required
• No Time Limit Applies
• No Charge
49
sigsauer.com
L
I
M
I
T
E
D
5
Y
E
A
R
W
A
R
R
A
N
T
Y
E
L
E
C
T
R
O
N
I
C
&
T
R
I
T
I
U
M
If you ever have a problem, no matter the cause, we promise to take care of you when it counts.
Please note that our Infinite Guarantee does not provide coverage for intentional damage, misuse,
cosmetic damage that does not affect the performance of the optic, loss, theft or unauthorized
repair or modification. Excludes electronic components.
SIG SAUER Electronic & Tritium Component Limited 5-Year Warranty
For components not included under the SIG SAUER® Infinite Guarantee™, this
warranty covers any defects in materials and workmanship in the electronic and
Tritium components of illuminated riflescopes/sights, pistol sights, electronic
sights, flashlights, lasers, binoculars, spotting scopes, and rangefinders. This
warranty lasts for five years from the date of manufacture. If, during that five-year
period, these products are found to have electronic or Tritium component defects in materials or
workmanship, SIG SAUER will repair your product, at no charge to you. If we cannot repair your
product, we will replace it with a product in perfect working order of equal or better physical
condition.

P/N 7401004-01 R01
FOR PRODUCT SERVICE ON THIS MODEL, PLEASE CALL 603-610-3000
27100 SW Parkway Avenue, Wilsonville, Oregon 97070 USA
sigsauer.com