Sigma Projetor 880 Manual MAN 027 May 2007 User To The 9b2bb142 7f63 4621 9abf D92603a03ee1
User Manual: Sigma projetor to the manual
Open the PDF directly: View PDF ![]() .
.
Page Count: 73
- DANGER - IMPORTANT WARNINGS
- SHIELDING
- CONTENTS
- 8 INSTRUCTIONS FOR DISPOSAL 8.1
- Surveying
- Receipt of Radioactive Material
- NOTE
- Radioactive material transport checklist
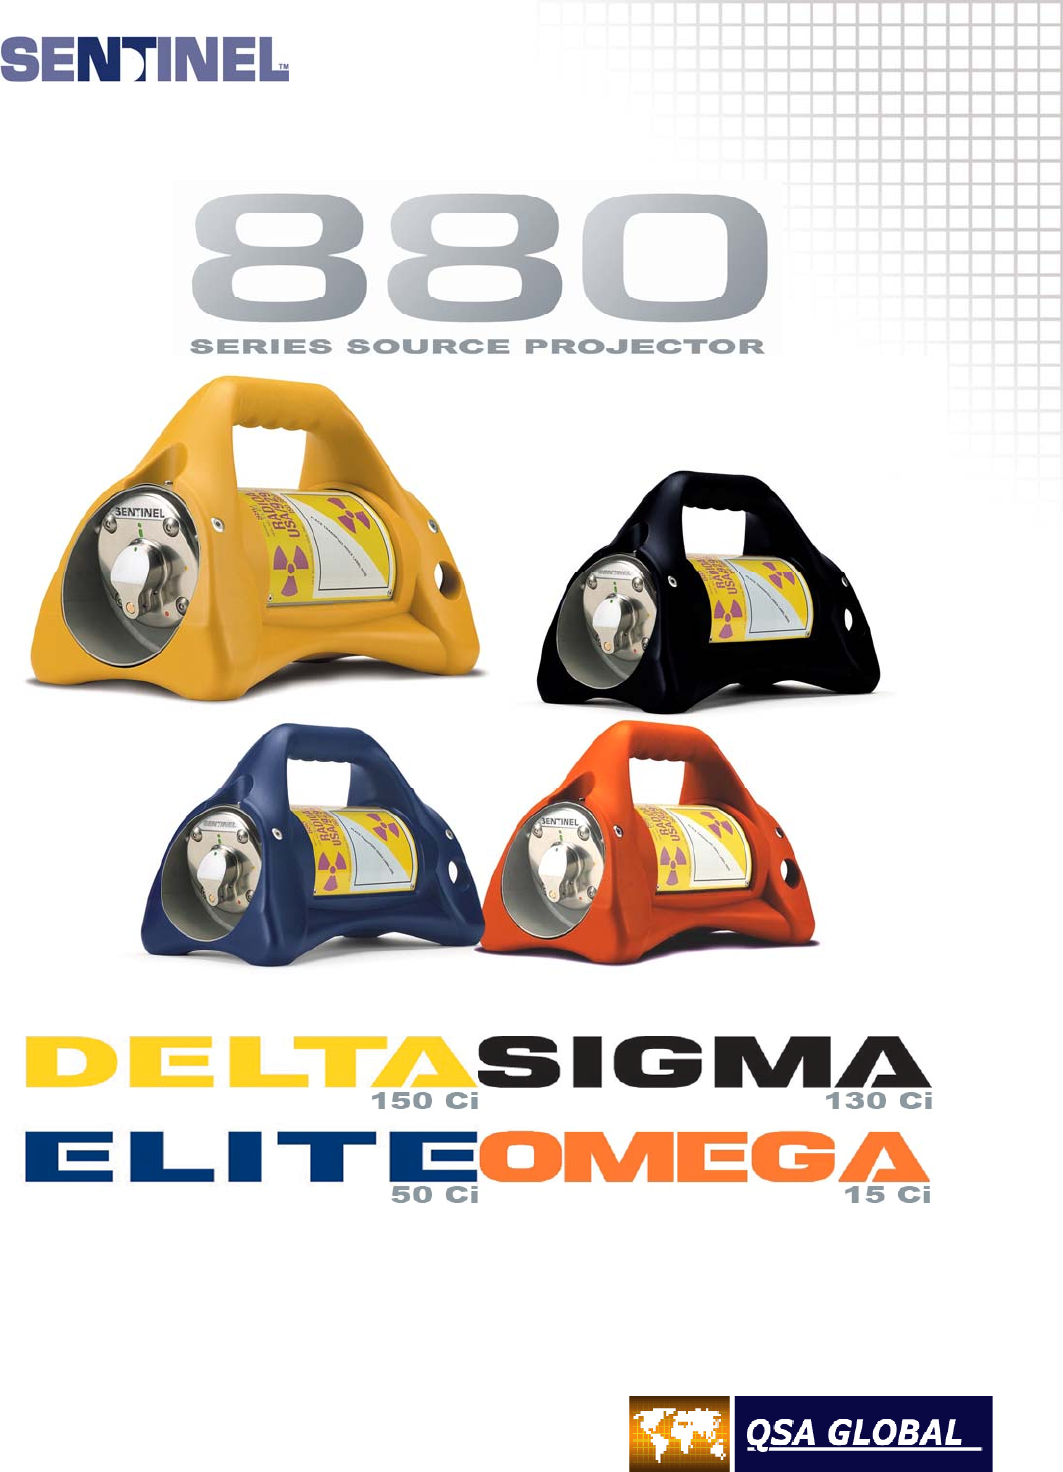
MAN-027-May 2007
Operating and Maintenance Manual

i
DANGER - IMPORTANT WARNINGS
The system must be operated only by trained and qualified radiographers who have read and understand this
Operating Manual or by trained assistants working under their direct supervision.
WARNING
The use of this radiographic exposure device by unqualified personnel or when safety procedures are not
fully met could result in life-threatening dangers.
Gamma radiography systems emit high levels of highly penetrating radiation during use.
An unshielded radiation source at close range can cause injury, sickness or death to anyone who is exposed to it
even for a short period of time. A radiation source (or an unshielded source assembly) must NOT be touched by the
hands under any circumstances.
Since gamma radiation cannot be detected by the human senses, strict operating and emergency procedures must
be followed. The proper use of calibrated and operable survey meters must be employed to avoid potentially
dangerous levels of radiation exposure.
Proper dosimetry including film badges or thermoluminescent dosimeters, direct reading pocket dosimeters and
audible alarm ratemeters must be worn during all radiographic operations.
During use of this radiography system, never assume the position of the radiation source. Always conduct a
thorough confirmatory survey using a calibrated and operable survey meter to verify the location of the radiation
source. Be reminded that a multitude of overexposure incidents which include injuries are directly attributed to a
failure of the radiographer to perform or supervise an adequate confirmatory survey.
It is imperative that the users of this transport container perform adequate radiation surveys of the transport container
and exposure devices. Surveys must be performed using a calibrated survey instrument before, during and after
source exchanges and before transport to determine if the source assembly is properly shielded within the transport
container. Again, the failure to perform an adequate radiation survey can cause unnecessary exposure to personnel
resulting in a reportable incident.
It is very important and required by national and international regulations to prevent access by unauthorized persons
to radiographic equipment and to the area where radiography is performed.
Take advantage of the three basic radiation protection methods to minimize radiation exposure:
TIME
Spend less time near the radiation source.
DISTANCE
Increase your distance in a direction away from the radiation source.
SHIELDING
When possible, always apply the use of effective shielding between you and the radiation source.
Do not perform any unauthorized modifications to the radiographic exposure device or components of the
radiography system.
It is important that trained and qualified radiographers perform or supervise a daily safety inspection of the
radiography system for obvious defects prior to operation of the system.
Do not use any components that are not approved for use with the radiography system or after-market components
that may compromise the safety features designed into the system.

ii
CONTENTS
_______________________________________________________________________
1 TECHNICAL SPECIFICATIONS 1.1 – 1.7
_______________________________________________________________________
2 OPERATING INSTRUCTIONS 2.1 – 2.11
_______________________________________________________________________
3 DAILY INSPECTION INSTRUCTIONS 3.1 – 3.9
_______________________________________________________________________
4 MAINTENANCE INSTRUCTIONS 4.1 – 4.24
_______________________________________________________________________
5 SAMPLE TRANSPORTATION INSTRUCTIONS 5.1 – 5.11
_______________________________________________________________________
6 DEFINITIONS AND TERMS 6.1 – 6.3
_______________________________________________________________________
7 EMERGENCIES AND PERSONNEL SAFETY 7.1 – 7.2
_______________________________________________________________________
8 INSTRUCTIONS FOR DISPOSAL 8.1
_______________________________________________________________________
iii
880 Delta 150 Ci (5.55 TBq)
Maximum package weight 880 Sigma 130 Ci (4.81 TBq)
Maximum package weight
With jacket 52 lb (24 kg) With jacket 52 lb (24 kg)
Without jacket 46 lb (21 kg) Without jacket 46 lb (21 kg)
880 Elite 50 Ci (1.85 TBq)
Maximum package weight 880 Omega* 15 Ci (0.55 TBq)
Maximum package weight
With jacket 42 lb (19 kg) With jacket 33 lb (15 kg)
Without jacket 33 lb (17 kg) Without jacket 28 lb (13 kg)
*(880 Omega is a Type A transport container)
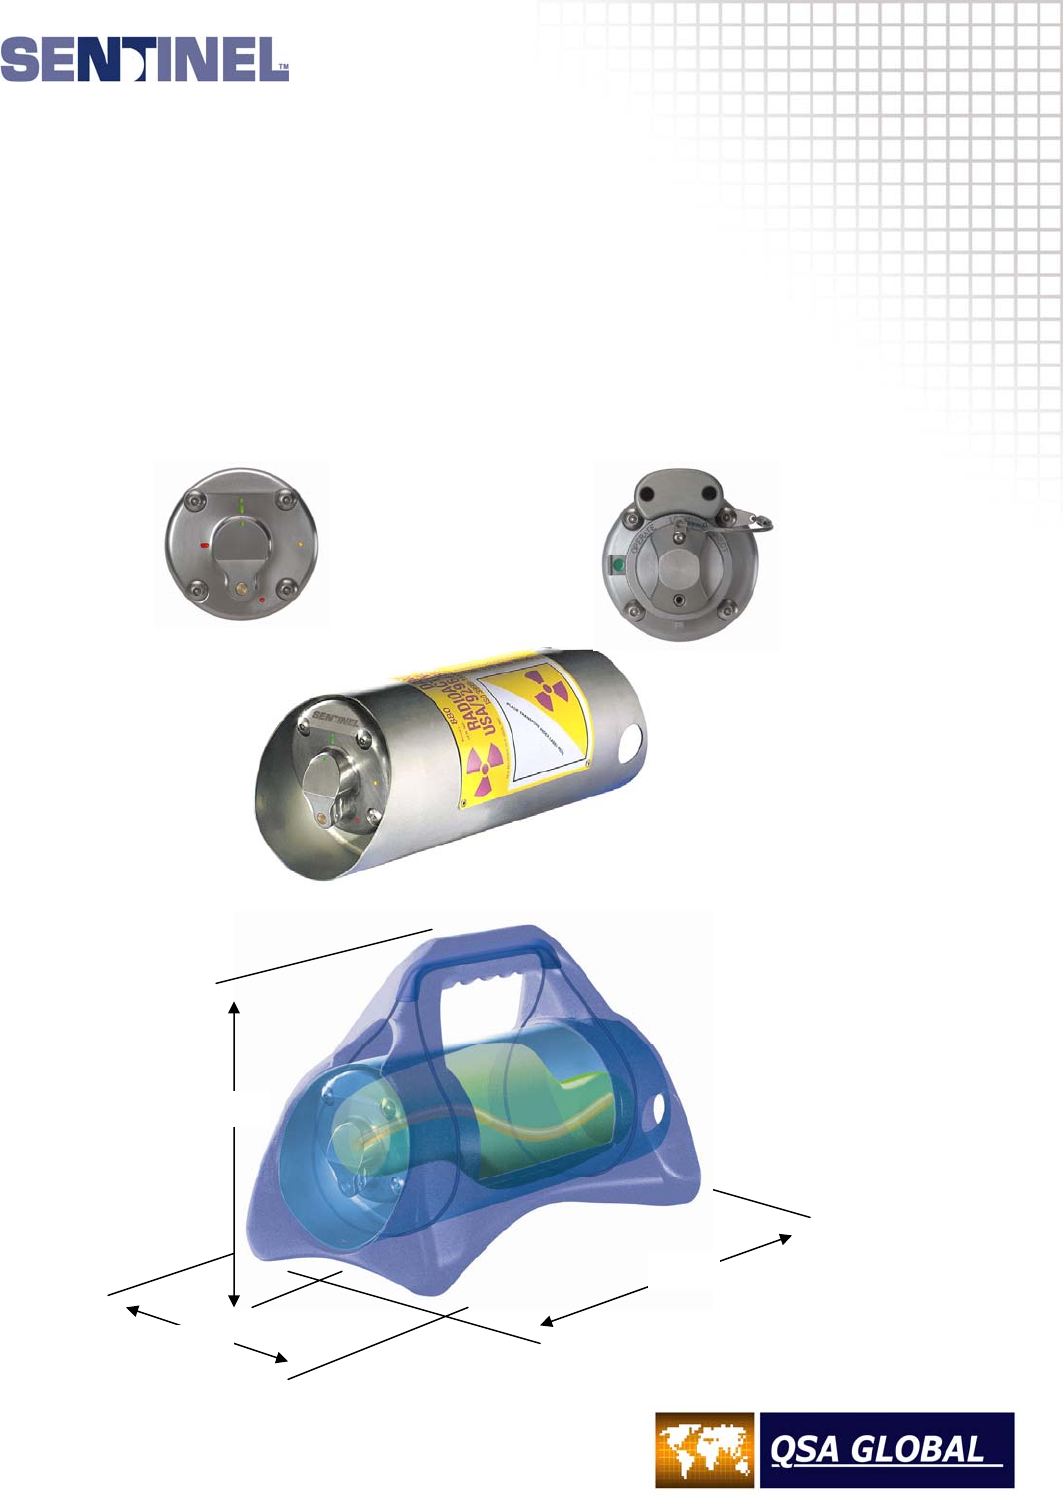
FRONT VIEW
Outlet Port
Guide Tube Connector
REAR VIEW
Locking Mechanism
Remote Control Connector
7.5 in
191 mm
9 in
229 mm
13.3 in
338 mm
TECHNICAL SPECIFICATIONS
1.1
Exposure Device Description
The Model 880Delta, Model 880 Sigma, Model 880 Elite and Model 880 Omega are physically small,
lightweight, portable industrial radiographic exposure devices. The ‘S’ tube design exposure device
consists of a cast depleted Uranium (DU) shield contained and secured within a 300 series stainless steel
tube with stainless steel discs welded at each end to form a cylinder shaped housing. Both discs are
recessed into the stainless steel tube to provide protection for the locking mechanism at the rear side and
the outlet port at the front side.
The welded tubular hosing is oriented horizontally to provide easy access to the locking mechanism and
source assembly connector and to provide easy access to the outlet port for connection of the projection
sheaths. The internal void space of the welded housing is filled with polyurethane foam to prevent the
ingress of water or foreign material but is open to atmospheric pressure. The stainless steel housing
containing the DU shield, locking mechanism, outlet port, protective covers and required labels comprise
the radioactive material transport package.
A plastic jacket surrounds the welded housing and serves as a protective barrier for the labels and
provides the means for carrying and placement during use as a radiographic exposure device. The
Model 880 Delta is identified by a yellow colored jacket. The Model 880 Sigma is identified by a black
colored jacket. The Model 880 Elite is identified by a blue colored jacket and the Model 880 Omega is
identified by a safety orange colored jacket. The plastic jacket incorporates a carrying handle and a base
that is used during radiographic operations but is not required for transportation purposes. The plastic
jacket may be removed for certain applications such as when the exposure device is securely mounted to
a pipe-crawler locomotive or a pipe-liner sled.
The Model 880 Delta, Sigma, Elite and Omega exposure devices are designed, tested, and manufactured
to meet the requirements of ANSI N432-1980, ISO 3999-1:2000(E), IAEA TS-R-1 (1996 Revised),
USNRC 10CFR34, 10CFR71 and 49CFR173 requirements. Additionally, these exposure devices are
designed, manufactured and serviced under an ISO 9001 QA Program and a USNRC 10CFR71, Subpart
H QA Program. The QA program also includes the reporting requirements of USNRC 10CFR21 for
suppliers of source and byproduct materials.
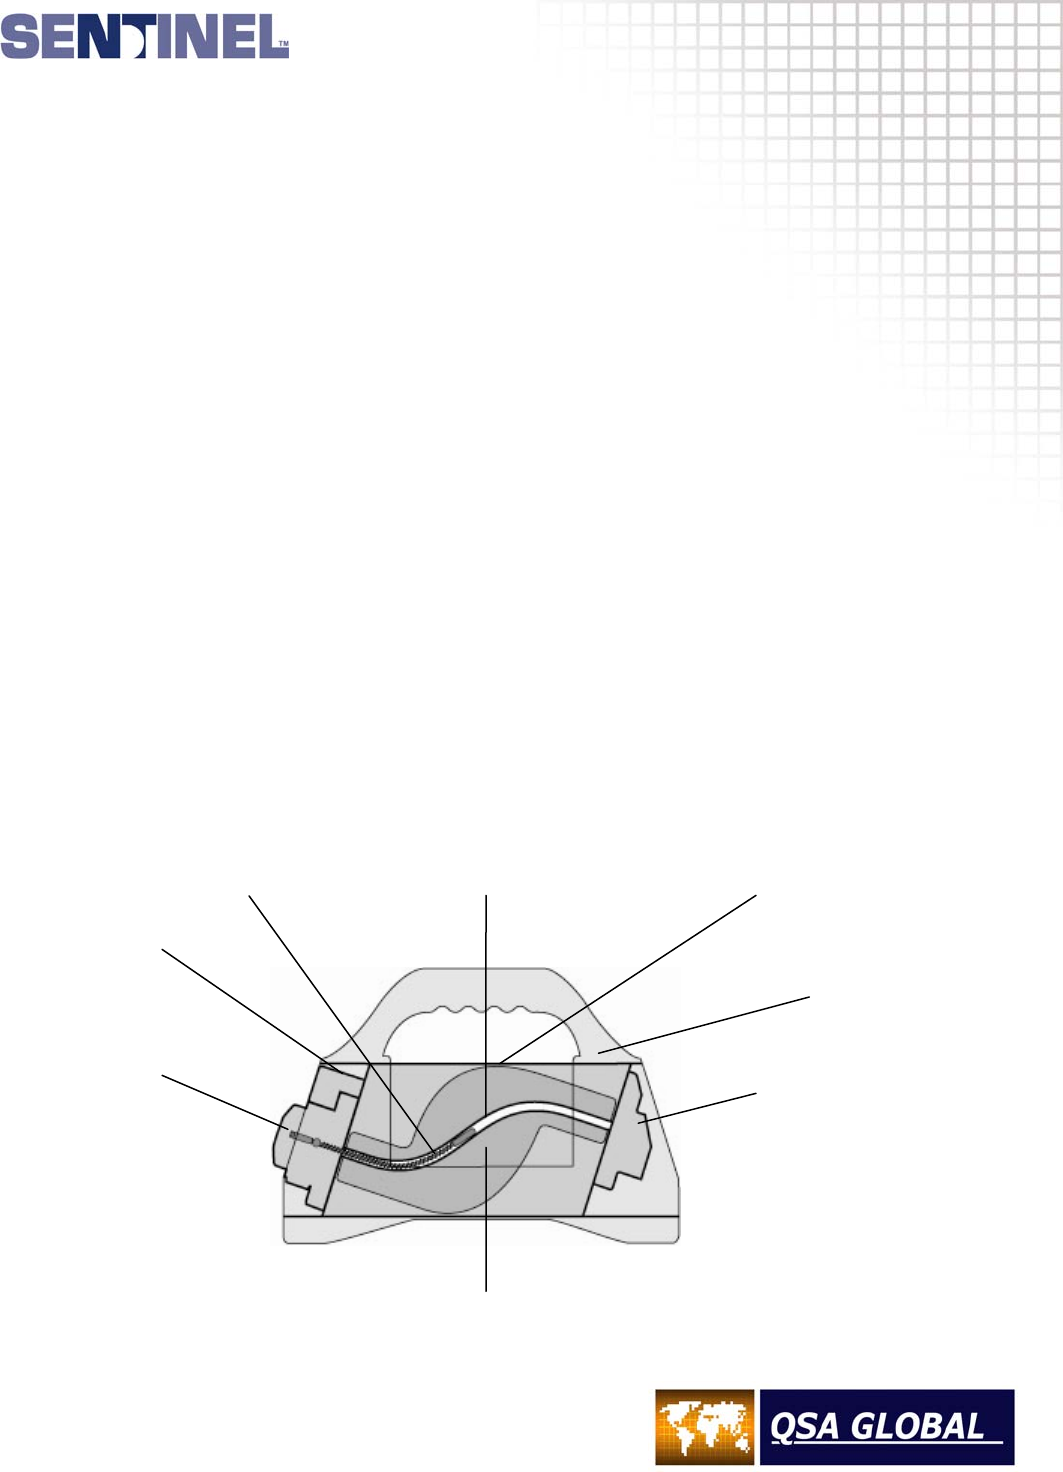
Titanium ‘S’ TubeSource Assembl
y
Plun
g
er Lock
Locking Mechanism
Remote
Control
Connector
Welded Shield Container
Protective
Plastic Jacket with
Carrying Handle
De
p
leted Uranium Shield
Outlet Port
Guide Tube
Connector
TECHNICAL SPECIFICATIONS
1.2
Applications
The Model 880 devices are used for industrial applications of gamma radiography, mainly with Iridium-
192, to inspect materials and structures in the density range of approximately 2.71 g/cm3 through 8.53
g/cm3. The Model 880 devices also accommodate low energy isotopes to permit radiography of materials
and structures of thin sections of steel and low-density alloys. The Model 880 exposure devices are also
designed for use with low activity sources with high photon energies that are used for mass absorption
(gamma scanning) studies of high-density materials up to 18.7 g/cm3.
Standard Source Assembly
Metallic Iridium-192 discs and pellets are doubly encapsulated in welded stainless steel or titanium
capsules. The sealed sources are designed and tested to achieve an ISO/ANSI minimum classification of
97C63515 and to comply with the IAEA and USDOT requirements for ‘Special Form’ radioactive material.
The ISO/ANSI classification 97C63515 stated in this manual refers to the complete source capsule which
is attached to the source assembly. This classification also applies to the Se-75, Co-60 and Cs-137
versions of the source assemblies. The Yb-169 sealed sources are designed and tested to achieve an
ISO/ANSI minimum classification of 97C63535 and to comply with the IAEA and USDOT requirements for
‘Special Form’ radioactive material.
The sealed source is swaged to one end of a source holder consisting of a short flexible steel cable which
has a female half of a connector at the other end, used for coupling to a control cable connector. The
female connector also incorporates a stainless steel stop-ball swaged onto it (older versions of this
source wire had the stop-ball as a separate component from the female connector). The purpose of the
stop-ball is to provide mechanical positioning of the source assembly within the exposure device’s
shielding and to provide a means of securing the source assembly in the exposure device’s locking
mechanism.
Model 880 Delta authorized contents
Isotope Assembly
Model Number Gamma
Energy Range Half Life Approximate
Steel Working
Thickness
Device/Source
Maximum
Capacity
Ytterbium-169 91810 8-308 keV 32 days 2-20 mm 20 Ci 0.74 TBq
Selenium-75 A424-25W 66-401 keV 120 days 3-29 mm 150 Ci 5.55 TBq
Iridium-192 A424-9 206-612 keV 74 days 12-63 mm 150 Ci 5.55 TBq
Cobalt-60 A424-19 1.17-1.33 MeV 5.27 years 50-150 mm 65 mCi 2.40 GBq
Cesium-137 A424-30 663 keV 30 years 12-63 mm 380 mCi 14.0 GBq
Model 880 Sigma authorized contents
Isotope Assembly
Model Number Gamma
Energy Range Half Life Approximate
Steel Working
Thickness
Device/Source
Maximum
Capacity
Ytterbium-169 91810 8-308 keV 32 days 2-20 mm 20 Ci 0.74 TBq
Selenium-75 A424-25W 66-401 keV 120 days 3-29 mm 150 Ci 5.55 TBq
Iridium-192 A424-9 206-612 keV 74 days 12-63 mm 130 Ci 4.81 TBq
Cobalt-60 A424-19 1.17-1.33 MeV 5.27 years 50-150 mm 25 mCi 925 MBq
Cesium-137 A424-30 663 keV 30 years 12-63 mm 380 mCi 14.0 GBq
TECHNICAL SPECIFICATIONS
1.3
Model 880 Elite authorized contents
Isotope Assembly
Model Number Gamma
Energy Range Half Life Approximate
Steel Working
Thickness
Device/Source
Maximum
Capacity
Ytterbium-169 91810 8-308 keV 32 days 2-20 mm 20 Ci 0.74 TBq
Selenium-75 A424-25W 66-401 keV 120 days 3-29 mm 150 Ci 5.55 TBq
Iridium-192 A424-9 206-612 keV 74 days 12-63 mm 50 Ci 4.81 TBq
Cobalt-60 A424-19 1.17-1.33 MeV 5.27 years 50-150 mm 25 mCi 925 MBq
Cesium-137 A424-30 663 keV 30 years 12-63 mm 380 mCi 14.0 GBq
Model 880 Omega authorized contents
Isotope Assembly
Model Number Gamma
Energy Range Half Life Approximate
Steel Working
Thickness
Device/Source
Maximum
Capacity
Ytterbium-169 91810 8-308 keV 32 days 2-20 mm 30 Ci 1.11 TBq
Selenium-75 A424-25W 66-401 keV 120 days 3-29 mm 80 Ci 2.96 TBq
Iridium-192 A424-9 206-612 keV 74 days 12-63 mm 15 Ci 0.55 TBq
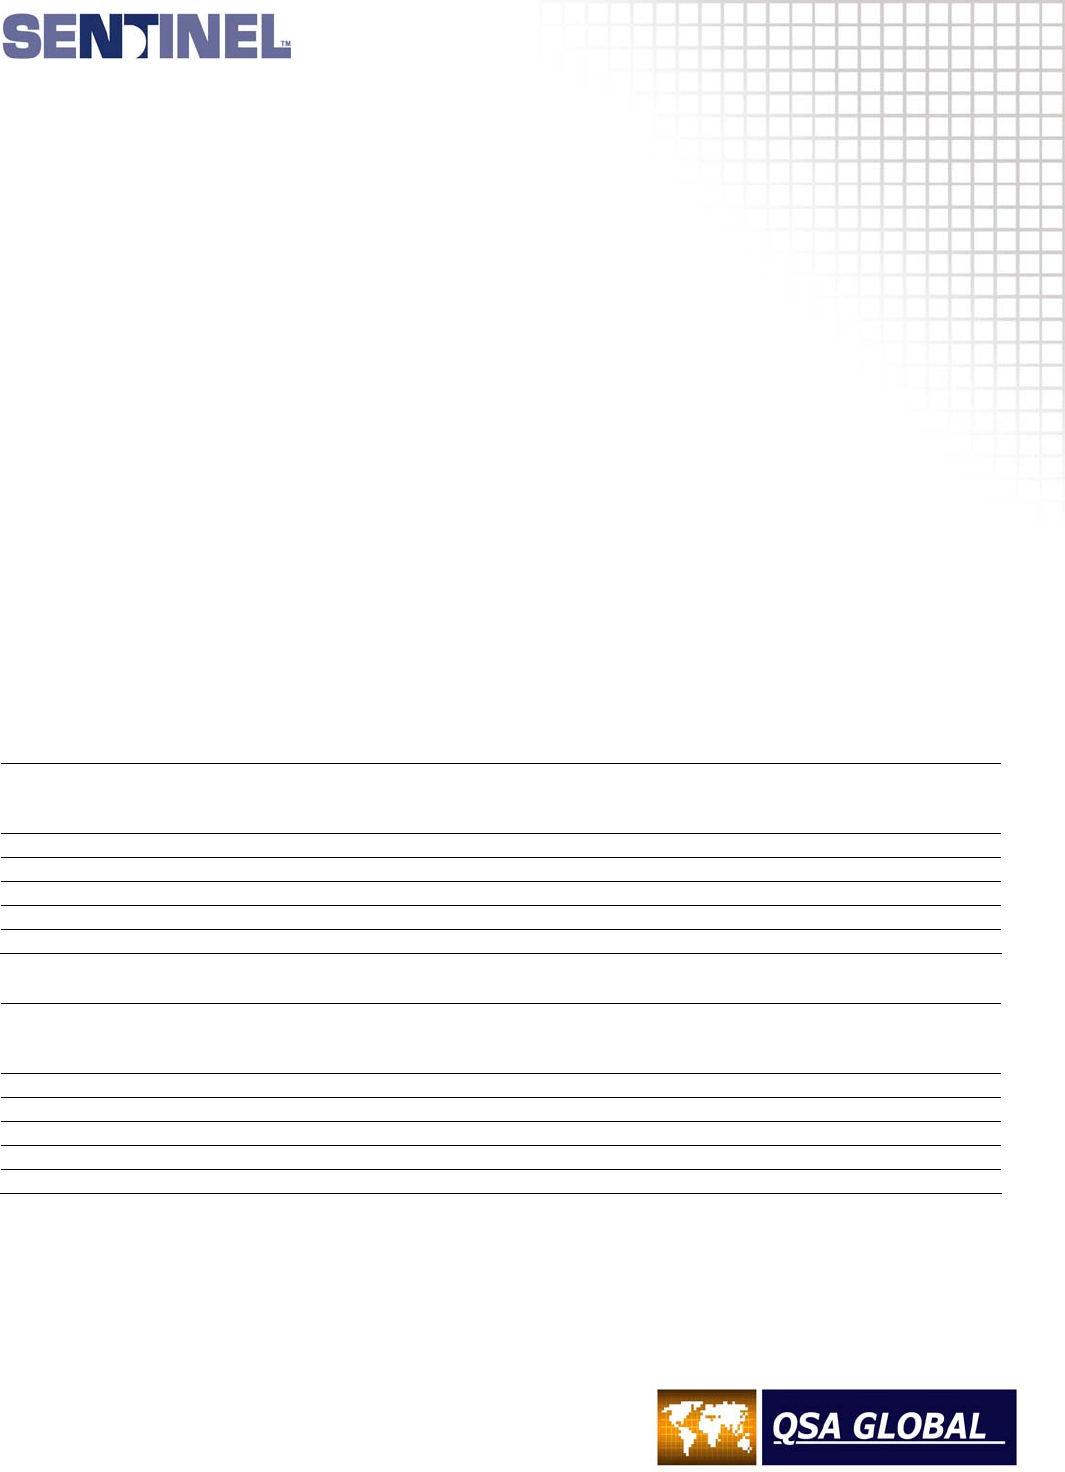
Source output
Isotope At 1 m per Ci (37 GBq) At 1 ft per Ci (37 GBq)
Ytterbium-169 0.125 R/hr 1.25 mSv/hr 1.3 R/hr 13.0 mSv/hr
Selenium-75 0.203 R/hr 2.03 mSv/hr 2.2 R/hr 22.0 mSv/hr
Iridium-192 0.48 R/hr 4.80 mSv/hr 5.2 R/hr 52.0 mSv/hr
Cobalt-60 1.30 R/hr 13.0 mSv/hr 14.0 R/hr 140 mSv/hr
Cesium-137 0.32 R/hr 3.20 mSv/hr 3.4 R/hr 34.0 mSv/hr
Selected attenuation data Approximate Half Value Thickness
Inches (mm)
Material Approximate
Material
Density
(g/cm3) Ytterbium-169 Selenium-75 Iridium-192 Cobalt-60 Cesium-137
Concrete 2.35 1.140 (29.0) 1.180 (30.0) 1.700 (43.2) 2.400 (61.0) 3.00 (76.2)
Aluminum 2.65 - 1.100 (27.0) - - -
Steel 7.80 0.170 (4.3) 0.315 (8.0) 0.512 (13.0) 0.827 (21.0) 0.900 (22.9)
Lead 11.34 0.032 (0.8) 0.039 (1.0) 0.200 (5.1) 0.500 (12.7) 0.250 (6.4)
Tungsten 17.80 - 0.032 (0.8) 0.130 (3.3) 0.310 (7.9) 0.225 (5.7)
DU 18.70 - - 0.050 (1.3) 0.270 (6.8) 0.125 (3.2)
Operating Distance
The distance between the remote control and the exposure head is determined by summing the length of
the remote control conduits plus the total length of source guide tubes used, and normally should not
exceed 47 ft (14.2 m) with standard 25 ft. controls.
Standard remote controls:
25 ft (7.6 m), 35 ft (10.7 m), 50 ft (15 m)
Standard source guide tubes (projection sheaths):
7 ft (2.1 m) set of three source guide tubes: 21 ft total (6.3 m)
TECHNICAL SPECIFICATIONS
1.4
Note:
The total length of source guide tubes utilized must be shorter in length than the remote controls to
ensure the source assembly will project into the working position.
e.g. When using 25 ft (7.6 m) remote controls, a maximum of three 7 ft (2.1 m) source guide tubes can be
used with a combined length of 21 ft (6.4 m).
Conversely, when using 35 ft (10.7 m) remote controls, a maximum of four 7 ft (2.1 m) source guide tubes
can be utilized.
When using 50 ft (15 m) remote controls, a maximum of six 7 ft (2.1 m) source guide tubes can be
utilized. This limitation is due to the weight and friction of remote control cable length.
Control Specifications
Complete Remote Control Assemblies
Product code Model number Control cable length Unit weight
TAN66425 664/25 25 ft (7.6 m) 21 lb (10 kg)
TAN66435 664/35 35 ft (10.7 m) 24 lb (11 kg)
TAN66450 664/50 50 ft (15.2 m) 27 lb (12 kg)
TAN69325 693/25 25 ft (7.6 m) 21 lb (10 kg)
TAN69335 693/35 35 ft (10.7 m) 24 lb (11 kg)
TAN69350 693/50 50 ft (15.2 m) 27 lb (27 kg)
TAN69225 692/25 25 ft (7.6 m) 21 lb (10 kg)
TAN69235 692/35 35 ft (10.7 m) 24 lb (11 kg)
TAN69250 692/50 50 ft (15.2 m) 27 lb (12 kg)
88325 883/25 25 ft (7.6 m)
88335 883/35 35 ft (10.7 m)
88350 883/50 50 ft (15.2 m)
Model 664 Control Storage Reel Unit Size _____
Length Width Height
21 in (533 mm) 12 in (305 mm) 6.6 in (168 mm)
The Model 664 reel and 693 pistol grip controls are equipped with odometers. The Model 692 pistol-grip
controls are not equipped with an odometer.
Source Guide Tube (with source stop)
Product Code Model Number Length
TAN48906 48906 7 ft (2.1 m) male 1-18 threaded fitting
48906-X 48906-X Customer specified length
48931-7 48931-7 7 ft (2.1 m) with bayonet fitting
48931-X 48931-X Customer specified length with bayonet fitting
95020 95020 7 ft (2.1m) male 1-18 threaded fitting
95020-X 95020-X Customer specified length
Source Guide Tube Extension
Product Code Model Number Length
TAN48907 48907 7 ft (2.1 m) male/female 1-18 threaded fittings
48930-7 48930-7 7 ft (2.1 m) bayonet fitting/female 1-18
48930-X 48930-X Customer specified length bayonet fitting/female 1-18
95021 95020 7 ft (2.1 m) male/female 1-18 threaded fittings
95021-X 95021-X Customer specified length
NOTE: X indicates customer can order lengths other than the standard length.

TECHNICAL SPECIFICATIONS
1.5
Exposure Device Specifications
Manufacturer Length
Sentinel - QSA Global, Inc. 13.33 in (33.8 cm) all models
40 North Avenue, Burlington, Massachusetts, USA 01803
Primary Application Width
Industrial gamma radiography 7.5 in (19.1 cm) all models
Model Numbers Height
Model 880 Delta, Model 880 Sigma, Model 880 Elite 9 in (22.9 cm) all models
and Model 880 Omega
Weight of Exposure Device Type B(U) Certification
Delta: 52 lb (24 kg), Sigma: 52 lb (24 kg) The Models 880 Delta, 880 Sigma and
Elite: 42 lb (19 kg), Omega: 33 lb (15 kg) 880 Elite are certified by the following:
Weight of Depleted Uranium Shield USA/9296/B(U)-96
Delta: 34 lb (15.4 kg), Sigma: 34 lb (15.4 kg) CDN/E199/-96
Elite: 25 lb (11.4 kg), Omega: 17 lb (7.7 kg)
Activity of Depleted Uranium Shield Type A Approval
Delta: 5.4 mCi (200 MBq), Sigma: 5.4 mCi (200 MBq) All Models meet the Type A package
Elite: 3.8 mCi (141 MBq), Omega: 2.7 mCi (101 MBq) requirements of 49 CFR 173.415 and
IAEA TS-R-1 (1996 revised)
Special Form Certifications
Iridium-192, Cobalt-60 & Cesium-137: USA/0335/S-96
Selenium-75: USA/0502/S-96
Ytterbium-169: USA/0597/S-96

TECHNICAL SPECIFICATIONS
1.6
Construction
A depleted Uranium (DU) shield is encased within a welded tubular stainless steel shell with stainless
steel end plates. The interior void space is filled with rigid polyurethane foam. The exposure device body
is encased in an engineered plastic jacket also consisting of the handle and a base.
Materials
Titanium ‘S’ tube, DU shield, 300 series stainless steel tubular shell and plate, aluminum, brass, tungsten
and polyurethane.
Maximum Capacities
See previous table listings in this section.
Inspection Requirements
Daily pre-operational inspection for obvious damage to the system.
Maintenance Requirements
Most national regulations require inspection and maintenance of the system at quarterly intervals. The
complete annual servicing ensures the integrity of the system. Shorter frequencies of inspection and
maintenance are required when the system is operated under severe operating environments. In some
cases, the system should be serviced immediately after certain jobs in severe environmental working
conditions.
Device Operating Temperature Range
-40°F to 300°F (-40°C to 149°C)
Source Assembly
See previous table listings in this section.
NOTICE
These industrial radiography systems are used as an exposure device, a Type A shipping container and
for the Models 880 Delta, 880 Sigma and 880 Elite as Type B(U)-96 shipping containers for QSA Global,
Inc. source assemblies. The purpose of this manual is to provide information that will assist qualified
radiographers in using the Model 880 Delta, 880 Sigma, 880 Elite and 880 Omega gamma radiography
systems. The user must be thoroughly familiar with this instruction manual before attempting operation
and use of this equipment.
In order to use this equipment or perform source changes, users within the USA must be specifically
licensed to do so. Applications for a license should be filed with the Materials Licensing Section of the
appropriate U.S. Nuclear Regulatory Commission regional office or with the appropriate Agreement State
office. All users within Canada must have a Canadian Nuclear Safety Commission license.
Prior to the initial use of the exposure device as a shipping container, the user must register with the
Office of Nuclear Material Safety and Security, U.S. Nuclear Regulatory Commission. The user should
have in his possession a copy of the Certificate of Compliance issued for the exposure device, which may
be obtained from Sentinel, QSA Global, Inc. customer service centers upon request. This also applies to
users from Agreement States and other regulatory jurisdictions.
It is the responsibility of users of this equipment outside of the United States to comply with all local,
national and international regulatory, licensing and transportation rules and regulations as they apply in
their respective countries.

TECHNICAL SPECIFICATIONS
1.7
Warranty and Limitation of Liability
QSA Global, Inc. (herein referred to as the manufacturer) warrants its product which it manufactures and
sells to be free from defects in material and workmanship for a period of one year from the date of
shipment. This warranty shall not apply to any product or parts which have been subjected to misuse,
improper installation, repair, alteration, neglect, accident, abnormal conditions of operation, or use in any
manner contrary to instructions.
The manufacturer's liability under such warranty shall be limited to replacing or repairing, at its option, any
parts found to be defective in such respects, which are returned to the manufacturer, transportation
prepaid; or at its option, to returning the purchase price thereof.
The warranty on other manufacturer's components shall be that of the original manufacturer whose
warranty shall be binding.
In no event shall the manufacturer be liable for any incidental or consequential damages, whether or not
such damages are alleged to have resulted from the use of such product in accordance with instructions
given by or referred to by the manufacturer.
QSA Global, Inc. assumes no liability or responsibility for the usage of any radioactive material or device
generating penetrating radiation used in connection with this product. The use of such material or
generators in any manner other than prescribed in the U.S. Nuclear Regulatory Commission or equivalent
Agreement State or permitted by any regulation of the U.S. Nuclear Regulatory Commission or State
Regulation may constitute a violation of such license terms.
All other warranties, except those warranties expressly stated herein, including without limitation
warranties of, merchantability and implied warranties of fitness, are expressly excluded.
The warranty on this device is specifically limited to its use only with sealed sources and connectors,
parts, and accessories manufactured by QSA Global, Inc.
QSA Global, Inc. has received equipment approvals for the Model 880 Delta, Model 880 Sigma and
Model 880 Elite systems from the Commonwealth of Massachusetts, the USNRC Transportation Branch,
the U.S. Department of Transportation, and the Canadian Nuclear Safety Commission. (The Model 880
Omega is not currently authorized for use in the USA or Canada). This requires use of Agreement State
or USNRC registered and approved remote controls, control cables, projection sheaths, sealed source
assemblies, remote control cranks used in conjunction with the Model 880 Delta, Model 880 Sigma and
Model 880 Elite. For additional information on compliance with Type B(U)-96 certifications, USNRC
10CFR34, ANSI N432-1980 or ISO 3999-1:2000(E) please contact QSA Global, Inc.
SentinelTM, QSA Global, Inc. shall not be liable for any errors or omissions contained herein and the
provision by SentinelTM, QSA Global, Inc. of the information set out in this manual does not in itself
constitute acceptance of any liability on the part of SentinelTM, QSA Global, Inc.

OPERATING INSTRUCTIONS
2.1
Job site safety precautions
Instruments
The radiographer and radiography assistants must at all times wear a film badge or TLD and pocket
dosimeter with a range of 0-2 mSv (0-200 mRem). Regulatory requirements in the USA also require that
an audible alarm ratemeter be worn at temporary jobsites. Specifically, those locations that are not
permanent radiographic installations equipped with functional door interlocks and audible/visual alarms.
Radiographers in the USA must also have a survey meter capable of measuring in the range
20 µSv/hr (2 mR/hr) up to 10 mSv/hr (1,000 mR/hr). Canadian regulations require that survey meters
used for industrial radiography be capable of measuring from 2 µSv/hr (0.2 mR/hr) and up to 100 mSv/hr
(10 R/hr). In any regulatory jurisdiction, always verify survey meter requirements affecting the range and
calibration requirements prior to engaging in industrial radiography operations.
An audible ‘chirper’ pocket alarm may be required in some countries.
Restricted Area
Radiography must be performed only in a restricted area that is marked with the appropriate radiation
warning signs and secured against unauthorized entrance.
Distance
Since the source emits high levels of radiation it is good practice to operate the system from as great a
distance as possible.
Shielding
Whenever possible, situate the radiographic exposure area in a room with suitably thick walls, floor,
ceiling and doors. Whenever possible, the use of a collimator (beam limiter) provides effective shielding to
reduce radiation levels outside of the central beam. It is recommended that collimators be used at
temporary job sites to minimize occupational exposure to radiation.
Surveillance
Only trained and qualified radiographers or assistants working under their direct supervision may operate
radiography systems. The radiographer must be physically present at the site and able to control and limit
access to the restricted area.
Locking
Keep the exposure device locked while assembling the system and when not being used to perform
radiography. Locked is defined as the exposure device's lock is fully engaged with the key removed.
Store the key in a secured location.

OPERATING INSTRUCTIONS
2.2
It is essential that the 5 STEPS set out below are followed in the
correct order to ensure safe operation and compliance with
regulations.
STEP 1 Exposure Device Survey
STEP 2 Connecting the Source Guide Tube(s)
STEP 3 Connecting the Remote Control Cable
STEP 4 Projecting and Retracting the Source Assembly
STEP 5 Dismantling Equipment
STEP 1
Exposure Device Survey
Check the operation of the survey meter by measuring the radiation level at the surface of the
exposure device. The radiation level measurement should not exceed 2 mSv/hr (200 mR/hr) on any
surface of the exposure device. Use this measurement for verification surveys of the source
assembly’s return to the fully shielded/secured position within the exposure device after each
radiographic exposure.
STEP 2
Source Guide Tube (projection sheath) Layout
Ensure all source guide tubes that will be utilized have received a daily inspection according to the
daily inspection section of this manual. Position and secure the source stop (exposure head) of the
terminating source guide tube at the radiographic focal position using the tripod stand and swivel
clamps or some other secure and suitable means.
Ensure that a source stop (end stop) is in place on the terminating source guide tube.
Use a collimator (beam limiter) to limit the primary beam in unwanted directions.
Determine where the exposure device will be positioned and lay out the source guide tubes as
straight as possible, with no bend radius less than 20 in (0.5 m) to avoid restricting the movement of
the source assembly.
Make sure that the source guide tubes do not contact any heated surface greater than 140°F (60°C).
Avoid any risk of crushing the source guide tube(s) by falling objects, vehicles or doorways during
set-up and during radiographic exposure.
Connecting the Source Guide Tube(s)
The source guide tubes must always be attached to the outlet port of the device before connecting
the remote controls in the set-up for a radiographic exposure.
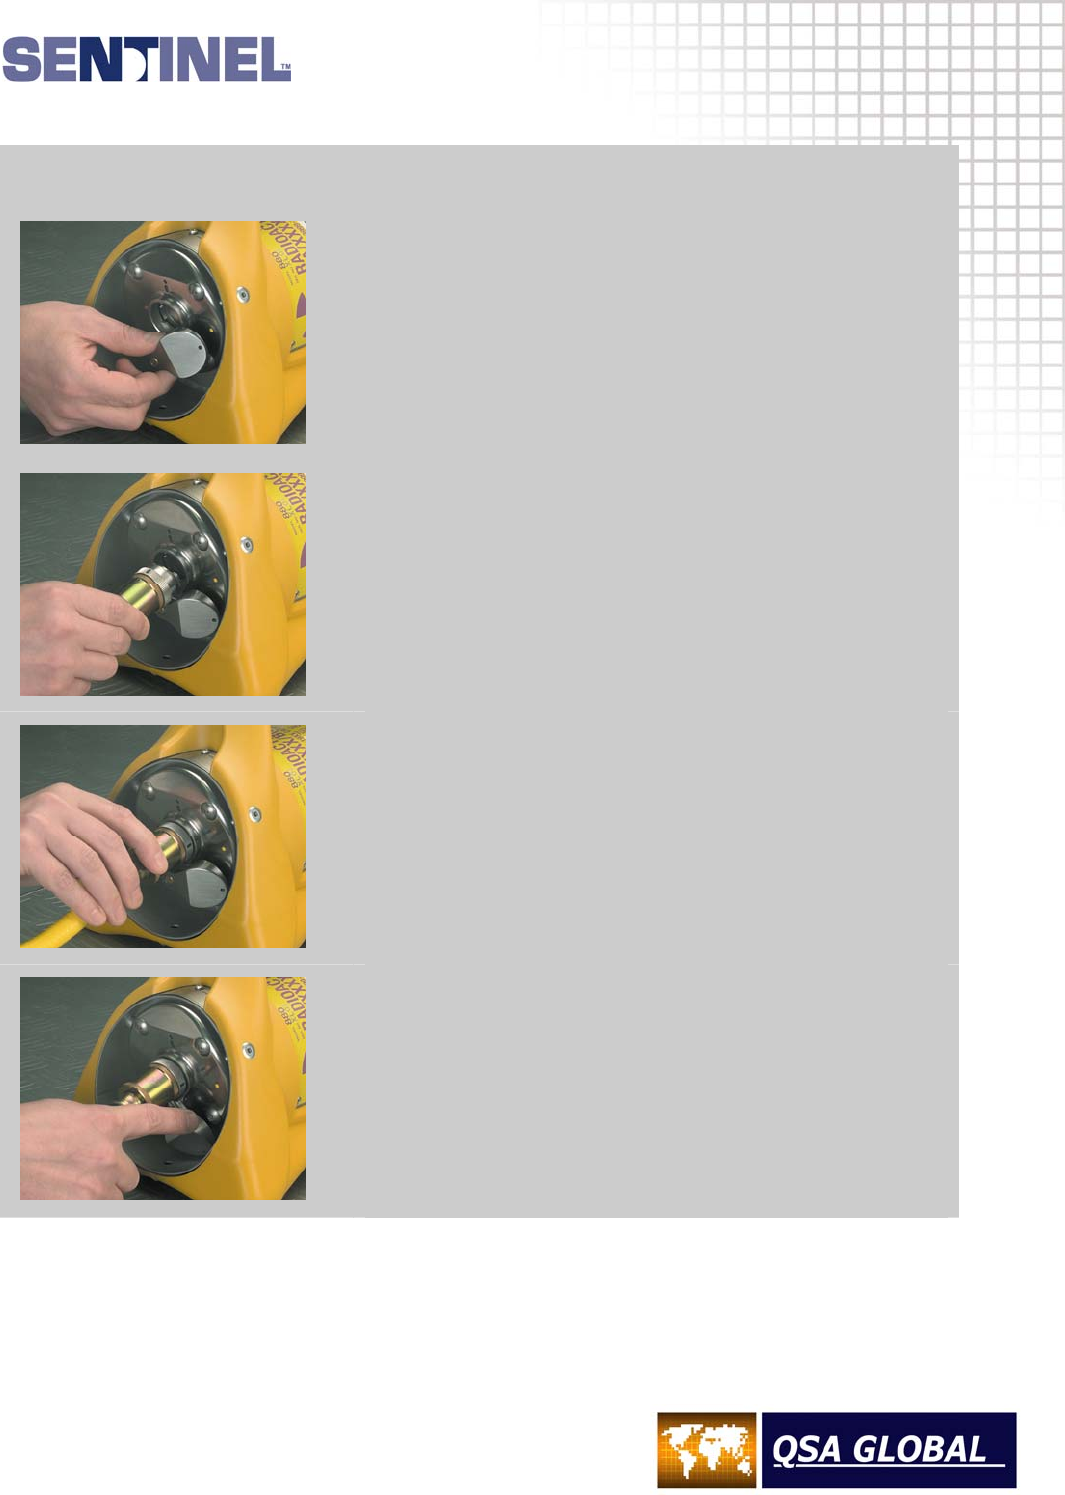
Connect the source guide tube(s) to the exposure device outlet port as shown.
OPERATING INSTRUCTIONS
2.3
STEP 2
Connecting the Source Guide Tube(s)
Simultaneously pull and rotate the
spring-loaded outlet port cover a quarter of
a turn in a clockwise direction.
Insert the bayonet fitting of the source guide tube
Into the exposed outlet port.
Align the GREEN MARKINGS on the bayonet
fitting and outlet port.
Rotate a quarter of a turn counter-clockwise.
Rotate the spring-loaded outlet port cover
an additional 60 degrees in a clockwise direction
until it stops.
1
2
3
4
OPERATING INSTRUCTIONS
2.4
STEP 2
WARNING
Ensure that the available length of the control cable is greater than the total length of the
source guide tubes. See the technical specifications section for details.
If the remote control conduits are shorter than the total length of the source guide tubes:
1 The source assembly cannot be projected all the way to the source stop of the terminating
source guide tube and be correctly positioned for the exposure.
2 The source assembly may not reach a collimator; therefore, restricted area dose rates may be
higher than expected.
3 The control cable end may be cranked beyond the drive wheel of the remote controls if the drive
cable is not be fitted with a safety retaining spring. This scenario must be treated as an
EMERGENCY.
STEP 3
Remote Control Conduit Layout
Lay out the remote control conduits as straight as possible, with no bend radii less than about 36 in
(approximately 1 m).
Avoid any risk of crushing the remote control conduits by falling objects, moving vehicles or closing
doors, etc.
The remote control crank mechanism (operator's hand-crank) should be placed as far away from the
source focal position as possible (preferably behind shielding).
Connecting the Remote Control Cable
Connect the control cable to the source projector as shown.
OPERATING INSTRUCTIONS
2.5
STEP 3
Connecting the Remote Control Cable
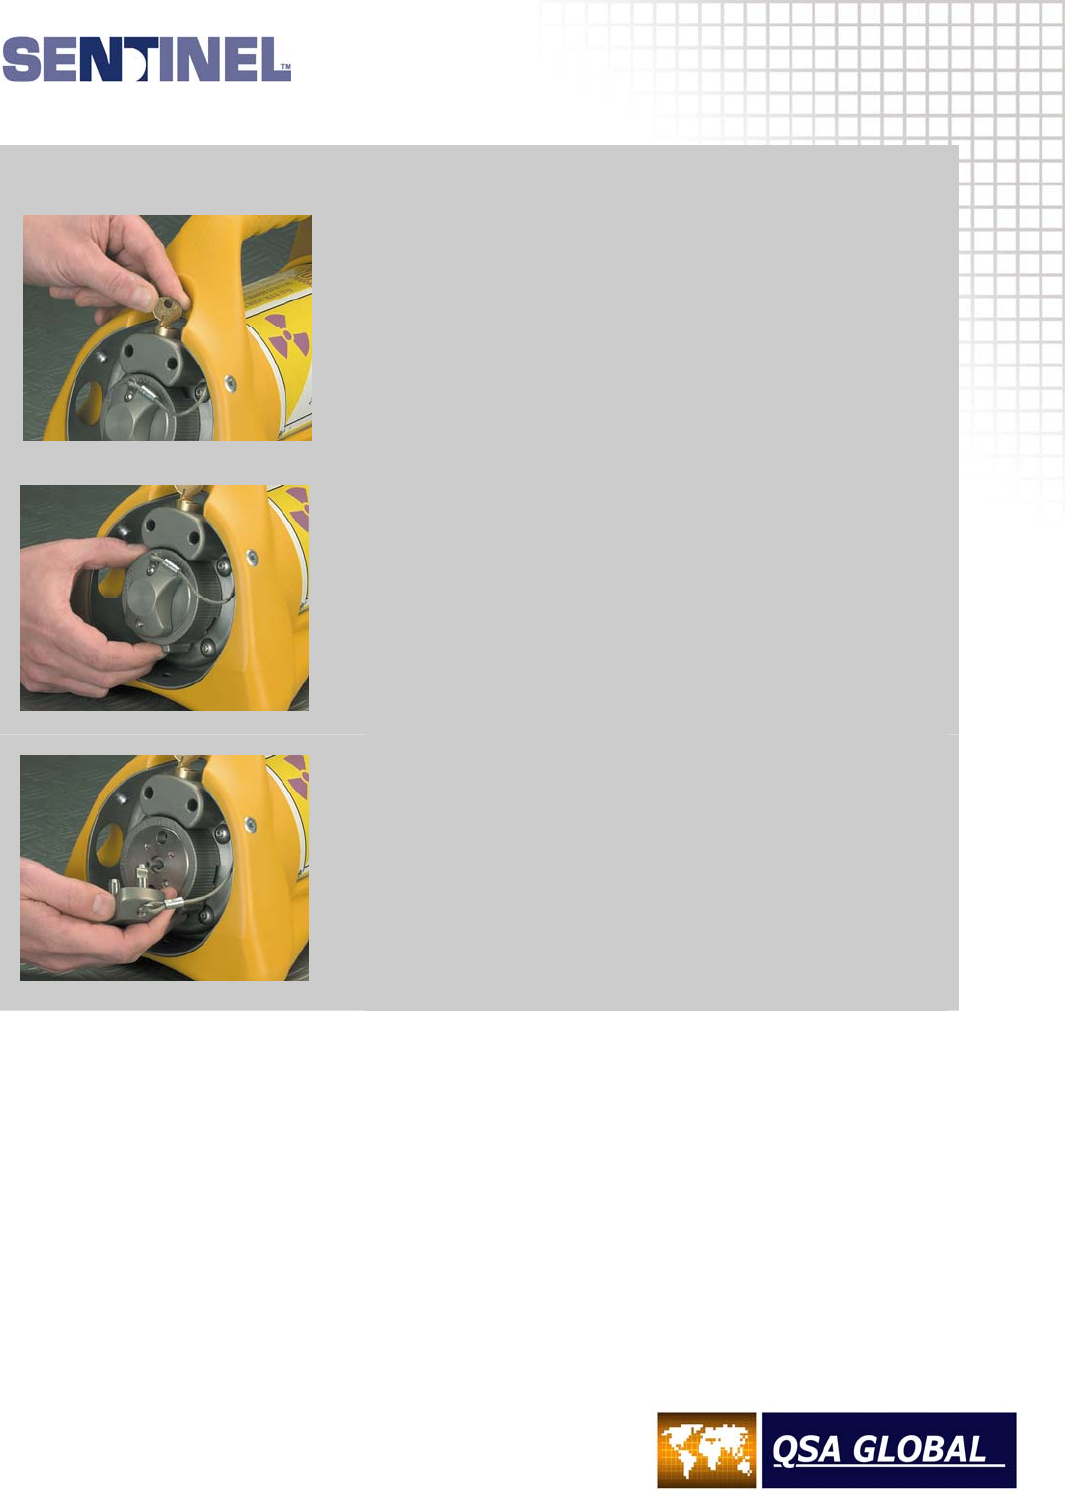
Unlock the plunger lock with the key.
Turn the selector ring from LOCK to CONNECT
The protective cover will disengage from the projector.
1
2
3
OPERATING INSTRUCTIONS
2.6
STEP 3
Connecting the Remote Control Cable
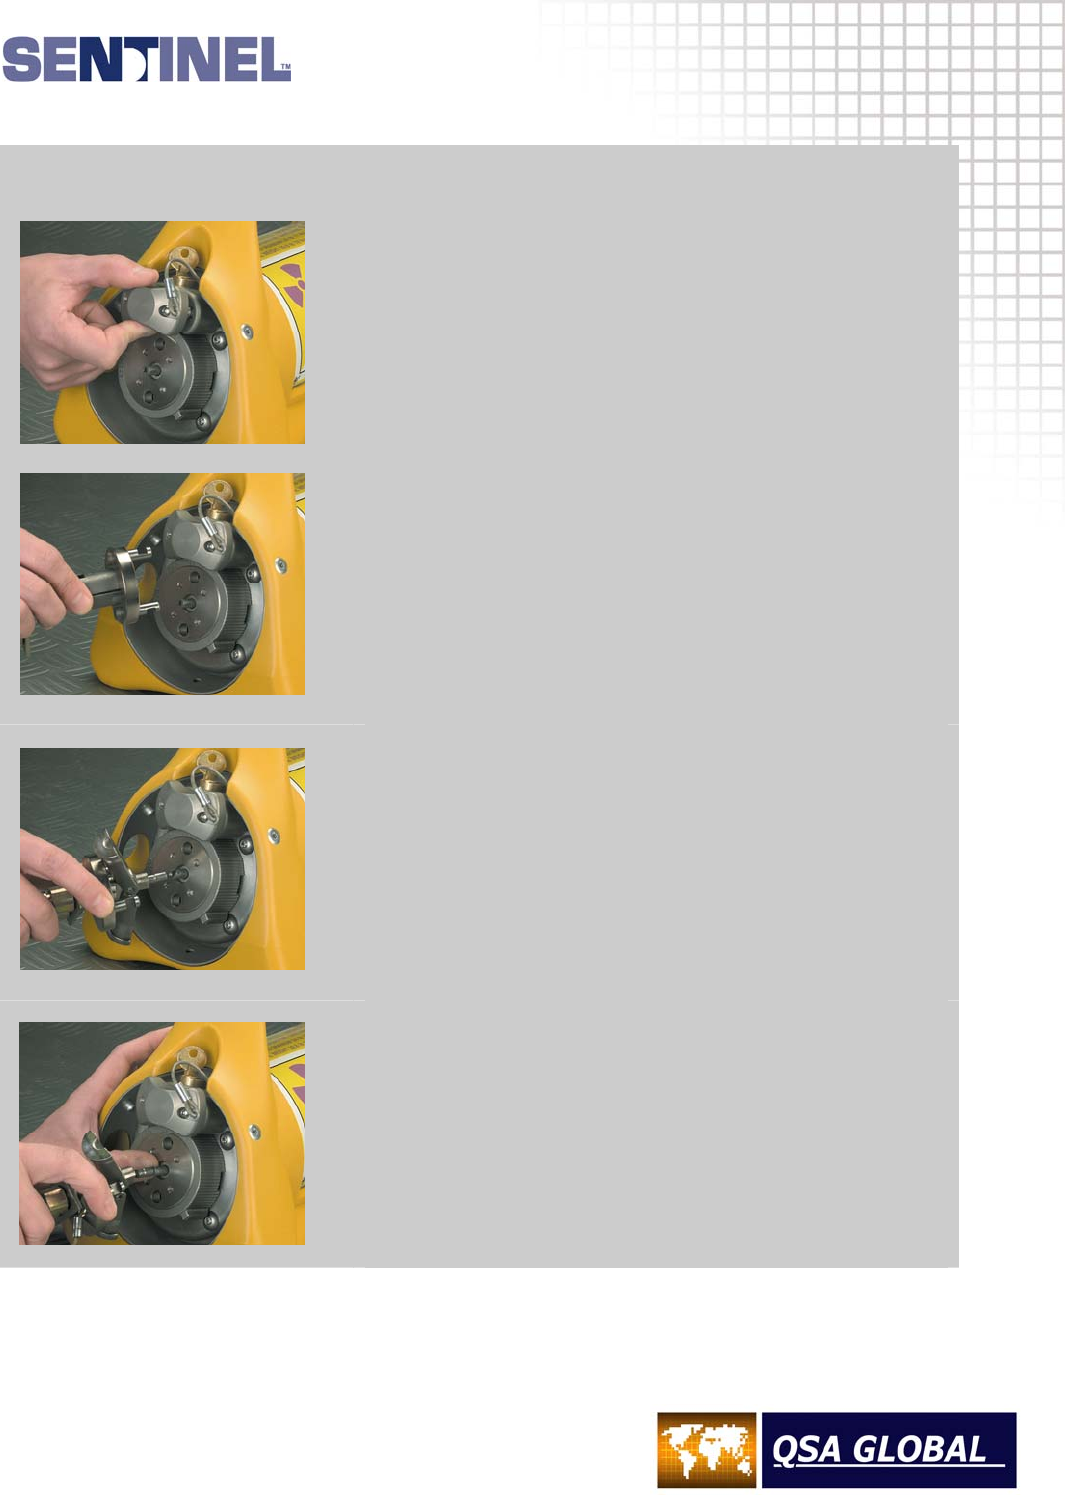
Insert the protective cover into the lock housing during use of
the device.
Check the control cable and source assembly connectors
using the NO GO gauge according to the daily inspection
section.
Remove the protective rubber cap from the remote control
connector.
IMPORTANT WARNING
The control cable connector is a made from hardened
steel and should never be left unprotected or forced into
connection with the source assembly as this could
damage the connector overtime leading to possible
breakage during use.
ALWAYS use the protective end-cover when remote
controls are not connected to the exposure device and
ALWAYS manually move the sleeve of the female
connector of the source assembly to the OPEN position
when connecting and disconnecting the control cable
from the source assembly.
Slide the remote control connector assembly’s collar back
and open the jaws to expose the male portion of the control
cable connector (i.e. the ball-end on the control cable
connector).
Press back the spring-loaded locking pin of the source
assembly connector with a thumb-nail and engage the
male and female portions of the connectors.
Release the locking pin of the source assembly connector
and check that the connection is secure.
Use the NO GO gauge to check the gap between the
joined connectors during the daily inspection.
4
5
6
7
OPERATING INSTRUCTIONS
2.7
STEP 3
Connecting the Remote Control Cable
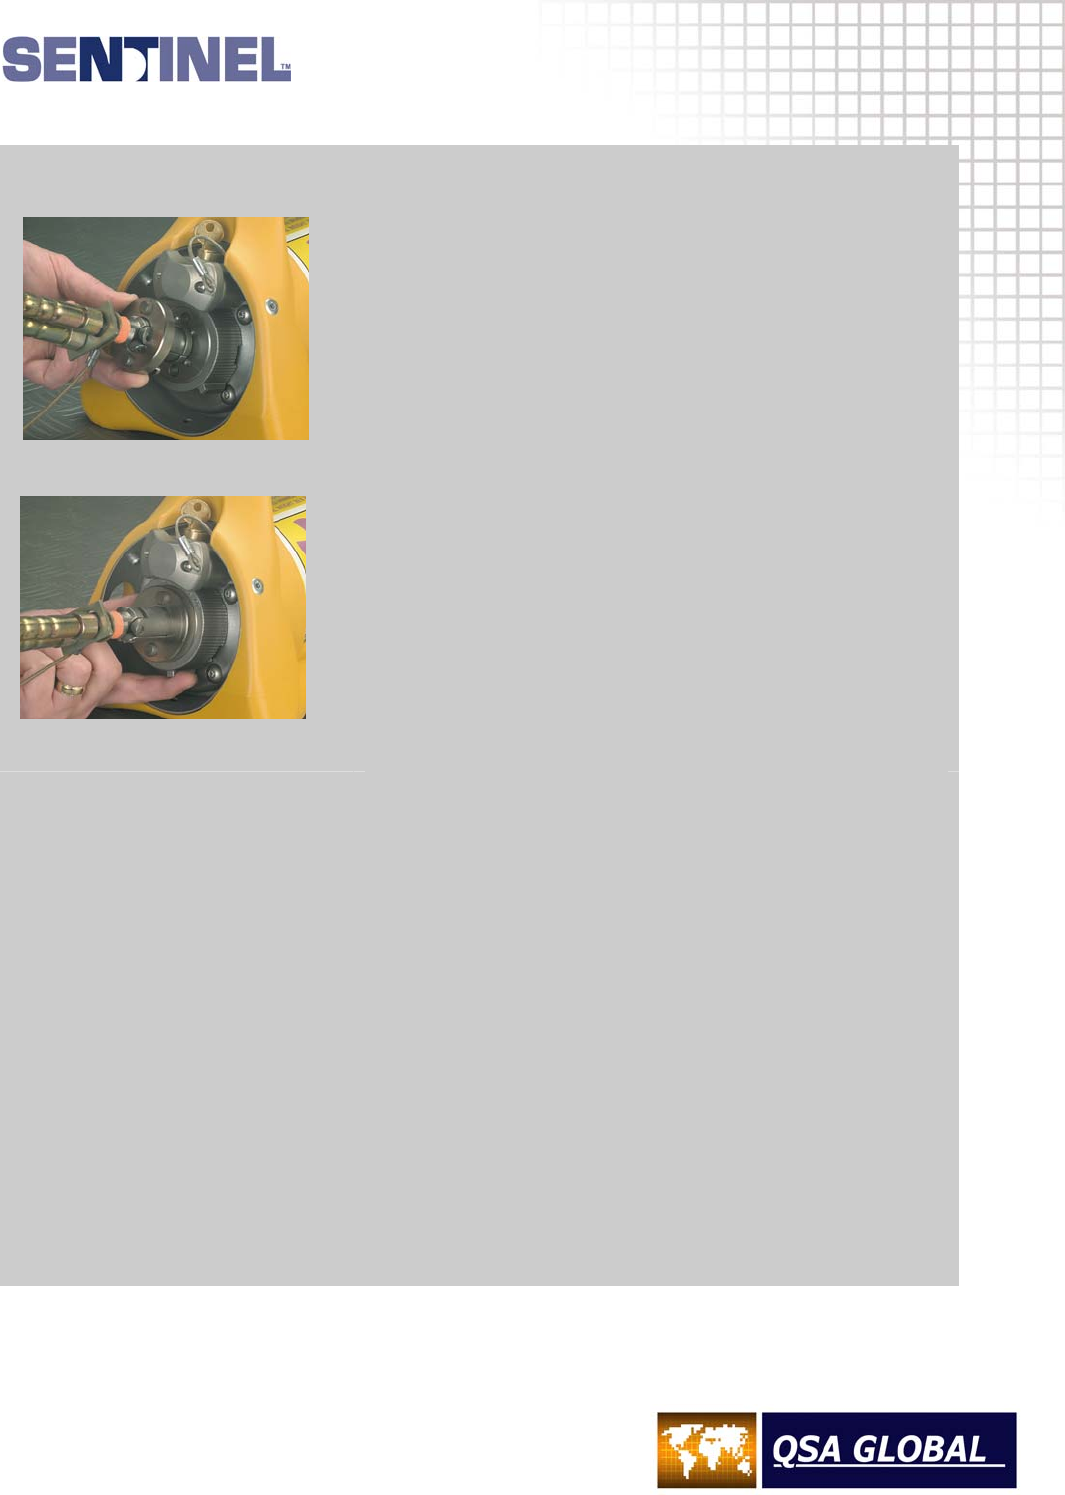
Close the jaws of the control cable connector over the joined
connectors.
Slide the remote control connector assembly collar over the
connector jaws.
NOTE: The control cable connector, when properly installed
with the selector ring in the CONNECT position, displaces anti-
rotation lugs which allows the selector ring to be rotated to the
LOCK position and when required, through to the OPERATE
position.
Push and hold the remote control connector assembly collar
flush against the exposure device’s locking mechanism and
rotate the selector ring from CONNECT to LOCK. The
selector ring can be secured in this position by engaging the
plunger lock.
Do Not Rotate past LOCK.
The remote control cable connector is now secured into the
exposure device’s locking mechanism.
Keep the exposure device in the lock position until ready to
start the exposure.
Checks Before Exposure of the Source
Verify that the source guide tubes are attached to the outlet port.
Verify that the remote control connector assembly is correctly connected to the exposure device’s
locking mechanism.
Ensure that no personnel are inside the Restricted Area or exposure room.
Ensure that the proper signs are posted and required warnings are in operation.
NOTE
If the remote control is fitted with an additional lock, release this lock and apply a forward motion to
control crank handle, as if exposing the source, until a resistance is felt. Release the control crank
handle and proceed with the next step.
CAUTION
Do not apply excessive force to the control crank handle in the expose direction as this could
cause the source assembly to move forward out of the stored position when the lock slide is
released. Do not retract the control cable and apply the control crank brake. Leave the control
crank and the control cable in a neutral tension position.
8
9
OPERATING INSTRUCTIONS
2.8
STEP 4
Projecting and Retracting the Source Assembly
Unlocking
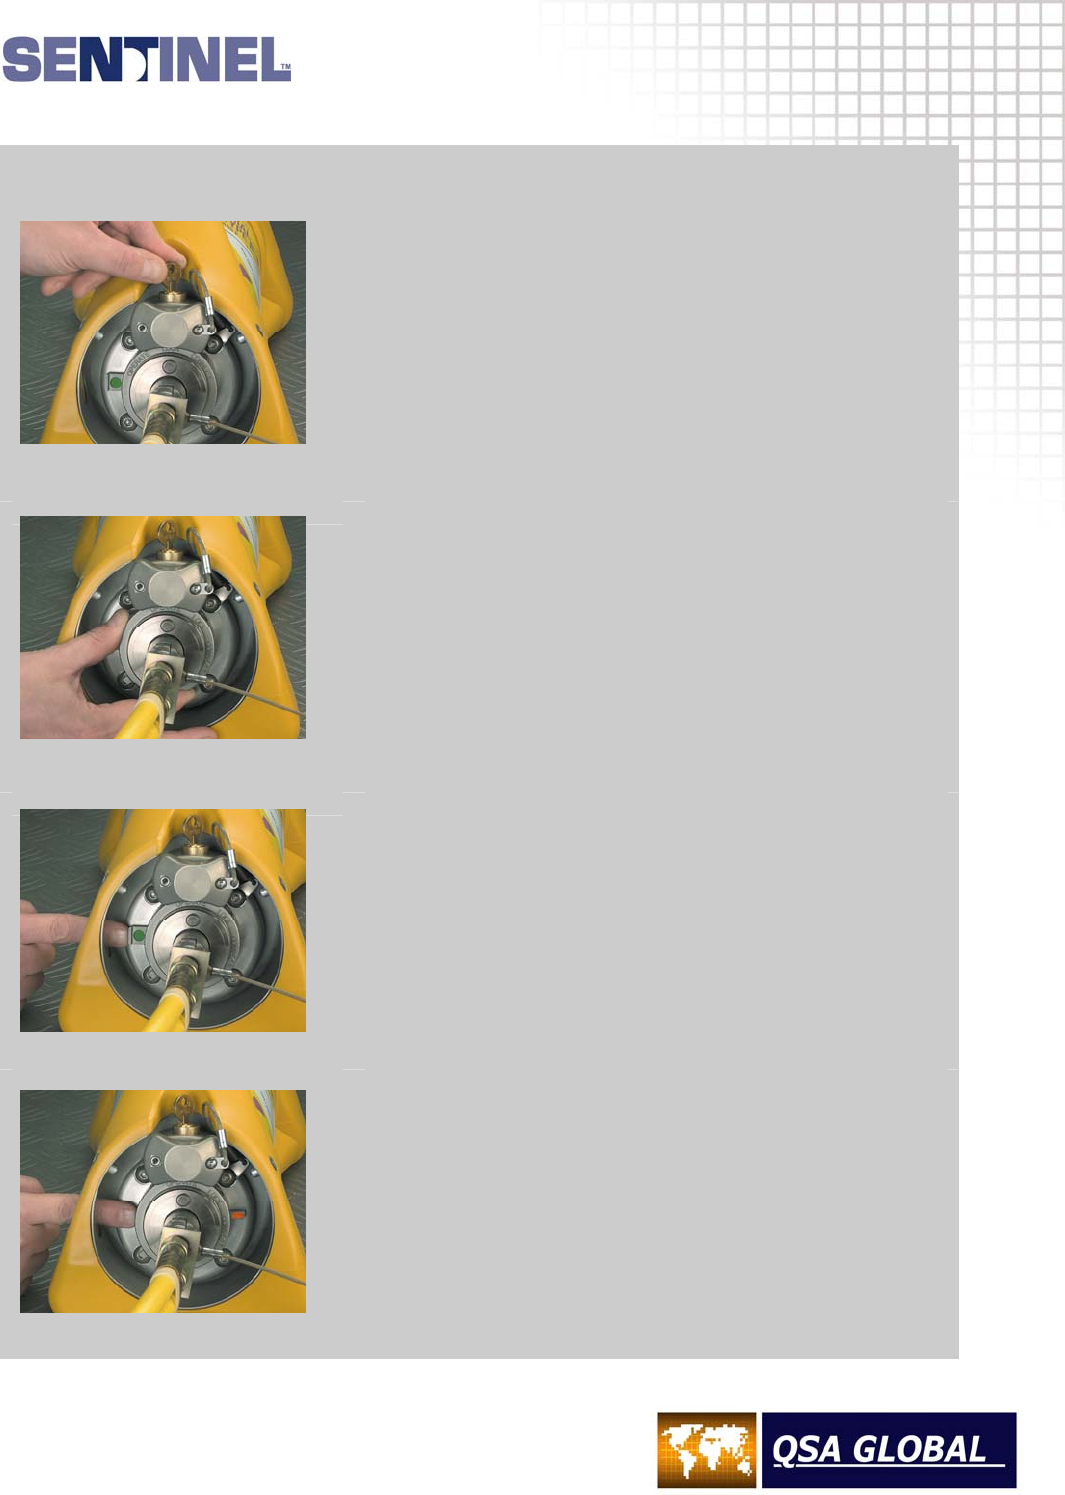
If engaged, unlock the exposure device’s plunger lock with
the key.
Rotate the selector ring to the OPERATE position.
Ensure there is no tension/force in either direction on the
control cable.
Push the lock slide GREEN MARKING laterally from left to
right (as seen behind the projector) until the lock slide
RED MARKING fully appears on the right side of the
selector ring and you feel or hear the sleeve snap into the
slide.
When the GREEN MARKING is visible, the source
assembly is locked into the secured position within the
exposure device.
When the RED MARKING is visible, the source assembly
is free to be projected from, and retracted to, the projector.
Ensure all personnel leave the immediate area.
Got to the remote control crank.
If an odometer is fitted, adjust the reset knob to read zero.
The source assembly can now be projected.
1
2
3
4
OPERATING INSTRUCTIONS
2.9
STEP 4
Projecting
Rapidly rotate the control crank handle in the EXPOSE direction (counter-clockwise) to move the
source assembly out of the exposure device to the radiographic focal position.
The control crank handle will stop turning when the source reaches the source stop. Do not use
excessive force.
The odometer (if fitted) will indicate the approximate total distance traveled, 7 ft (2.1 m) for each guide
tube section.
Set the brake to ON to prevent movement of the source assembly during the radiographic exposure.
Start timing the radiographic exposure from the moment the source assembly reaches the exposure
head.
Survey meter readings observed during the projection operation should increase rapidly from
background to a high level as the source emerges from the projector. Then readings should fall as
the source moves out towards the focal point, fall sharply as the source enters a collimator (if used)
and remain steady throughout the exposure.
Actual survey meter readings will depend on the source activity, distance, collimators and shielding.
The sequence of changes should be observed and the readings noted.
During retraction of the source assembly from the exposure head to the exposure device, the
sequence will reverse. The survey meter should indicate a continually increasing radiation level as
the source assembly is retracted, then drop to background when the source assembly is stored in the
exposure device.
During the radiographic exposure, use the survey meter to check the boundary dose rate, but spend
as little time as possible in and near the restricted area to minimize personal exposure.
OPERATING INSTRUCTIONS
2.10
STEP 4
Retracting
At the end of the required exposure time, set the brake to OFF and rapidly turn the crank handle in
the RETRACT (clockwise) direction until it no longer moves. You may hear the lock slide ‘click’
back into its original position depending on the ambient noise level at the job site. From the
control crank you may be able to observe the GREEN MARKING on the slide bar.
Apply a slight amount of forward pressure on the crank handle as if to expose the source to
ensure that the positive locking mechanism has actuated.
Allow the crank handle to return to a neutral position, thereby relieving any tension (force) on the control
cable that would cause source movement when unlocking the projector. At this point the source cannot be
moved out of the stored position.
In the unlikely event the lock slide moves toward the lock position before the source is fully stored in the
exposure device, turn the crank handle in the RETRACT (clockwise) direction until it stops turning. (The
lock slide is designed to lock on the stop ball, not the control cable). Do not use excessive force. The
source assembly will be in the exposure device but not in the fully shielded position. Approach the
exposure device, from the rear, with a survey meter. The survey meter will measure approximately 400
µSv/hr (40 mR/hr) at the rear plate of the exposure device when a 3.7 TBq (100 Ci) Ir-192 source is in use.
CAUTION
Remain clear of the front of the exposure device (outlet port side) to minimize personal exposure. Reset
the lock slide to the open position. Return to the control crank and turn the crank handle in the RETRACT
(clockwise) direction and store the source assembly in the normal manner.
The odometer (if supplied) should read approximately zero when the source assembly has returned to the
projector.
Confirmatory Survey
Approach the exposure device while observing the survey meter – observe the GREEN MARKING on the
lock slide and survey the exposure device. The survey meter should indicate the same radiation level as
observed before the exposure. Note particularly the outlet port reading.
Survey the entire length of source guide tube with the survey meter. If the meter shows a sharp increase,
the source is exposed or incompletely shielded.
If the source is still exposed, attempt to store it properly by cranking the source a short distance towards
the exposure head and retracting it, repeating if necessary.
Locking the Exposure Device
When the source assembly is properly stored in the projected, rotate the selector ring from the OPERATE
position to the LOCK position and secure it with the plunger lock.
Remove and safeguard the key.
WARNING!
If after several attempts to return the source assembly, the selector ring cannot be rotated to the
lock position (do not use excessive force) or the lock slide is not actuated, one must suspect an
accident in which the source assembly may have become disconnected or stuck outside the
projector, giving rise to a very high radiation field. Treat the situation as an EMERGENCY.
OPERATING INSTRUCTIONS
2.11
STEP 5
Dismantling equipment
Remote control unit
Unlock the exposure device and then rotate the selector ring counter-clockwise from LOCK to CONNECT.
The remote control connector will partially disengage from the exposure device's locking mechanism.
Completely disengage the remote controls from the exposure device by disengaging the control cable
connector from the source assembly connector. Place the protective cover over the remote control's
connecting plug assembly to exclude dirt and protect the control cable connector from damage. Roll the
remote control conduits loosely for easier handling and transport.
Reinstall the locking mechanism's protective cover, hold in place and rotate the selector ring clockwise to
the LOCK position. Push in the plunger lock and remove the key to lock the exposure device.
Source guide tubes
Remove the source guide tube attached to the exposure device outlet port by:
1 Rotating the spring-loaded outlet cover 60 degrees in a counter-clockwise direction.
2 Grasp the source guide tube fitting and rotate a quarter of a turn in a clockwise direction. This action
will allow removal of the source guide tube from the outlet port.
3 Simultaneously pull and rotate the spring-loaded outlet port cover a quarter of a turn in a counter-
clockwise direction.
Place the protective covers on the fittings of each source guide tube used to exclude dirt and protect the
swaged fittings. Source guide tubes should be rolled up loosely for easier handling and transport.
Surveying
After installing the locking mechanism’s protective cover and the outlet port cover, survey the entire
circumference of the exposure device with the survey meter to ensure the source is fully shielded and
properly secured. The survey should not measure more than 2 mSv/hr (200 mR/hr) on any surface of the
exposure device and should indicate the same measurement as the initial survey.
Storage
Lock the exposure device and secure it in a clean dry storage area where it cannot be tampered with or
removed by unauthorized personnel. Perform a storage survey on the surface of the exposure device to
verify the dose rate is less than 2 mSv/hr (200 mR/hr) and record.
A radioactive material warning notice must be posted on the door or entrance of the storage area. The door
or entrance must be locked to prevent access by unauthorized personnel.

DAILY INSPECTION INSTRUCTIONS
3.1
Introduction
The QSA Global, Inc. Model 880 Delta, Sigma, Elite and Omega radiographic exposure devices provide
innovation to the most widely used family of radiographic exposure devices utilized for on-site gamma
radiography. The Model 880 Series exposure devices are portable, lightweight and permit use of several
different isotopes commonly needed by the nondestructive testing community.
The Model 880 is primarily designed for use with Iridium-192 sources for radiographic inspection of steel
and light alloys. Due to the advancements in radiographic inspection techniques, additional source
assemblies for the Model 880 Series devices are available. See Section 1 – Technical Specifications, for
a complete list of sources and accessory equipment designed for use with the Model 880 Series devices.
The USNRC and international regulations require routine inspections to ensure that industrial radiography
equipment is operating safely and properly. Design of the Model 880 Series devices includes inherent
safety features and quality construction to ensure the highest degree of quality, safety, reliability and
durability.
Care should be taken to prevent radiological incidents that can occur from neglect, accidental damage,
abuse and lack of inspection and maintenance.
The following instructions should be followed carefully to ensure safe and proper operation of this
equipment.
Operational Features
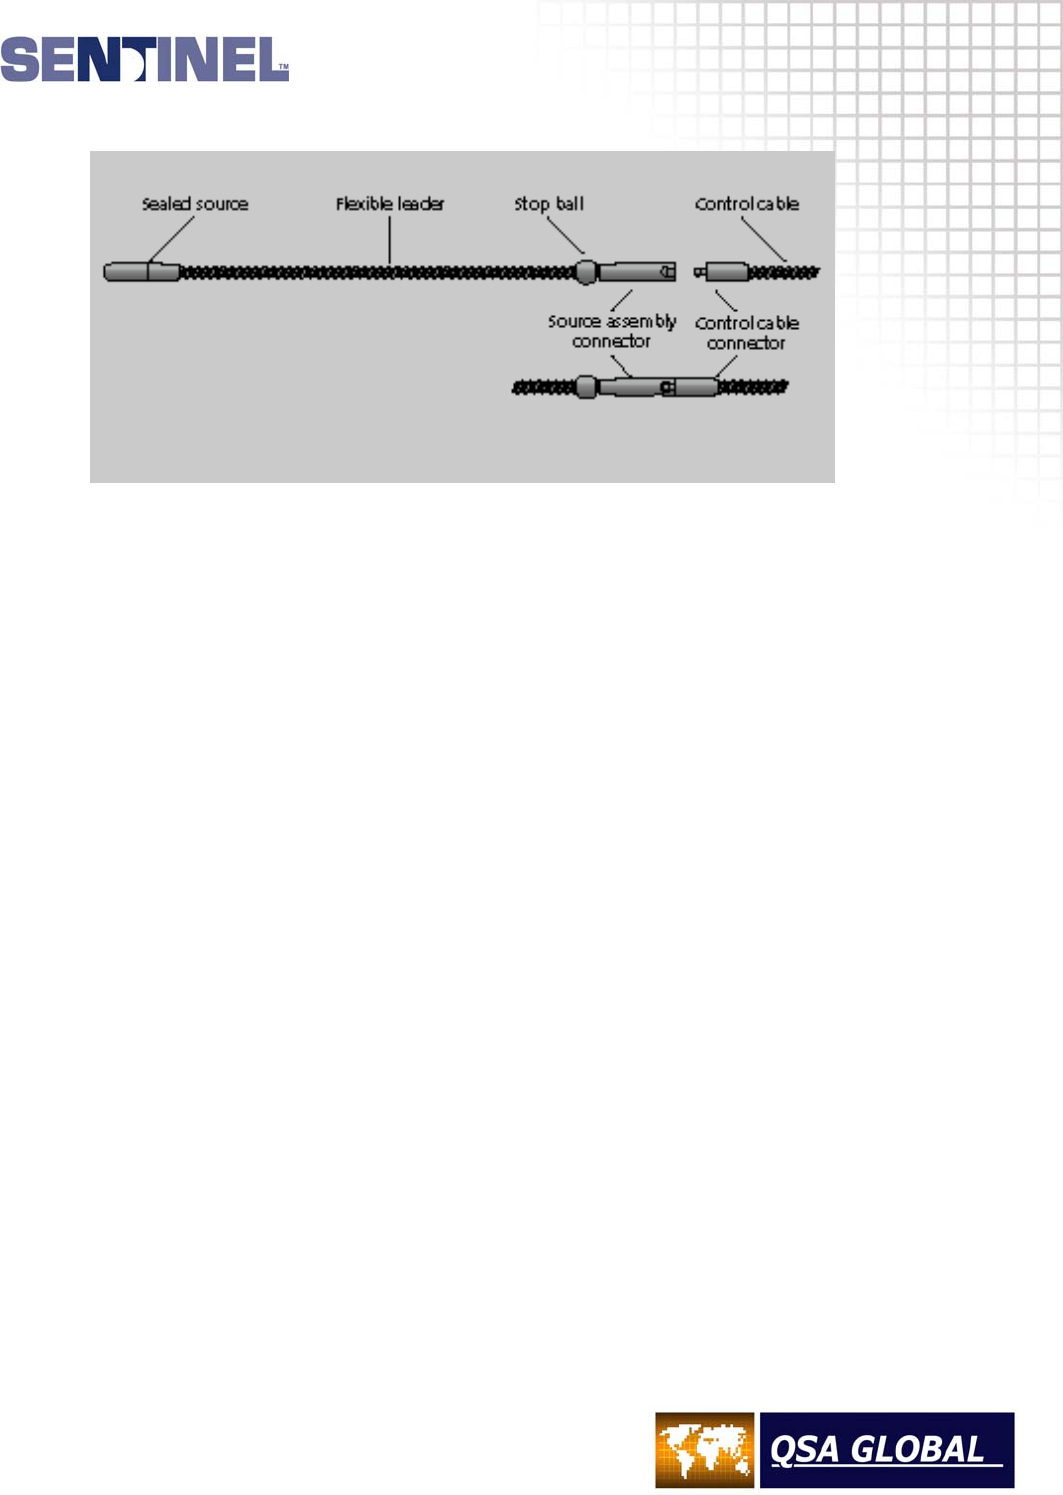
1 Source Assembly
A sealed source containing the radioactive material is swaged (crimped) to one end of a flexible steel
leader, commonly referred to as the source holder or pigtail. A stainless steel stop-ball and a stainless
steel connector are swaged to the opposite end of the source holder. The stop-ball provides the means to
secure the source assembly within the exposure device's locking mechanism. The source assembly
connector provides the means to attach the control cable connector to enable remote projection and
retraction of the source assembly. The source assembly connector and projector locking mechanism are
designed so that the sealed source cannot be projected from the exposure device unless it has been
properly coupled to the control cable connector and the remote control. (See figure 3.1)
DANGER - IMPORTANT WARNING
The source assembly while in an unshielded position and the sealed source containing
the radioactive material must NOT be handled under any circumstances. The unshielded
source at close proximity can cause serious injury, sickness or death to anyone exposed
to it even for a short duration.
All specific model number source assemblies used in the Model 880 are designed and tested for use in
accordance to ISO/ANSI and USNRC requirements.
DAILY INSPECTION INSTRUCTIONS
3.2
Figure 3.1 Source assembly and remote control cable connectors
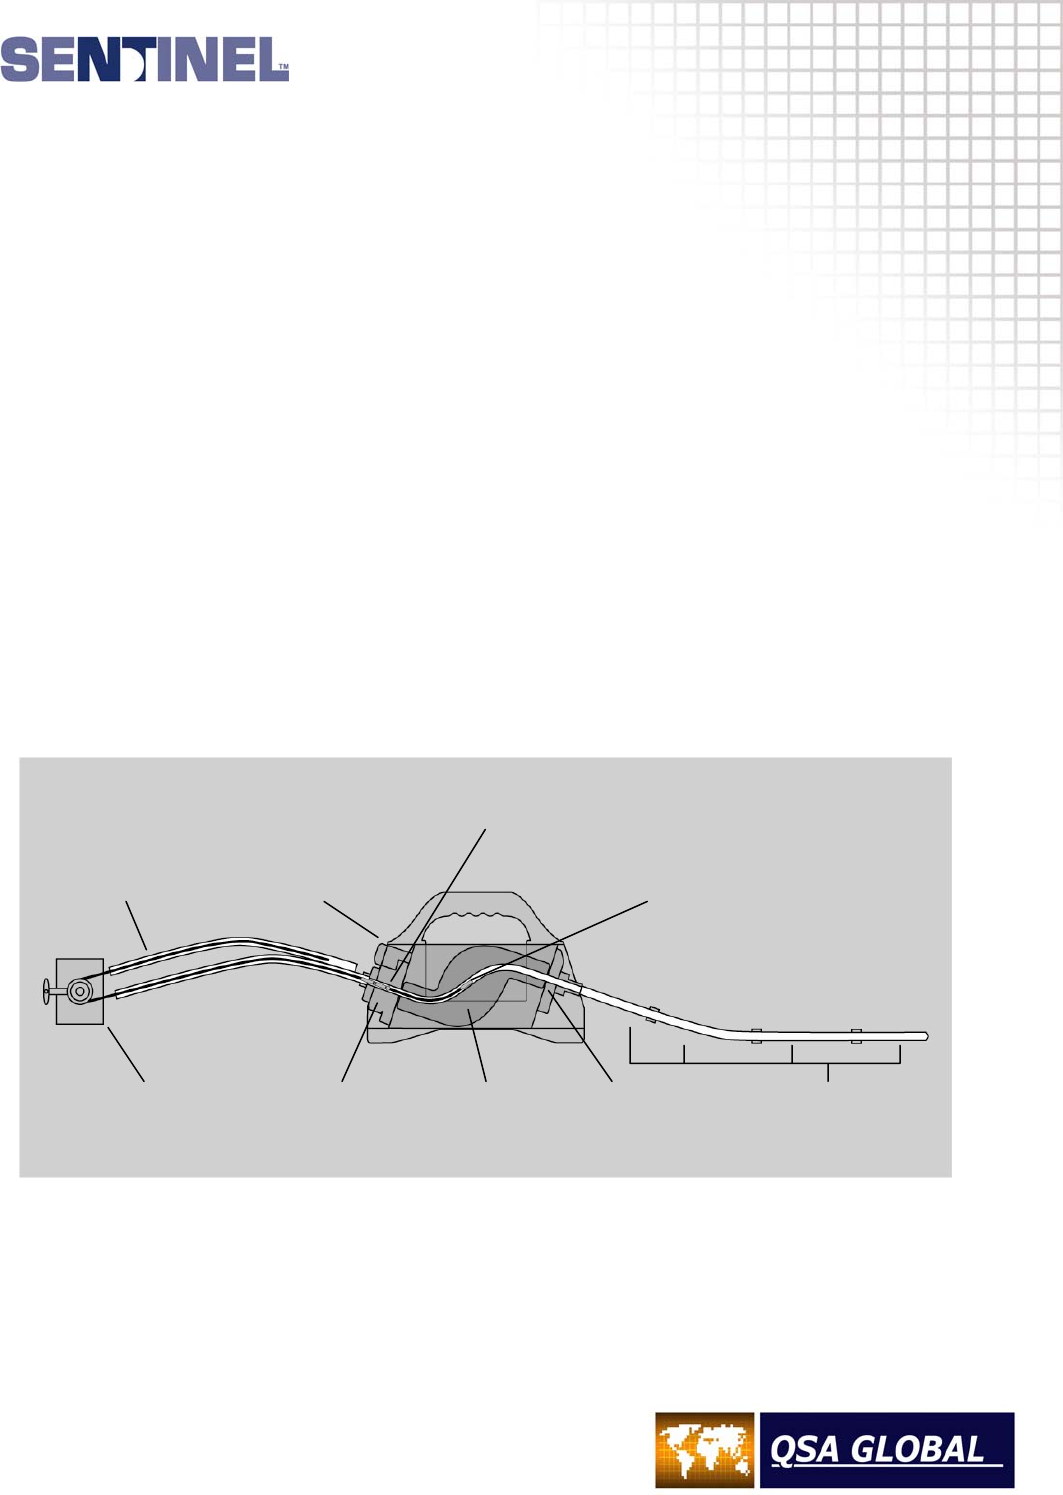
2 Exposure Device
The source assembly is shown in the stored position in a titanium or ‘S’ tube at the center of the depleted
Uranium shield of the exposure device. (See figure 3.2)
A remote control unit is shown with its control cable connector coupled to the source assembly.
High density depleted Uranium shielding is used in the exposure device to provide good radiological
protection with minimal weight.
A shielded outlet port cover mechanism permits a secure attachment of source guide tubes (projection
sheaths) without an elevation of radiation levels. The outlet port mechanism will not allow the source
assembly to be projected outside of the exposure device unless a source guide tube has been properly
attached to the outlet port. A three-step connection is accomplished by completion of the following steps:
1 Pull and rotate the spring-loaded outlet port cover a quarter turn (from a 12 o’clock to a 3 o’clock
position) in a clockwise direction. This action moves the protective cover away from the outlet port to
permit attachment of a source guide tube.
2 A bayonet-style fitting of the source guide tube is inserted into the outlet port and rotated a quarter
turn (from a 12 o’clock position to a 9 o’clock position) counter-clockwise. A complete insertion and
counter-clockwise rotation of the source guide tube fitting releases the lock and an internal shielding
rotor of the outlet port.
3 Rotate the spring-loaded cover an additional 60 degrees (from a 3 o’clock position to a 5 o’clock
position) in a clockwise direction until it stops. This last movement moves the outlet port shield out of
position and aligns a pass-through opening on the rotor with the ‘S’ tube and outlet port while
simultaneously securing the source guide tube fitting to the outlet port.
The design permits attachment of the source guide tubes without an elevation of radiation intensity at the
outlet port, minimizing the radiation exposure to the radiographer’s hands. The sealed source assembly
cannot be exposed out of the exposure device unless a positive connection of the source guide to the
device has been accomplished.
The exposure device’s locking mechanism provides three main safety features for the radiographer
during radiographic operations.
DAILY INSPECTION INSTRUCTIONS
3.3
First, the locking mechanism requires a deliberate action to enable exposure of the source assembly.
This is accomplished by coupling the control cable connector to the source assembly connector, coupling
the remote control connector to the exposure device locking mechanism and then pushing a lock slide
from the SECURED position into the EXPOSE position. The lock slide must be manually pushed into the
EXPOSE position prior to each radiographic exposure to enable operation of the remote control.
Second, during termination of a radiographic exposure, the remote controls are used to retract the source
back into the exposure device. When the source assembly is returned to the fully shielded position within
the exposure device, the locking mechanism automatically secures the source assembly, preventing the
source from being inadvertently exposed from the fully shielded position. The automatic securing
mechanism allows movement of the exposure device with the remote controls attached at the job site
while preventing inadvertent exposure of the source assembly.
For the third feature, the controls cannot be removed from the exposure device locking mechanism
unless the source assembly has been returned to the fully shielded position within the exposure device.
The complete radiography system consists of the radiographic exposure device containing the source
assembly, the remote controls, source guide tubes and collimators (beam limiters) whenever possible.
The use of multiple source guide tubes must be a combined length shorter than the length of the remote
controls, e.g. if the remote controls are 25 ft (7.6 m) long, only 3 source guide tubes can be utilized for a
combined length of 21 ft (6.4 m). This consideration ensures the source assembly will be fully projected to
the source stop (exposure head).
The source assembly must never be projected until the equipment is properly connected and all
personnel have exited the restricted area.
Figure 3.2 Sealed source in fully shielded position of radiographic exposure device.
Control Cable Ex
p
osure Device
Source Assembl
y
Sealed Source
Remote
Control Crank Locking
Mechanism Shield Outlet Port Source Guide
Tubes
DAILY INSPECTION INSTRUCTIONS
3.4
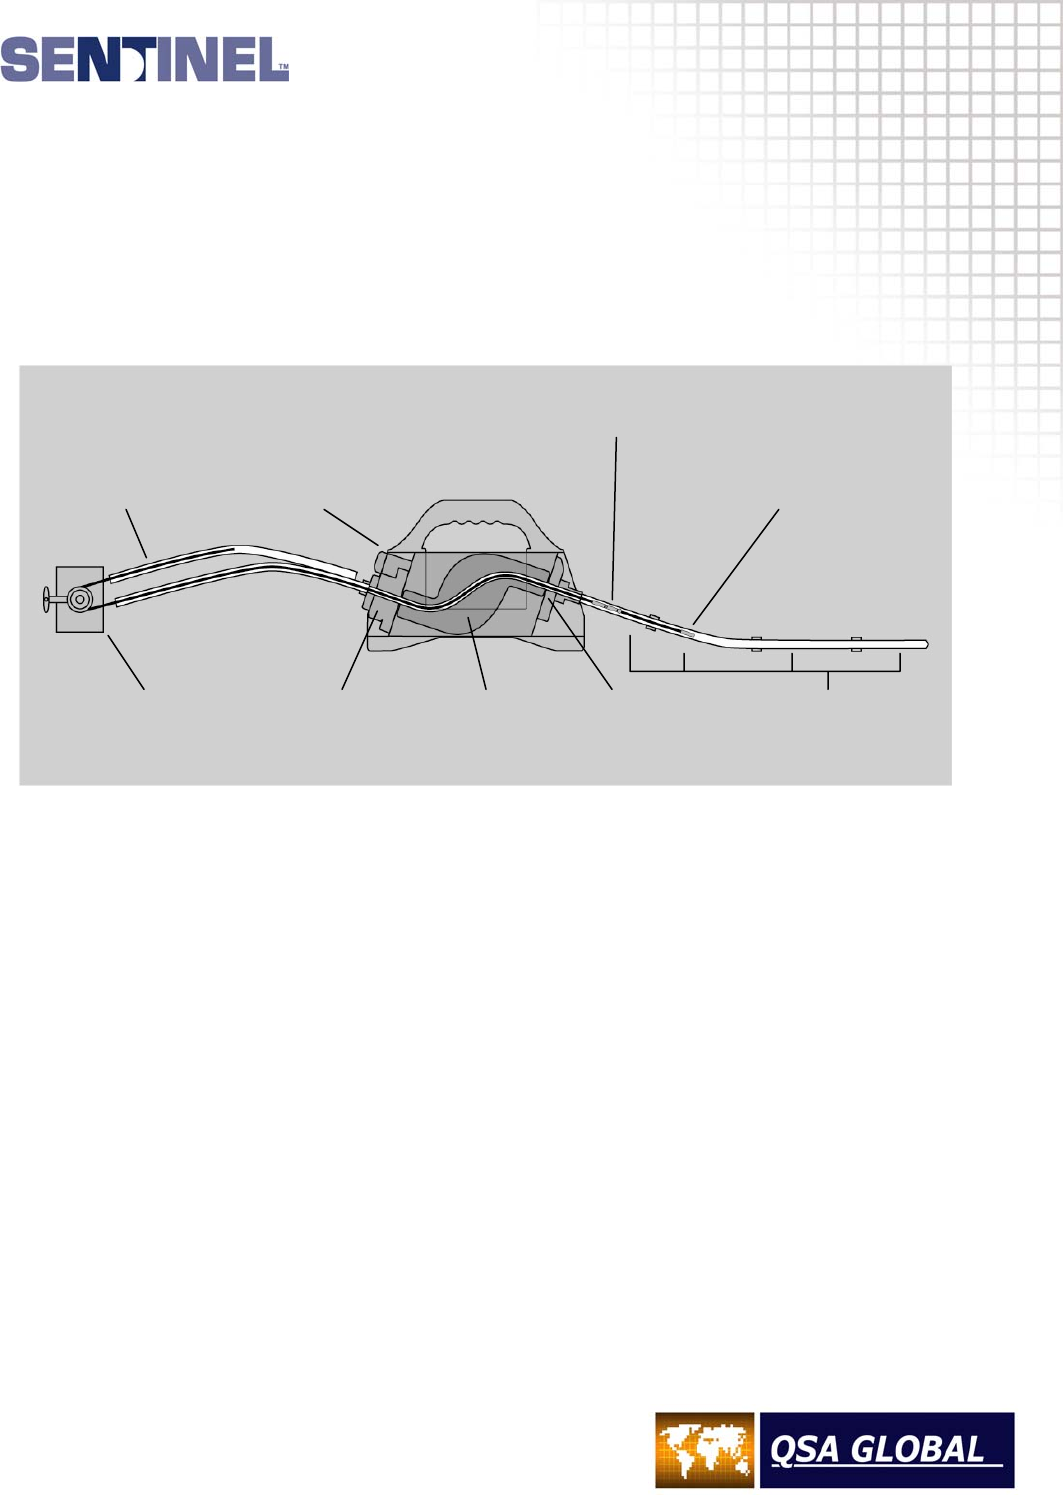
Transit Mode
Rotating the handle of the remote control crank in the EXPOSE direction (counter-clockwise) moves the
source assembly out of the shielded position in the exposure device and into the source guide tubes
(projection sheaths). (See figure 3.3)
The source assembly is under positive mechanical control using the remote control crank. The remote
controls may be fitted with an odometer to provide an indication of the sealed source’s position. The
odometer reading should never be a substitute for the requirement and proper use of a radiation survey
meter.
Figure 3.3 Sealed source in transit mode
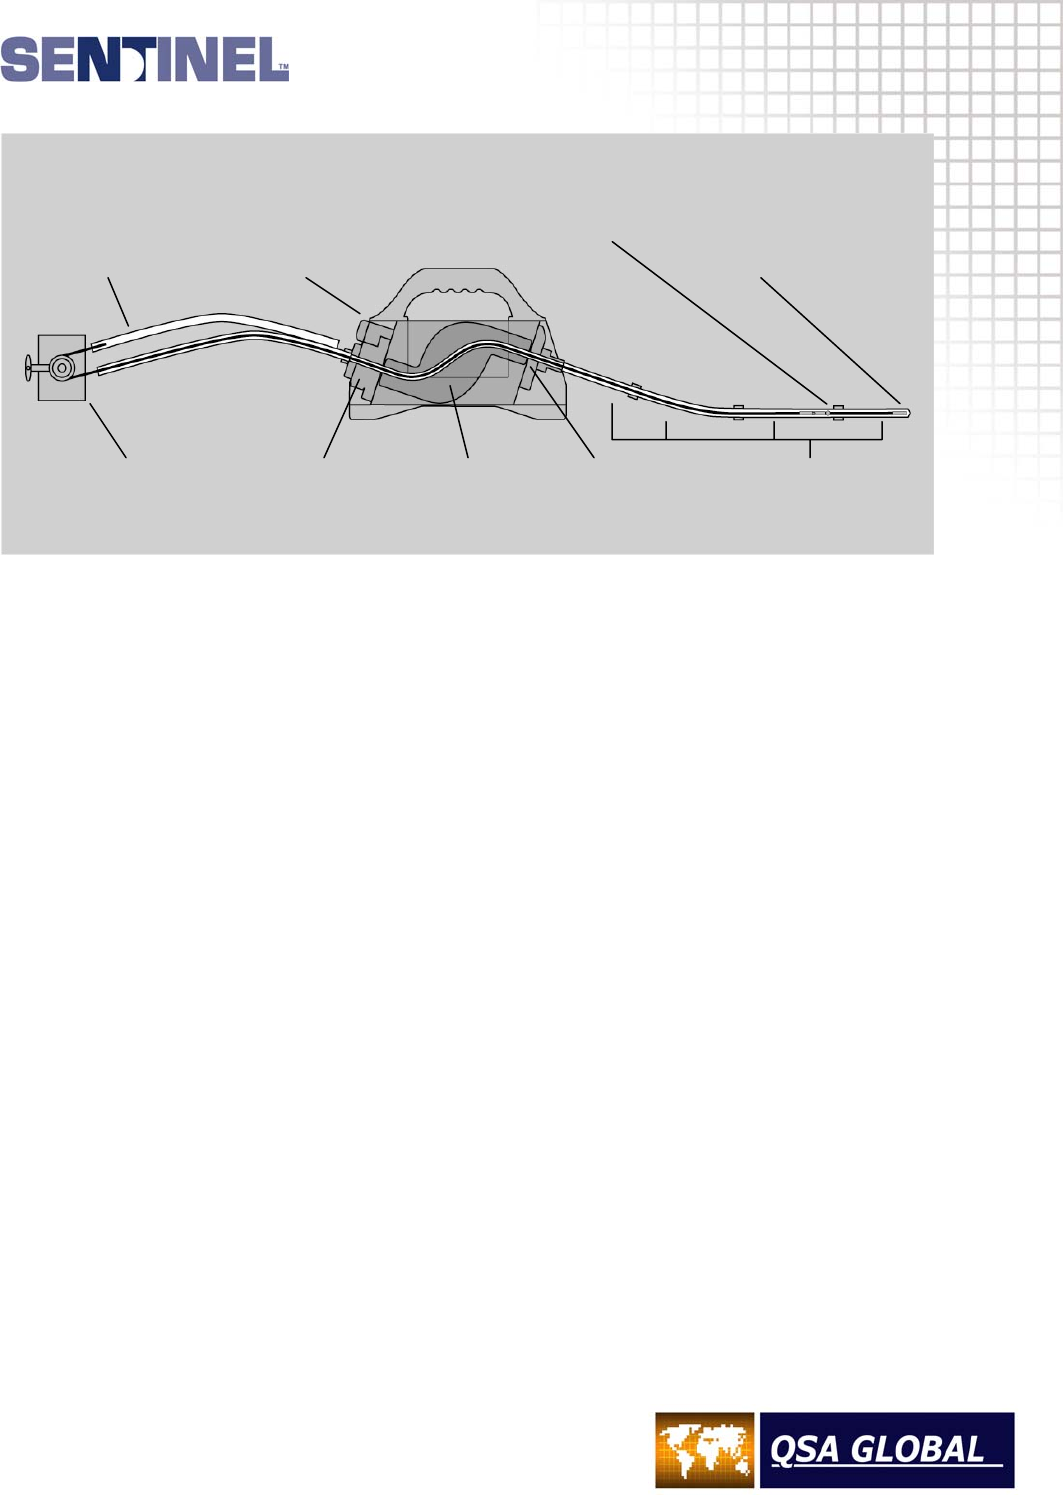
Exposure Mode
When the source assembly reaches the exposure head at the radiographic working position, the
odometer will indicate (in feet and tenths of a foot) the approximate distance the sealed source has
traveled. (See figure 3.4)
To return the source assembly to the exposure device the crank handle is rotated in the
RETRACT direction (clockwise). When the source assembly is returned to the fully shielded position
within the exposure device, the locking mechanism automatically secures the source assembly. The
automatic securing mechanism will not permit exposure of the source assembly unless the radiographer
pushes the lock slide into the expose position.
The remote controls cannot be disconnected from the source assembly unless the source assembly is
fully retracted into the shielded position in the exposure device.
The system is designed for safe and reliable operation provided the system is properly used and
maintained.
Control Cable Ex
p
osure Device
Source Assembl
y
Sealed Source
Remote
Control Crank Locking
Mechanism Shield Outlet Port Source Guide
Tubes
DAILY INSPECTION INSTRUCTIONS
3.5
Figure 3.4 Sealed source in the exposure mode
Daily Inspection of the System
A daily inspection of the gamma radiography system for obvious defects is essential to ensure the
equipment is in a safe and proper operating condition. It is important that all radiographers perform or
supervise this inspection prior to the first radiographic exposure of the shift regardless of any previous
inspections that may have been performed that day. As an example, damage to a component of the
system may occur during transport of the equipment to the job-site. If damaged equipment were used
without detection, the result may be the inability to retract the source assembly into the exposure device
and secure it.
The results of a daily inspection should be recorded and include the date, the name of the inspector and
what specific equipment was inspected. If any defective or damaged components are discovered during
the daily inspection, the component must be removed from service and identified with a status indicator
(tag, label, or tape) to prevent inadvertent use by other radiography personnel. Defective or damaged
components must be repaired or replaced before reuse in radiographic operations. The three main
components of the radiography system consisting of the radiographic exposure device and transport
case, remote controls and source guide tubes must be inspected in addition to accessories such as lab
stands, collimators, J-tubes, magnetic lab-stands and pipe-clamping apparatus.
Radiographers must take a proactive role in preventing incidents, by performing or directly supervising a
simple, but thorough daily inspection of the radiography system. The implications that affect safety and
the importance of the daily inspection must be emphasized and understood by the entire radiography
staff.
Daily Inspection of the Exposure Device
1 Survey the surface of the exposure device or device in the transport case to ensure the radiation level
is less than 2 mSv/hr (200 mR/hr), even when containing a source assembly with the maximum
allowable activity. This survey provides a function check of the survey instrument that it is responding
to radiation, in addition to providing the radiographer with a reference measurement that can be
compared to confirmatory surveys after terminating each radiographic exposure.
Control Cable Ex
p
osure Device
Source Assembl
y
Sealed Source
Remote
Control Crank Locking
Mechanism Shield Outlet Port Source Guide
Tubes

DAILY INSPECTION INSTRUCTIONS
3.6
2 Inspect the labels on the exposure device or the transport case to ensure they are legible and
securely attached to the unit. The warning label containing the trefoil should be legible from a
distance of at least 3 ft (approximately 1 m). This label warns the individuals in the immediate vicinity
of the presence of radioactive materials and permits them to take measures to minimize their
exposure to radiation. The printed verbiage and the radiation symbol must be legible. The trefoil
symbol becomes the warning for those individuals who cannot read or understand the written
warning, ‘Caution or Danger, Radioactive Material’. Inspect the legibility and attachment of the source
identification tag that describes the radioactive source contained within the exposure device.
3 Inspect the exposure device’s locking mechanism to ensure the protective covers are installed over
the source assembly connector. Inspect the plunger lock to ensure the lock will engage when the
plunger is depressed and the key is removed. Grasp the entire locking mechanism with one hand and
try to move the lock to determine that the screws have not loosened due to vibration. Unlock the
plunger lock and remove the protective cover. Push the protective cover into the plunger lock
housing for storage during use of the device.
4 Inspect the outlet port for damage and for smooth operation by operating the outlet port cover. Verify
that the outlet port cover rotates smoothly and that the mechanism is not clogged with dirt, grease or
sludge.
Daily Inspection of the Source Guide Tube(s)
1 Remove the protective covers from the swaged fittings on the source guide tubes. Inspect both
swage fittings to ensure the threads are not stripped or clogged with dirt, grease or sludge. Inspect
the ears on the bayonet fitting to ensure they are not bent, broken or excessively worn.
2 Inspect each length of source guide tube(s) that will be used for cuts, inward dents and heat damage.
The inspection is primarily a visual one, but it should include the radiographer using his hands to feel
for the inward dents. This is necessary due to the fact the outer material of the source guide tube is a
flexible waterproof material that can mask dents. During a visual-only inspection, a dent in the source
guide tube may retain a circular appearance on the exterior, while having an inward dent in the
metallic conduit directly below the waterproof material. This type of masked dent can be felt by the
radiographer's hands. Dents in the source guide tubes are the major cause of source hang-ups.
3 Inspect the source stop (exposure head) to ensure there are no dents, perforations or excessive
wear.
4 Inspect the attachment of the collimator to the source stop (exposure head) if used during
radiography. If collimator utilizes a set screw to affix the collimator to the source stop, hand tighten
only. The use of tools may damage the source stop.
Daily Inspection of the Remote Controls
The remote control consists of a control crank, a control cable with a connector swaged at one end, two
control cable conduits and a connector plug assembly.
The control crank contains a diagonally cut, geared drive wheel that matches the outer helical winding of
the control cable. This worm-gear arrangement of the control crank drive wheel and the control cable
provides the radiographer with a reliable means to project and retract the source assembly from and to
the exposure device. The control crank is equipped with a lever brake that retains the source assembly
while in the exposure head. Beneath the control crank is a label that indicates the direction for EXPOSE
and RETRACT during use in addition to ON and OFF positions for the brake. Control cranks are available
with an odometer to provide the radiographer with the approximate travel distance of the source
assembly. The travel distance is indicated in increments of feet and tenths of a foot. Radiographers can
count the number of rotations of the crank handle when using control cranks that are not equipped with
DAILY INSPECTION INSTRUCTIONS
3.7
odometers to obtain an approximation of the travel distance. One full revolution of the crank handle is
equal to approximately 10 in (25.4 cm) of travel.
Two remote control conduits (sheaths, housings) are attached to the control crank. One conduit contains
the working side of the control cable that drives the source assembly out of the exposure device and
through the source guide tubes. The second conduit is the reserve conduit containing the length of the
control cable necessary for projection of the source assembly. The remote control conduits provide a
degree of protection of the control cable against the elements common to the working environments that
industrial radiography is performed.
Attached to the opposite end of the remote control conduits is a connecting plug assembly that is used for
attachment of the remote controls to the locking mechanism of the exposure device. The connecting plug
assembly and the control cable connector are designed with minimal tolerances. A connection of the
source assembly connector to the control cable connector must be completed before the remote control
connecting plug assembly can be attached to the locking mechanism of the exposure device. A protective
end-cover must be installed after use of the remote controls. The protective cover provides protection to
the connecting plug assembly and the control cable connector and prevents the ingress of water, mud,
sand or other foreign matter.
IMPORTANT WARNING
The control cable connector is a made from hardened steel and should never be left unprotected
or forced into connection with the source assembly as this could damage the connector over time
leading to possible breakage during use. Always use the protective end-cover when remote
controls are not connected to the exposure device and always manually move the sleeve of the
female connector of the source assembly to the OPEN position when connecting and
disconnecting the control cable from the source assembly.
The control cable (drive cable) is a flexible, steel cable with an outer helical winding. The length of control
cable is approximately twice the length of the remote controls. Attached to one end of the control cable is
a male connector. The control cable when used in conjunction with the remote control as a system
provides a positive mechanical control of the source assembly at a distance. The control cable is a critical
link for safe operation and is the radiographer's only means of control over the source assembly.
Therefore, the control cable's storage, use, daily inspection and quarterly maintenance are critical
elements to the prevention of a control cable failure. In almost all cases, repairs for a control cable are
not possible, with the exception of replacing the control cable’s Model 550 male connector every five
years. Damaged, defective or control cables with unknown origin (non-traceable) must not be used and
must be removed from service.
1 Remote Control Inspection:
a. Uncoil the remote controls at the site. Inspect the control crank to assure all screws are present
and tightened and that the crank handle is properly secured. If the control crank is equipped with
an odometer, zero the odometer while the control cable is fully retracted. Verify the odometer is
fully functional.
b. Ensure the instructions on the control crank's label are legible. These instructions are important to
safety, especially when assistants are being trained or during an emergency.
Without the instructions it is conceivable a radiographer could become confused as to which
direction the crank handle must be turned to retract or expose the source.
c. Ensure the brake is operational. Resistance should be felt while rotating the crank handle with the
brake in the ON position. Inspect the control conduit fittings to verify they are secured to the
control crank.

DAILY INSPECTION INSTRUCTIONS
3.8
2 Control Conduit Inspection:
a. Inspect the control conduit where it is swaged onto the fittings that mount on the control crank.
There should be no evidence of cracks or breaks in the PVC sheath. Also, look for bulges in that
area that result from repeated flexing.
b. Visually inspect the entire length of both control conduits looking for dents, cuts and thermally
damaged areas. During this inspection, the radiographer should use his hands to feel for inward
dents. Cuts and melted areas found on the control conduits should be sealed with PVC tape to
prevent against the ingress of water.
c. Inspect the control conduits where they are swaged to the swage fittings that are mounted to the
connecting plug assembly. There should be no evidence of cracks, breaks or bulges in the PVC
sheath.
d. Remove the protective cover from the connecting plug assembly. Inspect the connecting plug
assembly to verify the movable jaws are not excessively loose and the connecting collar pins are
not excessively loose or bent. Check the control sheath swage fittings to verify they are not loose
where they are joined to the connecting plug assembly.
3 Control Cable Inspection:
a. Inspect the control cable connector as it protrudes out of the connecting plug assembly. The
control cable connector should not be bent or at an angle exceeding 15 degrees relative to the
control cable centerline. If a control cable connector is repeatedly bent at an angle greater than
15 degrees, damage to the control cable may be introduced by straightening the bend. Inspect
the control cable (male) connector to verify that the stem and ball of the connector are not bent or
cracked. Using hand pressure, attempt to twist the control cable connector from the control
cable. If the control cable connector can be twisted using hand pressure or appears bent or
cracked, remove from service and label as defective.
b. Pull approximately 12 in (30.5 cm) of control cable out of the connecting plug assembly and
inspect for the following anomalies directly behind the connector:
• Cuts, breaks, nicks or fraying of the spiral windings of the control cable.
• Areas with kinks or permanent bends.
• Rust (a red oxide) on the inner core of the control cable.
• Uniformity of the spacing between the outer spiral windings. Also check for flattened areas
and wear.
• Bend the connector section of control cable back towards itself and release the cable to test
for flexibility or ‘spring’ of the control cable. A cable that has been subjected to the flexibility
test and remains in the bent position after the test provides an indication of internal corrosion
and must be removed from service.
• Verify that a light coating of mil-spec grease is present on the control cable. The light coating
of grease is necessary to prevent the penetration of water and chemicals that can oxidize and
permanently damage the control cable.
c. Check for freedom of movement of the control cable within the remote controls by moving the
control crank handle back and forth approximately one-quarter turn. During this test, take care to
avoid cranking the control cable onto the ground exposing it to dirt and sand. If any resistance is
felt during this check, re-inspect the control conduits for dents or depressions. If dents are not
present on the remote control conduits, the control cable may be rusted stiff somewhere within
the control conduits. Do not use remote controls that do not function properly or exhibit defects
described above.
DAILY INSPECTION INSTRUCTIONS
3.9
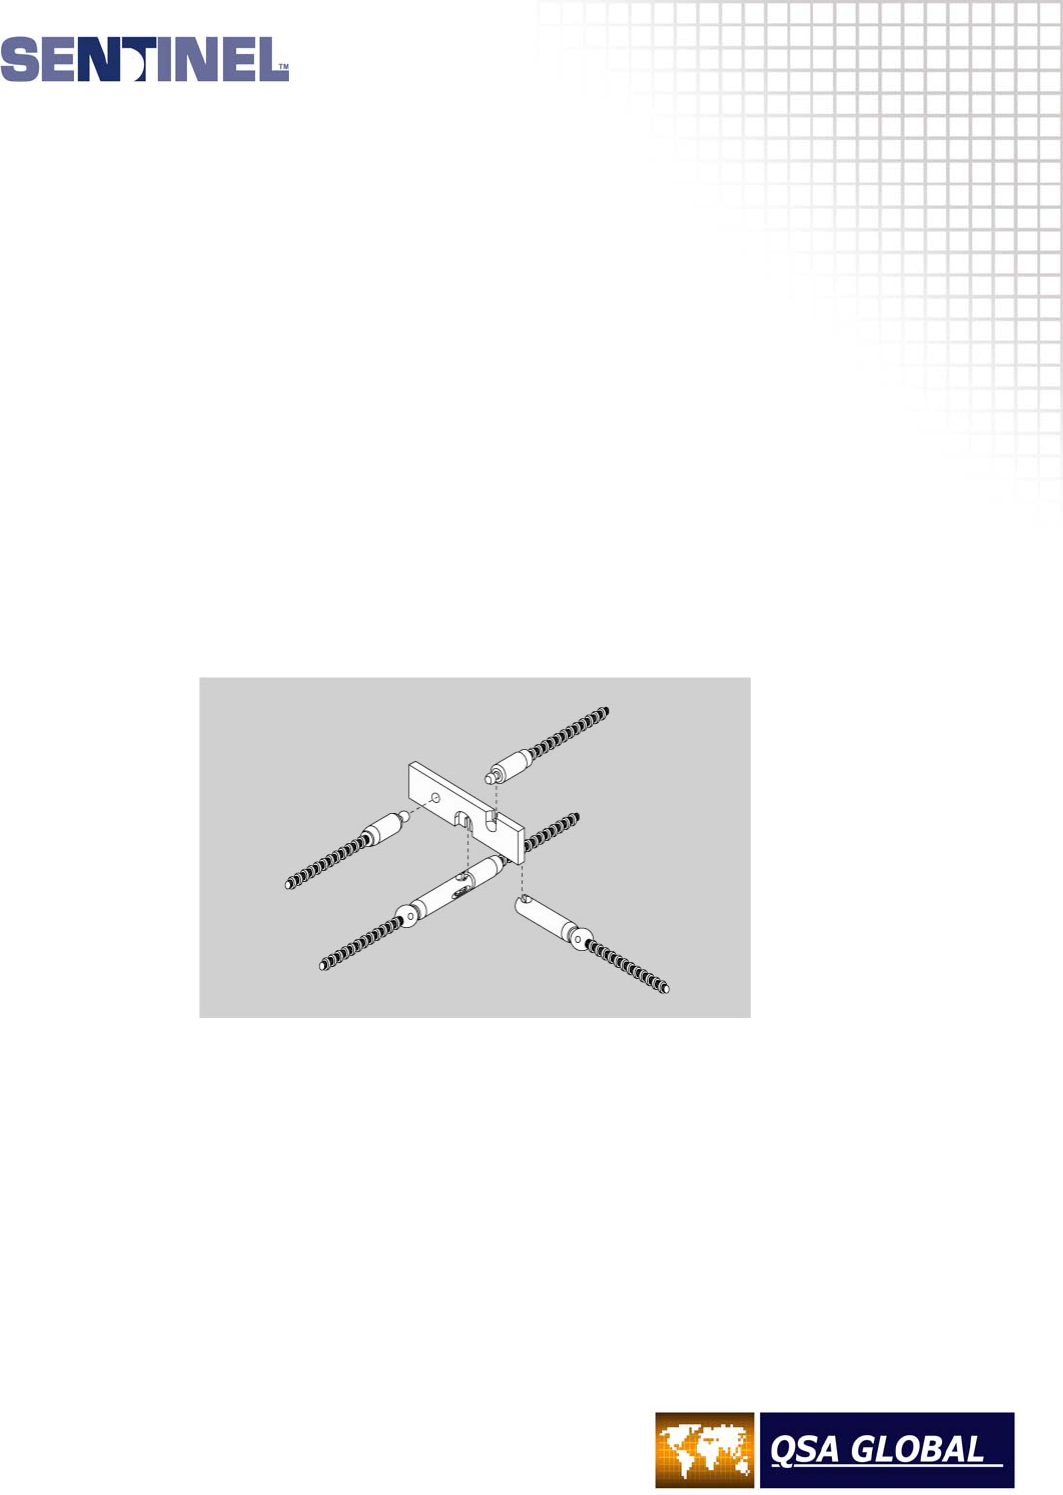
d. A final check of the control cable connector and source assembly connector is accomplished by
use of a Model 550 NO GO gauge to check for significant wear on the connectors that would
affect safety. Without using excessive force, check the following four positions (see figure 3.5):
1 Ball at the end of the control cable connector must NOT GO into the hole of the gauge.
2 The shank or stem of the control cable connector must NOT GO into the smaller of the
two notches located on the side of the gauge.
3 The width of the gauge must NOT GO into the female slot of the source assembly
connector.
4 After a positive connection between the control cable and source assembly connectors
has been accomplished, verify that the larger notch located on the side of the gauge will
NOT GO in the gap between the joined connectors.
Replace any components that fail any of the NO GO gauge tests, because a failure indicates
significant wear that could allow safety features of the design to be defeated.
IMPORTANT REMINDER
Do not compromise on safety. Always perform a daily inspection of the exposure device,
projection sheaths and remote controls prior to use.
Defective equipment that is discovered during the daily inspection must be removed from
service until repaired or replaced.
Figure 3.5 No-Go gauge tests
1. Ball Diameter 2. Ball Shank
4. Connector
Gap Width 3.Female Slot Width

MAINTENANCE INSTRUCTIONS
4.1
Quarterly (Routine) and Annual (Complete) Maintenance Requirements
Radiographic exposure devices and associated equipment must be maintained regularly by trained and
qualified personnel to ensure consistent and safe operation of the radiographic system. The routine
inspection and maintenance also ensures that the integrity of the Type B(U)-96 and Type A transport
packages are maintained in compliance with the package certification numbers; USA/9296/B(U)-96,
CDN/E199/-96 and approval requirements, respectively.
Manufacturers base the recommended inspection and maintenance requirements on the system's design,
application, materials, anticipated work cycles, environmental factors of use under the normal and
abnormal conditions of industrial radiography and while in the transport system. A program of systematic
maintenance will prolong the working life of the radiographic exposure device and associated equipment
in addition to ensuring safety during use. By most national regulations, routine maintenance of the
systems is required at intervals not to exceed 3 months in addition to the radiographer's daily inspections
for obvious defects. The complete annual servicing ensures the integrity of the system.
Maintenance program administrators must recognize the need for maintenance intervals that are less
than the required 3-month interval especially in cases where the systems are used in severe
environmental conditions. Maintenance program administrators must ensure the systems are completely
serviced immediately after certain jobs in severe conditions. Extreme or severe conditions may include,
but is not limited to conditions where the equipment was:
• Immersed in water or mud.
• Subjected to high-concentrations of particulate such as fly ash or sand.
• Subjected to hot radiography conditions.
• Subjected to salt-water conditions, caustic or acidic materials.
• Subjected to accidental drops or falling objects.
• Whenever subjected to extreme environmental conditions.
The routine maintenance performed every 3 months requires partial disassembly, cleaning, inspection,
re-lubrication and operational checks of the system. The complete maintenance (performed once a year)
involves a complete disassembly, cleaning, inspection, re-lubrication and operational tests of the entire
system.
Trained and qualified individuals within the licensee’s organization can perform equipment maintenance.
QSA Global, Inc. service engineers are available to provide maintenance on the systems at the licensee's
premises or at one of the service centers.

MAINTENANCE INSTRUCTIONS
4.2
Routine (Quarterly) Maintenance Requirements
1 Remote Controls
Disassemble, clean, inspect and maintain the remote control crank, control conduits and control cable
according to the complete service section. Record the results of the inspection and any repairs that
are performed. Any components found to be deficient during the inspection must be removed from
service until repaired or replaced. Deficient components must be labeled with a status indicator to
prevent inadvertent use.
2 Source Guide Tubes
Clean and inspect the source guide tubes in accordance to the “Quarterly and annual maintenance
for source guide tubes” section of this manual. Record the results of the inspection and any repairs
that are performed. All source guide tubes found to be deficient during this inspection must be
removed from service and sent to a service center for repairs. Deficient components must be tagged
with a status indicator to prevent inadvertent use.
3 Radiographic Exposure Device
Clean and inspect the exposure device/transport container for wear and obvious damage. Record any
defects that might affect safe operation of the exposure device or contribute to unsafe transport of the
device in the container. If deficiencies are found during this maintenance, the exposure device must
be removed from service until repairs are accomplished and the results of subsequent operational
tests and inspection are satisfactory. Inspect the radiography system for the following using a
‘satisfactory’ or ‘deficient’ criteria:
a. Survey the surface of the container to ensure the measurable dose/rate is less than
2 mSv/hr (200 mR/hr) and less than 20 µSv/hr (2 mR/hr) at 1 meter (to comply with ANSI/ISO
requirements). Remove the device from service if the dose/rate exceeds these limits. Contact
QSA Global, Inc. for guidance.
b. Ensure the metal identification tags for the radioisotope is legible and securely fastened to the
exposure device. Do not cover the tag with any other labels.
c. Ensure the label containing the device model number, serial number, Type B(U) certification
number (or Type A specification identification) and the trefoil with the warning ‘Caution or Danger,
Radioactive Material’ is legible from a distance of 3 ft (approximately 1 m) and securely fastened
to the container. Do not cover the required warnings with any other labels. Ensure the labels
applied for transportation are legible.
d. Check the welded stainless steel end plates of the exposure device for weld failure (cracks, etc.)
behind the back plate (locking mechanism) or the front plate (outlet port). Ensure the handle, the
bottom contact surfaces and the sides comprising the plastic jacket of the exposure device are
intact. Check the bottom contact surfaces of the jacket to ensure the contact area is not
excessively worn allowing contact of the stainless steel body with the work surface. If any
deficiencies are found during this inspection, repairs can be accomplished at a QSA Global
service center.
e. Check the outlet port for proper function by attaching and removing a source guide tube. The
operation should be smooth and resistance free. If there is any resistance or ‘crunchy’ feeling
noticed during attachment or removal of the source guide tube or during movement of the outlet
port cover, this indicates excessive amounts of sand or dirt within the mechanism. The outlet port
mechanism must be removed, cleaned and lubricated according to the complete service
instructions.
MAINTENANCE INSTRUCTIONS
4.3
f. Check the locking mechanism and plunger lock to verify attachment and operation.
Grasp the entire mechanism with one hand and attempt to shift the mechanism. Retaining
screws that have been loosened from excessive vibration or improper maintenance will allow the
movement of the locking mechanism during this check. Loose screws must be tightened
according to the annual maintenance requirements prior to use or transport.
g. Use the Model 550 NO GO gauge to check for wear on the remote control cable connector and
the source assembly connector. Replace components that fail any of these tests.
h. Operationally check the locking mechanism and then the function of the entire system during the
first radiographic exposure of the work shift while within a restricted area.
Operation of the radiographic system verifies both the locking mechanism and entire system
operates smoothly and freely. If operation is faulty, remove the exposure device from service and
perform the complete annual maintenance.
Misconnect Test
After performing the quarterly maintenance, the complete radiography system must be tested by the
maintenance program administrator or Radiation Safety Officer. A misconnect test on the exposure
device including the radioactive source assembly and wind-out controls effectively tests the integrity of
the entire locking system. This procedure detects long-term wear (or damage) of the interrelated failsafe
system including identification of any excess wear on the control cable connector, device locking
mechanism and sealed source connectors simultaneously.
Note: Component wear occurs to both the control assemblies and the device lock assemblies
over time, therefore, to ensure acceptable equipment operation, the misconnect test must be
performed on each device lock assembly and control assembly combination that could be used in
the field. For example, if controls are used interchangeably with more than one specific exposure
device, then each control must be checked with each device to ensure the failsafe system for all
control assembly/device combinations are compliant.
WARNING
The test should only be performed by personnel that are formally trained, authorized and thoroughly
familiar with annual maintenance procedures. This test is performed by engaging the remote control
connecting plug assembly into the exposure device's locking mechanism WITHOUT first engaging the
control cable connector within the source assembly connector.
The ability to then rotate the locking mechanism from the CONNECT position towards the LOCK position
indicates critical dimensions of the locking system are excessively worn to an unsafe condition. Extreme
care should be exercised to prevent rotating the locking mechanism's selector ring beyond the
LOCK position (see WARNING above). If the locking mechanism and remote controls fail a misconnect
test the equipment must be removed from radiographic operations. The equipment must not be used until
repairs are performed and misconnect test results are satisfactory.
During the performance of the misconnect test there is a risk of losing control of the radioactive
source assembly if:
the components are excessively worn or damaged
the person performing the test intentionally or inadvertently rotates the selector ring from the
CONNECT position to the OPERATE position
the person performing the test intentionally or inadvertently pushes the lock slide into the EXPOSURE
mode.
Contact a QSA Global, Inc. service center if you have questions regarding the misconnect test.

MAINTENANCE INSTRUCTIONS
4.4
Routine (Quarterly) Maintenance Records
Records of all equipment inspected and maintained during the routine maintenance must be recorded.
Records should indicate:
• The date of inspection and maintenance.
• Name and signature of the qualified individual performing the required inspections.
• Problems found and maintenance or repairs performed.
• Model number and serial number of the exposure device and transport container.
• Associated equipment that was inspected and maintained.
• Part numbers and associated lot numbers or serial numbers of replacement parts installed.
Annual Maintenance Requirements
Radiographic exposure devices used under normal environmental conditions should only require
complete maintenance once a year. Complete maintenance on the associated equipment including the
remote controls and source guide tubes should be performed every three months to detect deficiencies
and to prevent corrosion and wear related problems.
The complete maintenance of the exposure device requires the disassembly of the exposure device to
enable a detailed inspection of all major components. Therefore, the inspection and maintenance requires
transfer of the source assembly from the exposure device into a source changer performed inside of a
restricted area. The annual inspection and maintenance must be performed by individuals specifically
trained, qualified and authorized for this work.
Perform the following steps to transfer the sealed source from the exposure device into a source changer:
1 Perform a survey of the exposure device to ensure measurable dose rates are less than
2 mSv/hr (200 mR/hr) and less than 20 µSv/hr (2 mR/hr) at 1 meter (to comply with ANSI/ISO
requirements) when loaded to maximum capacity. Perform a radiation survey and an inspection of the
source changer to be used according to the source changer's operating instructions manual.
2 Perform a daily inspection of the remote controls, source guide tube and exposure device according
to the daily inspection section of this manual. If the source assembly connector fails the NO GO
gauge test, do not proceed with transfer of the source assembly. Contact a QSA Global, Inc. service
center for advice on disposition of the source assembly.
Use the Model 550 NO GO gauge to check the remote control cable connector before and after a
connection to the source assembly connector. For complete instructions to use the NO GO gauge
and points tested (review the daily inspection instructions).
Do not use remote controls that do not meet the inspection criteria described in the daily inspection.
3 Set up the equipment within a restricted area before transferring the source assembly into the source
changer according to the instructions supplied with the source changer. The transfer must be
performed by properly trained and licensed personnel. Use a survey meter to perform confirmatory
surveys of the exposure device, source guide tube and source changer to confirm that the sealed
source is properly secured. Engage the lock on the source changer to lock the sealed source within
the source changer.
Remove the source identification tag from the exposure device and fasten it to the source changer.
Attach a Model 550 connector gauge (jumper) to the end of the remote control cable connector found
inside of the protective cover of the locking mechanism. The jumper will allow removal of the remote
controls from the locking mechanism of the device after the remote control cable connector is
returned to the exposure device lock.

MAINTENANCE INSTRUCTIONS
4.5
Leak Testing
Leak Test of the Radioactive Sealed Source
Periodic leak tests of the radioactive sealed source are required by most national and international
regulations. The leak test provides a confirmation of the integrity of the hermetically welded sealed
source by determining the amount of removable contamination. In most regulatory jurisdictions, a leak
test of a sealed source must be performed every 6 months or prior to its first use after removal from
storage. Acceptable results of a radio-assay must indicate removable contamination is less than <185 Bq
(0.005 µCi). To perform a wipe of the radioactive sealed source, perform the following steps:
1 Survey the entire exterior surface of the exposure device to ensure the dose/rates are less than 2
mSv/hr (200 mR/hr).
2 Prepare a Model 518 wipe test swab according to the instruction sheet. Fill in all required information
for the source on the leak test form. Omission of the isotope, source model and serial number, etc.
will delay processing of the wipe test.
3 Install service bayonet fitting (part no. 88049) into the outlet port and rotate the cover to allow the
wipe test want to enter the ‘S’ tube.
4 Fully insert the wipe test swab into the ‘S’ tube and move back and forth to obtain the sample.
5 Carefully withdraw the wipe test swab from the outlet port while observing the survey instrument.
Withdraw the plastic bag over the wipe test wand without touching. Always assume the sample is
contaminated.
6 Remove the service bayonet fitting from the outlet port and rotate the outlet port cover into the closed
position.
7 In a low background (no radiation) area, switch the survey meter to the lowest scale and obtain a
background measurement. Leaving the survey meter stationary, move the plastic wrapped swab
towards the survey meter's detector to determine if a gross quantity of contamination is on the wipe
test. If the survey meter measures greater than 1 µSv/hr (0.1 mR/hr), contact QSA Global, Inc. for
instructions. If there is no measurable increase above background, the sample may be sent to the
SENTINEL™ laboratory for radio-assay. The SENTINEL™ laboratory will send a leak test certificate
after performing the radio-assay. Retain this certificate in your records.
In the event you are informed by the radio-assay laboratory that your leak test results indicate
greater than >185 Bq (0.005 µCi), you must immediately remove from service the radioactive sealed
source, the exposure device and all remote controls, source guide tubes, collimators, lab stands, etc.
that were used in conjunction with that sealed source. You must cause the equipment to be repaired
or decontaminated and notify the regulatory agency (USA) within 5 days (check local regulations for
reporting requirements). Contact the sealed source manufacturer for assistance.
Leak Test for Depleted Uranium (DU)
Some regulatory jurisdictions require periodic leak tests every twelve months of all projection-type
exposure devices that utilize DU for shielding. The purpose of the leak test is to detect the long-term wear
through of the device's source tube that may consequently expose the DU shielding. A wipe-test wand
that is both flexible and long enough to reach a bend radius or a wear point is required to perform a leak
test. The wand enables direct contact with the DU where the device’s source tube has worn through. A
direct wipe of the DU is required due to the low specific activity of depleted uranium. The wipe test for DU
is obtained in the same fashion as a leak test of a sealed source utilizing the same radiation safety
procedures.

MAINTENANCE INSTRUCTIONS
4.6
The analysis performed on the wipe test must be capable of detecting the presence of 0.005 µCi (185 Bq)
of radioactive material on the test sample. If the test sample reveals 185 Bq (0.005 µCi ) or more of
removable DU contamination, the exposure device must be removed from service until an evaluation of
the wear on the ‘S’ tube has been made. Should the evaluation reveal that the source tube is worn
through, the exposure device may not be used again.
DU shielded devices do not have to be tested for DU contamination while in storage and not in use.
Before using or transferring a device that has been in storage for more than 12 months, the exposure
device must be leak tested for DU contamination prior to use or transfer. Please contact a QSA Global,
Inc. service center if you require leak test kits, radio-assay services or assistance in the disposal of worn
through exposure devices.
Annual Maintenance for the Model 880 Series Exposure Devices
Tools required for complete maintenance
• 5/32 in Allen wrench for the 10-32 socket head lock and selector-ring screws.
• 3/32 in Allen wrench for the lock’s socket head screw.
• Number 30 Drill bit and pop-rivet gun for removal and installation of 1/8 in s/s rivets.
• Tamperproof tool bit for locking mechanism plate screws.
• Calibrated torque wrench (in/lb) for locking mechanism’s socket head screws.
• Small slot screwdriver for source identification tag 6-32 screws.
• U-tool (part # SK1761) for functional checks of lock mechanism.
• Model A424-9XL mock source assembly and short length control cable for lock mechanism
operational tests after servicing.
Materials required for Model 880 Series complete maintenance:
• Mil-spec grease MIL-G-23827B (or C), MIL-PRF-23827C, (or equivalent radiation resistant grease
authorized by QSA Global, Inc.).
• Temporary Lock-tite™ or Vibra-tite™ thread sealant .
• Recommended solvents for cleaning and degreasing operations: clean mineral spirits (Follow
manufacturer’s safety precautions for use, handling, storage and disposal).
• Clean lint-free rags.
• 12-gauge gun patches or any lint-free cloth for cleaning the ‘S’ tube.
• Large pan for use in cleaning and degreasing the remote drive cable and mechanical parts.
• Stainless steel, brass or synthetic bristle brush to be used during degreasing and cleaning of parts.
• Light viscosity oil, such as 3-in-1™ oil to lubricate plunger lock.
• Model 880 label if required and (4) each 1/8 in stainless steel rivets.
• Lock mount rubber sleeves (4) each.
• PermatexTM anti-seize thread lubricant.
• Replacement springs for the locking mechanism –
1 x compression spring part number SPR006
1 x compression spring part number SPR005
2 x compression spring part number SPR004
• Replacement springs for the outlet port – 2 x compression spring part number SPR033.
• Bayonet-type source guide tube for operational tests of the outlet port.

MAINTENANCE INSTRUCTIONS
4.7
Model 880 Series Annual Maintenance Requirements
Model 880 Series exposure devices must receive inspection and maintenance at least once a year.
The locking mechanism and outlet port mechanism must be removed from the exposure device and
disassembled for proper cleaning, inspection and lubrication of components that are critical to safety.
These procedures can only be performed on an empty exposure device, which requires transfer of the
radioactive source assembly into an approved storage container.
The inspection and maintenance procedures must be performed by personnel specifically trained and
qualified for this work. QSA Global, Inc. service engineers will service these systems at one of their
service centers or in the field upon request.
Trained and qualified personnel who wish to perform this work should use the following procedure:
1 Perform a daily inspection of the system and transfer the radioactive source assembly into an
approved storage container. Disengage remote controls and source guide tubes. The exposure
device must be empty for the following steps.
2 Remove the four 5/16-18 x 1½ in socket button-head screws that retain the locking mechanism plate
from the empty Model 880 device using the tamperproof tool bit mounted in a ratchet.
3 Remove the 10-32 socket head screws that retain the selector-ring and plunger lock housings from
the mounting plate using a 5/32 in Allen wrench.
4 Disassemble the locking mechanism assembly, taking care not to lose the spring loaded parts. Place
the disassembled locking mechanism components into a pan filled with fresh, clean solvent. Clean all
parts using a brush to dislodge any dirt or grease. Remove cleaned parts from the solvent bath, dry
and place on a clean surface. Inspect all parts for wear. Replace worn parts as necessary.
Discard all used locking mechanism springs and replace with new springs. All compression springs
located within the selector ring mechanism must be replaced at 12-month intervals to ensure smooth
and consistent operation of the mechanism.
When ordering spare parts, quote the model and serial number of the exposure device as well as the
part number to ensure correct replacement.
Remove the lock retainer from the mounting plate by unscrewing the two 10-32 x ½ in socket head
screws using a 5/32 in Allen wrench. Remove the plunger lock from the lock retainer by removing the
cap screw using a 3/32 in Allen wrench. Clean the lock plunger, lock retainer and springs in a solvent
bath. Ensure the lock plunger is thoroughly rinsed to remove all dust from the key tumblers. Remove
the cleaned parts from the solvent bath and dry thoroughly, using compressed air to dry the lock
tumbler. Inspect all parts for wear. Replace worn parts as necessary. Lubricate the plunger lock
barrel and tumbler using two drops of a light viscosity oil. Apply Vibratite™ thread sealant to the lock
set screw and install. Check the plunger lock for proper function by using the key to engage and
unlock. Apply Vibratite™ to the lock retainer's 10-32 x ½ in screws, then mount the lock retainer to
the locking mechanism plate. Hand-tighten the screws using a 5/32 in Allen wrench.
Apply a light coating of lubrication to the inside surfaces of the selector body and selector ring using
MIL-G-23827B (or C), MIL-PRF-23827C, (or equivalent radiation resistant grease authorized by QSA
Global, Inc.). Do not lubricate the lock slide and sleeve. Note that some types of greases may
undergo chemical changes and form tars when exposed to radiation.

MAINTENANCE INSTRUCTIONS
4.8
5 Begin assembly of the locking mechanism by lightly coating all components with MIL-G-23827B (or
C), MIL-PRF-23827C, (or equivalent radiation resistant grease authorized by QSA Global, Inc.). Treat
all screw thread ends with Vibratite™ or Locktite™ thread sealant.
Mount the locking mechanism plate horizontally in a vise or fixture with the plunger lock and retainer
at a 12 o’clock position. (Note: Carefully mount the mounting plate in a vise or fixture so hands are
free for the assembly procedure and no damage to the mounting plate will occur.)
The narrow end of the lock slide slot must be located at the 3 o'clock position. Locate the lock slide
and return spring into the mating slot of the selector body.
Place the selector ring with the word CONNECT at the 12 o'clock position, over the selector body.
Push the lock slide inward during placement of the selector ring for clearance. Doing so will allow the
selector ring to rest flush on the selector body. Insert the anti-rotation lug springs at the top and
bottom of the selector body. Place the anti-rotation lugs over the springs.
Place the tungsten sleeve with the large diameter facing downward, on the center of the lock slide.
Place the compression spring over the sleeve.
Install the selector ring retainer into the selector ring. Verify that the three non-threaded holes line up
under the word CONNECT located on the selector ring. Depress the selector ring retainer into the
selector ring until it is flush with the top of the selector ring. Hold the selector ring retainer firmly
against the mounting plate until the 10-32 x 1¼ in screws are installed.
While firmly holding the locking mechanism against the mounting plate, turn the plate over to expose
the back side of the mounting plate. Install the four 10-32 x 1¼ in socket head screws to secure the
mechanism to the mounting plate. Torque the socket head screws to 30 in/lb (3.39 Nm) ± 5 in/lb (0.57
Nm) using a calibrated torque wrench.
6 Perform functional safety testing of the Posilok locking mechanism by the following:
Mount the locking mechanism plate vertically in a vise or mounting fixture with the plunger lock at the
12 o'clock position.
Insert the ‘U- tool’ into the top and bottom holes of the selector assembly and rotate the selector ring
toward the OPERATE position. Push the lock slide until the sleeve snaps into place.
While in the OPERATE position, wind out a short length of control cable and pass it through the front
of the selector assembly. Attach a mock source assembly or the test jumper connector to the control
cable connector and withdraw it into the selector assembly.
Pull on the section of control cable and confirm that the lock slide automatically secures the
connector. The lock slide must snap shut in a fast and smooth motion when triggered. Verify the
securement action of selector mechanism by attempting to both push and pull the mock source
assembly out of the selector mechanism while in the EXPOSE, LOCK and CONNECT positions.
Rotate the selector mechanism back to the OPERATE position and push in the lock slide to ensure
smooth operation and positive engagement. Attempt to push the lock slide towards the SECURED
position to test for a positive engagement of the sleeve in the lock slide. If a smooth operation is not
attained and/or the lock slide can be forced into the secured position by testing for positive
engagement, disassemble and thoroughly re-inspect for faulty components.
Thoroughly inspect all components for rough edges or burrs, etc. which could cause jamming or
irregular operation. Replace parts as necessary, re-lubricate and reassemble the selector assembly.
Repeat the functional safety testing to verify smooth and safe operation of the selector mechanism.
Do not install the serviced back plate (lock mechanism) module to the exposure device at this point.

MAINTENANCE INSTRUCTIONS
4.9
7 Remove the front plate containing the outlet port mechanism from the empty Model 880 device by
removing the four 5/16-18 x 1½ in socket button-head screws using the tamperproof tool bit mounted
in a ratchet.
After removing the outlet port mechanism, clean the ‘S’ tube of the exposure device by pushing cloth
swabs wetted with solvent through the ‘S’ tube until they come out clean. Use a dry cloth swab to
remove any residual solvent from the ‘S’ tube after cleaning.
Clean the exterior of the Model 880 using a mild detergent solution to remove all dirt and grime.
Visually inspect the exposure device’s stainless steel end plates for weld failures (cracks, etc.) on the
locking mechanism and outlet port ends. Ensure the handle, the bottom contact surfaces and sides
comprising the plastic jacket are intact. Check the bottom surfaces of the jacket to ensure the contact
area is not excessively worn allowing contact of the stainless steel body with a flat work surface.
Additionally, if dents to the device’s body or flanges due to accidental drops are found during this
inspection, these repairs must be performed at a QSA Global service center.
Ensure that all of the information contained on the Model 880 label is legible. The trefoil and the
warning, ‘Caution or Danger, Radioactive Material’, must be legible at a distance of 3 ft
(approximately 1 m). The model number, serial number and Type B certification number (or Type A
Specification identification) must also be legible. For label replacement, remove the old label from the
exposure device by using a number 30 drill-bit mounted in a hand drill. Remove the rivet heads used
to fasten the label to the stainless steel body by drilling through the rivet head just enough to allow the
rivet head to rotate freely. Remove all rivet heads to remove label. Install the replacement label, andl
and use a pop-rivet gun to secure the new 1/8 in x 3/16 in stainless steel rivets.
Disassemble the front plate (outlet port mechanism) by removing the set screw (or roll pin) from the
outlet port cover. Unscrew the two socket head cap screws from the pivot disk. Remove and discard
the two compression springs from the outlet port mechanism and replace with new springs.
Clean all parts in solvent using a brush to dislodge all dust and dirt. Dry all components thoroughly.
Do not lubricate, leave all components completely dry.
Inspect for wear and burrs on the brass slider and rotor surfaces. Verify the tungsten port shield is
not loose within the rotor. If the port shield is loose, remove the set screw, apply VibratiteTM thread
sealant and retighten the set screw against the tungsten port shield. If the port shield uses a roll pin,
remove the roll pin and replace. Inspect the front plate’s outlet port for wear and burrs where the
source guide tube bayonet fitting engages.
Install new compression springs and assemble the outlet port mechanism. Apply VibratiteTM thread
sealant to the socket head cap screws before tightening. Install a new set screw to the outlet port
cover.
After assembly of the front plate, perform the following safety function tests using a bayonet source
guide tube fitting. Pull the outlet port cover and rotate clockwise 90 degrees. Movement should be
smooth and limited to a clockwise 90 degree turn. Insert a bayonet fitting into the outlet port and
rotate 90 degrees in a counter-clockwise direction. Insertion and rotation of the bayonet fitting should
be smooth and without snags. Rotate the outlet port cover from a 3 o’clock position to a 5 o’clock
position. This operation moves the rotor from the port shield position to a pass through section of the
rotor. Reverse the operation to disengage the bayonet fitting. Repeat the function test three times to
ensure smooth operation.

MAINTENANCE INSTRUCTIONS
4.10
8 Re-assemble the Model 880 exposure device by performing the following steps:
Apply PermantexTM anti-seize thread lubricant to the first several end threads of the back plate’s
(locking mechanism) four 5/16-18 x 1½ in socket button-head screws. Align and attach the locking
mechanism assembly to the exposure device’s end plate by installing the four 5/16-18 x 1½ in screws
using a tamperproof tool bit mounted in a calibrated torque wrench. Torque the tamperproof screws
in an opposing cross pattern to 110 in/lbs (12.43 Nm), ± 5 in/lb (0.57 Nm).
Operationally test the function of the entire system using a bayonet-fitting source guide tube, the
remote controls and a mock source assembly.
Attachment of the bayonet source guide tube to the outlet port must be smooth and without
resistance. Rotate the outlet port mechanism to enable exposure of the mock source assembly.
Connect the (serviced) remote controls to the mock source assembly connector and the device
locking mechanism. Push the lock slide into the EXPOSE position and crank the control cable into
the exposure mode. While cranking the mock source assembly from the exposure device, carefully
feel for resistance or snags. During retraction of the mock source assembly back into the exposure
device, carefully feel for any resistance or snags during movement. Conclude the test by verifying the
lock slide automatically secures the mock source assembly. Action of the lock slide should be
smooth with an audible ‘snap’ during automatic securing. After automatic securing, attempt to expose
the mock source assembly from the exposure device to confirm a positive capture. Repeat this
testing several times. If resistance, snags or sluggish movement of the lock slide is discovered during
this testing, remove the outlet port and locking mechanism plates to determine the cause. Repeat all
safety function tests if any additional servicing is required.
Clean the Model 550 jumper gauge in solvent. Lubricate the inner sleeve with light oil while moving
the sleeve back and forth. Apply a light coat of oil over the entire jumper and insert back into the
spring clip of the locking mechanism’s protective cover.

MAINTENANCE INSTRUCTIONS
4.11
Annual Maintenance for the Remote Controls
Tools required for complete maintenance of Models 692, 693, 664 remote controls:
• 11/16 in open-end wrench for the control conduit swage fittings.
• 1/2 in open-end wrench for the 5/16 in control crank handle bolt.
• Slot screwdriver for the 10-32 remote control crank screws.
• 3/8 in wrench for the 10-32 control crank stop nuts.
• 0.050 in Allen wrench for the 4-40 set screw on the odometer knob on the Model 693 and Model 664
remote control units.
• Control cable run-off prevention (stop) spring removal tool if required.
• Model 550 connector NO GO gauge for wear check of the control cable connector.
• X4 to X7 magnification glass for control cable inspection if required.
• Micrometer for measurement of control cable diameter.
Materials required for complete maintenance of Models 692, 693, 664 remote controls:
• Clean solvent: fresh mineral spirits recommended for cleaning and degreasing remote control
mechanism, control cable and cleaning the control conduits internally. (Follow manufacturer’s safety
precautions for use, handling, storage and disposal.)
• Large pan for cleaning and degreasing the control crank assembly and control cable.
• Clean lint-free rags and detergent to clean the exterior of the control conduits.
• Mil-spec grease, MIL-G-23827B (or C), MIL-PRF-23827C (or equivalent radiation resistant grease)
for lubricating the control cable and control crank mechanism.
• Stainless steel, brass or synthetic bristle brush to clean control crank parts and the control cable.
• Compressed air source and hand nozzle to blow dry the control cable internal Teflon™ liner of the
remote control conduits after cleaning.
• 3M™ yellow polyvinyl tape (or black polyvinyl electrical tape) for repair of cuts in remote control
conduits.
• Safety glasses.
Remote Control Maintenance Requirements
1 Disconnect the remote control unit from the exposure device.
2 Straighten out the remote control housings on a work surface, then remove the control cable from the
remote control conduits (661 safety connector side) until it stops (a stop spring on the end of the
control cable). Rubber gloves are recommended for this operation. Do not use excessive force during
removal of the control cable. During removal of the control cable, it should be coiled in loops no less
than a 12 in (305 mm) diameter and secure.
3 Disconnect the remote control conduit fitting from the control crank using the 11/16 in open-end
wrench. Remove the stop spring from the end of the control cable and pass the control cable through
the crank gear to completely disengage. Label the remote control conduits for proper assembly after
the servicing.
4 Pull the remaining control cable through the 661 safety connector and secure.
5 Using the 11/16 in open-end wrench, remove both remote control conduits from the 661 safety
connector and the control crank.
6 Thoroughly clean the control cable using a brush in a degreaser bath. Use compressed air to blow off
residual solvent after the degreasing operation. Be sure to follow the solvent manufacturer's safety
recommendations.

MAINTENANCE INSTRUCTIONS
4.12
7 Perform the following inspections of the control cable:
a. Use the Model 550 NO GO gauge to inspect the control cable connector for wear. Closely inspect
the connector for bends or cracks in the neck (shank) area and dented areas on the ball of the
connector. Remove the control cable from service if any cracks or bends in the shank or dents in
the ball of the male connector are found during this inspection. The male connector should not be
bent at an angle greater than 15 degrees from the axis of the control cable in the area where it is
crimped. Using your hands, attempt to twist or rotate the male connector off the control cable. If
any movement is possible during this test, the control cable must be removed from service and
the male connector must be replaced.
b. Carefully inspect the control cable directly behind the remote control cable connector and
approximately 12 in (305 mm) beyond the male connector looking for the following anomalies:
• Cuts, breaks, nicks or fraying in the spiral windings of the cable.
• Kinks or permanent bends.
• Rust (red oxide) on the inner and outer core of the cable.
• Uniformity of the spacing between the outer helical windings of the cable. Check for flattened
areas and excessive wear that reduces the cable's outer diameter less than 0.183 in (4.7
mm).
• Perform a flexibility (spring) test of the cable by bending the connector end of the cable into a
‘U’ shape and then releasing it. A cable that is bent/released and does not spring back into an
essentially straight shape is indicative of internal corrosion of the cable. The cable must be
removed from service.
• Carefully examine the cable in the area of the control crank assembly looking for cuts,
breaks, fraying, rust, unusual stiffness and uniformity of the spacing between the outer spiral
windings.
• Examine the entire length of cable looking for defects described above.
If a control cable is deemed as defective during this inspection, remove it from service and tag it
with a label to prevent inadvertent use.
The control cable (Model 550 male) connector must be replaced at intervals not to exceed five (5)
years. Maintenance program administrators must maintain traceability records for replacement of all
‘Safety Class A’ designated components.
8 Lightly lubricate the control cable using MIL-G-23827B (or C), MIL-PRF-23827C, or equivalent
grease. Apply additional grease to the first 3 ft (approximately 1m) of control cable (male connector
end).
9 Clean the exterior of the remote control conduits using clean rags and a detergent. Remove all dirt
and grease from the polyvinyl conduits and swaged fittings. Carefully inspect the entire length of
remote control conduits for cuts and melted areas. Repairs to cut or melted areas can be
accomplished by taping the area with 3M™ yellow polyvinyl tape (or black polyvinyl electrical tape).
The tape will prevent the ingress of water and other liquid that would cause corrosion of the remote
control conduit's inner braids and the remote control cable. Look and feel for dents and depressions
in the remote control conduits. Minor dents can be rounded out by gently tapping the area with a
small hammer.
Examine the control conduits where they protrude from the swage fittings, looking for bulges or
cracks in the polyvinyl. Remote control conduits with large dented areas or cracks/ bulges near the
swage fittings should be sent to the manufacturer for repairs.

MAINTENANCE INSTRUCTIONS
4.13
Clean the interior of both remote control conduits by pouring 4-5 oz (100 ml) of clean solvent into one
end. Use compressed air to blow the solvent through the entire length of conduits into a clean white
cloth attached to the opposite end. Repeat this cleaning process until the solvent blown through the
conduit comes out clean. Use the compressed air to thoroughly dry the interior of the conduit.
Residual solvent left in the remote control conduit will dilute the lubrication applied to the remote
control cable diminishing the protective qualities.
Check the swage fittings to ensure the threads are not stripped and are clean. Using your hands,
attempt to twist or rotate the swage fittings off the control conduits. If any movement is possible, the
control conduit must be removed from service and new swage fittings must be installed.
10 Remove the crank arm from the control crank assembly by removing the 5/16 in hex bolt and washer.
While wearing safety glasses, carefully remove the control crank assembly from the handle or frame
by unscrewing the four bind head screws from the stop nuts.
Separate the two halves of the control crank housing.
CAUTION
Ensure the cable adapters stay in the bottom control crank housing during separation. Care should
be taken to avoid losing control of the tensioned wear strip that may fly out during separation of the
control crank housing. This is the reason why safety glasses must be worn.
Disassemble and degrease the drive wheel, wear strip, the two cable adapters, the two brake jaws,
the two halves of the control crank housing and brake bearing. The wheel bearings may be left in the
control crank housing during cleaning, but care should be taken not to lose the spacer rings that fit
between the wheel bearings and the drive wheel as applicable. Clean and inspect all parts for
damage or wear and replace as necessary.
If applicable, remove the reset knob of the odometer by loosening the two Allen set screws, then
remove the odometer cover by removing the two bind head screws that fasten it to the mounting
plate. Do not disassemble the odometer.
Clean the helical gear of the odometer with solvent using a brush to dislodge any material between
the gear teeth. Check the odometer for proper operation: turning the gear should turn the odometer
but the odometer shaft should still be able to turn when the gear is held fixed (for zeroing the
odometer).
Clean the drive wheel in solvent using a brush to dislodge any dirt between gear teeth. Inspect the
drive wheel's gear teeth looking for broken or bent teeth. If the drive wheel has broken or bent teeth,
use a file to grind the tooth flush with the drive wheel. Up to three consecutive teeth can be missing
from the drive wheel before a replacement is required.
Light rust may be removed from the wear strip using fine sandpaper and machine oil.
Lightly grease the drive wheel hub, wheel bearings and the wear strip before reassembling.
Place one of the cable adapters in the lower control crank housing. Place one end of the wear strip
against the cable adapter then fit the rest in the track of the housing. Fit the other cable adapter in
place to retain the wear strip.

MAINTENANCE INSTRUCTIONS
4.14
CAUTION
Wear safety glasses when inserting the wear strip. It will be under tension and could suddenly fly out
during assembly.
Place the drive wheel in the lower half of the control crank housing making sure the spacer rings are
between it and the wheel bearings if applicable.
Assemble the two brake jaws, brake bearing and brake arm. The angled sides of the brake jaws
should be facing the retract side of the control crank housing.
Place the upper control crank housing over the assembly while keeping them level and press them
together.
Check that the control crank mechanism is properly assembled by turning the shaft. It should spin
freely.
Check the operation of the friction brake while holding both halves of the control crank housing
together tightly. If it does not function correctly, check for faulty assembly or excessively worn brake
jaws.
As applicable, mount the control crank housing on the frame or handle with the four bind head screws
and stop nuts. Secure the crank arm to the shaft using the 5/16 in washer and hex bolt.
For reel type controls, secure the odometer cover to the mounting plate with two bind head screws.
Secure the odometer's reset knob to the shaft by tightening the two Allen head screws, leaving
clearance between the knob and the cover.
After assembly, perform a check to ensure the control crank will turn freely. Set the brake lever to the
ON position and attempt to turn the handle using moderate pressure. Do not apply excessive force.
Run a section of the control cable through the control crank to ensure the control crank operates
easily without snags or resistance.
If applicable, make sure the odometer turns when the crank handle is turned. If the odometer does
not function during this test, check for improper assembly or damaged parts.
11 Clean the 661 safety connector assembly using a brush and solvent. Ensure the movable jaws of the
safety connector are not excessively loose or worn where they swivel in the clevis pins. Examine the
connector collar for bent or loose connecting pins and excessive wear on the inner-mating surface.
Examine the face of the connector body where the control cable protrudes and verify that long-term
usage has not chamfered the area.
Re-assembly of the Remote Control Unit:
Reattach the remote control conduits to the safety connector assembly. Attach the EXPOSE sheath to the
EXPOSE side of the control crank assembly.
Lay the remote control conduits out in a straight line or a wide loop. Feed the end of the control cable into
the conduit as far as it will go. As the control cable is being fed into the remote control conduits, feel for
any resistance that indicates damage of the remote control conduit.
Turn the control crank handle in the RETRACT direction until the end of the control cable is protruding.
Screw the safety stop spring onto the end of the control cable approximately 2 in (50 mm) from the end.

MAINTENANCE INSTRUCTIONS
4.15
Connect the RETRACT control housing to the control crank housing. Retract the control cable fully,
watching for any binding that may indicate damage to the control housing.
If applicable, reset the odometer to zero with the control cable fully retracted.
Replace the protective rubber cap over the end of the safety connector assembly.
Quarterly and Annual Maintenance for Source Guide Tubes
Tools required for maintenance of source guide tubes:
• A424-9XL mock source assembly to perform function tests after cleaning and inspection.
• Length of clean control cable to push A424-9 XL through a 7 ft (2.1 m) source guide tube.
• 1 in-18 tap and 1 in-18 die for male and female threads of the source guide tubes, if required.
Materials required for maintenance of source guide tubes:
• Solvent: Clean mineral spirits to clean the source guide tubes internally.
• Clean lint-free cloths and detergent to clean the exterior of the source guide tubes.
• Mil-spec grease MIL-G-23827B (or C), MIL-PRF-23827C (or equivalent radiation resistant grease) to
lubricate the swage fittings on the source guide tubes.
• Source of compressed air and hand nozzle to blow dry the internal conduit of the source guide tubes.
• 3M™ yellow polyvinyl tape (or black polyvinyl electrical tape) for repair of cuts in the source guide
tubes.
Source Guide Tube Maintenance
1 Clean the exterior of all the source guide tubes thoroughly using clean cloths and a detergent.
Remove all of dirt, grease and grime from the yellow polyvinyl source guide tubes and the swage
fittings.
2 Clean the interior of each source guide tube by pouring 4-5 oz (100 ml) of clean solvent into one end.
Manipulate the source guide tube back and forth to cause the solvent to wash the interior of the entire
length of source guide tube. Pour the solvent into a used solvent container. Refill the source guide
tube with clean solvent and repeat the cleaning operation. Repeat this cleaning process until the
solvent poured out of the source guide tube into the used solvent container is clean. Use a
compressed-air hose to blow out any residual solvent from the source guide tubes. Use of a clean
white cloth attached to one end of the source guide tube will trap any debris or residual solvent when
blowing out the source guide tubes. Repeat the cleaning process until the cloth ‘trap’ indicates dirt is
not present within the source guide tubes.
3 Carefully inspect the entire length of each source guide tube for cuts and melted areas. Repairs to cut
or melted areas can be accomplished by taping the area with 3M™ yellow polyvinyl tape (or black
polyvinyl electrical tape). Taping the damaged area of the polyvinyl sheath will prevent the ingress of
water and other liquid that would cause corrosion to the remote control cable. Carefully look and feel
for dents and depressions in the source guide tubes. Even a small inward dent in the source guide
tube could cause a seized source assembly resulting in emergency operations. A ‘mock’ (Model
A424-9XL) source assembly attached to a section of control cable that is pushed through the entire
length of source guide tube provides additional confirmation the source guide tube suitable for use.

MAINTENANCE INSTRUCTIONS
4.16
4 Inspect the swage fittings of each source guide tube to ensure the threads are not stripped or galled.
If the threads are damaged, the use of a 1in-18 tap or die and oil can be used to clean the damaged
area. Using moderate pressure, attempt to twist the swage fitting off the source guide tube. If any
movement is possible, remove from service and replace the swage fitting. Inspect the source guide
tube near the swage fitting for breaks and bulging, remove from service and send to a service center
for repairs. Inspect the exposure head (source stop) for excessive wear or perforations on the end-
stop and the side where the collimator (beam limiter) is mounted. Damaged fittings or exposure
heads on source guide tubes can be replaced at a QSA Global service center. If the swage fittings
are not damaged and are securely attached to the source guide tube, apply a light coat of grease to
the threads and install the protective covers over the fittings.
Misconnect Test After Reloading Sealed Source into the Exposure Device
After performing the annual maintenance, the complete radiography system must be tested by the
maintenance program administrator or Radiation Safety Officer. A misconnect test on the exposure
device including the radioactive source assembly and wind-out controls effectively tests the integrity of
the entire locking system. This procedure detects long-term wear (or damage) of the interrelated failsafe
system including identify any excess wear on the control cable connector, device locking mechanism and
sealed source connectors simultaneously.
Note: Component wear occurs to both the control assemblies and the device lock assemblies
over time, therefore, to ensure acceptable equipment operation, the misconnect test must be
performed on each device lock assembly and control assembly combination that could be used in
the field. For example, if controls are used interchangeably with more than one specific exposure
device, then each control must be checked with each device to ensure the failsafe system for all
control assembly/device combinations are compliant.
The test should only be performed by personnel that are formally trained, authorized and thoroughly
familiar with annual maintenance procedures. This test is performed by engaging the remote control
connecting plug assembly into the exposure device's locking mechanism WITHOUT first engaging the
control cable connector within the source assembly connector.
The ability to then rotate the locking mechanism from the CONNECT position towards the LOCK position
indicates critical dimensions of the locking system are excessively worn to an unsafe condition. Extreme
care should be exercised to prevent rotating the locking mechanism's selector ring beyond the
LOCK position. If the locking mechanism and remote controls fail a misconnect test the equipment must
be removed from radiographic operations. The equipment must not be used until repairs are performed
and misconnect test results are satisfactory.
During the performance of the misconnect test there is a risk of losing control of the radioactive
source assembly if:
• the components are excessively worn or damaged
• the person performing the test intentionally or inadvertently rotates the selector ring from the
CONNECT position to the OPERATE position
• the person performing the test intentionally or inadvertently pushes the lock slide into the EXPOSURE
mode.
Contact a QSA Global, Inc. service center if you have questions regarding the misconnect test.

MAINTENANCE INSTRUCTIONS
4.17
Annual Maintenance Records
Records of all equipment inspected and maintained during the annual maintenance must be recorded.
Records should indicate:
• the date of the inspection and maintenance.
• name of the qualified individual performing the required inspections.
• problems found and maintenance or repairs performed.
• model number and serial number of the exposure device.
• associated equipment that was inspected and maintained.
• part numbers and associated lot numbers or serial numbers of replacement parts installed.
Model 880 Series Safety Class A Components
Safety Class A Designation Items
Items that comprise the Model 880 Series radiographic exposure device and associated equipment that
are critical for safe radiological operation are classified as Class A items or components. Class A items
can be structures, components and systems whose failure or function could directly result in a condition
adversely affecting public health and safety. This would include extreme conditions such as the loss of
primary containment with a subsequent release of radioactive material and or a loss of shielding creating
a substantial safety hazard. Replacement parts that are sent to you with a safety Class A designation are
clearly marked with lot numbers and contain instructions to maintain traceability.
Considerations of Safety Class A Items
Users of the Model 880 Series exposure devices and associated equipment must recognize their
responsibilities of maintaining the integrity of the Type B(U)-96 (or Type A) package and the control of
Safety Class A items and components by:
• maintaining traceability of Class A replacement items or components to a specific exposure device or
an associated component.
• use of manufacturer specified items to maintain the integrity of the exposure device/transport
package according to the certifications. Do not use generic grade items or components that do not
meet original design specifications.
• performance of periodic inspections to verify the Class A items are not excessively worn from long
term use or have been damaged from accidents.
• use and handling of the system consistent with its design and intended application.
• promptly notifying the manufacturer in the event a Safety Class A item or component which contains
a defect or deviates from the original design specifications. This action will initiate a formal evaluation
of the defect or deviation.
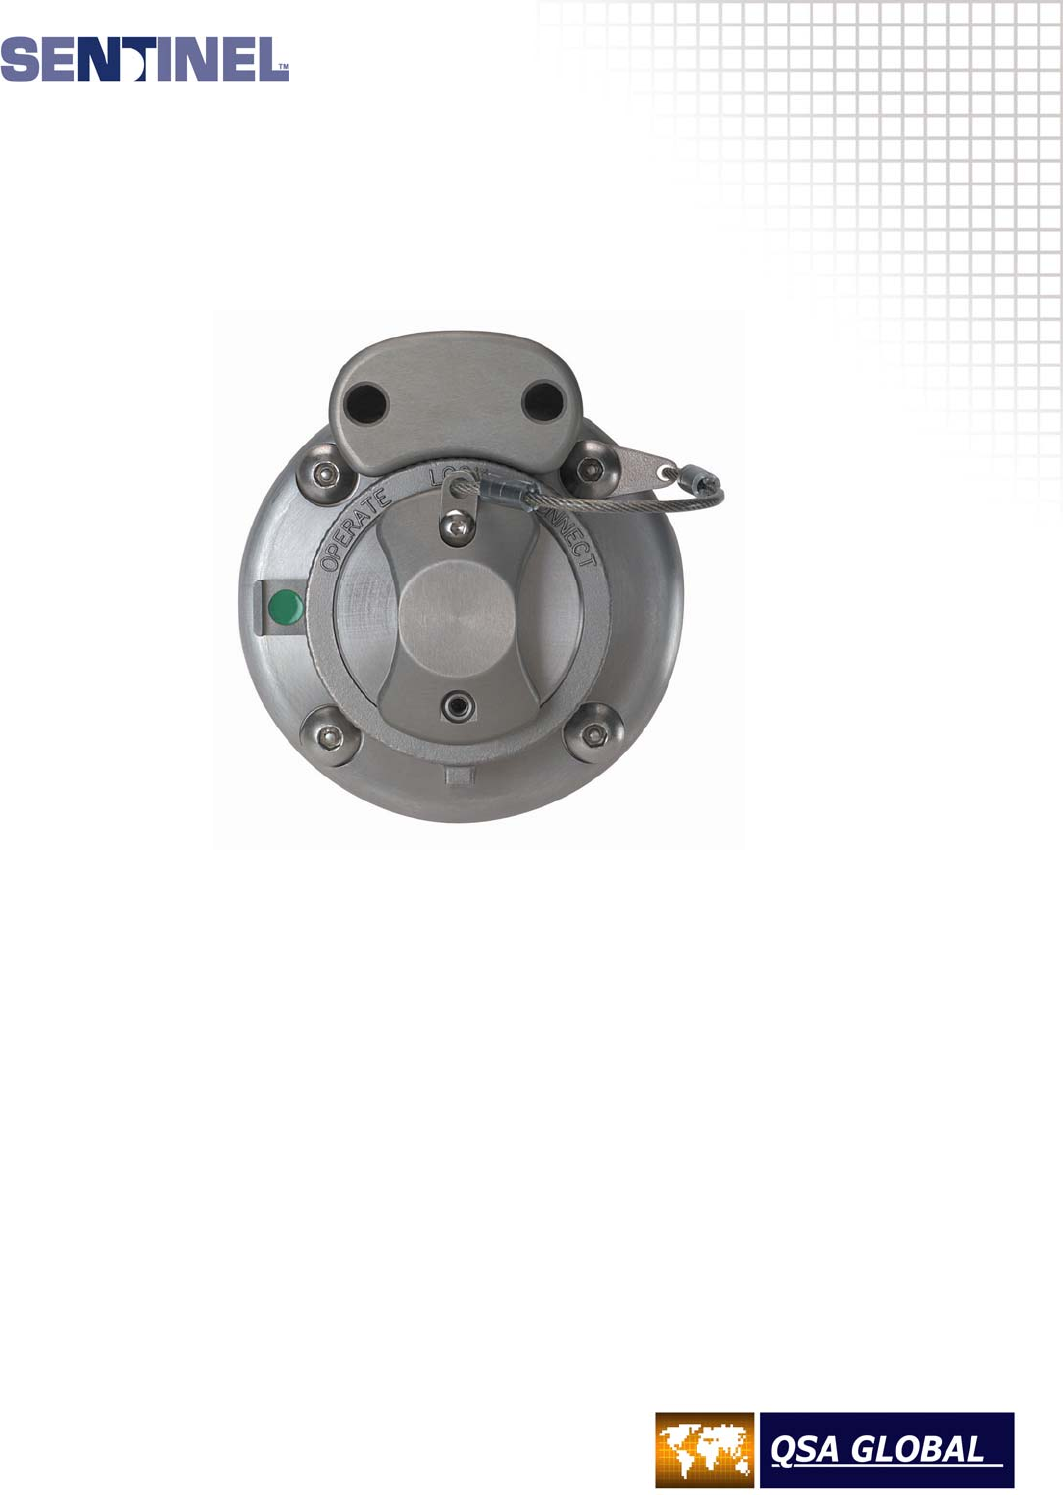
MAINTENANCE INSTRUCTIONS
4.18
Rear Plate Assembly
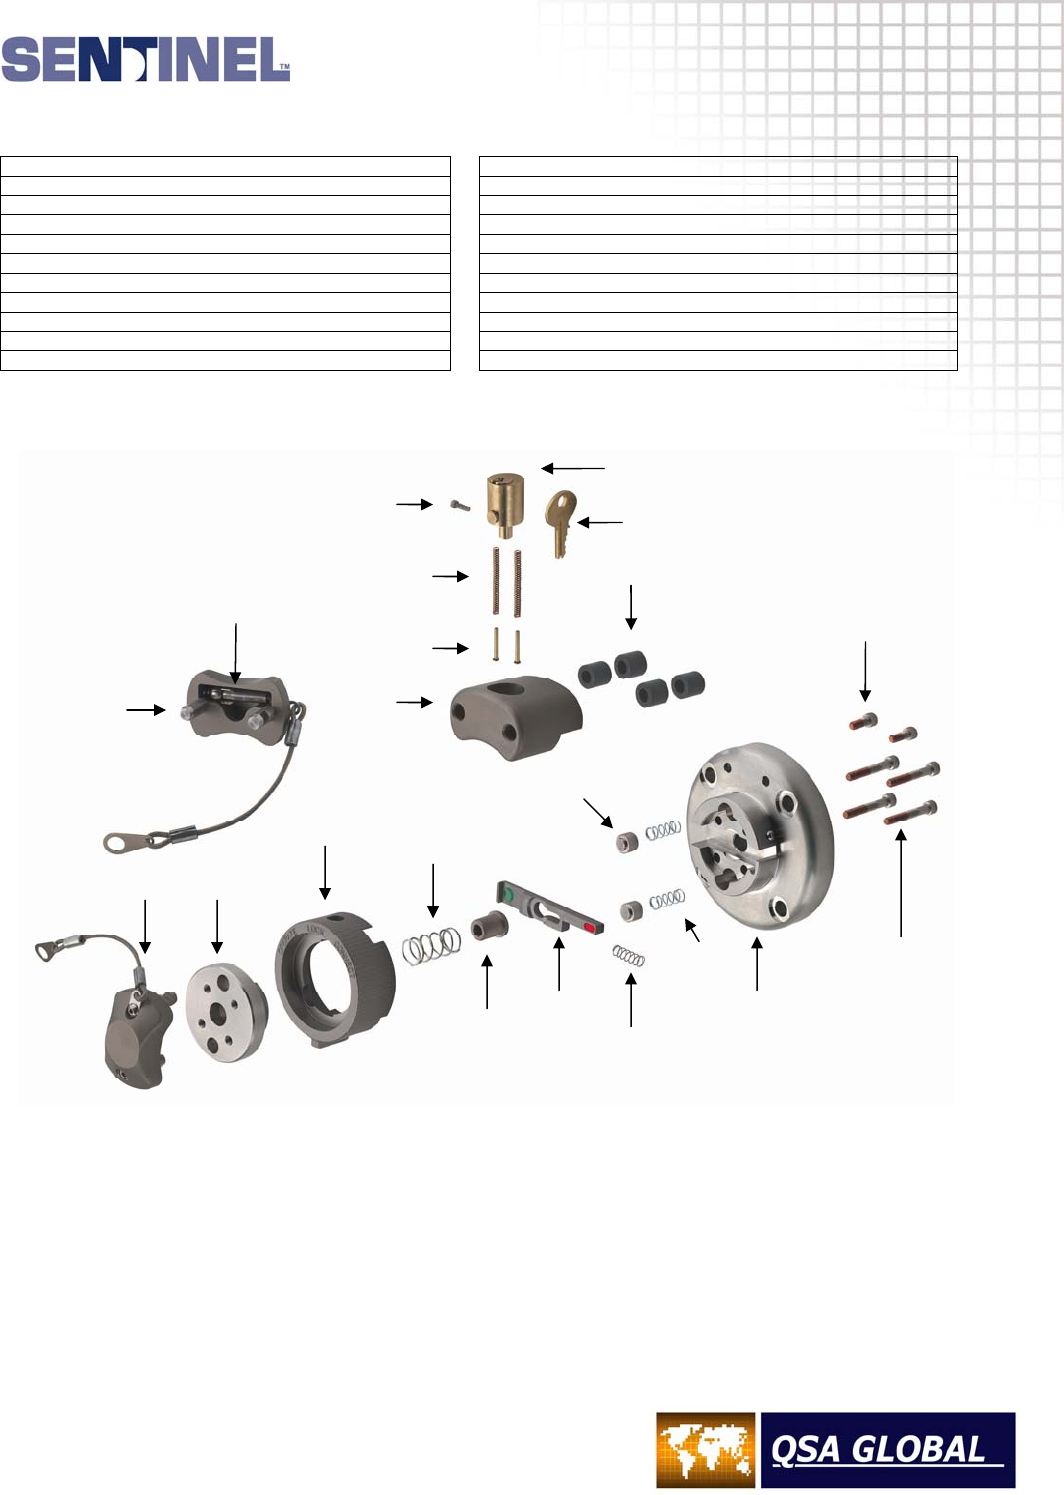
MAINTENANCE INSTRUCTIONS
4.19
REAR PLATE ASSEMBLY
ITEM PART NO. QTY. DESCRIPTION ITEM PART NO. QTY. DESCRIPTION
1 88014 1 LOCK COVER ASSEMBLY 11 SCR003 4 SOCKET HEAD CAP SCREW
2 85701-5 1 SELECTOR RING RETAINER 12 SCR072 2 SOCKET HEAD CAP SCREW
3 88026 1 SELECTOR RING 13 SLV005 4 RUBBER SLEEVE
4 SPR005 1 COMPRESSION SPRING 14 88022 1 LOCK MOUNT
5 88025 1 SLEEVE 15 66001-11 1 LOCK ASSEMBLY
6 88024 1 LOCK SLIDE 16 2 LOCK PIN (Supplied with 66001-11)
7 SPR006 1 COMPRESSION SPRING 17 2 LOCK SPRING (Supplied with 66001-11)
8 66001-6 2 ANTI-ROTATE LUGS 18 SCR023 1 SOCKET HEAD CAP SCREW
9 SPR004 2 COMPRESSION SPRING 19 66001-811 2 KEY
10 88021 1 REAR PLATE 20 66001-20 1 DUMMY CONNECTOR
1
1 2
3 4
5 6
7
10
8
9
14
16
17
18
15
19
13
12
20
11 Apply
Thread
Lock
Apply
Thread
Lock
Double
Stacked
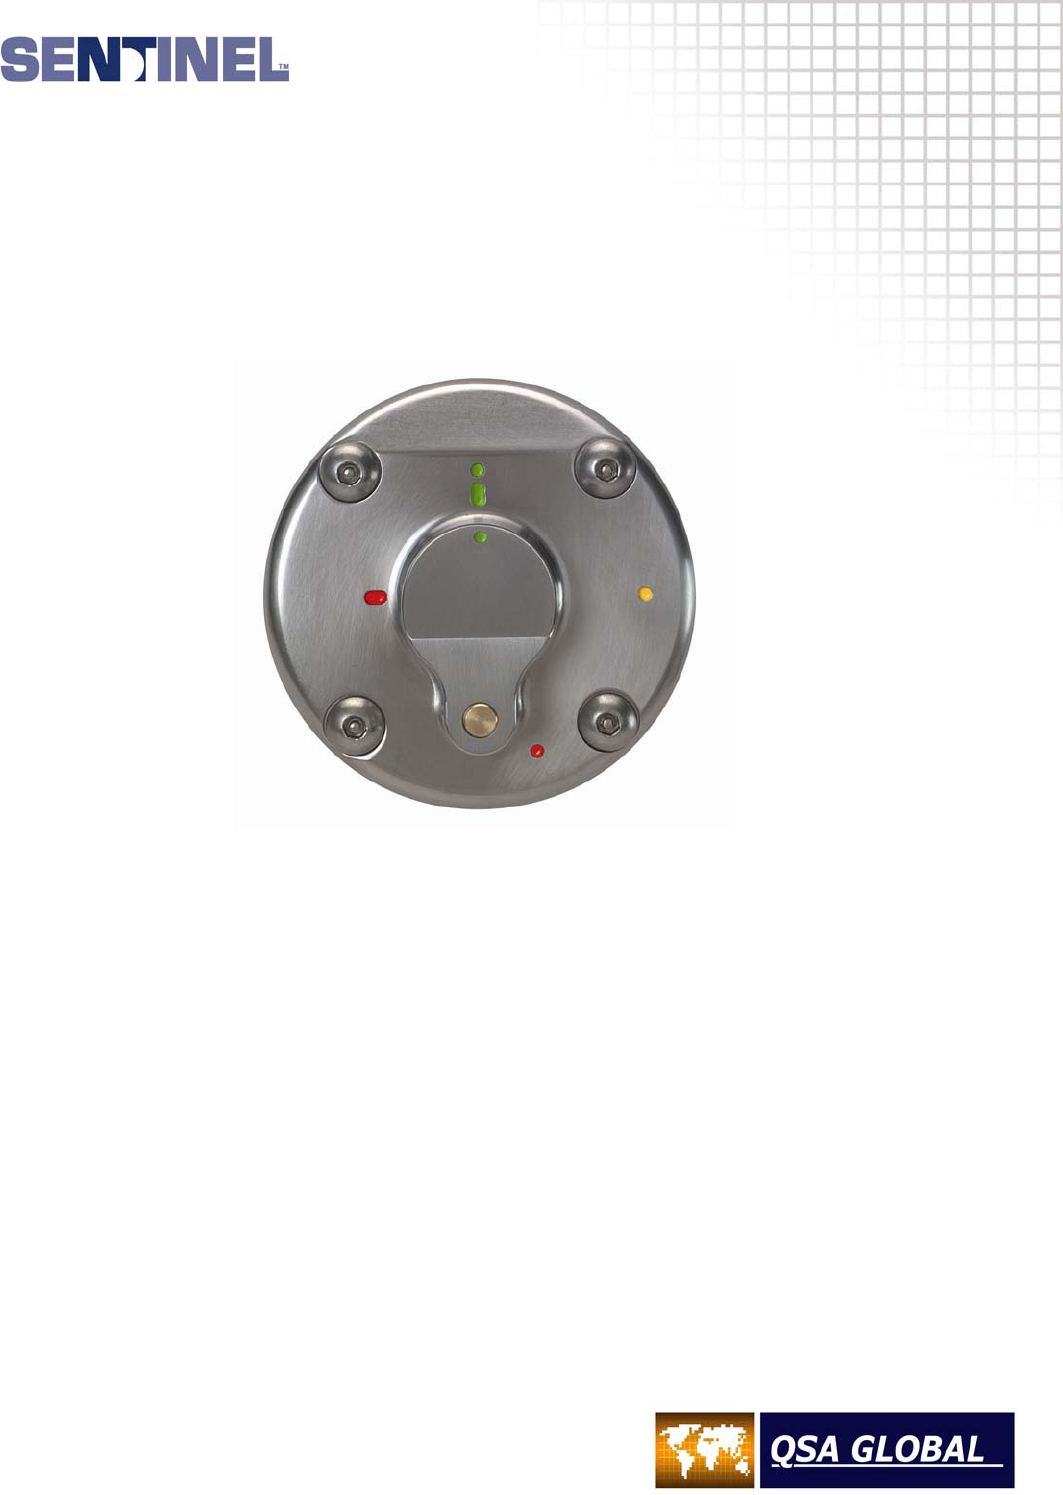
MAINTENANCE INSTRUCTIONS
4.20
Front Plate Assembly
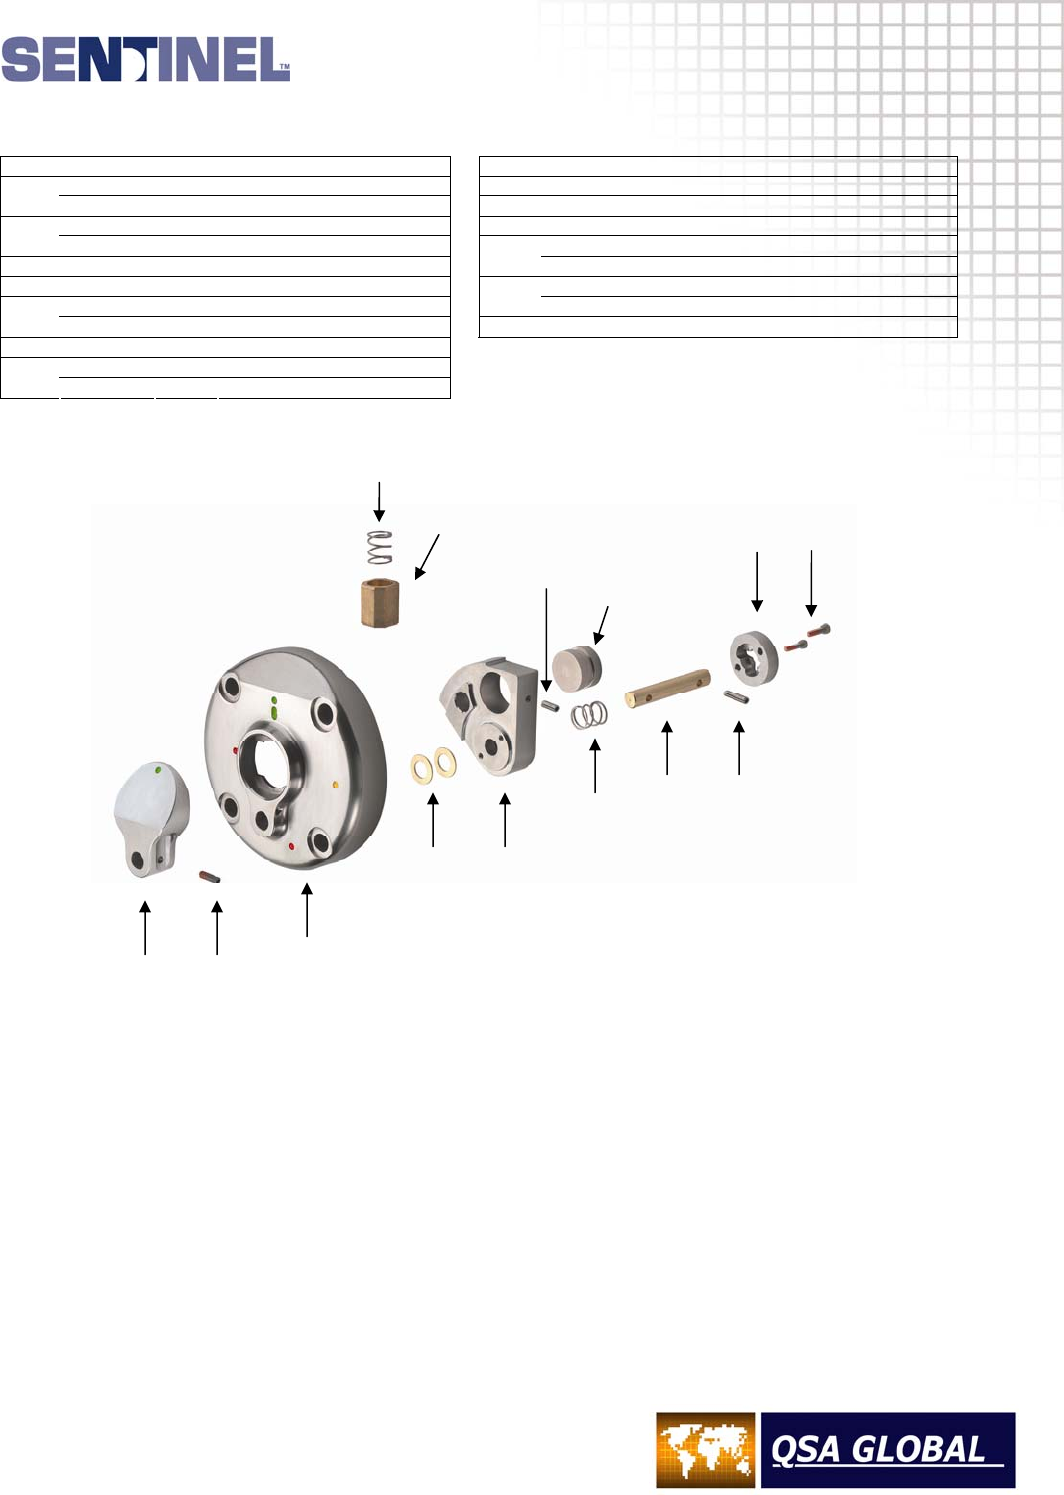
MAINTENANCE INSTRUCTIONS
4.21
FRONT PLATE ASSEMBLY
ITEM PART NO. QTY. DESCRIPTION ITEM PART NO. QTY. DESCRIPTION
1 88033 1 PORT COVER (SET SCREW TYPE) 8 PIN024 1 ROLL PIN
• 88033A 1 PORT COVER
(ROLL PIN TYPE) 9 SCR160 2 SOCKET HEAD CAP SCREW
2 SCR162 1 SET SCREW 10 88039 1 PIVOT DISK
• PIN036 1 ROLL PIN 11 88034 1 PORT SHIELD
(ROLL PINTYPE)
3 88031 1 FRONT PLATE
• 88034A 1 PORT SHIELD (SET SCREW TYPE)
4 88036 2 WASHER 12 PIN038 1 ROLL PIN
5 88032 1 ROTOR (ROLL PIN TYPE)
• SCR157 1 SET SCREW
• 88032A 1 ROTOR
(SET SCREW TYPE) 13 88035 1 SLIDER
6 SPR033 2 COMPRESSION SPRING
•
7 88037 1 SHAFT (SET SCREW TYPE)
• 88037A 1 SHAFT
(ROLL PIN TYPE)
COMPONENTS ON SOME MODELS DIFFER SLIGHTLY
FROM THOSE ILLUSTRATED-CHECK PART NUMBER
BEFORE ORDERING
6
13
12 11
10 9
8 7
6
5 4
3
2 1 APPLY
THREAD
LOCK
EQUAL
PROTRUSION
APPLY
THREAD
LOCK
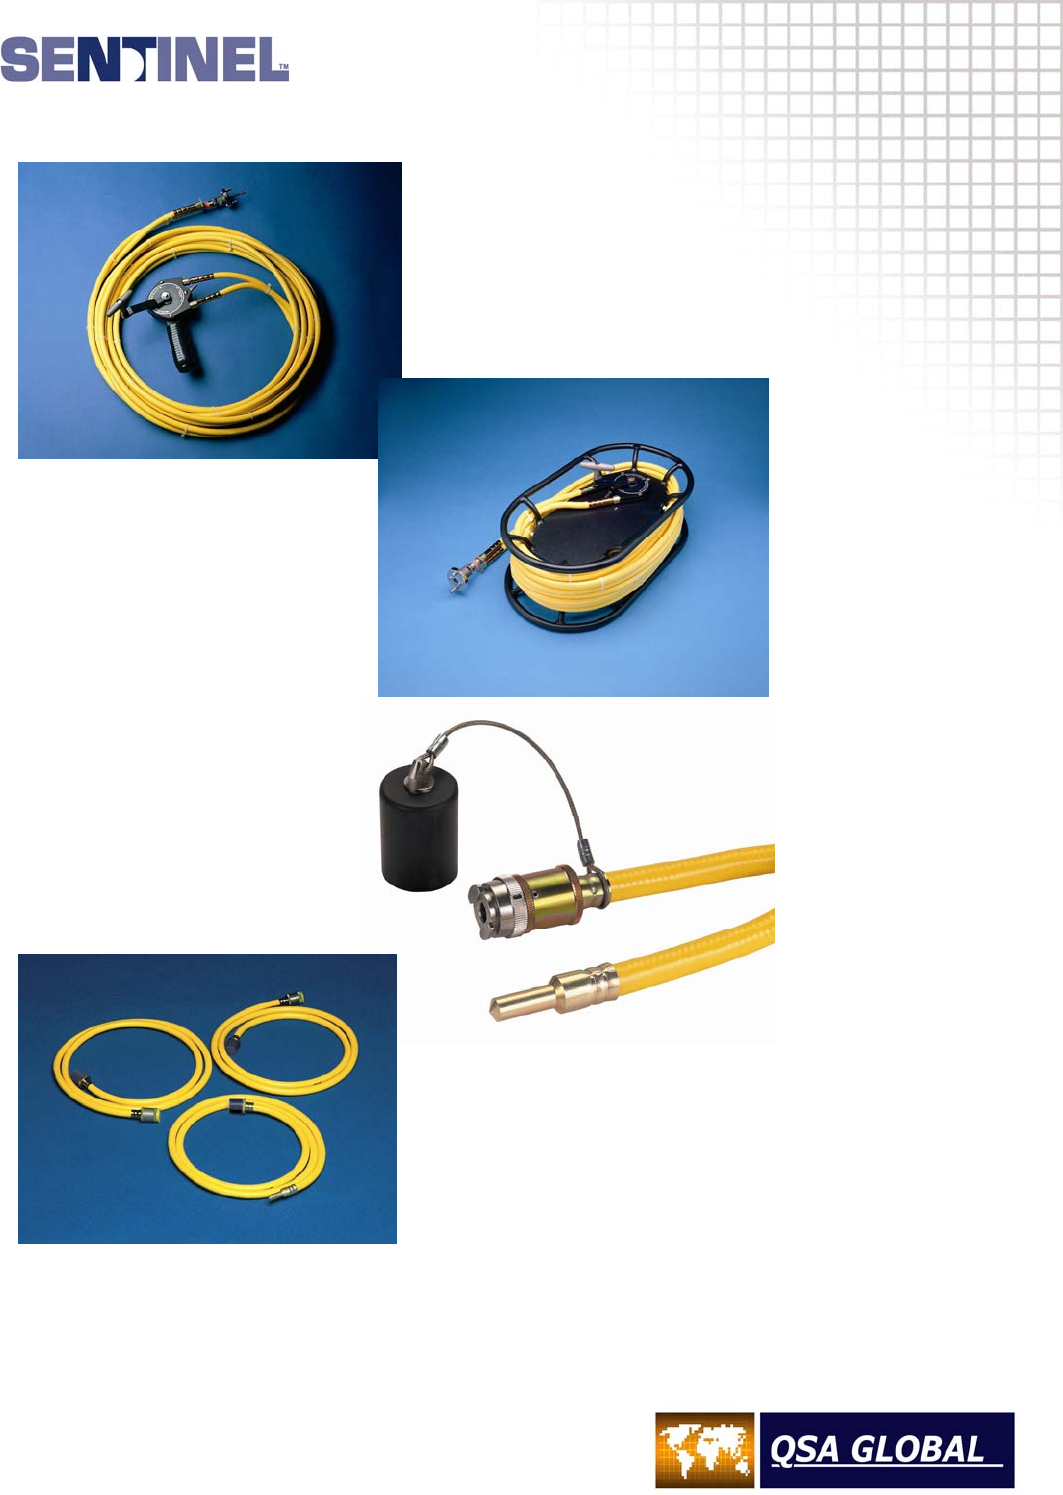
MAINTENANCE INSTRUCTIONS
4.22
CONTROL ASSEMBLIES
SOURCE GUIDE TUBES
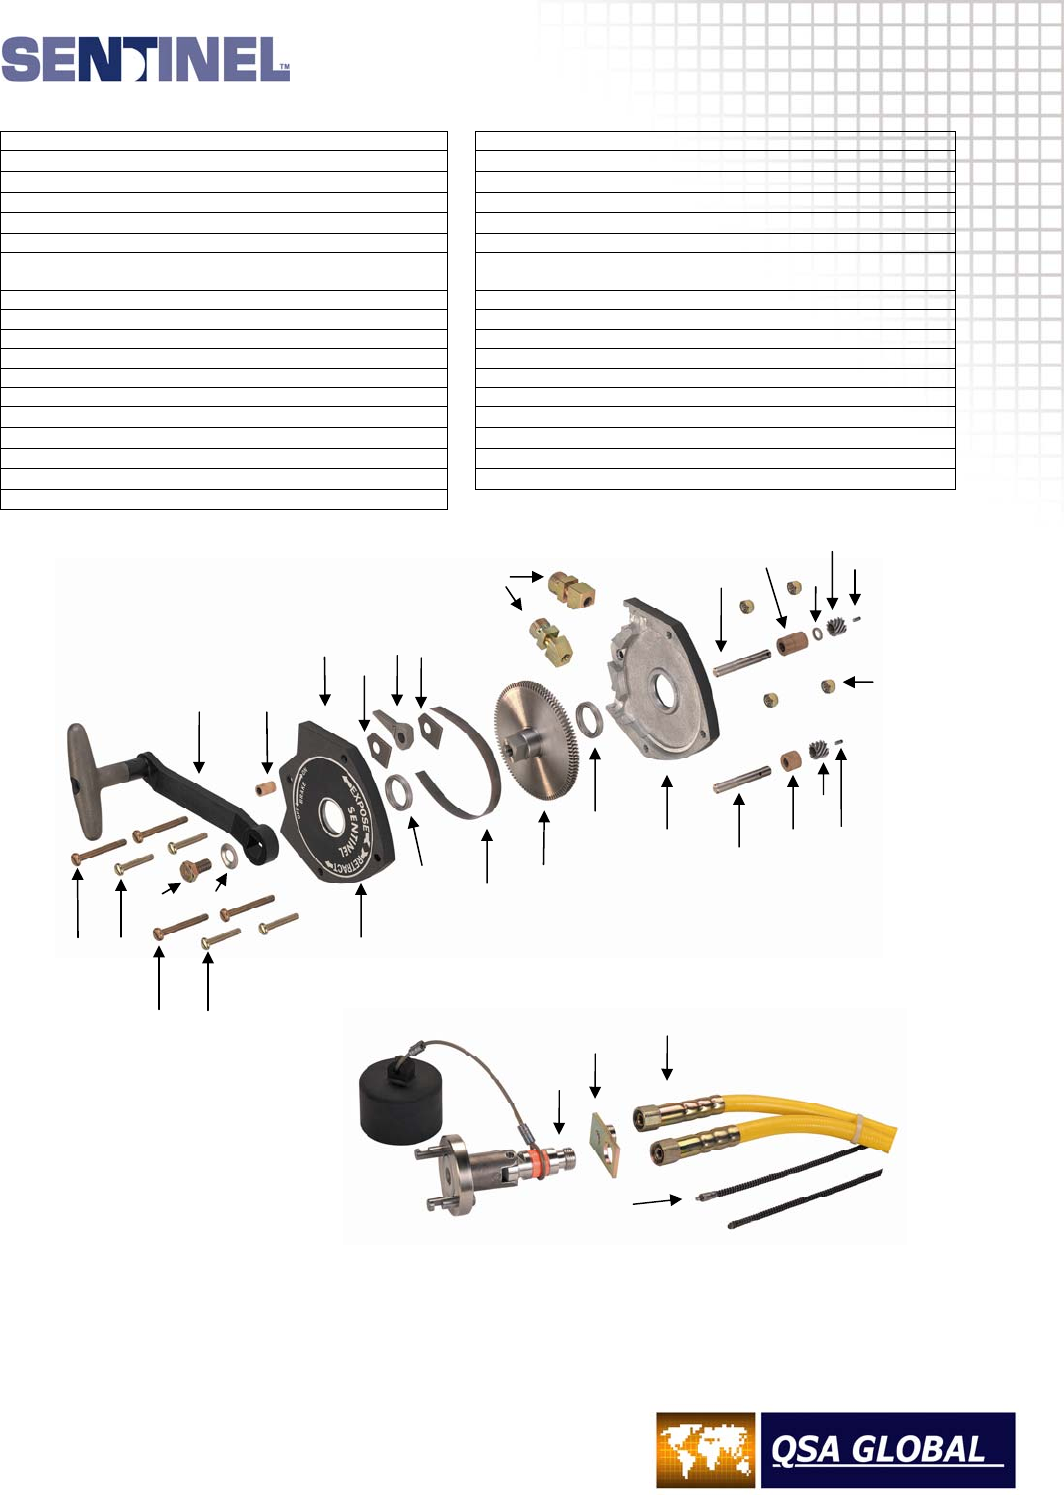
MAINTENANCE INSTRUCTIONS
4.23
CONTROL ASSEMBLIES
ITEM PART NO. QTY. DESCRIPTION ITEM PART NO. QTY. DESCRIPTION
1 SCR125 4 1 5/8 IN BIND HEAD SCREW • 18 GEA-002 1 HELICAL GEAR
2 SCR008 4 1 1/4 IN BIND HEAD SCREW ο 19 PIN008 1 ROLL PIN
3 BLT008 1 HEXAGONAL BOLT 20 66404-1 1 GEAR SHAFT ο
4 WSH019 1 WASHER 21 BBS-005 1 OILITE BEARING ο
5 68901 1 CRANK ARM 22 NUT025 4 STOP NUT
6 BBS-004 1 BRAKE BUSH 23 66103
66101-4 1
1 SAFETY CONNECTOR
CABLE PLUG
7 81800-10 2 CONTROL CRANK HOUSING 24 59125 2 25 FT (7.6 M) HOUSING
8 68900-8 1 CRANK DECAL 59135 2 35 FT (10.7 M) HOUSING
9 68900-4 2 BRAKE JAW 59150 2 50 FT (15.2 M) HOUSING
10 68900-3 1 BRAKE ARM 25 55005 1 50 FT (15.2 M) CONTROL CABLE
11 BBS-001 2 BALL BEARING ASSEMBLY 55010 1 70 FT (21.3 M) CONTROL CABLE
12 68900-7 1 WEAR STRIP 55009 1 100 FT (30.5 M) CONTROL CABLE
13 81800-1 1 DRIVE WHEEL 26 69303 1 ODOMETER ASSEMBLY •
14 68900-2 2 CABLE ADAPTER 27 69201-3 1 HANDLE •
15 69302-1 1 GEAR SHAFT • 28 66410 1 FRAME ο
16 BBS-007 1 OILITE BEARING • 29 66403 1 ODOMETER ASSEMBLY ο
17 PIC-003 1 WASHER • • PISTOL GRIP MODEL ο REEL TYPE MODEL
14
1 2
1 2
3 4
5 6
7
8
9 9 10
11 12 13
11 7 20 21
18
19
22
19
18
17
16
15
24
23
23
25
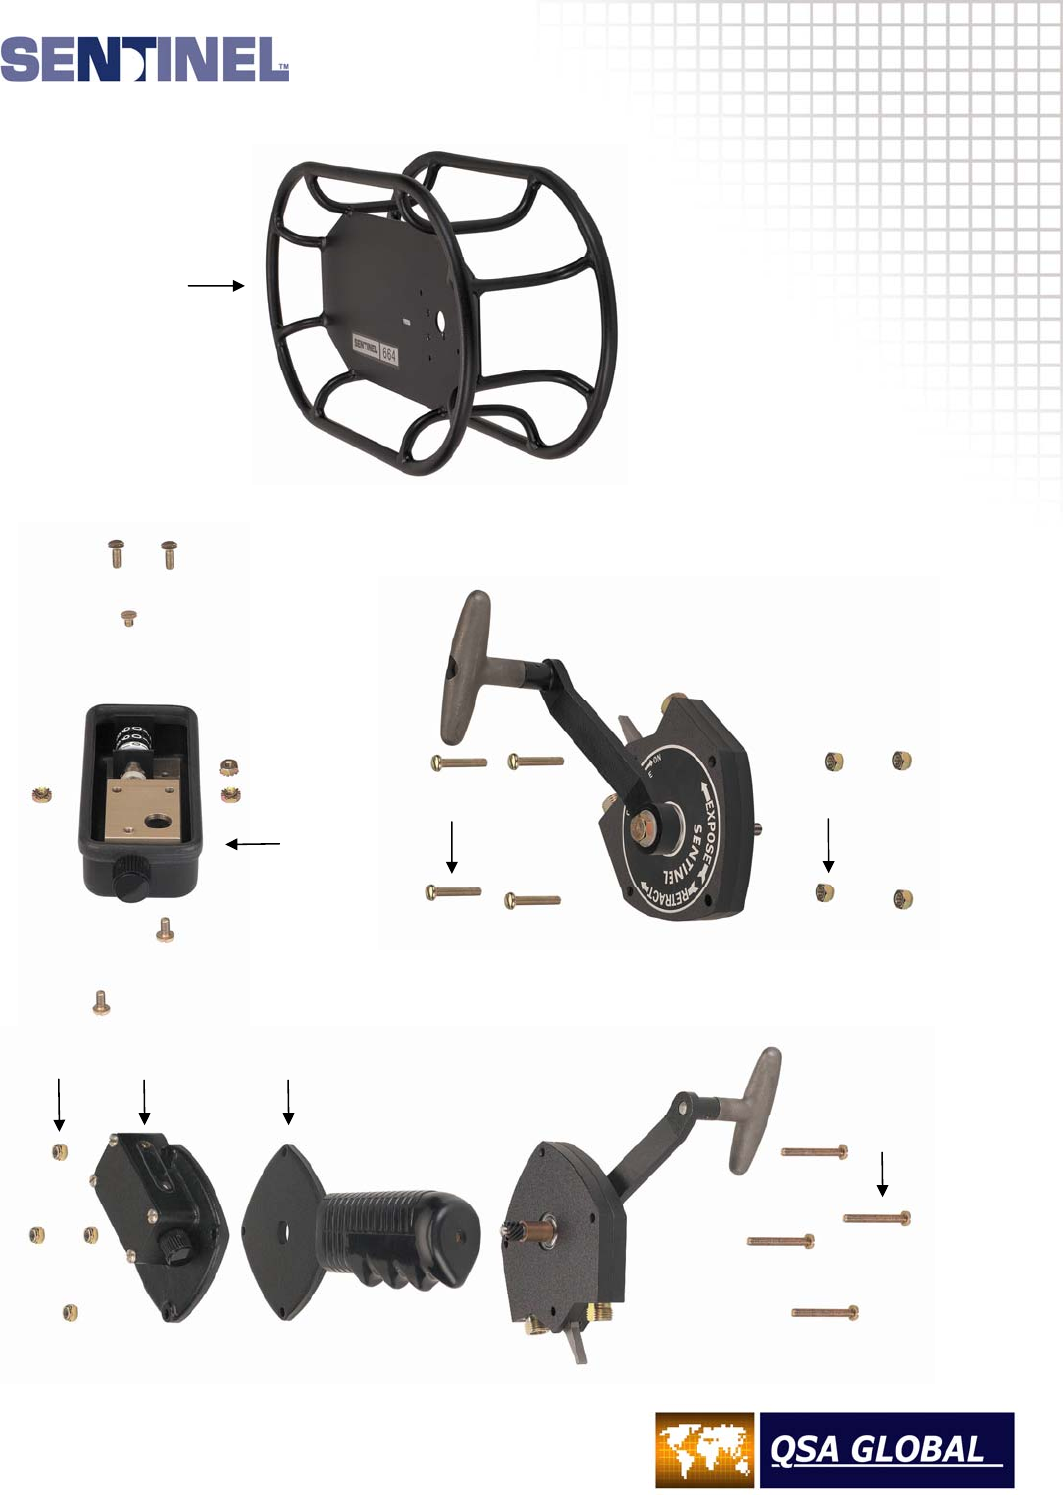
MAINTENANCE INSTRUCTIONS
4.24
28
29
2 22
1
27
26 22

SAMPLE TRANSPORTATION INSTRUCTIONS
5.1
The following instructions are samples for the transport of this radiographic exposure device/transport
container and source assembly within the United States and are based on current transport regulations.
Shippers of radioactive materials in regulatory jurisdictions outside the USA must ensure full compliance
with all current and applicable transport regulations. Listed are the regulations that should be referenced
for the legal transport of radioactive materials:
• International Atomic Energy Agency requirements No. TS-R-1 (1996), ‘Regulations for the Safe
Transport of Radioactive Materials’.
• International Air Transport Association, ‘Dangerous Goods Regulations’.
• International Civil Aviation Organization, ‘Technical Instructions for the Safe Transport of Dangerous
Goods by Air’.
• International Maritime Organization, ‘International Maritime Dangerous Goods Code’.
• U.S. Department of Transportation, Title 49 Code of Federal Regulations Parts 171 through 178.
• U.S. Nuclear Regulatory Commission, Title 10 Code of Federal Regulations Parts 20, 34 & 71.
• Canadian Nuclear Safety Commission, Nuclear Safety and Control Act, ‘Packaging and Transport of
Nuclear Substances Regulations’; ‘Nuclear Substances and Radiation Devices Regulations’.
• Transport Canada, ‘Transport of Dangerous Goods Regulations’.
• Transport in the United Kingdom: Refer to the regulations as listed on the ADR approval Certificate.
Transport Package
The Model 880 Delta, 880 Sigma, 880 Elite and 880 Omega are approved as radiographic exposure
devices. All but the Model 880 Omega are approved as Type B(U)-96 transport packages under the
certification number USA/9296/B(U)-96. The Model 880 Omega is approved as a Type A transport
package.
As a shipper of radioactive material, you must perform a pre-shipment inspection to verify conformance to
the Type B(U)-96 certification (or Type A approval as applicable) for each individual shipment of
radioactive material. This verification assures the package's integrity is not compromised, which may
cause a reduction of safety while in the transport system.
Visually inspect the transport package:
• Assure the source assembly is properly secured in the locked position. The selector ring must be in
the LOCK position, the protective cover in place, the plunger lock engaged and the key removed.
• Assure all screws are present and secured.
• Assure the front port is properly secured.
• Assure the seal wire is properly installed, if used.
• Assure the ‘Danger, Radioactive Material’ label is securely attached and visible on the package.
Assure that the label is legible and not defaced.
• Assure the other information on the label is legible (the warnings and trefoil, the model number and
serial number and either the Type B certification number or the Type A specification identification as
applicable.
• Visually assure all welded areas are not cracked. If there is any evidence of cracked welds contact
QSA Global, Inc. prior to shipment.
• Assure all the conditions of the Certificate of Compliance are met and the transport package has all
the required markings.
• Wipe test the transport package over an area of 300 cm2 and assure the level of removable
contamination is less than 0.0001 µCi per cm2.
If the package fails any of the inspections described, remove the container from use until it can be
brought into compliance with the Type B certificate or the Type A approval as appropriate.

SAMPLE TRANSPORTATION INSTRUCTIONS
5.2
Receipt of Radioactive Material
NOTE
1 A radioactive material package must be accepted from the carrier at the time it is delivered.
[10CFR20.1906(a)(1)]
2 If a radioactive material package is to be held at the carrier's terminal for pickup, arrangements must
be made to receive notification from the carrier of the arrival of the package at the time of arrival. The
package must be picked up expeditiously upon receipt of notification (within three hours if
practicable). [10CFR20.1906(c), Reg. Guide 7.3-5]
3 Monitoring as described below must be performed as soon as practicable but at least within three
hours if received during normal working hours or within three hours of the next work day if received
after normal working hours. [10CFR20.1906]
3.a Upon receipt of a package of radioactive material, the package shall be placed in a restricted area.
Assure appropriate personnel are notified.
3.b Survey the entire exterior surface of the package at the time of receipt and assure that the maximum
radiation level does not exceed 2 mSv/hr (200 mRem/hr). Survey all sides of the device at 1m from
the exterior surfaces of the packages and assure that the maximum radiation level does not exceed
0.1 mSv/hr (10 mRem/hr). If either of these limits are exceeded, notify the Radiation Safety Officer
immediately. Record the maximum radiation levels measured at the package surface and at 1m from
the package surface on the Receiving Report. [10CFR20.1906(d), 10CFR71.47]
Note: If any of these limits are exceeded, the Radiation Safety Officer must immediately notify
the USNRC (or applicable governing agency) and the final delivering carrier.
4 Inspect the package for any evidence of physical damage. Record the results of this inspection on the
Receiving Report. Also record on the Receiving Report the date, source model number, source serial
number, radionuclide, activity, the individuals name making the record, transport package model
number, mass or activity of the depleted uranium and the package serial number. [10CFR34.63]
5 Assure that the package is locked or place the package into an outer locked container and secure the
package in accordance with your license requirements. [10CFR34.35, 10CFR34.23]
6 Keep a copy of the Operating Manual for the package on file to assure you have the proper opening
and handling instructions. Assure that the instructions are followed and any noted special precautions
are performed. [10CFR20.1906(e)]
Note: For licensees transporting special form sources in licensee owned or operated vehicles to
and from a work site are exempt from the contamination monitoring requirements. The
radiation survey required upon receipt must still be performed. [10CFR20.1906(f)]

SAMPLE TRANSPORTATION INSTRUCTIONS
5.3
Shipment of Radioactive Material
1 Prior to shipment of a Type B package within the USA, assure that you are a registered user of the
radioactive material package you wish to ship. Also, assure that you have appropriate quality
assurance procedures for Type B packages. [10CFR71.12, 10CFR34.31(b)]
2 Pre-shipment training requirements:
Prior to shipping hazardous materials, personnel must be trained in accordance with
49CFR172, Subpart H and be retrained every three years. Training shall include:
• General awareness/familiarization training.
• Function specific training.
• Safety training, providing:
• Emergency response information.
• Measures to protect employees from potential hazards associated with hazardous material
to which employees may be exposed in the workplace, both radioactive and chemical
hazards.
• Employer safety measures implemented to protect employees.
• Methods and procedures for accident avoidance, i.e. proper procedures for handling
hazardous material packages.
• OSHA or EPA training, MSDS information.
• Security awareness training [49CFR172.800, 10CFR30]
• An appropriate test must be administered and the following documentation must be kept:
• Employee name.
• Date of most recent training.
• Description, copy or location of the training methods.
• Name of person performing training.
• Certification that person has been trained and tested.
Documentation should be kept in one file, i.e. all radiation safety related training used as part of the
Hazmat training should be included.
3 Prior to shipment maintain copies on file of the most current Type B and Special Form certifications
(or Type A approval as applicable) and assure the package and its contents meet the following
requirements:
• The contents are authorized for use in the package.
• The package is in good physical condition for transport.
• All locks and outlet port fittings are properly installed and seal wired where required.
• All conditions of the Type B(U)-96 Certificate of Compliance (or Type A approval as appropriate)
are met [10CFR71.87]. Maintain copies of the current Type B, Type A and special form
certifications on file.
4 Assure that the source is secured in the proper shielded position in the shipping package as
described in Section 2 of this operations manual. Perform a pre-shipment inspection as described in
Section 5 under the “Transport Package” requirements and verify the package is assembled as
described in the Type B(U) certification (or Type A approval as applicable).
5 As applicable, attach a security seal with an identification mark to the package closure that serves as
a tamper indicator. [49CFR173.412(a)]
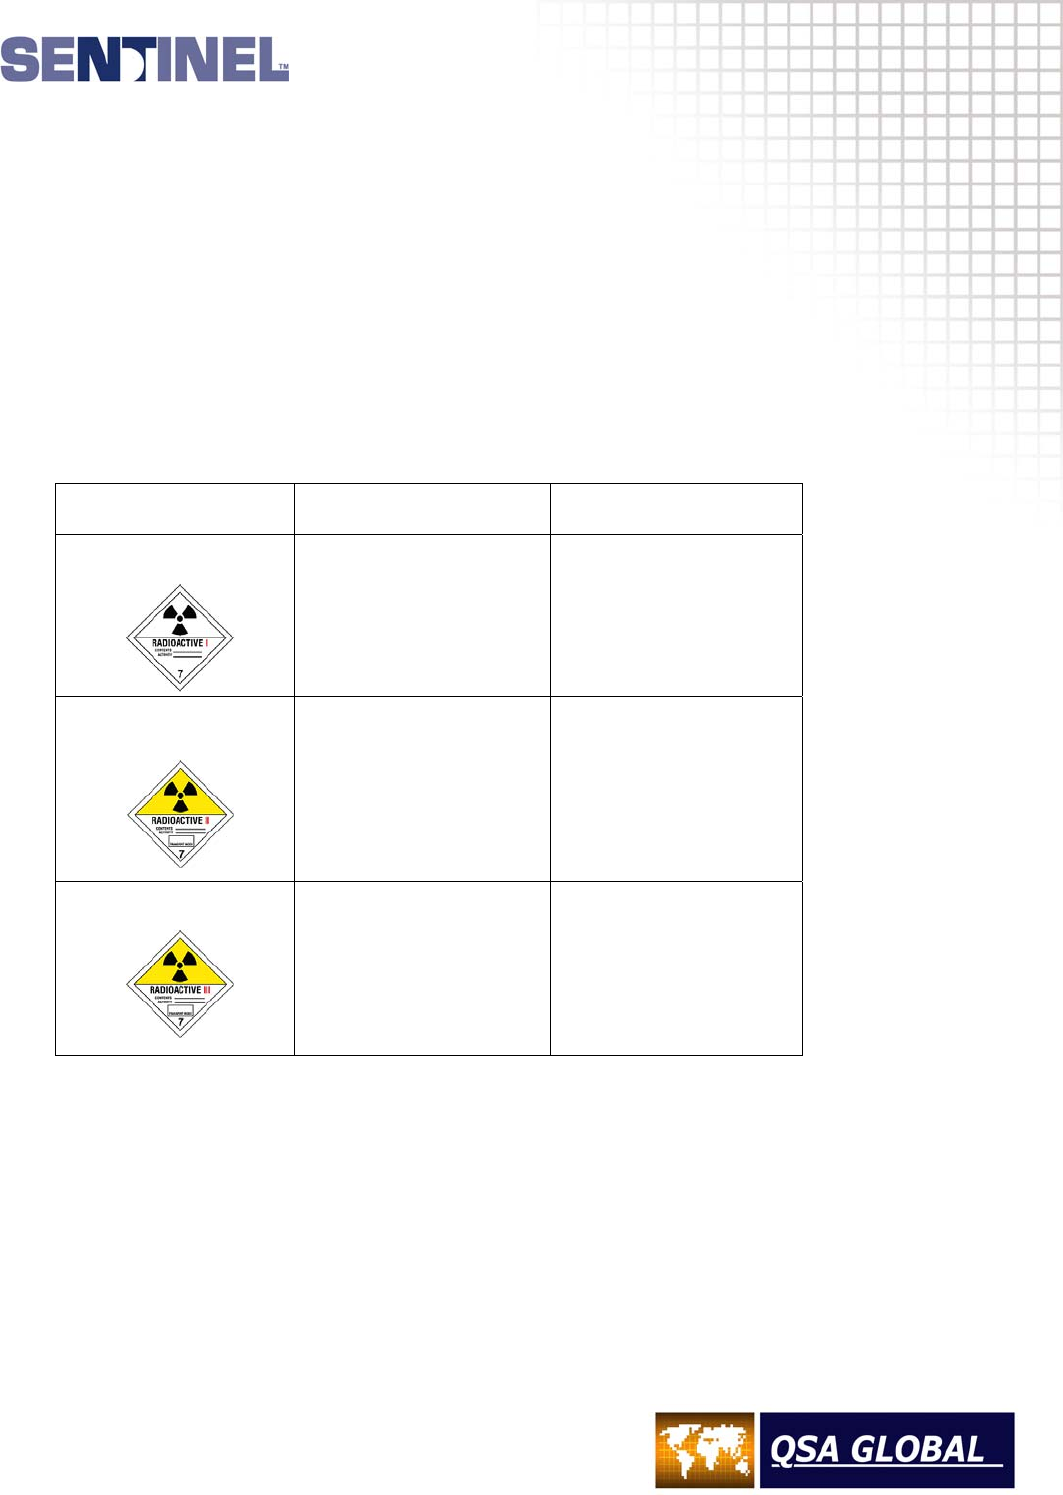
SAMPLE TRANSPORTATION INSTRUCTIONS
5.4
6 If the shipping package is to be packaged inside a crate or other outer packaging, the outer
packaging must be strong enough to withstand the normal conditions of transport and must not
reduce the safety of the package. The shipping package must be placed within the outer package
with sufficient blocking to prevent shifting during transportation. [49CFR173.25]
7 Survey the entire exterior surfaces of the package and assure that the maximum radiation level does
not exceed 2 mSv/hr (200 mRem/hr). Survey 1 m from all sides of the exterior surfaces of the
package and assure that the maximum radiation level does not exceed 0.1 mSv/hr (10 mRem/hr).
Determine the proper shipping labels to be applied to the package using the criteria of Table 1.
[49CFR172.403]
Note: If shipping the container inside an overpack or convenience box in the back of a vehicle,
survey and label both the inner 880 package and the overpack. Placarding the vehicle is
dependent on the category of label applied to the overpack if used. [49CFR173.448]
Table 1 Maximum Radiation
Level at Surface Maximum Radiation
Level at 1 Meter
Radioactive
White I
0.5 mRem/hr
(0.005 mSv/hr)
None
Radioactive
Yellow II
50 mRem/hr
(0.5 mSv/hr)
1.0 mRem/hr
(0.01 mSv/hr)
Radioactive
Yellow III
200 mRem/hr
(2 mSv/hr)
10 mRem/hr
(0.1 mSv/hr)
For a package, both the transport index (TI) and the surface radiation level conditions shall be
taken into account in determining which is the appropriate category of radioactive material label.
Where the TI satisfies the condition for one category but the surface radiation level satisfies the
condition for a different category, the package shall be assigned to the higher category of the two.
For this purpose, category White-I shall be regarded as the lowest category.

SAMPLE TRANSPORTATION INSTRUCTIONS
5.5
The TI is the maximum radiation level measured in mRem/hr at a distance of 1m from the external
surfaces of the package. When recording the TI, the dose rate units of mRem/hr are not listed, for
example a reading of 20 µSv/hr (2 mem/hr) would indicate a TI = 2.0. (Note that the TI is rounded to
the nearest tenth value.)
8 Properly complete two shipping labels indicating the contents (e.g. Ir-192), the activity of the source
(in Becquerels or multiples of Becquerels, e.g. GigaBecquerels (GBq)) and the transport index. The
transport index is used only on Yellow II and Yellow III labels and is defined as the maximum
radiation level in mRem/hr at 1m from the package surface (see Table 1). [49CFR172.403(g)]
9 Assure that any old shipping labels have been removed from the package. Apply two properly
completed labels to two opposite sides of the package (excluding the bottom surface).
[49CFR172.403(f)]
10 For air shipments within the USA, the package must be labeled with ‘Cargo aircraft only’ labels.
Ensure that these labels do not cover any other package markings or labels.
11 Mark the outside of the package with the proper shipping name and identification number (e.g.,
‘Radioactive Material, Type B(U) Package, UN2916’ for a Type B shipment or ‘Radioactive Material,
Type A Package, Special Form, UN3332’ for a Type A shipment) if not already marked. Place the
letters RQ (stands for Reportable Quantity) next to the proper shipping name when shipping more
than 10 Ci (370 GBq) of Ir-192, Se-75, Yb-169, Co-60 or 1 Ci (37 GBq) of Cs-137. [49CFR172.300]
12 If the shipping package is inside a crate or other outer packaging, mark the outside package ‘Inside
package complies with prescribed specifications’ and list the appropriate USNRC Type B number and
the words ‘Type B(U)’ in letters a minimum of ½ in (13 mm) high (or ‘DOT Type A Specification 7A’ for
a Type A shipment). [49CFR172.310; 49CFR173.471; 49CFR173.25]
13 Assure that the levels of removable radioactive contamination on the outside surface of the outer
package do not exceed 0.37Bq (10-5 µCi) per cm2. [49CFR173.443]
14 If the package gross weight exceeds 110 lb, mark the outside of the package with the gross weight.
[49CFR172.310]
15 Properly complete the shipping papers indicating:
a. Proper shipping name, United Nations Class Number ‘7’, and identification number (e.g.
‘Radioactive Material, Type B(U) Package, Class 7, UN2916’ for a Type B shipment or
‘Radioactive Material, Type A Package, Special Form, UN3332’ for a Type A shipment).
b. The letters RQ must appear next to the proper shipping name when shipping more than 10 Ci
(370 GBq) of Ir-192, Se-75, Yb-169, Co-60 or 1 Ci (37 GBq) of Cs-137.
c. Name of the radionuclide (e.g., Ir-192).
d. Physical and chemical form (i.e. Special Form).
e. Activity of the source in Becquerels or other appropriate multiples of Becquerels on the DOT label
and the shipping papers.
Note: number of Ci x 37 = number of GigaBecquerels (GBq).
f. Category of label applied (i.e. Radioactive Yellow II).
g. Transport Index.
h. USNRC identification number (i.e. USA/9296/B(U)-96) (or DOT Type A Specification 7A for a
Type A shipment).
i. For export shipments, the IAEA identification number (i.e. USA/9296/B(U)-96).
For Canadian shipments, include the Canadian Endorsement Number for the package.
j. Shipper’s certification: ‘This is to certify that the above-named materials are properly classified,
described, packaged, marked and labeled and are in proper condition for transport according to
the applicable regulations of the Department of Transportation.’ [49 CFR 172.204(a)].

SAMPLE TRANSPORTATION INSTRUCTIONS
5.6
NOTE: For shipments in company vehicles to and from job sites, the shipper’s certification is not
required.
k. The shipping papers must indicate your company's emergency telephone number. The telephone
number must have 24-hour coverage in case of an emergency concerning your shipment. The
telephone number must be clearly visible on the shipping paper and must be answered by a
person that can provide immediate emergency response information. Beepers and pagers are not
acceptable.
16 For air shipments, the shipping papers must meet the requirements specified in IATA for a Shipper's
Declaration for Dangerous Goods. In addition to the information listed in Step 15 of this part, the
following information needs to be specified:
a. Air waybill number: Enter the number of the air waybill to which the declaration form will be
attached. (This may be amended by the carrier.)
b. Aircraft limitations: Specify that the shipment is within the limitations for
‘Cargo aircraft only.’ A notation can be added in the handling information box of the Shipper's
Declaration which states ‘This shipment may be carried on passenger aircraft outside U.S.
jurisdiction’.
c. Airport of departure: Enter the full name of the airport of city of departure, which may be amended
by the carrier.
d. Airport of destination: Enter the full name of the airport or city of destination, which may be
amended by the carrier.
e. Shipment type: Specify the shipment type as ‘Radioactive’.
f. Under quantity and type of dangerous goods, specify the number of packages (of same type and
content), their type of package and activity in Becquerels or multiples thereof (units used must be
clearly indicated) in each package, including packages in overpacks.
(If relevant) Indication of use of overpack and dimensions of the overpack (including dimensional
units). When an overpack is used, the wording ‘overpack’ must be inserted on the declaration
form immediately after all the relevant entries relating to the packages within the overpack. In
such cases, packages within overpacks must be listed first. Dimension units must be in multiples
of meters.
g. The 24-hour emergency number required by Step 15 of this part, must appear in the ‘Additional
Handling Information’ section of the Declaration for Dangerous Goods.
h. For shipment of special form radioactive material, the Special Form Certificate of Competent
Authority for the radioactive source must be included. (e.g. USA/0335/S). For shipment of Type B
packages also include the certificate of Competent Authority (e.g. USA/9296/BU-96)
i. The shipper’s certification must be as follows:
‘I hereby declare that the contents of this consignment are fully and accurately described above
by the proper shipping name, and are classified, packaged, marked and labeled/placarded, and
are in all respects in proper condition for transport according to applicable International and
National governmental regulations. I declare that all of the applicable air transport requirements
have been met.’
The information on the Declaration for Dangerous Goods must be entered strictly in accordance with
the order specified in the latest edition of the International Air Transport Association, Dangerous
Goods Regulations. Questions regarding completion of a Shipper's Declaration for Dangerous Goods
should be directed to the Radiation Safety Officer.

SAMPLE TRANSPORTATION INSTRUCTIONS
5.7
Shipment of Empty Uranium Shielded Containers
1 Assure that the package does not contain a radioactive source. Perform the following procedure to
confirm there are no unauthorized source assemblies within the container:
• Transfer the authorized source assembly from the exposure device in accordance with the source
changer operations manual.
• After removing the source assembly and disconnecting the source assembly, attach the jumper
(dummy connector without a serial number) to the male connector of the control cable.
• Retract the control cable and jumper and disconnect the controls from the locking mechanism.
• Insert the protective cover into the locking mechanism, rotate the selector ring into the lock
position, engage the plunger lock and remove key. Insert the shipping plug.
• Remove the source identification tag from the exposure device and place it with the source
assembly.
• In some regulatory jurisdictions, ‘empty’ labels or tags must be attached to the empty Model 880.
2 If the shipping package is to be placed inside a crate or other outer packaging, the outer packaging
must be strong enough to withstand the normal conditions of transport and must not reduce the safety
of the package. The shipping package must be placed within the outer package with sufficient
blocking to prevent shifting during transportation. [49CFR173.25]
3 Assure that the levels of removable radioactive contamination on the outside surface of the outer
package does not exceed 0.4 Bq (10-5 µCi) per cm2 based on wiping an area of at least 300 cm2.
[49CFR173.443]
4 Survey the package at the surface and at 1 m from the surface to determine the proper shipping
labels to be applied to the package.
Note: If the surface radiation level does not exceed 5 µSv/hr (0.5 mRem/hr) and there is no measurable
radiation level at 1m from the surface, continue with the instructions in Step 5 below and skip Step
6. If either of these levels are exceeded, skip Step 5 and continue with the instructions in Step 6.
5 If the surface radiation level does not exceed 5 µSv/hr (0.5mRem/hr) and there is no measurable
radiation level at 1m from the surface, no label is required.
a. The outside of the inner packaging or, if there is no inner packaging, the outside of the packaging
itself bears the marking ‘Radioactive’.
b. The outside of the package must be marked with UN2909.
c. When shipping by air, excepted packages are exempt from the requirement for use of Dangerous
Goods Declaration.
i. For air shipments [IATA 10.8.8.3], the ‘Quantity and Type of Dangerous Goods’ box must
read:
“Radioactive Material, excepted package, articles manufactured from depleted uranium,
UN2909.”
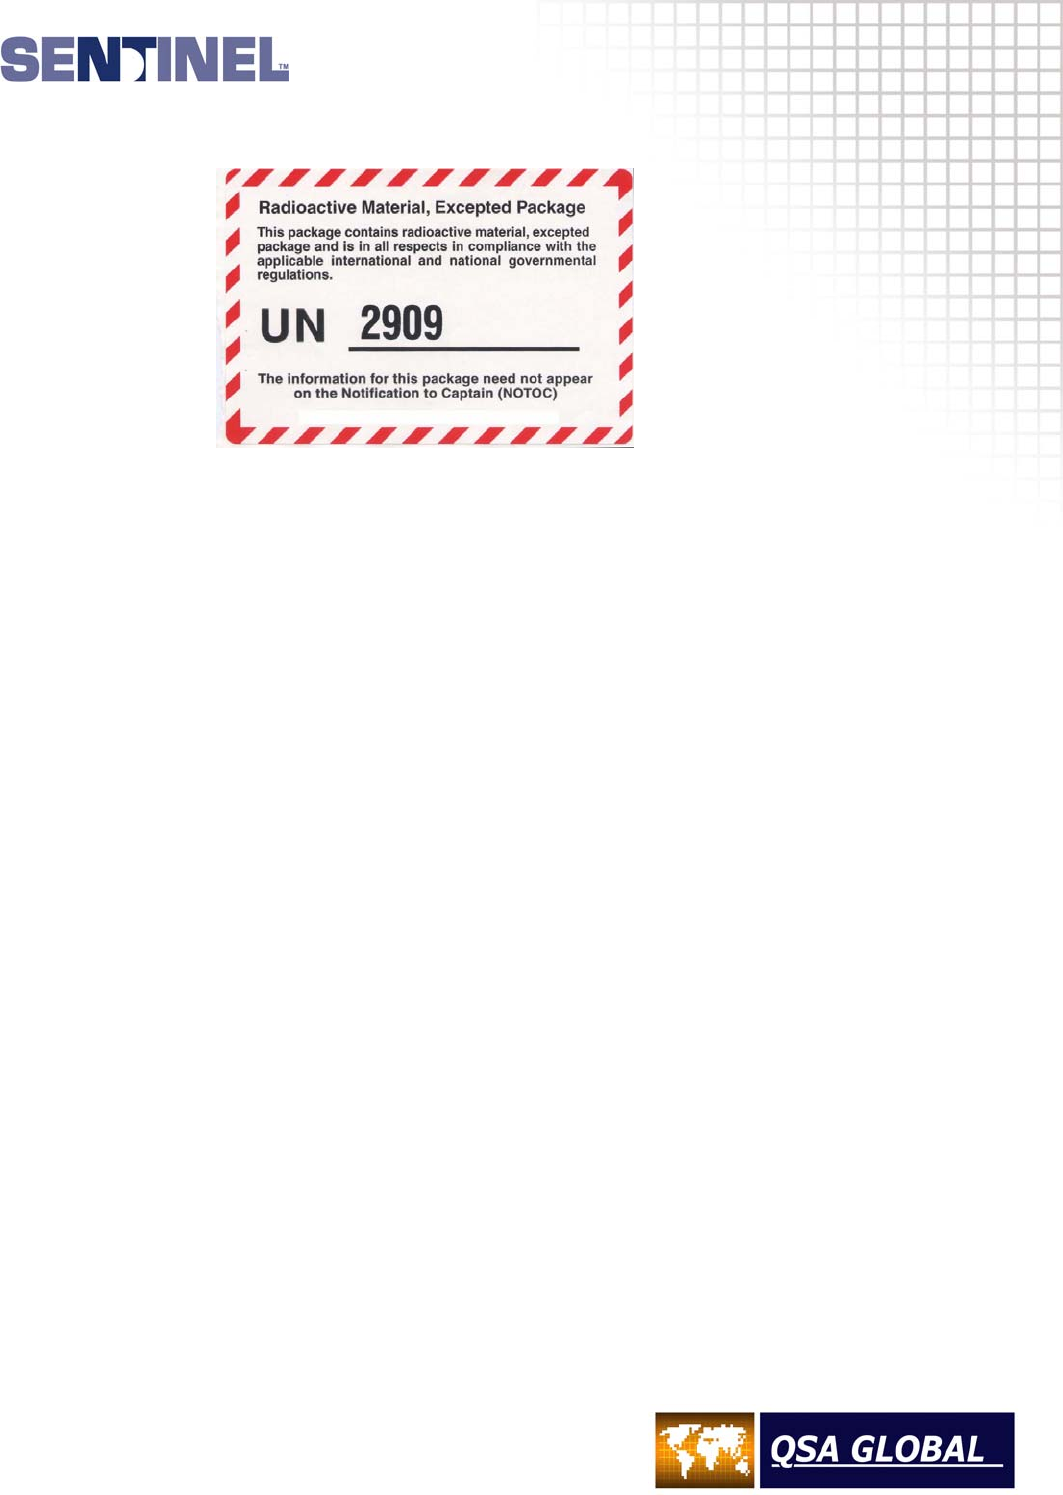
SAMPLE TRANSPORTATION INSTRUCTIONS
5.8
ii. Required after 1 January 2007, the outside of the package must include the following label
[IATA 10.7.4.4.3]:
6 If the surface radiation level exceeds 5 µSv/hr (0.5 mRem/hr), or if there is a measurable radiation
level at 1m from the surface, use the criteria of Table 1 to determine the proper shipping labels to be
applied to the package.
a. Mark the outside of the outer shipping package with the proper shipping name and identification
number (Radioactive Material, Low Specific Activity (LSA-I) UN2912. If the container is packaged
inside a crate or other outer packaging, mark the outer package with the word ‘Overpack’.
b. Properly complete the shipping papers, indicating:
i. Proper shipping name, identification number and class (i.e. Radioactive Material, Low
Specific Activity (LSA-I), Class 7, UN2912).
ii. Name of the radionuclide (i.e. depleted Uranium-238).
iii. Physical and chemical form (i.e. Solid Metal).
iv. Activity of the uranium in Becquerels or other appropriate multiples of Becquerels.
NOTE: Number of Curies x 37,000 = number of MegaBecquerels (MBq). The activity in
millicuries for U-238 equals 0.16 x the shield weight in pounds (i.e. for a Model 880 Delta
with a 34 lb shield, the approximate activity is 0.16 x 34 lb = 5.4 mCi).
v. Category of label applied (i.e. Radioactive Yellow II).
vi. Transport Index.
vii. USNRC identification number or DOT specification number, i.e. Model 880 Series cert:
USA/9296/B(U)-96.
viii.Shipper's certification:
‘This is to certify that the above-named materials are properly classified, described,
packaged, marked and labeled and are in proper condition for transport according to the
applicable regulations of the Department of Transportation.’ [49CFR172.204(a)]
Note: For shipments in company vehicles to and from job sites, the shipper’s certification
is not required.
For air shipments, the following Shipper's Certification may be used:
‘I hereby certify that the contents of this consignment are fully and accurately described
above by proper shipping name and are classified, packaged, marked and labeled/placarded,
and are in all respects in proper condition for transport according to applicable International
and national governmental regulations. I declare that all of the applicable air transport
requirements have been met’

SAMPLE TRANSPORTATION INSTRUCTIONS
5.9
ix. For air shipments, the package must be labeled with a ‘Cargo aircraft only’ label and the
shipping papers must state: ‘This shipment is within the limitations prescribed for cargo only
aircraft’.
x. Your company's 24-hour emergency telephone number.
xi. The weight of the package including the unit of measurement of the hazardous material
covered by the description (e.g. 100 lb). (Note: For air shipments, the weight must be in
multiples of kilograms.)
c. For air shipments, the shipping papers must meet the requirements specified in IATA for a
Shipper's Declaration for Dangerous Goods. In addition to the information listed in this Section,
the following information needs to be specified:
i. Air waybill number: Enter the number of the air waybill to which the declaration form will be
attached. (This may be amended by the carrier.)
ii. Aircraft limitations: Specify that the shipment is within the limitations for ‘Cargo aircraft only.’
A notation can be added in the handling information box of the Shipper's Declaration, which
states ‘This shipment may be carried on passenger aircraft outside U.S. jurisdiction’.
iii. Airport of departure: Enter the full name of the airport of city of departure, which may be
amended by the carrier.
iv. Airport of destination: Enter the full name of the airport or city of destination, which may be
amended by the carrier.
v. Specify contents (isotope) on the DOT hazard labels as LSA-I.
vi. Shipment Type: Specify the shipment type as ‘Radioactive’.
vii. Under Quantity and Type of Dangerous Goods, specify the number of packages (of same
type and content), their type of packaging and activity in Becquerels or multiples thereof
(units used must be clearly indicated) in each package, including packages in overpacks and
LSA-I.
(If relevant) Indication of use of overpack and dimensions of the overpack (including
dimensional units). When an overpack is used, the wording ‘Overpack’ must be inserted on
the declaration form immediately after all the relevant entries relating to the packages within
the overpack. In such cases, packages within overpacks must be listed first. Dimension
units must be in multiples of meters.
viii. The 24-hour emergency number required in this Section, must appear in the ‘Additional
Handling Information’ section of the Declaration for Dangerous Goods.
The information on the Declaration for Dangerous Goods must be entered strictly in
accordance with the order specified in the latest edition of the International Air Transport
Association, Dangerous Goods Regulations. Questions regarding completion of a Shipper's
Declaration for Dangerous Goods should be directed to the Radiation Safety Officer.
Carriage of Radioactive Material
1 Assure that the vehicle used is in good condition and carries the normal complement of safety
equipment including Radiation Area signs, a length of rope, spare tire, fire extinguisher, a set of
vehicle tools and a set of flares. Assure that the glove compartment contains the vehicle registration
certification and an operating flashlight. Additionally, assure that the operator has a calibrated and
operable survey meter and assure that all individuals traveling in the vehicle are wearing both a film
badge and a direct reading pocket dosimeter.
2 Assure that the transport package is properly packaged, marked and labeled and assure that the
proper shipping papers are completed in accordance with the instructions for shipping radioactive
material. The shipping papers must be accessible from the driver’s seat.

SAMPLE TRANSPORTATION INSTRUCTIONS
5.10
3 Place the transport package in the vehicle. Properly brace and secure the package against
movement in the vehicle. [49CFR177.842(d)]
4 Survey the driver's compartment to assure that the radiation level does not exceed 0.02 mSv/hr (2
mRem/hr). [49CFR177.842(g)] Note: This requirement is mandatory only for exclusive use shipments
by a common carrier. [49CFR173.441(b)(4)]
5 If the vehicle is transporting a package bearing a Radioactive Yellow III label, the vehicle must be
placarded on all four sides with a Radioactive placard.
Note: Operation of a vehicle which is required to be placarded requires compliance with the Federal
Motor Carrier Safety Regulations of 49CFR Parts 390-397 and the Driver Training
requirements of 49CFR177.827; 49CFR177.804.
6 Complete the Radioactive Material Transport Checklist (see attached example). Forward a completed
copy to the Radiation Safety Officer upon completion of the carriage.
7 If the vehicle becomes disabled on the road, do not leave the vehicle unguarded when going for help.
A message for help may be sent by a passing motorist or the police may be enlisted to guard the
vehicle.
8 Should any kind of accident occur, make an immediate radiation survey to determine if any radiation
levels are unusually high. If unusual radiation levels exist, establish the boundary of the restricted
area. Keep all persons out of this area and get police assistance, if possible. Notify the Radiation
Safety Officer as soon as possible, but do not leave the scene without assuring that the police or
some other responsible party will keep people out of the area.
9 Collect information pertinent to the accident, such as names of witnesses, names of people involved,
and names of police, license numbers and circumstances of the accident. Call the Radiation Safety
Officer promptly and give him as much information as possible.
10 If a source should escape from the packaging, the vehicle operator should make no attempt to restore
the source by himself. He should wait for assistance from the Radiation Safety Officer.
11 If the vehicle is going to be used for storage of radioactive material at a temporary job site:
a. The vehicle's storage access entrance must be posted with ‘Caution Radioactive Material’ signs.
b. The vehicle must be secured/locked so that there is no unauthorized access.
c. Radiation levels must be below 20 µSv/hr (2 mR/hr) outside the vehicle to meet unrestricted area
requirements.
d. Vehicle must meet new security requirements where applicable.
12 In the event of a transport emergency or accident involving this package, follow the guidance
contained in “2004 Emergency Response Guidebook: A Guidebook for First Responders During the
Initial Phase of a Dangerous Goods/Hazardous Materials Incident”, or equivalent guidance
documentation.

SAMPLE TRANSPORTATION INSTRUCTIONS
5.11
Radioactive material transport checklist
Date Operator
Destination
Transport Container Model Serial Number
Radionuclide Activity
Type of Label Applied Transport Index
Survey Meter Model Serial Number
Calibration Date Film Badge
Dosimeter Serial Number Initial Reading
Final Reading
Radiation Area Signs Packing List
Rope Bill of Lading
Radioactive Material Sign Emergency Equipment
Radiation Survey Driver’s Compartment mRem/hr
(Record highest reading) Vehicle (18 in from surface) mRem/hr
Packages properly marked and labeled (including transport index)
Packages secured in vehicle Vehicle Placarded
Shipping papers properly completed
Remarks:
Operator’s Signature

DEFINITIONS AND TERMS
6.1
Area alarm
An area radiation level monitor that provides a highly visual warning when the radiation level exceeds a pre-set
threshold. Commonly referred to as Gammalarms, use is required by most jurisdictions in permanent
radiographic installations and they are often used in conjunction with door interlocks and audible alarms.
Portable area alarms are required by some jurisdictions for radiography performed at temporary job-sites.
Alarm ratemeter
An alarm worn by radiography personnel that provides a continuous audible warning when the alarm ratemeter
detects a radiation level in excess of a pre-set threshold of 5mSv/hr (500mR/hr). This redundant safety alarm is
required by regulation for temporary job-site radiography within the USA.
Apparatus for industrial gamma radiography
Apparatus including an exposure device, a source assembly as applicable, a remote control, a projection
sheath, an exposure head and accessories designed to enable radiation emitted by a sealed radioactive source
to be used for industrial gamma radiography purposes. Also known as: isotope radiography system, isotope
radiography kit.
Automatic securing mechanism
An automatically activated mechanism located on the radiographic exposure device designed to restrict the
source assembly in the secured position.
Beam limiter
A shielding device for confining the elements of a beam of radiation to an assigned solid angle. Beam limiters
are generally manufactured from lead, tungsten and depleted Uranium and are pre-positioned over/on the
radiation source's working position. Also known as: collimators.
Control crank
A control cable cranking device that is a component of the remote controls. The control crank is used at a
distance by the radiography personnel to move the radiation source to and from the device, through projection
sheaths to and from the exposure position. Manual control crank mechanisms are commonly used, but
automatic exposure controllers are available which can be operated from a greater distance and allows preset
timing and automatic expose and retract modes. Also known as: wind-outs, crank-outs and hand-cranks.
Control cable
A cable or other mechanical means used to project and retract the source assembly out from and into the
radiographic exposure device by means of remote control. The control cable includes the means of attachment
to the source holder. Also known as: remote control cable, drive cable, Teleflex™ cable.
Control cable sheath
Rigid or flexible tube for guiding the control cable from the remote to the radiographic exposure device and
providing physical protection to the control cable. The control cable sheath includes the necessary connections
for attachment to the radiographic exposure device and to the remote control. Also known as: control cable
housing, conduit.
Exposure device (container)
Radiographic exposure devices are used to remotely project the radiation source to a predetermined
exposure position when required and to securely maintain it and shield it when it is not in use. Current
equipment requirements require devices be designed and tested to ISO/ANSI standards and pertinent
transportation regulations for transport containers. Also known as: projector, gamma ray projector
(G.R.P.), camera, pill-box, source-box, exposure container.

DEFINITIONS AND TERMS
6.2
Exposure head
Device which locates the sealed source included in the source assembly, in the selected working position
and prevents the source assembly from projecting out of the projection sheath. Also known as: source
stop, end stop, snout and head-hose.
Locked position
Describes the condition when the lock on a radiographic exposure device or transport container is fully
engaged to lock the source assembly in place and the key is removed from the lock. This condition
prevents unauthorized personnel access to the sealed source assembly locked within the device.
Maximum rating
The maximum activity expressed in bequerels and curies that cannot be exceeded, of a sealed source
specified by radionuclide by the manufacturer when contained within a radiographic exposure device or a
transport container.
Plunger lock
A mechanical device with a key used to lock or unlock the radiographic exposure device or transport
container.
Projection sheath
A flexible or rigid tube for guiding the source assembly from the radiographic exposure device to the
working position, having the necessary connections for attachment to the radiographic exposure device
and the exposure head or including the exposure head itself. The projection sheaths also provide
protection of the source assembly and attached control cable from water, dirt, sand and other foreign
materials usually present at radiography environments. Also known as: source guide tubes, guide tubes,
source tubes, head-hoses. Examples of rigid projection sheaths include j-tubes, probes, jet engine
probes.
Remote control
The mechanical device that enables the source assembly to and from a working position by operation
from a distance away from the radiographic exposure device. The remote control includes the control
crank mechanism (normally a hand-crank), and where applicable, also the control cable, the control cable
sheath and the necessary connections and attachments. See additional description under ‘control crank’.
Reserve sheath
Remote control sheath (conduit) containing the length of control cable, necessary for the projection of the
source assembly.
Sealed source
Radioactive source sealed in a capsule or having a bonded cover, the capsule or cover being strong
enough to prevent contact with and dispersion of the radioactive material under the conditions of use and
wear for which it was designed. Commonly referred to as: the ‘source’ or the ‘pill’.
Secured position (shielded position)
Condition of the radiographic exposure device and source assembly, when the sealed source is fully
shielded and restricted to this position within the radiographic exposure device.
Note: When in the secured position during radiographic operations, the radiographic exposure device
may be unlocked.
Simulated source
A sealed source whose structure is such as that of the sealed radioactive source, but not containing any
radioactive material. Also known as: mock source, dummy source, phantom source, dummy pill.

DEFINITIONS AND TERMS
6.3
Source assembly
A source holder with a sealed source attached or included. In cases where the sealed source is directly
attached to the control cable without the use of a source holder, the source assembly is the control cable
with the sealed source attached. In cases where the sealed source is not attached to the control cable nor
included within the source holder, the sealed source is the source assembly.
In the case where a simulated source is attached to or included with a source holder or control cable, this
becomes a simulated source assembly.
Flexible type source assemblies are also known as ‘pigtails’. The source assembly is most commonly
referred to as the ‘source’.
Rigid or chain link type source assemblies are also known as: source rods, source pencils, source trains,
source chains.
Source holder
A holder or attachment device, by means of which a sealed source or simulated source can be:
• directly included in the radiographic exposure device (category I apparatus - an exposure device in
which the source assembly is not removed for exposure).
• fitted at the end of the control cable (category II apparatus - an exposure device from which the
source assembly is projected out through a projection sheath to the exposure head for exposure. The
exposure is remotely operated.)
Source holders may be an integral part of the source assembly or may be capable of being dismantled for
sealed source replacement.
Source changers
A lockable Type A or Type B transport container used to transport new sealed source assemblies,
exchange them and return depleted sealed source assemblies to the manufacturer. Source changers are
also utilized for storage of sealed source assemblies. Also known as: source exchangers, storage
containers.
Working position
Condition of the exposure container and source assembly when in the position intended for the
Performance of industrial gamma radiography.
EMERGENCIES AND PERSONNEL SAFETY
7.1
Emergencies
During the termination of a radiographic exposure, observation of the survey meter provides an indication
of source movement while cranking the remote control handle. After retracting the sealed source into the
exposure device, radiographers are required to perform a confirmatory survey of the exposure device, the
projection sheaths and beam limiter when used. Performing a confirmatory survey after a radiographic
exposure is required by regulation and is the only method that the radiographer should rely on to
determine if a source assembly is in the fully shielded position within the exposure device. If the
radiographer measures any radiation level that indicates the sealed source is not fully shielded while
performing the confirmatory survey, the radiographer must first recognize that problem exists and then
follow his company’s emergency procedures. Emergency conditions are those problems in which the
source assembly cannot be returned to the shielded position by normal means, specifically the remote
control crank mechanism. The majority of problems experienced by radiographers are where the source
assembly becomes disconnected or when the source assembly becomes jammed in the projection
sheath while in an exposed position. The important safety points for radiographers to follow are:
• Always perform a confirmatory survey after each exposure.
• If higher than expected radiation levels are measured, recognize that an emergency exists.
• Follow emergency procedures.
• Do not attempt to retrieve the sealed source. Secure the area and notify the Radiation Safety Officer.
The radiography crew is limited to the following basic steps and must be adhered to
under regulation:
1 Immediately leave the area and maintain continuous surveillance of high radiation area.
2 Adjust the restricted area boundary to ensure the measured dose/rate is < 2 mR/hr.
Do not allow anyone into the area.
3 Immediately notify the Radiation Safety Officer.
4 Do not leave the area unattended under any circumstances. Maintain security of the area until the
Radiation Safety Officer arrives at the site.
Do not under any circumstances attempt to retrieve the source. Performing source retrieval is a licensed
activity that allows only specially trained RSOs to respond to an emergency. This regulatory requirement
is the result of overexposures to radiographers attempting to handle emergency retrievals by themselves.
WARNING:
An unshielded source must not be picked up or handled at close range under any circumstances.
An unshielded source at close range can cause serious injury or death to anyone who is exposed
to it, even for a short duration of time.
Training
Formal classroom training in radiation safety, supervised hands-on training and certification by an
independent certifying organization of radiographers are essential components for radiological safety in
isotope radiography and is a regulatory requirement in the United States and Canada.
SentinelTM, QSA Global, Inc. provides radiation safety and inspection & maintenance training at the Baton
Rouge, Louisiana and Burlington, Massachusetts facilities. On-site training is available by arrangement.

EMERGENCIES AND PERSONNEL SAFETY
7.2
Access to Restricted Areas
The site where radiography is performed must be separated from other work areas by as much distance
as possible. If applicable, check for occupation of the areas above and below the radiography site.
Clearly defined boundaries must be set up and warning signs displayed to provide warning and prevent
access to the radiography site by unauthorized personnel before any exposure begins.
No one should enter the boundary marking a ‘Restricted Area’ or ‘Controlled Area’ without a film badge or
TLD, direct reading pocket dosimeter (or electronic pocket dosimeter) and alarm ratemeter (if required).
A pocket ‘chirper’ alarm is required in some countries to provide radiography personnel with an immediate
audible warning of a high radiation intensity.
United States Regulations
‘High Radiation Area’ signs must be posted where a dose of 1 mSv (100 mRem) could be received in any
one hour. The radiographers must provide continuous direct surveillance of the area or when a
permanent installation is used, the entrance must be equipped with door interlocks, audible and visual
warnings.
‘Radiation Area’ signs must be posted where dose of 5 µSv (5 mRem) could be received in any one hour.
‘Restricted Area’ must be identified and posted where a dose of 20 µSv (2 mRem) could be
received in any one hour or 1 mSv (100 mRem) in one year.
In practice, the ‘Radiation Area’ and ‘Restricted Area’ are combined and identified by the use of a rope
barrier. The area is posted with the ‘Radiation Area’ signs where the maximum dose will not exceed 20
µSv (2 mR) in any one hour or 1 mSv (100 mRem) in a year. The practice of using the ‘Radiation Area’
sign at the ‘Restricted Area’ boundary clearly defines why the area has been restricted. Additionally, the
trefoil (radiation) symbol provides a visual warning for those individuals who cannot read.
During a radiographic exposure, a calibrated and operable survey meter must be used to confirm the
dose rate at the ‘Restricted Area’ boundary and adjusted if the dose rate exceeds the limit of 20 µSv (2
mRem) in one hour.
During the radiographic exposure, the radiographers must maintain continuous direct surveillance of the
‘High Radiation Area’ in addition to ensuring that no one enters their posted ‘Restricted Area’.
EU Regulations
A ‘Controlled Area’ must be marked with a barrier at a distance where the radiation intensity will not
exceed 7.5 µSv/hr (0.75 mR/hr). The boundary dose rates must be noted and the record kept for 2 years.
During radiographic operations, only classified radiation workers are allowed inside this area.
A ‘Supervised Area’ is defined as the area where the boundary dose rate limit must not exceed 2.5 µSv/hr
(0.25 mR/hr). No barriers or notices are required here, but the radiographer must be vigilant to ensure
that personnel in this area do not enter the ‘Controlled Area’.
Personnel Monitoring
All personnel who enter a ‘Restricted’ or ‘Controlled’ area or are present during radiographic operations
are required to wear the appropriate personnel monitoring devices as required by the regulatory
jurisdiction. These devices can include; film badges; thermoluminescent dosimeters (TLD); optically
stimulated luminescence badges; direct reading pocket dosimeters; electronic pocket dosimeters; alarm
ratemeters; and audible alarms. Calibrated and operable survey meters must be used to determine
radiation levels when conducting radiographic operations.

INSTRUCTIONS FOR DISPOSAL
8.1
Disposal
By international regulations, radioactive materials that are no longer required must be transferred to a
licensed recipient for final disposition. Cobalt-60 source assemblies that have depleted beyond their
useful working life may be returned to authorized recipients using a source changer authorized for the
specific model source assembly.
Authorized recipients will provide any specific conditions to the shipper as required by regulatory
authorities. As a minimum, sources that are transferred for a final disposition must be within a current leak
test and properly secured within an authorized package before shipment.
Damaged, cropped, modified or contaminated source assemblies may require special handling and
special transport containers. Notify the authorized recipient for specific instructions in these
circumstances.
Depleted Uranium (DU) shielded exposure devices that are removed from service due to severe damage,
worn through ‘S’ tubes or decommissioning reasons must be sent to a licensed recipient for final
disposition. If the Type B transport status of a damaged exposure device is impaired, the exposure device
must be transported without radioactive source assemblies. DU shielded exposure devices sent for final
disposition must be properly packaged, surveyed, marked and labeled before placement into the
transportation system.
Contact QSA Global, Inc. for assistance in the transfer of DU shielded exposure device for final
disposition

MAN-027-May 2007
Sales
SENTINEL™
QSA Global, Inc.
6765 Langley Drive
Baton Rouge, Louisiana 70809 USA
Telephone + 1 225 751 5893
Toll Free + 1 800 225 1383
Fax + 1 225 756 0365 or
+ 1 225 751 8082
Manufacturing
SENTINEL™
QSA Global, Inc.
40 North Avenue,
Burlington, Massachusetts 01803 USA
Telephone + 1 781 272 2000
Toll Free + 1 800 815 1383
Fax + 1 781 273 2216
Email: sales@sentinelndt.com
Website: www.sentinelndt.com
abc
All goods and services are sold subject to the terms and conditions
of QSA Global, Inc. A copy of these terms and conditions is available upon request.
SENTINEL™ is a trademark of QSA Global, Inc.
All brand names and product names where used are acknowledged
to be trademarks of their respective holders.
© 2007 QSA Global, Inc