users manual
SIGMA TNT II PRO / TM 64
User’s manual
Ver.1.0
• All specifications described in this manual are subject to change without prior notice.
• This manual is not allowed to copy or print in whole or in part without a written permission of
SIGAMCOM CO., LTD.
• If you find any omission or misprinted part, please let us know in witting.
• SIGMA TNT II PRO is a registered trademark of SIGAMCOM CO.,LTD.
• Other trademarks and names are the property of their respective owner
• Copyright©2000 SIGAMCOM CO.,LTD.

2
FCC NOTICE
THIS DEVICE COMPLIES WITH PART 15 OF THE FCC RULES.
OPERATION IS SUBJECT TO THE FOLLOWING TWO CONDITION:
(1) THIS DEVICE MAY NOT CAUSE HARMFUL INTERFERENCE, AND
(2) THIS DEVICE MUST ACCEPT ANY INTERFERENCE RECEIVED,
INCLUDING INTERFERENCE THAT MAY CAUSE UNDERSIRED
OPERATION.
This equipment has been tested and found to comply with the limits for a Class
B digital device, pursuant to part 15 of the FCC Rules. These limits are designed
to provide reasonable protection against harmful interference in a residential
installation. This equipment generates, uses and can radiate radio frequency
energy and, if not installed and used in accordance with the instructions, may
cause harmful interference to radio
communication. However, there is no guarantee that interference will not occur
in a particular installation. If this equipment does cause harmful interference to
radio or television reception, which can be determined by turning the equipment
off and on, the user is encouraged to try to correct the interference by one or
more of the following measures :
- Reorient or relocate the receiving antenna.
- Increase the separation between the equipment and receiver.
- Connect the equipment into an outlet on a circuit difference from that to which
the receiver is connected.
- Consult the dealer of an experienced radio/TV technician for help.
NOTE : The manufacturer is not responsible for any radio or TV interference
caused by unauthorized modifications to this equipment. Such modifications
could void the user’s authority to operate the equipment.

3
Table of contents
Table of contentsTable of contents
Table of contents
Chapter1 Before getting started
Features of SIGMA TNT 2 board
System configuration and each part description
Chapter2 Installation
Display driver installation
Microsoft Windows 95
Microsoft Windows 98
Microsoft Windows Me
Microsoft Windows NT4.0
Microsoft Windows 2000
Installation of application programs
Chapter 3 Using programs
How to use Sigma TNT 2 utilities
Color management
DirectX 3D settings
OpenGL settings
Overlay color control
Gamma Correction
Other options
Watching video CD
Listening to MP3 files

4
Chapter 1
Before getting started
Before getting startedBefore getting started
Before getting started
• Features of SIGMA TNT 2 board
Features of SIGMA TNT 2 board Features of SIGMA TNT 2 board
Features of SIGMA TNT 2 board
• System configuration and each part description
System configuration and each part descriptionSystem configuration and each part description
System configuration and each part description

5
Features of SIGMA TNT 2 board
! The latest NVIDIA RIVA TNT2 (Pro/TM 64) chip built-in
! 143MHz Core clock /166MHz memory clock
! 6ns 32MB SDRAM standard
! Real 128bit 2D/3D acceleration
! AGP 4X support
! Twin-texel acceleration engine integrated
! 100% hardware triangle setup engine
! 32bit true color 3D rendering
! Anti-aliasing in full modes
! MP3 file player and Sigma MP3 player provided
! Integrated hardware BIOS for DDC monitor information and VESA timing
6
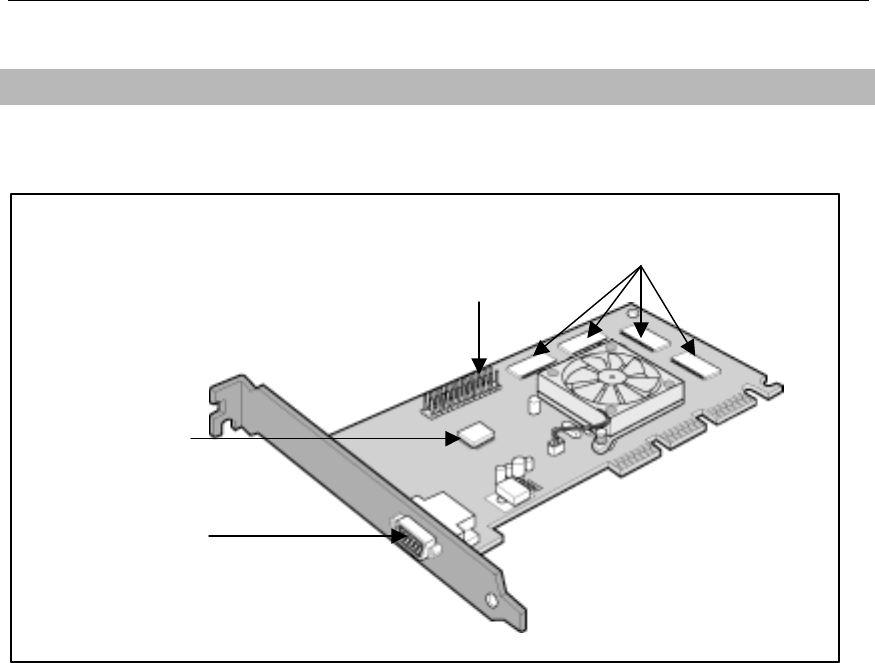
Video Memory
Video Capture Port
ROM BIOS
Monitor connector
System configuration and each part description
Figure 1. TNT 2 Pro 32 (32MB)
" Monitor connector
Is connected to the monitor and outputs video signals of VGA board.
# Video Capture Port
Connects to other multimedia products.
Refer to a corresponding manual of each multimedia product.
$ ROM BIOS
Sets up to control VGA in your system.
% Video Memory
Is a storage place to have the contents to be displayed on the screen. It is called as Frame Buffer or
Video Buffer.
Sigma TNT 2 Pro 32 VGA board provides high speed SDRAM 32MB as a default.

7
Chapter 2
Chapter 2Chapter 2
Chapter 2
Installation
• Display driver installation
Microsoft Windows 95
Microsoft Windows 98
Microsoft Windows Me
Microsoft Windows NT 4.0
Microsoft Windows 2000
• Installation of application programs

8
Display driver installation
Windows 95
Note
In order to install the SIGMA TNT 2 under Windows NT4.0, Windows 95 OSR 2.1 or higher
version needs to have been installed. If not, download OSR2.1 patch program at
www.microsoft.com.
" Insert the installation CD into CD-ROM drive when Windows 95 starts.
# Select “Properties” when Pop-up menu appears by clicking the right mouse button.
$ Click “Settings” in “Display Properties” dialog box.
% Click “Advanced Properties” and “Change” in “Adapter”.
& Click “Have Disk” when “Select Device” dialog box appears.
' Click “Browse” in “Install from disk” dialog box and install “WIN9X” directory in “TNT2” folder
of CD-ROM drive when “Open” dialog box displays. Click “OK”.
( Click “OK” in “Install From Disk” dialog box.
) If it recognizes “Sigma TNT 2 (x.xx)” in “Select device” dialog box and click “OK”
again. (TM 64 board recognizes ‘Sigma TNT2-TM64’ and TNT 2 PRO boards recognizes
‘Sigma TNT 2 Pro’.) Follow the instruction displayed.
* If a dialog box appears asking if you want to restart your system, select “Yes”.
9
Windows 98
+
++
+ In case of installing Sigma TNT 2 board and Windows 98 together
If you have installed Windows 98 newly, your system recognizes the video card as “standard
PCI graphics adapter”. If it has not been set correctly, switch display to “standard PCI graphics
adapter” and proceed with the following procedures.
" Insert the installation CD into CD-ROM drive when Windows 98 starts.
# Click the right mouse button and select “Properties” when Pop-up menu appears.
$ Select “Settings” in “Display Properties”.
% Click “Advanced”, “Adapter” then “Change”.
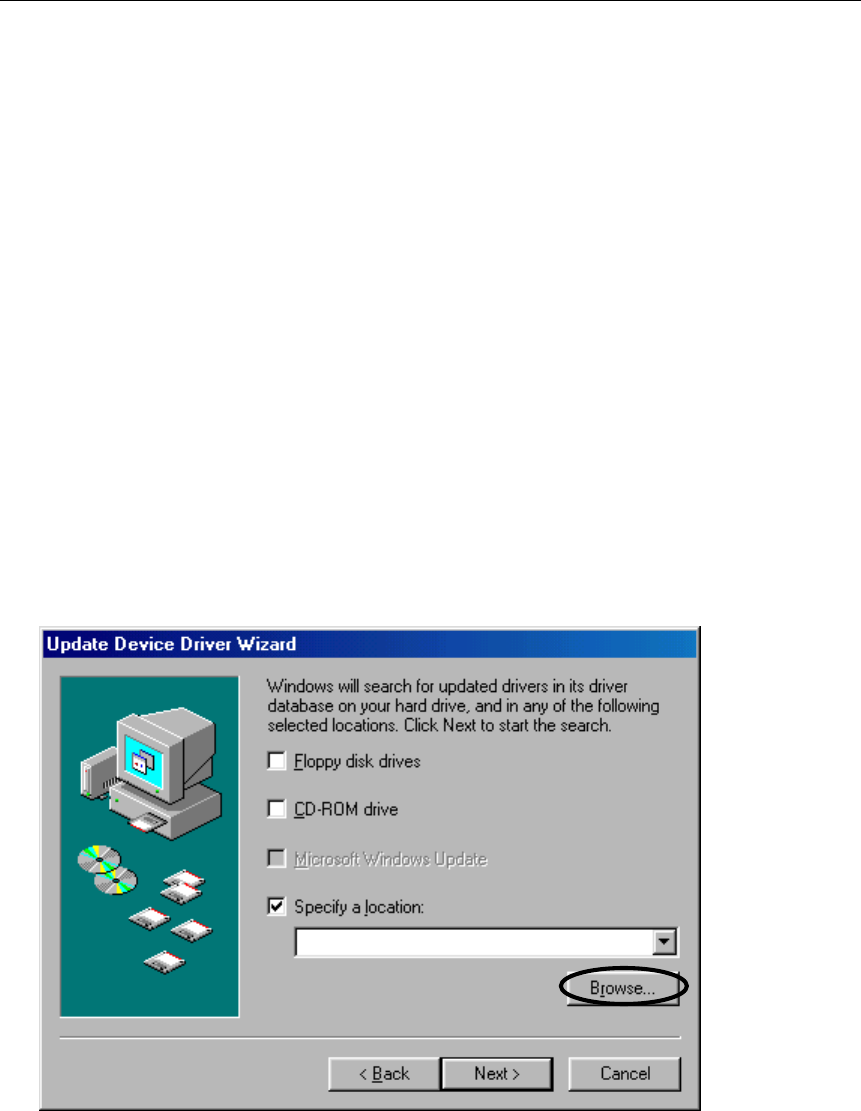
& “Update Device Driver Wizard” appears then click “Next”. Select “Search for a better driver
than the one your device is using now (Recommended)” and click “Next”.
' Select “Specify a location” and “Browse…”
( Select “WIN9X” directory on “TNT” folder of CD-ROM drive then click “OK”.
) When it turns back to the “Update Device Driver Wizard”, click “Next”.
* If it recognizes “Sigma TNT2 (x.xx)” in “Device to Find Driver”, click “Next” and
“Finish”.
, If a dialog box appears asking if you want to restart your system, select “Yes”.

10
+
++
+ In case of exchanging the VGA card to Sigma TNT 2 board
" When Windows begins, VGA board is recognized by PnP BIOS and “Add New Hardware
Wizard” dialog box will appear on the screen then click “Next”.
# Click “Search for the best driver for your device [Recommended]” and then click “Next”.
$ Insert the installation CD into CD ROM drive and select “Browse” in the “Add New Hardware
Wizard”.
% When “Browse for Folder” dialog box appears, select “WIN9X” directory in “TNT2” folder. Click
“OK “ and “Next”.
& If it recognizes “Sigma TNT 2 (x.xx.xx)” in “Update Device Driver Wizard” dialog box
then click “Next” and ”Finish”
) The appropriate drivers will be copied. If a dialog box appears asking if you want to restart
your system, click "Yes".

11
Windows Me
TNT 2 driver for Windows Me is installed automatically. However, if you want to use a driver
we provide on CD, install the driver as follows.
" Insert the installation CD into CD-ROM drive when Windows Me starts.
# Click the right mouse button on the background and select “Properties” when Pop-up menu
appears.
$ Select “Settings” in “Display Properties”.
% Click “Advanced” and “Adapter” then “Change”.
& “Update Device Driver Wizard” appears. Select “Specify the location of the driver
(Advanced)” and click “Next”.
' Select “Search for a better driver than the one your device is using now (Recommended)
and “Specify a location” and “Browse…”
( Select “WIN 98_ME” folder on “TNT 2” folder of CD-ROM drive by using “Browse” button
then click “OK”.
) When it turns back to the “Update Device Driver Wizard”, choose “Install one of the other
drivers” then click “Next”.
* Select “TNT 2 (vX.XX)” in “Select Other Driver”, click “OK”.
When “Update Device Driver Wizard” appears, choose “Install one of the other drivers” then
click “Next”.
, Click “Next” then “Finish”.
`If a dialog box appears asking if you want to restart your system, select “Yes”.

12
Windows NT 4.0
Note
In order to install the SIGMA TNT2 under Windows NT4.0, the service pack 3 or higher version
needs to have been installed.
" Run Windows NT 4.0.
# Insert the installation CD into the CD-ROM Drive.
$ Click the right mouse button on the initial display and select “Properties”.
% “Display Properties” appears then click “Setting” and “Display Type”.
& Select “Change” in “Display type” then “Change Display” box appears. Click “Have Disk”.
' Click “Browse…” when “Install from disk” dialog box appears and locate the NT4.0 directory
from “TNT2” folder of CD-ROM drive then “Open”.
( Select “Yes” if a dialog box that asks to install a third party drivers.
) The message “The drivers will successfully installed” appears. Run “Window NT 4.0” again.

13
Windows 2000
TNT 2 driver for Windows 2000 is installed automatically. However, if you want to use a
driver we provide on CD, install the driver as follows.
" Insert the installation CD into CD-ROM drive when Windows 2000 starts.
# Click the right mouse button on the background and select “Properties” when Pop-up menu
appears.
$ Select “Settings” in “Display Properties”.
% Click “Advanced” and “Adapter” then “Properties”.
When “nVidia Vanta Properties” appears click “Update Driver…”.
& “Upgrade Device Driver Wizard” appears then click “Next”. Select “Search for a suitable driver
than for my device (Recommended)” and click “Next”.
' Select “Specify a location” and “Browse…”
( Select “WIN2000” folder on “TNT 2” folder of CD-ROM drive by using “Browse” button then
click “OK”.
) When it turns back to the “Upgrade Device Driver Wizard”, choose “Install one of the other
drivers” then click “Next”.
* Select “TNT 2 (vX.XX)” in “Driver Files Found”, click “Next”.
If a dialog box appears “Digital Signature Not Found”, select “Yes” and click “Finish”.
, When it turns back to the “TNT 2 Properties”, click “Close”.
`If a dialog box appears asking if you want to restart your system, select “Yes”.
14
Installation of application programs
" Insert the installation CD into CD-ROM Drive.
# Select the CD-ROM Drive at “TNT2” foler.
$ Run “SETUP.EXE” at “SIGMACOM” folder.
% Click “Next” in the installation procedure.
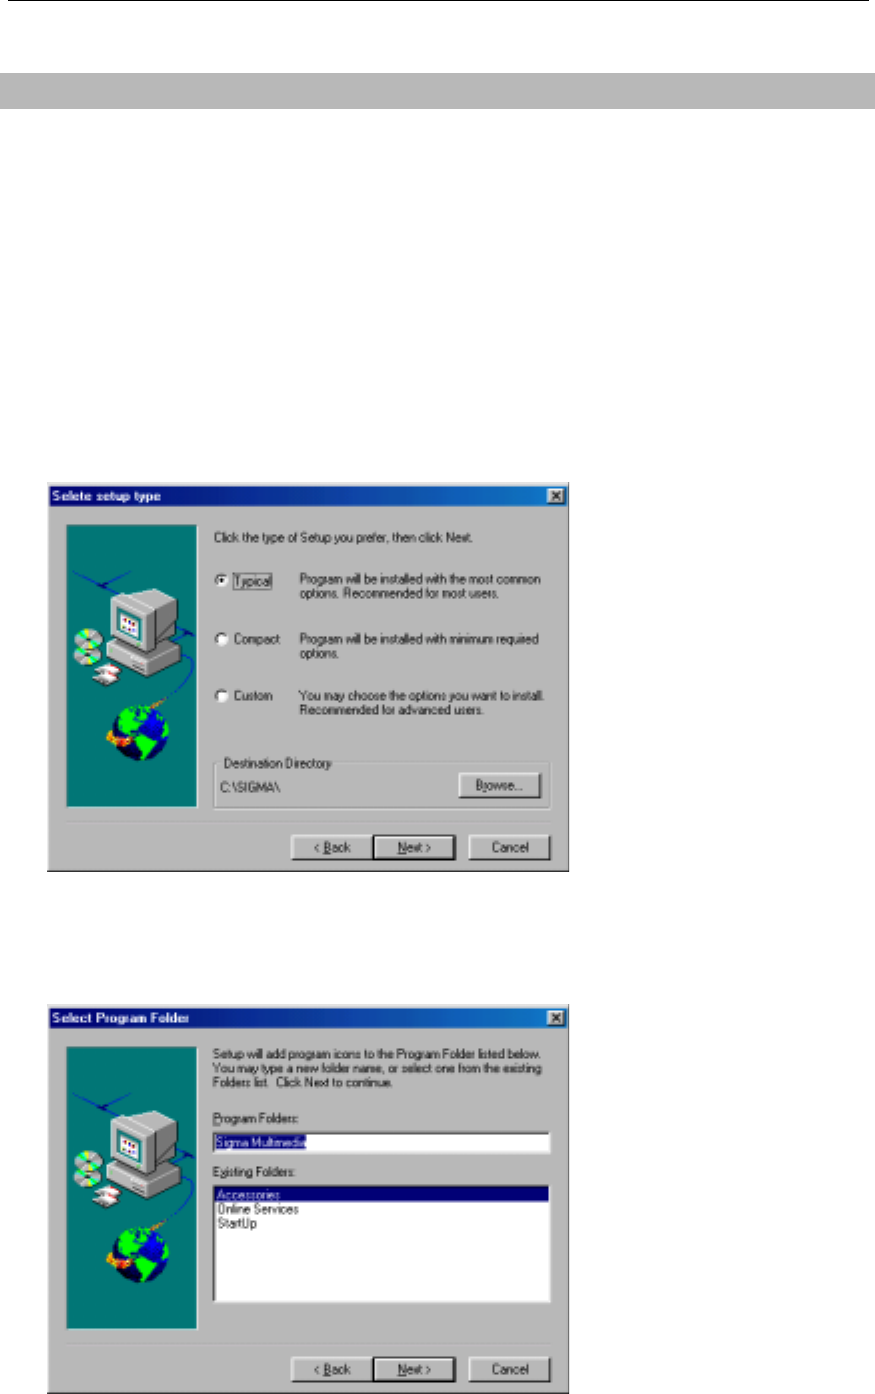
& Installation directory and method are shown in the dialog box. Click “Next”.
If you want to change the installation directory, click “Browse…” and place a directory you
want. If you want to install user-defined items, select “Custom” then “Next”.
' The “Select Program Folder” dialog box appears, then click “Next”.
If you want to change the name of the program folder, enter a name in the white blank.
15
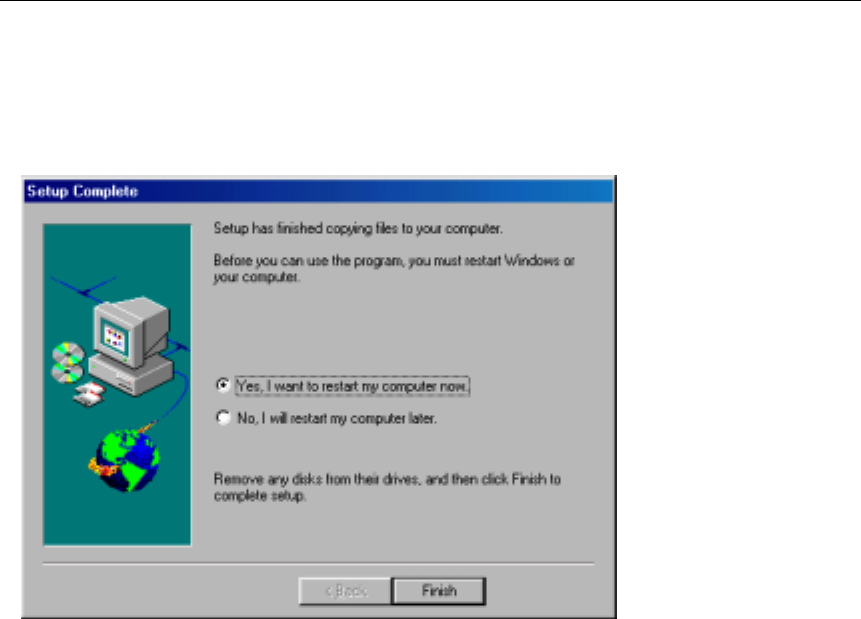
( The applications will be copied and folders and icons will be created.
) The “Setup Complete” dialog box appears.
Select “Yes, I want to restart my computer now” and click “Finish”.

16
Chapter 3
Using programs
• How to use SIGMA TNT 2 utilities
Color management
DirectX 3D settings
OpenGL settings
Overlay color control
Other options
• Watching video CD
• Listening to MP3 files
17
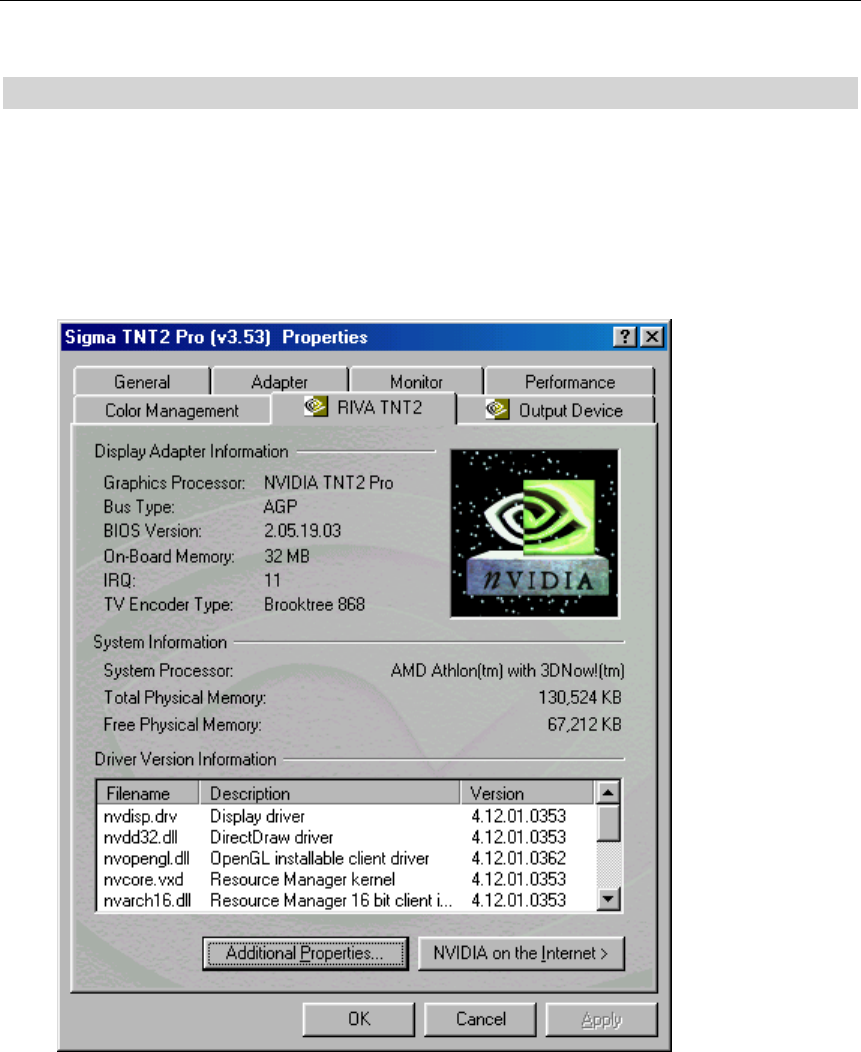
How to use Sigma TNT 2 Utility
This is a utility program that sets display properties and 3D functions.
When clicking “ Display properties”, “Settings”, “Advanced” and “RIVA TNT2”, the following
dialog box that shows hardware information, driver version, and memory size appears.
And for more detailed settings of Gamma correction, 3D feature setting, OpenGL, and DirectX,
click “additional properties” in the below part of the dialog box.
18
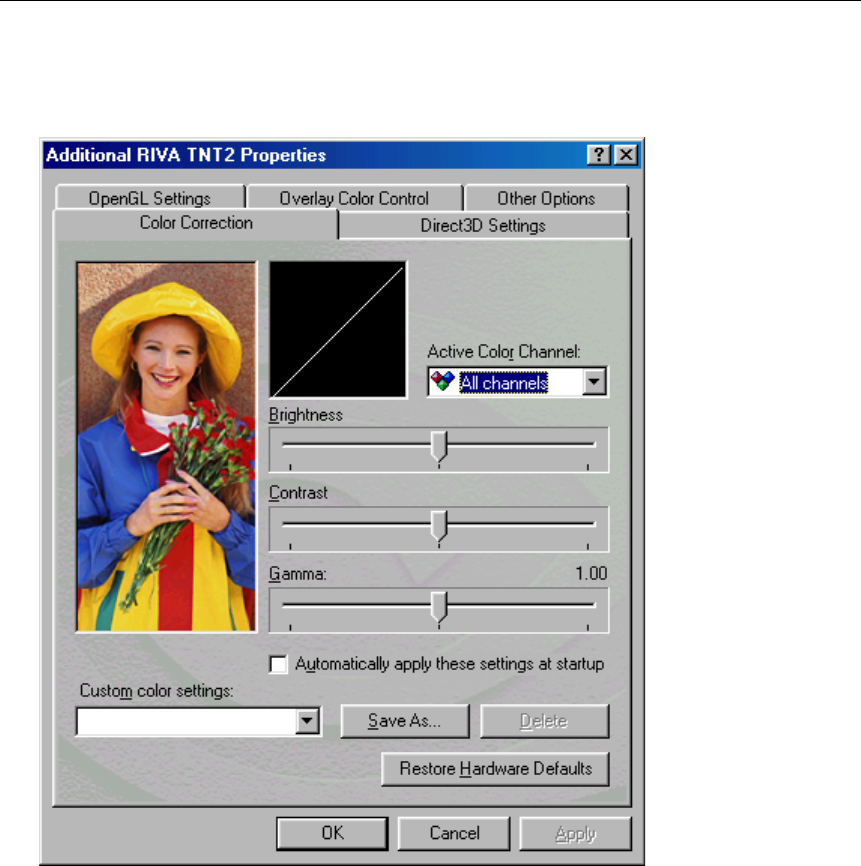
Color management
This is a utility to adjust a color (Gamma value) and contrast value.
19
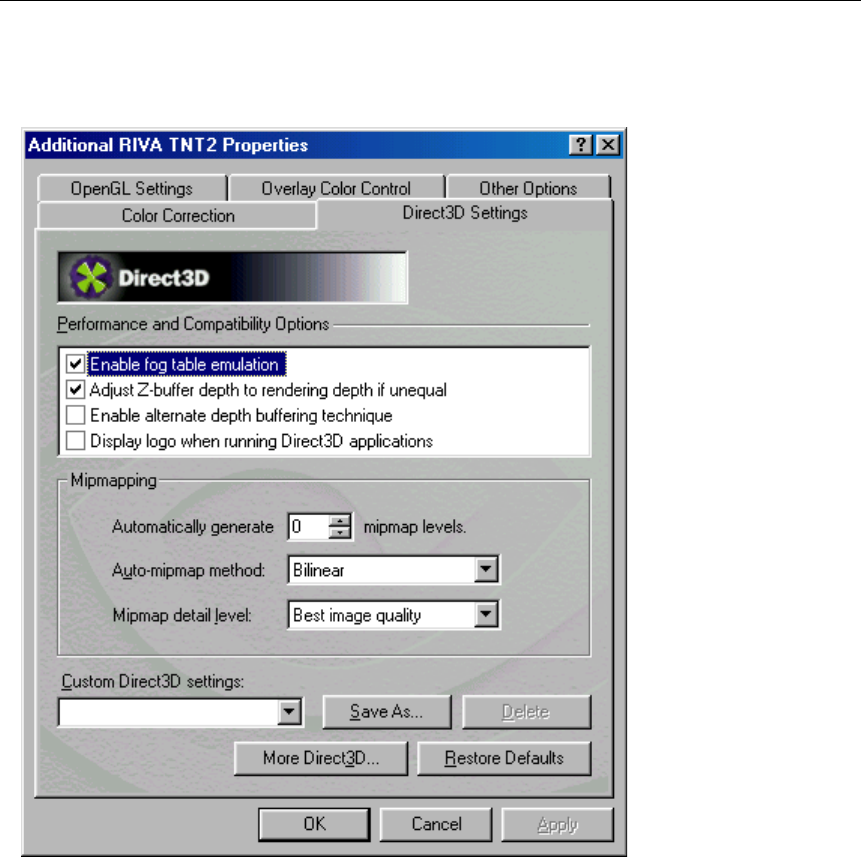
DirectX 3D settings
This is a utility to optimize your system performance for 3D acceleration.
20
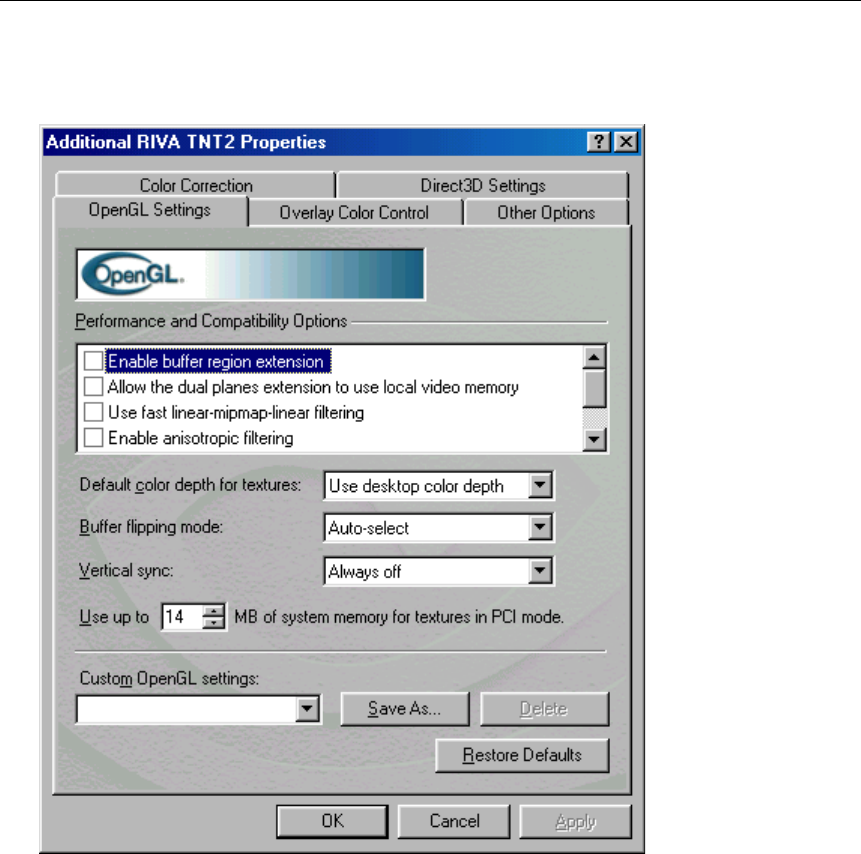
OpenGL Settings
This is to set the buffer and video memory for the use of OpenGL.

21
Overlay color control
This is to control an overlay color when watching TV or VCD.
22
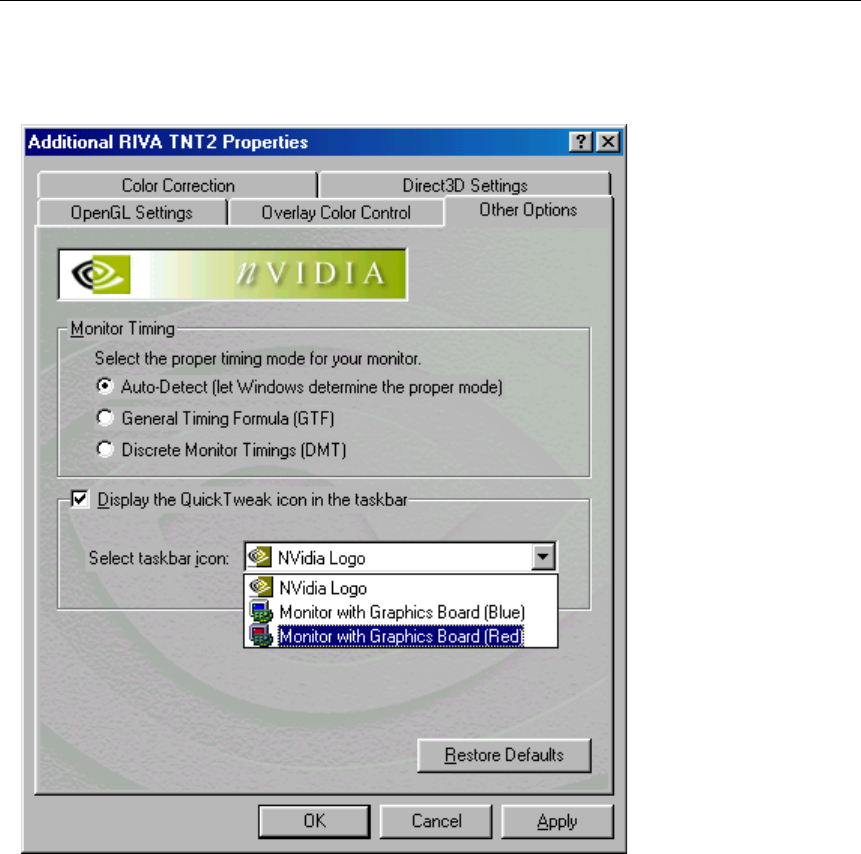
Other options
This sets a timing of monitor or icon images.
23
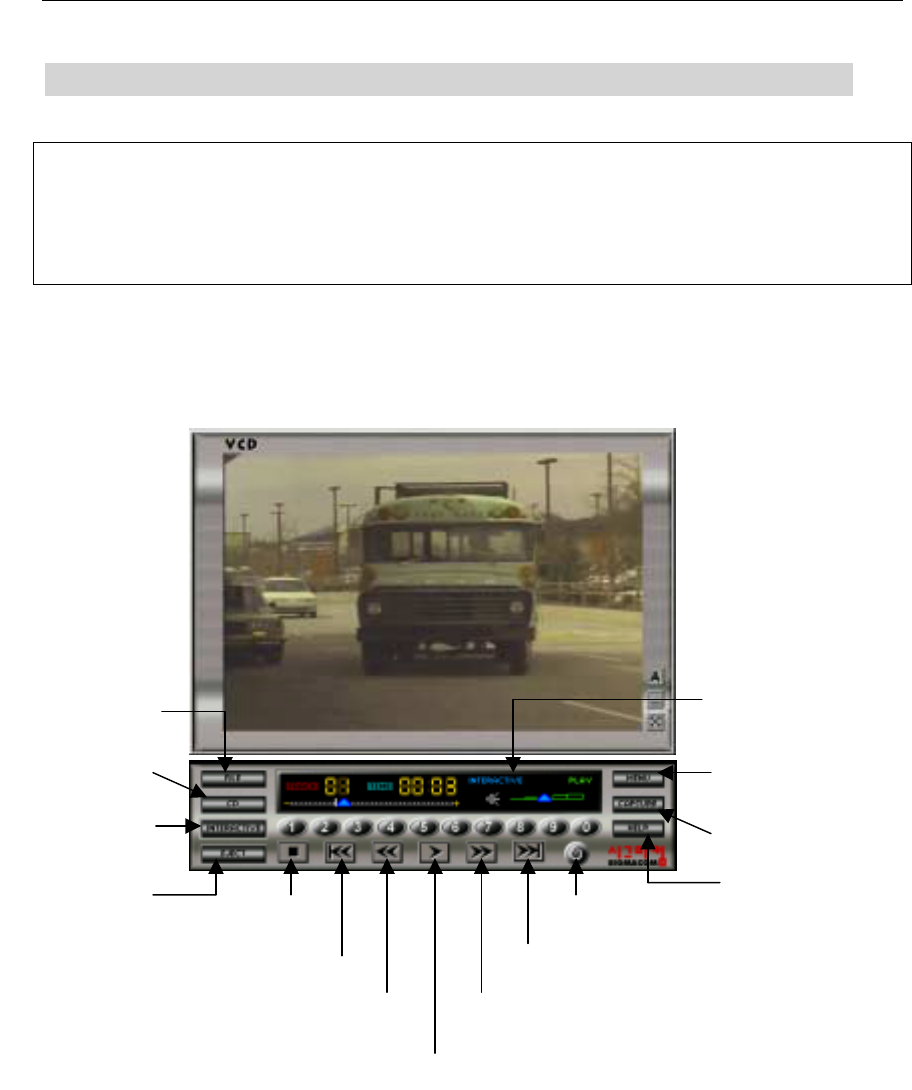
Watching video CD
Note
Make sure that sound card is installed properly before running application programs (Sigma
VCD Player, Sigma MP3 Player). The installed sound card in system is detected when
application program runs. If sound driver is not installed properly, the application program does
not run.
Sigma VCD player is a S/W MPEG player for video, audio CD and Midi files. This multimedia program
performs various functions such as subtitle display and still image capture.
File play
CD play
Interactive menu
Play/CD play
Open/close
Sto
p
Play previous track
Forward
Play/pause
Pla
y
forward track
Backward
Quit
Menu
Capture
Hel
p
Volume control and mute
24
Listening to MP3 files
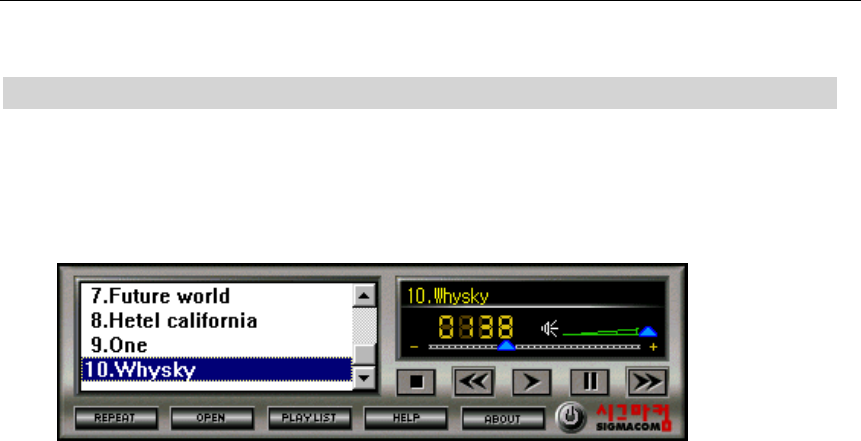
Sigma MP3 Player is a high quality MP3 player that runs in Windows environment. It supports easy
player pannel and play list function to record songs to be desired.
Repeat
“V” sign appears on the button and repeats MP3 file when clicking the icon.
Open
Opens MP3 file or list to be played. One or several files can be opened.
Play list
Makes a playable list of MP3 files.
Help
Shows the on line help of the Sigma MP3 player.
About
Shows the information (production co., version etc) on the Sigma Mp3 player.
Exit
Quits the Sigma MP3 player.

25
SIGMACOM CO., LTD.
SIGMACOM CO., LTD.SIGMACOM CO., LTD.
SIGMACOM CO., LTD.
1588-9 Anyang Nonghyup B/D 4F
Kwanyang-dong Dongan-gu Anyang city
Kyunggi-do 431-060 Republic of Korea
Phone +82-31-384-1010
Fax +82-31-382-8506
http://www.sigmaM.com