Sigmacom WMT-1000O WiViEW User Manual
Sigmacom Co., Ltd. WiViEW Users Manual
UserManual.wiki
>
Sigmacom
>
WMT 1000O User Manual
Users Manual
Navigation menu
Upload a User Manual
Namespaces
Wiki Guide
HTML
PDF
Info
Views
User Manual
Discussion / Help
Navigation

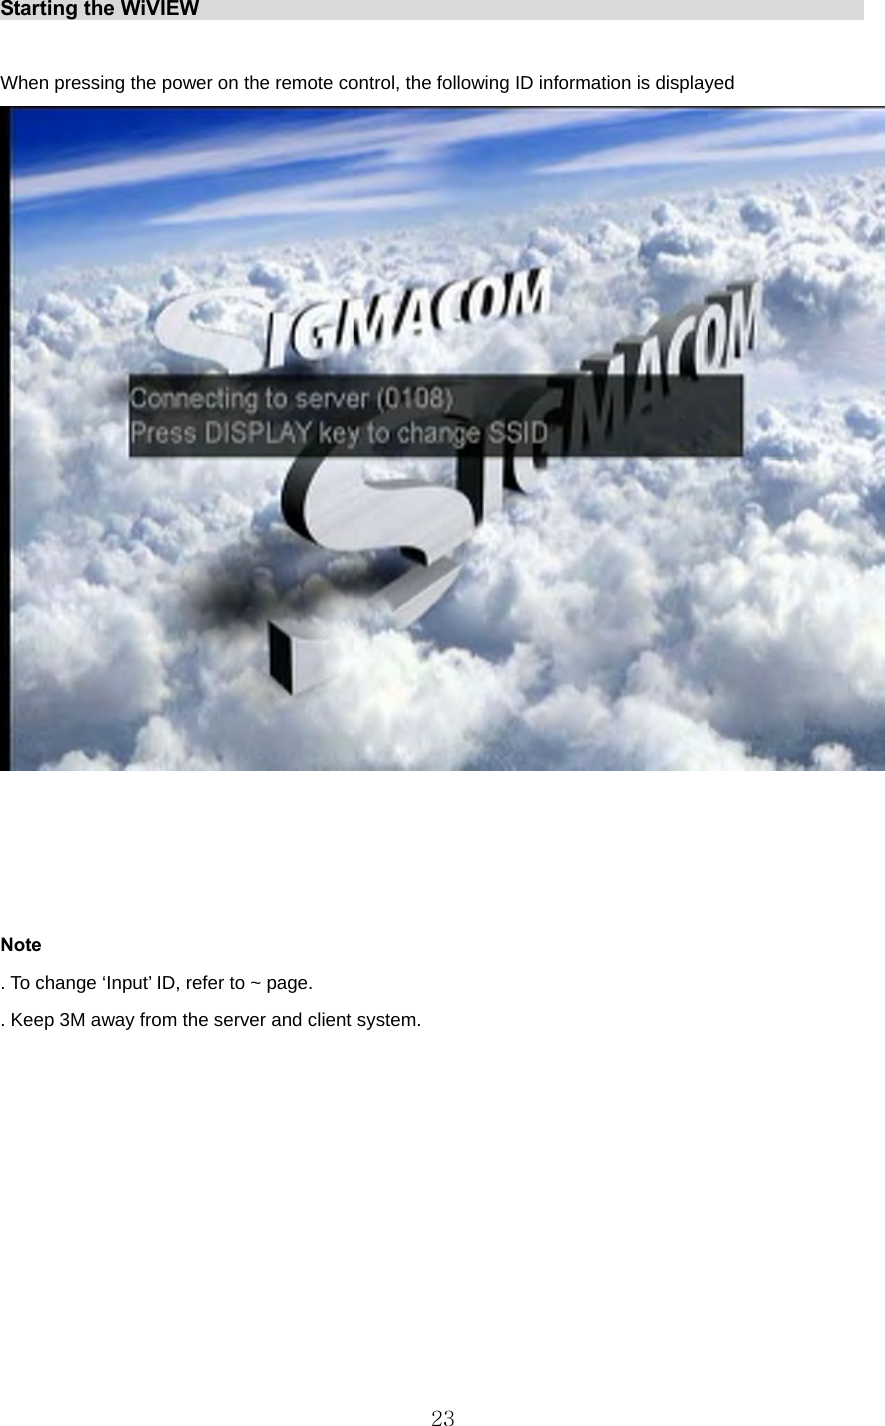
![Basic functions Using the remote control on the menu ◆ Button descriptions . SOURCE [figure]: Used for calling or quitting the menu screen. . BACK/ESC [figure]: Used for going back to the previous step. . Up/down [figure] : Used for going up and down from the menu screen. . Left/right [figure]: Used for going left or right from the menu screen. . Enter[figure] : Used for going to sub menu or changing setup values. *** Using remote control for Menu setup . Main menu: This is the Root menu and can be moved by up/down buttons. . Sub menu: This is the Sub menu that branches from the main menu and can be moved by up/down buttons. You can also use left/right buttons when changing setup values. Select a category then press ENTER to go to the sub menu Select an item that you want to change then press ENTER to select. 22](https://usermanual.wiki/Sigmacom/WMT-1000O/User-Guide-648045-Page-22.png)
![Server (input) setup This function is to set connections with the server and external video devices. (DVD player or PC) 1. Press SOURCE[ ] on the remote control, then Setup Menu appears. 2. Select “Input Selection” 3. Select an available input, then press [ ]. 24](https://usermanual.wiki/Sigmacom/WMT-1000O/User-Guide-648045-Page-24.png)
![Client (Output) setup This function is to set connections with the client and display devices (TV or monitor). 1. Press “SOURCE”[ ]’ on the remote control, then “Setup Menu” appears. 2. Select “Analog Output” 3. Select an available input‘, then press [ ]. 25](https://usermanual.wiki/Sigmacom/WMT-1000O/User-Guide-648045-Page-25.png)
![Quality control This function is to adjust the image quality on the TV screen. 1. Press ‘SOURCE[ ]’ then “Setup Menu” appears. 2. Select “Picture” 3. Select one of the Contrast, Luminance, Saturation, Sharpness and Hue. 4. Press [ ] then adjust the color value using [◀/▶]. Note Above pictures are the examples when selecting [Contrast]. 26](https://usermanual.wiki/Sigmacom/WMT-1000O/User-Guide-648045-Page-26.png)
![OSD language This function is to select OSD menu language. 1. Press ‘SOURCE [ ]’ on the remote control, then “Setup Menu” appears. 2. Select “Language” 3. Select OSD menu language, then OK [ ]. 27](https://usermanual.wiki/Sigmacom/WMT-1000O/User-Guide-648045-Page-27.png)
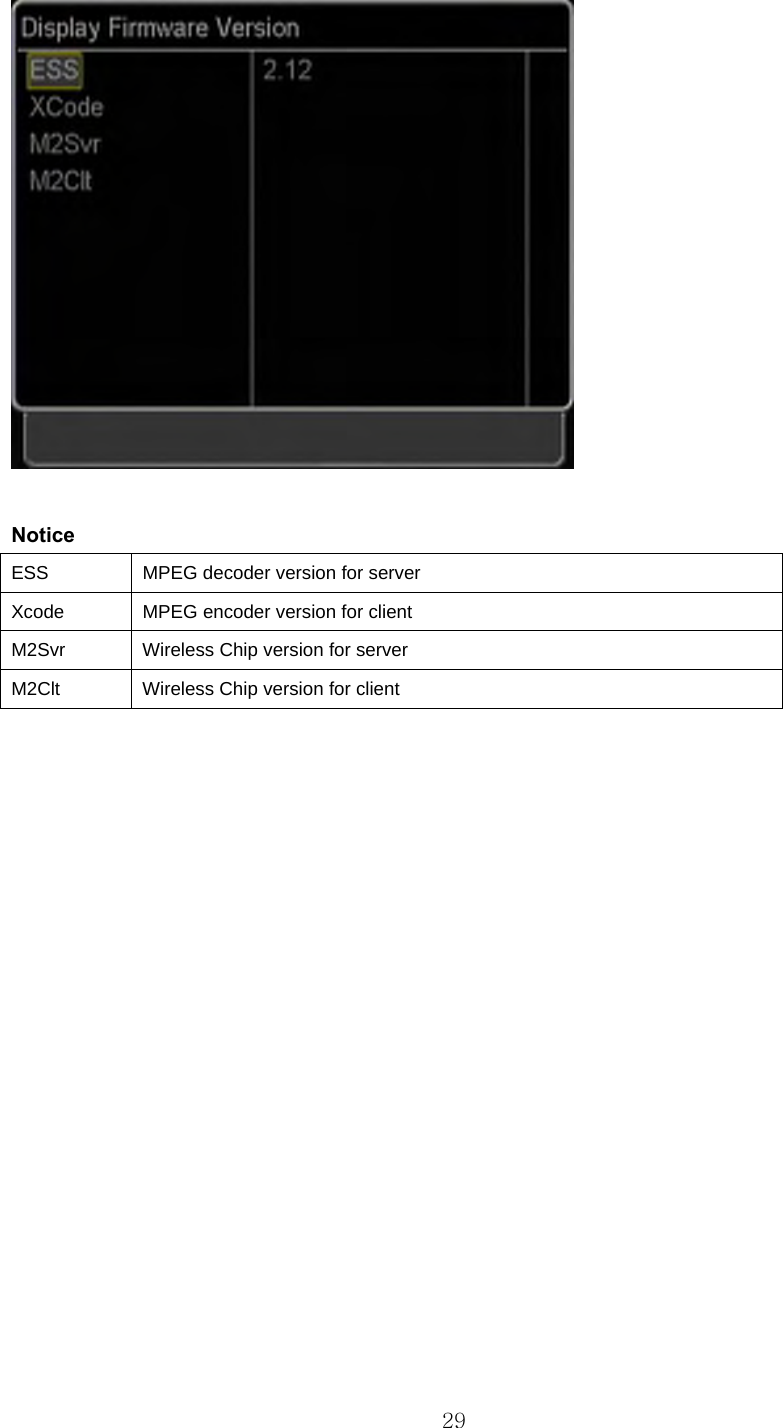
![Miscellaneous This function is to show basic information on firmware version, server ID, EEPROM, screen saver, and network status. 1. Press[ ]’ on the remote control. 2. ‘Setup Menu’ appears then select [Miscellaneous] . Checking Wi-VIEW information Information on firmware versions of MPEG Decoder, Wireless Chip, Mpeg Encoder, and Wireless Chip can be checked as below. 1. Select “Firmware Version” 2. By pressing OK[ ], firmware versions for server and client can be checked. 28](https://usermanual.wiki/Sigmacom/WMT-1000O/User-Guide-648045-Page-28.png)
![. Setting Screen Saver This function is to show a screen saver on the black screen when external video devices are not connected. This is useful when you do not know whether the server and client are activated or not. 1. Select “Set Screen Saver” then press [ ]. 2. Select “Enable” then press [ ]. 30](https://usermanual.wiki/Sigmacom/WMT-1000O/User-Guide-648045-Page-30.png)
![. Checking the network status This shows Client RSSI, Server RSSI, RF channel, RF frequency and stream bit rate. 1. Select “Network Status.” 2. Press [ ] then appropriate information appears. 31](https://usermanual.wiki/Sigmacom/WMT-1000O/User-Guide-648045-Page-31.png)
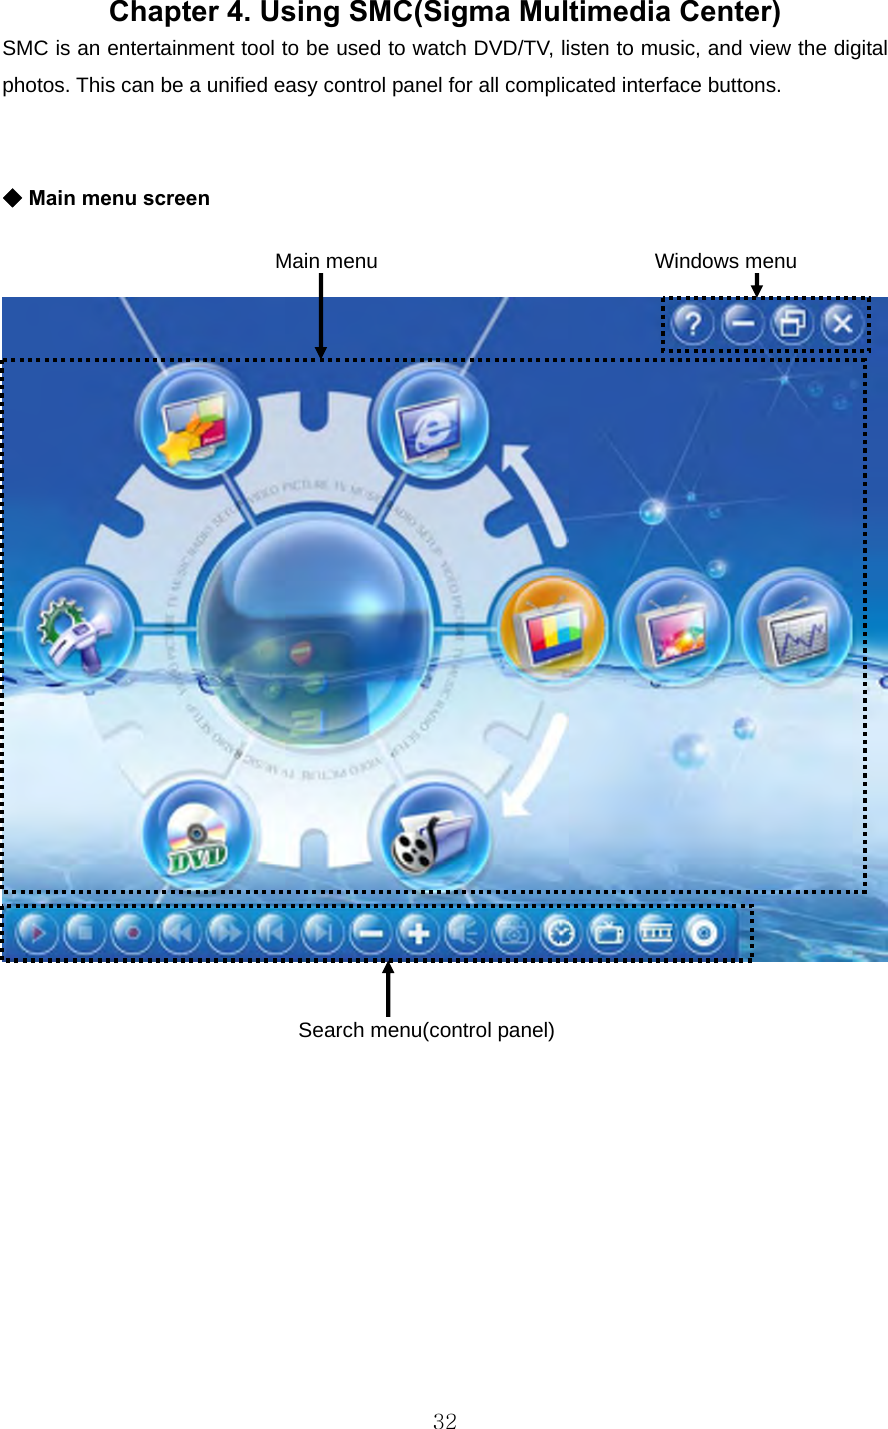
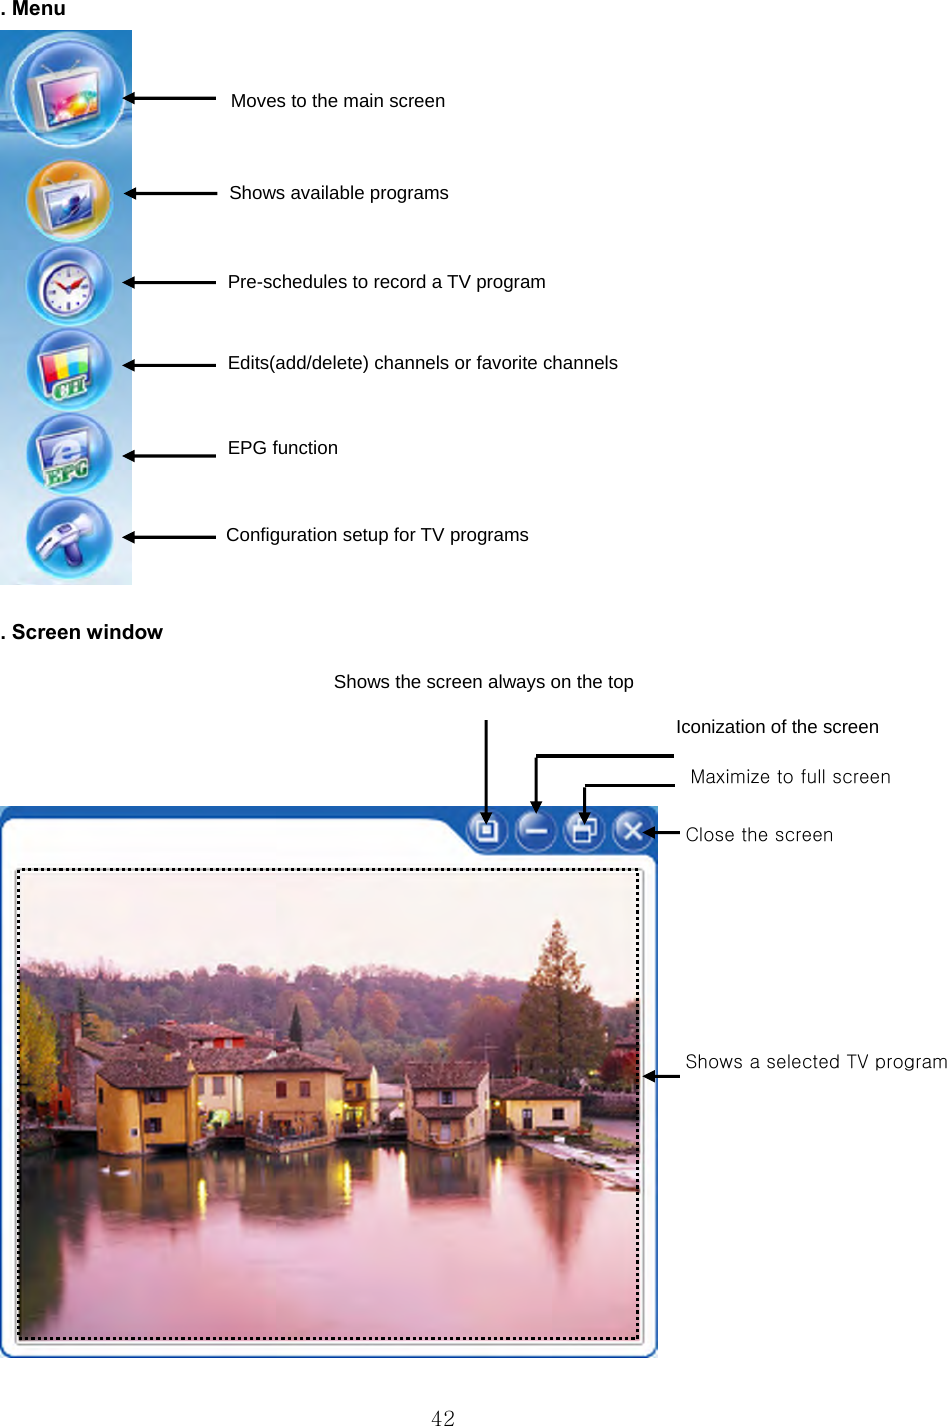
![z Each menu function ■ Main menu . Analog TV[ ], Digital TV[ ]) / Radio[ ] These functions are used to watch TV and listen to Radio. (SIGMA TV card should be installed in your system to enable TV functions.) . Movie[ ] / Music[ ] / Picture[ ] These functions are used to watch movies, listen to music and view digital photos. .DVD [ ] This function is used to play DVD titles. . Common[ ], TV Config[ ], File Config[ ], Multimedia Config[ ] These functions are used to set configuration for TV, file play or multimedia control. . Go to SIGMACOM home page[ ] This function is to go to SIGMACOM web site. ■ Windows menu . Help[ ]: shows program information on SMC. . Minimize[ ]: iconizes SMC program window. . Restore Previous Size[ ]: turns to full screen. . Close[ ]: quits SMC program. 33](https://usermanual.wiki/Sigmacom/WMT-1000O/User-Guide-648045-Page-33.png)
![■ Search menu .Play/Pause[ / ] : plays or pauses video(TV, video, DVD) or music files. .Stop[ ] : stops video(TV, video, DVD) or music files. .Record[ ] : records a watching scene as a file. (This function is possible when TV menu has been selected.) .Rewind/Fast Forward[ / ]: go backward or forward a video on play. .Previous file/Next file[ / ] : go previous or next track or title. .Previous channel/next channel[ / ]: go previous or next channel on TV or radio. .Volume up /down / ] : volume up or down .Sound off[ ] : makes MUTE .Still Capture[ ] : captures a scene on the screen as a still image (This function is enabled when TV menu has been selected.) .Reservation[ ] : makes a reservation to turn TV on or off .Quick TV[ ] : moves to TV mode quickly. . Quick VIDEO[ ]: moves to VIDEO mode quickly. . Quick DVD[ ]: moves to DVD mode quickly. 34](https://usermanual.wiki/Sigmacom/WMT-1000O/User-Guide-648045-Page-34.png)
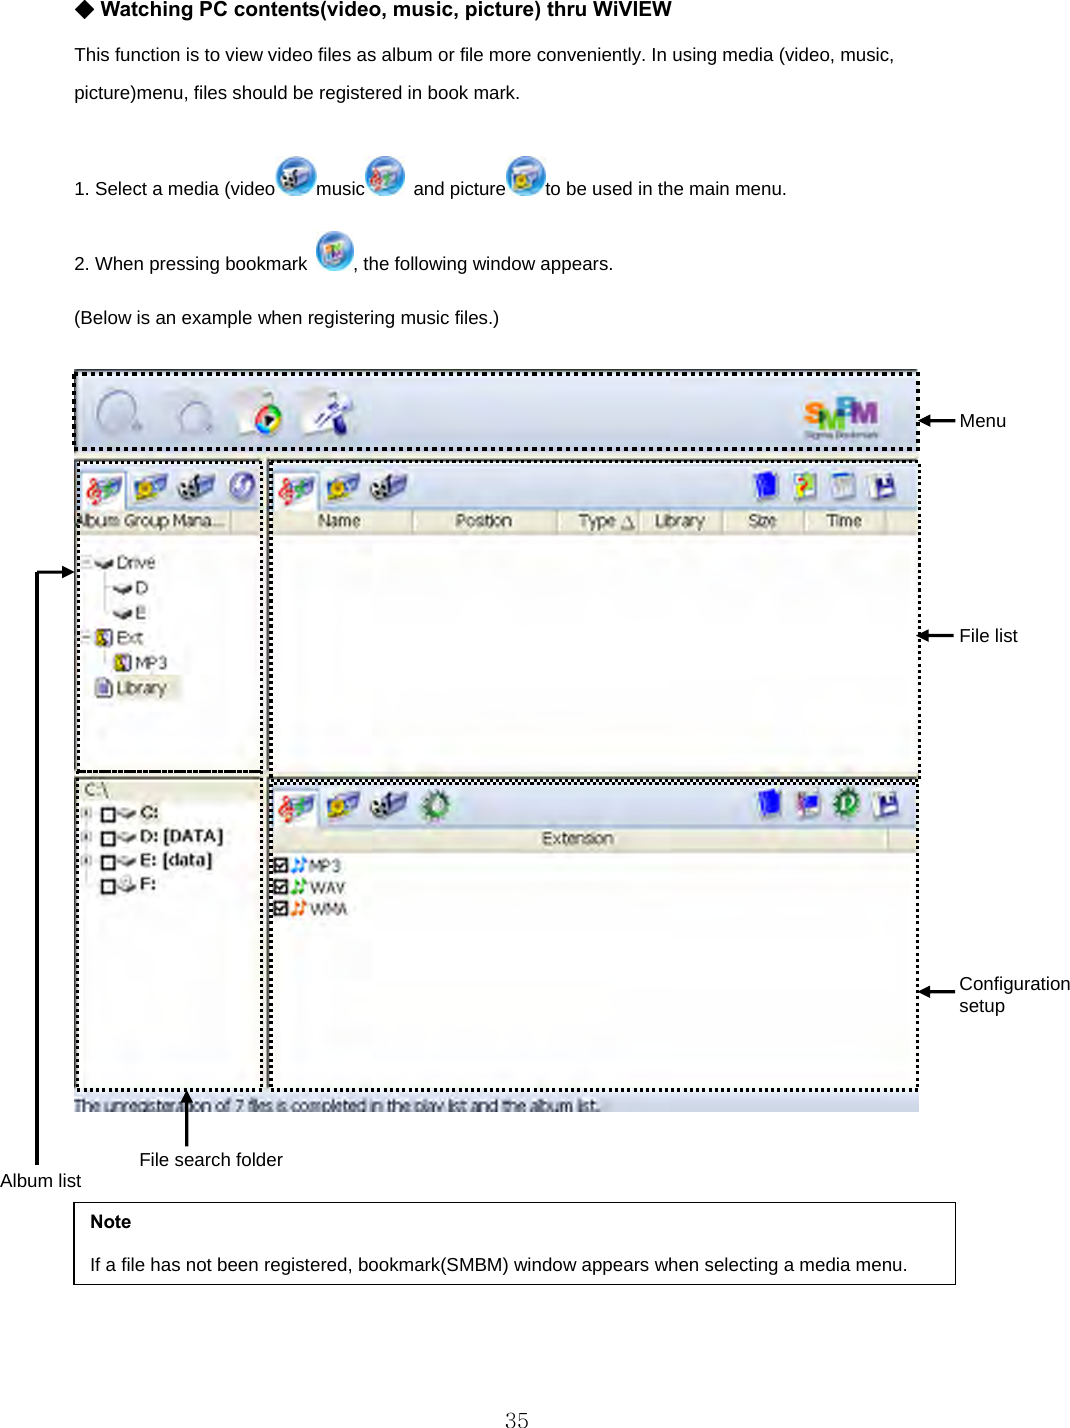
![■ Menu .Search files[ ] : scans media files(video, music, picture) .Mode change[ ] : switches to Search mode or Edit mode .Show the playlist[ ] : shows media file list(video, music, picture) .Configuration[ ] : shows configuration to set SMBM ■ Album list Used to select media files(video, music, picture) Used to add, delete or change libraries Shows scanned media contents(video, music, picture) ■ File search folder Used to set drive or folder for searching media files (video, music, picture) 36](https://usermanual.wiki/Sigmacom/WMT-1000O/User-Guide-648045-Page-36.png)
![■ File list Used to select media files(video, music, picture) Used to store configuration setup Used to arrange or mark media files Used to move, register or delete a selected file Used to select or release all media filesUsed to show scanned media files ■ Configuration setup Used to select or release all media files Used to select media files(video, music, picture) Used to set a font for (SMBM) Used to store configuration Used to turn it back to the default value Used to register, release or delete a selected item Used to show media files Note If there is a scanned file, it turns to play list when selecting []’ 37](https://usermanual.wiki/Sigmacom/WMT-1000O/User-Guide-648045-Page-37.png)
![■ Scanning files 1. Select a folder to scan in the folder window. 2. When pressing ‘File search[ ]’ , scanned files appear in the file list. 3. After selecting a file to register,, press ‘file save[ ]’. ② ③ ① 4. A message that album setting has been changed appears then press OK. Note In ‘Search mode’, the title color is changed to orange. 38](https://usermanual.wiki/Sigmacom/WMT-1000O/User-Guide-648045-Page-38.png)
![■ Registering files in the list 1. Select a file to register in the file list then it will be registered in “configuration setup and play list” automatically. 2. Click “file save” to save in the “file list”. 3. Saved files can be checked by clicking ‘Music[ ]’. 40](https://usermanual.wiki/Sigmacom/WMT-1000O/User-Guide-648045-Page-40.png)
![◆ SMC function 1) TV function (analog TV/digital TV) This function is used with a TV capture card. If a TV tuner card is not installed in your system, you can not use this function with SMC program. z Running the TV program 1. Select ‘TV[ ]’ or ‘DTV[ ]’in the menu. 2. If this is the first time to run the SMC program, it will ask you for auto-scan as follows. Click YES to proceed. (or by clicking ‘Auto-scan[ ]’in the TV menu) 3. If the channel scan is finished, the following screen appears. Screen window Menu Note If you can not see a TV show on the screen, make sure the antenna is connected correctly. Refer to page ~ for antenna connection. 41](https://usermanual.wiki/Sigmacom/WMT-1000O/User-Guide-648045-Page-41.png)
![z Setting TV channel This is used to search available TV channels from the over-the-air or cable and to set channel save/delete or favorite channels Select ‘auto-scan[ ]’ in the menu. ■ Registered channel(channel memory/delete) This shows scanned channel list and it also can be used to add or delete channels. Switches to Favorites Shows channel list Scanned channels are marked in the check-box. ‘[ ]’ 44](https://usermanual.wiki/Sigmacom/WMT-1000O/User-Guide-648045-Page-44.png)
![■ Favorite channel This is used to manage favorite TV channels only. . Adding a favorite channel 1 Select Favorite channel’ in ‘Auto-scan[ ]’ menu. 2. Select a favorite channel to be shown in the list then click “favorite channel add”. Switches to Favorite channel Shows favorite channels Adds or delete favorite channels 4. By pressing ESC on the keyboard or BACK/ESC on the remote control, the settings are saved. 45](https://usermanual.wiki/Sigmacom/WMT-1000O/User-Guide-648045-Page-45.png)
![z EPG(Electronic Programming Guide) This function is a TV program guide provided by national TV broadcast service providers. It can be used to record a favorite TV show at a convenient time. When selecting ‘EPG[ ]’, the following program guide window appears. EPG search Shows program informationRecords the current program Moves to the current selected program Scanned channels Moves the table up/down/left/right . Recording by pre-schedule 1. Select a TV program to record in the EPG table. 2. Click [ ]’ then it is registered in the pre-scheduled list automatically. (Reserved program list can be checked in ‘pre-scheduled[ ]’menu. Refer to ~page. Note . The current available channels are marked in sky-blue color. . One or more channels should be stored to run EPG. . This function is supported in DTV mode only and the screen should be activated. 46](https://usermanual.wiki/Sigmacom/WMT-1000O/User-Guide-648045-Page-46.png)
![z Reservation This is used to record or quit a TV program by pre-schedule system. Select ‘Pre-schedule[ ]’ then pre-schedule list appears. Shows program information to be pre-scheduled. 47](https://usermanual.wiki/Sigmacom/WMT-1000O/User-Guide-648045-Page-47.png)
![■ Adding Reservation list This function is to reserve a TV program in advance daily, weekly or b-weekly. Select ‘Add reservation [ ]’ then “Add Reservation” window appears. (Following menu is an example for DTV mode. Note that analog TV mode may have a different menu.) 1. Set a channel to reserve (virtual channel), input mode, frequency, start and stop time. 2. Press ‘Save’ to store the configurations. Note Reservation can be easily set by EPG. Refer to page ~ for more information on EPG. 48](https://usermanual.wiki/Sigmacom/WMT-1000O/User-Guide-648045-Page-48.png)
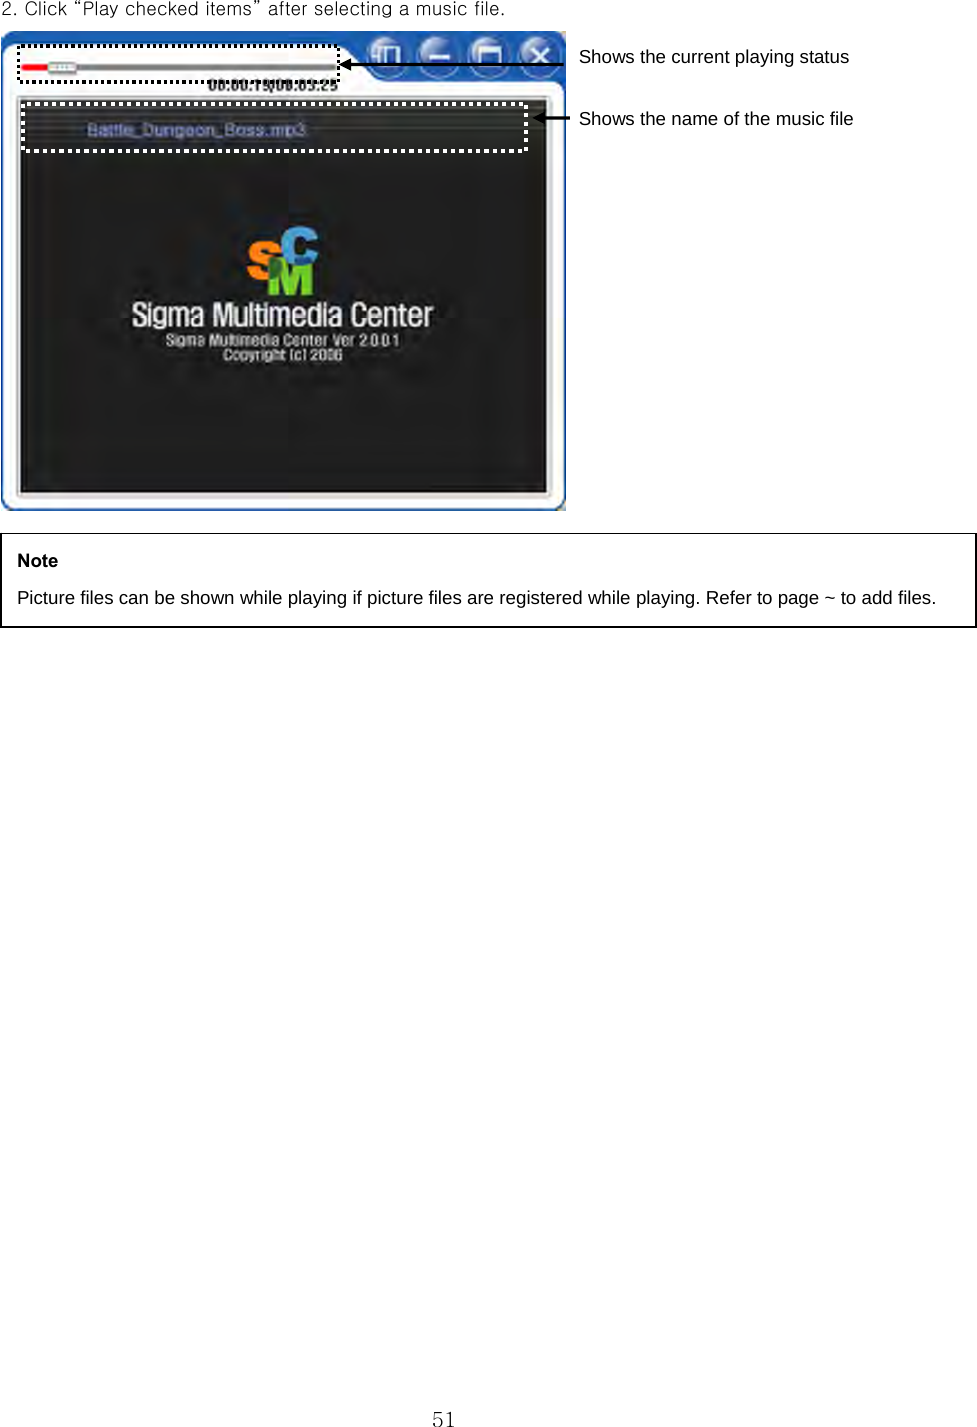
![2) Music This function is used to play music files (mp3/wav/wma) from HDD or CD-ROM Drive. Note Music files should be registered to use MUSIC function. Refer to page~. 1. Select ‘Movie [ ]’ in the menu then the following Music list appears. Shows registered music files 50](https://usermanual.wiki/Sigmacom/WMT-1000O/User-Guide-648045-Page-50.png)
![3) Picture This function is used to see picture files(BMP/GIF/JPEG/JPG/PNG/TIFF) from HDD or CD-ROM Drive. Note Picture files should be registered in the Book Mark to use Picture function. Refer to page ~ for more information. 1. Select ‘Picture [ ]’ in the menu. Shows selected picture files 2. Selected picture files will be shown by clicking ‘Play Checked item’. 52](https://usermanual.wiki/Sigmacom/WMT-1000O/User-Guide-648045-Page-52.png)
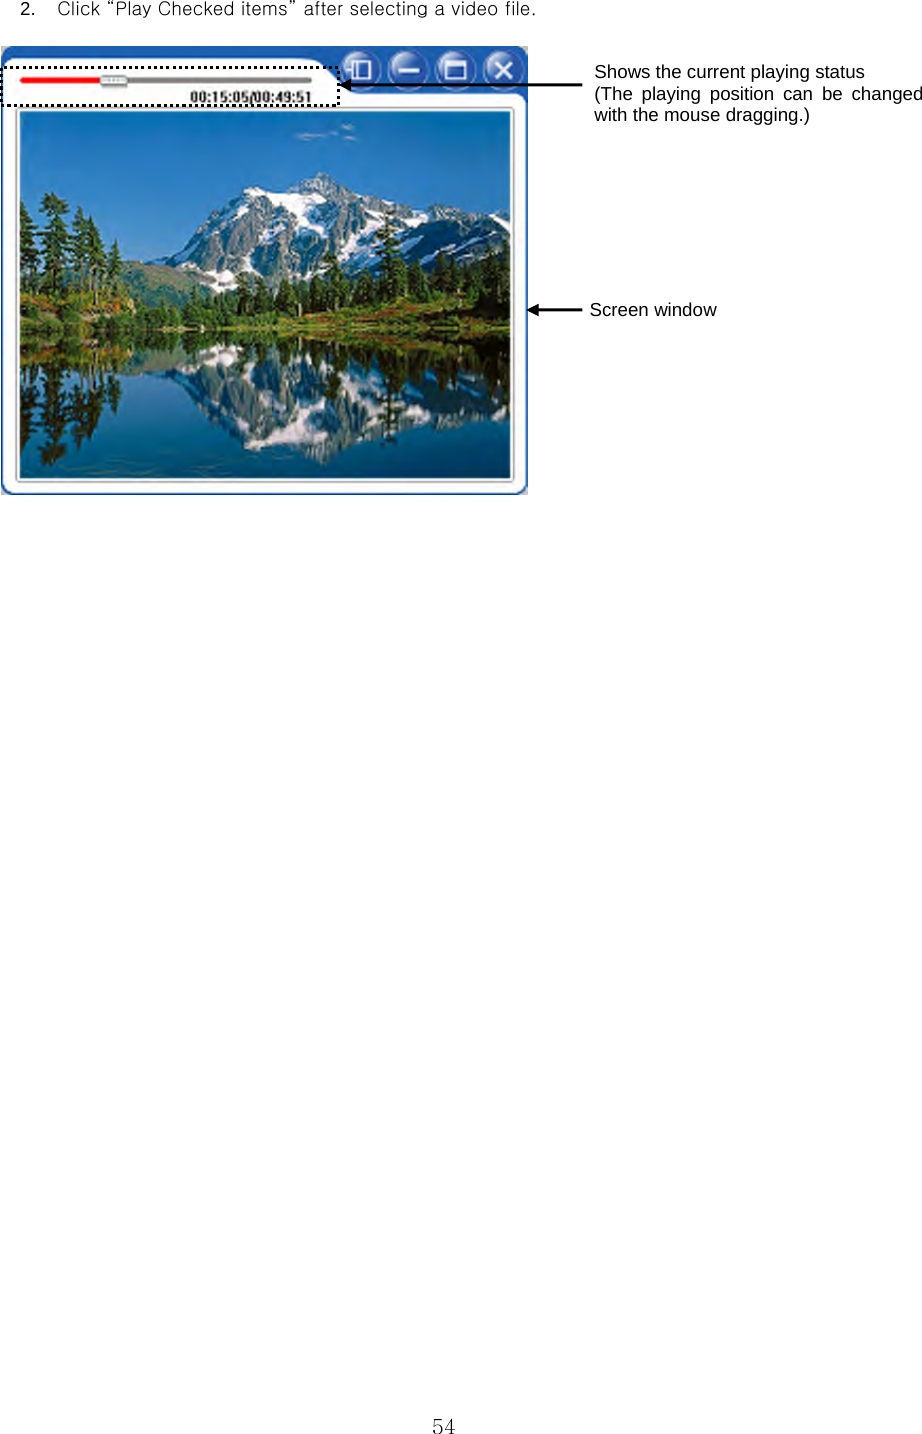
![4) Movie This function is used to see video files(ASF/AVI/MPEG/MPG/TP/TRP/TP) from HDD or CD-ROM Drive. . 동영상 파일을 재생하려면 Note Video files should be registered in Book Mark to use Movie function. Refer to page~ for more information. 1. Select ‘Movie[ ]’in the menu then the following box appears. Shows selected video files 53](https://usermanual.wiki/Sigmacom/WMT-1000O/User-Guide-648045-Page-53.png)
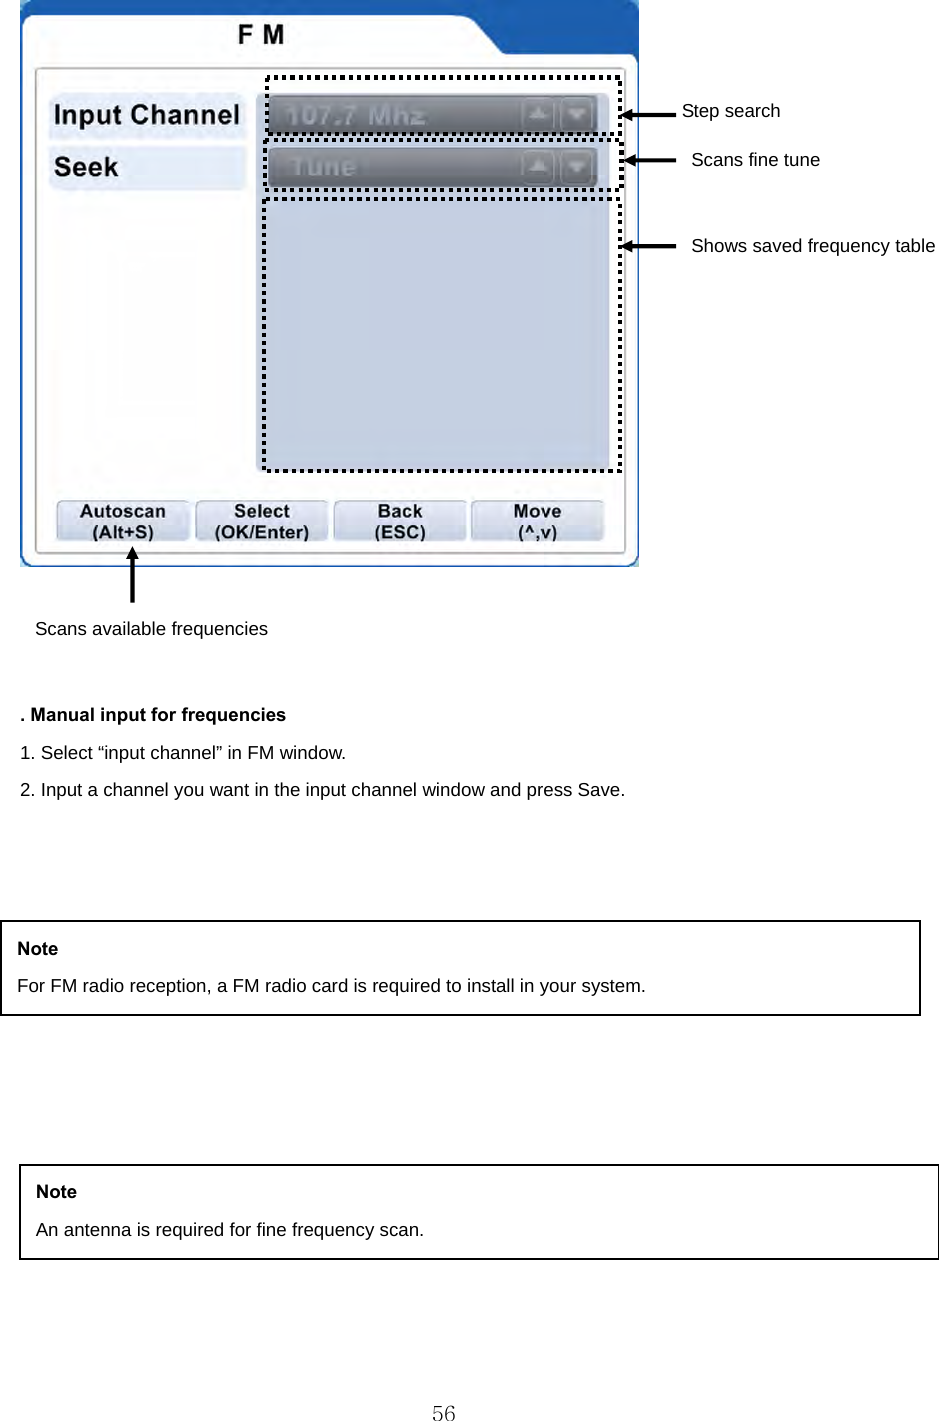
![5) DVD function This function is used to play DVD titles on the DVD-ROM. 1. Insert a DVD title into the DVD-ROM. 2. Click ‘DVD[ ]’ in the menu then it will run automatically. Playing status bar (You can move a playing position by mouse-dragging.) Screen window Note Sub-title and angle options can be set in Setting Multimedia. Refer to the page “ “. 6) Radio function This is used to receive radio signals from local radio stations. Select ‘FM[ ]’ then the following menu appears. 55](https://usermanual.wiki/Sigmacom/WMT-1000O/User-Guide-648045-Page-55.png)
![7) Setting This is used to show configurations for each function(TV/music/file/video/picture). The default set values can be changed. When selecting a function to change, appropriate setup window appears. ■ General setting This is used to set country, time zone and screen size. In addition priority, exit mode, sleep, auto update and startup size can be set. Select ‘Common[ ]’ in the main menu. Moves to main menu Sets priority, exit mode, sleep, auto update and startup size Sets the country Sets time Sets the screen size Shows selected menu 57](https://usermanual.wiki/Sigmacom/WMT-1000O/User-Guide-648045-Page-57.png)
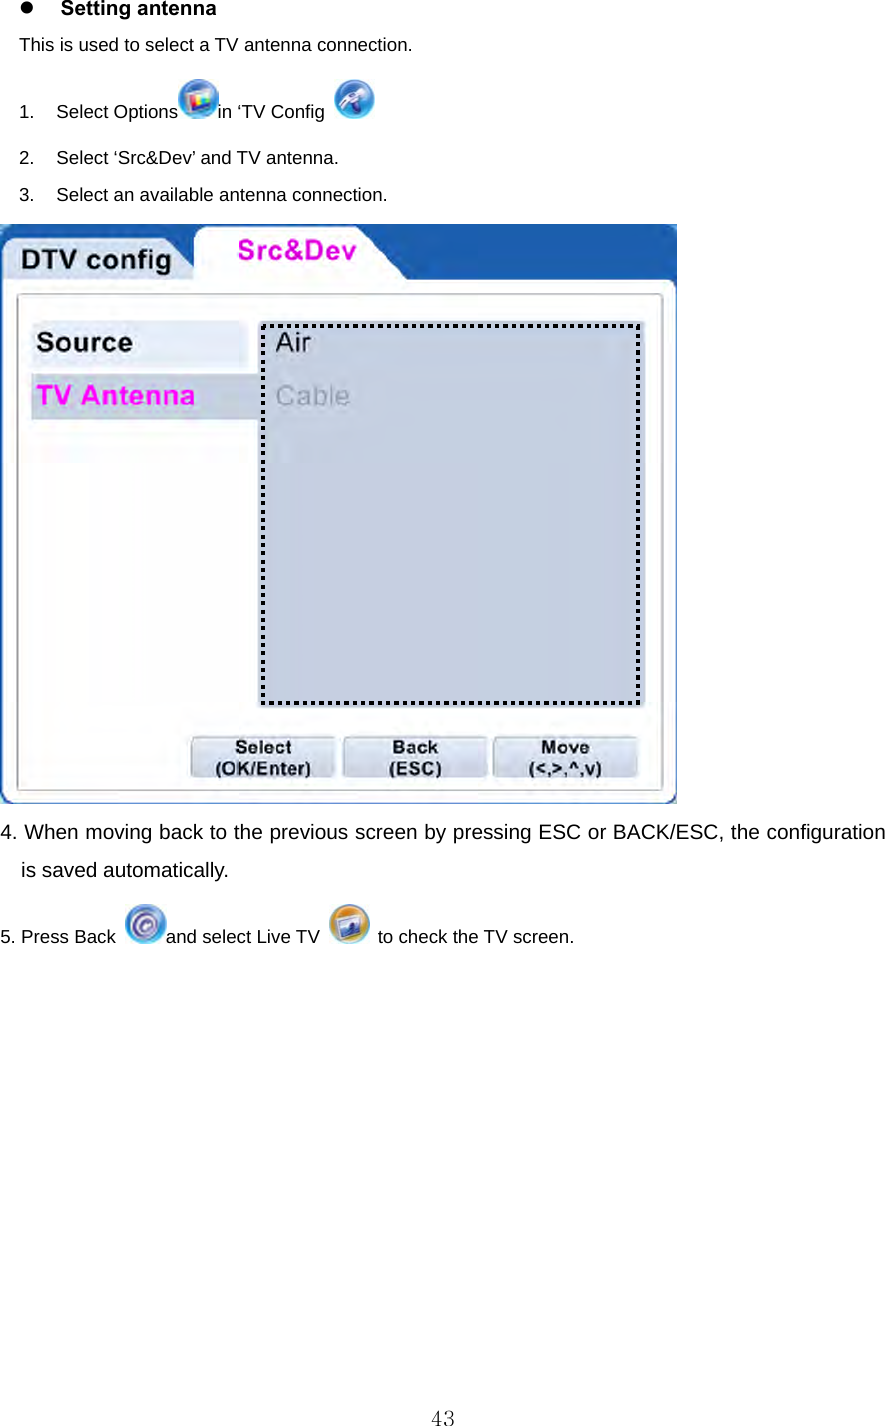
![■ Setting TV This menu is used to set configurations for TV input modes and pre-schedule. . Select ‘TV Config[ ]’ in the main menu. Moves to previous menu Sets TV color values Sets required values for still image and video capture Sets to reserve a time for start and quit Sets overlay and screen size Shows selected menu Sets audio format from analog TV, sub-title, input modes, and antenna types 58](https://usermanual.wiki/Sigmacom/WMT-1000O/User-Guide-648045-Page-58.png)
![■ Setting File configuration This menu is used to set play order, search time duration, aspect ratio and screen size for music and video files. Select ‘File Config[ ]’ in the main menu. Moves to previous menu Shows info on picture files and sets slide show time Sets aspect ratio and screen size Shows selected menu Sets play order and search time duration 59](https://usermanual.wiki/Sigmacom/WMT-1000O/User-Guide-648045-Page-59.png)
![■ Setting Multimedia This menu is used to set configurations for DVD or Digital Camcoder. Select ‘Multimedia Config[ ]’ in the menu. Moves to previous menu Sets aspect ratio or screen size Sets recording folder, file format and recording time Shows selected menu Sets sub-title, audio, angle and closed caption 60](https://usermanual.wiki/Sigmacom/WMT-1000O/User-Guide-648045-Page-60.png)