Silex Technology SX-200 802.11 Wireless Device Server User Manual SX 200 Users Guide 2006 05 02
Silex Technology, Inc. 802.11 Wireless Device Server SX 200 Users Guide 2006 05 02
Manual

User’s Guide
Document #40181-420 Rev. A
1
SX-200
User’s Manual

User’s Guide
Document #40181-420 Rev. A
2
Section 1 – Product Overview.......................................................................................................................................7
Introduction ...............................................................................................................................................................7
Package Contents.......................................................................................................................................................7
About This User’s Guide...........................................................................................................................................8
Windows
™
System Requirements..............................................................................................................................8
Other Operating System Requirements .....................................................................................................................8
Wireless Print Server Requirements..........................................................................................................................9
Print Server Components.........................................................................................................................................10
LED Indicators ....................................................................................................................................................11
Pushbutton Functions...........................................................................................................................................12
Factory Default Settings..........................................................................................................................................12
Default Settings (wired and wireless print servers) .............................................................................................12
Wireless Default Settings (wireless print servers only).......................................................................................12
Section 2 – Hardware Installation................................................................................................................................13
Before You Begin....................................................................................................................................................13
Hardware Installation (wired and wireless versions)...............................................................................................13
Verifying the Connection to the Printer...................................................................................................................15
Section 3 – Configuration and Management ...............................................................................................................16
Configuration Options.............................................................................................................................................16
ExtendView Utility..............................................................................................................................................16
Web Browser Interface........................................................................................................................................16
HP Web JetAdmin Utility....................................................................................................................................17
Configuration Console.........................................................................................................................................17
Configuring the Print Server via an Ethernet Connection .......................................................................................18
First-Time Configuration of the Wireless Print Server Using 802.11b or 802.11g (wireless print servers only)....20
Windows Print Queue Configuration ......................................................................................................................21
Macintosh Print Queue Configuration.....................................................................................................................22
Configuring to Print Using TCP/IP (OS 10.x).....................................................................................................23
Section 4 – Troubleshooting........................................................................................................................................24
Introduction .............................................................................................................................................................24
Printing Problems ....................................................................................................................................................24
Checking the Interface between the Print Server and the Printer: .......................................................................24
Checking the Network Connection and Cabling: ................................................................................................25
Troubleshooting Windows Problems.......................................................................................................................25
Troubleshooting Network Configuration Problems.................................................................................................26
Troubleshooting Wireless Configuration Problems.................................................................................................27
Section 5 – Where to Get Help....................................................................................................................................28
Returning Products ..................................................................................................................................................29
Appendix A – Safety and Regulatory Notices.............................................................................................................30
Information for United States Users........................................................................................................................30
Declaration of Conformity (FCC)............................................................................................................................31
Information for Canadian Users (IC notice)............................................................................................................31
Information for European Users ..............................................................................................................................32
Declaration of Conformity (CE)..............................................................................................................................32
Appendix B – Updating Firmware ..............................................................................................................................33
Loading New Firmware (Using the TCP/IP Update Utility) ...................................................................................33
Loading New Firmware (Macintosh OS-X) ............................................................................................................36
Command console access information ........................................................................................................................37
Telnet Command Console Access...........................................................................................................................37
Serial Port Command Console Access ....................................................................................................................37
Network Commands....................................................................................................................................................37
SH NW ....................................................................................................................................................................37
SET NW AUTHtype ...............................................................................................................................................38
SH NW AUTH ........................................................................................................................................................38
SET NW CHannel ...................................................................................................................................................38
SET NW ENC .........................................................................................................................................................38
SH NW ENC ...........................................................................................................................................................38
SET NW KEY# .......................................................................................................................................................38
SET NW KEYVAL.................................................................................................................................................39

User’s Guide
Document #40181-420 Rev. A
3
SET NW MOde .......................................................................................................................................................39
SET NW RAdio.......................................................................................................................................................39
SH NW MODE........................................................................................................................................................39
SH NW RADio........................................................................................................................................................39
SET NW SPeed .......................................................................................................................................................39
SH NW SPEED .......................................................................................................................................................39
SET NW SSid..........................................................................................................................................................39
CL NW SSid............................................................................................................................................................40
SET NW BSsid........................................................................................................................................................40
CL NW BSsid..........................................................................................................................................................40
SET NW RTS..........................................................................................................................................................40
SH NW RTS............................................................................................................................................................40
SET NW APDEN....................................................................................................................................................40
SH NW APDEN......................................................................................................................................................40
SH NW STATS .......................................................................................................................................................41
SET NW CERTCN..................................................................................................................................................41
SH NW CERTCN....................................................................................................................................................41
SET NW CERTCN2................................................................................................................................................41
SH NW CERTCN2..................................................................................................................................................42
SET NW CERTEXP................................................................................................................................................42
SH NW CERTEXP..................................................................................................................................................42
SET NW CERTKEY...............................................................................................................................................42
SET NW ID .............................................................................................................................................................42
SH NW ID ...............................................................................................................................................................42
SET NW PW ...........................................................................................................................................................43
SET NW INAP........................................................................................................................................................43
SH NW INAP..........................................................................................................................................................43
SET NW REALM ...................................................................................................................................................43
SH NW REALM .....................................................................................................................................................43
SET NW WPAAUTO ............................................................................................................................................43
SH NW WPAAUTO ...............................................................................................................................................44
SET NW WPAGROUP...........................................................................................................................................44
SH NW WPAGROUP.............................................................................................................................................44
SET NW WPAPSK .................................................................................................................................................44
SET NW WPATRACE ...........................................................................................................................................44
SET NW IROAM....................................................................................................................................................44
SH NW IROAM NW IROAM ................................................................................................................................45
SET NW DFS..........................................................................................................................................................45
SH NW DFS............................................................................................................................................................45
SET NW REGDOMain ...........................................................................................................................................45
SH NW REGDOMain .............................................................................................................................................46
SET NW WIRED ....................................................................................................................................................46
Port Commands ...........................................................................................................................................................46
Serial Port Commands.............................................................................................................................................46
SH PORT.............................................................................................................................................................46
SET PORT...........................................................................................................................................................47
CLEAR PORT S1 JOB........................................................................................................................................47
SET PORT S1 FLOW .........................................................................................................................................47
SET PORT S1 PARITY ......................................................................................................................................47
SET PORT S1 SIZE ............................................................................................................................................47
SET PORT S1 SPeed...........................................................................................................................................47
SET PORT S1 STOP...........................................................................................................................................47
Parallel Port Commands..........................................................................................................................................48
SH PORT.............................................................................................................................................................48
SET PORT...........................................................................................................................................................48
SET PORT P1 ACKH .........................................................................................................................................48
SET PORT P1 BIDir ...........................................................................................................................................48
SET PORT P1 ECP .............................................................................................................................................48
SET PORT P1 FSTB ...........................................................................................................................................48

User’s Guide
Document #40181-420 Rev. A
4
SET PORT P1 INWT ..........................................................................................................................................48
SET PORT P1 NBUF [ENable | DIsable] ...........................................................................................................49
SET PORT P1 NOINBUSY................................................................................................................................49
SET PORT P1 POLL...........................................................................................................................................49
SET PORT P1 PSTA...........................................................................................................................................49
SET PORT P1 SOJBUSY ...................................................................................................................................49
CL PORT <port> JOB.........................................................................................................................................49
USB Port Commands...............................................................................................................................................50
SET PORT U1 PSTA ..........................................................................................................................................50
SET PORT U1 NBUF [ENable | DIsable]...........................................................................................................50
Server Information Commands....................................................................................................................................50
SET SERVEr DEscription......................................................................................................................................50
SET SERVEr NAme ..............................................................................................................................................50
SET SNMP GETCOMM.........................................................................................................................................50
SET SNMP JETADmin...........................................................................................................................................51
SET SNMP SETCOMM1........................................................................................................................................51
SET SNMP SETCOMM2........................................................................................................................................51
SET SNMP CONtact...............................................................................................................................................51
SET SNMP LOCation .............................................................................................................................................51
SH SERIAL.............................................................................................................................................................51
SH SERVEr.............................................................................................................................................................52
SH SERVEr CO.......................................................................................................................................................52
SH SNMP................................................................................................................................................................52
SH VErsion..............................................................................................................................................................52
Zero .........................................................................................................................................................................52
Service Commands......................................................................................................................................................53
SET SERVI <service name> BOT ..........................................................................................................................53
SET SERVI <service name> EOT ..........................................................................................................................53
SH SERVI STRings [string_num]...........................................................................................................................53
SET SERVI <service name> FIlter .........................................................................................................................53
SH SERVI FILters...................................................................................................................................................53
SET SERVI <service name> FMS ..........................................................................................................................53
SET SERVI <service name> FRS ...........................................................................................................................54
SET SERVI <service name> IP...............................................................................................................................54
SET SERVI <service name> NAme........................................................................................................................54
SET SERVI <service name> POrt...........................................................................................................................54
SET SERVI <service name> PRIority.....................................................................................................................54
SH SERVI PRI [service_num]................................................................................................................................54
SET SERVI <service name> RECeive....................................................................................................................55
SET SERVI <service name> TCP...........................................................................................................................55
SET SERVI <service name> QUEUE.....................................................................................................................55
SH SERVI SUMmary [service_num]......................................................................................................................55
String Commands........................................................................................................................................................55
SET STRing.............................................................................................................................................................55
CL STRing...............................................................................................................................................................55
SH STRing [string_num]........................................................................................................................................56
SH FILters ..............................................................................................................................................................56
TCP/IP Commands......................................................................................................................................................56
SET IP ACcess ........................................................................................................................................................56
SET IP RANge ........................................................................................................................................................56
SH IP ACcess ..........................................................................................................................................................57
SET IP ADdress.......................................................................................................................................................57
SET IP ARP ENable...............................................................................................................................................57
SET IP BAnner........................................................................................................................................................57
SET IP CHKSUM ...................................................................................................................................................57
SET IP BOot............................................................................................................................................................57
SET IP ENable ........................................................................................................................................................57
SET IP FTIme..........................................................................................................................................................58
SET IP FTP..............................................................................................................................................................58

User’s Guide
Document #40181-420 Rev. A
5
SET IP HTTP ..........................................................................................................................................................58
SET IP KEepalive....................................................................................................................................................58
SET IP LPD.............................................................................................................................................................58
SET IP MEthod .......................................................................................................................................................58
SET IP PIng.............................................................................................................................................................58
SET IP PRObe.........................................................................................................................................................58
SET IP RARp ..........................................................................................................................................................59
SET IP REtry...........................................................................................................................................................59
SET IP ROuter.........................................................................................................................................................59
SET IP SUbnet.........................................................................................................................................................59
SET IP TCP.............................................................................................................................................................59
SET IP TELnet ........................................................................................................................................................59
SET IP TFTP...........................................................................................................................................................59
SET IP TImeout.......................................................................................................................................................60
SET IP WIndow.......................................................................................................................................................60
SH IP .......................................................................................................................................................................60
Power Configuration Commands ................................................................................................................................60
SET POWER DELAY nnnn....................................................................................................................................60
SET POWER PERIOD nnnn...................................................................................................................................60
SET POWER WINDOW nnnn................................................................................................................................60
Firmware Update.........................................................................................................................................................62
SET LOAd ENable.................................................................................................................................................62
SET LOAd HOst .....................................................................................................................................................62
SET LOAd IP ..........................................................................................................................................................62
SET LOAd SOftware...............................................................................................................................................62
SET LOAd TFTP.....................................................................................................................................................62
SET LOAd XModem...............................................................................................................................................62
SH LOAd................................................................................................................................................................63
Other Commands.........................................................................................................................................................64
SET DEFAULT.......................................................................................................................................................64
EXIT........................................................................................................................................................................64
SH FATal................................................................................................................................................................64
CL FATal................................................................................................................................................................64
SH FREE .................................................................................................................................................................64
HElp <command> ...................................................................................................................................................64
INIT.........................................................................................................................................................................64
SET PAssword.........................................................................................................................................................65
SET POWERON .....................................................................................................................................................65
SH POWERON .......................................................................................................................................................65
SET PROTect..........................................................................................................................................................65
CL PROTect............................................................................................................................................................65
SAVE.......................................................................................................................................................................65
SH TEst ...................................................................................................................................................................65
UNPROTECT..........................................................................................................................................................66
Netware Commands ....................................................................................................................................................66
SET NETW ADvertise............................................................................................................................................66
SET NETW ENable.................................................................................................................................................66
SET NETW FRame.................................................................................................................................................66
SET NETW NPrinter...............................................................................................................................................66
SET NETW PAssword............................................................................................................................................66
SET NETW POlling ................................................................................................................................................66
SET NETW QServer ...............................................................................................................................................67
SET NETW REscan ................................................................................................................................................67
SET NETW SErver .................................................................................................................................................67
CL NETW SErver ...................................................................................................................................................67
SH NETWare...........................................................................................................................................................68
Email Printing Commands...........................................................................................................................................68
SET POP3 ADdress.................................................................................................................................................68
SET POP3 ENable...................................................................................................................................................68

User’s Guide
Document #40181-420 Rev. A
6
SET POP3 POlling ..................................................................................................................................................68
SET POP3 NAme....................................................................................................................................................68
SET POP3 PAssword ..............................................................................................................................................69
SET POP3 TImeout.................................................................................................................................................69
SET SMTP ADdress................................................................................................................................................69
SET SMTP ENable..................................................................................................................................................69
SH POP3..................................................................................................................................................................70
SH SMTP.................................................................................................................................................................70
DLC / NETBEUI Commands......................................................................................................................................70
SET DLC ENable....................................................................................................................................................70
SET DLC TIMeout..................................................................................................................................................70
SH DLC..................................................................................................................................................................70
SET NetBEUI ENable.............................................................................................................................................71
SET NETBIOS DOMain.........................................................................................................................................71
SET NETBIOS MEthod ..........................................................................................................................................71
SET NETBIOS PRimary.........................................................................................................................................71
SET NETBIOS SEcondary......................................................................................................................................71
Appletalk Commands ..................................................................................................................................................71
SET APPletalk.........................................................................................................................................................71
SET APPletalk ZOne...............................................................................................................................................71
Wireless Security Configuration..................................................................................................................................72

Document #40181-120 Rev. A
7
Section 1 – Product Overview
Introduction
SX-200 Series Print Servers allow you to share a printer equipped with a USB or parallel port on a wired
or wireless network. The print server supports and automatically senses both 100baseTX Fast Ethernet
and 10baseT Ethernet network connections, and the wireless version allows connections to 802.11a,
802.11b, and 802.11g wireless networks as well. The installation can be performed by the least-
experienced users, while providing networking professionals with advanced features for configuration.
silex is confident that you will enjoy the many features of this print server. Refer to the Hardware
Installation Guide provided in the product package for hardware setup information. For additional
information on this product or for downloading firmware upgrades, visit the silex web site at
www.silexamerica.com.
Package Contents
silex Print Server
Power supply adapter
USB cable
Hardware Installation Guide
User’s Guide (this document)
SX-200 Series Print Server Installation CD
Desktop mounting kit
Printer mounting kit
IMPORTANT
?
Use Adobe Acrobat Reader 5.0 or higher to view or print the PDF files contained on the CD.
?
Fill out and return the electronic warranty card provided on the SX-200 Series Print Server
Installation CD.

User’s Guide
Document #40181-420 Rev. A
8
About This User’s Guide
This User’s Guide contains information on system requirements, basic troubleshooting, and instructions
on the following:
Installing the print server hardware
Configuring the print server for use on your network
Windows print queue configuration
Macintosh print queue configuration
Windows
™
System Requirements
To configure the print server settings (wired and wireless versions) using the provided ExtendView
Utility in Windows, your Windows-based system should include the following components:
A PC with a 133 MHz or higher processor
Microsoft Windows operating system
At least 64 MB of RAM (memory)
At least 3 MB of free hard disk space to install the software
A CD-ROM drive (to load the software)
A PC equipped with a USB version 1.1 or 2.0 port
An Internet connection (for online product registration)
Other Operating System Requirements
Users can access the configuration settings for the Serial Server through a standard web browser by
entering the IP address the serial server obtains from a DHCP server. If your network does not have
DHCP service, then enter the default static IP address of the Serial Server (192.0.0.192).

User’s Guide
Document #40181-420 Rev. A
9
Wireless Print Server Requirements
To print using a wireless print server, you will need an 802.11a, 802.11b, or 802.11g wireless network
consisting of either of the following:
An 802.11a, 802.11b, or 802.11g wireless-enabled PC or Macintosh printing straight to the printer
(Ad-Hoc or Peer-to-Peer Mode).
An 802.11a, 802.11b, or 802.11g wireless access point that allows wireless and wired Ethernet-
enabled computers to print to the wireless print server.
To configure and print to the wireless print server, you will need the following information from your
wireless network administrator:
Wireless Mode used (Infrastructure or Ad-Hoc)
The SSID (service set identifier) for your wireless network.
If you are using TCP/IP (recommended for Windows Networks) and are not connected to a DHCP
server (for obtaining an IP Address automatically), you will need a unique IP Address for the
wireless print server (for example: 192.168.1.14). If the wireless print server is not on the same IP
subnet as the computers you are printing from, you will also need a subnet mask and a router
(default gateway) address.
Wireless security settings
User’s Guide
Document #40181-420 Rev. A
10
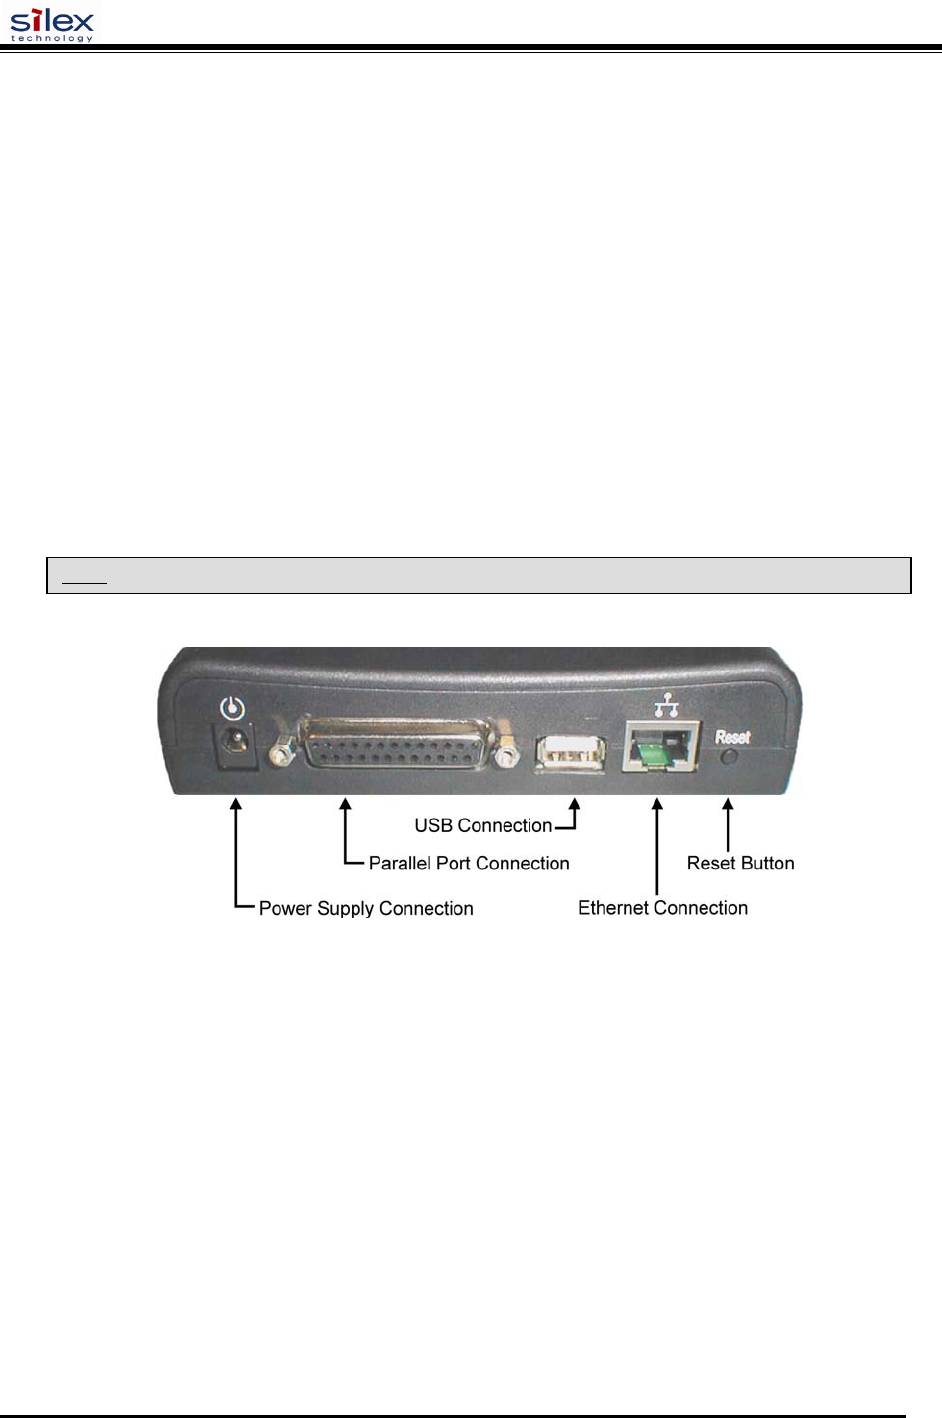
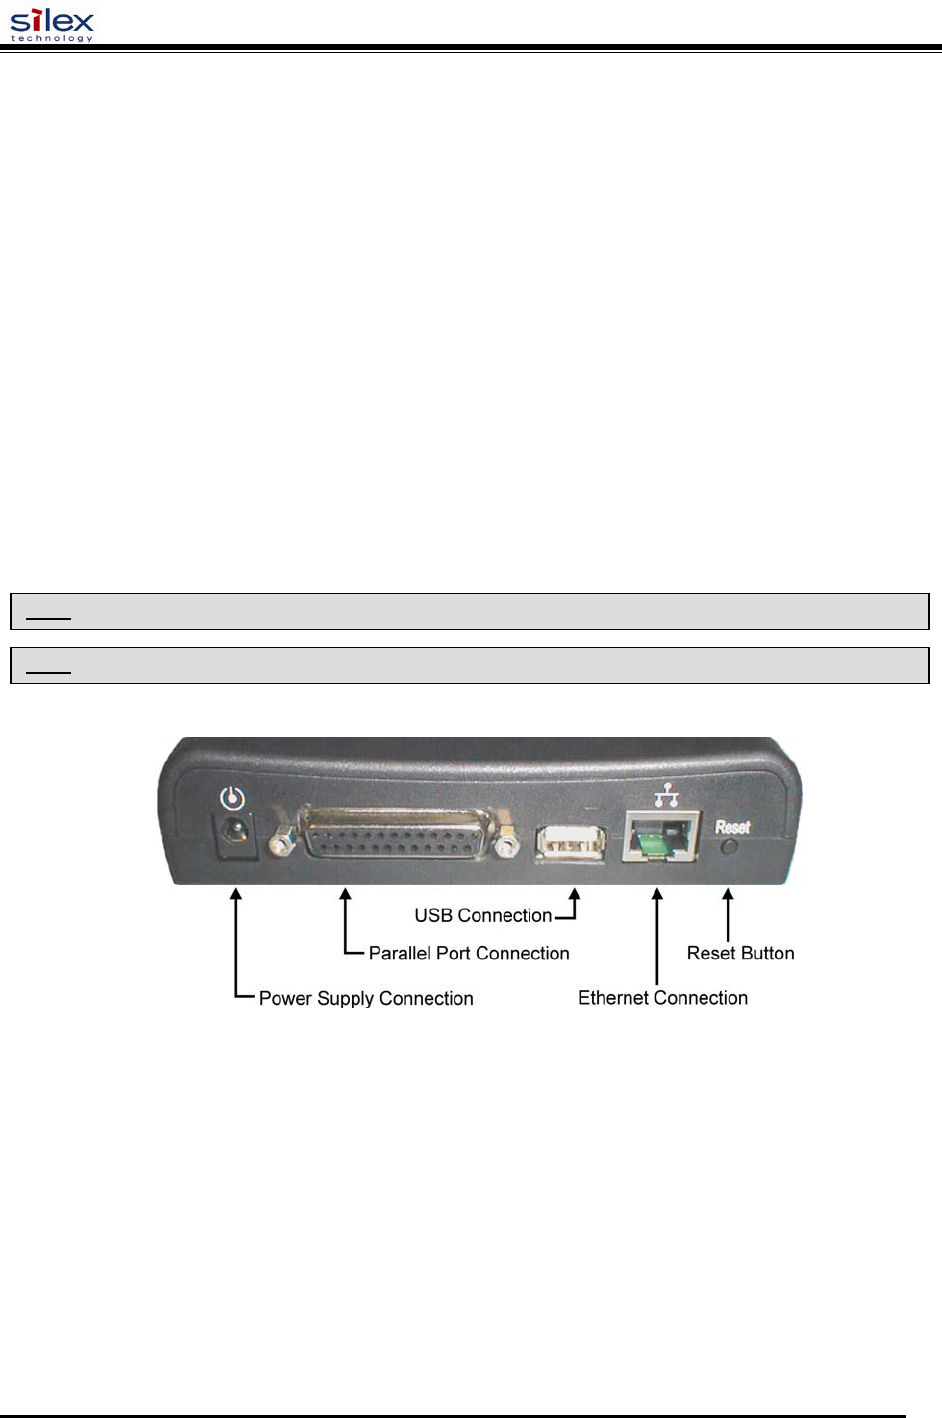
Print Server Components
The print server includes the following components. Detailed descriptions of these components are
provided below:
Power connector – The power supply cable plugs into this connector.
Test button – Pressing this button for less than three seconds will print a test page on the printer.
Pressing and holding this button for more than five seconds will reset the print server to factory
default settings.
LED status indicators – used to indicate the operational states of the print server. Refer to the LED
status light descriptions on the next page.
Ethernet Port – This port is used for connecting the print server to a 10/100Base-TX Ethernet card,
hub, router, or other wired access point for network access.
Parallel port – The parallel port is used for connecting the print server to the IEEE 1284-compliant
parallel port of your printer (parallel port models only).
USB port – The USB port is used for connecting the print server to the USB 2.0 port of your
printer. You must use a standard USB A (print server side) to B (printer side) cable (USB port
models only).
NOTE: A USB 2.0 cable must be used to take full advantage of the high-speed USB 2.0 connection.
User’s Guide
Document #40181-420 Rev. A
11
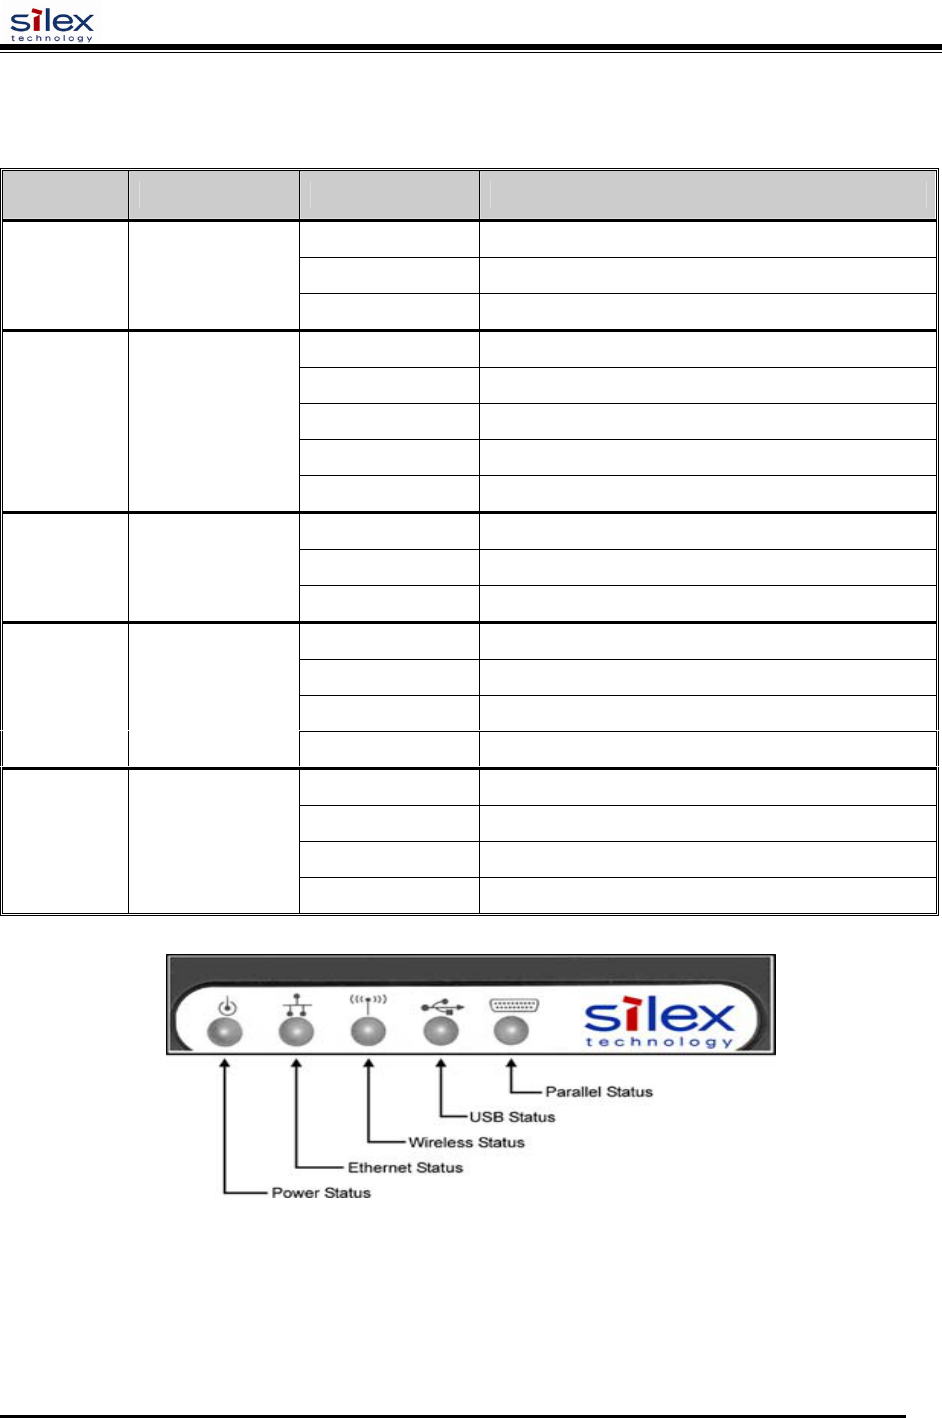
LED Indicators
The front edge of the print server provides five Green/Orange LEDs (Light Emitting Diode) indicators for
easy monitoring. The following table defines the function of each LED.
Label Color State Status
OFF The device is not receiving power
Green ON The device is ready
P
OWER
G
REEN
Green Blinking Device error
OFF No Ethernet link
Green ON 100baseTX link
Green Blinking 100baseTX data
Orange ON 10baseT link
10/100 G
REEN
/O
RANGE
Orange Blinking 10baseT data
OFF No wireless link
Green ON Wireless link
W
IRELESS
G
REEN
Green Blinking Wireless data
OFF No printer attached
Green ON Printer ready
Green Blinking Printer data
USB
(USB
PORT
MODELS
ONLY
)
G
REEN
/O
RANGE
Orange ON Printer error
OFF No device ID detected from printer
Green ON Printer ready
Green Blinking Printer data
P
ARALLEL
(
PARALLEL
PORT
MODELS
ONLY
)
G
REEN
/O
RANGE
Orange ON Printer error
User’s Guide
Document #40181-420 Rev. A
12
Pushbutton Functions
The front edge of the print server provides a momentary pushbutton that can be used to print a
test/configuration page or reset the device to factory default settings.
Action
Function
Press pushbutton for > 1/8 second but < 5
seconds Prints a test/configuration page on each connected port
Press pushbutton for > 5 seconds Resets the device configuration to factory defaults. The
unit will reinitialize itself after updating the
configuration memory.
Factory Default Settings
The SX-200 Series Print Server is shipped with a default configuration. The settings can be changed to
suit specific installation requirements via the ExtendView Utility, or other SNMP-based utilities, the
embedded Web server, or via a Telnet connection to the Print Server’s internal console. The factory
default settings can be easily restored at any time by performing a cold reset (press and hold the
pushbutton on the device for more than five seconds).
Default Settings (wired and wireless print servers)
Parameter Setting
IP Address 190.0.0.192
TCP/IP Method AUTO (BootP and DHCP are enabled)
Password access
Wireless Default Settings (wireless print servers only)
Parameter Setting
Wireless Mode Ad-Hoc (peer-to-peer)
RF Channel 11
ESSID printer (lower case)
User’s Guide
Document #40181-420 Rev. A
13
Section 2 – Hardware Installation
Before You Begin
Before installing the print server, make sure you have installed and set up your printer as described in the
documentation that came with the printer and that your printer functions properly. SX-200 Series Print
Servers support a parallel and/or USB connection to your printer.
Hardware Installation (wired and wireless versions)
1. Write down the 12-digit MAC address printed on the label located on the bottom of the print server
(for example: 004017023F96). You may need this number in order to configure the print server.
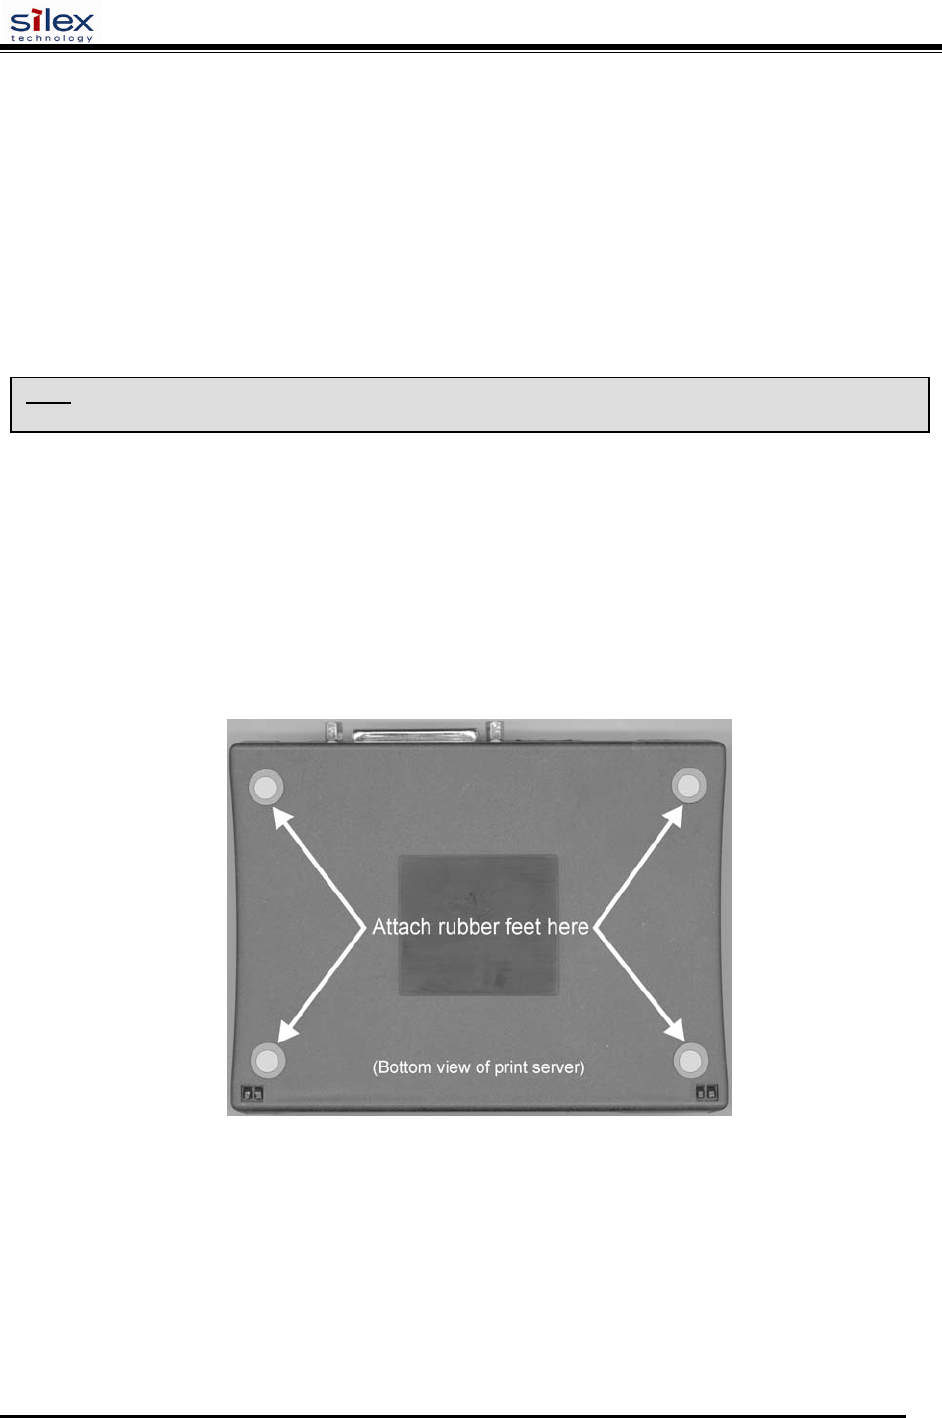
2. Mount the print server on either the printer or the desktop:
Printer mount – attach the print server to a suitable location on the side or rear of your printer by
applying an adhesive Velcro strip (provided in the printer mounting kit) to your printer and at the
top of the print server as it is to be attached to your printer.
Desktop mount – attach the adhesive rubber feet (provided in the desktop mounting kit) to the
bottom of the print server as shown below.
NOTE: Be sure to review the hardware requirements in the previous section to ensure you have the necessary
information before installing the print server.
User’s Guide
Document #40181-420 Rev. A
14
3. Connect the print server to your printer(s) using the USB and/or parallel port of your printer. For a
USB connection, use a standard USB A (print server side) to B (printer side) cable. For a parallel
connection, use an IEEE 1284-compliant parallel printer cable.
4. Plug the print server power supply adapter into a suitable AC receptacle, and then plug the power
supply cable into the print server. The print server will run through a sequence of power-up
diagnostics for a few seconds.
If the print server is operating properly, the power LED will illuminate continuously (refer to
page 1-5 for detailed LED status descriptions).
If the power LED blinks continuously in a regular pattern, a problem exists. If this is the case, try
powering the print server OFF and then ON again.
If the problem persists, refer to the Troubleshooting section in this User’s Guide.
5. Connect the print server to your network through a switch or hub using a category 5 (CAT5) Ethernet
cable. The print server’s IP address must be configured before a network connection is available. If
your network offers DHCP (Dynamic Host Configuration Protocol), the print server will
automatically search for a DCHP server upon power up and obtain an IP address. If your network
does not offer DHCP, a static (fixed) IP address must be assigned (see your system administrator for
assistance). In most cases, a fixed IP address is preferred because a DHCP server may not always
assign the same IP address to the print server when the print server is powered ON.
NOTE: The IP address must be within a valid range, unique to your network, and in the same subnet as your PC.
NOTE: For wireless print servers, if a wired connection is established to the unit, the wireless link will be disabled.

User’s Guide
Document #40181-420 Rev. A
15
Verifying the Connection to the Printer
1. Verify that both the print server and the printer are powered on and ready, and that a USB or parallel
printer cable is properly connected between the print server and printer.
2. Print a test page by pressing the Test button once. If the connection is good, a test page will print on
the printer. If nothing prints out, make sure that the printer cable is properly connected, your printer
is on line, and that no error conditions exist with the printer (off line, paper jam, out of toner, etc.).
NOTE: Before attempting to print, it is very important to verify the connection between the print server and printer.
If this connection is not working, you will not be able to print!
NOTE: The test page will only work with printers that can directly print PCL, PostScript, or text. It will not work with
some "Windows" printers like the HP DeskJet 820 (which performs the image rasterization in the PC), nor will it work
with HP-GL/2 or RTL plotters (unless the PostScript option is installed). For such devices, you must print a job from
an appropriate application program in order to test the print server-to-printer connection.

User’s Guide
Document #40181-420 Rev. A
16
Section 3 – Configuration and Management
Configuration Options
SX-200 Series Print Servers (wired and wireless models) can be configured using a variety of options,
some of which do not require any software installation on the host PC. The print server can be configured
and managed via an Ethernet or wireless connection using the ExtendView Utility (recommended), the
embedded web (HTTP) server pages, or the print server’s internal configuration console, which can be
accessed via a Telnet connection. If you choose to use the silex ExtendView Utility (provided on the
Print Server Installation CD), the software must be installed prior to use. Additional options for print
server configuration and management are available as third-party utilities that can be downloaded from
their respective web sites. If you are using a wireless print server, you can still configure it via an
Ethernet connection or optionally configure it via a wireless connection.
ExtendView Utility
used for advanced print server configuration, and allows you to configure for TCP/IP, Netware,
AppleTalk, and the wireless settings (for wireless print server models only).
uses a 32-bit graphical user interface.
works with Windows PCs running the TCP/IP protocol.
included on the Print Server installation CD.
can be downloaded from the silex web sites:
USA: http://www.silexamerica.com
after installation, this utility can be run from the START menu.
I
NSTALLING THE
E
XTEND
V
IEW
U
TILITY
(W
INDOWS OPERATING SYSTEMS
):
1. Ensure your PC is connected and has access to your network.
2. Connect an available Ethernet cable from your network hub to the print server. Ensure the print
server is powered on.
3. Insert the CD supplied with your print server into the CD-ROM drive of your computer. The CD
should automatically start and display a menu screen. Click on Install Software.
4. Select ExtendView, and then click on Install.
Web Browser Interface
allows you to configure the print server with a standard web browser (e.g., Internet Explorer or
Mozilla).
no additional software is needed on the system.
can be used on any system that supports web browser capabilities.
type the IP address into your web browser address bar to connect.
the default password is ACCESS (all uppercase characters).

User’s Guide
Document #40181-420 Rev. A
17
HP Web JetAdmin Utility
a web browser-based HP utility (e.g., Internet Explorer or Mozilla).
can be downloaded from the HP web site http://www.hp.com.
Configuration Console
a command-line-oriented console.
contains advanced features not available through ExtendView or the Web Browser Interface.
the default password is ACCESS.
can be accessed via TELNET using the print server’s Ethernet connection.
type HELP for a list of console commands.
More detail on the command console can be found in the Command Console section towards the
end of this manual.
NOTE: When connected, press ENTER to get the “#” prompt, enter the password ACCESS (will not ‘ECHO’ on your
screen), and press ENTER to get a “Local>” prompt (no response required for the “Enter Username>” prompt).
When the “Local>” prompt appears, the console is ready to accept commands.

User’s Guide
Document #40181-420 Rev. A
18
Configuring the Print Server via an Ethernet Connection
For Microsoft Windows operating systems, the ExtendView Utility (provided on the Print Server
Installation CD) is the recommended method of configuring one or more print servers on your network.
Once the print server obtains an IP address (occurs automatically when the unit is powered ON and
connected to a DHCP network), the ExtendView Utility’s auto-discovery feature will search for and
locate all print servers on the network and then display the IP address for each discovered print server.
For non-Windows operating systems such as Macintosh or Unix systems, a standard web browser (e.g.,
Microsoft Internet Explorer or Mozilla) can be used to access the configuration settings of the print server
(refer to the next page, “Using the Web Browser Interface” instructions). No additional software is
required.
U
SING THE
E
XTEND
V
IEW
U
TILITY TO
C
ONFIGURE THE
P
RINT
S
EVER
(W
INDOWS OPERATING SYSTEMS
):
1. Start the ExtendView Utility from the START Menu.
2. When the Welcome screen appears, click on Next, choose any name for your View Name, select
Automatically create a view with default settings, and then click on Finish.
3. Double-click on the print server that you want to use from the list. The default print server name is
SLXxxxxxx (where xxxxxx is the last six digits of the MAC address from the label located on the
back of the print server).
4. If you are using TCP/IP (recommended for Windows) and you do not have a DHCP server (see note
below), you will need to manually assign a valid IP Address (if you are not sure what IP address is
valid, ask your network administrator), and then click on OK.
5. Configure the 802.11a, 802.11b, or 802.11g wireless settings (wireless print servers only). To operate
on a wireless network, you must select your country or region from the drop-down list. This field
designates the region of operation for which the wireless interface is intended. It may not be legal to
operate the print server in a country/region other than the country/region shown in the drop-down list.
You must also set the wireless mode (ad-hoc or infrastructure), SSID channel, and WEP encryption of
the wireless print server to the same configuration as the wireless network you want the print server to
communicate on. All nodes of a wireless network need to have the same settings in order to
communicate with each other.
wireless mode (ad-hoc or infrastructure)
SSID channel
wireless security settings
More information can be found in the Wireless Security Configuration Section at the end of this manual.
NOTE: If you are using DHCP on your network, the print server should have acquired valid IP settings at this point
and no further configuration is necessary. However, for most installations, a static IP address is preferred. If your
DHCP server does not allow the print server to keep its assigned IP address permanently, then you must manually
assign an IP address. In this case, use a static IP address outside the range reserved for DHCP (see your DHCP
server documentation for details). To assign a static IP address, right-click on the print server in the menu, and then
select Configuration. On the TCP/IP tab, under IP Address Resolution, select Set Permanent, and assign a valid
static IP address for your network. Click on OK to save the new settings.
NOTE: It may not be legal to operate the print server in a country or region other than the country or region shown in
the drop-down list. If your country or region is not listed, please check with your local government agency.

User’s Guide
Document #40181-420 Rev. A
19
U
SING THE
W
EB
B
ROWSER
I
NTERFACE TO
C
ONFIGURE THE
P
RINT
S
ERVER
(N
ON
-W
INDOWS SYSTEMS
):
To configure the print server using non-Windows operating systems (e.g., Unix systems), a standard web
browser (e.g., Microsoft Internet Explorer or Netscape Navigator) can be used to access the print server’s
embedded Web (HTTP) server pages, which contain the print server’s configuration options. No
additional software is required.
1. Ensure your PC is connected and has access to your network.
2. Connect an available Ethernet cable from your network hub to the print server. Ensure the print
server is powered ON.
3. With your printer and print server switched on and ready, press the test button on the print server to
print a test page. The test page will display the current IP address assigned to the print server by your
network DHCP service. If your network does not use DHCP, then the print server will have the
default IP address of 192.0.0.192. In any case, your computer must use an IP address other than the
one used by the print server in order to establish a connection between the two devices.
4. Configure the 802.11a, 802.11b, or 802.11g wireless settings (wireless print servers only). To operate
on a wireless network, you must select your country or region from the drop-down list. This field
designates the region of operation for which the wireless interface is intended. It may not be legal to
operate the print server in a country/region other than the country/region shown in the drop-down list.
You must also set the wireless mode (ad-hoc or infrastructure), SSID channel, and WEP encryption of
the wireless print server to the same configuration as the wireless network you want the print server to
communicate on. All nodes of a wireless network need to have the same settings in order to
communicate with each other.
5. From the host computer, open a standard web browser (e.g., Microsoft Internet Explorer or Netscape
Navigator), enter the IP address of the print server into the address bar of the web browser, and then
press Enter. The Web Browser Utility will be displayed, allowing you to configure the print server.
The menu selections are displayed on the left side of the screen, and the individual settings are
located at the top of the screen. Use the browser’s Forward and Back buttons to navigate to the sub
pages where you can configure the print server’s settings.
NOTE: It may not be legal to operate the print server in a country or region other than the country or region shown in
the drop-down list in ExtendView. If your country or region is not listed, check with your local government agency.
User’s Guide
Document #40181-420 Rev. A
20
U
SING A THE
I
NTERNAL
C
OMMAND
C
ONSOLE TO
C
ONFIGURE THE
P
RINT
S
ERVER
:
The command console can be accessed using a Telnet connection via an Ethernet connection. To use a
Telnet connection, follow these steps:
1. Ensure the print server is connected via an Ethernet cable to the host computer.
2. From the Windows Start menu, click on Run, and then type the following command (where
x.x.x.x. is the IP address of the print server.
telnet X.X.X.X
After a connection is established, press RETURN or ENTER to get the ‘#’ prompt, enter the
password ACCESS (it will not ‘echo’ on your screen), and type anything in response to the Enter
Username> prompt. When you get the Local> prompt, you are ready to enter commands. Type Help
for a list of console commands.
First-Time Configuration of the Wireless Print Server Using 802.11b or
802.11g (wireless print servers only)
It is recommended that you initially configure the print server via a wired connection. However, if you
choose to configure the wireless print server for the first time from a computer via an 802.11b or 802.11g
wireless connection, you will need to temporarily change the settings on your computer to match the
default settings of the print server as follows:
Wireless Mode: Ad-Hoc (sometimes referred to as Peer-to-Peer)
Channel: 11
SSID (or wireless network name): printer
You should now be able to configure your print server using either the ExtendView Utility or the Web
Browser Configuration as described in the previous sections. For wireless security configuration, see
NOTE: Be sure to set your PC back to its original wireless settings after you finish configuring the wireless print
server.
NOTE: It is not necessary to change your computer’s settings if you are configuring the print server’s settings via an
Ethernet connection. The 802.11a wireless protocol cannot be used for this method of configuration.

User’s Guide
Document #40181-420 Rev. A
21
Windows Print Queue Configuration
It is recommended to use the ExtendNet Connect for TCP/IP software for Windows printer port
configuration (provided on the Print Server Installation CD). The Print Servers are also compatible with
Windows standard TCP/IP port and LPR ports. If you are using the Windows standard TCP/IP port, the
default port number is 9100. Perform the following steps to install and use ExtendNet Connect for
TCP/IP:
1. Install the ExtendConnect IP Port Monitor by inserting the CD supplied with your print server and
clicking on Install Software.
2. Select ExtendNet Connect Windows Printing, click on Next, click on ExtendNet Connect for
TCP/IP, and then click on Install. Follow the on-screen instructions to complete this installation.
3. Install the printer driver software according to the documentation for the printer.
4. Click the Windows Start button, select Settings, and then Printers (Start, then Printers and Faxes if
you are using Windows XP).
5. Right-click on the printer you wish to associate with the network port, and then select Properties.
6. If you are using Windows NT/2000/XP/2003, go to the Ports tab. If you are using Windows
95/98/ME, go to the Details tab, and then click on Add Port.
7. If you are using Windows NT/2000/XP/2003, highlight ExtendNet Connect IP Monitor, and then
click on New Port.
8. If you are running Windows 95/98/ME, select Other, highlight ExtendNet Connect IP Monitor, and
then click on OK. The search will begin for available print servers.
9. Highlight the print server you would like to create the port for, and then click on ADD.
10. Make sure the port you created is chosen, and then click on Apply. You are now ready to print.

Document #40181-120 Rev. A
22
Macintosh Print Queue Configuration
Silex Print Servers support the AppleTalk protocol running over Ethernet (also known as EtherTalk).
This capability allows Macintosh computers to print jobs to a printer simultaneously with jobs from
Windows, UNIX, NetWare, and other computers.
silex print server AppleTalk capabilities allow a printer to appear as a shareable printer node on an
AppleTalk Phase 2 network. The print server broadcasts information to Macintoshes on the network, and
automatically appears in the Print Center or Chooser of each Macintosh. Application programs (such as
Microsoft Word, Excel, PageMaker, etc.) can print without modification or special software on the
Macintosh.
M
ACINTOSH
C
ONFIGURATION
(OS
8.
X AND
9.
X
):
Identify the printer to which the print server is connected, and install the printer driver.
1. Verify that Ethernet is enabled from the Network Control Panel or AppleTalk Control Panel.
2. At a Macintosh workstation, from the Apple menu, open the Chooser.
3. If the Chooser window displays an AppleTalk zone list, select the necessary zone. Click on the icon
for the printer driver you are going to use. If you have a Postscript printer, you can use the
LaserWriter driver.
4. Select the print server name (the default is SLXxxxxxx_P1_AT, where "xxxxxx" are the last six
digits of the Ethernet address.).
5. Close the Chooser. You can now print to the printer using any standard Macintosh application
program.
NOTE: silex Print Servers are also compatible with the Macintosh TCP/IP Printer option in the Print Center as long as
you have a valid IP Address configured (refer to the section “Configuring your print server”). Enter the IP Address
of the print server for the “Printer’s Address”, and make sure the “Use default queue on server” option is checked,
and select your correct “Printer Model”.
User’s Guide
Document #40181-420 Rev. A
23
M
ACINTOSH
C
ONFIGURATION
(OS
10.
X
)
1. If you have not done so already, set the name of your computer by going to the Applications folder*,
selecting System Preferences, and then Sharing. Type in the computer name in the Network Identity
section (you can also set the IP address here if you want).
2. Turn on Ethernet and AppleTalk by clicking on the Applications folder and clicking on Network.
Next to Configure: select Built-in Ethernet (you can leave the Location: setting as Automatic).
3. Click on the AppleTalk tab; ensure the box next to Make AppleTalk Active is checked. If necessary,
select the appropriate AppleTalk Zone (you can leave the Configure: setting as Automatic).
4. Now go to the Applications folder, open the Utilities folder, and select Print Center. The Printer List
will appear (it will be empty if you have no printers configured). Click on Add Printer..., and then
select AppleTalk instead of Directory Services.
5. All of the available AppleTalk printers on the network should appear. Click on the one you wish to
add, and then click Add. The printer will now appear in the Printer List.
6. To print from an application program, go to File and then Print, select the desired printer, and then
click on Print.
Configuring to Print Using TCP/IP (OS 10.x)
1. From the System Dock, click on the Print Center icon, and then click on Add.
2. Select IP Printing and enter the IP address of the device. Make sure that Use Default Queue on
Server option is checked.
3. Select the appropriate Printer model, and then click on Add. The printer is now ready to accept jobs.
*
NOTE: The Applications folder can generally be reached by double-clicking on the Macintosh HD icon on the desktop.
NOTE: silex print servers are also compatible with the Macintosh TCP/IP Printer option in the Print Center as long as
you have a valid IP Address configured (refer to the section “Configuring your print server”). Enter the IP Address of
the print server for the “Printer’s Address”, and make sure the “Use default queue on server” option is checked, and
select your correct “Printer Model”.

User’s Guide
Document #40181-420 Rev. A
24
Section 4 – Troubleshooting
Introduction
This section describes procedures for troubleshooting problems you may encounter with the print server,
and is divided into the following sections:
Installation Problems
Intermittent Problems
Protocol-Specific Troubleshooting
If you have followed the steps in this section and you believe that you have a defective print server, then
please refer to Section 5 – Where to Get Help for information on returning defective products.
Printing Problems
If you cannot print to the print server after you install it, check the following:
Make sure that the printer is powered on and is on-line, and that all cables are securely plugged in.
If the printer initializes successfully but you cannot print, the problem could be one of the following:
There is a problem with the interface between the print server and the printer.
There is a problem with the network connection or cabling.
There is a queue setup problem, a print server setup problem, or other protocol-related problem.
Checking the Interface between the Print Server and the Printer:
1. Ensure that the print server is securely plugged into the printer.
2. After the printer is powered ON, wait until the printer initializes, and then print a self-test page by
pushing the Test button on the back of the print server for approximately one second.
If the self-test does not print, then there is possibly a hardware problem. Double-check the
connections. If you still cannot print, then make sure that your printer is capable of printing text,
PCL or PostScript (the self-test will not work unless one of these is supported). The only way to
test such printers is to use an application program with the correct printer drivers.
The following are some examples of printers that do not support direct printing of text files:
Some Windows printers (usually low-end inkjet printers) perform all the image
rasterization in the printer driver, so the printer only understands a raw image file.
Many plotters only support HP-GL/2, RTL, or proprietary languages.
If you are getting distorted printouts, try printing using the generic/text printer driver.
NOTE: Pushing the Test button for more than five seconds will restore the factory default configuration settings.

User’s Guide
Document #40181-420 Rev. A
25
If the self-test page prints successfully but you cannot print a job or you get distorted printouts, make sure
the printer is set for the correct Page Description Language. Most new printers support AUTO mode,
which means that they will automatically switch between PCL and PostScript. However, older printers
like the LaserJet II, LaserJet III, and LaserJet IIISi require that the printer be set to the desired language
through the printer control panel. Also, verify that you have set up the drivers correctly on the
workstation. Some printers, like the Epson Stylus, require special drivers and will not print if standard
PCL or PostScript drivers are used.
Checking the Network Connection and Cabling:
If the self-test page prints but you cannot print documents, first check the network connection and
cabling.
If the appropriate LEDs are not on, there is probably a bad 10baseT or 100baseTX cable, or the
hub port is bad. If possible, try a different cable and hub port, or try connecting a different device
to the cable.
If you are using a hub, verify that the hub port is good by trying the print server on a different
port.
If you have a bridge or router located between the print server and the host computer, make sure
that the device is set up to allow the print server to send and receive data from the host. For
example, a bridge can be set up to only allow certain types of Ethernet addresses to pass through
(a process known as filtering); therefore, such a bridge must be configured to allow print server
addresses. Likewise, a router can be set up to pass only certain protocols, so be sure that the
desired protocol can be passed through to the print server. In the case of routers, also make sure
that the protocol is routable (LAT, NetBEUI, and DLC/LLC are not routable).
If the job exists in the queue but does not print, ensure that you are not trying to print a text job to
a PostScript printer. If you have a printer that is capable of automatic language switching, ensure
that the printer is not forced into PostScript mode.
Make sure that you are not trying to perform an illegal operation, such as attempting to print a
legal-size form when the printer only supports 8.5" x 11" paper.
Troubleshooting Windows Problems
If you are having trouble printing with Windows, ensure you can ping the print server using the DOS
command PING ipaddress, where ipaddress is the IP address of the print server. If you cannot ping
the print server, you will not be able to print.

User’s Guide
Document #40181-420 Rev. A
26
Troubleshooting Network Configuration Problems
If you are using TCP/IP, make sure that your computer and the print server are on the same IP
segment or can reach each other with a PING command from the host. The IP address you assign
to the print server must be on the same logical network as your host computers (e.g., if your
computer has an IP address of 192.189.207.3, the print server should have an IP of
192.189.207.x, where x is an integer between 1 and 254), or you must properly configure your
router address to work with the print server.
If your print server is set to Auto or DHCP for obtaining an IP address, it is possible that the print
server’s IP address can change. Either configure your DHCP server to give the print server a
permanent lease, or configure the print server to be on a STATIC address outside the scope of
DHCP addresses.
The problem may be the result of mismatched or duplicate IP addresses. Verify that the IP
address is correctly loaded into the print server (via the self-test page or through the remote
console) and make sure that no other nodes on the network have this address (duplicate addresses
are the biggest cause of TCP/IP printing problems). If the address is not correct, then verify that
the loading procedure was properly executed.
Also verify that the host computer and the print server are either on the same subnet (for example,
if the print server has a subnet mask of 255.255.255.0, the host must have the same subnet mask)
or that the router is properly configured to pass data between the two devices.
If the wrong IP address is loaded, check your network for file servers that have DHCP, BOOTP,
or rarp enabled, and make sure that these file servers are not set up to load IP addresses into the
print server.

User’s Guide
Document #40181-420 Rev. A
27
Troubleshooting Wireless Configuration Problems
Make sure your computer’s wireless adapter and/or access point is configured properly and note
the settings, paying special attention to the wireless mode, SSID or network name, WEP or
security, and IP address settings so you can configure your print server to the same wireless
settings.
Make sure the radio mode is configured properly for 802.11a or 802.11g if auto mode is not
connecting properly.
Make sure you have a good wireless signal from your PC and from the print server, that the print
server is within range (90 meters or 300 feet), and that it is away from metal objects and other
devices that generate radio signals (like Bluetooth, Cordless Phones, and Microwave ovens).
Make sure your computer is set to infrastructure mode if you are connecting through an access
point, or ad-hoc (802.11) if you are connecting to the print server without an access point. See
the documentation for your wireless adapter for details.
If you want to use WEP encryption or password protection for your wireless network, and your
wireless adapter or access point normally uses a password or passphrase instead of WEP, it
should allow you to enter 0x followed by a ten digit (for 40-bit or 64-bit WEP) or twenty-six digit
(for 128-bit WEP) key in hexadecimal format (0-9 or A-F).
If you are using ad-hoc (peer to peer) mode and are experiencing slow performance or are having
intermittent problems connecting, try changing the RF channel of your wireless network. Refer
to your wireless adapter and/or access point documentation for more information. It is
recommended that you change the RF channel to at least three channels lower or higher than any
other wireless networks within range. The RF channel can be changed via the ExtendView
Utility or the Web Browser Configuration Utility for the print server.

User’s Guide
Document #40181-420 Rev. A
28
Section 5 – Where to Get Help
silex offers several customer support options to assist you in the event you experience difficulties with
your print server, including telephone support, repair services, and warranty.
The worldwide web site provides a quick and easy way to answer many common technical questions. It
includes a wide variety of technical support tips, as well as copies of product manuals, product literature,
and firmware load images. The web site is located at www.silexamerica.com.
Your first point of contact for technical support is the Distributor or Dealer from whom you bought your
product. They are familiar with your needs, and will generally be able to provide you with the fastest and
most comprehensive support.
If your Distributor or Dealer is unable to answer your questions or is for some reason not available, then
contact silex directly at (801) 748-1199. Or you can send an e-mail to: support@silexamerica.com .
Before contacting Technical Support, please refer to the troubleshooting suggestions or the web site in
this manual to isolate any problems, and be sure to write down any error messages. Also, make sure that
you have the serial number of the product (located on the product label on the card).

User’s Guide
Document #40181-420 Rev. A
29
Returning Products
If you need to return a product for any reason (failures, incorrect shipments, etc.), follow the steps below:
1. Contact the Technical Support group at (801) 748-1199 to request a Return Goods
Authorization (RGA) number.
2. Be prepared with the serial number of the unit you are returning. You will be asked for the
serial number to verify warranty coverage.
Please record these serial numbers in the space provided below for future reference.
Print Server Model #: ________________________________
Print Server S/N: ____________________________________

User’s Guide
Document #40182-420 Rev. A
30
Appendix A – Safety and Regulatory Notices
Information for United States Users
This equipment has been tested and found to comply within the limits for a Class B digital device
pursuant to Part 15 of the FCC Rules. These limits are designed to provide reasonable protection against
harmful interference in a residential installation. This equipment generates, uses, and can radiate radio
frequency energy and, if not installed and used in accordance with the instructions, may cause harmful
interference to radio communications. However, there is no guarantee that interference will not occur in a
particular installation. If this equipment does cause harmful interference to radio and television reception,
which can be determined by turning the equipment off and on, the user is encouraged to try to correct the
interference by one or more of the following measures:
Reorient or relocate the receiving antenna.
Increase the separation between the equipment and receiver,
Connect the equipment into an outlet on a circuit different from that to which the receiver is
connected.
Consult the dealer or an experienced radio/TV technician for help.
The user is cautioned that changes and modifications made to the equipment without the approval of
manufacturer could void the user’s authority to operate this equipment.
Operation is subject to the following two conditions: (1) This device may not cause harmful interference,
and (2) this device must accept any interference received, including interference that may cause undesired
operation.
The radiated output power of the print server is far below the FCC radio frequency exposure limits.
Nevertheless, print server shall be used in such a manner that the potential for human contact during
normal operation is minimized.
To satisfy RF exposure requirements, this device and its antenna(s) must operate with a separation
distance of at least 20 centimeters from all persons and must not be co-located or operating in conjunction
with any other antenna or transmitter. End-users must be provided with specific operating instructions for
satisfying RF exposure compliance.
Channel
The Wireless Channel sets the radio frequency used for communication.
- Access Points use a fixed Channel. You can select the Channel used. This allows you to choose a Channel
which provides the least interference and best performance. In the USA and Canada, 11 channel are available.
If using multiple Access Points, it is better if adjacent Access Points use different Channels to reduce interference.
- In "Infrastructure" mode, Wireless Stations normally scan all Channels, looking for an Access Point. If more than
one Access Point can be used, the one with the strongest signal is used. (This can only happen within an ESS.)
- If using "Ad-hoc" mode (no Access Point), all Wireless stations should be set to use the same Channel. However,
most Wireless stations will still scan all Channels to see if there is an existing "Ad-hoc" group they can join.
Note:This equipment marketed in USA is restricted by firmware to only operate on 2.4G channel 1-11

User’s Guide
Document #40182-420 Rev. A
31
Declaration of Conformity (FCC)
According to 47CFR, Part 2 and 15 for Class B Personal Computers and Peripherals; and/or CPU Boards
and Power Supplies used with Class B Personal Computers:
We: silex technology america, Inc.
Located at: 157 West 7065 South
Salt Lake City, UT 84047, USA
Declare under sole responsibility that the product identified herein, complies with 47CFR Part 2 and 15 of
the FCC rules as a Class B digital device FOR HOME OR OFFICE USE. Each product marketed, is
identical to the representative unit tested and found to be compliant with the standards. Records
maintained continue to reflect the equipment being produced can be expected to be within the variation
accepted, due to quantity production and testing on a statistical basis as required by 47CFR §2.909.
Operation is subject to the following two conditions: (1) this device may not cause harmful interference,
and (2) this device must accept any interference received, including interference that may cause undesired
operation.
Trade Name: silex
Type of Product: Ethernet and Wireless 802.11a, 802.11b, and 802.11g-enabled print server
Model: SX-200 Series
silex technology america, Inc. hereby declares that the equipment specified above conforms to the above
requirements.
Standards used and met in the assessment:
EN55022: 1998 Class B; CFR Title 47, Part 15, Subpart B, Subpart C, and Subpart E.
Information for Canadian Users (IC notice)
The term “IC” before the radio certification number only signifies that Industry of Canada technical
specifications were met. Operation is subject to the following two conditions: (1) this device may not
cause interference, and (2) this device must accept any interference, including interference that may cause
undesired operation of the device.
This Class B digital apparatus meets all requirements of the Canadian Interference-Causing Equipment
Regulations.
To prevent radio interference to the licensed service, this device is intended to be operated indoors and
away from windows to provide maximum shielding. Equipment that is installed outdoors is subject to
licensing.
This device has been designed to operate with an antenna having a maximum gain of 2 dB. Antenna
having a higher gain is strictly prohibited per regulations of Industry Canada. The required antenna
impedance is 50 ohms.
To reduce potential radio interference to other users, the antenna type and its gain should be so chosen
than the equivalent isotropically radiated power (EIRP) is not more than the required for successful
communication.

User’s Guide
Document #40182-420 Rev. A
32
Information for European Users
The print server and its built-in 802.11a, 802.11b, and 802.11g wireless technology is in compliance with
the Class B Information Technology Equipment requirements and other relevant provisions of European
Directive 1999/5/EC. The limits for Class B equipment were derived for typical residential environments
to provide reasonable protection against interference with licensed communications devices. The internal
function is a radio device using the 2.4 GHz frequency band (2.400GHz - 2.4845 GHz) and 5. GHz
frequency band ( 5.150GHz - 5.825GHz). It is intended for wireless communication with other 802.11a,
802.11b, and 802.11g-enabled devices in an indoor environment.
The use of 802.11a, 802.11b, and 802.11g wireless technology in certain countries may be restricted.
Before using 802.11x products, please confirm with the frequency management authority in the country
where you plan to use it. Many countries allow indoor use only. In Italy, general authorization is
required if used outside. In France, the use of certain channels is restricted outdoors. In some situations
or environments, the use of 802.11x wireless technology might be restricted by the proprietor of the
building or responsible representatives of the organization, for example, in airplanes, in hospitals or in
any other environment where the risk of interference with other devices or services is perceived or
identified as harmful.
If you are uncertain of the policy that applies to the use in a specific organization or environment, you are
encouraged to ask for authorization to use 802.11x wireless technology prior to switching it on. Consult
your physician or the manufacturer of personal medical devices (pacemakers, hearing aids, etc.) regarding
any restrictions on the use of 802.11x wireless technology.
silex cannot be responsible for any failure to satisfy the protection requirements resulting from a non-
recommended modification of the product.
Declaration of Conformity (CE)
Manufacturer: silex technology america, Inc.
157 West 7065 South
Salt Lake City, UT 84047, USA
Telephone: (801) 748-1199
Product: Ethernet and Wireless 802.11a, 802.11b, and 802.11g-enabled print server
Model No.: SX-200 Series
silex technology america, Inc., Inc. hereby declares that the above-referenced product, to which this
declaration relates, in is conformity with the provisions of:
Council Directives 1999/5/EC (March 9, 1999), Radio Equipment and Telecommunications Terminal
Equipment.
Standards used and met in the assessment:
• EN301 489-1 (V1.5.1, 2004-11)
• EN301 489-17 (V1.2.1, 2002-08)
• EN300 328 (V1.5.1, 2004-08)
• EN60950
The documents required by this Directive are maintained at the corporate headquarters of silex technology
america, Inc., 157 West 7065 South, Salt Lake City, UT 84047, USA
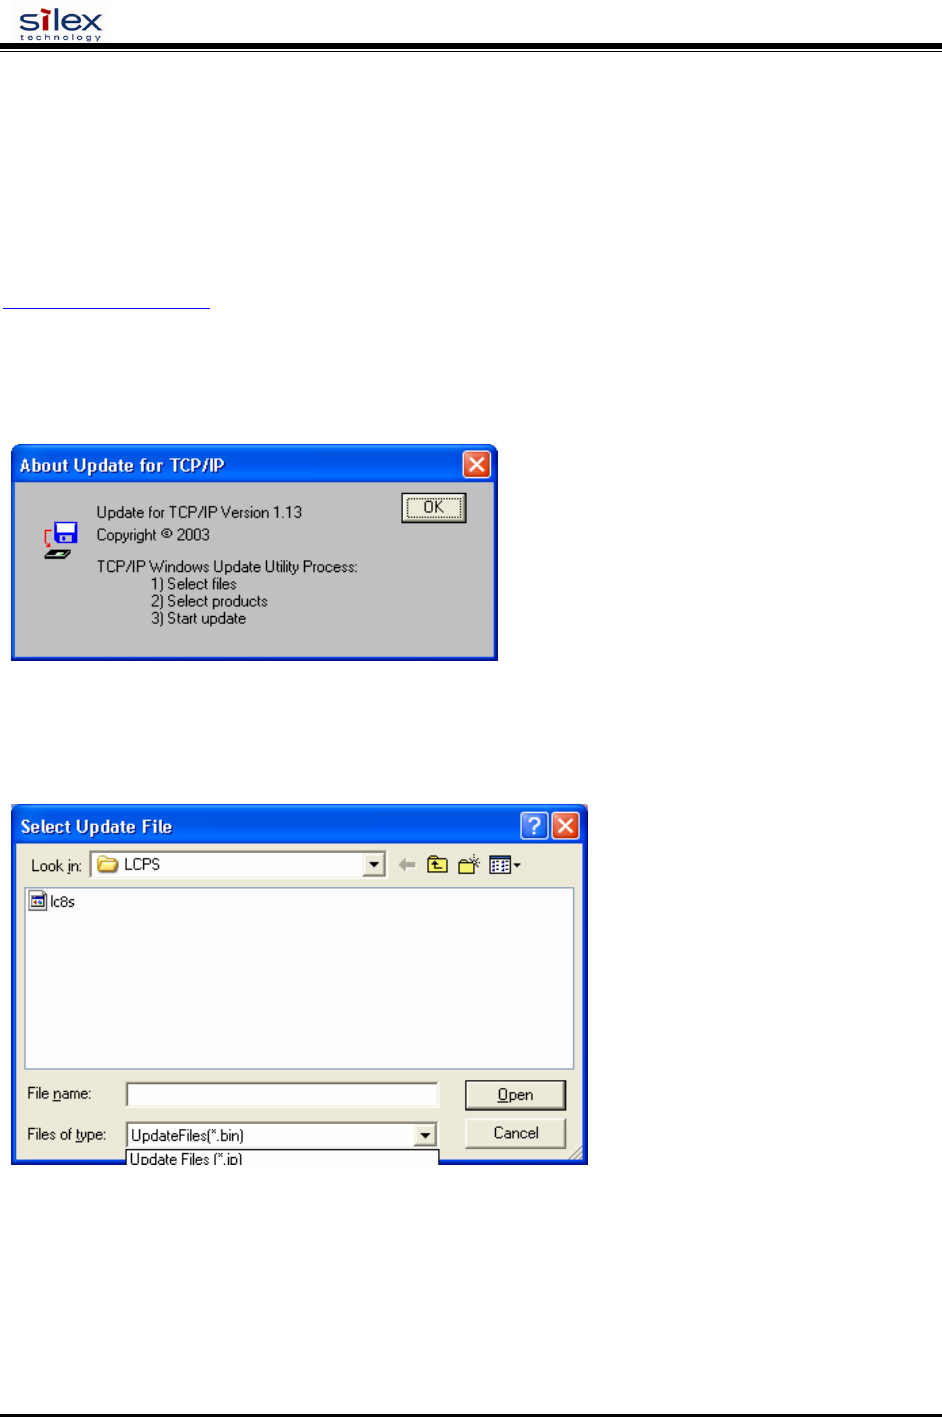
User’s Guide
Document #40182-420 Rev. A
33
Appendix B – Updating Firmware
Loading New Firmware (Using the TCP/IP Update Utility)
The silex print server’s internal firmware can be easily updated as updates become available. Please visit
the silex web site for more information on how to download the latest firmware updates at
www.silexamerica.com. Updating the print server’s firmware will not change any user-defined
configuration options.
1. Run the Update utility for TCP/IP. The About Update for TCP/IP window will be displayed. Click
on OK to continue. The Select Update File window will be displayed.
2. Select UpdateFiles (*.bin) file type, locate the print server bin file, and then click on Open. A
window will be displayed (see next page) showing the file(s) you have selected including the revision
level and date code for each file.
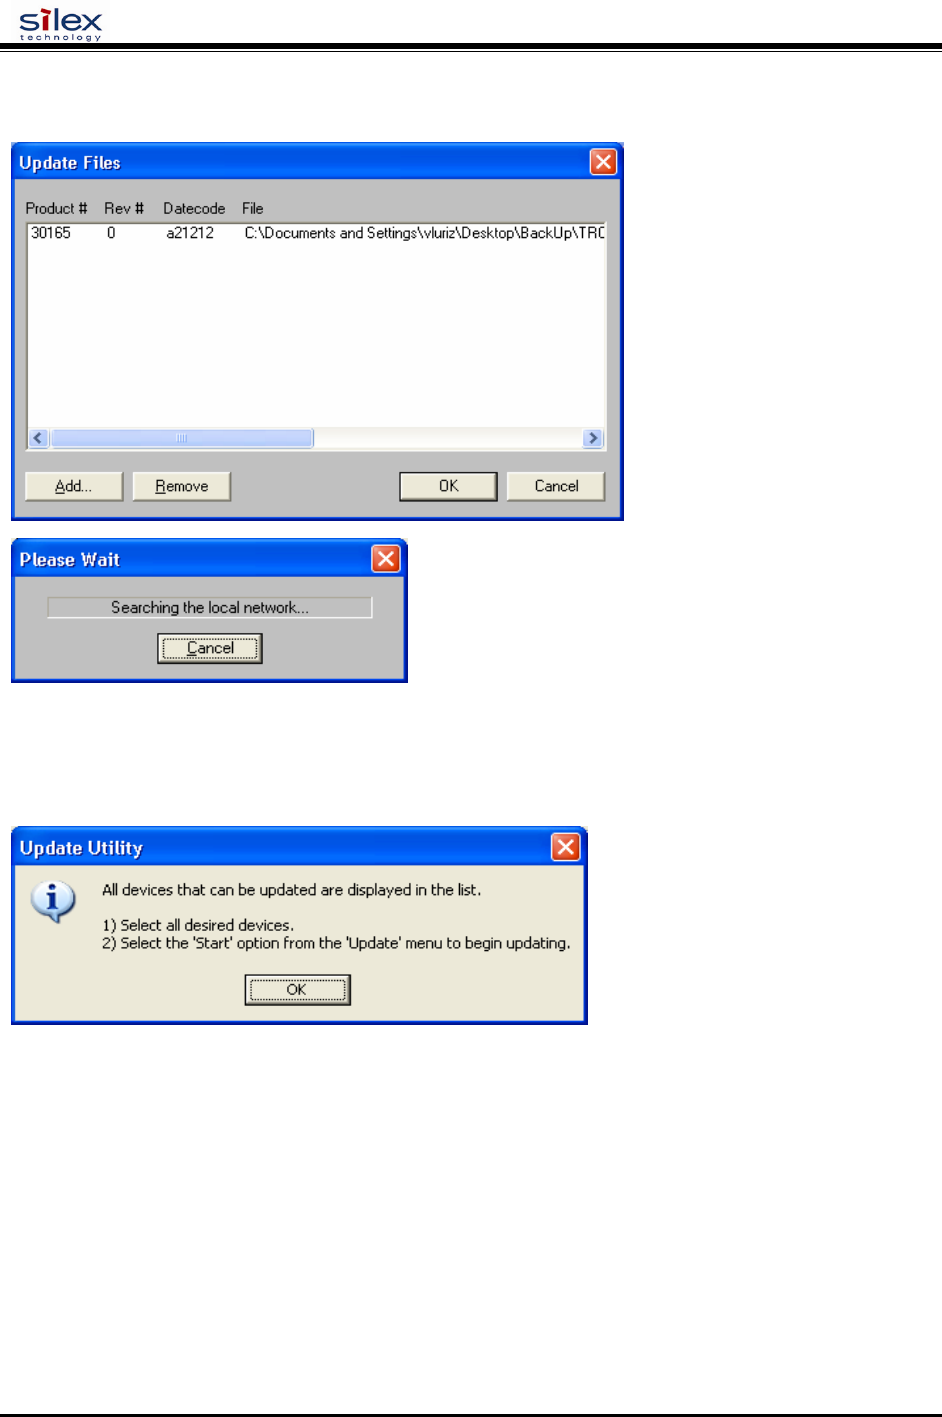
User’s Guide
Document #40182-420 Rev. A
34
3. Verify that the file(s) are correct, and then click on OK. The utility will start searching for qualified
print servers present on the network.
4. When the search process is complete, click on OK to continue. A list of discovered devices will be
displayed.
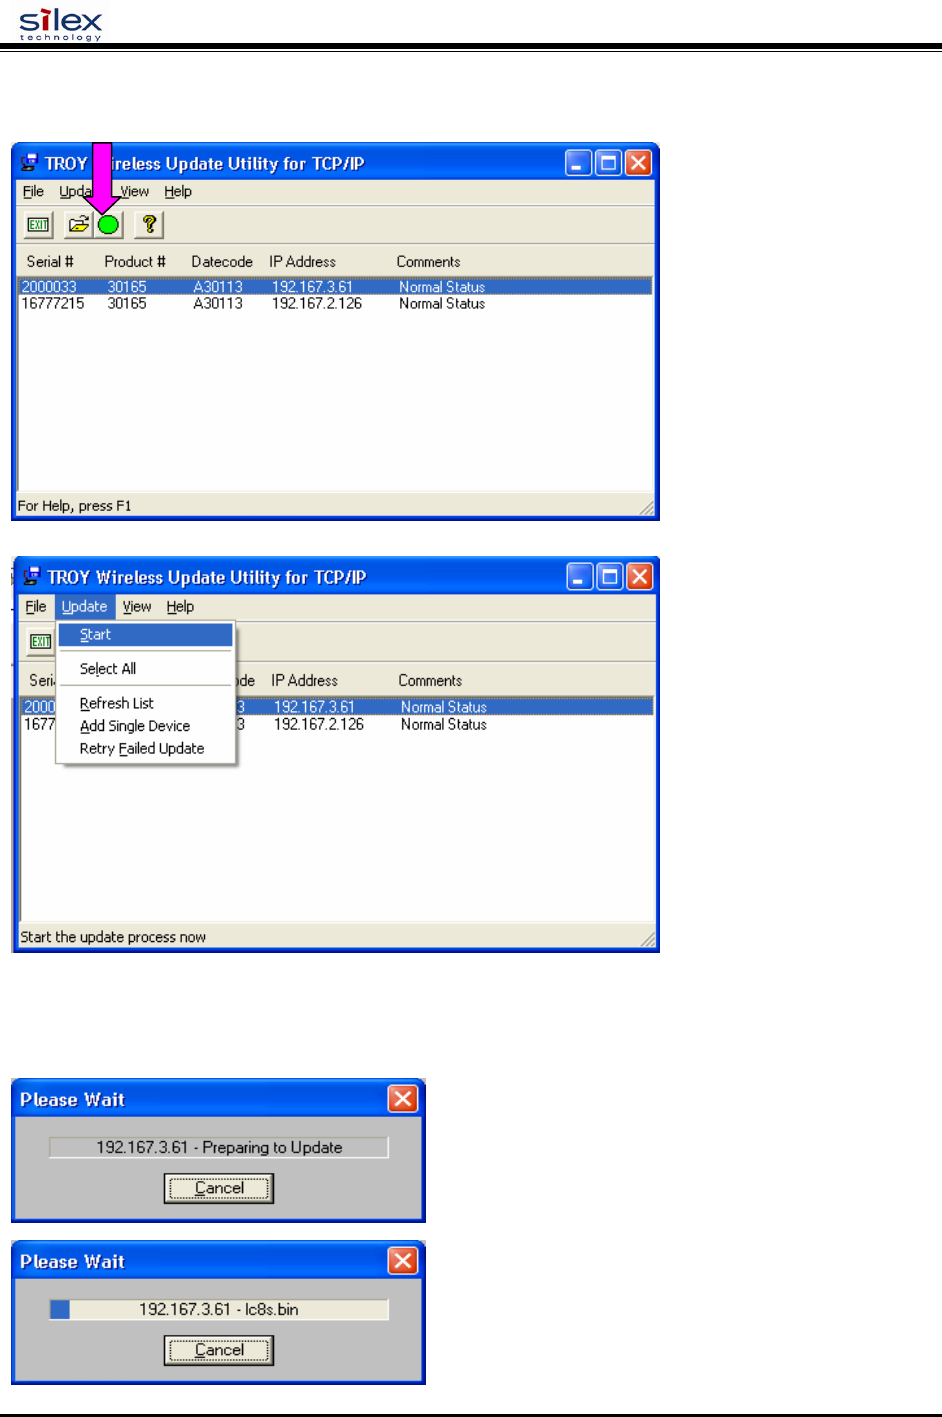
User’s Guide
Document #40182-420 Rev. A
35
5. Select the desired print server to be upgraded, click on the green icon, or click on UPDATE
Æ
START. The firmware update process will begin automatically as soon as the print server is ready.
6. When the print server is ready, the firmware upgrade will begin. The IP address of the print server as
well as the file you are loading will be displayed.
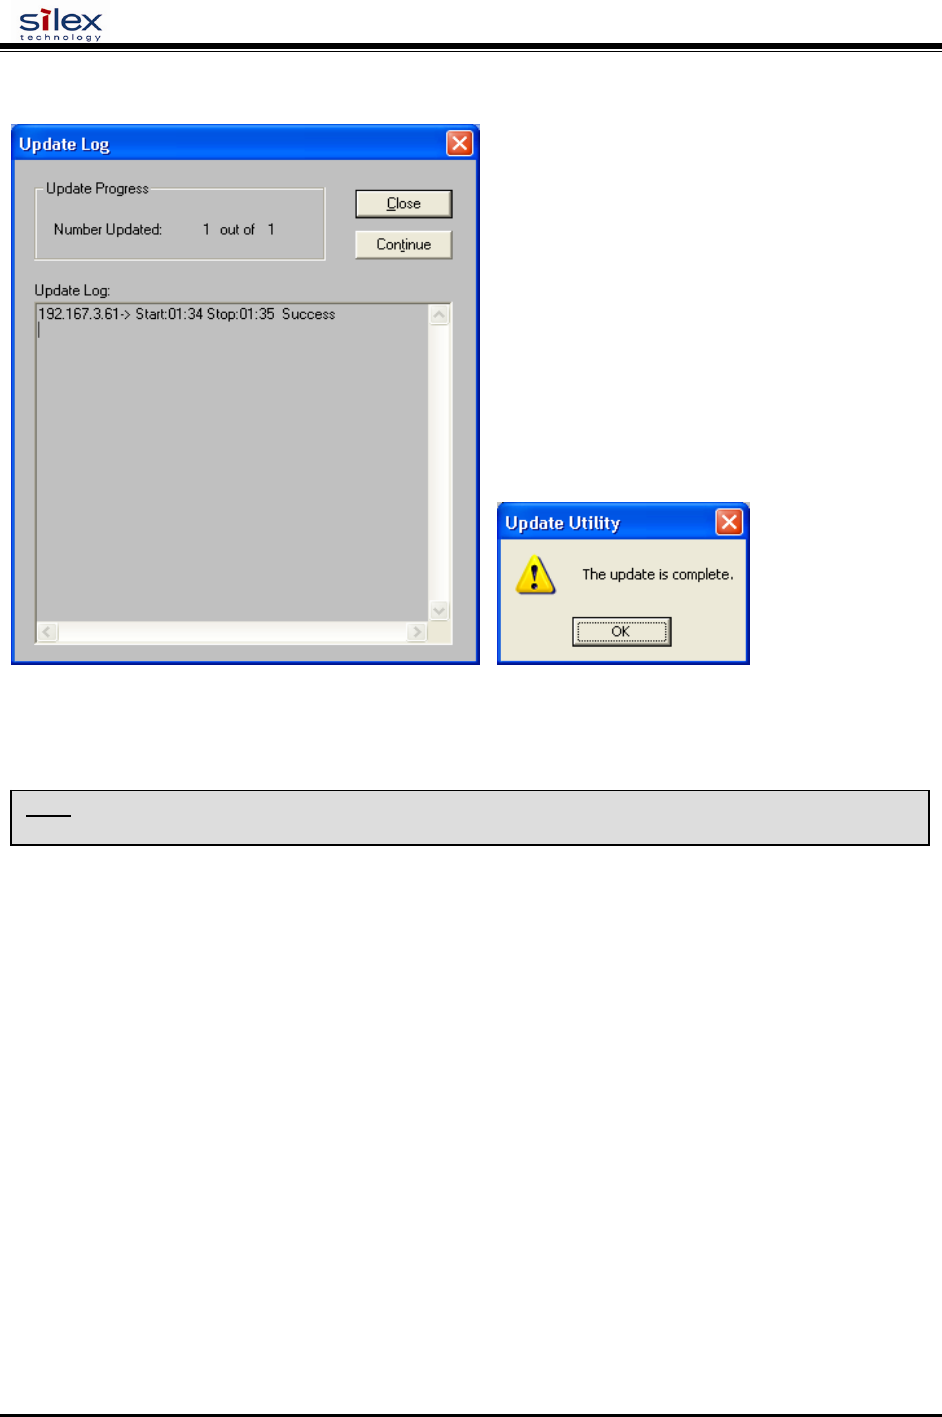
User’s Guide
Document #40182-420 Rev. A
36
7. The update log will be displayed when the update process is finished. Click on Close to continue.
Loading New Firmware (Macintosh OS-X)
1. If you are using the Macintosh OS-X operating system, download the firmware file to your desktop.
2. Go to the terminal command prompt and type cd desktop.
3. Type tftp <enter the IP address of the print server>, and then press Enter (e.g., tftp 192.168.0.4).
4. Type binary, and then press Enter.
5. At the tftp> prompt, type put <firmware file name> <password of the print server> (example: put
ppusb.bin access).
NOTE: To upgrade your print server’s firmware from operating systems other than Windows or Macintosh, refer to
the Print server Administrator’s Guide (provided in PDF format on the Print Server Installation CD).

User’s Guide
Document #40182-420 Rev. A
37
Command console access information
silex servers support a sophisticated command-line oriented console for configuration and management. The console
includes some features that are not available through other configuration methods. The console can be accessed via
TELNET, the server’s serial port (if applicable), or through the ADMIN web page using the web browser interface.
The general configuration procedure is the same regardless of which method is used. This document describes the
console commands available from the command console for silex servers. All commands may not be applicable
towards your product.
The general configuration procedure is the same, regardless of which method is used.
Telnet Command Console Access
To connect to the print server using TELNET on UNIX, Windows, or most other TCP/IP systems, type the
following command at the command prompt:
TELNET ipaddress
Where ipaddress is the IP address of the silex server. When you are connected, press RETURN or ENTER to get the
"#" prompt, enter the password (ACESS is the default, it will not echo on your screen as you type), Hit ENTER
until you get the Local> prompt. You are now ready to enter commands.
Serial Port Command Console Access
Attach a null modem serial cable to the DB9 serial port of the print server, and the other side to the COM port on
your computer. Start a terminal emulation program (for example, HyperTerminal on Windows systems). Make sure
you are connecting with the relevant COM port on from your PC and use the following settings for the connection:
BITS PER SECOND: 115200
DATA BITS: 8
PARITY: NONE
STOP BITS: 1
FLOW CONTROL: NONE
Once connected, hit ENTER until you get a Local> prompt. You are now ready to enter commands.
Network Commands
This group of commands configures network parameters
SH NW
Displays summary network information
sample output:
WiFi Mode = INFRASTRUCTURE
WiFi SSID: silex
Speed = 11
Regulatory Domain = 704
WiFi FW Ver = 1F 1.7.1
AP density = LOW
TTLS is Disabled

User’s Guide
Document #40182-420 Rev. A
38
WEP is Disabled
Link DOWN
SET NW AUTHtype
Sets WLAN Authentication type
SET NW AUTHtype [OPEN |SHARED | TTLS | LEAP | PEAP | WPA-PSK]
(default = Open System)
SH NW AUTH
Shows the wireless authentication type
sample output:
Authentication type= OPEN SYSTEM
SET NW CHannel
Sets WLAN ad-hoc channel number
SET NW CHannel n
n =
1,2,3,4,5,6,7,8,9,10,11,36,40,44,48,52,56,60,64,100,104,108,112,116,120,124,12
8,132,136,140,149,153,157,161,165 (default = 11, this value is ignored in
Infrastructure mode)
SET NW ENC
Sets WLAN Encryption Mode. Supported modes are none, 64 bit WEP, 128 bit WEP, and TKIP (WPA).
SET NW ENC [DIsable | 64 | 128 | WPA | WPA2 | WPA2-WPA | Dynamic WEP ]
(default = Disable)
SH NW ENC
Shows the wireless encryption mode
sample output:
WiFi encryption is Disabled
Note:
The deprecated command SH NW WEP will also display this information
SET NW KEY#
Selects WLAN WEP key entry
SET NW KEY# n
n = 1-4 (default = 1)

User’s Guide
Document #40182-420 Rev. A
39
SET NW KEYVAL
Sets the currently selected WLAN WEP key entry to the hex value given.
SET NW KEYVAL <key>
key=10 or 26 hex characters (default=<null>)
SET NW MOde
Sets WLAN mode
SET NW MOde <mode>
[Infrastructure | Ad-Hoc] (default = Infra)
SET NW RAdio
Sets WLAN Radio Mode
SET NW RAdio <mode>
[ 802.11a | 802.11b-g | 802.11a-b-g] (default = 802.11b-g)
SH NW MODE
Shows the wireless operating mode
sample output:
Wifi mode = AD-HOC (802.11)
SH NW RADio
Shows the selected radio mode of operation
sample output:
Radio mode is 802.11b
SET NW SPeed
Sets maximum WLAN speed
SET NW SPeed n
n = 1,2,5.5,6,9,11,12,18,24,48,54 (default = 54)
SH NW SPEED
Show the maximum wireless data speed in megabits per second
sample output:
Speed = 11
SET NW SSid

User’s Guide
Document #40182-420 Rev. A
40
Sets WLAN SSID
SET NW SSid <name>
User defined (default = printer)
CL NW SSid
Clears the SSID value so the server will connect to any AP.
CL NW SSid
SET NW BSsid
Sets WLAN BSSID (connect to a specific access point’s mac address)
SET NW BSsid <value>
User defined (MAC Address)
CL NW BSsid
Clears the BSSID value so the server uses just SSID and not a specific AP.
CL NW BSsid
SET NW RTS
Sets WLAN RTS threshold
SET NW RTS n
n = 1-3000 (default = 2432)
SH NW RTS
Shows the configured wireless RTS threshold
sample output:
Wifi RTS Threshold = 2432
SET NW APDEN
Sets WLAN Access Point Density
SET NW APDEN [LOW | MED | HI]
(default = LOW)
SH NW APDEN

User’s Guide
Document #40182-420 Rev. A
41
Shows the access point density
sample output:
AP Density = Low
SH NW STATS
Show the network I/O statistics
sample output:
WiFi statistics:
TX Unicast frames: 0
TX Multicast frames: 0
TX Fragments: 0
TX Unicast octets: 0
TX Multicast octets: 0
TX Deferred: 0
TX Single retry frames: 0
TX Multiple retry frames: 0
TX Retry limit exceeded: 0
TX Discards: 0
RX Unicast frames: 0
RX Multicast frames: 0
RX Fragments: 0
RX Unicast octets: 0
RX Multicast octets: 0
RX FCS errors: 0
RX Discards no buffer: 0
TX Discards wrong SA: 0
RX Discards WEP undecr: 0
RX Msg in msg fragments: 0
RX Msg in Bad msg fragments: 0
SET NW CERTCN
Sets EAP Common Name
SET NW CERTCN <name>
User defined (default=<null>)
SH NW CERTCN
Shows the value of the first common name check string
sample output:
Common name 1
Note: the default for this string is a null (blank) string
Note: The deprecated command SH NW TTCN will also return this information.
SET NW CERTCN2
Sets second EAP Common Name
SET NW CERTCN2 <name>

User’s Guide
Document #40182-420 Rev. A
42
User defined (default=<null>)
SH NW CERTCN2
Shows the value of the second common name check string
sample output:
Common name 2
Note: the default for this string is a null (blank) string
SET NW CERTEXP
Sets EAP Certificate Exponent value
SET NW CERTEXP <exponent>
User defined (default = 10001 Hex)
SH NW CERTEXP
Shows the value of the certificate exponent
sample output:
65537 (10001h)
Note: The deprecated command SH NW TTEXP will also return this information.
SET NW CERTKEY
Sets EAP Root Key
SET NW CERTKEY <key value>
User defined
SET NW ID
Sets Authentication User ID This may include the realm, separated by a ‘@’ character.
SET NW ID <user id>
(default = anonymous)
SH NW ID

User’s Guide
Document #40182-420 Rev. A
43
Shows the value of the authentication ID (including realm, if present)
sample output:
anonymous@somewhere
Note: The default realm is a null (blank) string
Note: The deprecated command SH NW TTID will also return this information.
SET NW PW
Sets the password used for the 802.1x EAP authentication, if enabled.
SET NW PW <password>
(default = anonymous)
SET NW INAP
Sets EAP Inner-Authentication protocol
SET NW INAP [PAP|MSCHAP_V2]
(default = PAP)
SH NW INAP
Shows the selected inner authentication mode
sample output:
Authentication protocol = PAP
Note: the deprecated command SH NW TTAP will also return this information.
SET NW REALM
Sets the realm portion of the 802.1x EAP authentication ID This may also be set with the ID command.
SET NW REALM <realm>
(default = <null>)
SH NW REALM
Shows the realm associated with the authentication ID, if any.
sample output:
somewhere
Note: The default realm is a null (blank) string
Note: The deprecated command SH NW TTRE will also return this information.
SET NW WPAAUTO

User’s Guide
Document #40182-420 Rev. A
44
Enable or disable WPA auto mode. If enabled, the print server will connect to a non-WPA access point if a WPA
enabled access point is not available. Only valid when WPA is enabled (authentication type = TKIP).
SET NW WPAAUTO [ENable | DIsable]
(default = disabled)
SH NW WPAAUTO
Shows the state of the WPA auto connect flag
sample output:
WPA-AUTO Enabled
SET NW WPAGROUP
Enable or disable WPA group key mode. If enabled, this allows group keys to be used for data link encryption.
SET NW WPAGROUP [ENABLE | DISABLE]
(default = disabled)
SH NW WPAGROUP
Shows the state of the allow WPA group keys flag
sample output:
WPA-GROUP Disabled
SET NW WPAPSK
Sets the WPA PSK pass phrase or hex key. This value is only used if the authentication mode is WPA-PSK. The
argument to this command is either a pass phrase of 8-63 characters, or exactly 64 hex characters representing the
256 bit PSK value.
SET NW WPAPSK <key>
(default = “silex Group”)
SET NW WPATRACE
Sets the WPA trace level. note: this command is for diagnostic purposes only, and should not normally be used as
the trace can affect performance. A value of 0 disables the trace.
SET NW WPATRACE nn
(default = 0)
SET NW IROAM

User’s Guide
Document #40182-420 Rev. A
45
International Roaming (802.11d)
This controls whether the radio frequencies are set based on the radio configuration, or information from the access
point it connects to. Disabled means the radio defaults are used. Flexible means the access point settings are used if
present, but if not the radio default is used. Strict means the access point must provide regulatory frequency
information..
SET NW IROAM [ DISable | STRICT | FLEXible ]
(default = FLEXIBLE)
SH NW IROAM NW IROAM
Shows what International Roaming setting is currently configured.
sample output:
International Roaming = Flexible
SET NW DFS
Dynamic Frequency Select (802.11h)
This controls whether the available radio frequencies are set based on the radio configuration, or information from
the access point it connects to. Disabled means the radio defaults are used. Flexible means the access point settings
are used if present, but if not the radio default is used. Strict means the access point must provide frequency control
information...
SET NW DFS [ DISable | STRICT | FLEXible ]
(default = DISABLED)
SH NW DFS
Shows what Dynamic Frequency Select is currently configured.
sample output:
International Roaming = Flexible
SET NW REGDOMain
This field displays the region of operation for which the wireless interface is intended. Note that the possible
countries are pulled from the radio card and may differ depending on what card is used.
SET NW REGDOMain <country>
country = “xxx”, where xxx =
{ "US " , REGDOM_TEXT_US },
{ "USI" , REGDOM_TEXT_US_INDOOR },
{ "AU " , REGDOM_TEXT_AUSTRALIA },
{ "AT " , REGDOM_TEXT_AUSTRIA },
{ "ATI" , REGDOM_TEXT_AUSTRIA_INDOOR },
{ "BE " , REGDOM_TEXT_BELGIUM },
{ "BEI" , REGDOM_TEXT_BELGIUM_INDOOR },
{ "CA " , REGDOM_TEXT_CANADA },
{ "DK " , REGDOM_TEXT_DENMARK },
{ "DKI" , REGDOM_TEXT_DENMARK_INDOOR },
{ "FI " , REGDOM_TEXT_FINLAND },
{ "FII" , REGDOM_TEXT_FINLAND_INDOOR },
{ "FR " , REGDOM_TEXT_FRANCE },
{ "FRI" , REGDOM_TEXT_FRANCE_INDOOR },
{ "DE " , REGDOM_TEXT_GERMANY },

User’s Guide
Document #40182-420 Rev. A
46
{ "DEI" , REGDOM_TEXT_GERMANY_INDOOR },
{ "GR " , REGDOM_TEXT_GREECE },
{ "HU " , REGDOM_TEXT_HUNGARY },
{ "HK " , REGDOM_TEXT_HONG_KONG },
{ "IS " , REGDOM_TEXT_ICELAND },
{ "ISI" , REGDOM_TEXT_ICELAND_INDOOR },
{ "IN " , REGDOM_TEXT_INDIA },
{ "IE " , REGDOM_TEXT_IRELAND },
{ "IEI" , REGDOM_TEXT_IRELAND_INDOOR },
{ "IT " , REGDOM_TEXT_ITALY },
{ "ITI" , REGDOM_TEXT_ITALY_INDOOR },
{ "JP " , REGDOM_TEXT_JAPAN },
{ "JPI" , REGDOM_TEXT_JAPAN_INDOOR },
{ "JPO" , REGDOM_TEXT_JAPAN_OUTDOOR },
{ "LU " , REGDOM_TEXT_LUXEMBOURG },
{ "LUI" , REGDOM_TEXT_LUXEMBOURG_INDOOR },
{ "NL " , REGDOM_TEXT_NETHERLANDS },
{ "NLI" , REGDOM_TEXT_NETHERLANDS_INDOOR },
{ "NZ " , REGDOM_TEXT_NEW_ZEALAND },
{ "NO " , REGDOM_TEXT_NORWAY },
{ "NOI" , REGDOM_TEXT_NORWAY_INDOOR },
{ "CN " , REGDOM_TEXT_PRC },
{ "PT " , REGDOM_TEXT_PORTUGAL },
{ "PTI" , REGDOM_TEXT_PORTUGAL_INDOOR },
{ "PL " , REGDOM_TEXT_POLAND },
{ "SG " , REGDOM_TEXT_SINGAPORE },
{ "ES " , REGDOM_TEXT_SPAIN },
{ "ESI" , REGDOM_TEXT_SPAIN_INDOOR },
{ "SE " , REGDOM_TEXT_SWEDEN },
{ "SEI" , REGDOM_TEXT_SWEDEN_INDOOR },
{ "CH " , REGDOM_TEXT_SWITZERLAND },
{ "CHI" , REGDOM_TEXT_SWITZERLAND_INDOOR },
{ "TW " , REGDOM_TEXT_TAIWAN },
{ "GB " , REGDOM_TEXT_UK },
{ "GBI" , REGDOM_TEXT_UK_INDOOR }
SH NW REGDOMain
Shows the region of operation for which the wireless interface is intended.
sample output:
Reg. Domain: US
SET NW WIRED
Sets Ethernet Speed to 10baseT, 100baseTX, or Autosense.
SET NW WIRED [ AUTO | 10BASE | 100BASE ]
Port Commands
Serial Port Commands
SH PORT
Shows Port parameters

User’s Guide
Document #40182-420 Rev. A
47
sample output:
Port Q-Size Type Attributes
*S1 0 serial 115200 N 8 1 XON/XOFF RS232
SET PORT
Sets Parameters for specified port. The available commands are dependent on the port type.
CLEAR PORT S1 JOB
This command aborts the currently active job on the port specified. If the remote host is still connected, any further
data received will be discarded.
CL PORT S1 JOB
SET PORT S1 FLOW
Set serial port flow control to NONE, XON/XOFF, CTS, or DSR
SET PORT S1 FLOW <flow>
(default = None)
SET PORT S1 PARITY
Set serial port parity to NONE, EVEN, ODD, MARK, or SPACE
SET PORT S1 Parity <parity>
(Default = None)
SET PORT S1 SIZE
Sets the data bits on the serial port
SET PORT S1 Signal [7 | 8]
(default = 8)
SET PORT S1 SPeed
Sets serial port baud rate. Options for BAUD are 300, 600, 1200, 2400, 7200, 9600, 19200, 38400, 57600, 115200,
230400, and 460800
SET PORT S1 SPEED <baudrate>
(default = 115200)
SET PORT S1 STOP
Sets serial port stop bits per character.
SET PORT S1 STOP [1 | 2]
(default = 1)

User’s Guide
Document #40182-420 Rev. A
48
Parallel Port Commands
SH PORT
Shows Port parameters
sample output:
Port Q-Size Type Attributes
*P1 0 parallel BID ACKH NBUF
SET PORT
Sets Parameters for specified port. The available commands are dependent on the port type.
For EasyLAN Wireless Model AW02, the only port available is parallel port P1.
SET PORT P1 ACKH
Enable or disable pACK handshake (1284 compatible) mode. ECP and Fast Strobe mode must be disabled for
compatibility mode to be used.
SET PORT P1 ACKH [ENABLE | DISABLE]
(default = enable)
SET PORT P1 BIDir
Enable or disable bidirectional mode
SET PORT P1 BIDir [ENable | DIsable]
(default = enable)
SET PORT P1 ECP
Enable or disable 1284 ECP mode. If enabled, this mode takes priority over compatibility (ACKH) and fast strobe
(FSTB) mode.
SET PORT P1 ECP [ENable | DIsable]
(default = enable)
SET PORT P1 FSTB
Enable or disable fast strobe mode. This mode handshake only with the busy line from the printer. If enabled, this
mode take priority over the compatibility (ACKH) mode of operation.
SET PORT P1 FSTB [ENable | DIsable]
(default = disable)
SET PORT P1 INWT

User’s Guide
Document #40182-420 Rev. A
49
Enable or disable input wait mode. If enabled, this mode delays polling for input from the printer at the end of a job
for one poll period. If disabled, the printer is polled as soon as the last byte in the job is sent to it..
SET PORT P1 INWT [ENable | DIsable]
(default = disable)
SET PORT P1 NBUF [ENable | DIsable]
Enable or disable no buffer mode. If enabled, data is passed directly from the network to the printer without
buffering. Depending on the network set up and application, buffering may improve performance or reduce it.
SET PORT P1 NBUF [ENable | DIsable]
(default = enable)
SET PORT P1 NOINBUSY
Enable or disable noinput while busy mode. If enabled, the printer will not be polled to see if it has data to send
back to the host if it is reporting busy status on the interface.
SET PORT P1 NOINBUSY [ENable | DIsable]
(default = disable)
SET PORT P1 POLL
Set interval between input polls (msec). The value is meaningless if bidirectional mode is disabled.
SET PORT P1 POLL <nn>
(default = 50 msec)
SET PORT P1 PSTA
Enable or disable PJL status initialization.
SET PORT P1 PSTA [ENable | DIsable]
(default = disabled)
SET PORT P1 SOJBUSY
If the printer is busy when a print job is ready to start, this parameter determines how long the server waits after the
printer becomes ready before starting to send data to it.
SET PORT P1 SOJBUSY <nn>
(default = 100 msec)
CL PORT <port> JOB

User’s Guide
Document #40182-420 Rev. A
50
This command aborts the currently active job on the port specified. If the remote host is still connected, any further
data received will be discarded.
CL PORT P1 JOB
USB Port Commands
SET PORT U1 PSTA
Enable or disable PJL status initialization.
SET PORT U1 PSTA [ENable | DIsable]
(default = disabled)
SET PORT U1 NBUF [ENable | DIsable]
Enable or disable no buffer mode. If enabled, data is passed directly from the network to the printer without
buffering. Depending on the network set up and application, buffering may improve performance or reduce it.
SET PORT U1 NBUF [ENable | DIsable]
(default = enable)
Server Information Commands
SET SERVEr DEscription
Sets the server description string
SET SERVEr DEscription <description-string>
SET SERVEr NAme
Sets server node name
SET SERVEr NAme <name>
(default = “SLXxxxxxx”, where xxxxxx are the last 6 hex digits of
the MAC address)
SET SNMP GETCOMM

User’s Guide
Document #40182-420 Rev. A
51
Get Community Name
SET SNMP GETCOMM <string>
(default = “public”)
SET SNMP JETADmin
Enable or disable JetAdmin compatibility
SET SNMP JETADmin [ ENable | DIsable]
(default = enabled)
SET SNMP SETCOMM1
Set Community 1 Name
SET SNMP SETCOMM1 <string>
(default = “internal?”)
SET SNMP SETCOMM2
Set Community 2 Name
SET SNMP SETCOMM2 <string>
(default = “pass”)
SET SNMP CONtact
Set system contact string
SET SNMP CONtact <string>
(default = <null>)
SET SNMP LOCation
Set the system location string
SET SNMP LOCation <string>
(default = <null>)
SH SERIAL
Displays the serial number of the unit
sample output:
Serial number is 9047595

User’s Guide
Document #40182-420 Rev. A
52
SH SERVEr
Shows Server parameters
sample output:
Serial Server Serial # 9047595
Address: 00-40-17-8A-0E-2B Name: SLX8A0E2B Number: 0
Identification: Network Server
Enabled Characteristics:
Link DOWN
SH SERVEr CO
Shows Server network statistics
sample output:
Seconds Since Zeroed: 163 Frames Sent, 1 Collision: 26
Bytes Received: 72950 Frames Sent, 2+ Collision: 5
Bytes Sent: 18726 Send Failures: 0
Frames Received: 752 Send Failure Reasons: 0
Frames Sent: 181 Receive Failures: 503
Multicast Bytes Rcv'd: 64474 Receive Failure Reasons: 1
Multicast Bytes Sent: 2406 Unrecognized Destination: 0
Multicast Frames Rcv'd: 626 Data Overrun: 0
Multicast Frames Sent: 11 User Buffer Unavailable: 0
Frames Sent, Deferred: 2014 System Buffer Unavailable: 1
SH SNMP
Shows the state of the SNMP protocol enable
sample output:
SNMP is Enabled
SH VErsion
Shows the print server’s firmware version
sample output:
serial server
Firmware Ver. 4.19 (2004.10.31)
Boot Ver. 1.4
16Mbit Flash
Protocols supported:
NetBIOS SNMP TCP/IP EMail DHCP
Zero
Clears and resets the network statistic counters

User’s Guide
Document #40182-420 Rev. A
53
Service Commands
SET SERVI <service name> BOT
Set beginning of transmission (BOT) string index for service
SET SERVI <service name> BOT nn
(default = 1)
SET SERVI <service name> EOT
Set end of transmission (EOT) string index for service
SET SERVI <service name> EOT nn
(default = 1)
SH SERVI STRings [string_num]
Defines the BOT and EOT strings used in services. If string_num is provided then the specific string definition and
expansion is displayed. If string_num is not provided, then all string definitions (but not their expansions) are
displayed.
sample output:
10: \FF\04\FF\05\FF\06\FF\08
SET SERVI <service name> FIlter
Set filter index for service
SET SERVI <service name> FIlter nn
SH SERVI FILters
Shows filter settings
sample output:
# Service Name Filter
1 SLX_FFFFFF 0: No Filter
2 BINARY_P1 0: No Filter
3 TEXT_P1 1: Text Substitution m= LF, r=
CRLF 4 SLXFFFFFF_P1_4 0: No Filter
5 SLXFFFFFF_P1_5 0: No Filter
6 SLXFFFFFF_P1_AT 4: PostScript Tagged Binary
SET SERVI <service name> FMS

User’s Guide
Document #40182-420 Rev. A
54
Set filter 1 (text replacement filter) match string index. If the index is zero, the default string of <LF> (line feed) is
used.
SET SERVI <service name> FRM nn
(default = 0 )
SET SERVI <service name> FRS
Set filter 1 (text replacement filter) replace string index. If the index is zero, the default string of <CRLF> (carriage
return-line feed) is used.
SET SERVI <service name> FRS nn
(default = 0 )
SET SERVI <service name> IP
Enable or disable all IP based jobs (lpd, raw tcp, ftp, etc.) on the service.
SET SERVI <service name> IP [ENable | DIsable]
(default = enabled for service 1 and 2, disabled for all others)
SET SERVI <service name> NAme
Change the service name
SET SERVI <service name> NAme <newname>
(default varies by service)
SET SERVI <service name> POrt
Set the output port associated with a service.
SET SERVI <service name> POrt <portname>
(default = “S1”)
SET SERVI <service name> PRIority
Set priority for service if multiple service try to transmit data at the same time. Higher priority services are serviced
first.
SET SERVI <service name> PRIority nn
(default = 10)
SH SERVI PRI [service_num]
This shows the priority of a specific service. If service_num is not provided, the priority of all services is listed.

User’s Guide
Document #40182-420 Rev. A
55
SET SERVI <service name> RECeive
Set receive only mode for a service. This option is rarely required, but some host applications do not operate
properly if data is received back from the serial device.
SET SERVI <service name> RECeive [ENable | DIsable]
(default = disabled)
SET SERVI <service name> TCP
Set raw TCP port for service. If port number is zero, raw TCP is disabled on that service.
SET SERVI <service name> TCP nn
(default = 9100 for service 1, 3001 for service 2)
SET SERVI <service name> QUEUE
If enabled, and if a raw TCP port is defined, the server will queue jobs sent to that port. If disabled, jobs will be
rejected if the server is currently busy with another job.
SET SERVI <service name> QUEUE [EN | DIS]
(default = disabled)
SH SERVI SUMmary [service_num]
Shows the basic parameters for a specific service. If service_num is not provided, parameters for all services are
displayed.
Note: The command SH SERVI is equivalent to SHOW SERVI SUM
String Commands
These commands configure strings used with services and service filters.
SET STRing
Set service string table entry. (Note, String 1-11 can not be set or changed).
SET STRing <string #> ”value”
CL STRing
Clears the service string table entry.
CL STRing <string #>

User’s Guide
Document #40182-420 Rev. A
56
SH STRing [string_num]
Defines the BOT and EOT strings used in services If string_num is provided then the specific string definition and
expansion is displayed. If string_num is not provided, then all string definitions (but not their expansions) are
displayed.
sample output:
1:
2: \1BE
3: \04
4: \1B%-12345X
5: @PJL
6: ENTER LANGUAGE=
7: PCL\0A
8: POSTSCRIPT\0A
9: \FF\04\FF\05\FF\06\FF\07
10: \FF\04\FF\05\FF\06\FF\08
11: \0C
SH FILters
Shows the available filters which can be used to modify a job stream.
sample output:
# Filter
0 No Filter
1 Text Substitution
2 AppleTalk
3 Text to PostScript
4 PostScript Tagged Binary
5 DC1 Special
TCP/IP Commands
SET IP ACcess
Allow or disallow access to a block of remote addresses
SET IP ACcess [EN | DI | ALL] aa.bb.cc.dd {MAsk ee.ff.gg.hh]
(default = empty list)
SET IP RANge
Allow or disallow access to a range of remote addresses
SET IP RANge [EN | DI | ALL] aa.bb.cc.dd {MAx ee.ff.gg.hh]
(default = empty list)

User’s Guide
Document #40182-420 Rev. A
57
SH IP ACcess
Display current access list settings
Sample output:
All hosts permitted access
SET IP ADdress
Set server IP address
SET IP ADdress aa.bb.cc.dd
(default = 192.0.0.192)
SET IP ARP ENable
Enable or disable setting of IP address with an ARP packet
SET ARP [ENable | DIsable]
(default = enable)
SET IP BAnner
Enable or disable printing of job banner on LPD jobs
SET IP BAnner [ENable | DIsable]
(default = disable)
SET IP CHKSUM
Enable or disable verification of the IP checksum on received packets
SET IP CHKSUM [ENable | DIsable]
(default = enable)
SET IP BOot
Number of tries for each enabled IP boot method, if not set to STATIC
SET IP BOot n
(default = 3)
SET IP ENable
Enable or disable all IP based protocols
SET IP [ENable | DIsable]
(default = enable)

User’s Guide
Document #40182-420 Rev. A
58
SET IP FTIme
If enabled, the IP timeout is measured in seconds. If disable, the IP timeout is in minutes.
SET IP FTIme [ENable | DIsable]
(default = disable)
SET IP FTP
Enable or disable the FTP protocol
SET IP FTP [ENable | DIsable]
(default = enable)
SET IP HTTP
Enable or disable the HTTP protocol
SET IP HTTP [ENable | DIsable]
(default = enable)
SET IP KEepalive
Set interval at which TCP keepalive packets are sent on a connection, in minutes.
SET IP KEepalive n
(default = 5 min)
SET IP LPD
Enable or disable the LPD protocol
SET IP LPD [ENable | DIsable]
(default = enable)
SET IP MEthod
Set method of getting IP address
SET IP MEthod [ AUTO | BOOTP | RARP | DHCP | STATIC ]
(default = AUTO)
SET IP PIng
Send IP ping packets to test connection to remote host.
SET IP PIng aa.bb.cc.dd
SET IP PRObe

User’s Guide
Document #40182-420 Rev. A
59
Enable or disable TCP connection probes
SET IP PRObe [ENable | DIsable]
(default = disable)
SET IP RARp
Enable setting of default router and/or subnet mask based on the source of a RARP IP address set.
SET IP RARp nn
nn: 0=both 1=no subnet, 2=no router, 3=neither (default = 0)
SET IP REtry
Enable or disable LPD retry on incomplete job
SET IP REtry [ENable | DIsable]
(default = disable)
SET IP ROuter
Set the default router address
SET IP ROuter aa.bb.cc.dd
(default = 0.0.0.0)
SET IP SUbnet
Set the IP subnet mask
SET IP SUbnet aa.bb.cc.dd
(default = 0.0.0.0)
SET IP TCP
Enable or disable the raw TCP (9100) protocol
SET IP TCP [ENable | DIsable]
(default = enable)
SET IP TELnet
Enable or disable the TELNET protocol
SET IP TELnet [ENable | DIsable]
(default = enable)
SET IP TFTP

User’s Guide
Document #40182-420 Rev. A
60
Enable or disable the TFTP protocol
SET IP TFTP [ENable | DIsable ]
(default = enable)
SET IP TImeout
Set TCP Inactivity timeout , in seconds if fast timeout is enabled, otherwise in minutes.
SET IP TImeout n
(default = 1 minute)
SET IP WIndow
Set TCP maximum window size in bytes
SET IP WIndow nn
(default = 10240)
SH IP
Shows TCP/IP related Parameters
sample output:
IP is enabled
IP address 192.0.0.192 Boot tries 3
Subnet mask 0.0.0.0 Boot method AUTO
IP Gateway 0.0.0.0 Max window 10240
(set manually)
LPD banner disabled Timeout 1 min
LPD retries are disabled Keepalive 5 min
Service Port TCP port
xxxxxx_S1_A S1 9100
xxxxxx_S1_B S1 3001
Power Configuration Commands
SET POWER DELAY nnnn
This is the time, in milliseconds, to wait before the processor goes into power save mode. If no I/O occurs on the
network or from the attached peripheral within this time period, the processor will go into low power mode. The
value must be between 0 and 1800000 (30 minutes). A value of 0 disables processor power saving. The default value
is 0.
SET POWER PERIOD nnnn
If radio power save is enabled, this the time, in milliseconds, between radio wake up events. The value must be
between 1 and 65535. The default value is 65535.
SET POWER WINDOW nnnn

User’s Guide
Document #40182-420 Rev. A
61
This is the time, in milliseconds, the radio stays awake each time it wakes up in power save mode (i.e., every
PERIOD msec the radio wakes up for WINDOW msec to see if there is traffic for it). The value is in the range 0-
100. 0 disables radio power save mode (the CPU may still go into power save based on the DELAY parameter).
The default is 0 (disabled).

User’s Guide
Document #40182-420 Rev. A
62
Firmware Update
These commands set up the unit for performing an update of the server firmware.
SET LOAd ENable
If enabled, the firmware performs a soft reset and enters the server boot program after the next EXIT command.
This command should not be used with the Serial Server. It remains in the firmware for diagnostic use.
SET LOAd (ENable | DIsable ]
(default = disable)
SET LOAd HOst
Set the node name of the Netware boot host. Note that netware download is not supported on the Serial Server, so
this command should not be used.
SET LOAd HOst <name>
(default = <null>)
SET LOAd IP
Set the IP address of the source computer for a TFTP get operation.
SET LOAd IP aa.bb.cc.dd
(default = 0.0.0.0)
SET LOAd SOftware
Set filename on host for TFTP get update.
SET LOAd SOftware <filename>
SET LOAd TFTP
Initiate firmware update via a TFTP get operation. The TFTP server address must be set via SET LOAd IP and the
filename via SET LOAd SOfware. The server will reset after the firmware update is completed.
SET LOAd TFTP
SET LOAd XModem
Initiate firmare update via the serial console using the XModem protocol. The server will reset after the firmware
update is completed.
SET LOAd XModem

User’s Guide
Document #40182-420 Rev. A
63
SH LOAd
Shows the firmware update parameters
sample output:
Firmware load is disabled
Load Host IP = 0.0.0.0
Software file = xxxx.bin
Load Host Name =

User’s Guide
Document #40182-420 Rev. A
64
Other Commands
SET DEFAULT
Set parameters to factory defaults
EXIT
This command exits the current configuration console session.
EXIT
SH FATal
Shows fatal error log (if there’s any)
sample output:
No saved errors
CL FATal
Clears the fatal error log
SH FREE
Shows the amount of heap and configuration memory available
sample output:
2 bytes of heap available
Index 2, 6320 bytes
6320 bytes configuration memory available
HElp <command>
This is for getting help on the console commands. You can just type help, or type help and then a command to
display instructions on specific commands.
Sample output:
EXIT/^D Exit program
HElp Information on available commands
INitialize Reset unit
CLear/PUrge/DELete Remove configuration item
SAVE Save configuration to NV memory
SET/DEFine/CHange Modify unit parameters
SHow Display unit parameters
ZEro Zero statistical counts
Type 'HElp <cmd>' for more information
INIT

User’s Guide
Document #40182-420 Rev. A
65
This command instructs the server to do a soft reset when the next exit command is executed.
INIT
SET PAssword
Sets the server access (read) password
SET PAssword <password>
(default = “ACCESS”)
SET POWERON
Sets Power on delay
SET POWERON <delay-sec>
default == 0 (no delay)
SH POWERON
Displays Power on delay in seconds
SET PROTect
Sets update password to the string given.
SET PROTECT <password>
(default = <null>)
CL PROTect
Sets update password to <null>.
CL PROTECT
SAVE
This command saves the current configuration to non-volatile memory. Without this command, the configuration is
not saved unless an “EXIT” command is performed.
SAVE
SH TEst
Sends the configuration data via ASCII to the serial port

User’s Guide
Document #40182-420 Rev. A
66
UNPROTECT
If an update password has been defined (SET PROTECT), this command is used to enter the password to allow
configuration items to be modified. After entering this command, the server will prompt for the update password. If
entered properly, the user will then be able to execute SET commands to modify the server configuration. This lasts
only until the console session is terminated with an EXIT command.
UNPROTect
Netware Commands
SET NETW ADvertise
Advertising frequency in seconds
SET NETW ADvertise n
(default = 60 sec)
SET NETW ENable
Enable or disable the Netware Protocol
SET NETW [ENable | DISable]
(default = enable)
SET NETW FRame
Set Netware frame type
SET NETW FRame [802.2 | 802.3 | ETHer | AUto | SNAp]
(default = AUTO)
SET NETW NPrinter
Set NPrinter mode on service
SET NETW NPrinter <pserver> n ON <service>
SET NETW PAssword
Set password for file server
SET NETW PAssword <psw>
(default = <null>)
SET NETW POlling

User’s Guide
Document #40182-420 Rev. A
67
Set Queue polling time in seconds
SET NETW POlling n
(default = 4)
SET NETW QServer
Set QServer mode on service
SET NETW QServer <fileserver> ON <service>
SET NETW REscan
Rescan Netware servers for new queues
SET NETW REscan
SET NETW SErver
Enable or disable access to a server
SET NETW SErver <name> [ENable | DIsable]
CL NETW SErver
Removes the specified Netware Server
CLear NETW SErver

User’s Guide
Document #40182-420 Rev. A
68
SH NETWare
Shows Netware Parameters
sample output:
Netware is Enabled
Enabled frame types AUTO
Queue polling frequency is 4 seconds
Advertising frequency is 60 seconds
Queue Servers Bindery File Servers
PR1 None
Frame type Network Count
Ethernet II Unknown 8
IEEE 802.2 Unknown 408
* IEEE 802.3 000E8023 4967
Ethernet SNAP Unknown 6
Servers and Queues being serviced
Servicing 0 queues on 0 file servers
0 jobs printed
Email Printing Commands
SET POP3 ADdress
Set POP3 Server IP address
SET POP3 ADdress aa.bb.cc.dd)
(default = 0.0.0.0)
SET POP3 ENable
Enable or disable the POP3 Protocol
SET POP3 [ENable | DISable]
(default = enable)
SET POP3 POlling
Set frequency to poll POP3 server for jobs, in seconds.
SET POP3 POlling nn
(default = 30 sec)
SET POP3 NAme
Set POP3 Mailbox from which to fetch email jobs.

User’s Guide
Document #40182-420 Rev. A
69
SET POP3 NAme <name>
(default = <null>)
SET POP3 PAssword
POP3 Mailbox password
SET POP3 PAssword <password>
(default = <null>)
SET POP3 TImeout
Set POP3 Message timeout in minutes
SET POP3 TImeout nn
(default = 120 min)
SET SMTP ADdress
SMTP Server IP address
SET SMTP ADdress aa.bb.cc.dd
(default = 0.0.0.0)
SET SMTP ENable
Enable/Disable SMTP Protocol
SET SMTP [ ENable | DISable ]
(default = enabled)

User’s Guide
Document #40182-420 Rev. A
70
SH POP3
Shows POP3 Parameters
sample output:
Internet Printing Configuration:
POP3 Server 0.0.0.0
POP3 Mailbox
POP3 Polling 30 seconds
POP3 Timeout 120 minutes
POP3 Total Messages 0
POP3 Total Connects 0
POP3 Connect Failures 0
POP3 Connections Lost 0
POP3 User Failures 0
POP3 Password Failures 0
POP3 Total I/O Errors 0
SMTP Server 0.0.0.0
SMTP Total Messages 0
SMTP Total Connects 0
SMTP Connect Failures 0
SMTP RecdFrom Failures 0
SMTP SentTo Failures 0
SH SMTP
Shows SMTP Parameters. This displays the same output as SHOW POP3.
DLC / NETBEUI Commands
SET DLC ENable
Enable/Disable DLC Protocol
SET DLC [ ENable | DISable ]
(default = enable )
SET DLC TIMeout
Set DLC timeout in seconds, 0 disables the timeout
SET DLC TIMeout nn
(default = 0)
SH DLC
Shows DLC Parameters
sample output:
DLC is Enabled
DLC timeout 30 seconds

User’s Guide
Document #40182-420 Rev. A
71
SET NetBEUI ENable
Enable/Disable NetBEUI Protocol
SET NETBEUI [ ENable | DISable ]
(default = enable)
SET NETBIOS DOMain
Set the NETBIOS domain name
SET NETBIOS DOMain <name>
(default = <null>)
SET NETBIOS MEthod
Set method of getting WINS server address
SET NETBIOS MEthod [ AUTO | STATIC ]
(default = AUTO)
SET NETBIOS PRimary
Set the IP address of primary WINS server
SET NETBIOS PRimary aa.bb.cc.dd
SET NETBIOS SEcondary
Set the IP address of secondary WINS server
SET NETBIOS SEcondary aa.bb.cc.dd
Appletalk Commands
SET APPletalk
Enables or Disabled Appletlak Protocol
SET APPletalk [EN | DI]
(default = enabled)
SET APPletalk ZOne
Configures the Appletalk Zone for this server
SET APPletalk ZOne <name>
(default = none)

User’s Guide
Document #40182-420 Rev. A
72
Wireless Security Configuration
silex products support various methods of authentication and encryption to ensure compatibility with
wireless security depoyments. This document describes how to configure wireless security on silex print
servers and device servers.
silex offers a variety of ways to configure the security parameters, including the ExtendView utility for
Windows systems, a built-in web browser interface, and a command line console (described at the end of
this document).
ExtendView
Note: You must be using ExtendView version 2.4 or later in order to configure wireless security settings.
Install the ExtendView utility (found on the installation CD or at www.silexamerica.com). Select the
product you want to configure from the list, click Server, and then Configuration and follow these steps for
configuration:
1.
Click on the Wireless tab.
2.
Select Infrastructure for the Wireless mode and type in the correct SSID.
3.
Click Configure Wireless Security.
Web Browser Interface
Open any web browser from your PC (eg: Internet Explorer or Firefox) and type the IP Address of the
print server for the Address. Click Login from the main menu in the left frame, and type in the password
(default is ACCESS) and follow these steps for configuration:
1.
Click on Wireless from the main menu in the left frame.
2.
Select Infrastructure for the Wireless mode and type in the correct SSID.
3.
Click Submit.
4.
On the Configure Wireless screen, click on Configure Network Security.
Web Browser Interface and ExtendView Security Configuration
You should now be able to enter the security settings whether you are in ExtendView or the web browser
interface. See below for detail on each field in the form. Help is also available within the ExtendView utility
or the web browser. If you are using ExtendView, click OK when you are done for the settings to take
effect. If you are using the web browser interface, click submit when you are done, and click the link in the
lower right frame to reset it and have the settings take effect.
Encryption Mode
Select the desired encryption mode for the wireless link:
• 64 and 128 bit WEP are for basic security compatibility
• Dynamic WEP is displayed if an EAP (802.1x) method which automatically sets keys is selected
as the authentication type.

User’s Guide
Document #40182-420 Rev. A
73
• WPA uses TKIP encryption.
• WPA2 uses CCMP encryption.
• WPA2-WPA uses CCMP for pair-wise encryption, but allows TKIP for group encryption.
Key Selection
If WEP encryption is selected, and the authentication mode is not an EAP (802.1x) mode, select the
desired WEP key to be used, one through four.
WEP Key
These fields are ignored unless the encryption mode is 64 or 128 bit WEP. Enter up to 10 hexadecimal
digits for 64 bit WEP, or 26 hexadecimal digits for 128 bit WEP.
Authentication Type
Choose type of authentication to be performed with the network access point, or with a peer unit in Ad-
hoc mode.
User ID
Enter the logon user ID that the server uses to authenticate to the 802.1x-enabled network. The user ID
and password must be in the authentication server database, and is used in TTLS, LEAP, and PEAP
configurations. The default user ID is 'anonymous'. A realm defines a grouping of users. If a realm is
required for your network, it is separated from the user ID by a '@' character. Realms make it easier to
segregate user groups into independently administered databases, to apply policies on a user group
basis, and to establish roaming agreements to name a few applications. The default realm if not specified
is 'anonymous'. Realm is used with TTLS configurations, and sometimes with PEAP.
Password
Enter the logon password that the server uses to authenticate to the 802.1x enabled network. The user ID
and password must be in the authentication server database, and is used in TTLS, LEAP, and PEAP
configurations. The password may be a text string, or a string of hex bytes prefixed with '\x'. The default
password is 'anonymous'.
Certificate Common Name
Enter the name of the certificate on the primary authentication server. If both of the
common names are set to null, all certificates are accepted. The default is null. Certificate common name
is used in TTLS and PEAP configurations.
Certificate Root Key
Enter the authentication key used to verify the root certificate in the certificate chain provided by the
authentication server. To set to null, leave this field blank. Certificate Root Key is used in TTLS and PEAP
configurations. The Certificate Root Key can be extracted by clicking Browse and selecting the actual
certificate if you don’t want to type it in manually.
Certificate Root Key Exponent
This value must match the authentication server certificate value. The default is 65537 (x10001).
Certificate Root Key Exponent is used in TTLS and PEAP configurations. The Certificate Root Key
Exponent can be extracted by clicking Browse and selecting the actual certificate if you don’t want to type
it in manually.
Authentication Protocol
This field determines how the server authenticates itself to the 802.1x enabled network after an 802.1x
session is established. The default is PAP. Sometimes referred to as inner-authentication protocol, it is
used in TTLS and PEAP configurations.
Pre-Shared Key
If the PSK mode of authentication is selected with WPA (TKIP) or WPA2 (CCMP) encryption, the key
value or pass-phrase entered here is used to initialize the session with the access point. If a key value is
entered, it must be exactly 64 hex characters. A pass-phrase must be 8 to 63 displayable characters.

User’s Guide
Document #40182-420 Rev. A
74
WPA Auto Associate
If the WPA Auto Associate mode is enabled, then if there are no WPA enabled access points available
with the given SSID, the unit will attempt to associate with a non-WPA access point with the given SSID, if
available. The authentication mode will still have to match. For WPA-EAP, the non-WPA AP will have to
be configured for EAP authentication, and for WPA-PSK mode, the non-WPA AP will have to be in open
system mode. The default is disabled.
WPA Group Key
If the WPA Group Key mode is enabled, then group keys may be used for data link encryption.
The default is disabled.
--------------------------------------------------------------------------------
Command Line Console Configuration
Go to the command prompt on your PC and type TELNET ipaddress (where ipaddress is the IP Address
configured in the print server). You should get a # prompt, type in the password (default is ACCESS, this
will not echo on your screen as you type it). Hit Enter a couple times until you get a Local> prompt. This is
where you can type your commands. Type HELP to get a list of commands.
The following console commands can be used to configure your network security settings:
SH NW
Displays summary network information
sample output:
WiFi Mode = INFRASTRUCTURE
WiFi SSID: silex
Speed = 11
Regulatory Domain = 704
WiFi FW Ver = 1F 1.7.1
AP density = LOW
TTLS is Disabled
WEP is Disabled
Link DOWN
SET NW AUTHtype
Sets WLAN Authentication type
SET NW AUTHtype [OPEN |SHARED | TLS | TTLS | LEAP | PEAP | PSK]
(default = Open System)
SH NW AUTH
Shows the wireless authentication type
sample output:
Authentication type= OPEN SYSTEM
SET NW CHannel
Sets WLAN ad-hoc channel number

User’s Guide
Document #40182-420 Rev. A
75
SET NW CHannel n
n = 1-11 (default = 11, this value is ignored in Infrastructure mode)
SET NW ENC
Sets WLAN Encryption Mode. Supported modes are none, 64 bit WEP, 128 bit WEP, WPA (TKIP), and
WPA2 (AES/CCMP).
SET NW ENC [DIsable | 64 | 128 | WPA | WPA2 ]
(default = Disable)
SH NW ENC
Shows the wireless encryption mode
sample output:
encryption is Disabled
SET NW KEY#
Selects WLAN WEP key entry
SET NW KEY# n
n = 1-4 (default = 1)
SET NW KEYVAL
Sets the currently selected WLAN WEP key entry to the hex value given.
SET NW KEYVAL <key>
key=10 or 26 hex characters (default=<null>)
SET NW MOde
Sets WLAN mode
SET NW MOde <mode>
[Infrastructure | Ad-Hoc] (default = Infra)
SH NW MODE
Shows the wireless operating mode
sample output:
Wifi mode = AD-HOC (802.11)
SH NW RADio
Shows the selected radio mode of operation
sample output:
Radio mode is 802.11b
SET NW SPeed
Sets maximum WLAN speed

User’s Guide
Document #40182-420 Rev. A
76
SET NW SPeed n
n = 1,2,5.5 or 11 (default = 11) for 802.11b products
n = 1,2,5.5,6,9,11,12,18,24,36,48,54 (default = 54) for 802.11a/b/g
SH NW SPEED
Show the maximum wireless data speed in megabits per second
sample output:
Speed = 11
SET NW SSid
Sets WLAN SSID
SET NW SSid <name>
User defined (default = printer)
CL NW SSid
Clears the SSID value so the server will connect to any AP.
CL NW SSid
SET NW BSsid
Sets WLAN BSSID (connect to a specific access point’s mac address)
SET NW BSsid <value>
User defined (MAC Address)
CL NW BSsid
Clears the BSSID value so the server uses just SSID and not a specific AP.
CL NW BSsid
SET NW RTS
Sets WLAN RTS threshold
SET NW RTS n
n = 1-3000 (default = 2432)
SH NW RTS
Shows the configured wireless RTS threshold
sample output:
Wifi RTS Threshold = 2432
SET NW APDEN
Sets WLAN Access Point Density

User’s Guide
Document #40182-420 Rev. A
77
SET NW APDEN [LOW | MED | HI]
(default = LOW)
SH NW APDEN
Shows the access point density
sample output:
AP Density = Low
SH NW STATS
Show the network I/O statistics
sample output:
WiFi statistics:
TX Unicast frames: 0
TX Multicast frames: 0
TX Fragments: 0
TX Unicast octets: 0
TX Multicast octets: 0
TX Deferred: 0
TX Single retry frames: 0
TX Multiple retry frames: 0
TX Retry limit exceeded: 0
TX Discards: 0
RX Unicast frames: 0
RX Multicast frames: 0
RX Fragments: 0
RX Unicast octets: 0
RX Multicast octets: 0
RX FCS errors: 0
RX Discards no buffer: 0
TX Discards wrong SA: 0
RX Discards WEP undecr: 0
RX Msg in msg fragments: 0
RX Msg in Bad msg fragments: 0
SET NW CERTCN
Sets EAP Common Name
SET NW CERTCN <name>
User defined (default=<null>)
SH NW CERTCN
Shows the value of the first common name check string
sample output:
Common name 1
Note: the default for this string is a null (blank) string
Note: The deprecated command SH NW TTCN will also return this information.
SET NW CERTCN2

User’s Guide
Document #40182-420 Rev. A
78
Sets second EAP Common Name
SET NW CERTCN2 <name>
User defined (default=<null>)
SH NW CERTCN2
Shows the value of the second common name check string
sample output:
Common name 2
Note: the default for this string is a null (blank) string
SET NW CERTEXP
Sets EAP Certificate Exponent value
SET NW CERTEXP <exponent>
User defined (default = 10001 Hex)
SH NW CERTEXP
Shows the value of the certificate exponent
sample output:
65537 (10001h)
Note: The deprecated command SH NW TTEXP will also return this information.
SET NW CERTKEY
Sets EAP Root Key
SET NW CERTKEY <key value>
User defined
SET NW ID
Sets Authentication User ID. This may include the realm, separated by a ‘@’ character.
SET NW ID <user id>
(default = anonymous)
SH NW ID
Shows the value of the authentication ID (including realm, if present)
sample output:
anonymous@somewhere
Note: The default realm is a null (blank) string
Note: The deprecated command SH NW TTID will also return this information.
SET NW PW

User’s Guide
Document #40182-420 Rev. A
79
Sets the password used for the 802.1x EAP authentication, if enabled.
SET NW PW <password>
(default = anonymous)
SET NW INAP
Sets EAP Inner-Authentication protocol
SET NW INAP [PAP|MSCHAP_V2]
(default = PAP)
SH NW INAP
Shows the selected inner authentication mode
sample output:
Authentication protocol = PAP
Note: the deprecated command SH NW TTAP will also return this information.
SET NW REALM
Sets the realm portion of the 802.1x EAP authentication ID This may also be set with the ID command.
SET NW REALM <realm>
(default = <null>)
SH NW REALM
Shows the realm associated with the authentication ID, if any.
sample output:
somewhere
Note: The default realm is a null (blank) string
Note: The deprecated command SH NW TTRE will also return this information.
SET NW WPAAUTO
Enable or disable WPA/WPA2 auto mode. If enabled, the print server will connect to a non-WPA access
point if a WPA enabled access point is not available. Only valid when WPA is enabled (authentication
type = TKIP).
SET NW WPAAUTO [ENable | DIsable]
(default = disabled)
SH NW WPAAUTO
Shows the state of the WPA/WPA2 auto connect flag
sample output:
WPA-AUTO Enabled
SET NW WPAGROUP

User’s Guide
Document #40182-420 Rev. A
80
Enable or disable WPA/WPA2 group key mode. If enabled, this allows group keys to be used for data link
encryption.
SET NW WPAGROUP [ENABLE | DISABLE]
(default = disabled)
SH NW WPAGROUP
Shows the state of the allow WPA/WPA2 group keys flag
sample output:
WPA-GROUP Disabled
SET NW WPAPSK
Sets the WPA/WPA2 PSK pass phrase or hex key. This value is only used if the authentication mode is
WPA-PSK. The argument to this command is either a pass phrase of 8-63 characters, or exactly 64 hex
characters representing the 256 bit PSK value.
SET NW WPAPSK <key>
(default = “silex”)
SET NW WPATRACE
Sets the WPA trace level. note: this command is for diagnostic purposes only, and should not normally be
used as the trace can affect performance. A value of 0 disables the trace.
SET NW WPATRACE nn
(default = 0)