Silver Star Intelligent Technology TYX246105RX Wireless module User Manual Host
Shenzhen Silver Star Intelligent Technology Co., Ltd. Wireless module Host
Host User Manual

The instructions
Product name: remote control
Product model: I3RC
Tips:
1. Customers should operate the cleaner within 7 meters distance covered by WIFI signal with our
remote control; otherwise, the operation fails.
2. When press the “auto-recharge” button, the vacuum cleaner will may fail to return to the charging
base either because of complex surrounding obstacles or running-out-of batteries.
局部清扫/星期六
- 1 -
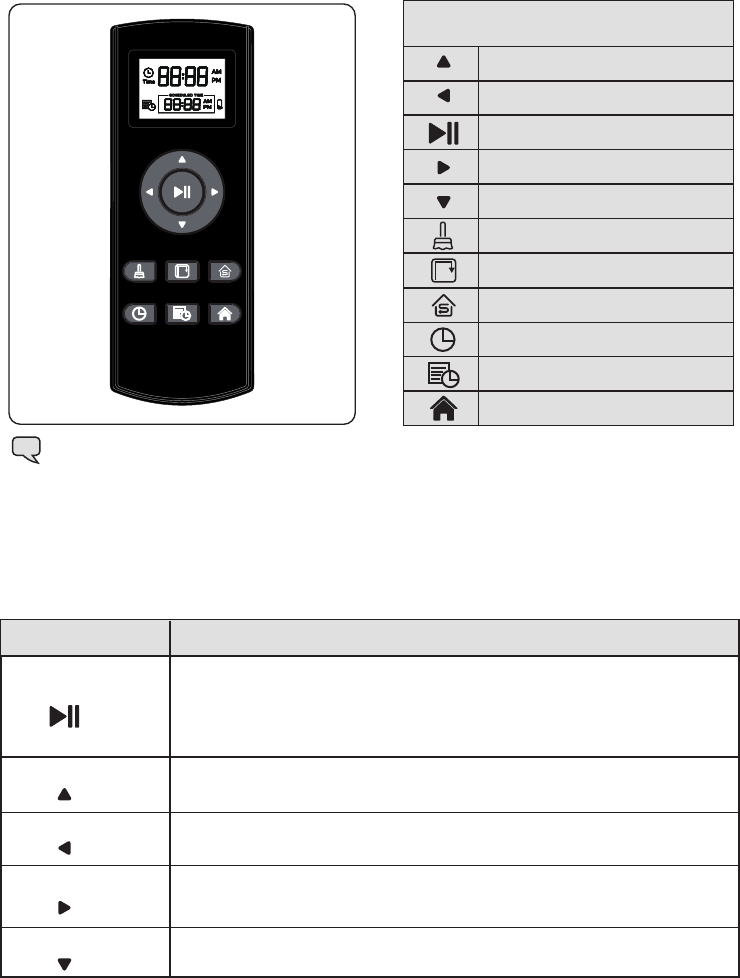
Single Room Cleaning
Start/Stop Auto cleaning
Right-turn button
Back button
Auto cleaning button
Left-turn button
Forward button
Auto charging
Set the current time
Button of scheduling to clean
Edge cleaning button
Use of Remote Control
Start/Stop (button)
Right-turn button
Back button
Left-turn button
Forward button
Guidelines of Remote Control Use:
Function Guidelines
1. When the cleaner is in standby mode, press the button to enter the auto-cleaning mode.
2. When the cleaner is at any cleaning mode, press the button to let it shift to standby
mode. After finishing the sweeping task it automatically turns into recharging mode.
3. When setting the time, press this button to hold settings.
4. The cleaner will respond with a sound when receiving an order from the remote control.
Long-press the button and the cleaner will forward; releasing, it stops moving.
Long-press the button and the cleaner rotates counterclockwise; releasing, it stops.
Long-press the button and the cleaner rotates clockwise; releasing, it stops rotating.
Long-press the button and the cleaner moves backward; releasing, it stops moving.
Function Information
Introduction of remote control buttons

- 2 -
1. Press the button to change the cleaner’s cleaning state to standby.
2. When the cleaner is standby, press the button to let it shift to auto cleaning mode. After
finishing the sweeping will turns into recharging mode.
3. The cleaner will respond with a sound when receiving an order from the remote control.
1. Press the button to change the cleaner’s cleaning state to standby.
2. When the cleaner is standby, press the button to let it shift to edge cleaning mode.
After finishing the sweeping task it automatically turns into recharging mode.
3. The cleaner will respond with a sound when receiving an order from the remote control.
1. Press the button to change the cleaner’s cleaning state to standby.
2. When the cleaner is standby, press the button to let it shift to single-room cleaning
mode. After finishing the sweeping task it automatically turns into recharging mode.
3. The cleaner will respond with a sound when receiving an order from the remote control.
1. In the standby state pressing this button, the “ ”and“ ” on the display screen
will flash. Then press the up/down key to adjust the hour.
2. Press the left/right-turn key “ ” and “ ” to change into “ ” to adjust the
minute.
3. Please save your settings by pressing the “ ” or “ ” key. The cleaner will
respond with a sound when receiving an order from the remote control.
1. In the standby state pressing this button, the “ ”and“ ” on the display
screen will flash. Then press the up/down key to adjust the hour.
2. Press the left/right-turn key “ ” and “ ” to change into “ ” to adjust the
minute.
3. Please save your settings by pressing the “ ” or “ ”. The cleaner will respond
with a sound when receiving an order from the remote control.
1. In the cleaning mode, press the button to change the vacuum cleaner into standby.
2. In the standby mode, press the button to let it do in recharging mode. The cleaner will
respond with a sound when receiving an order from the remote control.
Auto Cleaning button
Edge Cleaning button
Single Room Cleaning
button
Button of time-setting
Button of scheduling
to clean
Button of recharging
Function Guidelines Function Information
Steps of resetting the remote control:
A. Keep the cleaner in the standby mode;
B. Press the “power” button of the cleaner;
C. Waiting for 6s the machine will start to reset its code. The power indicator will flash.
D. Press the “ ” button, release the key. When listened the “didi” sound.The
pairing code process is finished.
Remarks:if do not listen the “didi” sound, it means the pair-code operation is failed.
Please repeat the above procedures.
We are responsible for additional testing to verify compliance as a composite system. When testing the
host device for compliance with Part 15 Subpart B, we have verify that our product compliance with Part
15 Subpart B while the transmitter module(s) are installed and operating. The modules should be trans-
mitting and the evaluation should confirm that the module's intentional emissions are compliant (i.e. fun-
damental and out of band emissions). We have verify that there are no additional unintentional emissions
other than what is permitted in Part 15 Subpart B or emissions are complaint with the transmitter(s) rule(s).
Note:If the remote control fails to respond, please check whether its battery power
is too low. If you still can't operate the cleaner after charge,then re-pair again.

THIS DEVICE COMPLIES WITH PART 15 OF THE FCC RULES.
OPERATION
IS SUBJECT TO THE FOLLOWING TWO CONDITIONS: (1) THIS
DEVICE MAY
NOT CAUSE HARMFUL INTERFERENCE, AND (2) THIS DEVICE
MUST
ACCEPT ANY INTERFERENCE RECEIVED, INCLUDING
INTERFERENCE THAT MAY CAUSE UNDESIRED OPERATION.
NOTE: THE GRANTEE IS NOT RESPONSIBLE FOR ANY CHANGES
OR MODIFICATIONS NOT EXPRESSLY APPROVED BY THE PARTY
RESPONSIBLE FOR COMPLIANCE. SUCH MODIFICATIONS COULD
VOID THE USER’S AUTHORITY TO OPERATE THE EQUIPMENT.
This device complies with Industry Canada licence-exempt RSS standard(s).
Operation is subject to the following two conditions: (1) this device may not
cause interference, and (2) this device must accept any interference, including
interference that may cause undesired operation of the device.
Le présent appareil est conforme aux CNR d'Industrie Canada applicables aux
appareils radio exempts de licence. L'exploitation est autorisée aux deux
conditions suivantes : (1) l'appareil ne doit pas produire de brouillage, et (2)
l'utilisateur de l'appareil doit accepter tout brouillage radioélectrique subi,
même si le brouillage est susceptible d'en compromettre le fonctionnement
-3-