Silverlit Toys TX0002G4-1803 Toy RC Robotic OP One Robot User Manual 2018 07 24 OpBot

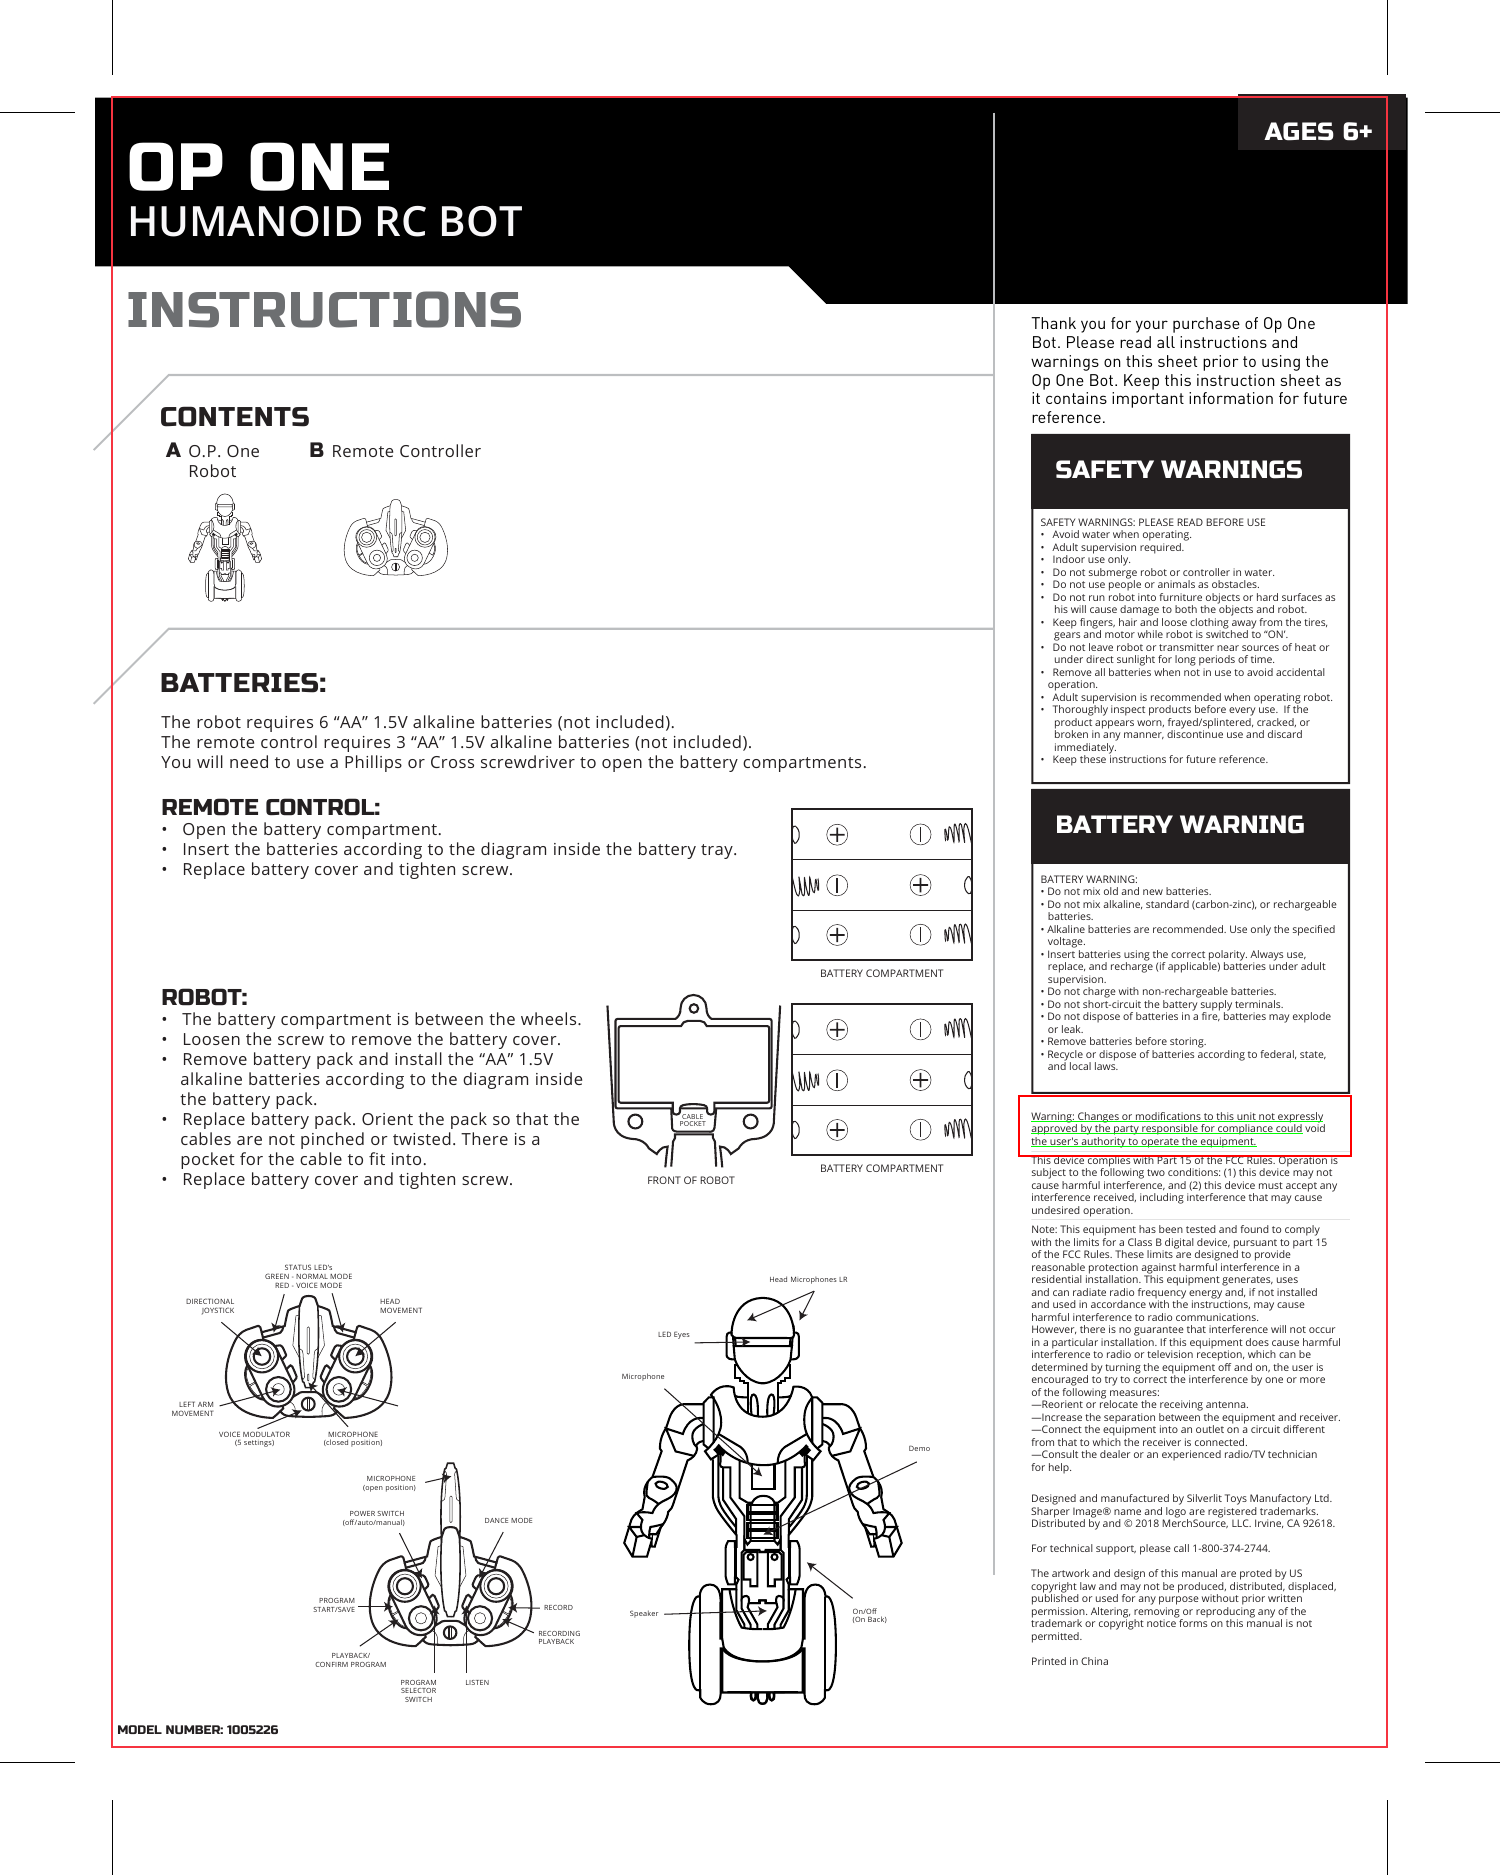
Silverlit Toys Manufactory Ltd. Toy RC Robotic OP One Robot 2018 07 24 OpBot

Users Manual

INSTRUCTIONSCONTENTSBATTERIES:AO.P. One RobotBRemote ControllerAGES 6+OP ONEHUMANOID RC BOTSAFETY WARNINGSSAFETY WARNINGS: PLEASE READ BEFORE USE•   Avoid water when operating.•   Adult supervision required.•   Indoor use only.•   Do not submerge robot or controller in water.•   Do not use people or animals as obstacles.•   Do not run robot into furniture objects or hard surfaces as          his will cause damage to both the objects and robot.•   Keep fingers, hair and loose clothing away from the tires,           gears and motor while robot is switched to “ON’.•   Do not leave robot or transmitter near sources of heat or         under direct sunlight for long periods of time.•   Remove all batteries when not in use to avoid accidental operation.•   Adult supervision is recommended when operating robot.•   Thoroughly inspect products before every use.  If the      product appears worn, frayed/splintered, cracked, or      broken in any manner, discontinue use and discard        immediately. •   Keep these instructions for future reference.BATTERY WARNINGBATTERY WARNING:• Do not mix old and new batteries.• Do not mix alkaline, standard (carbon-zinc), or rechargeable batteries.• Alkaline batteries are recommended. Use only the specified voltage.• Insert batteries using the correct polarity. Always use, replace, and recharge (if applicable) batteries under adult supervision.• Do not charge with non-rechargeable batteries.• Do not short-circuit the battery supply terminals.• Do not dispose of batteries in a fire, batteries may explode or leak.• Remove batteries before storing.• Recycle or dispose of batteries according to federal, state, and local laws.Designed and manufactured by Silverlit Toys Manufactory Ltd.Sharper Image® name and logo are registered trademarks.Distributed by and © 2018 MerchSource, LLC. Irvine, CA 92618.For technical support, please call 1-800-374-2744.The artwork and design of this manual are proted by US copyright law and may not be produced, distributed, displaced, published or used for any purpose without prior written permission. Altering, removing or reproducing any of the trademark or copyright notice forms on this manual is not permitted. Printed in ChinaThe robot requires 6 “AA” 1.5V alkaline batteries (not included).The remote control requires 3 “AA” 1.5V alkaline batteries (not included).You will need to use a Phillips or Cross screwdriver to open the battery compartments.REMOTE CONTROL: •   Open the battery compartment.•   Insert the batteries according to the diagram inside the battery tray. •   Replace battery cover and tighten screw.ROBOT: •   The battery compartment is between the wheels.•   Loosen the screw to remove the battery cover.•   Remove battery pack and install the “AA” 1.5V     alkaline batteries according to the diagram inside    the battery pack.•   Replace battery pack. Orient the pack so that the     cables are not pinched or twisted. There is a     pocket for the cable to fit into. •   Replace battery cover and tighten screw.DIRECTIONAL JOYSTICKSTATUS LED’sGREEN - NORMAL MODERED - VOICE MODEHEADMOVEMENTMICROPHONE (closed position)VOICE MODULATOR(5 settings)LEFT ARM MOVEMENTMICROPHONE(open position)POWER SWITCH(off/auto/manual) DANCE MODERECORDINGPLAYBACKRECORDPLAYBACK/CONFIRM PROGRAMPROGRAM SELECTOR SWITCHLISTENPROGRAM START/SAVEWarning: Changes or modifications to this unit not expressly approved by the party responsible for compliance could void the user's authority to operate the equipment.This device complies with Part 15 of the FCC Rules. Operation is subject to the following two conditions: (1) this device may not cause harmful interference, and (2) this device must accept any interference received, including interference that may cause undesired operation.Note: This equipment has been tested and found to comply with the limits for a Class B digital device, pursuant to part 15 of the FCC Rules. These limits are designed to provide reasonable protection against harmful interference in a residential installation. This equipment generates, uses and can radiate radio frequency energy and, if not installed and used in accordance with the instructions, may cause harmful interference to radio communications.However, there is no guarantee that interference will not occur in a particular installation. If this equipment does cause harmful interference to radio or television reception, which can be determined by turning the equipment off and on, the user is encouraged to try to correct the interference by one or more of the following measures:—Reorient or relocate the receiving antenna.—Increase the separation between the equipment and receiver.—Connect the equipment into an outlet on a circuit different from that to which the receiver is connected.—Consult the dealer or an experienced radio/TV technician for help.MicrophoneLED EyesSpeaker On/Off(On Back)DemoHead Microphones LRMODEL NUMBER: 1005226FRONT OF ROBOTCABLE POCKETBATTERY COMPARTMENTBATTERY COMPARTMENTThank you for your purchase of Op One Bot. Please read all instructions and warnings on this sheet prior to using the Op One Bot. Keep this instruction sheet as it contains important information for future reference.
The Controller and Robot must be “paired” in order for the Robot to receive commands from the Controller.     Turn the Controller on using the Power switch. Select either Automatic or Manual mode (see below). The LEDs will flash quickly.      After pair successfully, the lights on controller will stop flashing and OP One LED will still flash and make a noise.      When the Controller and OP One pair, the lights on both will stop flashing and OP One will straighten up and make a noise. This should take only a      few seconds to occur. If it does not, turn both off and begin with step 1.        • In case of loss of control, repeat the pairing process.        • Install fresh batteries if needed.        • The Controller and OP One must be within 20 feet of each other.        • OP One can be controlled up to 20 feet away.AUTOMATIC (CENTER POSITION)• Controller lights will be green.• Head and arms will move automatically while OP One is moving across floor.MANUAL (BOTTOM POSITION) • Controller lights will be red.• Head and arms will remain still while OP One is moving across floor.CONTROL MODESMOVEMENTThe head and arms can be independently controlled as well as the movement of the robot along the floor. Each function has its own joystick controller.Avoid sudden stops and reverses as it could cause OP One to tip over. If OP one tips over, the drive motor will automatically disengage to avoid damageApplies to both armsPAIRING CONTROLLER AND OP ONE123POWER SWITCH(off/auto/manual)DIRECTIONAL JOYSTICKHEADMOVEMENTRIGHT ARM MOVEMENTLEFT ARM MOVEMENTDIRECTIONAL JOYSTICKHEAD MOVEMENT ARM MOVEMENT
Three programmed motion patterns can be saved for later playback. The directional control joystick will be disabled while in programming mode. Programs can be replaced by recording a new one.     Slide the Program Selector (1) Switch to one of three positions.      Press and hold the Program Button (2)     OP One will make a sound to indicate that he’s ready to receive commands      Use the Controller to move the head and arms to a position.       After each movement, press the Playback/Confirm button (3). The Controller will issue a sound to confirm.      Enter more movements following steps 4 and 5, above.      Up to 30 movements may be recorded in a single program.      To end, programming, press the Program Button (2). •   Movements of OP One along the floor cannot be programmed.•   OP One can be driven while a program is being played back.•   A voice recording (see below) can also be played back at the same time.PLAYBACK:      Slide the selector to the desired program.      Press the Playback/Confirm button (3).After 15 seconds of inactivity, OP One will make a sound or action while waiting for his next commands. This will repeat until 3 minutes have elapsed after which the robot will go into a battery-saving sleep mode. When the Controller is set to Automatic Mode (green lights), OP One’s sound detection feature is active. When he detects a sound, he will exit Idle Mode and respond.To reawaken OP One, slide his power switch to OFF and then back to ON. You may need to repeat the pairing process between OP One and the controller.AGES 8+PROGRAMMINGIDLE MODEOP One can listen to sounds in the room and transmit them back to the speaker on the controller.      Press the Listen Button (1)      Any sounds picked up by OP One will play out of the Speaker (2)            Press the Listen Button again to exit Listening Mode.•   To avoid feedback, keep the remote at least five feet away from OP One while it is in listening mode.LISTENING MODEOP One has several pre-recorded dances.•   There are five pre-programmed dance routines that OP One can perform.•   Select the dance routine by pushing on the Dance Mode button (circled) the proper number of times. (see table, right)•   End a dance routine by pressing the Dance Button twice.Dance 1Dance 2Dance 3Dance 4Dance 5# of presses on dance button1 2345DANCE MODE1212345678132The user can record a message that can be played through OP One’s speaker.RECORD:      Push and hold the Record Button (1)           Speak into the microphone (2). It can be closed or extended.           Release the button when recording is complete. •   A recording can be up to 30 seconds long.•   Only one recording can be stored at a time.•   Recording a new message erases the old one. PLAYBACK:      Push the Playback button (3) to play back the recorded message.           Adjust the playback pitch using       the Voice Modulator dial (4).          There are five different settings.VOICE RECORDING11223123122134

Navigation menu