SimpleSoftware Manual Simple 7.5 User
2013-01-24
User Manual: SimpleSoftware Manual
Open the PDF directly: View PDF ![]() .
.
Page Count: 143 [warning: Documents this large are best viewed by clicking the View PDF Link!]
- 1 Introduction
- 2 Designing Your Imaging Solution
- 3 Automating Document Capture
- 4 Installing SimpleIndex
- Imaging Suite Applications
- 4.3 Upgrading from Previous Versions
- 4.4 Uninstall Notes
- 4.5 Running the SimpleIndex Installer Wizard
- 4.5.1 Setup Prerequisites
- 4.5.2 Setup Wizard Start
- 4.5.3 Destination Folder
- 4.5.4 Setup Type
- 4.5.5 Setup Complete
- 4.6.1 Setup Type Selection
- 4.6.2 License Activation
- 4.6.3 Default Job Folder
- 4.6.4 FineReader OCR Engine
- 4.6.5 File Association
- 4.6.6 Default Data Folders
- 4.6.7 Security Settings
- 4.6.8 Automatic Processing
- 4.6.9 Download Automatic Configuration
- 4.7 Demo/Registration Screen
- 5 Job Options
- 5.1 Overview – How to Setup SimpleIndex Jobs
- 5.2 Job Settings Wizard
- 5.3 Batch Options
- 5.3.1 Folder Settings
- 5.3.2 Pre-Process and Post-Process
- 5.3.3 Image Processing
- 5.3.4 Input Options
- 5.3.5 Output Options
- 5.4 Index Options
- 5.5 Barcode Options
- 5.6 Zones & OCR Options
- 5.6.1 Select Field to Edit
- 5.6.2 Field Coordinates
- 5.6.3 Lists and Dictionary Files
- 5.6.4 Advanced OCR Options
- 5.6.5 Global OCR Options
- Enable imprinting
- 5.7.2 Imprint Text
- 5.7.3 Imprint Field Value
- 5.7.4 Imprint Separator
- 5.7.5 X, Y Coordinates
- 5.7.6 Font Size
- 5.7.7 Imprint image filename
- 5.7.8 Imprint current date
- 5.7.9 Imprint page numbers
- 5.7.10 Page # Length
- 5.7.11 Measure X, Y from bottom-right
- 5.7.12 Imprint first page only
- 5.7.13 Use annotations when imprinting
- 5.8 Logging Options
- 5.9 Database Options
- 5.9.1 Design Overview for Database Connectivity
- 5.9.2 Select a Data Source
- 5.9.3 Database Mode
- 5.9.4 Table Name
- 5.9.5 Output File Field
- 5.9.6 File Type Field
- 5.9.7 Rename files in Update mode
- 5.9.8 Skip Insert if output file exists
- 5.9.9 Store files as binary objects
- 5.9.10 Database Field Name
- 5.9.12 Filter
- 5.9.13 Revision Field/Level
- 5.9.14 Full Text OCR Field
- 5.9.15 Page Count Field
- 5.10 Advanced Indexing Options
- 5.10.1 Batch & Indexing
- 5.10.1.1 Run job until input folder is empty
- 5.10.1.2 Remove empty subfolders after processing
- 5.10.1.3 Sort subfolders by date modified
- 5.10.1.4 Sort files by date modified
- 5.10.1.5 Save job file after each batch
- 5.10.1.6 Stop pre-index batch if required field is missing
- 5.10.1.7 Stop forwarding values at end of each input file
- 5.10.1.8 Go to first file on Save All
- 5.10.1.9 Required documents Auditing Field
- 5.10.1.10 Format all valid dates using this pattern
- 5.10.1.11 Forward this field value to next batch
- 5.10.2 File Naming
- 5.10.3 PDF Encryption/Decryption
- 5.10.4 Custom Export
- 5.10.5 Screen Shot OCR
- 5.10.6 SharePoint 2010 Integration
- 5.10.7 Database Compatibility
- 5.10.1 Batch & Indexing
- 6 How to Section
- 7 Running Jobs
- 7.1 Start Screen
- 7.2 Batch Processing Stages & Options
- 7.3 Toolbar Options
- 7.3.1 New /
- 7.3.2 Save As… /
- 7.3.3 Open /
- 7.3.4 Options /
- 7.3.5 Run Job /
- 7.3.6 Help /
- 7.3.7 Rescan /
- 7.3.8 Duplicate /
- 7.3.9 Deskew /
- 7.3.10 Despeckle /
- 7.3.11 Delete /
- 7.3.12 Undo /
- 7.3.13 Print /
- 7.3.14 E-Mail /
- 7.3.15 Fit Page /
- 7.3.16 Fit Width /
- 7.3.17 Zoom In /
- 7.3.18 Zoom Out /
- 7.3.19 Thumbnails /
- 7.3.20 Image Grid /
- 7.3.21 OCR Text /
- 7.3.22 SimpleCoversheet /
- 7.3.23 SimpleView /
- 7.3.24 SimpleSend /
- 7.4 Menu Options
- 7.4.1 File Menu
- 7.4.1.1 New Job Configuration
- 7.4.1.2 Open
- 7.4.1.3 Open URL
- 7.4.1.4 Open Recent
- 7.4.1.5 Save
- 7.4.1.6 Save As…
- 7.4.1.7 Close
- 7.4.1.8 File Viewer
- 7.4.1.9 Run Job
- 7.4.1.10 End Job
- 7.4.1.11 Resume Job
- 7.4.1.12 Schedule Job
- 7.4.1.13 Job Options
- 7.4.1.14 Job Settings Wizard
- 7.4.1.15 Global Settings Wizard
- 7.4.1.17 SimpleView
- 7.4.1.18 SimpleSend
- 7.4.1.19 Exit
- 7.4.2 Scan Menu
- 7.4.2.1 Use TWAIN Driver
- 7.4.2.2 Use ISIS Driver
- 7.4.2.3 Select Scanner
- 7.4.2.4 Display Scanner Settings
- 7.4.2.5 Compression
- 7.4.2.6 Set # of Page Windows
- 7.4.2.7 Display Settings Before Scan
- 7.4.2.9 Manually Duplex
- 7.4.2.10 Split Pages Vertically
- 7.4.2.11 Split Pages Horizontally
- 7.4.2.12 Magazine Scan
- 7.4.2.14 Scan to Input Folder
- 7.4.2.15 Add Pages to Batch
- 7.4.2.16 Rescan Page
- 7.4.2.17 Scan This File
- 7.4.3 Process Menu
- 7.4.4 Index Menu
- 7.4.5 View Menu
- 7.4.5.1 Actual Size
- 7.4.5.2 Full Page
- 7.4.5.3 Page Width
- 7.4.5.4 Image Thumbnails
- 7.4.5.5 Batch Thumbnails
- 7.4.5.6 Image Grid
- 7.4.5.7 OCR Text
- 7.4.5.8 Reset Grid Columns
- 7.4.5.9 Input Folder
- 7.4.5.10 Processing Folder
- 7.4.5.11 Output Folder
- 7.4.5.12 Log Folder
- 7.4.5.13 Backup Folder
- 7.4.5.14 Annotation Toolbar
- 7.4.5.15 Enable Zoom Locking
- 7.4.6 Navigate Menu
- 7.4.7 Send Menu
- 7.4.8 Help Menu
- 7.4.1 File Menu
- 7.5 Running jobs in SimpleSearch
- 8 Command Line Execution
- 9 Run Jobs as a Windows Service
- 10 Glossary
- 11 Contacting Simple Software

SimpleIndex Documentation
- 2 -
SimpleIndex Documentation
- 3 -
Table of Contents
1 Introduction ......................................................................................................... 7
1.1 Welcome to SimpleIndex! ........................................................................................... 7
1.2 Conventions Used in This Manual .............................................................................. 7
1.3 Who Should Read This Manual? ................................................................................ 7
1.4 New Features in Version 7.......................................................................................... 7
1.5 Unique Features ......................................................................................................... 8
1.5.1 1-Click Processing ................................................................................................................... 8
1.5.2 Template & Dictionary Matching OCR .................................................................................... 8
1.5.3 MS Office and PDF Processing ............................................................................................... 9
1.5.4 Command Line Interface ......................................................................................................... 9
1.5.5 Document Presence Auditing .................................................................................................. 9
1.5.6 Distributed Document Capture ................................................................................................ 9
1.5.7 Open Database Integration ................................................................................................... 10
1.5.8 OMR and OCR Document Separation .................................................................................. 10
2 Designing Your Imaging Solution ................................................................... 11
2.1 SimpleSearch ............................................................................................................11
2.2 Windows Folders & Filenames and SimpleView ........................................................12
2.3 Using a Document Management System ...................................................................13
2.4 Using a Database or Spreadsheet .............................................................................14
2.5 Custom Application Integration ..................................................................................15
2.6 Distributed Document Capture ...................................................................................16
2.6.1 Advantages of Distributed Capture ....................................................................................... 16
2.6.2 Implementation of Distributed Capture .................................................................................. 17
2.6.3 Centralized Administration of Job Configurations ................................................................. 18
3 Automating Document Capture ....................................................................... 19
3.1 Using Barcode Recognition .......................................................................................19
3.2 Using OCR ................................................................................................................20
3.3 Using Index Autofill ....................................................................................................20
3.4 Using Pre-Indexed Batches .......................................................................................21
4 Installing SimpleIndex ...................................................................................... 22
4.1 Imaging Suite Applications ........................................................................................22
4.2 Optional Applications .................................................................................................22
4.2.1 PDF Viewers .......................................................................................................................... 22
4.2.2 PDF Editors ........................................................................................................................... 22
4.2.3 Office Applications ................................................................................................................. 22
4.3 Upgrading from Previous Versions ............................................................................23
4.4 Uninstall Notes ..........................................................................................................23
4.5 Running the SimpleIndex Installer Wizard .................................................................23
4.5.1 Setup Prerequisites ............................................................................................................... 23
4.5.2 Setup Wizard Start ................................................................................................................ 24
4.5.3 Destination Folder ................................................................................................................. 24
4.5.4 Setup Type ............................................................................................................................ 24
4.5.5 Setup Complete ..................................................................................................................... 24
4.6 Running SimpleIndex for the first time .......................................................................24
4.6.1 Setup Type Selection ............................................................................................................ 24
4.6.2 License Activation ................................................................................................................. 25
4.6.3 Default Job Folder ................................................................................................................. 26
4.6.4 FineReader OCR Engine ...................................................................................................... 28
4.6.5 File Association ..................................................................................................................... 29
4.6.6 Default Data Folders ............................................................................................................. 31
4.6.7 Security Settings.................................................................................................................... 32
4.6.8 Automatic Processing ............................................................................................................ 33
SimpleIndex Documentation
- 4 -
4.6.9 Download Automatic Configuration ....................................................................................... 33
4.7 Demo/Registration Screen .........................................................................................35
4.7.1 Starting in Demo Mode .......................................................................................................... 35
4.7.2 License Activation ................................................................................................................. 36
5 Job Options ....................................................................................................... 37
5.1 Overview – How to Setup SimpleIndex Jobs .............................................................37
5.1.1 Processing Stages ................................................................................................................ 37
5.1.2 File Naming Schemes ........................................................................................................... 38
5.1.3 Linking Jobs ........................................................................................................................... 39
5.2 Job Settings Wizard ...................................................................................................40
5.3 Batch Options ............................................................................................................40
5.3.1 Folder Settings ...................................................................................................................... 41
5.3.2 Pre-Process and Post-Process ............................................................................................. 42
5.3.3 Image Processing .................................................................................................................. 42
5.3.4 Input Options ......................................................................................................................... 43
5.3.5 Output Options ...................................................................................................................... 47
5.4 Index Options ............................................................................................................49
5.4.1 Pre-Index Batch ..................................................................................................................... 50
5.4.2 Number of Fields ................................................................................................................... 50
5.4.3 Index Field Parameters ......................................................................................................... 51
5.4.4 Autofill Settings ...................................................................................................................... 60
5.4.5 Other Indexing Options ......................................................................................................... 62
5.4.6 Autonumber Settings ............................................................................................................. 65
5.5 Barcode Options ........................................................................................................67
5.5.1 Barcode Engine ..................................................................................................................... 67
5.5.2 Barcode Types ...................................................................................................................... 68
5.5.3 Delete barcode page ............................................................................................................. 68
5.5.4 Require exact match on template.......................................................................................... 68
5.5.5 Require checksum ................................................................................................................. 68
5.5.6 Enhanced analysis ................................................................................................................ 68
5.5.7 Pages to Process .................................................................................................................. 69
5.5.8 Minimum Confidence ............................................................................................................. 69
5.5.9 Low Confidence Barcodes .................................................................................................... 69
5.5.10 Setting Barcode Coordinates ............................................................................................ 69
5.6 Zones & OCR Options ...............................................................................................69
5.6.1 Select Field to Edit ................................................................................................................ 70
5.6.2 Field Coordinates .................................................................................................................. 70
5.6.3 Lists and Dictionary Files ...................................................................................................... 72
5.6.4 Advanced OCR Options ........................................................................................................ 74
5.6.5 Global OCR Options .............................................................................................................. 77
5.7 Imprinting Options .....................................................................................................78
5.7.1 Enable imprinting ................................................................................................................... 79
5.7.2 Imprint Text ............................................................................................................................ 79
5.7.3 Imprint Field Value ................................................................................................................ 79
5.7.4 Imprint Separator ................................................................................................................... 79
5.7.5 X, Y Coordinates ................................................................................................................... 79
5.7.6 Font Size ............................................................................................................................... 79
5.7.7 Imprint image filename .......................................................................................................... 80
5.7.8 Imprint current date ............................................................................................................... 80
5.7.9 Imprint page numbers ........................................................................................................... 80
5.7.10 Page # Length ................................................................................................................... 80
5.7.11 Measure X, Y from bottom-right ........................................................................................ 80
5.7.12 Imprint first page only ........................................................................................................ 80
5.7.13 Use annotations when imprinting ...................................................................................... 80
5.8 Logging Options ........................................................................................................80
5.8.1 Log File Naming Scheme ...................................................................................................... 81
5.8.2 Database Batch Logging ....................................................................................................... 83
5.8.3 Index Log Format .................................................................................................................. 83

SimpleIndex Documentation
- 5 -
5.8.4 Advanced Log Formatting ..................................................................................................... 84
5.8.5 Show Log After Batch ............................................................................................................ 85
5.8.6 Edit Users .............................................................................................................................. 85
5.9 Database Options ......................................................................................................86
5.9.1 Design Overview for Database Connectivity ......................................................................... 86
5.9.2 Select a Data Source ............................................................................................................ 87
5.9.3 Database Mode ..................................................................................................................... 90
5.9.4 Table Name ........................................................................................................................... 92
5.9.5 Output File Field .................................................................................................................... 92
5.9.6 File Type Field ....................................................................................................................... 92
5.9.7 Rename files in Update mode ............................................................................................... 92
5.9.8 Skip Insert if output file exists ................................................................................................ 93
5.9.9 Store files as binary objects .................................................................................................. 93
5.9.10 Database Field Name ....................................................................................................... 93
5.9.11 Editable ............................................................................................................................. 93
5.9.12 Filter .................................................................................................................................. 93
5.9.13 Revision Field/Level .......................................................................................................... 94
5.9.14 Full Text OCR Field........................................................................................................... 94
5.9.15 Page Count Field .............................................................................................................. 94
5.10 Advanced Indexing Options .......................................................................................95
5.10.1 Batch & Indexing ............................................................................................................... 95
5.10.2 File Naming ....................................................................................................................... 97
5.10.3 PDF Encryption/Decryption ............................................................................................... 98
5.10.4 Custom Export .................................................................................................................. 99
5.10.5 Screen Shot OCR ........................................................................................................... 101
5.10.6 SharePoint 2010 Integration ........................................................................................... 101
5.10.7 Database Compatibility ................................................................................................... 102
6 How to Section ................................................................................................ 104
6.1 Creating a document management system with SimpleIndex and SimpleSearch .... 104
6.2 How to create searchable CDs and DVDs ............................................................... 105
6.3 How to use barcodes or blank pages to separate documents automatically ............ 105
7 Running Jobs .................................................................................................. 107
7.1 Start Screen ............................................................................................................ 107
7.2 Batch Processing Stages & Options ........................................................................ 108
7.2.1 Start batch ........................................................................................................................... 108
7.2.2 Input files ............................................................................................................................. 108
7.2.3 Automatic processing .......................................................................................................... 108
7.2.4 Manual indexing & image verification .................................................................................. 108
7.2.5 Grid View ............................................................................................................................. 110
7.2.6 Mouse Action Options ......................................................................................................... 110
7.2.7 Document presence auditing ............................................................................................... 111
7.2.8 Export batch ........................................................................................................................ 112
7.3 Toolbar Options ....................................................................................................... 112
7.3.1 New ............................................................................................................................... 112
7.3.2 Save As… ................................................................................................................... 112
7.3.3 Open ............................................................................................................................ 112
7.3.4 Options ........................................................................................................................ 112
7.3.5 Run Job ........................................................................................................................ 113
7.3.6 Help .............................................................................................................................. 113
7.3.7 Rescan ......................................................................................................................... 113
7.3.8 Duplicate ...................................................................................................................... 113
7.3.9 Deskew ......................................................................................................................... 113
7.3.10 Despeckle ................................................................................................................ 113
SimpleIndex Documentation
- 6 -
7.3.11 Delete ....................................................................................................................... 113
7.3.12 Undo ......................................................................................................................... 113
7.3.13 Print ......................................................................................................................... 113
7.3.14 E-Mail ..................................................................................................................... 114
7.3.15 Fit Page .................................................................................................................... 114
7.3.16 Fit Width ................................................................................................................... 114
7.3.17 Zoom In .................................................................................................................... 114
7.3.18 Zoom Out ................................................................................................................. 114
7.3.19 Thumbnails ............................................................................................................... 114
7.3.20 Image Grid ............................................................................................................... 114
7.3.21 OCR Text .................................................................................................................. 114
7.3.22 SimpleCoversheet .................................................................................................... 114
7.3.23 SimpleView .............................................................................................................. 114
7.3.24 SimpleSend ............................................................................................................. 115
7.4 Menu Options .......................................................................................................... 115
7.4.1 File Menu ............................................................................................................................. 115
7.4.2 Scan Menu .......................................................................................................................... 117
7.4.3 Process Menu...................................................................................................................... 121
7.4.4 Index Menu .......................................................................................................................... 122
7.4.5 View Menu ........................................................................................................................... 123
7.4.6 Navigate Menu .................................................................................................................... 125
7.4.7 Send Menu .......................................................................................................................... 125
7.4.8 Help Menu ........................................................................................................................... 127
7.5 Running jobs in SimpleSearch ................................................................................. 128
8 Command Line Execution.............................................................................. 130
8.1 Command Line Parameters ..................................................................................... 130
8.2 Implementing the command line interface ................................................................ 130
8.2.1 Opening SimpleIndex configurations from an icon.............................................................. 130
8.2.2 Integrating scanning with custom applications .................................................................... 131
8.3 Unattended Processing ........................................................................................... 131
8.3.1 Run Jobs on a Timer ........................................................................................................... 131
8.3.2 Run Jobs with Windows Task Scheduler ............................................................................ 132
8.3.3 Configure Service Options .................................................................................................. 132
9 Run Jobs as a Windows Service ................................................................... 133
9.1 Service Installation .................................................................................................. 133
9.2 Job Configuration Files List...................................................................................... 134
9.2.1 Adding and Removing Jobs ................................................................................................ 134
9.2.2 Monitoring Job Progress ..................................................................................................... 134
9.3 Scheduling Jobs to Run ........................................................................................... 135
9.3.1 Schedule a Time to Run ...................................................................................................... 135
9.3.2 Run on a Timed Interval ...................................................................................................... 136
9.4 Advanced Service Options....................................................................................... 136
9.5 Web Service Interface ............................................................................................. 137
9.5.1 Installing the Web Service ................................................................................................... 137
9.5.2 Using the Web Service ........................................................................................................ 137
10 Glossary .......................................................................................................... 140
11 Contacting Simple Software .......................................................................... 143

SimpleIndex Documentation
- 7 -
1 Introduction
1.1 Welcome to SimpleIndex!
SimpleIndex is a tool to automate the process of organizing large numbers
of scanned images or electronic documents.
As its name implies, SimpleIndex was designed to be easy to use. Relative
to other document capture solutions with this much power and flexibility,
SimpleIndex is much simpler — especially for the operator. It does this by
providing a smooth workflow that takes the user automatically through the
stages of scanning, processing, indexing and exporting documents. This
design enables SimpleIndex to perform unique 1-click scanning and
unattended processing jobs.
This manual describes the features of SimpleIndex and gives an overview
of how to configure SimpleIndex to perform several common scanning
tasks.
1.2 Conventions Used in This Manual
• Italicized terms refer to specific settings, buttons or menu items within
SimpleIndex.
• Numbers in parentheses, such as (5.4.3), contain links to the section
in parentheses for further information on the current setting or topic.
• Several terms are used in this manual without providing further
definition. If you are unsure what is meant by a certain term, you may
find it in the Glossary section (10).
1.3 Who Should Read This Manual?
The SimpleIndex manual is designed to educate system administrators
who will configure SimpleIndex jobs. System administrators should read
this manual and familiarize themselves with those features they intend to
use. Scanner operators should read the 'Running Jobs' section (7) to
become familiar with the options available during batch processing.
1.4 New Features in Version 7
Version 7 provides significant upgrades to the OCR and Barcode
recognition technology, making it much faster and more accurate than
previous versions. Other key additions are:
SimpleIndex Documentation
- 8 -
• ABBYY FineReader OCR engine (5.6)
• Searchable PDF output (5.6.5.4)
• Export files and index data to SharePoint 2010 (5.10.6)
• Improved server performance, management and monitoring tool and
web service interface (9)
• Automatically convert MS Office & HTML documents to PDF (5.3.4.7)
• Upgraded barcode engine with improved speed and accuracy (5.5)
• Run multiple copies of SimpleIndex at once
• Read (5.4.3.3.6) and write (5.4.5.3) property tags and EXIF data for
images, MS Office & PDF files
• View multiple pages while scanning in ISIS mode (7.4.2.6)
• Clipboard OCR indexes documents from application screens (5.10.5)
• Parse folder and filenames with fixed fields (5.4.3.3.6)
• Output data to XML (5.8)
• Scan directly to network folder option with real time processing (5.2)
• SimpleExport conversion tool uses XSLT to transform index data files
into any format
• SimpleView document viewer and editor is now included (2.2)
1.5 Unique Features
SimpleIndex has many unique features that few other desktop scanning
applications have.
1.5.1 1-Click Processing
SimpleIndex is designed to streamline document scanning and indexing in
a single-user environment. It does this by performing all of the steps in the
scanning process in sequence. With sufficient automation using OCR,
barcodes, and database lookups, it is possible to perform the entire
workflow with a single mouse click. For more information see Automating
Data Capture (3), Pre-Index Batch (5.4.1), and Unattended Processing
(8.3).
1.5.2 Template & Dictionary Matching OCR
This simplified version of what is commonly known as Unstructured
Forms Processing allows you to automatically extract index information
no matter where it appears on the document. Most “Zone OCR” solutions
only work if the information appears in exactly the same place on every
page. SimpleIndex allows you to automate indexing as long as the OCR
field (5.4.3.1.9) matches a unique pattern (5.4.3.3.1) or pre-defined list of
values (5.6.3).
SimpleIndex Documentation
- 9 -
1.5.3 MS Office and PDF Processing
SimpleIndex’s Template and Dictionary Matching OCR (5.6.3) functions
can be used with MS Office and PDF files to index and organize them
automatically. SimpleIndex uses the existing text in these files instead of
OCR, so the process is instantaneous and the accuracy is 100%.
Other Office and PDF functions include:
• Split, join & merge PDF files (5.3.4.6)
• Convert images to PDF and PDF to images (5.3.4.7)
• Convert MS Office, HTML, and text files to PDF (5.3.4.7)
• Automatic bookmarking of PDFs based on index values (5.4.5.4)
• Set Office and PDF meta tags (5.4.5.3)
• Full support for PDF/A format (5.3.5.2)
• OCR to searchable PDF with hidden text (5.6.5.4)
• Support for encrypted PDF files (5.10.3)
• View or edit files in embedded Acrobat or MS Office, if installed
1.5.4 Command Line Interface
The Command Line Interface (8) allows SimpleIndex to be integrated with
custom software solutions with minimal programming. This interface allows
you to specify all job settings, set index values and process images with a
single command.
SimpleIndex also has the ability to run a command line application
automatically before or after each batch (5.3.2). These can perform file
format conversions on the import and export files, upload files to an FTP
server, email files, or launch a custom application integration.
1.5.5 Document Presence Auditing
Some applications have a set of standard documents that are required to
be present in each batch (5.10.2.4). With SimpleIndex you can specify a list
of required documents then audit each batch at the end to ensure all are
present. Any missing pages can be scanned and indexed automatically
from this screen as well.
1.5.6 Distributed Document Capture
SimpleIndex makes it possible to enable Distributed Document Capture
(2.6) in your organization. SimpleIndex is unique compared to other
distributed capture solutions in that the entire process takes place at the
point of capture, including barcode recognition, OCR, and index validation.
SimpleIndex Documentation
- 10 -
No server component is required. Despite being serverless, job
configurations can still be centrally managed by hosting them on a shared
drive or web page.
1.5.7 Open Database Integration
Another feature that makes SimpleIndex great for integration with custom
programs is its open database integration (5.9). Instead of using a
proprietary database, SimpleIndex allows you to map its index fields to
fields in any database table. It can be configured to create new records
(5.9.3.2), update existing ones (5.9.3.3, 5.9.3.5), or retrieve them for
viewing (5.9.3.4). These are the three basic functions for working with
database records and what gives SimpleIndex its flexibility. By
implementing database interaction with generic functions, SimpleIndex is
able to interface with and perform these functions on any database.
SimpleIndex also has a standard Database Autofill (5.4.4) feature that lets
you populate index fields from existing data in your database. This is not a
unique feature, but is still one of the most useful and powerful ways of
automating document capture.
1.5.8 OMR and OCR Document Separation
SimpleIndex offers a unique new approach to determining where the first
page of a new document starts. Traditionally, barcode separator sheets are
inserted during document prep to mark the start of a new document. It is
wasteful and time-consuming to insert them between each file, especially if
the files are small (2-20 pages).
SimpleIndex takes advantage of OMR (5.4.3.1.3) technology to provide an
easier solution to this problem. Simply take a felt pen and make a black
mark on the upper-left corner of the first page of each new document.
SimpleIndex will scan automatically to numbered multi-page files, with a
new file created each time a mark is detected (5.4.6.1). These files can
then be indexed and exported with a second SimpleIndex job.
SimpleIndex can also use OCR to locate the first page of a new document
by finding unique keywords or patterns of text on the page. If the same
page is used as the first page of each document this method can be used
to identify it without additional document preparation.

SimpleIndex Documentation
- 11 -
2 Designing Your Imaging Solution
If you have not yet decided on a plan for how to organize your scanned
images for later retrieval, you should take some time to consider the
possible options. There are various ways to store your document images
for later retrieval once they have been scanned with SimpleIndex:
1. Use SimpleSearch to search and view documents (2.1).
2. Use folders & filenames to organize your files and SimpleView to
browse, view, and edit them (2.2).
3. Use enterprise document management software for security,
regulatory compliance, web viewing, workflow, and other features
(2.3).
4. Use a database or spreadsheet such as MS Access or Excel to
import the index data and provide links to the stored document
images. Clicking the links can open the image in a free viewer like
Adobe Reader or Windows' built-in image viewer (2.4).
5. Integrate SimpleIndex directly with your custom application using the
Command Line Interface (2.5).
6. Use tools like Google Desktop, Window Search, and SharePoint
(5.10.6) to find documents scanned to Windows folders. SimpleIndex
sets document properties (5.4.5.3) automatically, which these
programs use to index files and rank search results.
Distributed Capture implementations will also be discussed in this chapter
(2.6).
2.1 SimpleSearch
SimpleSearch allows you to search for and view documents linked to a
database. The user is presented with a list of fields where they may enter
search criteria. Running the search retrieves the matching images and
displays them (7.5).
SimpleSearch is part of the SimpleIndex application. When only a
SimpleSearch license is activated, all scanning and indexing functions are
disabled and hidden from the user. Only jobs that are configured for
Retrieval mode (5.9.3.4) can be opened.
SimpleIndex Documentation
- 12 -
SimpleIndex also has a Media Wizard (7.4.7.6) that lets you copy your
database and images to a CD or DVD automatically. The disc contains a
start page that opens automatically when it is loaded, giving the user the
option to install SimpleIndex or search the disc. SimpleIndex configurations
are created automatically and installed on the disc, allowing the user to
search the images in SimpleSearch.
2.2 Windows Folders & Filenames and SimpleView
Unlike other document management applications, SimpleIndex uses
meaningful folder (5.4.3.5) and filenames (5.4.3.6) to organize files on your
hard drive or file server. This lets you browse and search files in Windows
Explorer, or use SimpleView for a more advanced viewing tool.
There are several advantages to this approach.
• No need for expensive viewing software to access documents
• Anyone can search and view files regardless of installed software
• Little or no training required
• No need manage a database to store document metadata
• Database and software cannot become obsolete or unsupported
• Easily copy to a CD, DVD or other portable media
Windows folders and filenames work just like a filing cabinet, organizing
your files hierarchically and providing all the information you need to find
the file you’re seeking. Their major shortcoming is that designated file
locations and naming conventions are hard to maintain manually.
SimpleIndex provides an automated, standardized process for organizing
documents to ensure documents are always saved in the right place.
SimpleView is a document viewer designed to work with the file system. It
greatly enhances the ability of knowledge workers to quickly browse,
search, view, and annotate documents. It also has a free version that lets
casual users work for free while power users can purchase a low cost
license.
Some key advantages to using SimpleView over Windows Explorer are:
• Searching non-indexed network shares is 10-20x faster
• Search supports Regular Expressions pattern matching
• Preview page thumbnails for multipage files
• Integrated TIFF/PDF/Image viewer
SimpleIndex Documentation
- 13 -
• Annotate pages with notes, highlights, lines, etc.
• Dockable windows for browser, thumbnails and image viewer
• Integrated TWAIN scanning
• Complete set of TIFF/PDF editing and conversion tools
2.3 Using a Document Management System
There are a wide variety of document management systems available on
the market today. They perform the tasks of managing stored images and
index data, as well as giving users an interface to search for and view
these images. Many perform advanced functions like workflow
management, revision tracking, and access auditing for HIPAA compliance.
SimpleIndex has the ability to interface with these systems, making it an
ideal scanning front-end for use with most document management systems
on the market.
Integration with document management software is done via the Index Log
Files (5.8) that SimpleIndex creates. Documents are scanned and indexed
with SimpleIndex, and a log file is created that lists each image scanned
and the index information associated with it. Virtually all document
SimpleIndex Documentation
- 14 -
management software comes with standard or optional components that
allow you to automatically import images and index information in the
format SimpleIndex provides.
Many document management systems have a scanning module that is sold
separately, at significantly greater cost than SimpleIndex. With a single
scanner, SimpleIndex can provide an easier and more cost-effective
scanning interface than the default module. With multiple scanners, the low
cost of SimpleIndex makes it possible to implement Distributed Document
Capture (2.6) for a fraction of what it would cost otherwise.
The SimpleExport add-on provides built-in exports to Digitech Systems
PaperVision and CompuThink ViewWise document management systems,
as well as a general method for formatting index data with XSLT that can
be used to interface with any system. Please contact Simple Software to
request a custom export script for any other document management
system that cannot import files using the delimited text file output
SimpleIndex provides.
2.4 Using a Database or Spreadsheet
The index file that SimpleIndex provides can also be imported into a
database (5.9) or spreadsheet, allowing you to create a search and
retrieval interface for your
documents that is simple,
cost effective, and tailored
for your specific application.
SimpleIndex can also be
configured to interface
directly with any database,
eliminating the need to
import the index files.
Using the Blank Database
Wizard (5.9.2.1), anyone
can create a generic
database with built-in
search and viewing
functionality and connect it
automatically to an existing
SimpleIndex job. The result
is a completely free
document management
SimpleIndex Documentation
- 15 -
system that anyone with Microsoft Office can use. Those familiar with
Access may customize the forms in this database to display descriptive
field names and hide unused fields.
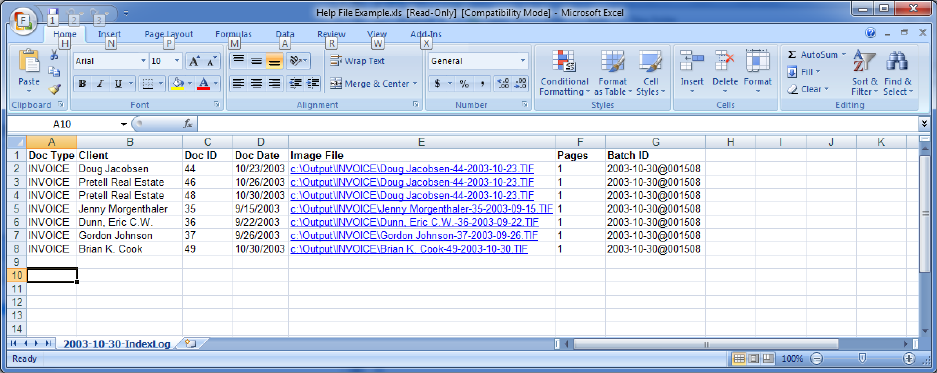
The following spreadsheet was created by opening the index file in Excel
and adding the column headings:
The image file paths were automatically converted to hyperlinks by running
this simple macro:
Sub ConvertToHyperlink()
Dim oCell As Range
For Each oCell In Selection
oCell.Font.Bold = True
ActiveSheet.Hyperlinks.Add Anchor:=oCell,
Address:=oCell.Value, _ TextToDisplay:=oCell.Value
Next
End Sub
To use this macro, simply copy the code example into the Excel macro
editor, select the cells in the Image File column and run the macro. Now
users can simply click the cell and the image file will open in their default
image viewer.
2.5 Custom Application Integration
SimpleIndex makes it easy to add document images to an existing custom
database application. By mapping the index fields in SimpleIndex to fields
in your database (5.9), SimpleIndex creates a direct interface to your
application’s data. It can create new records for the images you scan, or
SimpleIndex Documentation
- 16 -
update images and index information in existing records. All of this can be
done with your existing database, with the resulting images and index
information made available immediately in your custom application.
The Command Line Interface (8) is another component that makes
integrating SimpleIndex with custom applications simple. All of the
information you need to scan, process, organize and store documents is
saved with the SimpleIndex configuration file. Using the Command Line
Interface, your application can launch SimpleIndex, specify a configuration
file and pre-set index field values, and have SimpleIndex automatically
scan your documents, organize them, and link them to your database
without any user intervention whatsoever.
Since this is all implemented via the command line, it only takes the proper
configuration file and a single line of code to integrate fully automated
scanning in your application. Viewing documents can be done with another
line of code that simply opens the current image file in SimpleIndex using
SimpleSearch, or in the computer’s default viewer like Windows Imaging or
Adobe Acrobat. This design makes SimpleIndex by far the easiest way to
add document imaging to a custom application.
2.6 Distributed Document Capture
2.6.1 Advantages of Distributed Capture
Distributed Document Capture is a key feature of SimpleIndex that can
provide huge savings, fast turnaround and improved quality control for
enterprise scanning applications. For large enterprises with many locations
that need to capture and share data, Distributed Document Capture with
SimpleIndex is an ideal solution.
To scan documents from many locations with a centralized solution, they
must first be shipped to a scanning facility where dedicated personnel are
required to process the large volume of paper. SimpleIndex makes it
possible to scan these documents at their original location and send them
electronically to a central database where they are made available
throughout the enterprise. Other scanning software is too expensive and
complex to make this kind of distributed capture practical.
The savings in shipping costs alone can justify the investment in distributed
capture with SimpleIndex. Other advantages include faster turnaround,
keeping the originals on-site, eliminating the need for dedicated scanning
departments or costly outsourcing, and the ability to ensure the presence of
SimpleIndex Documentation
- 17 -
required documents at the time they are collected using SimpleIndex’s
Batch Auditing (5.10.2.4) feature.
2.6.2 Implementation of Distributed Capture
To implement Distributed Document Capture with SimpleIndex, you must
first carefully consider your existing network infrastructure to decide the
best implementation method to use. Essentially, you are configuring
SimpleIndex in the same way that you would in any of the other scenarios
mentioned in this section, except with the extra step of transferring the
images and index data to a central server. There are a wide variety of
automated ways to transfer this data; the most common are FTP, email,
and simply copying the files over a VPN or other high-speed WAN
interface.
If your WAN has a high-speed (128kbps+) connection to the central
database server, it is practical to configure SimpleIndex’s database
functions to interface directly with the central database via the WAN. When
saving images locally using a central database, the difference in
performance is negligible. If your image files are small or your network
connection is fast, it is also practical to use the central storage server as
your Output folder (5.3.1.2) and transfer images automatically. This
configuration is identical to how you would configure SimpleIndex with
multiple scanners on the same LAN.
SimpleSend is part of the SimpleIndex Imaging Suite and gives you the
ability to automatically transfer documents via secure FTP or email. It has a
command line interface that allows it to be launched automatically when a
batch of documents is released from SimpleIndex. It can also be scheduled
to transfer that day’s images at night. SimpleSend is the key to enabling
distributed capture with SimpleIndex.
The ability to check for required documents while scanning is most
commonly used in Distributed Document Capture scenarios. The Batch
Auditing (5.10.2.4) feature allows you to define a list of values that
represent required documents in a batch. If a scanned batch does not
contain all the items in this list, the user is warned and given an opportunity
to scan the file or enter a reason why the file could not be scanned at this
time. This feature was implemented to allow a health care chain to ensure
all the patient documents required to bill the insurance company were
collected and scanned by the front desk operator, greatly improving their
turnaround time and error rate for collections.
SimpleIndex Documentation
- 18 -
2.6.3 Centralized Administration of Job Configurations
SimpleIndex job configurations may be hosted on a website and launched
via web links. This allows administrators to have a single version of all
configuration files that can be updated without having to distribute local
copies to many locations. A web portal can be created with links to all of
the jobs relevant to the user, as well as processing instructions and other
relevant information.
It is also possible to distribute global configuration settings and job files via
download using the Global Settings Wizard (4.6.2). When SimpleIndex is
launched for the first time, the wizard is displayed automatically. The user
simply enters a URL provided by the administrator, and the settings wizard
can download all the settings files, configuration scripts, scanner drivers
and other support files required by your application and install them
automatically.
SimpleIndex Documentation
- 19 -
3 Automating Document Capture
Once you have decided the best way to organize, store and retrieve your
documents, the next part of the planning stage is to find the most efficient
way to scan these documents and associate them with the correct index
field values. Creating an efficient scanning and indexing process will save
you countless hours of labor over the life of your project.
The two main methods for automating indexing are barcode recognition
(5.5) and OCR – Optical Character Recognition (5.6). Barcode recognition
is faster and more accurate, but your documents must contain a barcode
on the document or a cover page for this to work. OCR is able to read
printed data directly from the page, which means most documents can be
processed as-is. However there are many conditions that can affect the
practicality of OCR that is discussed in this section.
If your index data already exists in another database, SimpleIndex has two
features that can make use of this data to automate processing. The Index
Autofill feature (5.4.4) lets you enter one key field that is used in a database
lookup to retrieve matching values and fill in the remaining index fields
automatically. SimpleIndex also has the ability to pre-set index values using
the Command Line Interface (8) and have a scanned document receive
these indexes automatically.
3.1 Using Barcode Recognition
Barcode recognition (5.5) is the most efficient way to capture index data
printed on documents. Some documents already have key information in
barcode format on them. If your project is to scan new documents on an
ongoing basis, it may be possible for you to redesign the forms to include
barcodes. Having a barcode with index data on the document is the best
case scenario, since all the index data is on the document at the time it is
created in a format that can be read with near 100% accuracy.
If it is not possible to print barcodes on the document itself, an alternative is
to have the person who creates the document print a barcode cover page
and place it on the file before it is scanned. The SimpleCoversheet
application was designed to make this easy by providing a simple interface
for selecting index values and printing a standard coversheet that contains
these values in barcode format.
Barcode recognition can also be useful when you have documents with a
variable number of pages that will all receive the same index values. If it is
SimpleIndex Documentation
- 20 -
not possible to generate an indexed coversheet for these at the time they
are created, a generic barcode coversheet can be used to separate the
scanned images into multi-page files, one for each document. A second
process can then be used to index these images one file at a time instead
of one page at a time, greatly increasing throughput.
3.2 Using OCR
Zone OCR (5.6) solutions traditionally require you to specify a region on the
page where index information is found. This region is recognized and the
result is inserted into an index field. The problem with traditional zone OCR
is that if the region is moved slightly due to variations in scanning, the result
could contain extra neighboring characters or cut off desired characters.
This limits the usefulness of traditional zone OCR to documents where the
index value is in the exact same place every time and has plenty of white
space around it.
SimpleIndex’s OCR contains many advanced features to overcome the
inherent limitations of zone OCR. This is done by providing template and
dictionary matching for OCR fields. These features search the OCR results
for a certain pattern or list of possible values and return only the matching
data. This allows you to draw your OCR zones much larger than normal,
ensuring that no matter how much the data shifts around it will always be
contained within that region.
It is even possible to draw your zone around the entire page and find key
information that is not printed in any fixed location. For example, a doctor’s
office may receive lab reports from many different labs. Each report is
formatted differently, but each contains the patient’s name somewhere on
it. Using the dictionary matching feature with a patient name list,
SimpleIndex can identify the correct patient for each lab automatically.
When implementing OCR for document automation, carefully consider the
data you are trying to recognize. Is the text legible? Does it appear in a
fixed location? Does it conform to a unique pattern that won’t be found
anywhere else on the page? Is there a list available with all the possible
values for this field? Answer these questions, and you will know which
OCR approach is best for your application.
3.3 Using Index Autofill
The Autofill feature (5.4.4) of SimpleIndex is an easy way to associate
many index fields with one document without retyping data that already
exists in another application. Autofill uses a database lookup to retrieve
SimpleIndex Documentation
- 21 -
records that match a key value entered by the user. Blank index fields are
then filled in automatically with the data from this lookup. The result is a
document database with many different possible search fields, of which
only one needed to be entered during scanning.
The key field may be typed by the user or it may be read from the
document automatically using barcode recognition or OCR. The lookup is
performed either when the user changes this field or when the index values
are saved. If the lookup finds multiple matching records, the user is notified
and the first set of values is used by default.
3.4 Using Pre-Indexed Batches
Pre-index batches (5.4.1) are a unique feature of SimpleIndex that greatly
improve throughput for scanning a single document at a time. Pre-indexed
batches can be configured to allow the user to enter index values prior to
scanning or they can be executed from the command line to circumvent
user interaction altogether.
The pre-index batch option must be selected to enable unattended
processing (8.3).
Some typical scenarios for pre-indexed batches are:
1. SimpleCoversheet or another barcode application is used to
automate indexing. Scanning is done on an MFP, and SimpleIndex
runs automatically on a processing workstation to read the barcodes
and export the renamed images.
2. User scans one document at a time by entering field values first,
scanning, and having all the images saved with these values
automatically.
3. User has several pre-defined documents that they must scan. All field
values are generated automatically or saved with the configuration
file. User loads the scanner and double-clicks the appropriate
configuration to scan and save that file automatically.
4. SimpleIndex is integrated with an existing application. A “Scan
Current Record” button is implemented that launches SimpleIndex
and passes the index values for the current document through the
command line. The user loads the scanner and clicks this button;
images are scanned and saved automatically.
SimpleIndex Documentation
- 22 -
4 Installing SimpleIndex
4.1 Imaging Suite Applications
The SimpleIndex Imaging Suite installs six applications that work together
to form a complete solution for a wide variety of scanning environments.
SimpleIndex - main scanning and indexing application
SimpleView - search, view, edit and annotate images
SimpleCoversheet - barcode coversheet printing application
SimpleSend - document distribution via e-mail and FTP
SimpleSearch - launch SimpleIndex in search mode (shortcut only)
SimpleExport - export to third-party document management systems
In version 7.5, free versions of all applications except SimpleIndex are
available. The paid version is only required to access advanced features.
The complete list is found in the manual for each application.
4.2 Optional Applications
SimpleIndex is designed to use commonly installed applications to access
specific functions or view certain document types.
4.2.1 PDF Viewers
To view PDF files in SimpleIndex, a PDF viewer must be installed that is
able to view PDF documents within the Internet Explorer browser. These
include the most common PDF viewers like Adobe Acrobat Reader and
FoxIt. If you are unable to view PDF files, please reinstall your PDF reader.
If you are able to view PDF files in Internet Explorer, but cannot view them
in SimpleIndex, please contact support.
4.2.2 PDF Editors
If Acrobat Standard or Pro are installed, the PDF viewer interface will let
you access all the features of these applications, including PDF editing,
annotations, digital signatures, etc.. Other PDF editors may also be used
as well, as long as they have the ability to work as an Internet Explorer
plug-in.
4.2.3 Office Applications
Microsoft Office is required to view MS Office documents in SimpleIndex.

SimpleIndex Documentation
- 23 -
To enable Office to PDF conversion features, you may either install MS
Office or the freely available OpenOffice.
4.3 Upgrading from Previous Versions
If upgrading from version 6.1 or previous, you must first uninstall the
'Imaging for Windows OCX Controls' from Add/Remove Programs in your
Control Panel before upgrading.
Users with version 5.1 or previous must uninstall the existing version before
upgrading.
Major upgrades (like version 6.x to 7.x) will require re-activation of your
SimpleIndex license. Please contact your SimpleIndex dealer to verify the
status of your maintenance and obtain a new serial number before
upgrading.
4.4 Uninstall Notes
When uninstalling SimpleIndex, please note that the FineReader Engine
and FineReader Language Pack are listed separately in Add/Remove
Programs and must be uninstalled separately.
Service components such as the web service are configured manually and
so must be removed manually using the Service Manager application.
4.5 Running the SimpleIndex Installer Wizard
Launch the setup wizard by double-clicking the downloaded file.
You must have administrator privileges on the computer to install
SimpleIndex, as well as the first time you run the application. After the initial
configuration is complete, SimpleIndex will run under restricted user
accounts.
4.5.1 Setup Prerequisites
If required components are not detected, they will be downloaded and
installed. These are commonly installed automatically by Windows Update
and other applications so they are not included in the download.
An internet connection is required. If an internet connection is not available,
you may download these components from Microsoft and install them
before running the SimpleIndex setup.
• Microsoft .NET 3.5 SP1

SimpleIndex Documentation
- 24 -
• Microsoft Visual C++ 2010 SP1 Redistributable (x86)
4.5.2 Setup Wizard Start
Click next.
4.5.3 Destination Folder
Only change this option if you know what you are doing.
4.5.4 Setup Type
A full install is recommended. The optional components have free versions,
share most components, and only add a few megabytes to the install.
Using the custom setup it is possible to install any combination of the
Imaging Suite applications. The Imaging Components option may be
deselected if SimpleIndex is not being installed.
After the setup type selection is complete, the selected components are
installed.
4.5.5 Setup Complete
Leave the box checked to launch SimpleIndex and complete the initial
configuration.
4.6 Running SimpleIndex for the first time
The first time you run SimpleIndex, the Global Settings Wizard is displayed.
From this wizard you can download configurations from a website, set
default configuration folders and security options.
Administrator privileges are required to run the Global Settings Wizard
since it configures shared settings for all users on the computer.
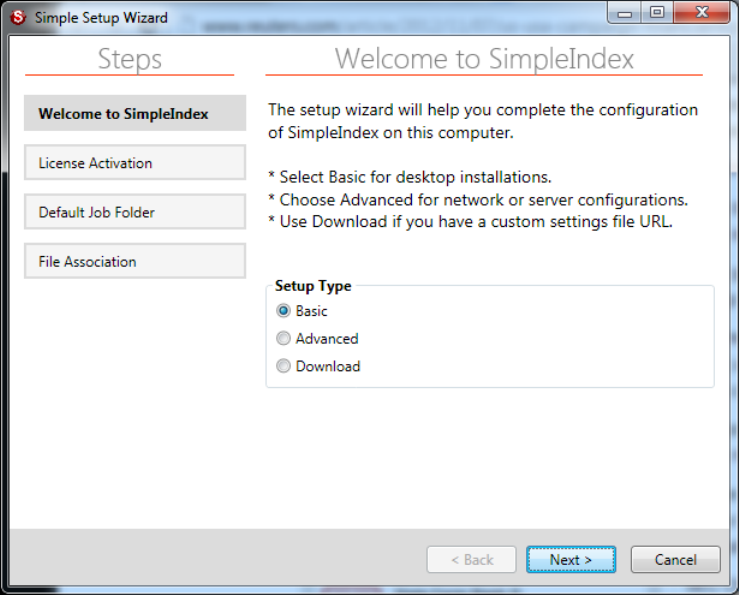
4.6.1 Setup Type Selection
SimpleIndex Documentation
- 25 -
The Basic option is sufficient for most users.
Use Advanced if you need one of the following:
1. Server processing options
2. Password-protect job settings
3. Redaction options
4. Prevent users from saving/emailing files
The Download option is available to automatically download and configure
job settings and supporting files. This download must be configured by an
administrator.
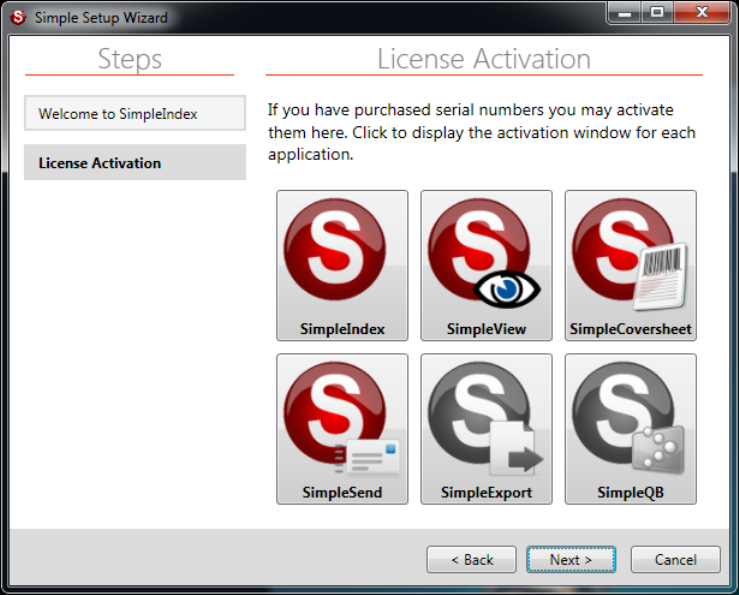
4.6.2 License Activation
SimpleIndex Documentation
- 26 -
The License Activation screen is always displayed after the Setup Type
selection. This screen has a button for each application in the SimpleIndex
document management suite. The button will be gray when the application
is not activated or installed. The buttons will show in color for each
application that is currently activated.
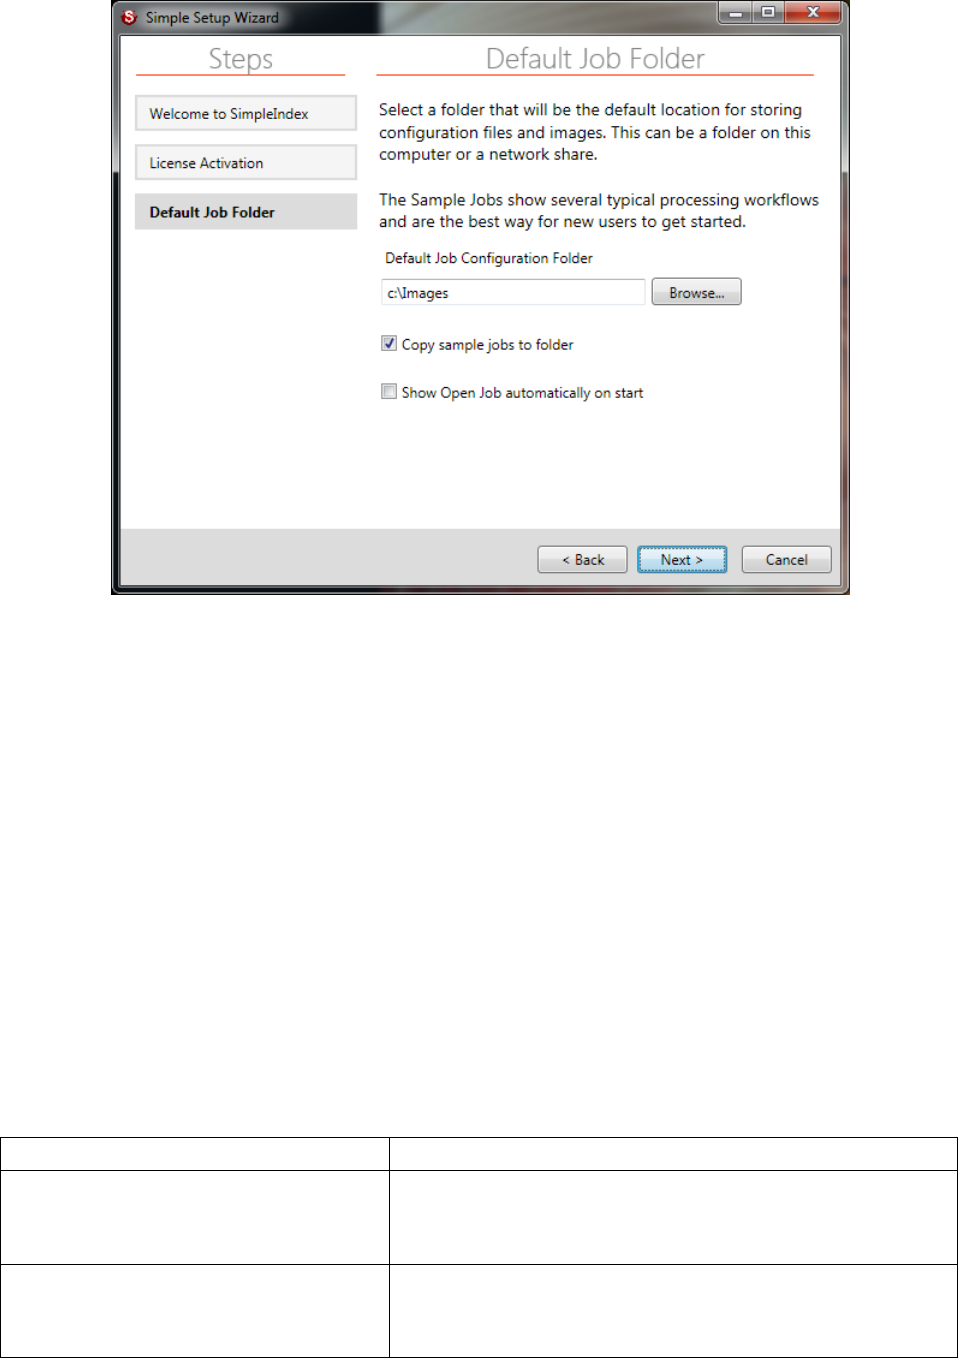
4.6.3 Default Job Folder
This screen is show in the Basic and Advanced wizards.
SimpleIndex Documentation
- 27 -
4.6.3.1 Default Job Configuration Folder
This folder is shown automatically any time you open or save a
configuration. It is recommended you put all of your job configuration files,
lists, and other files required by your jobs in this folder or in subfolders of
this folder.
4.6.3.2 Copy sample jobs to Config folder
Selecting this option will copy several sample job files, complete with
sample images, list files and databases, to your default Config folder under
a folder called Samples. These jobs demonstrate many of the core features
of SimpleIndex.
Many of the samples are numbered to indicate that they should be run in a
specific order, since the processing done in Step 1 provides the documents
that are searched in Step 2.
Sample Job
Description
Accounting
1 - Parse Accounting Reports.sic
2 - Search Accounting Reports.sic
1) Reads PDF accounting reports and organizes them
automatically using the report title and date extracted from
the PDF text. 2) Searches documents processed in step 1.
Document Classification
Classify Documents.sic
Classify Documents - Barcodes.sic
Search and View Documents.sic
These configurations form the base framework for performing
document classification tasks. The DocumentList.mdb is
populated with the list of possible document types, as well as
barcodes and keywords that identify each document. Use

SimpleIndex Documentation
- 28 -
these jobs as a starting point for any classification task.
Education
1 - Education.sic
2 - Education (Search).sic
Demonstrates Optical Mark Recognition (checkbox)
technology using a simple test form as an example.
Healthcare
1 - Process Patient Records.sic
2 - Search Patient Records.sic
Uses barcode index separator sheets designed with
SimpleCoversheet to identify patient records in a typical
patient chart scanning scenario.
Invoice Processing
A – Read Invoices with Zone OCR.sic
Uses Zone OCR to locate index data and pattern matching to
remove extra data from the zone, leaving only the desired
index value.
Invoice Processing
B1 – Read Invoices with Barcodes.sic
B2 – Search Invoices from Barcode.sic
B1) Uses barcode recognition to capture 2 barcodes and
pattern matching to match the values to the appropriate index
fields. Runs in 1-click processing mode. Exports index data to
Barcode Invoices.mdb. B2) Search and view documents
exported to Barcode Invoices.mdb.
Invoice Processing
C1 – Read Invoices from PDF.sic
C2 - Search Invoices from PDF.sic
(Requires Adobe Acrobat)
C1) Uses text from PDF documents and automatically
indexes files with pattern matching. Exports index data to
PDF Invoices.mdb. C2) Searches documents from C1.
Invoice Processing
D1 – Read Invoices with Full-Page
OCR.sic
D2 – Update Invoices from Full-Page
OCR.sic
D3 – Search Invoices from Full-Page
OCR.sic
This sample demonstrates how OCR data can be extracted
from full page OCR instead zones, as well as how to validate
documents using Update mode. D1) Scans and reads invoice
data into a database. D2) Lets you search and view only the
documents with missing data so you can make corrections
without looking at every page. D3) Is used to search and view
the documents.
Office Documents
1 - Read My Documents.sic
2 - Search My Documents.sic
1) Uses text from MS Office documents and automatically
indexes files with pattern matching. Exports index data to
Document Sorting.mdb 2) Search and view documents
exported to Document Sorting.mdb in step 1.
Office Documents
Convert Office to PDF.sic
(Requires MS Office or OpenOffice)
This job will convert all images, MS Office documents, HTML,
and text files to PDF files automatically. They can then be
sorted, renamed and exported in a standard format.
Real Estate
1 - Process Rental Documents.sic
2 - Search Rental Records.sic
1) Uses barcode separator sheets to indicate the start of a
new document, then performs zone OCR on the first page of
each document to extract the relevant data like name,
address, and date. 2) Search and view the documents.
4.6.3.3 Show Open Config when SimpleIndex starts
Select this option to display the Open dialog automatically when you run
SimpleIndex. This lets you quickly select a job file to run, saving you the
extra step of having to click the Open button.
4.6.4 FineReader OCR Engine
The FineReader OCR Engine is required to perform character recognition
functions. It is not required if you only plan to use scanning, manual
indexing, and/or barcode recognition features only. It is downloaded and
installed separately here to make the download smaller and to streamline
the process for non-OCR users.
This page is displayed if you select Advanced setup type, or in the Basic
wizard if you have not previously installed FineReader.

SimpleIndex Documentation
- 29 -
4.6.4.1 FineReader OCR Engine
Click the Download button under this option to download and install the
core FineReader OCR components, as well as the most common western
European language dictionaries (English, Spanish, French, Italian,
German, and Dutch).
4.6.4.2 Language Pack
Install the language pack only if you require OCR in languages other than
the ones listed above. The FineReader Engine must be installed first.
4.6.4.3 Silent Install
Uncheck this option if you experience any issues with the automatic
download and installation process. This will allow you to install the
applications interactively.
4.6.5 File Association
This screen is the final screen shown in the Basic and Advanced wizards.
Use it to change the default viewer for TIFF or PDF files to SimpleView,
add SimpleView to the right-click menu in Windows Explorer, or add
SimpleIndex job files to the Explorer right-click menu.

SimpleIndex Documentation
- 30 -
4.6.5.1 Open TIFF files with SimpleView
Use this to change the default file association for TIFF images to
SimpleView. Double-clicking a TIFF file will open that file in SimpleView
instead of any other program, such as Windows Picture & Fax Viewer.
4.6.5.2 Open PDF files with SimpleView
Use this to change the default file association for PDF images to
SimpleView. Double-clicking a PDF file will open that file in SimpleView
instead of any other program, such as Adobe Acrobat Reader.
4.6.5.3 Add 'Browse with SimpleView' to Explorer right-click menu
Check this box to integrate SimpleView with the Windows Explorer right-
click menu for folders. Right-clicking on any folder will display a new
"Browse with SimpleView" option in the context menu. Selecting this option
will open a new instance of SimpleView with the selected folder displayed.
4.6.5.4 Add SimpleIndex jobs to Explorer right-click menu
You can add any SimpleIndex job file to the Explorer right-click context
menu. Right-clicking on any folder will display a new option in the context
menu with the job file name. Clicking that option will execute the job file
using the selected folder as the Input folder.
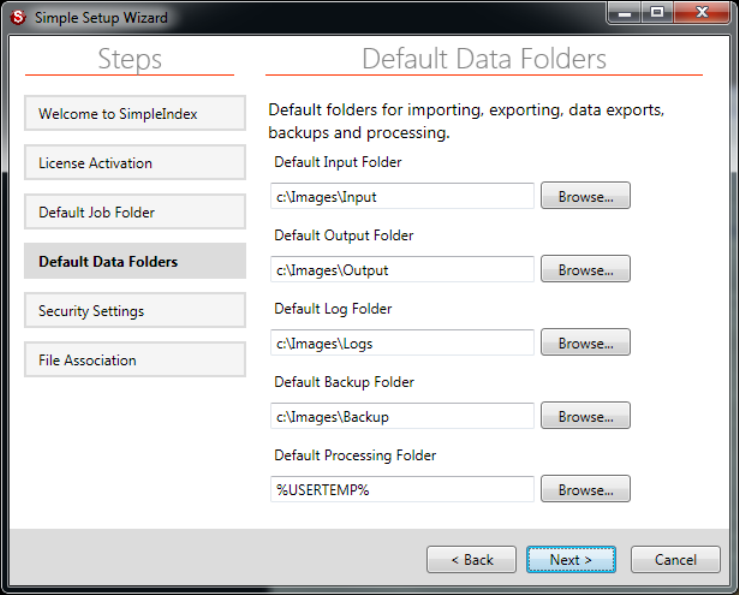
SimpleIndex Documentation
- 31 -
This lets you perform ad-hoc processing on any folder without having to
configure the job options. For example you can create a job called "Convert
All Files to PDF" that simply converts all the files in a folder to PDF,
preserving the existing filenames. Add this job to the right-click menu and
you can convert the files in any folder to PDF with a simple right-click.
4.6.6 Default Data Folders
This screen is only shown when you select the Advanced setup type.
The default folder settings are used when creating new SimpleIndex
configurations. They allow you to create job files that work on computers
with different folder structures and to move configurations and image files
without having to update multiple job files.
In any of the settings that use a file path you may use special keywords like
%DEFAULTINPUT% in place of the actual path.
The following pre-defined folders are set here:
• Config – folder for storing configuration files %DEFAULTCONFIG%
• Input – source for processing files %DEFAULTINPUT%
• Output – destination for processed images %DEFAULTOUTPUT%
• Log – destination for index and batch logs %DEFAULTLOG%
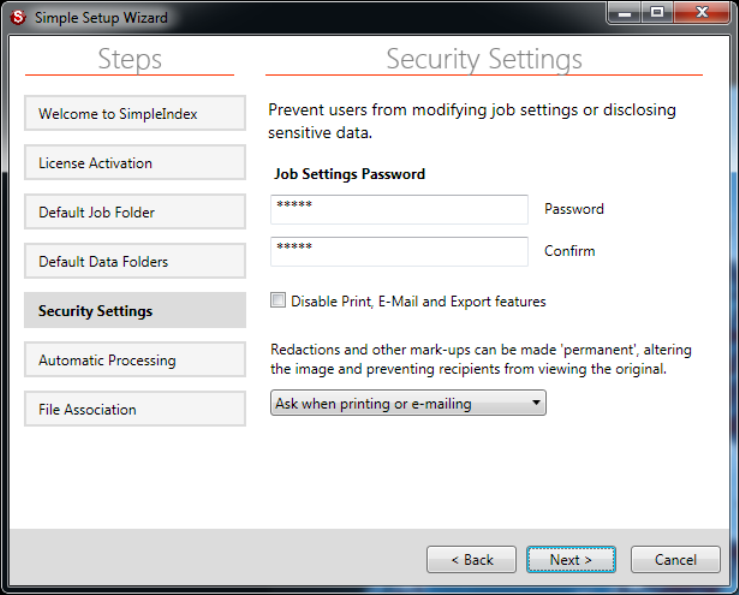
SimpleIndex Documentation
- 32 -
• Backup – destination for files with invalid formats, aborted batches
and backups of input files %DEFAULTBACKUP%
• Temp –folder for files currently being processed. The default is
c:\Temp to allow easier administrative access to this folder and for
permissions inheritance. Server users should use %USERTEMP% to
store files under their user profile, which prevents multiple users from
accessing the same Temp folder simultaneously.
Use the path to the configuration file with %CONFIGFILEFOLDER%
4.6.7 Security Settings
Part of the Advanced settings. Prevent users from accessing job options or
disclosing private or confidential information to third parties.
4.6.7.1 Admin Password
Set this option to force the user to login with this password before
accessing the configuration settings. This prevents users from accidentally
changing configuration options.
4.6.7.2 Disable Print, E-Mail, and Export features
Check this option to disable features that allow users to reproduce
documents outside of SimpleIndex. Use this for extra security and access
control.
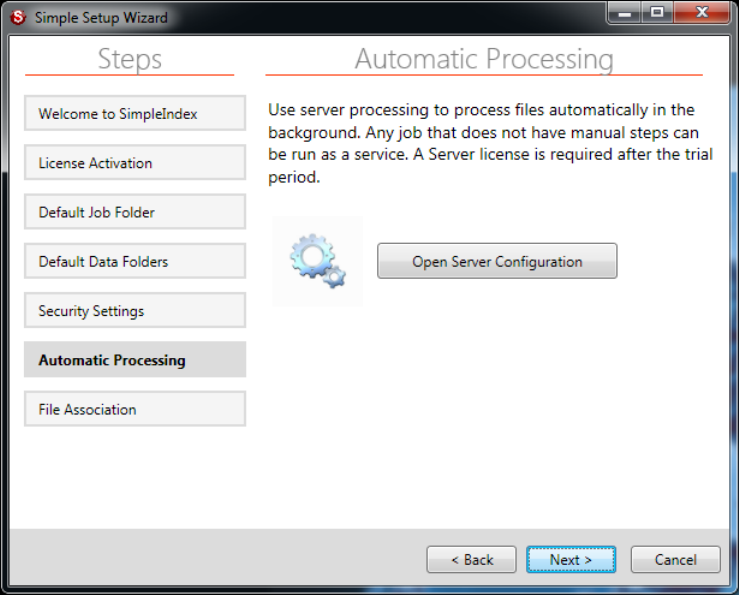
SimpleIndex Documentation
- 33 -
4.6.7.3 Annotation Privacy Settings
This option lets you select when to “burn in” annotations automatically,
which makes the annotation a permanent part of the image and prevents
users from viewing the data underneath. This is typically used for redaction
of private information. Options are to always make annotations permanent,
only when printing or emailing documents, or never.
4.6.8 Automatic Processing
This screen lets you access the Configure SimpleIndex Service options to
setup the unattended server processing settings. Click the Open Server
Configuration button to display the server settings screen.
4.6.9 Download Automatic Configuration
This option allows administrators to bundle several configuration files,
supporting documents and data files together, and download them
automatically when installing SimpleIndex.

SimpleIndex Documentation
- 34 -
The user only has to enter a URL configured by the administrator and click
the Download button. Once the download completes, the required files are
installed automatically; the user simply clicks Finish to complete the wizard.
The download is a zip archive file containing all of the files you wish to
install on the computer. The zip file can also contain a batch file called
“Config.bat”, “Config.exe”, or “Config.vbs” that is launched automatically if
present. This file can perform a wide variety of tasks:
• Automatically set all default folders and security options via the registry
• Copy list files, databases and other supporting files to default locations
• Download and install scanner drivers
• Install other supporting applications like image conversion tools
Registry Keys set by the Global Settings Wizard are below. Options set by
check boxes are “1” or “0”; other settings are the full path to a folder.
“HKLM” is short for “HKEY_LOCAL_MACHINE”
HKLM\Software\SimpleIndex\DefaultFolders\Config
HKLM\Software\SimpleIndex\DefaultFolders\Input
HKLM\Software\SimpleIndex\DefaultFolders\Output
HKLM\Software\SimpleIndex\DefaultFolders\Log
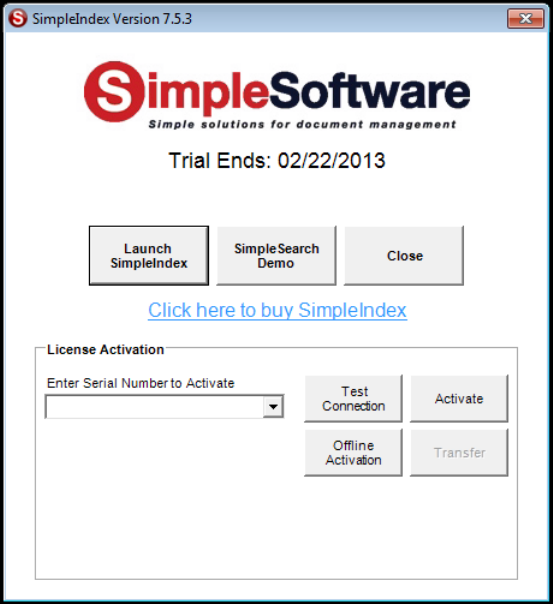
SimpleIndex Documentation
- 35 -
HKLM\Software\SimpleIndex\DefaultFolders\Backup
HKLM\Software\SimpleIndex\DefaultFolders\ShowOpen
HKLM\Software\SimpleIndex\Security\AdminPW
HKLM\Software\SimpleIndex\Security\DisableSend
HKLM\Software\SimpleIndex\Security\MakePermanent
4.7 Demo/Registration Screen
When SimpleIndex is first installed, it is automatically set to run in Demo
Mode, with the expiration date set to 30 days after you first run the
program. Demo Mode can run as SimpleIndex Full with all optional features
enabled, or it can emulate the SimpleSearch view-only. You must restart
SimpleIndex to switch between modes.
4.7.1 Starting in Demo Mode
To start SimpleIndex in demo mode, click Launch SimpleIndex. Click
SimpleSearch Demo to emulate a search-only license. Close will exit the
application.
SimpleIndex Documentation
- 36 -
4.7.2 License Activation
To register SimpleIndex, enter your serial number in the box and click
Activate. If you are connected to the Internet, and no firewall is blocking it,
SimpleIndex will connect to the activation server and register automatically.
If connectivity problems prevent communication with the activation server,
you may activate offline by clicking the Offline Activation button and
following the on-screen instructions.

SimpleIndex Documentation
- 37 -
5 Job Options
5.1 Overview – How to Setup SimpleIndex Jobs
There are many options in SimpleIndex to perform a wide variety of
imaging tasks. This overview will help you learn the steps involved in
setting up jobs so that you can go directly to those settings that apply to
your project.
SimpleIndex comes with several example job configurations that
demonstrate the configuration of most features. When configuring your first
SimpleIndex job, you should open the sample job that is most similar to
your own and use it as a starting point.
5.1.1 Processing Stages
SimpleIndex is designed to process documents in the following
stages, starting when the user clicks the Run Job button.
1. Import images from the Input folder (5.3.1.1) or scan
new images (5.3.4.1).
2. Process images, performing PDF Processing
(5.3.4.7), Auto-rotate (5.3.3.3), OCR (5.6),
Barcode Recognition (5.5), Despeckle (5.3.3.2) and Deskew
(5.3.3.1).
3. Manually review images and index values from OCR and
Barcode Recognition. Manually enter index values that are not
populated automatically.
4. Audit the batch (optional) to ensure all required documents are
present and all index information is entered correctly (5.10.2.4).
5. Export the images and index information to the Output
folder (5.3.1.2). Subfolders (5.4.3.5) and filenames (5.4.3.6)
are determined by the index options you select.
If enabled, Insert mode (5.9.3.2) will create records in your database
and populate them with the index values from this batch.
Index, batch, and audit log files (5.8) are written to the Log
folder and log files/database records are created.
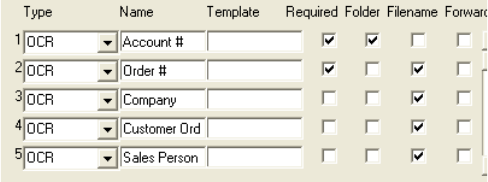
SimpleIndex Documentation
- 38 -
SimpleIndex is unique because it performs all the enabled stages
sequentially without user intervention. Other programs require a separate
command to initiate each step, slowing productivity in single-workstation
environments. When you click the Run Job (7.3.5) button, SimpleIndex
scans, processes, and exports the images automatically according to your
configuration settings.
An even greater degree of automation can be achieved if all of the index
values can be automated through Barcodes (5.5), OCR (5.6), or the
Command Line Interface (8). Using Pre-Indexed (5.4.1) batches, you can
skip step 3 and perform scanning, processing, and export without any user
intervention whatsoever. This allows you to run SimpleIndex by just double-
clicking the job file, or by launching it from another program.
When configuring SimpleIndex, keep these stages in mind and think about
what your particular job requires at each step. This will help you make
sense of the many options available to you.
5.1.2 File Naming Schemes
SimpleIndex’s file naming parameters allow you to organize scanned
documents logically using folders (5.4.3.5) and filenames (5.4.3.6), making
it easy for users to find the file they need using Windows Explorer. File
naming conventions also allow you to link images to existing database
records by assuming images are saved with a specific folder and filename,
eliminating the need for data imports.
File naming conventions are how SimpleIndex combines pages in a multi-
page document into a single file. If you are used to other document
management applications, this may be a different way of doing things.
SimpleIndex considers any set of images that have the same index values
a single document. At the end of the job, the export file is determined by
the index values, and similar images are combined into one multi-page file.
This simplifies the indexing process and makes it possible for pages in a
single document to occur non-consecutively in a batch. This also makes it
possible to append pages to previously scanned documents at a later date.
Each index field you define has
the option to be used as a folder
level or filename. When exporting,
SimpleIndex goes through the
index fields in order, creating
folders for each field where Folder
SimpleIndex Documentation
- 39 -
is checked, and creating the filename by linking the index values that have
Filename checked. For the pictured example, if the Output folder is
“c:\output” and the Field Separator is “-“ the files would be named:
C:\output\Account #\Order #-Company-Customer Order #-Sales Person.tif
5.1.3 Linking Jobs
Many scanning tasks are better performed in separate stages. For
example, a large scanning operation may need several scanners and
indexers working together. This can be accomplished by configuring the
scanners to scan images to an intermediate folder, from which the indexers
would then pull files, index them, and produce the final output. Using this
technique, a wide variety of imaging tasks can be accomplished.
The database features are also useful in linking jobs. Insert mode (5.9.3.2)
can be used by scanning workstations to create new records, and Update
mode (5.9.3.3) can be used by unattended barcode/OCR processes and by
indexers to review and correct the index information.
Finally, the PreProc and PostProc options (5.3.2) allow you to run any
program from a command line automatically at the beginning or end of
each batch. This is perfect for converting input files or performing post-
processes on the output files to transform them to any format you need.
You can also use it to initiate a database import or FTP upload. Since you
may launch any application, there is no limit to the possibilities.
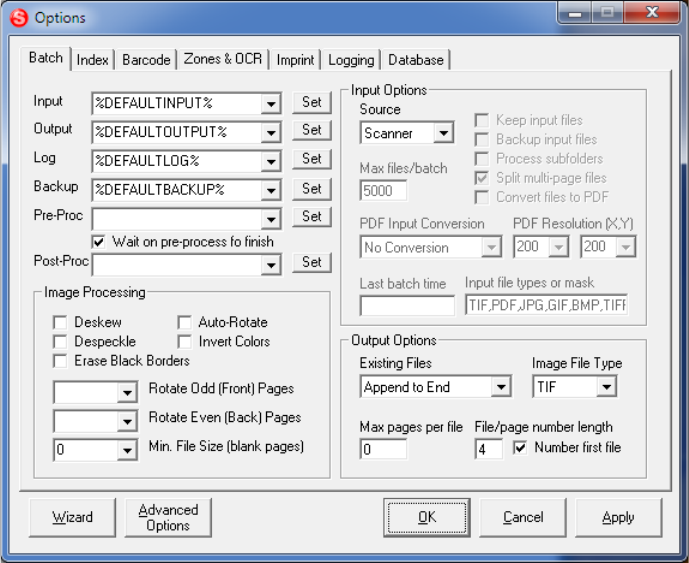
SimpleIndex Documentation
- 40 -
5.2 Job Settings Wizard
The Job Settings Wizard is displayed when you create a new job
configuration. You can also access the wizard from the File menu or the
Wizard button on the Job Options screen.
The wizard guides you through the process of creating a job configuration
file step by step. Each option has a detailed description of its function. Only
the most common options are displayed on the wizard—other options must
be configured from the Job Options screen.
All of the options in the wizard correspond to options on the Job Options
screen. Detailed descriptions in the manual are listed under the
corresponding option.
5.3 Batch Options
The Batch tab contains general batch settings such as import and export
file locations, file format conversion, and clean-up functions like Deskew,
Despeckle, automatic rotation, and blank page deletion.
SimpleIndex Documentation
- 41 -
5.3.1 Folder Settings
In the folder settings on this screen and any setting that uses a file path,
the keywords %DEFAULTINPUT%, %DEFAULTOUTPUT%,
%DEFAULTLOG%, %DEFAULTBACKUP%, and %DEFAULTCONFIG%
are substituted for the corresponding default folders entered in the Global
Settings Wizard (7.4.1.14).
5.3.1.1 Input Folder
This is the source folder when processing existing images.
5.3.1.2 Output Folder
After processing, the images are moved or copied to the Output folder and
the appropriate subfolders are created.
5.3.1.3 Log Folder
All log files (5.8) are stored in this folder. Log files contain index information
associated with processed documents, as well as batch information for
productivity tracking.
5.3.1.4 Backup Folder
The Backup folder is used to ensure that any files that cannot be processed
by SimpleIndex are preserved. There are several scenarios where this may
be necessary:
• Input files with invalid or unsupported formats
• Batches that must be canceled due to invalid settings, lost database
connection, etc.
• Creates a full backup of all processed files
When the Backup folder option is set, unsupported files and canceled
batches are copied to this folder. Subfolders are created automatically
using the Batch ID for the current batch. All processed files are copied
when the Backup Input Files option is selected.
Leave the Backup folder blank or set it to “DELETE”, and all invalid files
and canceled batches are deleted automatically.
It is important to periodically delete unneeded files from the backup folder
to prevent it from growing too large.
SimpleIndex Documentation
- 42 -
5.3.2 Pre-Process and Post-Process
PreProc runs a program from the command line at the beginning of each
batch. PostProc runs a program from the command line at the end of each
batch. You can enter any valid command line to launch another application
or enter the path to a SimpleIndex configuration file to run multiple jobs in
sequence.
The Wait on pre-process to finish option will cause SimpleIndex to wait for
the program to exit before beginning the batch. Uncheck this option to keep
the program open during processing, which is useful for displaying operator
instructions or launching support applications.
Several optional variables are available to allow you to pass batch
information to the program you are running. When these variables are
inserted in your command line, they are automatically replaced with the
values they represent when the command line is executed.
• %IDXFILE% - full path of the index file generated for this batch
• %BATCHNAME% - the unique ID for this batch, in the format YYYY-
MM-DD@HHMMSS
• %OUTPUTFOLDER% - the location of the images for this batch
• %USERID% - the name of the user logged in to SimpleIndex
• %PASSWORD% - the password entered in the SimpleIndex logon
screen
• %FIELD#% - where # is the number of a valid field - substitutes the
value of this field that was assigned to the first image in the batch
5.3.3 Image Processing
Several options are available to fix common problems with document
images to make them easier to read by humans and computers alike.
Barcode and Full licenses include an enhanced image processing engine
that is much faster and produces significantly better quality images.
5.3.3.1 Deskew
Straightens the page, correcting any skew that might have occurred during
scanning.
5.3.3.2 Despeckle
Cleans the image, removing stray pixels and marks. The enhanced
despeckle included with the Full version will also remove shaded
backgrounds from images.
SimpleIndex Documentation
- 43 -
5.3.3.3 Erase Black Borders
Removes black borders around the edge of the page that some scanners
produce. Only works with black and white TIFF images.
5.3.3.4 Auto-Rotate
Checking this option will cause SimpleIndex to attempt to detect the proper
page orientation and rotate the image automatically to this position.
This option only works with black and white TIFF images.
Automatic rotation uses a “best guess” algorithm to determine the page
layout. This works very well with text documents, but accuracy decreases
the more tables, handwriting, and pictures you have on the page. It should
not be expected to work 100% of the time.
5.3.3.5 Invert Colors
Reverse the colors in the image automatically. This will switch Black with
White on B&W images, or create a “negative” image for color.
5.3.3.6 Rotate Odd (Front) Pages
Rotates odd pages the selected number of degrees clockwise. Separate
values for even and odd pages allow front and back pages to be rotated
independently.
5.3.3.7 Rotate Even (Back) Pages
Rotates even pages the selected number of degrees clockwise. Separate
values for even and odd pages allow front and back pages to be rotated
independently.
5.3.3.8 Minimum File Size
Set this option to automatically delete blank pages by removing any files
smaller than the value specified here (in Bytes). A good setting for this
value (with 200dpi, B&W images) is 2000, but this can be adjusted to meet
the specifics of your scanning environment. This option is good for
scanning mixed batches of single and double-sided pages and removing
the blanks automatically. A value for this field is required for the blank page
Autonumber (5.4.6.1) and OCR (5.6.4.1) features to work.
5.3.4 Input Options
5.3.4.1 Source
Select whether you want to input files from the Scanner or use existing
images in the Input folder. To scan files with SimpleIndex, select Scanner
SimpleIndex Documentation
- 44 -
as your source; scanning will take place automatically when the batch job is
run.
5.3.4.2 Max files/batch
This option determines the maximum number of image files that will be
used to determine a batch. In Update (5.9.3.3) and Retrieval modes
(5.9.3.4), this value should be set to prevent users from retrieving too many
records at once, which can impact performance.
This feature is also useful when using SimpleIndex to index many files from
a large Input folder. Processing more than 1,000 pages in a single batch is
not recommended. Set to 0 (default) for unlimited.
5.3.4.3 Keep input files
Select this option to keep all of the original files in the input folder instead of
removing them as they are processed. This option is useful when testing
configuration settings, as well as for re-organizing documents while leaving
the originals intact. This option is also necessary to prevent errors when the
Input folder is read-only.
When using the Last batch time (5.3.4.10) setting, it is possible to process
only new files added to the Input folder since the last batch. Without this
option selected, all files in the folder are processed in every batch.
5.3.4.4 Backup input files
When checked, all files are automatically copied to the Backup folder
(5.3.4.4) before they are processed. Subfolders are created automatically
in the Backup folder using the Batch ID (the current date/time formatted as
YYYY-MM-DD@HHMMSS).
5.3.4.5 Process subfolders
All subfolders of the Input folder are processed automatically when this
option is checked. Each folder is processed in its own batch until all folders
have been processed. Not available when scanning.
5.3.4.6 Split multi-page input files
When processing multi-page input files, each file is treated as a single
document with a single index value by default. Checking this option causes
SimpleIndex to split multi-page files into single images that must be
indexed individually.

SimpleIndex Documentation
- 45 -
5.3.4.7 Convert files to PDF
Converts all MS Office, HTML, XML, text, and image files in the Input folder
to PDF before processing. Files are converted and saved in the Input folder
before the import step. If Keep Input Files is unchecked, the original files
are deleted following conversion. To avoid having both copies of a file
imported after conversion, use the Input File Types option.
This option requires MS Office 2003 or above or OpenOffice 3 or above to
work. OpenOffice is available for free at OpenOffice.org.
5.3.4.8 PDF Conversion
In order to perform some operations on PDF files, they must first be
converted to TIFF images. SimpleIndex will automatically convert PDF to
TIFF for OMR and barcode recognition on-the-fly. However, for image-only
PDFs, it is much faster to have the embedded images “extracted” from the
PDF. The TIFF images can be converted back to PDF without loss of
quality or data by setting the Image File Type option to PDF.
With all PDF conversion options, the PDF X and Y Resolution settings are
used to determine the output resolution of the TIFF image. The Split multi-
page input files option will determine whether imported PDF or TIFF files
are single or multi-page.
5.3.4.8.1 No Conversion
PDF Files are left as-is. If Split multi-page input files is selected then PDFs
are split into single page PDFs. OCR and barcode functions will
automatically convert the PDF to TIFF on-the-fly for recognition using the
slower Convert to B&W TIFF method, keeping the original.
5.3.4.8.2 Save Embedded Images
This is the preferred method. Image-only PDF files will have embedded
images saved to TIFF image files. Color is automatically detected. Text-
based PDFs are converted to TIFF using the Convert to B&W TIFF
method. Detection of text versus image PDFs may not be exact.
The PDF X and Y resolution must be set to match the original scan
resolution of the embedded images to get the correct TIFF image
dimensions.
5.3.4.8.3 Convert to B&W TIFF
PDF files are converted to black and white TIFF images. Text-based PDFs
will have text rendered as images, preserving the document image.
SimpleIndex Documentation
- 46 -
5.3.4.8.4 Convert to Color TIFF
Same as above only renders image as a color TIFF with LZW compression.
Not recommended for OCR and barcode recognition.
5.3.4.9 PDF Resolution (X,Y)
When converting PDF to TIFF, these settings indicate the output resolution
of the TIFF image. The first indicates the X or horizontal DPI (dots per inch)
setting. The second indicates the Y or vertical DPI.
When saving embedded images from a PDF file, a default resolution of
200dpi is assumed for images found in the PDF files. Use these settings to
override the X and Y resolution settings when extracting PDF images. If
these settings do not match the originals, output images will show incorrect
page dimensions.
5.3.4.10 Last batch time
Use this setting to process files that have been created or modified since
the date and time entered. This is useful when you want to keep the
original files in the Input folder and process new files as they are added or
changed. The Keep input files (5.3.4.3) option must also be selected to
enable this.
On the Index tab, you must select Reset seed value after batch (5.4.6.3) in
order to update the Last batch time after each batch and save it to your
configuration file. You will be prompted to enable this setting automatically
if it is not set. If the setting is not saved after each batch, the same date
and time is used for every batch.
5.3.4.11 Input file types or mask
This field lets you filter the input folder for specific file name patterns or
types. This can be a simple list of file extensions to process all files of each
types, or it can be a file mask such as a*.tif or *MISSING*.
TIF, JPG, GIF, and BMP images may be processed as images. PDF, DOC,
XLS, PPT, and other files may be processed and viewed in SimpleIndex if
the appropriate software is installed on the computer. Movie and Audio files
are played automatically in the SimpleIndex media player. Any OLE-
enabled application may be processed with SimpleIndex as long as its
viewer is installed. Non-OLE file types may be opened automatically in their
default viewer.
To automatically process all files, enter * in this field.
SimpleIndex Documentation
- 47 -
To set the file types, simply list all the extensions for the types of files you
want to process. Enter a Pipe “|” character, and all the extensions following
it will open automatically in their default viewer. For example:
TIF,PDF,DOC,XLS|ZIP,MP3,AVI
This setting will process TIF, PDF, Word, and Excel files in SimpleIndex
and automatically open Zip, MP3, and AVI files in their default application
when they are viewed in SimpleIndex.
Standard file masks may also be used. Separate multiple masks with a
semicolon. TXT files are ignored by default, unless you add *.txt to the list
of masks.
e.g.: a*.tif;b??c*.pdf;*MISSING*;*.txt
5.3.5 Output Options
5.3.5.1 Existing Files
When a file exists in the output folder, there are several options for how this
is handled by SimpleIndex. The Append options apply only to multi-page
TIFF and PDF files. All other file types are named according to the settings
described under Numbered 1-Page Files, unless Replace Existing Files is
selected, in which case existing files are overwritten.
5.3.5.1.1 Numbered 1-Page Files
Using this option, only single-page files are created, and the page number
is added to the filename for any subsequent pages with the same output
filename. Use the File/page number length (5.3.5.4), Number first file
(5.3.5.5), and Field Separator (5.4.5.6) settings to format the file numbering
scheme.
Here are 2 sample settings for the page numbering and the resulting
filenames (assuming TIF images):
File/page number length: 4
Number first file: On
Field separator: -
Page 1: Filename-0001.tif
Page 2: Filename-0002.tif
Page 3: Filename-0003.tif
SimpleIndex Documentation
- 48 -
File/page number length: 6
Number first file: Off
Field separator: =
Page 1: Filename.tif
Page 2: Filename=000002.tif
Page 3: Filename=000003.tif
Typically, you would turn Number first file off when you expect most files to
have only 1 page and only need to account for the occasional duplicate.
5.3.5.1.2 Append to End
Use this setting to add new pages to the end of existing files. These are
added in the order they appear in the batch. This is the default setting for
creating multi-page files from individual pages in a batch.
5.3.5.1.3 Append to Start
Use this setting to add pages to the beginning of existing file. If a batch has
multiple files with the same output filename, these pages will appear in the
same order they appear in the batch.
5.3.5.1.4 Replace Existing Files
This setting will replace any existing files with the file from the current
batch. The user is not prompted—the file is overwritten automatically. If
multiple TIFF or PDF files from a batch have the same filename, they are
combined into a multi-page file before overwriting the existing file.
5.3.5.2 Image File Type
Select the file type you would like images to be saved in, either TIFF
(default), PDF, PDF/A, or JPEG. JPEG does not support multi-page files.
Non-image files are saved in their original format and are not affected by
this setting.
5.3.5.3 Max pages per file
This option allows you to set a fixed number of pages for each file. This can
be used to automatically split files that have a fixed number of pages or to
break up very large files into several smaller ones.
When used with the Forward (5.4.3.7) option, this setting limits the number
of files that index values are carried forward for. For example, a setting of 2
would allow you to read index information from the front page of a

SimpleIndex Documentation
- 49 -
document, have it automatically apply to the back page, but not to the
following page.
This option may also be used with Autonumber (5.4.6) fields to
automatically increment the number every X pages.
5.3.5.4 File/page number length
Use this setting to change the number of leading zeros in the file
numbering scheme.
This setting is used with the Numbered 1-Page Files (5.3.5.1.1) option and
with any file that is not a TIFF or PDF.
5.3.5.5 Number first file
When scanning single-page documents, the -0001 after each file is usually
unwanted. Uncheck this option to disable the number on this first page.
This setting is used with the Numbered 1-Page Files (5.3.5.1.1) option and
with any file that is not a TIFF or PDF.
5.4 Index Options
The Index tab contains settings for labeling documents with index fields
and using those values to create standardized folder and file naming
schemes.
SimpleIndex Documentation
- 50 -
The order of the index fields is used to determine how subfolders and
filenames are generated. To change the position of an index field, double-
click the field number on the left.
5.4.1 Pre-Index Batch
When this option is checked, the user enters the Index fields before
scanning, and these values are applied to all scanned images. This
improves throughput for Single-Index batches and allows for completely
automatic processing from the command line (8).
5.4.2 Number of Fields
By default, SimpleIndex has 5 fields that can be configured as index fields
or marked as “Unused” to leave disabled. If your job requires more than 5
index fields, you must configure the following settings.
5.4.2.1 Max Fields
This is the total number of fields. Change this if you have more than 5
fields.
5.4.2.2 Display Fields
This is the number of fields to display at one time. The scroll bar must be
used to view fields above this number. Unless the screen resolution is very
high, a maximum of 7-8 fields can be displayed before some options
become obscured.
When you have many index fields, it may be useful to group them logically,
so that related fields are displayed on the screen at the same time. Field
grouping is accomplished by setting Display Fields to the number of fields
in the largest group and using Unused field types for extra fields on each
page.
5.4.2.3 Default Field
The field selected in this option is highlighted whenever a new image is
displayed. If every field does not change with every image, selecting the
field that changes most often will improve the speed of the indexing
process.
You can also select None for the default field to prevent the cursor focus
from returning to the index field after loading a new file. This makes it
easier to quickly browse documents using the Grid view and mouse wheel.
SimpleIndex Documentation
- 51 -
5.4.3 Index Field Parameters
There are many things you can do to configure your index fields for
automatic processing or to ensure the proper values have been entered.
The following fields define each index value.
5.4.3.1 Type
The type defines the basic data type for data entry validation and automatic
indexing. Each data type has its own unique set of Template (5.4.3.3)
options that control formatting and other parameters. The following types
are possible:
5.4.3.1.1 Autofill
All fields of this type are automatically populated with values from your
database once the Key Field (5.4.4) has been entered. The Template
(5.4.3.3.4) setting for this field must be set to the name of the
corresponding field in your database.
5.4.3.1.2 Autonumber
Allows you to have a field with a numeric value that increments
automatically under certain conditions. The Template (5.4.3.3.5) value for
this field determines the seed number, which can be any combination of
letters and numbers, as long as the last digit is numeric. Based on the
value of the Autonumber Increment (5.4.6.1) setting, the Autonumber can
be set to increment every page, every blank page, every barcode, or at the
end of each batch.
5.4.3.1.3 Barcode
If a barcode is recognized, the value is inserted into this field. Use the
Template (5.4.3.3.1) setting to force the field to accept only barcodes that
match the specified pattern. This also allows you to match multiple
barcodes to their appropriate fields, and ignore barcodes that are not
meant to be used as indexes. Use the Barcode tab (5.5) to configure other
barcode settings.
5.4.3.1.4 Date
Field is formatted as a date in YYYY-MM-DD format by default. This allows
for use of dates in folders and filenames and for proper sorting. For more
information see the Template (5.4.3.3.2) and Date Formatting (5.10.1.8)
options. Valid dates from Fixed field templates (5.4.3.3.6) can also be used.
5.4.3.1.5 Filename
Field is automatically populated with the original filename of the image from
the Input folder. Does not include the input file path.

SimpleIndex Documentation
- 52 -
5.4.3.1.6 Fixed
Calculated value from the Template (5.4.3.3.6) setting is used. There are
many variables you can use to automatically insert, such as file property
settings, all or part of the file and folder names, combinations of other field
values, and system settings like the user ID, computer name, etc..
With a Fixed field the user cannot change the calculated value. Use a Text,
Numbers or Date field to allow the user to modify a calculated value.
5.4.3.1.7 List
Possible index values are displayed in a
drop-down list, allowing the user to select
one or automatically fill in the field with
matching records as they type. The list
may be populated using either a text file
or database.
To populate the list with a text file, create
a file in Notepad that has a single entry
on each line and enter the path to this text file in the List File/Field (5.6.3)
setting. If no text file is specified and you have a database configured, the
list for this field is populated automatically with the values from the
corresponding database field.
5.4.3.1.8 Numbers
Only numeric values are accepted (5.4.3.3.2). Valid numbers from Fixed
field templates (5.4.3.3.6) can also be used.
5.4.3.1.9 OCR
If an OCR value is recognized, it is inserted into this field. Use the
Template (5.4.3.3.1) setting with this field type to search the OCR region
for the first string that matches the pattern. Use the List File/Field (5.6.3)
option to match OCR text against a list of possible values. Use the Zones &
OCR tab (5.6) to configure other OCR settings.
5.4.3.1.10 OMR
Use this type for check-box fields. Field is considered “checked” if the
number of black pixels in the region is greater than the number entered in
the Template (5.4.3.3) setting.
OMR fields can also be used to extract a region from an image and save it
to a separate file (5.10.2.2). Enter a negative number in the Template
SimpleIndex Documentation
- 53 -
setting to save the region to a separate file if the number of black pixels is
greater than the absolute value of this number.
5.4.3.1.11 Template
Forces the user to enter an index value that matches the pattern specified
in the Template setting for this field. See (5.4.3.3.1) for the formatting
instructions.
5.4.3.1.12 Text
User may enter any text into the index field. Template setting is used as a
default value (5.4.3.3.2). Fixed field templates (5.4.3.3.6) can also be used
to use a calculated value for the default.
5.4.3.1.13 Unused
This field will not appear in the index list. Useful for tabular grouping of
index fields using the Display fields (5.4.2.2) setting.
5.4.3.2 Name
The value entered under Name is used for the field label in the index bar.
This indicates to the user which value must be entered in that field.
5.4.3.3 Template
Depending on the field type, the Template setting can refer to several
different things. Generally speaking, the Template setting is used to provide
whatever additional data that is needed to define a field of that type.
Use the Set button to set the template for each field. Detailed instructions
for that field type are displayed.
5.4.3.3.1 Barcode, OCR and Template fields
For Barcode (5.4.3.1.3), OCR (5.4.3.1.7), and Template (5.4.3.1.11) field
types, the Template setting represents a series of specific letter and
number combinations that the field value must match. The possible values
for the template are:
• *: any character
• #: numbers only
• A: letters only
• X: any letter or number
• ?: optional characters. When several ????’s are placed at the end of
a template, SimpleIndex will accept any letters, numbers, or the
characters ()-&%@, until a non-matching character is reached.
• Other: character must match exactly
SimpleIndex Documentation
- 54 -
• \: enter backslash before *, #, A, X, ? or \ to indicate an exact match
for this character in the template instead of the variable value
• |: use the pipe character to separate multiple search templates to
allow searching of many variations on the field format
Some example templates are:
• Invoice \#: #######: the phrase “Invoice #:” followed by a 7-digit
invoice number
• ###-##-####: social security number
• ##/##/####|#/#/####|##/#/####|#/##/####: date with 4-digit year and
1 or 2-digit month and day
• ABC**##??: Any letter, B and C only, any 2 characters, 2 numbers, 2
optional characters
In version 7, an interactive template editor was added to make it easier to
design and test more complicated templates.
Enter the template in the first box and click the Test button to see what
match results from the sample text. There is some generic sample text
provided that has examples of many common data elements like names,
SimpleIndex Documentation
- 55 -
dates and numbers. To test the template with your own documents, copy
and paste the OCR text into this window. The new sample text will be used
next time you open the Template Editor.
There are also several built-in templates available to make it easy to find
several common data elements:
• %DATE% - find a date in any valid date format, including forms
where the month is spelled out or abbreviated and 2 & 4 digit years.
The full Regular Expression for %DATE% is:
(((J(anuary|uly|une))|February|(M(arch|ay))|(A(pril|ugust))|((Sept|Nov|Dec)ember)|October)|
(jan|feb|mar|apr|may|jun|jul|aug|sep|oct|nov|dec))
[.,]{0,1}[\s]{0,1}[0-9]{1,2}[.,]{0,1}[\s]{0,1}(19|20|)\d\d|
(0[1-9]|[12][0-9]|3[01]|[1-9])(th|rd|st|nd){0,1}[\s]{0,1}(day\s){0,1}(of\s){0,1}
(((J(anuary|uly|une))|February|(M(arch|ay))|(A(pril|ugust))|((Sept|Nov|Dec)ember)|October)|
(jan|feb|mar|apr|may|jun|jul|aug|sep|oct|nov|dec))[.,]{0,2}[\s]{0,1}(19|20|)\d\d|
(0[1-9]|1[012]|[1-9])[- /.](0[1-9]|[12][0-9]|3[01]|[1-9])[- /.](19|20|)\d\d|
(0[1-9]|[12][0-9]|3[01]|[1-9])[- /.](0[1-9]|1[012]|[1-9])[- /.](19|20|)\d\d|(19|20|)\d\d
[- /.](0[1-9]|1[012]|[1-9])[- /.](0[1-9]|[12][0-9]|3[01]|[1-9])
• %DATE2% - find a date with a 2-digit year.
• %DATE4% - find a date with a 4-digit year.
• %MONEY% - find an amount of money.
• %PHONEUS% - find a US phone number in many common formats.
• %SSN% - find a US social security number in ###-##-#### format.
5.4.3.3.2 Text, Numbers and Date fields
For Text (5.4.3.1.12), Numbers (5.4.3.1.8), and Date (5.4.3.1.4) field types,
the Template represents a default value that will appear automatically as
the field value, but may be changed by the user if necessary.
For Date field types, you may also enter a Template for automatic date
formatting. Enter %MM/DD/YYYY% to format dates in Month/Day/Year
format. Use %YYYY-MM-DD% to format for proper sort order in filenames.
Any of date format masks used in Microsoft Office applications like Excel
and Access may be used. There is also a global date formatting option in
the Advanced Options screen that will reformat all date values in any field
type, including Barcode and OCR.
These field types also accept the same constant values that Fixed fields
use, such as %TODAY% for today's date. You should use these instead of
a Fixed field if you want to allow the user to edit the calculated value. See
below for the complete list.
SimpleIndex Documentation
- 56 -
For search configurations, you can enter <, >, <=, or >= in the Template for
Date or Numbers fields to enable date or number range searches. To
create a minimum and maximum search field, create 2 fields that are linked
to the same database field and enter >= for the minimum value and <= for
the maximum.
5.4.3.3.3 List fields
For List (5.4.3.1.7) field types, the path to the text file containing the list
values is entered in the List File/Field (5.6.35.6.3.1) setting. The Template
field should be left blank.
5.4.3.3.4 Autofill fields
For Autofill (5.4.3.1.1) fields, the name of the corresponding database field
for use in the lookup should be entered.
5.4.3.3.5 Autonumber fields
For Autonumber (5.4.3.1.1) fields, you may enter any letter and number
combination, as long as the last digit is numeric. The last number or
numbers are used as the numeric value to increment, with the other
characters remaining constant. It is recommended that you prefix the
numeric value with enough 0’s to ensure all numbers are the same length
and preserve their sort order.
5.4.3.3.6 Fixed fields
For Fixed (5.4.3.1.6) fields, the template represents a pre-set value that
cannot be changed. There are several variables that may also be used to
substitute a calculated value based on system settings, input file path, file
properties, and other field values.
Input File Path
SimpleIndex has powerful file path parsing capabilities to get index data
from existing folder and file names. This is very useful when migrating
network files to a content management system or database. The following
settings retrieve values from the original file path.
Examples will be given that assume an input file path of
"C:\Input\a\b\c\d_e_f.pdf". The Process Subfolders (5.3.4.5) option is
enabled and the Input folder (5.3.1.1) is set to "C:\Input".
• %FOLDER#% - returns the subfolder that is # levels below the Input
folder. Using the example, %FOLDER1% will return "a", %FOLDER2"
will return "b", and %FOLDER3% would return "c".
SimpleIndex Documentation
- 57 -
• %FILE#% - splits the filename using the Field Separator setting
(5.4.5.6) and returns section #. Using the example, %FILE1% would
return "d", %FILE2% would be "e", and %FILE3% would be "f".
• %INFILE% - the original filename for the current file without the file
path or extension. In the example, this would be "d_e_f".
• %INFOLDER% - the name of the current Input folder. When
processing subfolders, this returns the root folder for the job. In the
example, this would be "Input".
• %INSUBFOLDER% - the name of the current subfolder being
processed. In the example, this would return "c".
Other Index Fields
• %FIELD#% - the value of the specified field #
• %FIELD#[Start,Length]% - part of the specified field from position
'Start' for the next 'Length' characters
• %FIELD#|Value% - the value of the specified 'field #' or 'Value' if the
field is blank. Can be used with [Start,Length].
System Settings
• %USERID% - the SimpleIndex User ID
• %CONFIGNAME% - the name of the current configuration file (*.sic)
without the file path or extension
• %CONFIGPATH% - the full path to the current configuration file
• %WINUSER% - the name of the user currently logged on to windows
• %COMPUTER% - the network computer name
• %BATCHID% - the SimpleIndex Batch ID (in the format YYYY-MM-
DD@HHMMSS)
• %COLORDEPTH% - the number of bits per pixel in the image (1 for
Black & White, 8 or 16 for Grayscale, and 24 or 32 for Color)
• %PAGECOUNT% - the number of pages in the current file
• %FILEHASH% - the MD5 encrypted file hash string generated for the
current file. This can be used to determine if a file's contents have
been modified. Any changes made to the file will cause this value to
change as well.
Batch Date & Time
The date and time that the batch is started is used when calculating the
following field values:
• %TODAY% - the current date (in the format YYYY-MM-DD)
• %NOW% - the current date and time (YYYY-MM-DD HH.MM.SS)
SimpleIndex Documentation
- 58 -
• %YEAR% - the current year
• %MONTH% - the current month
• %DAY% - the current day
• %HOUR% - the current hour
• %MINUTE% - the current minute
• %SECOND% - the current second
File Properties
Version 7 allows you to populate index fields automatically from the file
property tags in TIFF, JPEG, PDF, and MS Office files. These values are
the same ones that are displayed when you right-click a file and select
Properties in Windows Explorer. For more information on file properties,
see Set file properties on export (5.4.5.3). The following properties values
can be read:
All File Types
These properties are the ones used by Windows Search, SharePoint, and
other content searching applications to index documents.
• %TITLE%
• %SUBJECT%
• %AUTHOR%
• %KEYWORDS%
• %COMMENTS%
PDF Files
The Producer and Creator tags are set automatically when a PDF file is
created. These can be read along with the above list.
• %PRODUCER%
• %CREATOR%
TIFF and JPEG Files
It is possible to read and write any standard EXIF tag value, but the most
common ones have been included here. If you need to work with any tag
not listed here, please contact support.
• %ARTIST%
• %COPYRIGHT%
• %DATETIME%
• %EQUIPMAKE%
SimpleIndex Documentation
- 59 -
• %EQUIPMODEL%
• %IMAGETITLE%
• %PAGENAME%
• %SOFTWAREUSED%
• %USERCOMMENT%
• %INKNAMES%
• %HOSTCOMPUTER%
• %DOCUMENTNAME%
• %IMAGEDESCRIPTION%
Values Calculated During Export
In some applications, it may be necessary to output the export file path and
other log values in specific positions within the index file. By default, these
values are inserted automatically at the end of the file. When exporting
these values as Fixed fields, you should disable the Include File Path Field
(5.8.4.3) and Include Page Count & Batch ID (5.8.4.4) settings to avoid
duplicate fields.
• %OUTFILE% - the full or relative path to the output file (depends on
Log settings)
• %OCRFILE% - the full or relative path to the OCR text file containing
full-text data for the output file
• %PAGECOUNT% - the number of pages in the output file
• %BATCHID% - the unique ID for the current batch
• %SERVERRESPONSE% - the response code returned by the server
after an HTTP or web service upload
5.4.3.4 Required
When this option is selected, the user will not be able to finalize a batch
unless all images have been saved with a value for this field.
5.4.3.5 Folder
This option uses the index value to create subfolders in the Output folder
(5.3.1.2). If multiple folder fields are selected, nested subfolders are
created in order from top to bottom.
5.4.3.6 Filename
When this option is selected, the image files are renamed using this index
field value. If multiple fields have this option checked, the filename will
contain all the values in order, separated by the Field Separator (5.4.5.6)
character.
SimpleIndex Documentation
- 60 -
5.4.3.7 Forward
This option “carries forward” the field value to subsequent images until a
new saved value is encountered. Use this to index multi-page documents
without having to re-type the index data for each page. When unchecked,
each page must be indexed individually.
When using coversheets created with SimpleCoversheet (7.3.20) or
another barcode application, the forward option will automatically apply the
barcode values to all the pages between the coversheets.
5.4.4 Autofill Settings
The Index Autofill feature is a powerful tool for automating data entry. Most
of the time, the data that you are indexing exists in another database.
Using the Index Autofill feature, users only have to enter a single field, and
this value is used to retrieve the matching record and automatically
populate the remaining fields.
The Index Autofill feature uses the same configuration options as are
available with the Data Source (5.9.2) option on the Database tab. You
may use the Set button to browse to an Access database or ODBC data
source file. Alternatively, you may enter an ODBC data source name or
OLEDB connection string in this field. Use the drop-down arrow to select
the current data source from the Database tab. Refer to the Database
settings (5.9) for more information on configuring a Data Source.
You can use either a table or a query as the
source for your data. The field used to lookup
data should be unique for every record. If
multiple matches are found, the user is warned,
and the values from the first matching record
are used.
To configure the Index Autofill feature, you must
follow these steps:
1. Click the Set Autofill Data Source button
on the Index tab
2. Enter a valid data source in the Match
Data Source setting. If you have
configured a data source on the Database
tab, it will appear in the drop-down. Any
SimpleIndex Documentation
- 61 -
valid Access database, ODBC, or OleDB data source can be used.
3. Select the name of the lookup table or query in the Match
Table/Query setting.
4. Select the primary database field used for lookups in the Database
Key field setting. This field should uniquely identify a record in the
lookup table.
5. Select the corresponding SimpleIndex Key Field in that setting.
Values for this field are used to lookup records in the database.
6. Configure fields as type Autofill (5.4.3.1.1) and enter the
corresponding database field names in the Template (5.4.3.3) setting
for each
Other Autofill options:
• If a single field cannot uniquely identify records, you can configure a
second lookup field. Both field values must match the record to use it
for Autofill data.
• Allow manual input in Autofill fields: allows the user to manually type
in data in Autofill fields if no matching record is found.
• Automatically select first matching record: if multiple matches cannot
be avoided, check this option to automatically populate Autofill fields
with data from the first matching record without prompting the user.
The Autofill settings are also used in Match and Attach (5.9.3.5) mode to
specify the key field(s) used to determine a matching record. In this case
the Data Source and Match Table should match the settings on the
Database tab.
Following the database field name is a pipe “|” followed by the field type
(String, Numeric or Date). This is required for SimpleIndex to properly
format the lookup for numeric and date fields. If no pipe is found, the
default value of String are used.

SimpleIndex Documentation
- 62 -
5.4.5 Other Indexing Options
5.4.5.1 Display images while processing
Selecting this allows you to specify whether to show the images while
scanning, performing barcode processing, and other automated tasks.
Scanning and processing times can be significantly faster when images are
not displayed, especially with high-resolution or color images. Only images
file types can be displayed during processing.
5.4.5.2 Use Regular Expressions in templates
Check this option to enable Regular Expressions (RegEx), which allow you
to define much more complex pattern matching templates using a
standardized description language. Regular Expressions are a widely used
standard, similar to “grep” for those familiar with UNIX.
In version 7, it is possible to mix templates, having some use Regular
Expressions and others use the SimpleIndex template format. Simply
precede any template with ^^^ to indicate that template is a regular
expression. Check this box only if all templates will use RegEx.
A complete description of regular expressions is beyond the scope of this
document. However, you can search the web for the term “Regular
Expression” to find many reference sites and samples for common data
elements. Searching for the type of data you want with the term “Regular
Expression” will usually take you right to an example of what you need. You
will find there are often many ways to define the same pattern with RegEx.
There are several RegEx formats available. SimpleIndex uses the
"JavaScript" RegEx format, so keep this in mind when using third party
RegEx tools.
Here are some example searches to help you find several common fields
that are hard to capture with SimpleIndex templates but possible with
Regular Expressions.
• Email address regular expression
• Phone number regular expression
• Street address regular expression
• City state zip regular expression
• US Canada zip code regular expression
• UK zip code regular expression
SimpleIndex Documentation
- 63 -
5.4.5.3 Set file properties on export
TIFF, JPEG, PDF, and MS Office documents have various properties that
can be indexed and searched by various engines like Google Desktop,
Microsoft SharePoint, and Search Server. SimpleIndex is able to update
these property values using the data from your index fields.
The following properties can be set with any type of file:
• Title
• Author
• Subject
• Keywords
• Comments
To save the values for a particular field to one of these properties, enter the
property name as it appears above in the Name setting for the
corresponding field.
Enabling this option will increase the time it takes to export batches, in
some cases significantly.
PDF files also have a Producer tag that can be set in addition to the above
properties.
There are several property tags (called EXIF tags) specific to TIFF and
JPEG images that can be set as well. These are:
• ImageDescription
• Artist
• Copyright
• DateTime
• DocumentName
• EquipMake
• EquipModel
• HostComputer
• ImageTitle
• InkNames
• PageName
• SoftwareUsed
• UserComment
SimpleIndex Documentation
- 64 -
SimpleIndex has the capability to read and write any EXIF property tag,
including non-standard and custom tags. Please contact support if there
are any EXIF tags not listed here that are required by your application.
For a complete list of EXIF tags and their expected data types, see:
http://msdn.microsoft.com/en-us/library/ms534416
5.4.5.4 Add bookmarks to PDF files
SimpleIndex has the ability to automatically add bookmarks to multi-page
PDF files based on the index field values of the pages within it. Nested,
multi-level bookmarks can be created in the same way that subfolders are
created using the Folder (5.4.3.5) option.
These settings can be used to create a PDF file with the bookmark
structure shown on the right.
When a file exists with the same name as the export file, pages are
inserted into the correct bookmark section at the end. In the above
example, if another file is scanned later with the index values “2007”,
“January”, “Profit & Loss”, it is inserted as the last page in the existing
section. This powerful feature lets you use bookmarks as the primary
method for organizing and categorizing the individual documents contained
within large files like tax returns, medical records, and HR files.
SimpleIndex Documentation
- 65 -
5.4.5.5 Show Index Grid After Processing
The index value grid view (7.2.5) is very useful for those reviewing
documents after processing. Check this box to display it automatically, so
users do not have to click the toolbar option.
5.4.5.6 Field Separator
The character or characters entered here are used to separate multiple
field values in the image filename. If field1 and field2 have the Filename
option selected, and the separator character is “_”, then the output file will
be “field1_field2.tif”.
5.4.6 Autonumber Settings
Autonumber fields (5.4.3.1.1) can be used to add a unique sequential
number to each scanned image or document. They are useful for Bates
Numbers (5.7) and Document Separators (6.3), or to just provide a unique
identifier for each file.
5.4.6.1 Increment Event
When there is an Autonumber field (5.4.3.1.1) present, this setting is used
to determine when to increment the value.
5.4.6.1.1 Every Page
The number will be incremented on every page.
5.4.6.1.2 Blank Pages
The number is incremented each time a page under the Blank Page
Threshold (0) is detected. This allows you to place blank pages between
documents and create multi-page files automatically. This does not work
with duplex scanning unless every back page has content on it.
5.4.6.1.3 Barcodes
The number is incremented each time a barcode field is recognized. Use
Templates (5.4.3.3) and Dictionaries (5.6.3) to prevent unwanted barcodes
from triggering the increment. The most reliable way to separate
documents automatically is with barcodes.
If multiple barcode fields exist, any recognized field will trigger the barcode
event.
5.4.6.1.4 End of Batch
The number is incremented at the end of each batch.
5.4.6.1.5 Every Max Pages
SimpleIndex Documentation
- 66 -
Increments the number every X pages using the Max pages per file
(5.3.5.3). This is useful for scanning documents with a fixed number of
pages.
5.4.6.1.6 First OMR Field
The first OMR field (5.4.3.1.3) is used to increment the Autonumber. This
will allow you to draw an OMR zone in the corner of the page and use a
black felt-tip pen to mark the first page of each file. This is far faster than
the traditional method of inserting document separator sheets and saves on
printing costs.
The upper-left corner is recommended since it will have the same
coordinates with any page size.
If multiple OMR fields exist, only the first one will trigger the Autonumber
event.
5.4.6.1.7 First OCR Field
The first OCR field (5.4.3.1.7) is used to increment the Autonumber. Use
Templates (5.4.3.3) and Dictionaries (5.6.3) to indicate the text that will
trigger the increment event. This is useful if there is some unique text on
the first page of each document that can be recognized.
For best results, use the Fast OCR option (5.6.5.1) for speed and enter
multiple variations in the Template or Dictionary and enable the Max Errors
option (5.6.3.3) to prevent OCR errors from missing the document break.
5.4.6.2 Skip deleted pages
When pages are deleted, this can cause gaps in the numbering sequence.
This option will skip the numbering sequence on deleted pages so the
output does not have gaps.
5.4.6.3 Save seed value after batch
Check to automatically save the current Autonumber value after each batch
to preserve it between sessions.
5.4.6.4 Reset seed value after batch
This option is used to save the seed value for an Autonumber field after
each batch. By saving the configuration after each batch, the current value
of the Autonumber is preserved when you exit SimpleIndex. If this option is
unchecked, Autonumber fields will reset to their original value each time the
job file is open.
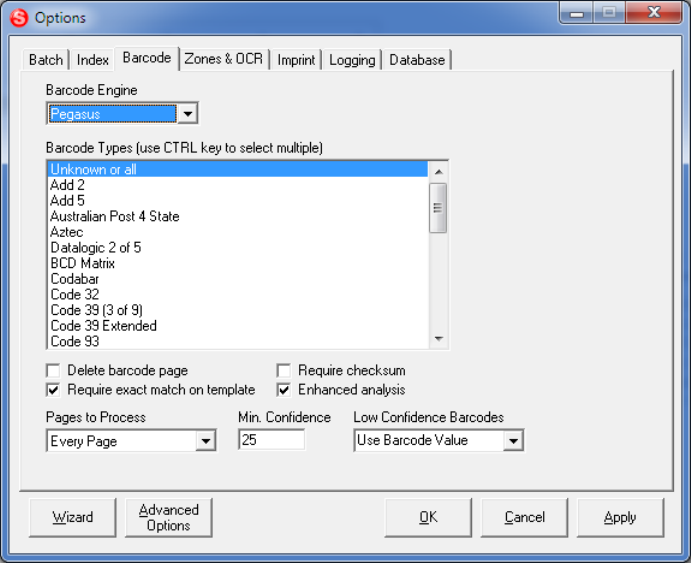
SimpleIndex Documentation
- 67 -
5.5 Barcode Options
SimpleIndex can recognize a wide variety of 1D barcodes, as well as 2D
PDF417 and DataMatrix formats with the 2D Barcode Recognition option.
5.5.1 Barcode Engine
SimpleIndex 7 introduces a new barcode recognition engine, as well as the
ability to enable "Voting" or recognition with multiple engines for greatly
improved accuracy. The available options are:
• Pegasus - this is the engine used in previous versions of
SimpleIndex. The Pegasus engine is faster and more accurate. With
Barcode-only license, Pegasus supports only 1D barcodes and has a
limited processing speed. The Full license supports 1D and 2D
barcodes and removes the limit on processing speed. To use the
Pegasus engine in server mode you must purchase the Pegasus
Server option.
• DTK - this engine was added in version 7 to enable 2D barcode
support in the low-cost Barcode-only license, and to provide a low-
cost solution for server-based barcode recognition. By default the
Server license uses DTK for barcode recognition.
SimpleIndex Documentation
- 68 -
• Voting - select this option to have each image scanned with both
barcode engines. This can greatly improve accuracy with hard-to-
read barcodes like faxes and photocopies. This option also enables
all possible barcode types where some are supported by only one or
the other engine.
5.5.2 Barcode Types
SimpleIndex is capable of reading many different types of barcodes. You
can select Unknown or all to recognize all types, or you can select one or
more types to increase recognition speed and accuracy, and to reduce the
possibility of detecting stray barcodes. Use the Shift and Control keys to
select multiple values from the list.
It is not recommended that you use Unknown or all with the DTK barcode
engine as this decreases the performance significantly.
5.5.3 Delete barcode page
Select this option to have the page with the barcode deleted from the final
document.
5.5.4 Require exact match on template
Some document barcodes contain multiple data elements concatenated
together. When this option is selected, Template and Dictionary matching
must match the entire value of the barcode. When unchecked these are
matched against any substring within the barcode, allowing you to extract
individual values easily.
5.5.5 Require checksum
Misread barcodes can be eliminated by employing a checksum. If your
barcodes contain a checksum, enable this option to verify the checksum
against the recognized value. If they do not match, the barcode is
discarded. If you do not know whether your barcodes contain a checksum,
then leave this option unchecked.
5.5.6 Enhanced analysis
Some hard to read barcodes can be detected by performing various image
enhancements on the image before recognition. Enabling this option will
cause SimpleIndex to enhance and re-recognize pages when all expected
barcode fields are not detected. This option is slower but can help
recognize very hard to read barcodes.
SimpleIndex Documentation
- 69 -
5.5.7 Pages to Process
This option lets you select whether to process barcodes on every page,
only the first page in the batch, or only on pages with more than 1 barcode.
When using a coversheet to index a single large document, it is much more
efficient to process only the first page.
Some batches may have pages with stray barcodes that cannot be filtered
out using a Template. If your coversheet has more than 1 barcode, you can
filter out many of these false positives by selecting Pages with >1 Barcode
for this option.
5.5.8 Minimum Confidence
Use this setting to force barcodes to be read with a high level of confidence
before accepting the value. This prevents misread barcodes from being
accepted as valid values. The setting must be a number between 0 (accept
all recognized values) and 100 (accept only values with 100% confidence).
When SimpleIndex reads a barcode that falls below this confidence value,
it performs various image enhancements on it and re-reads the image until
all barcodes are above the minimum confidence. If all image
enhancements fail to increase the confidence above the minimum, the
barcode is considered “bad” and is handled that way regardless of whether
a non-zero value was returned by the barcode engine.
5.5.9 Low Confidence Barcodes
This option lets you detect barcodes that are present on the document but
not readable by the barcode recognition engine. When this happens, you
can choose to ignore the bad barcode, clear the field, and stop forwarding,
or you can set the field to a pre-defined value. You may select one of the
pre-defined options from the list or type any value you wish. If your barcode
corresponds to a database field, be sure the value is valid for that type of
field.
5.5.10 Setting Barcode Coordinates
In the Field Coordinates settings (5.6.2) on the Zones & OCR tab, you may
set coordinates to limit the search area for barcodes.
5.6 Zones & OCR Options
The following settings control the OCR, OMR, and Barcode regions, as well
as Field Zooming (7.4.5.11) features. When changing these settings, first
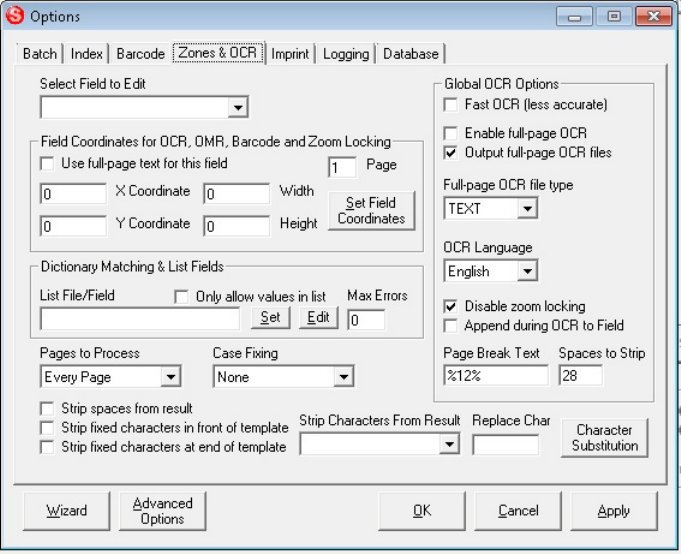
SimpleIndex Documentation
- 70 -
select a field from the list to load that field’s settings.
5.6.1 Select Field to Edit
To configure settings for each field, select the field you want to edit from
this list, and the settings for that field are displayed. If the field type is not
OCR or OMR, the coordinate values are used for Field Zooming (7.4.5.11)
and other settings are disabled.
5.6.2 Field Coordinates
The field coordinate settings are used for OCR, OMR, and barcode
processing, as well as automatically zooming in on a region when you
select a field (zoom locking).
5.6.2.1 Use full-page text for this field
This option must be selected to enable text processing for Office
documents or PDF files. Selecting this option causes SimpleIndex to
search the full text data for this image to find matching Template or
Dictionary values instead of the zone coordinates.
If Enable Full Page OCR (5.6.5.1) is not selected, existing full text data
from imported files is used. Existing full text can be obtained from text in
imported PDF files or Office documents, or in text files that have filenames
matching the corresponding images. For example, the text from
C:\Input\0001.txt is assigned to the image C:\Input\0001.tif. If Enable Full
SimpleIndex Documentation
- 71 -
Page OCR is selected, existing text data is overwritten with the recognized
text from OCR.
By combining the Template and Dictionary matching algorithms of
SimpleIndex with the ability to search existing text, SimpleIndex has the
ability to automatically re-index and reorganize large numbers of existing
files very quickly.
5.6.2.2 X and Y Coordinates, Width, and Height
These numbers define the dimensions of the OCR zone, as well as the
region to zoom in on when a field is selected. These values are in pixels.
When the Use Full Page OCR (5.6.2.1) option is selected, the coordinates
represent the starting row and column, number of rows, and column width
in the text file. This allows you to parse formatted text-based files by
specifying the exact position of field data within the file or improve
performance by narrowing the search area. This option works with MS
Office, PDF, HTML, and Text documents.
You can set these values manually, or automatically by choosing Set Field
Coordinates (7.2.6.4) from the Mouse Action menu on the main screen and
drawing a box around the area you want to OCR or zoom in on.
When using OCR with templates or dictionaries, it is better to set this area
to be larger than what is needed to ensure the data is captured despite
variability in the scans. You can even set this to the area of the entire
image and the full text is searched for the matching value. Keep in mind
that the larger this area is, the longer it will take to process the files.
5.6.2.3 Page
Indicates which page number the zone appears on in a multi-page file.
5.6.2.4 Set Field Coordinates
Clicking this button will save your current changes, hide the options screen,
and display the Draw Zones window.
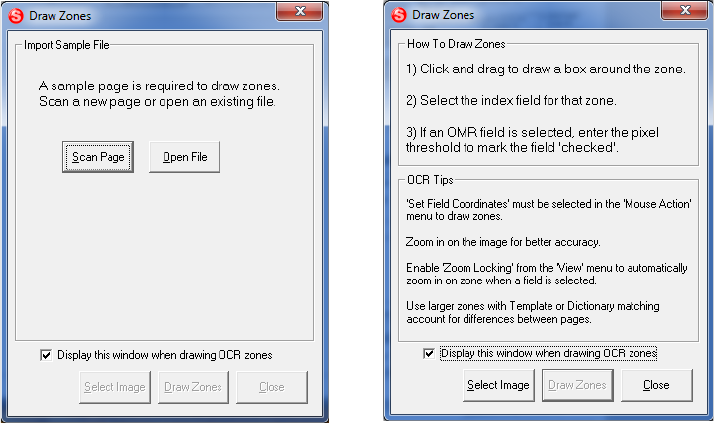
SimpleIndex Documentation
- 72 -
If no file is displayed in the window, you will be prompted to scan an
example page or open an existing file. Click the corresponding button to
display a sample page on the screen.
Once the sample page is displayed, follow the on-screen instructions to
draw OCR zones. Draw a box around the region to be recognized, and you
will be prompted to select the field for that region.
When you click Close, the Job Options are displayed again.
Please Note: OCR zones cannot be resized, even though the image
display will allow you to do so. Resized zones are not saved!
5.6.3 Lists and Dictionary Files
5.6.3.1 List File/Field
Enter the path to a text file containing a list of values, one on each line. The
OCR zone is searched for each of these values until a match is found. This
is the best way to automatically index files where the field will come from a
list of known possible values that will appear somewhere on the page, but
whose location may vary. This may also be used to correct for skew and
other factors that can cause an OCR zone to move. Use the Set button to
open a browse window to allow selection of a dictionary file.
When connected to a database, a field name may be entered here, and the
unique values from that field are used for a dictionary. This may be a field
from either the Data Source setting on the Database tab or the Match Data
Source setting in the Autofill settings, allowing you to define a separate
SimpleIndex Documentation
- 73 -
database for lists and export. You may also specify an alternate table for
the list by using the form “TABLE|FIELD” for this setting.
It is also possible to specify multiple search values for each dictionary entry
(“Thesaurus Matching”). This allows you to search for many possible
matching variations on a field label and have a standard value inserted in
the field. This is done by creating a pipe-separated list (“|”) of search values
on each line. If any of these values is found in the search area, the first one
in the list are inserted in the field.
For example, this list will find the correct state if the name, abbreviation, or
any of the major cities from that state appear in the search text:
California| CA |San Diego|Los Angeles|San Francisco
New York| NY |Albany|Niagra|White Plains
Texas| TX |Dallas|Houston|San Antonio
Georgia| GA |Atlanta|Macon|Savannah
This entry will put the value “California” in the field if any of the words
“California”, “ CA ”, “San Diego”, “Los Angeles” or “San Francisco” are
found in the search text. Adding the space before and after “CA” ensures
that the word “CAT” or “CAR” will not produce a false positive. This
particular example was used to automatically classify tax documents
coming from various municipalities by their state.
Another way to avoid false positives is to indicate negative keywords in the
list. These are preceded by a “^”. For example:
North Carolina|Charlotte|Raleigh|Ashville|^Nashville
Will prevent the word “Nashville” from matching on “Ashville” and giving a
false positive. Dictionary terms are read from right to left, so place the
negative keywords on the end of the line to search for the negative terms
before a match is found.
When designing dictionaries, it is important to note that the values in the
dictionary are searched in order until the first match is found. In order to
minimize false positives, the most unique values should be placed first in
the list, and values that may appear in other documents should be placed
at the end.
SimpleIndex Documentation
- 74 -
For example, a vendor list for an invoice processing job may contain the
entry “Microsoft”. However, it is likely that other invoices may contain this
word as part of an item description. Hence, “Microsoft” should be placed
towards the end of the vendor list.
5.6.3.2 Only allow values in list
Check this option to prevent users from manually entering a value that is
not in the list of pre-defined values from the list file.
5.6.3.3 Max Errors
This feature lets you automatically correct for mistakes in the OCR when
using dictionaries. This setting is a decimal value, usually between 0.05
and 0.30. This value is multiplied by the number of characters in the
dictionary entry to determine the number of incorrect characters the field
will accept.
For example, if Max Errors is set to 0.20 and the current dictionary entry is:
Simple Software
The dictionary entry has 15 characters, x 0.20 = 3 non-matching characters
will be accepted for this value. This means that “5imp1e S0ftware” will also
be recognized correctly as “Simple Software”. If the dictionary entry had 4
or fewer characters, all would have to be correct to consider the value a
match. Be careful not to set the Max Errors percentage too high in order to
prevent false positives!
5.6.4 Advanced OCR Options
5.6.4.1 Pages to Process
Using this option, you may limit the OCR to only certain pages within the
batch. This option greatly speeds up the OCR process if you know the
location of those pages in the batch that contain the index information you
need. The options are:
• Every Page – all pages are processed.
• First Page Only – only the first page in the batch is processed.
• Pages with Barcodes – only a page where a barcode is detected is
processed. Use the Template and zone features to prevent detection
of stray barcodes.
SimpleIndex Documentation
- 75 -
• Pages After Barcode – use this option with separator sheets, like
the ones created by SimpleCoversheet (7.3.20), where the first page
of the document comes after a barcode separator sheet.
• Pages After Blank – use this option with blank page separators to
indicate the start of a new document on the following page.
• Odd Pages – OCR only Odd numbered pages (1,3,5,etc.)
• Even Pages – OCR only Even numbered pages (2,4,6,etc.)
• Pages without Barcodes -
5.6.4.2 Case Fixing
This option allows you to automatically case fix the OCR results, forcing the
results to be all UPPER CASE, lower case, or Title Case (first letter of each
word). If a Dictionary File is specified, the case used in that file will override
this setting.
5.6.4.3 Strip spaces from result
This option strips any spaces from the OCR result. This is very useful when
using template matching or dictionary lookups, because spaces are
sometimes recognized by mistake, causing the match to not be found. The
Spaces to Strip (5.6.5.9) option can be used to modify the behavior of this
function to strip other classes of characters.
5.6.4.4 Strip fixed characters in front of OCR template
This option allows you to use text “markers” to determine the position of a
field when there is no unique template or dictionary lookup possible. For
instance, an invoice number may always follow the word “INVOICE” on
certain documents. Checking this option will allow you to enter “INVOICE
####” as the OCR template, but only have the invoice number and not the
word “INVOICE” show up in the field.
5.6.4.5 Strip fixed characters at end of OCR template
Same as the previous option, but strips fixed characters from the end of the
template instead of the beginning, in case the marker appears after the text
you are trying to recognize.
5.6.4.6 Strip Characters from Result
Enter a list of characters that you want to remove from OCR results prior to
template and dictionary matching. You can also use this in place of
templates by removing all unwanted characters from your OCR zone and
leaving the results. This technique allows you to get a partial result when
recognition mistakes take place, when templates or dictionaries will leave a
blank field.
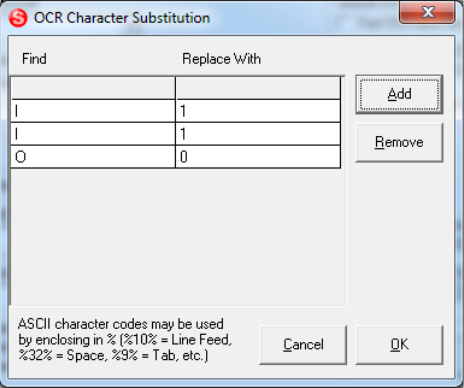
SimpleIndex Documentation
- 76 -
This setting can also be used with non-OCR fields to remove unwanted
characters from barcodes, database fields, dates, etc.
Here are several helpful hints for using this setting:
• Enter the values %LF% and %TAB% to remove line breaks and tab
characters, since these cannot be typed.
• There are several examples available in the drop-down menu with
common lists of characters that can be selected automatically.
• You can manually type or copy/paste values into this field.
• A good technique to use is to copy and paste any extra characters
that appear in that field during OCR until only valid characters remain.
• Use Notepad to edit a long list of special characters or to save lists
for later use.
• Use the Character Map (in Start Menu/Accessories) to find special
characters.
• Enter %##% to replace a specific ASCII character with numeric value
of ##. For example, %13% will remove line feeds.
• Set the Replace Character option to replace stripped characters with
another.
5.6.4.7 Replace Character
Enter a character or characters here that will replace those stripped using
the Strip Characters From Result (5.6.4.6) option. This allows you to
replace common mistakes, such as I and 1 or O and 0, or substitute a
space or dash for line feeds and other unwanted characters.
ASCII character codes may be entered in this field to allow special
characters to be used for
replacement. For example, the
single space character can be
entered as %32%, Line Feeds are
%10% and Tabs are %9%. A full list
of ASCII character codes can be
found if you search the web for
“ASCII Table”.
5.6.4.8 Character Substitution
This option allows you to define
several specific 'find and replace'
operations on images that will take
SimpleIndex Documentation
- 77 -
place before template and dictionary matching. This is useful for correcting
common OCR errors automatically, such as a "1" being recognized as "I".
Substitutions can be single characters or whole words and phrases. It is
also possible to replace unprintable characters such as tabs and line feeds
by entering their ASCII character code (e.g. %10% for line feeds).
5.6.5 Global OCR Options
The global OCR options are settings that do not depend on the selected
field. These include full-page OCR settings and training options.
5.6.5.1 Fast OCR
Check this option to use a faster but less accurate OCR analysis on
images. For high-quality images using standard fonts, Fast OCR provides
comparable accuracy with much faster processing speed. In many cases, it
is much faster to use this option even if a few more files require manual
correction.
5.6.5.2 Enable full-page OCR
Selecting this option will cause all image files in the batch to be OCR’ed.
The entire file is processed, generating full-text data that can be used for
auto-indexing and full-text searching.
It is also possible to have the OCR results output to MS Word or HTML
formats that can be edited in a word processor (5.6.5.4).
5.6.5.3 Output full-page OCR files
When this option is checked, full-page OCR text is written to text files using
the same folder and filename scheme as the images. If unchecked, no text
files are created. Text from MS Office and PDF files are also be saved as
text when selected.
5.6.5.4 Full-page OCR file type
Select the type of file that is output by the full-page OCR engine. If you
have OCR zones defined this must be set to TEXT. Other options are
WORD or HTML.
5.6.5.5 OCR Language
Select the default language for OCR text. By default, only English, French,
Spanish, Italian, and German languages are installed. Additional languages
can be provided by request.
SimpleIndex Documentation
- 78 -
5.6.5.6 Disable zoom locking
Zoom locking causes the image to be zoomed in on the zone automatically
when a field is selected. If no coordinates are indicated, a field will not
zoom. However, OCR fields must always have coordinates. Zoom locking
can be helpful when reviewing OCR results or keying in handprint data.
Disable zoom locking if you prefer to keep your selected zoom on each
field.
5.6.5.7 Append during OCR to Field
By default, the OCR to Field (7.2.6.3) option automatically advances to the
next field after you draw a zone. Select this option to keep the cursor in the
selected field so additional text can be added. This is useful for capturing
data from multiple lines or regions into the same field.
5.6.5.8 Page Break Text
The following value is output after each OCR page to indicate page breaks
in the text file. This string is also used to parse the OCR output when
creating searchable PDF files. In this case, the value should be something
that will never occur naturally within the text of your documents.
5.6.5.9 Spaces to Strip
This option allows you to modify the default behavior for space trimming on
OCR fields. It affects all OCR fields where Strip spaces from result (5.6.4.3)
is selected. Add the numbers for all space trimming options you want to
enable and enter the total.
1 - Remove spaces & line feeds from beginning
2 - Remove spaces & line feeds from end
4 - Remove all spaces and tabs
8 - Remove all line feeds
16 - Convert all blank space to single spaces
32 - Remove all non-alphanumeric characters except spaces
64 - Replace line feeds with <lf>
128 - Remove all non-alpha
256 - Remove all non-numbers
16384 - Run Trim function after template matching
5.7 Imprinting Options
Imprinting is a great feature for lawyers needing to bates stamp their legal
documents, as well as anyone who wants to add a header, footer, page
number, or any other mark to each image they process. Imprinting works
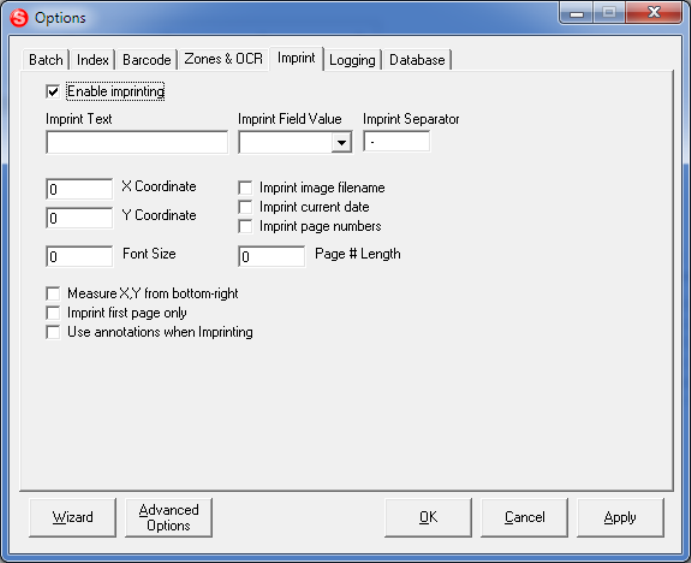
SimpleIndex Documentation
- 79 -
on both black & white TIFF and PDF files. Color TIFF and JPEG images
cannot be imprinted.
5.7.1 Enable imprinting
Checking this causes SimpleIndex to stamp each image with the imprint
text and/or page number entered in these options.
5.7.2 Imprint Text
If a value is entered here, it is used as the first characters of the imprint.
For example, the value “Page” with the Imprint Page Numbers (5.7.9)
option selected will imprint “Page - 001”, “Page - 002”, etc.
5.7.3 Imprint Field Value
The value for this field on the first image of the batch is imprinted.
5.7.4 Imprint Separator
If multiple values are imprinted, they are separated by the characters in this
field.
5.7.5 X, Y Coordinates
The coordinates for the location of the imprint on the image, in pixels.
5.7.6 Font Size
The size of the font to use in the imprint.
SimpleIndex Documentation
- 80 -
5.7.7 Imprint image filename
When selected, the imprint will use the filename as the base value. Any
index fields or recognition results that have been selected for use in the
filename will appear in the imprint as they do in the filename, followed by
the page number if that option is selected.
5.7.8 Imprint current date
Adds the processing date to the imprint in the format “YYYY-MM-DD”.
5.7.9 Imprint page numbers
When selected, the page numbers are printed at the end of the imprint
string. If the Imprint Text (5.7.2) is “EXAMPLE” and the Page # Length
(5.7.7) is set to 4, each page is stamped with “EXAMPLE-0001”,
“EXAMPLE-0002”, etc.
5.7.10 Page # Length
The number of characters to use in the page number. Entering “3” here will
produce page numbers “001”, “002”, “003”, etc.
5.7.11 Measure X, Y from bottom-right
When selected, X and Y are measured from the bottom-right instead of the
top-left. This makes it easier to specify imprinting on the bottom of the
page.
5.7.12 Imprint first page only
Places the imprint only on the first page of multi-page files.
5.7.13 Use annotations when imprinting
Imprints images with annotations that do not alter the original image data.
5.8 Logging Options
Up to 3 logs are created, depending on the options you have selected. An
Index Log that contains the Index Data, a Batch Log that contains the user
batch and productivity tracking information, and an optional Audit Log that
contains information about missing required documents, when that feature
is enabled.
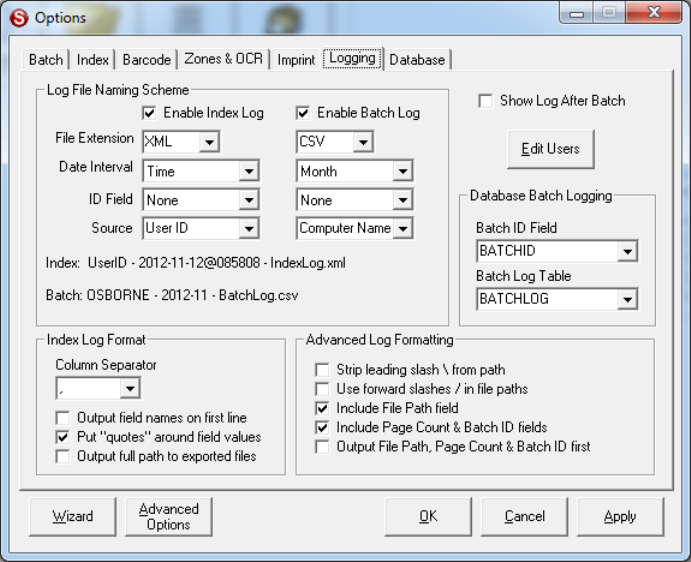
SimpleIndex Documentation
- 81 -
5.8.1 Log File Naming Scheme
Index log filenames are generated using the Index Interval, ID Field, and
Source values. Batch log filenames, as well as the Batch Identifier used to
track productivity, are all generated using the Batch Interval, ID Field, and
Source values. Filenames are generated in the format Source-IDField-
YYYY-MM-DD@HHMMSS.
There are several parameters available to serve as the component parts of
the filename. When more than one batch generates the same log
filenames, information is appended to the end of the existing files.
5.8.1.1 Enable Index Log
Enable/Disable creation of Index Log files.
5.8.1.2 Enable Batch Log
Enable/Disable creation of Batch Log files.
5.8.1.3 File Extensions
Sets the file extension to use for the log files. Use the Default setting to use
IDX for Index logs, LOG for Batch logs, and AUD for Audit logs. You can
select one of the pre-defined values or type any extension you wish.
SimpleIndex Documentation
- 82 -
Using custom file extensions lets you choose the application to use to view
the data. TXT files will open in Notepad, CSV files in Excel. Use the TSV
extension to create Tab-separated files that can be opened in Excel. TSV
files can contain field values with commas, unlike CSV.
5.8.1.4 Date Intervals
This appends the batch date and time to the log filename. Depending on
the interval selected, the corresponding level of detail is used in the
filename. The result is that a new log file is created every hour, day, week,
etc. depending on the option you select. Select Time to use the full date
and time to the second, with the result that a unique file is created for each
batch.
The full date and time is always used in the Batch ID, in the format YYYY-
MM-DD@HHMMSS. The Interval only affects the log filenames.
Since Index logs contain many more records than Batch logs, it is often
practical to use a much larger interval for the Batch logs to prevent too
many files from being created.
5.8.1.5 ID Field
Selecting a field in this option will cause the value for this field to be used in
the Batch log filename. If multiple values exist in the batch, only the first
one is used to identify the log.
5.8.1.6 Source
These fields are used as identifiers for the location, project, user, or
workstation that processed the batch. Pre-defined values exist for the
computer’s Network ID, SimpleIndex User ID, or both. It is also possible to
enter any other value you wish and it will appear in the Batch ID and/or log
filenames.
If multiple users are saving logs to a common network share, use this field
to ensure each user creates unique log filenames.
5.8.1.7 Log File Examples
When modifying the options that generate the log filenames, use the Log
File Examples to see what the resulting filenames will be. After changing
one of the values, the examples are updated once you click on another
field.

SimpleIndex Documentation
- 83 -
5.8.2 Database Batch Logging
These options let you configure a custom database table to store log
information.
5.8.2.1 Batch ID Field
In Insert (5.9.3.2) mode, the selected field is set to the Batch ID generated
using the values from the Logging tab. In Update (5.9.3.3) mode, each user
is assigned batches according to the values in this field. This is important to
ensure that similar documents are all indexed by the same user. When
used in conjunction with the Batch Log Table (5.8.2.2), a highly detailed
production log is generated automatically for each user.
The Batch ID Field is optional. If unused, users in Update mode are
assigned the next X images, where X is the value of the Maximum
Files/Batch (5.3.4.2) setting under the File tab. The Batch ID Field is
required if the Batch Log Table is used for productivity tracking.
5.8.2.2 Batch Log Table
The Batch Log Table is a table with several specific fields that store
information about user productivity. For each batch that a user completes,
a record is created that stores information about how long it took to index
the batch. The Batch Log Table must contain the field names and data
types listed in the table below:
Field Name
Data Type
Description
Primary
Key
Autonumber
This field can be any name and any auto-
generated data type.
BatchID
String
Stores the ID string for each batch.
Username
String
The User ID for the person that indexed the
batch.
BatchStart
DateTime
Starting date and time for this batch.
BatchEnd
DateTime
Ending date and time for this batch.
BatchTime
Float/Single
Decimal number representing batch
completion time in minutes.
BatchPages
Integer
Number of pages in the batch.
Revision
String
Revision Level for the batch.
5.8.3 Index Log Format
5.8.3.1 Column Separator
This character is inserted between values in the log files to separate one
value from the next on each line. The default delimiter is a comma, but TAB
SimpleIndex Documentation
- 84 -
or Pipe “|” often work better, particularly with values that may contain a
comma. You may select one of the pre-defined values or enter any
character(s) you wish to use.
5.8.3.2 Output field names on first line
Check this option to have the names of each index field output in the first
line of each index log file.
5.8.3.3 Put “quotes” around field values
If checked, the delimited log files will have quotes surrounding each field
value. This makes it possible to include the column delimiter in the index
values without them being interpreted as additional fields.
5.8.3.4 Output full path to exported files
If checked, the full path to the image file is stored in the log. If unchecked,
the Output folder (5.3.1.2) is stripped from the beginning of the path,
allowing you to use relative paths to indicate the location of your images.
This makes it much easier to move images to a new server in the future.
5.8.4 Advanced Log Formatting
5.8.4.1 Strip leading slash \ from path
By default, relative paths are output with a \ as the first character. If there
are no subfolders, the filename is output with a \ in front of it. Some
applications will require that just the filename be output. Check this option
to enable that.
5.8.4.2 Use forward slashes / in file paths
When the destination database is used on a website or UNIX file system,
forward slashes should be used instead of the default backslash. This lets
you link images indexed with SimpleIndex directly to a web database
without having to modify the output.
5.8.4.3 Include File Path field
This option is checked by default and causes the output file path to be
exported automatically after the last index field. In some applications, only
the index data is relevant, or you may need the output file in a specific
position within the file. Uncheck this box to disable automatic output of the
export file path.
You may use a Fixed field (5.4.3.1.6) to output the File Path, OCR File
Path, Page Count, and Batch ID values in specific positions within the file.
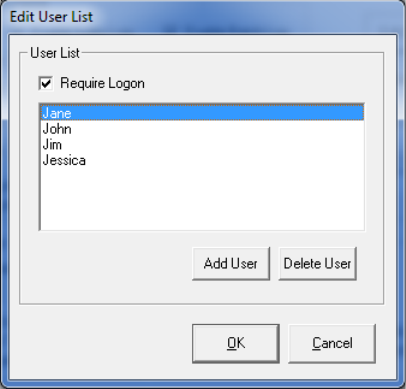
SimpleIndex Documentation
- 85 -
5.8.4.4 Include Page Count & Batch ID fields
By default the last 2 fields in the index log are the Page Count and Batch
ID. These fields may not be needed and can prevent the file from importing
properly, so uncheck this option to leave them out of the Index log.
5.8.4.5 Output File Path, Page Count & Batch ID first
When checked, the image file, batch ID, and page count is output first, and
index field values are output last. This lets you have a variable number of
index fields while keeping the image path in the same position.
5.8.5 Show Log After Batch
Use this option to display the index log automatically in the viewer at the
end of each batch. This lets the operator quickly review all of the images
and index information captured during the previous batch.
This feature can be enhanced by using the XSLT Image Log Formatter
option (5.10.4), which can convert the log file to XML or HTML that has
formatted data and even clickable links that open the exported files in the
viewer.
5.8.6 Edit Users
The user list is used to track user
productivity, as well as to connect to
password-protected databases. When a
SimpleIndex job that requires logon is
opened, the user is prompted to select
their name from a list. Unless a
password-protected database is used,
the logon is only used to track
productivity information. SimpleIndex
does not have an internal user
password—if your database does not
require a logon, you may leave the
password field blank.
Use the Add User and Delete User buttons to modify the user list. If
Require Logon is checked but no users are entered in the list, the user is
able to type any name they wish to use.
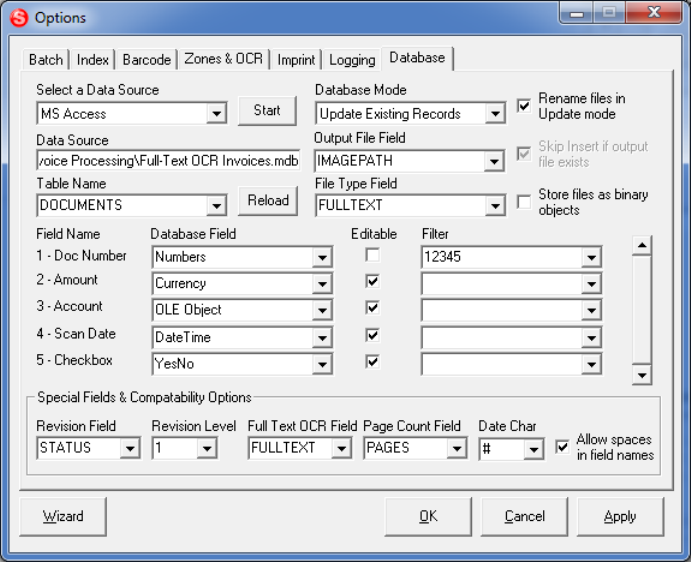
SimpleIndex Documentation
- 86 -
5.9 Database Options
SimpleIndex’s database functions give you the ability to export index data
directly to any database, as well as search, view and update images that
already exist in a database.
Database options should be set by someone who is knowledgeable about
the database and has the necessary permissions to modify tables and
views, if necessary. Novice users may automatically configure SimpleIndex
to use a generic database configuration, if they wish to use a database to
store index data, or enable use of the Media Wizard (7.4.7.6) to burn
searchable CDs or DVDs.
5.9.1 Design Overview for Database Connectivity
This overview will help you understand the overall database configuration
scheme. The sections that follow give detailed descriptions of how to
configure each setting on the database page.
The database interface with SimpleIndex was designed to provide low-level
interaction with any database to provide a wide variety of new functionality
for a multi-user environment. Most document capture software comes with
its own internal database that is used to manage scanned batches and
index values until they are exported to an intermediate format that is finally
imported into your database. SimpleIndex exports index data directly to
SimpleIndex Documentation
- 87 -
fields in your database, thus bypassing the intermediate stages and giving
you instant access to new images. This also allows SimpleIndex to work
directly with custom database programs without any custom programming.
SimpleIndex’s database interface provides this functionality by operating in
four “modes” (5.9.3): Insert New Records, Update Existing Records,
Retrieve and View Records, and Match and Attach.
1. When images are scanned, records must be “inserted” into the
database to store the image file location and pre-indexed data
(5.9.3.2).
2. Manual indexing is done by retrieving a batch of records on another
workstation and “updating” them with the correct index data (5.9.3.3).
3. Users may view scanned images by “retrieving” them from the
database based on index criteria and viewing the matching
documents (5.9.3.4).
4. Existing database records can be updated in batches, linking files
and updating index fields automatically (5.9.3.5).
Processing stages can be tracked using the Revision Level (5.9.13) field.
This field keeps track of how many times a document has been processed
(scanning, indexing, double-key verification, QC review, etc.) as well as
who is currently working on a document.
SimpleIndex assumes the database is configured to have a single table or
query that contains all the index fields and a field to link the image using
the full or relative path to the image file. Optionally, this table can include
fields for the batch ID (5.8.2.1), page count (5.9.15), and full-text OCR
(5.9.14). You may also store batch log information in a separate table for
productivity tracking (5.8.2.2).
5.9.2 Select a Data Source
The drop-down menu in the upper-left contains a list of configuration
options for your data source. Select an option from the list and click the
Start button to run the corresponding configuration wizard.
The Data Source field is populated automatically by these wizards. This
field may be configured manually using the following methods:

SimpleIndex Documentation
- 88 -
1. Enter the ODBC System or User data source name
2. Enter the path to an ODBC file DSN
3. Enter the path to a MS Access database file
4. Enter any valid OLEDB Connection String
The OLEDB Connection String lets system administrators create a single
SimpleIndex configuration that any network user can use to connect to a
database without additional configuration. A wizard is provided to configure
MS Access, SQL Server, Oracle, and MySQL connection strings.
Connection strings for Sybase, DB2, FileMaker, and others can be entered
manually. See your database documentation or Google “OLEDB
connection string” for more information on creating connection strings.
When configuring connection strings, you may leave out the User ID and
Password to use the ones entered in the SimpleIndex user logon.
The following wizards are available to automate database configuration
tasks:
5.9.2.1 Create Generic Access Database
This wizard copies a pre-configured Access database to the folder you
select and automatically configures all database options to use the defaults
from this database. By using generic field names and types for all fields,
SimpleIndex is able to connect any existing configuration with up to 25
index fields to a database, enabling the SimpleIndex multi-user scanning
and retrieval options instantly.
The blank database that comes with SimpleIndex has its own built-in
search interface that allows you to find and view the documents it contains
on any computer with Microsoft Access (2.4). The default template for this
search interface may be changed by modifying the forms in the file
“BlankDB.mdb” in your installation folder. Warning: modifying the field
names of the tables in this database will cause this wizard to no longer
function with the default settings.
5.9.2.2 Configure ODBC
ODBC allows you to configure connections to a wide variety of databases
and flat files. With ODBC, all connection and security information is pre-
configured in a Data Source. Once configured, SimpleIndex only needs to
know the name of the data source to connect to the database.
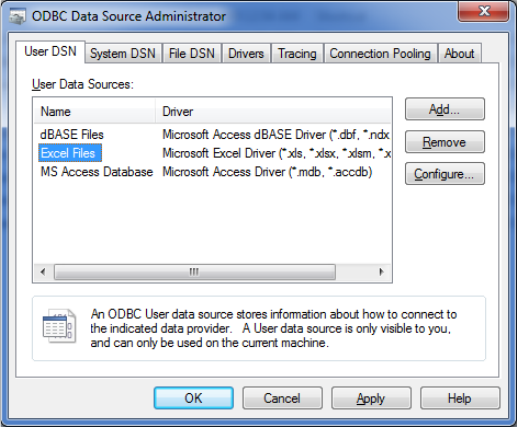
SimpleIndex Documentation
- 89 -
When using ODBC to connect
to a database, you must first
configure the data source in the
ODBC Data Source Manager.
Use the Configure ODBC option
to open the ODBC manager or
find it in your Windows Control
Panel (in 2000/XP it is found in
the “Administrative Tools”
folder).
For User and System DSNs,
each database has a unique
data source name which you
must enter in the Data Source field exactly as it appears in the manager.
For File DSNs, configure and save the DSN file and enter the path to that
file in the Data Source field. The Select ODBC File DSN wizard allows you
to browse your computer and select an existing File DSN using a common
dialog interface.
Please consult the ODBC Data Source Manager help file for more
information on how to create data sources.
5.9.2.3 MS Access
This option will display an Open File dialog, prompting the user to select an
existing MS Access database to use with SimpleIndex. The path to this
database file is entered in the Data Source field.
After selecting the database, you are prompted to configure MS Access
Workgroup security. If your database is protected by a workgroup file,
choose Yes and select the MDW file on the next screen. The User ID and
Password entered in your SimpleIndex logon (5.8.5) are used to connect to
the database. You may bypass logon by adding them to the OLEDB
connection string directly (e.g. “;User ID=XXX;Password=XXX”).
If your Access database is protected with a simple database password,
simply enable logon (5.8.5) and enter any User ID with the correct
database password to connect. You can also add the password to the
connection string (e.g. “;Jet OLEDB:Database Password=XXX”).
SimpleIndex Documentation
- 90 -
You may also configure connections to secure MS Access databases using
ODBC.
5.9.2.4 SQL Server
This option will prompt the user to enter the name of an MS SQL Server
and database to use with SimpleIndex. The server name and database
name are used to automatically create an OLEDB connection string that is
entered in the Data Source field. This configures the Date Delimiter
(5.10.4.4) and Allow spaces in field names (5.10.4.1) settings for SQL
Server compatibility.
5.9.2.5 Oracle
This option configures the Date Delimiter (5.10.4.4) and Allow spaces in
field names (5.10.4.1) settings for compatibility with Oracle data sources.
Data Source setting is not configured—ODBC or OLEDB connection string
must be entered manually.
5.9.2.6 MySQL
This configures the Date Delimiter (5.10.4.4) and Allow spaces in field
names (5.10.4.1) settings for compatibility with MySQL data sources. Data
Source setting is not configured—ODBC or OLEDB connection string must
be entered manually.
5.9.2.7 Select ODBC File DSN
This option will display an Open File dialog prompting the user to select an
existing ODBC File DSN to use with SimpleIndex. The path to this file is
entered in the Data Source field.
5.9.3 Database Mode
5.9.3.1 Disabled
Select this option to disable the database interface.
5.9.3.2 Insert New Records
Insert mode causes SimpleIndex to insert new records into a database that
correspond to the index values for your scanned images. This option lets
you populate the document database with new records for files processed
by SimpleIndex. The files in this database can then be searched and
viewed with Retrieval mode (5.9.3.4) or edited with Update mode (5.9.3.3).
5.9.3.3 Update Existing Records
Update mode configures SimpleIndex to retrieve existing images and index
information from the database and display it to the user. The index data
SimpleIndex Documentation
- 91 -
can be reviewed and modified, and images can be added, modified or
rescanned if necessary. The Update feature can also be used to
automatically create folder hierarchies and give meaningful filenames to
images while preserving their link with the database records.
There are several useful applications of the update feature of SimpleIndex:
• Quality control review & rescanning
• Verification of index values
• Unattended processing
• Distribute indexing among multiple users
• Automatically rename existing image files using index values
• Search tool to find and view specific images
5.9.3.4 Retrieve and View Records
Retrieval mode lets you find documents with keyword searches and view
the matching files. Retrieval mode is used interchangeably with
SimpleSearch. SimpleSearch is a retrieval-only license for SimpleIndex that
allows only Retrieval mode configurations to be run.
In Retrieval mode, the index fields on the main screen become search
fields, and the Save Index and Save All buttons become Search and Clear.
To find documents, type the search criteria into the index fields and click
the Search button. Use Clear to start a new search. See (7.5) for more
information on searching and viewing documents in Retrieval mode.
5.9.3.5 Match and Attach Records
Match and Attach mode lets you associate scanned images with existing
records in the database without recreating them or updating them one-at-a-
time. To use this mode, select a key field using the Autofill settings (5.4.4).
This key field is used to lookup matching records in your database. When a
batch is exported, a lookup is performed for each file. The matching record
for that file is updated with the image file path and other data entered into
SimpleIndex fields, leaving the rest of the data in the table intact.
This is the quickest method for image-enabling an existing database
application. All you need to do is add a field for the image file, then
configure a Match and Attach configuration that indexes documents based
on the primary key and fills in this field automatically.
SimpleIndex Documentation
- 92 -
5.9.4 Table Name
SimpleIndex is designed to store index information and the path to the
image files in a single table or query. Select a table or query that will store
this information here.
To use SimpleIndex in Insert Mode, the table or query must have a
primary key that is generated automatically (Autonumber, GUID, etc.).
Use the Reload button after you have entered the name of your table to
load the field selectors with a list of the available fields from that table.
It is possible to use a query (also called a view) that allows you to store
index information and image data in separate tables. Depending on the
database type, there are constraints on the field relationships necessary to
create a query that supports inserting and updating. Please ensure your
query is updatable before using it with SimpleIndex. Consult your database
documentation for more information on creating updateable queries.
5.9.5 Output File Field
The Output File Field is used to store the path to the image file
corresponding to the current record.
It is recommended that you use the relative path instead of the full path to
store the image filename. Doing this allows you to move the images to
another storage server without having to perform a complex update on this
field to reflect the change. Uncheck the Output full path to exported files
option (5.8.3.4) to store the relative path, leaving off the Output folder. If the
images move, you only need to enter the new path in the Input and Output
folders of your SimpleIndex configuration files to make your document
management system work in the new location.
5.9.6 File Type Field
This field stores the file extension for each file. It is designed to be used
when storing files as binary objects to allow SimpleIndex to determine what
type of file the data represents, so it can be displayed in the correct viewer.
5.9.7 Rename files in Update mode
This option will cause saved images in Update mode to be moved from the
Input folder to the Output folder, and renamed using the subfolder and
filename determined by the Index tab settings.
SimpleIndex Documentation
- 93 -
This makes it possible to do a variety of 2-stage indexing processes. Some
examples are:
• Scan and create multi-page files with separator sheets, then index
and rename those files with Update mode.
• Use scheduled OCR to automatically index fields and Update mode
to correct OCR mistakes and move files to their destination
• Keep files in a temporary location during processing and move to a
production server once indexing is complete
5.9.8 Skip Insert if output file exists
When you scan using the same configuration with the same index values,
images are appended to the existing files. In most cases, you do not want
another record created in the database for the same file. Check this box to
prevent these duplicate records from being created.
5.9.9 Store files as binary objects
Check this option to store the file data in the database field defined in the
Output File Field (5.9.5) instead of the default behavior, which is to save
the path to the external file in this field. This allows all data to be stored
within the database server without the need for separate files on the
network.
Use the File Type Field setting (5.9.6) to indicate the file type for
documents stored in the database. In Retrieval and Update modes, this is
used to determine the proper viewer to display the file in.
5.9.10 Database Field Name
Select the database fields that correspond to the fields you define under
the Index tab. If there is no corresponding database field, then leave this
value blank.
5.9.11 Editable
This option is only used in Update mode. For each field, select this option if
you want to allow the user to edit the values in this field. Leave it
unchecked if you want to use the existing values for reference or file
naming only and not allow the user to modify its value.
5.9.12 Filter
This option allows you to define default search criteria for Retrieval and
Update modes. Whenever the search screen is displayed, the values
entered here is displayed in the search criteria for that field. This makes it
SimpleIndex Documentation
- 94 -
possible to add default filters to automatically search a certain subset of
documents or make it easier to perform searches by partially filling search
fields.
5.9.13 Revision Field/Level
The Revision Field is used to indicate different queues that can be used for
different types of processing. In Insert mode, the Revision Level value you
enter is stored in the selected field. In Update mode, the user retrieves only
images that match the selected Revision Level, and this value is
incremented by 1 whenever the user saves an index value using the Save
Index button.
By incrementing the value of the Revision Level, it is possible to tell which
stage of processing each image is in. Typically, scanners will insert records
with a Revision Level of 0. Indexers then update these records with the
field information and increment the level to 1. Double-key indexers or QC
reviewers finally update the level to 2, indicating that processing is
complete. Database stored procedures may then be implemented to move
records with a level of 2 to a table on a production server if necessary.
IMPORTANT! The Revision Field must be defined as a Character data
type and not an Integer!
When used in Update mode, SimpleIndex “checks out” each batch to the
current user by setting the Revision Field temporarily to the user’s ID,
preventing the records from showing up in another user’s batches. For this
reason, the Revision Field must be a multi-character data type with
sufficient length to store the User ID.
5.9.14 Full Text OCR Field
If using Insert mode, this setting allows you to specify the name of a long
text or memo field to use to store the full text OCR results. This will
associate the image file and index information with the text of the document
inside your database, making full text search possible.
5.9.15 Page Count Field
If using Insert mode, this setting allows you to specify the name of a
number field to use to store the page count for each file.
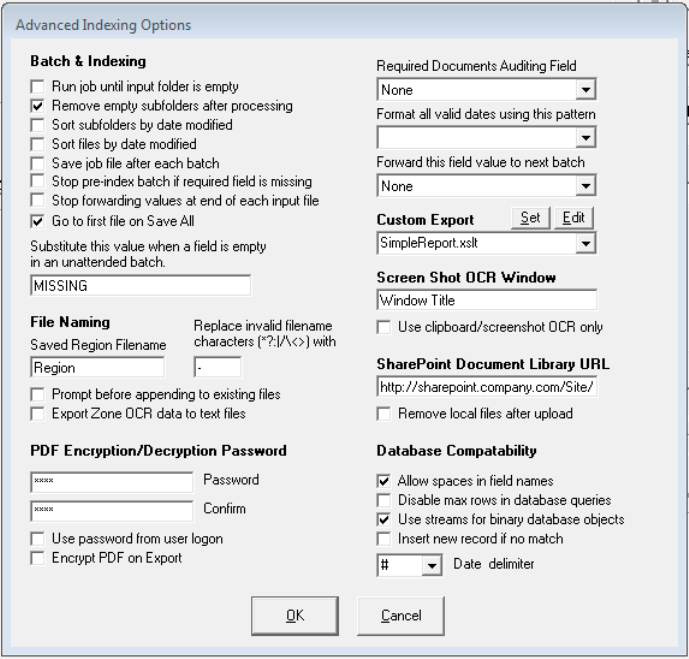
SimpleIndex Documentation
- 95 -
5.10 Advanced Indexing Options
Click the Advanced Options button at the bottom of the options screen to
access these settings. Advanced options are used mostly in special
circumstances; most job configurations will not require modifying these
settings.
5.10.1 Batch & Indexing
5.10.1.1 Run job until input folder is empty
When running a job on a timer loop, this option will stop the timed
processing once all files in the input folder have been processed. Useful for
processing very large folders in several smaller batches or for processing
several multi-page files as individual batches.
5.10.1.2 Remove empty subfolders after processing
Automatically deletes empty folders after the files have been processed.
Only applicable when the Process Subfolders option is selected.
SimpleIndex Documentation
- 96 -
5.10.1.3 Sort subfolders by date modified
Sort subfolders by modified date instead of name when processing
subfolders. Ensures that subfolders are processed in the order that they
are added to the input folder.
5.10.1.4 Sort files by date modified
Sort input files by modified date instead of name. Ensures that files are
processed in the order they were created.
5.10.1.5 Save job file after each batch
Automatically re-saves the configuration file at the end of each batch. This
is used to preserve Autonumber field values and the Last Batch Time
setting between sessions.
5.10.1.6 Stop pre-index batch if required field is missing
If a live user is present during a pre-indexed batch process, this option will
stop the export and let the user fill in any required fields that are blank. You
should not check this option with jobs running unattended (8.3).
5.10.1.7 Stop forwarding values at end of each input file
When processing several multi-page input files, document-level indexes
usually apply to a single file. If OCR or Barcode recognition fails on a file,
incorrect index values may be carried forward from the previous file if the
Forward (5.4.3.7) option is checked. Check this option to clear index values
at the end of each document. This option is valid only when processing
multi-page images with the Split multi-page input files (5.3.4.6) option
selected.
5.10.1.8 Go to first file on Save All
When this option is selected, clicking the Save All button (7.2.4.6) will
return the user to the first file in the batch before saving all index values.
When unchecked, saving starts at the currently selected file and proceeds
forward from there.
5.10.1.9 Required documents Auditing Field
This option is very useful when scanning batches that have several specific
document types that must be present in each. A typical example of this is a
front desk scanner in a doctor’s reception area that collects and scans the
medical history, insurance, and other required documents for each patient.

SimpleIndex Documentation
- 97 -
By selecting a List field
(5.4.3.1.7) in this option,
the form below will
appear upon completion
of the batch. Items in
the list that are present
are listed in green, while
missing files are listed
in red. A Scan button is
present to allow the
user to automatically
scan and index the
missing file.
With this option selected, the user must scan and index an image for each
value in the field list or enter a justification for why the file is not present.
5.10.1.10 Format all valid dates using this pattern
The format pattern selected here is used to reformat all valid dates
regardless of the field type. This is useful for reformatting dates extracted
from OCR text or barcodes.
5.10.1.11 Forward this field value to next batch
Specify a field whose value does not change between batches here. The
value for this field from the previous batch will be the default value for the
next batch.
5.10.2 File Naming
The following options determine the file naming behavior in various
scenarios.
5.10.2.1 Substitute this value when a field is empty
If a field used to generate the filename is missing, this text is substituted for
the blank value. This makes it easy to locate files where one or more fields
are not recognized automatically by OCR or barcode recognition in an
unattended process (8.3).
If you are exporting field values to a database, you must be sure that this
value is valid for all field types you are exporting to. The initial value of
“DEFAULT” will substitute the following values for the three basic data
types:
SimpleIndex Documentation
- 98 -
• Numbers 0
• Dates 2000-01-01
• String/Char MISSING
To configure individual values for empty fields, use a Fixed field (5.4.3.1.6)
instead. For example, to configure a 3-digit OCR field to use the value
“999” if there is no result, use the following settings:
Field Type Template
Field #1 OCR ###
Field #2 Fixed %FIELD1|999%
Use Field #2 to generate the filename or export the correct value to a
database.
5.10.2.2 Saved Region Filename
You can use an OMR zone (5.4.3.1.3) to indicate a region to be captured to
a separate file. The value from this setting is appended to the name of the
exported file the region corresponds to. For example, if the exported file is
"ABC.TIF", and the region value is "Signature", and the field separator is
"_", the region file will be saved to "ABC_Signature.TIF".
5.10.2.3 Prompt before appending to existing files
Check this box to prompt the user before any existing file is modified during
the export process. When unchecked, existing files are automatically
appended to without notifying the user.
5.10.2.4 Export Zone OCR data to text files
By default, only full-page OCR text is output to separate files during export.
Select this option to have the text from Zone OCR output to text files.
5.10.2.5 Replace invalid filename characters
When a field value used to generate folder or filenames contains
characters not allowed in filenames (* ? | < > / \), the character(s) entered
here will replace the invalid ones. This may be left blank.
5.10.3 PDF Encryption/Decryption
Use the following options when importing or exporting password-protected
PDF files.
SimpleIndex Documentation
- 99 -
5.10.3.1 Password
The password entered here is used to decrypt password-protected PDF
files when importing and processing. The password will also be used to
encrypt PDF files on export, if that option is select.
5.10.3.2 Use password from user logon
When working with PDF files that have different passwords, this option is
useful as it allows the user to enter a password when signing on to
SimpleIndex and have that password used for that session. All files
processed in a single batch must have the same password, but this option
allows you to quickly change the password between batches without having
to edit the job options.
5.10.3.3 Encrypt PDF on Export
All PDF files are encrypted with the current password when the batch is
exported.
5.10.4 Custom Export
The Index Log can be converted to any format you wish using XSLT, and
advanced output can be configured using SimpleExport. Several built-in
templates are included to output to popular document management
systems.
5.10.4.1 Simple XML/HTML Reports
To do a simple log file report, enter the path to an XSLT file here and that
file will be used to convert the log to an HTML, XML, or any formatted text.
The XSLT must be designed to accept the CSV or XML log file format as
input.
5.10.4.2 Export to Document Management Systems
Templates are included for the DocuBase, ImageSilo, LaserFiche,
PaperVision, Summation and ViewWise document management systems.
You can configure any existing job file to export to these systems by
selecting the appropriate template file (*.set) from the drop down. The
template file is copied to your configuration file folder and displayed in
SimpleExport to configure advanced settings.
The free version of SimpleExport is used to configure the export settings
and save them to a SimpleExport job file (*.sej). The job file contains
additional system-specific settings that must be included in the final output.
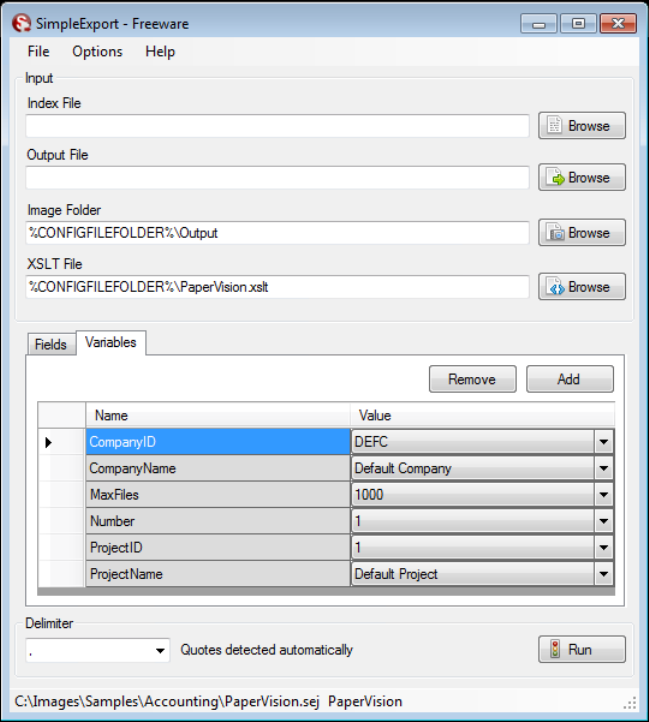
SimpleIndex Documentation
- 100 -
The Index File will be provided by SimpleIndex and can be left blank.
The Output File setting must be set to the final output filename for the
converted data file.
The Fields tab is filled in automatically with a list of data fields output by
SimpleIndex. These must be mapped to fields and data types in your
document management system as needed.
The Variables tab contains system-specific variables that must be
configured according to your vendor's import file specifications.
Additional settings are available. Please consult the SimpleExport manual
for details.
Please contact us (10) to get a quote for development of a custom log file
format.
SimpleIndex Documentation
- 101 -
5.10.5 Screen Shot OCR
Screen Shot OCR lets you index documents using data that appears on the
screen of another application. If this value is set, a screen capture of the
specified window will be taken automatically when you select OCR the
Clipboard from the Process menu. The screen capture is then processed
using the OCR job settings.
5.10.5.1 Screen Shot OCR Window
To enable this feature, enter a unique portion of the window title (the text
that appears at the top of the window with the application name). Many
applications modify the title when you open a document or perform certain
functions, so be sure to use the portion of the title that remains constant
and uniquely identifies the window among all open applications.
5.10.5.2 Use clipboard/screen shot OCR only
Check this box to disable OCR during batch processing and use OCR
settings only for clipboard, screen shot, or manual OCR.
5.10.6 SharePoint 2010 Integration
5.10.6.1 SharePoint Document Library URL
SimpleIndex is able to upload documents and index data to a SharePoint
2010 document library. This setting can also be used to upload files via
HTTP POST for integration with a variety of web-based document
management systems and custom applications.
Enter the URL of the root folder of the document library in this setting.
Folders and filenames created based on index settings will be replicated in
the library. If you need to upload all the files to a specific subfolder, you can
use a Fixed field with the Folder option checked to indicate this. If you
replace the Output folder with the SharePoint URL in the output file path,
you will get the resulting URL for the document in SharePoint.
For example:
SharePoint Site URL: http://sharepoint/Records/
Document Library URL: http://sharepoint/Records/Accounting/
Job File Output Path: Output Folder\Invoices\2010\vendor_date_invnum.pdf
Final Document URL:
http://sharepoint/Records/Accounting/Invoices/2010/vendor_date_invnum.pdf
The Document Library URL is the value that should be entered in the
options screen.
SimpleIndex Documentation
- 102 -
When uploading documents, any index fields whose name matches a
column name in SharePoint will be used to set the value of that column.
Use this method to set extended document metadata automatically.
5.10.6.2 SharePoint Login
In order to login to SharePoint automatically, your SharePoint site needs to
be included in the Local Intranet security zone in Internet Explorer. This
allows your Windows logon information to be used automatically to login to
SharePoint.
If your SharePoint site uses a different logon than Windows, be sure to
login to SharePoint in Internet Explorer before uploading documents.
5.10.6.3 Remove local files after upload
Files are saved to the Output folder before being uploaded to SharePoint.
You can keep that copy or select this option to remove it so the SharePoint
copy is the only one.
5.10.7 Database Compatibility
5.10.7.1 Allow spaces in field names
Databases that support spaces in field and table names use brackets to
enclose these names. Other databases do not use brackets. This setting is
set automatically when you use the Select a Data Source wizard (5.9.2).
5.10.7.2 Disable max rows in database queries
Some databases do not allow query size to be limited using the MaxRows
parameter. An example of this is FileMaker. Check this option to disable
query sizing.
5.10.7.3 Use streams for binary database objects
Changes how binary objects are stored and retrieved from the database.
Use the default for this option (selected) unless told to change it by support.
5.10.7.4 Insert new record if no match
When using Match and Attach (5.9.3.5) mode, the default behavior is to
give an error if no matching record is found. Check this option to
automatically insert a new record in the database if there is no record
matching the selected field values.

SimpleIndex Documentation
- 104 -
6 How to Section
There are several common scenarios whose configurations may not be
obvious from a list of options. This section is provided to describe some of
these scenarios and the configuration settings required to perform these
functions. For more how-to documents, please visit the FAQ page on
www.SimpleIndex.com.
6.1 Creating a document management system with
SimpleIndex and SimpleSearch
Creating a standalone or shared document management database with
SimpleIndex is easy. SimpleIndex is designed to work with any database
by simply mapping the index fields in SimpleIndex to fields in the database.
A key field is used to link processed files to the database record.
When scanning or importing, SimpleIndex creates new records in the
database. SimpleSearch uses the same configuration settings in Retrieval
mode (5.9.3.4) to search the index values and view the linked files (7.5).
SimpleIndex comes with an MS Access database that can be configured
automatically. You can use any custom database as your server platform,
but with these you must configure the field mappings manually – other than
that the process is the same.
To use the built-in database:
1. Create a job configuration that imports files, indexes them, and saves
them to your preferred folders and filenames.
2. Go to the Database options (5.9) and run the Create Blank Database
wizard (5.9.2.1). Browse to the folder that you want to store the
database in and click Save. If you want to share this database, be
sure to save it in a network shared folder available to all users.
3. Change the database mode to Insert New Records (5.9.3.2).
4. Save the configuration file (7.4.1.6).
5. Run some jobs to populate the database with files to search.
SimpleIndex Documentation
- 105 -
6. Create a SimpleSearch configuration by selecting Retrieval mode
(5.9.3.4).
7. Save the SimpleSearch configuration with a different name to
distinguish it from the import job.
Once you have created both an Insert and Retrieval mode configuration,
you may use these to add documents and search the database
respectively.
6.2 How to create searchable CDs and DVDs
SimpleIndex has the ability to copy all of your images, index data, and
SimpleIndex itself to a CD or DVD automatically, creating a searchable disc
that can be archived or given to anyone to view on their PC. SimpleIndex
does this using the Media Wizard (7.4.7.6).
The Media Wizard is useful for service bureaus that scan documents for
many clients and companies scanning specific files to give to accountants,
auditors, customers, etc. The Media Wizard lets the user search the CD
with SimpleSearch for free, without the 30-day demo time limit. It is an
easier and more flexible way for the user to find and access their
documents.
The Media Wizard is only able to search a single disc at once – it is not
designed to span multiple discs. If you have more images than fit on a
single CD, the user will need to copy the files off of the CD and search
them with a licensed copy of SimpleSearch.
6.3 How to use barcodes or blank pages to separate
documents automatically
Creating multi-page files from single-page files makes indexing faster and
easier. When indexing multi-page files, you only need to look at the first
page to find the index values, and the next file is shown automatically when
Save Index (7.2.4.5) is clicked. With single page files, you must flip through
each page until you get to the first page of the next document. It is also
possible to perform OCR and barcode recognition only on the first page of
each document, saving much processing time.
Creating multi-page files can be automated using barcode separator sheets
or blank pages. Blank page separation works only with 1-sided documents,
since duplex scanning produces blank pages when no information is on the
back page. Barcode separators work with any document since they use a
SimpleIndex Documentation
- 106 -
unique barcode value to indicate document breaks. These can be created
with SimpleCoversheet (7.3.20). Coversheets can be printed in large
quantities and quickly inserted between documents prior to scanning.
SimpleIndex uses an Autonumber field (5.4.3.1.1) to increment a numeric
field each time a barcode separator or blank page is detected. This is used
to create numbered, multi-page files in a temporary Output folder (5.3.1.2)
location.
A second configuration uses the temporary folder as its Input folder
(5.3.1.1) and imports the multi-page files for indexing. The Input Source
(5.3.4.1) should be set to “Folder” and Split multi-page input files (5.3.4.6)
must be disabled. Configure this job with the desired index fields and use it
to perform the data entry and output file naming.
It is possible to run both jobs sequentially by putting the path to the second
job file in the Post-Process setting (5.3.2) for the first. When the first job is
run, files are scanned, barcodes read, and multi-page files created.
Immediately the send job runs in the same window, displaying the multi-
page files to the user for indexing.
If you wish to use a database, configure the scan configuration using Insert
mode (5.9.3.2) and the indexing config in Update mode (5.9.3.3). Check
the Rename files in Update mode option (5.9.7) if you want to reorganize
the file structure as you index.
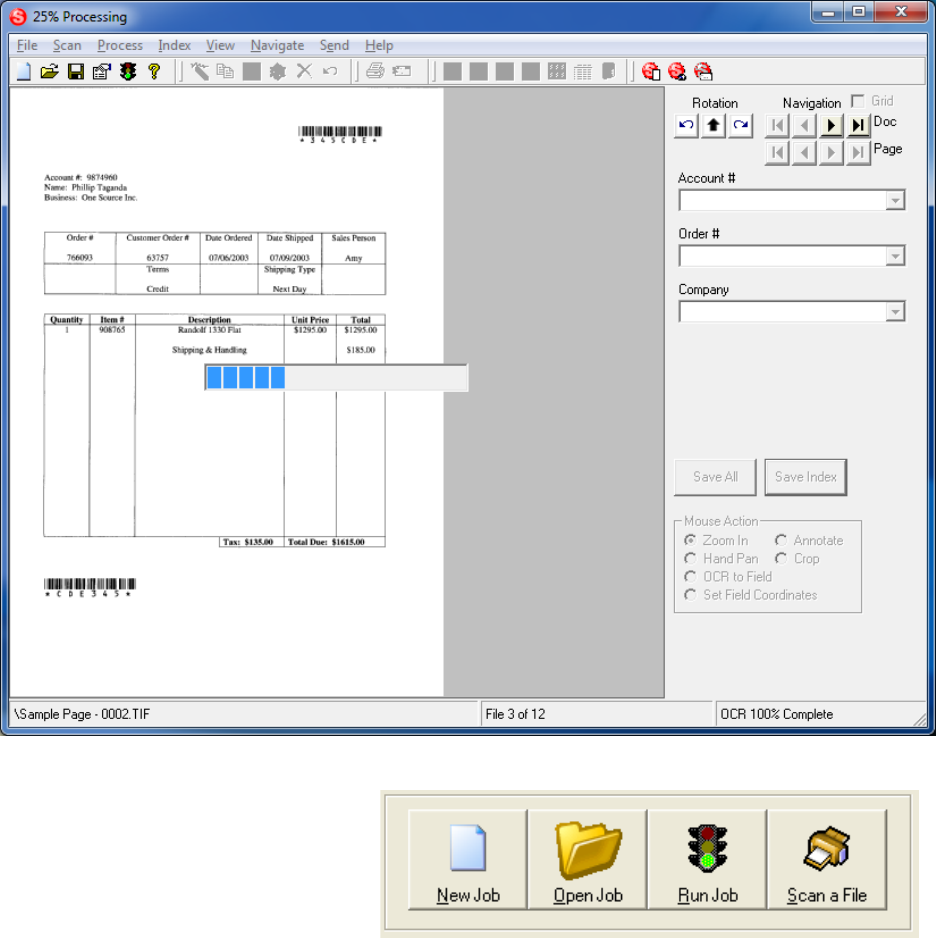
SimpleIndex Documentation
- 107 -
7 Running Jobs
This section describes the steps that the operator must take to scan,
process, index, and release a batch of documents, and the options
available at each of these stages. By becoming familiar with these options,
the scanner operator can increase the efficiency and quality of their work.
7.1 Start Screen
When you start SimpleIndex,
these 4 buttons give quick
and obvious access to the
most important functions.
The Run Job button is disabled unless you create a New Job or open and
existing job file. Clicking the Run Job button will start a new batch process
(7.2). You can quickly scan a single multi-page file without a batch job by
clicking Scan a File.
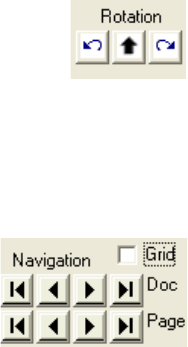
SimpleIndex Documentation
- 108 -
7.2 Batch Processing Stages & Options
This section describes the steps involved in batch processing, how to
initiate each step, and the manual processing options available to the user
during a batch.
7.2.1 Start batch
Start the batch by pressing the Run Job button (green traffic light icon) on
the toolbar.
7.2.2 Input files
Depending on the Input Source (5.3.4.1), scanning will start automatically
or images are moved from the Input folder to a temporary processing
folder.
7.2.3 Automatic processing
Image clean-up, OCR, and barcode recognition are performed
automatically. If the batch is large, OCR processing may take several
minutes. In this case, the user may do work in another application while
processing and return to the batch once processing is finished.
7.2.4 Manual indexing & image verification
Each image is displayed to the user, and they are able to enter index
information or correct the values from OCR or barcode recognition. The
following options are available during this stage:
7.2.4.1 Menu and Toolbar Options
A variety of options are available from the toolbar and menus to perform
image correction, rescanning, viewing, sending, and QC review of
documents. Please see the following sections for details on these.
7.2.4.2 Rotate Left, Right and Auto
If the page is sideways or upside down, use these buttons to
rotate the page until it is oriented correctly. Images are saved
automatically in new orientation.
Black and White TIFF images may be rotated automatically by clicking the
up arrow.
7.2.4.3 Document Navigation
Document navigation allows you to move from the current
file to the next, previous, first, or last file in the batch.
SimpleIndex Documentation
- 109 -
Changes to index fields are not saved when you use the document
navigation buttons! Use the Save Index button to save changes to index
fields and move to the next document automatically.
7.2.4.4 Page Navigation
Page buttons let you view pages within multi-page TIFF images. Page
buttons are disabled for single page files and non-TIFF files.
You can view all pages in a thumbnail view by clicking the Thumbnails
button (7.3.19). Double-clicking a thumbnail displays the full page.
Use the OCR Text view (7.4.5.7) to view and edit the recognized text for
the current file.
7.2.4.5 Save Index
Saves the current values as the index for the current image and moves to
the next file. When the last file is reached, Save Index will prompt the user
to export the batch.
7.2.4.6 Save All
Has the effect of clicking Save Index repeatedly until the end of the batch is
reached. This allows you to index an entire batch with the current values in
a single click. This is particularly useful for applying index values that are
calculated from previous images using the Forward option (5.4.3.7).
7.2.4.7 Image File Name / Browse / Open
The Image File Name field displays the filename for the current image. This
field can only be edited in Update mode.
The Open button opens the current file in its default viewer, allowing you to
view files not supported by SimpleIndex or perform advanced image
editing.
In Update mode, the Browse button will display an open file dialog that
allows the user to select another image file to replace the current one.
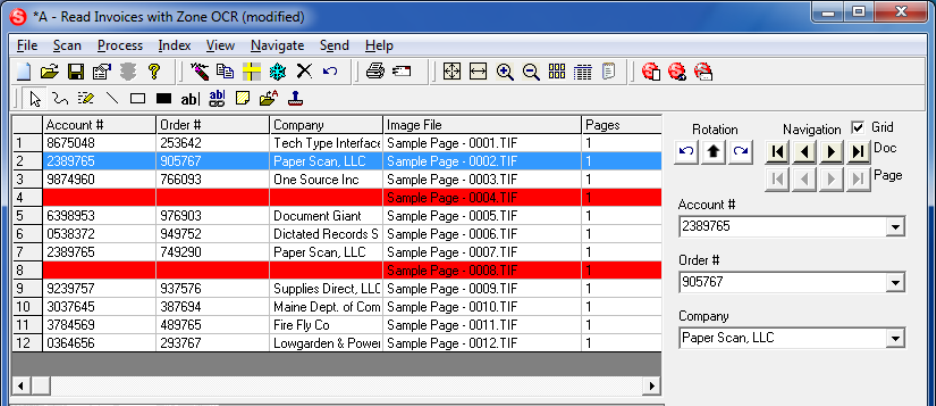
SimpleIndex Documentation
- 110 -
7.2.5 Grid View
The Grid View allows you to view all of the documents in the batch and all
of the captured index information. You can display any file by clicking the
corresponding row in the grid. Double-click a record to hide the gird and
display the file in the full window. In Update mode, you may edit index data
directly in the grid. Files marked for deletion are displayed in red.
7.2.6 Mouse Action Options
Depending on the option selected, SimpleIndex exhibits a different
behavior when a selection rectangle is drawn on the image.
7.2.6.1 Zoom In
Zooms the image to the selection. Once you draw the zoom rectangle, the
Hand Pan option is selected automatically.
7.2.6.2 Hand Pan
When the user holds down the mouse button on the image, the image
scrolls automatically allowing the user to quickly move around the page.
7.2.6.3 OCR to Field
Performs OCR on the selected region, inserts the result into the current
index field, and moves the cursor to the next field. This makes it very quick
and easy to read index information from the image manually when
automatic processing is not an option.
7.2.6.4 Set Field Coordinates
Sets the X, Y, Width, and Height options under the OCR tab to the
coordinates for the selection rectangle. This sets the OCR region for OCR
fields, as well as the Zoom Locking (7.4.5.14) region for all field types. This
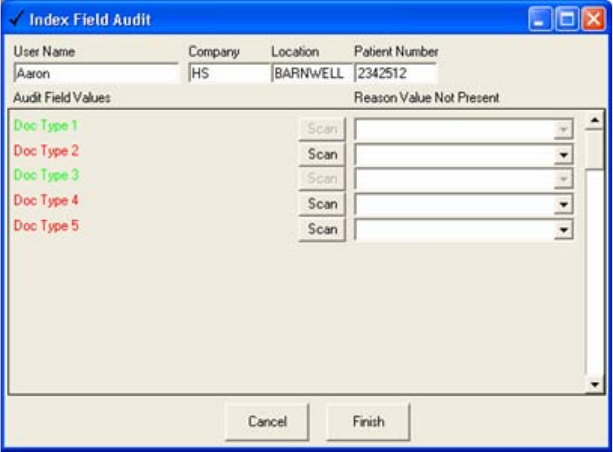
SimpleIndex Documentation
- 111 -
will cause SimpleIndex to zoom in on the selected region whenever the
corresponding field is selected.
Selecting this option will display the existing zones on the current image.
7.2.6.5 Annotate
Enables the annotation toolbar, allowing you to make a variety of markings
on the document. Options include lines, boxes, text stamps, and notes.
Annotations can only be used with Black and White TIFF images.
Annotations are saved separately from the image and can be hidden to see
the underlying image using the right-click menu. In the Global Settings
Wizard, it is possible to configure SimpleIndex to make annotations
permanent (4.6.4.4) which is useful for redacting private information on
documents.
7.2.6.6 Crop
Automatically crops the image to the selected region, discarding all image
data outside the selection rectangle. If the wrong region is selected, the full
image can be restored using the Undo toolbar button. Once Save Index is
clicked, the image is permanently cropped and cannot be undone.
7.2.7 Document presence auditing
If an Audit Field (5.10.2.4) is selected, the index field audit dialog will
appear once all images have been indexed. The user is prompted to scan
files not present in the batch or enter a justification for why the document is
not present.

SimpleIndex Documentation
- 112 -
7.2.8 Export batch
Once all files have been indexed and the batch is audited, the files are
exported. There are multiple steps in the export process, depending on the
options you select.
7.2.8.1 Create export files
If multi-page files are used, the first step is to combine files in the current
batch with the same index settings into multi-page files.
7.2.8.2 Imprint files
If the Imprint option (5.7) is selected, automatic watermarking of TIFF and
PDF files will occur at this point in the process.
7.2.8.3 Move files
When multi-page files are used, the last step of the export process is to
move files from the temporary processing folder to the Output folder
(5.3.1.2). Depending on the Existing Files setting, pages from the current
batch will replace existing files or are appended to the start or end of the
document. If the Add bookmarks to PDF files option (5.4.5.4) is selected,
pages are inserted into the matching bookmarked sections in any existing
file.
By performing the multi-page file export and move operations in two steps,
SimpleIndex greatly improves performance when exporting to large, multi-
page files on a network drive.
7.3 Toolbar Options
7.3.1 New
Displays the Job Settings Configuration wizard to create a new job
configuration.
7.3.2 Save As…
Displays the Save Job Configuration dialog to save the current job settings
to an SIC file.
7.3.3 Open
Displays the Open Job Configuration dialog box to open a new job
configuration file.
7.3.4 Options
Displays the Job Options screen to set job configuration parameters.

SimpleIndex Documentation
- 113 -
7.3.5 Run Job
Begins processing the current job file.
7.3.6 Help
Displays this manual file in Adobe Acrobat.
7.3.7 Rescan
Replaces the current page with a newly scanned image.
7.3.8 Duplicate
Creates the desired number of duplicate images with the same image and
index values as the current image. Can also be used in conjunction with
Rescan to add 1 or more pages to the batch after processing is complete.
7.3.9 Deskew
Performs automatic deskewing on the selected images to straighten the
page if it was skewed when it went through the scanner.
7.3.10 Despeckle
Performs automatic despeckling on the selected images to remove any
stray spots or “snow” that might appear on the image when it is scanned.
7.3.11 Delete
Marks the selected images and associated image information for deletion.
In Update mode, files and index information are deleted immediately.
Otherwise, files are not deleted until the batch is exported.
7.3.12 Undo
Reverts the index fields to the values present before they were modified by
the user. Also reverts any changes to the image file, such as redaction and
cropping.
7.3.13 Print
Prints the selected files. File must be able to preview in SimpleIndex to be
printed. PDF files and MS Office documents can also be printed from their
respective viewer plug-ins. When printing multiple PDF files, it is necessary
to click through a dialog after each file prints. For other file types, use the
Open button (7.2.4.7) to open the file in its default viewer and print it from
there.

SimpleIndex Documentation
- 114 -
7.3.14 E-Mail
E-mails the selected files using the default MAPI email client. You must
have an email application such as Outlook, Outlook Express, Eudora, or
Thunderbird installed and configured for your email account. It does not
work with webmail.
7.3.15 Fit Page
Automatically zooms the current image to fit entirely in the display window.
7.3.16 Fit Width
Automatically zooms the current image to fit its width in the display window.
7.3.17 Zoom In
Increases the zoom level of the current image so more detail is shown.
7.3.18 Zoom Out
Decreases the zoom level of the current image so less detail is shown.
7.3.19 Thumbnails
Displays image files in thumbnail view to let you preview pages within multi-
page files. Double-clicking a page shows it in the full page view. When
thumbnail view is selected, Despeckle, Deskew, Rotate, and Delete will
apply to all currently selected thumbnail pages. It is also possible to reorder
pages in thumbnail view by dragging and dropping thumbnails.
7.3.20 Image Grid
Displays the Image Grid (7.2.5), so you can see all of the files and index
field data in the batch.
7.3.21 OCR Text
Displays the OCR text for the current file, including full page OCR and data
from Zone OCR.
7.3.22 SimpleCoversheet
Launches SimpleCoversheet to print barcode separator sheets for
automatic indexing.
7.3.23 SimpleView
Launches SimpleView and displays the current batch in the SimpleView
thumbnail viewer.

SimpleIndex Documentation
- 115 -
7.3.24 SimpleSend
Launches SimpleSend for secure FTP and email uploading of documents.
7.4 Menu Options
This section outlines the options available through the SimpleIndex menus.
Most of the menu options do the same thing as toolbar buttons and so their
descriptions refer to those buttons. Options not available elsewhere are
described in detail.
7.4.1 File Menu
7.4.1.1 New Job Configuration
Creates a new job configuration using the Job Settings Wizard.
7.4.1.2 Open
Displays the Open Job Configuration dialog box to open a new job
configuration file.
7.4.1.3 Open URL
Allows you to enter the URL for a configuration file on a website and open it
directly from there. This lets administrators centrally manage configuration
files on a website and even provide a web page with links to a variety of
scan jobs.
To host SIC files on a website, it is necessary to add the SIC file type to the
list of MIME types on your server. See the server documentation for details.
It is also possible to save configuration files as XML to avoid MIME type
issues.
7.4.1.4 Open Recent
Displays the last 4 configuration files opened.
7.4.1.5 Save
Saves the current job configuration without displaying the Save As dialog.
7.4.1.6 Save As…
Displays the Save As job configuration dialog to save the current job
settings to file.
7.4.1.7 Close
Close the current job file, ending any job in progress.
SimpleIndex Documentation
- 116 -
7.4.1.8 File Viewer
The File Viewer options let you view and edit single files with SimpleIndex
without running a batch job.
7.4.1.9 Run Job
Creates a new batch and begins processing the current job file.
7.4.1.10 End Job
Aborts the job in progress. Images from the current batch are deleted or
moved to the Backup folder (5.3.1.4) if configured.
7.4.1.11 Resume Job
If SimpleIndex is restarted due to an error during processing, use this
option to resume processing the last batch without rescanning. You will be
shown an Open dialog displaying the temporary batch process folder or the
Backup folder (5.3.1.4) if no batches are in the temp folder. Select the
folder that corresponds to the date and time of the aborted batch to re-
process the images in that batch.
7.4.1.12 Schedule Job
Allows you to schedule a SimpleIndex job (8.3) to run at a future date or a
recurring period of time.
7.4.1.13 Job Options
Displays the Job Options screen to edit the current job configuration
settings.
7.4.1.14 Job Settings Wizard
Displays the Job Settings Wizard to edit the job current configuration
settings using the wizard.
7.4.1.15 Global Settings Wizard
Displays the Global Settings Wizard (4.5) to set default folders and security
settings.
7.4.1.16 SimpleCoversheet
Launches the SimpleCoversheet barcode coversheet designer application.
7.4.1.17 SimpleView
Launches the SimpleView application. If a batch is in progress,
automatically opens SimpleView in the Processing folder, displaying
thumbnails for the images in the current batch. If no batch is in progress,
the Output folder is displayed by default.
SimpleIndex Documentation
- 117 -
7.4.1.18 SimpleSend
Launches the SimpleSend secure FTP and email transfer application.
7.4.1.19 Exit
This manual requires the user to figure this one out for his/her self.
7.4.2 Scan Menu
7.4.2.1 Use TWAIN Driver
Check this option to use the TWAIN scanner driver. TWAIN is compatible
with more scanners, but is slower than ISIS for most sheetfed document
scanners. It is recommended that you use ISIS if your scanner supports it.
7.4.2.2 Use ISIS Driver
Check this option to use the ISIS scanner driver instead of the default
TWAIN. ISIS scanning is faster and more stable than TWAIN scanning,
particularly for high-speed document scanners. An ISIS license is required
to use this option.
ISIS scanning is recommended for use with any document scanner that
supports it. With ISIS, all scanner settings are saved to your SimpleIndex
job file. This lets you specify job-specific scanner settings that load
automatically when you open a job file.
7.4.2.3 Select Scanner
Displays the Select TWAIN or ISIS Source dialog, allowing you to select
the scanner you wish to use with your SimpleIndex job.
7.4.2.4 Display Scanner Settings
Displays the TWAIN or ISIS settings dialog, allowing you to modify the
resolution, page size, thresholds, and other scanner settings available with
your model scanner.
ISIS scanner settings are saved to your job configuration file. Save the job
configuration to save the new settings and use them whenever the current
job is opened.
Most TWAIN scanners will “remember” the last settings used each time a
new scan is performed. You should only need to modify the settings when
scanning different types of documents.
Scanners that use the Window Imaging (WIA) TWAIN driver do not
remember settings. For these scanners you should check the Display
SimpleIndex Documentation
- 118 -
Settings Before Scan (7.4.2.5) option to show the scanner settings before
each new scan.
7.4.2.5 Compression
The compression settings are applied anytime an image is saved. This
happens automatically when:
• Scanning images
• Importing multi-page TIFF files when the Split multi-page input files
option (5.3.4.6) is selected.
• PDF to TIFF conversion (5.3.4.7)
• Exporting image files to a different file type
7.4.2.5.1 Recompress Images
Check this option to recompress both
scanned and imported images that don’t
match the compression settings specified
in the Compression Options.
Recompression takes place on export and
may slow down processing significantly,
depending on the source and output
compression settings.
7.4.2.5.2 Black & White Pages
Set the compression type for 1-bit per pixel
black & white images. Group 4 (fax)
compression provides optimal compression
without loss of image quality and is
recommended in all cases.
7.4.2.5.3 Color & Grayscale Pages
Set the compression type for all color and grayscale images. JPEG
compression is used by default. LZW is a lossless compression type and
should be used instead of JPEG when image quality is the highest priority.
7.4.2.5.4 JPEG Quality
Manually set the JPEG quality setting to an exact value (1-100). More detail
is retained with a higher quality setting, but the file size is also larger. JPEG
compression is "lossy", meaning that some image resolution is lost in the
compression process.
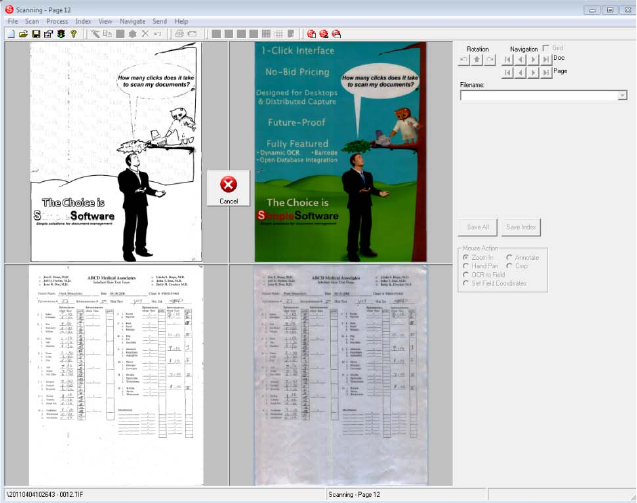
SimpleIndex Documentation
- 119 -
7.4.2.6 Set # of Page Windows
When scanning in ISIS mode, multiple pages can be displayed on the
screen at once (up to 9). This option is not available in TWAIN mode. This
is useful for viewing both sides of a duplex scan or multiple image streams
at once.
7.4.2.7 Display Settings Before Scan
When this menu option is checked, the scanner settings dialog are
automatically displayed before each new scan.
7.4.2.8 Display Scan More Prompt
This checkable menu item causes SimpleIndex to ask the user if s/he
wants to scan more pages into the current batch. This helps if the
scanner’s hopper is not big enough for all the pages, or if a jam interrupts
scanning before the batch is complete.
7.4.2.9 Manually Duplex
Use this option to scan 2-sided (duplex) documents on a 1-sided (simplex)
scanner. When checked, the user is prompted to scan the front side of the
batch first and then the back. When the batch is processed, the pages will
appear in the correct order.
7.4.2.10 Split Pages Vertically
Automatically splits images vertically as they are scanned. This is very
useful for scanning books on a flatbed scanner.
SimpleIndex Documentation
- 120 -
7.4.2.11 Split Pages Horizontally
Automatically splits images horizontally after they are scanned. Again,
useful for scanning books on a flatbed scanner.
7.4.2.12 Magazine Scan
Use this option to scan booklets or magazines that have 2 pages printed
side by side and folded down the middle without cutting. When this option
is checked, pages are split down the middle, automatically rotated, and
reordered, so each page is a single image in the proper order and
orientation.
7.4.2.13 Scan to Multi-Page File
Lets you scan a document and save it to a single multi-page TIFF or PDF
file. Useful for scanning example files for OCR zones (5.6.2.3) or for ad-hoc
scanning of single documents without a batch configuration.
7.4.2.14 Scan to Input Folder
This option lets you scan images to sequentially numbered files in the Input
folder (5.3.1.1) for later processing.
Normally, scanning is done automatically as the first stage in processing.
Certain applications may run faster by manually initiating the scanning in
this way, instead of automatically processing images after scanning.
7.4.2.15 Add Pages to Batch
Allows you to add more pages to the current batch after scanning has
finished without rescanning or creating a new batch. All pages in the batch
must be re-processed, losing any manual indexing or automatic processing
like OCR and barcode recognition. This option should only be used to add
pages to a manually indexed batch when a paper jam or other scanner
issue causes scanning to end prematurely.
7.4.2.16 Rescan Page
When a batch is in progress, you may use this option to replace the current
page with a newly scanned image.
7.4.2.17 Scan This File
Scans the current file. Used only in Update mode (5.9.3.3) to scan and
attach images to existing records in a database.
Use Match and Attach mode (5.9.3.5) to perform this task automatically
with batches of documents.
SimpleIndex Documentation
- 121 -
7.4.3 Process Menu
7.4.3.1 Process Selected Files
Performs OCR, barcode recognition, and other automatic processes on the
current page. Useful for testing OCR zones on example images.
7.4.3.2 Reprocess Batch
Reprocesses all of the images in the current batch without reading new
images from the scanner or Input folder.
7.4.3.3 OCR to Word/HTML/PDF
Performs full-page OCR on the current document and lets you export to MS
Word, HTML, Text, or PDF.
7.4.3.4 OCR the Clipboard
Perform OCR on an image currently stored in the Windows Clipboard. OCR
zones, dictionary, and template matching will be applied to the clipboard
image as if it was a document image being processed. The resulting index
data will be populated in the corresponding fields.
If the current configuration has the Screen Shot OCR Window (5.10.5)
setting defined, then the application will automatically bring that window
into focus, take a screen shot, then use that image to perform OCR.
7.4.3.5 Test Barcodes
Reads the current image with all barcode detection options available and
reports all detected barcodes along with their coordinates, type, and
checksum data.
7.4.3.6 Rotate Left
Performs the same function as the Rotate Left button (7.2.4.2).
7.4.3.7 Rotate Right
Performs the same function as the Rotate Right button (7.2.4.2).
7.4.3.8 Auto-Rotate
Performs the same function as the Auto-Rotate button (7.2.4.2).
7.4.3.9 Deskew Page
Performs the same function as the Deskew toolbar button (7.3.9).
7.4.3.10 Despeckle Page
Performs the same function as the Despeckle toolbar button (7.3.10).
SimpleIndex Documentation
- 122 -
7.4.3.11 Enable Processing Log
Select this menu option to enable the Processing Log, which causes an
extended log file called “Process_YYYY-MM-DD.txt” to be created in your
Log folder (5.3.1.3). A new log is created for each day. This file contains
extensive information on the processing steps taking place during each
SimpleIndex job.
If you have Enable Processing Log checked when you create a
SimpleIndex service (8.3.3), the service is configured to create a
processing log as it runs. To enable this after the service has been created,
you must delete and re-create the service.
The Processing Log is particularly useful for:
• Diagnosing issues with unattended processing
• Viewing raw zone OCR results prior to template matching
• Working with Simple Software support
7.4.3.12 View Processing Log
Opens the current Processing Log in Notepad.
7.4.4 Index Menu
7.4.4.1 Save Index Values
Performs the same function as the Save Index button (7.2.4.5).
7.4.4.2 Save All with Current Values
Performs the same function as the Save All button (7.2.4.6).
7.4.4.3 Find in List
Searches the for the current field to find a specific value. This is useful
when a list field is very long and items are not easily found alphabetically.
The search string is matched against any part of the list value. The
keyboard shortcut Control+F can be used to quickly access this function. If
there are multiple matches in the list, you can repeat the find to locate
subsequent matches.
7.4.4.4 Refresh Lists
Reloads all drop-down list fields from the database or text file. Lets you add
records to the list during batch processing and refresh the list to use it as
an index value in a list field.
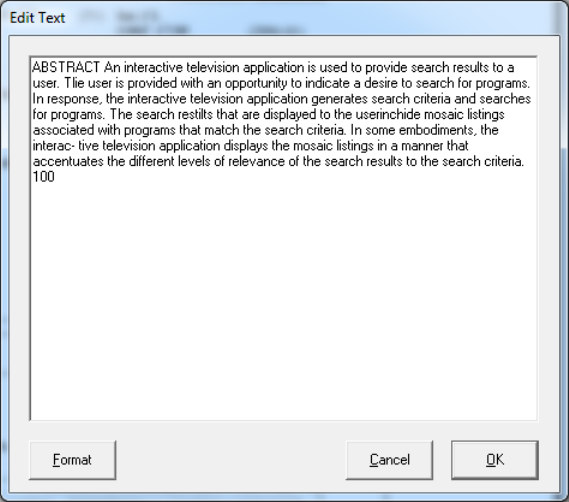
SimpleIndex Documentation
- 123 -
7.4.4.5 Edit Text
Brings up the Edit Text
dialog box. This lets you
read and edit fields that are
too long to view in the
standard indexing box.
The Format button applies
the space trimming,
character stripping, and
find/replace functions
defined for the current field
to the text in the box.
This makes it possible to
select blocks of text with
the PDF text selection tool,
copy it to the clipboard, paste it into the Edit Text box, and quickly reformat
the text to match the requirements of your index field. This proves to be a
highly efficient way to capture whole paragraphs of text.
7.4.4.6 Mark/Unmark for Deletion
Performs the same function as the Delete toolbar button (7.3.11).
7.4.4.7 Duplicate Page
Performs the same function as the Duplicate toolbar button (7.3.8).
7.4.4.8 Undo Changes
Performs the same function as the Undo toolbar button (7.3.12).
7.4.5 View Menu
7.4.5.1 Actual Size
View the actual pixels of the image in 1:1 ratio.
7.4.5.2 Full Page
Fit the entire page on the screen (7.3.15).
7.4.5.3 Page Width
Fit the width of the page on the screen (7.3.16).
7.4.5.4 Image Thumbnails
Performs the same function as the Thumbnails toolbar button (7.3.19).
SimpleIndex Documentation
- 124 -
7.4.5.5 Batch Thumbnails
Performs the same function as the SimpleView toolbar button (7.3.23).
7.4.5.6 Image Grid
Displays or hides the Grid view (7.2.5).
7.4.5.7 OCR Text
When this option is selected, OCR text for each file is displayed in the
SimpleIndex window instead of the original file. This includes text from full-
page OCR, existing text files, and text extracted from MS Office and PDF
files. Zone OCR text is not displayed. The OCR text may be edited to
correct mistakes. Changes are saved when the Save Index button (7.2.4.5)
is clicked.
7.4.5.8 Reset Grid Columns
Reverts all grid column sizes back to their default. Use it to restore columns
that have been hidden by shrinking them down to zero width.
7.4.5.9 Input Folder
Opens the Input folder (5.3.1.1) for the current job in Windows Explorer.
7.4.5.10 Processing Folder
Opens the current processing folder. For most jobs this folder is:
C:\Documents and Settings\CurrentUser\Local Settings\Temp\SimpleIndex
7.4.5.11 Output Folder
Opens the Output folder (5.3.1.2) for the current job in Windows Explorer.
7.4.5.12 Log Folder
Opens the Log folder (5.3.1.3) for the current job in Windows Explorer.
7.4.5.13 Backup Folder
Opens the Backup folder (5.3.1.4) for the current job in Windows Explorer.
7.4.5.14 Annotation Toolbar
Use this option to show or hide the annotation toolbar when TIFF images
are displayed. When annotations are not used, hiding the toolbar gives you
a little extra room to view images.
7.4.5.15 Enable Zoom Locking
This checkable option enables or disables the automatic zooming feature of
SimpleIndex, configured in the Zones & OCR settings (5.6). Automatic
zooming causes the display to zoom in on a certain part of the image
SimpleIndex Documentation
- 125 -
whenever a field is selected. Some users may prefer this feature, others
may not. This menu option lets you turn it on and off.
7.4.6 Navigate Menu
The options in the Navigate menu perform the same functions as the
Document Navigation and Page Navigation buttons on the main screen.
Only the additional navigation functions are listed here.
7.4.6.1 Next Empty Field
This takes you to the next page in the batch that has a required index field
that is blank. This lets you quickly find missing index values within a batch.
7.4.6.2 Next Deleted Page
Takes you to the next page in the batch that is marked for deletion.
7.4.6.3 Next Unsaved Page
Takes you to the next page in the batch with unsaved index values. Helpful
for finding any unfinished files in a batch that is ready to export.
7.4.6.4 Jump to Document
Allows you to display a specific file within the batch immediately, without
cycling through the page or document buttons. The status bar on the
bottom of the SimpleIndex window displays the current file number and
total number of files in the batch.
7.4.7 Send Menu
7.4.7.1 Select All Files
Selects all files in the current batch.
7.4.7.2 E-Mail Selected Files
Performs the same function as the Email toolbar button (7.3.14).
7.4.7.3 Print Selected Files
Prints the current image file. If the Show Print Settings menu option is
checked, the print settings are displayed to allow you to select a printer,
page range and other settings. PDF files may be printed from the Acrobat
Reader plug-in. For OLE and other file types, use the Open button to open
the file in its default viewer and print from there.
7.4.7.4 Export Selected Files
This option is only enabled in Retrieval mode (5.9.3.4). It allows you to
save all the files from the current search results to another folder
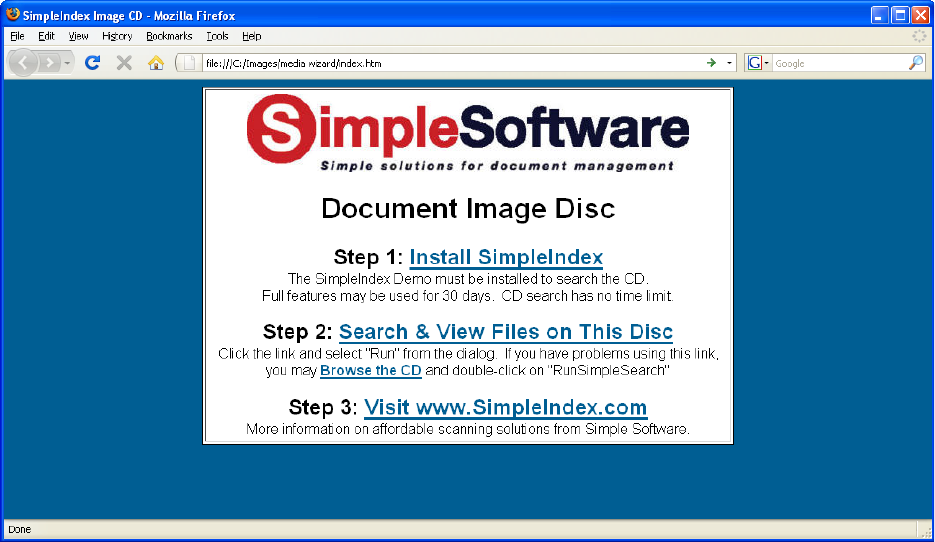
SimpleIndex Documentation
- 126 -
automatically. Useful for sending several related documents to another
person at once.
7.4.7.5 Export Index Values
This option is only enabled in Retrieval mode (5.9.3.4). It allows you to
save the index information from all the files in the current batch to a CSV
file. Useful for creating reports or spreadsheets based on values from
search results.
7.4.7.6 Media Wizard
The Media Wizard lets you copy a database and the image files associated
with it to a temp folder for burning to a CD or DVD, or for copying to any
other media or network location. The end product is a CD or DVD that
automatically launches a start page when inserted. The start page contains
links to a SimpleIndex demo installation, as well as saved configuration
files for searching and viewing the documents on the disc.
Searching images from a CD or DVD is free. The demo time limit is
bypassed when running a Retrieval mode (5.9.3.4) configuration from a
CD/DVD drive. Using a configuration from the hard drive or network will run
SimpleIndex in Demo mode.
To enable installation of SimpleIndex from the CD/DVD, you must copy
the SimpleIndex setup file to \CDFiles\Setup.exe in your program
folder (default is C:\Program Files\SimpleIndex).
SimpleIndex Documentation
- 127 -
You may modify the Index.htm file or the autorun settings in the CDFiles
folder to customize the disc with your own startup page. It is possible to
have multimedia demos or custom programs run automatically when you
insert the CD.
The Media Wizard performs the following tasks:
1. Prompts the user to select a folder. This folder is a temporary folder
that will hold all the files for the disc until they can be burned. Select a
folder by browsing to it and clicking Save.
2. Copies the Access database used by the current job to the folder,
saving it under the name “SimpleIndex.mdb”. This step will fail if
your Data Source setting uses ODBC or OLEDB. Your Data
Source setting must be a path to a valid Access database.
3. Copies all of the images from the Output folder (5.3.1.2) to the
selected folder. All files and subfolders are copied, even if their size is
much larger than your media. When using the Media Wizard, be sure
that your Output folder is not larger than the capacity of your disc.
4. Saves several copies of the current configuration in Retrieval mode,
replacing the Input folder (5.3.1.1), Output folder (5.3.1.2) and Data
Source path (5.9.2) with “D:”, “E:”, etc., allowing the user to search
the media no matter what drive letter their reader uses.
5. Copies all the files in your “CDFiles” folder to the selected CD folder.
This includes an autorun program, startup web page, and
SimpleIndex installer. The web page contains links to the
SimpleIndex installer, Access database, and a batch file that detects
the CD drive letter and launches the appropriate configuration file.
7.4.8 Help Menu
7.4.8.1 Manual
Opens the SimpleIndex Manual in Adobe Acrobat. You must have a PDF
viewer installed on your computer to view the manual.
7.4.8.2 Getting Started
Displays the Getting Started Guide listing several basic tips on using
SimpleIndex.
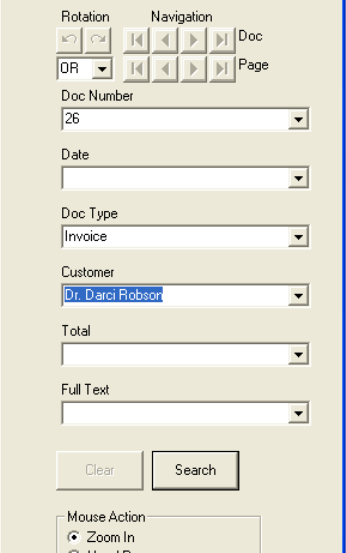
SimpleIndex Documentation
- 128 -
7.4.8.3 Setting Field Coordinates
Displays the field coordinates window to assist in setting OCR zones.
7.4.8.4 Activate/Transfer License
Displays the licensing window, allowing you to order, register, or transfer
the registration for your copy of SimpleIndex.
7.4.8.5 Download Updates
Opens the Update page on SimpleIndex.com in the default web browser.
7.4.8.6 Visit SimpleIndex.com
Opens the SimpleIndex.com website in the default web browser.
7.4.8.7 About SimpleIndex
Displays the version information for SimpleIndex.
7.5 Running jobs in SimpleSearch
With SimpleSearch, as well as SimpleIndex jobs configured for Retrieval
mode (5.9.3.4), the index fields are turned into search fields, allowing you
to type in criteria and view the matching documents.
SimpleSearch automatically uses partial matching to let you search for any
part of the field value and pull up all the records that contain it. This allows
you to quickly search for files without typing long strings of characters,
finding groups of documents and finding files where spelling may be in
question.
Use the And/Or selector to choose between
matching all the values or any one of them. If
a list is associated with that field you can
select it using the drop-down.
Clicking the Search button retrieves the
matching records and displays the first one
on the screen. The index information for this
document is displayed in the index fields but
is not editable. You may use the navigation,
zoom and rotation functions to view the
documents, or click the Open button to open
the current document in your default viewer,
such as Imaging for Windows or Adobe
Acrobat.
SimpleIndex Documentation
- 129 -
While viewing documents, you may click the Clear button at any time to
clear the display and search fields, enable the Search button, and allow
you to perform another lookup.
SimpleSearch can also be initiated from the Command Line Interface (8).
Search keywords can be specified on the command line and the matching
records displayed automatically.

SimpleIndex Documentation
- 130 -
8 Command Line Execution
Another powerful feature of SimpleIndex is that jobs can be executed from
the command line and completed without user intervention. This allows
programmers to implement fully automated document scanning in their
applications with just a few lines of code. Non-programmers may also take
advantage of this feature by designing program shortcuts with pre-defined
index values and modes of operation. Using these methods, the work of the
scanner operator can be reduced to a single mouse click.
8.1 Command Line Parameters
Usage 1: SimpleIndex [options]
Options:
/c:configfile
specify a configuration file to use
/m
specifies “manual” mode; disables automation and allows
user to interact with prompts
/u:userid
uses the specified user ID for database logon and audit
features
/p:password
uses the specified password for database logon
/d:#
enables the processing log with the logging detail level
specified by # (0-5)
/#:value
where # is a field number (1-99), sets the index data for
that field to value
/i:inputfolder
override the Input folder setting in the job config
/o:outputfolder
override the Output folder setting in the job config
/e
run in SimpleSearch mode
/t
exits the program after batch processing is finished
Usage 2: SimpleIndex configfile [field1value] [field2value] [field3value] …
Using this form allows you to simply double-click a configuration file and
have SimpleIndex execute it.
8.2 Implementing the command line interface
8.2.1 Opening SimpleIndex configurations from an icon
The command line interface allows saved SIC config files to be double-
clicked, starting SimpleIndex and running the job automatically. If the batch
is pre-indexed, the whole process will run unattended.

SimpleIndex Documentation
- 131 -
SimpleIndex job files can be opened from other applications, including the
hotkeys on many scanners. By mapping hotkey events to SimpleIndex
jobs, users can load documents, press the button for that document type,
and have all the files scanned and indexed automatically.
By default, pre-indexed jobs run minimized when launched from an icon or
command line. A dialog box is displayed when the batch has completed to
let the user know it is finished. Use the “/q” option to suppress this dialog.
If you want to be able to open a config file by double-clicking it but not have
it automatically start processing, you can create a shortcut to that config
that includes the “/m” switch. This will disable automatic processing and
only open SimpleIndex with the specified config.
8.2.2 Integrating scanning with custom applications
Using the command line interface, all your program has to do is launch
SimpleIndex with the appropriate configuration, and images can
automatically be linked to the data in your application. There are a few
ways to do this:
• Use the Insert (5.9.3.2) or Update (5.9.3.3) database modes to
update your database directly.
• Import the images and index information from the Index Log (5.8).
• Assume file structure based on the index data. If index field values
are used to create a standard file naming convention, files can be
opened from other applications by
calculating the path on-the-fly.
8.3 Unattended Processing
SimpleIndex can be configured for
unattended processing using several
methods. To access scheduled processing
options, open the configuration file you want
to schedule and click the Schedule Job
option from the File menu. The dialog shown
here are displayed.
8.3.1 Run Jobs on a Timer
This option lets you keep SimpleIndex open
on the desktop and have process the job on
a regular interval. Indicate how often you
would like the job to run using the Timer
SimpleIndex Documentation
- 132 -
Interval and click Run to begin automatic processing. SimpleIndex will
continue to process the job on the selected interval until the user clicks the
Cancel button. You can also select Stop when input folder is empty to end
automatic processing as soon as all files have been processed.
8.3.2 Run Jobs with Windows Task Scheduler
You can use the Windows Task Scheduler to automatically launch
SimpleIndex and run a job at a particular date in the future or to run it on an
interval. Using the Task Scheduler does not require a Server license. The
main drawback to this approach is that a user must be logged on to the
computer for the job to run. Processing will stop if the user logs off or the
computer is rebooted.
To configure a scheduled task, select a start date and time and click
Schedule. You may optionally indicate a user account and password to run
the task if the logged on user has insufficient rights.
Click Edit Tasks to open the Windows Task Scheduler. From here you can
enable or disable specific jobs, or configure detailed settings.
8.3.3 Configure Service Options
Click this to open the Configure SimpleIndex Service application to
configure jobs to run as Windows services.
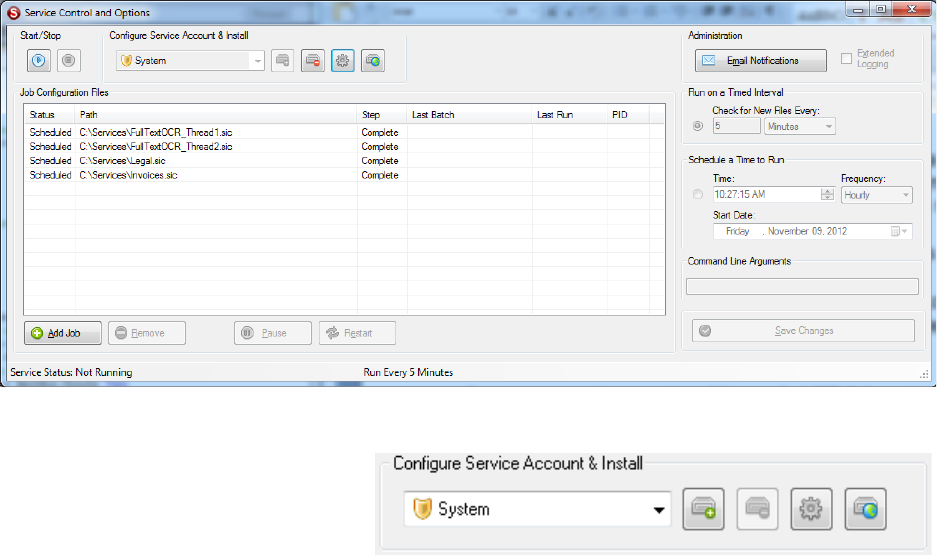
SimpleIndex Documentation
- 133 -
9 Run Jobs as a Windows Service
The Server license enables you run SimpleIndex as a Windows Service.
This enables fully unattended processing for high-demand, server
environments. Advantages to running as a Windows service include:
• User does not have to be logged on for process to run
• All dialog boxes are suppressed
• Errors are logged to the Windows Application Log
• Processing runs faster when application is hidden
• Services can be started and stopped remotely
Server processing requires Microsoft .NET 2.0 or above.
The service options can be opened by clicking Configure Service Options
from the Schedule Job screen, or it can be launched from the Start menu
under SimpleIndex\Tools\Configure SimpleIndex Service.
9.1 Service Installation
The SimpleIndex service
must first be installed before
it can be configured. The
service must run under a
user account that has modify access rights to all folders and files used by
the job. When all files are stored on the same computer, the System
account is recommended. When files are stored on a network server, you
must select a user account that has sufficient network permissions to
access these files. Under the Service Account drop-down, select System or
User as needed then click the Install Service button on the right to create
the service.
SimpleIndex Documentation
- 134 -
When you click Install Service, you will be prompted to select the startup
type (Manual or Automatic) and the user account (if User is selected).
After the service is installed, you can delete the service and all associated
settings using the Delete Service button.
Once all service options have been configured, you can use the Start and
Stop buttons to control service execution. You may also edit detailed
service parameters using the Services management tool.
9.2 Job Configuration Files List
9.2.1 Adding and Removing Jobs
Once the service is installed you must add the job files that you want to run
to the list using the Add Job button. Only Pre-Indexed jobs (5.4.1) can be
run as a service--if the job is not configured properly for unattended
processing, you will receive a warning when you try to add it.
Each job file name must be unique. It is possible to have multiple threads
for the same job if you create copies of the job file and add each one to the
list. This improves throughput by utilizing multiple CPU cores
simultaneously.
Depending on the computer, once 5-8 job processes are running at the
same you may experience errors with some jobs. It is recommended that
you schedule jobs in such a way that no more than 5 will run at the same
time. Jobs that run on a timer interval will always have an active process,
while scheduled jobs are only active at the designated times.
To remove a job from the list, select the job and click the Remove button.
This will delete all scheduling settings for that job from the registry.
9.2.2 Monitoring Job Progress
When the service is running, the Job Configuration Files list displays
information about the status of each job.
9.2.2.1 Status
The current start/stop status of the service job. One of the following:
Scheduled: job is started and set to run at a future time.
Pending: timed job is awaiting next interval to start processing thread.
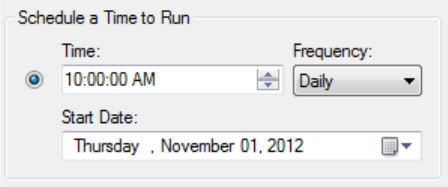
SimpleIndex Documentation
- 135 -
Paused: job is currently paused and will not run.
Running: processing thread is currently running.
Stopping: stop request has been received but a batch process is finishing.
9.2.2.2 Path
The path to the job file.
9.2.2.3 Step
The current processing step for the batch in progress. These correspond to
the processing steps when you run the job interactively. Possible values:
Startup
PreProcess
Import
Processing
Export
Imprint
PostProcess
Complete
9.2.2.4 Last Batch
The Batch ID for the last job to process.
9.2.2.5 Last Run
The last date/time that a new process was started. For scheduled jobs this
will indicate the time of the last batch process. For timer jobs this is the last
time the processing thread was restarted.
9.2.2.6 PID
The Process ID for the processing thread for the current job. This field is
blank if there is no active process. When you view the list of running
processes in the Task Manager, the PID will let you figure out which
process corresponds to the job.
9.3 Scheduling Jobs to Run
9.3.1 Schedule a Time to Run
It is possible to run multiple jobs on
different schedules. To configure the
job schedule, select the job file from
the list and the schedule for that job
are displayed under Service
Schedule.
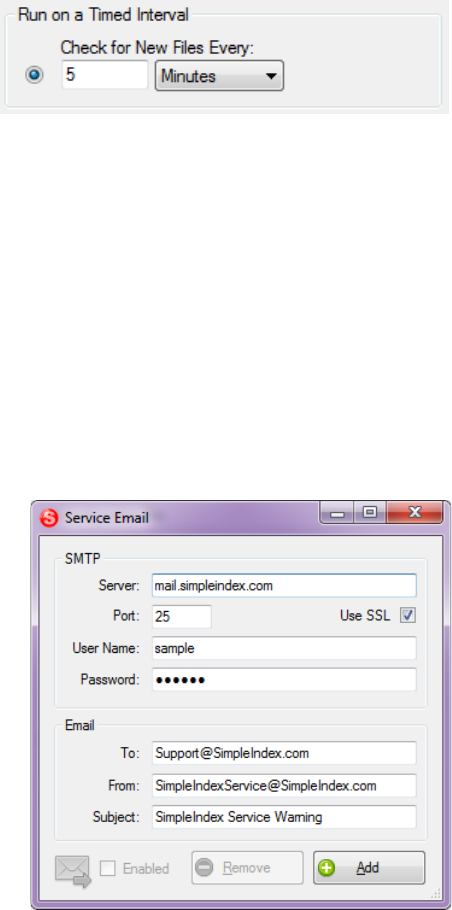
SimpleIndex Documentation
- 136 -
Once the schedule has been set, click Save Changes to update the service
controller. This will automatically restart the service.
9.3.2 Run on a Timed Interval
To run a job in a way that monitors a
"hot folder" and processes new files
as they appear, select Run on a
Timed Interval. The Input folder for
the job will be checked at the designated time interval in minutes or hours.
9.4 Advanced Service Options
Command Line Arguments - the SimpleIndex service works by launching
a new SimpleIndex process for each job on its scheduled interval.
Therefore it is possible to modify job parameters via the command line
interface as part of the service configuration. The most common use for this
is to enable the processing log with "/d". This will generate a detailed
processing log that is very useful for diagnosing issues with unattended
processes.
Email Notifications - the SimpleIndex
service can email an administrator
whenever there is an error with one of
the service jobs. To configure email
notifications, click the Tools box at the
bottom of the service configuration and
select Email to display the email
settings.
The email notification system uses
SMTP to send messages. Enter the
SMTP server, user, and password.
Check Use SSL to encrypt the logon
and prevent the password from being
sent in plain text. Finally enter the To, From and Subject that will be used
and click Add to save the settings, test and enable the email notifications.
Extended Logging - add items to the Application Log for any time a new
process starts or stops, not just when an error occurs.

SimpleIndex Documentation
- 137 -
9.5 Web Service Interface
The web service interface lets you run specific jobs on the server on
demand. The client application is able to send job file paths or URLs to the
server and the server will immediately start processing that job.
The key advantages of using the web service interface are:
• Run any job without having to configure and schedule it
• Jobs run immediately instead of on a schedule
• Tighter integration with custom applications
• Lower overhead on the server when you have many possible job files
9.5.1 Installing the Web Service
9.5.1.1 IIS Installation
On your web server, copy the WebJob.asmx file from your installation
folder to a web-viewable folder on your web server. Note the resulting URL.
For example, if your website is "www.mysite.com" and you place the file in
a folder called "Service" the resulting URL would be:
"http://www.mysite.com/Service/WebJob.asmx".
This is the URL you need to enter in the next step.
9.5.1.2 Connecting to the Web Service
Click the Add Web Service button in the service manager to enter
the URL from the previous step. A dialog will note if the connection is
successful or not.
Once a URL is entered, the service will connect to the web service and
listen for jobs automatically when it is started. To disable the web service,
simply enter a blank for the URL.
9.5.2 Using the Web Service
9.5.2.1 Using the Web Service Sample Client
A sample application is installed in the program folder called
WebServiceClient.exe. This application can be used to connect to the web
service and launch jobs on the server.
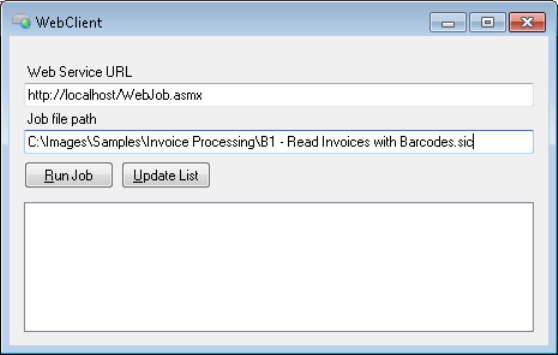
SimpleIndex Documentation
- 138 -
Launch the application. Enter your Web Service URL for your server. You
can then enter either the full path to a job file under Job File Path, or you
can enter a valid command line that includes the job file as well as other
parameters like Input or Output folders and index values. Click the Run Job
button to send the job to the server for processing.
If multiple jobs have been queued for processing on the server, you can
use the Update List button to see the list of pending jobs.
WebServiceClient.exe can be distributed by itself and run from any
computer. The web service is designed to be integrated into your custom
application but the sample application can be used if necessary.
9.5.2.2 Referencing the Web Service
As with any web service, you must first add a web service reference to your
.NET project. Right-click your project and select Add Web Reference... (or
Add Service Reference...) from the context menu. Enter the URL for your
web service from (9.5.1.1).
9.5.2.3 Launching Jobs with the Web Service
Once you have added the reference to the web service, you can start new
jobs on the server by calling the AddJob function.
AddJob takes two parameters. The Session ID is a GUID that uniquely
identifies this application instance and allows multiple clients to
communicate with the server. The second parameter is a Job File Path,
which can be a URL, UNC path or local file path on the server. This must
be a valid XML job file that is accessible by the server process.
C#
SimpleIndex Documentation
- 139 -
WebJob srvc = new WebJob();
Guid sessionID = Guid.NewGuid();
string JobFile = @"http://www.myserver.com/jobfile.sic";
srvc.AddJob(sessionID, JobFile);
VB.NET
Dim srvc as WebJob
Dim sessionID as Guid
sessionID = Guid.NewGuid()
Dim JobFile as string = @"http://www.myserver.com/jobfile.sic"
srvc.AddJob(sessionID, JobFile)
SimpleIndex Documentation
- 140 -
10 Glossary
These terms are used without definition throughout this manual. Many refer
to specific functions of SimpleIndex and hence have different meanings
than when used elsewhere. Please familiarize yourself with these terms to
help you better understand the manual.
Audit Field – An index field with a list of values where each must be
present in the batch before it can be released (5.10.2.4).
Audit Log – Batch auditing ensures all required documents are scanned,
or a justification has been entered for why a required document is not
present. The audit log tracks these justifications.
Autofill – The process of using database lookups to automatically populate
index fields based on a key value entered from the image (5.4.4).
Autonumber – Autonumbers (5.4.3.1.1) are numbered index fields that
can be automatically incremented each time a new image, blank page, or
barcode is found. Autonumbers are useful for using document separators
to create multi-page files (6.3), bates stampting (5.7) and other numbering
tasks.
Barcode – Barcode recognition is also used by SimpleIndex to automate
the population of indexes (5.5).
Batch – A batch is a group of documents that are processed together. All
images in a batch must be indexed before they are saved to their final
destination.
Batch Log – Contains summary information about each batch scanned,
including the user id, start time, end time, total processing time, number of
images processed and the batch ID (5.8).
Comma-Delimited Text File – A standard file format, similar to a
spreadsheet, which lists data values, using commas to separate the
columns of data (5.8). The following is an example:
"INVOICE","Doug Jacobsen","44","2003-10-23","\INVOICE\Doug Jacobsen-44-2003-10-23.TIF","1","2003-10-30@001508"
"INVOICE","Pretell Real Estate","46","2003-10-26","\INVOICE\Pretell Real Estate-46-2003-10-26.TIF","1","2003-10-30@001508"
"INVOICE","Dunn, Eric C.W.","36","2003-09-22","\INVOICE\Dunn, Eric C.W.-36-2003-09-22.TIF","1","2003-10-30@001508"
"INVOICE","Gordon Johnson","37","2003-09-26","\INVOICE\Gordon Johnson-37-2003-09-26.TIF","1","2003-10-30@001508"
"INVOICE","Brian K. Cook","49","2003-10-30","\INVOICE\Brian K. Cook-49-2003-10-30.TIF","1","2003-10-30@001508"
Command Line – Executing a program from a command line means that
instead of double-clicking an icon, the program is launched using DOS
SimpleIndex Documentation
- 141 -
command syntax. This allows you to launch SimpleIndex from other
applications and pass information to it (8).
Insert Mode – When SimpleIndex is used to create new records in a
database and link them to scanned images, this is referred to as Insert
mode (5.9.3.2).
Update Mode – When SimpleIndex is used to retrieve existing records in a
database and update the images and/or index information, this is referred
to as Update mode (5.9.3.3).
Retrieval Mode – This refers to configurations designed for viewing
documents linked to a database with SimpleSearch. No processing takes
place in Retrieval mode (5.9.3.4).
Default Image Viewer – All Windows operating systems come with
software to view TIFF and JPEG images. PDF images can be viewed with
the free Acrobat Reader software. The Default Image Viewer refers to the
software installed on the user’s computer that is associated with these file
types and used as a viewer when one of these files is double-clicked.
Document – Pages that go together form a document. SimpleIndex
considers page with the same values for all Folder (5.4.3.5) and Filename
(5.4.3.6) index fields a single document.
File – Refers to any file (images, PDF, MS Office, media clips, etc.)
Image – Refers specifically to image files (TIFF, JPEG, GIF, BMP, etc.).
Can be a single page or multiple pages (TIFF Only).
Imaging for Windows – SimpleIndex is built around Global 360’s Imaging
for Windows OCX controls, which are used for image display, annotation,
OCR and other imaging functions.
Imprint – This refers to the process of stamping text on an image.
Imprinting normally refers to printers that physically print characters on a
page as it is scanned. SimpleIndex provides an electronic substitute for
imprinting by writing the characters to an already-scanned image (5.7).
Index – Refers to the values used to identify documents (5.4).
SimpleIndex Documentation
- 142 -
Index Log – Contains the index information for a batch. The example
comma-delimited text file is an index log. The Index Log contains the
information the user enters to identify documents (5.8).
Job – A SimpleIndex Job refers to a set of configuration settings that
determine how images are processed, indexed and exported. A job can
also refer to the process of running a single batch with a particular set of
configuration options, as in “running a job”.
Log Files – Refers to the following logs: Batch, Index and Audit. All are
comma-delimited text files (5.8).
OCR – Stands for Optical Character Recognition and refers to the process
of recognizing text from an image. In SimpleIndex, OCR is used to
automate the population of index fields (5.6).
Record – Refers to a single set of index values in a database, which
correspond to a single image file that may contain one or many pages.
Redact – This is the term for blacking out parts of a document that you
don’t want to be viewable. This is most commonly seen in classified
documents that have been partially declassified for public viewing (4.6.4.4).
Release – When all images have been indexed, the images are copied to
the Output folder (5.3.1.2) and the log files are generated (5.8). This
process is referred to as releasing the batch.
TIFF – Stands for Tagged Image File Format. TIFF is an industry standard
file format for black & white document images that yields small files that
can be viewed on any computer. SimpleIndex uses TIFF images as the
default file format.

SimpleIndex Documentation
- 143 -
11 Contacting Simple Software
SimpleIndex is a product of Simple Software. Simple Software is a wholly
owned subsidiary of Meta Enterprises, LLC.
SimpleIndex Website: http://www.simpleindex.com/
Mailing Address:
PO Box 548
Knoxville, TN 37901-0548
Physical Address:
500 West Summit Hill Drive
Suite 302
Knoxville, TN 37902
Sales/General E-Mail:
info@SimpleIndex.com
Tech Support E-Mail:
support@SimpleIndex.com
Toll Free: (877) 355-4141
Outside US: +1 (865) 637-8986
