Simu U S TRANSHZ003 Windy Hz Accel 2007827C User Manual 5070670A00 WINDY HZ ACCEL EN indd
Simu U.S. Inc. Windy Hz Accel 2007827C 5070670A00 WINDY HZ ACCEL EN indd
Simu U S >
User Manual
These instructions describe how to install, commission and operate this
product.
The Windy Hz Accel is a cordless, independent, three-dimensional motion sensor. It
enables the awning to be raised automatically when it is being shaken by the wind.
The detection of shaking corresponds to a sensitivity threshold.
The Windy Hz Accel has been designed for terrace awnings with arms, such as
folding arms cassette or semi-cassette awnings. The Windy Hz Accel is compatible
with Hz motors, Hz remote controls and Hz sensors from Simu.
The sensor does not protect the awning against sudden squalls; keep the awning
closed if there is a risk of such a meteorological phenomenon.
1. Safety
1.1 Safety and Responsability
This Simu product must be installed by a person with professional knowledge of
motorisation and home automation, for whom these instructions are intended.
Moreover, the installer must comply with the current standards and legislation in
the country in which the product is being installed, and inform his customers of the
usage and maintenance conditions relevant to the product.
Any use outside the sphere of application specied by Simu is forbidden. This
invalidates the warranty and discharges Simu of all liability, as does any failure to
comply with the instructions given herein.
Never begin installing without rst checking the compatibility of this product with the
associated equipment and accessories.
2.2. Specic safety advice
To prevent damaging the product:
Avoid impacts!1)
Do not drop it!2)
Do not submerge it.3)
Do not use abrasive products or solvents to clean the product.4)
Do not clean it using a water spray or high pressure cleaning method.5)
Ensure that the sensor is kept clean and regularly check it is operating correctly.
This sensor does not protect the awning in the event of strong gusts of wind.
If there is a risk of this kind of weather, ensure that the awning remain closed.
2. Methods of adjustment
2.1 1 Predened threshold adjustment method
Predened threshold adjustment sets the detection of movement to one of the
threshold values pre-set in the potentiometer. Each value is a threshold of sensitivity
to shaking:
threshold 1 = high sensitivity to shaking: low intensity shaking will cause the •
awning to close;
threshold 9 = low sensitivity to shaking: high intensity shaking will cause the •
awning to close.
Threshold 2 provides sensitivity to shaking under usual conditions. When leaving
the factory, the Windy Hz Accel is set to threshold 2.
2.2 Personalized threshold adjustment method
Personalized threshold adjustment will allow the detection of shaking at a
sensitivity threshold set by the installer. The awning is shaken manually until it rises
automatically: the intensity of the shaking caused is recorded by the sensor. If the
awning is not shaken before it rises automatically, the sensor switches automatically
to its original conguration: the Windy Hz Accel is set to threshold 2 value.
Once the threshold has been set, the sensor switches to Demonstration mode for
the rst two cycles following adjustment. This mode enables the selected setting to
be modied easily. Simply pressing the STOP button stops the awning rising and
enables the threshold of sensitivity to be modied by shaking the awning again
manually.
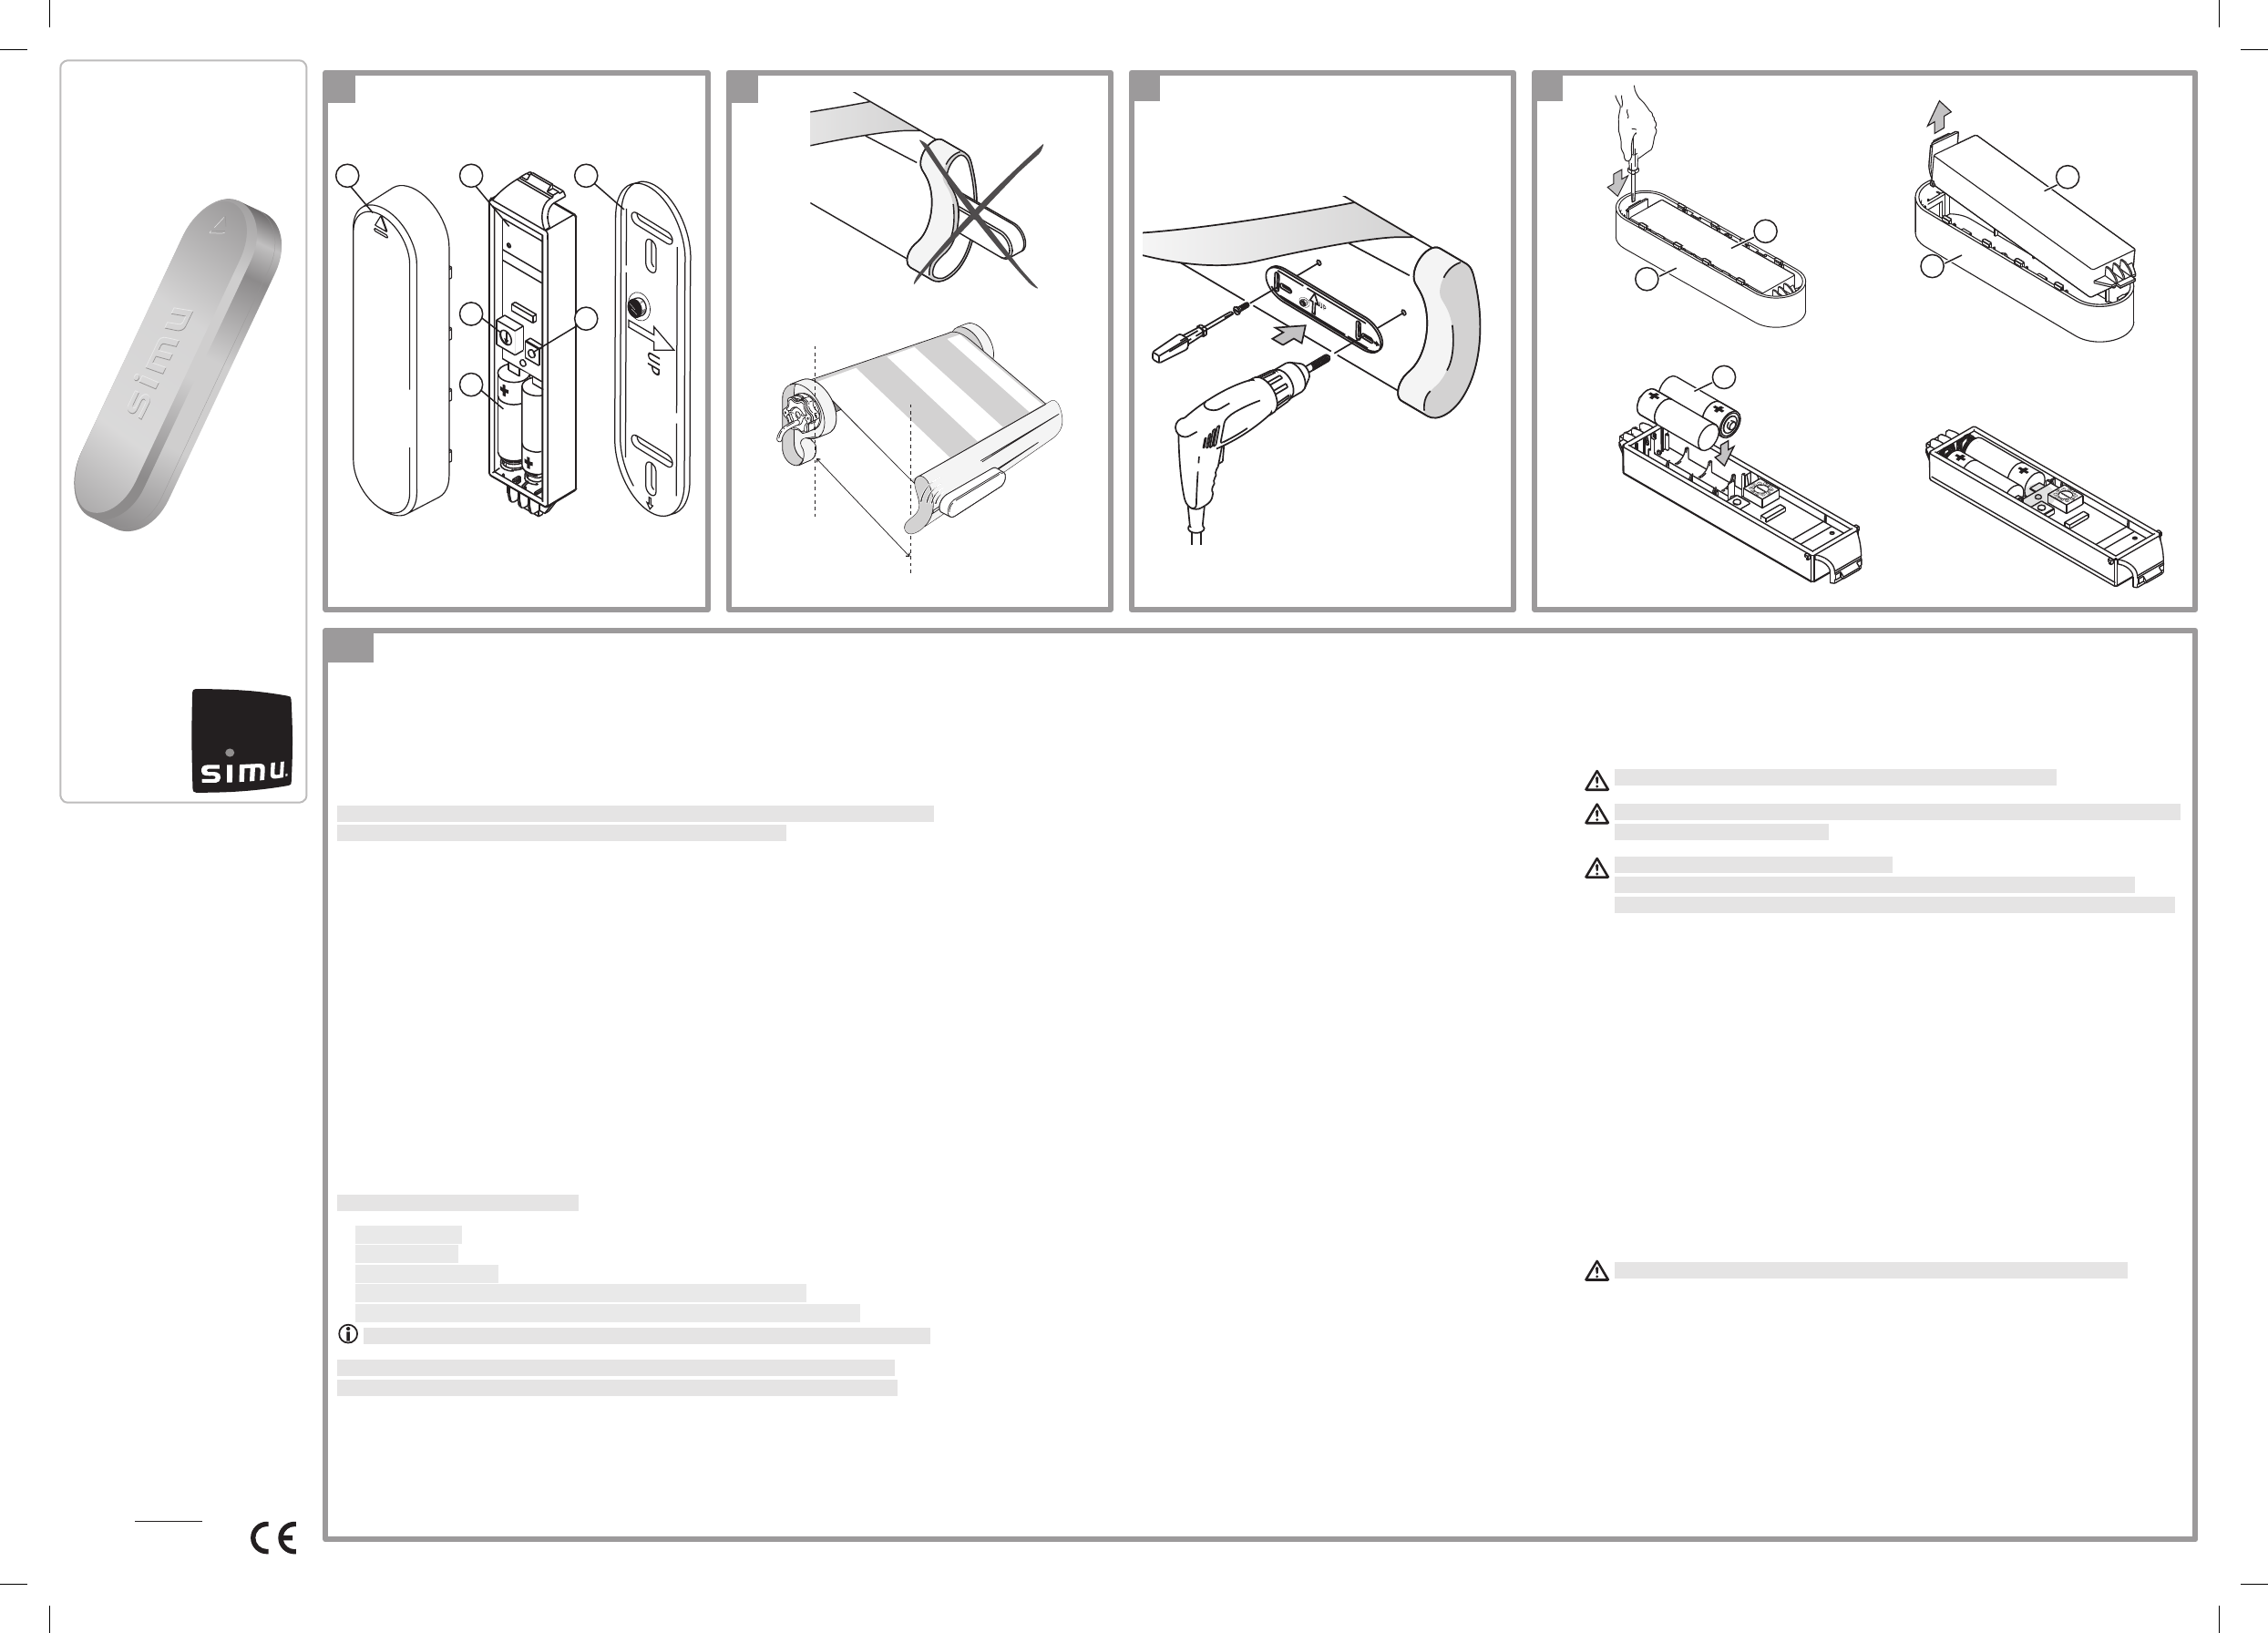
3. The Windy Hz Accel in details
See illustration A )
1. Casing
2. Sensor
3. Support
4. Potentiometer
5. PROG button
6. AAA (LR03) 1.5V alkaline batteries
4. Installation
4.1 Installation recommendations
See illustration B )
The Windy Hz Accel has to be attached on the load bar, on the same end of the
awning as the motor is installed. Shaking is more easily detected.
The Windy Hz Accel must never be enclosed in the load bar.
The Windy Hz Accel only works when the sensor (2) is secured to the bracket
(3) and the settings are done.
The sensor’s radio range is X = 20 m.
Powerful local transmitter equipment (e.g. cordless headphones) with a
transmission frequency identical to the Windy Hz Accel can affect its function.
4.2 Premounting the support
See illustrations C and E )
The support (3) may be attached, without washers, using 2 domed cylindrical-head
(4-mm-diameter) #8 screws (not supplied), 2 countersunk-head screws (4 mm in
diameter) #8 (not supplied), 2 pop rivets (4 mm in diameter) 5/32” (not supplied) or
2 Simu xing accessories (not supplied).
Position the support (3) on the inside surface of the load bar.
-
Check that the position chosen does not prevent the awning from closing and does -
not damage the sensor.
Drill two holes into the load bar to match the holes in the support and to suit the -
selected method of xing (see “Technical data”).
Fix the support using the selected xing accessoiries: the arrow with “UP” engraved -
into the support must point upwards.
4.3 Installing the batteries
See illustration D )
Never use rechargeable batteries to power the Windy Hz Accel sensor.
Remove the sensor (2) from its casing (1) using a at screwdriver.
-
Insert the AAA batteries provided (6) into the sensor, following the polarity indicated: -
the LED will come on for 1 sec to conrm that the batteries have been properly
inserted.
WINDY HZ ACCEL
EN - Installer instructions
www.simu.com
EN
Ref. 5070670A
C
A
13
2
4
6
D
a
B
X
EN - Hereby, Simu, declares that this product is in compliance
with the essential requirements and other relevant provisions of
Directive 1999/5/EC. A Declaration of Conformity is available at
the web address www.Simu.com/ce,
Patents pending for some countries (e.g. : us)
SIMU FRANCE
Siège social SIMU SAS
France - BP 71
70103 Gray Cedex
Tel. 00 33 (0) 3 84 64 75 00
Fax 00 33 (0) 3 84 64 75 99
SIMU GERMANY
Hombrucher Weg 12 58638 -
Iserlohn GERMANY
Tel. 00 49 (0) 2371 93 83 10
Fax 00 49 (0) 2371 93 83 73
SIMU BELGIUM
Mercuriusstraat 19
1930 Zaventem
BELGIUM
Tél. 00 32 (0) 2 788 84 40
Fax 00 32 (0) 2 788 84 49
SIMU NETHERLANDS
Diamantlaan 6
2130 AD Hoofddorp
The Netherlands
Tél. 00 31 (0) 23 561 43 44
Fax 00 31 (0) 23 561 58 23
SIMU GREECE
47, Karamanli avenue
Axarnes - Menidi
13671 Athènes
GREECE
Tél. 00 30 21 06 14 67 68
Fax 00 30 21 08 05 61 08
SIMU LEBANON
& MIDDLE EAST
Karam Bldg, Badaro Street
Parc Beirut 2058-7704 Beirut
LEBANON
Tel. 00 961 13 91 224
Fax 00 961 13 91 228
SIMU MOROCCO
29 rue Ibnou Majid El Bahar
20100 Casablanca
MOROCCO
Tél. 00 212 22 44 35 00
Fax 00 212 22 44 35 23
SIMU POLAND
Ul. Marywilska 34
03228 Warszawa
POLAND
Tél. 00 48 22 50 95 350
Fax 00 48 22 50 95 352
SIMU CZECH REPUBLIC
NA RADOSTI 413
15521-PRAHA 5 - ZLICIN -
CZECH REPUBLIC
Tél. 00 420 267 910 007
Fax 00 420 571 610 761
SIMU TURQUEY
Altunizade Mah.
Fahrettin K. Gökay Cad N°29
Arduman Is Merkezi,
D blok Kat2/A
34662 Uskudar - Istanbul
TURKEY
Tél. 00 90 21 66 51 30 15
Fax 00 90 21 66 51 30 17
SIMU U.S.A.
6100 Broken Sound
Parkaway N.W
Suite 14 - Boca Raton
FLORIDA 33487
Tel. 00 1 561 995 03 35
Fax 00 1 561 995 75 02
SIMU EXPORT
SIMU Export - BP 71
70103 Gray Cedex
FRANCE
Tel. 00 33 (0) 3 84 64 75 00
Fax 00 33 (0) 3 84 64 76 21
5
b
c d
1
2
6
1
2
Copyright © 2010 Simu SAS. All rights reserved - 11/2010. SIMU S.A.S. au capital de 5 000 000 € - Z.I. Les Giranaux - BP71 - 70103 Arc-Les-Gray CEDEX - RCS GRAY B 425 650 090 - SIRET 425 650 090 00011 - n° T.V.A CEE FR 87 425 650 090
SIMU Worldwide
5070670A00_WINDY HZ ACCEL_EN.indd 1 26/11/10 10:21:53
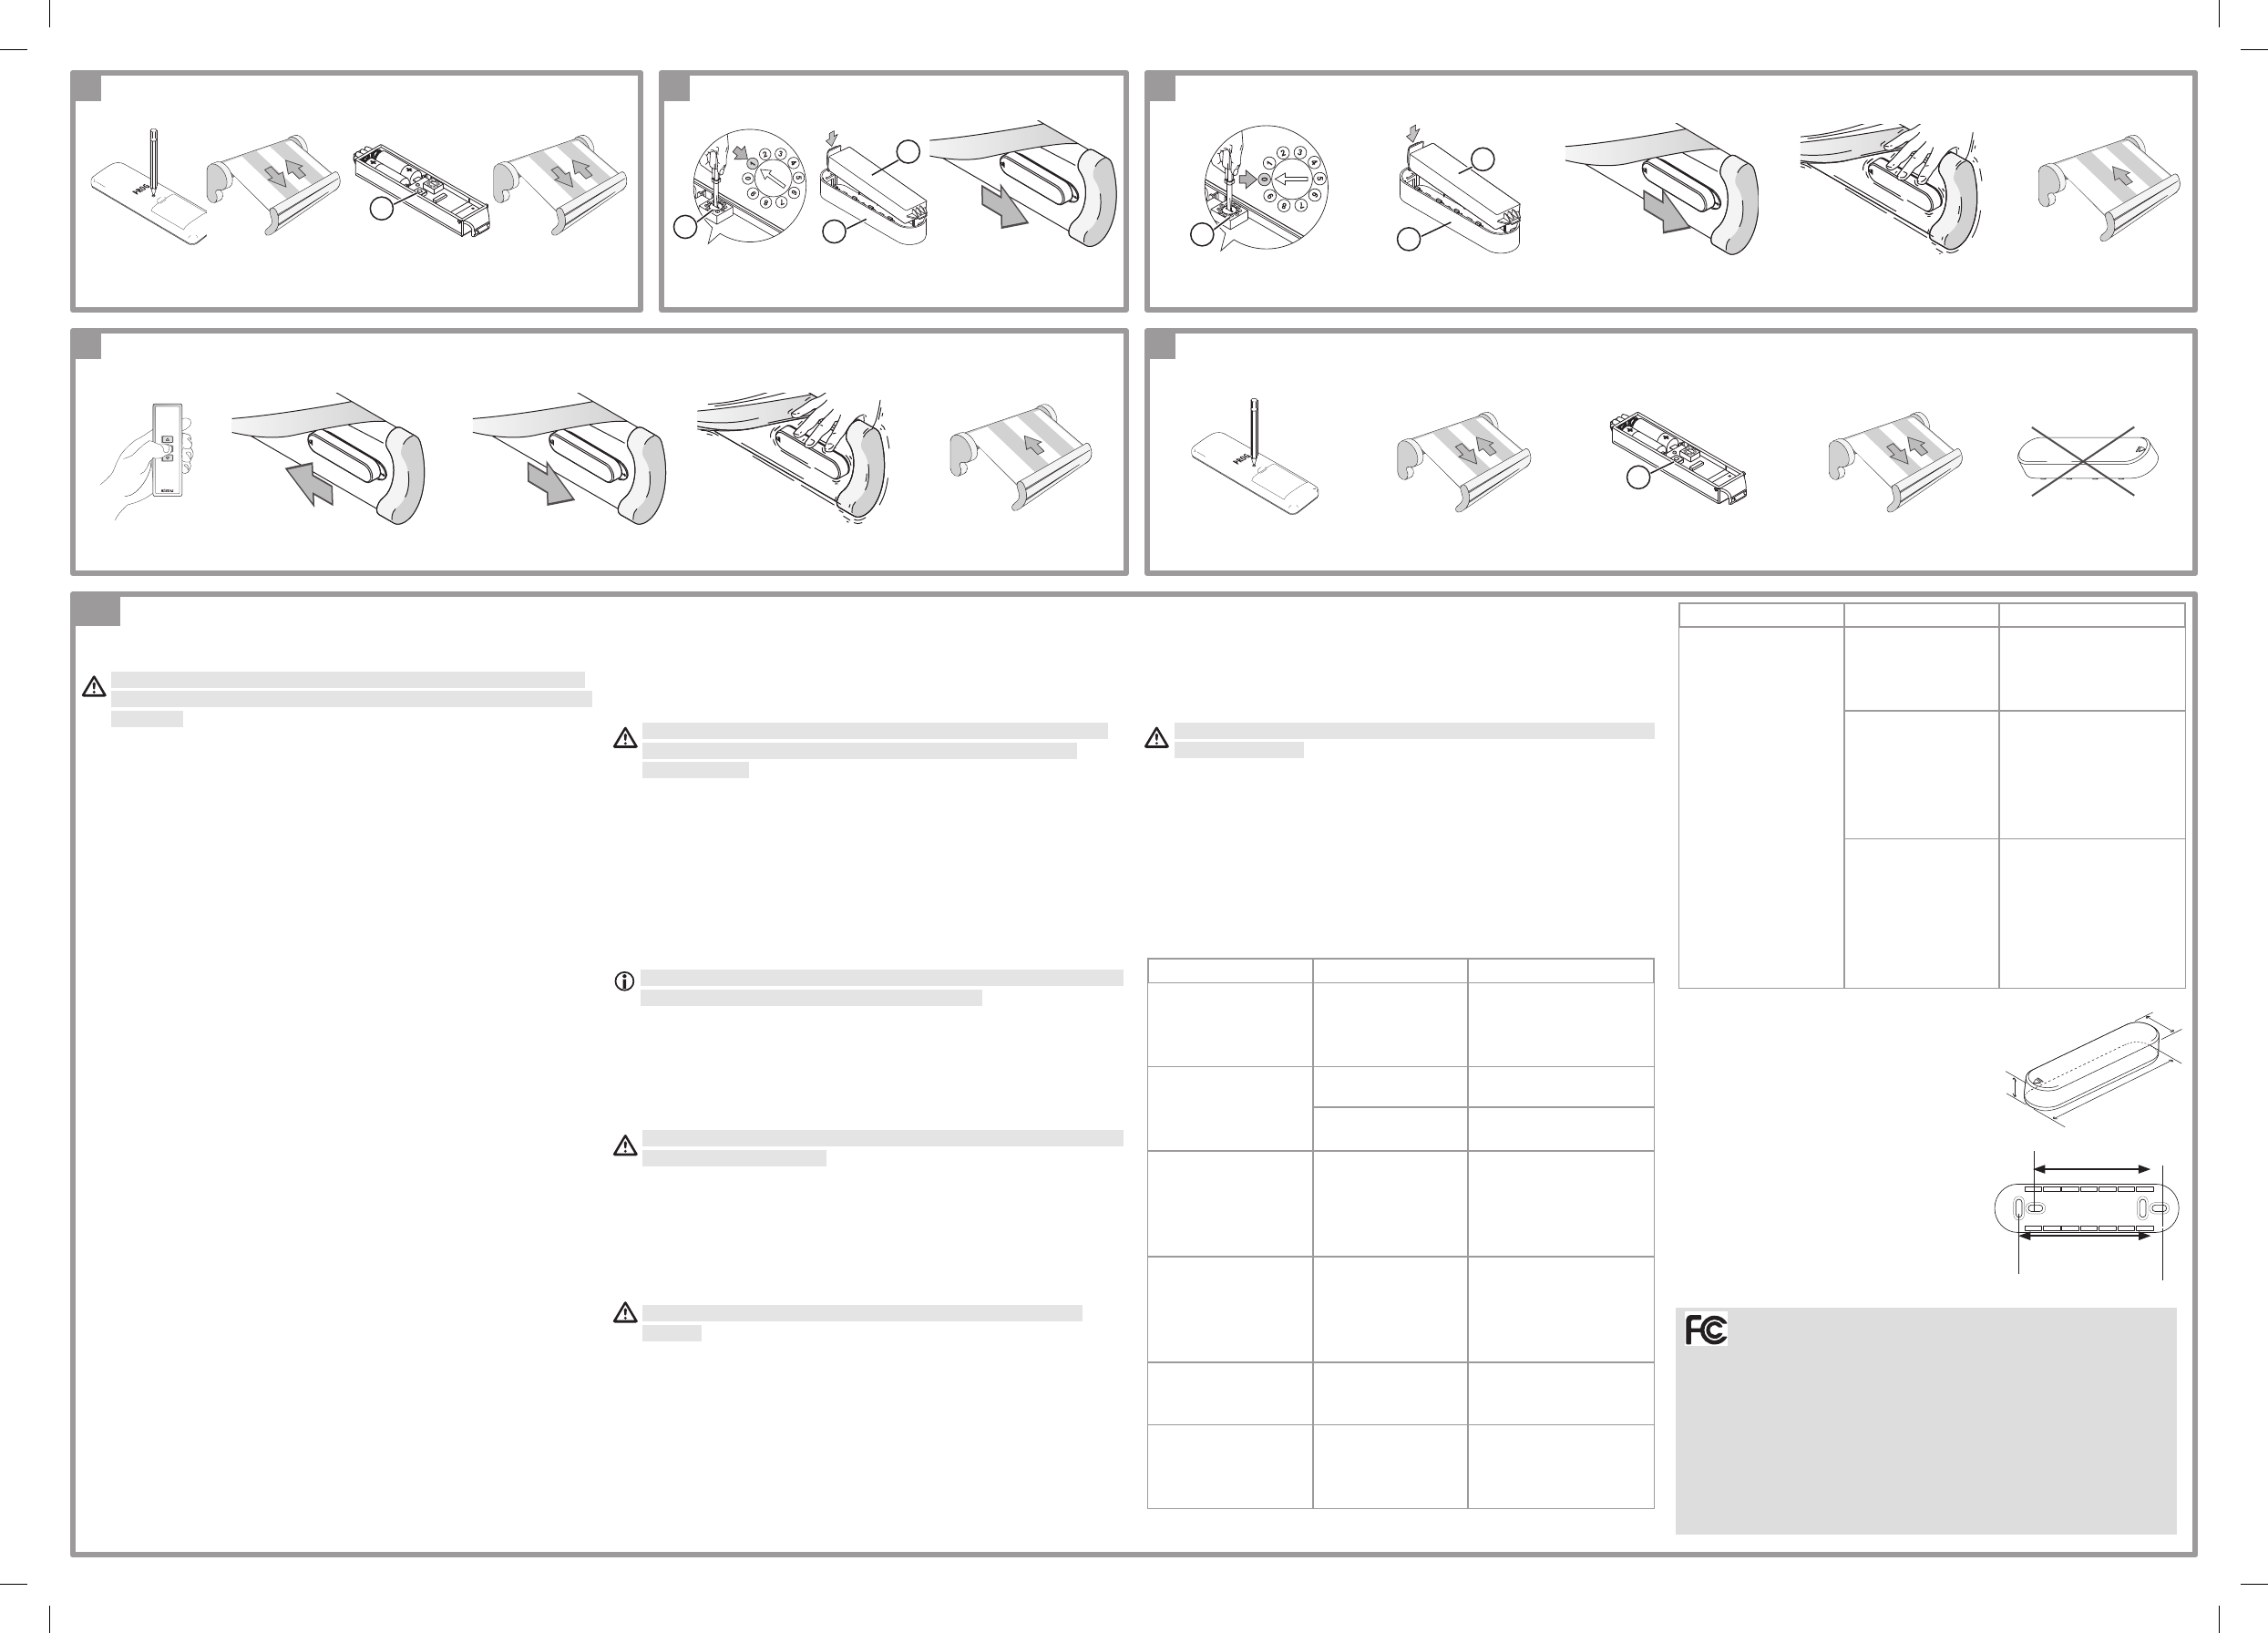
5. Commissioning
5.1 Specic safety recommendations
Once the awning and Windy Hz Accel have been commissioned,
make sure that activation of Windy Hz Accel causes the awning to
be raised.
5.2 Recording of the sensor
See illustration E )
Take a remote control that is already programmed in the memory of -
the motor.
Press the PROG button on the remote control until the awning does a -
short up and down movement: the motor is in programming mode.
Press the PROG button (5) on the Windy Hz Accel sensor until the
-
awning does a short up and down movement: the Windy Hz Accel
sensor is programmed in the memory of the motor.
5.3 Pre-dened threshold adjustment method
See illustration F )
Set the potentiometer (4) to the desired threshold using a at -
screwdriver: 1 = high sensitivity to shaking; 9 = low sensitivity to
shaking
Insert the sensor (2) into the casing (1). -
Slide the sensor (2) onto the support (3) until the end stop: the sensor -
is set.
Check the adjustement and modify it in the event of incorrect sensitivity -
to shaking.
5.4 Personalized threshold adjustment method
See illustration H )
5.4.1 Adjustment to «Personalized threshold»
See illustration G )
Set the potentiometer (4) to 0 using a at screwdriver. -
Insert the sensor (2) into the casing (1). -
Slide the sensor (2) onto the support (3) until the end stop: the sensor -
is in «Personalized threshold» mode.
To Check the adjustment :
Shake the awning to simulate the maximum level of vibration permitted, -
until the awning rises automatically: the sensor is set and it switches to
demonstration mode.
Lower the awning then gently shake it to simulate the effect of wind; -
this should cause the awning to rise:
If the awning reacts satisfactorily, this means the sensor is set -
correctly,
If the awning does not react satisfactorily, stop the rising of the awning -
by pressing the STOP button and go to the next step «Changing the
threshold ajustement”.
5.4.2 Changing the threshold adjustment
Lower the awning. -
Release the casing and sensor assembly from the support (3) then -
wait for 2 secs.
Engage the casing and sensor assembly on the support (3): the -
sensor is in «Personalized threshold» mode.
If the casing and sensor assembly is disengaged from the support
for more than 4 seconds, re-engage it and then repeat the two
previous steps.
Shake the awning to simulate the maximum level of desired vibration,
-
until the awning rises automatically: the sensor is set.
6. Operation
6.1 When the wind comes up
When the wind comes up, the awning will start to vibrate. If the vibration
is greater than the set threshold, the awning will rise automatically:
It is impossible to prevent the awning from being raside and to lower
it until at least 30 secs after it has been raised.
6.2 When the wind dies down
When the wind dies down, the awning can be lowered using the remote
control after a time lag of 30 secs.
If the Windy Hz Accel sensor is linked to a sun sensor, the awning can
be lowered using the remote control after a time lag of 30 secs.
When the day is sunny and windy, deactivate the ‘Sun’ function so
as to protect the awning.
7. Repairs
7.1 Replacing of the batteries
See illustration D )
Never use rechargeable batteries to power the Windy Hz Accel
sensor.
The specic adjustments of the sensor are retained in the sensor’s
memory when batteries are changed.
Withdraw the sensor (2) from the support (3).
-
Remove the sensor (2) from its casing (1) using a at screwdriver. -
Replace the AAA alkaline batteries (6) with batteries of identical -
characteristics according to the polarity indicated: the LED will come on
for 1 sec to conrm that the batteries have been correctly inserted.
Replace the sensor (2) in its casing (1) and then on the support (3).
-
7.2 Deleting the sensor
See illustration I )
Follow the ‘Recording the sensor’ procedure to delete the sensor from -
the motor memory.
7.3 Disabling all the sensors.
Resetting disables all the sensors (sun, wind, etc) associated with
the awning motor.
Take a remote control recorded in the motor.
-
Give a long press on the PROG button on the remote control: the -
motor is in programming mode and performs a short up and down
movement.
Give a long press (7 seconds) on the PROG key of a sensor associated -
with the awning motor: the awning makes two short up and down
movements; all sensors are deleted in the motor’s memory.
7.4 Questions about the Windy Hz Accel ?
Observations Possible causes Solutions
The LED does not
come on after the
batteries have been
inserted.
The batteries are
incorrectly tted.
Check the direction
in which the batteries
are inserted into the
sensor.
The awning
does not rise
automatically when
the wind comes up.
The threshold is
incorrectly set.
Modify the threshold.
The threshold is
incorrectly set.
Modify the threshold.
Radio reception is
bad because there
is a metal obstacle
preventing radio
transmission.
Check that there are
no metal items near
the sensor.
The sensor or the
motor is out of
order.
Shake the awning to
raise it back up.
If this does not
happen,
replace the batteries.
If the awning still does
not move, check the
sensor and motor.
The awning rises
every 30 mins and
the LED is on all
the time.
The batteries are
low.
Replace the
batteries with
batteries of identical
characteristics.
Observations Possible causes Solutions
The awning rises
once an hour.
The sensor
is incorrectly
inserted in the
support.
Engage the sensor
into the support.
The radio link
between the
sensor and the
motor does not
work.
Replace the batteries
with ones having
exactly the same
characteristics. If the
awning still does not
rise, check the sensor.
The sensor is not
operating.
Replace the batteries
with ones having
exactly the same
characteristics.
If the awning
continues to rise,
replace the sensor.
7.5 Technical data
Power supply: 2 AAA alkaline batteries
Size: 25 x 38 x 153 mm (h x l x L)
Space between the oblong:
A = 93,5 mm B = 120,5 mm
This device complies with Part 15 of the FCC Rules.
Operation is subject to the following two conditions:
- this device may not cause harmful interference, and
- this device must accept any interference received, including
interference that may cause undesired operation.
Warning !
Changes or modications not expressly approved by the manufacturer
could void the user’s authority to operate the equipment.
hL
l
A
B
EN
5
5
4
2
1
4
2
1
E
I
G
H
F
5070670A00_WINDY HZ ACCEL_EN.indd 2 26/11/10 10:21:59