Singer Athena 2000 Instruction Manual ManualsLib Makes It Easy To Find Manuals Online!
2014-12-11
: Singer Singer-Athena-2000-Instruction-Manual-121399 singer-athena-2000-instruction-manual-121399 singer pdf
Open the PDF directly: View PDF ![]() .
.
Page Count: 25

i ¸ i_
,_i!__ii,i,_!i
$I GE ?"i¸iiii_iiiii_i_i_ii_,_,i_'_!_!,, !!ii!i_!iii_!i!i¸ii!ii!ii'ili_iiil,¸¸¸_
Solid-state Electronic Sewing Machine
Congratulations,.
'cou are aeou[ to sew on _ne mos_ aavancee sewtng macnme _nthe wollo..
ATHENA 2000.
It makes sowm _ _o simele _c fooIDroof -- arc so much f[JR[ -- joe W e@
_stounaea
The crov--g acmevemem of years of Singer research ATHENA _ 2000
sewing machine teatures--esE "_or_an_ [ecnnoJoc ca creaKmrougr]s:
® Exclusive Sotidostate Electronic Sewi,ng System ATHENA 2000 is the
sewm_ macn_n_ w_m the electronic 'brair_ 'a storehouse of sewm
Knowledge [ au_omanca y programs your macmne _'_ sew o-_e of twer [y
ve different shtches--mc doing two t3 Des of buttonno_es
Exclusive Light Touch Fingertip Controls. They re the buttons on the front
of the macnme. You SImD_V tOUCh me one unaer me Da_e<n you want
the red indicate- ign_ c_mes on-- _nd ATHENA 20C2 _s read _o sew.
Am, s[ncn S ins[at -_V_laOle. at the to Jch of eSing e euz_on.
Exclusive Individual Preference Panet. Your ver own centre ean_
31lows yoL lo modify _ne orr-_grammed stilcn e]rnens )ns [_ 3ur heart's
conten'(, re suit sEocta fabr :_ and satisfy persone_ preference2
And tha_ _s onw me begmmng! There are so many more ne'-- features. Such as
_ne Exclusive Pattern Receet Button-that lets you sew one or]it )t a oatten
for sueerc eecorat ve _o__sbes. And Exclusive L_ght Touch F/ngeR_ 3uick
Reverse Button--for an _nstan_ reverse stra ght stitch A-]a over a cozen more
Singer Excluswes _lus all 3] the other Singer advances of the Eas_ decade
Such as the fabuJous Exclusive built-i- Flio& Sew* _ _nel for both nat ana _n
me-rouna sewing. 3oft-touch Fabric Feed. _nat ore[acts even tne most ee_
ca_e fabrics. Variah}e-seeeo Solid-state Control System, that enables you to
rnamta q the same pressure on [ne eoeeo controller as ou sew [nrougn vary-
ng fabric m_cKnesses And mar, man_, more advances from Stager.
We suggest you take a Tew moments to read [-_ougn [n_s new oeerator s
guide, as ¢ou sit at _our machine You will qulc_/ • discover now s mole i_ Is to
co any sewing ooerat_on ,ou aeswe on ATHENA 200L
We/corr?e to [Re fUrL re worlQ or se_ _o
Today!
¸.%¸¸
CONTENTS
Getting to Know Your ATHENA 2000 Electronic Sewing Machine ........................ 2
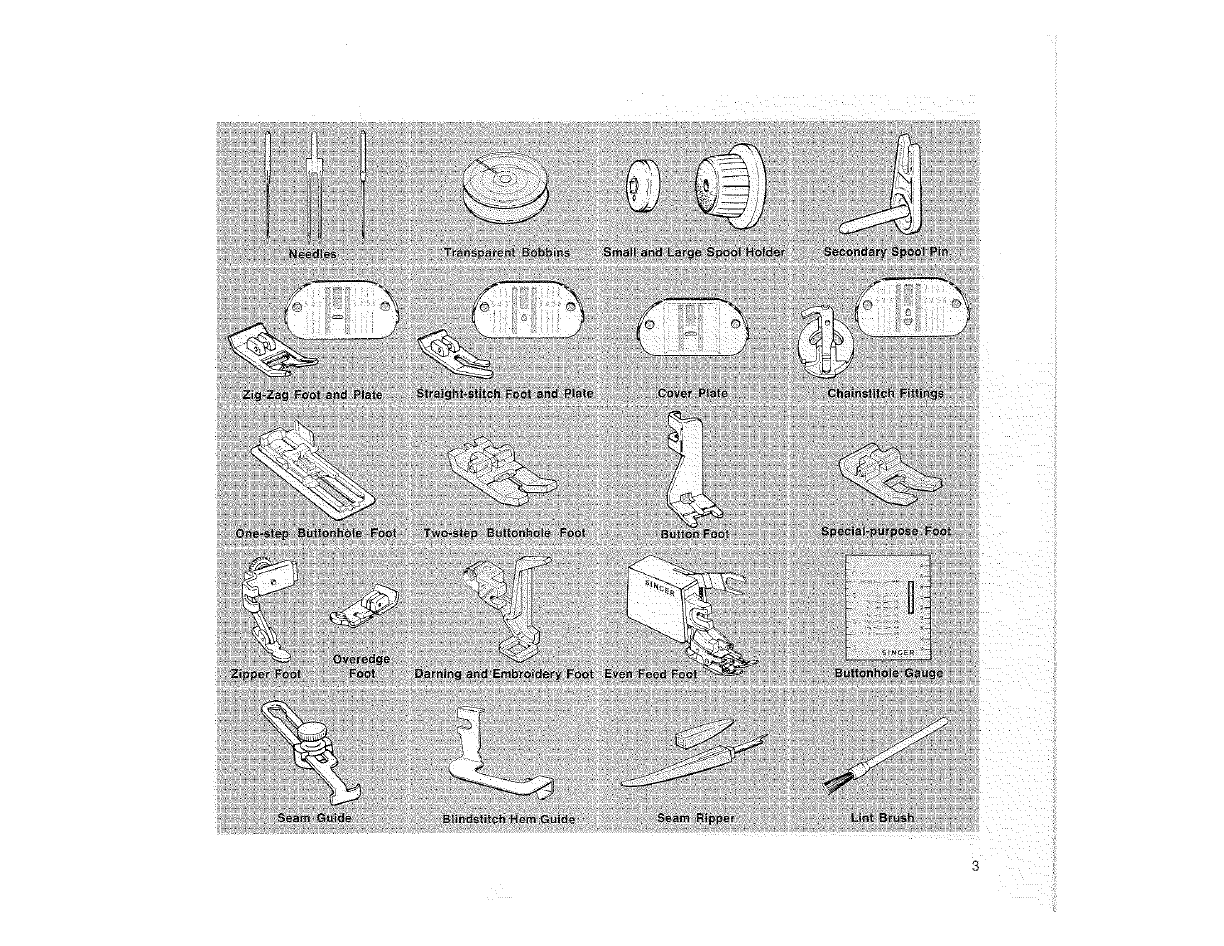
Accessories ........................................................................ 3
Changing Presser Feet .............................................................. 4
Snap-on Presser Feet •The Button Foot, Even Feed Foot
Changing Plates ................................................................... 5
Chainstitch Plate and Insert ........................... : .............................. 5
Speed Control ..................................................................... 6
Needles ........................................................................... 6
Changing the Needle
Threading the Machine ............................................................. 7
Threading the Needle
The Bobbin .................. ; ................................................. 8
Winding the Bobbin - Removing the Bobbin ,, Replacing a Wound Bobbin •
Raising the Bobbin Thread • Removing Thread from Bobbin
Threading for Twin-Needle Stitching ................................................... 10
Regulating Pressure ................................................................ 11
Adjusting Thread Tension ............................................................ 11
Lifting the Presser Foot ............................................................... 11
Electronic Sewing ..... .... ..... _. .................. , _: : ...... ................... 12
Selecting a Stitch *Straight-Stitching •Straight-Stitch Plate and Foot •
Pattern Repeat Button, Starting to Sew, Sewing in Reverse *
Removing Work from Machine • Chainstitching
Individual Preferences., ,: ............ ......... , .................................... 14
Stitch Width ,, Stitch Length ,, Reverse Stitch-balance
One-step Buttonholing ..... ........ ,....... , ...................................... !5
Balancing the Density • Stitching a Series of Buttonholes
Two-step Buttonholing .......................... : .................................. 16
Corded Buttonholes ............................................................... 17
inserting Cord in One-step Buttonhole Foot • inserting Cord in Two-step Buttonhole Foot
Free*Arm Sewing ................................................................... t8
Circuit Breaker ................................................................ 18
Cleaning the Machine ............................................................... 19
Changing the Light Bulb ............................................ : .... :. : ......... 19
Performance Checklist ............................................................... 20
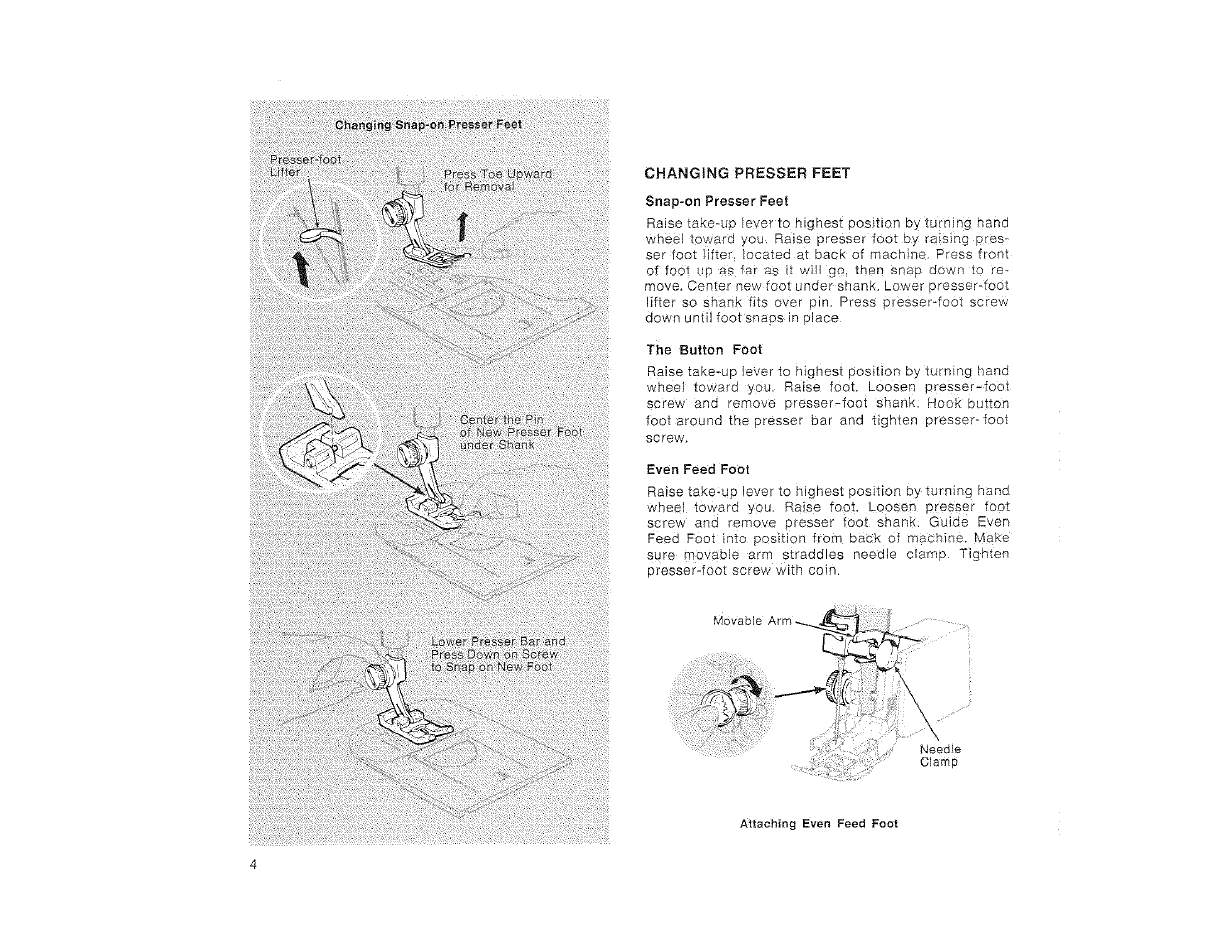
CHANGING PRESSER FEET
Snap-on Presser Feet
Raise take-up fever to highest position by turning hand
wheel toward you, Raise presser foot by ra!sing pros _
ser foot lifter, }ocated at back of machine. Press front
of foot _Jt_as far as it will go_ then snap down to re-
move. Center new foot under shank Lower presser-foot
lifter so shank fits ever pin. Press presser_foot screw
down untii foot snaps in place
The Button Foot
Raise take-up lever to highest position by turnin 9hand
wheel toward you. Raise foot. Loosen presser-foot
screw and remove presser-foot shank: Hook button
foot around the presser bar and tighten presser-foot
screw.
Even Feed FoOt
Raise take,up lever to highest position by turning hand
wheel toward you, Raise foot. Loosen presser foot
screw and remove presser foot shank Guide Even
Feed Foot into position from back of machine. Make
sure movable arm straddles needle clamp Tighten
presser-foot screw with coin.
Me
NeedJe
Clamp
Attaching Even Feed Foot
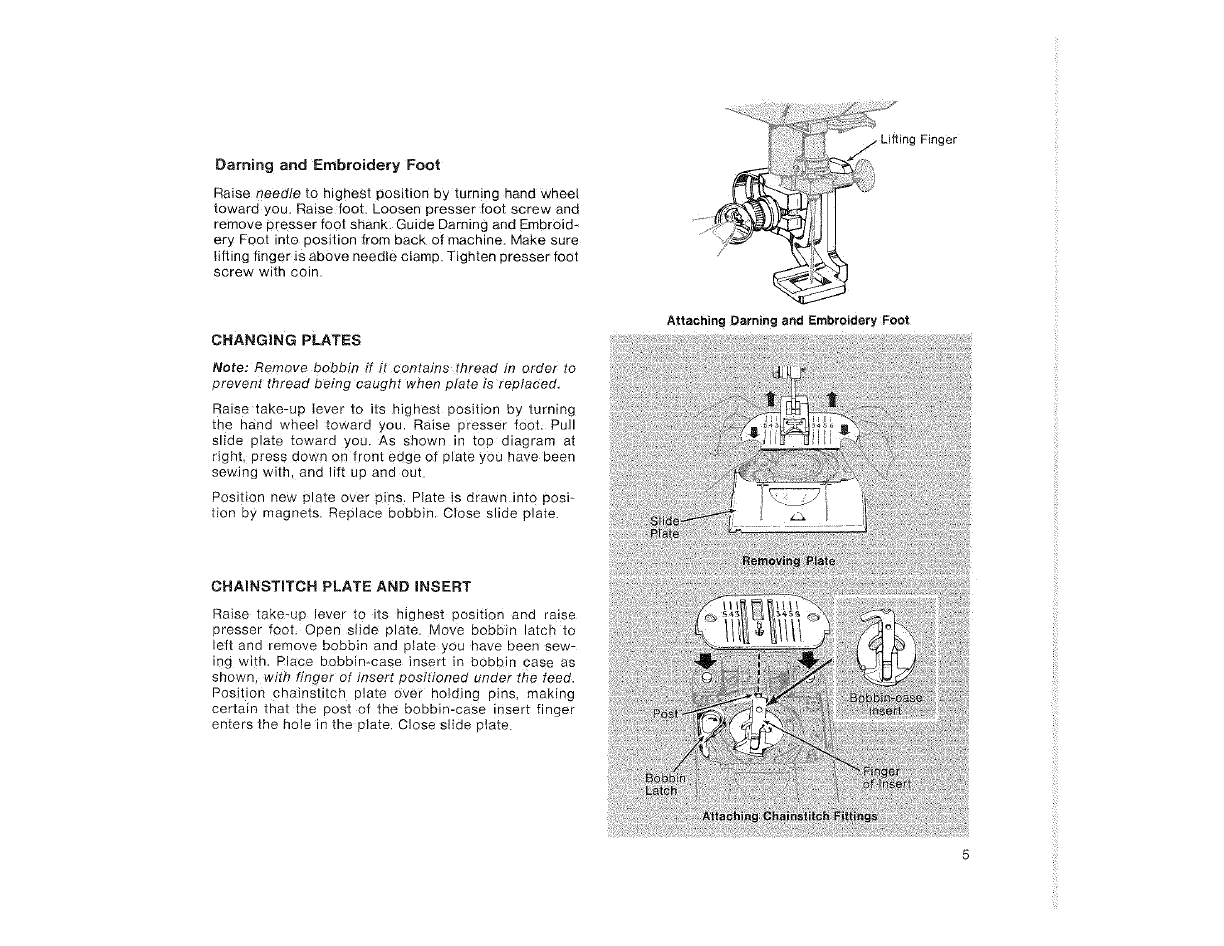
Darning and Embroidery Foot
Raise needle to highest position by turning hand wheel
toward you. Raise foot. Loosen presser foot screw and
remove presser foot shank: Guide Darning and Embreid_
ery Foot into position from back of machine. Make sure
lifting finger is above needle ctamp. Tighten presser foot
screw with coin.
/
_er
CHANGING PLATES
Note: Remove bobbin if it contains thread in order to
prevent thread being caught when plate is replaced.
Raise take-up lever to its highest position by turning
the hand wheel toward you. Raise presser fQot, Pull
slide plate toward you, As shown in top diagram at
_ight, press down on front edge of plate you have been
sewing with, and lift up and out.
Position new plate over pins. Ptate is d_awn into posi-
tion by magnets. Replace bobbin. Close slide plate.
Attaching Darning and Embroidery Foot
CHAINSTITCH PLATE AND iNSERT
Raise take-up lever to its highest position and raise
presser foot, Open slide plate, Move bobbin latch to
left and remove bobbin and plate you have been sew-
ing with. Place bobbin*case insert in bobbin case as
shown, with finger of insert positioned under the feed.
Position chainstitch plate over holding pins, making
certain that the post of the bobbin-case insert finger
enters the hole in the plate. Close slide plate.
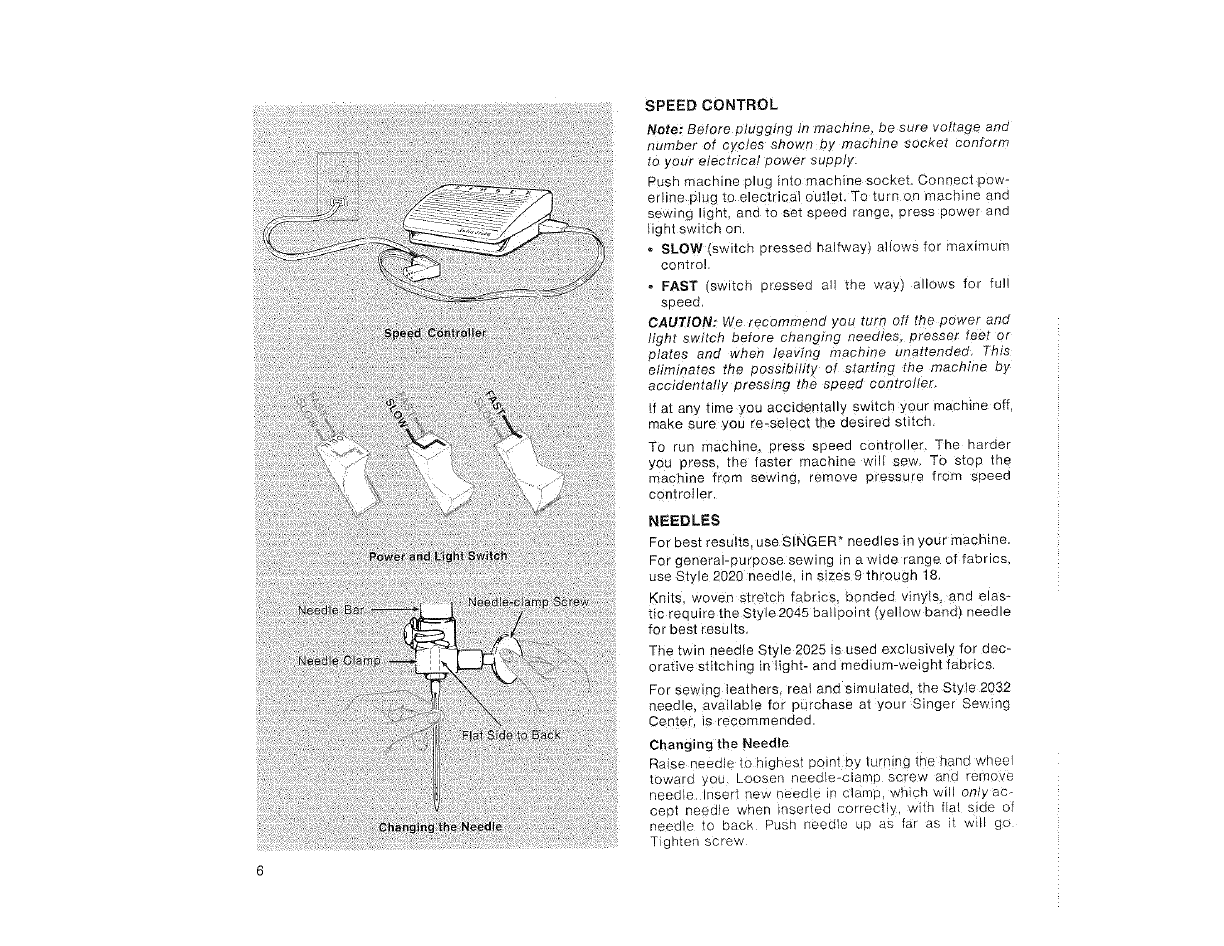
SPEED CONTROL
Note: Before plugging in machine, be sure voltage and
number of cycles shown by machine socket conform
to your electrical power supply:
Push machine plug into machine socket. Connect pow-
erline plug to electrical outlet, To turn on machine and
sewing light, and to set speed range, press power and
light switch on.
,, SLOW (switch pressed halfway} allows for maximum
control.
FAST switcP oressea au me way aRROWSfor ful!
sceeo
CAUTION: We recommeno , ou turn oft the sower ano
ignt swltcn before changing needles, ores._er feet or
elates and wnen leaving macnme unattended. This
eliminates the oossibilil/ of starting me macnme oy
accidentally press/ng rne s_eeo oemrouer
tf at any nine _ou acclaen[a _ sw_tch your machine off
make sure /ou re-select tne oesirea StltCr
To run machine Dress soeec controller The harder
you press, the faster maomne v. sew To sioe me
machine from sewing remove 3ressure from seeea
controller
NEEDLES
For best results use SINGER* needles in :/our macmne.
For general-purpose sewing m a wide range of fabrics
use Style 2020 neede inslzes9througn 18.
Knits woven stre[cr fabrics Dcqded vir,ts ana elas-
tic reouire the Style 2045 ba point wei_ow band neeaie
for best resorts
The twin needle Style 2025 is used exclusive, for aec-
orati e stitching in light- and medium-weignt fabrics.
For sewing leathers, real one sJmula[ea the Style 2032
needle, avauae_e for ourcnase at your Singer Sewing
Center is recommenaeo
Changing the Needle
Raise needle [o n gRes[ Delta Dy 1urnmg Tile Dane wneol
toware • or. Loosen neeo/e-clame screw _ne remove
needle insert new neeo e n clapt •wmcn w, only ac-
Coot neeele wner nsertea :orrec_, _v_rnflat si_e ol
nee(lie re DaOK Push neeele JO as far as w go
Tgmen screw
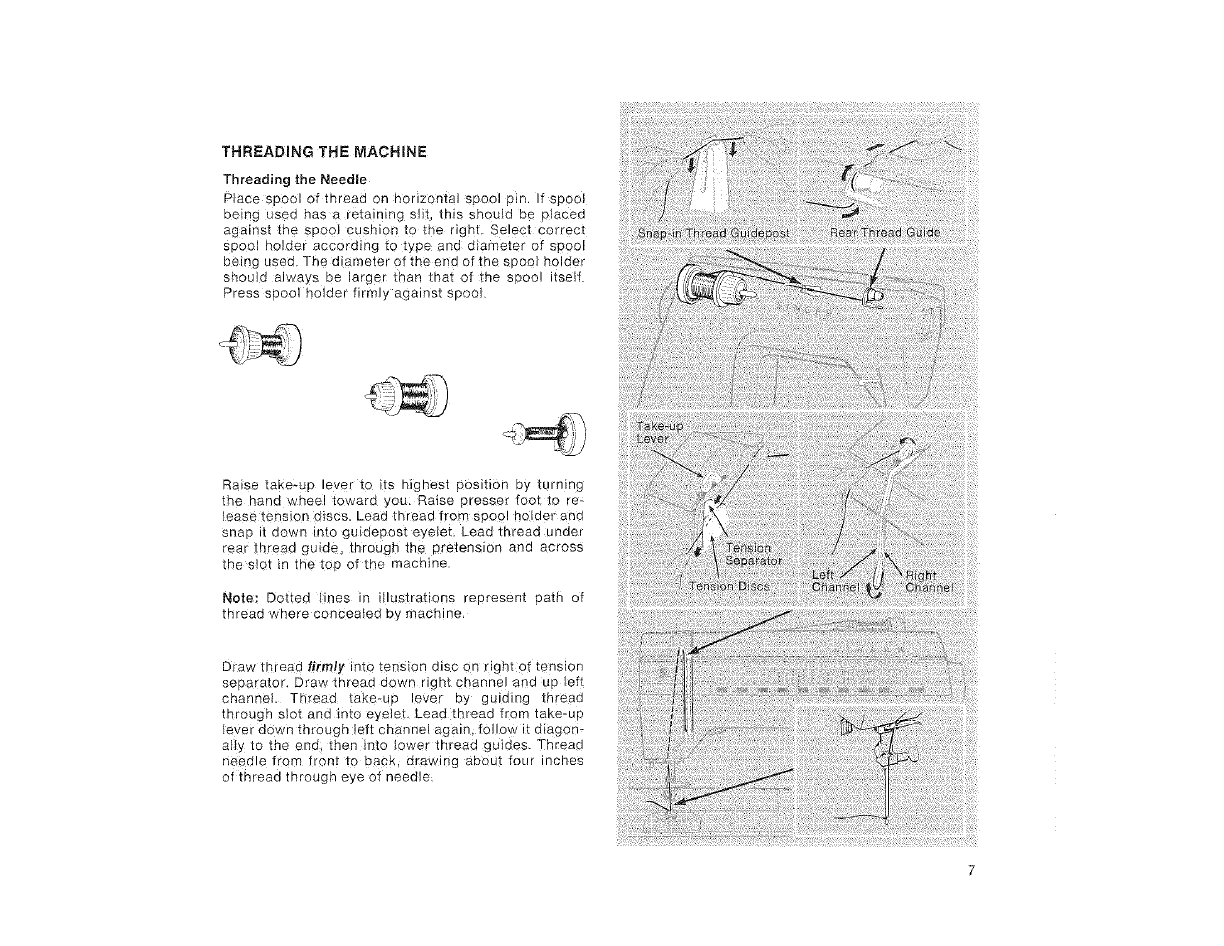
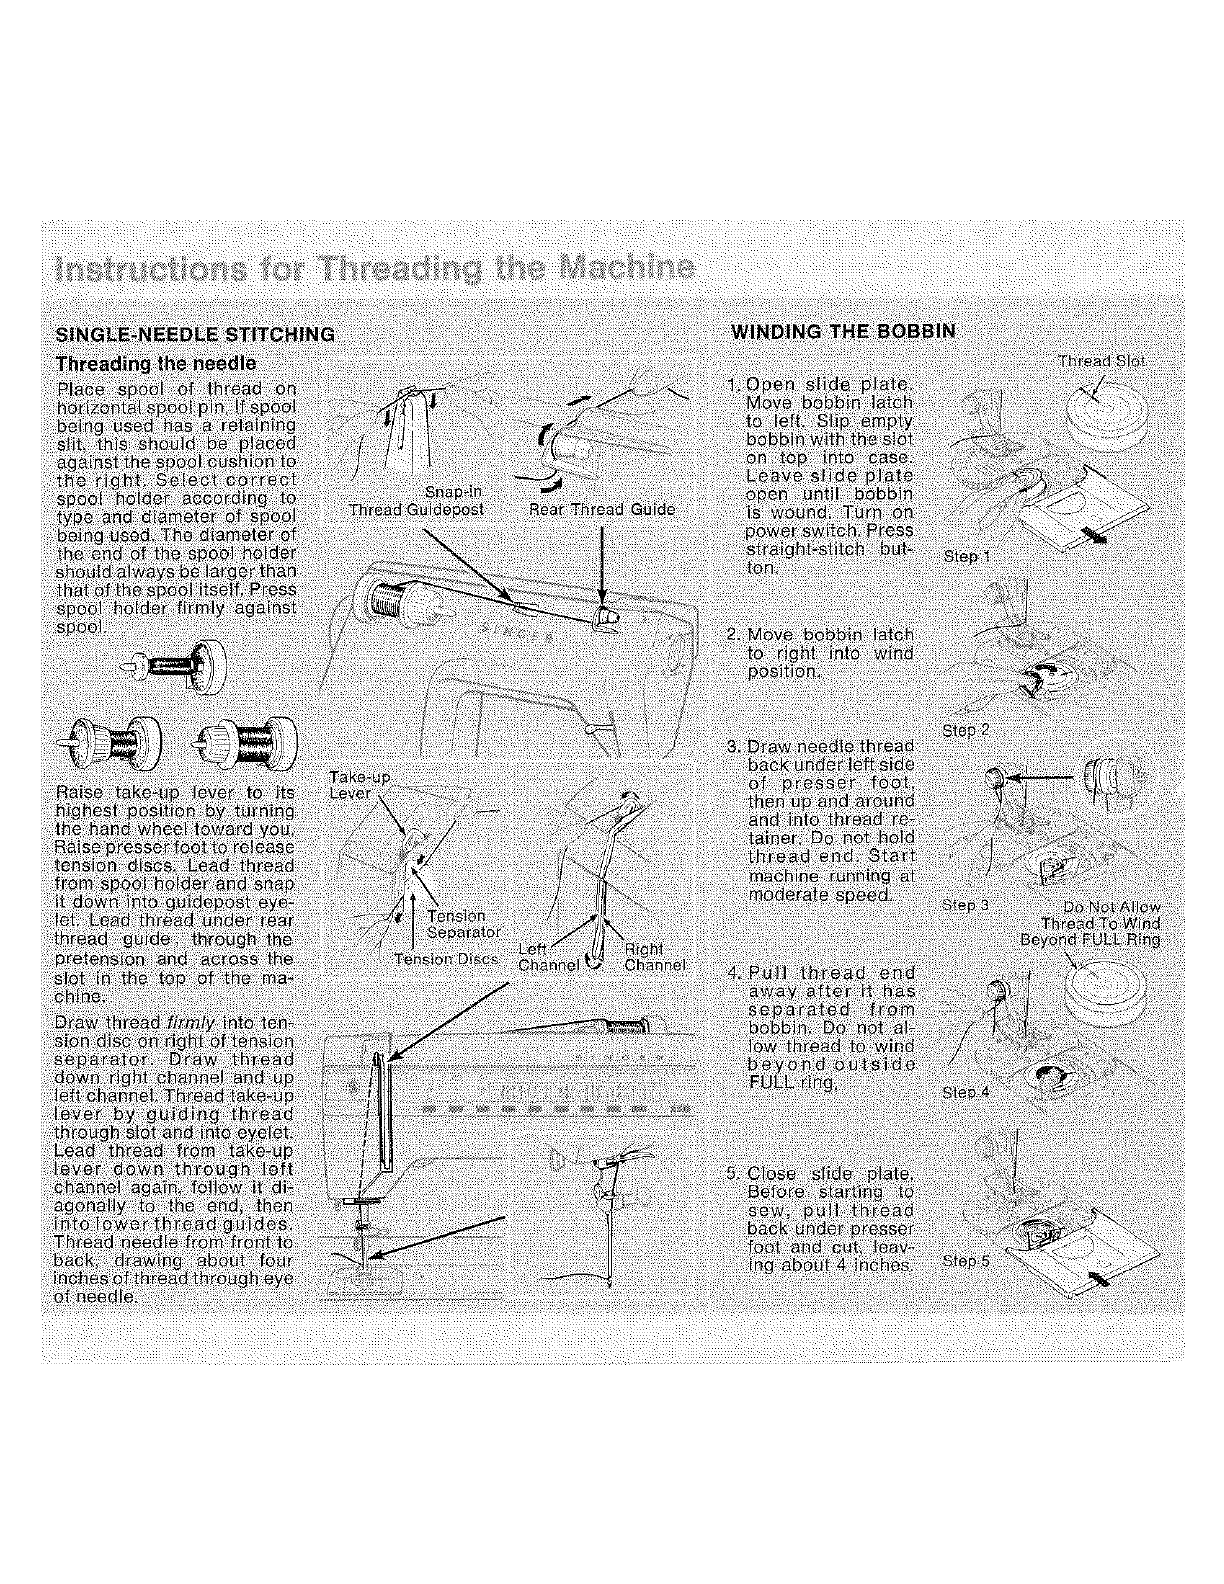
THREADING THE MACHINE
Threading _he Needle
Ptace spool of thread on horizontal spool pin. If spool
befng used has a retaining slit, this should be placed
against the spoo! cushion to the right. Select correct
spool holder according to type and diameter of spool
being used. The diameter of the end of the spool holder
shouJd always be larger than that of the spool itself
Press spool hoider firmly against spool
Raise take-up lever to its highest position by turning
the hand wheel toward you: Raise presser foot to re-
lease tension discs. Lead thread from spool holder and
snap it down into guidepost eyeieL Lead thread under
rear thread guide, through the pretension and across
the slot in the top of the machine.
Note: Dotted lines in illustrations represent path of
thread where concealed by machine,
Draw thread firmly into tension disc on right of tension
separator. D_aw thread dewn right channel and up left
ehannet. Thread takewup lever by guiding thread
through slot and into eyetet Lead thread from take-up
lever down through left channel again; _eilow it diagon-
ally to the end then into lower thread guides. Thread
needle from _ront to baek_ drawing about four inches
of thread through eye of needle:
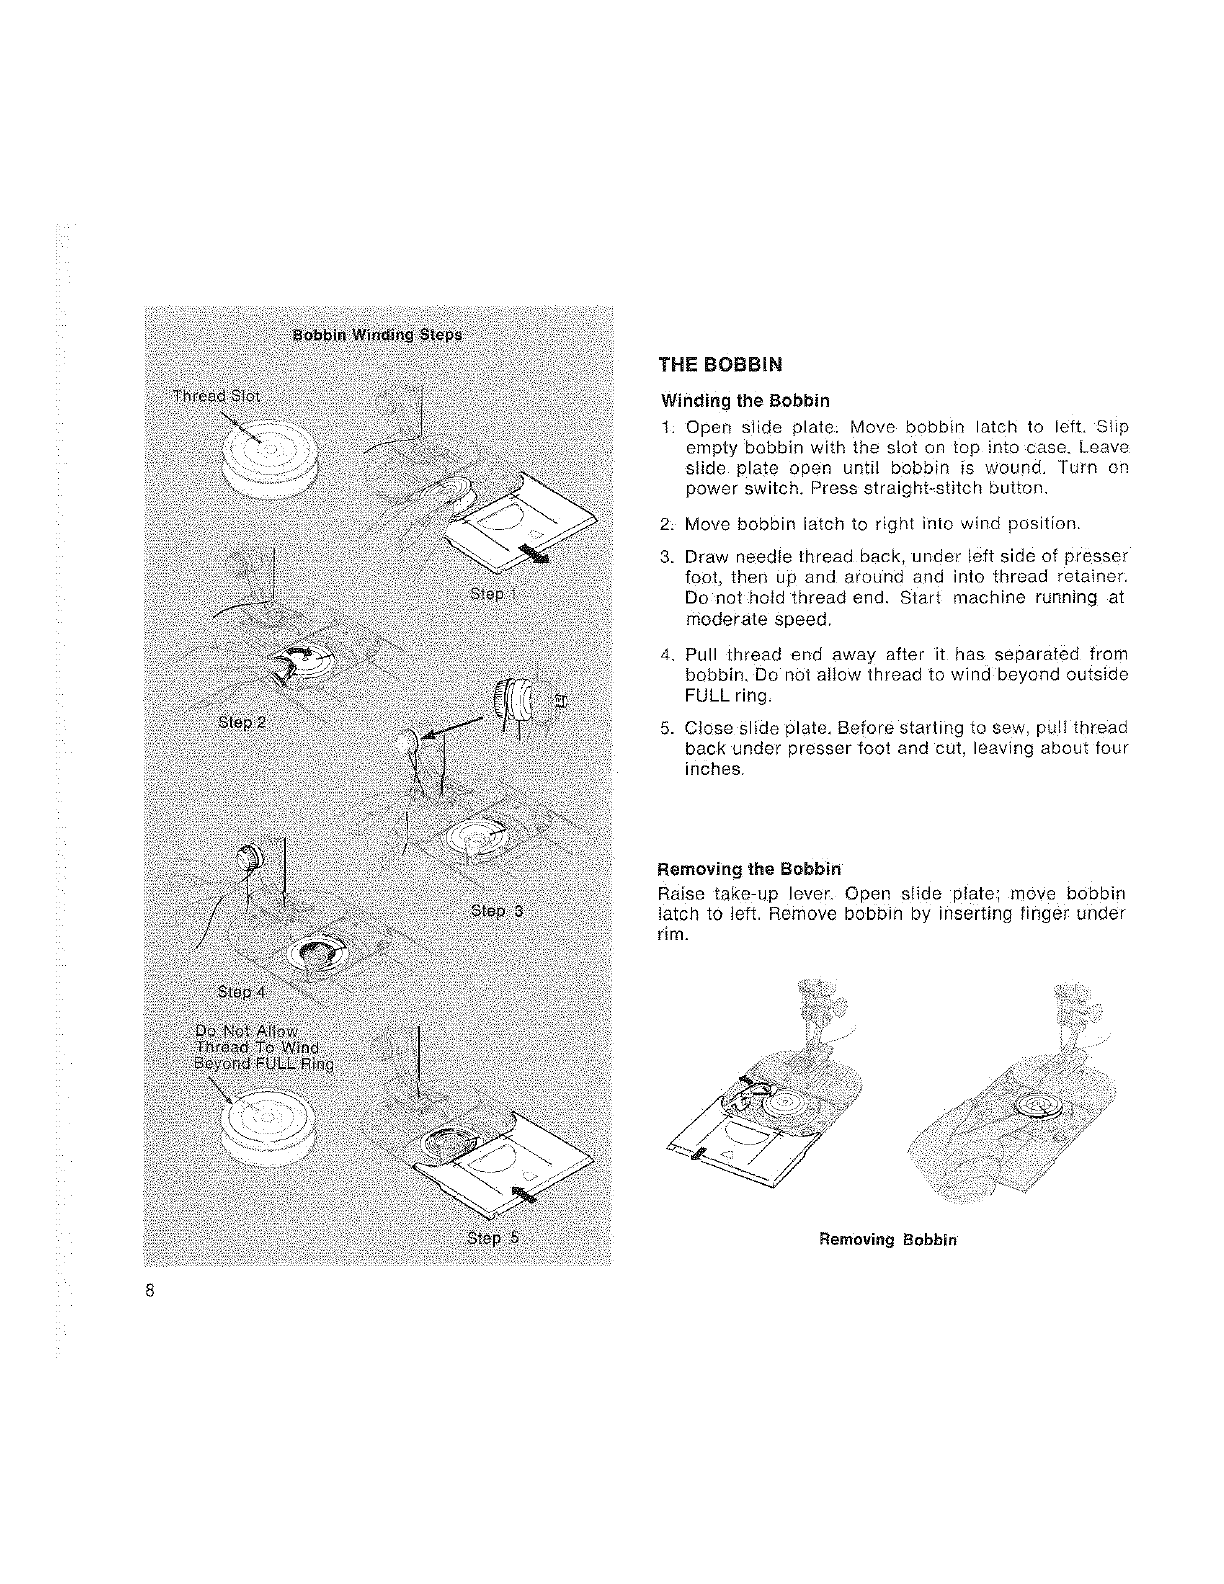
THE BOBBIN
Winding the Bobbin
1: Opee slide plate; Move bobbin latch to left. Slip
empty bobbin with the slot on top into case. Leave
slide plate open until bobbin is wound. Turn on
power switch. Press straight-stitch button,
2 Move bobbin latch to right into wind position.
3. Draw needle thread back, under left side of presser
foot, then up and around and into thread retainer
Do not hold thread end. Start machine running at
moderate speed.
4,
5.
Pull thread end away after it has separated from
bobbin, Do not allow thread to wind beyond outside
FULL ring,
Close slide plate. Before starting to sew, puli thread
back under presser foot and cut, leaving about four
inches.
Removing the Bobbin
Raise take-up lever Open slide plate; move bobbin
latch to left. Remove bobbin by inserting finger under
rim.
Removing Bobbin
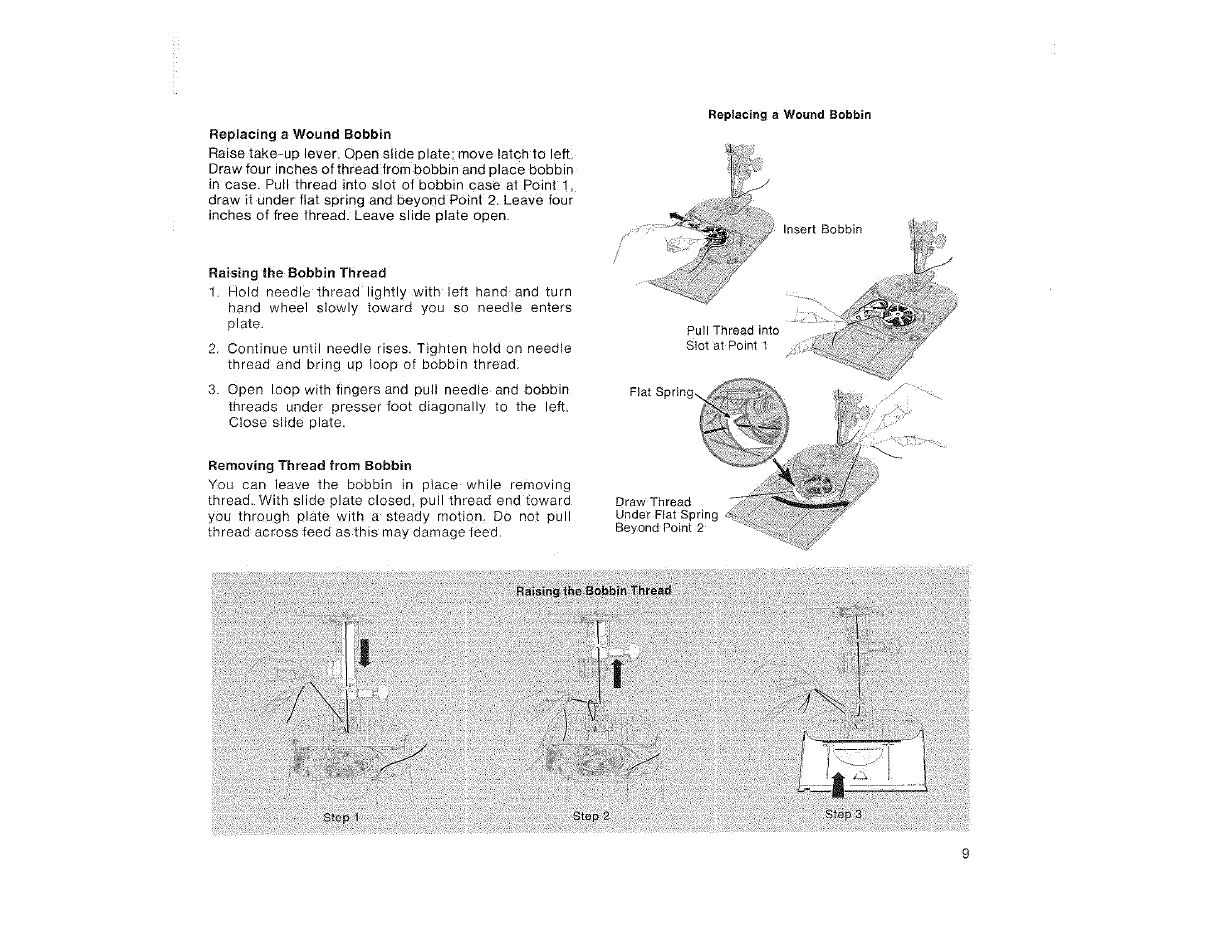
Replacing a Wound Bobbin
Raise take-up lever. Open stide plate move latch to eft
Draw four inches of thread from bobbin and mace DODDIR
in case. Pull thread into slo_ of bobbin case at Point 1
araw it under flat senng and beyond Point 2. Leave four
inches of free thread. Leave suae Dlate open
Raising the Bobbin Thread
] MOle neea e tnreaa ilgntl'_ with left qand and turn
nanc Nheel slo_ , toward you so needle en[ers
elate.
2. Continue um neeule rises. Tigmen no_o on neee_e
tnreaa anc erlrg ue _ooe of bobbin thread.
3. Oeen IOODwith fingers and pUll needle ane DODDIn
threads under presser foot elag3nally ;o me eft
Close slide dlate
Replacing a Wound Bobbin
Insert Bobbin
Pull Thread into
Slot at Point 1
Flat Spring,,
Removing Thread from Bobbin
You can leave the bobbin in place while removing
thread. With slide plate closed, pull thread end toward
you thrdugh plate with a steady motion. Do not pull
thread across feed as this may damage feed.
Draw Thread
Under Fiat Spring
Beyond Point 2
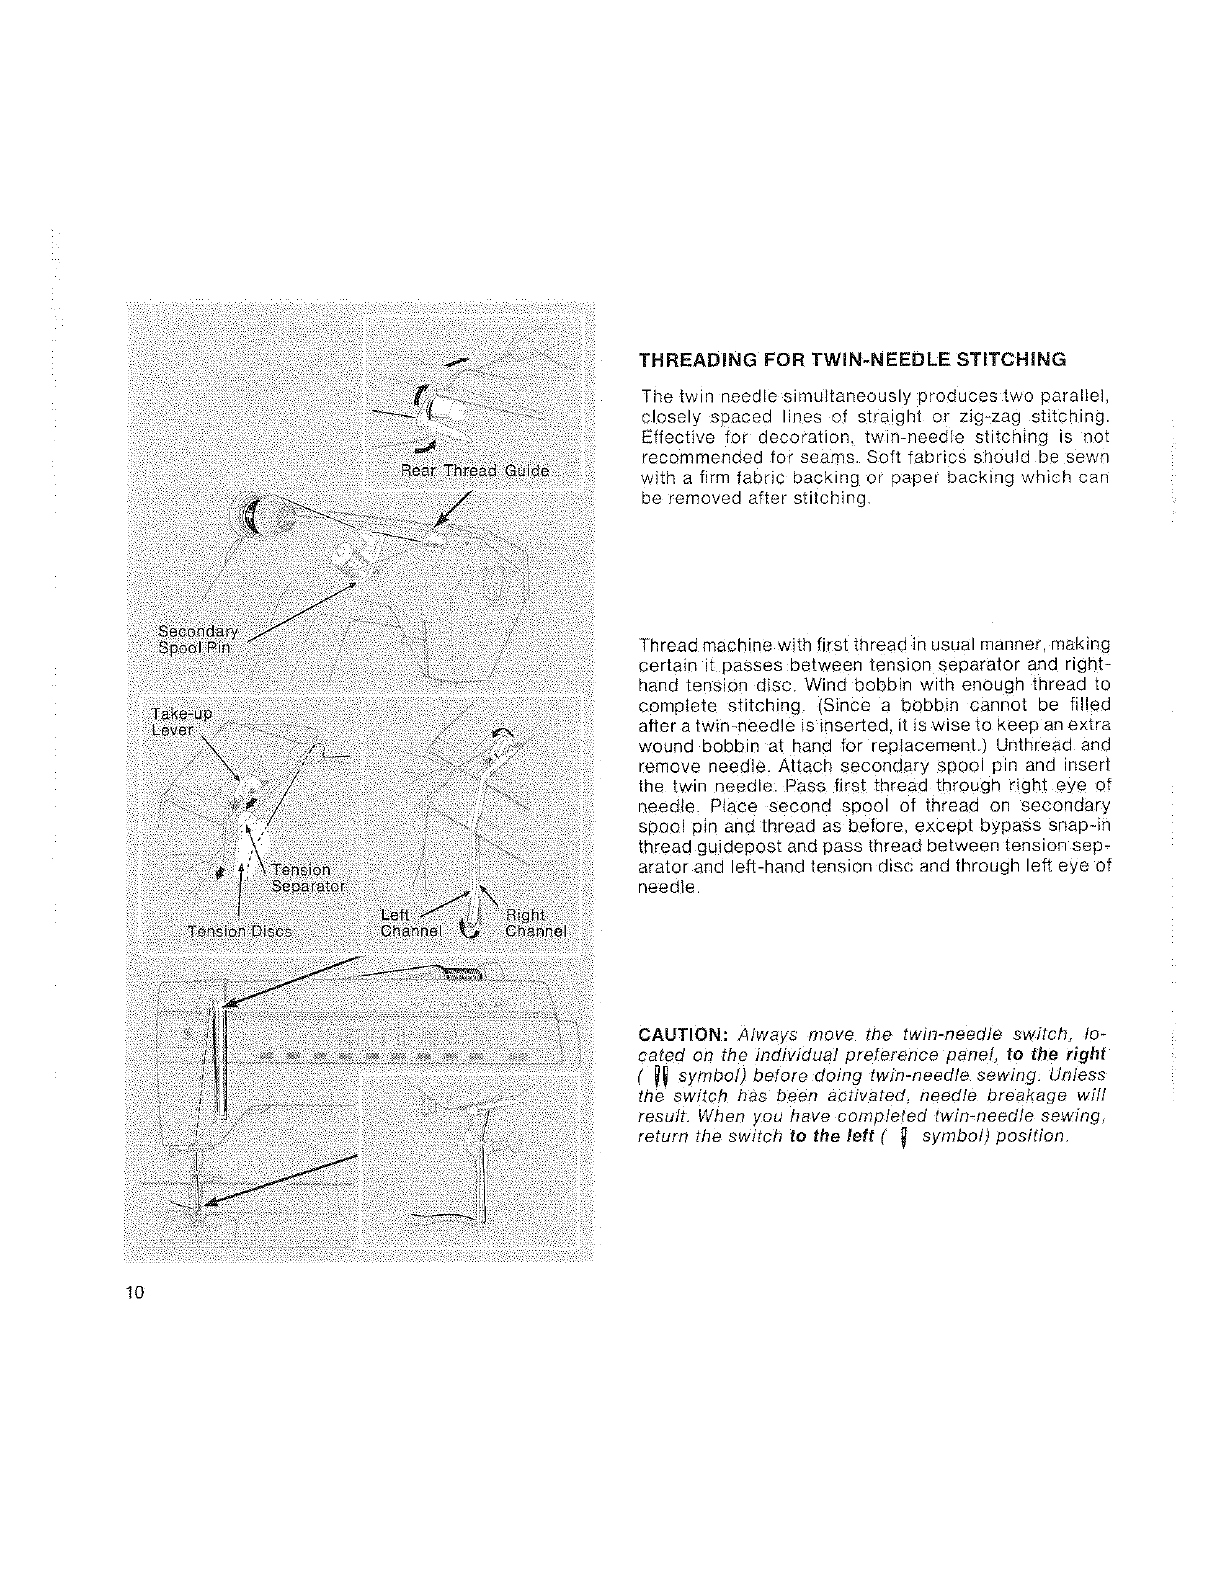
THREADING FOR TWiN-NEEDLE STITCHING
The twin needle simultaneously produces two parallel,
closely spaced lines of straight or zig_zag stitching.
Effective for decoration, twin-needle stitching is not
recommended for seams. Soft fabrics should be sewn
with a firm fabric backing or paper backing which can
be removed after stitching.
Thread machine with first thread in usua manner maKing
cer[am I( passes De!.ween tension separator aria r gn[=
qana tension d_sc Wind bobbin wnn enougn tnreaa to
cometete STircnng Since a Dobbin cannot De filled
after a twinmeedle _s_nser[eo t _swise to Keeo an extra
wouna DODQIB at hand for reolacemem Unthread ana
remove neeale. Attach secondary spoo Din ana nsen
me twin peedle. Pass first threaa mrougn right eye of
_eeaie Place second SPOOl of (nreaa on seconaar,
spoo_ p_n ana tnreaa as eetore except oypass snaD-in
tnreaa gu_depes[ ana Dass thread between [enslon sep-
arator and left-hand tension d sc ana mrougn left eye of
qeea e
CAUTION: Always move tee [w/n-neeoJe switch, to-
ca[ea on the molvJoL al greferenoe DaneJ to the right
(_symDoI before doing [w n-neeale sewing, umess
rne switch has been activated neeole oreaKage will
resum WheF you nave con, 31eteG [win-needle sewing
return the switch to the left _symoo_ oosition
10
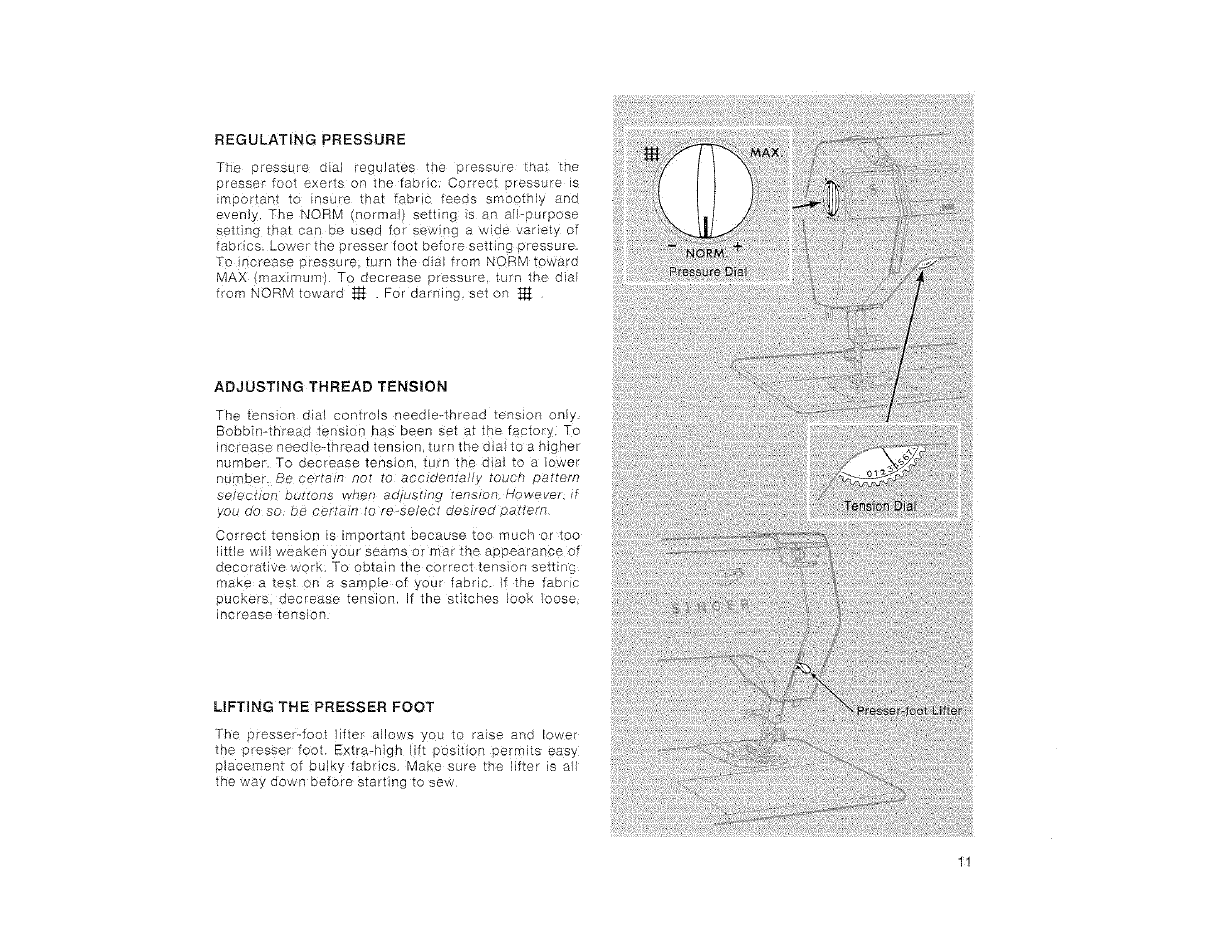
REGULATING PRESSURE
The pressure dial regulates the pressure that the
presser foot exebts on the fabric; Correct p_essure is
important to insure that tabric feeds smoothly and
evenly, The NORM (normal) setting is an all-purpose
setting that can be used for sewing a wide variety of
fabrics; Lower the presser foot before setting pressure.
To inorease Pressure turn the dla! from NQRMtoward
MAX imaximum) To decrease pressure, turn the dial
from NORM toward _ . For darning, set on
ADJUSTING THREAD TENSION
The _enslon ala controls neeole-mreao [ensJor only
Bobbln-th!'eae tens[or1 no5 Deem se_ at _P_e factory, To
Nerease neee e-tnrea(] _er'_lor _Llrn _neclJa/io a n/grief
qulTber, Tc aecrease ter1slon. _urn Irle Ll_al GO a owe
number. Be ¢}ef_aln fie[ [o accioer17,a]ly [ouch Da_,[efR
_elecnon DUrrOfTS wlset_ 8ojustlng rer1sio_r twowever
_ou Uo So De eFralFl to re-sclec t, Gesifeo oar_€/n
Col'_ect tensior sim Doriar1_ because toe mucr1 Dr TOO
]:_le v weaKen /ou_ seams or mar Trle aooearance of
eecoratlve wc _k. To obtain the correct fension settmq
slake a "_es_ or a SamPle of }/ou_ fabric _ 1:he fob _"
OUcKers oecrease _ens_on •[ne s:_cnes ]o_, oose
increase tension
LIFTING THE PRESSER FOOT
T_e presserZfoot liftes allows you to raise and lower
the p_esser foot. Extra-h!gh lift position permits easy
placement of bulky fabrics. Make sure the lifter is al_
the way down before starting to sew
1!
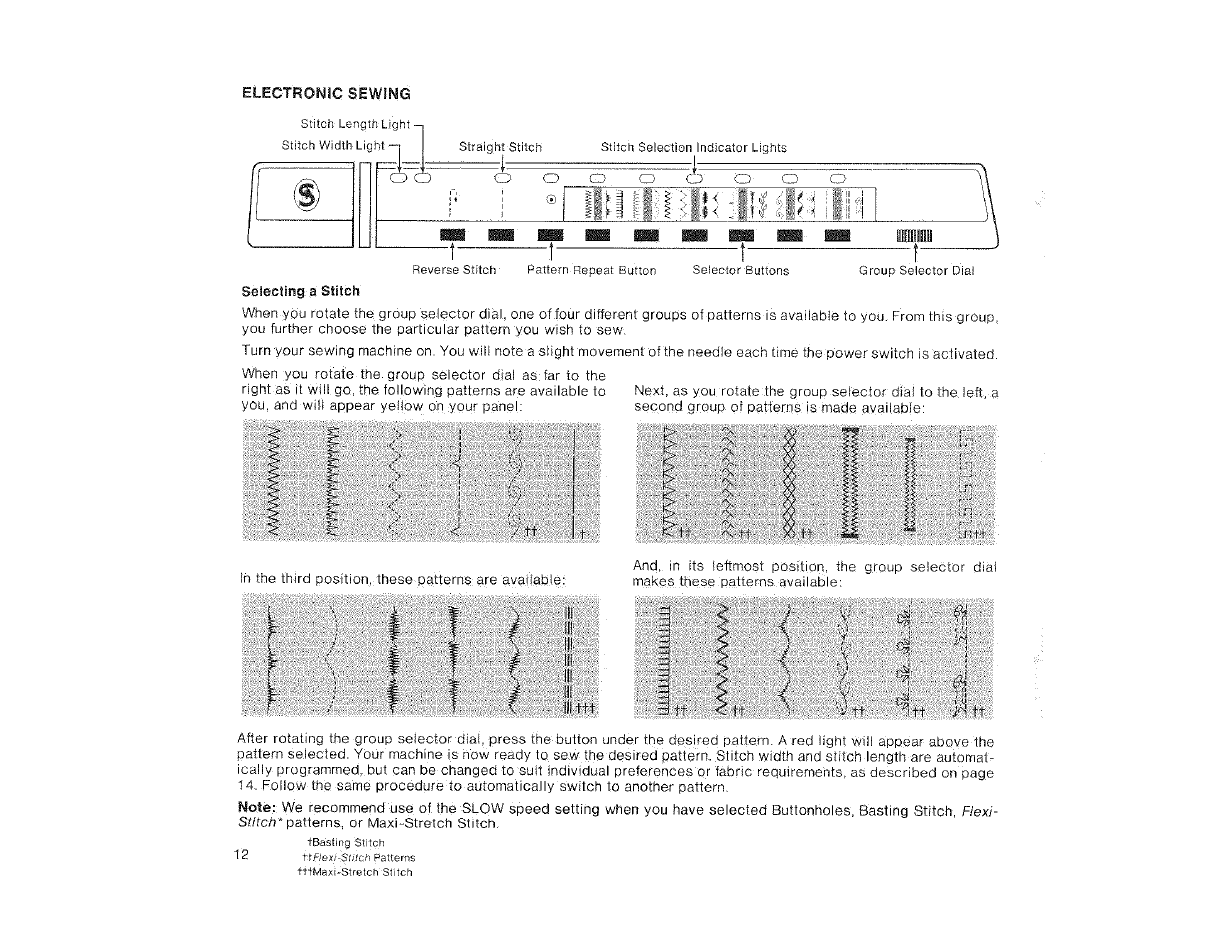
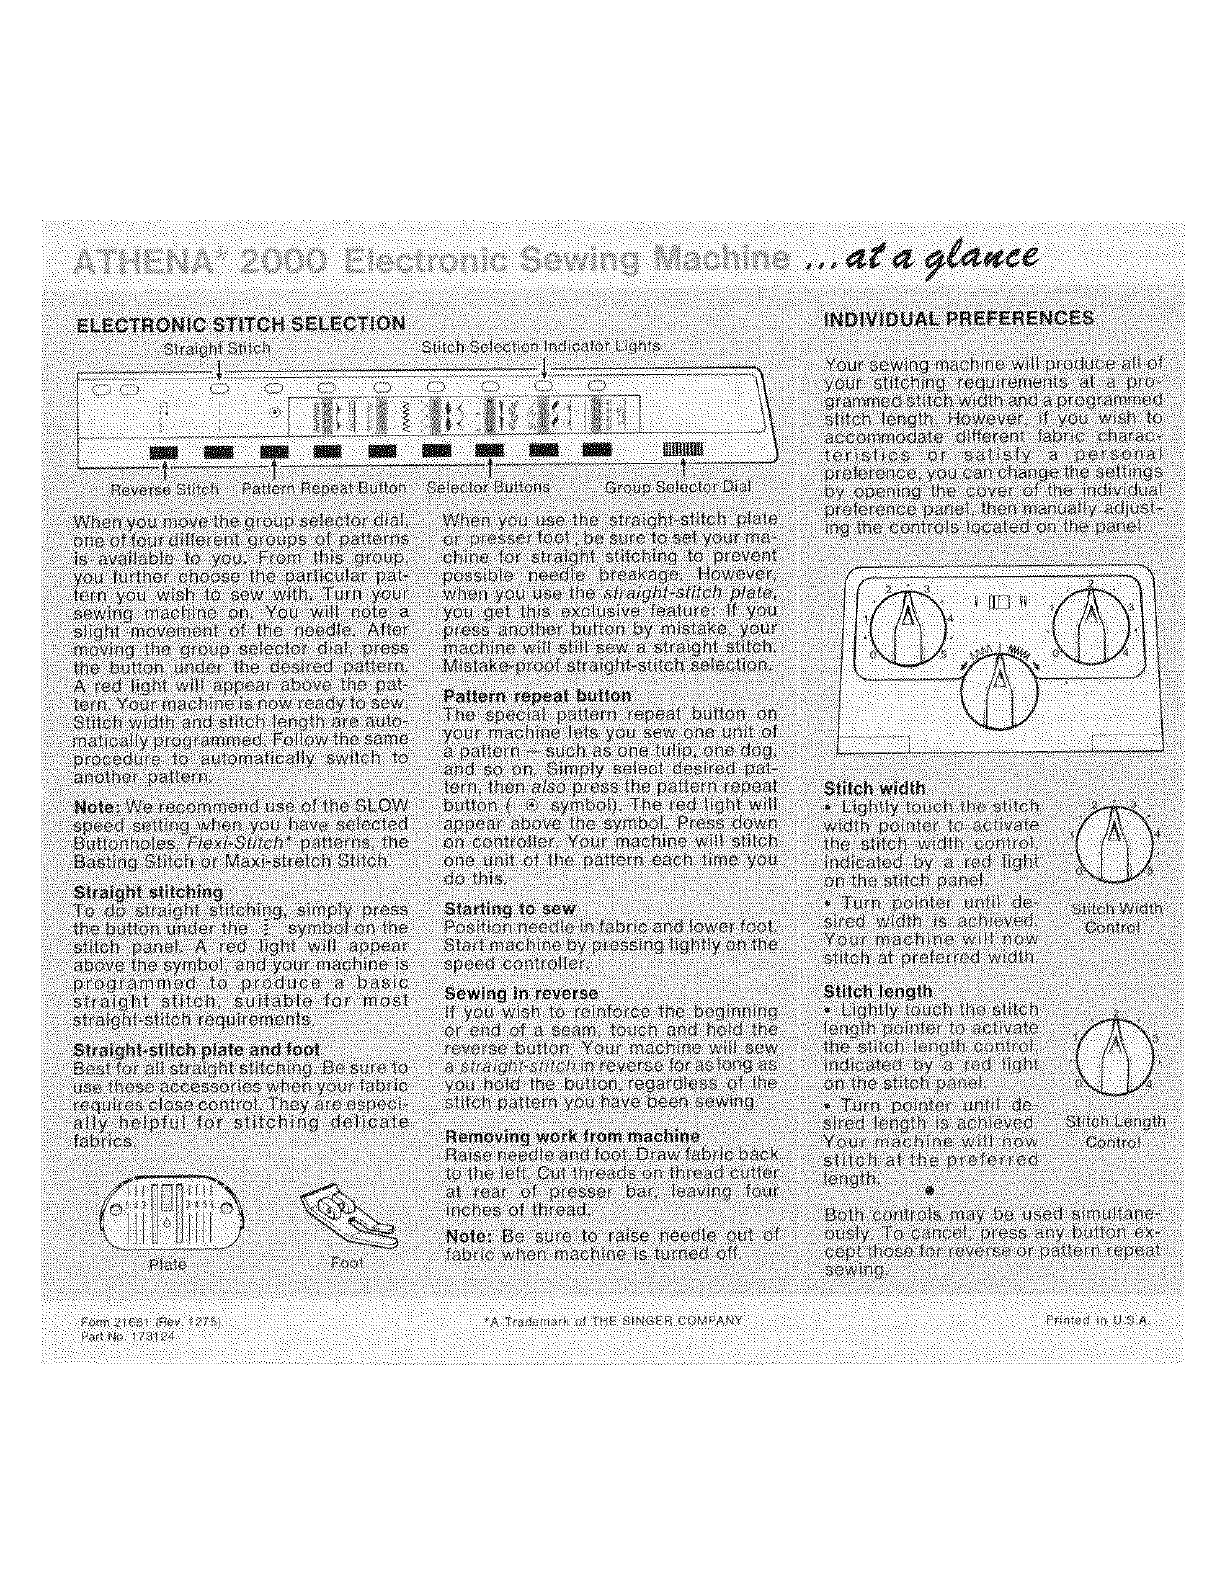
ELECTRONIC SEWING
Stitch Length Light
ii___ iiC_StitchWidth Light -- Straightl: Stitch Stitch Selection_._lndicator_ Lights _
CD 0 CZ) 0 _.._D C_ tiED LC_
t 1 t
Reverse Stitch Pa_ternRepeat Button Selector Buttons Group Selector Dial
Selecting a Stitch
When you rotate the group selector dial, one of four different groups of patterns is avaiiabIe to you. From this group,
you further choose the particular pattern you wish to sew
Turn your sewing machine on. You will note a slight movement of the needle each time the power switch is activated.
When you rotate the group selector dial as far to the
right as it will go, the following patterns a_e available to Next, as you rotat_ the group selector dial to the le_, a
you. and wilt appear ye!!ow on your panel: second group of patterns is made available:
in the third position, these patterns are avai!aMe And, in its /eftmost position, the group selector dial
makes these patterns available:
After rotating the group selector dial, press the button under the d_sired pattern. Ared light will appear above the
pattern selected. Your machine is now ready to sew the desired pattern. Stitch width and stdeh length are automat-
ically programmed, but can be changed to suit individual preferences or fabric requirements, as described on page
14. Follow the same procedure to automatically switch to another pattern.
Note: We recommend use of the SLOW speed setting when you have selected Buttonholes, Basting Stitch, Flexi-
Stitch* patterns, or Maxi_Stretch Stitch_
fBasting Stitch
12 t_Flexr_StLtch Patterns
fttMaxilStretch Stitch
Straight Stitching
To do s_ralgm Stl[cnlng.simply press tne DUttOn uric
IRe SVmDO on toe sTitCh aan@l 5 tea go1 w an-
pear above tne symDoI aria • our machine s _ro
]rammea ro )roauce a oasis _tragnt stitch, suitable
for most straight-stitch reouwernents
Straight-Stitch Plate and Foot
Best for all stratum stacmng. Be sure to use _nese ac
cessorles wnen, our fabric re8 4_res close control They
_reesoec_a ,nelEful for stt[cmng dehcate fabrics
When,ouusetne straight-stitch piateor oresserfoot
De sur_ _o set .,our macmne for stralgn_ srl[cmng to
prevent eOSSlDle neeale ereaKage However when you
use me s[ra gnr-srl_cn olaze you get ires exclusive
featulg: f you Dress another burton D_ mistake, you
n3acnlne w st sew a _tralgnt Silica Mistake-proof
stral _ht-stitch selectior
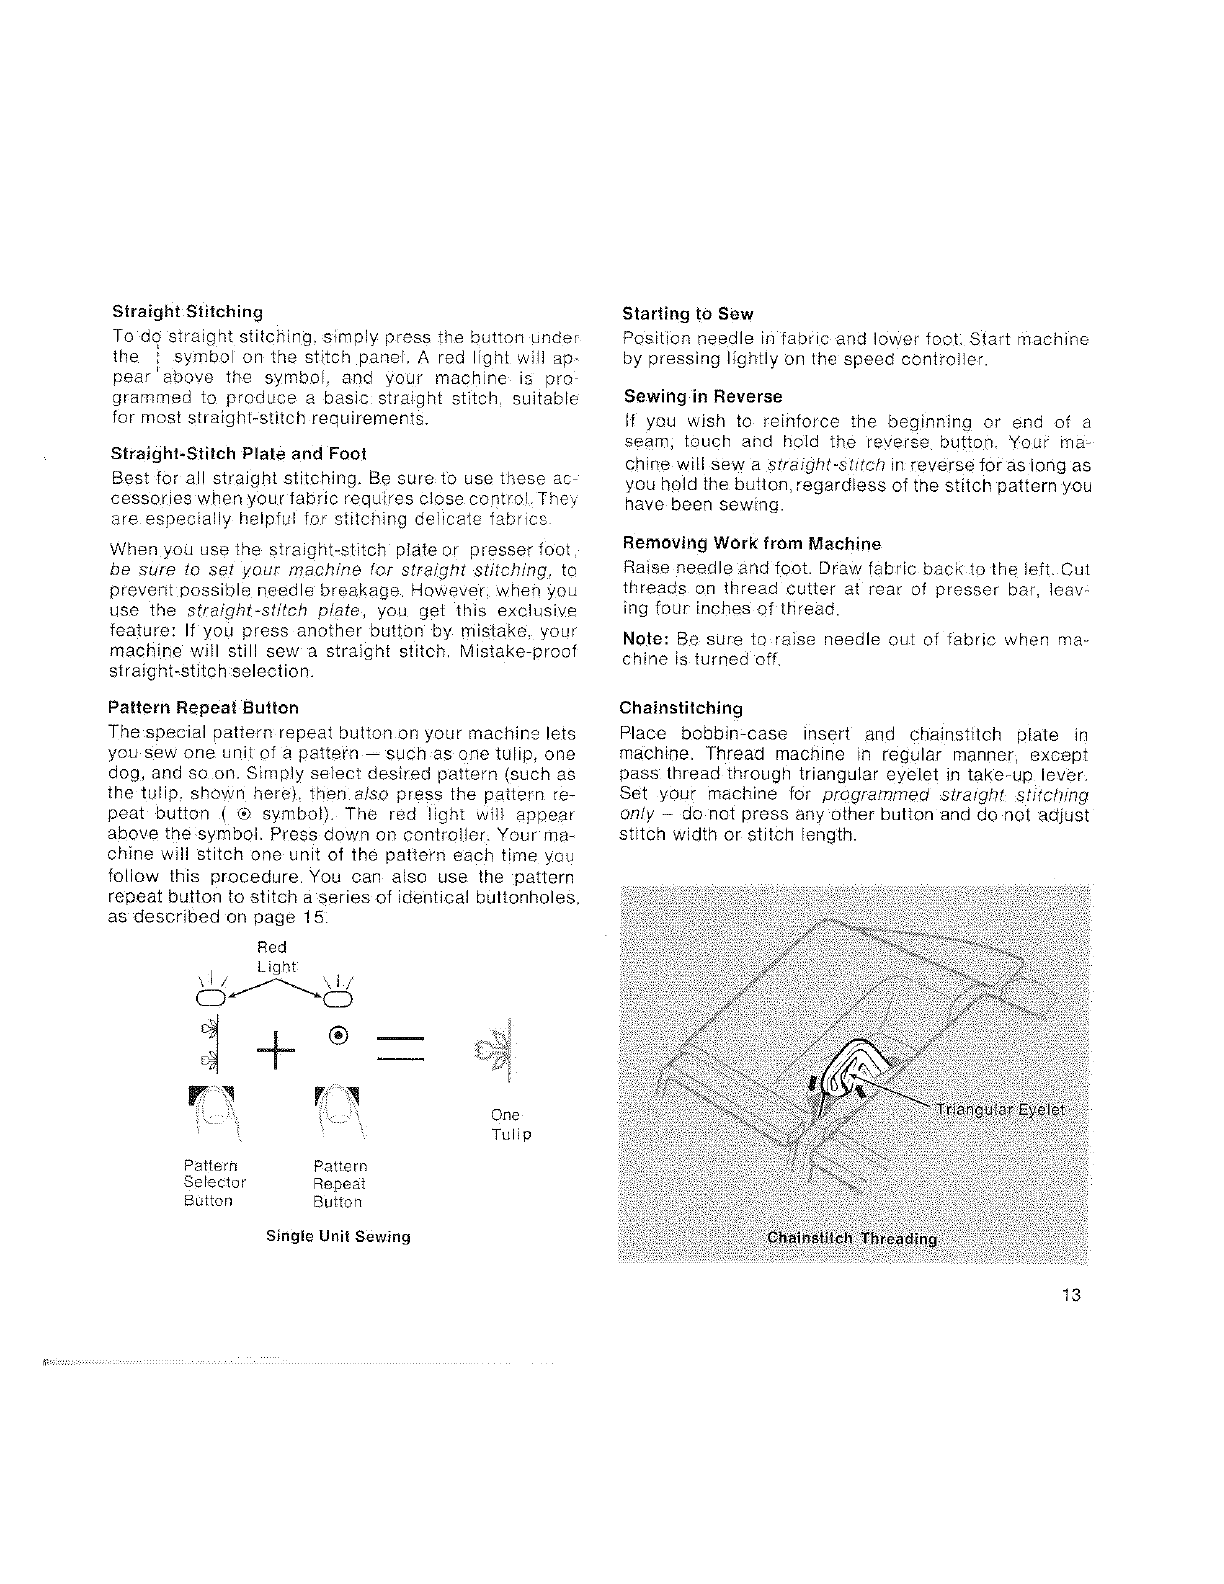
Pattern Repeat Button
The special pattern repeat button on your machine lets
you sew one unit of a pattern such as one tdlip, one
dog, and so on. Simply select desired pattern (such as
the tulip shown here), then a/so press the pattern re-
peat button ( ® symbol). The red light will appear
above the symbol. Press down on controller: Your ma
chine will stitch one unit of the pattern each time You
follow this procedure. You can also use the pattern
repeat button to stitch a series of identical buttonholes,
as descbbed on page 151
Red
Light
CD Z -"_O
:I+
, \
m
One
Tulip
Pattern Pattern
Selector Repeat
Button Button
Single Unit Sewing
Starting to Sew
Position needle in fabric and lower foot: Start machine
by pressing lightly on the speed controller.
Sewing in Reverse
i_ you wish to _einforce the beginning or end of a
seam; touch and h0td the reverse button. Yeu¢ ma _
chine will sew a straight-stitch in reverse foras long as
you hold the button, regardless of the stitch pattern you
have been sewing.
Removing Work from Machine
Raise needle and foot. Draw fabric back to the left. Cut
threads on thread cutter at rear of presser bar, leav:
ing four inches of thread.
Note: Be sure to raise needle out of fabric when ma-
chine is turned off.
Chainstitching
Place bobbin-case insert and chainstitoh plate in
machine. Thread machine in regular manner_ except
pass thread through triangular eyelet in take-up lever,
Set your machine for programmed straight stitching
only - do not press any Other button and do not adjust
stitch width or stitch length.
13
iJ
iii
14
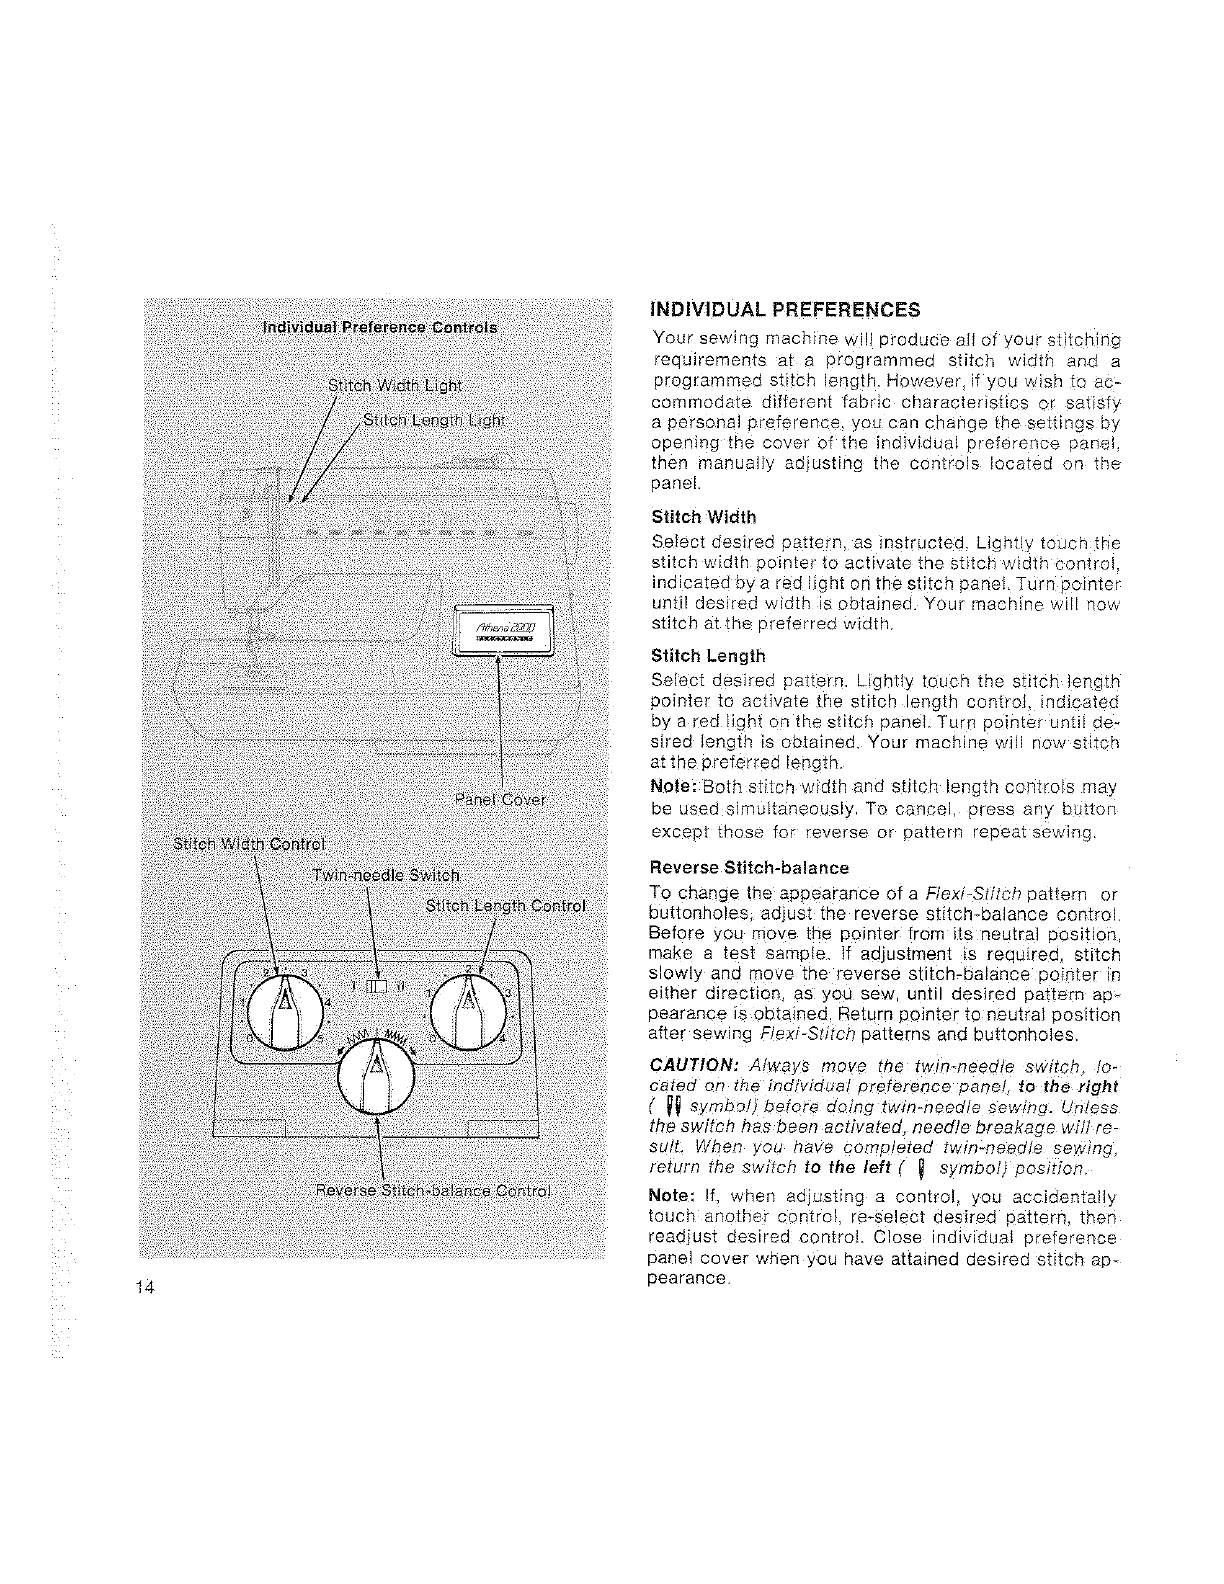
iNDIVIDUAL PREFERENCES
Your sewing macmne _ oroauce all of your stitching
"eoJirements at a programmed stitch w]a[n and a
programmed s[_cr _engtn, tlowever f you w_sn To ac-
commouate differenl fabric characteHs[_cs o[ satisf.
apersona 3reference ,oucancnar#e_neset_mgsey
opening [ne cover of the individual 9reference Dane
[nen manua _ adjusting tne DOtard,S _o:atea _n [ne
Dane
Stitch Width
Select des eo _at_ern, as instructed Lghtly tOUCh the
st_[cn w_otn oomter to ac[wate me st_tcr_ w_atn control
nmcatea eya red Hgm on_nesutcn oanel. Turn comter
until desired width is obtained. Your machine _,v, now
s,rltcn at TR6 are[erred width
Stitch Length
Select desired Ea_tern, ugn[_y toucn me sn_cn _er _tn
pointer to activate tne stitch leng[n contro na_catea
oy a red _ _n[ on [ne sutcn ganei, Turn aointer unto ]e_
sired length _s obtained Your macmne w now stitch
at tne preferred lengtn.
Note: Bo[n Sn_Ch width and stttcn leng_n controls maj
De used s_mu[[aneous_, To cance Dress _n3 OUttOr
exceot _nose for reverse or pattern repeat sewing.
Reverse Stitch-balance
To change the appearance of a FlexJ-StJtch cat,err or
eu_';onnoles ac_,JsT ere reverse shtch-balance contro
Before ,ou move tne aointer from its neutra oos_ on
make a _es: samote t_ aa. astment is reau_reu sn_cr
SlOWly and move _ne reverse S'(l[Cl3=balanee Doimer in
el[net o_rectlor as you sew um desired pattern ap-
pearance is obtained. Return ooln_er _o neu_ra_ posit/on
after sewing F/exi-Stitoh oaEems and buttonholes.
CAUTION: Always move me _wm_neeale swlmn o-
Dated on the individual oreterence oanel to the right
_symeol) before doing twin-needle sewm 9. unless
the switch has been actJvate_ neea]e oreaKage wm re-
sut[. When , ou nave corroteted twin-needle sewing
return [ne swt_cn to the left _symboh oostt_on
Note: f.wnen adjusting a comro you accidenta y
[oucn anotner comro_ re-select aestrea oat[ern tner
readjust aes_reo c)mro_ Close individJal 3reference
pane_ cover wnen you nave at[ained desired shtch ap_
pearance
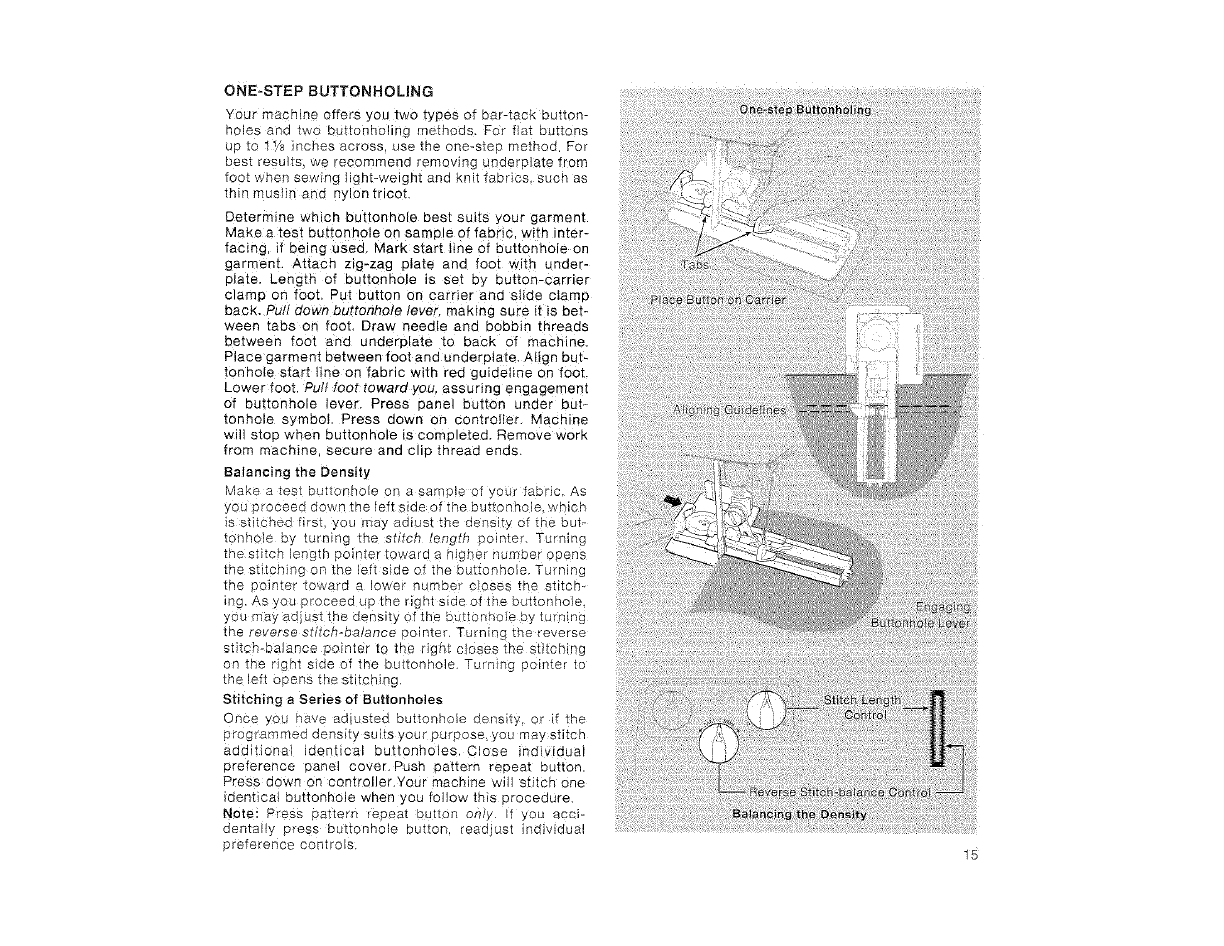
ONE-STEP BUTTONHOLING
Your machine offers you two types of oar-tacK outton-
qoles aDO tWO ourtorlnollrlg methods. :or f_at OUItOnS
UO to I _/8 nones across use me one-sieD melDed For
Best results, we recommena removing unaerolate from
foot when sewing light-weigt [ana knit fabrics. SUCh as
thin muslin and ny on trlco_
Determine _nIon buttonhole Best suits your garment.
Make a test ou[tonnole on sample of fabric w_tn mer-
facing '" being usea. Mark start line of aut[onnole on
garment. Attach zlg-zag ulate ana fool with unaer-
elate. L.engm of Buttonhole s set by button-carrier
clamp on foot. Put BUttOn on carrier aria slide clamp
back. Put QOWI?buttontTole lever maKing sure it is Bet-
ween tabs or foot. Draw needle and Dobbin threads
Between foot aria underplate to DOCK of machine.
Place garment between foot and unaerelate. Align BUt-
tonho{e start line on fabric w_tn rec gu_aeline on foot.
Lower foot Pull foot toward you, assuring engagement
of ou_tonnole lever. Press aane_ butter under but-
tonhole s_,mboL Dress aown on controller Machine
w_ stoa wnen out[onnole is completed. Remove work
from machine secureana c Dmreaa enas.
Balancing the Density
Makeatest outtonno_e on asamoleof -eL fabric As
yoL 9roceeooe nme eft side )f the buttonno_ wnlcr
s stitched hrsl you may aa_ue_ lne aensRj of tne out-
tonqole By turnmg tne sflrcr eng.*n oolntel Turning
rne sr_te_ _engm coiner toward a mcner numoer opens
the stitching onrne eft side of the buttonhole Turning
tne counter towars a ower qumoe cEoses rne strtcn-
ng, As ou _roceee uo me ngm sloe 3f the outtonnole
you may aa us1 ins aensit_ of the outton hole ay turn_ng
the -everse srn ;n-oalance oo_nte_ Turning tne reverse
stitch-balance 9olnter to me "lgnt cJoses the stlton -g
on me ngnr sloe of tne au[tonno4e Turning oc qTer _o
the left ooens tne st toning.
Stitching a Series of Buttonholes
Once yOL nave aa Jstec outl.onnole oensitj or Lf th_
programmeo cens_y su_ts your purpose, you rna_ sr_tcr
aaaltiQna aen[ica Buttonholes Close Dalvloual
oreference oanel cover. Push oat_ern reoea_ ou'_ton
Press down on controller.Your macn_ne ^ sutcn one
aentlca Buttonnole when you follow this 3roceaure
Note: Press oarterF eoeat DU[IOtq Dr?l X " yOU acci-
Dents j Dress au_tonnole DUUIOr reaD,us1 na_vlaual
oreference :omro_s. 15

TWO-STEP BUTTONHOLING
Two-step Buttonhole Foot
For buttons larger than 11/8 nches across or for but-
tons of unusual sha_e or tnlcKness use tne _wo_ste[
method of stdchmg Du[tonno_es
CAUTION: Do not pull down buttonhole lever,
Always maKe a teat outtonnole on a sample of your
fabric wlm qterfacing, f being used Determine length
of button ano mark start aria ena re of buttonhole on
garment. Attach z_g-zag plate and two-step puttonnole
foot. Draw qeedle and bobblr threads under foot [o back
of machine. Place garment under foot so that buttonno_e
start line is a gneu with re(] guideline on foot. Lower
foot Select reou_rea buttonhole 13y pusnlng OUt[On on
stitch selection oanei. See directions for one-step eu[-
[onnonng to balance density of your ouzronnole Start
machine and let It complete step I of buttonhole cycle
Stop macmne ust before gu_aenne on buttonhole foot
reacnes end of bUtTOnhole ena Hne on garmem Press
ou[[c nno e lever away from. 3u. Start machine and let
comolete step 2 of buttonhole cycle Stop sewing Nnen
SD[cnmg reaches s_artlng bar tack. For additiona DUr-
[onnoles. Dress me narrern reDear button and follow the
same procedure.
For sewing on buttons, see instructions in Sewing
Applications book.
16
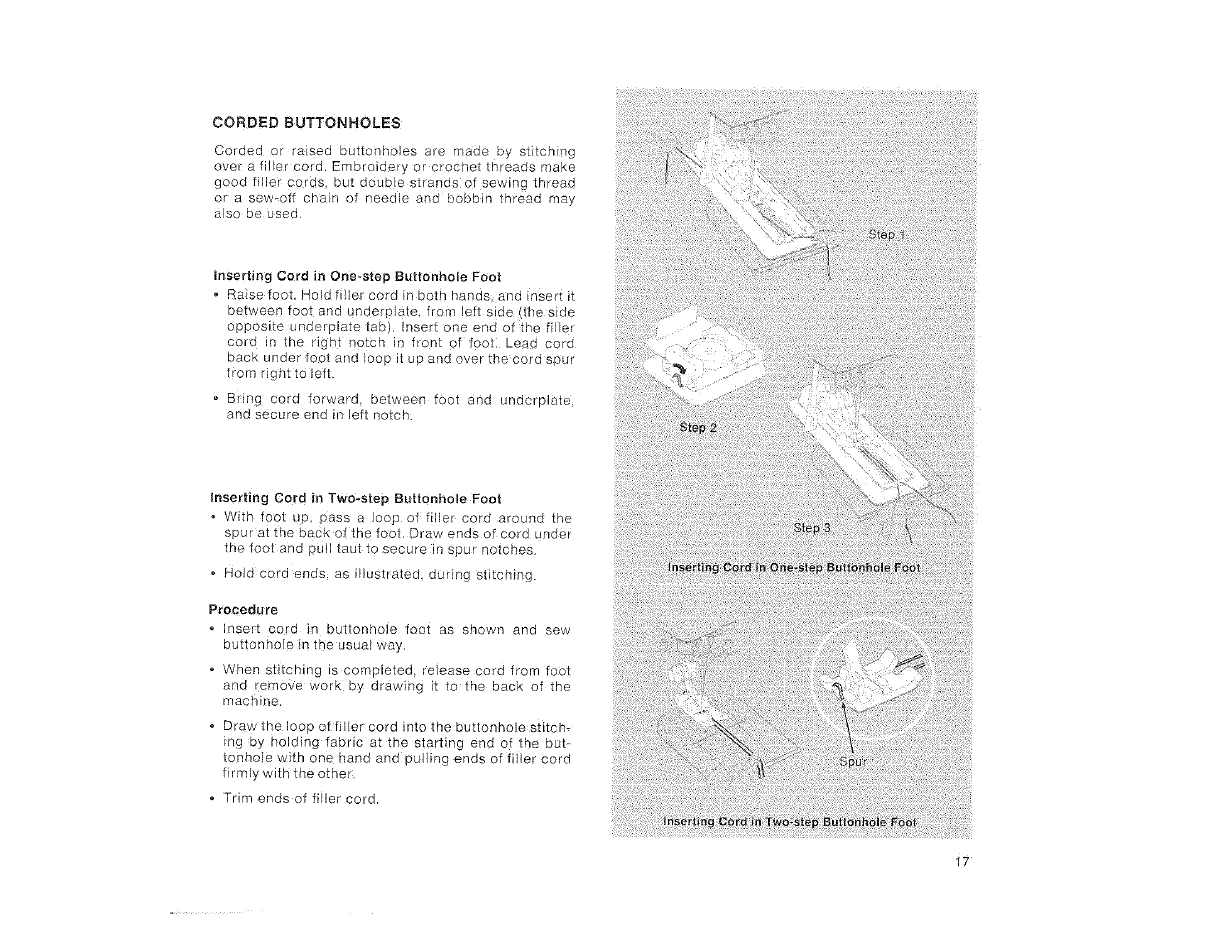
CORDED BUTTONHOLES
Corded or raised buttonholes are made by stitching
over a fil_er cord. Embroidery or crochet threads make
good filler cords, but double strands of sewing thread
or a sew_off chain of needle and bobbin fhread may
aJso be used
Inserting Cord in One-step Buttonhole Foot
• Raise foot, Hold fi}]er cord in both hands and insert it
between foo_ and underplate, from left side (the side
opposite underplate tab). Inse_t one end of the filler
cord in the right notch in front of foot: Lead cord
back under foot and loop it up and over the cord spur
from right to left.
• B_ing cord forward between foot and undcrplate
and secure end in left notch:
Inserting Cord in Two-step Buttonhole Foot
With foot up, pass a loop of fillep cord around the
spur at the back of the foot. Draw ends or cord under
the foot and pull taut to secure in spur notches.
, Hold cord ends as illustrated, during stitching.
Procedure
Insert cord in buttonhole foot as shown and sew
buttonhole in the usual way.
• When stitching is completed, retease cord fsom foot
and remove work by drawing it to the bask of the
machine.
Draw the loop of [iller cord into the buttonhole stitch-
ing by holding fabric at the starting end of the but-
tonhole with one hand and pulling ends of filler cord
firmly with the of her,
= Trim ends of filler cord.
17
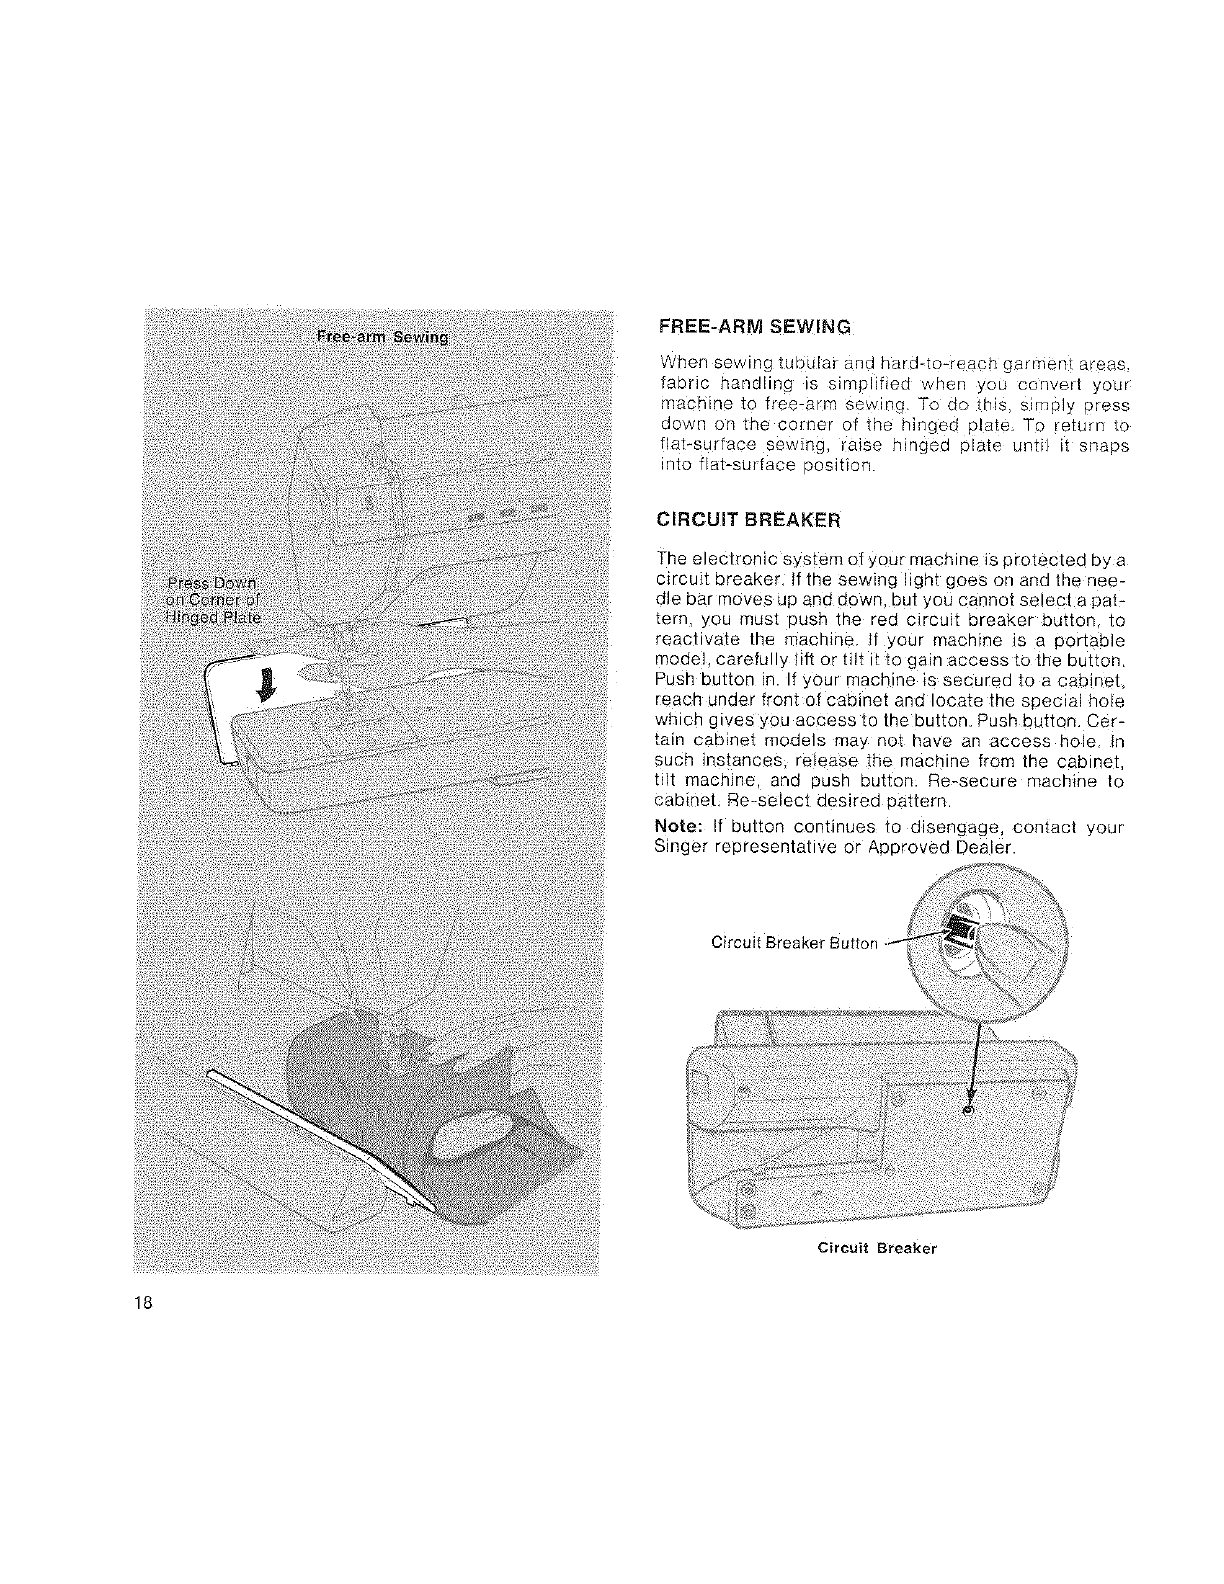
FREE-ARM SEWING
When sewing tubdlar and hard-to-reach ger_nant areas
fabric handling is simplified when you eonvert your
machine to freearm _ewing. To de _his, simply press
down on the co_ner of the hinged plate To return to
flat-surface sawing, _aise hinged plate until it snaps
into fiat-surface position
CIRCUIT BREAKER
The e_ectron_c system of your macnne _sDro_ecteo Dy a
c_rcuit breaker, if the sewing Hgnt goes on and the nee-
dle bar moves ue and down. OUt you cannot select a par-
tern you must 9usr the red c_rcu_t breaker outton to
reactivate me macnlne if your macmne s a ocrtaole
mode carefu .ft or tilt it to gain access re tne DUttOn.
_ush 3urron -f_our macr ne_ssecuredtoa :aolne]
reaon under front of cabinet and locale the seecJal no_e
Wnl:n gives ,'ou access to the eutton. Push button. Cer-
•,aln caDEnet models ma, not nave an _ccess hole
SUCh instances re_ease tne machine Item tne Cabinet
tilt macmne and 3USF DUttOP Re-secure machine [o
cabinet Re-selec_ desired aattern
Note: tf button continues to disengage contact /our
Singer rearesentat_ve or Aeeroved Dealer.
Circuit Breaker
Circuit Breaker
18
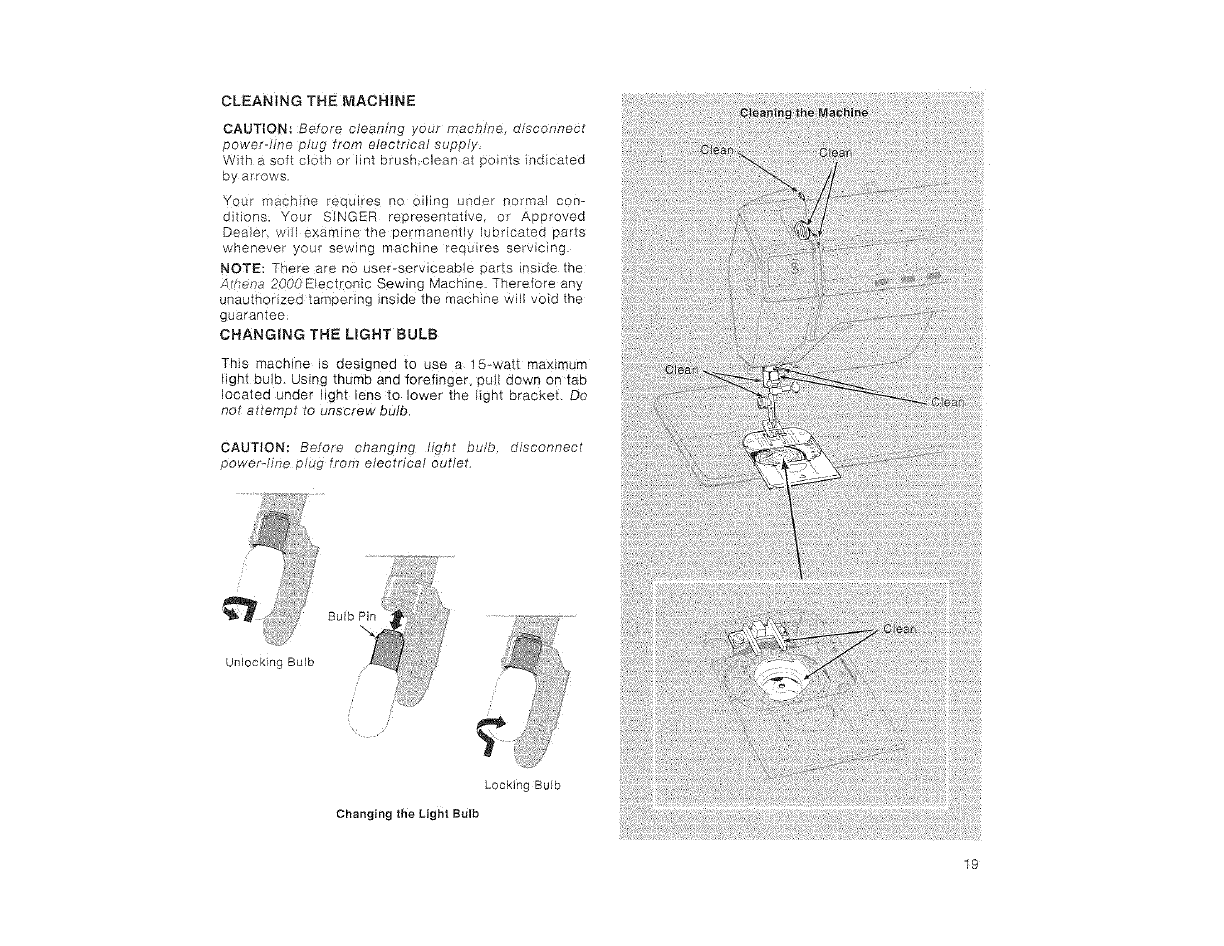
CLEANING THE MACHINE
CAUTION: Before cleaning your machine, disconnect
power-line plug from electrical supply,
With a soft cloth or lint brush clean at points indicated
by arrews.
Your machine requires no oiling under I_otmal con-
ditions: Your SINGER representative, or Approved
Dealer, will examine the permanently lubricated parts
whenever your sewing machine requires servicing
NOTE: There are no user-serviceable parts inside the
AU_ena 2000 Dectronic Sewing Machine. Therefore any
unauthorized tampering inside the machine will void the
guarantee:
CHANGING THE LIGHT BULB
This machine is designed io use a 15-watt maximum
light bulb, Using thumb and forefinger, puU down on tab
located under light lens to lower the light bracket. Do
not attempt to unscrew bulb.
CAUTION: Before changing Light bulb. disconnect
power-fine plug from electrical outlet
Unlocking Bulb
Locking Bulb
Changing the Light Bulb
19
PERFORMANCE CHECKLIST
20 Form 21680 (Rev 576/
Part NO 173122

Here, there, everywhere...S | _ 0 _ R
-L [r8demaH oTTHE S_NGER COMPAN _r_]t_rJ p USA
