Sinotech Digital Technology HSG-X5 MID User Manual Preface
Sinotech Digital Technology Company Ltd. MID Preface
Users Manual

Preface
For your ease as soon as possible to operate the machine,when you start using
this machine,please read the instructions we have supplied so that you can
properly use the machine.
The information in this manual subject to change without notice and does not
take up this manual errors or omissions arising from any event caused.
1

Please be sure the following items including in the packing:
Machine
Adapter
USB cable
OTG cable
Headset
HDMI cable
Manual
Touch pen
2

Directory
1. Main functions
2. Basic Operation
3. Connect the computer and File Transfer
4. The main interface
5. Music player
6. Video Player
7. Image View
8. Recording
9. File
10. Set
11. Book
12. Additional features
3

1、Main Fuction
●7-inch wide-screen TFT TFT resistive touch screen the whole 800 * 480 resolution,
high-definition display.
●Support MP3, WMA, WAV, OGG, APE format music player, support sequence playing a
variety of play modes, lyrics display, album picture playback.
●support AVI, RMVB, DAT, WMV, MPEG, FLV, H.264 supports video click-to-play, 800 * 480
resolution, ultra-clear video playback.
●support HDMI 1080P and PAL,λ NTSC standard TV-OUT TV output function.
●support from the ring features.
●supports up to 32GB capacity SD card.
●support the highest 4096 * 4096 resolution JPG, BMP, GIF, PNG formats picture browsing,
picture automatically browsing.
●Energy-saving setting, brightness can be adjusted freely.
●support for ultra-long recording capability.
●Support E-book reading and bookmark feature.
●support WINCE system.
●High-speed USB2.0 transfer.
●mobile hard disk function.
●support for external mouse, keyboard.
●Support firmware upgrade function.
●Support multi-tasking function,λ can look books while listening to music.
The information in this manual subject to change without notice and does not take up this
manual errors or omissions arising from any event caused.
2、Basic Operation
z Boot: Long press the power button about 3 seconds, the player displays the boot screen
to enter the function selection main interface.
● Shutdown:
a. Click the desktop Start menu, choose Shut Down pop-up "Shutdown" "hang"
selection dialog box, click on "shutdown", to achieve a shutdown operation.
b. in the boot state, long press the power button about 3 seconds, select Shut
4

Down pop-up "Shutdown" "hang" selection dialog box, click on "shutdown", to
achieve a shutdown operation.
c. In the absence of sufficient power, the machine automatically shut down.
●hang:
When you do not have the interim, you can choose hang. At this point the system
will be low-power operation, and the program will not be open until closed; again,
just a short press the power button, you can revert to the original state of operation.
To do the following:
a. Click the desktop Start menu, choose Shut Down pop-up "Shutdown" "hang"
selection dialog box, click the "hang" and realize suspend operations.
b. in the boot state, long press the power button about 3 seconds, select Shut
Down pop-up "Shutdown" "hang" selection dialog box, click the "hang" and realize
suspend operations.
System reset function
If you use MID disorder occurred during the procedure, crashes, etc. are not
normal circumstances, you can use the stylus hits the fuselage reset reset button
on this machine, and then restart the machine.
Power Supply Monitoring
●System reset function
If you use MID disorder occurred during the procedure, crashes, etc. are not normal
circumstances, you can use the stylus hits the fuselage reset reset button on this machine,
and then restart the machine.
●Power Supply Monitoringλ
Click on the desktop "Control Center" icon into the Control Center interface, choose the power
management, monitor battery power status, along with the increase in use of time machine,
the battery icon in the cell number will be reduced accordingly, and the battery life time and
play the type of file the screen display state and the volume size. Through the power settings:
automatic, power and optimal performance, three kinds of options to select the power mode,
when the battery icon shows the number of empty cells, please charge.
●Battery Chargingλ
This machine adopts built-in high-capacity polymer battery, you can use our company is
equipped with a battery charger charging, charging, the player has a certain degree of
5

warming, are a normal phenomenon.
▲ Note: When the red charging indicator light lit, full of light extinguished after. Full charge in
3 hours.
3.Connect The Computer and File Transfer
The machine via USB cable connected to the computer, so that can achieve the removable
disk function for data transmission. The machine and the computer through the USB
interface can be used as a U disk to use. You just need to enjoy music directly copied to the
player, which can be, without the need for any third-party process .Order to achieve.
4、Interface
Boot into the main interface, you can choose music, movies, pictures, sound recordings,
calendar, computer. Control center and e-books and other models
5、Music
In the main interface, click the option to start music player, this time to play music files for
the last time you saved the list first tracks; In addition, music files can also click on to start
music player, this time to play the file for the selected file.
z music interface
a. click the button to enter the music to set the page, respectively, are: disordered
playback, repeat playback and sound settings to choose three options, based on individual
set.
b. Click to musical pause, on the one, the next one operation.
c. Click, drag the page to next page. In the song list, by clicking the "Update Playlist"
Achieving the list update; selected to delete the file, click the "Delete" to remove.
d. Click to select Mute and volume models. Note: Mute is only valid for this procedure
6

does not affect the system volume.
e. Scroll volume adjustment of the volume size of music player.
f. Drag to draw a realization of the progress that the point-to-play operation.
g. to support the same file name the same directory LRC format lyrics fade display.
h. support for album art display.
6、Video
In the main interface, choose to start video player, this time playing video files saved for
the last time the list the first file. In addition, you can click on video files play selected files.
z Video interface
a. Double-click the video player interface through the user interface can be realized and the
full-screen conversion, interface in 5 seconds will automatically switch to full-screen playback
mode.
●Video interface
a. Click into the video settings interface. Respectively, the "random play", "repeat"
and "Scaling" 3 feature set. Click to enter the configuration mode were set. "Scaling" setting
page are: the original ratio of five kinds of 16:9,5:4,4:3 and covered with full-screen playback
mode, choose according to individual needs.
b. Click video pause, on the one, the next one operation.
c. Click into the video list, drag to next page. Click the "Update List" update the current
directory; selected list of files, click the "Delete" to delete the selected video files.
d. Click to select mute or volume mode. (Note: Mute is only valid for this procedure does
not affect the system volume.)
7

e. Scroll volume adjustment of the volume size of music player.
f. Drag to draw a realization of the progress of fast-forward or rewind operation.
g. In the playback mode, double-click the screen can switch to full screen display, or 5S,
without touching the screen will automatically switch to after the full-screen mode.
h. Switch to the HDMI:
Mode 1:
Already using the HDMI cable and the HDMI display when the MID into the video player will
prompt "has detected HDMI cable is connected, whether to switch to HDMI mode", you can
choose "Yes" to switch to HDMI output, this time video information is displayed in HDMI
display; choose "No", then the video output to the LCD.
Mode 2:
In the Control Center, open the HDMI set up items, open the HDMI, then go to video playback
mode, will automatically switch to HDMI output.
HDMI is also open in this way need to turn off the HDMI set-in program.
7、Picture
In the menu,choose to enter picture function.
The selected image file playback picture file. Double-click "root" icon to return to the root
directory. Double-click the "parent" to return to the parent directory.
a. Click to enter the Slideshow Settings page. Respectively: a slide set up two kinds
of speed and repeat functions, respectively, click set.
b. Click can be automatically switched to full-screen playback mode.
c. Click to select players on one or the next picture.
d. Click conduct image to enlarge or shrink operations.
e. Click, according to the need for clockwise and counterclockwise image
8

conversion.
f. click, you can open the need to open the specified file.
a. Double-click the screen to switch to full screen mode.
b. using the zoom feature, the full screen, you can use moving pictures.
c. Click to return to the previous menu level.
8、Recording
Main menu,choose ,enter the recording interface。
In the recording interface, will be prompted to the current format and the current remaining
NAND space
a. Click, switch the current recording format, can be switched formats: MP3 and
WMA two kinds.
b. Press to start or pause recording. After recording, press, recording will
be saved to the specified directory.
c. volume of rolling, adjust the recording gain.
▲Recording documents are available in the NAND space RECODE folder to find and
play。
9、Calendar
9

In the main interface, select, enter the calendar feature.
a. respectively, click on "Year / Month" by finding the need to date, the
calendar also shows the search interface, the date the corresponding lunar time.
b. Click “today” can jump back to the day of the date.
10.Calculator
In the main menu,choose to enter calculator interfac
11、Control Center
In the main menu,choose Into the Control Center interface. Drag the page, can be
realized next page
The time and date
In the "time date" item listed in the relevant time, the settings menu (see below), select the
desired setting year, month, day, hours, or minutes after, press UP ARROW or DOWN
ARROW to set (can be up and down a long fast by jump), click Save Settings to achieve..
Backlight
In the backlight settings, scroll to draw a set "Backlight Brightness"; "backlight delay" has 30
seconds, 60 seconds, 90 seconds, 120 seconds and never five kinds of mode selection.
Power Management
Enter "Power Management" setting interface (see figure below), can monitor the status of
battery, with the increase in use of time machine, the battery icon in the cell number will be
10

reduced accordingly, and the battery life time and play the type of file, screen display status
and volume size. Through the power settings: automatic, power and optimal performance,
three kinds of options to select the power mode, when the battery icon shows the number of
empty cells, please charge.
Volume Set
"Volume Settings" interface provides three volume settings: system settings, touch-screen
volume and volume buttons. Can be set according to individual needs. (See below)
HDMI Settings
Before entering the HDMI mode is set, please insert the HDMI cable. Into the HDMI Settings
page, there is "1080P", "1080I" and the "720P" three models to choose from. (See below)
a. Start "automatic detection", MID from high to low automatically matching; can also specify a
mode.
b. Click "Start HDMI", video player and photo player, the content will display on the HDMI
output.
c. end the use of HDMI feature, please select "Stop HDMI".
TVOUT Setting
The use of "TVOUT Settings" feature, please verify that connected TVOUT cable and mouse.
a. Set the list are "NTSC" and "PAL" two kinds of output formats, according to the output
device selection matching format.
b. Select "TV output", MID black screen, this time with the mouse to control all operations.
TVOUT output video mode.
c. Quit video post, automatically switch to "LCD output."
One button to restore
Click on "one button to restore", the system configuration will be restored to factory settings,
you need to restart to take effect. Please be used with caution!
11

Firmware Upgrade
a. In the firmware upgrade, please provide our upgrade program "TCBOOT.ROM" and
"NK.ROM" into the root directory of NAND or SD card root directory.
b. select the upgrade path, if you choose into the NAND directory, select the local disk; if
released
c. In the SD card, select the external removable disk.
d. Click the upgrade, the upgrade has been completed, you can shutdown restart.
e. The machine also provides another kind of upgrade: to upgrade the root directory on the
SD card, insert the SD card, plug in an external power supply, turn will be prompted whether
to upgrade, and then press the power button, you can upgrade . Will automatically restart after
the upgrade is complete.
Note: In the firmware upgrade, make sure the plug in an external power supply; the upgrade
process, do not do anything else.
touch-screen calibration
Into the touch-screen calibration interface, follow the prompts, click the touch screen using a
stylus to complete rectification work.
WIFI settingsλ
In WIFI Settings interface, set the WIFI status "open" or "off."
12.Electronic Book
In the main interface, select Start e-books, e-book for the broadcast at this time last
memory of playing e-book file. In addition, you can play the selected files directly to
double-click the e-book e-book file.
a. Click to enter e-books Settings page, the "auto-surf", "font color" and "font size"
3 kinds of feature set, namely, Click to enter settings.
(1) auto-surf: 5 seconds, 15 seconds, 25 seconds, 35 seconds and 45 seconds, five kinds
12

of browsing patterns to choose from. The system defaults to 45 seconds;
(2) font color: black, blue, green, white and yellow five kinds of colors to choose from. The
system defaults to black;
(3) Font size: 16pt, 18pt, 20pt, 22pt, and 24pt font size to choose from five kinds. The
system defaults to 18pt.
b. auto-surf: Click, switch to the e-books automatically play full screen mode,
page jump speed automatic browsing mode has been set up.
c. Click carried out up and down the flip operation; direct drag interface that
enables fast next page.
d. Add a Bookmark: Click to add books to bookmark the current page.
e. Read bookmarks: Click, choose to enter a saved bookmark, vice list, select
the need to open a bookmark will have a direct jump to the beginning of the bookmark the
page to begin.
f. Press the Left to return to previous menu, return key to exit to the main interface.
12.Internet setting:
MID built-in WIFI, and also can use an external 3G USB Dongle。
WIFI Setting
Use of WIFI settings, please ensure that the WIFI environment and the MID of the WIFI
setting is turned on. Through the Control Center → WIFI settings view.
a. Double-click the task bar at the main interface, wireless connection, the dialog box will pop
up the following tips:
b. in the wireless information page select the network you need, click on "Connect" after pop-up the
following dialog box:
c. Select the network, such as a password, please enter the password, press OK to enter after
the WIFI connection status
13
In the Open IE browser, enter the URL you can normally browse the web.
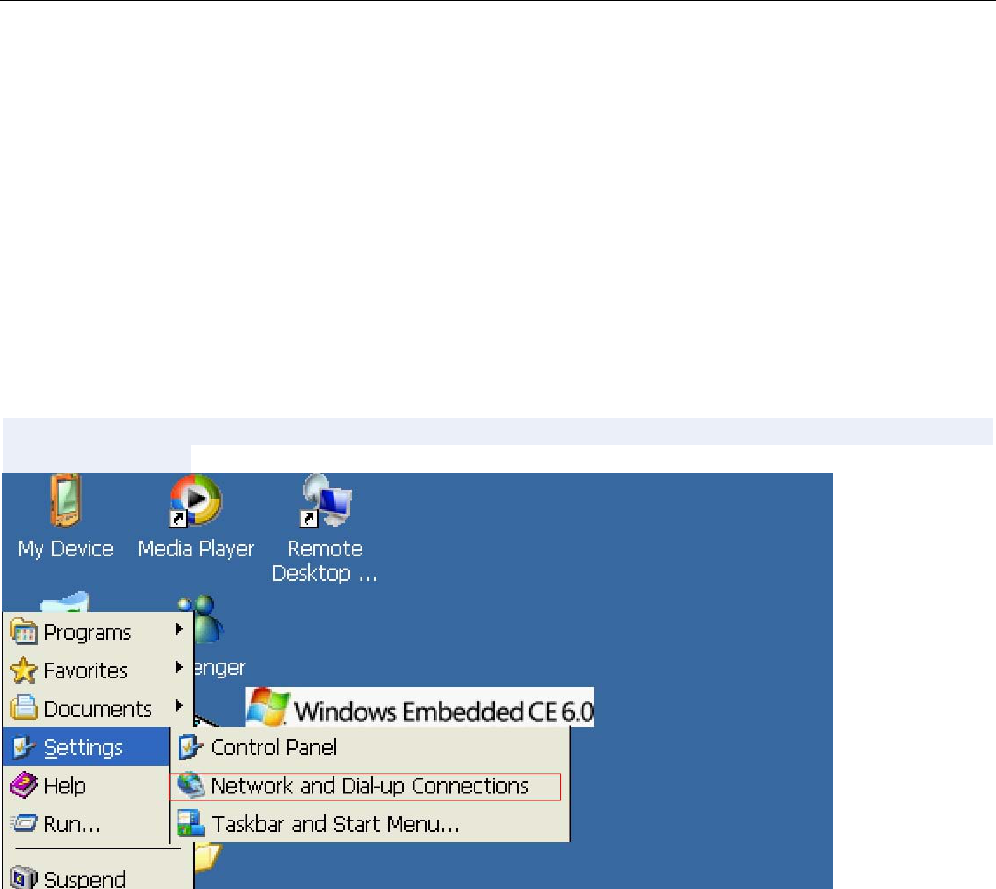
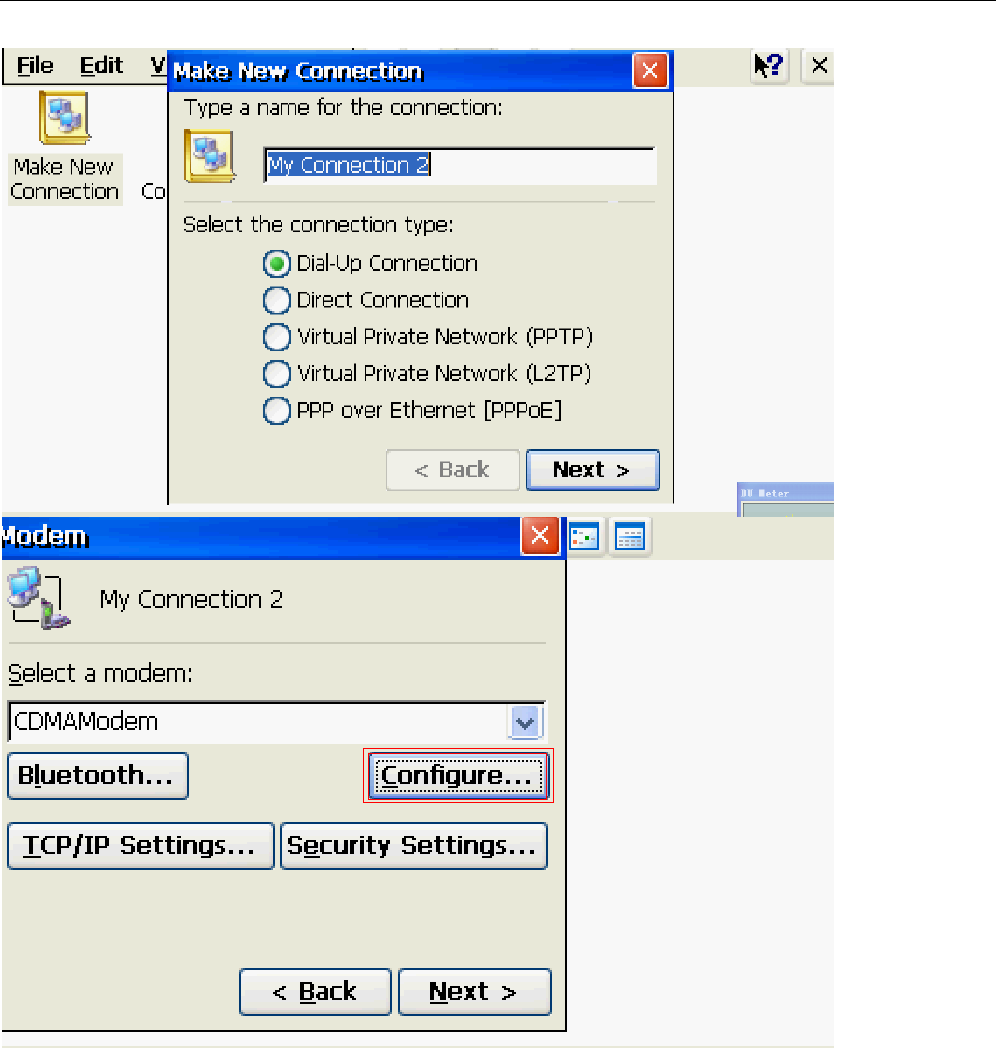
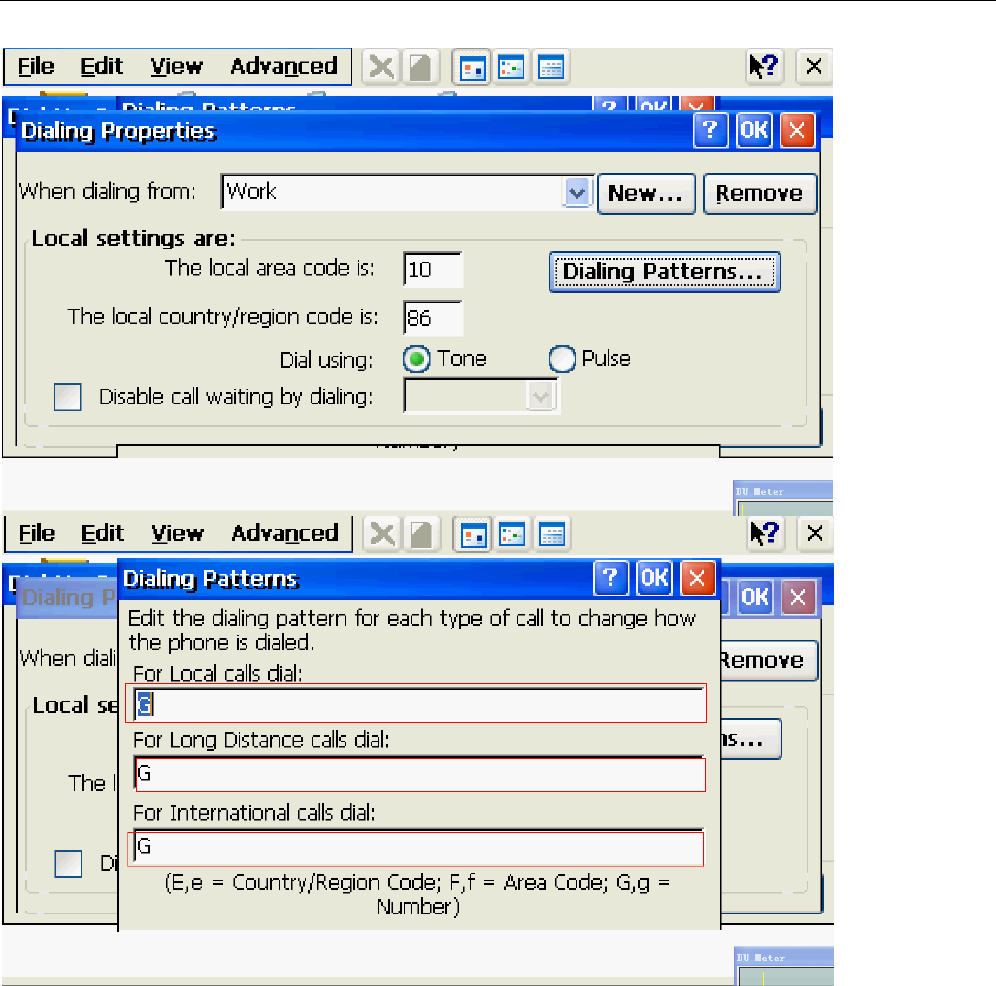
3G Setting
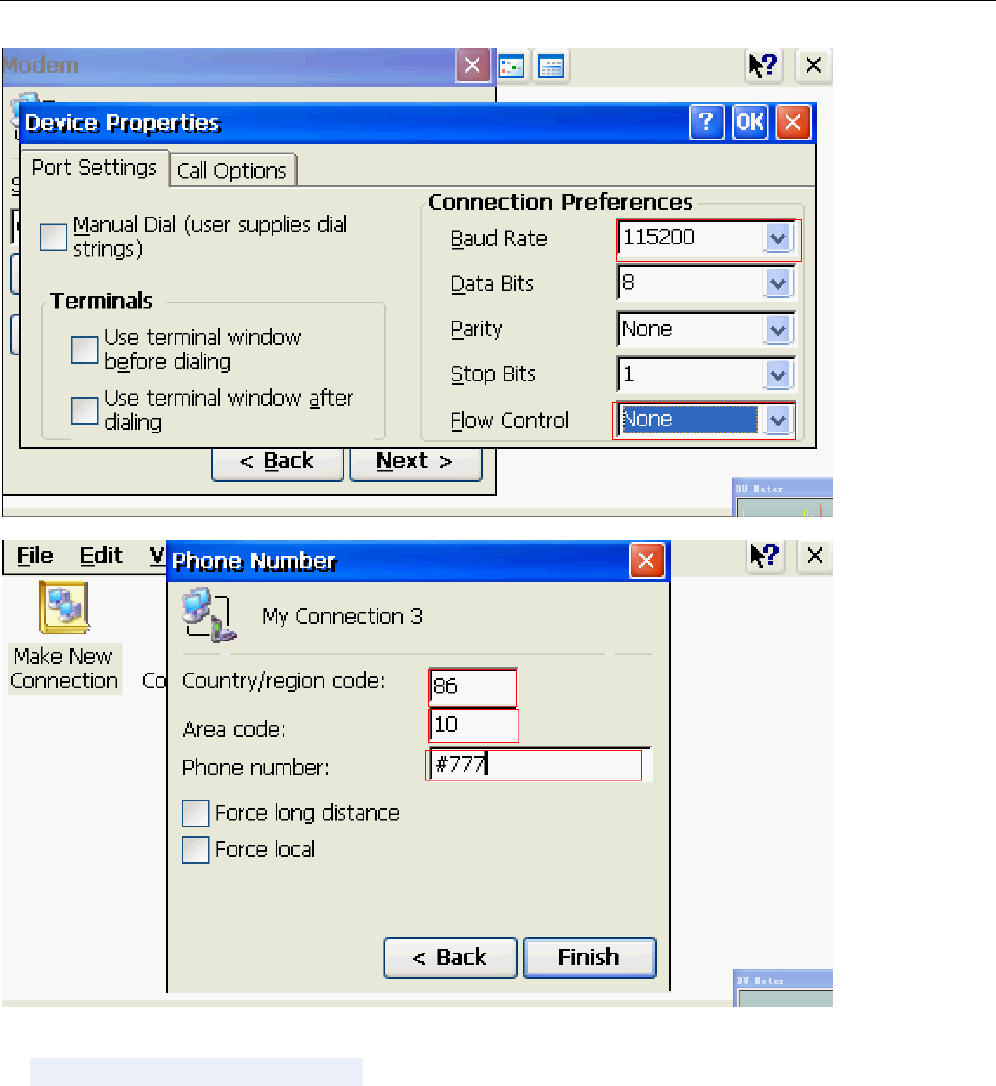
WIN CE 6.0 comes with the use of dial-up software to create dial-up link, baud rate: 115200,
flow control: none
14
15
b. Open the link has been created
16
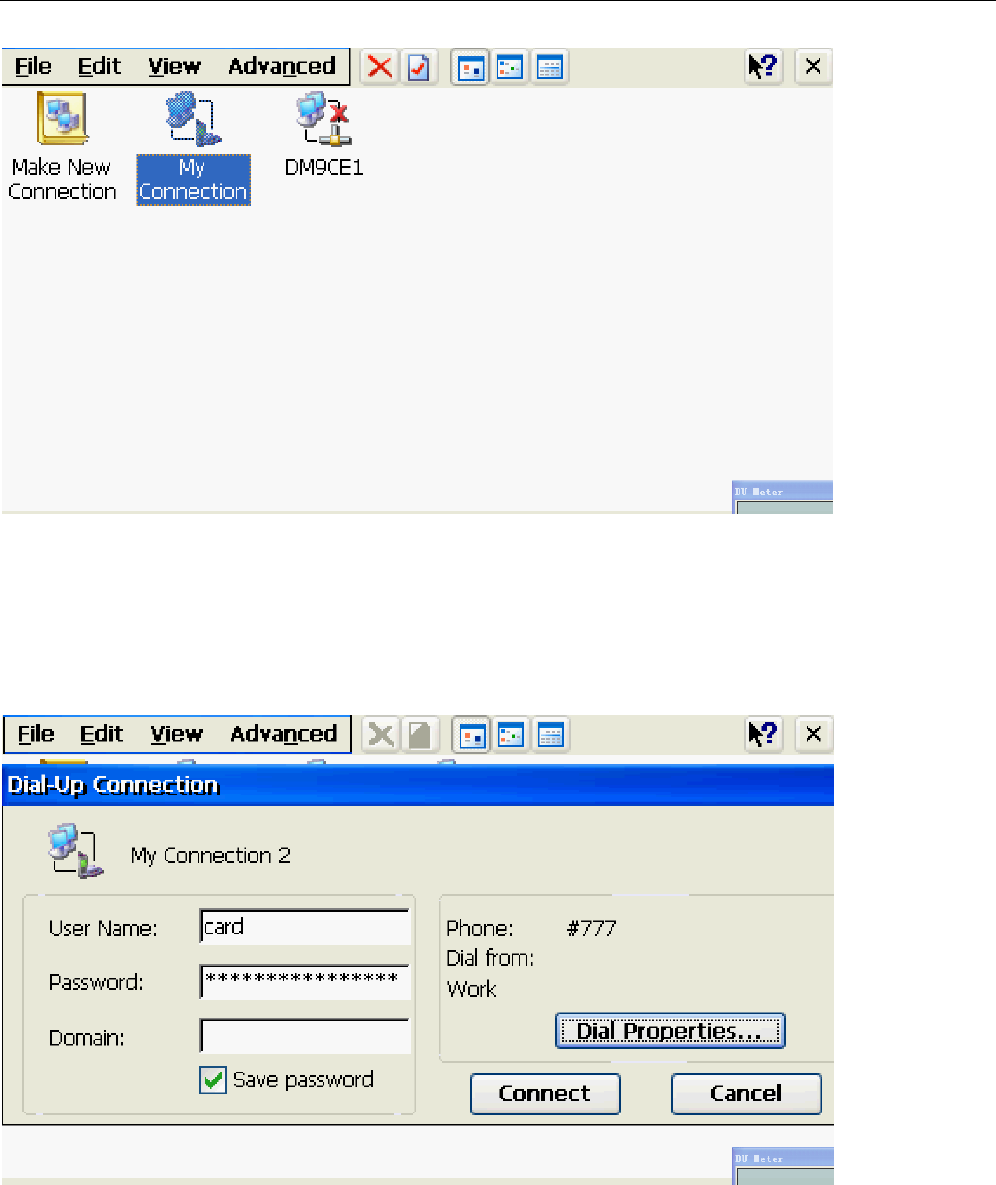
EG:
User Name: card
Password :card
Area code :10
Country code: 86
17
Done
18

14.Others
PDF, WORD, EXCEL, POWERPOINT use the results as so, and the PC on the mode of
operation is basically the same
15.Input
In the main interface, click on the task bar input method input method pop-up menu, choose
the input method you want. Such as: Mengtian input method. End use, select Hide Input
Panel
16.Touchscreen Calibration
In the main interface, double-click the touch screen calibration, enter the
touch-screen calibration interface
Into the touch-screen calibration interface, follow the prompts, click the touch screen using a
stylus to complete rectification work.
19

▲ FAQ
● player can not boot
a. Check the battery is no electricity.
b. Connect the power adapter and re-check the machine.
c. If the charge still does not boot, please contact with our vendors.
●headphones can not hear the voice within
a. Please check the volume is set to 0.
b. Check the headset connection no problem.
●serious noise
a. Check whether the headphone plug clean, dirt may cause a noise.
b. check the music file is damaged, try playing other music, to determine. If the file
has been damaged, may lead to serious noise.
●screen display garbled
Please check whether it has set the correct language option, language selection in
(set) = "(language selection) in the set.
can not download the fileλ
a. Verify that the computer and the player is properly connected between.
b. to confirm whether the memory is full of storage space.
c. confirm that the connection cable is damaged.
●Why do music without lyricsλ display
20

a. confirm whether the music files with the corresponding lyrics, and stored in the same
directory.
b. identified as LRC lyrics file format and the file name to play music files with the same
name.
Why do not switch when playing videoλ subtitle
a. confirm whether the video played with the corresponding subtitle file, and stored in the
same directory.
b. identified as SUB or SRT subtitle file format and the file name with the same name as
the video playback.
▲ headset Caution:
Suggested the use of this machine should first reduce and then plug in the headphones
the volume, and then slowly increase the volume, you can effectively prevent the large
volume of right eardrum damage and to prevent the headset overload caused by broken
voice coil burnout.
21

43
FCC WARNING
This device complies with Part 15 of the FCC Rules. Operation is
subject to the following two conditions:
(1) this device may not cause harmful interference, and
(2) this device must accept any interference received, including interference that may cause
undesired operation.
NOTE 1: This equipment has been tested and found to comply with the limits for a Class B digital device, pursuant
to part 15 of the FCC Rules. These limits are designed to provide reasonable protection against harmful interference
in a residential installation. This equipment generates, uses and can radiate radio frequency energy and, if not
installed and used in accordance with the instructions, may cause harmful interference to radio communications.
However, there is no guarantee that interference will not occur in a particular installation. If this equipment does
cause harmful interference to radio or television reception, which can be determined by turning the equipment off
and on, the user is encouraged to try to correct the interference by one or more of the following measures:
- Reorient or relocate the receiving antenna.
- Increase the separation between the equipment and receiver.
-Connect the equipment into an outlet on a circuit different from that to which the receiver is connected.
-Consult the dealer or an experienced radio/TV technician for help.
NOTE 2: Any changes or modifications not expressly approved by the manufacturer could void the user’s authority
to operate the equipment.
NOTE 3: The manufacturer is not responsible for any radio or TV interference caused by
unauthorized modifications to this equipment. Such modifications could void the user’s authority
to operate the equipment.
2010-1-20