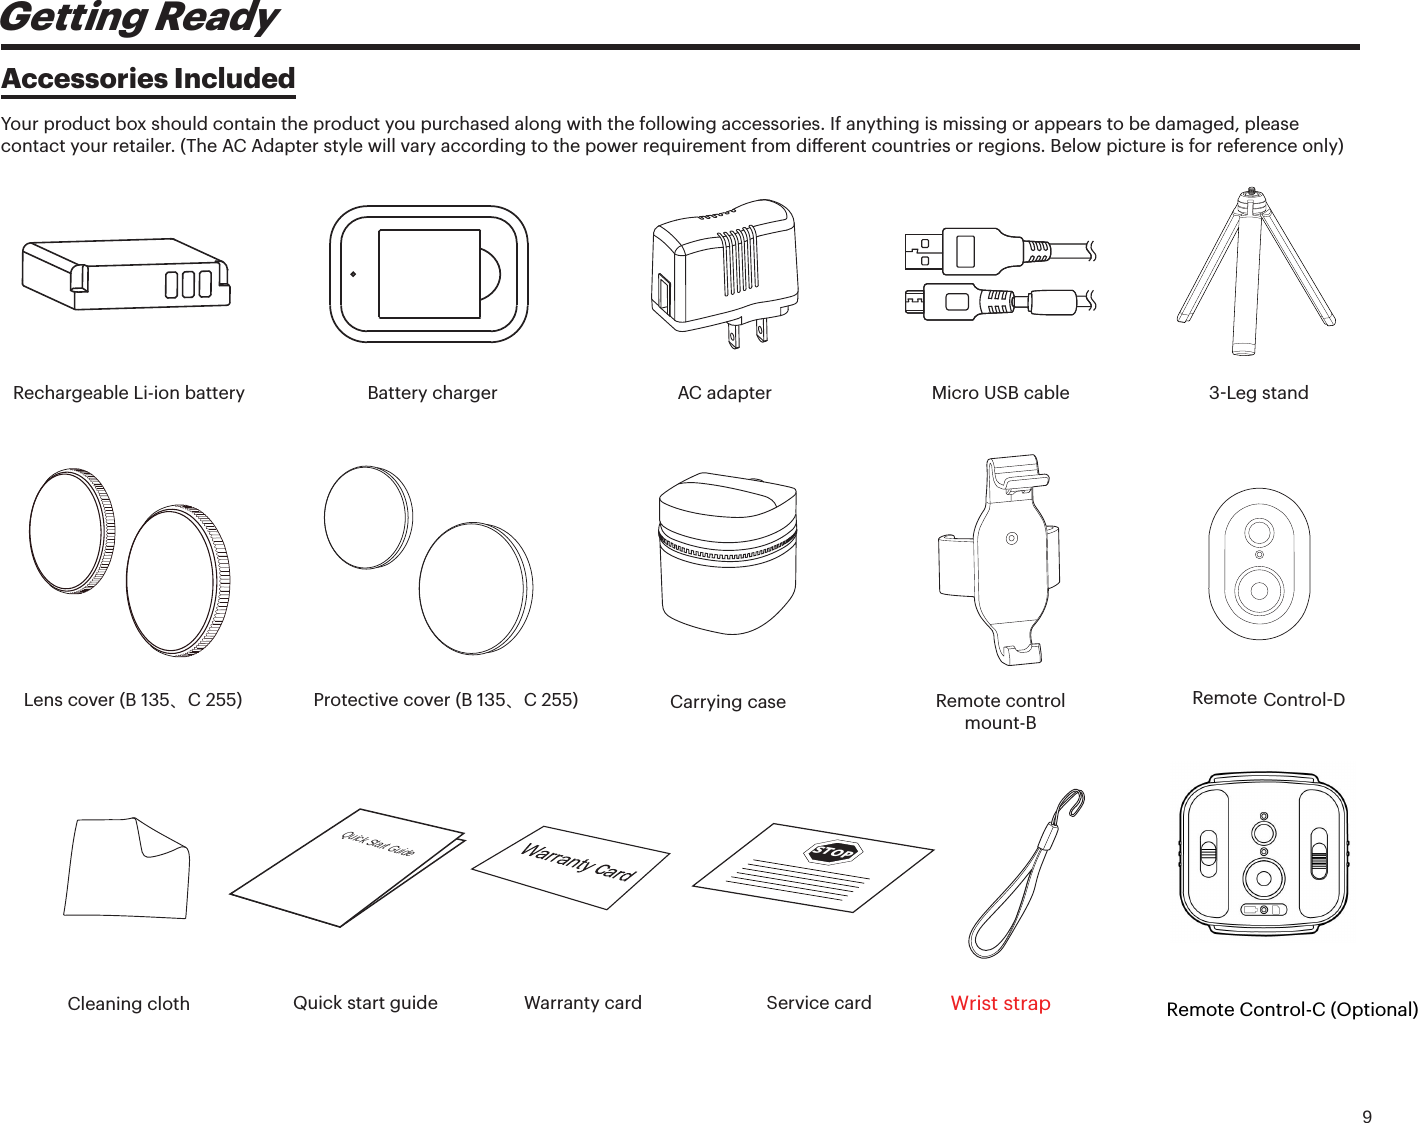
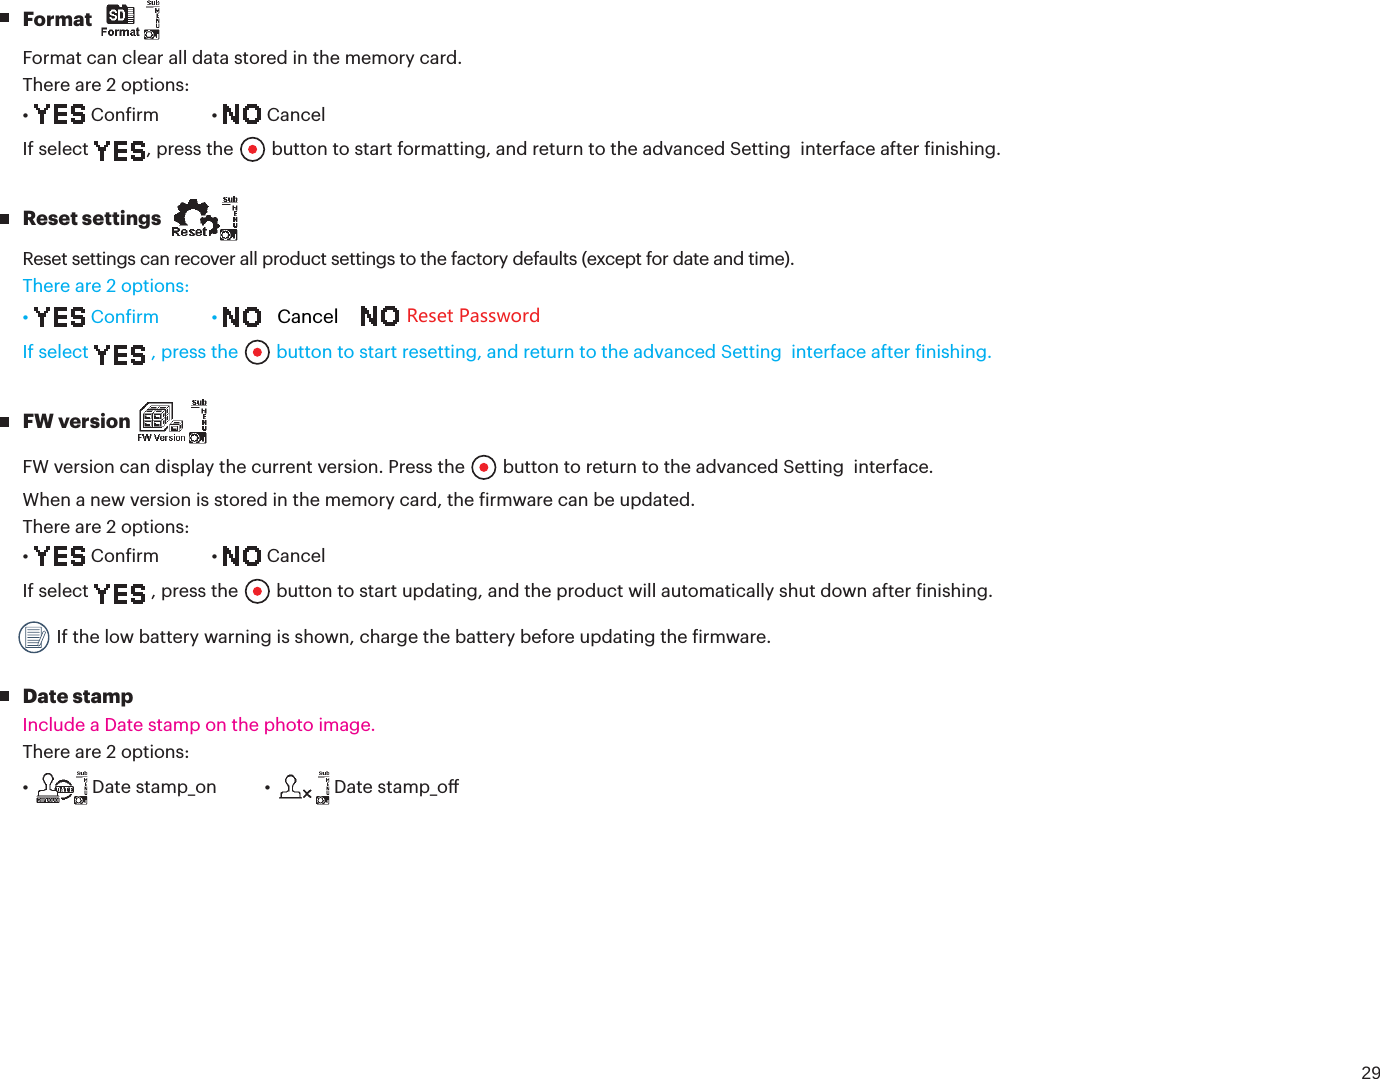
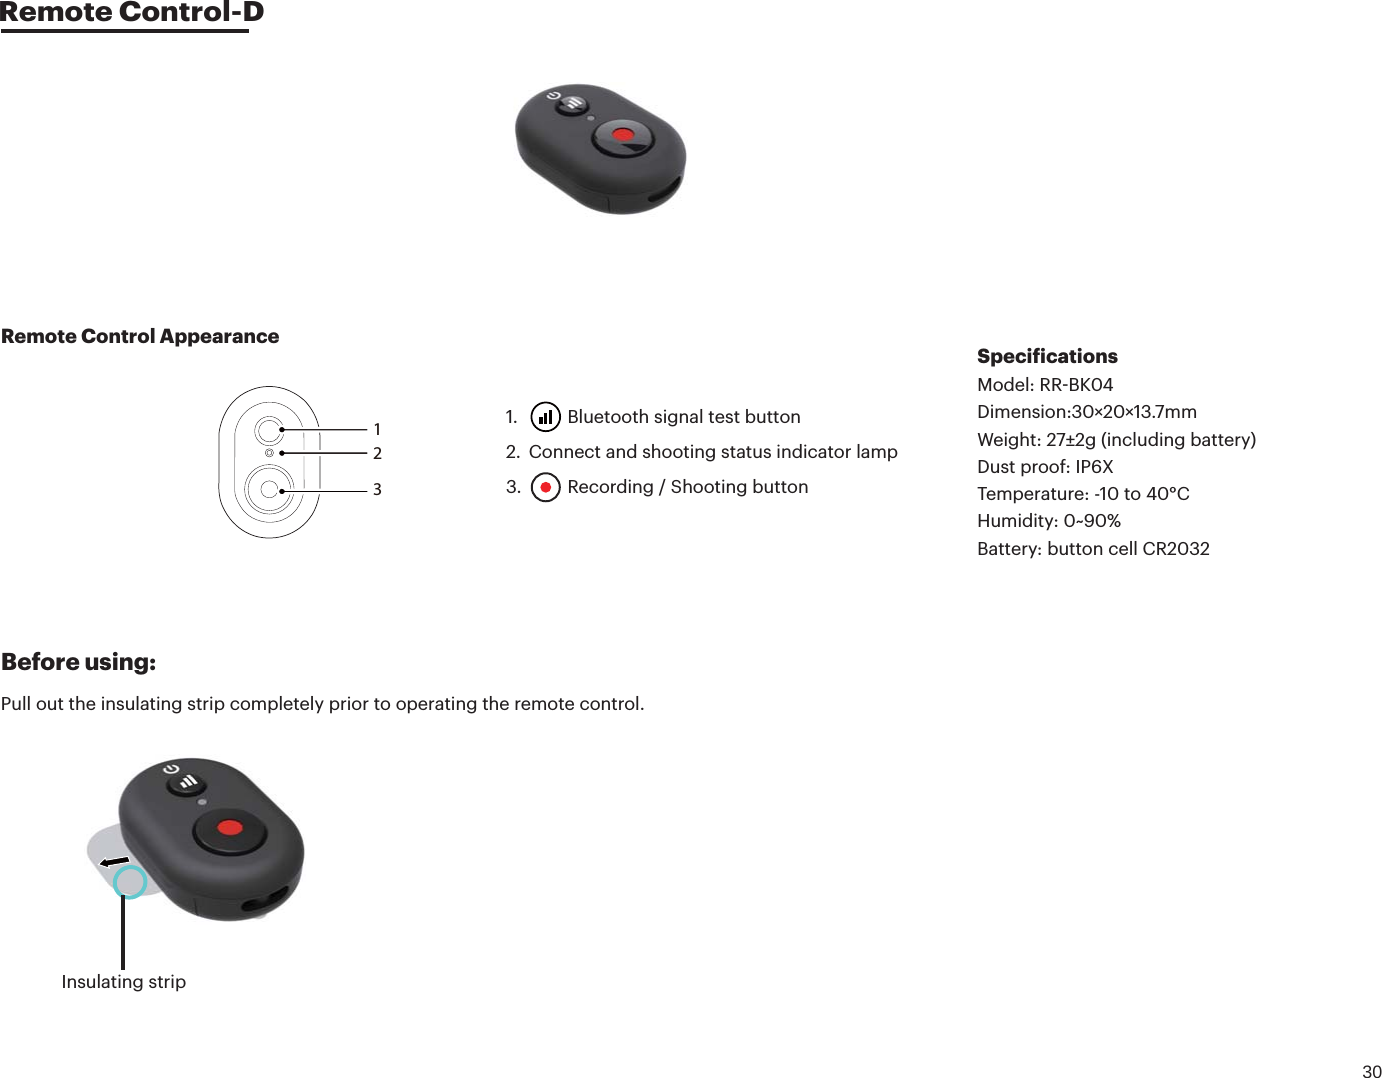
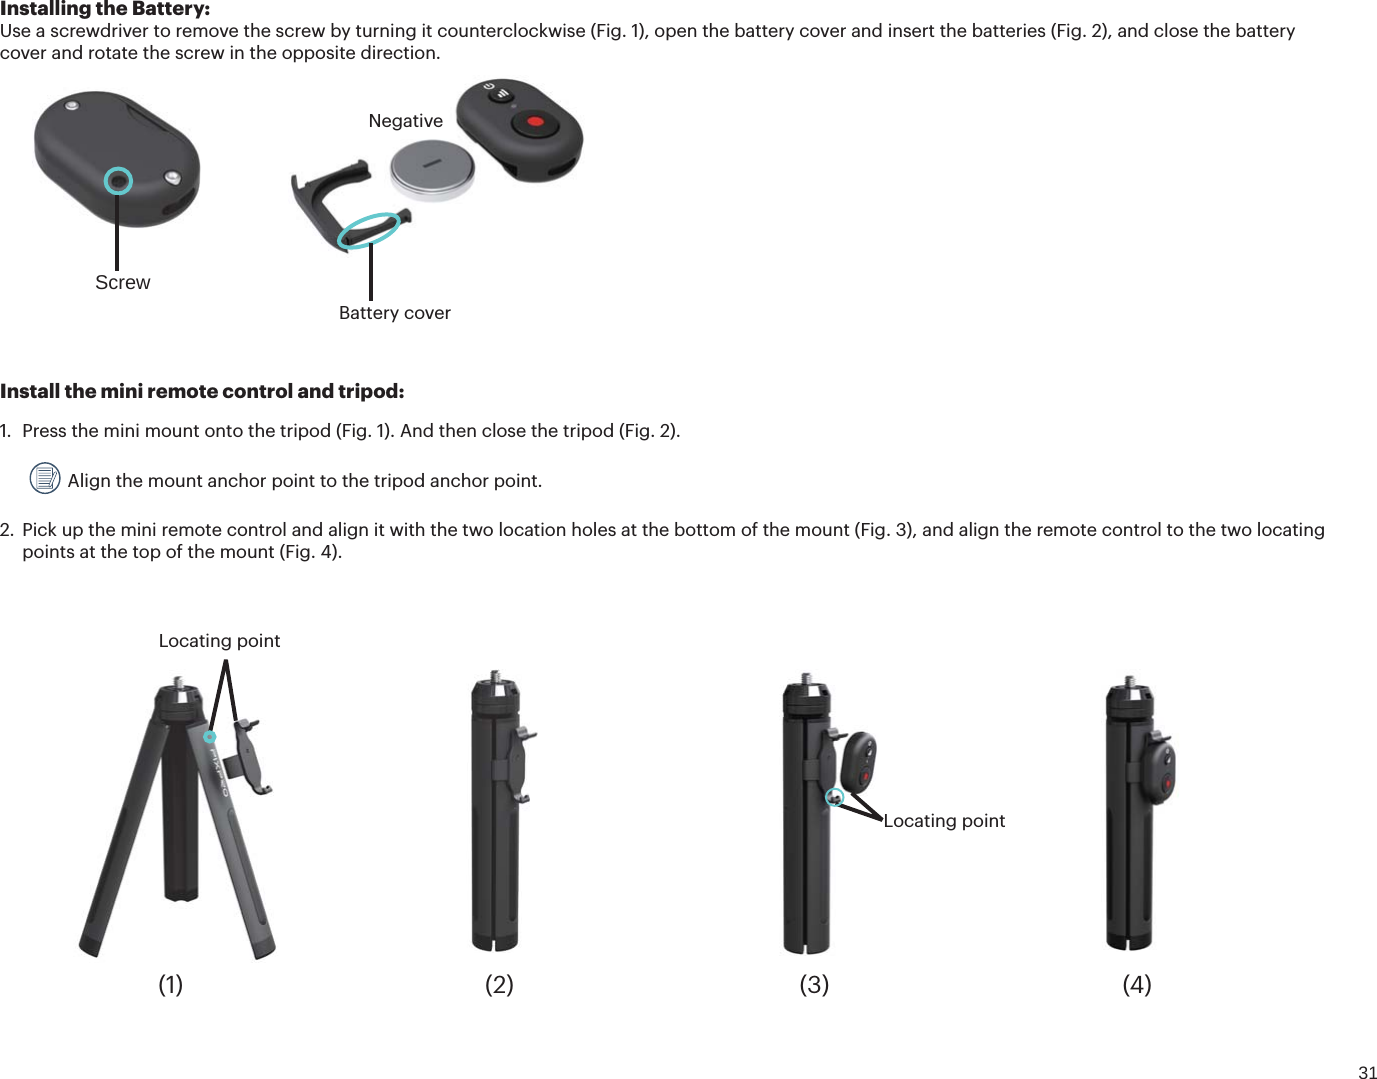
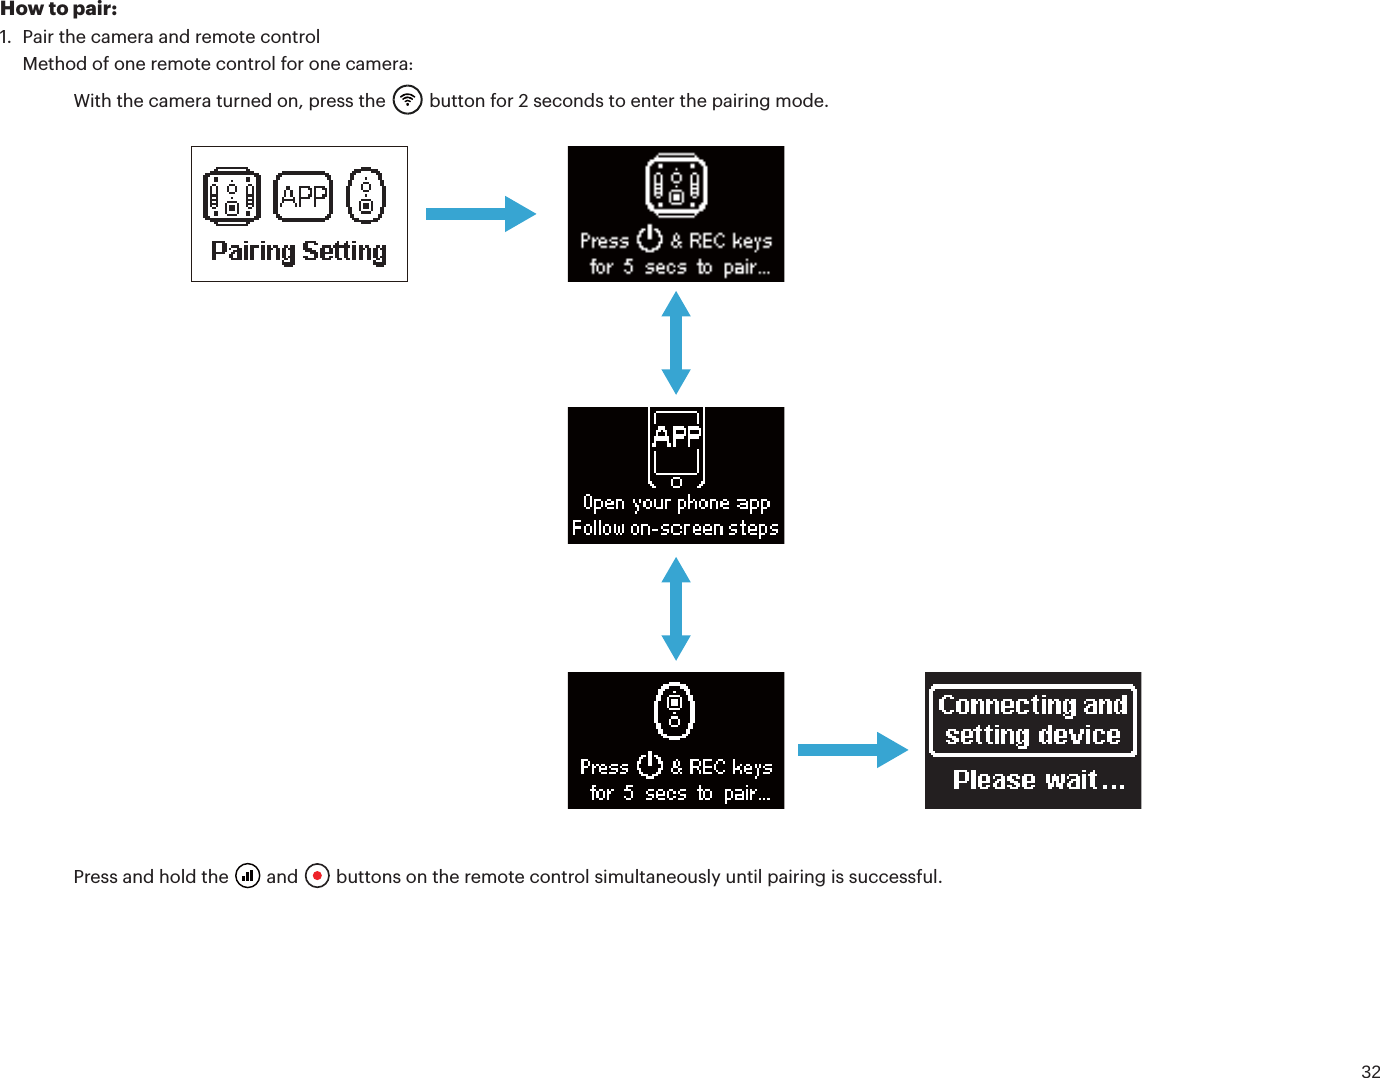
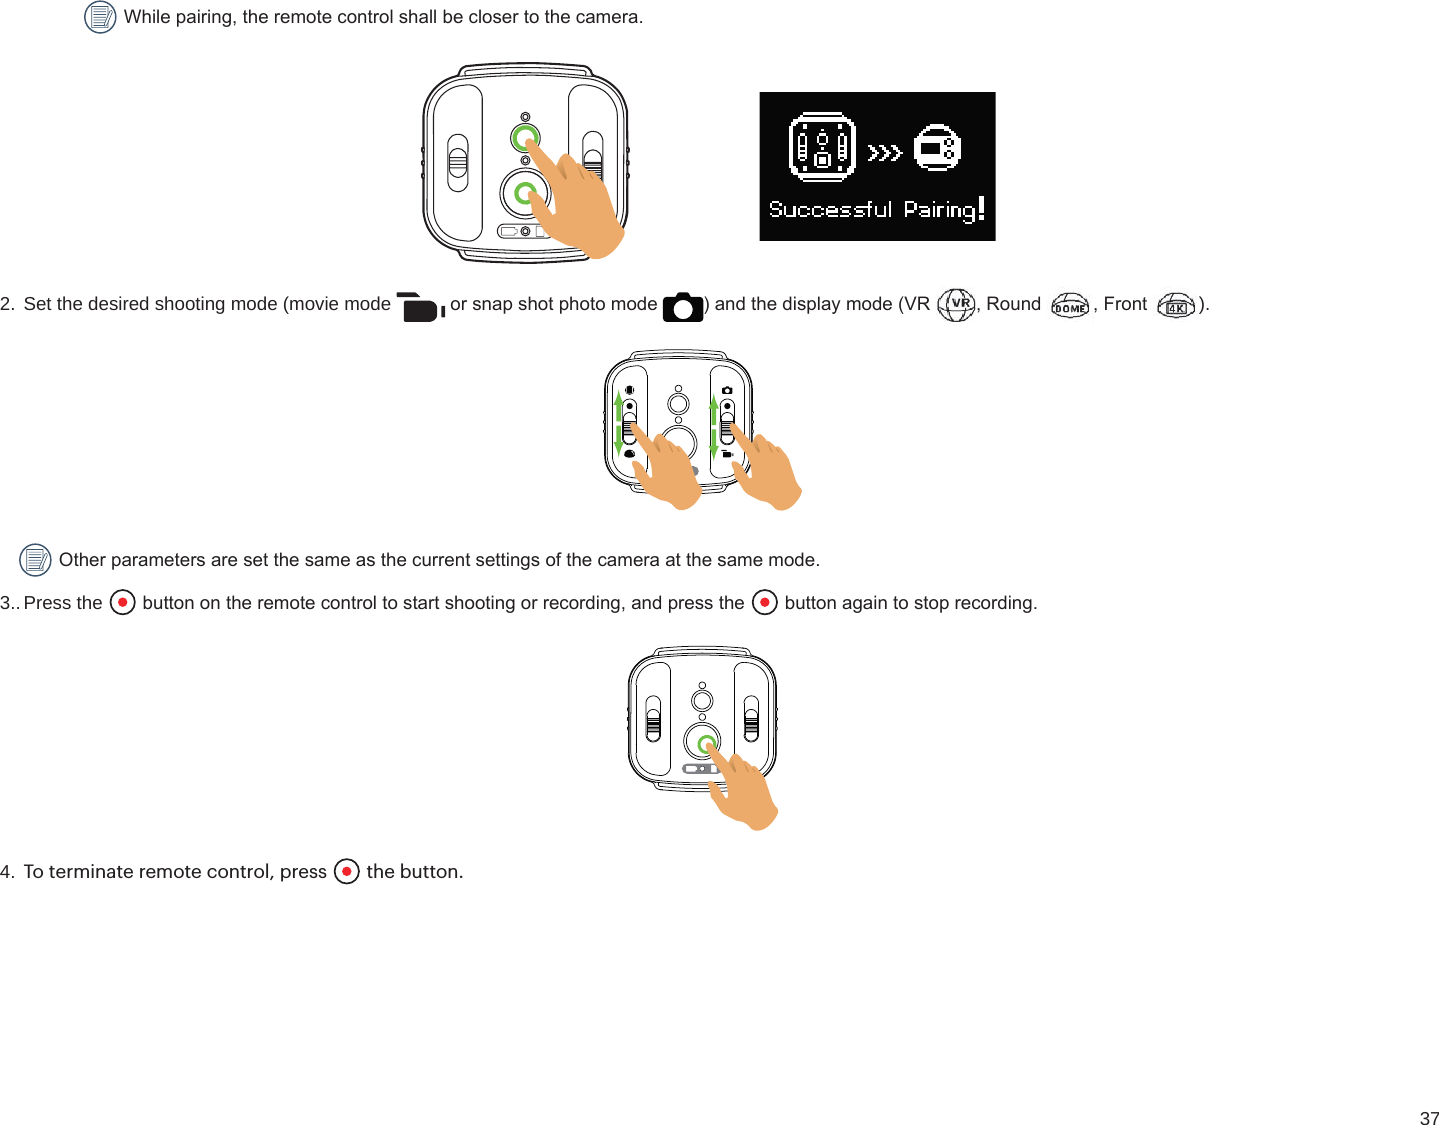
Sintai Optical RC05 Remote Control-D User Manual rev 3
Sintai Optical (Shenzhen) Co., Ltd. Remote Control-D rev 3
UserManual.wiki
>
Sintai Optical
>
RC05 User Manual
User Manual_rev 3.pdf
Navigation menu
Upload a User Manual
Namespaces
Wiki Guide
HTML
PDF
Info
Views
User Manual
Discussion / Help
Navigation
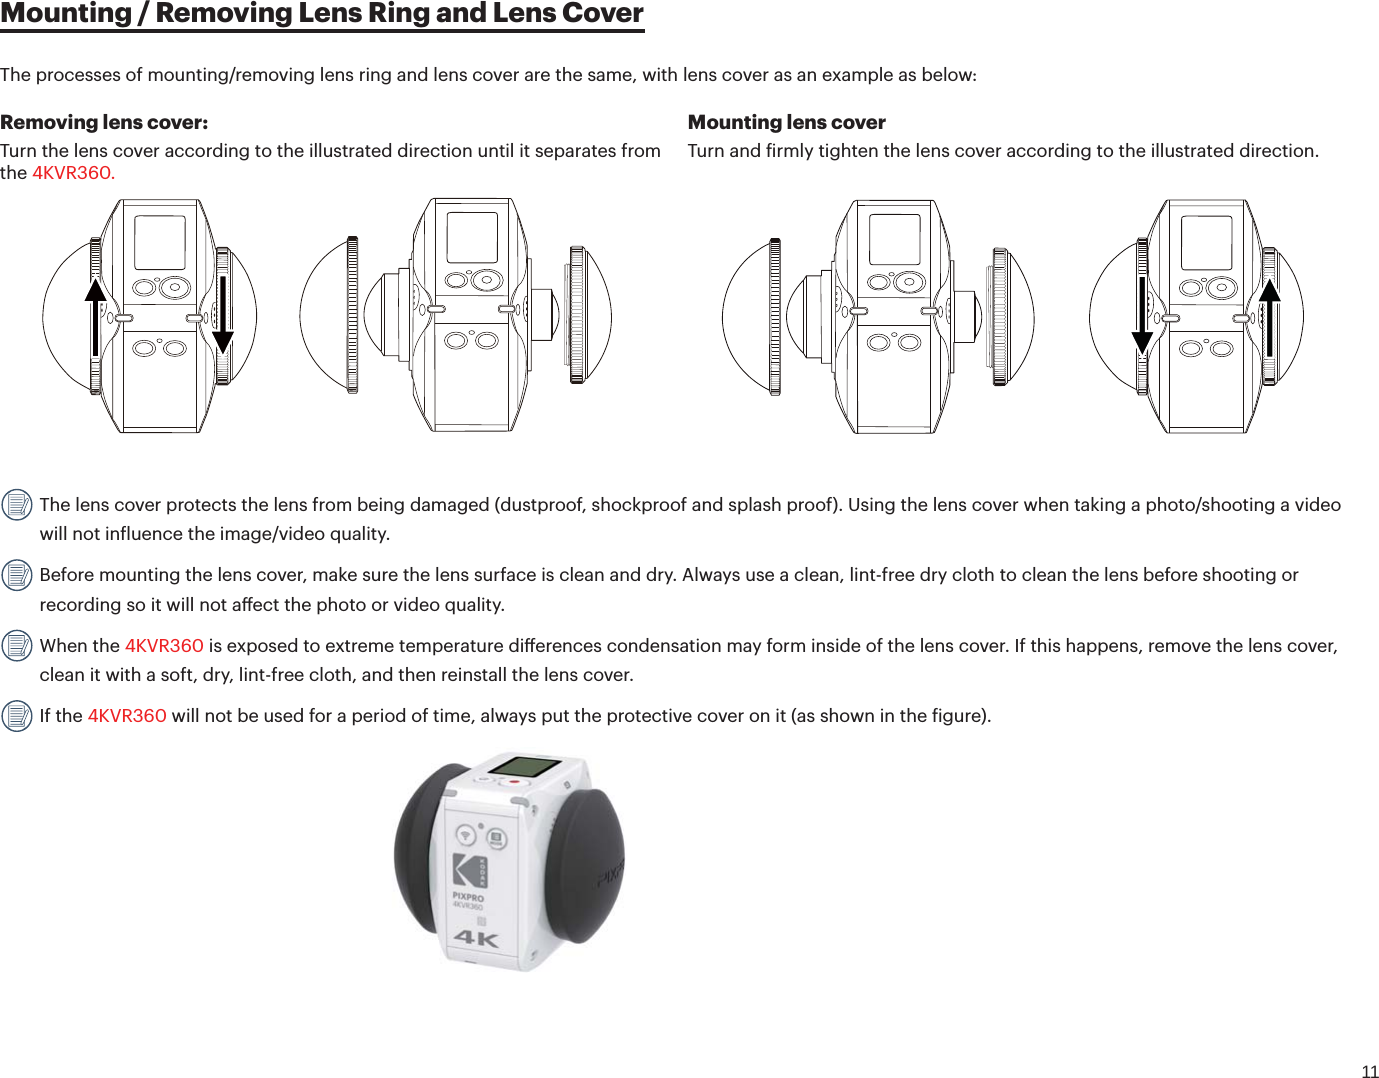
![3For Customers in EuropeThis symbol [crossed-out wheel bin WEEE Annex IV] indicates separate collection of electrical waste and electronic equipment in the European countries. Please do not throw the equipment into domestic refuse. Please use the return and collection systems available in your country for proper, safe disposal of this product.“CE” mark indicates that this product complies with the European requirements for safety, health, environment and customer protection. “CE” marked cameras are intended for sales in Europe.Europe – EU Declaration of ConformityThis device complies with the essential requirements of the RED Directive 2014/53/EU. The following test methods have been applied in order to prove presumption of conformity with the essential requirements of the RED Directive 2014/53/EU:- EN609501/A12:2011+A2:2013Safety of Information Technology Equipment- EN 62311:2008Assessment of electronic and electrical equipment related to human exposure restrictions for electromagnetic ields (0 Hz-300 GHz)- EN 300 3301 V2.1.1:2017Electromagnetic compatibility and Radio spectrum Matters (ERM); Short Range Devices (SRD);Radio equipment in the frequency range 9 kHz to 25 MHz and inductive loop systems in the frequency range 9 kHz to 30 MHz- EN 300 328 V2.1.1 (201611)Wideband transmission systems; Data transmission equipment operating in the 2,4 GHz ISM band and using wide band modulation techniques- EN 301 4891 V1.9.2:2011Electromagnetic compatibility and Radio spectrum Matters (ERM); ElectroMagnetic Compatibility (EMC) standard for radio equipment and services; Part 1: Common technical requirements- EN 301 4893 V1.6.1:2013Electromagnetic compatibility and Radio spectrum Matters (ERM); ElectroMagnetic Compatibility (EMC) standard for radio equipment and services; Part 3: Speciic conditions for Short-Range Devices (SRD) operating on frequencies between 9 kHz and 246 GHz- EN 301 48917 V2.2.1:2012Electromagnetic compatibility and Radio spectrum Matters (ERM); ElectroMagnetic Compatibility (EMC) standard for radio equipment; Part 17: Speciic conditions for Broadband Data Transmission SystemsHereby, [Sintai Optical (Shenzhen) Co., Ltd], declares that this [4KVR360 and Remote] is in compliance with the essential requirements and other relevant provisions of Directive 1999/5/EC.Manufacturer: Sintai Optical (Shenzhen) Co., LtdAddress: Qiwei Ind Sec, 1st, 2nd,& 3RD Bldg, Lisonglang Village, Gongming Town, Bao’an District, Shenzhen, Guangdong, China Packaging: Please follow local regulations for the recycling of packaging.Batteries: Please dispose of used batteries at designated collection centers.](https://usermanual.wiki/Sintai-Optical/RC05/User-Guide-3325523-Page-4.png)

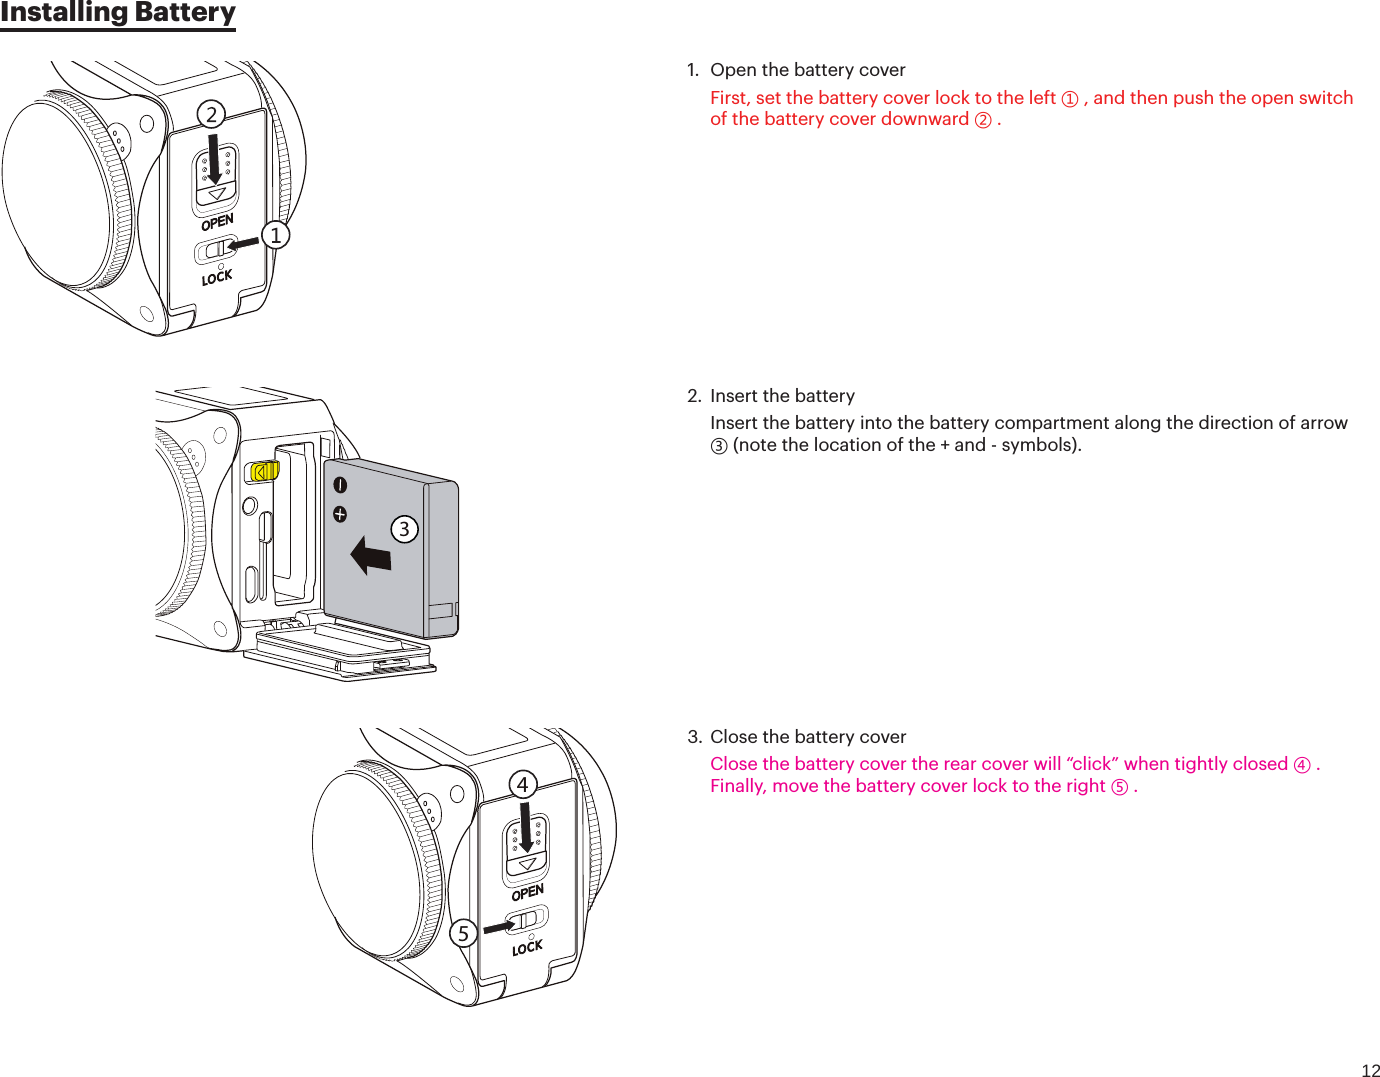

![40The folder structure of a microSD card on which this unit has performed recording is as follows.Example folder structure of a microSD card:Folder numbers range from 100 to 999. Four or eight alphabetic characters after a three-digit number indicate the ile type.A. Still pictures in JPEG format (Each folder stores a maximum of 999 still pictures) ͓ Folder numbers range from 100 to 999. Four alphabetic characters indicate the The character shows the camera lens type used in the shot:3600 Spherical / VR Mode : _155 Degrees 4K [16:9] Full Frame Mode : F235 Degrees Spherical Mode: R͓ VR files formatted(Each folder stores a maximum of 9999 still pictures) Still pictures in jpg format Movie files in mp4 format The size of a video ile will not exceed 4G or the time length will not exceed 30 minutes. When a new ile is generated automatically during recording, the recording process will not be interrupted. Recording in time-lapse mode may last for up to 72 hours. The video iles recorded by 4KVR360 cannot be played in the application program (Windows Media Player) supplied with Windows7. Play using the application program dedicated for 4KVR360. 100VR360DCIM4KVR360camera lens type.Five or eight alphabetic characters indicate the file type.](https://usermanual.wiki/Sintai-Optical/RC05/User-Guide-3325523-Page-41.png)
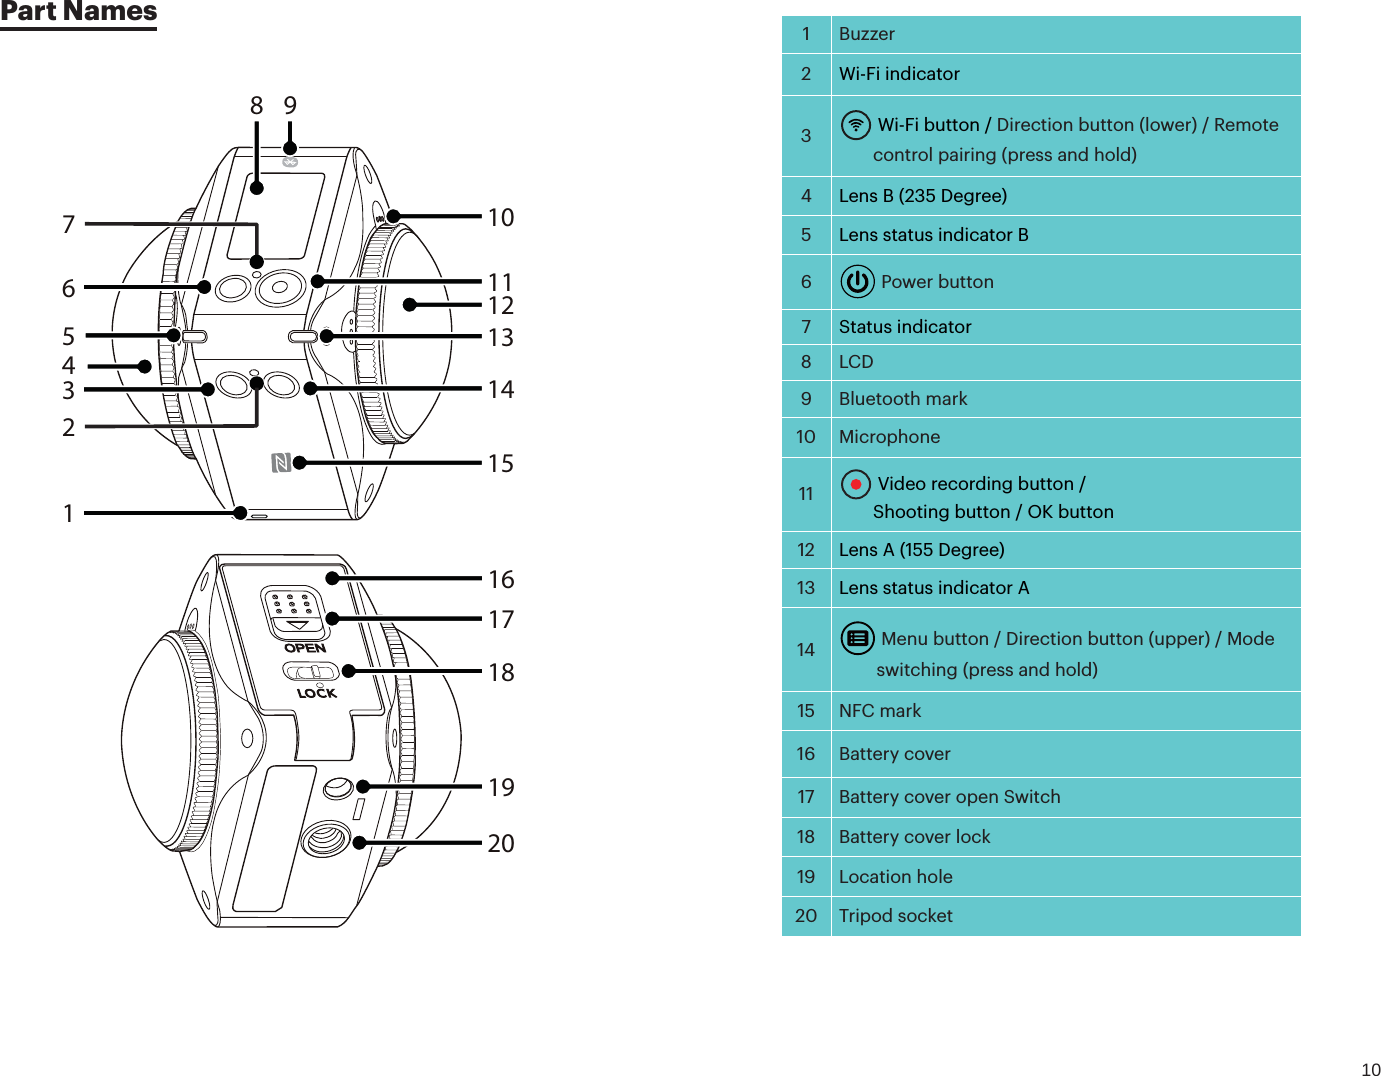
![49AppendicesSpeciications Design and speciications are subject to change without notice.Image Sensor AType 1/2.3" BIS CMOSEective Pixels 20.68 MegapixelsTotal Pixels 21.14 MegapixelsLens AFocal Length 1.633mmEquivalent to 35mm ilm 9.18mmF Number F2.4Lens Construction 7 groups 8 elementsFocus Fix FocusField of ViewMax. 197 Degree [For Front Mode (16:9) ] Max. 155 Degree [For VR Mode (2:1) ] Focusing Range 30cm~fImage Sensor BType 1/2.3" BIS CMOSEective Pixels 20.68 MegapixelsTotal Pixels 21.14 MegapixelsLens BFocal Length 1.257mmEquivalent to 35mm ilm 7.08mmF Number F2.4Lens Construction 7 groups 8 elementsFocus Fix FocusField of View Max. 235 Degree Focusing Range 30cm~fAnti-Handshake Electronic Image Stabilization](https://usermanual.wiki/Sintai-Optical/RC05/User-Guide-3325523-Page-50.png)
![50Number of Recording PixelsStill Image27MP: 7360x3680 (2:1) StitchedVR Mode15MP: 5520x2760 (2:1)27MP: 7360x3680 (2:1) Global15MP: 5520x2760 (2:1)13MP: 3680x3680 (1:1) Round Mode8MP: 3840x2160 (16:9) Front Mode9MP: 3525x2644 (4:3)Movie(2:1)3840×1920/24fps GlobalVR Mode3840×1920/15fps Stitched1920×960/30fps(1:1)2880x2880/24fps Round Mode1920×1920/30fps(16:9)3840x2160/30fpsFront Mode1920x1080/60fps1280x720/60fpsHigh-speed Movie :1280×640/120fps(2:1) VR Mode1280x720/120fps(16:9) Front ModeFile FormatStill Image Exif 2.3 (JPEG)Movie MP4 [Image: H.264; Audio: AAC(Stereo)]Camera Modes VR Mode (Lens A and Lens B), Round Mode (Lens B), Front Mode (Lens A)Shooting Modes Photo, Burst Mode, Movie, Hi-Speed MovieSplash proof Equivalent to JIS/IEC IPX5 (Body)Shockproof Up to 2m (with lens cover)Dustproof Equivalent to JIS/IEC (IP6X)](https://usermanual.wiki/Sintai-Optical/RC05/User-Guide-3325523-Page-51.png)