Sirius XM Radio SXPL1 Onyx PLUS User Manual Onyx Plus Users Manual p 21 to 40
Sirius XM Radio Inc. Onyx PLUS Onyx Plus Users Manual p 21 to 40
Contents
Onyx Plus Users Manual p 21 to 40
21
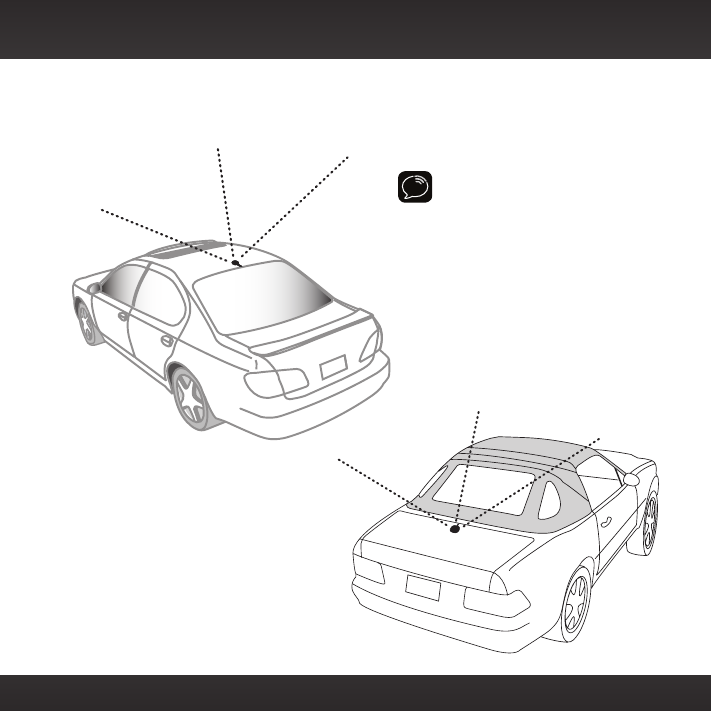
TIP! Mount the antenna on the
roof (for most vehicles) or trunk
(for convertibles) where it has a
clear view of the sky in all
directions.
4 Place the antenna in the location you selected. Follow the Tips and
Cautions shown on the next several pages.
Vehicle Installation
22
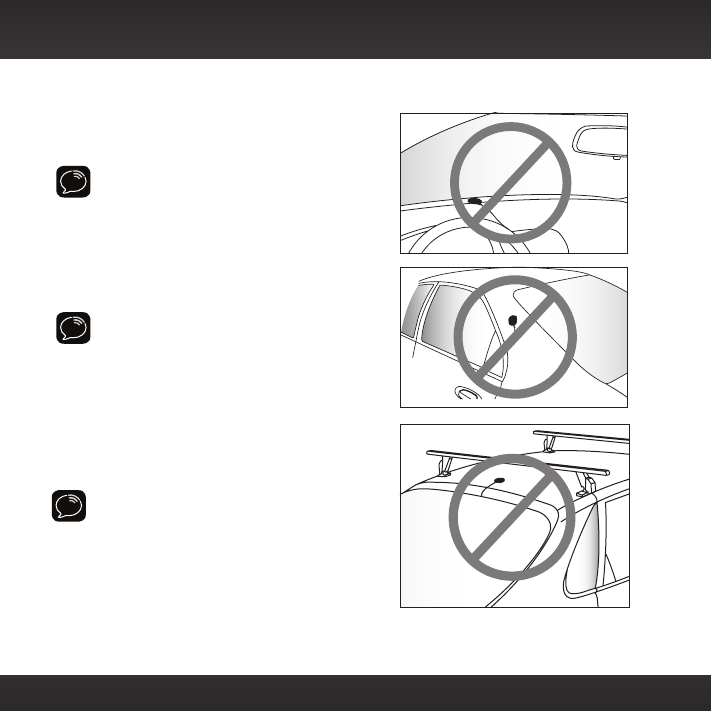
CAUTION! Don’t mount the antenna
inside the vehicle, for example, on the
dashboard.
CAUTION! Don’t mount the antenna on
any of the vehicle’s front, back or side
pillars.
CAUTION! Don’t mount the antenna
close to a roof rack. Adjust the rack so
it’s further away from the antenna or
move the antenna closer to the center of
the roof.
Vehicle Installation
23
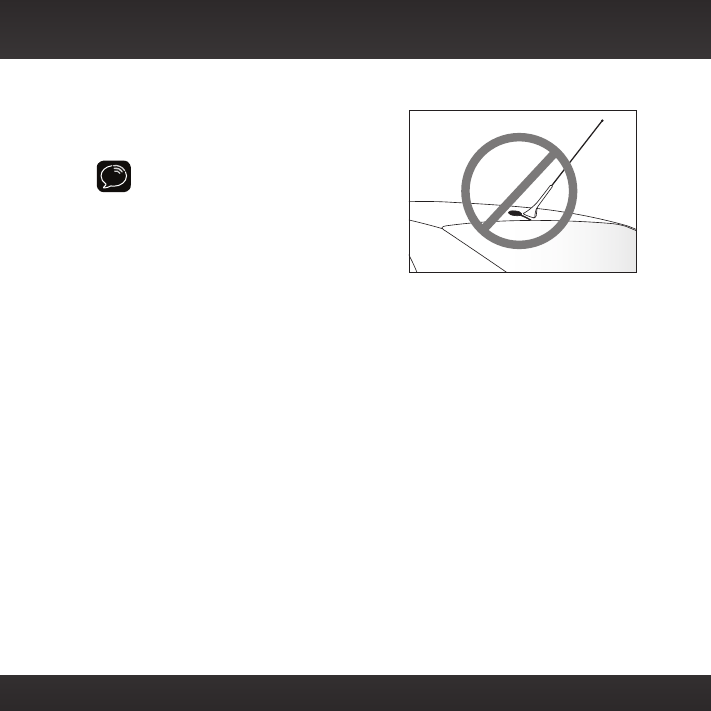
CAUTION! Don’t mount the antenna
close to another antenna. Mount it at
least 3 inches away.
Vehicle Installation
24
Step 4: Route the Magnetic Mount Antenna Cable
Before you begin routing the antenna cable, read these general instructions
for how to route and hide the antenna cable. Then route your antenna cable
according to the instructions which follow for your specific type of vehicle.
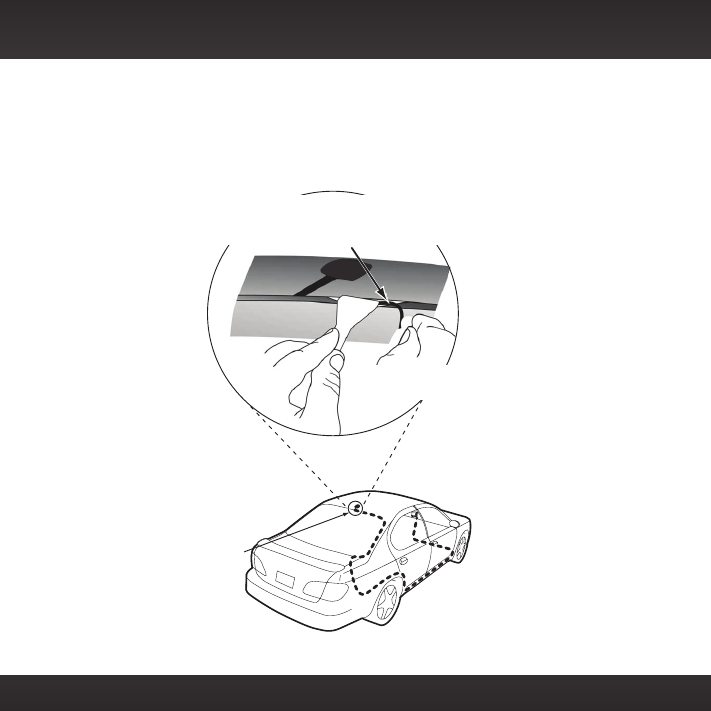
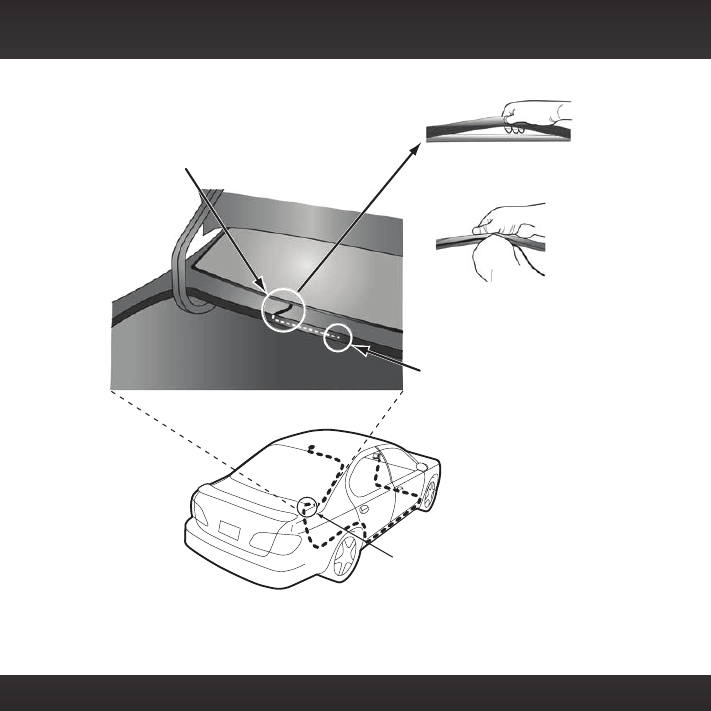
Feed cable under
rubber moulding
around window
Tuck the cable under the
moulding around the window
Use a blunt plastic putty knife, a credit card,
a plastic knife, or a similar blunt tool to lift the
rubber window moulding
Vehicle Installation
25
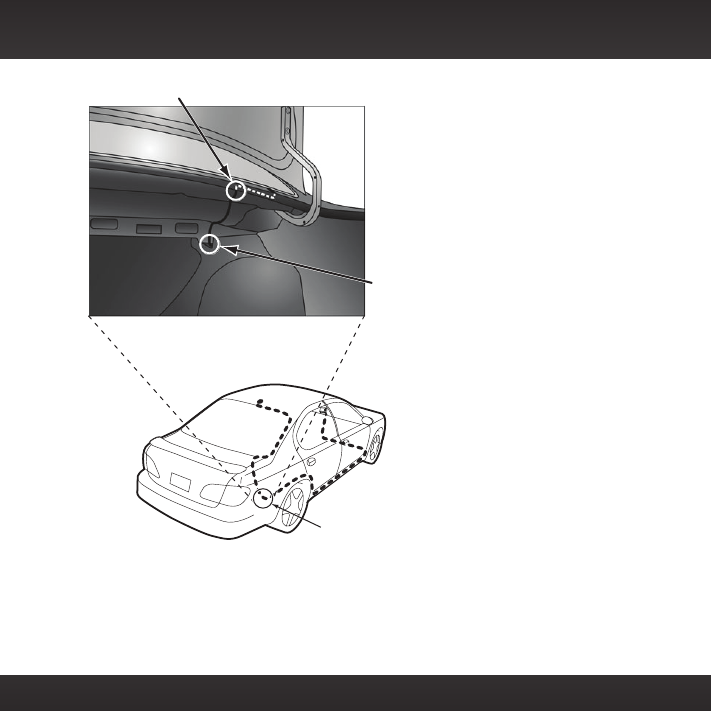
Route cable out from under rear windshield
moulding and tuck into weatherstripping
around trunk opening
Pull weatherstripping
from trunk opening
Tuck cable into weatherstripping.
Route cable through weatherstripping
several inches to avoid sharp bends
Pull cable out of weatherstripping
and route through trunk to cabin
Avoid sharp bends by running cable through
weatherstripping for several inches
Route cable out of window
moulding and into weather-
stripping around trunk opening
Vehicle Installation
26
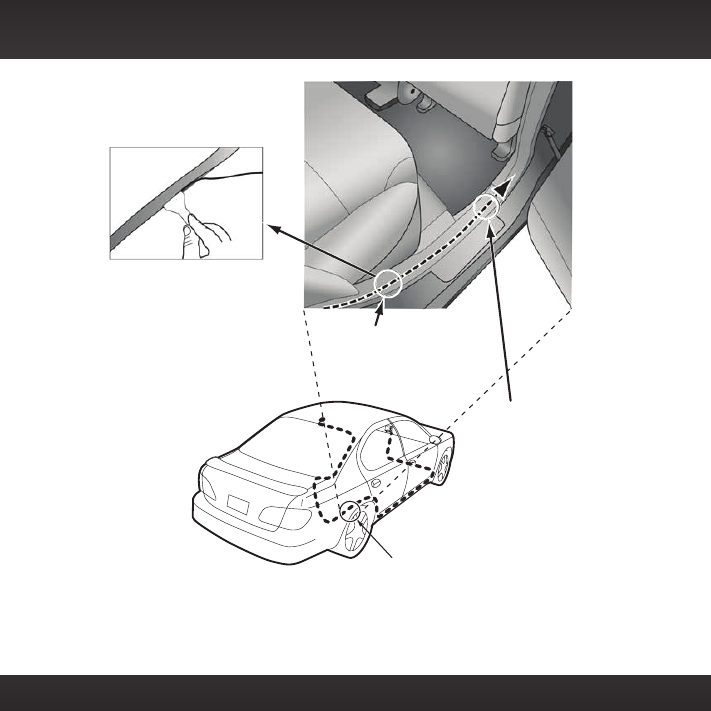
Bring cable out of weatherstripping and into trunk
Route cable along trunk
wall and into cabin through
gap or conduit, along existing
wiring harness
Route cable along trunk
wall and into cabin
Vehicle Installation
27
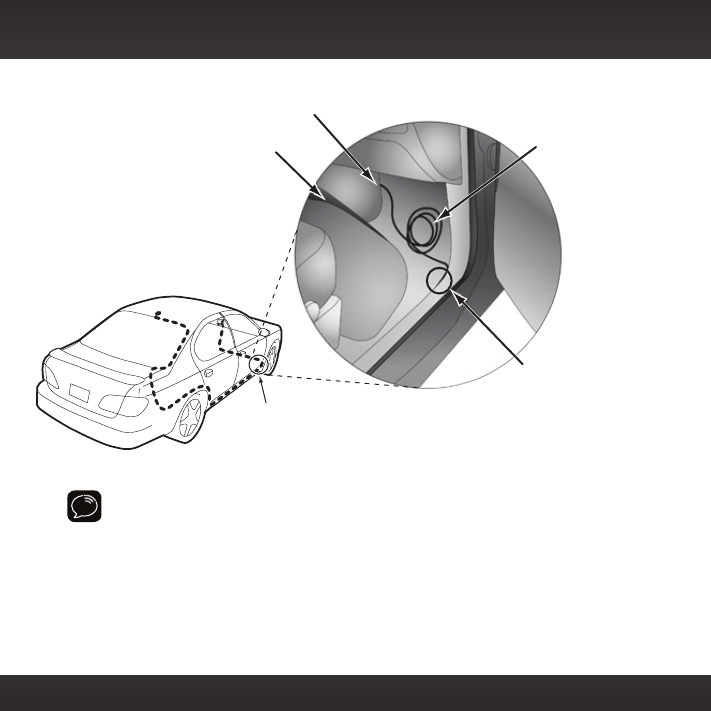
Use a blunt plastic putty
knife or similar blunt tool
to lift edge of interior
trim and tuck cable
under trim. Continue
towards front of vehicle
Route cable from trunk
under interior trim, into
cabin and towards front
of vehicle
Route cable under
trim or upholstery
Continue routing cable
under trim or carpet
towards front of vehicle
Vehicle Installation
28
TIP! Always be careful to include enough slack in your cable to
accommodate open doors or trunk lids. Use things typically found around
the home, like electrical tape, to secure cables in areas so that hinges do
not pinch the cable with the door. Hide any excess cable in the trim.
Continue routing cable under
carpet or console to radio location
Coil excess
cable under
carpet or mat
Bring cable out
from trim
Pull carpet
or mat back
Bring cable out from trim
and route under carpet to
dashboard or console
Vehicle Installation
29
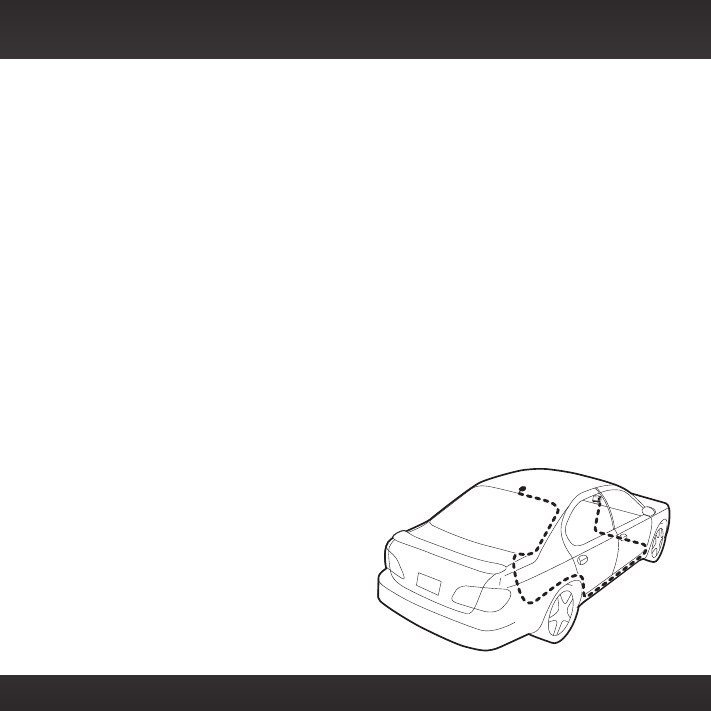
Sedan/Coupe With Antenna Placed at the Rear of the Roof:
1. Feed the antenna cable from the antenna underneath the rubber
molding around the rear window. Use a blunt plastic putty knife or
similar blunt tool to lift the rubber molding around the rear window
and tuck the antenna cable underneath the molding. Route the antenna
cable around and down the window to the lowest point. If your rear
window does not have rubber molding, we recommend consulting a
professional installer.
2. Route the antenna cable out of the window molding and into the
rubber weather stripping around the trunk opening. Lift the weather
stripping from the opening and tuck the cable inside it, then replace
the weather stripping. To avoid sharp bends in the cable, run the cable
inside the weather stripping for a few inches, then remove the cable
from the weather stripping inside the trunk. Keep the cable away from
hinges, gears, etc., that could damage it.
3. Route the cable out from the rubber weather stripping and along the
trunk wall. Continue routing the cable into the vehicle cabin through a
conduit or along an existing wiring harness.
4. Route the cable through the
main cabin area under the
interior trim, towards the front
of the vehicle. Use a blunt
plastic putty knife or similar
blunt tool to lift the plastic trim
just enough to tuck the cable
under underneath. Avoid side
airbag locations on back pillars
and above the doors. Airbag
locations are marked with “SRS”
Vehicle Installation
30
logos. Be careful not to crimp or cut the cable.
5. Bring the cable out from the trim near the front of the cabin and route
it under the carpet toward the dashboard or console. Coil any excess
cable in a hidden location, such as under the carpet, keeping it away
from any vehicle pedals or controls. Secure the excess cable with wire
ties (purchased separately).
6. Bring the end of the cable out at the PowerConnect Vehicle Dock
location. Leave yourself enough cable so you can easily connect it to
the antenna connector of the dock.
7. Continue with “Step 5: Connect the Magnetic Mount Antenna and
PowerConnect Power Adapter” on page 35.
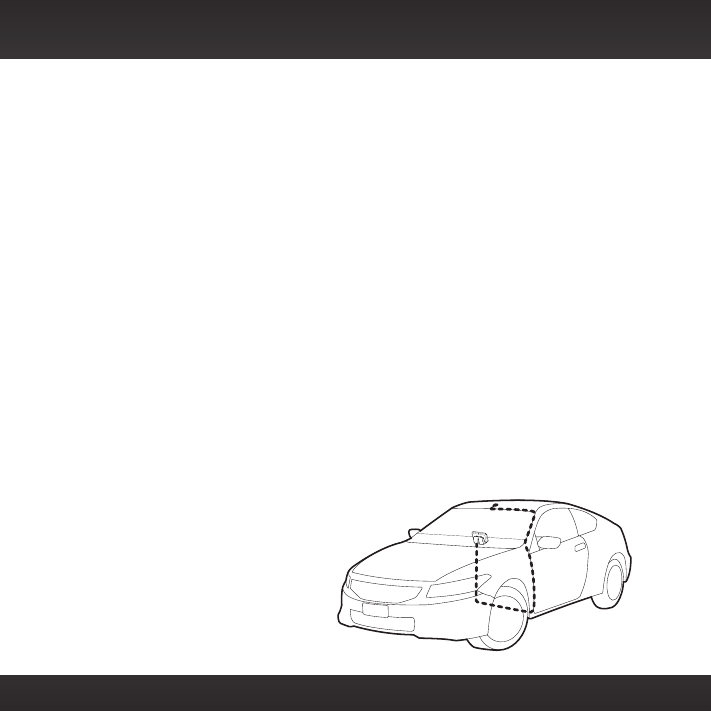
Sedan/Coupe With Antenna Placed at the Front of the Roof
1. Feed the antenna cable from the antenna underneath the rubber
molding around the windshield. Use a blunt plastic putty knife or
similar blunt tool to lift the rubber molding around the windshield and
tuck the antenna cable underneath the molding. Route the antenna
cable around and down the windshield to the lowest point.
2. At the lowest corner of the windshield, route the cable out of the
windshield molding and into
the rubber weather stripping
around the door opening. Lift
the weather stripping from the
opening and tuck the cable
inside it, then replace the
weather stripping. Run the cable
inside of the weather stripping
to the bottom of the door
Vehicle Installation
31
opening.
3. Pull the cable out of the weather stripping at the bottom of the door
opening and route it under the carpet toward the dashboard. Coil any
excess cable in a hidden location, such as under the carpet, keeping it
away from any vehicle pedals or controls. Secure the excess cable with
wire ties.
4. Bring the end of the cable out at the PowerConnect Vehicle Dock
location. Leave yourself enough cable so you can easily connect it to
the antenna connector of the dock.
5. Continue with “Step 5: Connect the Magnetic Mount Antenna and
PowerConnect Power Adapter” on page 35.
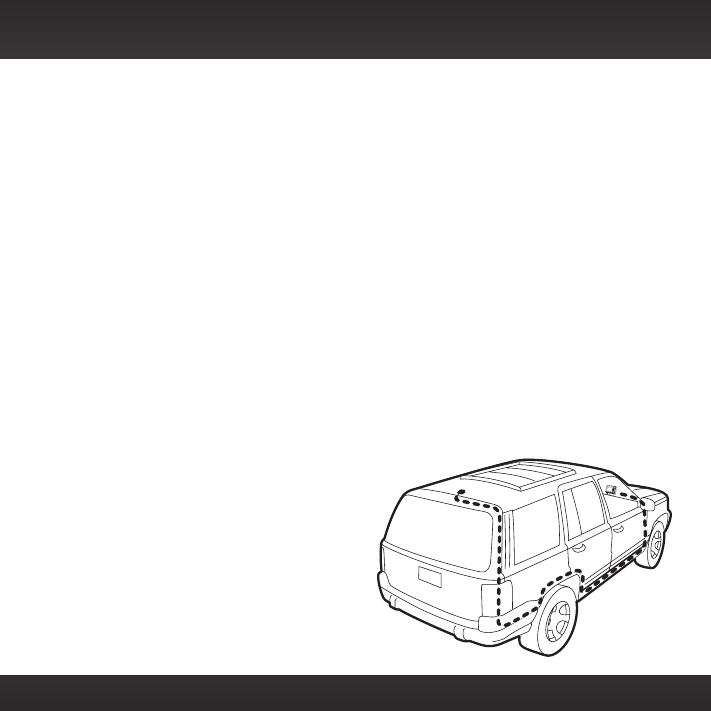
Sport Utility Vehicle (SUV)
1. Feed the antenna cable underneath the rubber weather stripping of
the rear tailgate window/door and route the cable along the rear hatch.
Lift the weather stripping from the opening and tuck the cable inside
it, then replace the weather stripping. Pull the cable out from weather
stripping and route it into the
cabin under the interior trim.
Avoid hinges or gears that could
crimp or cut the cable.
2. Route the cable through the
SUV’s main cabin area under
the interior trim, towards the
front of the vehicle. Use a blunt
plastic putty knife or similar
blunt tool to lift the plastic trim
just enough to tuck the cable
Vehicle Installation
32
under underneath. Avoid side airbag locations on back pillars and
above the doors. Airbag locations are marked with “SRS” logos. Be
careful not to crimp or cut the cable.
3. Bring the cable out from the trim near the front of the cabin and route
it under the carpet toward the dashboard or console. Coil any excess
cable in a hidden location, such as under the carpet, keeping it away
from any vehicle pedals or controls. Secure the excess cable with wire
ties (purchased separately).
4. Bring the end of the cable out at the PowerConnect Vehicle Dock
location. Leave yourself enough cable so you can easily connect it to
the antenna connector of the dock.
5. Continue with “Step 5: Connect the Magnetic Mount Antenna and
PowerConnect Power Adapter” on page 35.
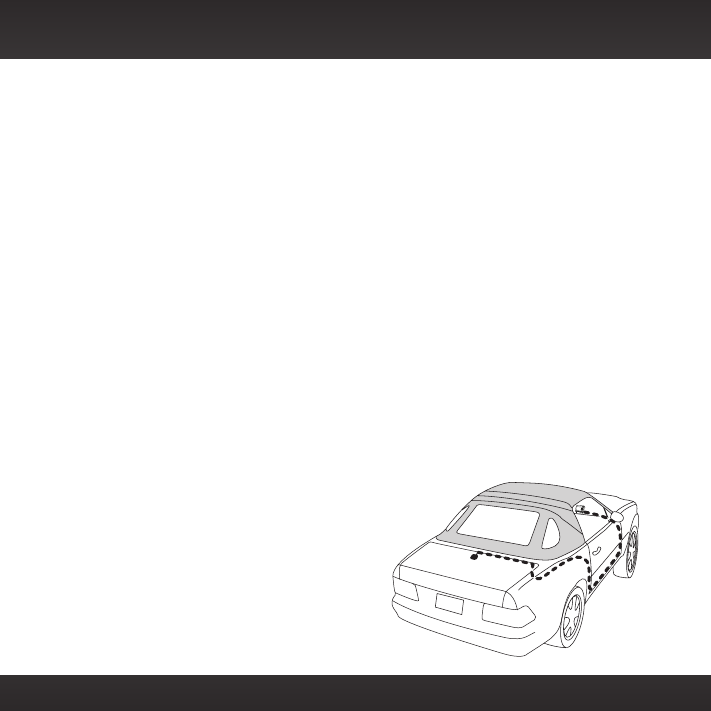
Convertible
1. Bring the antenna cable from the antenna into the trunk at the front
edge of the trunk lid. Keep any bends in the cable loose. Tape or tie the
cable along the inside of the trunk lid to the trunk lid hinge strut.
2. Allow enough slack in the cable so
the trunk lid can easily open and close
and keep the cable away from hinges,
gears, etc., that could crimp or cut it.
Route the cable along the trunk wall
and into the cabin through a conduit or
along an existing wiring harness.
3. Route the cable through the main
cabin area under the interior trim,
Vehicle Installation
33
towards the front of the vehicle. Use a blunt plastic putty knife or
similar blunt tool to lift the plastic trim just enough to tuck the cable
under underneath. Avoid side airbag locations on back pillars and
above the doors. Airbag locations are marked with “SRS” logos. Be
careful not to crimp or cut the cable.
4. Bring the cable out from the trim near the front of the cabin and route
it under the carpet toward the dashboard or console. Coil any excess
cable in a hidden location, such as under the carpet, keeping it away
from any vehicle pedals or controls. Secure the excess cable with wire
ties (purchased separately).
5. Bring the end of the cable out at the PowerConnect Vehicle Dock
location. Leave yourself enough cable so you can easily connect it to
the antenna connector of the dock.
6. Continue with “Step 5: Connect the Magnetic Mount Antenna and
PowerConnect Power Adapter” on page 35.
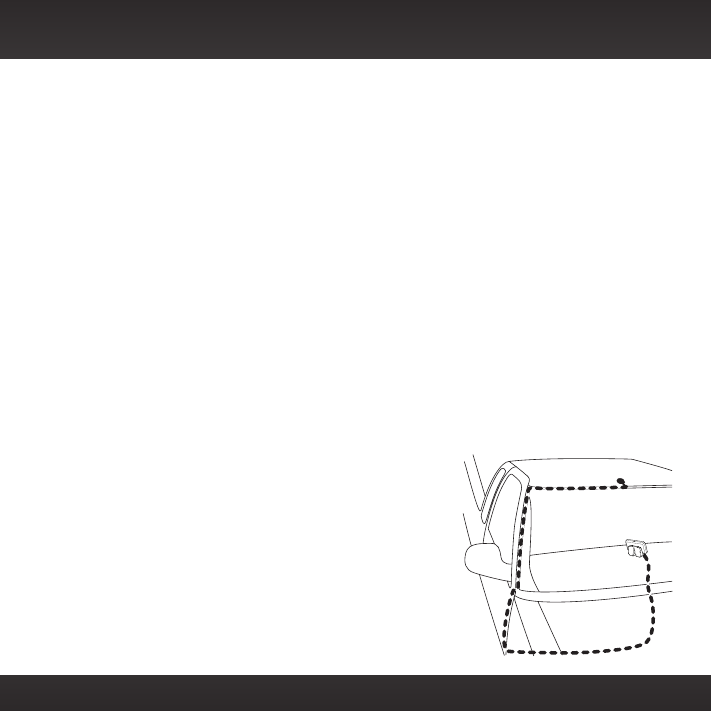
Pickup Truck
1. Use a blunt plastic putty knife or similar
blunt tool to lift the rubber molding
around the windshield and tuck the
antenna cable underneath it.
2. Continue tucking the cable underneath
the windshield molding around the
windshield to the lowest corner.
3. At the lowest corner of the windshield,
route the cable out of the windshield
molding and into the rubber weather
Vehicle Installation

34
stripping around the door opening. Lift the weather stripping from the
opening and tuck the cable inside it, then replace the weather stripping.
Run the cable inside of the weather stripping to the bottom of the door
opening.
4. Pull the cable out of the weather stripping at the bottom of the door
opening and route it under the carpet toward the dashboard. Coil any
excess cable in a hidden location, such as under the carpet, keeping it
away from any vehicle pedals or controls. Secure the excess cable with
wire ties.
5. Bring the end of the cable out at the PowerConnect Vehicle Dock
location. Leave yourself enough cable so you can easily connect it to
the antenna connector of the dock.
6.
Continue with “Step 5: Connect the Magnetic Mount Antenna and
PowerConnect Power Adapter” on page 35.
Vehicle Installation
35
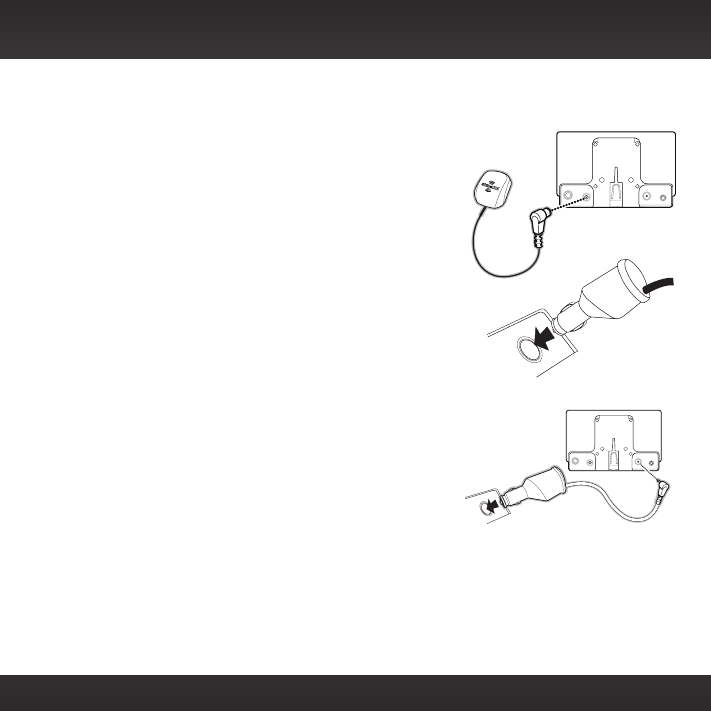
Step 5: Connect the Magnetic Mount Antenna and
PowerConnect Power Adapter
1. Plug the Magnetic Mount Antenna into the
silver ANT connector on the PowerConnect
Vehicle Dock.
2. Insert the PowerConnect Power Adapter
into your vehicle’s cigarette lighter or power
adapter socket.
3. Plug the PowerConnect Power Adapter into
the red PWR connector on the dock.
AUDIOANT PWR FM
AUDIOANT PWRFM
Vehicle Installation
36
Step 6: Connect the Audio
To play XM audio through your vehicle’s stereo or FM radio, decide on one
of the following audio connection options:
•Option 1: Best: Use the provided Aux In Cable if your vehicle’s stereo
system has an auxiliary input connection or jack. Refer to your vehicle’s
owners manual to find the location of the auxiliary input jack, or consult
the vehicle dealer.
TIP! The auxiliary input jack may be located on the face plate of the vehicle
radio, on the back of the radio, anywhere on the front dash panel, inside the
glove compartment, or inside the center console in between the front seats.
•Option 2: Better: Use a Cassette Adapter if your vehicle has a built-
in cassette player. Cassette Adapters are sold separately and can be
purchased from an electronics retailer, or go to www.siriusxm.com/
accessories.
•Option 3: Good: Use the PowerConnect feature of Onyx Plus.
PowerConnect plays the audio through your vehicle’s FM radio.
•Option 4: Best: Use the FM Direct Adapter. If none of the previous
three audio connection options will work in your vehicle, then you will
need to use the FM Direct Adapter (FMDA) (sold separately). The FMDA
needs to be installed by a professional installer and directly connects
Onyx Plus to your vehicle’s FM radio. To learn more, check with the
retailer where you bought your Radio, or go to www.siriusxm.com/
accessories.
Follow the installation instructions in the next several sections for the audio
connection option that you have selected.
Vehicle Installation
37
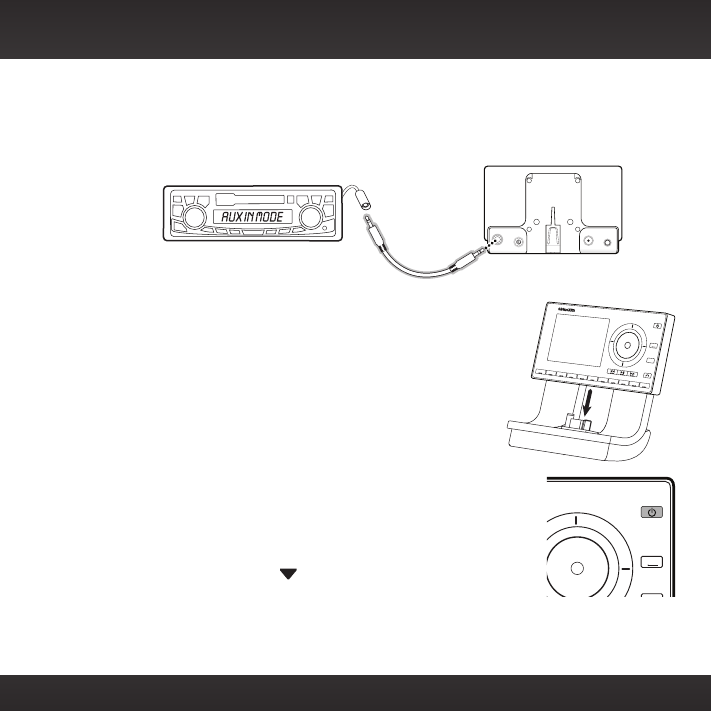
Option 1: Aux In Cable Installation Instructions
1. Plug one end of the Aux In Cable into the green AUDIO connector on
the dock.
2. Plug the other end into the auxiliary input jack
of your vehicle’s stereo system.
3. If you are using the vent mounting method,
attach the Vent Mount to the vehicle vent.
4. Insert your Onyx Plus into the dock.
5. Power on your Onyx Plus by pressing the
Power button.
6. Be sure the vehicle is outside and the antenna has a
clear view of the sky. Verify that you are receiving
the XM signal. There should be at least two bars on
the lower left corner of the main display screen that
denotes antenna signal strength. You can also press
menu and then press to scroll to and highlight
Signal Indicator. Press the Select button. The
Satellite and Terrestrial bars show the strength of the signal being
received. If the signal reception is good, press and hold menu to return
to the main display screen.
23456789
0
b / #
alerts
twx
FM
menu
t-mix
t-scn
1
234567890
b / #
alerts
twx
FM
menu
t-mix
t-scn
1
Plus
AUDIOANT PWRFM
Vehicle Installation
38
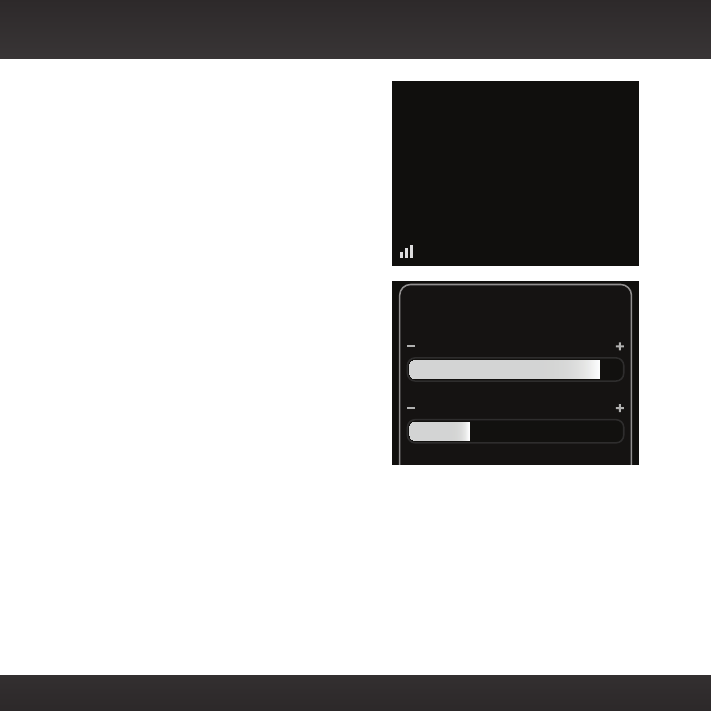
7. Ensure Onyx Plus is tuned to channel
1, the XM Preview channel. Upon
power up, Onyx Plus should tune to
channel 1 by default, when it’s not yet
activated. If it’s not on channel 1, refer
to “Listening to Satellite Radio” on
page 51 to learn about how to tune
a channel.
8. Turn on your vehicle’s stereo system.
Set it to play from the auxiliary input
source. You should hear XM channel 1
through your vehicle’s stereo system.
You are now ready to activate your
Onyx Plus.
9. Go back to “Step 2: Install the
Adhesive or Vent Mount” on page
14 and finish installing the Dash or
Vent Mount. Then the installation is
complete.
10.
The audio level output of Onyx Plus can be increased or decreased as
necessary to match the audio levels of other sources in your vehicle.
Refer to “Audio Level” on page 92.
If the signal reception is good, showing at least two bars in the lower
left corner of the display, but there is no XM audio, be sure the vehicle’s
stereo system is set to the auxiliary input source (step 8). Also be sure
that the audio level is set high enough to be heard (step 10). Refer to
“Troubleshooting” on page 105 for additional help.
Signal Indicator
S
ATELLIT
E
TERRESTRIA
L
866-635-2349
siriusxm.com
1 XM Preview
Vehicle Installation
39
Option 2: Cassette Adapter Installation Instructions
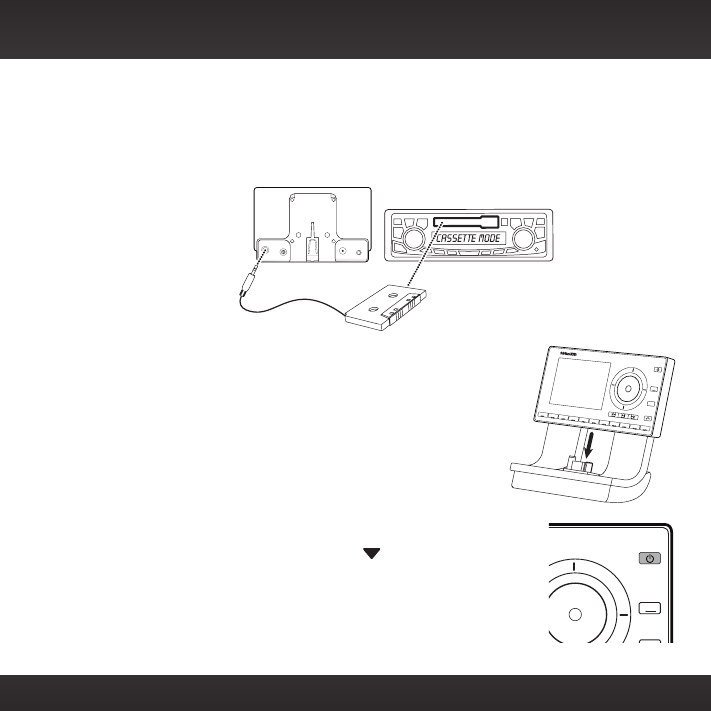
1. Plug the Cassette Adapter into the green AUDIO connector on the dock.
2. Insert the Cassette Adapter into the vehicle’s cassette deck. You may
need to turn on your vehicle’s stereo system in order to do so.
3. If you are using the vent mounting method, attach
the Vent Mount to the vehicle vent.
4. Insert your Onyx Plus into the dock.
5. Power on your Onyx Plus by pressing the Power
button.
6. Be sure the vehicle is outside and the antenna
has a clear view of the sky. Verify that you are
receiving the XM signal. There should be at least
two bars in the lower left corner of the main display
screen that denotes antenna signal strength. You can
also press menu and then press to scroll to and
highlight Signal Indicator. Press the Select button.
The Satellite and Terrestrial bars show the strength
of the signal being received. If the signal reception is
good, press and hold menu to return to the main
display screen.
23456789
0
b / #
alerts
twx
FM
menu
t-mix
t-scn
1
234567890
b / #
alerts
twx
FM
menu
t-mix
t-scn
1
Plus
AUDIO ANT PWRFM
Vehicle Installation
40
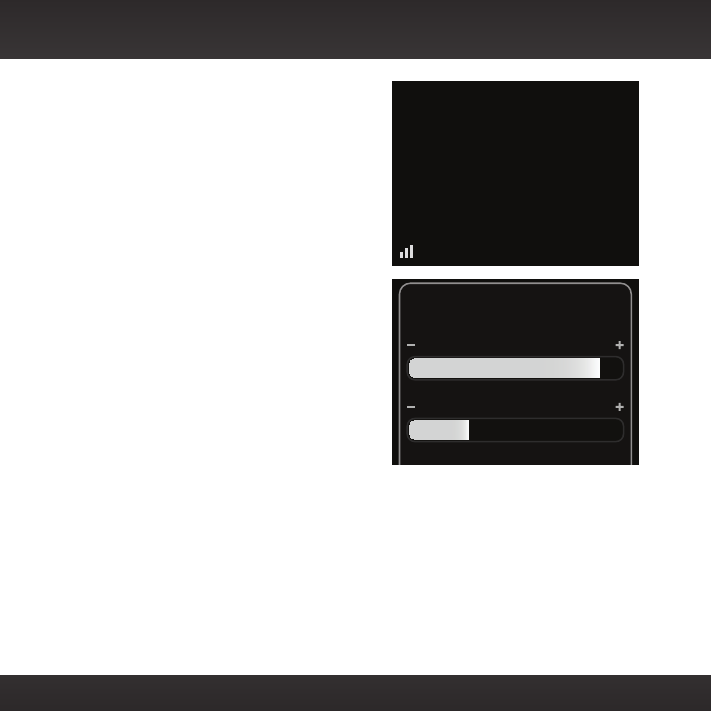
7. Ensure Onyx Plus is tuned to channel
1, the XM Preview channel. Upon
power up, Onyx Plus should tune to
channel 1 by default, when it’s not yet
activated. If it’s not on channel 1, refer
to “Listening to Satellite Radio” on
page 51 to learn about how to tune
a channel.
8. Turn on your vehicle’s stereo system.
Set it to play from the auxiliary input
source. You should hear XM channel 1
through your vehicle’s stereo system.
You are now ready to activate your
Onyx Plus.
9. Go back to “Step 2: Install the
Adhesive or Vent Mount” on page
14 and finish installing the Dash or
Vent Mount. Then the installation is
complete.
10.
The audio level output of Onyx Plus can be increased or decreased as
necessary to match the audio levels of other sources in your vehicle.
Refer to “Audio Level” on page 92.
If the signal reception is good, showing at least two bars in the lower left
corner of the display, but there is no XM audio, be sure the vehicle’s stereo
system is set to the cassette source (step 4). Also be sure that the audio
level is set high enough to be heard (step 5). Refer to “Troubleshooting” on
page 105 for additional help.
Signal Indicator
S
ATELLIT
E
TERRESTRIA
L
866-635-2349
siriusxm.com
1 XM Preview
Vehicle Installation