User Manual

Tek wireless enhancement
User Guide

2

3
Content
Content
Introduction 4
TEK 5
Intended use 7
General notes on safety 8
Getting started 12
Basic functions 15
Display information 18
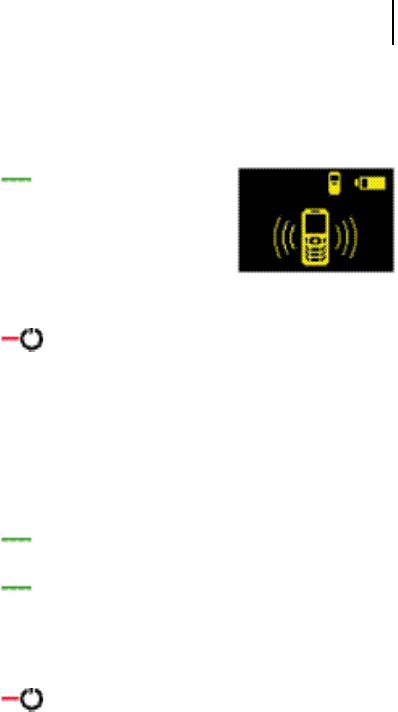
What is Bluetooth? 20
Using the remote control with a phone 21
Using the Tek Transmitter 27
Using the direct audio input 33
Maintenance and care 35
Technical information 36
Technical Data - power supply 38
Disposal information 39

Introduction
4
Dear Customer,
Your hearing instruments equipped with e2e wirelessTM
2.0 technology can be controlled by your new Tek Con-
nect remote control.
This remote control offers you more hearing comfort in
your daily activities. Via Bluetooth it links your hearing
instruments to the expanding world of electronic media.
It will support you when you watch television, listen to
music or talk on the phone.
These instructions, together with the guidance from your
Hearing Care Professional, will help you to understand
how your remote control works.
If you have further questions, please contact your Hearing
Care Professional.
Introduction
Introduction
5
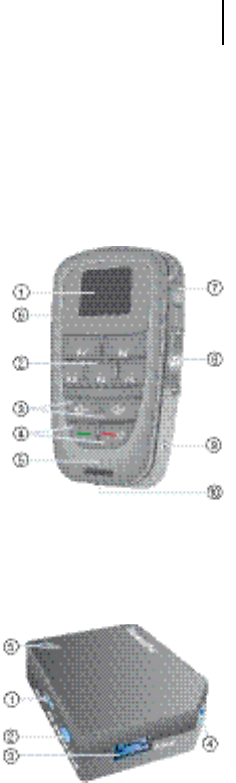
Included in delivery
Device and accessories:
■ Tek Connect remote control with rechargeable battery
and lanyard
① Display
② Program buttons
③ Volume buttons
④ Telephone buttons;
remote control on/off
⑤ Microphone opening
⑥ Key lock
⑦ Read out button;
hearing instruments
on/off
⑧ SoundBalance buttons
⑨ 2.5 mm stereo socket
⑩ Socket for power plug
■ Tek Transmitter
① On/off switch
② Sound level
③ Socket for power plug
④ 2.5 mm stereo socket
⑤ LED
TEK
Introduction
6
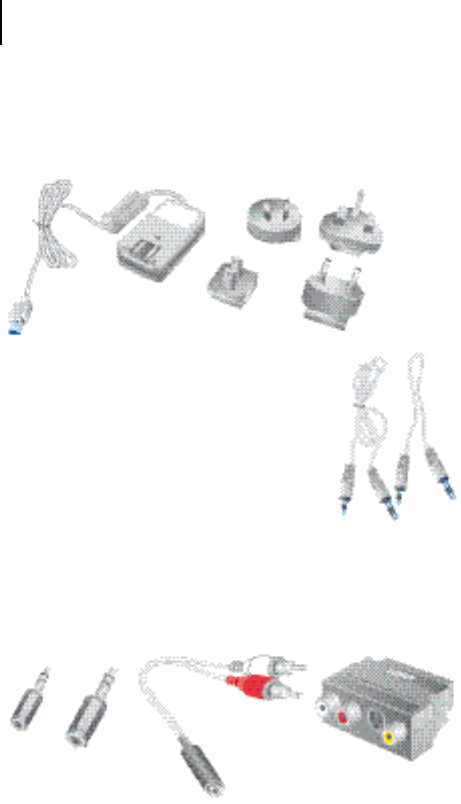
■ 2 Power plugs with country specific adapters (one for
remote control, one for Tek Transmitter)
■ Cables:
□ 1.8 m audio cable with 3.5 stereo
plug on one side and a 2.5 mm
stereo plug on the other side
□ 0.3 m audio cable with 3.5 stereo
plug on one side and a 2.5 stereo
plug on the other side
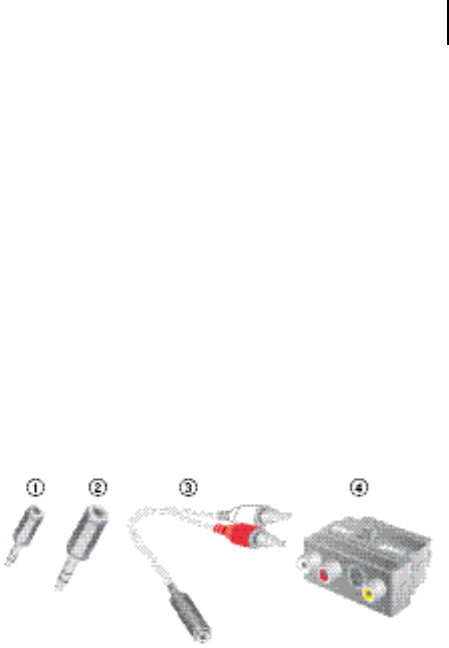
■ Adapter set:
□ 2.5 stereo plug to 3.5 stereo socket
□ 6.3 stereo plug to 3.5 stereo socket
□ RCA (cinch) to 3.5 stereo socket
□ RCA (cinch) to SCART
Intended use
7
This remote control is intended to operate hearing
instruments.
Read and follow the instructions of this user guide to
avoid injuries or damage to remote control.
Symbols:
Be aware of information marked with the warning symbol
WARNING, CAUTION or NOTICE!
WARNING points out a situation that could
lead to serious injuries, CAUTION indicates a
situation that could lead to minor and moder-
ate injuries.
NOTICE NOTICE indicates possible property damage.
Advice and tips on how to handle your device
better.
Instruction. Indicates that something has to be
done.
Intended use
General notes on safety
8
WARNING
Wireless systems may interfere with devices and
electronic equipment.
Turn the remote control off when in hospitals or
airplanes.
Do not use with life supporting systems.
The remote control may respond when triggered
by an external Bluetooth device.
NOTICE
The remote control is sensitive to extreme heat,
high humidity, strong magnetic fields (> 0.1T),
X-rays and mechanical stress.
Do not expose the remote control to extreme
temperature or high humidity.
Do not leave it in direct sunlight.
Do not immerse it in water.
Do not place your remote control in a micro-
wave oven.
In some countries restrictions for the usage of
wireless equipment exist.
Refer to local authorities for further informa-
tion.
General notes on safety
General notes on safety
9
The performance of the e2e wireless function may
be affected by electromagnetic interference – e.g.
from a computer monitor or fluorescent lamp
system.
Move away from the source of interference if
you experience difficulty.
In the event your hearing instruments can be
controlled by another person's remote control,
return hearing instruments and remote control
to your Hearing Care Professional.
WARNING
Risk of interference with cardiac pacemakers.
Do not use the remote control if you are fitted
with a cardiac pacemaker.
WARNING
Hazard of explosion in gas-filled spaces!
Do not use your hearing instruments and re-
mote control in areas where there is danger of
explosions (e.g. mining).
General notes on safety
10
WARNING
Strangulation hazard when lanyard gets entangled
in moving mechanical parts of machines for ex-
ample.
Use only the delivered breakaway lanyard. It will
automatically detach when entangled.
Do not use lanyard for children under the age of
twelve.
WARNING
Risk of explosion when the rechargeable battery is
handled wrong.
Do not short circuit, pierce, crush or disassem-
ble the rechargeable battery.
Prior to return the battery for recycling, tape the
electrodes to prevent short circuit, which may
cause the battery to explode.
Do not place it in oven or fire.
Do not immerse it in water.
Charge the rechargeable battery between 0ºC
and 45ºC.
Remove the rechargeable battery when the
instrument is not in use for a prolonged period
of time.
General notes on safety
11
Batteries contain harmful substances that pollute
the environment.
Do not throw used batteries into household
trash.
Return them to your Hearing Care Professional
for environmentally correct disposal.
WARNING
Choking hazard posed by small parts.
Keep batteries, small parts and remote control
out of children‘s reach.
If swallowed consult a physician or hospital im-
mediately.
NOTICE
Please make sure that the power plug is easily ac-
cessible to remove it from power supply if neces-
sary.

Getting started
12
Set up the remote control
Insert the rechargeable battery into the remote control:
Insert first the top part of the battery (the part without
contacts) into the top part of the battery compartment.
Press down the bottom part of the battery into the bat-
tery compartment.
The contact areas of battery and battery compartment
match up.
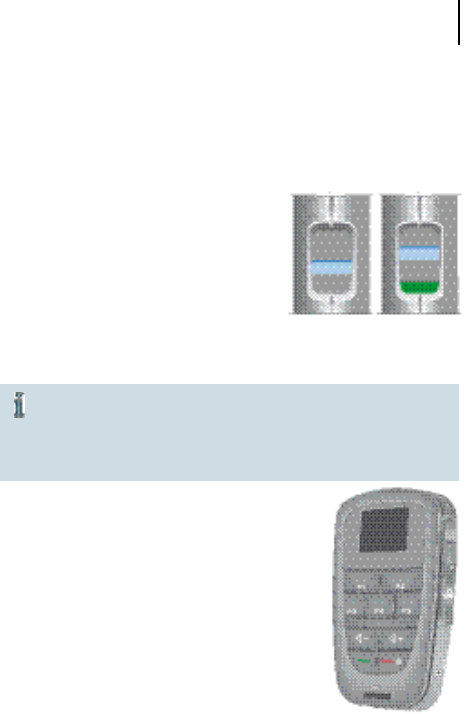
Charge the rechargeable battery before first use.
Charging process
Connect the remote control with
the power plug to a power supply.
The charging process starts. Charg-
ing time is about 5 hours depend-
ing on the status of the recharge-
able battery.
Charging is complete when the bat-
tery symbol shows a full battery.
Running time of the rechargeable battery
The running time of the rechargeable battery depends on
the way the remote control is used.
■ The function with the highest power consumption is
the transmission of an audio signal. This function is
active when telephoning or listening to an external
device. The rechargeable battery will last about 6 hours
in this case.
Getting started
Getting started
13
■ When no transmission of audio signal is active and
a phone is paired, the rechargeable battery will last
several days.
■ When no transmission of audio signal is active and
no telephone is paired, the rechargeable battery lasts
several months.
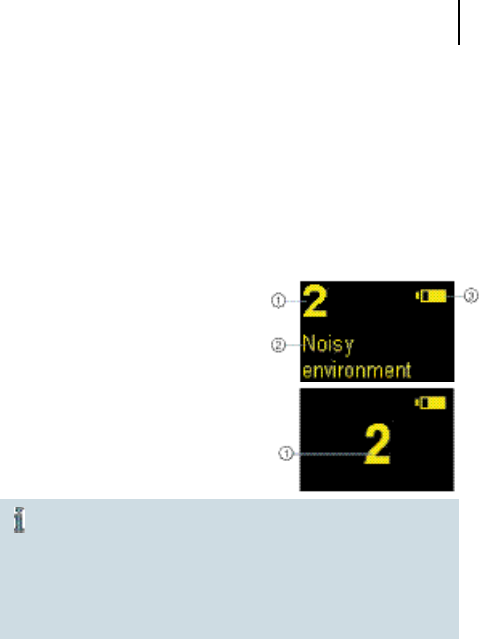
Display information
① Hearing program
② Program description (only
available if programmed by your
Hearing Care Professional)
③ Battery status of remote control
The remote control goes into a stand-by mode
after a period of inactivity. In stand-by mode no
information is shown on the display.
Press any key to turn the remote control back
into working mode to see the information on
the display.
Wearing the remote control
To operate your hearing instruments wear the remote
control within a distance of 1 m (40 in) to the hear-
ing instruments. You can wear the remote control, for
example, in your pocket.

Getting started
14
For best listening quality when
receiving an audio stream, wear
the remote control with the
lanyard around your neck. This
way remote control and
hearing instruments are in the
proper distance and alignment.
You can also set the remote control on
the table in front of you, for example
when watching TV.
For best listening quality turn the re-
mote control in the same direction you
are facing.
When telephoning with the remote
control, hold the remote control in
your hand and speak directly into the
microphone.
Basic functions
15
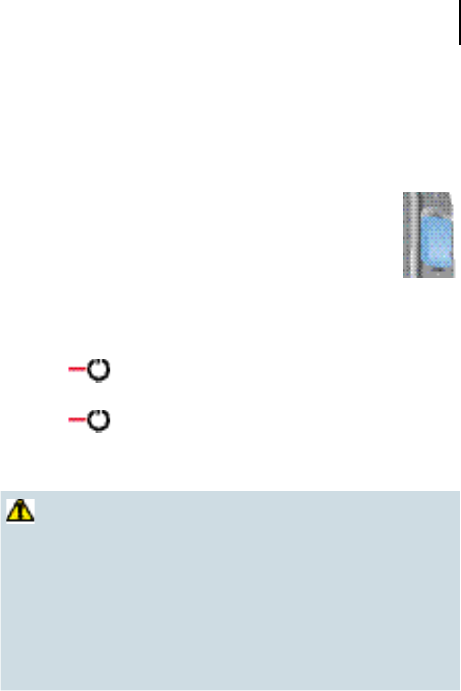
Your remote control has a key lock on the left side.
Slide the control to the bot-
tom to enable the key lock.
Pressing the buttons will now
have no effect.
Slide the control to the top to
disable the key lock.
locked / unlocked
Changing the hearing program
Your Hearing Care Professional can activate or
de-activate acoustic signals in your hearing instru-
ments. Acoustic signals confirm changes in the set-
tings such as program, volume or SoundBalance.
The remote control allows you to control
up to 5 programs of your hearing instru-
ments.
Your Hearing Care Professional will
program the settings in the different
programms for your particular listening
needs.
Press the number of the desired hear-
ing program.
The remote control shows the number
of the program you are in now.
You hear the acoustic signal for the chosen program in
your hearing instruments.
Basic functions
Basic functions
16
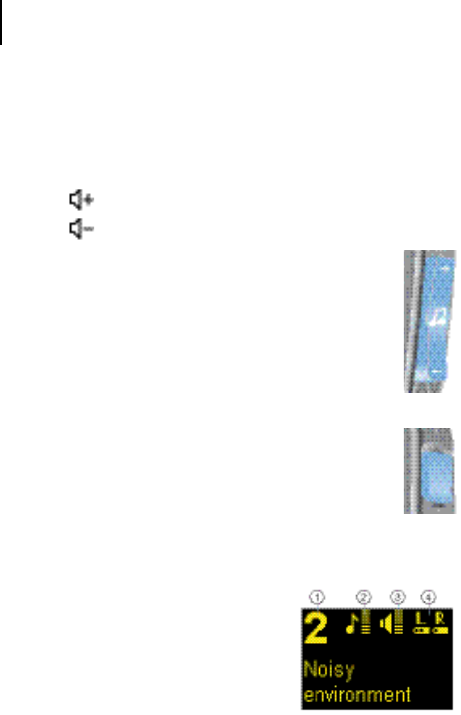
Changing the volume
Press to increase the volume.
Press to decrease the volume.
Changing the SoundBalance (Treble)
With the rocker switch on the right side of the
remote control you can change the sound of your
hearing instruments.
Press + (up) to get a more shrill sound.
Press – (down) to get more muffled sound.
Reading out the hearing instrument's information
This functions gives you the possibility to view
the current settings like battery status, volume or
hearing program of your hearing instruments.
Hold the remote control close to one of your
hearing instruments (about 10 cm / 4 in).
Press the read out button.
The display of the remote control shows you the follow-
ing information:
① Hearing program with description
② Sound control of hearing instru-
ments
③ Volume of hearing instruments
④ Battery status of hearing instruments left / right
Basic functions
17
Turning the hearing instruments on/off
Press the read out button for more than 5 sec-
onds to turn your hearing instruments off.
Press one of the program buttons on the
remote control to turn the hearing instruments
back on.
Turning the remote control on/off
Press for about 5 seconds to turn the remote
control off.
Press for about 5 seconds to turn the remote
control back on.
WARNING
Wireless systems may interfere with measuring
devices and electronic equipment.
Turn the remote control off when in hospi-
tals or airplanes.
Prior to use in conjunction with an electronic
implant or life supporting system, have the
electromagnetic compatibility verified.
Display information
18
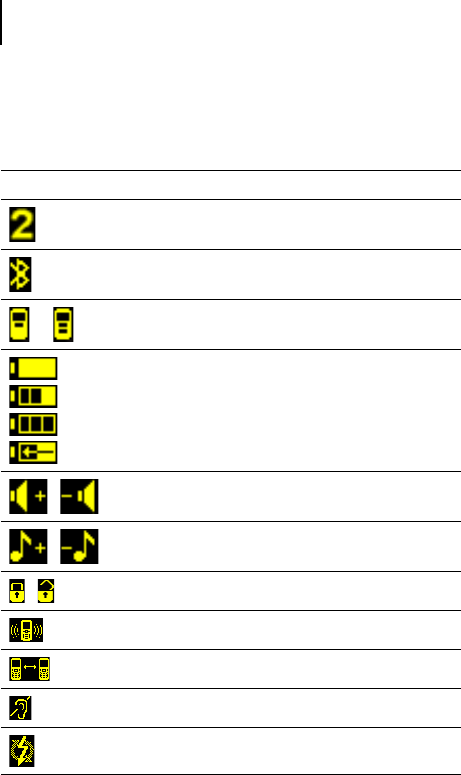
Symbols
program number
bluetooth connection active
or
phone connection active
full
empty
charging
battery status of remote control
/
volume up / volume down
/
treble up / treble down
/ key lock activated / deactivated
incoming call
active call
hearing instruments off
error
Display information

Display information
19
Symbols
/ / searching bluetooth audio stream /
bluetooth audio stream active /
audio stream active
Read-out symbols
Sound balance and volume of hearing
instruments
battery status of left and right hearing
instrument
Display information
What is Bluetooth?
20
Bluetooth is a wireless standard that provides a way to
wirelessly connect devices like cell phones, laptops,
headsets and others.
Over a Bluetooth connection the devices can exchange
information such as data, sound or even control com-
mands. The range of the Bluetooth connection in the Tek
Connect remote control is about 10 m (32 ft). Walls or
objects in between the devices can shorten this distance.
The Bluetooth symbol denotes if a device is
Bluetooth compatible.
The Tek Connect remote control can be connected via
Bluetooth to your cell phone or to the Tek Transmitter.
Follow the instructions in the following chapters to hear
the sound of your cell phone, TV or mp3 player directly in
your hearing instruments.
What is Bluetooth?
What is Bluetooth?
21
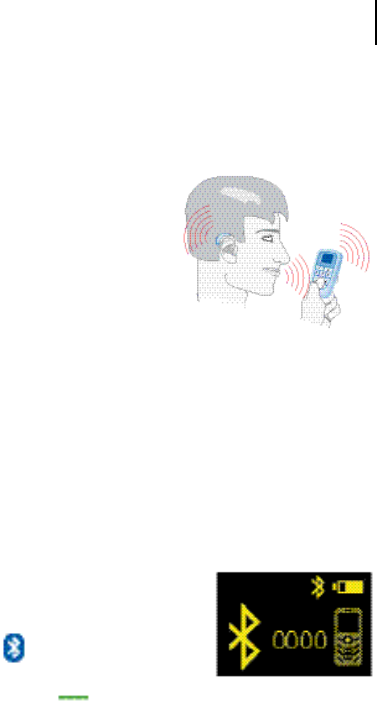
The remote control allows you
to use your hearing instruments
as a wireless headset when you
are telephoning with a Blue-
tooth compatible phone or cell
phone.
Instead of using the telephone
receiver, you speak into your
remote control and listen through your hearing instru-
ments.
Pairing remote control and phone
Before you can use the remote control with a phone for
the first time you need to pair your phone and the remote
control. The pairing process can be compared with an "in-
troduction" of phone and remote control. After the pair-
ing process the phone and remote control "know" each
other. The pairing process does not need to be repeated.
Activate the Bluetooth function in
your phone. The display of your
phone should show a Bluetooth
symbol when the Bluetooth
function is activated.
Press and hold on the remote control for about
7 seconds.
The remote control changes to pairing mode. You now
have 2 minutes to finish the pairing process.
Using the remote control with a
phone
What is Bluetooth?
22
Search in the menu of your phone for other Bluetooth
devices.
Your phone should find a device called "Tek Connect".
This is the remote control.
Choose this device to pair phone and remote control.
Your phone should ask you to insert a PIN.
Insert "0000".
Refer to the user guide of your connected
device for more detailed information on how to
link devices via Bluetooth.
Connecting remote control and phone
After pairing, the phone and remote control "know" each
other. In order to listen to a call through your hearing
instruments it is also necessary to connect the remote
control to your phone. After connecting, the phone and
remote control can "communicate" with each other.
Press to connect the remote control with the
phone.
OR
Connect the remote control over the menu of your
phone.
The remote control shows the phone symbol when
your phone and your remote control are connected.

What is Bluetooth?
23
■ The remote control can be paired with more than one
phone.
■ The remote control can be connected with only one
phone at a time.
It is not necessary to have the remote control and the
phone connected all the time. But only when connected
to the phone the remote control will show an incoming
call on the display and transfer the sound of your phone
to your hearing instruments.
Depending on your phone also keypad tones will
be transfered to your hearing instruments when
phone and remote control are connected.
If this function interferes with the program you
are using deactivate the keypad tones in your
phone.
The performance of the phones and cell phones
described can slightly differ from the performance
of your phone or cell phone.
Headset and hands-free
Most phones or cell phones connect to the remote control
via "hands-free" mode. Some phones or cell phones use
the "headset" mode. Refer to the table for the avaible
functions in each mode.
What is Bluetooth?
24
headset hands-free
symbol shown in remote control
taking a call
rejecting a call
terminating a call
transferring an existing call
Before using the remote control for telephoning
for the first time you need to:
Activate the bluetooth function in your phone.
Pair phone and remote control.
Taking a call ...
... when remote control and phone are connected
The ringing is audible in your hearing instruments.
The remote control indicates an incoming call.
Depending on your phone, there might be no ring-
ing audible in your hearing instruments when the
phone is in silent mode.
What is Bluetooth?
25
Press to accept the incoming
call.
Speak into the microphone of the
remote control to talk.
You need to speak within a range
of about 0.5m (inches) from the microphone.
Press to terminate the call.
Your hearing instruments switch back to the hearing
program you used before taking the call.
... when remote control and phone are not connected
The ringing will not be audible in your hearing instru-
ments. The remote control does not show an incoming
call.
Press to transfer the incoming call to remote
control.
Press to accept the incoming call.
Speak into the microphone of the remote control to
talk. You need to speak within a range of about 0,5m
(inches) from the microphone.
Press to terminate the call.
Your hearing instruments switch back to the hearing
programm you used before taking the call.

What is Bluetooth?
26
Rejecting a call ...
... when remote control and phone are connected
Press to reject an incoming call.
... when remote control and phone are not connected
Press to transfer the incoming call to the remote
control
Press to reject an incoming call.
Making a call
Press to connect remote control and phone.
Dial the desired number on your cell phone.
You can hear the call connection signal and the ringing
in your hearing instruments.
Press to terminate the call.
Transferring an existing call from/ to the remote
control
Press to transfer an existing connection from your
phone to your remote control.
Press to transfer an existing connection from your
remote control back to the phone.

Using the Tek Transmitter
27
The Tek Transmitter allows you to use your hearing
instruments as a wireless headset for any external device.
Connected to the desired device, the Tek Transmitter
submits the audio stream via the remote control to your
hearing instruments.
① On/off switch
② Sound level
③ Socket for power plug
④ 2.5 mm stereo socket
⑤ LED
Turning the Tek Transmitter on/off
Use the on/off switch to turn the Tek Transmitter on.
The blue LED blinks, indicating that the Tek Transmitter
is waiting to connect to the remote control.
When the blue LED is on constantly, the connection to
the remote control is established.
Use the on/off switch to turn the Tek Transmitter off.
Turn the Tek Transmitter off when not in use.
Using the Tek Transmitter

Using the Tek Transmitter
28
Sound level
The Sound level button allows you to increase or decrease
the volume of the audio signal of the Tek Transmitter.
There are 5 volume levels.
Press the Sound level button to change the volume of
the audio signal.
The blue LED blinks. The number of times the LED
blinks indicates the volume level.
Charging the Tek Transmitter
Connect the Tek Transmitter with the power plug to a
power supply.
A red LED indicates that the Tek Transmitter battery is
charging.
Charging time is about 5 hours depending on the sta-
tus of the rechargeable battery.
Charging is completed when the red LED goes out.
Using the Tek Transmitter
29
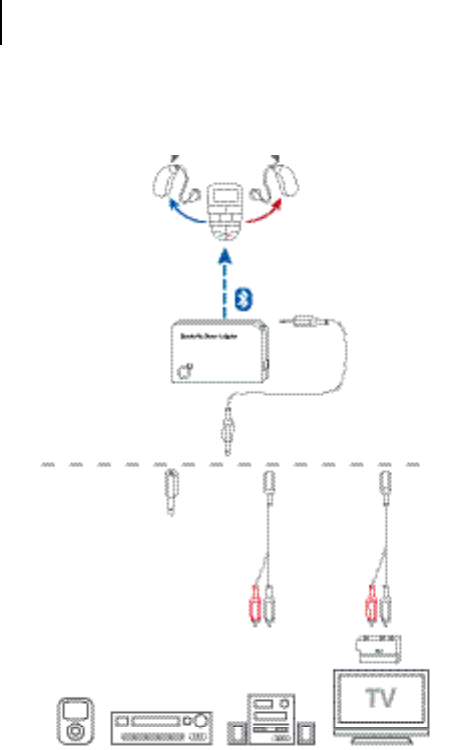
Connecting the Tek Transmitter with an external
device
Choose one of the cables delivered with the remote
control and plug the 2.5mm (smaller) stereo plug into
the Tek Transmitter.
Depending on the device you want to connect the Tek
Transmitter to, different adapters are included in the
delivery:
① 2.5 stereo plug to 3.5 stereo socket
② 6.3 stereo plug to 3.5 stereo socket
③ RCA (cinch) to 3.5 stereo socket
④ RCA (cinch) to SCART
The graphic on the following page shows how different
devices can be connected to the Tek Transmitter.
Connect the external device to the Tek Transmitter ac-
cording to the graphic.
Preferably, use the SCART or RCA (cinch) outlet.
Using the Tek Transmitter
30

Using the Tek Transmitter
31
Receiving the audio stream from an external device
Connect the Tek Transmitter with the power plug to a
power supply.
The Tek Transmitter has a rechargeable battery
and can also work without a connection to a
power supply.
Ensure to charge the battery regularly in this
case.
Using the remote control, change to the audio pro-
gram. It will take a few seconds for the remote control
to connect to the Tek Transmitter. The blue LED on the
Tek Transmitter confirms that the Bluetooth audio link
is established.
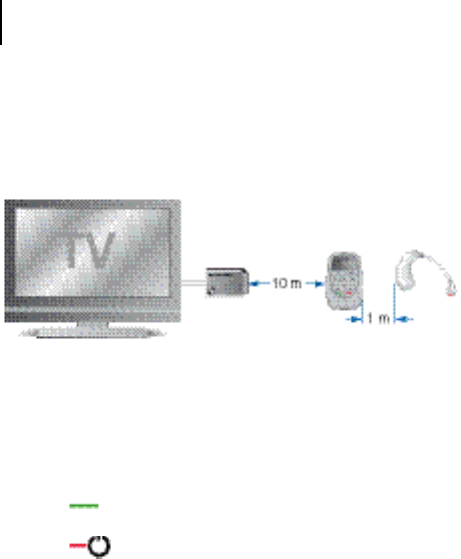
You can now hear sound from the TV through your
hearing instruments.
For better sound quality keep the remote
control within a range of 10 m (32 ft) to the Tek
Transmitter and the hearing instruments within
a range of 1m (40 in) to the remote control.
Keep the Tek Transmitter visible.
If the sound is tinny or artificial ask your Hearing Care
Professional for advice.
Using the Tek Transmitter
32
Receiving a phone call while watching TV
If your remote control and your phone are paired and
connected you can still receive phone calls when you are
connected to an external device. The hearing instruments
will switch automatically to the telephone programm
when your phone rings.
Press to answer the phone.
Press to reject the call.
The hearing instruments will change back to the audio
program after you have finished the call.
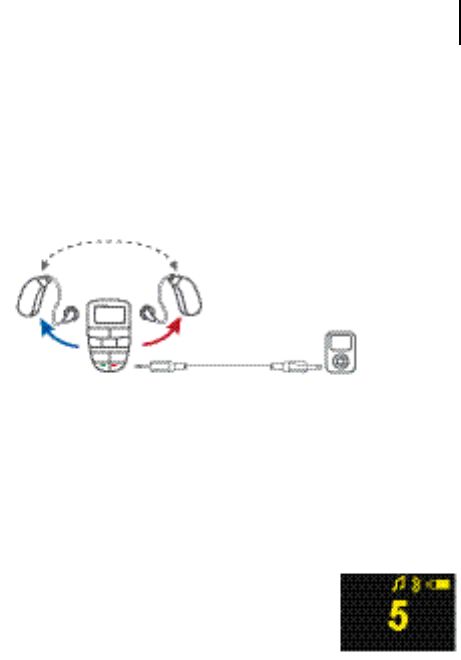
Using the direct audio input
33
The remote control allows you to use your hearing
instruments as a wireless headset when you are listening
to the music on your mp3 player or another audio device.
Connecting directly to your mp3 player
Choose one of the cables delivered with the remote
control and plug the 2.5mm (smaller) stereo plug into
the remote control.
Connect the other side of the cable with a 3.5mm jack
to the external device. Use one of the adapters if your
device does not have a 3.5mm jack.
Change to the audio program. The
remote control shows the symbol for
direct audio input.
You can hear the sound of your mp3
player through your hearing instru-
ments.
If you choose the audio program without an audio device
connected to your remote control, the remote control will
search for a connection to the Tek Transmitter.
Using the direct audio input
Using the direct audio input
34
Receiving a phone call while using the direct audio
input
If your remote control and your phone are paired you can
still receive phone calls while using the direct audio input.
The hearing instruments will switch automatically to the
telephone program when your phone rings.
Press to answer the phone.
Press to reject the call.
Your hearing instruments will change back to the
audio program.
WARNING
Risk of injuries caused by electric shock!
Connect audio input only to a device conform-
ing to IEC 60065 (IEC-Norm for audio, video and
other electronic devices).
While charging do not use the line-in audio
input with devices that are connected to the
power supply.

Maintenance and care
35
NOTICE
Do not put your remote control in
water!
Do NOT clean your remote con-
trol with alcohol or benzine.
Clean the remote control as necessary with a soft tis-
sue.
Avoid abrasive cleaning liquids with additives such as
citric acids, ammonia, etc.
Maintenance and care

Technical information
36
Siemens Tek Connect remote control
FCC: SGI-WL201AP
IC: 267AB-WL200AP
Operating frequencies: Fc=3,28 MHz
Max. field strength @ 10m: 41 dBμV/m
Max. field strength @ 30m: 21 dBμV/m
CE, FCC and IC compliance information can be found
inside the battery compartment.
N14203
This Class B digital apparatus complies with Canadian
ICES-003.
Changes or modifications made to this equipment not ex-
pressly approved by SAT GmbH for compliance may void
the FCC authorization to operate this equipment.
FCC compliance
This device complies with Part 15 of the FCC Rules and
with RSS-210 of Industry Canada.
Operation is subject to the following conditions:
■ this device may not cause harmful interference, and
■ this device must accept any interference received,
including interference that may cause undesired opera-
tion.
This equipment has been tested and found to comply
with the limits for a Class B digital device, pursuant to Part
Technical information

Technical information
37
15 of the FCC Rules. These limits are designed to pro-
vide reasonable protection against harmful interference
in a residential installation. This equipment generates,
uses and can radiate radio frequency energy and, if not
installed and used in accordance with the instructions,
may cause harmful interference to radio communications.
However, there is no guarantee that interference will not
occur in a particular installation. If this equipment does
cause harmful interference to radio or television recep-
tion, which can be determined by turning the equipment
off and on, the user is encouraged to try to correct the
interference by one or more of the following measures:
■ Reorient or relocate the receiving antenna.
■ Increase the separation between the equipment and
receiver.
■ Connect the equipment to an outlet on a circuit differ-
ent from that to which the receiver is connected.
■ Consult the dealer or an experienced radio/TV techni-
cian for help.
Siemens Transmitter
IMPORTANT NOTE: IC Radiation Exposure Statement
This equipment complies with IC radiation exposure limits
set forth for an uncontrolled environment.

Technical Data - power supply
38
Technical Data - power supply
Fuhua Model: UE10W-050080SPC
Input voltage: 100-240 V AC
Input current: 150 mA
Input frequency: 50-60 Hz
Output voltage: 5 VDC
Output current: 0.8 A
Disposal information
39
Within the European Union, the marked
equipment is covered by "Directive 2002/96/EC
of the European Paliament and of the Council
of 27 January 2003 on waste electrical and
electronical equipment."
Amended by "Directive 2003/108/EC" (WEEE).
Recycle the device and acccessories according
to national regulations.
With the CE marking Siemens confirms compliance
with the European Directive 93/42/EEC concerning
medical devices and the European Directive
99/5/EC (R&TTE) concerning radio and telecommunica-
tions terminal equipment.
Disposal information

www.siemens.com /hearing
Siemens Audiologische Technik GmbH
Gebbertstrasse 125
91058 Erlangen
Germany
Phone +49 9131 308 0
© Siemens AG, 05.2011 · FB
Document No. A91SAT-00312-99T6-7600
Order/Item No. 104 17 428
Printed in Germany