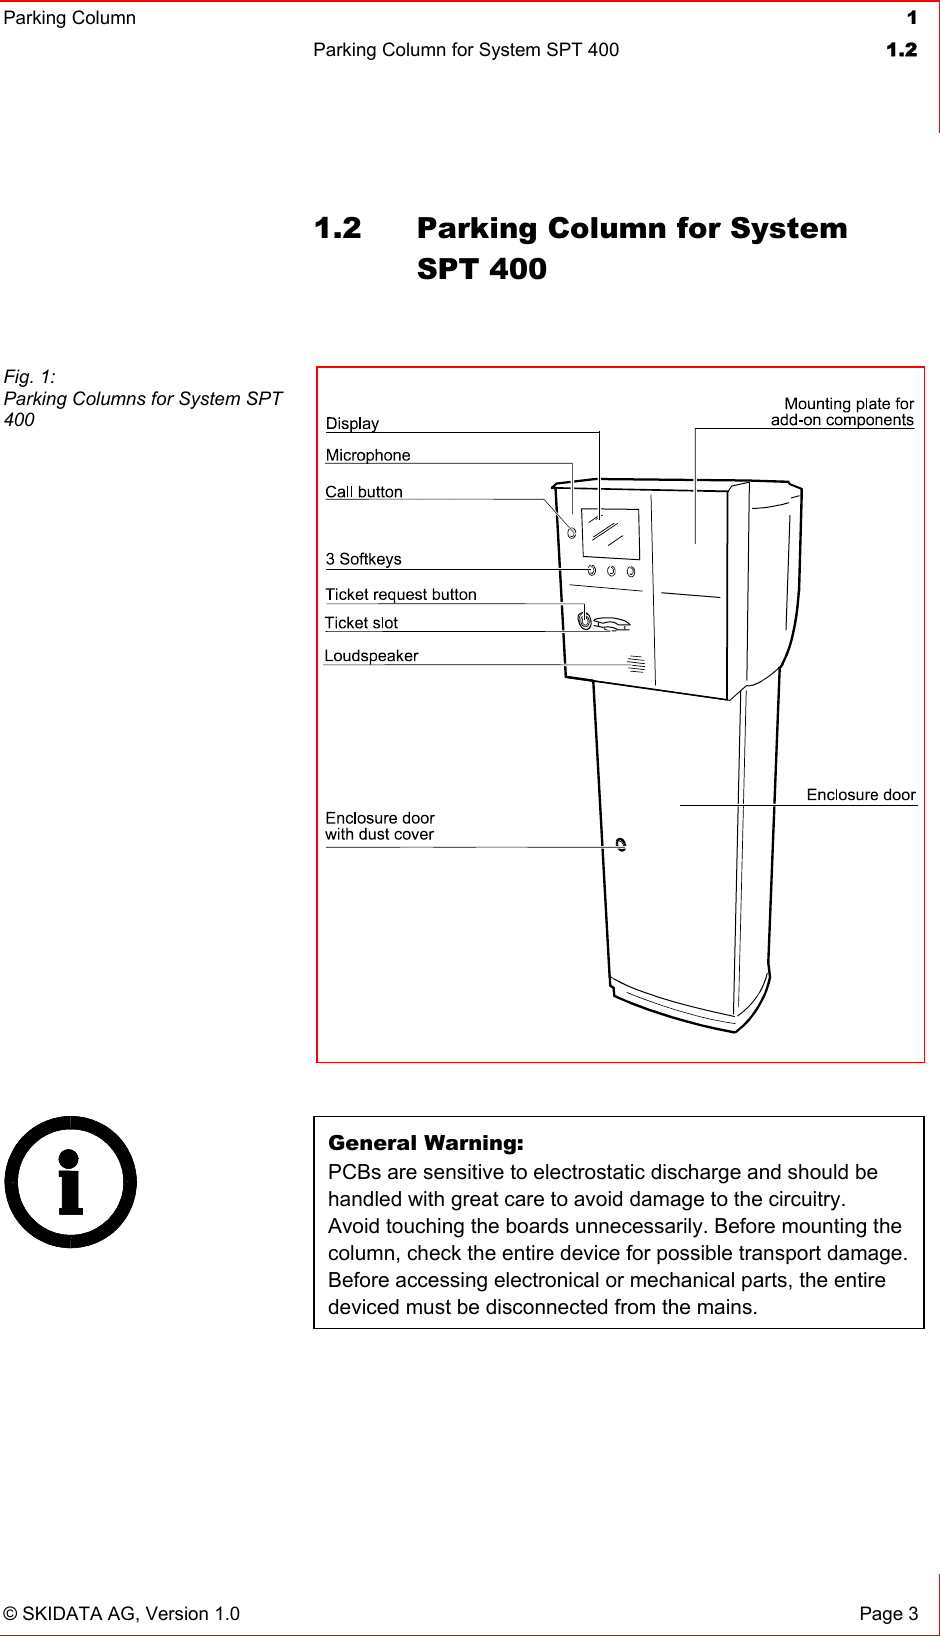
Skidata ENGR400 Parking column using RFID User Manual Cover ColumnSPT400 1 0 en

Skidata AG Parking column using RFID Cover ColumnSPT400 1 0 en

User manual

Manual and operational descriptionParking Column EN/EX EMPTY 400Parking Column ENTRY LCD 400Parking Column ENTRY GR MON 400Parking Column EXIT LCD 400Parking Column EXIT GR MON 400Parking Column EN/EX EMPTY 400 - USParking Column ENTRY LCD 400 - USParking Column ENTRY GR MON 400 - USParking Column EXIT LCD 400 - USParking Column EXIT GR MON 400 - USParking Columns System SPT 400
  Manual and operational description  Parking Columns System SPT 400  Page 2  © SKIDATA AG, February 2004 SKIDATA AG Technical Documentation Untersbergstrasse 40 A-5083  Gartenau Telephone   +43 6246 888-0, Telefax   +43 6246 888-7 Internet http://www.skidata.come-mail docu@skidata.comCopyright © 2004 by SKIDATA AG. All rights reserved. All information in the following document is protected by copyright law. No part of this document may be reproduced without the written consent of SKI-DATA AG. SKIDATA AG reserves the right to make any changes of specification and other information in this document without further notice. Please note During the compilation of this Technical Documentation, great care has been taken to ensure the accuracy of the information contained in it. However, despite our constant effort to ensure the highest degree of accuracy and comprehensiveness possible, the information provided cannot be guaranteed to be absolutely error-free.TrademarksThis documentation may contain representations of registered product or service trademarks owned by SKIDATA AG or third parties, as well as references to proprietary know-how protected by copyright laws or other legal provisions. In any case the intel-lectual property rights remain exclusively with their respective owners.Declaration of ConformityThe Parking Columns of System SPT 400 except the model ver-sions where the name ends with the characters “-US” have been developed, designed and manufactured in accordance with the following EU directive: R&TTE (99/5/EC) 0408Version February 2004
Parking Columns System SPT 400  Manual and operational description© SKIDATA AG, February 2004  Page 3 Important : The FCC-specific notes apply only to the model ver-sions where the name ends with the characters “-US”.FCC 15.19:This device complies with Part 15 of the FCC Rules.  Operation is subject to the following two conditions:  (1) this device may not cause harmful interference, and (2) this device must accept any interference received, including interference that may cause un-desired operation.FCC 15.21:IMPORTANT: Any changes to or modifications of Parking Col-umns of System SPT 400 unless expressly approved by SKI-DATA AG, may void the user's authority to operate this device.
  Manual and operational description  Parking Columns System SPT 400  Page 4  © SKIDATA AG, February 2004 Parking Columns System SPT 400  1 Document Management – Version Table Tab. 1: Document Version Table for Installation & Maintenance Instructions Section Document Pages Version Date1  Parking Columns System SPT 400  251.0 2004-02-11
Parking Column  11Parking ColumnsSystem SPT 400Version 1.0 25 pages Copyright 2004 by SKIDATA AG
 1  Parking Column1.1 Contents  Page 2  © SKIDATA AG, Version 1.0 1.1 Contents 1.1 Contents 21.2 Parking Column for System SPT 400  31.2.1 Installation 41.2.2 Power supply  71.2.3 Stripping connection wires  91.2.4 Cross-sectional area of cable leads  111.2.5 Connection terminals for control lead andintercom 111.2.6 Connection loop detector  131.2.7 Connection SIO, Arcnet  141.2.8 Changing the fuse  161.2.9 Earthing connection  171.2.10 Surge protection for external devices  181.2.11 Weather protection  181.2.12 MANUAL OPEN/CLOSE switch  201.2.13 Installing devices in the front panel  211.2.14 Opening the front panel  231.2.15 Closing the Parking Column  25
Parking Column 1Parking Column for System SPT 400  1.2© SKIDATA AG, Version 1.0  Page 3 1.2  Parking Column for System SPT 400 General Warning: PCBs are sensitive to electrostatic discharge and should be handled with great care to avoid damage to the circuitry. Avoid touching the boards unnecessarily. Before mounting the column, check the entire device for possible transport damage. Before accessing electronical or mechanical parts, the entire deviced must be disconnected from the mains. Fig. 1: Parking Columns for System SPT 400
 1  Parking Column1.2  Parking Column for System SPT 400  Page 4  © SKIDATA AG, Version 1.0 Ensure the following before proceeding with the installation: The concrete foundation must be exactly horizontal. Installing the device on an uneven surface may cause the chassis to become warped or damaged. If levelling of the surface is not possible, the parking column must be level-adjusted, e.g. by using additional hexagon nuts (see Fig. Hexagon nuts as spacers); in that case the threaded rods must be allowed to protrude further. The surface of the concrete foundation must be even and ex-actly horizontal Cable protection tubes should be cut approx. 2 cm above the concrete surface 1.2.1 Installation The threaded rods should protrude approx. 50 mm from the concrete surface The fastening tension of the hexagon nuts must not exceed 20 NmUse washers with large outer diameter (∅ = 30 mm, as per UN 737 standard) The parking column must be aligned exactly horizontally
Parking Column 1Parking Column for System SPT 400  1.2© SKIDATA AG, Version 1.0  Page 5 Fig. 2: Column installation
 1  Parking Column1.2  Parking Column for System SPT 400  Page 6  © SKIDATA AG, Version 1.0 Installation on non-level surfaces (applies only in exceptional cir-cumstances)All three No. 2 washers must be absolutely level (use a spirit level if necessary). Important:Avoid drilling dust from getting into the device during installa-tion, as electrostatically charged dust may cause damage to the electronic assemblies inside the column. Fig. 3: Hexagon nuts as spacers
Parking Column 1Parking Column for System SPT 400  1.2© SKIDATA AG, Version 1.0  Page 7 1.2.2  Power supply  Two types of Parking Columns are available : 120 V und 230 V Important notes: Electric installation and maintenance work may be carried out only by appropriately qualified, licensed electrical technicians.Mains connections must be hardwired. Please ensure full compliance with all applicable national and international rules and regulations concerning elec-tric connections, and all applicable safety regulations.  When all electric lines are properly connected, replace and fasten the cover.
 1  Parking Column1.2  Parking Column for System SPT 400  Page 8  © SKIDATA AG, Version 1.0 Fig. 4: Column interior:Mounting plate configuration
Parking Column 1Parking Column for System SPT 400  1.2© SKIDATA AG, Version 1.0  Page 9 Ensure the following before proceeding with electrical con-nections:Check for proper mains supply voltage (120 V or 230 VAC) Mains connections must comply with national standards and guidelinesWhen using flexible stranded wires, all filaments must be placed inside the terminal clamps (use wire-end sleeves, if necessary)The mains supply line must be fused in accordance with ap-plicable regulations (6 A fuse recommended) Check the isolation resistance of the cables to make sure it exceeds 0.5 MΩFix cables to mounting plate by way of tension relieve tongues and cable ties Check the network cables to ensure the proper loop imped-anceImportant: Always make sure that the device is completely disconnected from the mains while fitting electric wiring. 1.2.3 Stripping connection wires To avoid danger of short circuit with wires or chassis parts, wires should not be stripped by more than 6 mm (recommended value).  Uninsulated wire sections must be inserted completely into the connection terminals. When attaching connecting wires, the insulation should cover the wire up to the point where it connects to the terminal. Fig. 5: Correct connector wiring
 1  Parking Column1.2  Parking Column for System SPT 400   Page 10  © SKIDATA AG, Version 1.0 ** see 1.2.4 Section Cross-sectional area of cable leads Fig. 6: Power supply on sd591
Parking Column 1Parking Column for System SPT 400  1.2© SKIDATA AG, Version 1.0  Page 11 Caution:The OUT terminal on connection control board sd591 is not fused and cannot be deactivated by way of the on-board mains switch. Note:Electrical leads and wires must comply wirth applicable na-tional guidelines concerning – mechanical stress – tension resistance – cross-sectional area with respect to voltage drop– current carrying capacity and short-circuit rating To install electrical fittings, you must first remove the cover of control board sd591 1.2.4  Cross-sectional area of cable leads 1.2.5  Connection terminals for control lead and intercom Tab. 1: Cable leads – Technical characteristics wires Max. torque at terminals  RigidSolidFlexibleTwisted*  0,22 – 0,25 Nm 0,14 – 1,5 mm²  0,14 – 1,5 mm² **  0,5 – 0,6 Nm 0,20 – 2,5 mm²  0,20 – 2,5 mm² ***  0,22–0,25 Nm  0,14 – 1,5 mm²  0,14 – 1,0 mm²
 1  Parking Column1.2  Parking Column for System SPT 400   Page 12  © SKIDATA AG, Version 1.0 * see Section 1.2.4 Cross-sectional area of cable leads Fig. 7: Connection terminals for control lead and intercom
Parking Column 1Parking Column for System SPT 400  1.2© SKIDATA AG, Version 1.0  Page 13 1.2.6  Connection loop detector Fig. 8: Connection terminals for loop detector
 1  Parking Column1.2  Parking Column for System SPT 400   Page 14  © SKIDATA AG, Version 1.0 1.2.7  Connection SIO, Arcnet *** see Section 1.2.2 Power supply Fig. 9: Connections on control board sd582
Parking Column 1Parking Column for System SPT 400  1.2© SKIDATA AG, Version 1.0  Page 15 Note on wire twisting:When connecting Arcnet and loop cables, make sure that the wires are twisted up to the connection terminal (approx. 5 twists per 10 cm). Shield connections must be as short as possible and insulated against contact with the chassis wall by means of a protective tube.Fig. 10: sd582 – I/O circuit connections
 1  Parking Column1.2  Parking Column for System SPT 400   Page 16  © SKIDATA AG, Version 1.0 1.2.8  Changing the fuse Important Note:A blown fuse indicates a device defect that requires the atten-tion of a trained service technician. The fuse must be re-placed by a new one of the same type and technical characteristics (see below).  Before replacing the fuse, the lead in the power distributor must be deactivated (i.e., discon-nected from the mains). Fuse characteristics:120 VAC = 5 A–T 230 VAC = 2.5 A–T Model: Schurter Type: SPT 5x20 Time lag:  T High breaking capacity:  H Ceramic tube
Parking Column 1Parking Column for System SPT 400  1.2© SKIDATA AG, Version 1.0  Page 17 1.2.9 Earthing connection The protective earth conductor of the lead must be attached to the central earthing point by way of a ring lug.After installation, ensure proper metal contact of all aluminium parts, i.e. the cable lug and/or metal part (check by measur-ing)If necessary, mill off any aluminium parts at the contact point to ensure proper conductivity (the resistance of the earth con-ductor must not exceed 0.1 ȍ)After connecting the earth conductor, proceed as follows: Check the strain relief clamps for proper fit Check to make sure the cables leading to the connection ter-minals are properly placed in accordance with applicable normsPerform a visual check of the insulation to ensure it is in proper condition Fig. 11: Earthing point Fig. 12: Protective earth conductor
 1  Parking Column1.2  Parking Column for System SPT 400   Page 18  © SKIDATA AG, Version 1.0 Slightly tug at the wires to check whether the terminal screws are fastened properly Check to ensure the connectors are plugged in properly Reattach the cover of sd591 Perform a visual check and manual inspection of the earthing connectionCheck to make sure that none of the wires are strained Note:If the Parking Column is powered up at temperatures below2 °C, the control assembly will not start up to prevent possible damage.  In that case, the built-in temperature control system will activate the heater (make sure that all doors are closed to allow for the device to warm up as quickly as possible). 1.2.10  Surge protection for external devices In case additional devices (e.g., relays, controls, etc.) are in-stalled inside the chassis (on the top-hat rail), any relay contacts and coil connections must be protected against transient voltage by means of appropriate components (e.g., diodes, RC elements, varistors, etc). 1.2.11 Weather protection Important:Opening the device while it is exposed to rain or snowfall may cause damage to the components inside. To avoid moisture damage when performing installation work, you can protect the open device against moisture by means of an umbrella (see illustration below).Before opening the device during or shortly after a rain or snow shower, use a cloth to wipe down the top cover and up-per edge of the front panel to avoid moisture getting inside while opening the device.
Parking Column 1Parking Column for System SPT 400  1.2© SKIDATA AG, Version 1.0  Page 19 Fig. 13: Using an umbrella for moisture protection when performing main-tenance work Fig. 14: Column top  – Detail: umbrella holding frame
 1  Parking Column1.2  Parking Column for System SPT 400   Page 20  © SKIDATA AG, Version 1.0 1.2.12  MANUAL OPEN/CLOSE switch Switch positions Position 0: Normal operation Position 1: Keep CLOSED Position 2: Keep OPEN Single gate passage Briefly set the switch to position 2; after the barrier opens, set it back to the 0 position If no vehicle passes through the gate, the barrier will close automatically after approximately ten seconds Fig. 15: OPEN/CLOSE switch on sd591
Parking Column 1Parking Column for System SPT 400  1.2© SKIDATA AG, Version 1.0  Page 21 1.2.13  Installing devices in the front panel Fig. 16: Installing devices in the front panelFig. 17: Installing devices in the front panel – inner side – Top view
 1  Parking Column1.2  Parking Column for System SPT 400   Page 22  © SKIDATA AG, Version 1.0 Important: Devices and cables intended for subsequent in-stallation must bear a CE label (EU countries) or UL/CSA la-bel (USA; Canada) and must comply with all national and international standards and guidelines. Installation of such components may only be performed by qualified electricians. CAUTION:When installing devices in the front panel, ensure a minimum clearance of 5 cm above the fan/heater (see illustration). The fan/heater must never be covered to avoid the danger of fire. To avoid damage to the device, make sure that the fastening screws of the mounting plate are not screwed in too tightly (max. torque 0.5 Nm). When cutting out the metal plate, make sure it is not warped, as this may cause water to leak into the device. After installing the desired device(s), check the chassis for tightness against water and snow.
Parking Column 1Parking Column for System SPT 400  1.2© SKIDATA AG, Version 1.0  Page 23 1.2.14  Opening the front panel To open the front panel, open the column door and pull the lock-ing lever on the inside of the chassis wall forward (see illustra-tion).
 1  Parking Column1.2  Parking Column for System SPT 400   Page 24  © SKIDATA AG, Version 1.0 Fig. 1: Unlocking lever
Parking Column 1Parking Column for System SPT 400  1.2© SKIDATA AG, Version 1.0  Page 25 1.2.15  Closing the Parking Column Close the top cover and the front panel After locking the column door, slide the dust cover back over the lock Important:If the front panel is not closed tightly, water or snow may get inside the device, causing damage to the electronic assem-blies.After closing the front panel, pull at it slightly to make sure it is properly closed and locked shut. Fig. 18: Closing the column top section

Navigation menu