Pitch Back Instructions V2
Pitchback Instructionsv2 PitchBack_instructionsV2 PitchBack_instructionsV2 product_drills storefiles
2012-12-14
: Sklz Pitchback Instructionsv2 PitchBack_instructionsV2 instructions storefiles
Open the PDF directly: View PDF ![]() .
.
Page Count: 4

www.SKLZ.com
PART # QUANTITY DESCRIPTION
1 3 31.75” Straight Tube
2 2 31” L-Shaped Tube (Female)
3 2 31” L-Shaped Tube (Male)
4 2 21” L-Shaped Tube (Female)
5 & 6 2 21” L-Shaped Tube (Male)
7 2 30” Extending Straight Tube
8 2 3.5” Straight Connector Fitting
9 2 Butterfly Nut and Bolt 2.5”
10 4 Butterfly Nut and Bolt 2.25”
11 26 Net Hooks
12 1 Net
13 4 Ground Stakes
14 1 White Target Ribbon
www.SKLZ.com
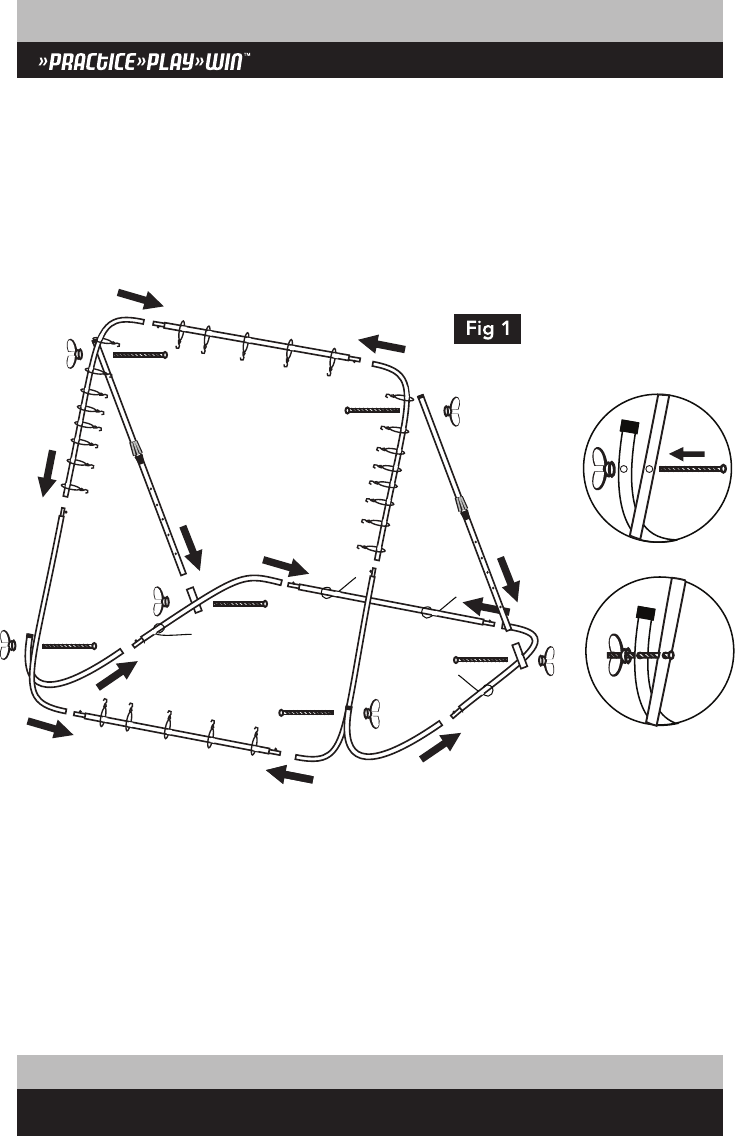
» Slide 5 Net Hooks (part #11) onto two of the Straight Tubes (part #1), 5 hooks per tube.
» Slide 8 Net Hooks onto each Long Female L-Shaped Tube (part #2).
» Then take the remaining Straight Tube (part #1) and slide on 2 Ground Stakes (part #13).
» Slide the two remaining Ground Stakes onto each L-Shaped Tube (part #5 and #6).
Note: Make sure all hooks face the same way during assembly.
» Follow the illustration in Figure #1 to assist in assembling the rest of the frame.
» Fit tubes #2 and #3 together on each side, then fit two Straight Tube (part #1 with net hooks)
between them at the top and bottom to create the main net frame.
» Attach tubes #4 the bottom of the frame with the large Butterfly Nuts and Bolts (part #9).
» Fit Straight Tube (part #1 with ground stakes) into tubes #5 and #6 and fit into tubes #4 to finish
the bottom frame.
» Attach both Straight Connector Tubes (part #8) to the bottom of the frame with the two small
Butterfly Nuts and Bolts (part #10).
» Fit each Extending Tube (part #7) into the Straight Connector Tubes (part #8), attach the top of
each Extending Tube to the top of the frame with the small Butterfly Nuts and Bolts (part #10).
Butterfly Nut and
Bolt Assembly
1
1
1
2
3
4
5
7
8
9
9
910
10
10
10
13
2
3
4
7
6
8
13
13
13
www.SKLZ.com
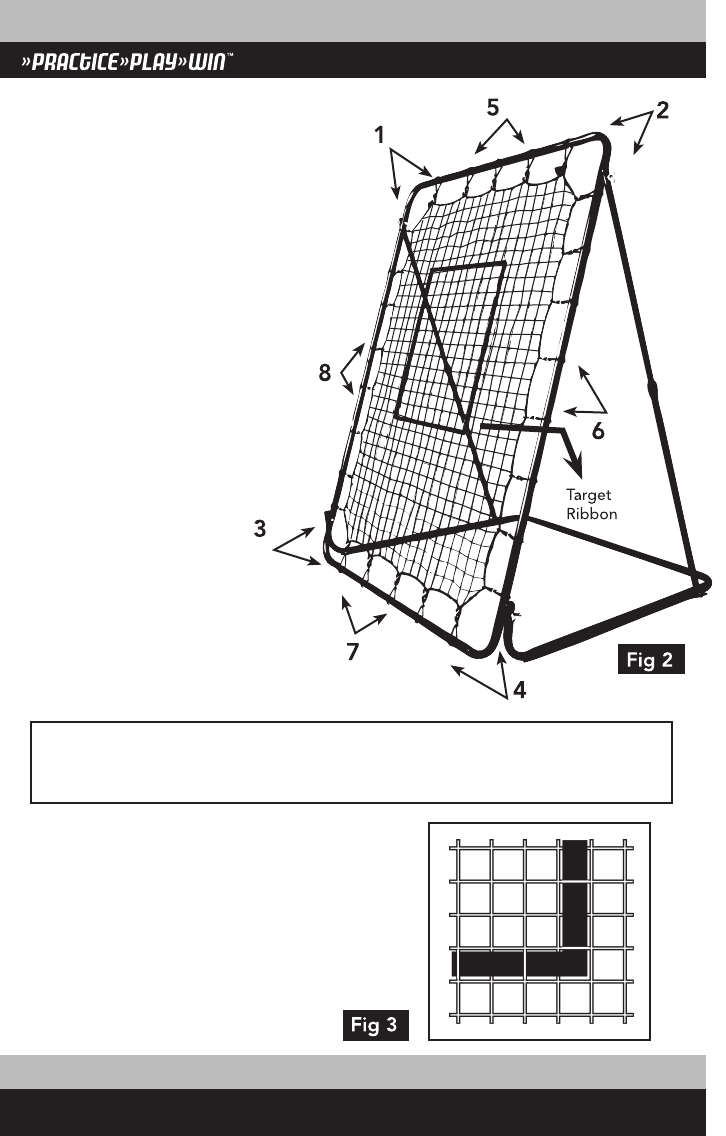
» Spread out the Net Hooks (Part #11) along the
frame, making sure they are all still facing the
same way.
» Attach the net by following the numbered
sequence illustrated in Figure #2. Start
by taking the Net (Part #12) and attaching
one of the squares with a red tab to the
top left net hook. Skip one net square
between the top and side hook and
attach the side hook for this corner.
» Find the square with the other red tab
and repeat this procedure for the top
right corner.
» Attach the net to the remaining
two corners, making sure that
each corner of the net is attached
to two net clips. Study the net
clip configuration as shown in
Diagram #2. This represents
the best clip positioning for
optimum performance.
» Attach the White Target Ribbon (Part #14) by weaving
the ribbon through the net (10 squares across and 14
down) and tying off at the ends. See Figure #3
www.SKLZ.com
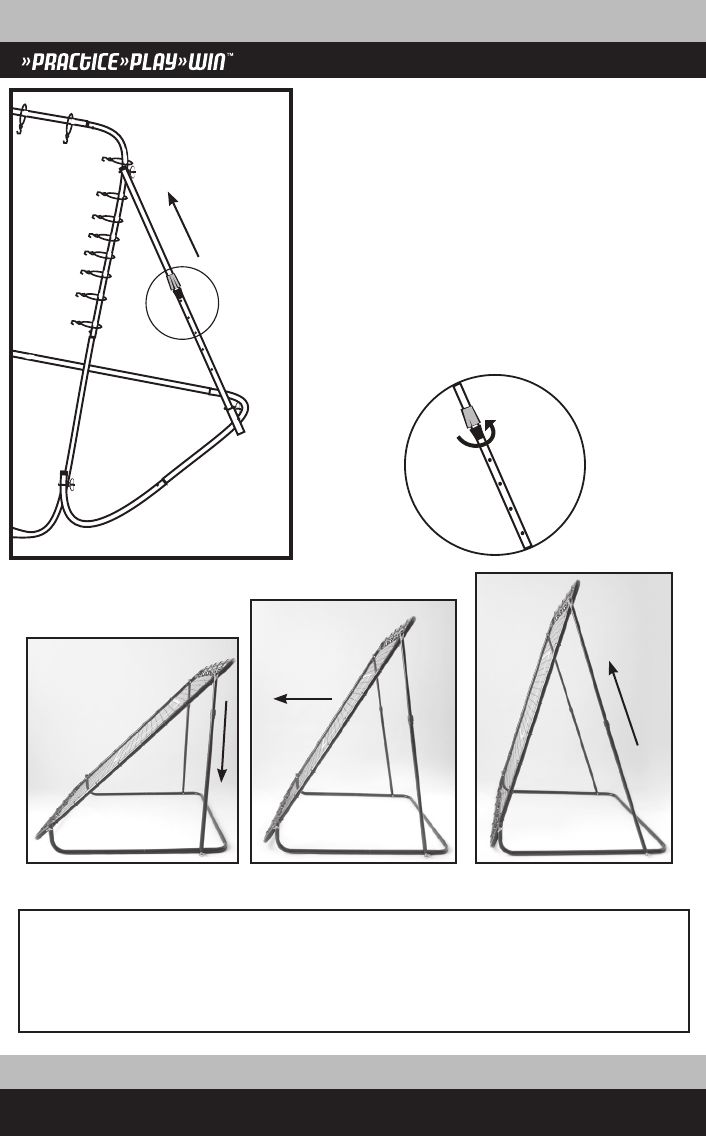
» You are able to adjust the PitchBack to 10 different
angles for Pop Flies, Line Drives and Grounders.
» First unscrew the support bracket on each Extending
Straight Pole (part #7).
» Push in the push pin and adjust the height up or
down. Make sure each pin is locked into place and
the pins are at the same level on each side.
» Once you have the correct angle tighten the
support bracket on each side.
» Pop Flies
(Centered)
» Line Drives » Grounders
Safety Warning: All rebounders should be utilized with adult
supervision to ensure safe use. Thrown balls may rebound more
quickly than anticipated. Be sure to practice throwing balls at slow
speeds to become accustomed to the way a ball returns when thrown.
