Pro Mini Hoop System Instructions
2012-03-20
: Sklz Prominihoopsystem Instructions ProMiniHoopSystem_Instructions instructions storefiles
Open the PDF directly: View PDF ![]() .
.
Page Count: 5
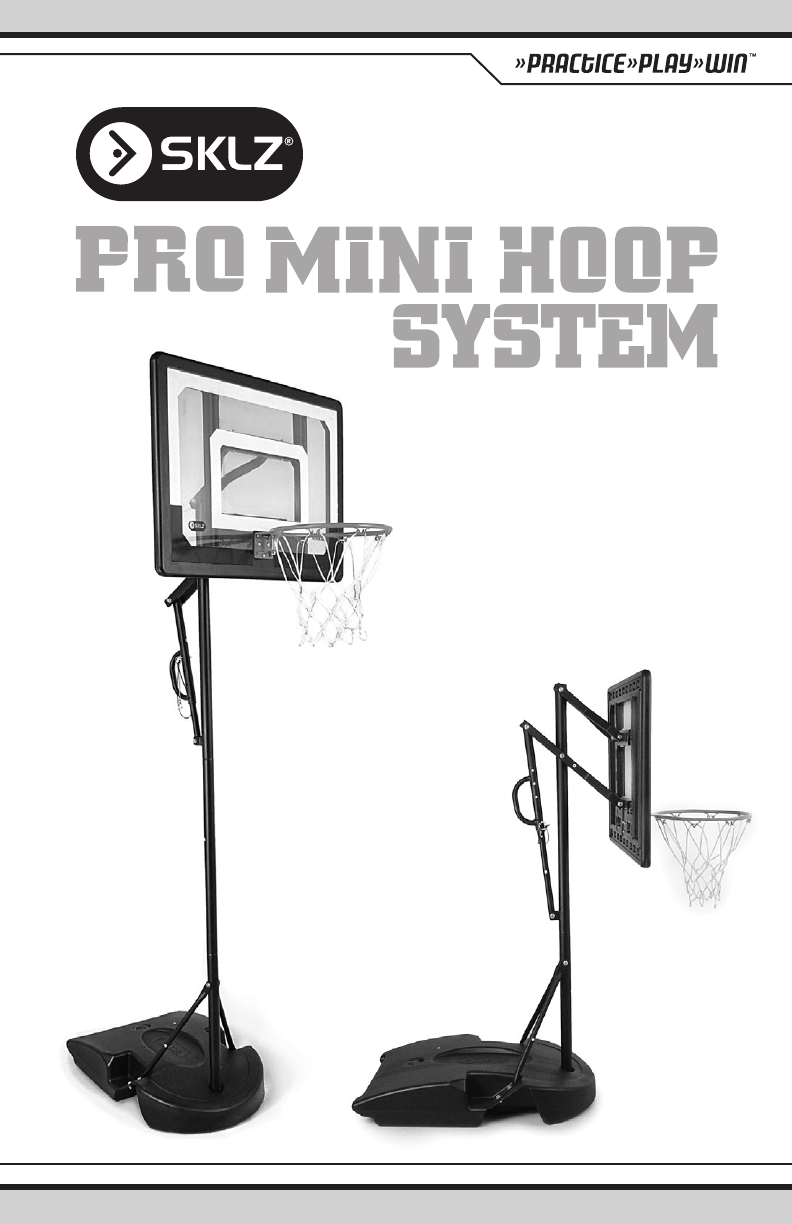
SET-UP INSTRUCTIONS
» Junior & Poolside
Configuration
» Standard
Configuration
PRO MINI HOOP SYSTEM
SKLZ.com
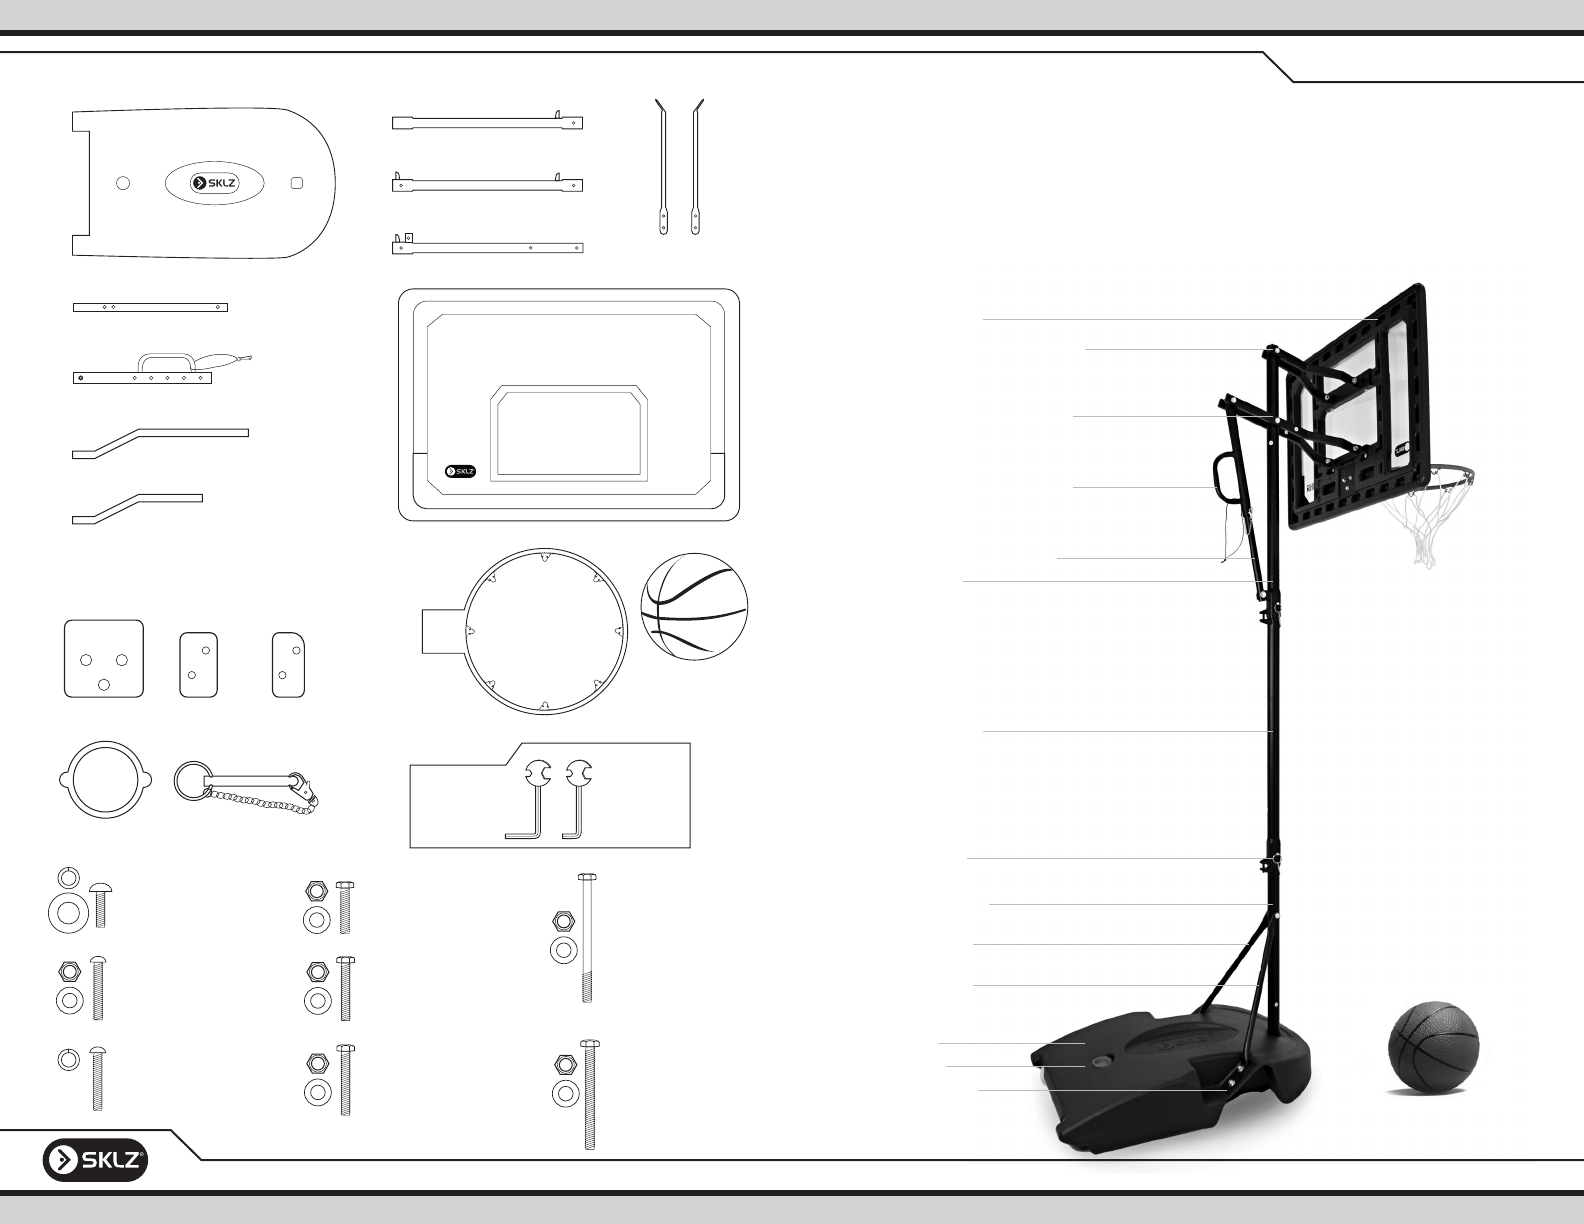
Red Base Cap
Top Base Plate
Bottom Pole (2)
Middle Pole (3)
Top Pole (4)
Rim (12)
Height Adjustment Pole (7)
Height Adjustment Handle (8)
Lower Backboard Brackets (9)
Upper Backboard Brackets (10)
Backboard (11)
Locking Pin
Base Arm (5)
Base Arm (6)
Base (1)
PARTS:
TOOLS:
HARDWARE:
BEFORE YOU BEGIN:
» Make sure you have all of the Pro Mini Hoop System components. Please contact SKLZ
customer service toll free at 877-225-7275 x128 if you are missing anything.
» Read all setup and usage instructions carefully.
» You will need water or up to 130 lbs of sand to fill the base.
» Do not use if base is not full of sand and/or water.
» Adult setup required.
» Do not hang on the rim.
1 – Base
7 – Height Adjustment Pole
8 – Height Adjustment Handle
9 – Lower Backboard Bracket (2)
10 – Upper Backboard Bracket (2) 11 – Backboard
12 – Rim
Rim Plate
Red Base Cap Locking Pin with
Safety Chain (2)
Top Base
Plate (2)
Bottom Base
Plate (2)
1” Bolt, Lock Washer,
Washer –
Attaches bottom pole to base
1.25” Hex Bolt (4),
Nut (4), Washer (8)–
Attaches base arms to base
3.25” Hex Bolt (3),
Nut (3), Washer (6)–
Attaches brackets to
height adjustment handle
and to top pole
2.5” Hex Bolt,
Nut, Washers–
Attaches arm braces to
bottom pole
1.5” Bolt (3),
Nut (3), Washer (3)–
Attaches rim to backboard
1.5” Bolt with Blue
adhesive (2),
Lock Washer (2)–
Attaches poles together
1.5” Hex Bolt (4),
Nut (4), Washer (8)–
Attaches backboard to brackets
1.75” Hex Bolt,
Nut, Washers–
Attaches height adjustment
pole to top pole
2-Sided
Wrenches (2)
Mini Basketball
(7” in dia.)
Net (not shown)
4 – Top Pole
2 – Bottom Pole
3 – Middle Pole
5 – Base Arm (R)
6 – Base Arm (L)
Front
Locking Pin Attached
Mini Basketball
(air pump not included)
SKLZ.com
PRO MINI HOOP SYSTEM
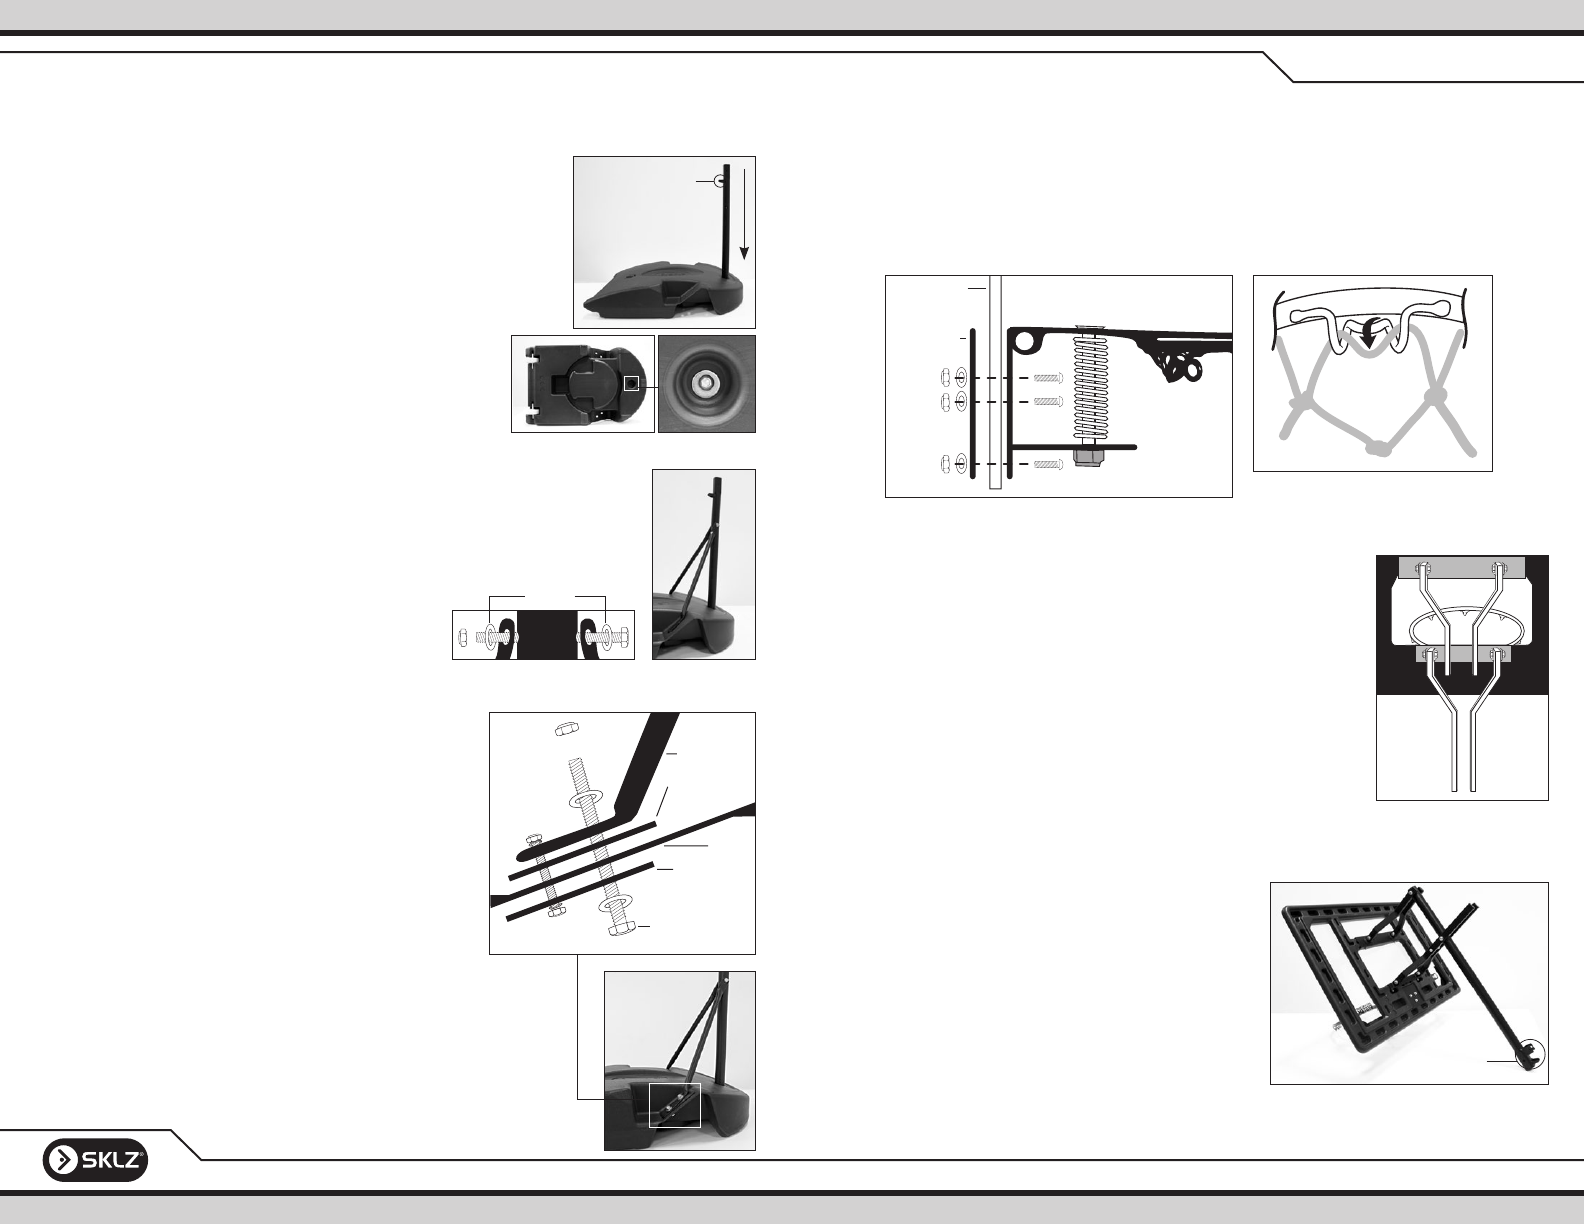
STEP 4– RIM AND BACKBOARD ASSEMBLY
Align the holes on the Rim Plate with the Backboard (11) fitting the Rim Plate into the
back of the backboard. Using the 1.5” bolts, attach the Rim (12) to the Backboard (11).
Assemble so that the washers are next to the nuts. Tighten each nut with one of the
provided 2-Sided Wrenches to secure the Rim to the Backboard. Attach the net to the
rim by looping the long end of the net over the metal loops.
STEP 5– BRACKETS AND BACKBOARD ASSEMBLY
Using the 1.5” hex bolts, attach the Lower Backboard Brackets
(9) to the bottom of the Backboard (11) and tighten with the
2-Sided Wrenches provided.
NOTE: Attach the short sides of Backboard Brackets to the
Backboard. Make sure when brackets have been attached
they come in towards each other.
Attach the Upper Backboard Brackets (10) with the remaining
1.5” hex bolt to the top of the Backboard and tighten with the
2-Sided Wrenches provided.
STEP 6– BACKBOARD AND TOP POLE ASSEMBLY
Using a 3.25” hex bolt, attach the Upper Backboard
Brackets (10) to the top of the Top Pole (4). Tighten
to secure. Do not over tighten as these joins will
move to raise or lower the backboard. Then attach
the Lower Backboard Brackets (9) to the pole by
aligning the holes in the middle of the bracket.
Loosely tighten the nut with your fingers. (Will fully
tighten in STEP 7).
NOTE: Make sure that the pole connector is facing
away from the backboard.
ASSEMBLY
STEP 1– BOTTOM POLE AND BASE ASSEMBLY
Attach the Bottom Pole (2) to the Base (1) by sliding the pole
into the square hole at the front of the Base. Make sure that the
Bottom Pole connector is facing the back of the Base. Push the
Bottom Pole all the way into the Base.
Turn the Base on its side and slide the one locking washer onto
the 1” bolt followed by the 1” washer. Screw the bolt
into the Base and Bottom Pole using a 2-Sided Wrench.
Turn the Base back over and fill halfway with water or
with 50 pounds of sand to stabilize the system while the
unit is built. Snap the Red Base Cap into the Base.
STEP 2– BASE ARMS AND BOTTOM POLE ASSEMBLY
Connect Base Arms (5 & 6) to Bottom Pole (2) using the 2.5” hex bolt.
Loosely tighten the nut with your fingers, do not tighten all the way.
(Will fully tighten at the end of STEP 3).
NOTE: When using a bolt, nut and two washers
make sure that the washers are always
used on each end of the bolt.
STEP 3– BASE ARMS AND BASE ASSEMBLY
Place one Bottom Base Plate under and one Top
Base Plate over the holes on one side of the base.
Note: To align the Bottom Base Plate, place the
rounded corner into the inner top corner
of the Base.
Align the holes and slide one 1.25” hex bolt up
through the Bottom Base Plate. This bolt will
connect in order from bottom to top; Bottom
Base Plate, Base, Top Base Plate, Base Arm (see
illustration). Add the washer and loosely finger
tighten the nut. Slide a second 1.25” hex bolt up
through second hole on the Bottom Base Plate.
Secure both nuts with the 2-Sided Wrenches provided.
Repeat on the other side.
Now tighten the nut that connects the Base Arms to the Bottom
Pole with the 2-Sided Wrenches provided. Set aside.
Connector is facing
the back of the base
Rim Plate
Backboard
Rim
Rim and Backboard Assembly
Net attachment
Washers
View of Back of Backboard
Connector is facing
away from the backboard
Base
Top Base Plate
Base Arm
Hardware not to scale
Bottom
Base Plate
SKLZ.com
PRO MINI HOOP SYSTEM
Secure the Middle and Top Poles the same way.
NOTE: Before play, make sure you have tightened all nuts and bolts.
STEP 10– FILL BASE FOR PLAY
Move the Pro Mini Hoop System to desired location. Remove the Red Base Cap and fill
the Base up the rest of the way with water or with an additional 80 pounds of sand.
Your Pro Mini Hoop System is now ready for use.
ADJUSTING THE HEIGHT
Unclip the safety chain on the Height Adjustment Handle. Grip the handle firmly and pull
out the Locking Pin. Raise or lower the handle to the desired backboard height. Once
at desired height, line up the holes and slide the Locking Pin through and clip the safety
chain to the pin.
To shorten the Pro Mini Hoop System for smaller children or poolside use, remove the
black bolt connecting the Top Pole to the Middle Pole and pull out the locking pin.
Set aside. Pull the Top Pole with Backboard off and set aside. Remove the black bolt
connecting the Middle Pole and Bottom Pole as well as the locking pin. Pull off the
Middle Pole. Screw in the bolt and attach the locking pin to the Middle pole for safe
keeping. Slide the Top Pole with Backboard onto the Bottom Pole and attach with the
locking pin and bolt.
Additional Mini Basketballs and replacement nets can be purchased at SKLZ.com or by
calling toll free: 1-877-225-7275 x128.
STEP 7– HEIGHT ADJUSTMENT POLE AND HANDLE ASSEMBLY
Slide the Height Adjustment Handle (8) onto the Height Adjustment Pole
(7) by aligning the two holes of the Height Adjustment Pole with the two
bottom holes on the Height Adjustment Handle. Slide the Locking Pin
connected to the handle through the two poles to connect them. Clip the
safety chain to the pin to secure.
NOTE: Moving the Height Adjustment Handle up and down these holes
will raise and lower the backboard. This configuration has the
backboard at its lowest height.
STEP 8– HEIGHT ADJUSTMENT HANDLE AND BACKBOARD/POLE ASSEMBLY
Attach the Height Adjustment Handle to the Bottom
Backboard Brackets with the remaining 3.25” hex bolt, tighten
with 2-Sided Wrenches (Connection A - see image). Make sure
that the handle is pointing away from the Backboard.
Next, tighten the nut and bolt connection of the Lower
Backboard Brackets and Top Pole from STEP 5
(Connection B - see image).
Attach the Height Adjustment Pole to the bottom of the Top
Pole with the 1.75” hex bolt and nut (Connection C - see
image). Tighten to secure.
NOTE: Before you continue, unclip the safety chain, firmly hold
the handle and slide out the locking pin. The handle
should slide up and down the pole freely, raising and
lowering the backboard. If it does not move, check the
three circled nut and bolt connections to see if they
have been overtightened. Relock the adjustment handle with the locking pin.
STEP 9– POLE AND BASE ASSEMBLY
Slide the Middle Pole (3) onto the Bottom Pole (2). Make sure the connector is pointing
towards the back of the base. Slide the Top Pole (4) with Backboard assembly onto the
Middle Pole (3).
NOTE: For pool height or smaller children, omit the Middle Pole and
connect the Top Pole directly onto the Bottom Pole.
Slide one of the locking pins through the Bottom and Middle Poles.
Clip the safety chain to the pin to secure. Slide a locking washer onto a
1.5” bolt with blue adhesive and screw it down the back of the Middle
Pole to the Bottom Pole to secure. Tighten with a 2-Sided Wrench.
Check these circled connections.
A.
B.
C.
90-DAY LIMITED WARRANTY – PRO MINI HOOP SYSTEM
Pro Performance Sports (PPS) warrants to the original consumer purchaser of any PPS product it
manufactures that the product will be free of defects in materials or workmanship for 90 days (unless
specified in alternate warranties) from the date of purchase. If defective, and purchased from a retail store,
return the product along with receipt to the retail store where the product was purchased. If the item was
purchased from PPS, return the product along with proof of the date of purchase (i.e. the packing slip),
postage prepaid to the address below for replacement consideration:
Pro Performance Sports :: 5823 Newton Drive :: Carlsbad, CA 92008 :: Attn: Returns
This warranty does not cover damages resulting from accident, misuse, abuse or lost merchandise.
Only valid in the USA. All returns sent to PPS require a Return Merchandise Authorization number (RMA).
For returns to PPS and for all other Customer Service inquiries, please call toll free: 1-877-225-7275
Register your product at SKLZ.com to ensure warranty coverage, get new
product information and special deals from SKLZ
DO YOU HAVE A WINNING SPORTS PRODUCT OR IDEA?
Visit our website to learn how to submit a product application for consideration.
It may become our next winning product!
SKLZ.com
Made In China
©2011 Pro Performance Sports.
All rights reserved.
Unauthorized duplication is
a violation of applicable laws.
U.S. Patent # D608,848
Follow us on Twitter:
@teamSKLZ
Like us on Facebook:
facebook.com/ProMiniHoop
VIDEOS
SKLZ.com
