Sky Light Imaging HPC01 Video Camera/iON The Home/iON The Home-Black/iON The Home-White User Manual HOME SIMS
Sky Light Imaging Limited Video Camera/iON The Home/iON The Home-Black/iON The Home-White HOME SIMS
User Manua-revisedl

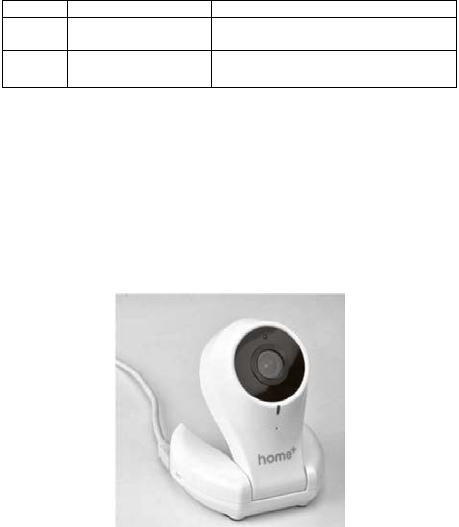
HOME+ SIMS
HPC01
User Manual
1. Key Features
Stunning video quality.
102 °Wide field of view.
Set up your camera directly from your Smart device.
Live stream via your Smart Device.
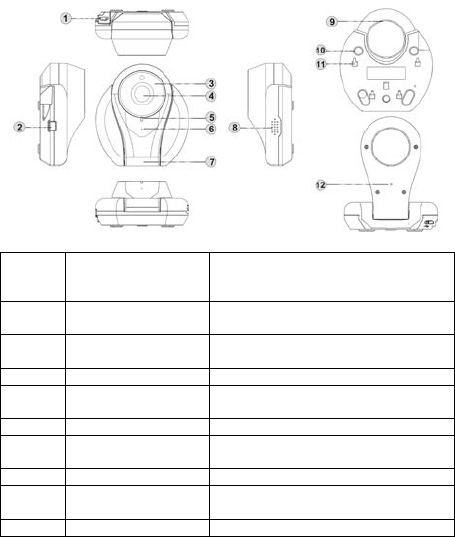
2. Functional Parts
1 Micro USB Port
Power up your camera by
connecting to an external power
supply
2 Set Button
Press to enter the QR code
scanning mode
3 IR LED Indicator
Turn on/off automatically for night
vision
4
Lens
Provide a clear, wide angle sight
5
Status LED
Indicator
Show the camera status
6
Microphone
For audio input
7 Swivel Joint
Pan the camera by different
location usage
8
Speaker
For audio output
9
Heat Radiating
Vents
For heat radiation
10
Rubber Base
Add friction while locating your
EN-1
camera on a smooth surface
11 Mount Slots
Attach the camera to the Mounting
bracket
12 Reset Button Reset the camera
3. Connect your Camera to an External Power
Supply
Plug the included AC adaptor into the USB cable and plug it into an
outlet. Plug the USB cable into the port on your camera and place it
wherever you want.
1. The camera will automatically turn on after connecting to an external
power supply.
2. The camera's status LED indicator will light up in Purple for about 30
sec, then, it will blink alternately in Red and Blue.
4. Set up your Camera
The camera can be set up and connected to an AP by scanning a QR
code and reading the AP information through the Home plus Application.
Remark:
Search for home+ app via the Play Store or App Store. Download and
install the app to your smart device.
EN-2
Plug it in and connect to your Wi-Fi network. You’re ready to begin live
streaming!
Please refer to the “Help” page of the home+ app to download, operate,
and utilize the full capabilities of the App.
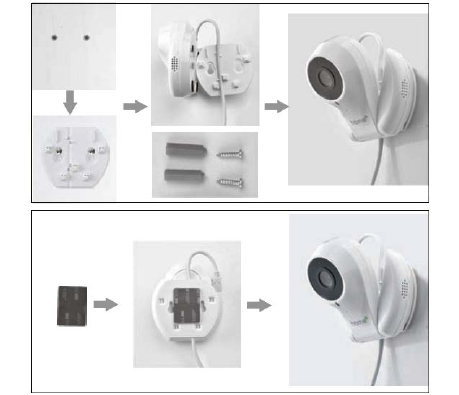
5. Mount your Camera on a Wall or Ceiling
Your camera can stand on flat surface, besides, it can be mounted on
any wall or ceiling. Simply:
1. Attach the mounting bracket to your wall or ceiling by using the
screws and wall insert included in the box. Or, you can use the 3M
adhesive to stick the mounting bracket to the wall or ceiling.
2. Mount your camera by fitting the base into the mounting bracket.
3. Plug it into a power outlet.
EN-3

6. Specifications
Wireless 802.11 b/g/n
Lens Wide angle
Video Resolution
720p (1280x720)
WVGA (848x480)
WQVGA (432x240)
Video Format H.264
Photo Resolution 1MP
White Balance Auto
Night Vision Around 6 meters
Microphone Built-in
Speaker Built-in,1W,8 ohm
Motion Detection Yes
Image Sound Detection Yes
Power AC/DC adapter
Input Voltage AC:100-240V/50-60HZ
Output Voltage DC:5V/1.0A
Compatibility IOS 6.0/Android 4.0 or higher
Operating Temperature 0°-40 °C
Storage Temperature -30°-80°C
7. Mobile System Minimum Requirements
Operating System
IO
S 6.0/Android 4.0 or higher
CPU
1GHz or above
RAM
1GB or above
EN-4

8. Troubleshooting
Problem
Cause
Solution
Camera disconnects
from Wi-Fi network
1. Limited upload
bandwidth
2. Distance between the
router and the camera
is far
3. Wi-Fi interference
1. Check with your
internet service provider
2. Move your camera
closer to your router
3. Reduce the number of
connected devices near
the camera
Fail to view videos
using your smart
device
1. Wi-Fi disconnection
2. This camera is not
properly connected
1. Reconnect the camera
to your Wi-Fi network
2. Check the USB cable
and power connection
Status LED lights up
in Red Disconnection
with AP
1. Restart your router
2. Reset your camera and
pair it again
Status LED flashes
in Red slowly Disconnection with server
Make sure your
internet Connection is
alright
Camera cannot
recognize QR code
1. The camera lens and
the QR code are not in
parallel
2. Scan distance is not
proper
3. Ambient light is either
too weak or strong
1. Make sure the camera
lens and the QR code
are in parallel.
2. Adjust the scan
distance properly per
the screen size of your
mobile device
3. Avoid scanning in dark
environment or strong
sunlight
Camera cannot
detect router
The router’s channel is
beyond the camera’s
detection range
Set the router’s channel
within the range from 1 to
11
EN-5

FCC Statement
Warning: Changes or modifications to this unit not expressly approved by
the party responsible for compliance could void the user’s authority to
operate the equipment.
NOTE: This equipment has been tested and found to comply with the
limits for a Class B digital device, pursuant to Part 15 of the FCC
Rules. These limits are designed to provide reasonable protection against
harmful interference in a residential installation. This equipment generates,
uses and can radiate radio frequency energy and, if not installed and used
in accordance with the instructions, may cause harmful interference to
radio communications.
However, there is no guarantee that interference will not occur in a
particular installation. If this equipment does cause harmful interference to
radio or television reception, which can be determined by turning the
equipment off and on, the user is encouraged to try to correct the
interference by one or more of the following measures:
• Reorient or relocate the receiving antenna.
• Increase the separation between the equipment and receiver.
• Connect the equipment into an outlet on a circuit different from that to
which the receiver is connected.
• Consult the dealer or an experienced radio/ TV technician for help.
This device complies with Part 15 of the FCC Rules. Operation is subject
to the following two conditions:
(1) This device may not cause harmful interference.
(2) This device must accept any interference received, including
interference that may cause undesired operation.
This equipment must be installed and operated in accordance with
provided instructions and the antenna(s) used for this transmitter must be
installed to provide a separation distance of at least 20 cm from all persons
and must not be co-located or operating in conjunction with any other
antenna or transmitter. End-users and installers must be provided with
antenna installation instructions and transmitter operating conditions for
satisfying RF exposure compliance.
For EU only
AM-HPC01-GB-STD-1
EN-6