Sky Phone GCSKY45Q Mobile Phone User Manual 1 ok
Sky Phone LLC Mobile Phone 1 ok
Users Manual
1
Contents
1 Safety Precautions ................................................. 2
2 Overview ................................................................ 4
3 Installing the SIM card .......................................... 5
4 Installing the battery .............................................. 7
5 Installing the storage card ..................................... 7
6 Charging ................................................................. 8
7 Power on / Power off ............................................. 9
8 Android Home Screen Guides ............................ 10
9 Changing OSD Language & System Time ........ 10
10 Connecting to Wi-Fi ...........................................11
11 Transferring Contents from PC......................... 12
12 Troubleshooting ................................................. 12
13 Technical Specifications ................................... 14
Notice
The phone pictures, as well as data on the phone
appearance, color and design features found in the
manual are for reference only. We reserve the right
to change the appearance and technical parameters
of the product without prior notice.

2
1 Safety Precautions
Never attempt to disassemble your phone. You alone
are responsible for how you use your phone and any
consequences of its use.
As a general rule, always switch off your phone
wherever the use of a phone is prohibited. Use of your
phone is subject to safety measures designed to protect
users and their environment.
Do not use your phone in damp areas (bathroom,
swimming pool…). Protect it from liquids and other
moisture.
Do not expose your phone to extreme temperatures
lower than - 10°C and higher than + 55°C.
The physicochemical processes created by chargers
impose temperature limits when charging the battery.
Your phone automatically protects the batteries in
extreme temperatures.
Do not leave your phone within the reach of small
children (certain removable parts may be accidentally
ingested).
Electrical safety: Only use the chargers listed in the
manufacturer’s catalogue.
Aircraft safety: When traveling by plane, you will
need to switch your phone off when so instructed by
the cabin crew or the warning signs.
Personal safety: To prevent possible
hearing damage, do not listen at high
volume levels for long periods.
Explosive materials: Please comply with warning
signs at gas stations asking you to switch your phone
off. You will need to comply with radio equipment
usage restrictions in places such as chemical plants,
fuel depots and at any location where blasting
operations are under way.
3
Electronic equipment: To avoid the risk of
demagnetization, do not let electronic devices close to
your phone for a long time.
Electronic medical equipment: Your phone is a radio
transmitter which may interfere with electronic medical
equipment or implants, such as hearing aids,
pacemakers, insulin pumps, etc. It is recommended that
a minimum separation of 15 cm be maintained between
the phone and an implant. Your doctor or the
manufacturers of such equipment will be able to give
you any advice you may need in this area.
Hospitals: Always make sure that your phone is
switched off in hospitals when so instructed by
warning signs or by medical staff.
Road safety: Do not use your phone when driving. In
order to give your full attention to driving, stop and
park safely before making a call. You must comply
with any current legislation.
Distance of operation: This phone model has been
tested and meets radiofrequency exposure guidelines
when used as follows:
• Against the ear: Place or receive a phone call and
hold the phone as you would a wire line telephone.
• Body worn: When transmitting, place the phone in a
carry accessory that contains no metal and positions the
phone a minimum of cm from your body. The use of
other accessories may not ensure compliance with
radiofrequency exposure guidelines. If you do not use a
body worn accessory and are not holding the phone at
the ear, position the phone a minimum of cm from
your body.
• Data operation: When using a data feature, position
the phone a minimum of cm from your body for the
whole duration of the data transmission.
4
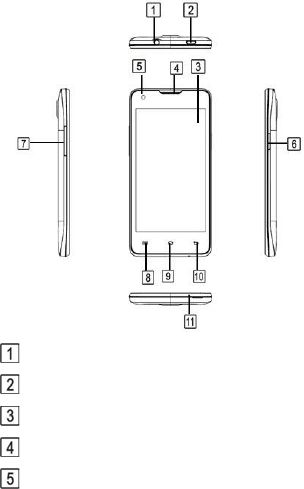
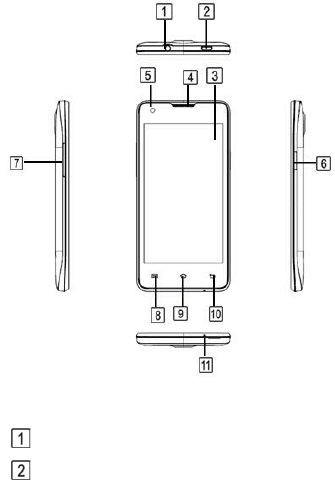
2 Overview
Front and Side panels
Headphone Jack
Micro USB Port
Touch Screen
Earpiece
Front Camera
5
Power Button
Volume +/- Button
Menu Button
Home Button
Back Button
Microphone
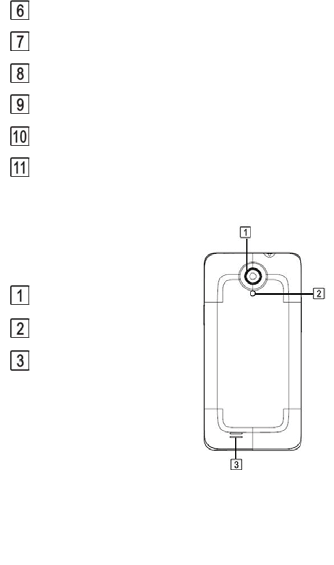
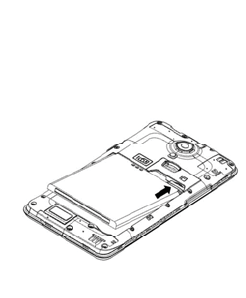
Back Panel
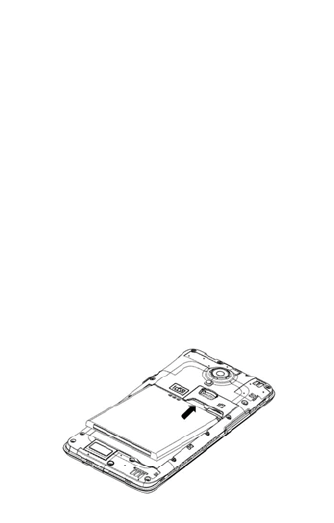
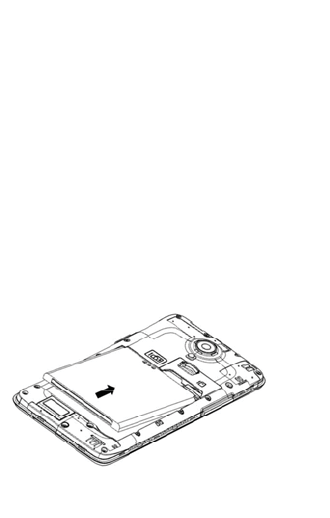
3 Installing the SIM card
You need to remove the back cover before you can
Back Camera
Flash Light
Speaker
6
install the SIM card and battery. Also, make sure to
always turn off the power before installing or
replacing the SIM card and battery.
To prize up the back cover
1) Make sure your device is turned off.
2) Use your nail or pick to open up the back cover,
since there is a slot at the right bottom corner of
back cover.
To install the SIM card
Your device is supported both 2G and 3G
(WCDMA) SIM cards.
1) Remove the battery if it is installed.
2) Locate the SIM card slot, and then insert the
SIM card in correct direction as the following
figure.
3) Slide the SIM card completely into the slot.
7
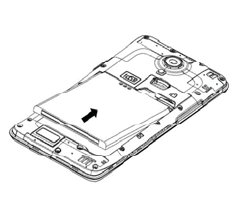
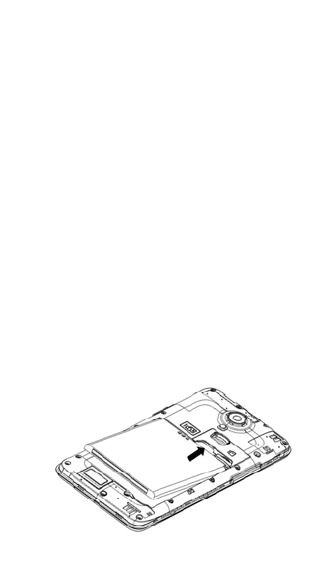
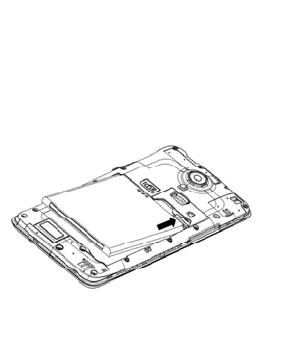
4 Installing the battery
4) Align the battery’s exposed copper contacts with
the battery connectors at the right top part of the
battery compartment.
5) Insert the contacts side of the battery first and
then gently push the battery into place.
6) Replace the back cover.
To remove the battery
1) Make sure your device is turned off.
2) Remove the back cover.
3) The bottom of the phone has a notch. Lift the
battery by the notch to remove it.
5 Installing the storage card
To have additional storage for your images, videos,
music, and files, you can purchase a memory card
and install it into your device.
8
1) Make sure that your device is turned off, and
then remove the back cover.
2) Remove the battery if it is installed.
3) Locate the memory card slot on the upper part
of the exposed Left panel.
4) Insert the memory card into the slot according to
the indication icon.
To remove the memory card, perform converse
installations.
Note: make sure the power is off before inserting or
removing the memory card to avoid damages.
6 Charging
New batteries are shipped partially charged. Before
you start using your device, it is recommended that
you install and charge the battery. Some batteries
perform best after several full charge/discharge
cycles.
9
Plug the DC end of adapter to the micro USB
port of the device and plug the AC end to the
wall socket for charging.
Normally it takes approximately 3~5 hours to
fully charge the device. Operating the device
during charging with the AC adapter may extend
the time of full charging.
7 Power on / Power off
1) To turn on the device, press and hold the Power
button until you see the start-up screen then
release, it will automatically enter the Home
screen. If it is the first time to use it, it will enter
set-up guide menu. Please follow the on-screen
instructions.
2) Press the Power button once to enter sleep mode
and press it again to open the device.
3) Press and hold the Power button, and then tap on
OK to power off the device.
Notice
If the system halts, press and hold the Power button
until it is turned off completely.
10
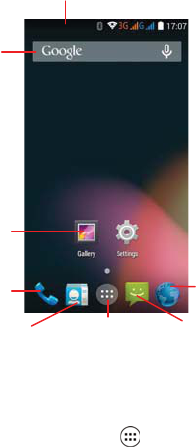
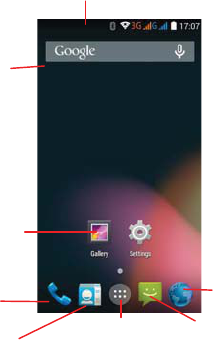
8 Android Home Screen Guides
9 Changing OSD Language & System
Time
On the Home menu tap on the icon and select
Settings icon to access the list of options.
Notifications &
quick
settings: hold and slide down
Web information
search
Message
Call
Explore
browser
APPS menu
Shortcuts:
touch to
open; touch & hold
to move
Contacts

11
Select Settings---Language &
input---Language to change OSD language.
Select Settings---Date & time to change system
time.
10 Connecting to Wi-Fi
On the Home menu tap on the icon and
select Settings icon to access the list of options.
Select Wireless & Networks.
If the Wi-Fi is off, tap on the Wi-Fi line to turn it
on.
The device will scan for available Wi-Fi
networks and display them on the screen.
Tap on the network you want to connect to. Then
tap on the wireless password field to enter the
required network information and tap on
Enter---Connect.
Your device will now attempt to establish a
connection to the Wi-Fi access point with the
network parameters you entered.

12
11 Transferring Contents from PC
Connect the device to your PC/Notebook via
USB cable.
If the network of your PC/Notebook is on, it will
install the required driver automatically then tap
"Turn on USB storage" on the screen to turn on
USB storage function.
Select the contents you want to transfer from
your PC/Notebook.
Drag the contents from the PC/Notebook to the
device.
Please do not disconnect the USB cable during
loading. It may cause malfunction of the device
and files.
Left click on on the right bottom of your
PC/Notebook to disconnect the device from
PC/Notebook safely.
12 Troubleshooting
Q1: What if water enters the device?
Aφ
1) DO NOT turn on the device.
2) Disconnect the outlet cable in order to turn it
off instead of pressing the power button.
13
Disconnect all external devices and then send
to the service center for advice.
Q2: How to check the device if it won’t turn on?
Aφ
If the power is low, connect the adapter to
charge.
Remove the micro-SD card and any other
external device.
Q3: How to restore the factory default settings?
AφGo to Settings---Backup & reset---Factory
data reset to recover the system to the default
status.
Q4: How to prolong the usage time of the battery?
Aφ
Adjust the brightness of the touch screen to
proper level on Settings---Display---
Brightness menu.
Turn down the volume.
Set the sleep time to proper level on
Settings--- Display---Sleep menu.
Q5: What to do if the micro SD or SIM card can’t
be read?
A: Please turn off the device and re-insert the card.
Q6: Why are the Bluetooth and 3G function
14
disabled? (Applicable only for model with
Bluetooth and 3G function)
A˖Check if the “Airplane mode” is enabled, if it is
then the Bluetooth and 3G function can’t be
activated.
13 Technical Specifications
Processor MT6582M
RAM (#) 512MB LPDDRII
Storage capacity(#)
EMMC 4GB
Size 4.5’’ FWVGA LCD,
Capacitive Multi-touch
Resolution 480h854 pixels
Camera Front: 2.0M pixel; Back: 8.0
M
pixel
Communications Wi-Fi (802.11 b/g/n),
Bluetooth (BT4.0)
Operating
Temperature 5-35ć
Operating Humidity
35%- 85%
Storage
Temperature -20- 55ć
Storage Humidity 20%- 93%
15
Adapter AC 100~240V; DC 5V/1A
Output Power
(maximum) ≤5~10W
Battery 1850mAh Li-ion battery
Weight About 140g
Dimension 136 x 66.5 x 9mm
Notice
The # symbol means that the item is optional.
1
Contenido
1 Advertencias de seguridad .................................... 2
2 Vista general…………………………………….5
3Instalación de la tarjeta SIM……………………..7
4Instalación de la batería………………………….8
5Instalación de la tarjeta de almacenamiento……..9
6Carga……………………………………………10
7Encender y apagar……………………………...10
8Guías para la pantalla de inicio del Android…...12
9Cambiar el idioma OSD y el sistema horario…..13
10 Conectar a Wi-Fi……………………………..13
11 Transferir contenidos desde la PC……………14
12Solución de problemas………………………..15
13Especificaciones técnicas……………………..17
2
Aviso
Tanto las fotos como la información sobre la
apariencia del teléfono, como el color y
características del diseño que se encuentran en el
manual, son solo referenciales. Se reserva el
derecho de cambiar la apariencia y los parámetros
técnicos del producto sin previo aviso.
1 Advertencias de seguridad
Nunca intente desarmar el teléfono. Es su
responsabilidad el uso que haga del teléfono y
cualquier consecuencia resultante del mismo.
Como regla general, siempre apague el teléfono
dondequiera que se prohíba su uso. El uso del teléfono
está sujeto a medidas de seguridad diseñadas para
proteger a los usuarios y su entorno.
No utilice el teléfono en áreas húmedas (tales como
baños, piscinas, etc.). Protéjalo de líquidos y de otras
humedades.
No exponga el teléfono a temperaturas extremas
menores a -10°C y superiores a +55°C.
Los procesos fisicoquímicos creados por los cargadores
imponen límites de temperatura durante el proceso de
carga de la batería. El teléfono automáticamente
protege las baterías cuando estén expuestas a
temperaturas extremas.
No deje el teléfono al alcance de los niños (ciertas
partes desmontables pueden ingerirse
accidentalmente).
Seguridad eléctrica: Solo utilice los cargadores que
figuran en el catálogo del fabricante.
Seguridad en los aviones: Al viajar en avión deberá

3
apagar el teléfono cuando así se lo solicite la
tripulación de cabina o las señales de advertencia.
Seguridad personal: Para prevenir
posibles daños auditivos, no escuche a
volumen alto por periodos prolongados.
Materiales explosivos: Por favor cumpla con las
señales de advertencia en las estaciones de servicio
donde se le solicita apagar el teléfono. También debe
cumplir con las restricciones de uso de equipos de
radio en lugares tales como plantas químicas, depósitos
de combustible y en cualquier lugar donde se realicen
explosiones.
Equipo electrónico: Para evitar el riesgo de
desmagnetización, no coloque dispositivos electrónicos
cerca del teléfono por periodos prolongados.
Equipos médicos electrónicos: El teléfono es un radio
transmisor que puede causar interferencias en equipos
médicos electrónicos o implantes, tales como
audífonos, marcapasos, bombas de insulina, etc. Se
recomienda mantener una mínima separación de 15 cm
entre el teléfono y el implante. Su doctor o el
fabricante de dichos equipos le podrán hacer las
recomendaciones pertinentes al respecto.
Hospitales: Siempre asegúrese de apagar el teléfono
en hospitales cuando así se lo solicite el personal
médico o las señales de advertencia.
Seguridad en las carreteras: No utilice el teléfono
mientras conduce. Debe prestar toda su atención al
conducir, estacione adecuadamente antes de hacer o
recibir una llamada. Debe cumplir con la legislación
vigente.
Distancia de funcionamiento: Este modelo de
teléfono ha sido probado y cumple con todas las
4
normas de exposición de radiofrecuencia cuando se
utiliza de la siguiente manera:
• Cerca del oído: Realice o reciba una llamada y
sostenga el teléfono como lo haría con un teléfono de
línea fija.
• Al portar el teléfono en el cuerpo: Al transmitir,
coloque el teléfono en un accesorio portable que no
contenga metal y ubíquelo a un mínimo de 2.5 cm del
cuerpo. El uso de otros accesorios puede no asegurarle
el cumplimiento con las normas de exposición de
radiofrecuencia. Si no utiliza un accesorio para portarlo
en el cuerpo y no está sujetando el teléfono cerca de la
oreja, coloque el teléfono a una distancia mínima de
2.5 cm del cuerpo.
• Operación de datos: Al utilizar una característica de
contenido de datos, coloque el teléfono a una distancia
mínima de 2.5 cm de su cuerpo, mientras dure toda la
transmisión de datos.
5
2 Vista general
Panel frontal y lateral
Conector para auriculares
Puerto micro USB

6
Pantalla táctil
Auricular
Cámara frontal
Botón de encendido
Botón volumen +/-
Botón menú
Botón inicio
Botón atrás
Micrófono
Panel posterior
Cámara posterior
Linterna
Altavoz
7
3 Instalación de la tarjeta SIM
Necesita retirar la tapa posterior antes de instalar la
tarjeta SIM y la batería. También, asegúrese de
siempre apagar el teléfono antes de instalar o
reemplazar la tarjeta SIM o la batería.
Levantar la tapa posterior
1) Asegúrese de apagar el dispositivo.
2) Utilice la uña u otro objeto para levantar hacia
arriba la tapa posterior, ya que hay una pequeña
ranura en la esquina inferior derecha de la tapa
posterior.
Para instalar la tarjeta SIM
El dispositivo es compatible con tarjetas tanto SIM
2G como 3G (WCDMA).
1) Retirar la batería si está instalada.
2) Identifique la ranura de la tarjeta SIM y luego
insértela en esa dirección como se muestra en la
siguiente figura.
8
3) Deslice completamente la tarjeta SIM en la
ranura.
4 Instalación de la batería
4) Alinee los contactos de cobre expuestos de la
batería con los conectores de batería en la parte
superior derecha del compartimento para la
batería.
5) Primero inserte el lado de los contactos de la
batería y luego presiónela suavemente en su
lugar.
6) Vuelva a colocar la tapa posterior.
Para retirar la batería
1) Asegúrese de apagar el dispositivo.
2) Retirar la tapa posterior.
3) La parte inferior del teléfono tiene una
9
hendidura. Para retirar la batería levántela por la
hendidura.
5 Instalación la tarjeta de
almacenamiento
Para contar con almacenamiento adicional para sus
imágenes, videos, música y archivos, puede
comprar una tarjeta de memoria e instalarla en el
dispositivo.
1) Asegúrese de apagar el dispositivo y retire la
tapa posterior.
2) Retire la batería si es que está instalada.
3) Ubique la ranura de la tarjeta de memoria en la
parte superior del panel expuesto de la
izquierda.
4) Inserte la tarjeta de memoria en la ranura de
acuerdo al ícono de indicación.
Para retirar la tarjeta de memoria realice la
10
instalación en sentido contrario.
Nota: Para evitar daños asegúrese que el teléfono
esté apagado antes de insertar o retirar la tarjeta de
memoria.
6 Carga
Las baterías nuevas ya vienen parcialmente
cargadas. Antes de utilizar el dispositivo, se
recomienda instalar y cargar la batería. Algunas
baterías se desempeñan mejor después de varios
ciclos completos de cargas y descargas.
Inserte el extremo DC del adaptador en el puerto
USB micro del dispositivo y enchufe el extremo
AC al toma corriente de pared para su respectiva
carga.
Por lo general toma de 3 a 5 horas completar la
carga del dispositivo. Utilizar el dispositivo
mientras se está cargando puede prolongar el
tiempo de carga completa.
7 Encender / Apagar
1) Para encender el dispositivo, presione y
mantenga el botón de Encendido hasta que
11
aparezca la pantalla inicial y luego suelte,
automáticamente entrará a la pantalla de Inicio.
Si es la primera vez que lo utiliza, ingresará al
menú de guía para su configuración.
2) Presione el botón de Encendido una vez para
ingresar al modo de reposo y presiónelo otra vez
para abrir el dispositivo.
3) Presione y mantenga el botón de Encendido, y
luego toque OK para apagar el dispositivo.
Aviso
Si el sistema se detiene, presione y mantenga el
botón de Encendido hasta que se apague
completamente.
12
8 Guías para la pantalla de inicio del
Android
Notificaciones y configuraciones rápidas:
para abrir mantenga y deslice hacia abajo.
Buscar
información en la
Web
Mensajes
Llamar
Navegador
para explorar
Menú
APPS
Acceso directo
:
tocar para abrir
;
tocar y mantener
para mover
Contactos

13
9 Cambiar el idioma OSD y el sistema
horario
En el menú de Inicio tocar el ícono y seleccione
el ícono Configuraciones para acceder a la lista de
opciones.
Seleccionar Configuraciones---Idioma y
entrada---Idioma para cambiar el idioma OSD.
Seleccionar Configuraciones---Fecha y hora
para cambiar la hora del sistema.
10 Conectar a Wi-Fi
En el menú Inicio tocar el ícono y
seleccionar el ícono Configuraciones para
acceder a la lista de opciones. Seleccionar Redes
inalámbricas.
Si el Wi-Fi está apagado, tocar la línea de Wi-Fi
para encenderlo.
El dispositivo buscará las redes Wi-Fi
disponibles y las mostrará en pantalla.
Seleccione la red a la que desea conectarse.
Luego presione el campo para ingresar la
14
contraseña de la red inalámbrica, ingrese la
información requerida de la red, luego presione
Ingresar---Conectar.
Ahora el dispositivo intentará establecer una
conexión al punto de acceso Wi-Fi con los
parámetros de la red ingresados.
11 Transferir contenido desde la PC
Conectar el dispositivo a la PC/laptop a través
del cable USB.
Si la red de la PC/laptop está encendida instalará
automáticamente el controlador que se requiere,
luego tocar “Encender almacenar en USB” en la
pantalla para encender la función de
almacenamiento del USB.
Seleccionar los contenidos que quiere transferir
de la PC/laptop.
Arrastrar los contenidos desde la PC/laptop al
dispositivo.
Por favor no desconecte el cable USB durante la
descarga. Puede causar un malfuncionamiento
del dispositivo y de los archivos.

15
Haga click con el botón izquierdo en en la
parte inferior derecha de la PC/laptop para
desconectar el dispositivo de manera segura.
12 Solución de problemas
Q1: ¿Qué pasaría si se moja el dispositivo?
Aφ
1) NO encienda el dispositivo.
2) Desconecte el cable de salida con el fin de
interrumpir el suministro de energía, en vez
de presionar el botón de encendido.
Desconectar todos los dispositivos externos y
luego enviarlo al centro de atención para
solicitar asistencia.
Q2: ¿Cómo revisar el dispositivo si no enciende?
Aφ
Si la batería está baja, conectar el adaptador
para cargarla.
Retirar la tarjeta SD-micro y cualquier otro
dispositivo externo.
Q3: ¿Cómo restablecer las configuraciones pre
establecidas de fábrica?
AφIr a Configuraciones---Backup y
restablecer---restablecer información de fábrica,
16
el sistema recuperará la configuración por defecto.
Q4: ¿Cómo prolongar el tiempo de uso de la
batería?
Aφ
Ajuste el brillo de la pantalla táctil a un nivel
adecuado en Configuraciones---Pantalla---
menú Brillo.
Baje el volumen.
Configure el tiempo de reposo a un nivel
adecuado en Configuraciones--- Pantalla---
menú Reposo.
Q5: ¿Qué hacer si las tarjetas SD o SIM micro no
se pueden leer?
A: Por favor apague el dispositivo y reinserte la
tarjeta.
Q6: ¿Por qué están desactivadas las funciones de
Bluetooth y 3G? (Solo aplica para los modelos que
cuentan con la función Bluetooth y 3G).
A˖ Revise si está habilitado el “modo avión”, si es
así las funciones Bluetooth y 3G no pueden ser
activadas.
17
13 Especificaciones técnicas
Procesador MT6582M
RAM (#) 512MB LPDDRII
Capacidad de
almacenamiento(#) EMMC 4GB
Tamaño 4.5’’ FWVGA LCD,
Multi-táctil capacitiva
Resolución 480h854 pixeles
Descripciones Frente: 2.0Mpixel; posterior
:
8.0M pixel
Comunicaciones Wi-Fi (802.11 b/g/n),
Bluetooth(BT4.0)
Operación
Temperatura 5-35ć
Humedad de
Operación 35%-85%
Temperatura
almacenamiento -20-55ć
Humedad de
almacenamiento 20%-93%
18
Adaptador AC 100~240V;DC 5V/1A
Potencia de salida
(máxima) ≤5~10W
Batería 1850mAh Li-ion batería
Peso Alrededor de 140g
Dimensión 136 x 66.5 x 9mm
Aviso
El símbolo # significa que dicho ítem es opcional.
)&&:DUQLQJ
$Q\&KDQJHVRUPRGLILFDWLRQVQRWH[SUHVVO\DSSURYHGE\WKHSDUW\UHVSRQVLEOHIRU
FRPSOLDQFHFRXOGYRLGWKHXVHUV DXWKRULW\WRRSHUDWHWKHHTXLSPHQW
7KLVGHY LFHFRPSOLHVZ LWKSDUW RIWKH)&&5XOHV2 SHUDWLRQLVVXEMHF WWRWKH
IROORZLQJWZRFRQGLWLRQV 7KLVGH YLFHPD \QRWFDXVHKDU PIXOLQWHUIHUHQFHDQG
WKLVGHY LFH PXVWDFF HSWDQ \LQWHUIHU HQFHUHF HLYHGLQFOXGLQJ LQWHUIHUHQFHWKD WPD\
FDXVHXQGHVLUHGRSHUDWLRQ
6SHFLILF$EVRUSWLRQ5DWH6$5LQIRUPDWLRQ
6$5WHVWVDUHFRQGXFWHGXVLQJVWDQGDUGRSHUDWLQJSRVLWLRQVDFFHSWHGE\WKH
)&&ZLWKWKHSKRQHWUDQVPLWWLQJDWLWVKLJKHVWFHUWLILHGSRZHUOHYHOLQDOOWHVWHG
IUHTXHQF\EDQGVDOWKRXJKWKH6$5LVGHWHUPLQHGDWWKHKLJKHVWFHUWLILHGSRZHU
OHYHOWKHDFWXDO6$5OHYHORIWKHSKRQHZKLOHRSHUDWLQJFDQEHZHOOEHORZWKH
PD[LPXPYDOXH%HIRUHDQHZPRGHOSKRQHLVDDYDLODEOHIRUVDOHWRWKHSXEOLF
LWPXVWEHWHVWHGDQGFHUWLILHGWRWKH)&&WKDWLWGRHVQRWH[FHHGWKHH[SRVXUH
OLPLWHVWDEOLVKHGE\WKH)&&WHVWVIRUHDFKSKRQHDUHSHUIRUPHGLQSRVLWLRQV
DQGORFDWLRQVDVUHTXLUHGE\WKH)&&)RUERG\ZRUQRSHUDWLRQWKLVPRGHO
SKRQHKDVEHHQWHVWHGDQGPHHWVWKH)&&5)H[SRVXUHJXLGHOLQHVZKHQXVHG
ZLWKDQDFFHVVRU\GHVLJQDWHGIRUWKLVSURGXFWRUZKHQXVHGZLWKDQDFFHVVRU\
WKDWFRQWDLQVQRPHWDODQGWKDWSRVLWLRQVWKHKDQGVHWDPLQPXQRIFPIURP
WKHERG\
1RWH7KLVHTXLSPHQWKDVEHHQWHVWHGDQGIRXQGWRFRPSO\ZLWKWKHOLPLWVIRUD&ODVV%
GLJLWDOGHYLFHSXUVXDQWWR SDUWRIWKH)&&5XOHV7KHVHOLPLWVDUHGHVLJQHGWR
SURYLGHUHDVRQDEOHSURWHFWLRQDJDLQVWKDUPIXOLQWHUIHUHQFHLQ DUHVLGHQWLDOLQVWDOODWLRQ
7KLVHTXLSPHQWJHQHUDWHVXVHVDQGFDQUDGLDWHUDGLRIUHTXHQF\HQHUJ\DQGLIQRW
LQVWDOOHG DQGXVHGLQDFFRUGDQFHZLWKWKHLQVWUXFWLRQVPD\FDXVHKDUPIXO
LQWHUIHUHQFHWRUDGLRFRPPXQLFDWLRQV+RZHYHU WKHUHLVQRJXDUDQWHHWKDW
LQWHUIHUHQFHZLOOQRWRFFXULQDSDUWLFXODULQVWDOODWLRQ,IWKLVHTXLSPHQWGRHVFDXVH
KDUPIXO LQWHUIHUHQFHWRUDGLRRUWHOHYLVLRQUHFHSWLRQZKLFKFDQEHGHWHUPLQHGE\
WXUQLQJWKHHTXLSPHQWRIIDQGRQWKHXVHULV HQFRXUDJHGWRWU\WRFRUUHFWWKH
LQWHUIHUHQFHE\RQHRUPRUHRIWKHIROORZLQJPHDVXUHV
²5HRULHQWRUUHORFDWHWKHUHFHLYLQJDQWHQQD
²,QFUHDVHWKHVHSDUDWLRQEHWZHHQWKHHTXLSPHQWDQGUHFHLYHU
²&RQQHFWWKHHTXLSPHQWLQWRDQRXWOHWRQDFLUFXLWGLIIHUHQWIURPWKDWWRZKLFKWKH
UHFHLYHULVFRQQHFWHG
²&RQVXOWWKHGHDOHURUDQH[SHULHQFHGUDGLR79WHFKQLFLDQIRUKHOS