Skyline Connectivity SKY-100 REMOTE CONTROL TRANSMITTER User Manual 611097
Skyline Connectivity Corp. REMOTE CONTROL TRANSMITTER 611097
USERS MANUAL
User Manual
IPod RF receiver Set-up
Plug the RF receive into the top of your iPod . The receiver will be run automatically in 30
seconds and your remote will be ready for operation at the same time. Plug in the 3.5MM head
of the 3.5mm-to-RCA audio cable into your iPod and RCA end into your home studio, you are all
set. You can start the freedom of the wireless control on your iPod up to 50 meter. Of course,
you can plug your ear bud into receiver directly for portable use. The receiver is powered by
your iPod, so no battery is needed. Our state-of-art low power design helps reducing the power
consumption to the lowest level. Our default is if there is no music playing for 20 seconds, it will
go to sleep mode to save power. There is a LED indicator on the receiver for voice recording
feature. Compatible iPod: 3rd/4th GEN & Mini
LED light up only for voice recording mode. When it is in voice recorder mode, the LED will be
ON.
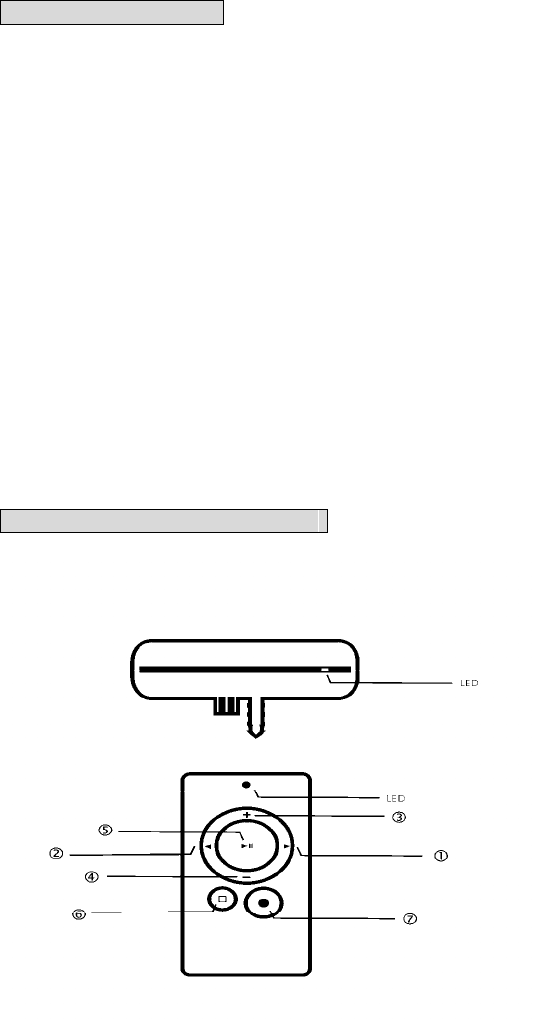
Multi-function IPod Remote Control
Basic Feature:
Button 1: Next track (Forward) Button 5: Play & Pause
Button 2: Last Track (Rewind) Button 6: Advanced Feature
Button 3: Volume Up Button 7: Voice Recorder (press twice in two seconds to
activate voice recording feature)
Button 4: Volume Down LED: RED: voice record mode.
GREEN: Others.
Side switch is a hold switch.

Advanced Feature:
Next Playlist : Button 6 + button 1
Previous Playlist: Button 6 + Button 2
Next Album: Button 6 + +
Previous Album: Button 6 + -
Repeat one song : Button 6 + play, press again to repeat ALL. Press again to turn it off.
Shuffle: press button 6 + button 7, press twice to turn it off.
(Second button needs to be pressed within two seconds.)
Built-in Voice Recorder (iPod only)
When you plug the receiver into the iPod, there are two ways to record voice, or lecture.
1. Use your iPod’s menu: Go to “Extras” -> “Voice Memos” -> “Record Now”
2. Use remote: Press button 6 twice, you will see your iPod is in the voice recording mode
already. Press start on your iPod to start recording. After recording, press save and playing
on your ipod to save. Put the built-in microphone (in the receiver) near the speaker for the
best performance.
Note: For the best performance, Apple Inc. recommends to record with efficient power
since low power will cause noise during the recording.
Connecting to Car Stereo Using AUX input
Most aftermarket stereo must have an available auxiliary RCA input. Follow the instructions to
connect your iPod with your car speaker.
1. Disconnect negative battery terminal and remove aftermarket stereo.
2. Plug the RCA ends for the 3.5-to-RCA into the Left and Right auxiliary RCA INPUTS at the
back of your aftermarket car stereo.
3. Reconnect negative battery terminal and power up your stereo. Verify that the iPod plays
through your stereo when the Auxiliary input source is selected. Your stereo may require
the CD Changer or Auxiliary Input to be activated in order to use.
4. Once test is complete and you hear the audio from your iPod through your vehicle’s stereo,
re-install the stereo.
5. Locate the 3.5MM Male end of the 3.5-to-RCA cable in a dash packet or near your iPods
location.
This device complies with part 15 of the FCC Rules. Operation is subject to the following two
conditions: (1) This device may not cause harmful interference, and (2) this device must accept any
interference received, including interference that may cause undesired operation.
NOTE: THE MANUFACTURER IS NOT RESPONSIBLE FOR ANY RADIO OR TV
INTERFERENCE CAUSED BY UNAUTHORIZED MODIFICATIONS TO THIS EQUIPMENT.
SUCH MODIFICATIONS COULD VOID THE USER’S AUTHORITY TO OPERATE THE
EQUIPMENT.