Skyrocket Toys 01736RX24G Sky Viper Streaming Drone with GPS User Manual
Skyrocket Toys LLC Sky Viper Streaming Drone with GPS Users Manual
Users Manual
FLYING GUIDE
STREAMING DRONE WITH AUTO PILOT
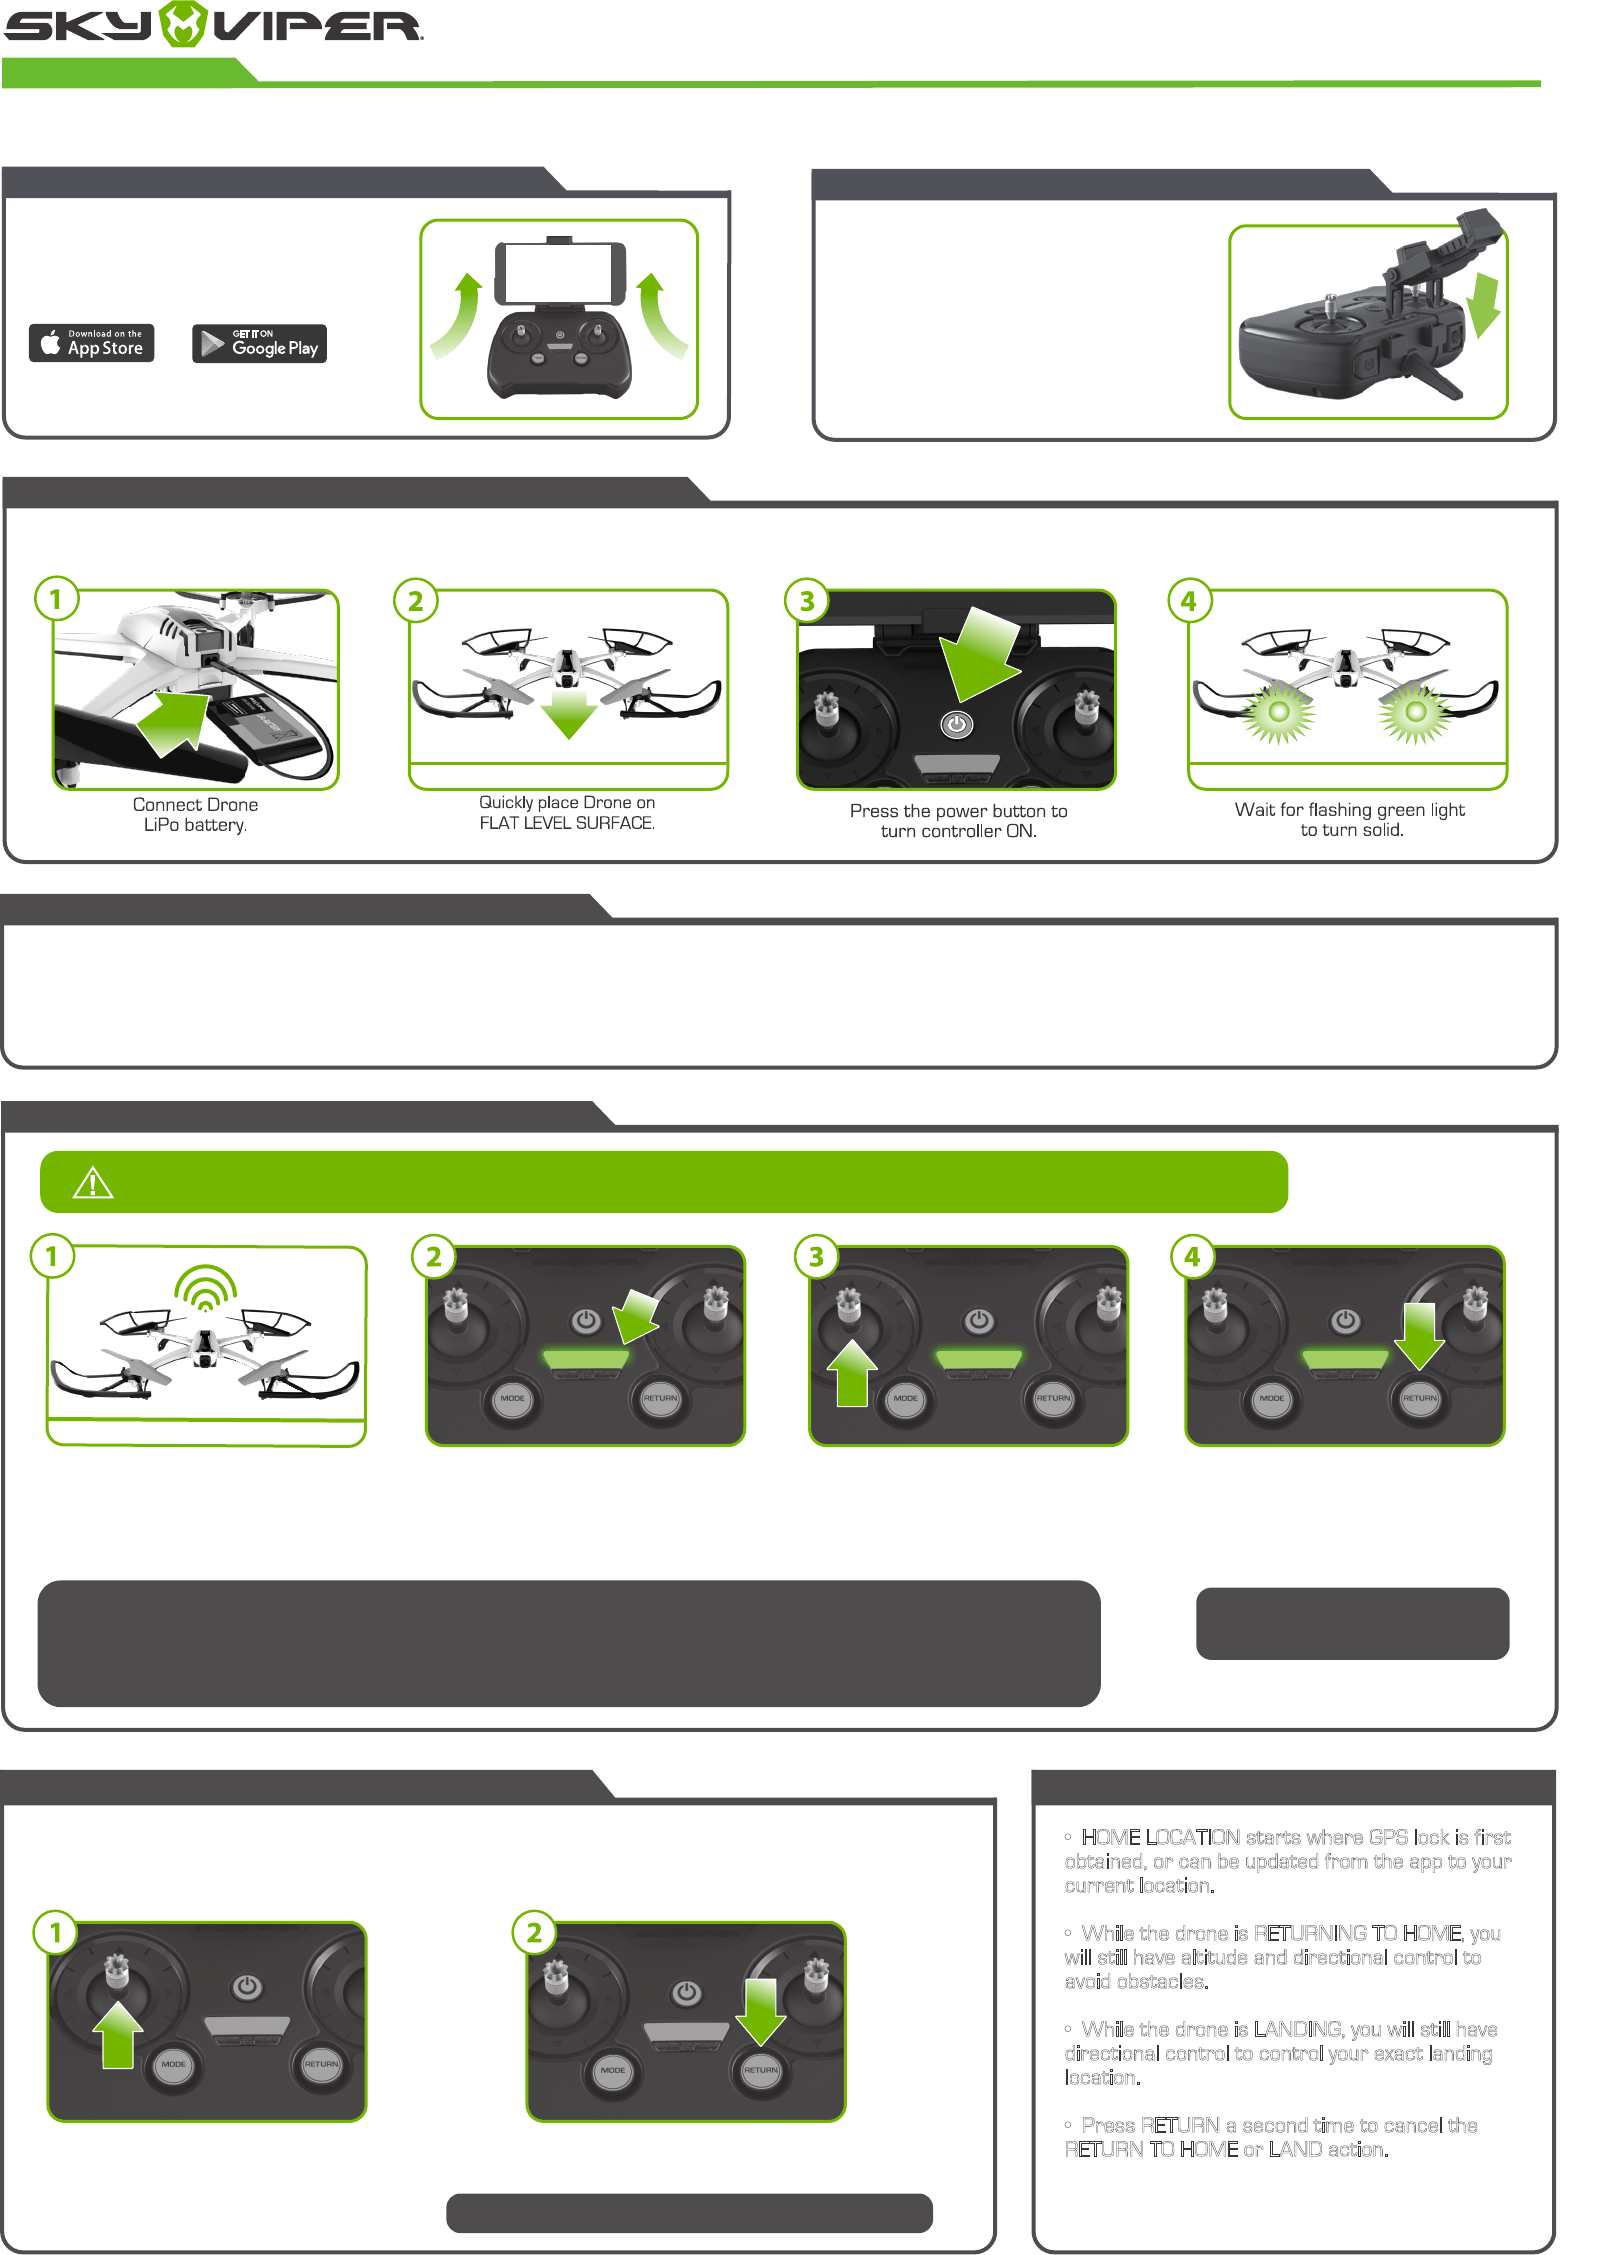
CONNECTING DRONE TO SMART PHONE
ACQUIRING GPS LOCK
When enough satellites are locked
on, the GPS LOCK will illuminate a
solid GREEN. The frame is now
ready to fly in GPS mode.
Raise the throttle stick to arm the
frame. The motors will spin, indicating
the frame is armed. Increase throttle
to lift off of the ground.
When flying in GPS mode, press the
RETURN button to RETURN HOME.
The frame will fly back to the home
location and land. RETURN HOME will
ONLY work if GPS LOCK is active.
Press RETURN a second time to
CANCEL the RETURN HOME action.
Press RETURN a second time to CANCEL the LAND action.
The frame will start to acquire
GPS satellites. During this time,
the GPS LOCK LED will blink.
If GPS mode is taking too long to lock, you can still launch the frame while the system continues to lock. Simply raise the
throttle stick while the device continues to lock on to the GPS signal. Indoor LED will blink while you are flying without GPS
lock, and will turn off once GPS lock is established. CAUTION: In this case, your HOME LOCATION will start
where the GPS LOCK is obtained. This may not be near your launch location.
If an open sky is not possible, the frame can be flown in INDOOR mode.
To activate this mode, a tap of the MODE button will enable INDOOR MODE.
The INDOOR LED will illuminate solid red to indicate this mode is active.
1. Go to the Wi-Fi settings on your device and select SKYVIPERGPS_XXXXXX to connect.
(Name of Sky Viper network may vary). Connection may take up to 30 seconds.
2. Enter the Wi-Fi password: vipergps
3. Open the Sky Viper Video Viewer App on your device
• HOME LOCATION starts where GPS lock is first
obtained, or can be updated from the app to your
current location.
• While the drone is RETURNING TO HOME, you
will still have altitude and directional control to
avoid obstacles.
• While the drone is LANDING, you will still have
directional control to control your exact landing
location.
• Press RETURN a second time to cancel the
RETURN TO HOME or LAND action.
WARNING: GPS MODE SHOULD ONLY BE USED OUTDOORS
INDOOR MODE RETURN TO HOME / LAND
ATTACH YOUR PHONE TO THE REMOTE
If not already assembled, attach
phone mount to remote.
Push upper lip of phone mount
upward and insert your phone into
mount as shown.
v2450
GPS
Dowload and install free
Sky Viper Video Viewer
app onto your smart phone.
INSTALL THE SKY VIPER VIEWER APP
Raise the throttle stick to arm the
frame. The motors will spin, indicating
the frame is armed. Increase throttle
to lift off of the ground.
When flying in INDOOR mode, the RETURN button will
cause the drone to LAND at its current location.
with an unobstructed view to the sky
POWERING UP AND PAIRING DRONE TO REMOTE
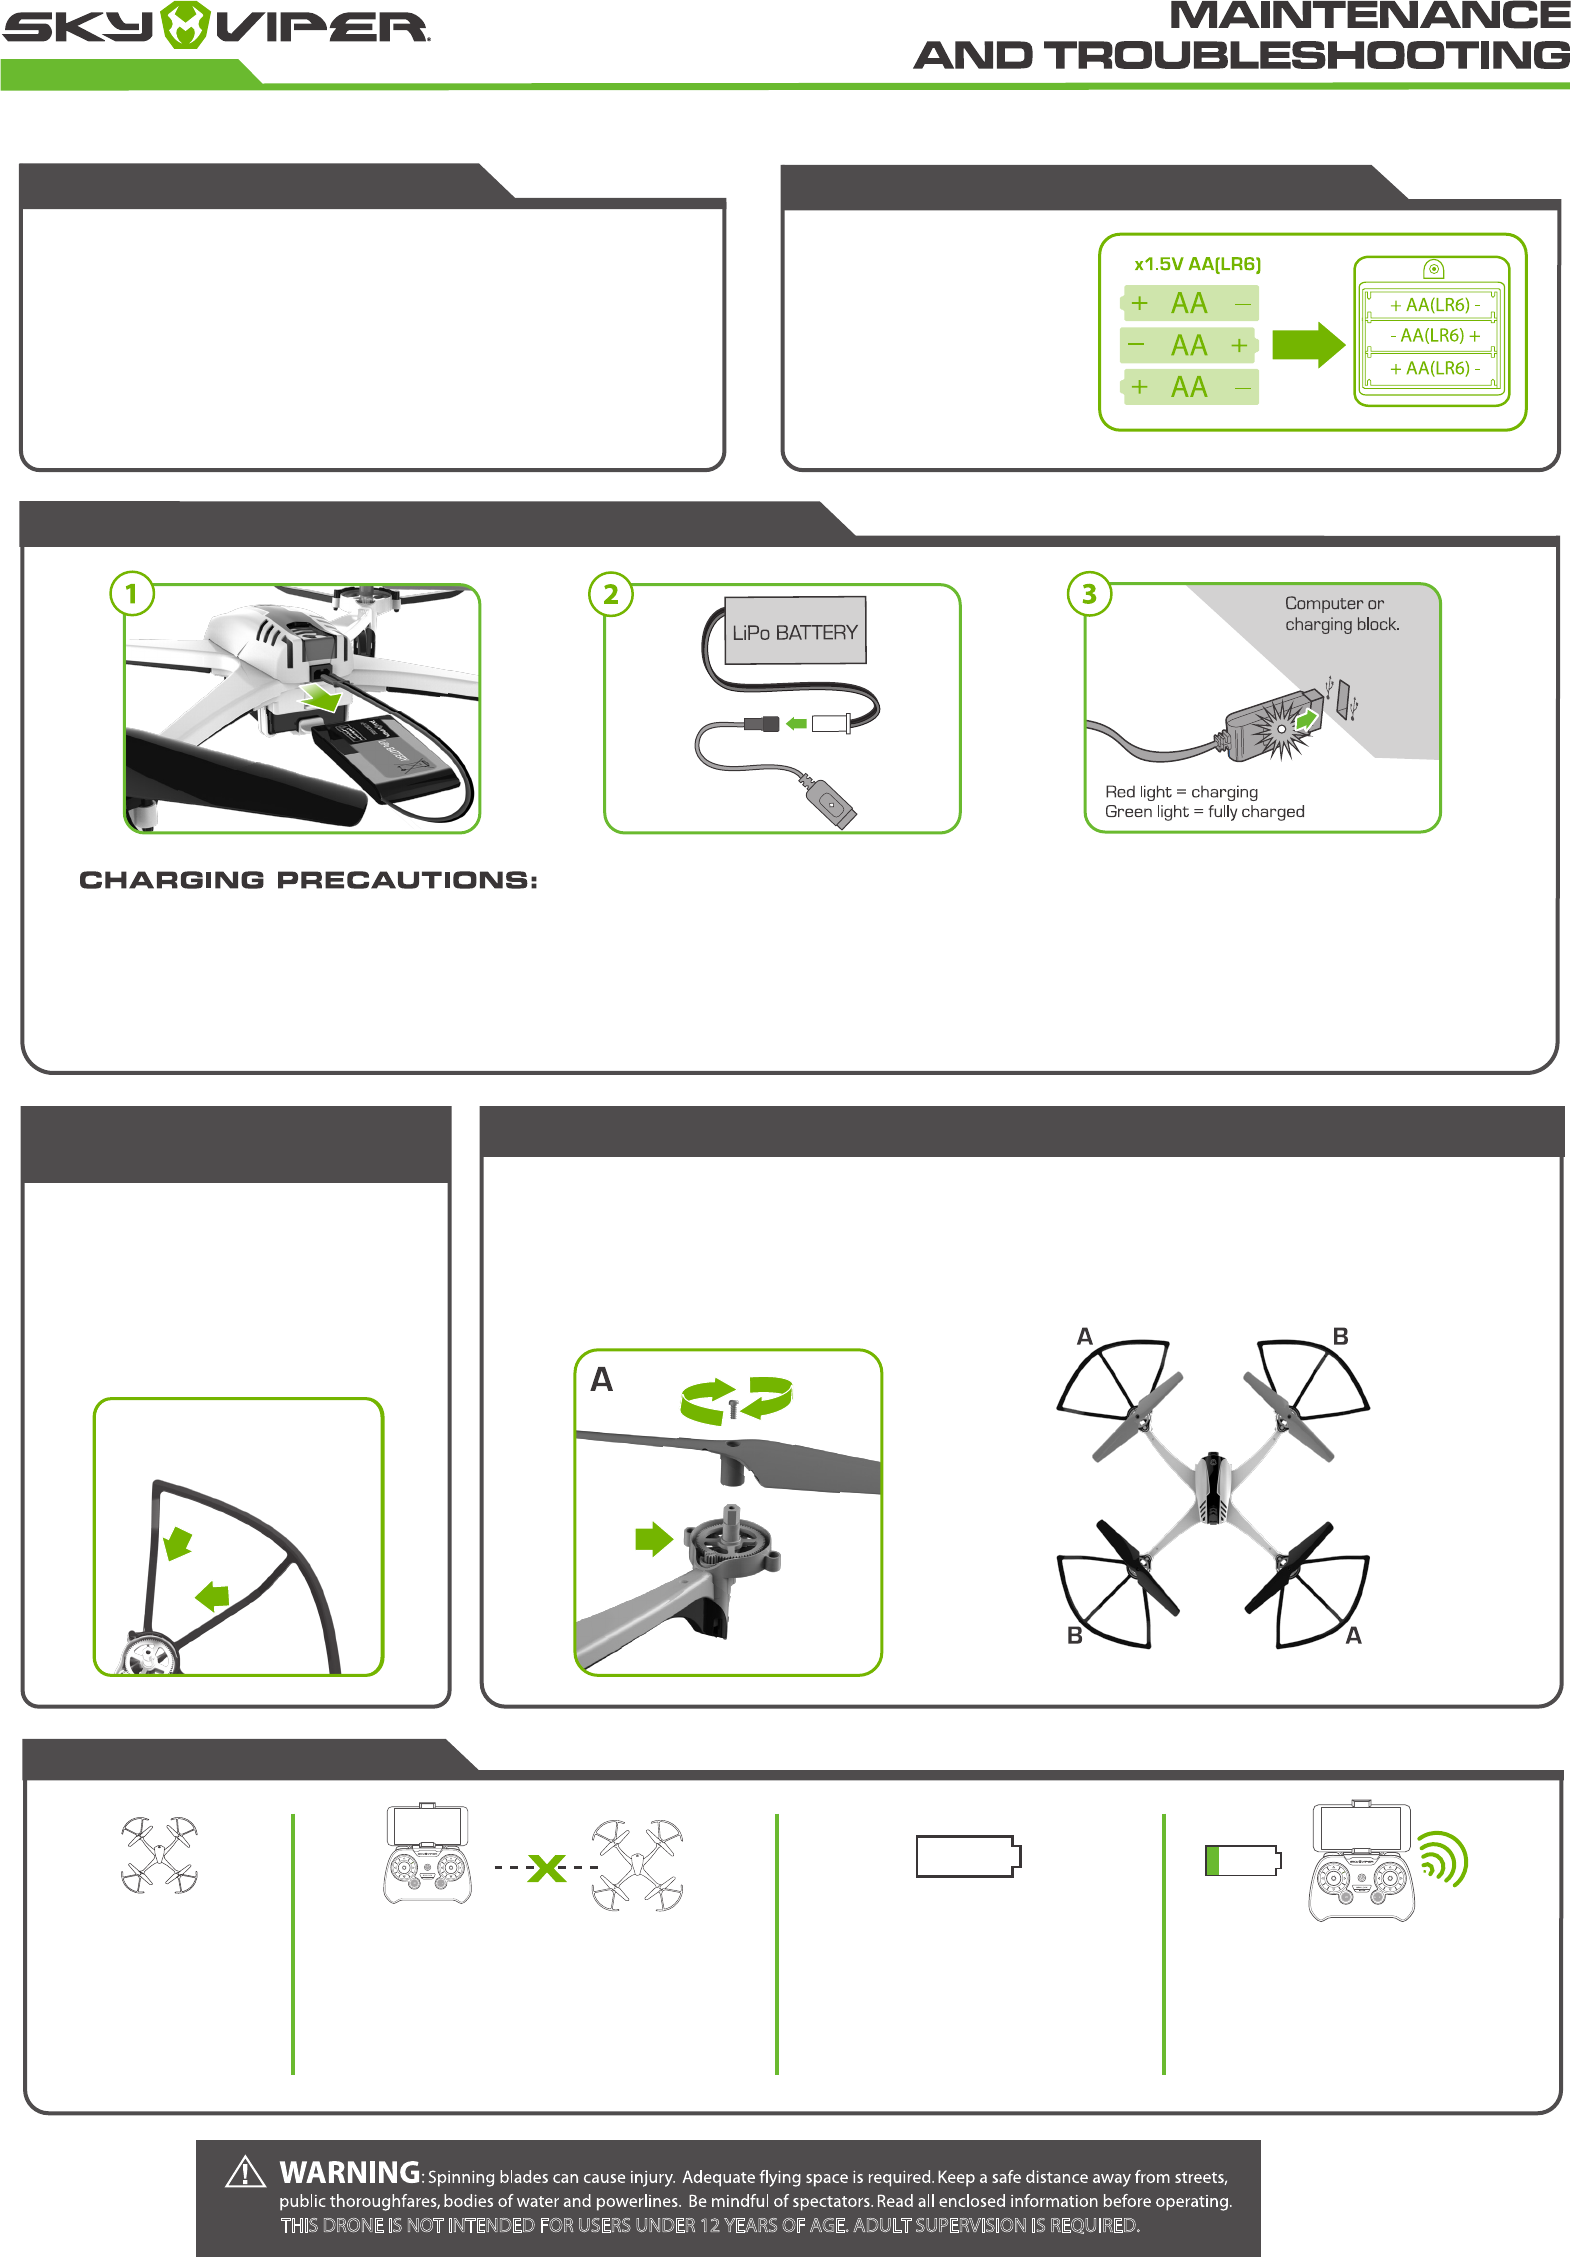
Charge LiPo battery and insert into drone. Install 3 fresh 1.5V AA (LR6) batteries into remote.

BASIC FLIGHT MANEUVERS (IN GPS OR INDOOR MODE)
When GPS LOCK is solid,
or in INDOOR mode,
move the left Throttle
Thumbstick up to arm
the frame, and then
launch the drone.
Move the left Throttle
Thumbstick up and
down to fly higher or
lower.
Press RETURN button
to return home in GPS
Mode or land in INDOOR
Mode. You can also land
the drone manually by
holding the left
thumbstick down.
Move the Directional
Thumbstick in the
direction you want to fly.
This drone is designed to automatically maintain a hover so basic flight is easy and intuitive.
• Pulling the throttle backwards will reduce power
and the drone will descend.
• Stream live video from your drone’s point of view as you fly. Simply follow the in-app
instructions for streaming video.
• Record video or take pictures during your flight using the on-screen recording buttons
or the Photo or Video buttons located on your flight controller. See app for details.
• Higher quality video and pictures can be recorded directly to the micro SD memory
card located inside the drone. Once video has been recorded and you have completed your
flight, the video files can be downloaded to your smart device through the drone’s
Wi-Fi connection. Videos can also be downloaded directly by removing the Micro SD card
from the drone and inserting into a personal computer. See app for details regarding
recording and Micro SD card.
• When launching the drone, face the same direction
as the drone faces. Green blades face forward.
• Practice launching, hovering and landing before
attempting to learn other moves.
• Flying 2 to 3 feet above the ground will reduce ground
turbulence and make flying easier.
• When first attempting to fly in different directions, start
by tapping the direction stick until you have a feel for it.
Always move controls slowly until you become comfortable
operating the drone.
• Once you’ve mastered flying in directions, practice
rotational controls. Spin and keep drone facing the same
direction as flying becomes easier and more intuitive.
• If propeller blades come in contact with another object or you crash,
throttle down or land immediately to prevent possible or further damage.
• If anything prevents drone’s blades from spinning or they become
jammed, throttle down or land immediately. Do not attempt to fly until
obstruction has been removed and damage fixed.
• Should soemthing prevent drone’s blades from spinning, drone may
auto shutdown. LiPo battery will need to be unplugged then reconnected
to restore flying power.
• If the drone flies too far away, beyond the control range of the remote,
the drone will return to home or land to prevent the drone from flying
away out of control.
Micro SD slot is located
on the back of drone.
Insert card pin side up.
STREAMING AND RECORDING VIDEO
FLYING TIPS
TAKE OFF
RETURN / LAND
DIRECTIONAL CONTROL
ADJUST ALTITUDE
FLIGHT CONTROLS
• Push throttle stick up to arm the drone. Motors will slowly spin. • Move the direction stick forward to fly forward in the direction
of the green front blades. Move backwards to fly backward. The
further you push, the faster the drone will fly in that direction.
• Push the direction stick left to fly left. Push right to fly right.
The further you push the faster the drone will fly sideways.
If you press the power button, the
motors will shut off. To reactivate,
turn off remote and unplug battery
from drone, then restart both as
instructed in Powering Up and Pairing.
When in GPS Mode, pressing the RETURN button
will instruct the drone to return to the home location.
HOME LOCATION starts where GPS lock is first
obtained or can be updated from the app to your
current location.
When in INDOOR Mode, pressing the
RETURN button will instruct the drone
to land immediately at its current
location.
• Once armed, push the throttle stick up to make the drone lift.
• The further you push the throttle stick, the faster you lift.
SWITCH BETWEEN
GPS MODE /
INDOOR MODE
SAFETY SHUT-OFF INDOOR MODE: LANDGPS MODE: RETURN TO HOME
*GPS Mode should ONLY
be used outdoors
Video Record Button
Phone Mounts
Photo Button
Power On/
Off Switch
THROTTLE/
ROTATION STICK DIRECTION STICK
When the drone
turns upside down,
the motors will stop
spinning.
When the drone goes of range of the controller,
it will automatically return home/land. If the
controller comes back into range before the
drone lands, it is possible to cancel this
automatic landing by pressing return.
When the transmitter battery is at
a critical level, it will alert with
audible warning.
When the drone’s battery is
depleted, the drone will automatically
land itself in its current position. This
automatic landing cannot be
interrupted with the controller.
• Drone
• Controller/Transmitter
• 1200 mAh 3.7V LiPo Battery
• 4 Blade Guards
• Phone Holder
Blade guards are recommended
for inexperienced users of all ages.
To attach blade guards, insert the
guards to the end of each arm,
under the blade.
Loosen the screw in the
Remote Control battery
compartment door with
a Phillips screwdriver
and insert batteries as
shown. Replace door
and tighten screw.
• After use, allow the battery to cool down to room
temperature before charging again.
• Charge battery in an isolated area, away from
excessive heat or moisture.
• If you suspect that the battery is damaged or swelling, turn off the drone immediately.
• Do not modify, heat, or wet the battery in any way.
• Only recharge with provided charger.
•4 Replacement Blades
•Operator Manual
• USB Charger
• 2 Pro-Style thumb sticks
• 2 Game-Style thumb sticks
REPLACING DAMAGED BLADES
CHARGING THE DRONE
CONTENTS REMOTE BATTERIES (NOT INCLUDED)
R E M O VA B L E
BLADE GUARDS
Use the screwdriver to unscrew the propeller, then pull up on propeller to
detach. Match A propellers to A legs and B propellers to B legs. Replace screws
and tighten. For proper installation, tighten the screws until it is all the way down
completely. See image below.
Front
STREAMING DRONE WITH AUTO PILOT
3
THIS DRONE IS NOT INTENDED FOR USERS UNDER 12 YEARS OF AGE. ADULT SUPERVISION IS REQUIRED.
FAILSAFE GUIDE
• Do not fly near spectators or animals.
• Keep spinning rotors away from loose clothing, fingers, hair, eyes
and other body parts.
• Always launch from a flat surface.
• Never leave the drone unattended while it is turned on.
• Read all enclosed information before operating.
• Keep instructions for use for later reference.
• Do not touch the rotating rotor.
• Do not change or modify anything on the drone.
• Only operate under good visibility and calm weather conditions.
• Flying is strictly forbidden near high voltage poles, railway tracks,
airports, roads, swimming pools, open water or large crowds of
people.
3.7V
1200mAh:
Google Play and the Google Play logo are trademarks of Google Inc.
Apple and the Apple logo are trademarks of Apple Inc., registered in the U.S. and other countries.
App Store is a service mark of Apple Inc., registered in
the U.S. and other countries.
Remove all packaging attachments before giving the toy to a child.
Not suitable for children under 3 years due to small parts that could be swallowed.
Conforms to product safety standards ASTM F963.
Keep instructions for future reference. Do not discard.
This device complies with PART 15 of the FCC Rules. Operation is subject to the following two
conditions. (1) This device may not cause harmful interference, and (2) this device must accept any
interference received, including interference that may cause undesired operation.
CAUTION: Changes or modifications to this unit not expressly approved by the party responsible
for compliance could void the user’s authority to operate the equipment.
NOTE: This equipment has been tested and found to comply with the limits for a Class B digital device,
pursuant to Part 15 of the FCC Rules. These limits are designed to provide reasonable protection against
harmful interference in a residential installation. This equipment generates, uses and can radiate radio
frequency energy and, if not installed and used in accordance with the instructions, may cause harmful
interference to radio communications. However, there is no guarantee that interference will not occur in a
particular installation. If this equipment does cause harmful interference to radio or television reception,
which can be determined by turning the equipment off and on, the user is encouraged to try to correct the
interference by one or more of the following measures: Reorient or relocate the receiving antenna - Increase the
separation between the equipment and receiver - Connect the equipment into an outlet on a circuit different
from that to which the receiver is connected - Consult the dealer or an experienced radio/TV technician for help.
The software included in this product contains
copyrighted software that is licensed under the GPLv3. A
copy of that license is included in our website at the URL
below. You may obtain the complete Corresponding
Source code from us for a period of three years after our
last shipment of this product and/or spare parts therefor,
which will be no earlier than 05-01-2020, on our website
at http://www.skyviper.com/GPL/
WE’RE HERE TO HELP
For questions
about this product:
Online:
skyviper.com/support
©2017 Skyrocket LLC, Los Angeles CA 90066 USA. All Rights Reserved. Sky Viper and
Skyrocket and their respective logos are trademarks and/or registered trademarks of
Skyrocket LLC. All other trademarks, logos and copyrights are the property of their
respective owners, and there is no relationship express or implied with Skyrocket LLC.
MADE IN CHINA.
This device is marked with the selective sorting symbol on waste electrical and electronic equipment. This
means that this product should be supported by a selective collection system in accordance with applicable
regulations in order to be either recycled or dismantled in order to reduce any impact on the environment. The
batteries, submitted to a specific collection system, must be removed from the product and disposed of
separately. When that the batteries are not to be extracted, the product must be delivered to an appropriate
collection center for recycling is complete. Electrical and electronic products as well as batteries that have mot
been sorted before disposal are potentially dangerous for the environment and human health due to the
presence of hazardous substances. For more information, contact your local or regional government.
Warning. Not suitable for children under 12 years of age. Before first use: Read the user's information together with your child. Keep the instructions for use for later reference.
Flying the drone requires skill and users must be trained under the direct supervision of an adult.
Note for adult supervisors: Check if the toy is assembled as instructed. The assembly shall be performed under the supervision of an adult. Hands, hair and loose clothes must be kept
away from the propeller (rotor). Do not touch the rotating rotor. Do not change or modify anything on the drone. For use only outdoors – not to be used indoors. Risk of eye injuries.
Start and fly only when the area is appropriate for the intended use (free area, no obstacles) and only within direct visual contact. Start and fly is strictly forbidden near high voltage
poles, railway tracks, roads, swimming pools or open water. Caution. Do not start up and fly when persons, animals or any obstructions are within the flying range of the drone.
Flying range is up to 100M. Only operate under good visibility and calm weather conditions.
Proudly built with open source code
http://www.skyrocketon.com/open-source/
the radiator& your body.
For Quadcopter,This equipment should be installed and operated with minimum distance 20cm between
FCC Radiation Exposure Statement:
This equipment complies with FCC radiation exposure limits set forth for an uncontrolled environment .
This transmitter must not be co-located or operating in conjunction with any other antenna or transmitter.