Skytech II 6601TX Remote control transmitter User Manual SKY 6601
Skytech II, Inc. Remote control transmitter SKY 6601
Users Manual
SKY-6601
INSTALLATION AND OPERATING INSTRUCTIONS
INTRODUCTION
This SKYTECH remote control system was developed to provide a safe, reliable, and
user-friendly remote control system for gas heating appliances. The system can be
operated thermostatically or manually from the transmitter. The system operates on
radio frequencies (RF) within a 20”range using non-directional signals. The system
operates one of 256 security codes that are user programmable; the remote receiver’s
code must be matched to that of the transmitter prior to initial use.
Review COMMUNICATION SAFETY SECTION under TRANSMITTER
section and THERMO SAFETY SECTION under REMOTE RECEIVER section.
These signal/temperature safety features shut down the fireplace system when a
potentially unsafe condition exists.
The transmitter operates on 2 AAA-size 1.5V
batteries. It is recommended that ALKALINE
batteries always be used for longer battery life and
maximum operational performance.
IMPORTANT: New or fully charged batteries are
essential for proper operation of the multi-function
transmitter. Insert 2 AAA-size 1.5V batteries into the
battery compartment on the back of the transmitter,
positioning the (+) and (-) ends of the batteries as
indicated on the casing. When the batteries are
inserted, the screen at right (with similar numbers)
will display.
Note: If a LOW battery icon appears on the
screen, check the position of the batteries; a
reversed battery will not activate transmitter.
Note: Due to the sensitive
temperature-monitoring components in the
transmitter, it may be necessary to allow the
transmitter to stabilize to room temperature
before accurate room temperatures are displayed on the screen. If the transmitter is
TRANSMITTER
PM
SET
LCD DISPLAY
FF
ROOM
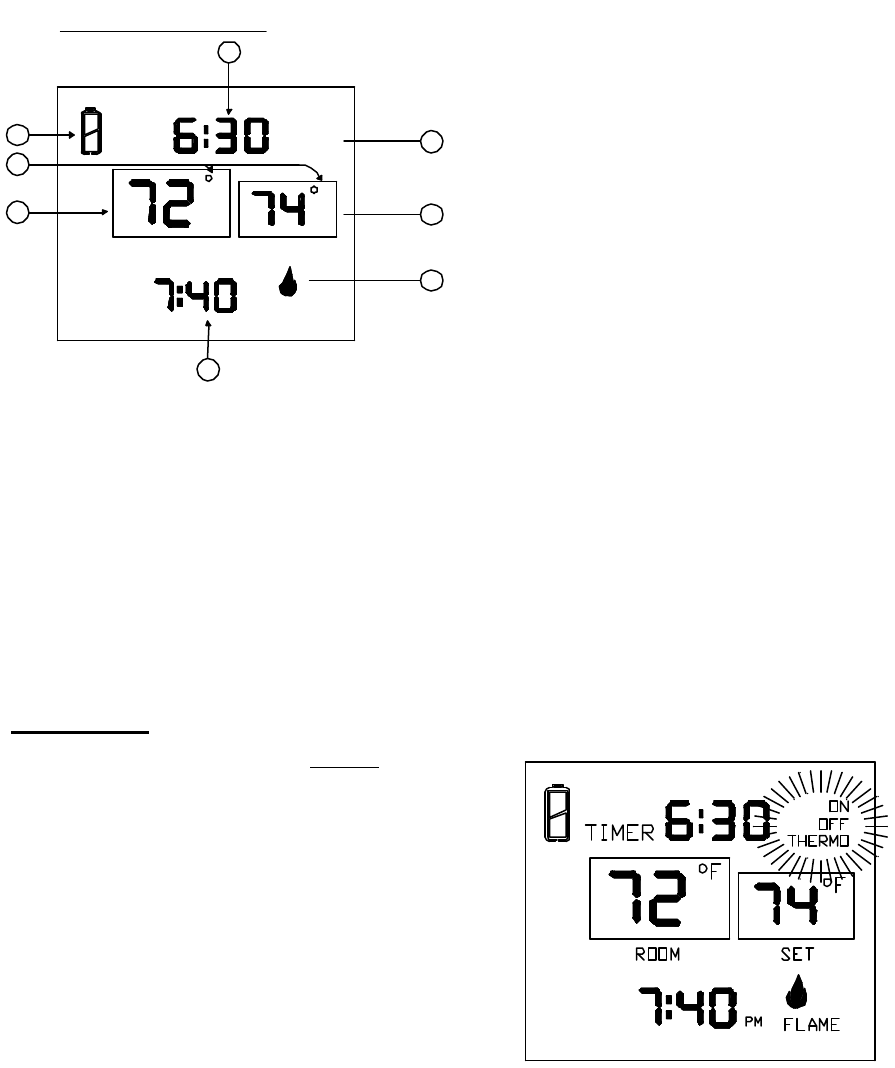
activated from a severe cold condition, it can take up to fifteen minutes for accurate
temperature readings to appear.
1. LOW-Battery power is low.
Replace batteries within two
weeks.
2. TIMER-Indicates time remaining
before system shuts off, when
timer-programmed; 9-hour
maximum setting.
3. MODE-Indicates operation
MODE of system. ON indicates
the system is on, either manually
or thermostatically. OFF indicates
the entire system is turned off THERMO indicates the system will automatically
cycle on/off, depending on programmed
4. SET-Indicates desire SET room temperature for THERMO operation
5. FLAME-Indicates burner/valve in operation.
6. CLOCK-Indicates the current time in AM/PM
7. ROOM-Indicates CURRENT room temperature.
8. ℉ indicates degrees Fahrenheit (℃ indicates degrees Celsius).
FUNCTIONS
To operate the system, press the MODE button on
the front of the transmitter to select the
operational MODE desired.
l ON indicates the system is on, either
manually, timed or thermostatically.
l THERMO indicates the system will
automatically cycle ON/OFF, depending
ON programmed set temperature.
l OFF indicates the entire system is turned off.
8
7
SET
6
ROOM
PM
F
FLAME
F
5
4
LCD DISPLAY SCREEN
1TIMER
2
ON
OFF
THERMO 3
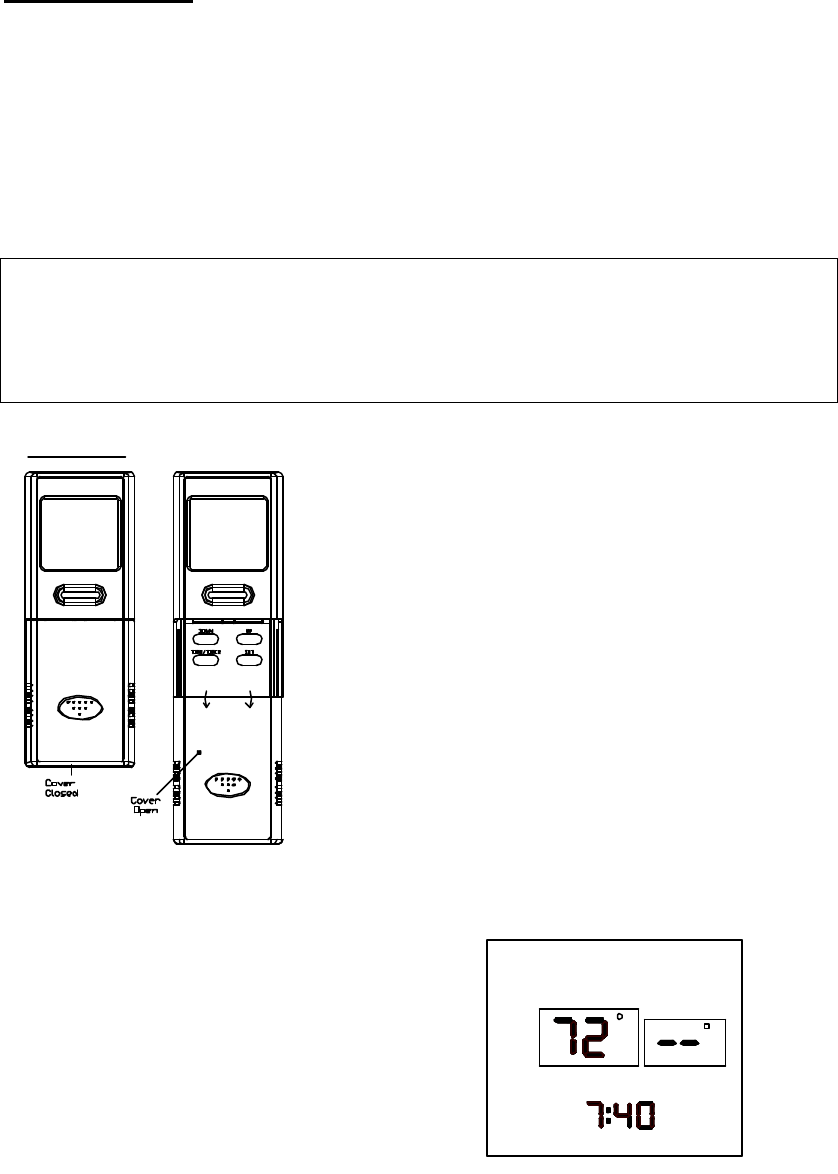
Slide down the plastic cover on the front of
the transmitter to expose the “SET” buttons.
The Slide cover protects the SET buttons from
being changed accidentally. Close the cover
after completing the following
settings/programming.
Flashing numbers on the display indicate the
system is awaiting user input, such as using
the UP and DOWN buttons to program a new
setting. If no change is made to flashing digits within 15 seconds, the system will
complete the procedure last programmed and reset the display to its normal state.
1. Press and hold the TIME /TIMER button
on the transmitter for more than two
seconds. The hour digit(s) will begin
flashing.
2. Press the UP or DOWN button until the
desired hour is displayed in AM or PM.
3. After setting the desired hour, press and
release the TIME/ TIMER button again to
set the minutes; the minute digits will
begin flashing.
4. Press the UP or DOWN button until the
desired minutes are displayed.
5. Press the SET button on the transmitter to
stop the time digits from flashing and set
the time. The time digits will cease
flashing, indicating the clock has been successfully set.
SETTING ℉/℃ SCALE
The factory setting for temperature is ℉. To change this setting to ℃, first press and
hold the UP button and the DOWN button on the transmitter at the same time. Follow
this same procedure to change from ℃ back to ℉. When changing between the ℉
and ℃ scales, the temperature in the SET frame defaults to the lowest temperature
(45℉, or 8℃). The highest SET temperature is 99° Fahrenheit (37° Celsius).
F
ON
OFF
THERMO
ROOM
PM FLAME
SET
SETTING THE CLOCK
TIMER
F
DOWN
TIME/TIMER
UP
SET
MODE
BUTTON SETTINGS
SETTING DESIRED ROOM TEMPERATURE
This remote control system can be
thermostatically controlled when the
transmitter is in the THERMO mode
(THERMO must be displayed on the
screen). To set the DESIRED room
temperature, press the MODE button to
place the transmitter into THERMO mode,
then press the UP or DOWN button to
select the desired room temperature. The
highest SET temperature is 99°
Fahrenheit (37° Celsius).
OPERATIONAL NOTE: TO CONSERVE BATTERY POWER, CHANGES IN
ROOM TEMPERATURE ARE AUTOMATICALLY UPDATED EVERY TWO
MINUTES TO THE TRANSMITTER.
The Thermo Mode on the transmitter operates the appliance whenever the ROOM
TEMPERATURE varies a certain number of degrees from the SET TEMPERATURE.
This variation is called the “SWING” or TEMPERATURE DIFFERENTIAL. The
normal operating cycle of an appliance may be 2-4 times per hour depending on how
well the room or home is insulated from the cold or drafts. A smaller “swing number”
increases the number of cycles so the room temperature is more constant. A larger
“swing number” decreases the number of cycles, which saves energy, in most cases.
The factory setting for the “swing number” is 2. This represents a temperature
variation of +/-2℉ (1℃) between SET temperature and ROOM temperature, which
determines when the fireplace will be activated. The “SWING” number values are:
1=±1℉ (.5℃), 2=±2℉ (1℃) and 3=±3℉ (1.6℃).
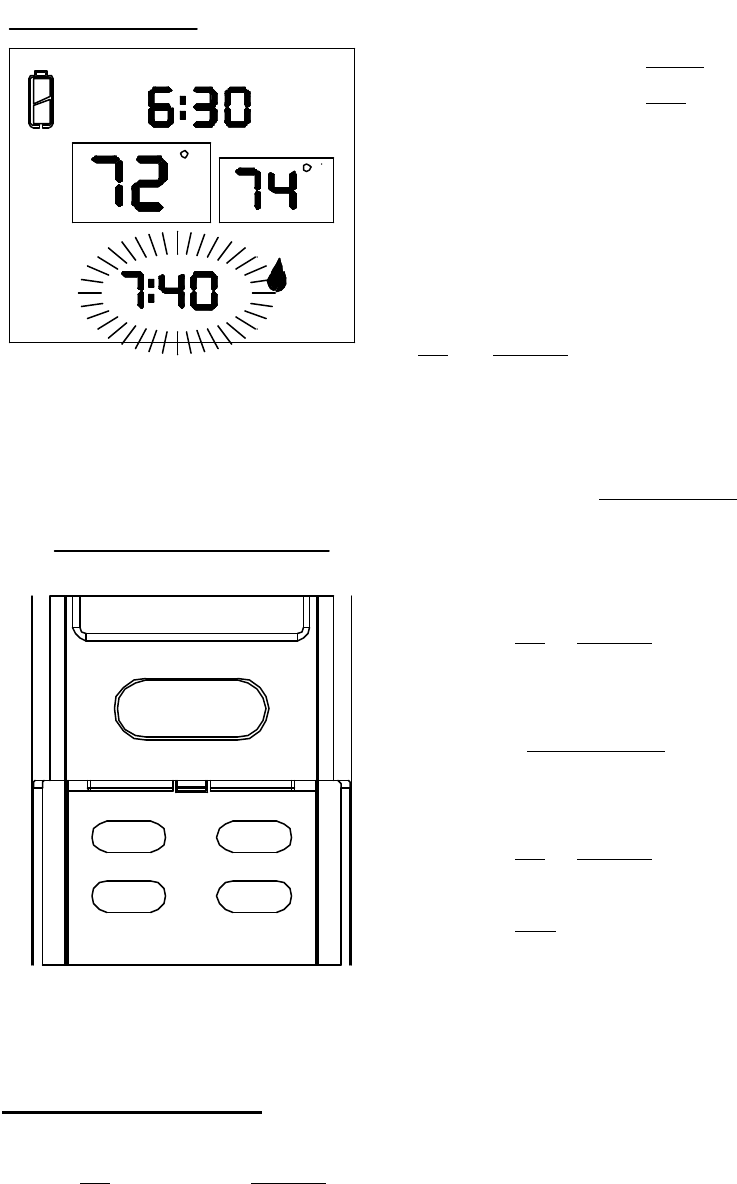
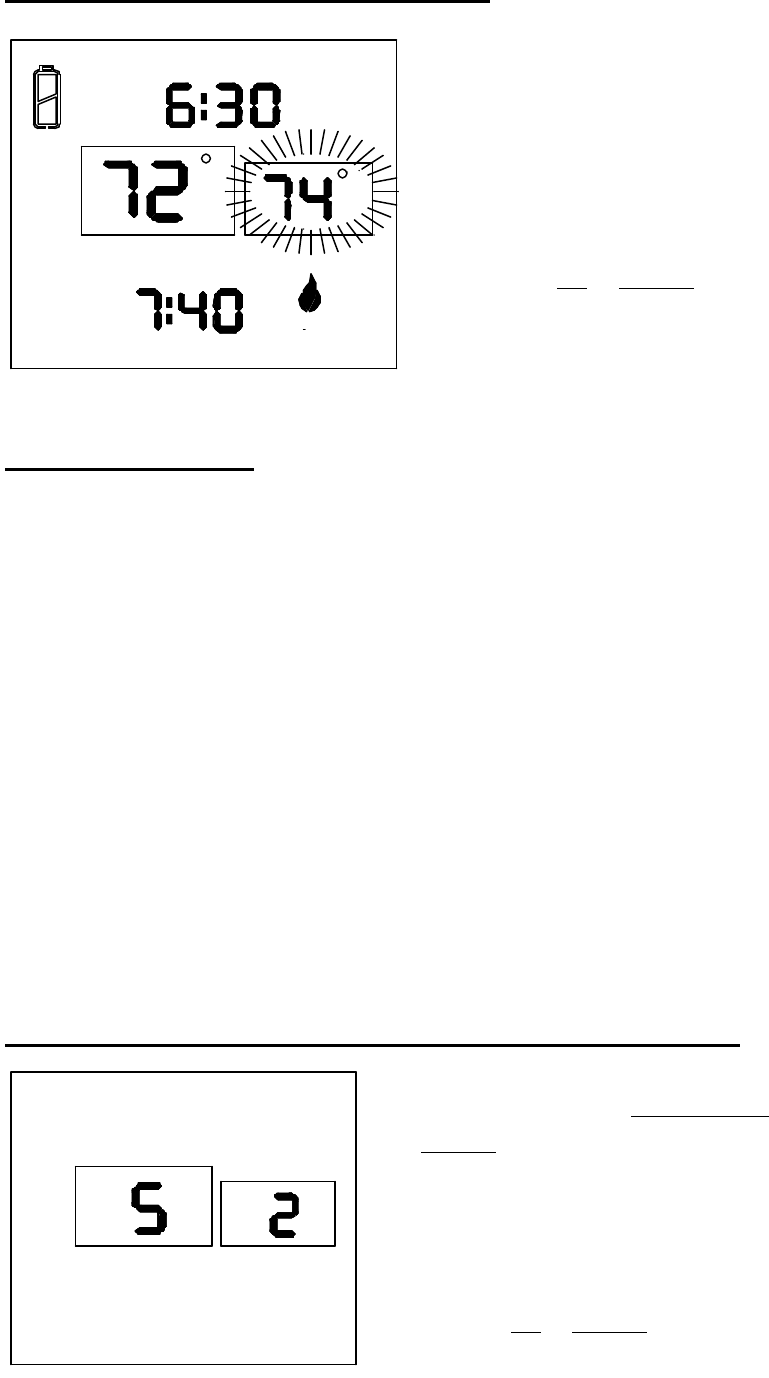
SETTING THE TEMPERATURE SWING (TEMPERATURE DIFFERENTIAL)
1. To change the temperature “SWING”
setting (1-3), press the TIME/ TIMER and
DOWN buttons simultaneously to display
the current “SWING” setting in the SET
TEMP frame. The letter “S” will display in
the ROOM TEMP frame on the LCD
screen.
2. Press the UP or DOWN button to change
F
ON
OFF
THERMO
F
ROOM
PM FLAME
SET
TIMER
the temperature differential or “SWING” (1-3). See above for 1-3 “SWING”
temperature valves.
3. To store the “swing number” press the SET button or allow 15 seconds to lapse,
and the new “swing number” will be automatically programmed.
MANUAL CHECK OF “SWING” OR TEMPERATURE DIFFERENTIAL
The operation of the factory set “THERMO SWING” can be checked by adjusting the
SET TEMP 2℉ above or below the room temperature. This will cause the system to
turn OF or OFF. Normally the system will only respond to temperature changes every
two minutes. Manually changing the SET temperature will activate the system in less
than 10 seconds. IF the “SWING” is changed, then a new room temperature
differential will respond. Factory setting of “SWING” temperature is 2℉.
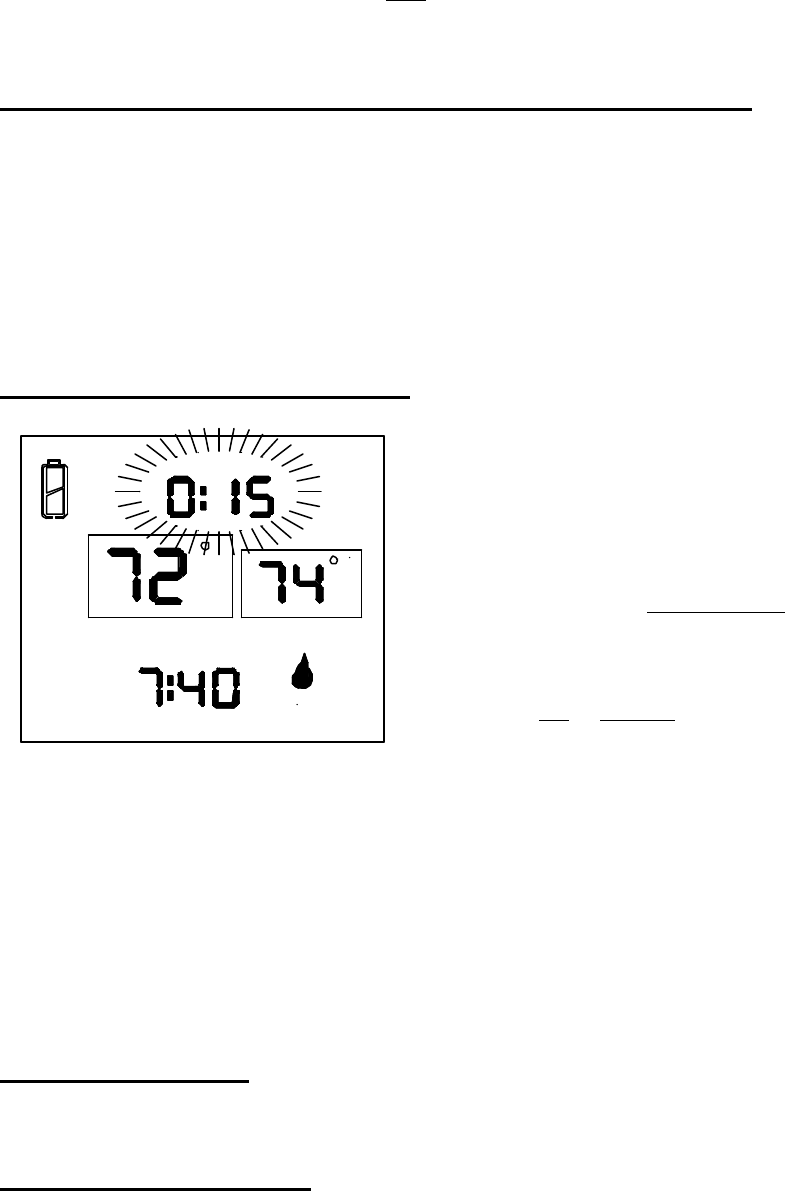
SETTING THE COUNTDOWN TIMER
This remote control system can operate
with a built-in countdown timer when the
transmitter is in the ON or THERMO
modes (THERMO or ON must be
displayed on the screen).
1. Press and release the TIME/ TIMER
button on the transmitter. The word
TIMER and 0:15 flash on the screen.
2. Press the UP or DOWN button on the
transmitter to begin advancing through
each of the countdown time options. Available countdown times are 15 minutes,
30 minutes, 45 minutes, 1 hour, 1 hour 30 minutes, 2 hours, 2hours 30 minutes,
and each additional half-hour up to nine hours.
3. To set the TIMER press the SET button on the transmitter if the system is ON. It
will remain on until the time has expired. If the system is in the THERMO mode,
it will cycle on and off as the room temperature requires until the “time” has
expired.
OPERATIONAL NOTE: When the timer is used in the THERMO mode, the
THERMO operation will discontinue when the “time” has expired.
LOW/BATTERY INDICATOR
ROOM
TIMER
FLAME
PM
SET
ON
OFF
THERMO
FF
The low battery icon on the left side of the
LCD screen will appear when battery power
has dropped significantly. At this time,
approximately two weeks of battery power
remains until the transmitter may experience
partial or complete loss of functions.
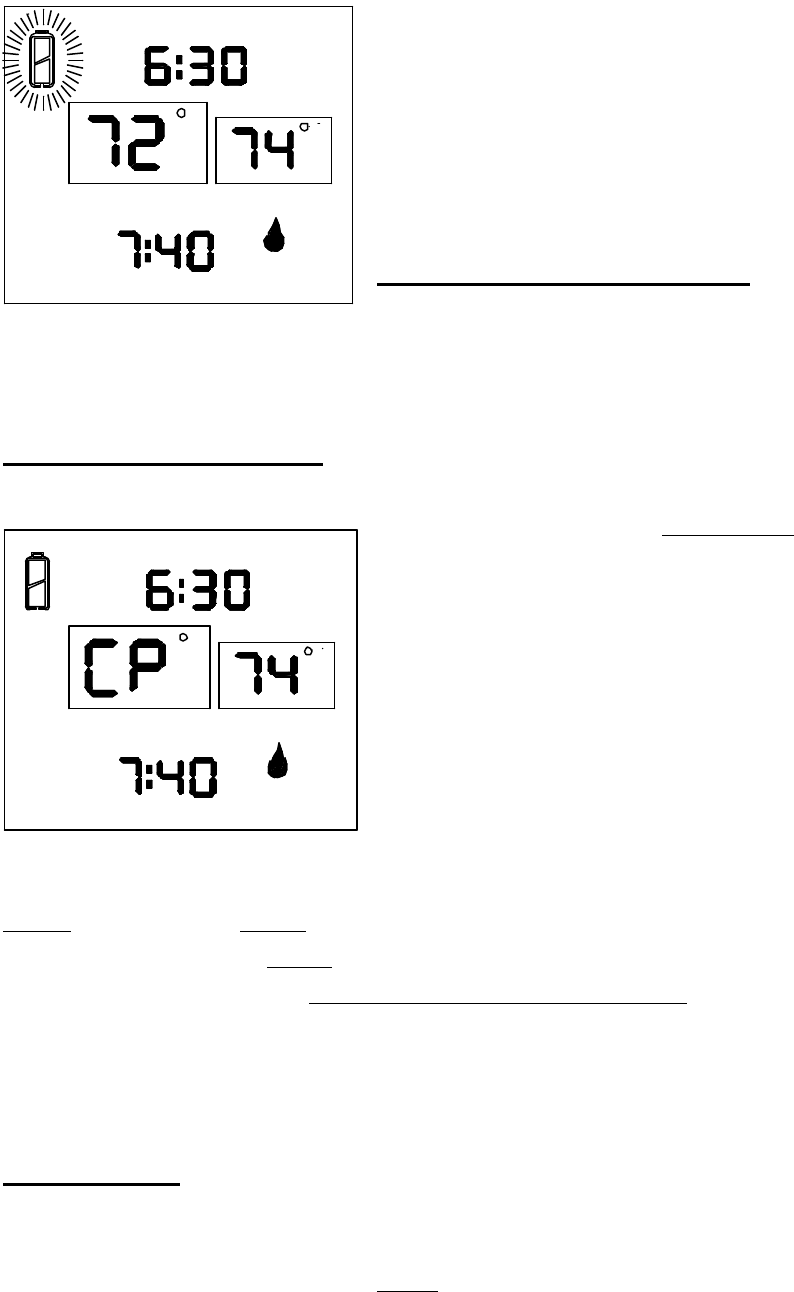
CHILDPROOF “LOCK-OUT” –(CP)
This SKYTECH remote control includes a
CHILDPROOF “LOCK-OUT” feature that allows the user to “LOCK-OUT”
operation of the appliance, from the TRANSMITTER.
SETTING “LOCK-OUT” –(CP)
1. To activate the “LOCK-OUT” feature,
press and hold the UP and TIME/TIMER
buttons, together, for 5seconds. The letters
CP will appear in the TEMP frame on the
LCD screen.
l To disengage the “LOCK-OUT”, press and
hold the UP and TIMER buttons, together
for 5 seconds or more, and the letters CP
will disappear from the LCD screen and
the transmitter will return to its normal
operating condition.
NOTE: If the appliance is already operating in the ON or THERMO MODES,
engaging the “LOCK-OUT” will not cancel the operating MODE. Engaging the
“LOCK-OUT” prevents only the manual operation of the TRANSMITTER. If in the
auto modes, the THERMO operation will continue to operate normally. To totally
“LOCK-OUT” the operation of the TRANSMITTER’S operating signals; the
transmitter’s MODE must be set to OFF.
TRANSMITTER
The SKYTECH remote control operates, on RF (radio frequency) signals that are sent
by the TRANSMITTER (remote) to the RECEIVER that operates the appliance. It is
recommended that the TRANSMITTER always be located within the 20 foot
operating range, preferably in the same room in which the appliance is located.
PM
ROOM
TIMER
F
ON
OFF
THERMO
FLAME
F
SET
PM FLAME
ON
OFF
THERMO
TIMER
ROOM
F
SET
F

THERMO UPDATING FEATURE -TRANSMITTER - (T/S -TX)
This SKYTECH remote control has a THERMO UPDATING Feature built into its
software. The THERMO UPDATING Feature operates in the following manner, but
only in the THERMO MODES:
The transmitter normally reads the ROOM temperature every 2 minutes checking
the ROOM temperature against the SET temperature and then sends a signal to
the receiver.
Federal Communication Commission Interference Statement
This equipment has been tested and found to comply with the limits for a Class B
digital device, pursuant to Part 15 of the FCC Rules. These limits are designed to
provide reasonable protection against harmful interference in a residential installation.
This equipment generates, uses and can radiate radio frequency energy and, if not
installed and used in accordance with the instructions, may cause harmful interference
to radio communications. However, there is no guarantee that interference will not
occur in a particular installation. If this equipment does cause harmful interference
to radio or television reception, which can be determined by turning the equipment off
and on, the user is encouraged to try to correct the interference by one of the
following measures:
- Reorient or relocate the receiving antenna.
- Increase the separation between the equipment and receiver.
- Connect the equipment into an outlet on a circuit different from that to which the
receiver is connected.
- Consult the dealer or an experienced radio/TV technician for help.
FCC Caution: Any changes or modifications not expressly approved by the party
responsible for compliance could void the user's authority to operate this equipment.
This device complies with Part 15 of the FCC Rules. Operation is subject to the
following two conditions: (1) This device may not cause harmful interference, and (2)
this device must accept any interference received, including interference that may
cause undesired operation.
Important Note:
FCC Radiation Exposure Statement:
This equipment complies with FCC RF radiation exposure limits set forth for an
uncontrolled environment. To maintain compliance with FCC RF exposure
compliance requirements, please avoid direct contact to the transmitting
antenna during transmitting.
This transmitter must not be co-located or operating in conjunction with any
other antenna or transmitter.