Sleep Number 1000G Adjustable Foundation Remote User Manual
Select Comfort Corp Adjustable Foundation Remote
User Manual
7
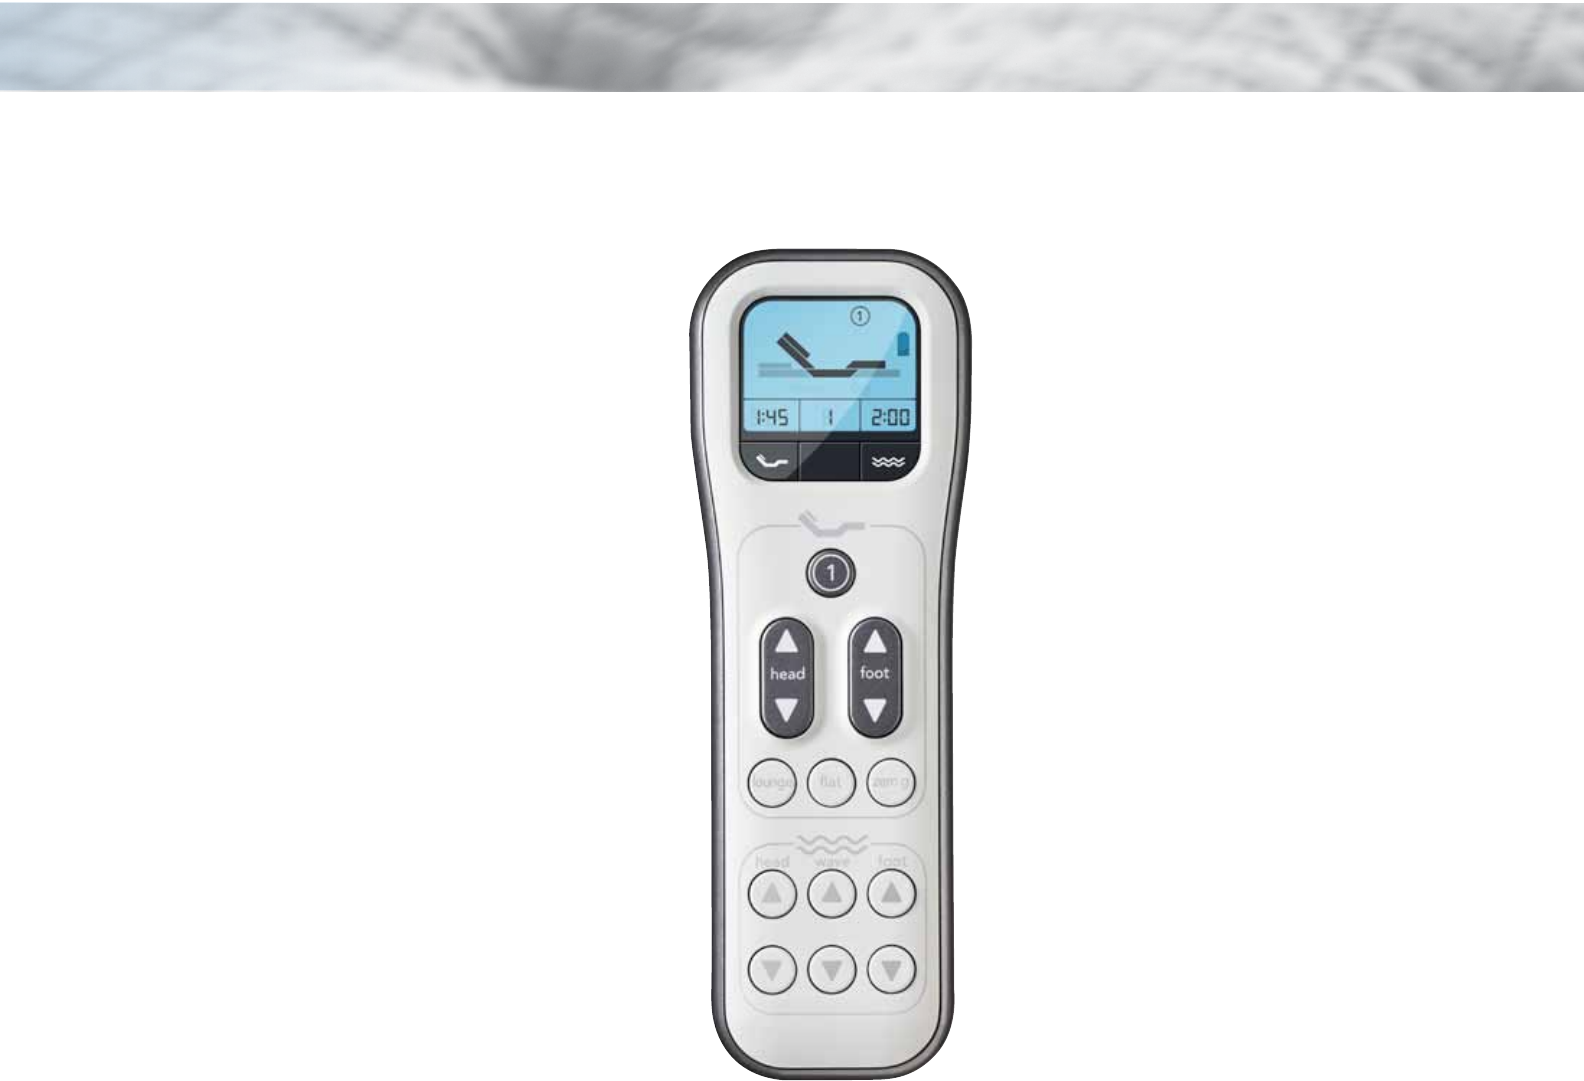
Remote Control Function
A Low Battery
If low battery indicator is lit up, batteries need to be changed.
B Remote Troubleshooting
Pressing and holding both Head Massage Down button
and Foot Massage Down button for 3 seconds will force
the remote into a self-test mode. If LCD displays either “1”
or “2” error code, the remote needs to be replaced.
1 – Radio error
2 – Battery circuit error
C Position Timer
Press to set the current position timer in 15-minute increments
up to 180 minutes. Once it reaches 180 minutes, the next
increment goes back to 0. Once timer has expired, the foundation
will return to the flat position. If a position other than flat is
desired, press and hold Custom Preset 1 as you set the position
timer. Once the timer has expired, the foundation will return to
the Custom Preset 1 position.
D Massage Timer
Press to set the current massage timer in 15-minute increments
up to 180 minutes. Once it reaches 180 minutes, the next
increment goes back to 0. Massage timer does not activate the
massage feature. Once massage feature is activated and massage
timer has expired, the massage feature will stop. Activating the
massage timer and setting it to 0 will not turn off the massage.
E Custom Preset 1
Press and hold for more than 3 seconds to set current
position or function (massage or wave) as the programmed
position and/or function. The LCD display will show “1”
to indicate that the position and/or function has been set.
Press Custom Preset 1 to return the bed to the custom
programmed position and/or function. LCD display will show
“1” and bed animation of both head and foot sections.
F Raise Head/Lower Head
Press and hold to raise or lower the head
section to reach desired position. LCD will
display animation of the head section.
G Raise Foot/Lower Foot
Press and hold to raise or lower the foot section.
H Lounge
Press Lounge – the head and foot sections rise to a lounge
position. LCD will display bed animation of both head and
foot sections.
I Flat
Press Flat – the head and foot sections go to the flat
position and both massage and position timers reset to
0. Pressing the Flat button will automatically turn off all
massage features.
J Zero Gravity
Press Zero Gravity – the head and foot sections raise to
7 degrees.
K Head Massage
Press and hold for more than 3 seconds to turn the head
massage feature on or off. Press the up arrow to increase
massage intensity; press the down arrow to decrease
massage intensity. LCD display will light up.
L Wave Massage
Press and hold for more than 3 seconds to turn the wave
massage feature on or off. Press the up arrow to increase
massage intensity; press the down arrow to decrease
massage intensity. LCD display will light up.
M Foot Massage
Press and hold for more than 3 seconds to turn the foot
massage feature on or off. Press the up arrow to increase
massage intensity; press the down arrow to decrease
massage intensity. LCD display will light up.
FlexFit Plus™ Adjustable Base
E
C
F
H
KL
B
A
D
G
IJ
M
8
Remote Control Function
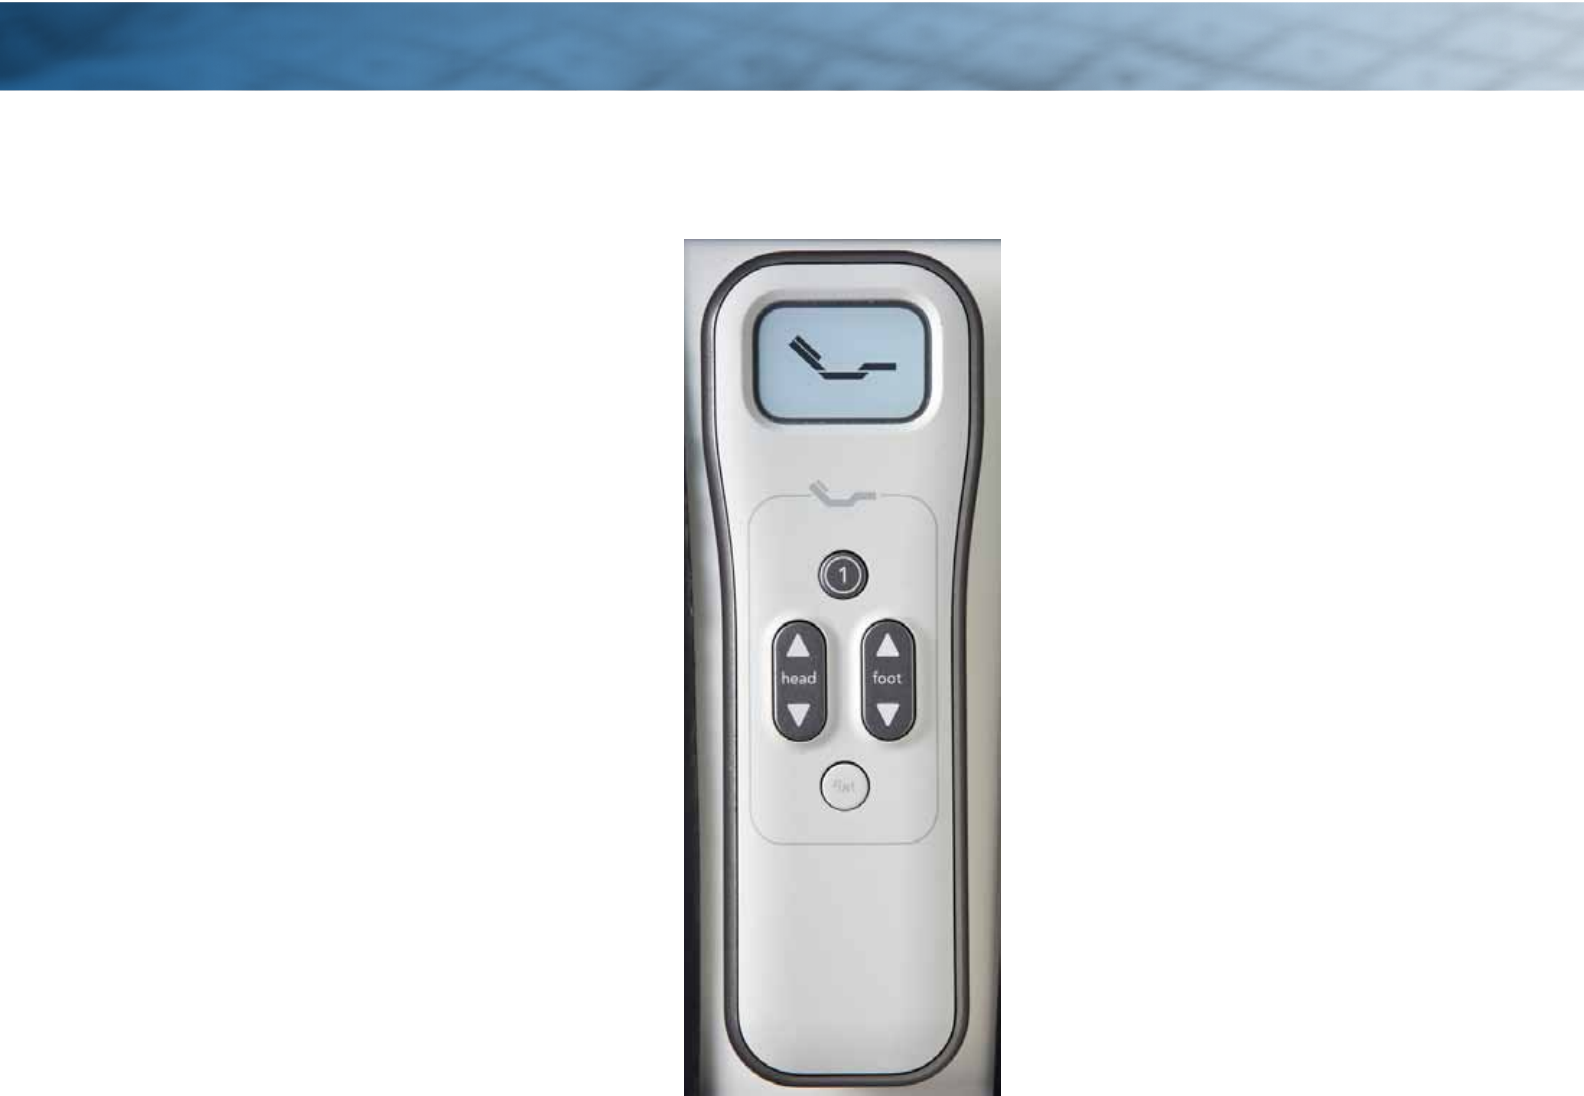
FlexFit™ Adjustable Base
A Raise Head/Lower Head
Press and hold to raise or lower the head section to reach
desired position. LCD will display animation of the head
section.
B Custom Preset 1
Press and hold for more than 3 seconds to set current position
as the programmed position. The LCD display will show “1”
to indicate that the position has been set. Press Custom
Preset 1 to return the bed to the custom programmed
position. LCD display will show “1” and bed animation of
both head and foot sections.
C Raise Foot/Lower Foot
Press and hold to raise or lower the foot section.
D Flat
Press Flat – the head and foot sections go to the flat position.
A
B
C
D
9
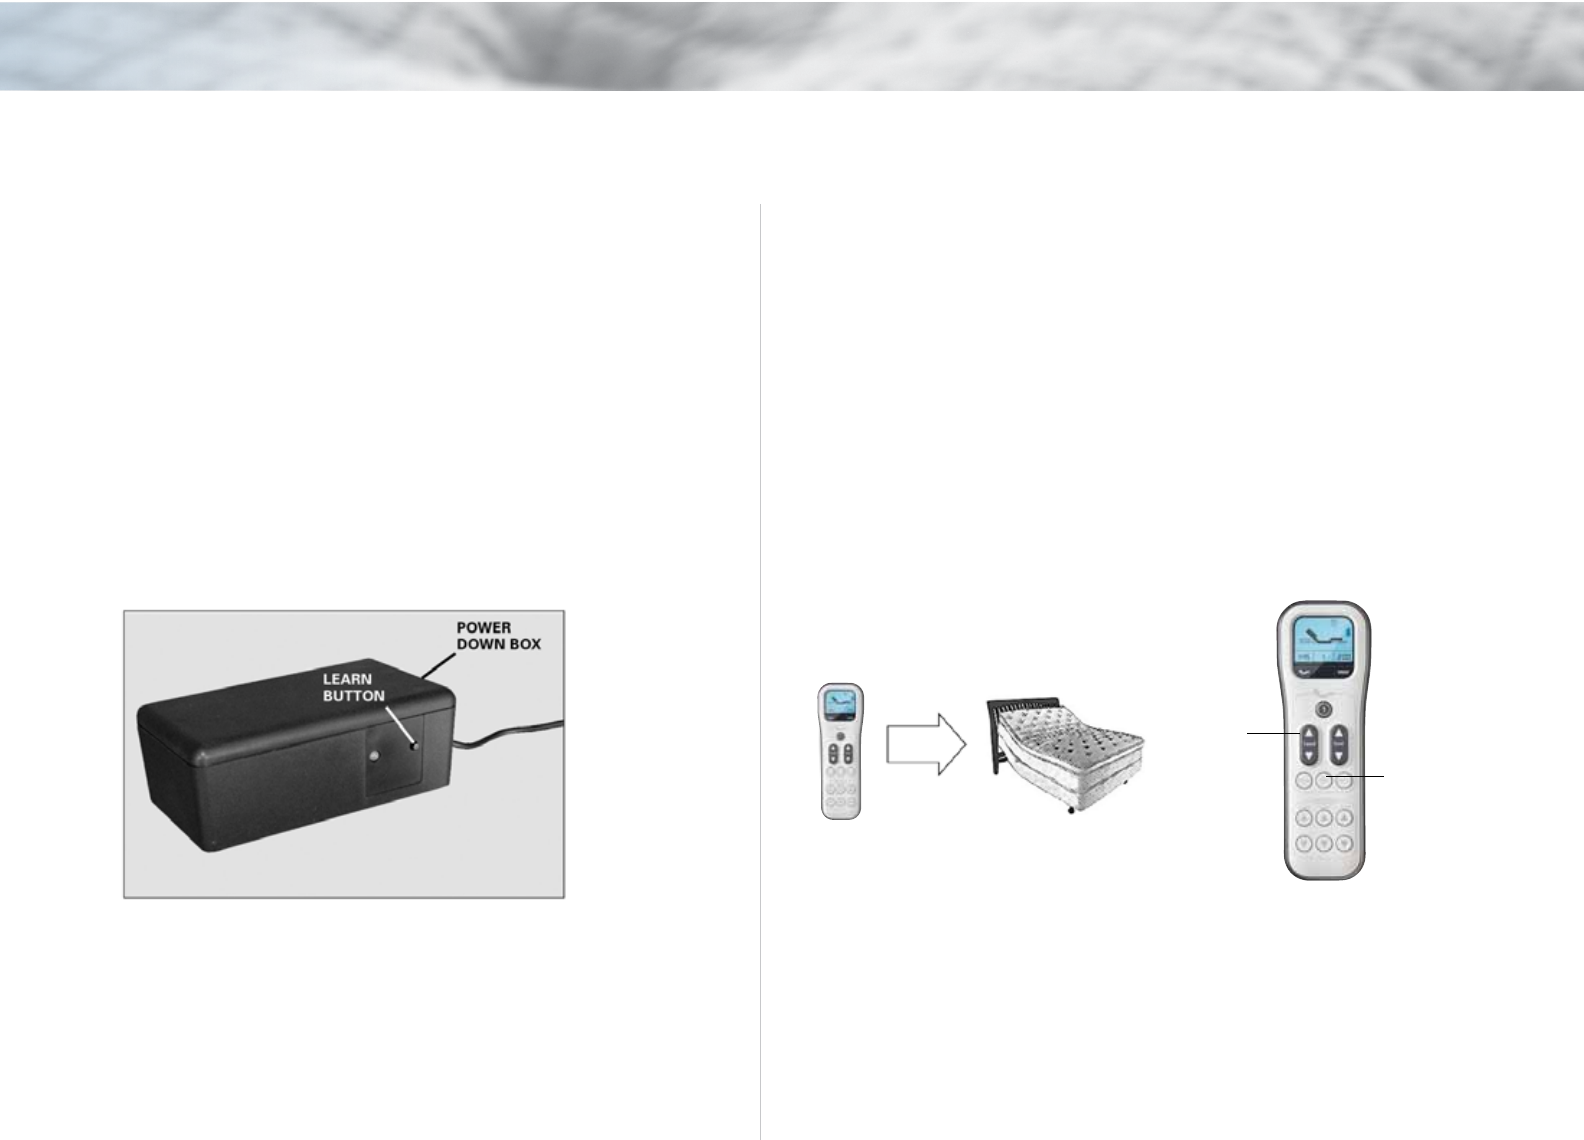
Remote Programming
FLAT
BUTTON
RAISE
HEAD
BUTTON
2 Program One Remote to an Adjustable Base
Before beginning, make certain the bed is plugged into a working, grounded
electrical outlet.
Locate the receiver unit (power down box) and press the Learn button on the
power down box for 1 second then release. Press and hold both the Flat and
Raise Head buttons on the remote simultaneously for more than 5 seconds.
The remote LCD display will blink a few times. The LED on the power down
box will flash slowly at first then rapidly to indicate that the remote has been
programmed to operate a bed.
If programming fails, initiate the programming procedure a second time.
1 Power Down Box
In case of a power outage, press and hold the Learn button
on the receiver unit (power down box) to lower the bed to the
flat position. This function is only for lowering the bed and will
not move the bed to any other position. Once the bed is flat
replace the (2) 9 volt batteries.
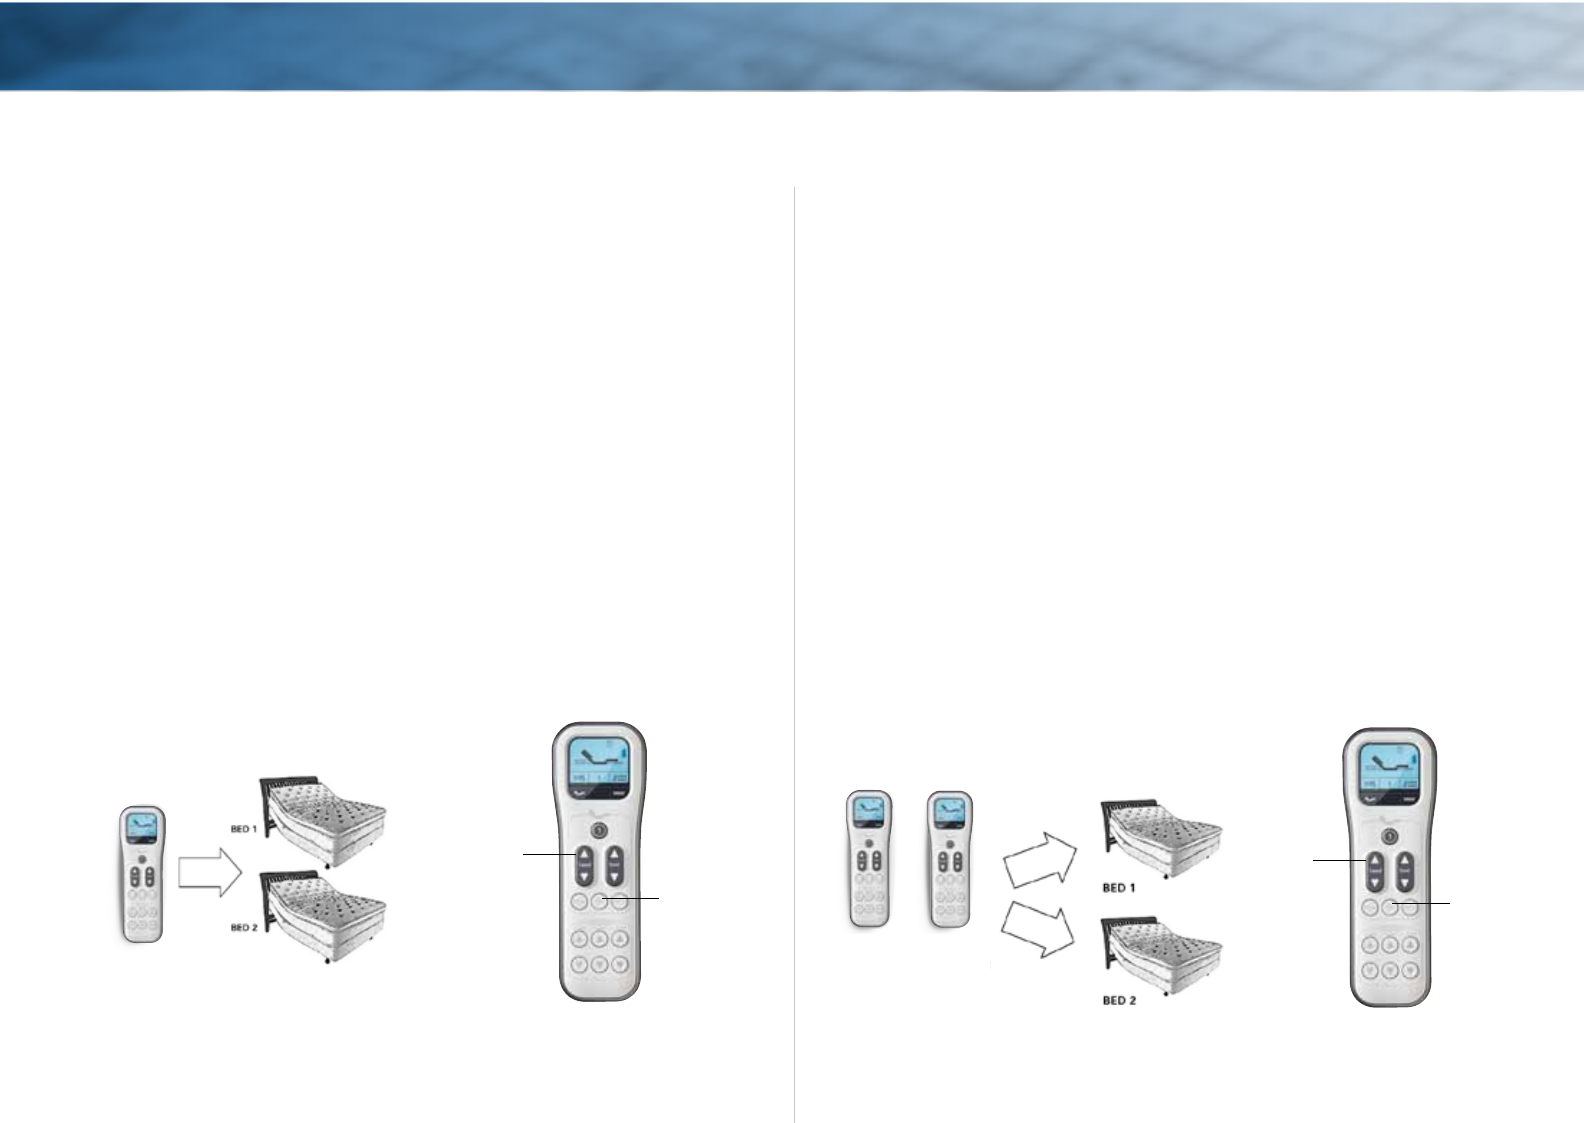
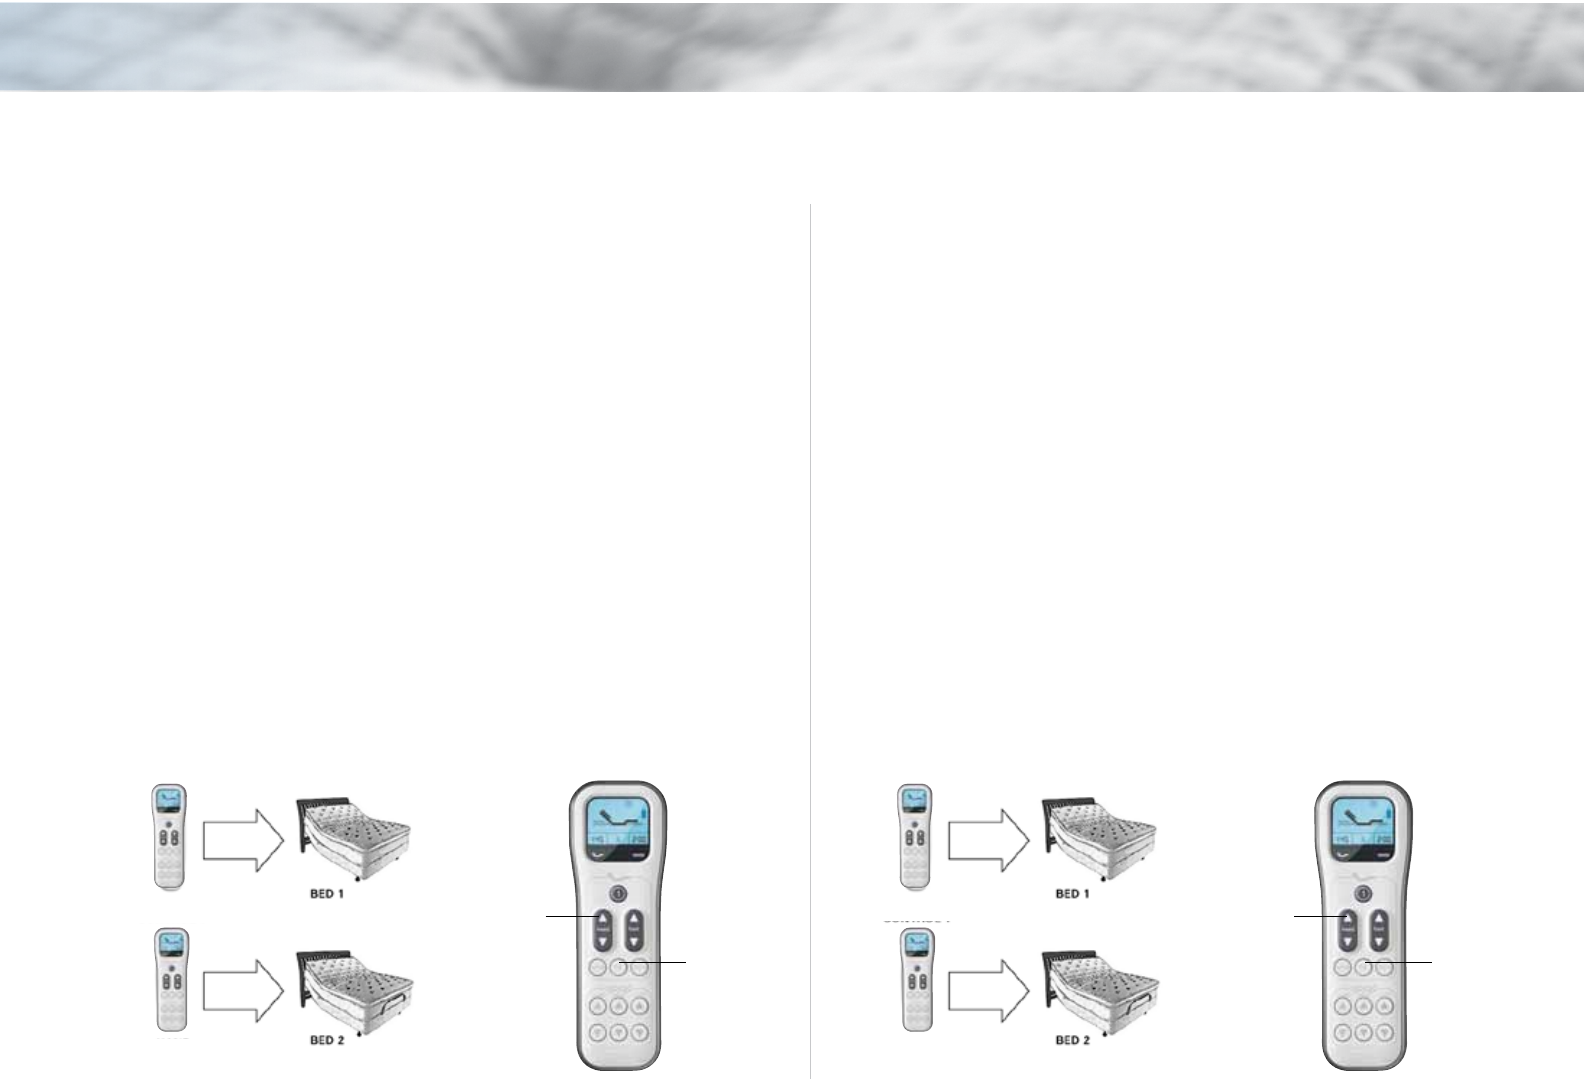
3 Program One Remote Control to Two Beds
Before beginning, make certain the beds are plugged into a working,
grounded electrical outlet.
Locate the power down box for bed 1 and press the Learn button on the
power down box for 1 second then release. Press and hold both the Flat
and Raise Head buttons on the first remote simultaneously for more than 5
seconds. The remote LCD display will blink a few times. The LED on the first
power down box will flash slowly at first then rapidly to indicate the remote
has been programmed to operate the first bed. Repeat these steps with
bed 2. One remote is now programmed to operate two beds.
If programming fails, initiate the programming procedure a
second time.
4 Program Two Remote Controls to Two Beds
Before beginning, make certain the beds are plugged into a working,
grounded electrical outlet.
Locate the power down box for bed 1 and press the Learn button on the power
down box for 1 second then release. Press and hold both the Flat and Raise
Head buttons on the first remote simultaneously for more than 5 seconds. The
remote LCD display will blink a few times. The LED on the first power down box
will flash slowly at first then rapidly to indicate the remote has been programmed
to operate the first bed.
Repeat these steps with remote 2, then locate the power down box for bed
2 and press the Learn button on the power down box for 1 second and re-
lease. Repeat all steps for both remotes on both beds.
If programming fails, initiate the programming procedure a second time.
NOTE: Operate only one (1) remote at a time. Operating two (2) remote at the
same time will momentarily block both RF signals and prevent both remotes
from functioning.
Remote Programming
FLAT
BUTTON
RAISE
HEAD
BUTTON
FLAT
BUTTON
RAISE
HEAD
BUTTON
REMOTE 1 REMOTE 2
11
5 Program Two Remotes to a Split-King
Adjustable Base
Before beginning, make certain the beds are plugged into a working, grounded
electrical outlet.
Locate the power down box for bed 1 and press the Learn button on the power
down box for 1 second then release. Press and hold both the Flat and Raise Head
buttons on the first remote simultaneously for more than 5 seconds. The remote
LCD display will blink a few times. The LED on the first power down box will flash
slowly at first then rapidly to indicate the remote has been programmed to operate
the first bed.
Wait 90 seconds before proceeding to the second remote.
Locate the power down box for bed 2 and press the Learn button on the power
down box for 1 second then release. Press and hold both Flat and Raise Head
buttons on the second remote simultaneously for more than 5 seconds. The remote
LCD display will blink a few times. The LED on the second power down box will flash
slowly at first then rapidly to indicate the remote has been programmed to operate
the second bed.
If programming fails, initiate the programming procedure a second time.
NOTE: Operate only one (1) remote at a time. Operating two (2) remotes at the same time will
momentarily block both RF signals and prevent both remotes from functioning.
6 Separate Remote Controls
Before beginning, make certain the beds are plugged into a working, grounded
electrical outlet.
Locate the power down box for bed 1 and press the Learn button on the power
down box for 1 second then release. Press and hold both Flat and Raise Head
buttons on the first remote simultaneously for more than 5 seconds. The remote
LCD display will blink a few times. The LED on the first power down box will flash
slowly at first then rapidly to indicate the remote has been programmed to operate
the first bed.
Wait 90 seconds before proceeding to the second remote.
Locate the power down box for bed 2 and press the Learn button on the power
down box for 1 second then release. Press and hold both Flat and Raise Head
buttons on the second remote simultaneously for more than 5 seconds. The
remote LCD display will blink a few times. The LED on the second power down box
will flash slowly at first then rapidly to indicate the remote has been programmed
to operate the second bed.
If programming fails, initiate the programming procedure a second time.
NOTE: Operate only one (1) remote at a time. Operating two (2) remotes at the same time will
momentarily block both RF signals and prevent both remotes from functioning.
FLAT
BUTTON
FLAT
BUTTON
RAISE
HEAD
BUTTON
RAISE
HEAD
BUTTON
REMOTE 2
REMOTE 2
REMOTE 1
REMOTE 2
Warning: Any attempt to make changes or modifications to the remote (e.g. an intentional radiator) could void the user’s authority to operate the remote according to
FCC certification (section 15.231).